Kimber Mfg. has released the CDS9, a new entry into their popular KDS9c family of semi-automatic handguns. Marketed for everyday concealed carry (EDC), the CDS9 is designed to meet the demands of consumers seeking a micro-compact, high-capacity firearm. While Kimber has long been known for producing premium firearms, this latest model is designed to offer competitive value by including custom-like features typically found on higher-end guns.
Design & Build
From a design standpoint, the CDS9 is a fully-featured concealed carry handgun built with durability and ergonomics in mind. It starts with an all-metal frame, providing a more sturdy platform compared to polymer-based alternatives. This model is also optics-ready, allowing users to mount red dot sights directly onto the slide without the need for aftermarket milling. The addition of an accessory rail gives owners the flexibility to attach lights or lasers for added utility in low-light situations.
Kimber’s attention to ambidextrous features is evident. Both the safety and slide release are designed to cater to both right- and left-handed shooters. Additionally, a reversible magazine release allows for further customization based on the user’s preference. For grips, the handgun comes with G10 panels, providing both durability and a firm hold in various conditions. Alloy frame options are also available.
Performance and Capacity
Performance-wise, the CDS9 takes advantage of a dual recoil spring assembly, which replaces the traditional guide rod system. According to Kimber, this configuration is intended to reduce felt recoil, enhancing the overall shooting experience for a micro-compact handgun. This could be a valuable feature for those who prioritize controllability in small, high-capacity firearms.
Magazine capacity is another area where the CDS9 aims to meet the needs of a variety of users. The handgun comes standard with two high-capacity magazines: one 13-round and one 15-round. For those who prioritize concealability over capacity, a flush-fit 10-round magazine is also available. Kimber has plans to release an ergonomic extended 10-round magazine for regions with capacity restrictions, providing an option for shooters who face legal magazine limits.
In keeping with Kimber’s history of incorporating premium components, the CDS9 features TAG fiber optic front sights paired with tactical rear sights, which aim to improve target acquisition and accuracy.
Trigger System And CCW Features
One of the more notable features of the CDS9 is its trigger design, which draws inspiration from Kimber’s popular 1911 models. It uses a flat-faced trigger with straight-pull characteristics, designed to offer a solid trigger wall and a crisp break. For experienced shooters, this trigger design could provide a familiar and reliable feel, making the CDS9 an attractive option for those who appreciate the 1911-style performance in a micro-compact form factor.
As an EDC firearm, the CDS9 is built to balance concealability with functionality. With the option of using a 10-round magazine for a smaller profile or the 13- and 15-round options for greater capacity, the handgun offers flexibility depending on the user’s needs. It is also available in a threaded barrel version, the TFS model, giving it compatibility with suppressors for those who prefer quieter shooting experiences.
Warranty and Support
Kimber’s commitment to quality is backed by its limited lifetime warranty for the original owner, offering an extra layer of confidence to buyers. With all firearms made and assembled in the United States, Kimber continues to appeal to American consumers seeking locally manufactured products.
According to Mountie Mizer, Kimber’s Vice President of Sales, the CDS9 is a continuation of the company’s consumer-focused approach. Mizer highlights how the gun's blend of high capacity and compact size fits the concealed carry market’s current demands. “The CDS9 is just an awesome handgun for individuals looking for the most capacity with the greatest concealability,” Mizer said in a recent statement.
Final Thoughts
The release of the CDS9 positions Kimber as a competitive player in the micro-compact concealed carry market. With features like a high-capacity magazine, optics readiness, and premium trigger design, the CDS9 appeals to both seasoned shooters and new concealed carry permit holders. It is a noteworthy option for those searching for an EDC firearm.
Over the last several years, recce has become a popular topic. Recce, short for reconnaissance, is simply information gathering or surveying of an area. This is typically thought of in a military role, but it’s also useful for hunters or even for checking a resupply or escape route during a disaster scenario. Recce is meant to be non-kinetic — if you encounter a threat, the goal is to break contact ASAP — and low visibility. This means minimal gear and austere conditions. To successfully complete the task of infiltrating an area, gathering information, and exfiltrating, you’ll need highly capable gear and a good system for carrying it, such as the Low Vis Gear ISR Pack.
Low Vis Gear ISR Pack
The Low Vis Gear ISR pack (Intelligence, Surveillance, Reconnaissance) is a purpose-driven midsized pack with approximately 35 liters internal capacity. The focus of the ISR pack is to carry a tripod and spotting scope along with other mission-essential gear for information-gathering missions. A large, padded spotting scope pocket that runs the entire height of the pack has three tension straps to keep your valuable optic safe and from shifting as you move. On the opposite side of the pack is a sleeve that also runs the height of the pack and has three tension straps. This sleeve is for packing out your tripod and helping to keep your visual and auditory signatures low. The main compartment is large enough for everything you will need to be successful in the field while prompting you to be selective so as not to overload the pack.
The air mesh padded shoulder straps and waist belt adjust to give you custom comfort while assisting you in carrying 30 to 60 pounds. A frame sheet with aluminum crossover stays and 3D spacer mesh at the lumbar and in the mid-back make up the support structure. The ISR is offered in A-TACS IX, A-TACS AU Terrain, OD green, or MultiCam.
Above: With binoculars, night vision, and a thermal monocular, it’s easy to scout hide sites and track game animals, day or night.
ISR Electronics
InfiRay Outdoor Rico RH25: This is one of the most versatile thermal optics on the market right now. The RH25 can be helmet-mounted, weapon-mounted, or used as a handheld device. I like having this as an addition to my LPVO on my carbine, but it sees the most use as a handheld for doing quick sweeps of an area. It picks up thermal images out to 1,300 yards and runs off a rechargeable 18650 battery.
Kestrel 5700: While you probably won’t be firing a shot on a successful ISR mission, it’s a great opportunity to map out good hide sites and vantage points for the future. Having your own weather meter and applied ballistics calculator for long-range applications is a powerful advantage. The 5700 also measures wind speed, air density, humidity, temperature, pressure, and altitude. The ability to connect the Kestrel 5700 to a smartphone, range finder, or computer increases the power this tool brings to the field immensely.
SIG Sauer Kilo 2400 ABS: Much like the Kestrel, a good rangefinder can help you find shooting positions and take the guesswork out of putting rounds on target. The Kilo comes equipped with Applied Ballistic Elite technology to work with the SIG Ballistic App on your smartphone. The monocular is 7x25mm with SpectraCoat anti-reflection coatings which gives great clarity and light transmission. The Kilo body is made of lightweight and tough magnesium, has an adjustable diopter, and binocular-style eyecup as an added touch to aid in comfort of use. This device runs off one CR123 battery.
TNVS: Night vision is a superpower, and the ability to travel in the dark without using a flashlight is an advantage that cannot be underestimated. This specific dual-tube set is particularly handy because you can flip one side up and out of the way to use your eye unassisted or to bring your thermal device up. These NVGs can be handheld like binoculars, but I prefer to mount them to my Team Wendy helmet.
Thyrm Cell Vault: The curse of electronics is that they require power to keep working. I have long been a fan of Thyrm products. The Cell Vault allows me to keep all spare batteries together in one container while keeping the contact points from touching and draining them of energy. Thyrm was insightful enough to make this container watertight with a rubber gasket, MOLLE attachable, and lockable.
Above: Cutting tools provide a means of collecting foliage, and the zip ties and cordage can be used to attach it to gear for camouflage.
ISR Tools
Bradshaw Knife: I am partial to a blade that’s no larger than what’s needed for the job. This Bradshaw blade has a 4-inch D2 blade for edge retention and durability paired with G10 grip scales.
Silky Gomboy: The Gomboy is the go-to folding saw for bushcraft applications. In many information-gathering roles, you’ll be constructing a hide site to observe from, and the Gomboy is the tool you’ll want. A saw keeps your sound signature much lower than that of a hatchet being swung into a tree trunk or a knife being batoned through a fallen limb. The Gomboy 240mm medium punches way above its weight with its 8-inch saw blade and weightless feel.
Fix It Sticks: My kit is an amalgamation of a few separate orders from Fix It Sticks. In this kit, I have everything needed to remove or adjust every nut, bolt, screw, and bit that is in the ISR kit as well as adjusting optics and doing battery swaps. The ratcheting T-handle may or may not be necessary, but I’m glad I have one. The torque limiters are also great to have and worth the added weight.
BOG Deathgrip Infinite: A tripod’s main use in a recce situation is going to be for stabilizing your spotting scope for viewing an area from long distances. The Infinite has an Arca-Swiss mount to accept your spotting scope and can quickly transition to stabilizing a rifle instead.
Leupold SX-2 Alpine: I am partial to angled-body spotting scopes as I find them less physically taxing to use for extended periods, as compared to the straight-bodied versions. The Alpine is a 20-60×80 HD optic that’ll produce a clear view of targets well out to 1,000 yards.
Low Vis Gear Shelter Roll: During an ISR, there isn’t a lot of sleeping going on unless you’re in a team. If you’re lucky enough to be able to get some shuteye, you have to remember that keeping your signature small is paramount. That means a poncho or tarp and maybe a section of a sleeping mat to insulate your body from the ground. I like to keep a poncho, half a dozen titanium stakes, a line kit, bank line, and a few bungee cords in my Shelter Roll.
Above: Clean water is essential to staying healthy in the field. This kit includes several methods of purification.
Medical and Emergency
Dark Angel Medical D.A.R.K.: As with every pack, vehicle, and outbuilding I’ve got, there’s a Dark Angel Medical D.A.R.K. (Direct Action Response Kit). This is considered an IFAK (individual first aid kit) and is attached to the right side of the removable CTR (Close Target Reconnaissance) belt included with the pack. The DARK is a pre-assembled kit with just the right amount of trauma gear to stabilize life-threatening injuries.
WIN Pouch: Lester River Bushcraft designed this smart little kit. WIN is an acronym for “what’s important now?” This is the item I would grab if I had to cut and run. The WIN is a minimalist pouch with two small snap closure pockets and three shock cord tie-down attachment points. There’s also a fire plug attached to the tension strap. In it, there’s a Sawyer Mini water filter, foldable water container, Pull Start emergency fire starter, ferro rod, emergency space blanket, and a small Benchmade Griptilian folding knife.
Above: The LVG Shelter Roll contains a large poncho, stakes, and cordage for protection from inclement weather.
Food and Water: It’s important to keep this as simple as possible. The more you eat and drink, the more you will need to relieve yourself. Drink enough to keep yourself performing smoothly and eat as little as possible. Being hungry for a day or two will not kill you, but crawling out of your hide site to use the head may give away your position, and that would certainly put you in danger of spooking game or in physical danger from an enemy. Water is much more important than food. I carry water via a bladder, 32-ounce Nalgene bottle, and a Grayl water filter bottle.
Miscellaneous Gear: Heavy-duty zip-top bag with assorted zip ties, ranger bands, rubber bands for camouflaging gear, shock cord, BIC lighter, and insect-resistant head net from Sea to Summit has been a lifesaver a few times.
Final Thoughts
Conducting recon is a lonely enterprise. Making sure you’ve got the right tools to complete your assignment in a timely manner is paramount to not being miserable in the field. Take the time required to test and evaluate your gear ahead of the task, rather than finding out the hard way when a tool breaks or an item is missing. Always add a healthy dose of critical thinking and you’ll go far.
The modern supply chain is a complex web that is responsible for the production and distribution of all the supplies used in modern society. This web involves coordination between suppliers, manufacturers, transportation companies, retail stores, and even governments to facilitate international trade. Beyond the coordination between many businesses and organizations, it also relies heavily on our infrastructure, like roads and bridges as well as utilities such as power and water. Not only does this supply chain ensure we have access to life-sustaining essentials, but it also fuels global industry, utilities, hospitals, military operations, and just about anything else you can think of. Each part of the supply chain is vital to keeping the flow of goods moving to the next part and a failure in just one cog in the wheel can lead to supply chain disruptions that have a profound impact on our communities.
The Dangers of Supply Chain Disruptions
Despite the complexity of this fragile system, most people will not give it much thought on a day-to-day basis. We have become comfortable with simply going to the store or clicking a few buttons on the internet to access crucial supplies we need and the very many luxury items that modern life has afforded us. This level of complacency can be dangerous, especially seeing firsthand the impact disruptions in the supply chain can have on us as individuals and the communities we live in.
A majority of people can deal with the economic impact of minor supply chain disruptions. Higher prices based on a temporary disruption will not impact the wealthy, and those who are unwilling or unable to pay the higher prices will often seek alternative items. But what happens when a more serious disruption occurs on a regional, national, or even international level?
What was once a minor inconvenience can quickly turn into a devastating issue that can lead to serious consequences. In some cases, long-term supply shortages have driven prices of essential items to prices that are unmanageable for many and have even led to these essential items being inaccessible for extended periods. This often leads to panic and desperation, increasing crime rates, and even leading to civil unrest.
Many of us have experienced this to some degree or another throughout our lifetimes. Despite this, many of us quickly forget these experiences, and quickly fall back into complacent lifestyles that rely solely on these supply chains to get us what we need.
Two Decades of Supply Chain Disruptions
In the last two decades, several major disruptions have occurred. Unfortunately, it seems that every passing event is more severe than the last. While some of the events were regionally specific, the impacts were felt all over the United States. Issues like these have become widespread, and almost everyone has a story to tell about an event that disrupted their supply chain.
Northeast Grid Failure
In the early 2000s much of the Northeast experienced catastrophic power outages, impacting everything from grocery stores, public transportation, communications, and hospitals. While many institutions had backup generators, the systems were antiquated, and many of those backup systems failed.
Over the course of 4 days, frozen and refrigerated foods spoiled in homes and stores, gas pumps were largely non-functional, and the use of debit or credit cards in stores and ATM’s was impossible. Even if a store was open to sell non-perishable food, unless you had cash on hand, you could not buy anything. After a few days, the power came back online, and people moved on with their lives without much thought.
Superstorm Sandy
In 2012, we experienced Superstorm Sandy, which devastated many Caribbean countries and eventually made its way to the Mid-Atlantic states. On Long Island at the time, this storm destroyed much of our infrastructure, many areas were without power for weeks. Some surrounding areas were out even longer.
It is easy to forget that Long Island is an island until major bridges and ports were damaged, and getting food and other necessities into the grocery stores was impossible. Once again, electronic gas pumps were not functional, and even as certain areas began to get power back, fuel was in short supply. Long gas lines quickly led to frustrations, and it was common to hear news stories of people getting into physical altercations, and even events where people were being stabbed or shot over disputes about filling their gas tanks.
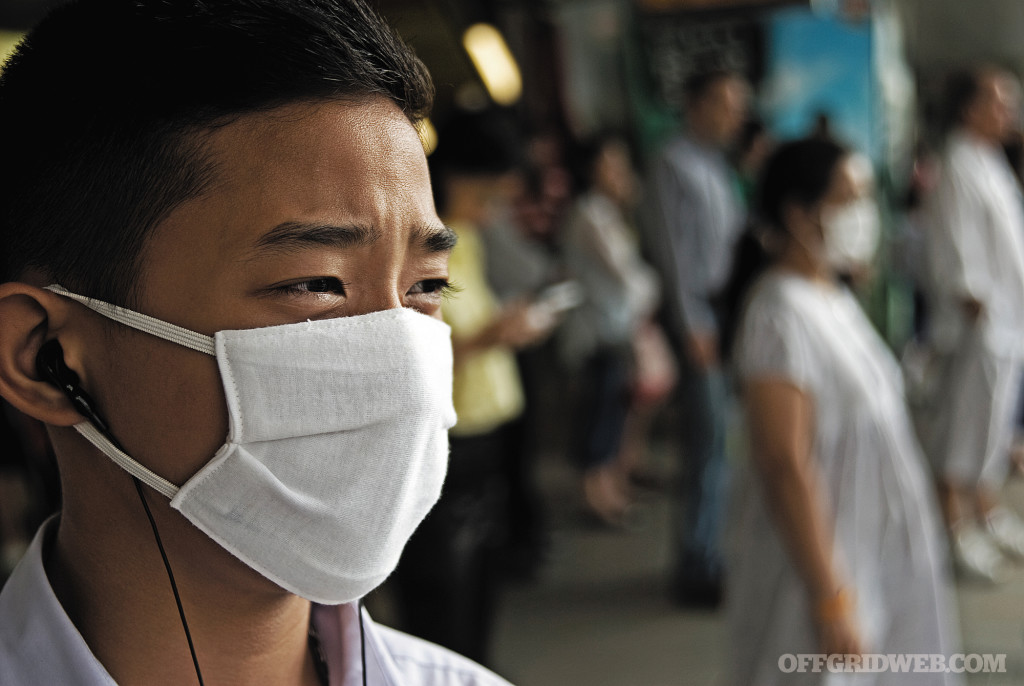
The Pandemic
After experiencing the effects of Superstorm Sandy, people started to become more preparedness-minded, but most of that wasn’t constructive or practical.
Enter the pandemic and panic buying.
The COVID-19 pandemic started in late 2019, and by early 2020, there was full-scale public panic. Many grocery store shelves sat barren of staples that people relied upon, and many of these shortages lasted for months.
Common items were in short supply from a combination of reduced supply from many businesses being closed and an increase in panic buying. Many grocery stores instituted purchase amount limits on key items to reduce panic buying and get much needed supplies into many peoples hands. These shortages and purchase limits continued for months and exacerbated an already high tension situation for people, especially those living in densely populated areas.
Supply chain disruptions during the pandemic extended well beyond pantry staples. Prescription medications were in short supply, which put many people at risk of serious health complications. Motor vehicle production ground to a halt due to shortages in circuit boards and other parts driving prices on new and used vehicles up. These supply chain disruptions were so severe that the impact is still felt in our economy today!
Current Events
Fast forward to today, an ongoing conflict between Russia and the Ukraine has driven the cost of grains and other staples through the roof. Many businesses are still recovering financially from the pandemic, and prices for fuel, transportation, and utilities, along with record inflation, have drastically increased prices of goods across the board.
Massive storms rocked the northeast and many southern states, destroying roads, bridges, and entire communities. Early in October, the Dock Workers Union organized a major strike that shut down nearly all the ports from Maine to Texas, meaning food, clothing, machine parts, and much more could not make it into the country from foreign sources.
Surviving and Thriving During Supply Chain Disruptions
With the threats of massive infrastructure destroying storms becoming more common, economic challenges making coping with rising prices more difficult, and workers becoming increasingly frustrated with their job conditions and pay rates, supply chain disruptions are likely to continue into the future.
While we may not have the ability to control the supply chain issues, each of us can be more prepared to handle minor and even major disruptions. With the proper mindset, a few ancestral skills, and the simple act of stocking up on key items we can ensure we have everything we need to get through the challenges of supply shortages, bring peace of mind to our loved ones, and encourage our local community to support one another.
Remember, like any other skill, preparedness is developed over time. Each piece of gear is helpful, but knowing how to use them properly and developing the proper mindset and skill set will take practice and time!
Rubik's cubes and assorted puzzle games are a favorite in our house. Games like this are not only fun, but they sharpen our minds
Mindset
The most important tool or the greatest hindrance in any difficult situation is right between your ears. Your mind helps you make every decision in your life from something as mundane as what shoes to wear to major life decisions like choosing a place to live. The brain is such a powerful tool that even the most advanced computer on the planet does not even come close to matching its ability to process and store data.
Unfortunately for us, our brain has several unconscious defense mechanisms that are designed to keep us alive but can often lead to the opposite. The worst thing we can do in any difficult situation is panic and give in to irrational thoughts as it can often lead to hasty and poor decision-making.
There are a number of exercises we can do to help sharpen our minds and utilize logic-based thought, as well as exercises, that can help us focus and calm our minds through difficult situations.
Logic-Based Games: regularly playing logic and strategy-based games is one of the best ways to sharpen your mind. Games like chess, puzzles, and Rubik's cubes all teach our brain how to analyze data, patterns, and can help to make us more aware of small details. Playing cards with our friends and family can help us learn to better read body language, vocal tones, and facial expressions in others.
Situational Awareness Practice: Practicing situational awareness in different environments and conditions can teach us a great deal about our ability to perceive potential threats and identify resources. First, choose an environment. This could be a crowded urban area, a secluded wilderness area, or anything in between. Find a comfortable place to sit and spend 15 minutes just recording all the things that you can detect with your senses.
You can record the details of people you see, buildings, vehicles, and natural features. If in a populated area, pay attention to the places people congregate and the places they avoid. You should also note the sounds and smells you encounter. Later on, attempt to recall as much of that information as possible. It should come as no surprise the first few times you will have a hard time recalling many details.
But as you keep practicing you will not only start to remember more but you will also start understanding the patterns of people's behavior and common themes in wilderness areas. This will greatly increase your detailed memory retrieval, help you identify potentially helpful or harmful people, and help you avoid dangers and identify resources in the wild.
Box Breathing: This is a simple technique that has proven effective in calming panic and recenter yourself. Like any other exercise, it does require a bit of practice, but in time, it can quickly become second nature to start box breathing exercises in high-stress situations. Start by exhaling all the air in your lungs, then slowly inhale through your nose for 4 seconds. Next, hold your breath for 4 seconds and finally exhale through your mouth for 4 seconds. Repeat this process until you find yourself calm, centered, and ready to make rational decisions.
Our households Emergency Plan Binder, along with some essential survival supplies that we keep easily accessible.
Planning
The old adage goes “failing to plan is planning to fail” and outside of moments of pure luck, this tends to be accurate. While it is next to impossible to account for every possible situation, having some basic plans of action will go a long way to help keep your mind focused and avoid panic.
Every person, household, and community is different, so no cookie-cutter plan will work for everyone. In a supply chain shortage, there are a few key factors that should be taken into account when developing your plan. While these are just a few points, these and many others will become more apparent as you begin to understand the other points on this list:
Household Members: When determining the quantity of supplies you will need, you will have to account for each member of your household. Emergency supplies kept on hand should be enough to cover the needs of each household member.
Medical Needs: If anyone in your house has specific medical needs such as required medications or the need for some form of medical device you should, when possible, ensure you have extra medication on hand and the ability to power electronic medical devices should there be a disruption in electricity distribution.
Available Local Resources: Know what supplies are available locally. Are there edible plants that can be foraged? Are there local farms that can supply meat, fruit, or vegetables? Can you hunt in the area? Is there a place where you can go fishing? These are all questions you should know the answer to and have a plan to leverage these resources if needed.
Community-Based Planning: Know your community. Do you have reliable people with skills and resources that you trust and can barter with? Are there people who may pose a threat or try to take your resources? Developing plans to both work with other people and potentially defend yourself, loved ones, and resources is vital.
A few of the items we always keep on hand. Canned tuna, crushed tomato, pasta, and some basic first aid supplies.
Stockpiling
Stockpiling is one of the easiest and most accessible ways to prepare for a supply chain shortage. The biggest challenge with stockpiling is storage space and available funds to purchase supplies. If you live in an urban setting, your space may be limited, but even keeping a few extra packages of essential items can ensure you get through a shorter supply chain issue. Here are some items that everyone should consider having in their stockpile, but this can be modified to suit your specialized needs.
An additional benefit to having a stockpile during a supply chain disruption is that it opens up the option of bartering with members of your community. This allows both parties to benefit from getting needed supplies and helps build bonds within the community!
Food: Nourishment is key to keeping your mind and body healthy and should always be at the top of your priority list. Stockpiled food items should be non-perishable and have a long shelf life. Things like canned foods, pasta, rice, and dried beans are excellent options. Freeze-dried food is also an option as it takes up little space and has exceptionally long shelf lives. While most of these food items are edible well beyond their listed expiration date, it is always a good idea to rotate your stockpiled food regularly.
Batteries: Many simple electronics in our lives use disposable batteries. It is always a good idea to determine what kind you use regularly and keep extras on hand. Batteries should always be stored in a cool, dry place to avoid damage.
Water and Water Purification: Having extra water on hand is always a good idea, as one of the most commonly compromised resources is our water supply. While bottled water is finite, having a reliable home filtration system and some extra filter elements can provide safe potable water for extended periods if needed.
Medication and First Aid: As mentioned in the planning section, backup prescription medication is important if accessible, but over-the-counter medication like pain killers, allergy medication, cold and flu medication, and gastrointestinal medications. They are essential to keeping ourselves functioning during potentially high-stress situations. Keeping ample amounts of first aid supplies like bandages, disinfectants, disposable gloves, and other similar items can help treat minor wounds and are often among the first items to vanish during an emergency based supply shortage.
Back-Up Parts: Keeping some backup parts for essential tools like saw blades, drill bits, and parts that can often wear or break on your bow or firearm can ensure these valuable tools can continue to serve you even when supply chain issues and panic buying have wiped them off the shelves.
Hygiene Supplies: Things like toothpaste, soap, and other hygiene related items are often overlooked when people stockpile. Having proper hygiene not only helps to prevent illnesses and infections, but it also goes a long way when having to interact with other people!
Part of my personal foraging kit. Foraging can provide healthy plant options during supply chain disruption.
Ancestral Skills
It’s time to tap into the modern version of the skills our ancestors relied upon to stay alive. While modern tools such as compound bows, composite fishing polls, and hunting rifles have made these tasks easier, there is still a need to develop skills to use these tools effectively. While we can't teach these skills in a few sentences, there are some essential skills that you should consider looking into.
Hunting, Fishing, and Trapping: If you live in an area where any of these are viable, having access to high-quality animal protein can give you meals that fill your belly and provide essential nutrients and calories.
Gardening: If you have land available, basic gardens can provide a good amount of food and barter items during the growing season. In urban environments, plants such as tomatoes, peppers, and a variety of herbs can easily be grown in porch or balcony pots. Thanks to advances in technology, many plants can be grown indoors using specialized devices that can provide fruits, vegetables, and herbs even in the cold months.
Foraging: Learning to identify edible and medicinal wild plants can be a tremendous benefit during supply chain shortages. Many useful plants can be found in the wild, on our front lawns, in abandoned lots, or the cracks of sidewalks. While wild plants often don’t provide significant calories, they are high in vitamins and nutrients.
Fire Starting: Supply chain shortages can also affect the fuels that power our outdoor grills and kitchen stoves. Having the ability to make an effective fire outdoors will ensure that food can be cooked and a campfire is always a good way to boost morale!
Common recreational items like this bicycle and scooter can be used as faster then walking transportation when fuel becomes scarce.
Transportation
Getting around through either personal vehicles or public transportation is often taken for granted, but as seen in the examples earlier in the article, supply chain issues can impact the availability of vehicle fuels. Having backup methods of transportation can help us move quickly in an emergency or just get where we need to go faster than walking.
Bicycle: A tried and true classic, the bicycle is an easily accessible transportation option that requires no fuel except the calories used working the pedals. Always keep your environment in mind when picking a bicycle as a mountain bike is more suited in rural and wooded areas than your typical street bicycle.
Electric Transportation options: electric scooters and mopeds can be great to move around fast without burning too much of your energy, but are all but useless in a power outage scenario. Assisted E-Bikes are one of the best options available as they can work with a charge or pedal manually.
Final Thoughts
Supply chain disruptions have become more prevalent in recent years with no signs of letting up. Taking control of our reaction to situations like this will ensure that we are prepared to survive and thrive even during long-term supply shortages. Sharpening our minds will ensure we are calm and focused during high-stress situations. Creating emergency plans for our household will provide a road map when the times get tough. Keeping extra stock of vital supplies can allow us to maintain a fairly normal lifestyle during short-term supply chain disruptions, and honing the skills our ancestors relied upon can carry us through long-term supply shortages. Having backup transportation options can help us cover distance when needed when fuel supplies are unavailable. It may seem difficult to accomplish this all, but take it one step at a time, and you will quickly find yourself feeling more confident and prepared to take on any challenge!
Have you ever considered what course of action is best when the fabric of society crumbles apart, and the rug of your worldview is pulled out from under you? Should you bug out to a safe location? Bug in and wait it out? Do you throw up your hands and decide to DIP (die in place)? It’s difficult to consider what you would do if war has never affected your life, but there are plenty of war survivors out there with compelling stories and a treasure trove of wisdom.
The 411
In a world increasingly fraught with uncertainty, the stories of those who have faced the unimaginable and survived provide not just a blueprint for endurance but a call to introspection. The SHTF Anthology by Selco Begovic, a survivor of the Balkan Wars, thrusts us into the harsh realities of a life upended by conflict and chaos. Through his eyes, we witness the breakdown of society, the collapse of resources, and the human spirit’s indomitable will to persevere. This book aims to transform Selco’s harrowing experiences into a reflective journey, urging us to wonder, “What would I do?”
Selco’s narrative is more than a survival manual, it’s a mirror held up to our own lives, challenging us to consider our preparedness, resilience, and adaptability in the face of crisis. Each chapter delves into aspects of survival that go beyond the physical, addressing the mental, emotional, and ethical dilemmas one might face when the fabric of society is torn apart.
Imagine, for a moment, waking up to a world where the conveniences and certainties we take for granted are obliterated overnight. Without electricity, running water, or access to food, how would you adapt? Selco’s experiences force us to confront these questions head-on, providing not just answers but a framework for survival that emphasizes resourcefulness, community, and the preservation of humanity amidst inhumanity.
Security and violence become paramount concerns in such a scenario. Selco doesn’t shy away from the grim realities of protecting oneself and loved ones in a lawless environment. But it’s his reflections on the psychological toll of violence and the importance of maintaining a moral compass that strike a chord. It’s easy to theorize about what one might do when threatened, but Selco’s account compels us to ponder the deeper implications of our choices.
Health and medical challenges are another critical aspect explored in the anthology. In a world stripped of medical infrastructure, knowledge of basic first aid and understanding how to prevent disease become lifesaving. Selco’s advice underscores the importance of preparedness in all forms — not just stockpiling supplies but acquiring skills that can sustain us when external systems fail.
Perhaps the most moving lessons come from Selco’s insights into the survival mindset. Survival is not solely about physical endurance but the mental fortitude to face each day with hope and determination. The stories shared in the anthology illustrate the power of human connection, the value of small kindnesses, and the strength found in shared suffering and solidarity.
As we reflect on Selco’s journey and the broader implications of his experiences, we’re reminded of the fragility of our own existence. His story is a testament to the resilience of the human spirit, but it also serves as a wake-up call. In our comfortable lives, it’s easy to overlook the importance of preparedness, community, and ethical resilience.
The Verdict
So, what would you do? This question isn’t just hypothetical, it’s a prompt for action. It encourages us to evaluate our readiness for the unexpected, to strengthen our mental and emotional fortitude, and to cultivate a network of support that can withstand the tests of crisis. Selco’s story, while unique to his circumstances, offers universal lessons on the importance of being prepared not just for survival but for living in accordance with our values when tested by fire.
The SHTF Anthology is more than a survival guide, it’s a philosophical inquiry into what it means to be human in the face of catastrophic change. It challenges us to ask ourselves how we would navigate the collapse of the familiar and emerge not just intact but stronger, wiser, and more compassionate. As we consider our answers, let’s take to heart the lessons of those who have endured the unthinkable and emerged with insights that can guide us through any storm.
About The Book
Book & Author: The SHTF Anthology by Selco Begovic
Publisher: Daisy Luther Media
MSRP: $15 (PDF download) or available for free as a series of blog posts
School shootings are not only extremely tragic events, but they also spawn vivid discussions amongst our communities. Media pundits and politicians debate the causes of and solutions to the problem ad nauseam, butone group that we often don’t hear from are those who stand guard on the front lines of defense every day: teachers.The teacher is the eyes and ears of our school system, so it goes to say that they have a stronger finger on the pulse of students than most.Their voices, however, are often drowned out regarding the struggles, anxieties, and stories that today’s educators share on the frontlines of the classroom.
Above: Posting signs is only the start. Teachers and the community must be involved (Photo credit: iStock – gerenme).
Painting the Picture
Before we can see through the eyes of the teacher, we need to gain a proper perspective of what characterizes an active shooter incident in our schools.An active shooter event is commonly defined as an individual actively engaged in killing or attempting to kill people in a confined and populated area.Most active shooter attacks last anywhere from 5-7 minutes, with some reports lasting up to 15 minutes.
In many cases, the attack is already over by the time law enforcement arrives.Adam Blanton, the Assistant Chief of Police for Richmond, Indiana, believes that the overall approach to active shooters from a law enforcement perspective has changed.“One of the first things we have adopted from our standpoint, especially using the Columbine High School incident as a baseline, is that the established protocol today is that you go in.The first officers on the scene are going in and they are going toward the sound of gunfire.
According to the Center for Homeland Defense and Security, most active shooting events happen on Fridays, typically in the early morning hours as school is starting.However, there is not enough evidence to note this as a conclusive pattern in school shooting events.The Federal Bureau of Investigation (FBI) determined in their own study that an overwhelming number of attackers were current students within their own school system and displayed 4 to 5 very telling behaviors prior to the attack.
Above: Problematic signs can be difficult to detect. However, sometimes they are not so subtle (Photo credit: iStock – DEBBY LOWE).
These behaviors included problematic interpersonal interactions and signs of violent intent, both of which can indicate a potential future attack. Rick Wilcox, a Student Resource Officer for the Nettle Creek School Corporation in Indiana thinks that “we’re doing better, but more still can be done for mental health and how it relates to school shootings.Even with increases in federal funding to examine the role of mental health, it really is just the tip of the iceberg in terms of what can be done to mitigate school shootings on a National level.
A Troubled Teen Profile
While not definitive, the following are Personality Traits and Behaviors sometimes exhibited by troubled students who might be considering school-based violence at some level:
Low Tolerance or Frustration
Poor Coping Skills
Lack of Resiliency
Failed Love Relationship
Signs of Depression
Narcissism
Alienation
Dehumanizes Others
Lack of Empathy
Exaggerated Sense of Entitlement
Attitude of Superiority
Exaggerated or Pathological Need for Attention
Masks Low Self-esteem
Anger Management Problems
Intolerance
Inappropriate Humor
Seeks to Manipulate Others
Lack of Trust
Closed Social Group
Change of Behavior
Rigid and Opinionated
Unusual Interest in Sensational Violence
Fascination with Violence-Filled Entertainment
Negative Role Models
Behavior Appears Relevant to Carrying Out a Threat
The Role of Schools
In America, many schools are underfunded and more recently, understaffed.While rewarding, teaching is difficult work and becoming more difficult with each generation.Student enrollment in undergraduate bachelor’s programs is dwindling by the year resulting in a national shortage of college-educated teachers.This not only makes it difficult for school administrations to fill empty roles with recent graduates but lowers the morale of overworked educators who are trying to understand the cultural shift in today’s student.
While school shootings are major events that shock our nation, there are still many in our communities who believe that it couldn’t happen in their school system.“Normalcy bias” is a cognitive bias that leads people to underestimate the possibility of disaster and underestimate the negative or harmful effects of a disaster as it’s happening.Former member of the CIA and best-selling author Steve Tarani states that normalcy bias encompasses a state of mind we enter when faced with a threat that overwhelms our mental capacities.“It makes you disbelieve your situation when faced with grave and imminent danger,” and causes you to “greatly under-estimate the severity and most likely consequences.
In turn, it causes you to reinterpret the event, rather than taking evasive or decisive action.”Unfortunately, many community leaders subconsciously believe that they are immune to active shooters and may not fully support the measures needed to optimally protect the children entrusted in their care.“These things happen sporadically in areas that you would never think.People tend to believe that a school shooting is beyond their community, or they don’t have a cultural problem like gang activity to deal with, so they’re not prone to such issues.I think that sort of violence is so far out of place for those communities,” says Blanton. Although disasters elsewhere may well be on the radar, their minds tell them that it will never happen to them, and their preparation (or lack thereof) soon follows.
Above: Many schools have adapted to active shooter threats by having Law Enforcement present during the school day (Photo credit: iStock – Jacob Wackerhausen).
Pat Tudor, a Detective for the Richmond Police Department believes that schools can do more to prepare themselves for active shooter situations.“There are a lot of discussions, but not a lot of implementation.Not a lot of school administrators or community leaders say that they’re actually going to make something happen and stick to it.”School Crisis Plans are typically accompanied with School Safety Specialists who help develop, monitor, and train others within schools on how to deal with hazards and threats ranging from the standard monthly fire drill to re-unification plans after a disaster has occurred.While many school employees and faculty members are uneasy about addressing school shootings, it is a possible threat that many must stare down, overcoming their trepidation to deal with the threat head on.
To do just that, school administrators, along with School Safety Specialists, perform threat assessments on an as-needed basis.A threat assessment could run the spectrum from evaluating unlocked doors all the way to evaluating a troubled student with consistent or erratic disciplinary issues.Threat assessments are an important part of dialing in on the safety pulse of a school and can lend themselves to actionable steps the school can take upon themselves to further safety measures for the student body.Of course, communication is key.Keeping fellow teachers and administrators in the loop as it relates to safety and emotional health issues is a vital component to addressing specific problems before they become a flood of calamity.
In 2015, the Sandy Hook Advisory Commission created a report that included recommendations on how to improve school safety and lockdown procedures.Many of these procedures are in place today amongst school districts and include the ability to lock classroom doors from the inside if a threat becomes active.While other technical recommendations were suggested, one that envelops the push for safer schools is increased safety and security training for all faculty, staff, and students.This becomes the cornerstone of active shooter preparedness, but many schools find themselves under-prepared followed by a lack of adequate funding to mitigate potential problems.
These barriers open the possibility of bringing student involvement to the table as an option.The fact is adults know the most on how to keep students safe.Students, however, can run circles around faculty when it comes to knowledge of their peers.Students will know who is up to what, who is smoking what, and who is dating who.They know more than we ever will about the pulse of their fellow students within school walls.What they lack, though, is the knowledge to properly evaluate their surroundings and put the dots together.In other words, they have the knowledge but lack the instinct that is learned over time by adults.It makes sense to combine both the knowledge of students and the intellects of their adult teachers to bring about a fresh perspective to active shooter policy.
Above: School shootings are tragic on a community level, affecting everyone with ties to the school (Photo credit – iStock: raclro).
Students should be involved in some level of decision making because they are more aware of social dynamics and can intervene in ways that adults cannot.Social media posts are an example of how students can monitor the activities of their peers and have been proven to be extremely useful in circumventing potential active shooter incidents.Encouraging students to become peacemakers will improve a student’s emotional intelligence, communication skills, and overall climate of a school.This gives the student ownership of their safety, rather than depending only on adults to provide it for them.This also serves students of all ages to grow and become more responsible for their small microcosm of society, which is one of the missions to educate our youth in the first place.
Students should also have some input on the drills that schools practice.For many in emergency management, the level of training in school corporations fails to meet the mark of current threats in America.Granted, “duck and cover” during the Cold War era was a ridiculous practice in preparation for a nuclear attack.But when was the last time we’ve heard of a school burning down?Yet schools are required by their states to practice fire drills once a month.
Fire drills have their place and can be utilized to practice for any sort of evacuation, but the fact that there is often no requirement for active shooter lockdown drills seems every bit as ludicrous as “duck and cover.”Additionally, requiring off-site evacuation and reunification drills during school hours is like “pulling teeth for school corporations, but they are as every bit important as an active shooter drill since they will inevitably follow an active shooter event,” according to Pat Tudor.
Enter the Classroom Teacher
To be fair, dealing with school violence is not something any teacher dove into the profession of education for.They’re just not trained to deal head on with situations that potentially put their lives at risk.Teachers are some of the most overworked, underpaid positions in America.So, putting any kind of expectation on them to be frontline security guards — on top of all their other duties — is unrealistic.But these are different times we live in.
It shouldn’t be their problem, but if we are to take a community approach to school shootings, then they are at least part of the solution.So how should teachers approach classroom preparedness when it comes to preparing themselves and their students for the possibility of active shooter incidents?The following are seven practices that teachers either have or could incorporate into their daily regimen to help prepare their students for anticipating the unthinkable active shooter event:
Practice #1
Understand their responsibility and influence over their students
This practice might go without saying, as any good teacher will always know the depths of how they influence students, but it’s worth mentioning anyway.After interviewing several students, one suggestion resurfaced several times, which is teacher-student interaction.While it’s true that students know their peers better than anyone else, it is the teacher who can put that information into proper perspective.
Teachers begin to see behavior patterns in their classrooms and eventually begin to deduce that things outside of the classroom may be interfering with education efforts such as relationship problems, bullying, problems at home, or even when some students are under the influence of drugs or alcohol.The teacher is the first line of defense when it comes to being “situationally aware” of student personalities and their learning environment.As teachers establish expectations and mentor struggling students, they can become more aware when things are out of sorts.
Above: Overt behaviors are a clear indicator that a student may be struggling (Photo credit: iStock – P_Wei).
Practice #2
Maintain a safe, inviting, interactive classroom
Classrooms should be safe environments, especially when it comes to Junior High/Highschool age brackets.A teenager’s hormone levels ride volatile waves like a rowboat in a hurricane and their reactions are more apt to spike and drop at a moment’s notice.The calmer the learning environment, the more at ease the student will be.Classroom interactivity also plays an important role in the lives of today’s students.With each passing generation, old ways of teaching must be laid to rest.If today’s students attempted to learn from an overhead transparency projector, teachers would be guaranteed to have a scholastic mutiny on their hands within ten minutes.Time to switch it up.
Practice #3
Maintain an offensively defensive classroom
Say what?It sounds confusing, especially as it relates to a classroom.Classrooms, first and foremost, must provide safety for students as well as the teacher.Developing a classroom to be both defensive and offensive is a practiced action.Positioning large furniture to be moved to barricade a door is an example of taking the offense in room protection from outside threats.Some teachers actually collect soup cans or rocks to hand out to students to be utilized as offensive weapons in the case a school shooter enters the premise.
These items can also double as food drive supplies or the next lesson in geography.Be creative. The phrase “the best defense is a proper offense” is also known as the strategic offensive principle of war. Generally, the idea is that proactivity (a strong offensive action) instead of a passive attitude will preoccupy the opposition and ultimately hinder its ability to mount an opposing counterattack, leading to a strategic advantage.When the student’s life is on the line, passivity should be thrown out the window and teachers should emotionally equip students to take the offensive as a last resort for their survival.
Above: Teachers have the strongest influence regarding how well a classroom can be defended, and how smooth a lockdown drill goes (Photo credit: iStock – kali9).
Practice #4
Be on board with school safety policies
As the saying goes, a chain is only as strong as its weakest link, and the same is true of security protocols. So, it’s important that everyone follows the same school safety policy.If the plan is solid, then any deviation of the plan from any one faculty member weakens the plan and potentially puts others in danger.This is not to say that people shouldn’t think for themselves, but not at the expense of a solid plan aimed at saving lives.Being on board with school safety policies means that teachers need to be willing to train the plan until they feel confident in their ability to save their life and the lives of their students.
Practice #6
Talk honestly and openly with students about school shootings
Obviously, this is an age-appropriate rule that can have both positive and negative ramifications if not handled with care, but the conversations need to happen. Teachers should approach young children with brief and simple information that should be balanced with reassurance.Upper elementary and early middle school children may be more vocal in asking questions so it might be a good idea to discuss what is being done at the school to help ensure their safety.
Upper middle school and high school students may have strong and varying opinions about causes of violence in school and society. Teachers should stress the role that students have in maintaining safe schools by following the school's safety guidelines.It's also best, regardless of age, not to provide false reassurance or minimize their distress.We need our students to be vigilant, but not anxious about potential threats.It’s much better to help children learn to cope with distressing feelings, rather than pretend they don't or shouldn't exist.
Above: Students cope with stress in various ways. It's important to approach these issues on and individual level (Photo credit: iStock -bodnarchuk).
Practice #7
Drill down how students react to an active shooter event
On top of the regular emergency drills, teachers must train for active shooter preparedness and should be the first to understand these emergency responses so they can guide their students through the drills. When it comes to equipping students with knowledge of how to handle active shooters, there are two main schools of thought:ALICE and Run-Hide-Fight.ALICE training stands for Alert – Lockdown – Inform – Counter – Evacuate.
The other training is known as “Run-Hide-Fight,” developed by the F.B.I.Both programs are viable active shooter response training, but knowing which one is for you really depends on your preference.“Run-Hide-Fight” has a slight majority of proponents because of its simplicity.Also, it equips its practitioners with more individual involvement in threat response than ALICE does.“Run-Hide-Fight” allows students to run out of the school if the opportunity presents itself, and if not, fight for their lives by any means necessary.
Above: Regular training is an important measure to mitigate an active shooter situation (Photo credit: iStock – Brycia James).
Both are excellent programs.The idea is to provide basic, easy-to-remember actions in the event that people find themselves in an active shooter incident.Pat Tudor believes that programs such as ALICE are instrumental for school safety.“Schools should really send members of their safety committees to ALICE training or like-minded programs so they can train other staff members, especially with the high turnover rate amongst teachers and students.”
Another common concept from both the training programs is the importance of going into lockdown. Both ALICE and Run-Hide-Fight emphasize that if evacuation is not feasible at the time of the attack, it’s better to get into a room and stop the shooter from entering it.In schools, teachers should mobilize students to lock classroom doors from the inside. Aside from locking classroom doors, these also need to be barricaded to prevent any intruder from forcing their way inside.
When a school conducts practice drills, teachers must provide an overview to students. Doing so will ensure that students do not have unnecessary anxiety towards the drills.“Educators need to realize that they no longer have a choice in the matter.We have to be open about it, train ourselves and train our students until it becomes second nature,” says Rick Wilcox.
What is Active Shooter Leakage?
“Leakage” occurs when a student intentionally or unintentionally reveals clues to feelings, thoughts, fantasies, attitudes, or intentions that may signal an impending violent act. These clues can take the form of subtle threats, boasts, innuendos, predictions, or ultimatums. They may be spoken or conveyed in stories, diary entries, essays, poems, letters, songs, drawings, doodles, tattoos, or videos.
Another form of leakage involves efforts to get unwitting friends or classmates to help with preparations for a violent act, at times through deception (for example, the student asks a friend to obtain ammunition for him because he is going hunting). Leakage can be a cry for help, a sign of inner conflict, or boasts that may look empty but actually express a serious threat. Leakage is considered to be one of the most important clues that may precede an adolescent's violent act.
Moving Forward
Society is just different than it used to be, and there’s not one direct reason why these circumstances are at our community doorsteps.“We have to acknowledge that we can’t put the toothpaste back in the tube.We have an entire generation who was raised by social media who just have a different view of the world,” says Tudor.Teachers are tasked to ensure all students are aware of what to do in times of crisis. They are the ones that will make sure that students understand what needs to be done and why this is happening.It all comes at a cost, according to Adam Blanton.“We don’t have to let people keep hurting each other.It’s going to require us having a serious conversation and being steadfast to see a change in our culture so this stops becoming the problem that it is.”
Above: Today's students are growing up in tumultuous times, and the adults in their lives must help guide them through today's unique challenges (Photo credit: iStock – Constantinis).
The innocence of our children is quickly being lost to a culture steeped in emotional discord, and the end result is concerning.It’s the responsibility of every adult to protect our children from violence, but this challenge is most relevantto teachers on the front lines.They are the ones who change lives every day and now stand as shields for our children.The rest of us must do our best to encourage, empower, and train those who spend years shepherding the most vulnerable members of our society.
About the Author
Mark Linderman MSM, CEM, CSSS, CCPH
Mark Linderman is the owner of Disaster Initiatives, an online company that provides communication leaders with the tools needed to address their communities and the media throughout a crisis, teaching the communicator to approach crisis communication from the listener’s perspective.He is a Certified Emergency Manager (CEM) and nineteen-year veteran of Public Health.He instructs Crisis & Risk Communication and Disaster Preparedness courses for seven universities, including Indiana University’s Fairbanks School of Public Health.Mark is considered a Subject Matter Expert in the field of disaster-based communication and is a widely received public speaker and advocate for disaster preparedness. He can also be found on LinkedIn.
Quasi-tactical buzzwords like low vis, low pro, and reduced signature get thrown around constantly in the preparedness and self-defense space, as ways to describe the concept of carrying a lot of gear on you in a manner that does not portray what you’re carrying. What we’re about to cover is a thought exercise in low visibility carry. This is not intended to represent a sample EDC. In fact, you can be absolutely positive that nobody will wear the following configuration every day. Or most days. Or any day, unless your job requires you to work in places where car bombs and assassination attempts are a routine occurrence.
Our intention here is two-fold. The first is to showcase some products we’ve come across in the last several months, or have been in our inventory for some time, that you may not be aware of. While this complete combination of products will be vast overkill for most of us, there may be one or two that you can use to fit your needs perfectly. The other is to show you why the right gear is so important. Particularly if you are looking for a high-capacity, low-visibility solution in an urban or suburban environment. If this is a capability you need, or would like to have, it is important to pay attention to the individual components you choose. But when you do gear-up smartly, it’s impressive just how much you can carry.
A Note On Wardrobe
The shoes and button-down shirt shown here come from 5.11 Tactical – their Foley Low sneakers and Gunner button up shirt, respectively. These are both among the most urbanized offerings from 5.11, but you could very well replace them with whatever shoes and button-up shirt you like to accomplish the same result. The jeans are regular, off-the-table Wrangler straight-cut from Walmart. We deliberately did not choose tactical or EDC jeans with extra pockets, or commercial boot cut jeans to give ourselves extra room for concealment.
We also did not up-size the shirt or pants from our true daily wear. The jeans are 34 x 32 straight cut, the Gunner flannel is size medium, and the RECOIL t-shirt is size large. Model is 5-feet-10-inches tall and 200 pounds – neither excessively skinny nor supremely athletic. We explain all this to further illustrate the potential of what’s possible for “normal” body types in “normal” clothes.
With all that in mind, here’s a breakdown of the low-vis loadout shown in these photos…
The author has been running Mastermind Tactics’ previous flagship belt, the Specialist Belt, for years. Last year, the Specialist was discontinued for the APB which brings some additional features to the table. This 1.5-inch belt is purpose belt for inside-the-waistband carry. The low-profile buckle is marine-grade 316 stainless steel. The end of the belt is chemically stiffened to provide positive feed through the buckle and prevent fraying even with years of use. Two changes which separate the APB from its predecessor include the removal of hook-and-loop.
Many EDC belts use this method to open and close, and there’s nothing wrong with it from a purely utilitarian standpoint. But in addition to being a little noisy, hook-and-loop will gunk up with lint and debris, eventually losing some of its holding power over time (although we’ve not seen this in three years of literal every day use with the Specialist). Furthermore, hook-and-loop on a belt isn’t especially fashionable.
While some may scoff at the idea of considering fashion for carry wear, assimilating cultural norms—even in your own office or neighborhood—is one of the cornerstones of true low-vis operations from a military and law enforcement standpoint. The APB uses heavy-duty nylon for its base construction and is available with either a flexible or stiffened core. We received samples of both, and find the flexible core to be more than adequate for daily IWB carry use. For those looking to carry large handguns outside the waistband, or use their APB in lieu of a heavier battle belt, the stiffened core may be better.
Holster
Make & Model: LAS Concealment Saya 2.0 w/Mastermind Tactics Carry Pillow
There’s nothing new about the LAS Concealment Saya 2.0 holster. Most of the RECOIL OFFGRID team has been using LAS holsters for the last 5+ years, almost without exception. These holsters are comfortable, durable, uncomplicated, and make larger pistols easy to hide.
To prove our previous point about LAS holsters, we setup this loadout with a carry gun that is far from demure. The Staccato C2 pistol sports a 3.9-inch bull barrel and 16-round double-stack magazine. As if that weren’t challenging enough, our particular C2 has been customized by 2011 gunsmith AJ Zito of Practical Performance. Upgrades include a Threat Cadre compensator, Leupold Delta Point Pro and Sure X300U-B weapon light.
There is not one thing slim or lightweight about this pistol. But pairing it with the discreet All Purpose Belt and an appropriate holster thoughtfully designed for max concealment makes even this hog leg of a handgun disappear under jeans and a t-shirt. We believe it was Clint Smith who said “carrying a firearm should be comforting, not comfortable” and we feel very much comforted while carrying a pistol that’s easily capable of repeat, 50-plus-yard hits with a military grade weapon light.
Spare Mags
Make & Model: Grayfighter Gear HUSH and Sanguis Pouches
There’s no shortage of IWB pistol mag pouches on the market, but we were especially impressed with the Grayfighter pouches. The pouch seen here holding a rifle magazine is their HUSH pouch – short for Hidden Under SH*t. Our pistol mag is being held by their Sanguis pouch. Designed by a New York LEO with experience in undercover work, these pouches take a different approach from what you might expect.
While most mag pouches are molded kydex, formed to fit the type of magazine in question, the HUSH pouch takes an ultra-minimalist approach, constructed from a combination of laminates and hook-and-loop straps attached to Discreet Carry Concepts metal clips. The straps can be adjusted to carry anything you can stuff into them, and then trimmed to fit by the end user. The HUSH pouch was meant for all manner of magazines, from pistol to rifle, and the Sanguis pouch for a tourniquet.
But the customizable structure allows them to be repurposed for other items. The Sanguis can hold things like multi-tools, flashlights and pistol mags (the latter is what’s shown here). The HUSH pouch can be sized to fit small radios or even large rifle mags like AR-10/SR-25 boxes. We’re carrying a 20-round pistol mag with aluminum baseplate and a 30-round AR-15 mag.
Not all problems are gun problems, and the value of a small, defensive fixed blade cannot be understated – just ask non-permissive environment expert and OFFGRID contributor Ed Calderon. The Ditch Pik from JB Knife, designed in concert with Calderon himself, is one of our favorite examples encountered over the years.
The double-edged, talon-shaped blade can be used ambidextrously, and its extremely flat profile keeps it tight to the body without printing or protruding from under a shirt.
Immediate Casualty Care is a small shop that specializes in one thing: IWB carry of trauma medical supplies for use by prepared citizens and first responders. Shown here is their IWB Flat, one of their most low-profile IWB kits that has room for chest seals, tourniquet, Israeli bandage and compressed gauze.
ICC recently replaced the design seen here with an updated 2.0 version that features a high-back design to prevent gear from rubbing on the wearer’s skin.
At this point in the article, we realize some folks might be running out of waistband to fit gear into. If carrying your medical gear IWB doesn’t appeal, Live The Creed makes a number of small medical pouches, including this Pocket Trauma Kit, which is also part of the author’s actual EDC. This wallet-sized folding pouch fits in the back pocket of your jeans, opposite your actual wallet, and still holds all the trauma essentials you’d need.
The only drawback to this method is not being able to carry a “hard” tourniquet like a CAT or SOFT-T. We carry a SWAT-T in our, which is better than not having a TQ at all, but if you prefer a hard strap-and-windlass option, Immediate Casualty Care makes an IWB pouch that’s standalone for just a tourniquet. Or you can pick up a second HUSH pistol rig and use that.
Folding Knife
Make & Model: Blood Oath Instruments Pocket Fiend v2
Folding knives can be had in any size, shape, color, or configuration you fancy, and there are near-infinite options to choose from, so we won’t deep dive it. But we’ve grown fond of the Pocket Fiend, v2 from Blood Oath Instruments. We liked the original Pocket Fiend just fine, but there are some material and aesthetic upgrades that give the v2 an edge (no pun intended) over its predecessor. These include a DLC-coated S35VN blade, ambidextrous pocket clip, caged ceramic ball bearing mechanism, and a lightweight aluminum handle that’s finished in Magpul FDE cerakote.
There is absolutely no disputing the utility of having a good flashlight on hand, and that Surefire is the name when it comes to bomb proof, high-performance tactical and carry flashlights. The EDC1-DFT is part of their high-candela Turbo line, offering 95,000 peak candela to overcome all manner of mixed lighting conditions. It is also part of their Dual Fuel line, able to accept either a rechargeable 18350 battery, or single CR123, ensuring you can fuel your light regardless of whether you can get to a charging station.
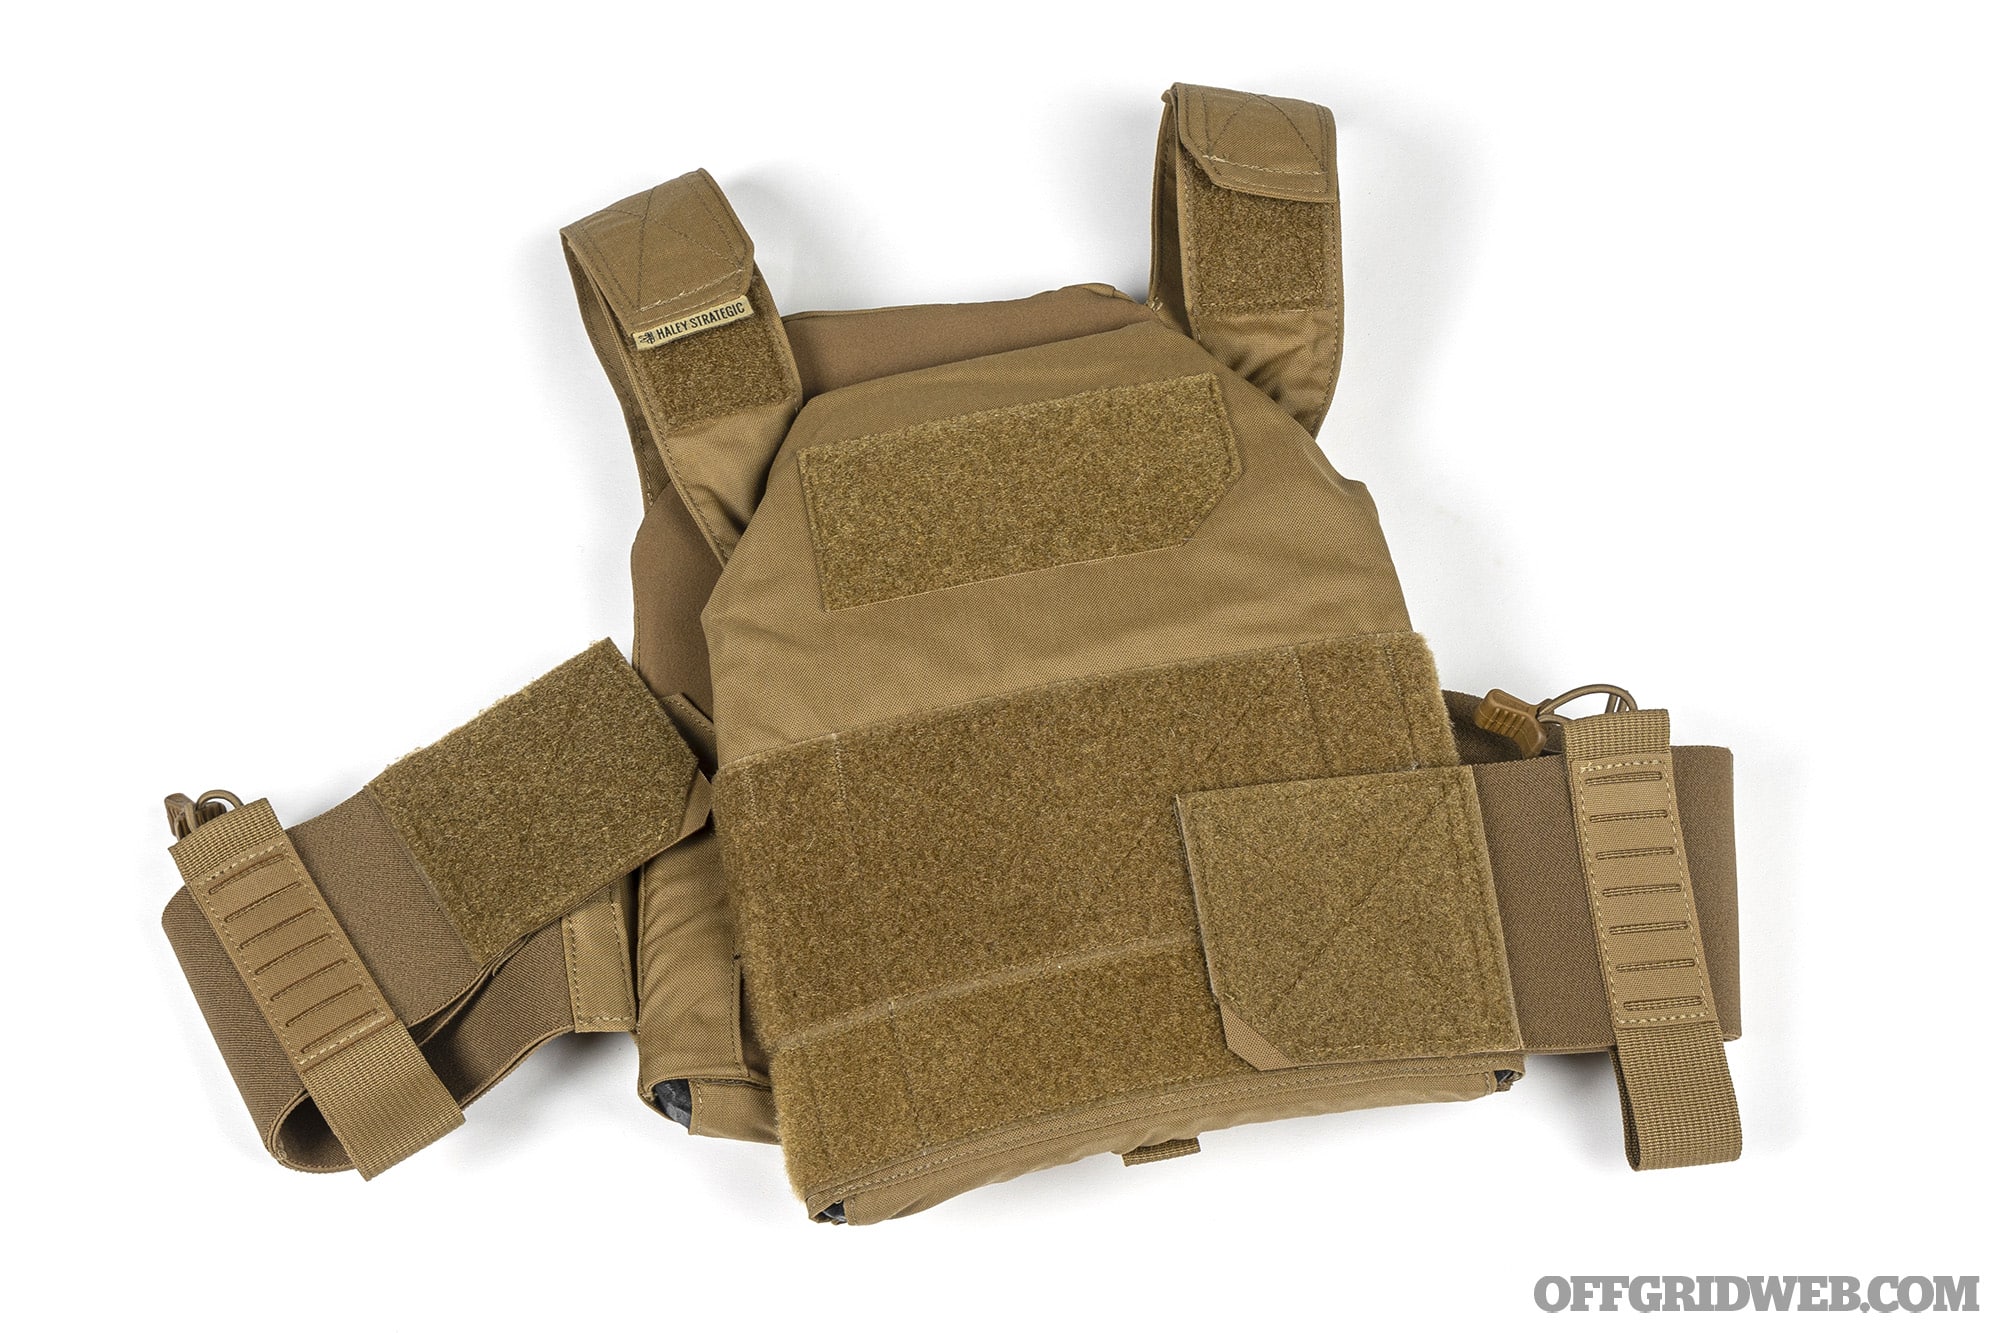
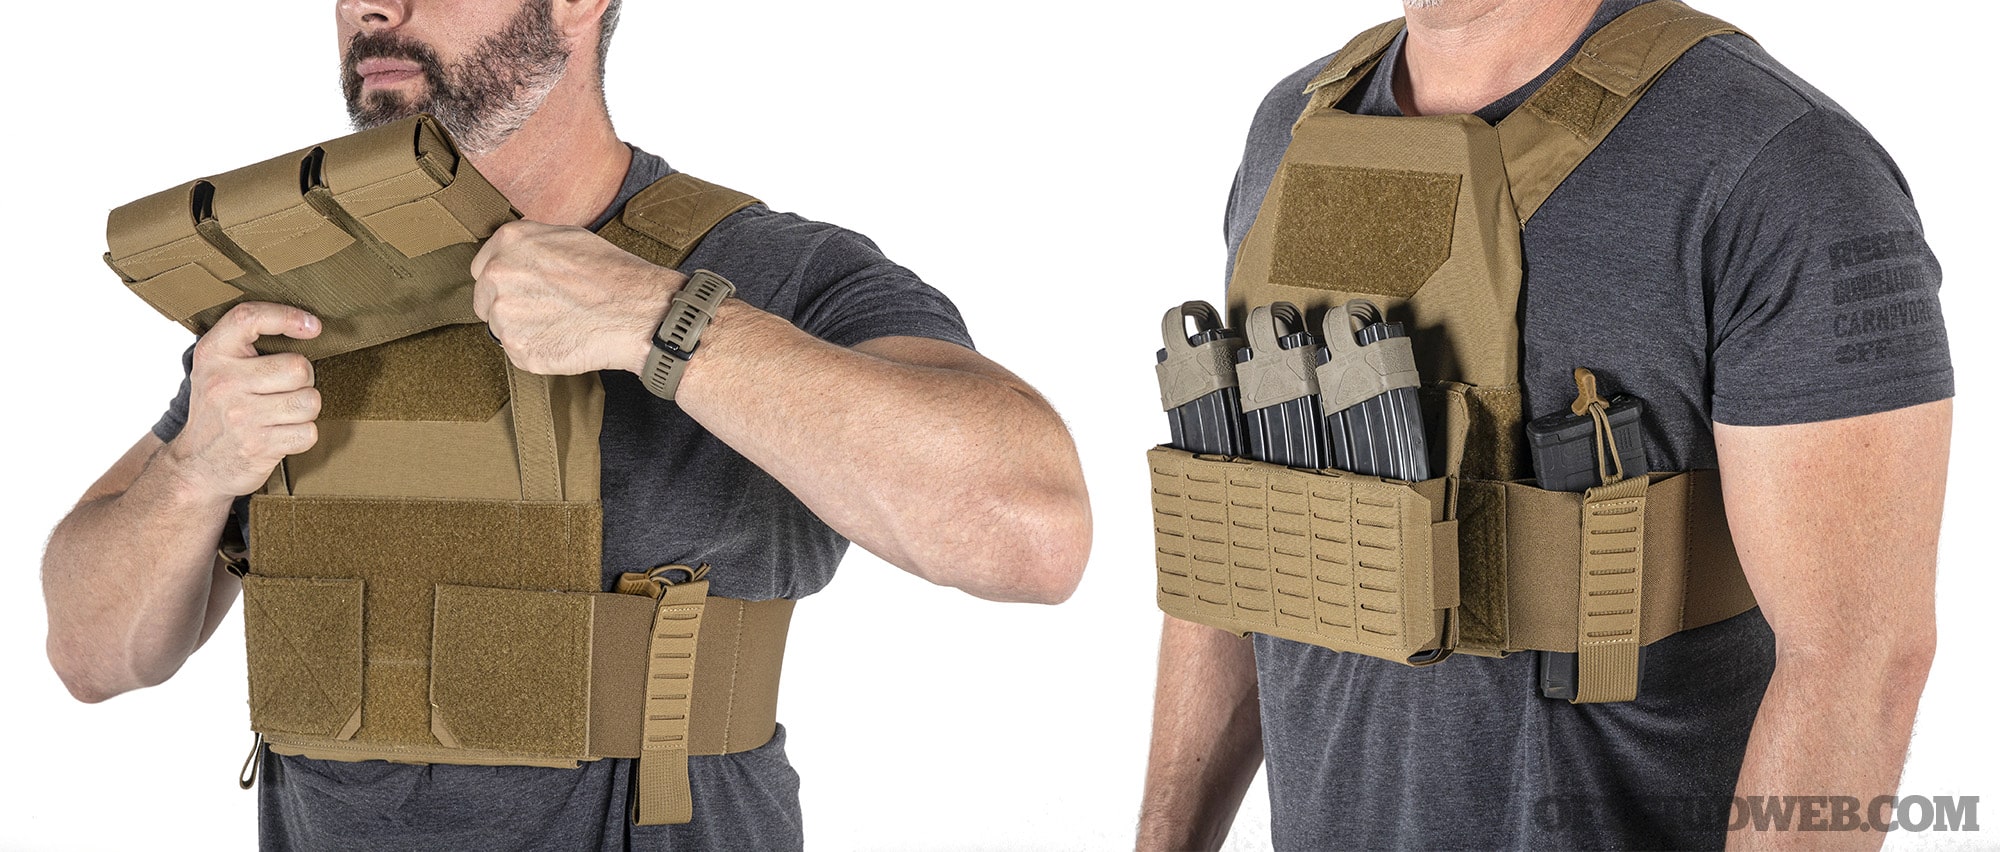
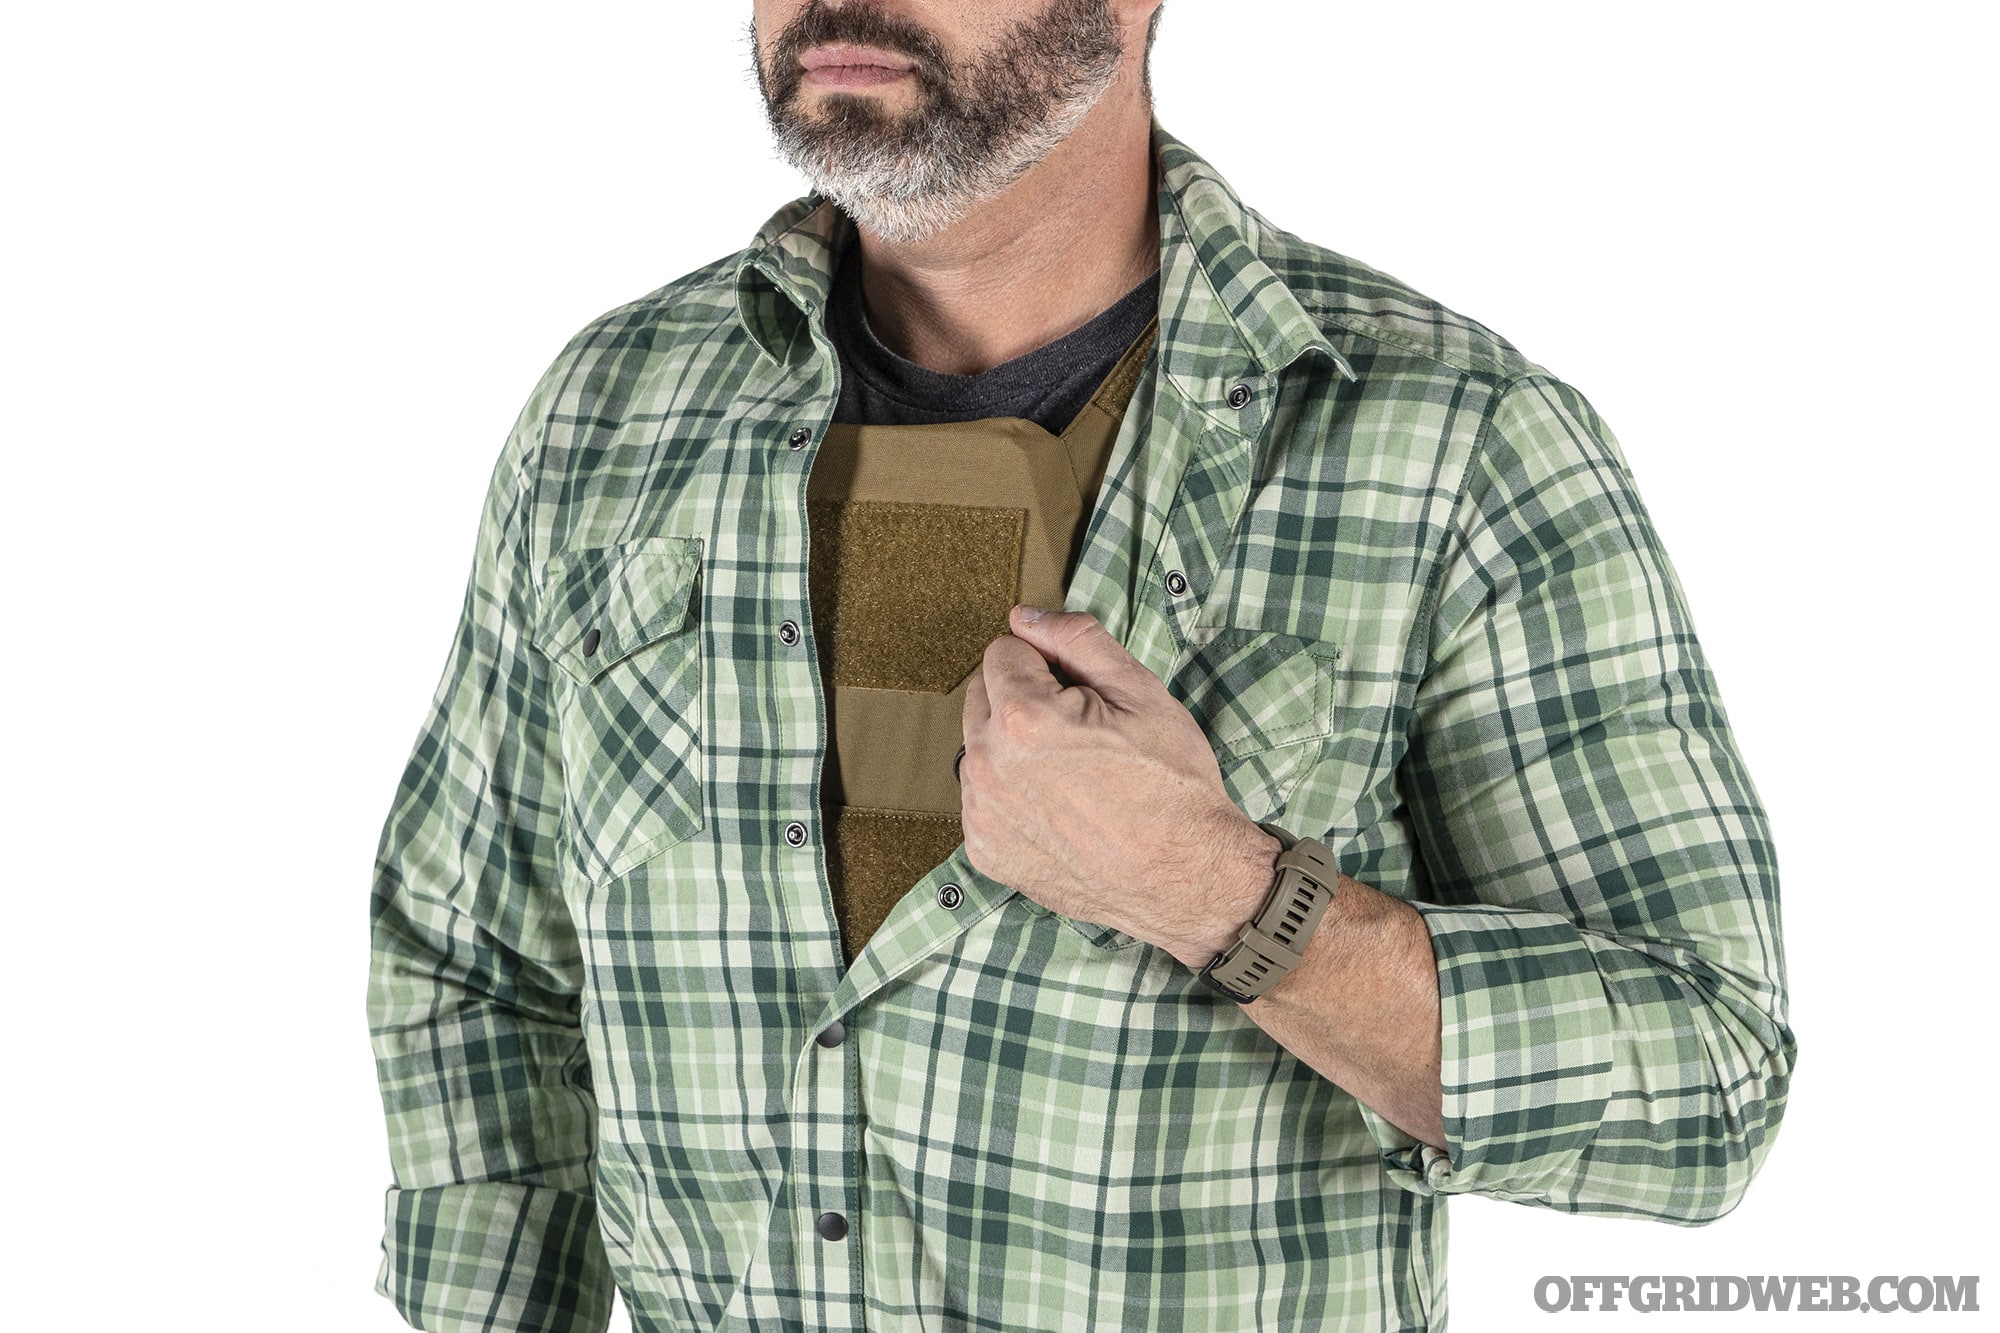
The practicality of wearing armor is debatable in the context of citizen preparedness. But recent years have shown an uptick in civil unrest in the United States that is likely to resurge in the face of yet another hotly contested Presidential election. This may leave every day citizens in a situation where they are required to transit through areas being affected by mostly-peaceful protests, which have repeatedly erupted into violence including shootings. In these situations, wearing armor is a distinct advantage.
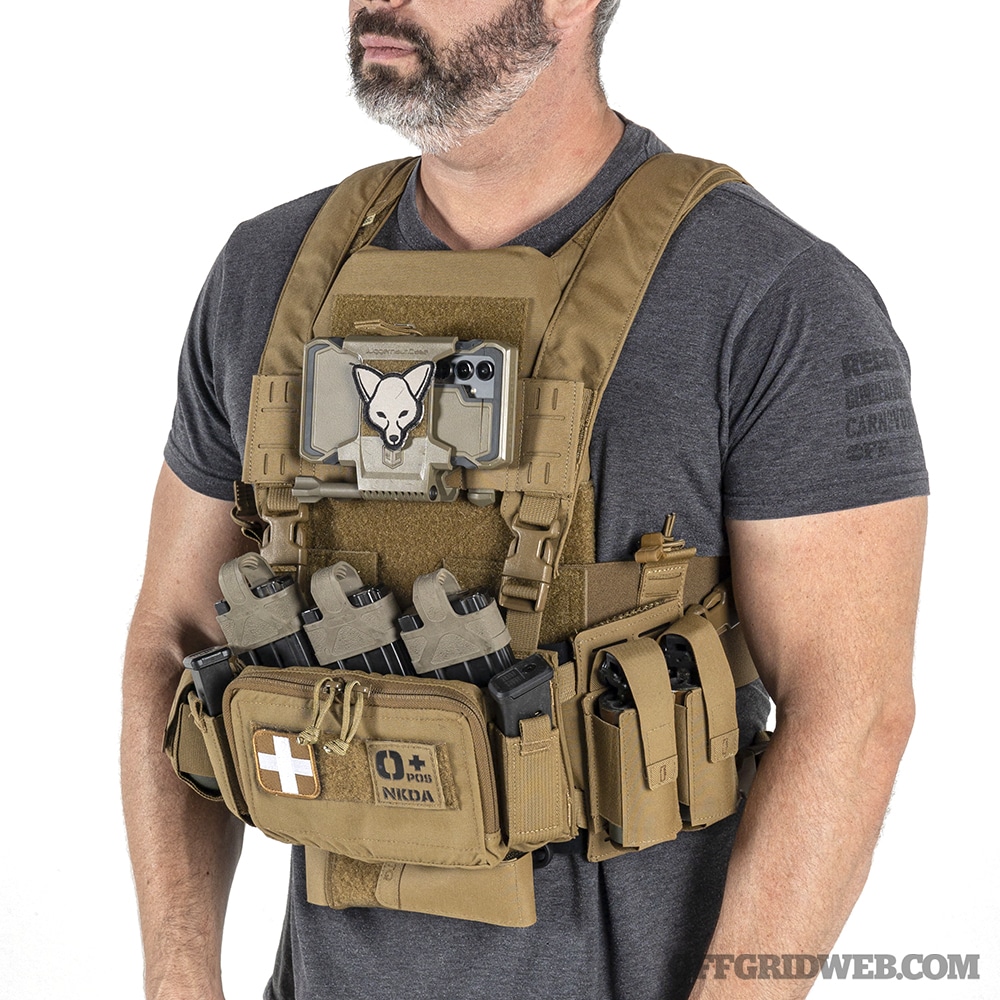
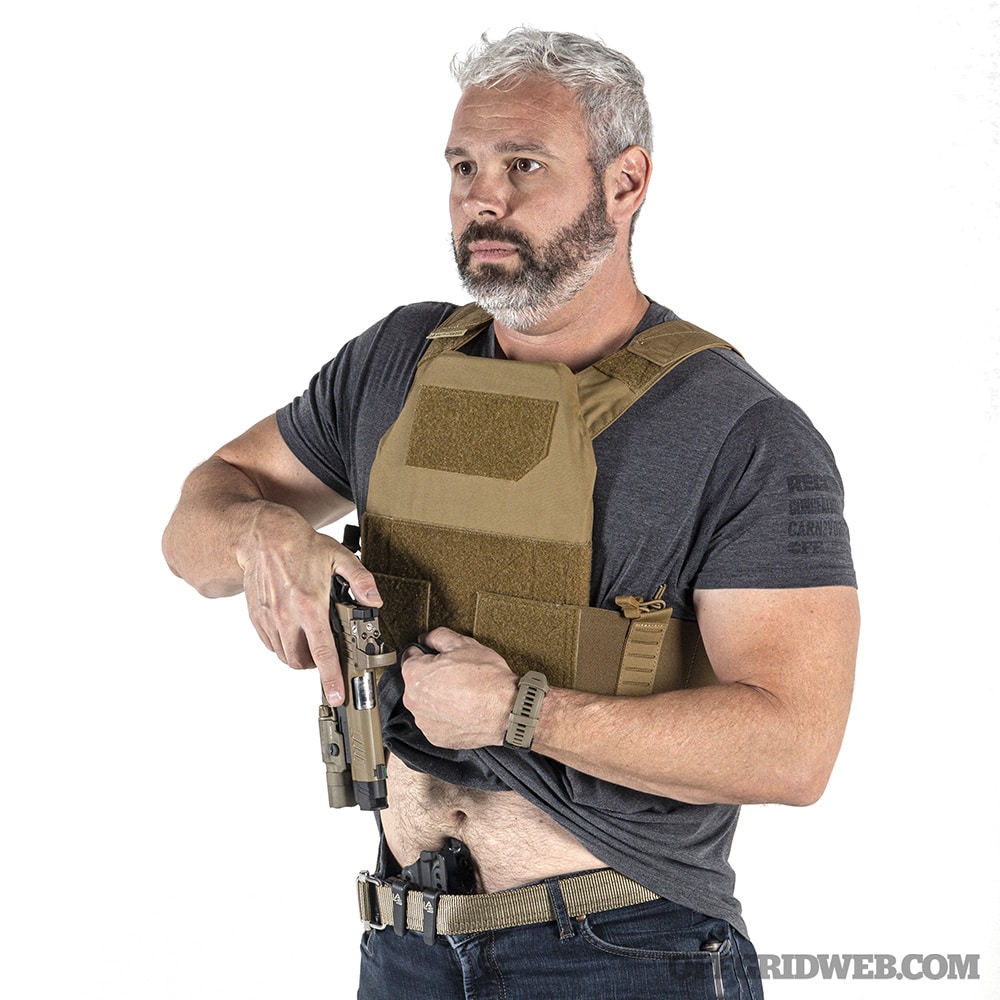
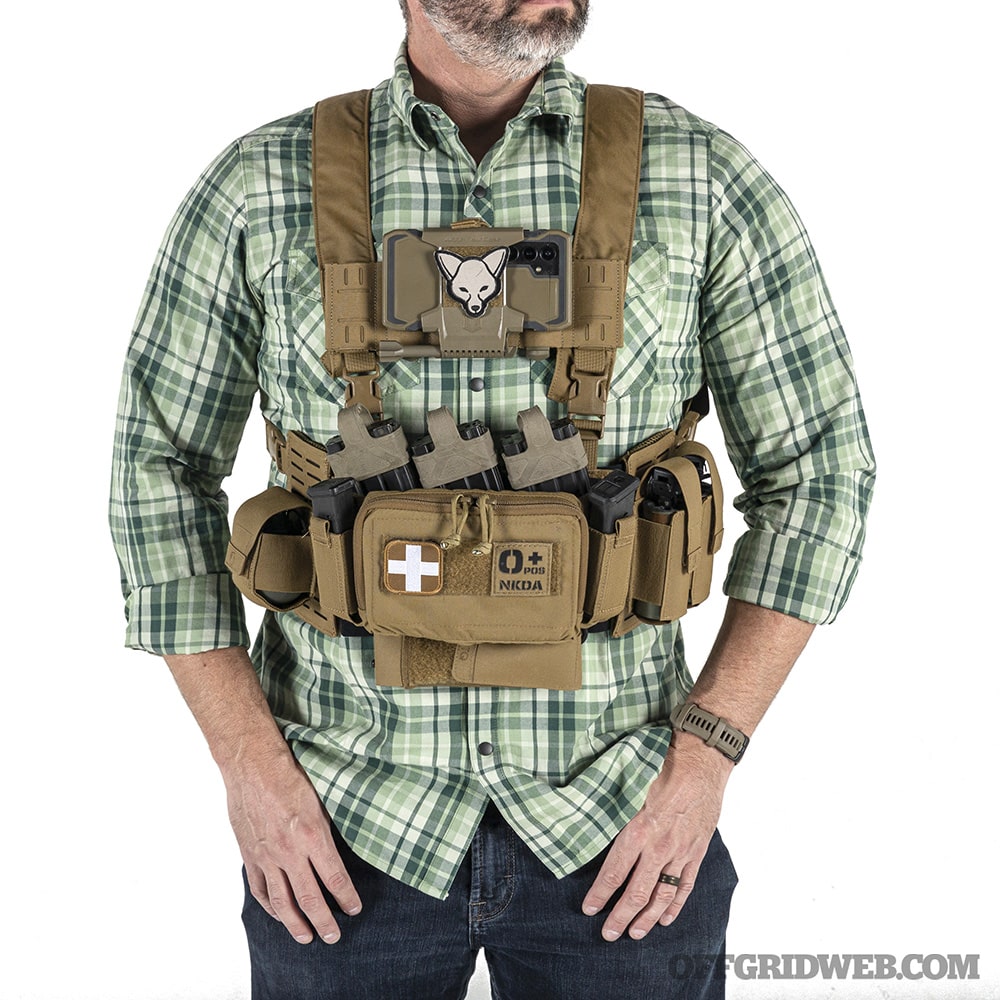
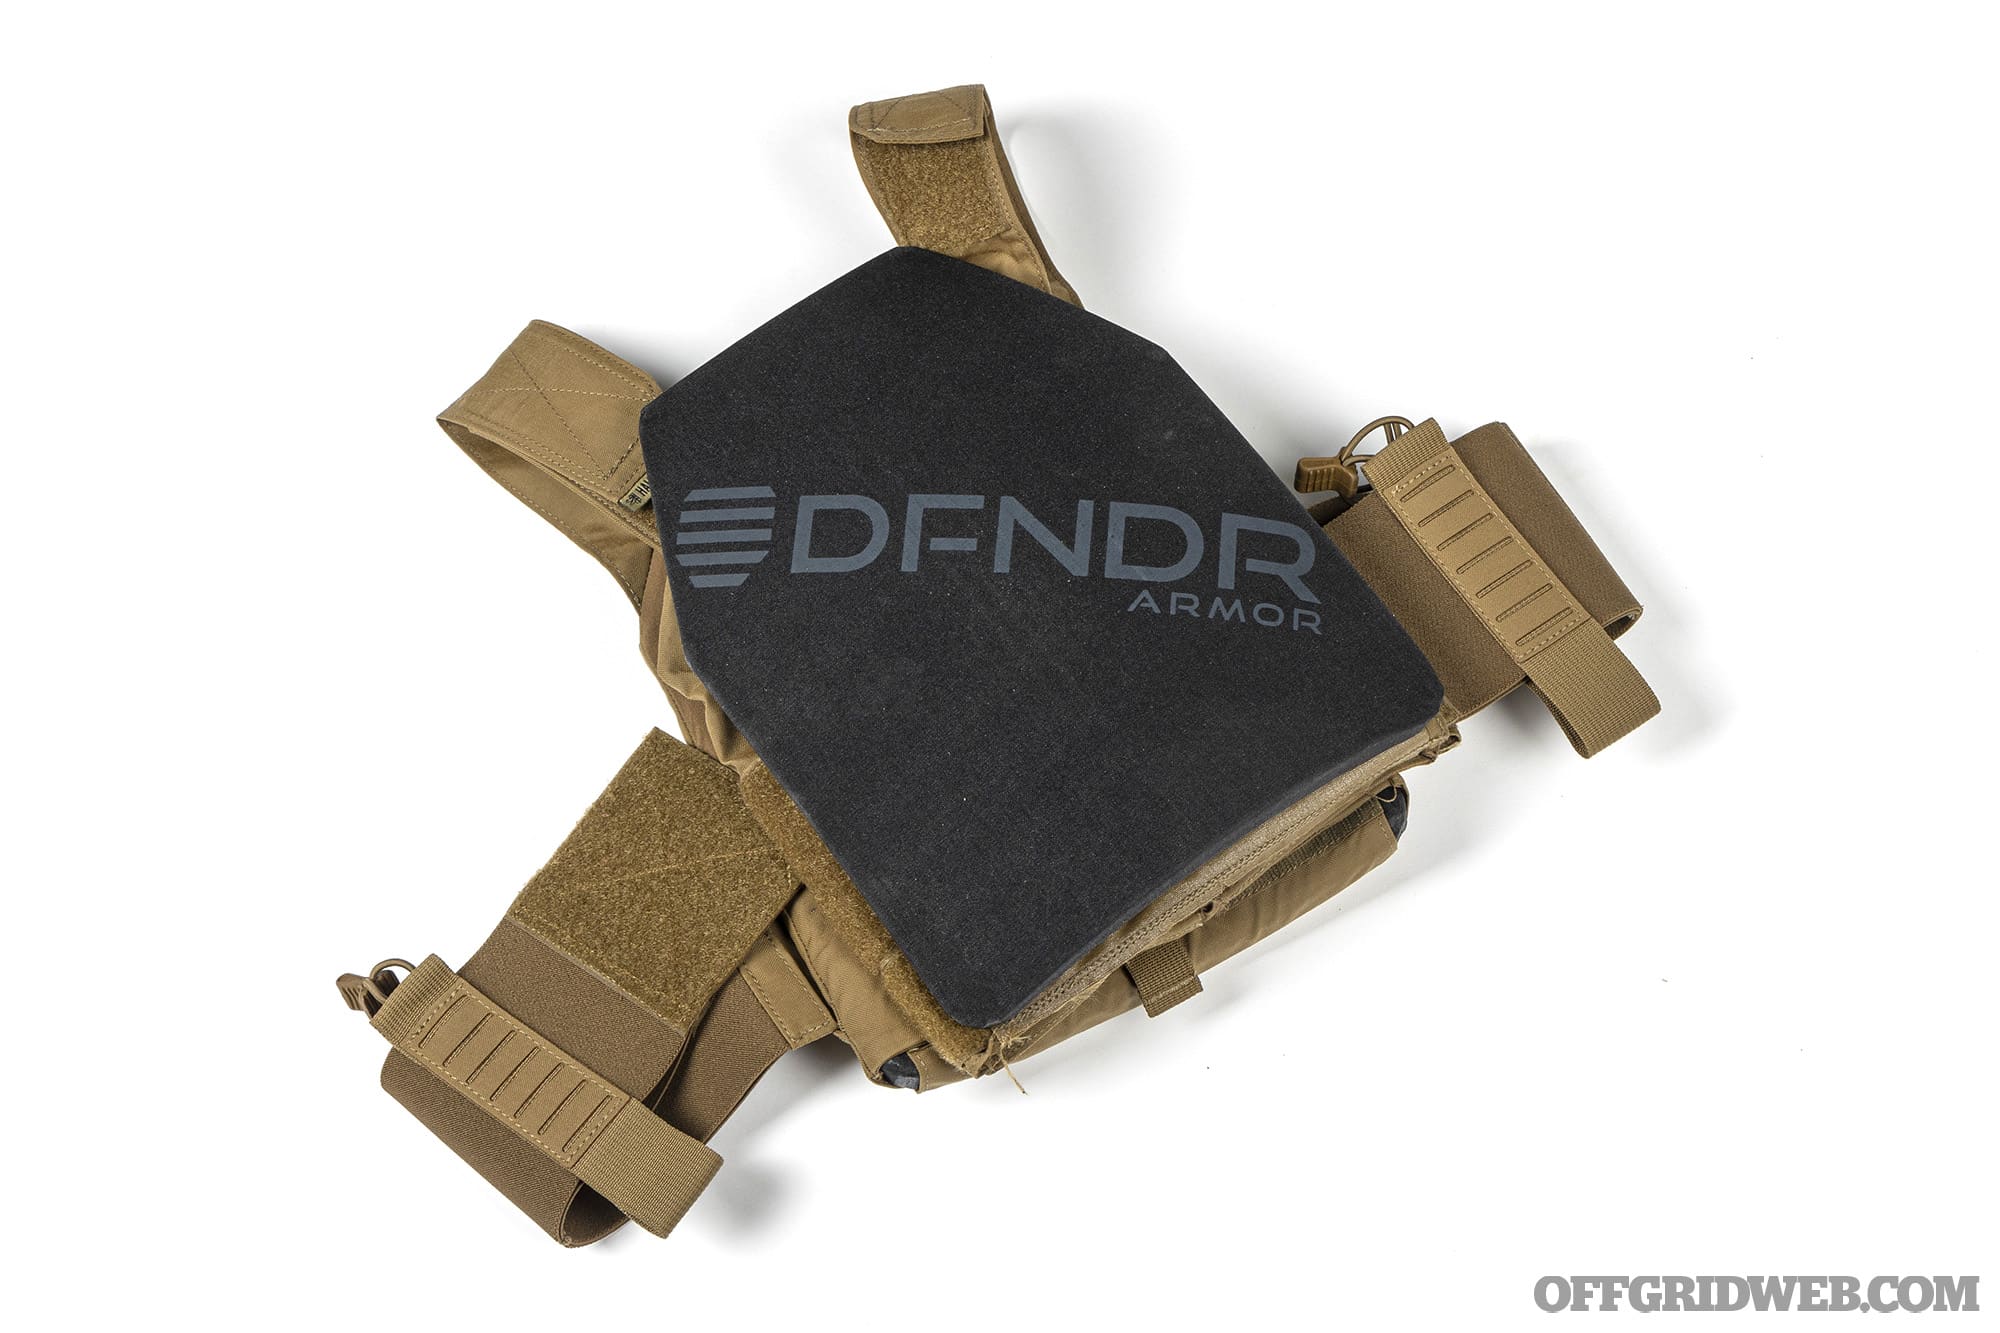
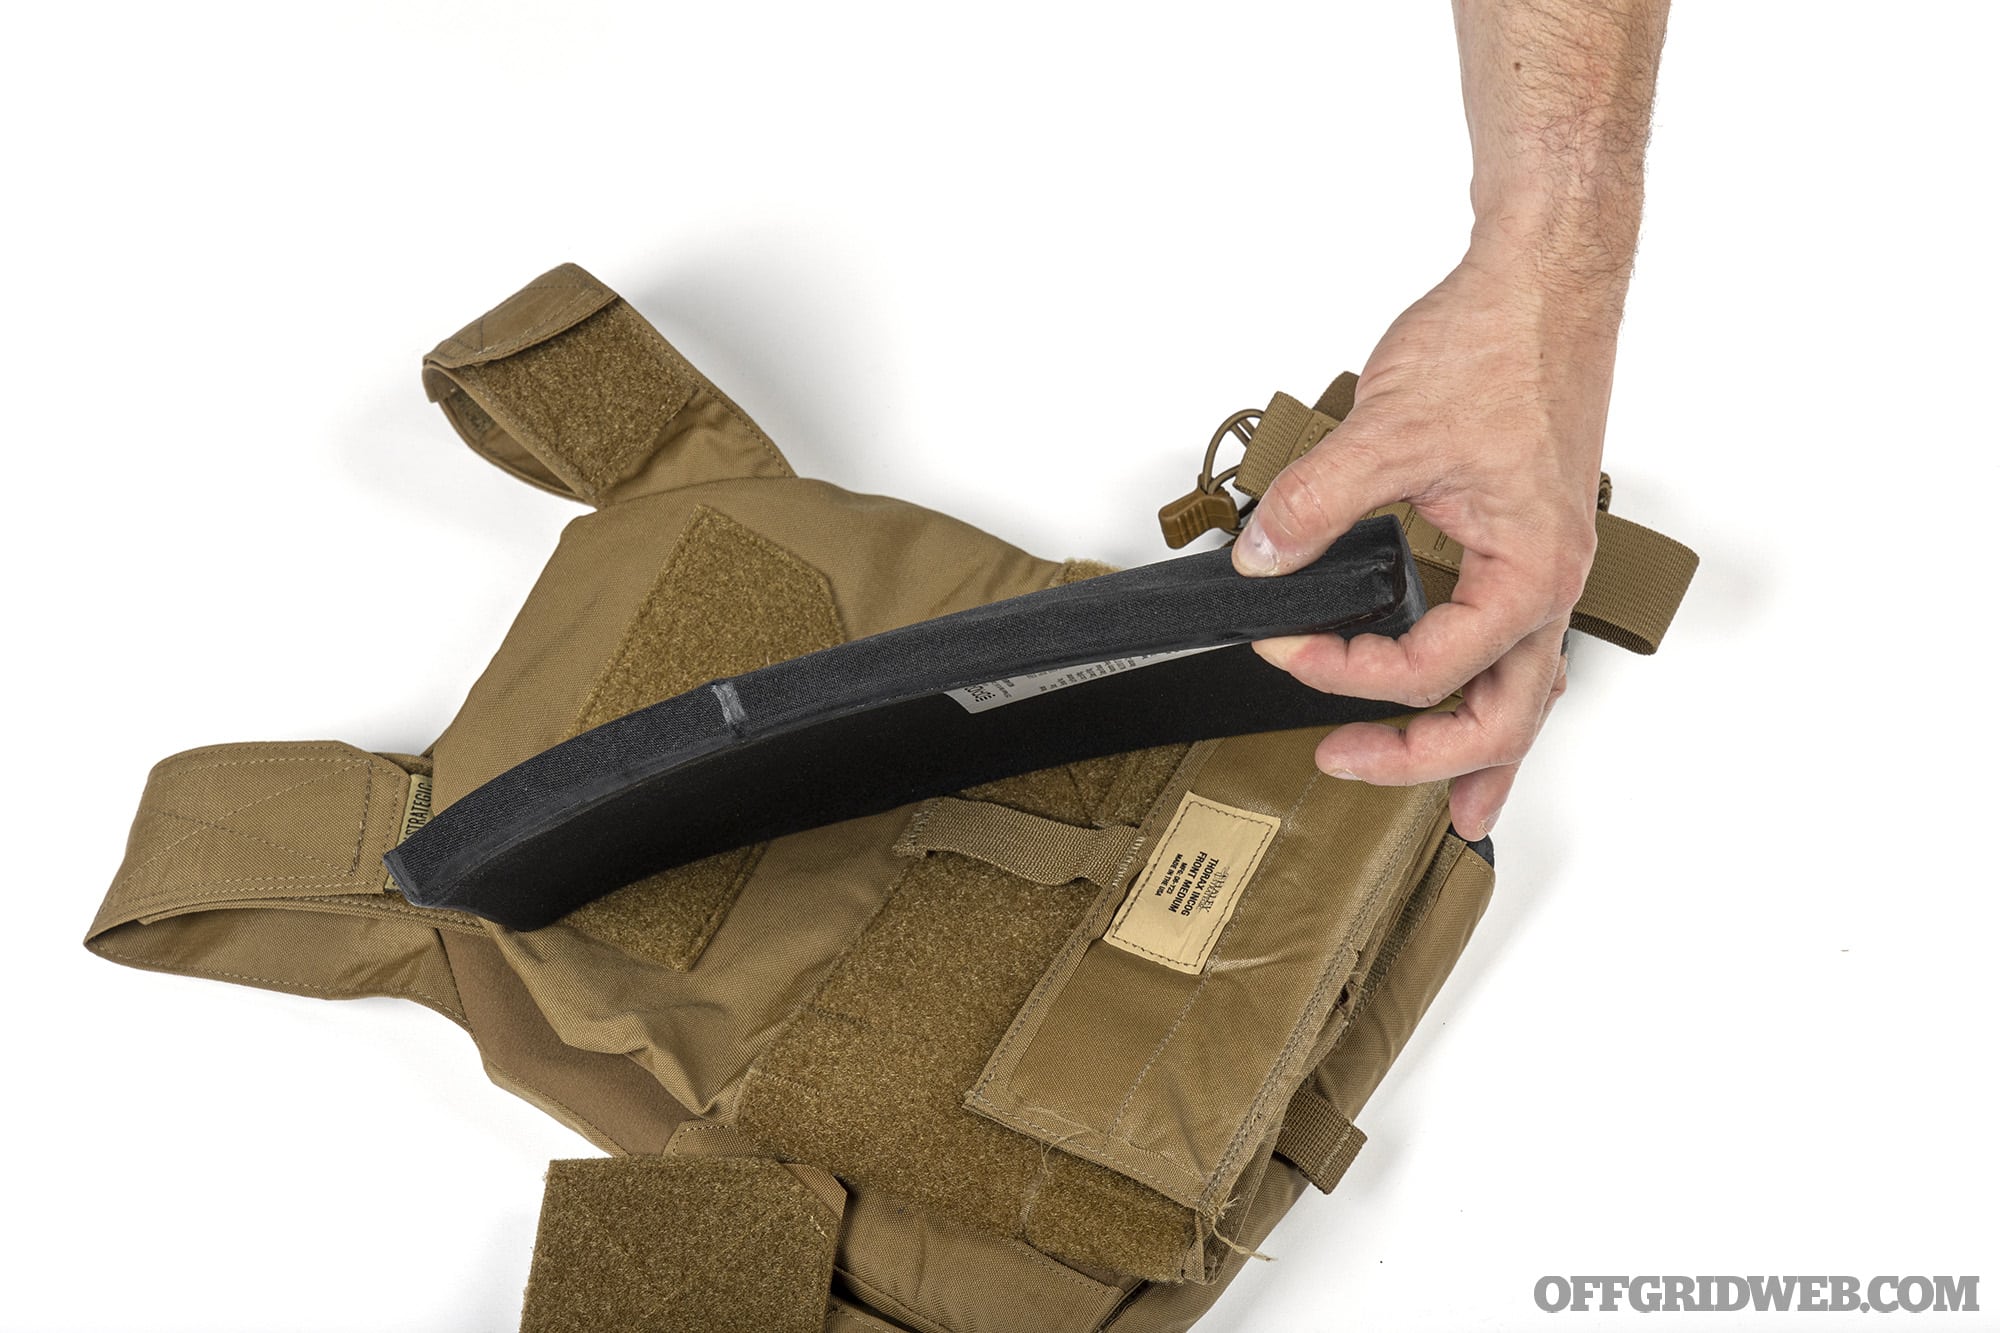
But being seen wearing armor…not so much. Throwing on a tactical plate carrier festooned with MOLLE webbing, buckles, and quick-release cummerbunds could itself escalate an otherwise tenuously calm situation. In such cases, a more discreet armor carrier is the best tool for the job, and Haley Strategic’s new Thorax Incog is one of the most versatile, low-visibility plate carrier we’ve come across in recent years. It’s truly slick (no MOLLE, no buckles) and form-fitting tweave construction allows you wear rifle-rated hard armor under all but the thinnest of shirts.
Ours is loaded with DFNDR Armor RF1 Elite plates. These plates will stand up to threats including 5.56mm M193 ball, 7.62x39mm Mild Steel Core, and 7.62x51mm NATO M80 ball. Even with this level of protection, the plates are only 0.75 inches thick and weigh a scant 2.09 pounds each. Not only will you not look like you’re wearing armor, you won’t move like it either.
Like armor, carrying a rifle in an urban environment is a highly personal decision and ought be considered thoroughly in terms of pros-versus-cons. But if you do choose to carry one, keeping it completely concealed is paramount for prepared citizens to steer clear of brandishing laws. Not only is it important that people don’t see your rifle, it’s also important they don’t perceive you to have a rifle. Simply sticking your carbine in your Multicam soft case can carrying it down the street won’t be enough.
The Grey Ghost Gear Apparition SBR bag is purpose built for short carbines, and deliberately designed to look like not-a-rifle bag. The slick exterior and waist belt design make it look more like a hiking pack than a gun case. The tan/green colorway shown here is by far the most tactical option they offer, but not out of place among trail junkies and camping enthusiasts in the Southwest. If this isn’t enough camouflage for your locale, there are several other colorways including more generic colors and brightly colored accents that most tactical bags wouldn’t be caught dead using – which is exactly the point. Even with its politically correct construction, the Apparition was able to comfortably fit our fully-decked out SBR, detailed below.
Rifle
Make & Model: Cobalt Kinetics CK-PRO 12.5-inch SBR with Scrambler Suppressor
We didn’t want to cheat the exercise by using an AR pistol or lightweight SBR with a LAW folder. The rifle shown here is a Cobalt Kinetics CK-PRO, in use by several law enforcement units around the country. The sample here is a 12.5-inch SBR with Rosco K9 barrel. The furniture is B5 Systems. Accessories include a Vortex Razor 1-6x LPVO and SPARC Solar red dot in an American Defense 1.7-inch Delta-M scope mount, foregrip, weapon light, and IR laser/illuminator. Our only shortcut was stowing it with a 20-round magazine instead of a standard capacity 30-rounder. But since we’re already carrying a full-size magazine, we felt it was allowable. That alone gives us a total of 50 rounds for our carbine, with pockets inside the Apparition bag for additional 30 round mags.
The muzzle device is Cobalt’s own RCB-6 brake, and will accept their Scrambler suppressor, which we also have stowed in the bag. The Scrambler titanium is an incredibly small, incredibly lightweight suppressor: 4.75 inches and 6.8 ounces total. While it’s not Hollywood quiet, it’s barely-there form factor can be quickly attached or detached, and can still protect your hearing and reduce your signature if you ever need it.
Low Vis Gear Conclusion
Are we advocating this complete setup as a practical solution for the average citizen? Absolutely not. But we are showing what is possible when you shop smart for gear and give just a little consideration to your wardrobe. We deliberately stayed within the confines of acceptable street dress for most areas, and were still able to carry a pistol, flashlight, hard armor, two knives, two med kits, 36 rounds of 9mm, and 30 rounds of 5.56mm on-body, before introducing the SBR bag.
Once the sole purview of military special operators, undercover cops, and executive protection specialists, the ability to carry the kitchen sink while still able to walk into the grocery store without causing a stir is now firmly in reach for anybody looking to bolster their capabilities to protect themselves or their loved ones in a crisis without looking like a partisan guerrilla.
An engineer, municipal worker, and a teacher walk into a campsite. No, this is not the setup to a joke, it's a testament to the range of people with diverse backgrounds who came from all over the country to participate in the PNW Survival Games. In the heart of Oregon's rugged wilderness, the Games offers a unique blend of education, competition, and camaraderie. This event, held this year at the scenic Hipcamp in Molalla Ripple, invited participants from all walks of life to test their survival skills in a series of intense, hands-on challenges. With nearly 40 contestants, esteemed judges from popular survival TV shows like Alone and Naked and Afraid, and experts from well-known survival training companies, the event offered a unique opportunity for anyone interested in honing their wilderness survival skills.
Above: Many of the participants had no prior survival training and felt a little nervous before the games started. However, they were optimistic and eager to learn!
The PNW Survival Games is open to the public, requiring nothing more than the purchase of a $395 ticket to participate. This accessibility, combined with the opportunity to learn from seasoned survival experts, is making it a must-attend event for both seasoned enthusiasts and curious beginners. This year, participants ranged from teachers and utility workers to retired engineers and even a former PBS correspondent, each eager to learn and push their limits in the wild. For those who are fans of survival reality shows, signing up asked participants if they want to be considered for inclusion a televised version of the Games, adding another layer of excitement to the mix.
Day 0: The Gathering
The first day of the PNW Survival Games was more about connection than competition. As contestants and staff arrived at Hipcamp Molalla Ripple, the atmosphere was relaxed and welcoming. There were no claims of expertise, no bravado—just a group of people united by a shared interest in survival skills. This was a gathering of diverse individuals, each with their unique background and experience level, coming together to learn, share, and grow.
The event’s experts, or subject matter experts (SMEs), were particularly passionate about sharing their knowledge. Their enthusiasm was infectious, setting the tone for the days to come. Despite the relaxed atmosphere, there was a palpable undercurrent of excitement as everyone anticipated the challenges that lay ahead.
Above: Contestants signed terms of agreement before participating, and were issued crucial items for the days ahead.
Day 1: The Challenges Begin
Day one of the PNW Survival Games kicked off the morning with introductions and backstories, allowing contestants to get to know one another and the experts they’d be learning from. Contestants also received everything they would be allowed to use over the course of the two days. This included:
Length of Medical Tubing (for the First Aid Challenge)
All of these items were placed into a pack that would be carried throughout the duration of the challenges, and were meant to mirror common survival items that are frequently carried by recreationalists and adventurers versed in their use. With gear distributed, and introductions out of the way, the Games began with the first challenge!
Above: Each contestant was issued a backpack full of gear that would be crucial to completing the challenges over the next two days.
Criteria: shelter must be weatherproof, have bedding material, and have side walls
Phase 2 (no time limit): test weatherproofing via fire hose
Led by Dana Anderson (aka “Wild Mountain Man Dan”), the shelter-building challenge was an exercise in resourcefulness and quick thinking. This challenge began with an introduction to the “Rule of Threes”—a survival principle that emphasizes the importance of addressing critical needs within specific time frames. Peter Bauer of Rewild Portland added his own twist: “Three seconds to check your attitude,” stressing the mental aspect of survival. From there, Dan moved on to discuss the importance of shelter in a survival scenario, particularly the need to mitigate exposure to the elements.
Above: Two contestants lash sourced timber together for the frame of their shelter.
The rules for the challenge were simple but demanding: contestants had 60 minutes to build a weatherproof shelter using only natural materials found on the ground. The scramble for materials was immediate and intense, with contestants racing to claim the best resources along a short stretch of the riverbank. The pressure was on, and as the midday sun beat down, temperatures soared into the mid-80s, adding another layer of difficulty to the task.
When time was up, contestants were required to step away from their shelters and prepare for judgment. Exhausted and overheated, they took a short water break while the judges evaluated their work. The shelters, constructed from leaves, branches, and other natural materials, were put to the test in a dramatic fashion. One member from each team donned a dry orange jumpsuit and lay beneath their shelter as a fire hose pumped water from the nearby river in an overhead manner that resembled a heavy downpour. The goal was simple: stay dry.
After 15 seconds of the shelter being drenched by the hose, the jumpsuits were removed and weighed to determine how much water they had absorbed. This practical test of the shelters’ effectiveness highlighted the importance of proper construction and attention to detail in survival situations.
Above: Foliage needed to be stacked thickly to prevent water from getting inside during the weather proof test.
Criteria: must build 6 arrows, a bundle bow, and a slingshot bow
Phase 2 (no time limit): hit rotating targets, hit a moving target, hit a stationary target
The second challenge of the day focused on archery, with EJ Snyder from Naked and Afraid leading the way. EJ’s expertise in primitive weaponry was evident as he demonstrated the use of a bundle bow and shared tips on arrow-making and the construction of a slingshot bow. The rules for this challenge were equally demanding: contestants had 60 minutes to craft six arrows, a bundle bow, and a slingshot bow. Some materials, like fletching and river cane for arrows was provided. Other materials had to be sourced from the landscape and provided gear. Arrowheads were available via Grim Workshop survival cards included in each of the contestants kits.
Above: River cane with a larger diameter than the arrows was used as the “barrel” for the slingshot bow.
The archery challenge was divided into three stations, each testing different aspects of the contestants’ skills. At the first station, they were tasked with shooting at five spinning balloons, earning one point for each balloon hit. The second station involved a side-to-side moving target, with contestants needing to hit the target once to earn five points. The third station featured long-range shots at large balloons filled with colored powder, with points awarded based on the order of successful hits.
Above: Orange balloon targets were rotating on a spindle, providing an additional layer of difficulty to the challenge.
Despite the challenge’s intensity, the contestants impressed with their resourcefulness. Even though some arrows weren’t perfectly straightened, they still managed to hit their targets. The Games are not without danger, as the first injury of the event occurred during this challenge. One contestant, attempting to meet the time constraints, lost his concentration and suffered a minor knife wound while constructing their bow and arrows. Fortunately, the injury was not serious and was quickly tended to, underscoring the real risks involved in survival activities.
Above: Although minor, this contestant injured his thumb while losing focus crafting his bows and arrows.
Criteria: build a tripod, start a fire, boil water
The final challenge of the day revolved around a skill essential to survival: fire-making. Sharon Ross of Afrovivalist took the lead, emphasizing the evolutionary importance of fire in human history. She demonstrated how to start a fire using a gum wrapper and an AA battery, a technique that fascinated and challenged the contestants.
Above: Starting a fire with AA batteries and chewing gum wrapper is challenging but possible if prepared properly.
Rules for this challenge were straightforward but challenging, contestants had 60 minutes to build a tripod that their fire would be made underneath, gather tinder and kindling, start a fire using the gum wrapper method, and heat a plastic bottle of water to 210 degrees Fahrenheit without it melting or spilling on to the flames. If they failed to start a fire with the gum wrapper within 15 minutes, they could switch to using a ferro rod. And finally, after heating their water to boiling temperature, they had to use a second tinder bundle and light a tiki torch as part of the process.
Above: If suspended carefully, water can be boiled in a plastic container without the exterior melting completely.
After fires were lit and water was boiled, the sense of accomplishment was, with everyone finishing the challenge with 7 minutes and 30 seconds left on the clock. The tiki torches were later used to light the dinner tables, adding a warm and symbolic glow to the evening’s meal—a pig roast that had been cooking over an open fire all day. After dinner, contestants were encouraged to pick the brains of the guest judges, gaining further insights into survival techniques.
Day 2: Pushing Limits
The second day of the PNW Survival Games began with a discussion led by Wild Mountain Man Dan on the origins of the self-reliance movement, tracing its roots back to the Back to Basics movement of the 1970s. This historical context set the stage for the day’s challenges, which would push the contestants to their physical and mental limits.
Above: Pulling a patient on an improvised litter is laborious and physically exhausting, even over relatively short distances. The hot weather made for tough conditions for the the participants.
Criteria: stop the bleed, close the wound, splint the fracture, carry patient to safety
Natalie Bonthius from Survival Med delivered an in-depth session on wilderness first aid and first responder skills. She covered a wide range of topics, from the first evidence of amputation 30,000 years ago to modern techniques for bleeding control. Natalie emphasized the importance of the MARCH Protocol—Massive Hemorrhage, Airway, Respirations, Circulation/C-Spine, Hypo/Hyperthermia—as a guide for prioritizing care in emergency situations.
Above: Fake blood, suspended in an IV bag, was used to replicate a major hemorrhage. The bleeding needed to be stopped via improvised tourniquet before contestants could move on to the next part of the challenge.
The challenge that followed required contestants to apply these skills in a simulated emergency. They had 60 minutes to stop a bleed stemming from a fake blood pouch, close a wound with duct tape sutures, splint a leg with improvised materials, and transport the “patient” to safety using an improvised litter. This challenge brought out the best in the contestants, but also highlighted the harsh realities of survival. One contestant suffered from heat exhaustion and had to withdraw, a stark reminder of the physical demands of the environment.
Above: Contestants were taught how they could use duct tape to suture a wound without actually have to penetrate the skin (wound was simulated).
Despite the difficulties, the challenge was a success. Contestants showed resilience and adaptability, learning valuable lessons about the importance of preparedness and the risks involved in wilderness survival.
Criteria: dig a pit, build and set the trap, test the trap, camouflage the hole, catch a bear
Next up was the trap-building challenge, led by Biko Wright from the History Channel’s Alone – Season 8. Contestants were tasked with constructing a spring-step trap, a traditional snare used to catch small game. The rules required contestants to dig a step hole measuring 12 inches by 12 inches by 12 inches (later revised to 6 inches deep due to soil conditions), camouflage the hole, set the trap, and successfully catch an “animal”—in this case, a stuffed teddy bear.
Above: Spring traps are effective at catching small game, or in this case, a careless teddy bear. Being able to procure valuable food resources is a vital survival skill.
This challenge tested not only the contestants’ technical skills but also their patience and attention to detail. Setting the trap and camouflaging it effectively was no easy feat, and many contestants struggled to get the trigger mechanism just right. However, the satisfaction of successfully suspending the teddy bear at least four feet above the ground made the effort worthwhile.
Above: Setting a snare trap can be frustrating, even for experienced trappers. Getting it done within a 60 minute time frame is nothing short of impressive.
Challenge 6: Raft Building
Time: 60 minutes
Instructor: EJ Snyder, Biko Wright, and Wild Mountain Man Dan
Criteria: build a one person raft
Phase 2: collect 6 streamers along a length of river and cross the finish line
The final challenge of the event was the raft-building competition, which required teamwork, creativity, and resourcefulness. EJ and Karie Lee from History Channel's Alone, were leading the charge, and discussed the basics of a “Huck Finn” style raft. Teams were combined (two teams per raft), and given 60 minutes to construct a one-person raft using materials from the shelter-building challenge.
Above: Wild Mountain Man Dan offers suggestions to teams with questions, but as an instructor/judge, he is unable to help them physically.
They were also given two 5-gallon jugs and a blue tarp to use wherever teams deemed appropriate. The rafts were judged on buoyancy, craftsmanship, and maneuverability, and contestants had to use their rafts to retrieve flags hidden in the river and on the distant shore. Once they returned, they had to carry their rafts a short distance to the PNW Survival Game’s finish line, and to triumphant celebration!
Above: Combined teams did not have much time to discuss how to design and build their rafts. This meant using some serious teamwork and problem solving skills.
The raft-building challenge was a fitting conclusion to the PNW Survival Games, bringing together all the skills and lessons learned over the past two days. As contestants tested their rafts in the water, it was clear that the designs were both innovative and functional. The excitement was palpable as teams navigated the river, retrieved their flags, and returned to shore, showcasing their survival skills and teamwork.
Above: The improvised rafts did not always hold up the way the contestants wanted them to, making navigation through the river extremely difficult.
Winners and Rewards
The PNW Survival Games culminated in the announcement of the top three teams, who were recognized for their outstanding performance throughout the event. The third and second-place winners both earned 41 points and the judges were asked to evaluate the nuances of their rafts to break the tie. Remarkably, one member of the second place team, a retired municipal worker, had never even been camping a day in his life and had purchased his gear just two weeks prior to the event. The first-place winners, with 45 points, attributed their success to their meticulous preparation, including practicing challenges from previous years and maintaining an organized approach to their gear. As one of the winners noted, “You never rise to the occasion, you sink to your lowest level of training.”
Above: Once the rafts were out of the water, the contestants had to carry them a short distance over the finish line. They were met with enthusiasm and encouragement along the way.
Winners of the PNW Survival Games received a generous prize cache for their efforts:
3rd Place: – $250 Cash Prize – 20 L ORCA Cooler – 40 L Outlast Supply Co Drybag – Outdoor Element: Pot Set – PNWBushcraft: Waxed Canvas Travel Tray – Survival Med All Access Pass to Online Catalog
2nd Place: – $500 Cash Prize – 40 L ORCA Cooler – 40 L Outlast Supply Co Drybag – Outdoor Element: Pot Set & Windproof Stove – PNWBushcraft: Waxed Canvas Foraging Hip Bag & Waxed Canvas Cedar Bucket Bag – Survival Med All Access Pass to Online Catalog
1st Place: $1,000 Cash Prize 58 L ORCA Cooler 40 L Outlast Supply Co Drybag Outdoor Element: Pot Set, Windproof Stove, & Basecamp Bliss Bundle Blackbeard Firestarter Pirate Plunder Kit PNWBushcraft: Waxed Canvas Ground Cloth, Hammock Chair, & Waxed Canvas Foraging Hip Bag Survival Med All Access Pass to Online Catalog
Above: The first team from the raft building challenge crosses the finish line, making them the first to complete the 2024 PNW Survival Games.
Reflections and Insights
As the PNW Survival Games came to a close, it was clear that the event had left a lasting impression on all who participated. Contestants were eager to share their thoughts and experiences, reflecting on the challenges they had faced and the skills they had acquired.
Above: Teams who placed in the top three were awarded custom made PNW Survival Game plaques.
One contestant remarked, “I never realized how much I didn't know.” Another noted, “I feel much more confident being self-reliant in the wild.” These sentiments were echoed by others who praised the practical, applicable skills they had learned, particularly during the medical portion of the event. “You don't realize how much time it takes to complete one of these skills,” a contestant observed, which speaks to the importance of practice, preparation, and patience necessary to master these skills.
Above: Todd from PNWBushcraft watches the participants of the Games as they build their bows and arrows. Aside from presence of sponsors, contributors and a busy camera crew, spectators were also invited to attend to cheer on their contestants.
Many participants expressed their intention to return next year, with many planning on bringing friends. The sense of accomplishment and the confidence gained from the event were evident in their words. “I learned so much practical, applicable skills from the medical portion. I feel much more confident being able to help others or myself,” one participant said, which seemed to be the overall impact of the event among contestants.
Above: Nothing builds the bonds of friendship quite like a shared obstacle to overcome. Everyone who attended left the 2024 PNW Survival Games with new friends and new stories to share around their next campfire.
Final Thoughts
Despite some minor setbacks—understandable for an event in only its second year—the PNW Survival Games proved to be an accessible and invaluable experience for anyone interested in survival skills. It offered a unique opportunity to learn and practice these skills in a supportive environment while also providing a platform for participants to meet TV personalities and potentially pursue their own path in the survival community. For those who participated, it was an unforgettable experience that left them better prepared to face the challenges of the wild—and eager to return for more.
Special Thanks
This event would not have been the success it was without the hard work of LeeAnn Peniche holding down base camp, and all of the sponsors, vendors and contestants chipping in to help. We are also grateful for the timely response of the Molalla First Responder crew who came to help the contestant who suffered a heat injury.
Above: Molalla First Responders arrived in short order to assist with a heat injury. Their presence added a layer of comfort knowing they were nearby and ready to help.
Read More
Subscribe to Recoil Offgrid'sfree newsletter for more content like this.
It could be argued that warfare is a telegraph of the societies engaged in it. Despite the continued conventional conflict in places like Eastern Europe and Southwest Asia, much of the rest of the world is looking at asymmetric threats that require a more refined response. Whether it’s protecting the Olympic Games or the president’s life, being adaptable to threats that don’t require MultiCam and machine guns has become critical to any defense plan — including those of prepared citizens. Two years ago, Haley Strategic Partners launched their Thorax Plate Carrier. It’s a product still on par with market trends: a compound of Velcro and MOLLE that minimizes bulk while accepting a diverse array of clip-on placards with the traditional pair of pinch-buckles mounted to the front of the concealable plate carrier. Multiple placard options, plus multiple cummerbund and side-entry options made the Thorax a heavy-duty, low-bulk option for everyone from prepared citizens to professional end users.
Above: The slender plate carrier disappears beneath this 5.11 Tactical Gunner plaid flannel shirt and would be easy to conceal under a jacket or sweatshirt.
This year, HSP announced a new iteration of the concept they’re calling the Thorax Incog that’s aimed squarely at low-profile use cases. Every design feature of the Thorax Incog is purpose driven and meant to provide users with the lowest-possible signature while still being scalable to carry a fighting load. The Thorax Incog starts with plate bags made from 500D Cordura and stretch Tweave. While the original Thorax included heavier, padded, thermo-formed backing and technical laminates to sustain a heavy load over time, the simpler construction of the Incog variant is meant to hug both your plates and your body with a glove-like fit. It should actually form to your body over time if you wear it enough. But this glove can quickly turn into a gauntlet with just a few quick additions to the carrier. More on that in a minute …
Slicked Down
The front bag has two fields of loop material, a large one for attaching a triple-rifle-mag TRMP Incog panel, and a smaller chip-shaped one up top for patches — whether you’re running a police placard, American flag, or just your favorite morale patches. The rear bag also has a small loop field up high for patches or placards. The cummerbund is attached by inserting it into a pass-through sleeve sewn into the back of the carrier. Once it’s in place, press down on the hook-and-loop and you’re good to go. The Incogspecific cummerbunds that come with the Incog are elastic, and each side features a single cell that can hold a rifle mag, radio, small med kit, or other accessory. The sleeve has a single row of laser-cut PALS slots on the outside if you want to attach a small pouch. If you need more or different side support, the Thorax Incog is compatible with all existing Thorax cummerbunds, including their Chicken Strap, Side Entry System, and side-plate-bearing PALS cummerbunds.
Above: The Thorax Incog is made in the USA from U.S. materials in a variety of solid colors and MultiCam patterns. Cummerbunds are sold separately, allowing the user to choose their preferred style.
The aforementioned TRMP Incog is a variation of the existing Haley Strategic Triple Rifle Magazine Placard. The difference lies in the attachment system. When designing the Thorax Incog, HSP received feedback from SOF personnel that while they did want modularity, they wanted the slicked-down configuration to be as slick as possible. That meant no buckles or G-hooks on the front bag that would protrude when wearing the carrier concealed under plainclothes. The result is what the HSP team calls TabLoc. The front of the plate carrier has two narrow channels sewn into it — one at each outside edge. The TRMP panel itself has a corresponding pair of long, thin, reinforced nylon tabs that slide into the channels before the hook-and-loop is pressed to lock everything together.
Bulked Up
Bulking up the Thorax Incog is quick work, if your use case requires it. Conventional wisdom might scoff at the idea of taking a plate carrier designed to be low-visibility and then building it out to run as a high-profile rig with full combat load. But there are advantages to this. First and foremost, because of the intention for it to be lowpro, the Thorax Incog has a much snugger, glove-like fit to the body. The plate bags hug the plates tighter and the carrier hugs you tighter. So even when you pile on placards and pouches, the Incog variant still sits closer to the body. For prepared citizens — who are not running 12-hour missions laden down with grenades and multiple radios and enough ammunition for a protracted gunfight — the extra padding can be foregone for a more bespoke fit that will be just as comfortable in most situations. This also has the benefit of a carrier that can strip down slim enough to fit under a hoodie or flannel.
Above: The fastest way of scaling up this slick plate carrier is to put on a kitted-out chest rig over it. This is known as patrol configuration.
The second is increased adaptability if you do choose to bulk up. Within the Haley Strategic ecosystem alone, there are multiple ways to scale up the Thorax Incog. If you have added the TRMP Incog panel to the front of your carrier, and that’s not enough extra capacity, you can add on the Auxiliary MOLLE Panel. The AMP is simply a hook-and-loop wrap that completely engulfs the TRMP. Now you can carry three rifle mags, plus whatever you can fit onto the six rows of laser cut MOLLE slots. If that isn’t enough, you can add a hanger to the bottom of the carrier, by sandwiching in the hook-and-loop between the back of the TRMP and the front of the plate carrier. HSP offers multiple hangers including MOLLE panel variants, the Multi-Mission Hanger, which is a general cargo pouch that can be adapted to carry different types of items, or the 5-Banger Hanger, which is a purpose built hanger that holds five 40mm rounds in elastic loops.
Haley Strategic also has “wing pouches” that hang off the edge of the carrier, tucked behind the cummerbund, that will hold military grade radios if you need communications. We’ve seen wing pouches from other manufacturers that hold everything from knives to tourniquets to (even) more magazines. Adding pouches onto the cummerbund is also an option.
The only potential issue with scaling your carrier up with all these attachments is, if you want to go back down to a slick configuration, it’s going to take a few minutes to manually remove each component. Switching on the fly or in the middle of a protracted crisis is less than ideal, especially if you’re somewhere other than your garage (where we presume you have a plastic tub to store all your nylon “parts and pieces” just like we do).
The Middle Ground: Patrol Ready
The alternative is a setup sometimes referred to as “patrol configuration,” where you simply keep your plate carrier completely slick all the time and don a separate, pre-loaded chest rig over it when more gear is needed. That term comes from situations when special operations units have to infiltrate their target area on foot — through jungle or over mountains — and then engage a specific objective through direct assault. Because plate carriers trap body heat and can be highly uncomfortable with a heavy rucksack on top of them, these teams would keep a slick plate carrier in their pack while hiking through harsh terrain. But they still wear standalone chest rigs to have ammunition, first aid, and comms within arms’ reach if they get attacked on the move. When the team reaches its specific target, they pull those plate carriers out of their rucks, put the chest rigs on over top of them, and now have body armor to protect them during the deliberate assault.
Above: In slick configuration, the Thorax Incog with DFNDR plates still allows unimpeded access to your AIWB draw.
This approach holds good value for prepared citizens. For those living in urban or suburban areas, wearing a plate carrier with nothing attached to it, easily concealed with street clothes, allows you personal protection when moving through high-risk neighborhoods, or when civil unrest begins to escalate. You may need to move through dangerous areas without making yourself a target by appearing as if you showed up to participate. But if you wind up in a situation where having at least a basic self-defense loadout accessible and in the open is advantageous, you can slip your chest rig on over the armor and street clothes.
Above: The TRMP panel with AMP can be quickly added via the unique Tab- Loc system.
The reverse is also true. Folks living in rural areas who may be concerned with protecting a ranch or other larger property might not need plates very often but may want a chest rig and rifle handy when checking their property lines in a vehicle, on an ATV, or even on horseback. A small chest rig like HSP’s D3 Micro, shown in the photo below, can stow almost anywhere — under a car seat, in a saddlebag, even inside a backpack or messenger bag where it’s quickly accessible but completely hidden until needed.
The State of The Plate
Much like night vision or AR-pattern carbines, your kit must be looked at as a system. The armor plates are one component of that system and not all plates will work with all carriers. We initially had some trouble finding plates that fit the Thorax Incog. We have Level III+ plates from multiple manufacturers that would not fit this carrier, on account of being too thick (1.1 to 1.2 inches). Because the Incog is meant to be a low-profile carrier, the bag sizing is biased to thinner plates. Since we did not have any plates on hand that fit properly, the team at Haley Strategic directed us to DFNDR Armor, the brand they carry and use.
The folks at DFNDR were very responsive and incredibly helpful, sending over a set of their new RF1 Elite plates. Plate thickness and weight are usually a balancing act against cost and protection level. Rifle-rated plates can be had for 5-ish pounds per plate, but they’re typically over an inch thick. You can get them thinner, but then you’re relying on more ceramic in the construction, which can make them closer to 8 pounds per plate. But thinner, heavier plates can be cheaper. Protection levels being (relatively) equal, you typically wind up at a decision point that looks like this:
Lightweight
Thin
Inexpensive
Pick two.
In the case of DFNDR’s RF1 Elite, you’re getting the first two in exchange for the third. These stand-alone plates require no soft armor backer and are tested to the NIJ’s new armor rating protocol, which classifies rifle-rated armor into three categories. The lowest level, RF1, is required to stop the following threats:
5.56x45mm NATO M193 ball (55-grain FMJ)
7.62x51mm NATO M80 ball (147-grain FMJ Steel Jacket)
The DFNDR RF1 Elite plates are rated to stop all of these threats while measuring only 0.75-inch thick and weighing in at an astonishing 2.09 pounds per plate for a medium SAPI cut. Prices range from (brace yourself) $1,390 to $1,730 per plate, depending on size — no small financial feat, for sure.
But what you’re paying for is the ability to have rifle level armor protection that is thin enough to wear under almost any shirt and light enough to wear all day. The adage buy once, cry once might hurt your wallet for a couple of months but will ensure that you have a piece of cutting-edge protective equipment that will serve you well, and do so comfortably, for years to come.
Total Package
Due to its simplified design, the Thorax Incog Plate Bags ($125) and cummerbund ($60) are nearly $100 less than the original Thorax plate bags by themselves ($270). If you need the additional load-bearing properties of the latter, it’s money well spent. But if your job or preparedness plan are built around concealability and scalability, the Incog variant will save you some money which can be conveniently spent on accessories. In fact, at $95, the TRMP Incog placard is almost exactly the price difference between the two Thorax models.
We’ve seen a lot of really great plate carriers. Some are bombproof workhorses meant to haul a platoon’s worth of gear. Others are ultra-minimalist with zero load carriage whatsoever. Others attempt to be a jack-of-all-trades but don’t perform in either category with true excellence. The Haley Strategic Thorax Incog may be the first one we’ve come across that scales up and down with real seamlessness. In base configuration, it’s truly slick but can be built up to a level that allows it to punch way above its weight class against more complex, much more expensive plate carriers. If you don’t yet have a hard armor setup in your gear locker, or you think it’s time to refresh your kit to keep up with current advancements, we almost guarantee the Haley Strategic Thorax Incog can be made into your goldilocks fit, regardless of use case or occupation.
Getting started in the world of firearms can be overwhelming. Sure, there are countless videos, blogs, and books out there, but there are also a lot of conflicting opinions, and sadly, a great deal of misinformation. As someone who aspires to become a more proficient pistol shooter, it was tough to find a reliable source to learn from. Fortunately, I was advised to check out Modern Samurai Project (MSP), a business with a world-class lead instructor who prides himself in getting shooters who are new to red-dot-equipped pistols up to speed quickly. And, as fortune would have it, MSP founder and lead instructor Scott Jedlinski was headed to the nearby Richmond Rod and Gun Club to teach his flagship class: Red Dot Pistol Fundamentals and Performance.
When I first signed up for Scott's 2-day class, I wasn’t entirely sure what to expect. My experience with handguns was limited to rudimentary training with a standard-issue 9mm Beretta during my military service and occasional range visits with my personal handguns. Formal performance training was foreign to me, and the idea of mastering a red dot-equipped pistol in two days felt daunting. However, I was eager to learn, and Scott’s reputation in the industry made this an opportunity I couldn’t pass up.
Above: Scott Jedlinski, AKA “Jedi”, applies the discipline he acquired learning martial arts to his passion for performance shooting.
The Instructors
Scott Jedlinski, the mastermind behind this course, is a force to be reckoned with in the world of tactical training. A lifelong martial artist with a Master class shooter rating in USPSA, Scott brings a wealth of experience to the table. With hundreds of hours of training under some of the industry’s best, his expertise spans from self-defense to competition shooting. His Brazilian Jiu-Jitsu brown belt, earned under Tony Passos and Vicente da Silva Jr., adds another layer of discipline to his teaching approach. Scott’s resume isn’t just for show — his classes have been sought after by elite organizations including Pentagon ERT, US Marshals, FBI National Tactical Training Unit, and multiple SWAT teams across the country. His primary focus in this course was on the red dot-equipped pistol, an increasingly ubiquitous tool for carry weapons.
This course was elevated further by assistant instructor AJ Zito of Practical Performance. AJ also has Master class shooter rating with the USPSA, is a U.S. Army combat veteran, and spent several years working in the private security and executive protection sector. Over the years, he has turned his passion for firearms into a career, first earning a gunsmithing degree, and later founding his own instruction company. For more on Zito's background, check out Recoil's interview with him in Issue 67.
Above: The course was intense and fast paced, but Scott and AJ were always willing to take the time to help students get the techniques right.
The Course: Red Dot Pistol Fundamentals and Performance
This course wasn’t designed for beginners who had never handled a handgun before. To participate, a solid basic pistol skill base is required, which attracted a diverse group of participants, from professional shooters, to law enforcement officers, to guys like myself, all looking to refine their skills with red dot-equipped pistols. The course covered a broad spectrum of topics, from zeroing the red dot to mastering draw techniques and utilizing the sight for accurate shots at various distances.
Scott’s teaching style was straightforward and practical. “This is a way to do it, not the only way to do it,” he reminded us throughout the course. This approach was refreshing and set the tone for an open-minded learning environment.
Above: AJ demonstrates how much more stable it is to fire when your elbows are NOT locked out.
Day One: Building the Foundation
The first day kicked off with a focus on the fundamentals. Before even hitting the range, Scott discussed which red dots were available on the market, and which ones he prefers. After a range safety brief, we started by zeroing our red dots. From there, we moved into dry and live fire drills, honing in on grip, stance, and presentation. Scott’s emphasis on maintaining a fighting stance with our feet, and bending rather than locking elbows, ensured that we were shooting from a solid base, which would improve accuracy. He also shared a tip that has since become a staple in my practice: when drawing the firearm, push it down into the holster first, allowing it to “bounce” up into your grip. This technique, combined with learning to build my grip efficiently, drastically improved my draw speed.
We quickly learned that our support hand — rather than the firing hand — is almost 100% responsible for keeping the firearm steady while shooting. Scott pushed us to keep our support hand strong, his exact words being, “don’t let your support hand be a bitch.” It was blunt and humorous, yet an effective reminder that control is key in landing accurate and precise shots. To prove his point, Scott held his firearm primarily with his support hand, not even holding the grip with his firing hand, and with a single finger in the trigger well, sent a burst of rounds into a target in rapid succession. The results were eye-opening. With the gun held firmly with the support hand, it hardly moved.
One of the standout moments from day one was the realization that the red dot isn’t just a tool for precision — the housing itself is a guide that can be used even in high-pressure situations. Scott demonstrated how, in a pinch, simply using the outline of the sight window could be enough to land accurate shots. It was yet another eye opener for me, shifting my perspective on how to utilize the red dot in real-world scenarios. Rather than wasting time acquiring a perfect sight picture in a high-stress, close-range situation, the sight window offers an expeditious way to get shots on target.
At the end of the day, I realized that the way I was wearing my holster didn't seem ideal. When asked how to tweak my setup, Scott offered me some invaluable pointers on concealed appendix carry. For starters, adjusting my belt to move the buckle off-center, and applying custom foam wedges to the back side of the holster to improve the angle and comfort — these were small adjustments that made a big difference.
Above: My setup for the class was a Walther PDP, Leupold DeltaPoint Pro, Surefire X300 Turbo, and a Tier 1 Concealed MSP IWB holster (Scott's signature series holster).
Day Two: Pushing the Limits
The second day was all about speed and accuracy. We began shooting at different distances, running through a series of drills designed to push our limits. Scott emphasized the importance of efficiency in our draw and presentation, encouraging us to find a rhythm that allowed for both speed and precision.
Scott’s focus on the support hand was a recurring theme throughout the course. He taught us to drive our pinky finger on the support hand into our sternum, creating a firmer, more stable grip. This small adjustment had a profound impact on my shooting, increasing my control and accuracy significantly.
Above: AJ discusses draw technique.
The Black Belt Patch Challenge
One of the unique aspects of this course was the opportunity to earn the Black Belt Patch, a badge of honor that only a few could claim. The criteria were rigorous, to say the least:
3&2 Drill: At 3 yards, 3 shots to the center of mass (COM) Alpha, then transition to 2 rounds on a 3×5 card in the head box within 2.0 seconds.
1 Shot Drill at 7 yards: 1 shot to COM Alpha within 1.0 second.
Bill Drill at 7 yards: 6 shots to COM Alpha within 2.0 seconds.
1 Shot Drill at 25 yards: 1 shot to COM Alpha within 1.5 seconds.
These drills were not just a test of skill but of composure under pressure. Most of my shots were fired between the 3 and 4 second range, but all were inside the designated target zone. Not too shabby considering this was my first go at any form of competitive shooting challenge, but not enough for that coveted Black Belt Patch. While I still have a long ways to go before I can earn a patch, the challenge provided a clear benchmark for where I stood and what I needed to work on.
Our class did have one Black Belt Patch recipient, and it was none other than assistant instructor AJ Zito. This was the second time for him to earn this difficult achievement, and it spoke to his talents and proficiency as shooter. At MSP classes, even the instructors themselves are continuously putting in hard work to become better shooters — the process of self-improvement is never truly finished.
Final Thoughts
Attending Scott’s Red Dot Pistol Fundamentals and Performance course was a paradigm shifting experience. It pushed me to rethink how I approach shooting and highlighted areas where I needed to improve. The biggest takeaway for me was the importance of the support grip, something I had previously thought nothing about. Scott’s teaching style was candid and effective. His ability to break down complex concepts into digestible pieces made the course accessible, even for a relative handgun beginner like me. His emphasis on flexibility, reminding us that there isn’t always a single “right” way to do things, encouraged a mindset of continuous learning and adaptation.
Scott's course is not just a class for one type of shooter — it’s for anyone serious about improving their skills with a red dot-equipped pistol. This course offers valuable insights and practical techniques that can make all the difference in high-pressure situations, whether that's competition, self-defense, or in the line of duty. While the Black Belt Patch remains a goal for the future, the lessons I’ve taken away from this experience are ones that will stick with me and revamp they way I approach training. My future days at the range will be much more effective. If you’re considering taking your shooting skills to the next level, this course is an investment worth making.
Read More
Subscribe to Recoil Offgrid'sfree newsletterfor more content like this.
When you think about lung damage, you might think about pneumonia, but not all damage to the lungs and chest is related to inflammation due to infections. Trauma is also a possibility, especially for those of us who venture off the grid for activities such as hunting, hiking, or mountain biking. In austere settings, a family medic may have to deal with injuries that can sometimes be lethal without immediate intervention. Penetrating chest wounds often fall into this category.
WARNING: Although the steps to performing needle decompression and chest tubes are explained in this article, be aware that these procedures are not always successful, even in the hands of trained medical personnel. If performed incorrectly, they can cause severe injury or death, and certain states do not waive liability for complications under “Good Samaritan” laws. Always stay within your level of training and seek professional medical help as soon as possible.
First, some anatomy: The lungs are protected by the rib cage. Humans have 12 pairs of ribs, numbered from top to bottom. These are sometimes called “true ribs,” “false ribs,” and “floating ribs.” The true ribs (ribs 1 to 7) connect to the sternum (breastbone) via flexible connective tissue called cartilage. The false ribs (8 to 10) connect not to the sternum itself, but to the cartilage of the 7th rib instead. The 11th and 12th ribs “float” in front, with no connection to the breastbone at all. All ribs, however, connect to the spine in back. Ribs are also connected to each other by muscles (called intercostal muscles). Nerves and blood vessels travel just under each rib in the intercostal space.
Above: An illustration of the human rib cage.
Rib Fractures
Once significant trauma impacts the rib cage, fractures may occur. Rib fractures most often involve the middle ribs. If a rib is broken, you may note the following:
Pain, sometimes with a palpable bump or dent at the site of impact
Increased discomfort with breathing or movement
Bruising of the chest or back
Grating sensations or sounds when fractured bone ends rub against each other (use a stethoscope over the area to listen)
“Splinting,” the tensing of muscles in an effort to decrease pain while breathing
In uncomplicated single fractures, there’s often no change in the appearance of the chest wall itself. Previously, these injuries were treated with a binder or by tightly taping around the entire chest. Although these methods relieved some discomfort, they’re now thought to cause more harm than good by preventing the ability to take deep breaths. Failure to fully inflate the lungs can lead to pneumonia. Instead of completely encircling the chest, tape could be placed on the front over the injured rib and ending at the middle of the spine in the back.
Above: Simple rib fractures may heal with little intervention, but more severe fractures can puncture the lungs.
You can prevent pneumonia due to “under-breathing” by encouraging slow deep-breathing exercises and gentle coughing every two hours or so. Your patient will experience less pain during this process by holding a blanket or pillow against the site of injury. Some practitioners, instead, place the arm on the affected side in a sling with padding between the arm and ribs for support during breathing exercises. Full recovery will take six to eight weeks.
Ibuprofen and cold packs are helpful for pain. Interestingly, many rib fracture patients sleep more peacefully lying on the injured side.
More serious or multiple fractures may present with:
Rapid, shallow breathing
Rapid heart rate
Bloody cough (hemoptysis)
Markedly irregular appearance (bump or dent) at the site of injury
Decreased or unusual movement of the chest wall on the affected side
The signs above may indicate injury to the lungs or other structures in the chest.
When there are multiple rib fractures, they usually occur in a row. This injury is called a Flail Chest and can be identified by placing one hand on each side of the chest. Observe chest movement during breathing. The uninjured side will rise during inhalation as normal, but the flail injury side will fall. This occurs because the loose rib segments “float” and are pulled into the chest cavity when inhaling. The lung is usually bruised (at best) and gets less oxygen to the body. Without modern respiratory support and, perhaps, surgical intervention, the patient is unlikely to survive.
Above: A lung can collapse due to the pleural space filling with air, blood, or a combination of both.
Pneumothorax
Rib fractures are most dangerous if a bone fragment punctures organs in the chest, such as the lungs. Air enters the chest cavity through the lung puncture, causing a condition known as a pneumothorax. As more air fills the chest, it causes pressure that makes it difficult for the lung to inflate with air. The lung collapses under the increased pressure.
If blood is filling the chest cavity, it’s called a hemothorax. Hemothorax is characterized by a dull sound on tapping (percussion), while air in the chest cavity sounds more like a drum. If it’s dulled at the bottom and drum-like at the top of the lung, it’s a combination of the two (hemopneumothorax).
Although a person with a very small pneumothorax will complain of pain with breathing or some shortness of breath, the condition may sometimes resolve on its own or with supplemental oxygen. It may, however, progress to a tension pneumothorax.
In tension pneumothorax, a large air collection in the pleural space compromises breathing and heart function. It can occur as a result of trauma from an open chest wound, like a stab wound or a gunshot. It can also occur in closed trauma, like a rib fracture.
The victim may present with signs of bluish skin coloration (cyanosis), distended neck veins, rapid breathing, and an elevated heart rate. The victim may go into shock. If you use a stethoscope, you’ll hear crackling sounds or, sometimes, no breath sounds at all on the affected side.
Above: If air enters the chest cavity and causes the lung to collapse, this is known as a pneumothorax
Needle Decompression
With a tension pneumothorax from a rib fracture, emergency needle decompression is indicated if there isn’t an open wound. Needle decompression carries significant risks and can be fatal if performed incorrectly. It should only be attempted in austere settings if it’s clear the patient will die without action taken on their behalf.
Above: Some individual first aid kits (IFAKs) or trauma kits include a decompression needle, but it’s critical that you understand the risks and have been trained in the proper technique before attempting to use one.
To perform needle decompression:
Wearing gloves, clean the area of the chest on the affected side with Povidone-iodine solution (betadine) or Chlorhexidine (Hibiclens). Your target is the intercostal space just above the third rib midway between the center of the collarbone and the nipple. On the left side, be sure to stay to the outside of the nipple line and not pointed toward the heart (left side). An alternative would be the fourth or fifth intercostal space at a line straight down from the front of the armpit (anterior axillary line). A product called Thorasite is meant to pinpoint this area clearly.
Using a 10-14-gauge 3.25-inch decompression needle catheter, enter the skin just above the rib at a 90- degree angle to the chest wall. This will avoid blood vessels and nerves, which travel just below the rib.
Listen for a pop and a hiss as air passes through. This should decrease the pressure in the chest cavity and allow the lung to inflate.
Remove the metal needle and secure the remaining plastic sleeve (the “catheter”) in place with tape.
Many are taught to place a valve of some sort over the catheter once placed. This is meant to prevent air from returning to the lung cavity. Some needles may have a stopcock for this purpose. Otherwise, an item known as a “vented chest seal” may be used as a covering.
Above: The SAM Thorasite serves as a guide for decompression needle placement.
Chest Seals
Chest seals are useful items for medical storage. Asherman, Hyfin, Bolin, or other vented chest seals are effective in helping secure the catheter in place in a closed pneumothorax.
When penetrating trauma like a stab or gunshot collapses a lung, it’s termed an “open pneumothorax” or a “sucking chest wound.” In order for a lung to reinflate, a chest seal must be placed over the site of entrance wounds (and exit, if any). Your goal is to provide a way for the air to escape from the chest cavity wound, but not to go back in.
Above: Chest X-ray of a stab wound with knife in place. If an object has impaled the chest, it’s generally advisable to leave it there until the patient reaches a hospital. Removing it may make the situation much worse.
To apply a chest seal:
Position the victim so that breathing is easiest.
Wipe all edges of the entry wound clean with dry gauze.
Wait for the patient to exhale and apply the seal without touching the inside adhesive surface.
Repeat this process for exit wounds as well.
The desired effect of a properly placed chest seal is to decrease the pressure in the lung cavity that’s preventing the lung from inflating. Your patient should start to breathe easier.
Although many commercial vented seals are available, one can be improvised by taking a 4- to 6-inch square of plastic wrap or other airtight material and firmly taping over the top and sides of the wound. The open bottom edge will serve as a valve and allow air (and perhaps, blood) to escape and the lung to inflate, while not letting air back in. Do not seal all four sides. If this fails, it may be because air cannot exit. In this case, the wound opening could be spread slightly to allow air to exit; then, replace the seal.
Above: Sealing a chest wound requires a valve or a side to be open so that air can enter and fluids can drain. Hyfin vented chest seal (left) and an improvised chest seal (right)
Chest Tubes
A successful needle decompression or chest seal placement is only the start in a wound that collapses a lung. There’s much more to be done, such as placing a chest tube. This is an extensive procedure that opens a path for drainage of fluids and re-inflation of the lung. Inflammatory or bloody fluid is likely to accumulate in many lung wounds and must be eliminated to allow adequate air passage. A chest tube will help.
Most commonly, a suction system powered by electricity is used for a major wound. If no help is coming, however, a chest tube of sorts, using gravity, can be improvised in dire off-the-grid circumstances.
A length of plastic tubing (not too soft) with several holes cut in the sides will be a good material to use for the tube itself. It doesn’t have to be very large. 38 French is a typical size for an adult (French size is a measure of the outer diameter of the tubing). 38 French is about half an inch, but somewhat larger sizes can be used if available, especially in the case of a hemothorax.
Above: Once inserted, remove the metal decompression needle and leave the plastic catheter.
Locate the fifth intercostal space at the mid-axillary line (straight down from the middle of the armpit). The incision should be made higher in women in advanced pregnancy. It must be above the level of the diaphragm.
If local anesthesia is available, this is a good time to use it. Put on sterile gloves and make a small incision with a scalpel through the intercostal muscle. This should be big enough to accommodate the tube and penetrate all the way into the space between the inside chest wall and the lung. A hiss may be noted when it enters the chest cavity. Stretch the incision with a Kelly clamp and then your finger to make space for the tube.
Placing the tip on the clamp on the forward end of the tube, deposit the tubing into the lung space. Using the clamp, insert it further in until all the drainage holes are inside the pleural space. Place a silk suture to secure the tube so it doesn’t fall out. There should be no fluid or air leakage from the incision itself. Cover with a sterile dressing.
Above: Once a chest tube is inserted, secure it in place with a nonabsorbable suture.
Ongoing Care and Complications
Now that the chest tube has been placed, you need a drainage collecting system. Two bottles with tops and some more tubing can be used as materials. Make two holes in the top of each bottle that match the size of the tubing. The end of the tube that’s in the lung space is placed in one of the openings in the first bottle. Here’s where blood and air will collect.
Place one end of some extra tubing in the second opening of the first bottle and insert the other end into a hole in the second bottle. This bottle should contain about 20 centimeters of sterile water. The tubing is placed so that the end is 2 centimeters below the water level. This prevents air from entering the lung space.
Once the tubing is properly secured and leak-free, air from the lung space goes into the first bottle and travels to the second bottle. It’ll appear as bubbles coming from the underwater end of the tube (more noticeable when the patient coughs). The air then exits through the second hole in the second bottle. If the chest tube is clear, the water will rise slightly with inhalation and fall with exhalation. As water evaporates, it’s important to check and maintain the water level in the bottle.
Above: Pneumothorax patients may present with cyanosis, bluish skin coloration due to a shortage of oxygen in the blood.
The victim is placed on the side that the chest tube was placed so gravity helps with drainage. The bottles are placed below the level of the patient. Tubing should be checked regularly for kinks. Some suggest having the patient blow into a balloon or a nitrile glove to help force fluid and air out of the chest cavity during healing. Be aware that this will be painful. At the very least, have the patient perform deep breathing and coughing exercises.
As blood accumulates in the first bottle, it’ll likely need discarding from time to time. The tube should be removed when the patient is stable, drainage is minimal (100ml per day or so), and no air bubbles are noted.
Complications with this system, even in modern times, aren’t uncommon. If, for some reason, the chest tube falls out of the chest, immediately apply pressure to the insertion site after having the patient exhale fully. Disconnection of the tube further out in the drainage system requires clamping the tube and immediately placing the disconnected ends in sterile water. Clean the loose ends with alcohol and reconnect.
Above: Doctors placing a chest tube in an emergency room.
It’s not rare for blood clots to clog chest tubes. Avoid stripping or “milking.” Suctioning the tube with a large syringe may be a low-tech solution to clear the system. If this doesn’t work, the tube may require removal and reinsertion. If constant bubbling in the system is noted, there may be an air leak somewhere in the system.
To remove, have a dressing ready with a good amount of petroleum jelly on it. Cut the suture that is holding the tube in place and have the patient hold their breath and bear down. As soon as they comply, pull the tube out quickly and place the dressing on right away. Secure in place. There may be some splatter (and, oh, it hurts).
The above method is a reasonable option in austere settings, but, honestly, no improvised system will be as efficient and sterile as the suction systems and respiratory support available in modern medical facilities.
Above: During the American Civil War, chest trauma carried a staggering 72 percent death rate.
Reality Check
It’s important to accept that a traumatic pneumothorax will be difficult to survive. During the Civil War, chest wounds carried a 72 percent death rate. We’ve come a long way since then, but the chances of a failed procedure or complication are very high when you’re working outdoors in austere conditions with less-than-ideal equipment. Be realistic in your expectations, and always try to call for help before attempting any potentially life-threatening medical procedure on your own.
About the Author
Joe Alton, MD, FACOG, FACS, is an actively licensed physician, medical preparedness advocate, and the New York Times bestselling author of several award-winning books, including The Survival Medicine Handbook: The Essential Guide For When Help Is NOT On The Way, now in its fourth edition. He designs an entire line of medical kits for the serious off-grid medic; find them at www.doomandbloom.net
Read More
Subscribe to Recoil Offgrid'sfree newsletter for more content like this.