DIY Guide: Make Your Own Dehydrated Soup Base

Almost all of us have a favorite soup recipe, either one that has been passed down for generations or just something we saw on a cooking show. Soups have been a staple for human consumption for about as long as we’ve known how to boil water, and they continue to provide us with nourishment. Here we examine ways soups are an optimal part of our preparations and how to make them more shelf-stable and bug-out friendly.

Soup as a Survival Food

Soups can make an excellent survival food because of their ability to make ingredients stretch to feed more people. Soup variety is only limited to available resources and the cook’s imagination, making it excellent for personal touches and adaptability. Because of the variability of ingredients, some recipes can be extremely nutritious and hearty, even if all you have is an assortment of scraps that would be inadequate for a solid meal. This has made soup a popular choice during times of scarcity, such as the Great Depression.

Dehydrated soup base vegetable garden food dried shelf stable survival prepper 1

The importance of balanced foods during emergencies or survival situations is vital. When our bodies are stressed both physically and mentally, we need to replenish nutrients, proteins, and carbohydrates to continue operating at peak levels. As prepared individuals, we know that hunger can control emotions, activities, and ultimately decision-making abilities for the worse or better. You can only subsist on granola bars and beef jerky for so long before it catches up with your digestive system, so it’s wise to have more nutritious and natural options ready.

Lastly, soups can provide much-needed morale boosts when times are tough. Just like when we got sick as kids and mom gave us chicken noodle soup to make us feel better, having your own soup base on hand can be mission essential.

Dehydrated soup base vegetable garden food dried shelf stable survival prepper 11

Dehydrating Vegetables

Dehydration is usually a survivalist’s mortal enemy but, in this case, we can use it to extend the life of fresh vegetables and create soup bases. The process of dehydration uses heated air flow to remove moisture and preserve foods. By removing moisture, the food is more resistant to the growth of bacteria which would usually cause spoilage.

The easiest way to perform this task is to purchase a dedicated dehydrator. These can be had for less than $50 and can provide you with food for years to come. Many models can be expanded for more drying space, can utilize built in timers, and can even fulfill a commercial-grade volume if your preps take you in that direction. In our opinion, they are a worthy preparedness investment.

Dehydrated soup base vegetable garden food dried shelf stable survival prepper 10

If a dedicated machine is not available, it is possible to use your oven for dehydration as well. Simply set your oven to the lowest setting, cut your vegetables into less than 1/4-inch thick pieces, and lay them on a lined cooking sheet. Leave them in the oven for 6 to 10 hours, checking them periodically for dryness. To perform the dryness test on both oven- or machine-dehydrated goods, pull a piece and attempt to break it. If it bends or does not snap, moisture is still present and more drying is necessary. We are focusing on vegetables here, but dehydrators are also useful for meats, fish, herbs, and fruits.

Creating a Dehydrated Soup Base

Making your own soup bases is a relatively simple task. As with all food preparedness, it is important to select foods you and your family enjoy and eat regularly. Growing your own vegetables is an economical and easy way to stock up on nutritious soup ingredients. Purchasing locally grown vegetables from farmers markets or grocery stores is also a great option for preparing your own bases. Dehydrating your vegetables is simple but lengthy task:


  1. Wash vegetables thoroughly (if they came from your garden, double-check them for insects, insect eggs, and bird droppings).
  2. Pat the vegetables dry then cut them into uniformly-sized pieces, about 1/4-inch thick.
  3. Lay them out on your drying racks, avoiding overlap.
  4. Check your machine’s manual for optimum drying temperature setting, 135° is the most common.
  5. Dry your vegetables for 6 to 10 hours, checking on them every two hours.

Most vegetables follow the above instructions; however, some need one more preparatory step: blanching. Blanching is a process of boiling the food for a very short amount of time then removing and rapidly cooling it in an ice bath. For dehydration, this process is used to preserve taste and color of the vegetable. Blanching is generally necessary for:

  • Potatoes
  • Carrots
  • Peas
  • Green Beans
  • Asparagus

Dehydrated soup base vegetable garden food dried shelf stable survival prepper 6

Soup bases are made up of available ingredients without using a set recipe. This example will comprise of kale, white onion, green and yellow bell peppers, swiss chard, carrots and tomato powder (refer to our previous DIY article to learn how to make this versatile ingredient). Combining these ingredients, we accomplish a flavorful and nutritious soup base that can be amended depending on available additives such as game meat, fresh vegetables or other long-term food storage items. Your chosen ingredient ratio depends on your preferred tastes. According to our preferences, this soup was light on tomato but heavy on onions.

Storing Your Dried Greens

Ideal storage for your ingredients is air-tight containers, out of direct light, and at 68°-72°F. Storing ingredients separately isn’t necessary, but doing so allows you to use ingredients for different recipes. Our preferred method is to store each ingredient in a glass jar, vacuum-sealed with reusable canning lids. These are stored in a pantry with ideal temperature conditions. For camping and bug-out purposes, ready-made packets are stored in small resealable bags.

Dehydrated soup base vegetable garden food dried shelf stable survival prepper 7

Using Dehydrated Soup

Reconstituting is the process of bringing your vegetables back to, or close to, their original form. This is accomplished by adding the greens to water and bringing them to a boil for about 10 minutes. Hard measurements aren’t entirely necessary however, adding about 1.5 cups of water to about ¾-1 cup soup mix should achieve the right consistency. Once the vegetables have reconstituted they can be used for a variety of meals. Here are a few examples:

Basic Vegetable Soup (1 Serving)

Dehydrated soup base vegetable garden food dried shelf stable survival prepper 8

  • 1 ¾ cup water
  • 1 chicken bouillon cube
  • 1 cup soup mix
  • Pinch of pepper
  • Pinch of garlic powder

Begin to heat water and add bouillon. As water heats, add soup mix and garlic powder. Boil for 10 minutes covered, stirring occasionally. Remove from heat and let steep for another 5to 10 minutes. Stir and add pepper (and/or other spices) to taste and enjoy. This recipe can be prepared beforehand by adding all ingredients to a plastic bag for easy transport — just add water.

Survival Breakfast Hash (4 Servings)

Dehydrated soup base vegetable garden food dried shelf stable survival prepper 9

  • 4 eggs
  • 3 cups dehydrated/ freeze dried cheese
  • 1.5 cups soup mix
  • Optional: meat and/ or potatoes
  • Salt/pepper to taste

Reconstitute cheese and soup mix. Whisk together (or blend) eggs, cheese, and soup mix. If using meat, cook the meat first then add to the egg/cheese/soup mixture. Potatoes can be boiled first to soften or chopped and lightly fried then added. Pour into greased pan and cook until done.

Chili

  • ¼ cup dehydrated onions
  • ¼ cup dehydrated carrots
  • 2 heaping tablespoons tomato powder
  • 1 ½ cups water
  • 1 can of beans (or 1 cup dry beans, soaked)
  • Meat (if available)
  • Pinch garlic powder
  • Pinch chili powder
  • Pinch paprika
  • Salt/pepper to taste

Rehydrate the onions and carrots, add to pot with water, and begin to boil. Add tomato powder. Add beans to boiling water and let simmer for about 20 minutes. If meat is available it should be cooked first then added to the chili. Add dry ingredients and stir, let simmer for additional 5 minutes.

Conclusion

Dehydrated soup base vegetable garden food dried shelf stable survival prepper 12

Preserving food is a precious skill set that should not be over looked. Even if you are unable to grow your own food, buying in bulk and learning to preserve can be an excellent way of saving money and keeping a well-stocked pantry. Dehydrating, canning, and pickling are only a few ways to keep you (and your family) full and healthy during tough times. Using your knowledge, experience, and ingenuity will help ensure your successful survival. Learning these methods now when you can afford to screw up is a better choice than learning them when spoiled fruits and vegetables will mean malnutrition and hunger.

About the Author

Alexander Crown OFFGRIDweb author photo

Alexander Crown served as an Infantryman with the Scout/Sniper Platoon of the 3rd Battalion, 509th Parachute Infantry Regiment in Ft. Richardson, Alaska, where he specialized in radio communications and reconnaissance. Since separating, Alexander spends his time as an avid outdoorsman and hunter with an appreciation for self-sufficiency in the form of gardening. He also enjoys woodworking, firearms, and reloading. You can follow him on Instagram @acrown509.


New: Mahindra ROXOR Off-Road Vehicle

Take a quick look at the ROXOR, and you might think it's an early-model jeep. Although that's not exactly the case, it does share some ancestry. Back in the 1940s, Willys — the manufacturer of the World War II “jeep” — issued manufacturing licenses to a few other companies, permitting them to reproduce the jeep design. One of these companies was India's Mahindra corporation. Fast-forward to present-day, and Mahindra is still producing off-road vehicles that descended from this Willys inspiration. The latest is known as the ROXOR.

The ROXOR was designed and created by Mahindra Automotive North America (MANA) as a small off-road vehicle for the North-American market. It's built in America and based around a 2.5-liter M2DICR turbo-diesel engine, which produces 62 horsepower and 144 ft-lbs of torque. That may not sound like much, but it's enough to carry two occupants, up to 349 pounds of gear in the rear cargo area, and tow an impressive 3,490 pounds. Top speed is 45mph, or 15mph while towing.

Mahindra Roxor vehicle truck off road diesel atv sema 3

The rest of the drivetrain consists of a 5-speed manual transmission, 2-speed Dana T-18 transfer case, selectable 2WD/4WD, and 3.73:1 floating axles in front and rear. Brakes are 9-inch discs in the front and 11-inch drums in the rear, with hydraulic assist and parking brake standard. The boxed steel frame is supported by leaf springs and shock absorbers, plus a stabilizer bar up front. Ground clearance is 9 inches on the 16-inch 5-lug wheels and 235/70R16 mud tires.

Standard conveniences on the ROXOR include hydraulic power steering, halogen headlights, a 12V power port, and two seat boxes. However, many other optional parts can be installed, including a HD bumper with winch, light bar, mirrors, aluminum wheels, a soft top or hard top, and grab handles. Standard colors for the steel body are blue, red, white, and black, but special editions are available with more colors and graphics. For example, there's a tan Dune Edition, a olive-drab green Military Edition, and a RealTree camo package.

As an off-road-only vehicle, the ROXOR competes with other side-by-sides, but MANA claims its turbo-diesel engine, sturdy boxed frame, and simplicity set it apart from more conventional UTVs. Pricing for the ROXOR Classic starts at $14,999 — to see pricing with options, check out the interactive ROXOR vehicle builder. For more info, go to RoxorOffroad.com or watch the video below.


Debunked: The Myth of Water Divining

Water divining is a practice dating back centuries where metal rods, a pendulum, forked stick, or other object held in the hand(s) is moved by underground water and points the “diviner” to its location. Divining has been considered a supernatural ability defying the rules of science. Some old-timers swear by it and cite folklore and/or pseudoscience to explain the way it works. Skeptics cite hard science and the results of controlled testing. Divining for water has even been featured in some old kids’ cartoons only to perpetuate the myth for future generations. Some water companies have recently cited using diviners in their newsletters, bringing this topic to the forefront again. Here’s what you should know in case you encounter someone trying to sell you on the idea to apply this mystical technique in a survival situation.

The Myth

Dowsing rod

Water divining, sometimes also called dowsing or witching, is the belief a person can detect underground water where a well can be dug. Some diviners claim to have the ability to locate other underground objects using the same skillset, but water is easily the most valuable. Water has been essential to all of the great civilizations and having an ability to locate it where others can’t would give a person incredible authority. Before science, everything was magic. Without an understanding of involuntary muscle movements, magnetism, and how groundwater travels, it’s easy to be lured into the idea a person can detect groundwater with their “vining rod” or Merlin stick, while walking around taking readings from it. The movement of the object holds the attention of onlookers like a metronome or hypnotist’s dangling watch. Water diviners can claim their ability is something that can’t be taught, making the skill even more coveted. If their “skill” can’t be passed to you, you should evaluate if it’s worth pursuing or if other proven methods are a better course of study.

The Reality

Water doesn’t move rods, especially with earth in between. Ask any reputable scientist if water has magnetism, and they should give you this very simple answer, “it doesn’t.” Divining has been tested against random chance in a famous study by German scientists in the ’80s with eye-opening results. Even the most confident and experienced diviners couldn’t locate an underground pipe any more effectively than the average person looking for the same pipe. In fact, a look at the data points in the testing results looks more like a hole-ridden target hit with birdshot than anything consolidated or clearly pointing to verifiable divining skill. Yet even in the face of testing and hard facts, divining still draws some people’s attention like a David Blaine magic trick.

Alternatives

Tropical laterite soil or red earth background. Red mars seamless sand background. Top view

Unless you want to trust your life to smoke and mirrors, you should exercise good water discipline instead. Learn to stay hydrated so you don’t have to play catch up when you have a shortage of water.

Should you need to truly look for water, the best way to find it is to study nature and increase your awareness using all of your senses. These skills are all environment-dependent, but highly reliable. Pointing a forked stick at the ground will get you nowhere. Instead, pay attention to animals and insects. They often don’t travel far from water sources. Look for animal tracks and game trails, and scout them in both directions. Look for natural catch points, remembering water runs down from higher elevations to lower elevations. Crevices on rock faces and hollows in logs can hold water on the micro level and canyons and ravines may hold water at their lowest points on the macro level.

Keep a length of paracord on your water bottle to dip it into out of reach cracks. Know what trees in your area are good indicators of water and develop the skill to tap those trees that produce edible sap like maples, birches, and beeches. Carry a bandana to hold moisture-laden moss you can squeeze water out of. That same bandana can be used to wipe dew from grass in the morning. By the way, digging into riverbeds may prove just as fruitless as divining. You don’t want to sweat out more water than you’ll get back. True survival skills include knowing how to find, collect, treat, and carry water; so leave your vining rods at home.

More From Issue 28

Don’t miss essential survival insights—sign up for Recoil Offgrid's free newsletter today!

Read articles from the next issue of Recoil Offgrid: Issue 29

Read articles from the previous issue of Recoil Offgrid: Issue 27

Check out our other publications on the web: Recoil | Gun Digest | Blade | RecoilTV | RECOILtv (YouTube)

Editor's Note: This article has been modified from its original version for the web.


New: Ledlenser Outdoor Series Headlamps

In Issue 27 of our magazine, we published a Headlamp Buyer's Guide which included 12 headlamps that provide hands-free light for hiking, camping, hunting, or survival situations. The MH6 from Ledlenser was featured in this guide, and we recently learned that the company has expanded its headlamp line with three new Outdoor Series models: MH3, MH5, and MH7.

MH3

MH3

These headlamps are priced at $30, $50, and $70, and all use Ledlenser's Advanced Focus System to allow the wearer to adjust the beam pattern by twisting the bezel. Each is available in black, blue, or green color. The mounting system is also detachable, allowing the lights to be hand-held or worn on a shirt or belt. Beyond these similarities, we'll outline the differences between these new headlamps below.

MH5

MH5

The MH3 runs on a single AA battery, and produces 200 lumens. The MH5 is powered by a USB-rechargeable lithium-ion battery pack, and produces 400 lumens with a run time up to 35 hours. The MH7 can be powered by either the included lithium-ion pack or disposable batteries, and includes a quick-connect magnetic USB charger. It also features a red LED to preserve night vision. Run time is up to 60 hours.

MH7

MH7

For more info on these new Ledlenser headlamps, go to LedlenserUSA.com.


Review: Wound Cube Medical Training Tool

Wound packing, besides applying a tourniquet, is one of the most basic techniques of bleeding control in a pre-hospital environment. In theory, the concept is relatively simple: hold pressure on a wound, and after several minutes, the applied pressure will help to encourage the body’s natural clotting factors. This can vary from just three minutes of pressure if using specially manufactured gauze (i.e. Combat Gauze) impregnated with hemostatic agents, to 10 minutes if using standard gauze or other fabrics.

DSC_0163.jpg

The trick to this technique, however, is that the correct pressure application point may be several inches down inside the muscle. Pressure is much more effectively generated once you reach a hard surface, such as a bone, to push against. Otherwise, trying to compress relatively squishy fat and muscle starts to feel like pushing rope.

The Wound Cube from Phokus Research Group is a new training tool to help teach this vital technique. We’re featuring it because it’s difficult to make a similar tool on your own, and even harder to make it for less money than its current retail price.

Misleading Instincts

A layperson’s instinctual reaction when presented with a heavily bleeding wound is often to apply pressure directly on top of the skin, possibly with their hands. Even if they have gauze, their first reaction is often to try and mash a ball of it into the wound from the top. A more appropriate technique, however, is to feed gauze or other wound-packing material starting down at the bottom of the wound, slowly packing from the bottom until the wound is filled. At that point direct pressure will be applied from the outside surface (skin) and this pressure becomes directly transmitted to the base of the wound — exactly where we want it.

DSC_4758.JPG

Above: Using a flashlight to illuminate the inside of the Wound Cube allows for instant feedback as to whether or not your wound packing technique is properly filling the wound cavity.  

Take a standard gunshot wound as a classic example. Those familiar with ballistic impact response may already know that a wound into flesh can create a narrow channel at the start, gradually expanding into a larger wound cavity as the bullet expands or mushrooms. It would be impossible to apply adequate pressure on the inside of the expanded chamber by pushing from the outside.

But by feeding gauze in with your fingers, ½ inch by ½ inch, the wound cavity can be filled correctly. This isn’t easy. Because gauze is flexible and non-rigid, it can be tough to feed it down a narrow tube where you can’t see what you’re doing or where it’s going. It’s an acquired technique and, like many survival skills, requires periodic refresher training.

Feels Like Warm Apple Pie

DSC_4754.JPG

Enter the Wound Cube. The cube, designed to accurately depict the texture and feel of a traumatic injury in flesh, features several types of correctly modeled and sized wounds. These include lacerations as well as different types of gunshot wounds. The ballistic patterns are authentic, recreating the narrow entrance channels and larger interior cavities created by a gunshot wound. Its durable silicone also features realistic tissue density and is textured to feel similar to human skin, especially when a few drops of simulated-blood lubricant is added.

For those of you who may be familiar, yes, the Wound Cube is based on the same materials technology as the Fleshlight. The versatility of science can enrich many facets of our lives.

How It’s Used

DSC_4761.JPG

A Treasure Island (FL) police officer honing her wound packing skills using the Wound Cube silicone block.

The mechanics of using the cube are simple. Basically, it’s an inert block of silicone with holes that you stick your fingers (and only your fingers) into. Continually training on the act of feeding gauze into the tiny holes with your fingers will make it that much easier if you ever have to aid a victim who’s been shot or stabbed — at least if that injury is to the arms, shoulders, or legs. Wounds in places like the chest, abdomen, neck, and head often require advanced care techniques, and it’s usually better to focus on rapid evacuation, as covered in Issue 5 of our sister publication CONCEALMENT.

The Wound Cube is made from clear silicone, making it semi-transparent and easy to confirm that you’re effectively getting the wound-packing material to the base of the wound inside the body. While you’re getting to third base with the cube, an instructor can shine a flashlight into one of the other open holes to illuminate the inside of the channels and make easy visual confirmation on how effectively you’re packing the wound.

Practicality and Effectiveness

Although the premise of the Wound Cube is very simple, it’s also very effective and robust. Wound packing isn’t a delicate act — fingers have to work fast, plunging repeatedly into the wound cavity in an effort to tamp down as much gauze as will fit inside, in a hurry. First timers or the untrained may look like they’re delicately trying to knead the world’s tiniest pizza dough, softly feeding one finger in after another and alternating index fingers. More experienced medics on the other hand, may use more arm motion to aggressively pack in the gauze and make sure they’re hitting the bottom of the wound or a hard bone.

DSC_4767.JPG

The point is that if these cubes are being regularly trained on like they should, the relatively small wound channels will see a lot of action from big fingers, which raised a question in our minds about whether the holes would inadvertently split or expand. Phokus Research Group states that they’ll stand behind their product and offer a five-year guarantee that the wound channels won’t “stretch out” or increase in size from regular use.

Unfortunately, we didn’t have five years to test this thing, but we did have one night of intense training in a bleeding control class taught by our friend Detective Eric Soderlund, who is featured in RECOIL OFFGRID Issue #25 teaching improvised evacuation techniques. Along with law enforcement officials from the Treasure Island, Florida Police Department, we went family style on the Wound Cube and passed it around the class.

The difference was immediately obvious. Unlike the other homemade training devices which Eric had painstakingly carved out of foam blocks, the cops using the Wound Cube had instant feedback on not just the mechanics of their wound packing techniques, but visual confirmation once the gauze had completely filled the hole. This made it easier for the students to adjust their techniques since their performance was so easy to measure.

The only component that didn’t make sense to us was the simulated laceration wound. We thought the laceration was too shallow and didn’t allow a lot of gauze to be packed into the wound. We took an X-Acto knife and cut it a bit deeper, but that was only marginally successful.

Final Analysis

With a price point starting at $140 and first responder discounts available, the Wound Cube is a relatively affordable, durable training tool that’s significantly less expensive than similar competing products. For a homegrown alternative, there’s no easy way to accurately recreate the enlargement of the wound cavities as they vary in depth, and it becomes even more difficult if you’re trying to find a semi-transparent material so you can actually see what’s happening inside.

Similar to the idea that it’s better to have a small-capacity, small-caliber handgun on your person than a larger “better” weapon in your truck, we feel it’s preferable to have a tool that aids in realistic training for bleeding control, instead of thinking you can improvise or figure it out on the fly. It’s not perfect, but it fills a very specific niche that has never previously been addressed at this price point and with such ease of use. Overall, we like what we’ve seen and what we felt when we were inside the Wound Cube, and we’d definitely take it home to meet our parents.

Specifications

Wound Cube

Size
4 x 4 x 4 inches

Weight
2.5 pounds

Price
$140

URL
www.phokusresearch.com

About the Author

Andrew Schrader recently served as an advisor/reviewer for the San Bernardino (CA) City Fire Department’s After Action Report (AAR) of the Active Shooter Incident Response which took place in December 2015. His company, Recon Response Engineering LLC, educates firefighters and search-and-rescue teams on the subject of urban search-and-rescue and building collapse. Most recently, he was deployed in Florida to support rescue operations following Hurricane Irma. www.reconresponse.com / @reconresponse

More From Issue 28

Don’t miss essential survival insights—sign up for Recoil Offgrid's free newsletter today!

Read articles from the next issue of Recoil Offgrid: Issue 29

Read articles from the previous issue of Recoil Offgrid: Issue 27

Check out our other publications on the web: Recoil | Gun Digest | Blade | RecoilTV | RECOILtv (YouTube)

Editor's Note: This article has been modified from its original version for the web.


Book Review: “Cyber Mercenaries: The State, Hackers, and Power”

The Premise: Humankind’s dependency on technology pervades our lives. In the cracks between man and machine, hackers ply their trade. Motivated by both politics and profit, they affect the building blocks of our survival. Tim Maurer pens a ministerial text steeped in the academic study of statecraft in a world of state and non-state cyber actors. He paints a post-graduate level tapestry of diplomacy, manipulation, coercion, culture, economics, agency theory, uncertainty theory, terrorism studies, international law, and other disciplines to build a taxonomy of cyberspace from the view of the hackers and their beneficiaries — a Marauder’s Map peering into a foreboding future.

The 411: This book is a Marianas Trench deep dive into the cyber-verse. It’s an expert’s reference for building future research in a still very new field of study, global hacktivism. Maurer repeatedly packs entire graduate school semester courses into nuanced sentences; each of which could keep tenured Ivory Tower researchers and front line field personnel rolling in work for decades. But if you want to know how cyber warfare is organized and, more importantly, where it has emerged, this book will open your eyes.

The Verdict: The book isn’t an easy read. It’s clearly meant for professionals who have been soaking in global stability analysis hot tub since the Reagan years. Be prepared to look up unfamiliar terms. The text is 163 pages; footnotes take up an additional 70 pages. The author covers how the beneficiaries of hacking for influence fits into the broader art of statecraft using a modified form of the D.I.M.E. theorem of influence, consisting of Diplomacy, Intimidation, Militancy, and Economics. He covers the dynamics of the four types of benefactor-actor interaction where state and non-state players can be either string puller or operator. Maurer then goes on to detail the spectrum of how states can delegate, orchestrate, or sanction hackers. Also discussed is international law surrounding the use of cyber techniques as effectors of influence and warfare.

Maurer draws on research from areas such as the management of militias and the study of its close cousin, terrorism networks, to help color the complexity of the process. He spends time discussing the dilemma of defending against cyber attack; specifically, noting that per international law, nations are obligated to prevent non-state offensive cyber activity even to the point that in the United States it’s a felony to counterattack the hacker if one’s company is bombarded by Distributed Denial of Service (DDoS) or destructive malware attacks.

Students of global diversity will appreciate Maurer’s case studies, where he illustrates the radical difference in the path-dependent evolution of cyber activity in different countries. He covers rich western nations like the United States, where the culture of hacking was born in rebellious cultures antagonistic to the state that evolved a cadre of co-opted hackers seeking to serve to the state for monetary gain. He then describes politically motivated actors sometimes loosely connected to, and other times antagonistic to, states in troubled parts of the world like Iran, Syria, and Ukraine; and how they often switch sides.

He also covers the criminal sanctioning of hackers, aka privateering, in poor states like Russia where a weak $1.2 trillion GDP economy and an overabundance of pauper technocrats has led to cyber-crime-for-hire industries; as long as the underworld actors are careful not to aim their tools at the motherland. And finally, he examines the hyper patriotic phenomenon of China, where hackers are so eager to wreak havoc to defend China’s honor against real and imagined enemies that the state has had to create government infrastructure to tame their zeal.

The book describes how these cyber cultures came to be, why they act way they do, and what happens when these disparate cultures interact. He discusses that this is a battle space for tomorrow’s Cold Wars.

The one drawback to Maurer’s coverage was its narrow focus on the phenomenon of state-sponsored cyber operations. Then again, this is new ground just emerging in places like the U.S. where the orchestration of social media can influence public policy faster than considered deliberation can digest. Conversely, non-state actors are at work in places like Eastern Europe where post-national globalism and open society proponents seek to shape and influence that region’s potentially dystopian future. If you want to survive in tomorrow’s man-machine world, absorbing this book is worth your time.

For a real-world example of the devastation caused by cyber warfare, check out our web-exclusive article on the sophisticated Petya cyber-attacks.

Book & Author
Cyber Mercenaries: The State, Hackers, and Power
Tim Maurer

Publisher
Cambridge University Press

MSRP
$30

URL
www.cambridge.org

Pages
266 pages

Rating
>Thrive
Survive
Die


OFFGRID Library of Recommended Books

More From Issue 28

Don’t miss essential survival insights—sign up for Recoil Offgrid's free newsletter today!

Read articles from the next issue of Recoil Offgrid: Issue 29

Read articles from the previous issue of Recoil Offgrid: Issue 27

Check out our other publications on the web: Recoil | Gun Digest | Blade | RecoilTV | RECOILtv (YouTube)

Editor's Note: This article has been modified from its original version for the web.


Review: Holosun HE510C-GR Elite Green Dot Sight

Whether you're hunting, shooting competitively, preparing to defend your home against intruders, or facing a catastrophic bug-out situation, it's essential to be able to quickly acquire and accurately hit targets with your weapon of choice. Much of this comes down to training, but technology can also give us an advantage in this area. Modern optics provide an easy-to-use alternative to iron sights. Specifically, non-magnified dot sights have become ubiquitous in the firearms world as a result of their versatility for a variety of weapons and lighting conditions.

Holosun HE510C-GR Elite green dot sight ar15 rifle shotgun survival defense optic review 12

These days, the majority of home defense guns and survival rifles you'll come across will have some form of dot sight in addition to backup iron sights. Even on carry handguns, they're continuing to become increasingly popular — in a poll we posted last year on this site, 72 percent of readers said they have “positive” or “very positive” feelings about running dot sights on their carry pistols.

The caveat to dot sights is that they can easily cost $500 or more, and while there's no shortage of low-budget options on the market, many of those airsoft-grade sights are fragile, poorly-built, and/or unreliable (the last things you want on a weapon that you might need for self-defense). Finding a middle ground between price and dependability can be tricky, especially when you're looking for a sight that doesn't skimp on features.

Holosun HE510C-GR Elite green dot sight ar15 rifle shotgun survival defense optic review 18

Holosun recently released the HE510C-GR as part of its Elite green dot sight series. It's an open reflex sight, meaning that it uses a dot projected by an LED onto a thin reflective lens, rather than the cylindrical design of closed tube sights. This is intended to provide maximum field of view and minimal reduction of ambient light. MSRP for the sight is $388, but it's currently available from various online retailers for $330.

The Case for a Green Dot

In the past, virtually all dot sights used red aiming points, and they're still the industry standard today. However, green dot sights have seen a surge in popularity lately for various reasons. We'll admit that some of this is an aesthetic trend, motivated by users wanting something new and different. But there's more to it than that.

This chart from the UK National Physical Laboratory shows the spectral response of the human eye.

This chart from the UK National Physical Laboratory shows the spectral response of the human eye.

The obvious purpose of any sight is to provide a clear, high-visibility aiming point. From a purely scientific standpoint, the human eye is most responsive to colors in the green portion of the visible spectrum, meaning that a green light will be perceived as brighter than a red or blue light of equal power. As a result, Holosun says its green diode is “as much as 4 times more efficient” than its standard red diode, especially at high brightness settings.

A green LED near the back of the optic projects the dot onto the lens.

A tiny green emitter near the back of the optic projects the dot onto the lens.

Of course, we don't live in a world of black and white, so in a practical setting the technical advantages of a green dot may be more limited. Much of it comes down to the environments where you'll be using the weapon — a green dot may offer superior contrast in drab urban environments, while it may get lost more easily against the bright green backdrop of a forest. Personal preference is also a consideration, so you should take a firsthand look at both dot colors and see which works best for you.

If a green dot just isn't your thing, Holosun offers an HS510C red dot reflex sight that offers the same design and features as the HE510C-GR.

Holosun HE510C-GR Elite Features

Holosun HE510C-GR Elite green dot sight ar15 rifle shotgun survival defense optic review 5

We got our hands on a sample of the HE510C-GR, and decided to take a closer look at its viability as a more-affordable choice in the dot sight market.

Holosun HE510C-GR Elite green dot sight ar15 rifle shotgun survival defense optic review 1

Right off the bat, the packaging caught our eye with its prominent “green dot sight” label. The flamboyant font choice seems out of place, but we soon overlooked this and opened the box. It contained the following items:

  • Sight with included quick-detach mount
  • Adjustment/battery removal tool
  • Spare battery tray with O-ring and screws
  • Torx wrench
  • CR2032 battery
  • Micro-fiber lens cloth

As we said before, this is an open reflex sight which uses Holosun's “Green Super LED” to project either a 2-MOA dot, a 65-MOA circle, or both onto the lens.

The HE510C-GR can display a dot, circle, or both simultaneously.

The HE510C-GR can display a dot, circle, or both simultaneously.

The optic's controls are very straightforward, with rubberized “+” and “-” buttons on the left side. The adjustments are as follows:

  • Short presses of “+” or “-” adjust between 12 dot brightness levels.
  • Holding down “-” cycles between the three dot/reticle options mentioned above.
  • Holding down “+” until the reticle blinks toggles between Automatic and Manual modes — more on this feature below.
  • Holding down “+” for 10 seconds adjusts auto-shut-off timer setting.
  • The light can also be manually turned off by pressing both buttons, and turned back on by pressing either “+” or “-“.
  • Elevation and windage can be adjusted by turning a pair of screws with the included adjustment tool. Each click is 1/2 MOA.

Holosun HE510C-GR Elite green dot sight ar15 rifle shotgun survival defense optic review 4

The HE510C's body is constructed from 6061 aluminum, but it features an additional titanium shroud to protect the recessed lens from impacts to the top or side. The base of the sight features a quick-detach Picatinny rail mount, which includes a locking lever and a Torx screw to adjust the clamping force.

The gap between the body and titanium shroud protects the lens from impacts.

Power comes from a single CR2032 lithium-ion coin-cell battery. This is installed by loosening the two Torx screws on the battery tray, prying it open with the included tool, and reinserting the tray with the battery. Holosun claims a maximum battery life of 50,000 hours with the dot, and 20,000 hours with circle and dot.

Looking down from above, you'll notice the HE510C features a second power source: a solar panel. This serves two purposes. First, it can fully power the optic using ambient light from the sun or indoor light sources — if these aren't bright enough, it draws some or all of its power from the battery instead. Second, it acts as a light sensor to measure your environment and adjust dot brightness accordingly in automatic mode.

Automatic Mode

In its default automatic setting, the HE510C will monitor ambient light levels and increase or decrease the dot's intensity to produce optimal visibility. This ensures you don't end up looking at an overwhelmingly-bright dot in a dark room, or struggling to spot a dim dot on a sunny day. Within auto mode, you can adjust the brightness range to 8 levels.

Holosun HE510C-GR Elite green dot sight ar15 rifle shotgun survival defense optic review 22

If you prefer, you can also set the optic to manual mode with 12 brightness levels (10 for daylight and 2 for night vision). The sight has a memory function to remember these settings.

Shake Awake

To further extend battery life, the HE510C has a “Shake Awake” motion sensor which can detect movement and immediately turn the sight on. It will then remain on for 10 minutes (default), 1 hour, 12 hours, or indefinitely, depending on the auto-shut-off timer setting you've selected.

Our Impressions

Holosun HE510C-GR Elite green dot sight ar15 rifle shotgun survival defense optic review 11

After removing the sight from its box, we installed the battery. Even with the screws removed, the battery tray seals tightly to keep out water and dust, so prying it open with the included tool was a little tricky. We took our time to avoid scratching the finish. Luckily the extremely long battery life means we probably won't be replacing it again for a decade.

Thanks to the included quick-detach mount, installing the HE510C on a Picatinny rail is easy. Just depress the release button at the end of the locking lever, swing the lever open, and place it on the rail. The Torx adjustment screw needed to be loosened a few turns before the mount would clamp snugly. This mount is a big plus, since adding QD functionality to many other dot sights means spending an additional $100 on a separate QD mount or riser.

The HE510C's mount places it at absolute co-witness height for standard AR sights, so it aligned nicely with the A2 fixed front sight and Magpul MBUS flip-up rear sight on our S&W M&P-15 Sport II test gun.

Holosun HE510C-GR Elite green dot sight ar15 rifle shotgun survival defense optic review 10

Learning the controls was simple — we simply left the optic in its default automatic setting with a 10-minute shut-off timer, and increased the brightness setting slightly. The Shake Awake feature is very sensitive, and the sight activated reliably as soon as we picked up the gun. If you're keeping this sight on a truck gun, you'll definitely want to disable Shake Awake to avoid draining the battery with every bump in the road.

The green dot is clear and easy to track against a variety of backgrounds, even in intense midday sunlight. The dot and ring both exhibited good sharpness.

Holosun HE510C-GR Elite green dot sight ar15 rifle shotgun survival defense optic review 25

We tested the automatic brightness feature by walking between light and dark rooms — we were pleased to see the dot adjust on its own with barely a second of delay. One issue with this system is that it measures ambient light directly above the sight, not in front of the sight. This means that if you're aiming from a dark room into a fully-lit one or using a weapon-mounted light to clear a dark hallway, the dot will wash out and become difficult to track. Manual adjustment alleviates this, but requires fiddling with the controls.

Holosun HE510C-GR Elite green dot sight ar15 rifle shotgun survival defense optic review 18

Holosun claims this sight is “parallax free” but the reality is that all dot sights have some amount of parallax (i.e. perceived movement of the dot when you move your head — see this video for a demonstration of the effect). Fortunately, we didn't notice any substantial parallax during our testing, so this sight is good-to-go on that front.

Holosun HE510C-GR Elite green dot sight ar15 rifle shotgun survival defense optic review 21

Zeroing was straightforward, and we didn't notice any substantial point of impact shift after putting rounds downrange at 50 to 100 yards with our M&P-15. Holosun says the sight can be used on shotguns, so we mounted it on a Remington 870 Tactical and ran through some 00 buckshot to see how it held up. Despite the harsher recoil, the dot didn't wander.

Conclusion

Holosun HE510C-GR Elite green dot sight ar15 rifle shotgun survival defense optic review 15

Considering our previous experiences with inexpensive red dot optics, we were interested to try this Holosun, considering its full list of features and affordable price. We were pleased to find that it offers solid build quality and reliability at a price that's hundreds less than a comparable setup from other big-name companies.

Is it capable of taking years of hard use or surviving a house fire? Only time will tell, but our initial impressions of the HE510C-GR Elite have been positive. For the record, Holosun offers a limited lifetime warranty against defects on the housing or lens, and a 10-year warranty on the illumination system (this applies to Holosun's Elite optics only; Classic optics have a 5-year lens warranty and 3-year illumination warranty).

Holosun HE510C-GR Elite green dot sight ar15 rifle shotgun survival defense optic review 7

As for the topic of green dot versus red, color preferences will vary from one person to the next, but we found the Elite green dot was easy to pick up against most backgrounds. For home-defense or urban applications, we slightly prefer the green dot. Again, if red is your personal preference you can check out this sight's red-dot counterpart from Holosun.

Overall, we're glad we tried the HE510C, and it surpassed our expectations. Admittedly, it's not going to make other more-costly optics totally obsolete, but it's a dependable sight that offers good value for the money.

For more information on Holosun products, go to Holosun.com,


Video: Rudiger Roll Fire-Starter

When it comes to fire-starting, we all know about the obvious modern methods — lighters, matches, and ferro rods. As for more primitive ignition sources, you're probably aware of how to make a bow drill, use a magnifier to focus sunlight, or strike flint against steel. These methods are all well-publicized. However, there's one traditional fire-starting method you may not have heard of: the Rudiger roll.

advanced-fire-starting-techniques

The Rudiger roll is named after German survival instructor Rüdiger “Sir Vival” Nehberg, who documented the method in one of his books, but legend has it that this method was originally developed by WWII POWs who needed to start a fire without tools. The Rudiger roll consists of a flattened piece of combustible fibrous material, such as jute twine, cotton, hemp, or yucca fibers. The material is arranged into a long strip and covered with a layer of powdered abrasive/accelerant, such as ashes, rust, tobacco, or even crushed walnut husk. Accelerants are recommended but not always used — it's still possible to start a fire with nothing but the fibers, though more friction will be required.

Rudiger Roll fire starter tinder cotton jute fiber survival 1v2

Once the fibers and accelerant are combined, the strip is rolled tightly into a bundle that resembles a cigarette or a joint. This bundle is then placed on top of a flat surface such as rock, concrete, or a wood plank. Another flat item is placed on top of the roll, pressed down, and moved forward and backward rapidly to apply friction to the Rudiger roll. With the right technique, the friction should leave the roll smoldering in just a few seconds, ready to ignite a tinder bundle.

Rudiger Roll fire starter tinder cotton jute fiber survival 2

The following video from David West shows how to assemble and use the most basic Rudiger roll, composed of cotton and ashes.

Another YouTuber who goes by Boggy Creek Beast has dedicated dozens of videos to testing the effectiveness of a Rudiger roll with various natural and manmade materials. He has used chaga fungus, baking soda, poplar bark, manure, bone dust, newspaper, and even manganese dioxide from an alkaline battery. Watch the video below for an introduction to the technique, or check out his channel to see all his Rudiger roll videos.


Managing Dehydration: A Thirst for Knowledge

WARNING: This article is meant to be a quick overview and not a detailed guide on dehydration. Professional medical care should always be sought first before attempting any of these methods.

As self-reliant people, we understand the importance of water. We store it in our homes and bug-out shelters, carry it in our vehicles, and bring it with us during every hike or workout. The problem is that even with an abundance of available water, we often neglect the water within our own bodies.

Nearly two thirds of your body weight is water, yet taking that fluid status for granted, particularly during strenuous activity, frequently leads to dehydration and death. Here we’ll discuss the factors that contribute to water loss, followed by signs and symptoms of dehydration. Lastly, we’ll discuss some strategies for fluid management.

Activity and Environment

There are several factors that contribute to fluid loss. Exercise and temperature are among the biggest causes. Clearly, the hotter the environment or the more intense and prolonged the activity, the more water we lose, especially if we naturally sweat a lot. Don’t just assume, however, that increased activity and temperature are the only things to watch out for. It’s easy to think about replacing water when it’s hot outside, but many assume replacing it during the cold, dry winter months, isn’t as critical. Dehydration can and does still occur when you’re exposed to lower temperatures.

Deconditioning also plays a part in increased fluid loss. The simple truth is that being out of shape will require you to exert more energy and sweat more than usual, which may cause some to succumb to the heat more easily. Many people don’t realize that altitude also contributes to fluid loss. The higher you go, the more you perspire and lose water through increased respiration. The water/sweat also evaporates faster at higher altitudes due to higher atmospheric pressures, especially above 5,000 feet. Being aware of the factors that contribute to water loss is important.

Obvious signs of dehydration are thirst, dark-colored urine, and fatigue, which occur in mild dehydration (less than 5-percent body fluid loss). As water loss becomes moderate (5- to 10-percent loss), we can experience worsening of the aforementioned symptoms as well as increased heart rate, weak pulse, decreased urine output, decreased sweating, and decreased levels of alertness.

Replenishing

When dehydration is severe (greater than 10-percent loss), the mental state can be drowsy, even obtunded, and perspiration can stop, with the skin having “goose pimples.” There’s very little urine output and the respiratory rate increases. This is a situation that requires immediate medical attention, as it puts vital organs at risk of permanent damage.

In order to estimate how much fluid to replace, there’s a simple calculation. There are more precise equations that can be found on the Internet, but here we’ll keep it simple:

1) Take your weight in pounds, and divide by 2.2 to get your weight in kilograms.

2) Since your body is essentially 60-percent water, take your weight in kilograms multiplied by 0.6 to get the liters of water contained in your body. For example, if a male is 220 pounds, then the equation is (220/2.2) x 0.6 = 60 liters of water in his body.

3) Therefore, in a case of mild dehydration (5 percent) for this 220-pound (100kg) male, who we just calculated to have 60 liters of water in his body, would result in 3L of water lost during the activity (60L x 0.05 = 3L).

So with the signs of dehydration and the simple calculations above, we’ve one way to estimate how much water is lost during activity. Another is to weigh yourself before any activity, then weigh yourself afterward to find out how much weight you lost. You can assume that the weight lost was all water weight and replenish accordingly. As a general rule, 1 liter of water is equal to about 1 kilogram of weight. So, in our example, the man who lost 3 liters of fluid would have lost 3 kilograms of weight, or approximately 6.5 pounds.

Emergency water prep filter purifier disinfectant plastic bottles 6

If you don’t have a scale and anticipate a hard workout in a hot environment, we’d recommend drinking a ½ liter of water a few hours before the event, then about 250mL of water five to 10 minutes prior to the activity. During exercise, I would recommend drinking about 250mL every 15 minutes. This latter recommendation is approximately the maximum amount of fluid an average person can absorb from the stomach in that time period.

Having a Water Survival Plan

In a survival situation, however, remember from the rules of three that you can only survive roughly three days without water. Maintaining your hydration in a survival situation is crucial. As the level of dehydration becomes more severe, fatigue can interfere with performing tasks critical to your own survival. Mental clarity diminishes rapidly but is recovered slowly. The best approach is to prevent dehydration in the first place, by drinking water while you can. Trying to drink 250mL of water every 15 minutes in a stressful bug-out scenario may be a reasonable goal, assuming your cache of water is plentiful. If you’re bugging in, you may be able to stretch that out to every one to two hours, depending on ambient temperature and activity level.

Improvised Purification

Solar water disinfection purifier filter bacteria drink bottle 6

We all know that boiling water is one way to kill harmful pathogens, but did you know that it’s also possible to reliably purify water using clear bottles and exposure to sunlight? In the following article on OFFGRIDweb, we discuss SODIS, a solar water disinfection process designed for use in developing nations: offgridweb.com/?p=8644

Oral Rehydration Salts

Dehydration first aid fluid water health hydration drink medical survival 5

Above: Oral rehydration salts often come in such small packets like this example from Chinook Medical Gear. Keep some in your medical gear stash in the event dehydration and water scarcity becomes an issue.

What about the benefit of oral rehydration salts? The World Health Organization has developed an oral rehydration salt (ORS) that consists of sodium chloride (2.6g), glucose (13.5g), potassium chloride (1.5g), and sodium citrate (2.9g). These are available through the internet; one packet is dissolved in 1 liter of water. There are other ORS out there that you can put in a bottle of water, but they can have varying amounts of these four components.

The combination of “salts” was developed from treating severe dehydration due to infectious diarrhea in developing countries, where kids and adults were losing a lot of water and potassium. The potassium replacement was important to prevent cardiac complications. The glucose was added not so much for nutrition, but to assist in getting sodium into the cells. The sodium citrate was important to neutralize the acid built up in a severely dehydrated body. Some commercial ORS may have magnesium (to help with potassium transport) and may not have the sodium citrate. The citrate would only be important in very severe cases of dehydration. In a survival situation where there’s no ORS available, you could make a solution by using 1 liter of water, 6 leveled teaspoons of sugar (25.2g), and a half teaspoon of table salt (2.9g).

Alternate Hydration Methods

What about sports drinks? While these were developed to help aid athletes to recover faster, many physicians believe that sports drinks are generally not as helpful as people believe. The benefit you may perceive is the replenishment of glucose from the activity. What’s often lacking in these sugar-heavy beverages is the balance of electrolytes to accompany the glucose. If you don’t have water, it may be a reasonable alternative to consume a sports drink; however, it’s not recommended to rely on sports drinks when water is available.

Above: Do not rely solely on sports drinks in a dehydration situation if you have access to clean water.

Should you avoid caffeine? Contrary to popular belief, research shows that caffeine usually doesn’t act as a diuretic. A diuretic is a substance that makes you urinate more than the fluid consumed and is commonly used for those people with heart failure. Multiple factors can sway the argument toward caffeine being a mild diuretic. Are you dehydrated while drinking caffeine? Are you used to drinking caffeine? How much caffeine is being consumed at a time? If the answer to those questions is yes, yes, and more than 360 mg of caffeine, then you may notice a small diuretic effect. If you’re foraging for food in a survival situation, keep in mind that plants such as dandelion, onion, garlic, grapes, watermelon, and asparagus can have a diuretic effect.

You may have heard that zinc can be helpful in preventing dehydration since it has been studied in Africa during infectious diarrhea outbreaks (e.g. cholera). Zinc boosts the immune system and aids in intestinal transport of glucose and sodium. Studies have suggested that in cases of severe infectious diarrhea, patients who were given zinc had a significant decrease in severity and duration of diarrhea. They were also less likely to have recurrence of symptoms for months afterward.

Zinc supplements are often used to boost water retention and absorption.

Zinc supplements are often used to boost water retention and absorption.

The amount of zinc used in these studies was up to 20g a day for those over 6 months old, and 10g a day for those under 6 months old. Keep in mind that these were impoverished countries where zinc ingestion through foods was poor. In our western culture, we certainly get our fair share of zinc in our foods. In a survival situation, we have foods like garlic, raspberries, pumpkin seeds, cashews, almonds, and asparagus that all contain good amounts of zinc. It’s not known whether consuming zinc in a milder form of dehydration is beneficial.

Health Considerations

There are a few physiological items to discuss regarding dehydration as well. First, your gastrointestinal system always seems to be the first organ sacrificed when blood volume is low (e.g. dehydration). When you’re low on fluid, your body makes sure that your heart, brain, and lungs have all the fluid they need to keep you alive. If you eat while you’re dehydrated, your body doesn’t do a great job digesting the food, because the stomach was shut down to shift blood (fluid) to other more important organs. This is one of the reasons that you don’t feel hungry when you’re dehydrated.

Another factor in nutrition and fluid loss during a long-term survival scenario is a protein in our body called albumin. Although albumin has several important roles in the body, for our purposes here, its job is to keep fluid inside the blood vessels. If we re-visit the rules of three, we know we can survive about three weeks without food. Although we have albumin stored in our body, these levels can be depleted over a few weeks, especially if food is scarce. When albumin levels are low, water leaks out of the blood vessels and into the places where the tissues cannot use the water (this is called “third spacing”). This process decreases blood volume, decreases blood pressure, and creates an environment that leads to organ failure and death.

Optimal fluid management during activities or during survival situations is essential to maintain peak performance. By recognizing the signs and symptoms of dehydration, we might prevent a progression of dehydration that affects our performance. By managing our fluid intake to meet the demands of activity and the losses of fluid, we can prepare to perform at peak levels.

About the Author

David Miller, DO, FACOI, is an internist in private practice. Diagnosed with Type 1 diabetes in 1990, he has a unique perspective on patient care and disease management. Experiences away from the office include being a fight doctor for regional MMA bouts and a team physician for a Division I university in west central Illinois. Dr. Miller is an instructor for the Civilian Crisis Response Team (medical section) based out of Indianapolis.

More From Issue 28

Don’t miss essential survival insights—sign up for Recoil Offgrid's free newsletter today!

Read articles from the next issue of Recoil Offgrid: Issue 29

Read articles from the previous issue of Recoil Offgrid: Issue 27

Check out our other publications on the web: Recoil | Gun Digest | Blade | RecoilTV | RECOILtv (YouTube)

Editor's Note: This article has been modified from its original version for the web.


Watch Your Back: Backpack Armor Buyer’s Guide

We have our EDC and SHTF gear list for everything from going to the store to a doomsday incident. But what preparation have you made for your kids as you send them off to school? With mainstream media setting the stage for deranged individuals to get their claim to fame by going into so-called “safe zones” and harming the innocent, we’re forced to start looking at ways to protect our families in all facets of their daily life. Body armor is more economically accessible than ever, so you can wrap your loved ones, or even yourself, up in the latest Kevlar protection in case every parent’s nightmare becomes your reality.

With the influx of media attention, today’s market is packed with options for backpack armor. Some of these we’d literally stand behind, while others need some refining before they’re ready to catch rounds in the real world. We hit the range with several test samples to examine some options for armoring up our kids’ backpacks or even our own EDC bags.

The Testing

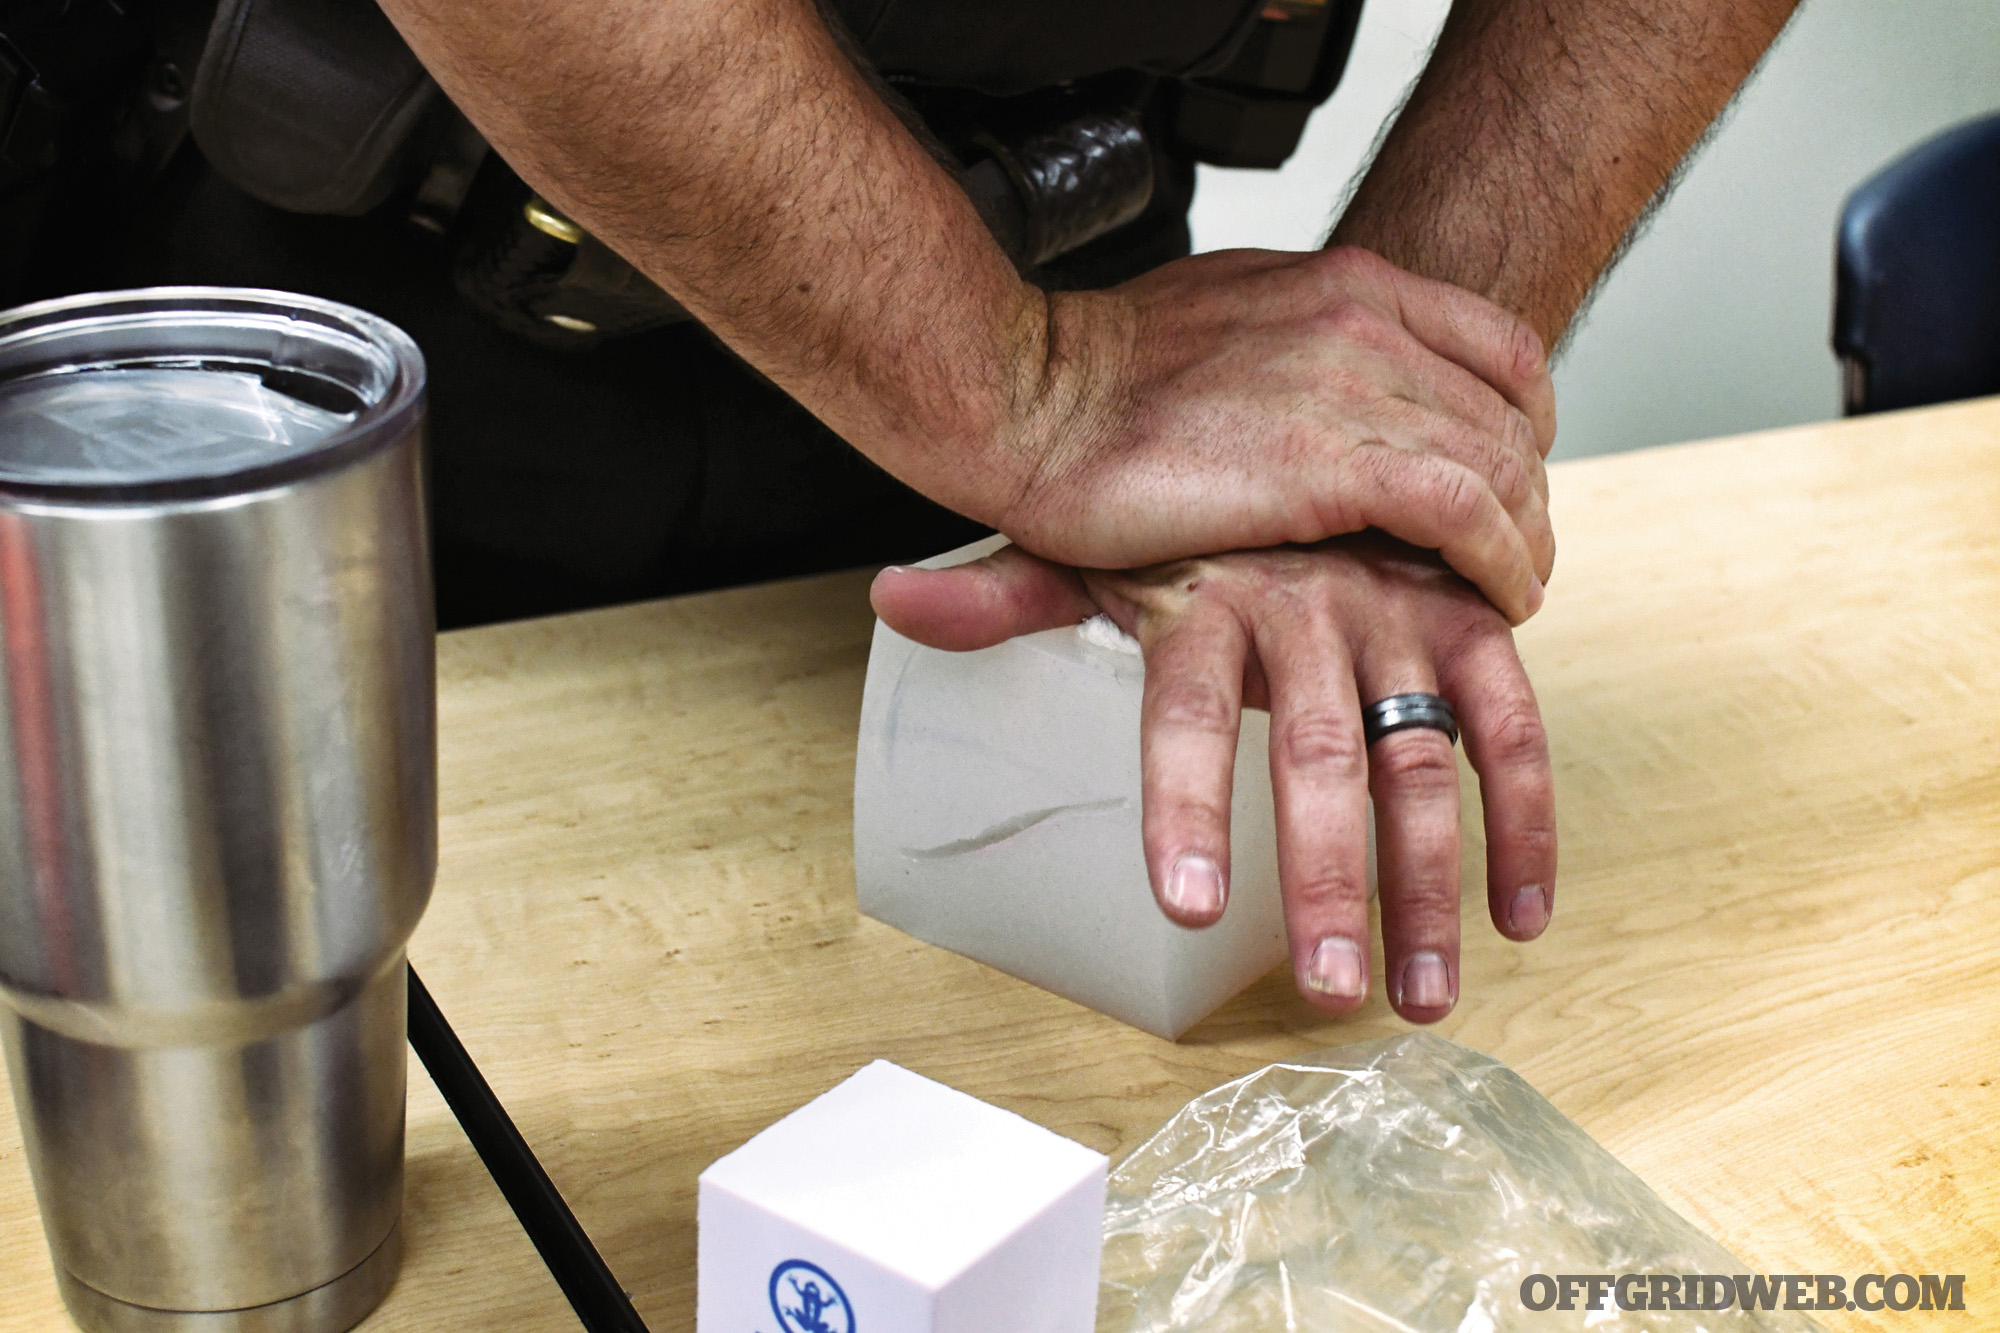
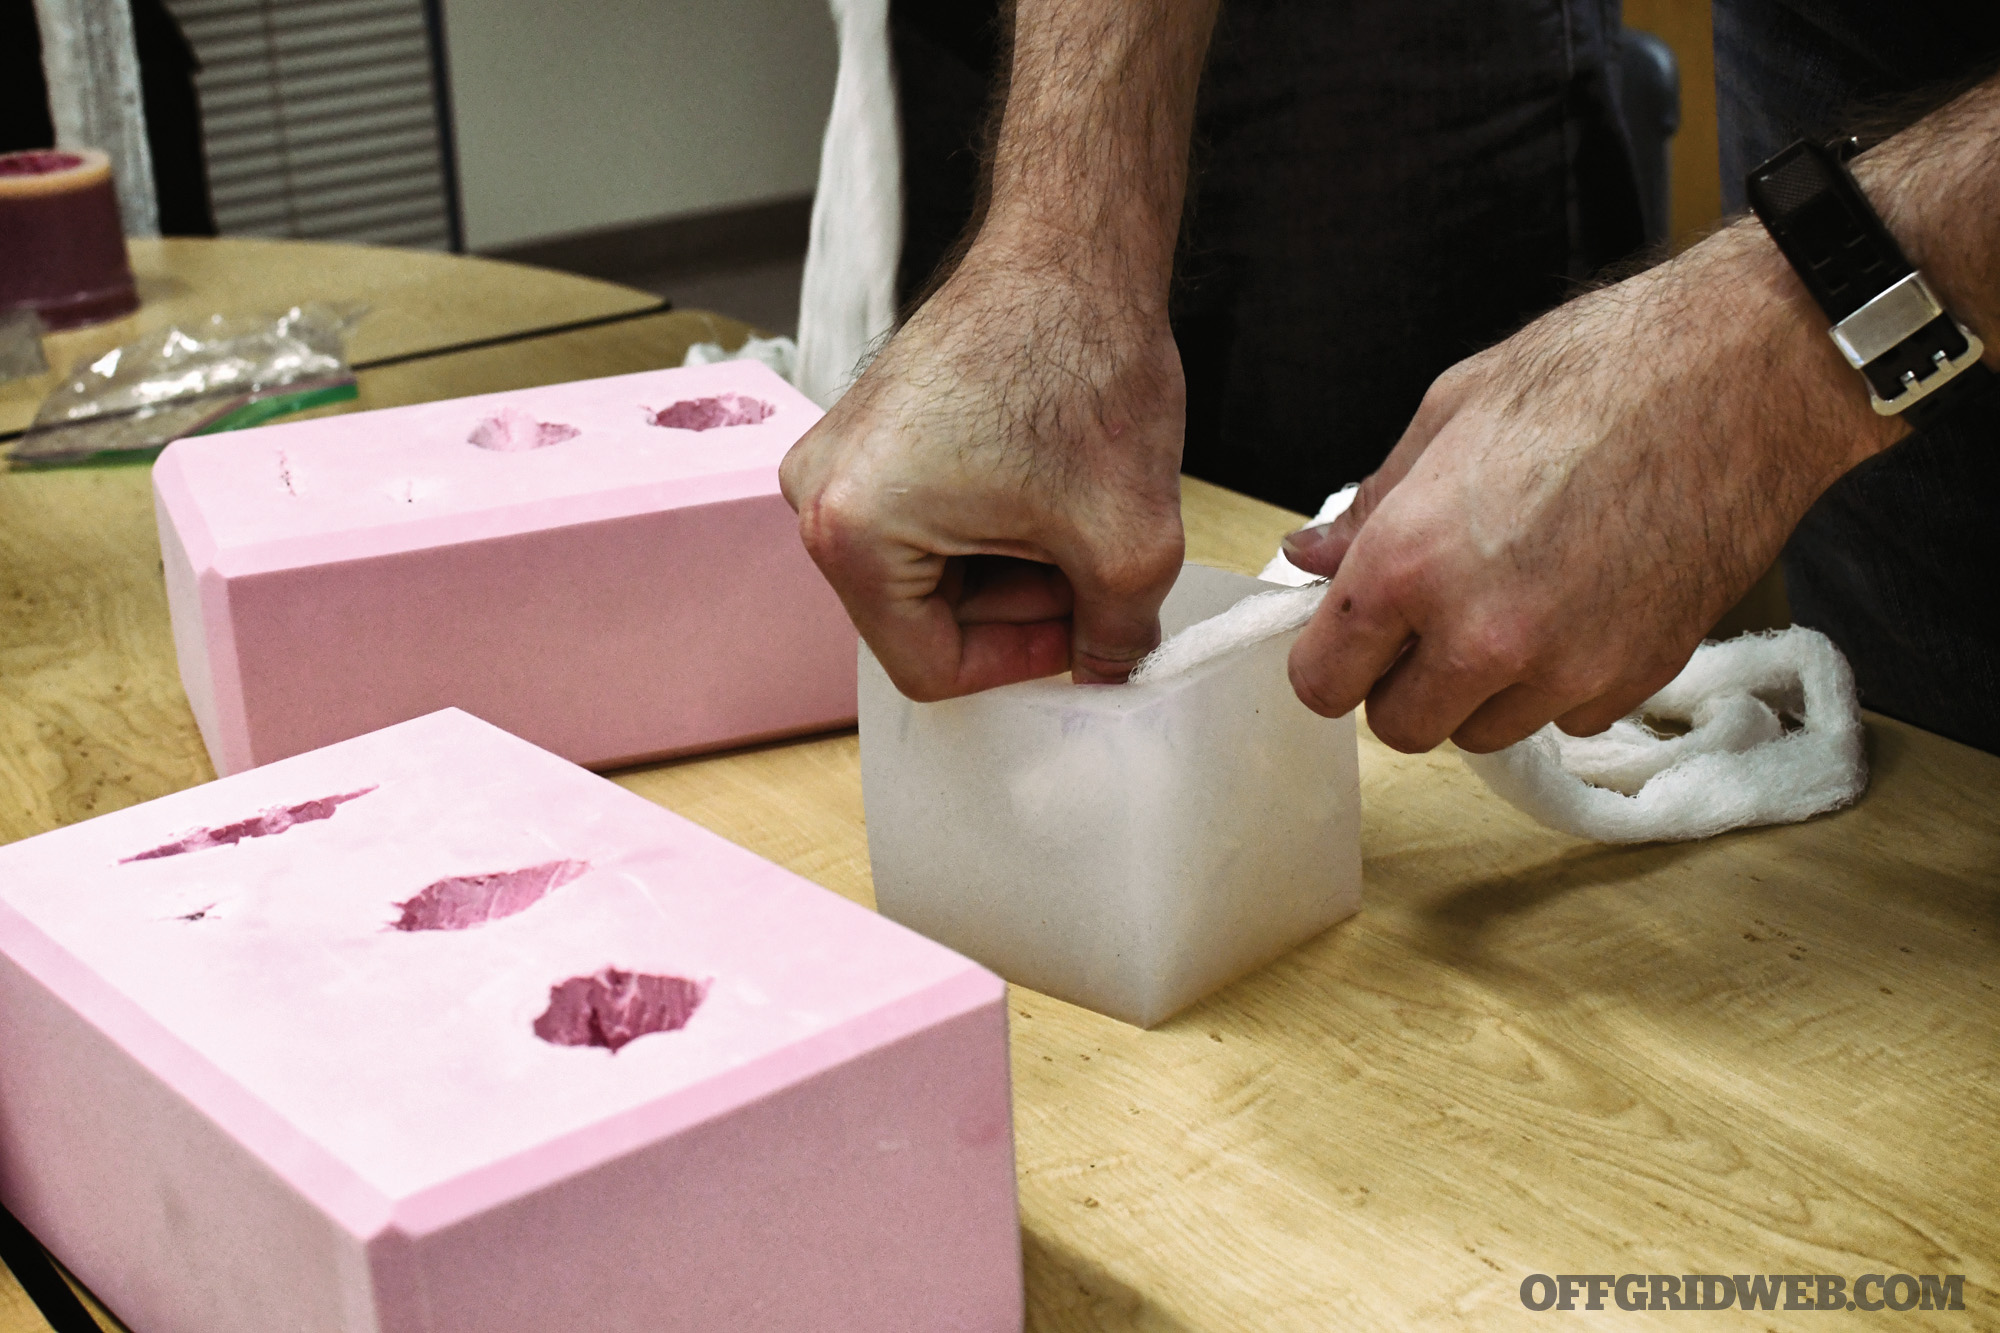
To simulate a realistic test, we looked at how most users would wear the bags during a shooting incident. The bags would likely either be held as a shield or worn as a vest. To that end, we arranged the following test parameters to best simulate these scenarios without the benefit of a fully-appointed ballistics lab:

Each bag was suspended by a target stand and shot in its center mass from a range of 15 meters.

Level IIIA bags were shot with an S&W M&P 2.0 Compact 9mm loaded with CCI Blazer 115-grain FMJ.

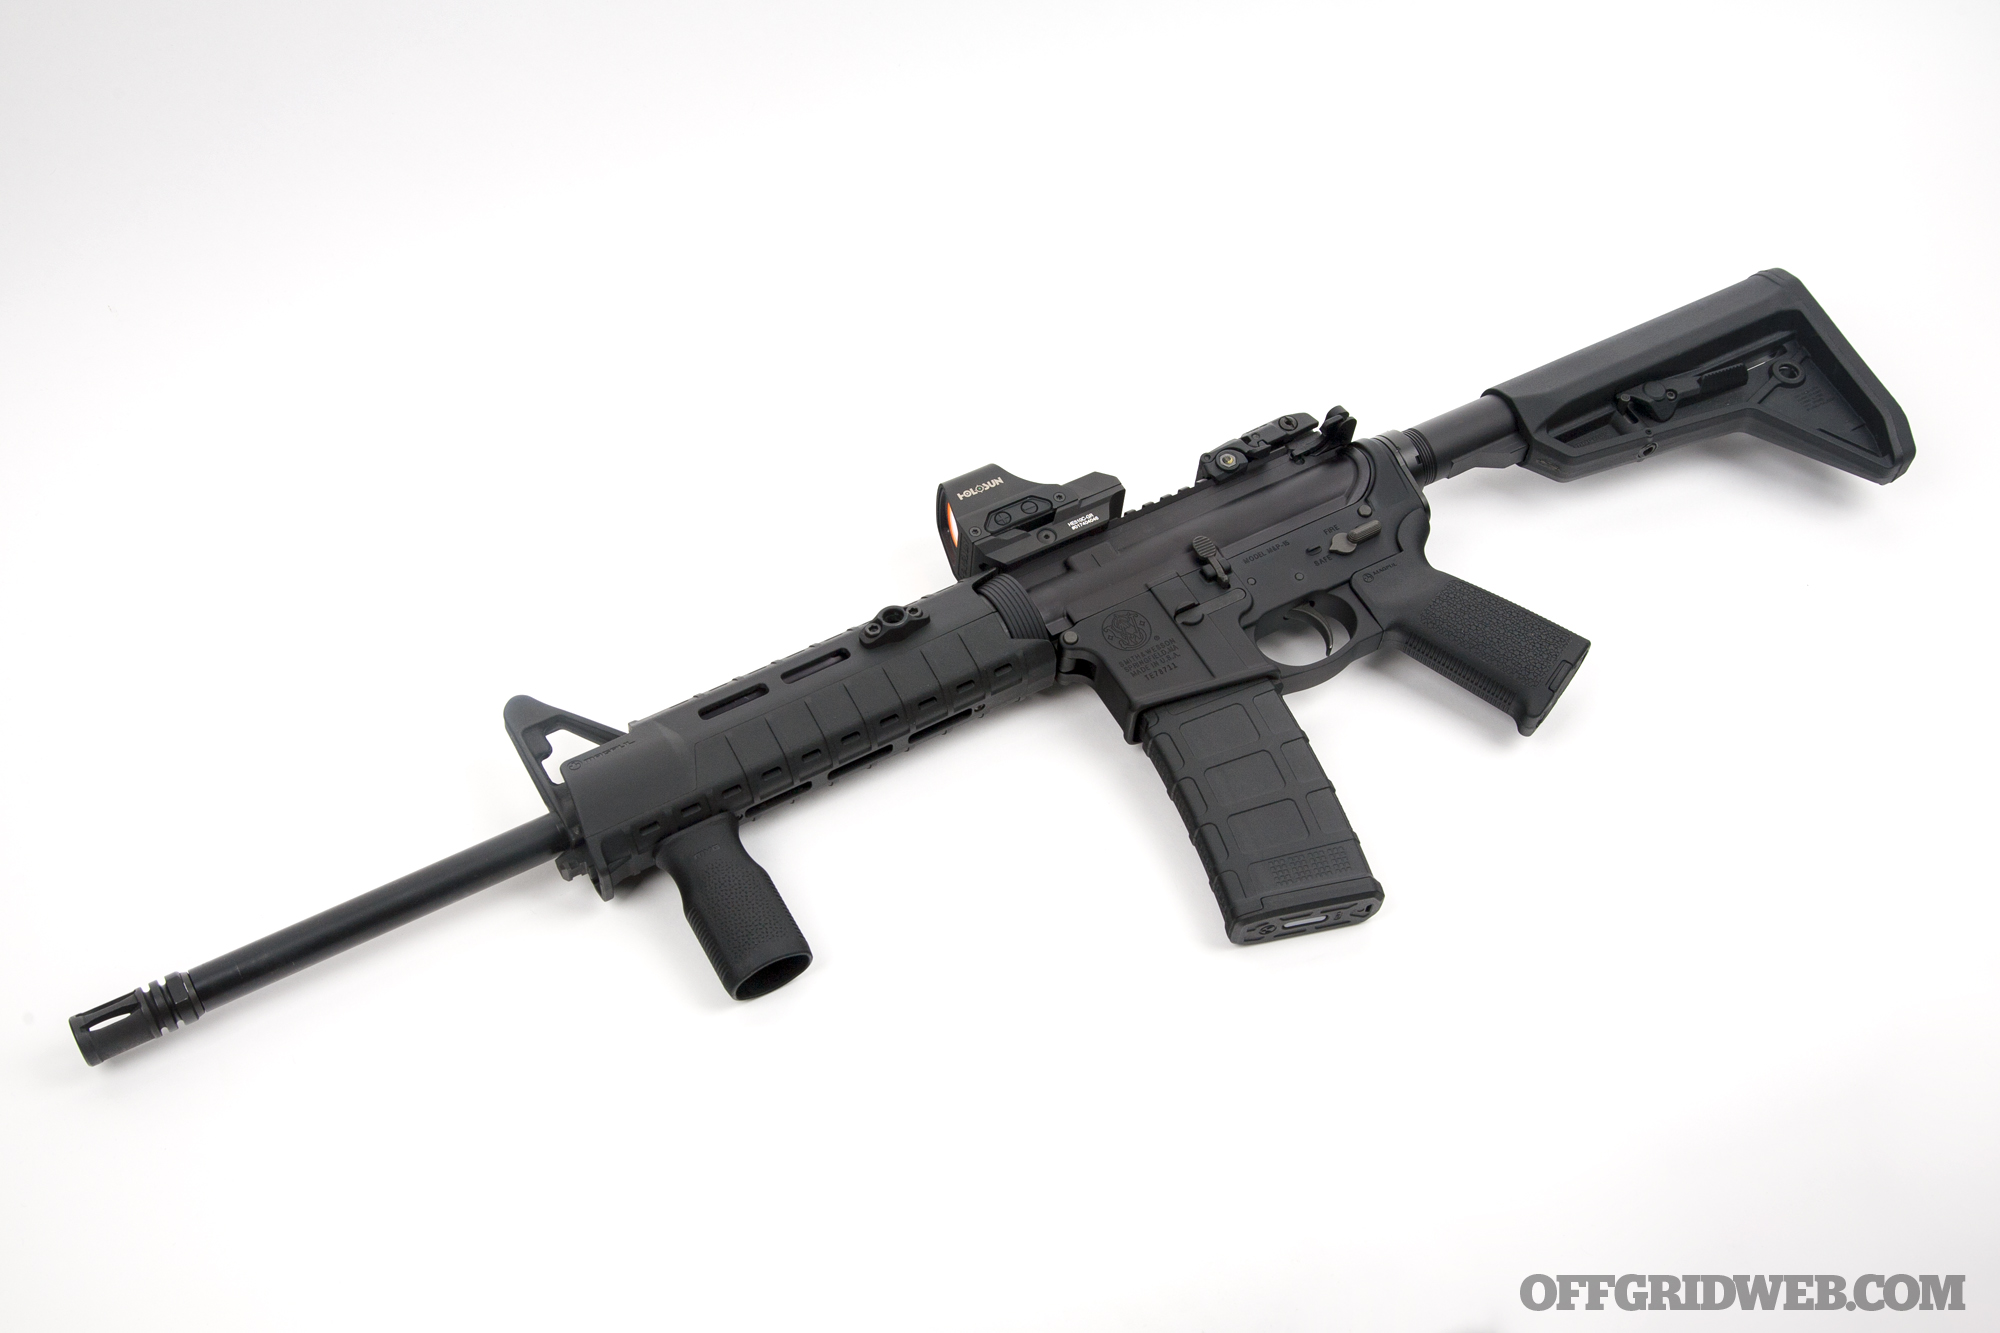
Level III+ were shot with an AR15 using a 20-inch barrel and .223 Remington 62-grain FMJ.

Note that a level III+ rating isn’t an actual NIJ standard, denoting that the manufacturer asserts the armor will meet the NIJ level III standard in addition to other threats (see sidebar to the right). We tested them with .223, given the ubiquity of the round in America. The two III+ plates in this guide are advertised to defend against .223.

AB4Y8312.psd

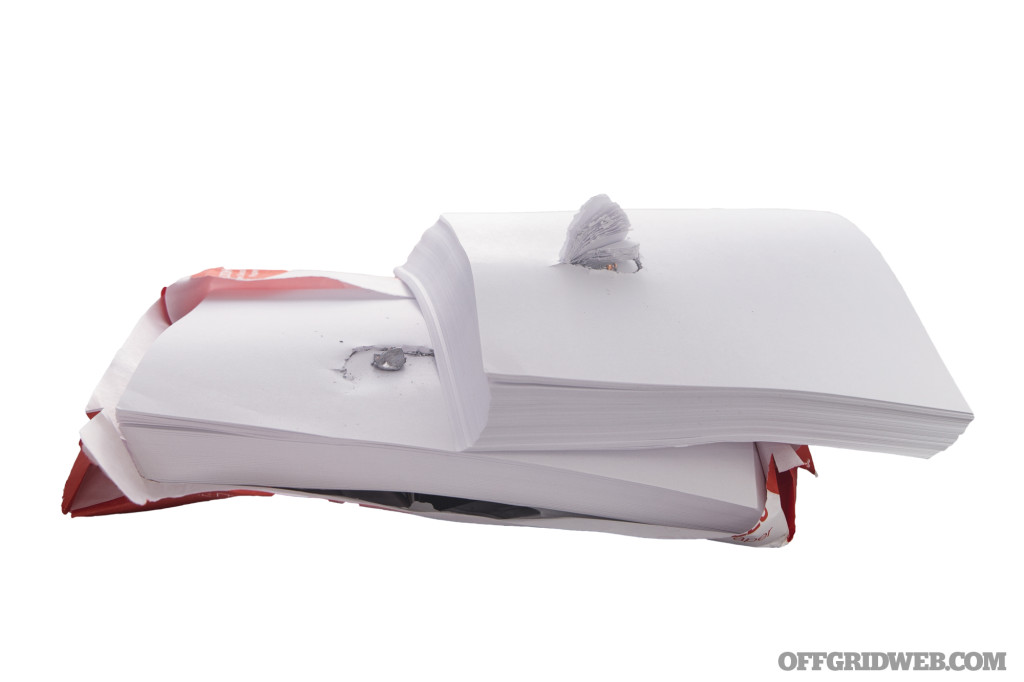
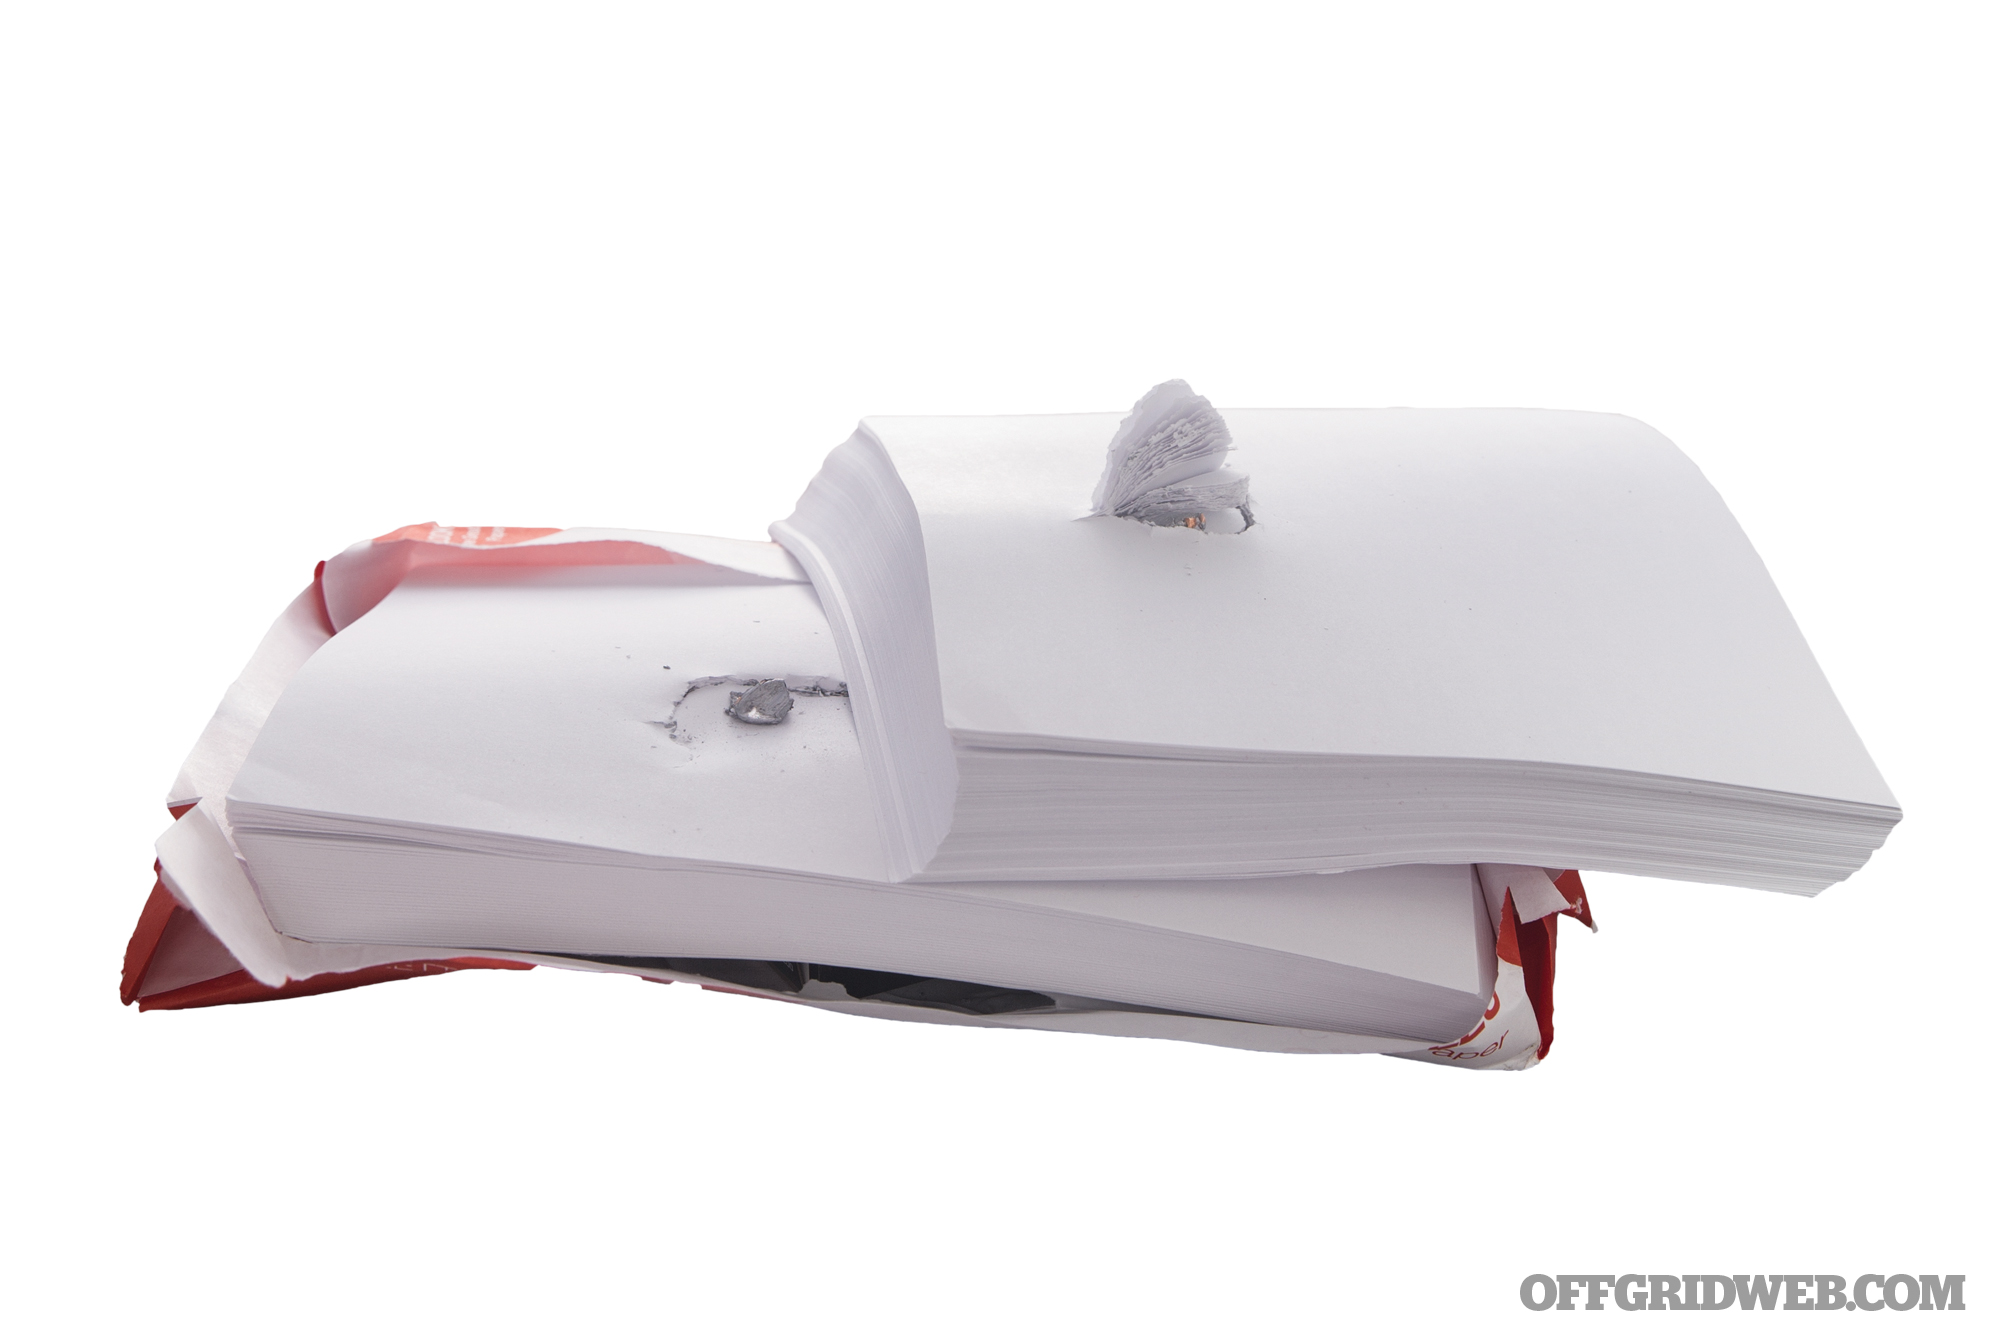
Initially, each bag was shot with a 500-page ream of 20-pound paper, 2 inches thick, in front of it. This simulates the approximate thickness of two textbooks to see how much, if anything, a backpack’s normal contents would do to stop a bullet on its own. Surprisingly, this was enough to stop a 9mm round. Of course, we wouldn’t recommend using paper reams alone as body armor, but the experiment provides some empirical evidence about how well it might stop a bullet. We re-tested each IIIA panel without the paper to see how well they’d hold up alone to defend against a caliber they’re rated for. As expected, the reams alone didn’t stop the .223 rounds at our testing distance.

Armor Considerations

Weight: Look for the highest-level protection with the most reasonable weight. We all want the highest level of protection, but it comes at the cost of weight and bulkiness. With some plates weighing more than 10 pounds, it can become almost impractical for daily carry and may very quickly be the first item removed when the backpack needs to be lightened up.

Independent Testing: Look for plates or panels that are independently tested. Any manufacturer can imply all of their products meet NIJ standards, but a reputable manufacturer will have an independent lab put each specific product through the paces. Don’t just check if the company’s other products are tested, look for a recent testing report for the specific product you’re buying.

Bigger is Better: Get the panel that will cover the most real estate inside your bag or backpack. This provides the most protection and most cover as a shield. While the bad guy is slinging rounds and not aiming for a small panel, you would be surprised how small you can make yourself behind even a 10-by-13-inch panel.

Train and Educate: Teaching loved ones how to react in an active shooter incident is just as important as fire drills or any other disaster planning. Develop the mindset that a ballistic backpack isn’t a personal effect to be left behind — it’s a defensive tool to grab and take with you in an emergency.

Ballistic backpack body armor buyers guide review test shooting gun shtf survival 1

Potential Issues

Don’t Place and Forget: Especially if you’re integrating a soft panel into your pack, check the panel placement frequently. We all get in a hurry and cram books, computers, and other items into a pack. If not located in a snug compartment, soft armor panels can easily get stuffed to the bottom of the pocket and won’t do much good in that position.

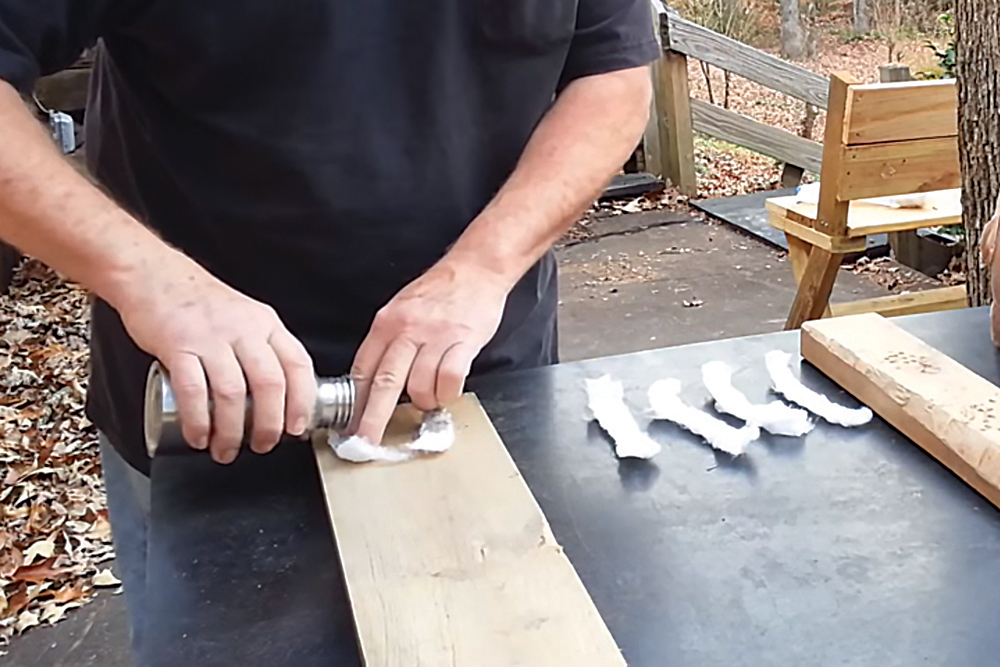
Humidity: You might think that Miami humidity only turns women’s hair into a bad ’80s album cover, but in humid conditions, Kevlar fibers puff up and create separation between the weave. This results in a reduction of the armor’s stopping ability. The same applies to wet armor — that stopping ability is reduced much more. NIJ testing indicates that armor’s effectiveness returns once it’s dried out completely.

ICW: “In Conjunction With” systems are a hard plate and soft armor backer that are designed to be used together to provide the rated protection. The plate degrades the projectile to a safe velocity to be captured by the second layer of soft armor. If you use the plate or soft armor by themselves, you won’t receive the listed protection, though some may indicate another rating when used standalone.

New and Improved!: The newest high-tech armor choices may sound appealing, but at times it’s best to wait. Give some subject-matter experts an opportunity to put the products through their paces and see what stands the test of time.

Expiration: The NIJ states that body armor must have an expiration date listed by its manufacturer. Most manufacturers put a five-year expiration date on their panels, but look at the tag to be certain.

NIJ Armor Ratings Explained

The National Institute of Justice (NIJ), a division of the Department of Justice, has been setting voluntary body armor standards since 1972. Its testing standards set the baseline for expectations of performance of body armor in the United States. Note that the “A” suffix of any body armor category, counterintuitively denotes a lower level of protection than the parent category. The most commonly seen ratings (the latest NIJ 0101.06 revision) certify protection from the following specific threats:

Handgun Calibers

  • Level IIA: 9mm FMJ 124-grain bullets at 1,225 fps and .40 S&W FMJ 180-grain bullets at 1,155 fps (six shots)
  • Level II: 9mm FMJ 124-grain bullets at 1,305 fps and .357 Magnum JSP 158-grain bullets at 1,430 fps (six shots)
  • Level IIIA: .357 Sig FMJ 125-grain bullets at 1,470 fps and .44 Magnum SJHP 240-grain bullets at 1,430 fps (six shots)

Rifle Calibers

  • Level III: 7.62x51mm FMJ steel-jacketed 147-grain bullets (M80) at 2,780 fps (minimum of six hits) Note: 5.56 may or may not be stopped by Level III, depending on bullet construction and velocity, which is largely dependent on barrel length. For example, at close range, M193 ball from a 20-inch barrel is harder to stop than M855 from a 16-inch barrel, despite the latter having a steel penetrator. This is due to the 55gr bullet’s higher velocity.
  • Level IV: .30 caliber armor piercing bullets (.30-06 M2 AP) at 2,880 fps (single hit)

Body Armor FAQs

Are body armor panels TSA approved?
Yes! TSA has permitted body armor in carry-on and checked luggage for airline travel. Don’t be surprised if you receive some extra scrutiny or a trip to the special room though.

Can I own body armor?
Yes, it’s legal in all 50 states unless you are a felon of a violent crime. And it can be shipped to your doorstep in all states, except Connecticut.

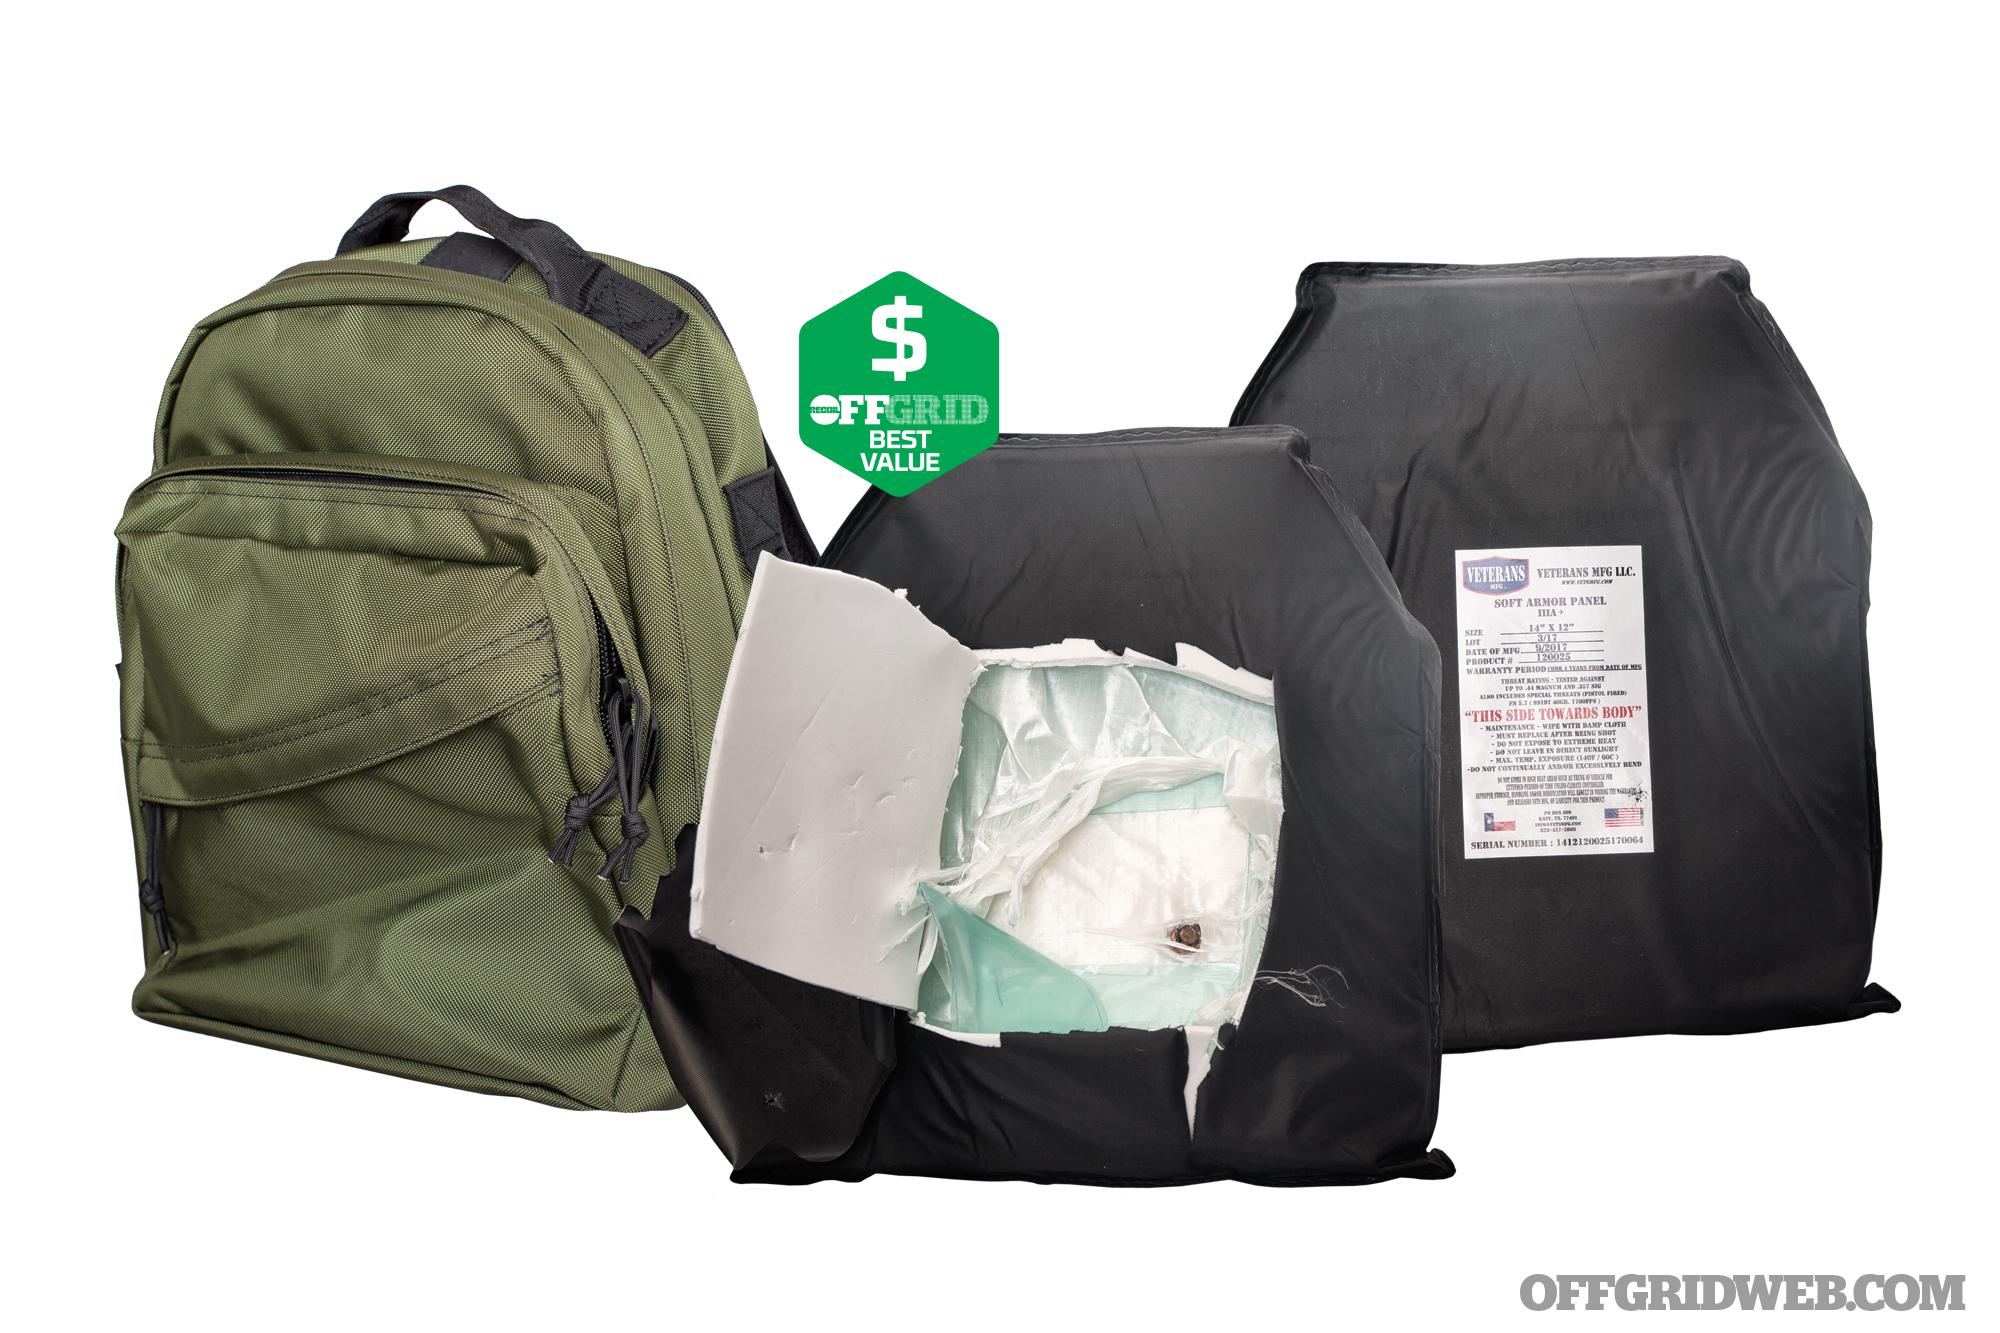
CYA Tactical Veterans MFG Level IIIA Soft Armor

AB4Y7995a.psd

Protection Level
IIIA Double Panel

Dimensions
12 by 14 by 0.5 inches

Weight
1 pound

Tested Inside
EDC Minimalist Pack

Test Result
PASS

MSRP
$315

URL
www.cyaconcealment.com

Notes
CYA Tactical was founded by James Renteria who spent years in situations where the threat of getting shot was a daily reality. While in Iraq, he started contemplating how to combine armor with the everyday functionality of a backpack to design a modular protective system. CYA Tactical’s system can be set up for a child to take to school or incorporated into a vest for first responders to incidents. The EDC Minimalist Pack system includes the panel, but you can also buy the panel individually. The CYA Tactical panel stopped the 9mm bullet in the first two layers of armor fabric (the CYA Tactical has extra material on the cover for water resistance) without any bullet deviation; no rear panel deformation was noted. The backpack’s design is pretty standard fare with three compartments and plenty of room for books and laptop.

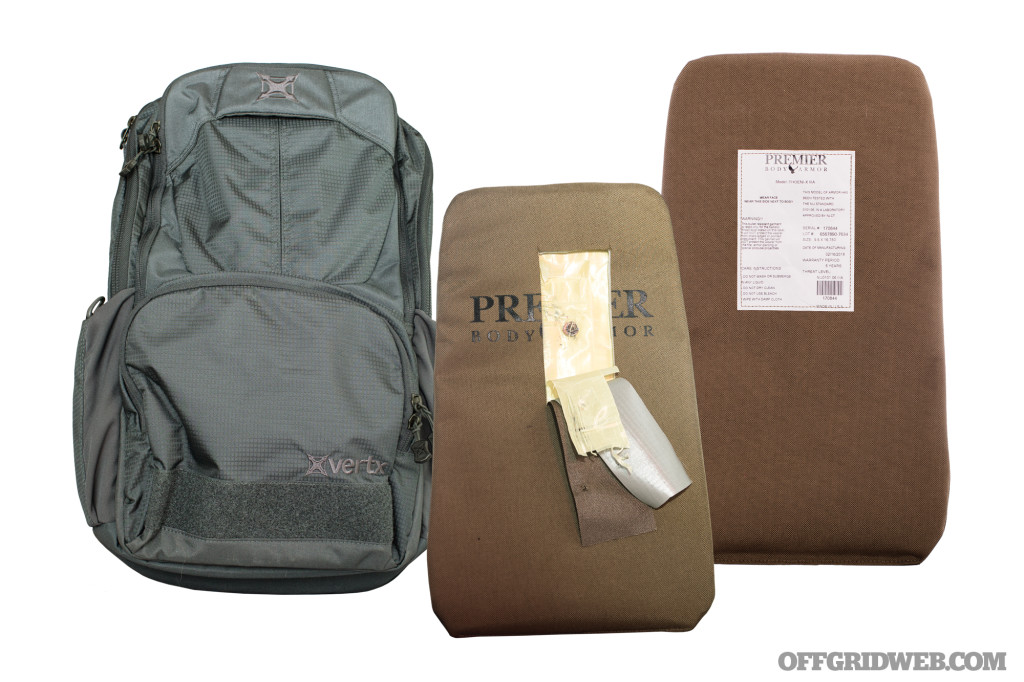
Premier Body Armor Vertx EDC Ready Panel

AB4Y7980.psd

Protection Level
IIIA

Dimensions
9.5 by 16.75 by 0.22 inches

Weight
1.49 pounds

Tested Inside
Vertx EDC Ready Pack

Test Result
PASS

MSRP
$200 (panel)

URL
www.premierbodyarmor.com

Notes
This panel from Premier Body Armor is designed specifically for the Vertx EDC Ready Pack and makes an impressive daily item for anyone from school children to adults. It provides ample room for a laptop and a couple of books without adding much extra bulk. The pack’s internal Kydex panel is replaced with the armor panel and maintains rigidity, while adding ballistic stopping power. The pack is sold separately by Vertx; Premier offers other panel shapes to fit various models. The Premier panel stopped the 9mm bullet in the second layer of armored fabric, with less than 1 inch of displacement of the bullet in the panel. The Vertx EDC Ready Pack will accommodate a 15-inch laptop, has several internal compartments to keep your daily EDC organized, and is mesh lined to accommodate customization of pouches.

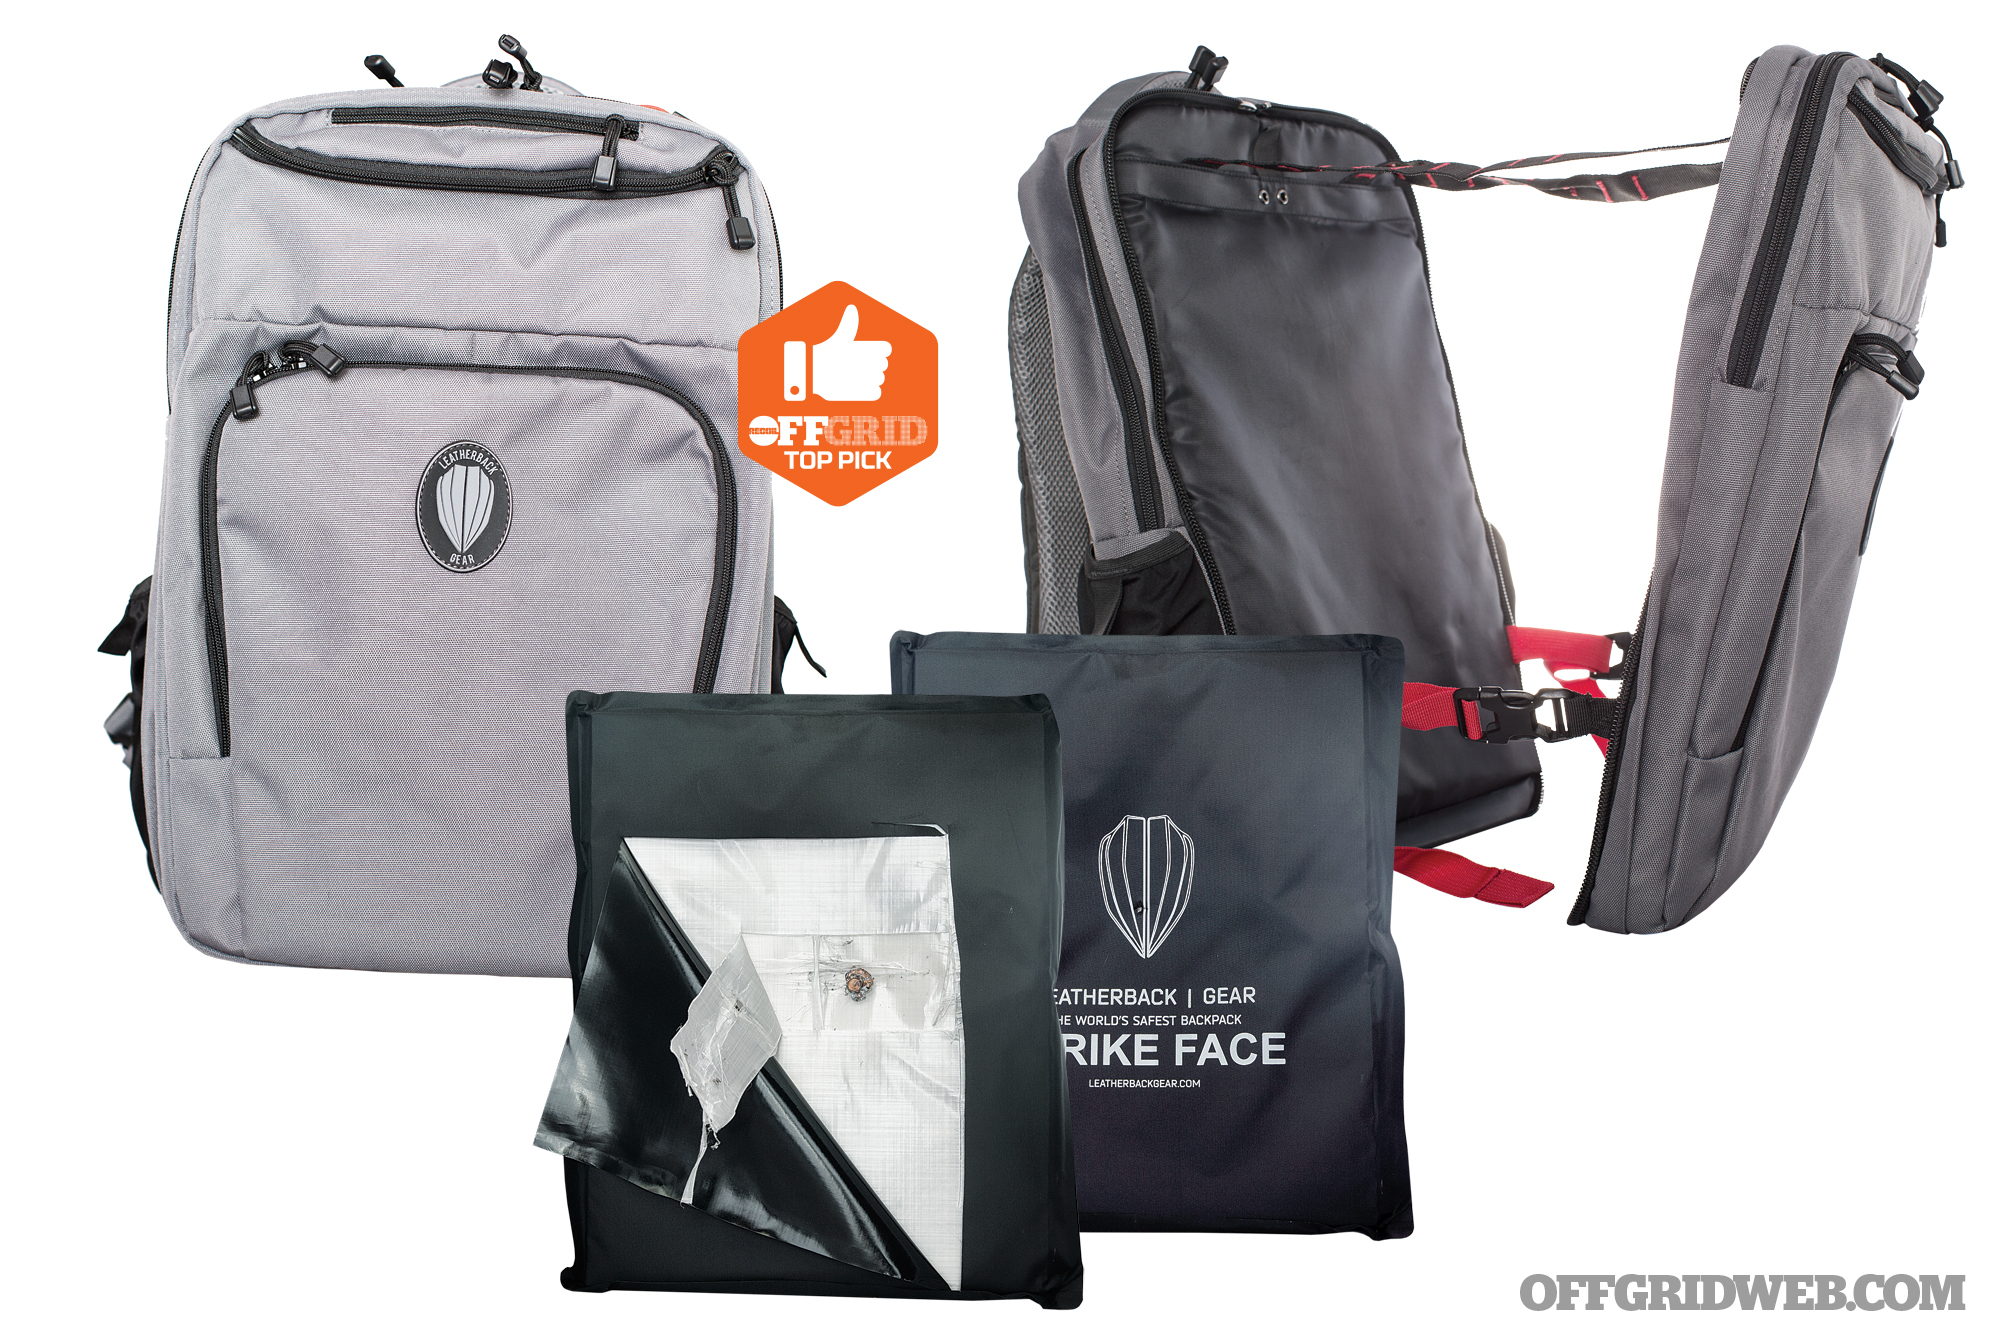
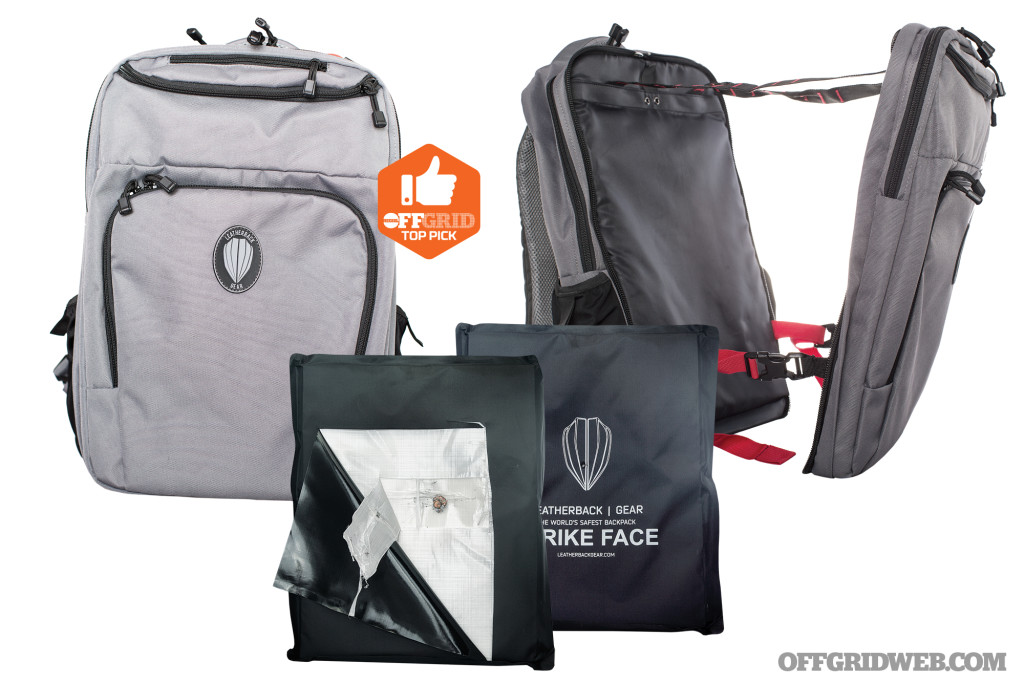
Leatherback Gear Leatherback Civilian One

AB4Y8002.psd

Protection Level
IIIA

Dimensions
19.5 by 13.5 by 7.5 inches

Weight
5 pounds, 3 ounces (2x panels)

Tested Inside
Leatherback Civilian One pack

Test Result
PASS

MSRP
$329

URL
www.leatherbackgear.com

Notes
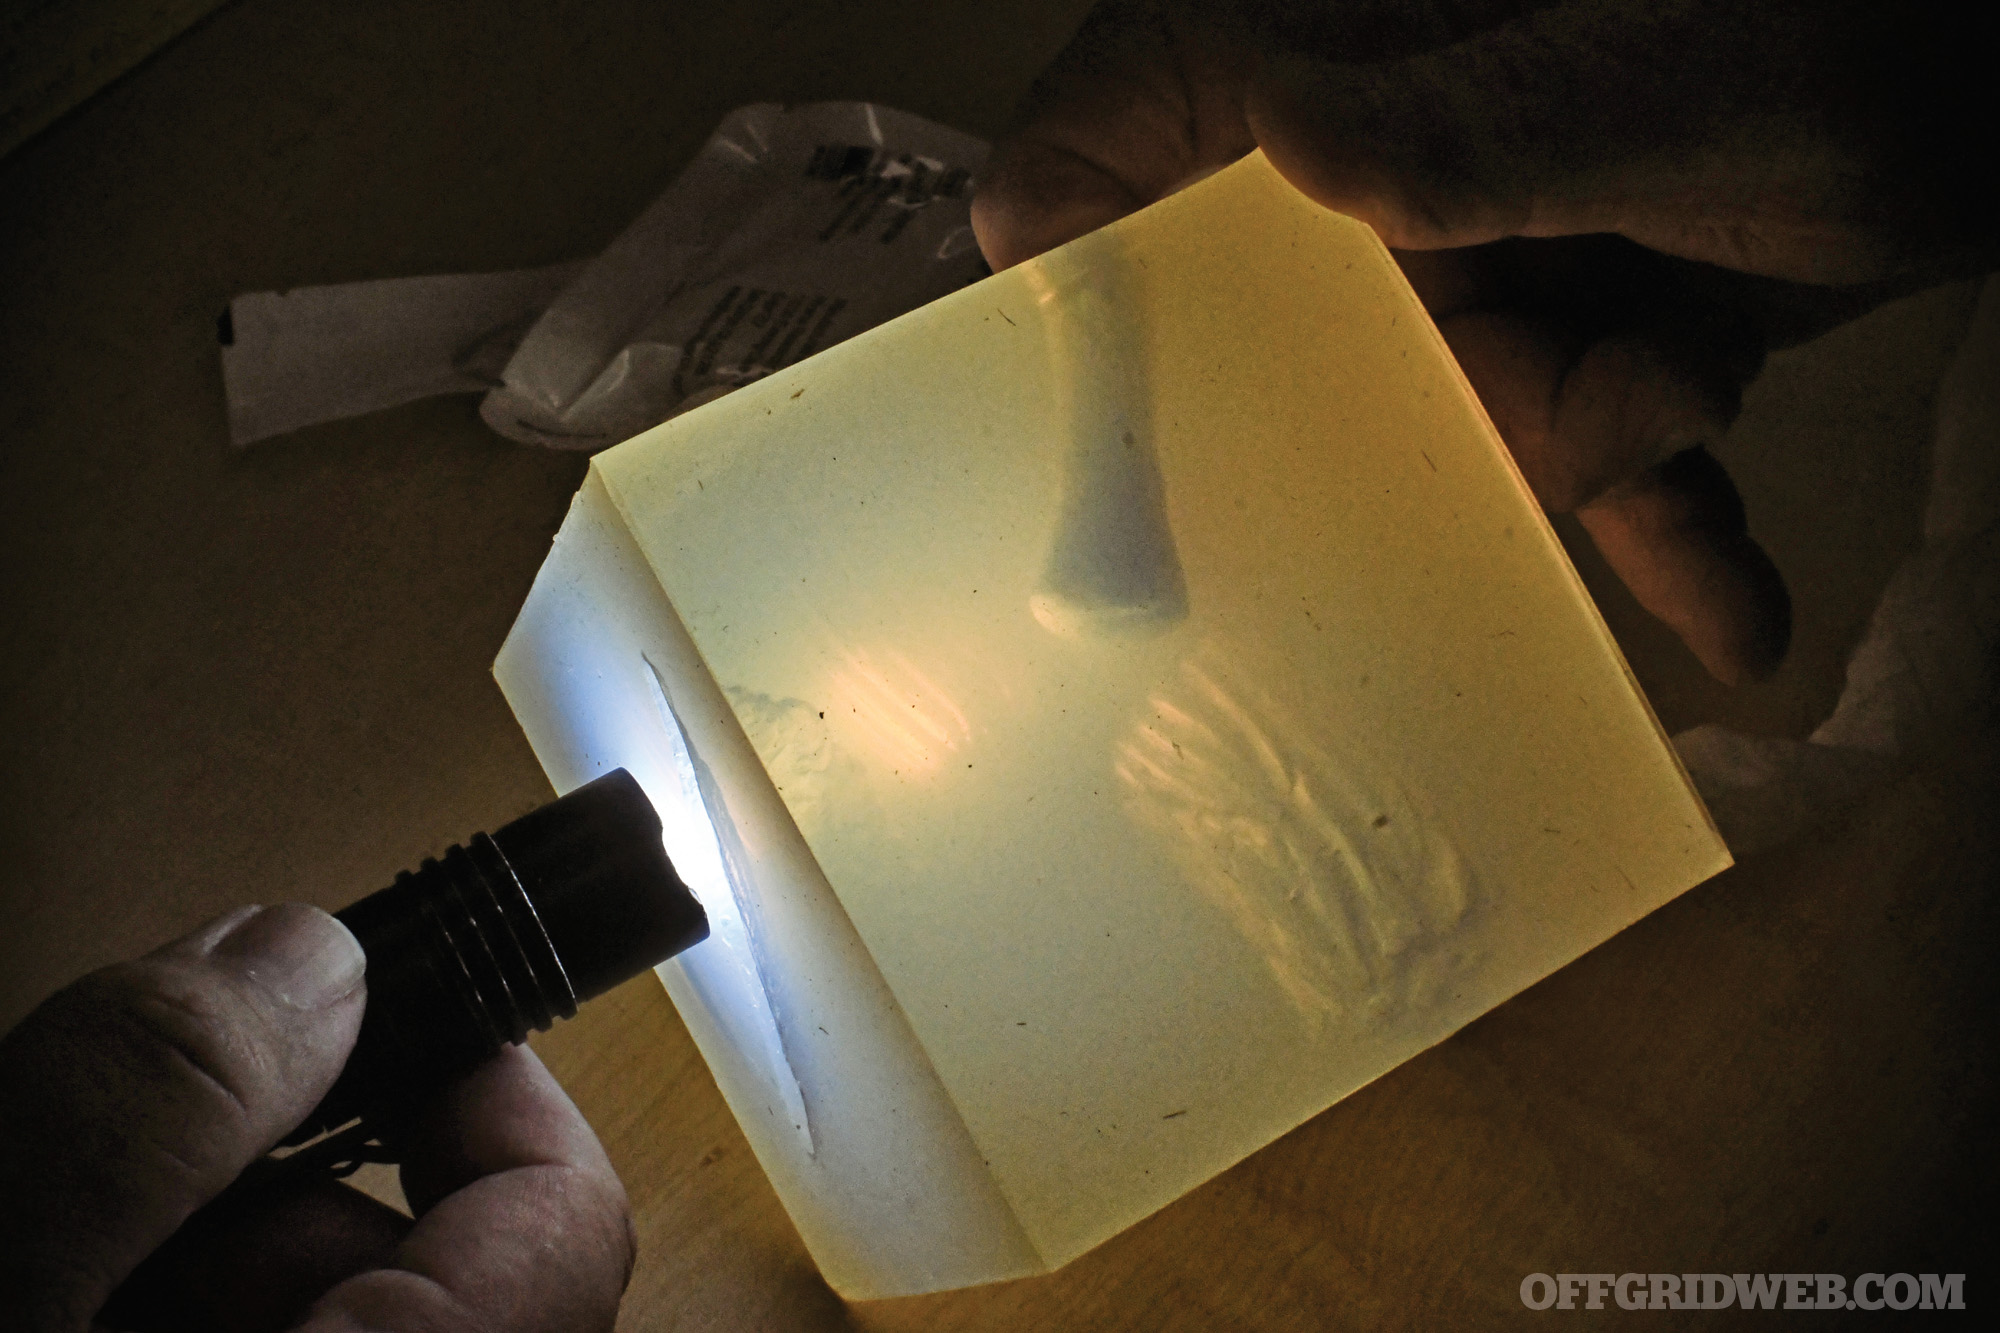
Leatherback Gear’s civilian backpack was our overall favorite of the bags in this guide. This bag is very inconspicuous to the point that a casual observer would never suspect double armor panels are carried inside. The company’s founders, a team of law enforcement and first responders, noticed the vulnerability of victims after responding to an active shooter event. So they set out to design a purpose-built defensive backpack, which splits apart to protect your front and back. One dig on Leatherback’s marketing material is their claim that the ITW Fastex straps “transform into tourniquets” — we certainly wouldn’t want to rely on these thin straps to stop blood flow. This system includes both pack and front and back panels, although a panel can be purchased separately. During testing, the panel stopped the 9mm bullet in the third layer of armored fabric without any back deformation. The bullet moved slightly in the fabric, but appeared more to tangle up in the weave than do any sort of yawing.

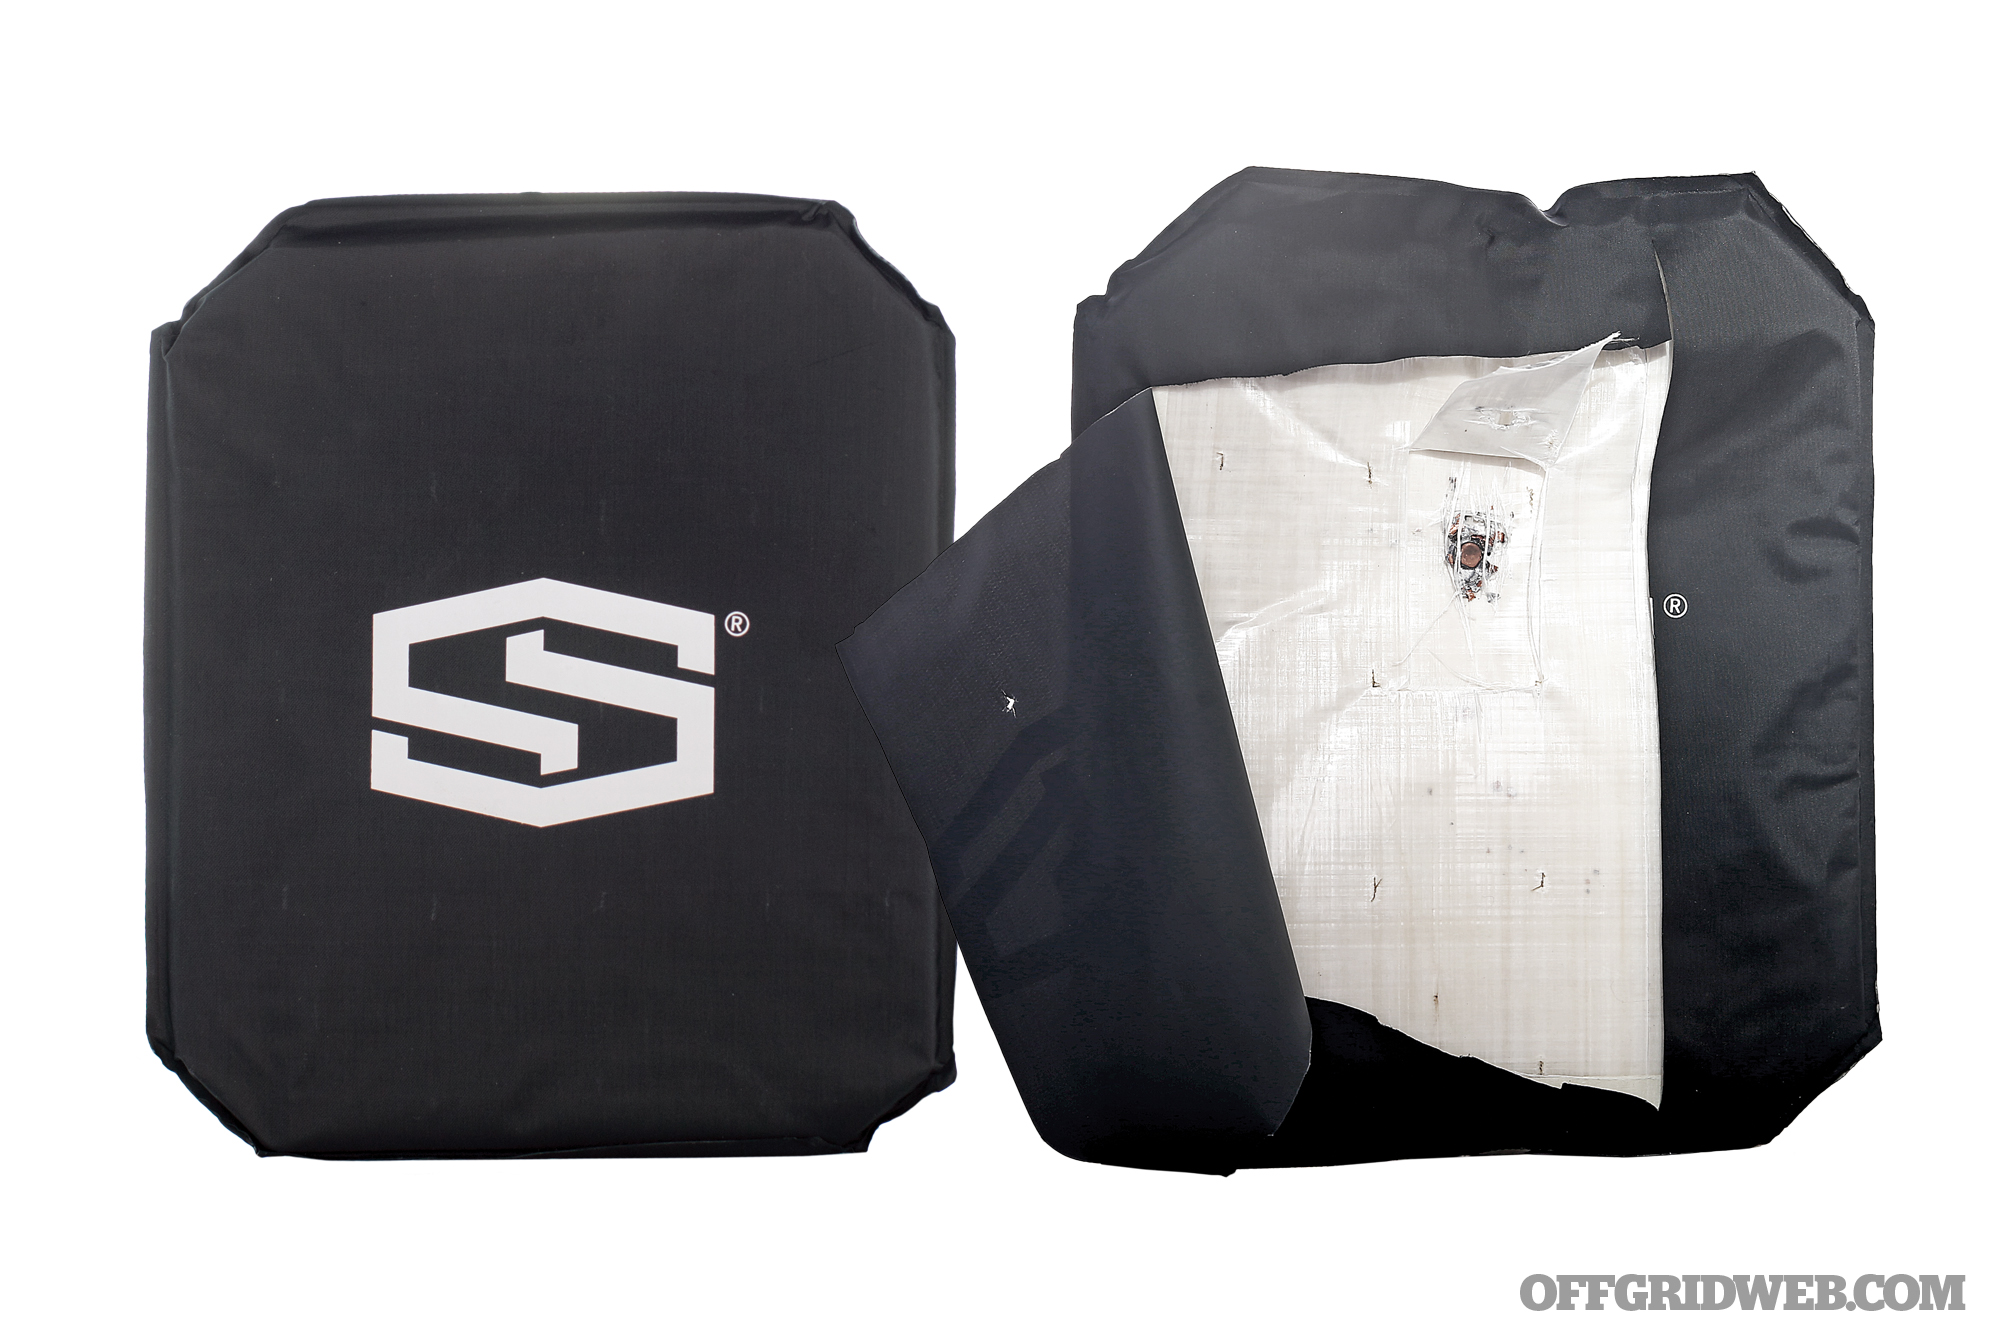
ShotStop BallisticBoard Level IIIA Soft Insert

Ballistic backpack body armor buyers guide review test shooting gun shtf survival 6

Protection Level
IIIA

Dimensions
10 by 12 by 0.26 inches

Weight
1.1 pounds

Tested Inside
Generic pack

Test Result
PASS

MSRP
$150

URL
www.shotstop.net

Notes
The IIIA soft panel had no issue defeating the 9mm caliber within the third layer of armored fabric without any bullet yawing. ShotStop doesn’t currently sell backpacks to pair its panels with so this panel and several others in this guide were tested using generic backpacks.

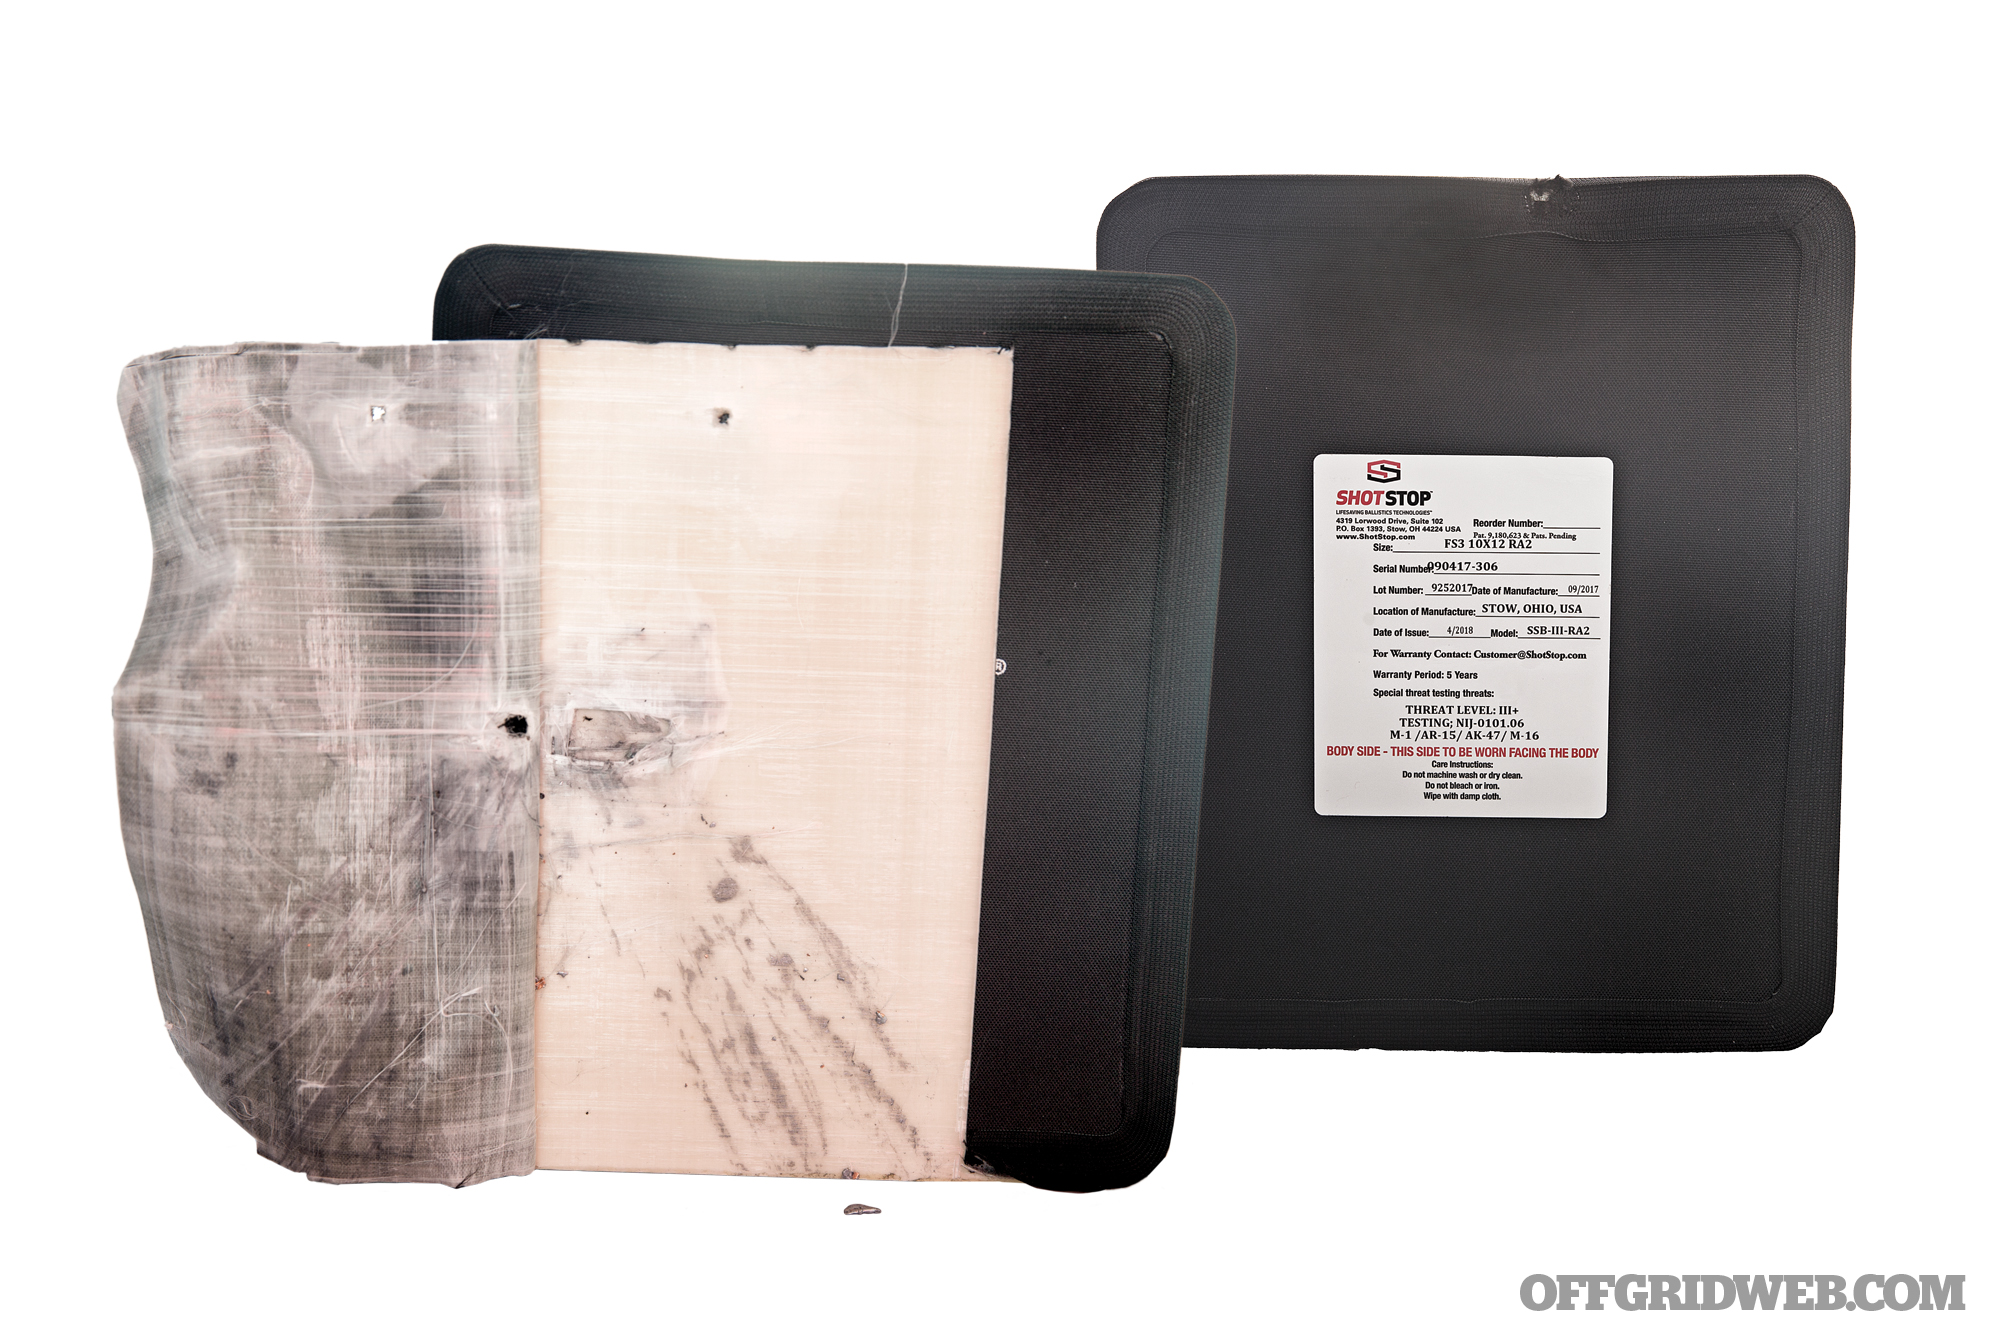
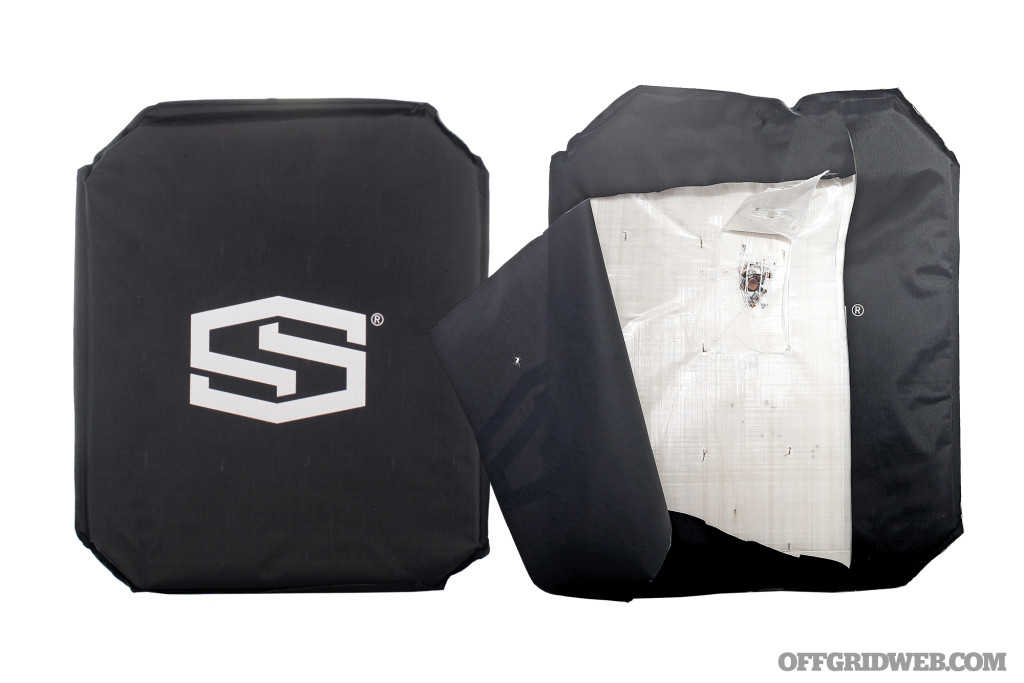
ShotStop BallisticBoard Level III Rigid Insert

AB4Y8303.psd

Protection Level
III+

Dimensions
10 by 12 by 0.9 inches

Weight
4.25 pounds

Tested Inside
Generic pack

Test Result
FAIL

MSRP
$249

URL
www.shotstop.net

Notes
When we first took the ShotStop’s III+ panel out of the box, it reminded us of the ICW plates we’ve seen issued to first responders many years ago. This panel was the only panel that failed the rated calibers during testing. The 9mm round didn’t penetrate but traveled the entire panel and fragments exited the bottom edge. Fragments of the 5.56 round penetrated and exited out the back of the panel.

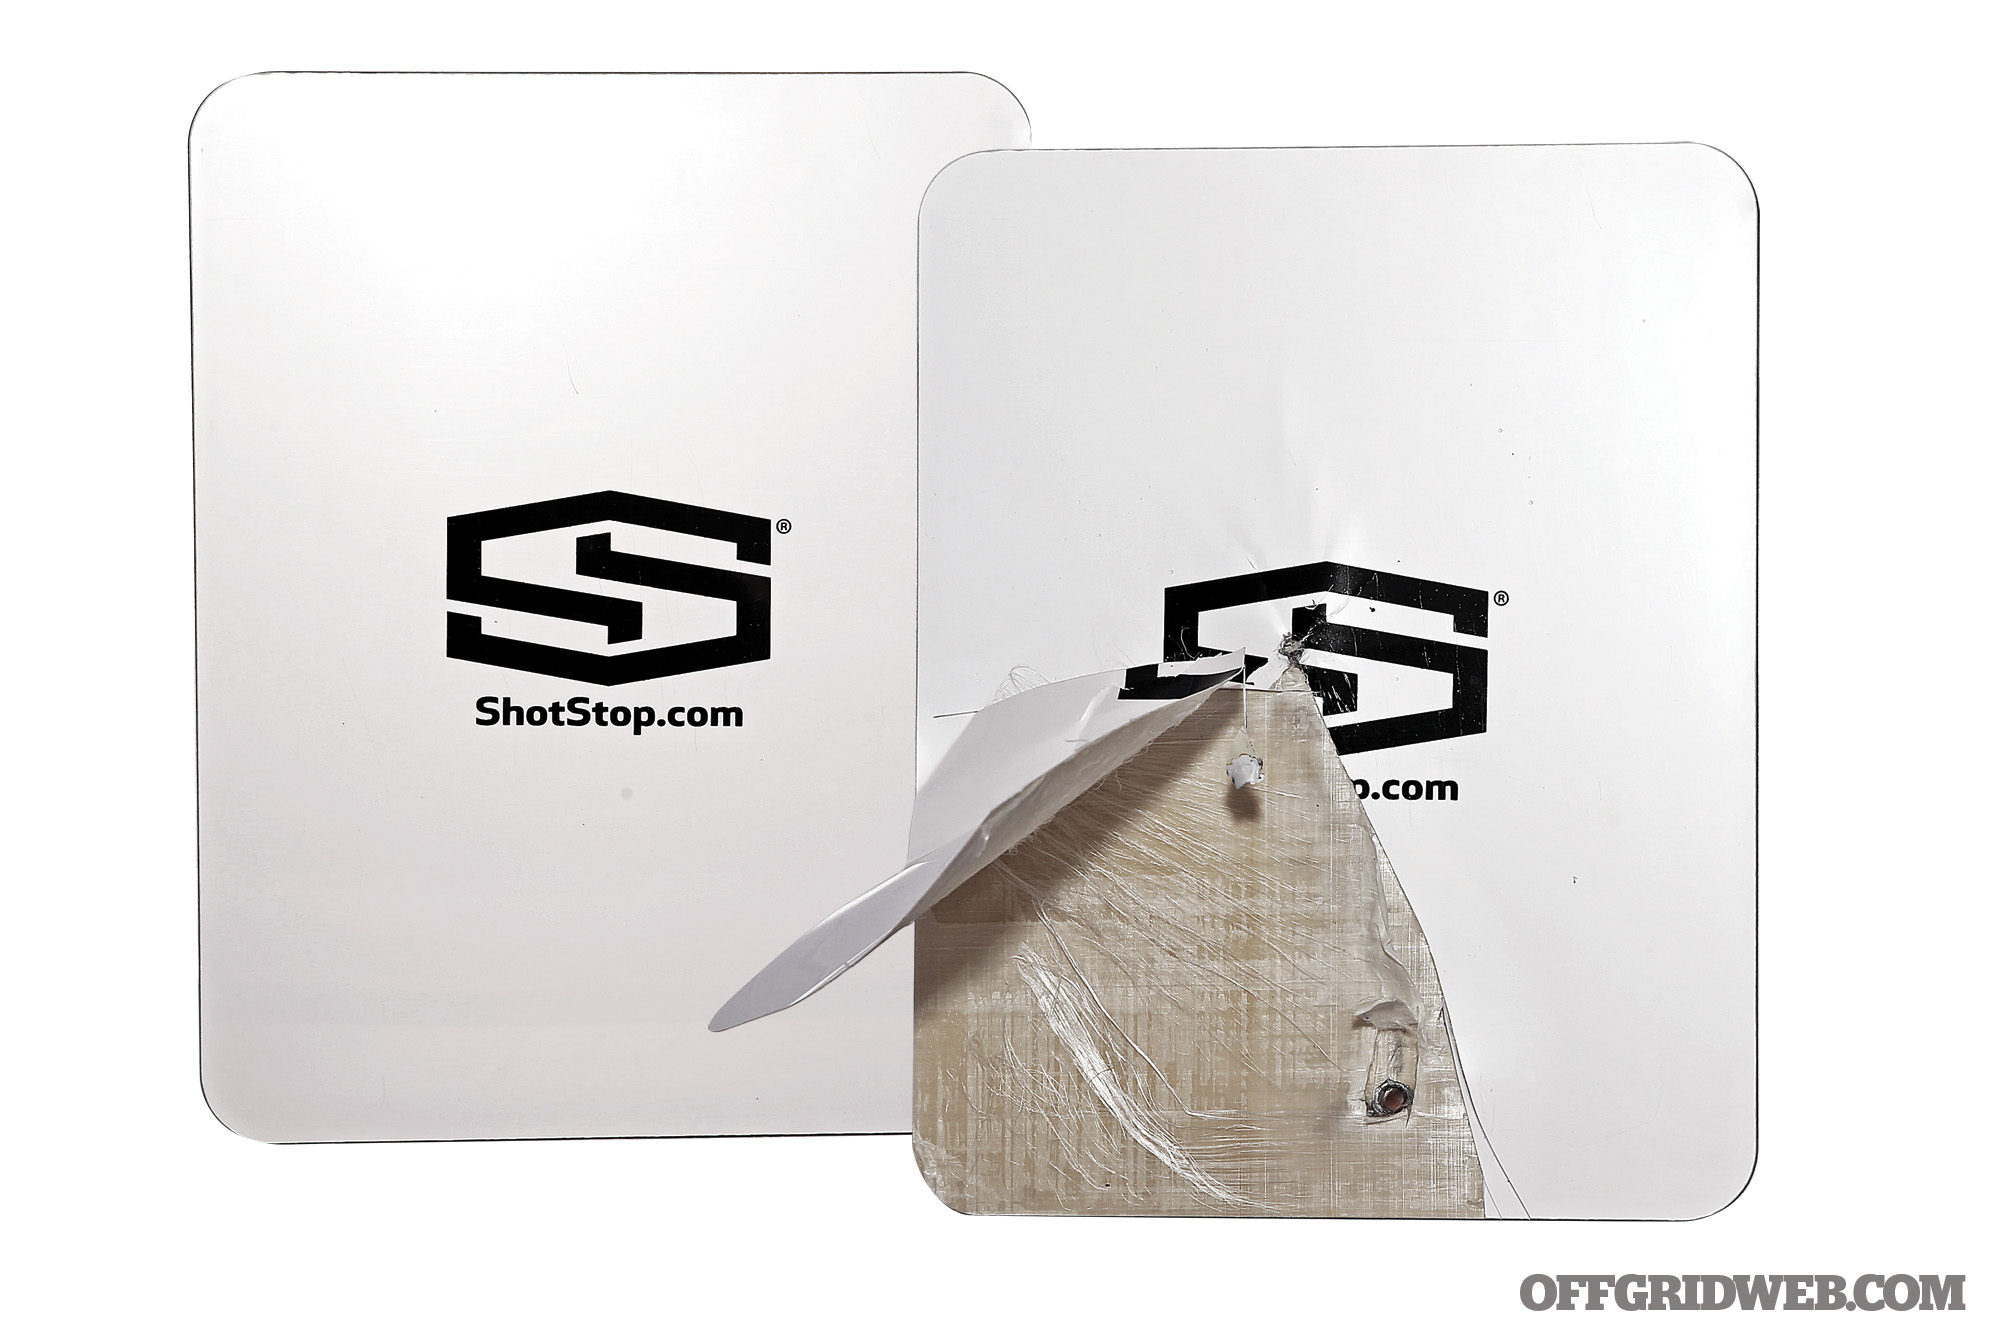
ShotStop BallisticBoard Level IIIA Clipboard
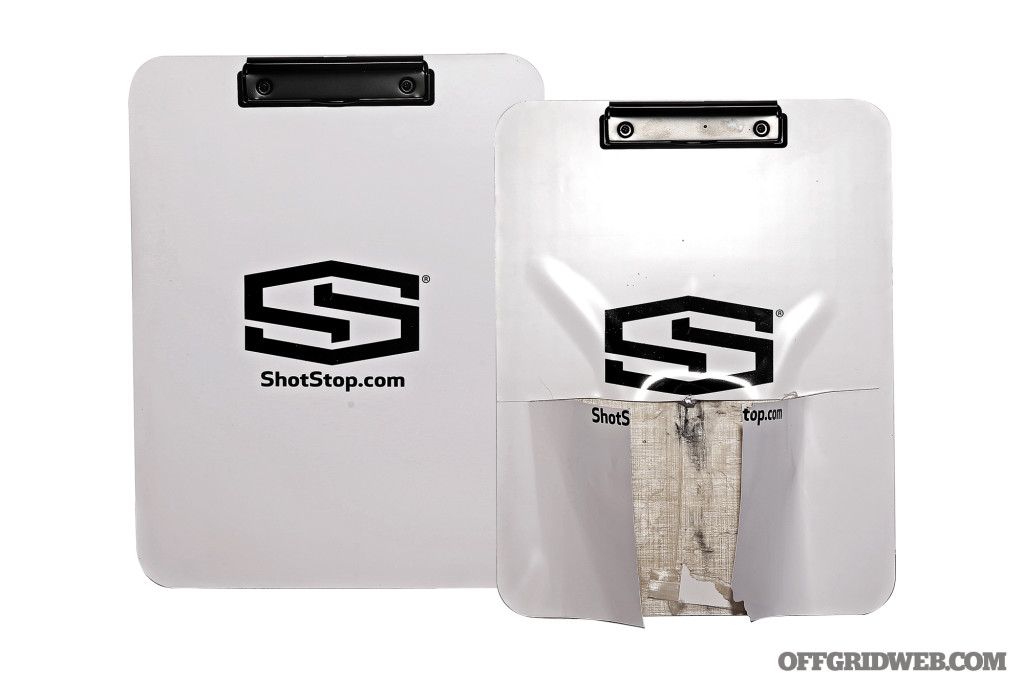
Ballistic backpack body armor buyers guide review test shooting gun shtf survival 8

Protection Level
IIIA

Dimensions
10 by 13 by 0.26 inches

Weight
1.3 pounds

Tested Inside
Generic pack

Test Result
PASS

MSRP
$165

URL
www.shotstop.net

Notes
The IIIA BallisticBoard Clipboard is an interesting concept of an armored panel in the guise of a clipboard. This would be handy for school faculty or businessperson who isn’t always able to carry a bag with them. The 9mm bullet was stopped in the second layer of armored fabric with a 1-inch yaw of the main bullet and smaller fragments traveling over 5 inches through the panel. The back face had less than 1/4 inch of deformation. We’d put a sticker over the ShotStop branding for a more discreet look.

ShotStop BallisticBoard Level IIIA Rigid Insert

Ballistic backpack body armor buyers guide review test shooting gun shtf survival 9

Protection Level
IIIA

Dimensions
11 by 14 by 0.26 inches

Weight
1.6 pounds

Tested Inside
Generic pack

Test Result
PASS

MSRP
$165

URL
www.shotstop.net

Notes
Shotstop’s IIIA is one of the larger panels tested and very light weight for its size. The 9mm bullet was stopped in the top four layers of armored fabric; it yawed and traveled over 4 inches through the panel before stopping. Back face deformation was less than 1/4 inch.

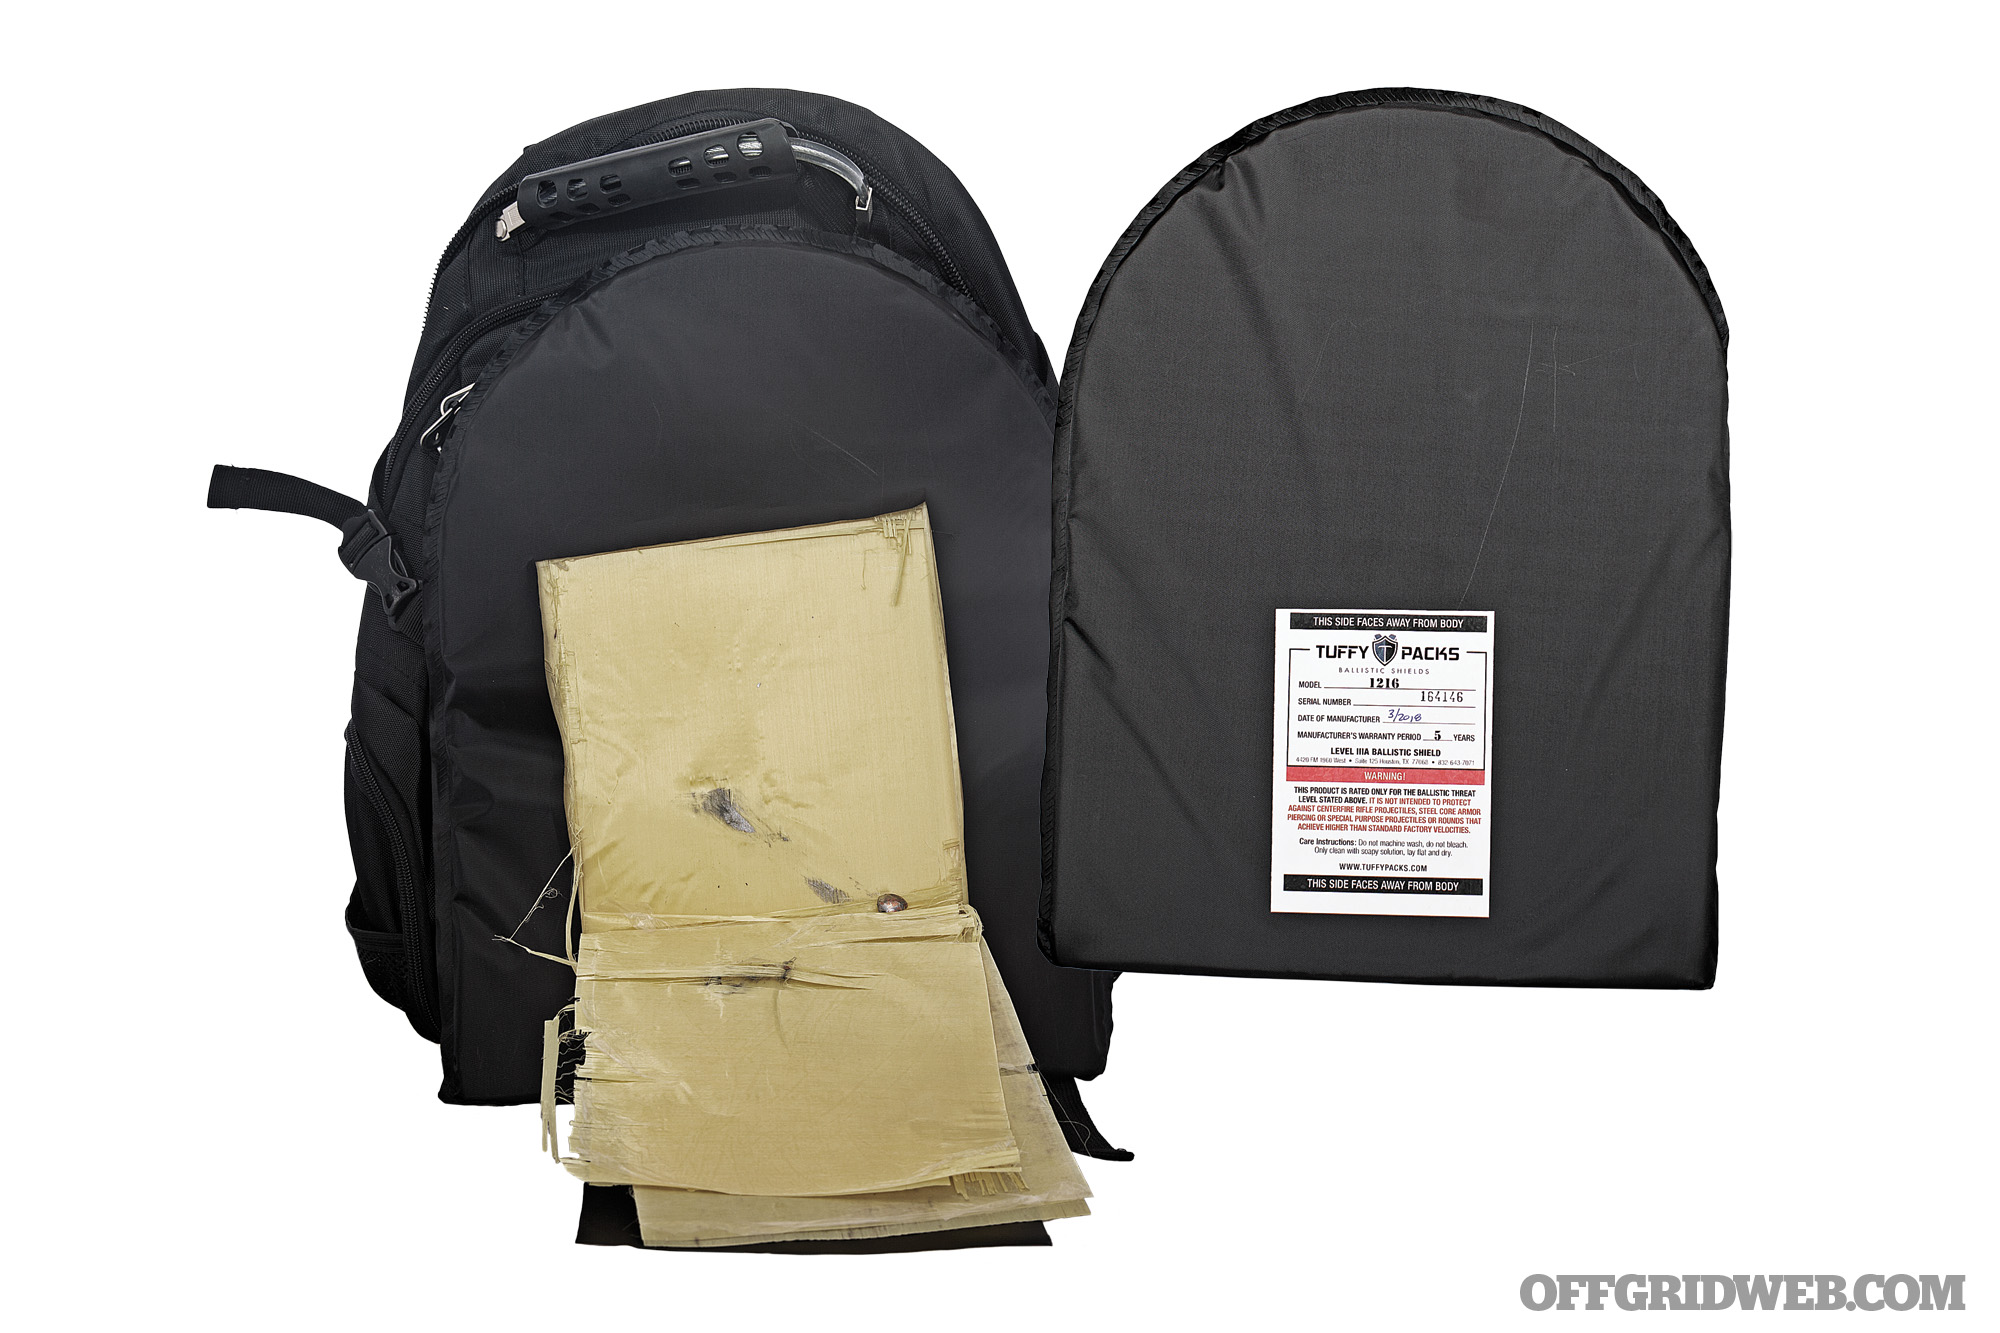
TuffyPacks 12×16 Ballistic Shield


AB4Y8345.psd

Protection Level
IIIA

Dimensions
12 by 16 by 0.30 inches

Weight
1.5 pounds

Tested Inside
SwissGear Multifunction Pack (available at TuffyPacks)

Test Result
PASS

MSRP
$157

URL
www.tuffypacks.com

Notes
Of the standalone soft panels, the TuffyPacks provides the most coverage area. The 12-by-16-inch panel is designed for children’s backpacks, and a 12-by-18 version is available for larger adult backpacks. Thanks to the way this panel fitted to the rear of the pack, it didn’t seem to get displaced easily. Tuffy offers this as a package you can buy with the pack and panel together or as a standalone insert. The TuffyPack panel had very minimal layer damage, with the 9mm bullet only penetrating through two layers. Being a soft panel, no back deformation was sustained. The 9mm round stayed fairly well within the impact area in the panel. TuffyPacks supplies this with an inconspicuous Swissgear Travel Gear backpack. The Travel Gear will fit a 17-inch laptop, is made of heavy-duty 1,200D polyester material, and opens like a clamshell to allow the backpack to be scanned by TSA without removing your laptop from your bag.

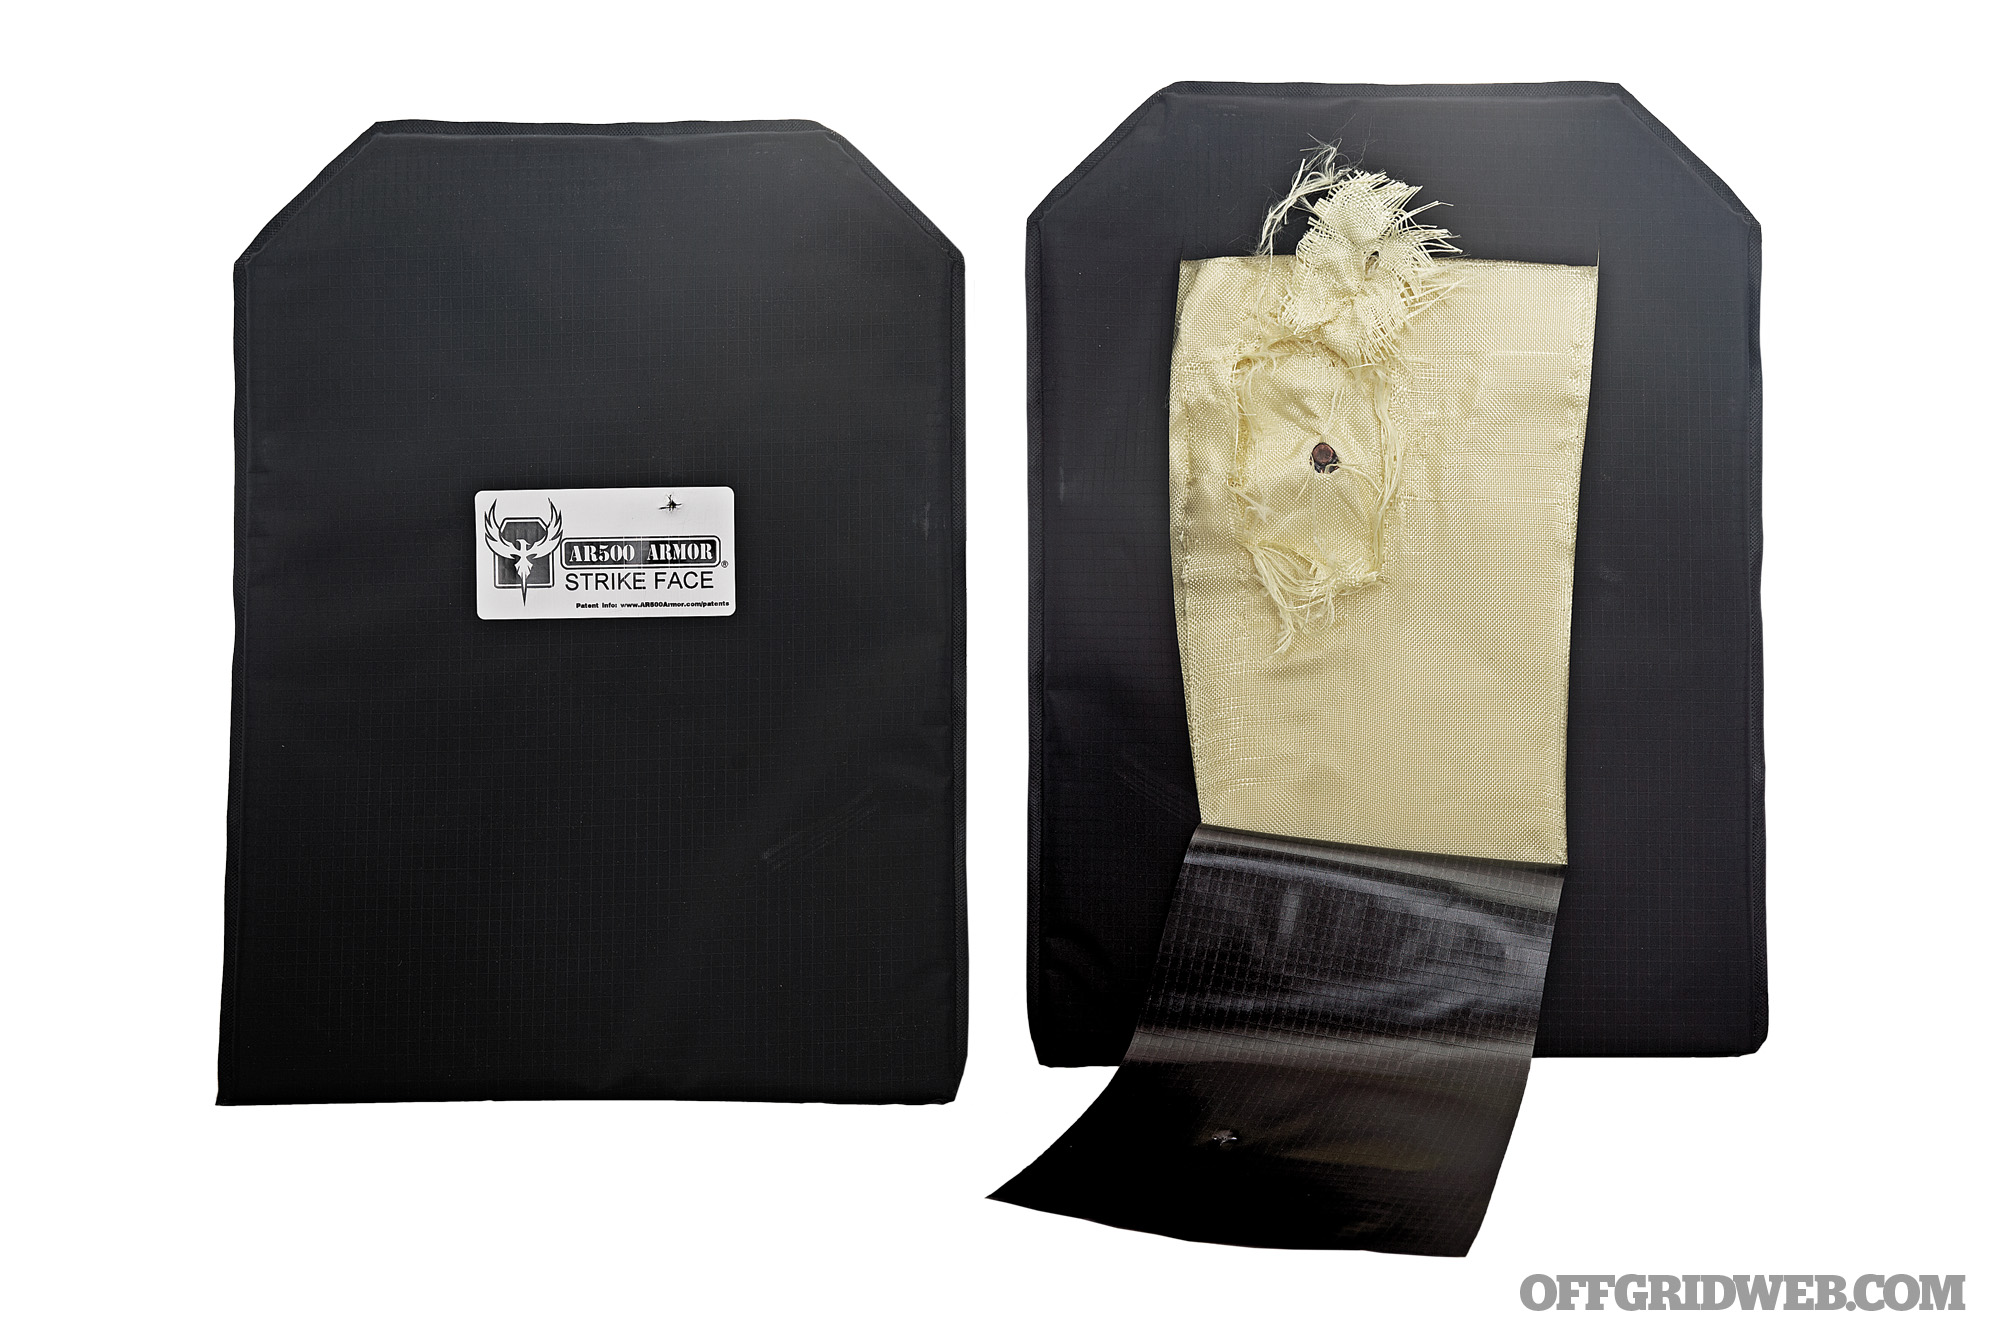
AR500 Armor Hybrid Backpack Armor
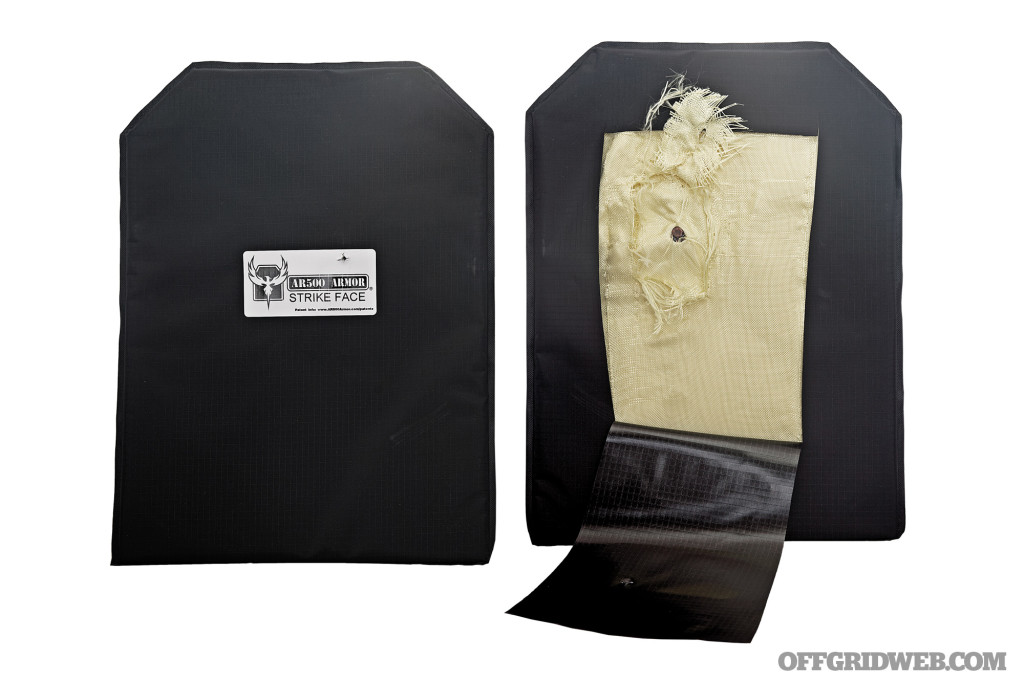
AB4Y8342.psd

Protection Level
IIIA

Dimensions
11 by 15 by 0.25 inches

Weight
1.5 pounds

Tested Inside
Generic pack

Test Result
PASS

MSRP
$143 (at time of testing)

URL
www.ar500armor.com

Notes
AR500’s soft IIIA panel has a large coverage area and stood up to the rounds fired. The AR500 soft panel stopped the 9mm bullet in the third layer of armored fabric, and there was no bullet yaw after impact.

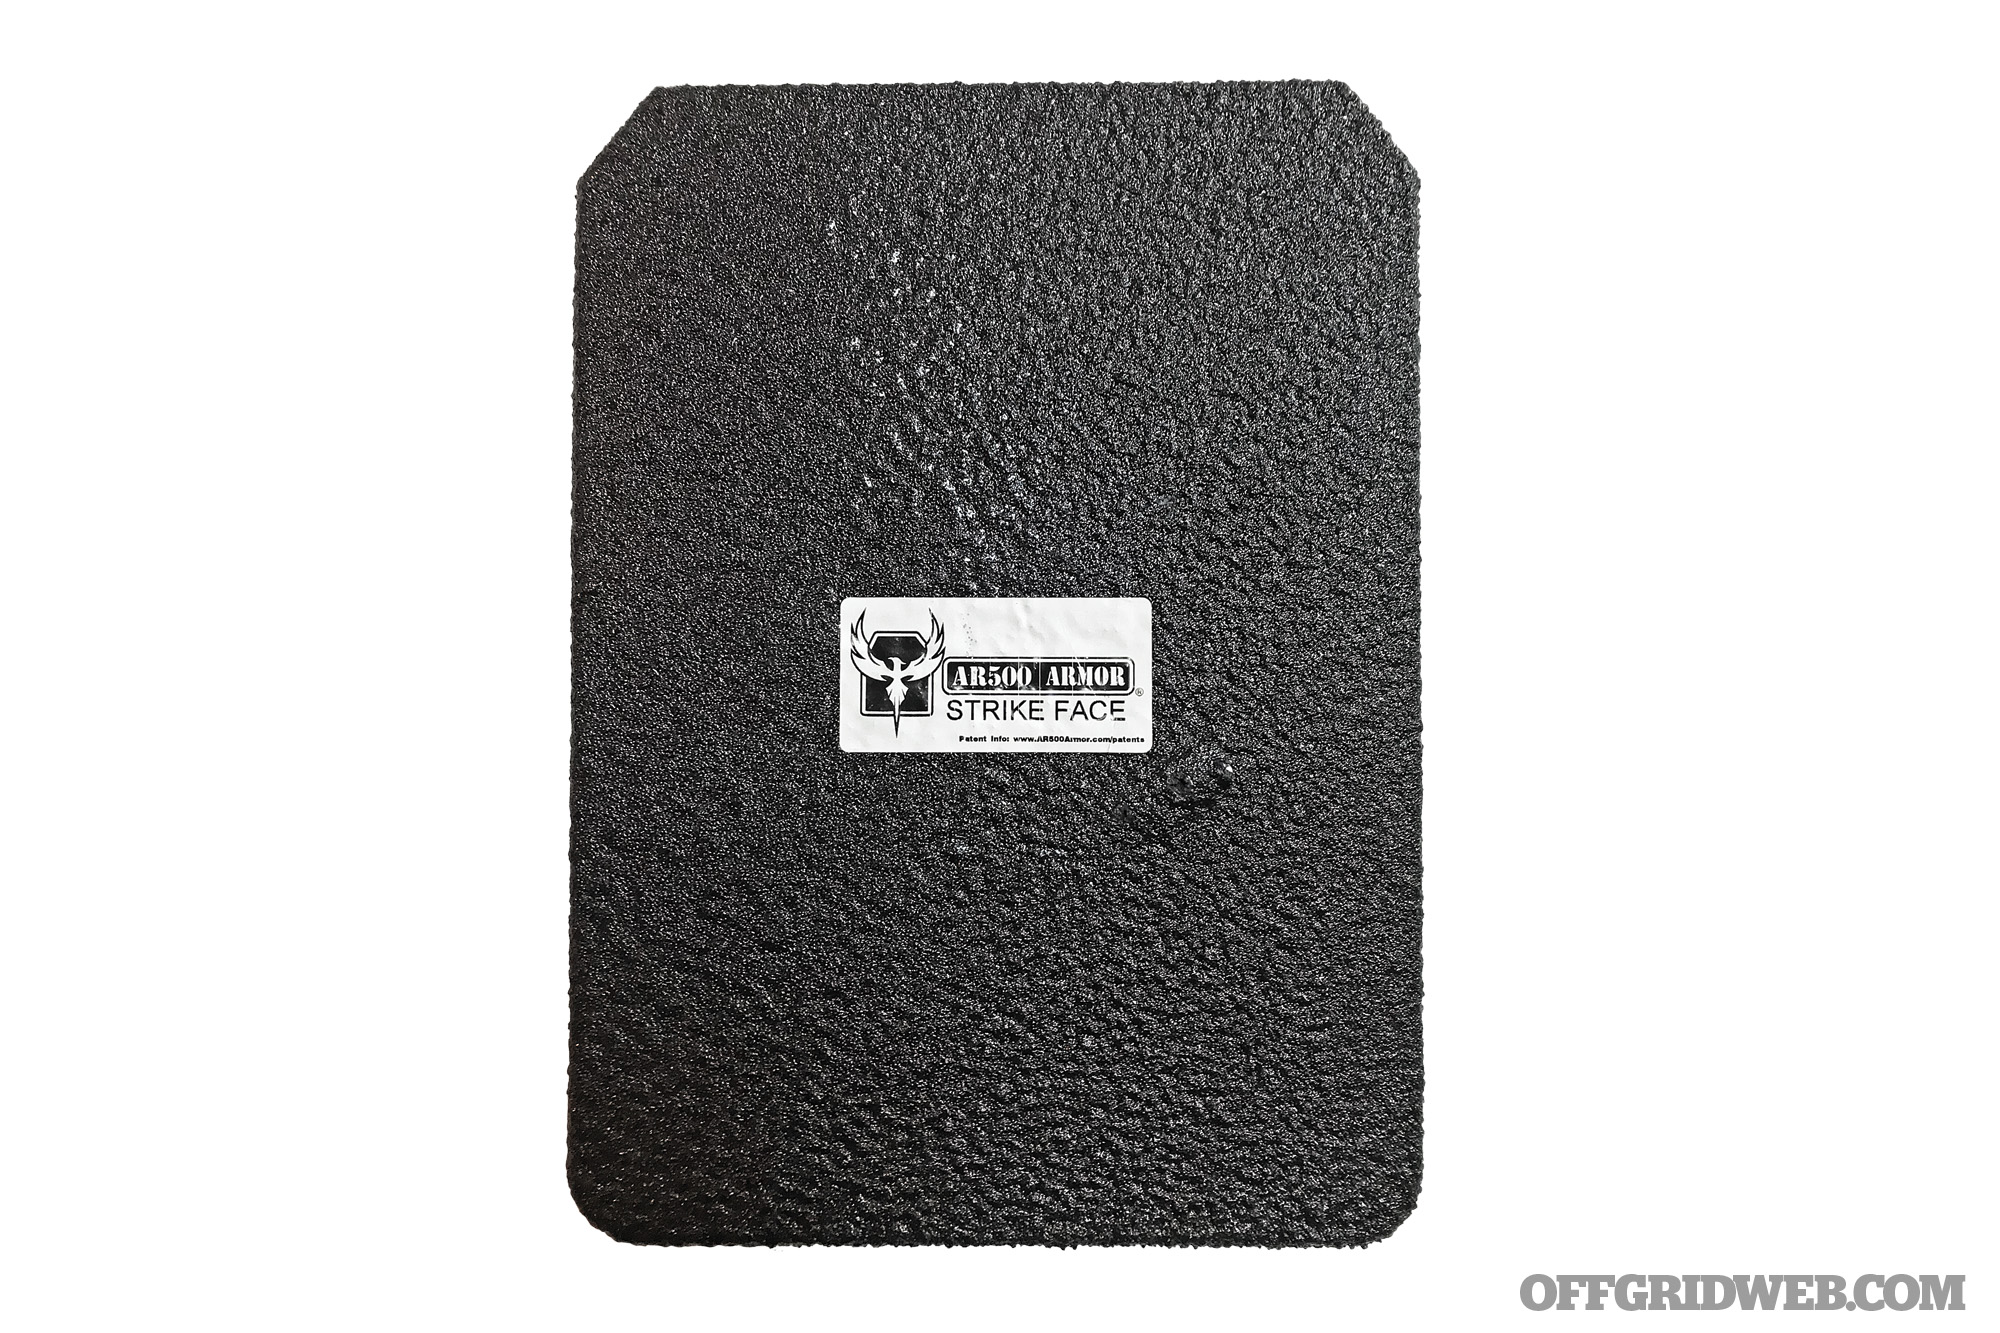
AR500 Armor Lightweight Backpack Armor
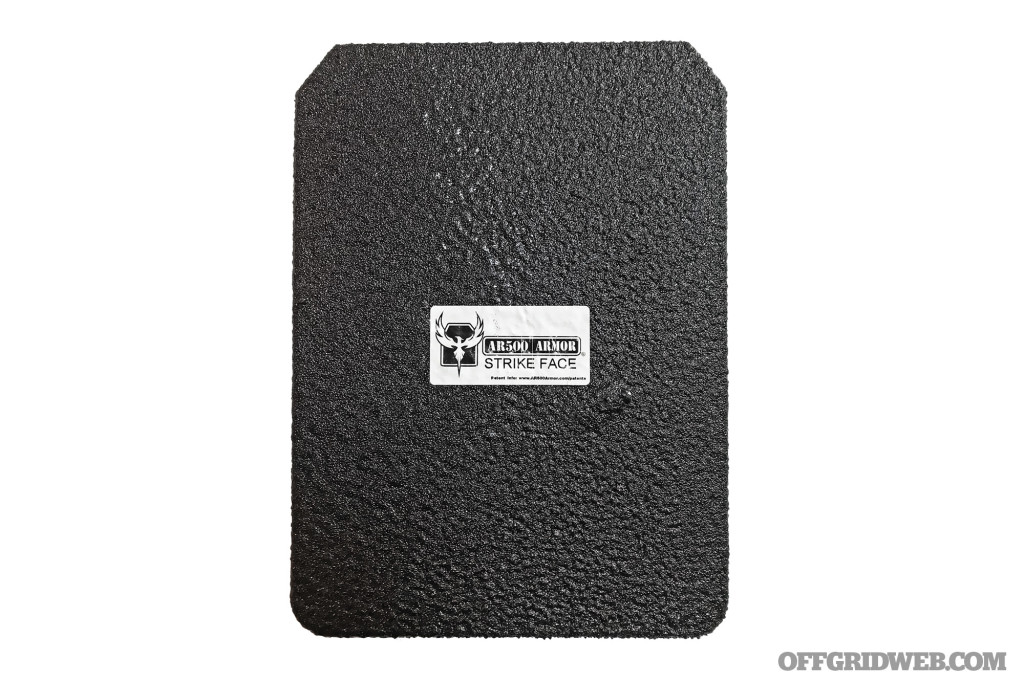
Ballistic backpack body armor buyers guide review test shooting gun shtf survival 12

Protection Level
III+

Dimensions
11 by 15 by 0.48 inches

Weight
10.5 pounds

Tested Inside
Generic pack

Test Result
PASS

MSRP
$178 (at time of testing)

URL
www.ar500armor.com

Notes
This is the sort of plate you could put in a bag next to your desk and know that it’ll stop almost anything coming its way. We took this plate back out for some additional testing and dumped a magazine of 5.56 into it without any ill effects. But while it excels in ballistic protection, its drawback is weight. This plate tips the scales at 10.5 pounds. It may be asking too much of many people to carry this daily, but we wouldn’t mind having it nearby for emergencies. During testing, it was difficult to even locate the 5.56 impact in the panel coating. The 9mm and 5.56 bullet didn’t penetrate any further than the spall coating in the panel, and there was no back face deformation.

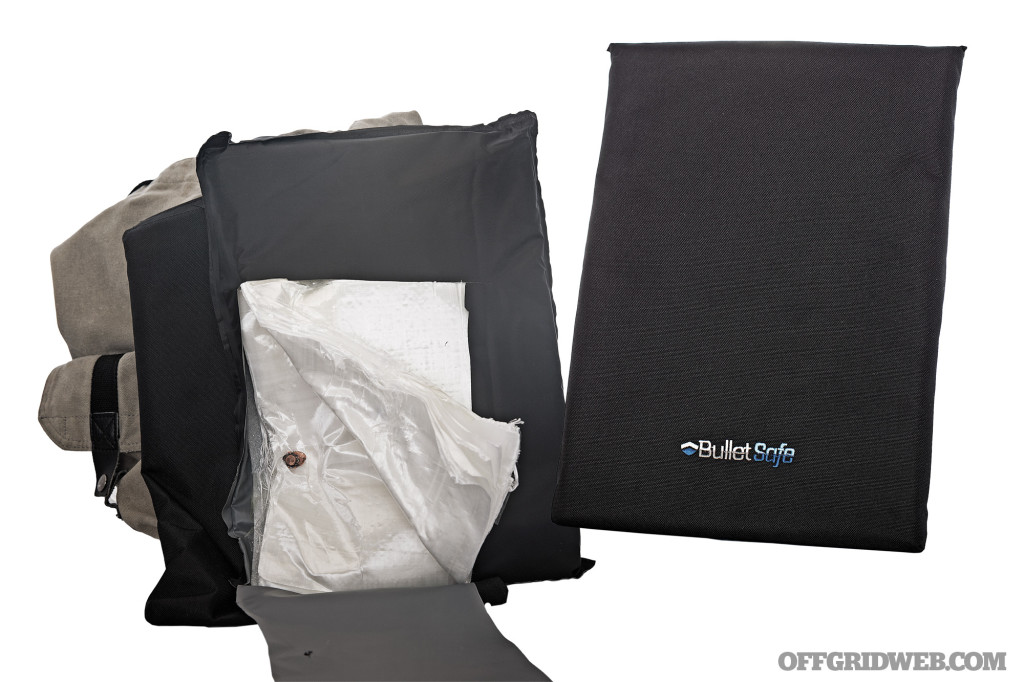
BulletSafe Bulletproof Backpack Panel


AB4Y8347.psd

Protection Level
IIIA

Dimensions
10 by 14 by 0.55 inches

Weight
1.5 pounds

Tested Inside
Generic pack

Test Result
PASS

MSRP
$99

URL
www.bulletsafe.com

Notes
The BulletSafe panel is a semi-rigid panel and fit easily in all the backpacks we tried it in. It had very insignificant panel deformation during testing and captured the 9mm fragments without issue. It allowed some rigidity to the pack and comes in a polyester pouch to guard against moisture. The BulletSafe panel stopped the 9mm bullet within the first six layers of its material. The bullet stayed directly at the impact point without any yaw throughout the panel.

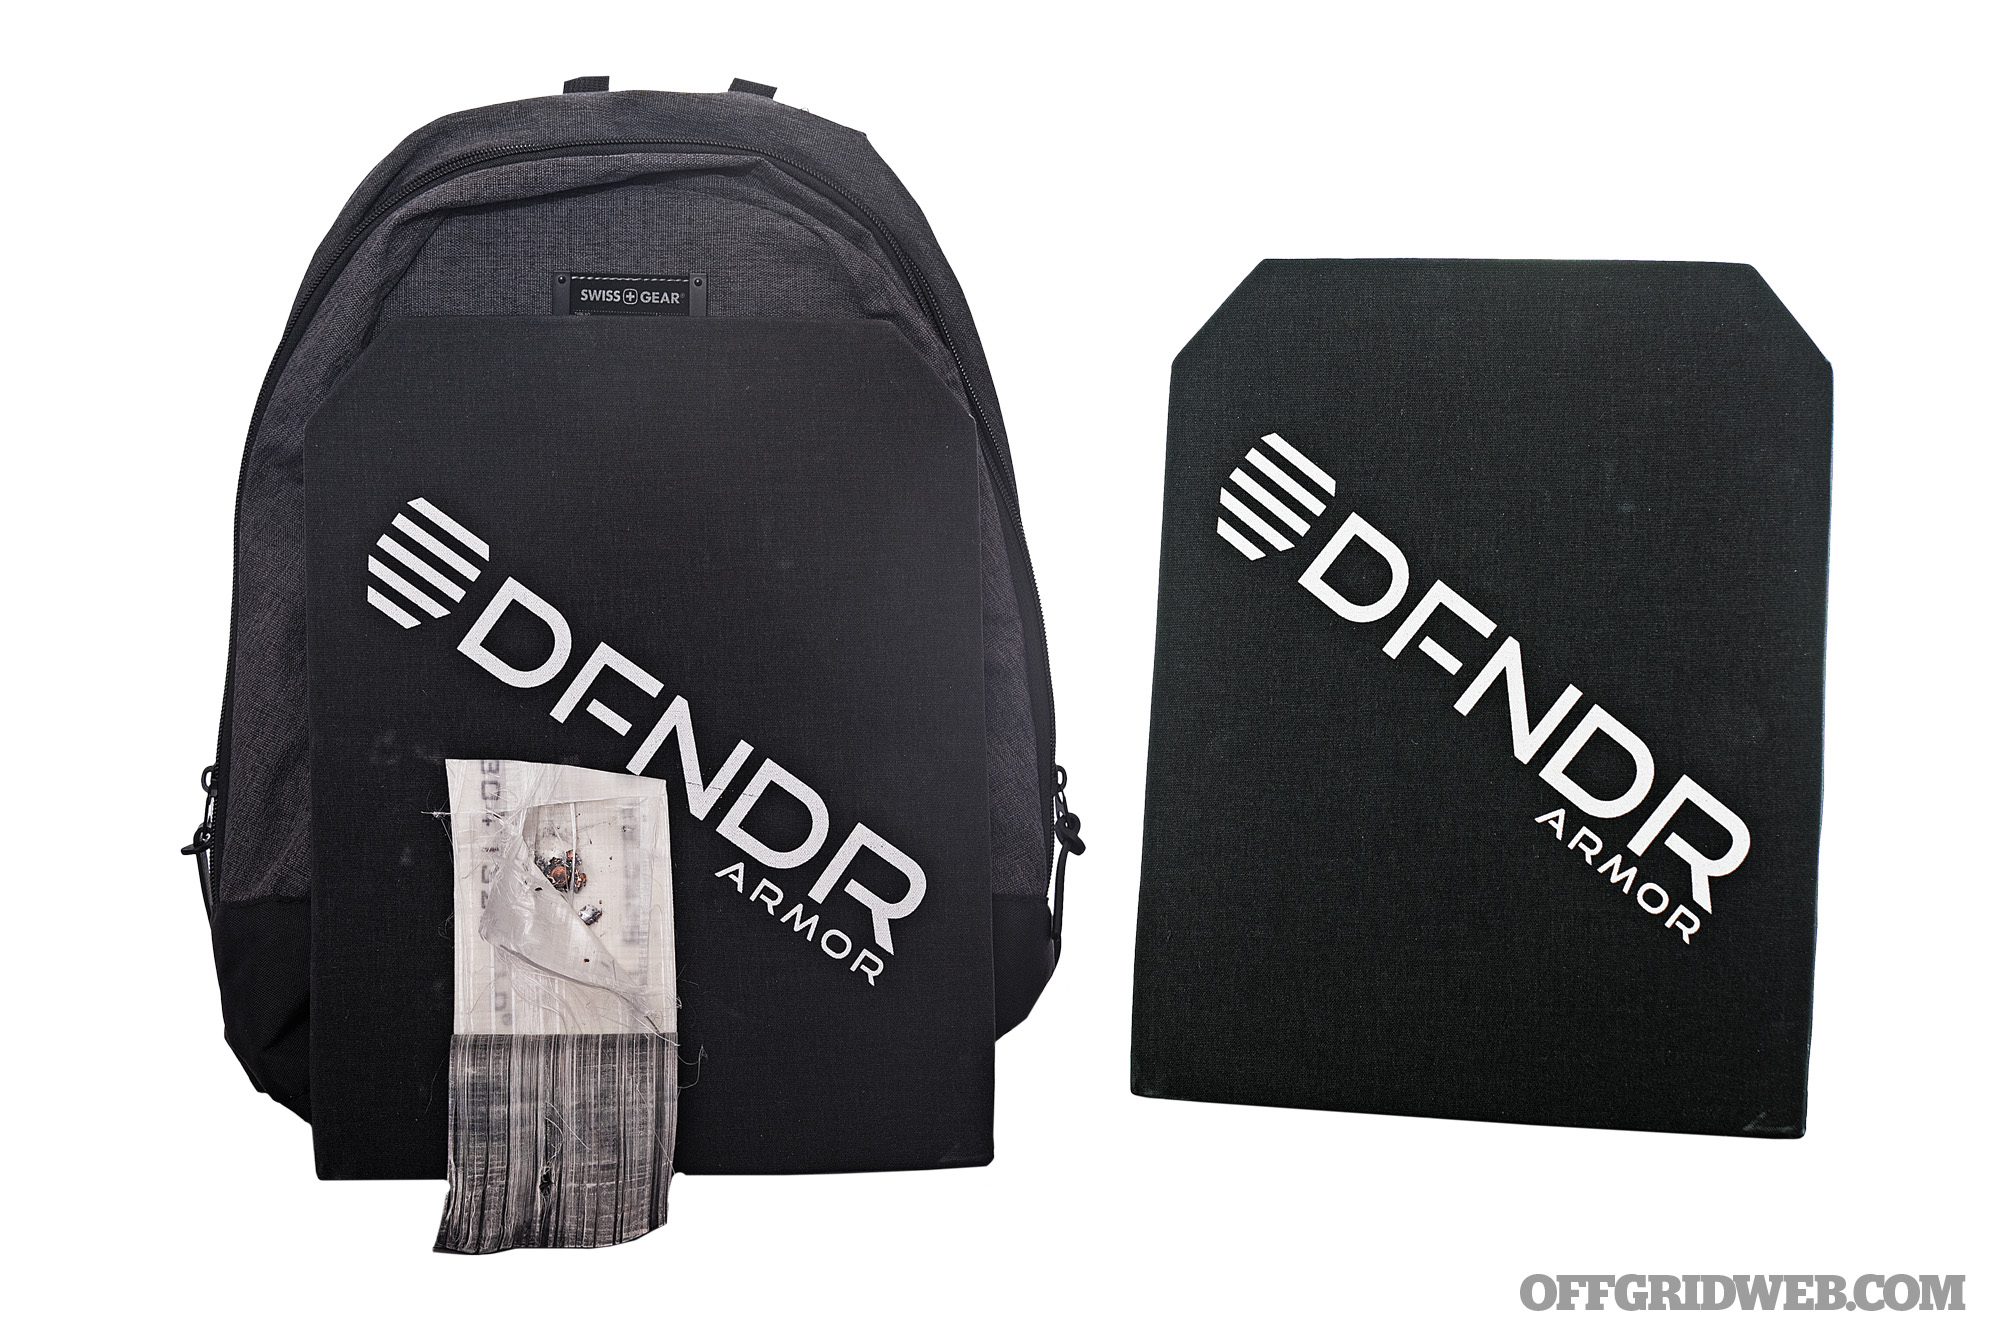
Dfndr Armor Handgun Armor Backpack Body Armor (EIIIASA-B)

AB4Y8353.psd

Protection Level
IIIA

Dimensions
11 by 14 by 0.6 inches

Weight
1 pound

Tested Inside
Generic pack

Test Result
PASS

MSRP
$190

URL
www.dfndrarmor.com

Notes
For its size, the Dfndr panel was the lightest. Its size and rigid shape fit a laptop sleeve perfectly and provided a large surface area as a shield. The panel was tested in a Swissgear backpack that is very inconspicuous and will hold a 15-inch laptop. The 9mm bullet was stopped in the third layer of armored fabric with the bullet fragmenting within less than 1 inch of yaw from point of impact. The back face of the panel had less than 1/2 inch deformation to the panel.

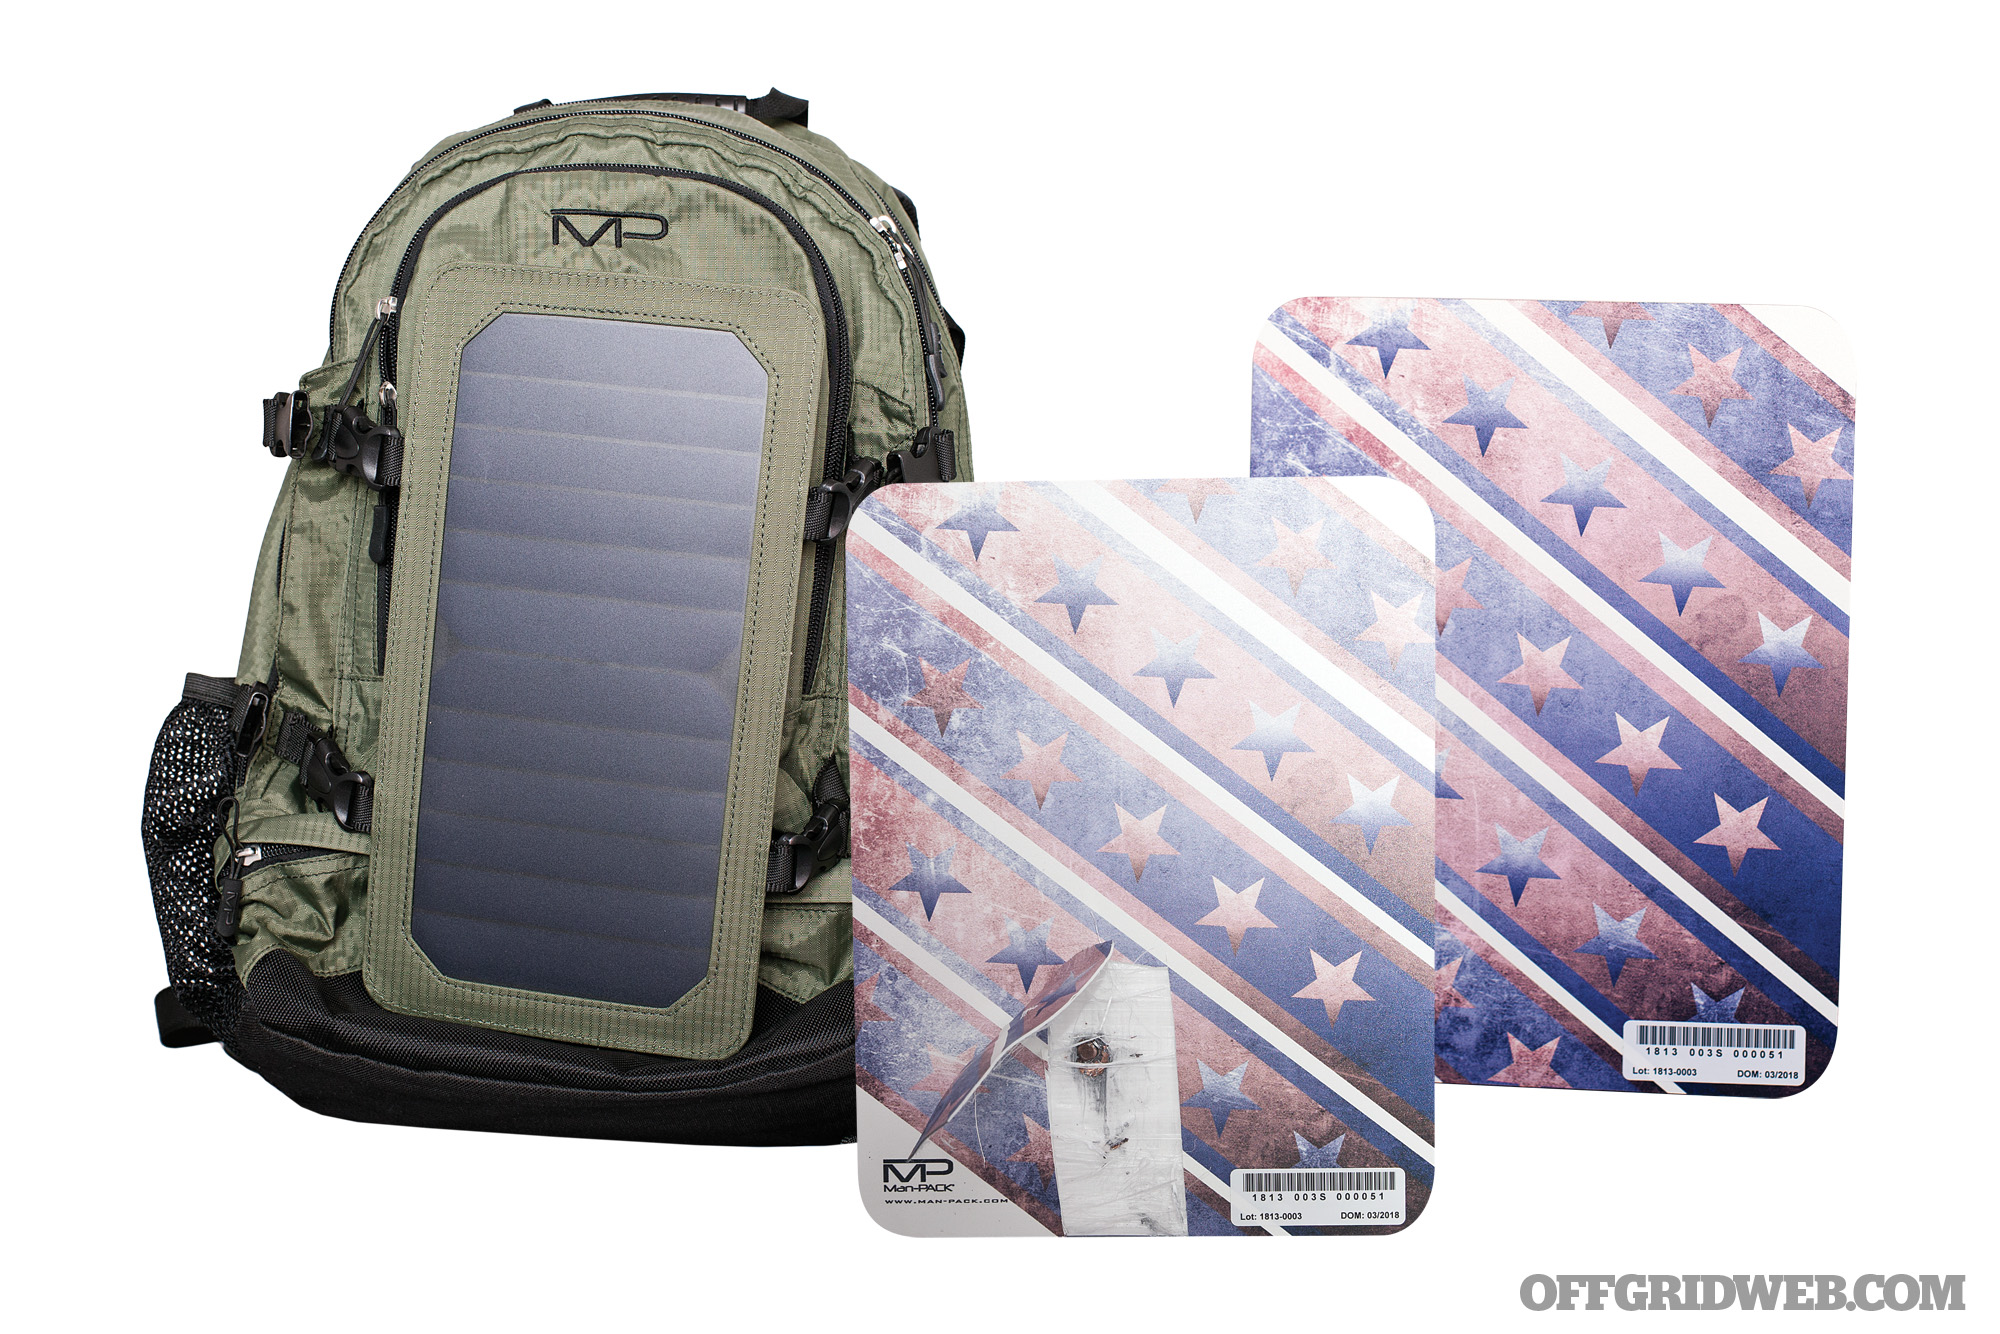
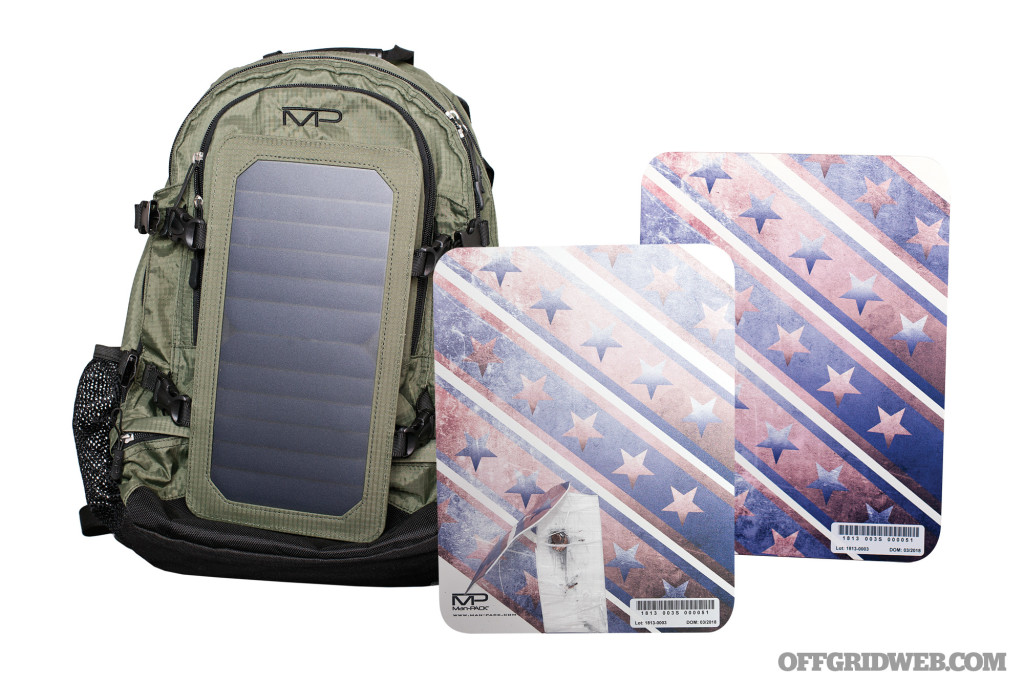
Man-PACK Bulletproof Backpack Insert

AB4Y8017.psd

Protection Level
IIIA

Dimensions
13 by 10 by 0.25 inches

Weight
1 pound

Tested Inside
Man-PACK Apollo

Test Result
PASS

MSRP
$140

URL
www.man-pack.com

Notes
The Man-PACK backpack insert is a rigid panel similar to the other panels. With a rigid panel, there’s less worry that it’ll get shoved to the bottom of a pack. You can purchase the backpack and panel separately or together, and Man-PACK also offers other bags and packs to choose from. The Man-PACK armored panel was tested in the Apollo solar backpack. The backpack itself is roomy and has compartments to hold your laptop, books, electronics, and maps. And to keep your electronics charged up, it has an integrated 7-watt solar cell. The 9mm bullet was stopped in the third layer of armored fabric and had all but a few fragments dissipate throughout the panel, with some traveling as far as 6 inches from point of impact. The back face of the plate had 1/2 inch deformation from the impact.

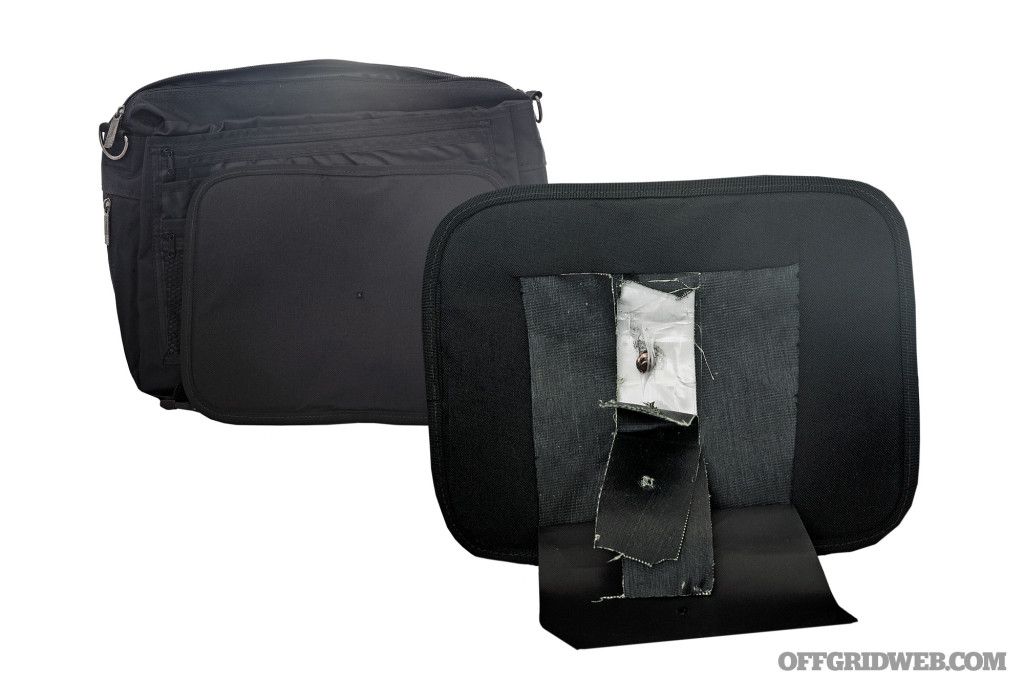
Citizen Armor Aegis Armored Shield Insert

AB4Y8361.psd

Protection Level
IIIA

Dimensions
13 by 10 by 0.25 inches

Weight
14 ounces

Tested Inside
Generic pack

Test Result
PASS

MSRP
$99

URL
www.citizenarmor.com

Notes
This is a very inconspicuous, semi-rigid panel. The Citizen Armor Panel stood up to testing with minimal deformation to the rear of the panel. One concern is that the only labeling is the “Citizen Armor” brand tag in the corner. Missing were any typical markings of rating, date of manufacture, or registered manufacture. Citizen Armor should add this labeling to their panels, which at minimum would allow customers to keep track of the panel, its rating, and expiration date. The Citizen Armor Panel stopped the 9mm bullet in the second layer of armored fabric and had less than a 1/4 inch deformation to the back face of the panel. The 9mm bullet was trapped at point of impact without any yaw.

More From Issue 28

Don’t miss essential survival insights—sign up for Recoil Offgrid's free newsletter today!

Read articles from the next issue of Recoil Offgrid: Issue 29

Read articles from the previous issue of Recoil Offgrid: Issue 27

Check out our other publications on the web: Recoil | Gun Digest | Blade | RecoilTV | RECOILtv (YouTube)

Editor's Note: This article has been modified from its original version for the web.