Everyone knows that keeping your firearms secure is a wise thing to do, but what does “secure” actually mean? If you ask some anti-gun politician, they’ll tell you that no gun is truly secure unless it’s unloaded, disassembled into small pieces, and locked in a vault so secure that opening it requires a procedure similar to a nuclear missile launch authorization. But here in the real world, secure simply means readily accessible to those who should access it and inaccessible to those who shouldn’t. Under normal circumstances, this may mean preventing your young kids from having unsupervised access to your guns; in extreme cases, it can be used as a safeguard against intruders entering your home by force. As with all security measures, you need to start with a realistic threat assessment before spending money on hardware.
Gun Safe vs. Gun Cabinet
Many gun owners assume that a gun safe is the only answer to this question, but that’s not always the case. Gun cabinets or lockers are also an option worth considering.
A proper gun safe will generally be constructed from thick, hardened steel with security features intended to keep determined thieves out. Of course, someone with power tools and/or sophisticated knowledge may be able to breach it, but this should take a lot of time and effort. Gun safes can also safeguard the contents against fire damage. But the trade-off for all this protection is significant weight, bulk, and cost.
On the other hand, a gun cabinet offers a lower level of protection in exchange for significantly lighter weight, convenient installation, and a more affordable price point. If, rather than criminal masterminds, you’re mostly concerned with keeping your guns out of reach from your kids or houseguests (e.g., the babysitter or cable guy), a gun cabinet may be the right choice for you. It’s perfect for “keeping honest people honest,” as the old adage says. Vintage decorative gun cabinets were made from ornate wood and glass with a keyed lock, while more modern options use stamped sheet metal and an electronic combination lock.
Some of the additional advantages of a gun cabinet include increased internal space due to thinner single-layer walls and dramatically improved portability. If you rent a home or live in an apartment, you may not want to install a 300- to 500-pound gun safe that you’ll just have to move in a year or two, but a cabinet can be disassembled and transported in a matter of minutes.
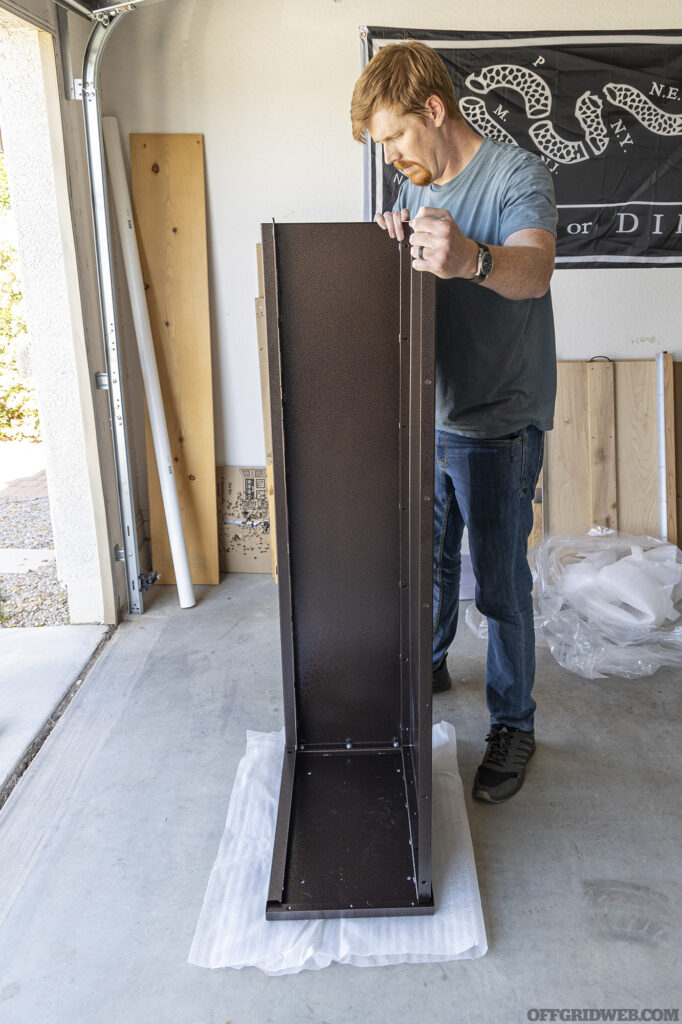
Above: Steelhead calls this color “Badlands Brown,” and I like it much better than the generic gray finish of most other manufacturers’ cabinets. The bolted-on logo is also a nice touch.
Steelhead Outdoors’ American-Made Cabinets
Recently, I had been searching for a new gun cabinet to house some of my ever-growing collection of firearms — I’m sure many of you can sympathize. While it’s possible to find a cheap metal cabinet on Amazon or at your local hardware store, I wanted a high-quality cabinet that’s not just a box of flat-packed panels from China. I also didn’t want to deal with the frustrations of misshapen brackets, incorrectly drilled holes, and missing hardware that usually goes hand-in-hand with those cheaper options. This led me to Steelhead Outdoors, a company founded by two engineers and outdoor enthusiasts in 2016. Steelhead designs and manufactures all its products in Minnesota and offers everything from huge custom-built safes to small pistol lock boxes. Their products come with clear, well-written assembly instructions (not machine-translated gibberish) and are designed to be put together with ease by two people.
Above: The Scout 25 arrives in four boxes, making it easier to move into position and less costly than one large box.
The Scout 25 is a modular gun cabinet that measures 25 inches wide by 60 inches tall and 15 inches deep. That’s enough for nine long-guns plus an included full-width adjustable shelf for handguns, ammo, accessories, and other gear. The inside of the door also features two removable grid panels that can hold MOLLE-compatible accessories such as pistol holsters, magazine pouches, medical gear, tool kits, suppressors, and much more.
One significant advantage of the Scout cabinet is its ease of transport, both before and after assembly. The cabinet arrives in four boxes, with the heaviest weighing only 60 pounds. This keeps shipping cost at a reasonable $150, much less than you’d spend on a fully assembled safe or cabinet. It’s assembled using basic hand tools, and can be done solo, though a few steps are easier with an extra pair of hands. Total weight of the finished cabinet is 175 pounds. MSRP is $1,600.
Above: Assembly begins with loosely connecting the sides and back panel to the base.
Security Features
Although the Scout 25 is a gun cabinet, some of its features are more reminiscent of a safe. Rather than a single-point latch or two-point lock bar that could easily be pried apart, it uses a patent-pending vertical beam with eight locking points on the inside edge of the door. This ensures that the entirety of the door clamps shut tightly without easily exploited weak areas. Although it does have external door hinges to allow 180-degree opening, those hinges are protected by internal, inaccessible hardware and four welded dead bolts that keep that side of the door just as secure as the latch side.
Above: A powered driver can make installing the 40 bolts much quicker but be very careful not to cross-thread or over-tighten any of them.
Anchoring the safe to the wall or floor is required, both for tip-resistance and to ensure potential thieves can’t just carry away the entire cabinet. All necessary anchoring hardware is included with the Scout 25. For concrete floors, you’ll need a hammer drill or impact driver, but, for wood floors or drywall/stud applications, a standard drill is OK.
Steelhead uses Sargent & Greenleaf (S&G) Spartan electronic locks on its cabinets and safes, a type of lock used for applications such as small ATMs. It features a motor-driven locking mechanism, and S&G even says it has been tested to remain functional in the event of an electromagnetic pulse (EMP). The Spartan lock uses a six-digit, user-programmable combination which unlocks the manual latch handle beneath it.
Above: Once the cabinet is assembled and squared up, the door can be positioned and bolted on. A second pair of hands is highly recommended for this step.
A notice that comes with each cabinet explains a master reset code is kept on file for each customer by default, with unique ID data and a decoder kept off site in two separate locations. This allows Steelhead to help if you lose or forget your safe’s combination. However, for customers who wish to opt out of records retention, Steelhead will destroy the master reset code upon request, as long as the customer acknowledges losing the combination after that point will mean calling a locksmith to drill into the safe. I appreciate this level of transparency and openness to user security preferences.
Above: The S&G Spartan digital lock can be programmed with a six-digit combination of your choice. Steelhead will even destroy their records of the master reset code if you request it.
Building the Cabinet
I began by unwrapping and inspecting all the components in my garage. No matter how well Steelhead packs them, shipping carriers tend to smash boxes and damage contents, so it’s always a good idea to check for bent panels before you find out the hard way while putting it together. Thankfully, everything looked OK.
The only tools required are a ¼-inch drive ratchet, extension, and 7/16-inch shallow socket. Steelhead says that 70 in-lb is the appropriate torque spec and warns against the use of power tools or large wrenches. Keeping this in mind, I still used a ¼-inch hex driver on the lowest power setting for the sake of convenience, being extremely careful not to cross-thread or over-tighten any of the 40 bolts. Always start bolts by hand and apply final torque with an appropriate ratchet or torque wrench to avoid damaging the cabinet.
Above: Unlike other cabinets that have only one or two lock engagement points, the Scout has eight along the edge of the door, plus four internal tabs that protect the hinge side against prying.
Assembly is simple, starting by loosely bolting together the bottom panel and left side panel, then the back, right side, and top. It’s much easier if someone can help you by holding the panel as you insert bolts with washers, but the panels are light enough that it could be done alone in a pinch. Once the five main panels are together, check that all of them fit tightly without gaps and appear square. Then, tighten the top, bottom, and back panel bolts, followed by the four front-facing bolts.
To install the door, make sure it’s unlocked using the default code and position it in front of the cabinet on top of some of the foam packing blocks. Slowly slide it up to the cabinet at a 90-degree angle, center the four studs on the hinges, and gently tighten the four nuts to hold the door in place. Ensure the door closes smoothly without any misalignment — mine barely grazed one edge of the cabinet, so I loosened and repositioned it before applying final torque to the hinge nuts.
Lastly, I installed the included shelf, which slides into a pair of slotted tracks just like any industrial shelving. It’s at the perfect height for a Savior Equipment pistol rack at the top of the cabinet, even with a suppressed 18-inch rifle in the long-gun rack below it. I also bolted the two gear panels to the inside of the door, which can be used to organize additional gear in the future.
Read More
Subscribe to Recoil Offgrid'sfree newsletterfor more content like this.
When it comes to the world of firearms, the .22 LR is a top contender for the title of “most versatile.” So it’s always exciting when firearms manufacturers find an innovative way to put a new spin on this time-tested caliber. During SHOT Show 2024, the Hammerli Force B1 bolt-action rifle was unveiled for the first time, and we were eager to get our hands on one to see how it stood up to scrutiny. We took one for a test drive, and the results were impressive.
Hammerli Arms began as a Swiss firearms manufacturer established in 1863 by Johann Ulrich Hammerli. The brand has a rich history of producing high-quality firearms for hunting and sports. Initially recognized for their precision craftsmanship in rifles and shotguns, the company later shifted focus to target pistols, gaining significant acclaim in competitive shooting, particularly in the Olympics. Over the years, Hammerli Arms has continually evolved, maintaining its reputation for precision and excellence, and earning respect within the shooting community for its innovative designs and consistent performance.
Above: Out of the box, the Force B1 is an impressive .22 rifle, and adding a quality optic to the Picatinny rail makes it even more so.
Design and Build
The Force B1 features a quick-change barrel system that allows for seamless transitions between different calibers, notably .22 LR and .22 WMR. This adaptability is crucial for users who might want to switch quickly between hunting small game and target shooting. Built into the design is an adjustable stock, allowing for customization of the length of pull and comb height, and creating a comfortable and precise shooting experience tailored to individual preferences. As any precision shooter understands, getting comfortable and relaxed behind a rifle is a large part of maintaining tight groups. Overall length ranges from 35.5 to 37.4 inches, with a weight of 5.75 pounds, making it a manageable option for extended use in the field.
By employing a toggle-style straight-pull bolt action, the Force B1 is capable of surprisingly rapid follow-up shots. The rifle’s barrel is threaded, ready for various muzzle devices and suppressors. One interesting feature is the rifle’s ability to use Ruger rotary-style magazines, known for their reliability. This integration ensures smooth feeding and operation, critical for maintaining performance under diverse conditions.
Equipped with a Picatinny optic rail, the Force B1 facilitates easy mounting of various optics for improved accuracy. The rifle is also compatible with common Ruger 10/22 style trigger groups, allowing users to customize their trigger setup to match their shooting style. Additionally, the rifle’s adaptable magwell and threaded barrel expand its functionality, enabling users to tailor their firearm to specific needs and preferences.
Above: The standard Ruger-style magazine holds 10 rounds, but there are plenty of 15- and 25-round mag options on the market as well.
First Impressions
Upon unboxing the Hammerli Force B1, the first thing that stands out is its sleek and sturdy build. The rifle’s ergonomic design, featuring an adjustable stock, allowed an immediate solution for a comfortable fit. The quick-change barrel system is a notable feature, promising easy transitions between calibers, which is a significant advantage for those who engage in both hunting and target shooting.
The toggle-style straight-pull bolt action feels smooth and precise, enhancing the rifle’s overall handling. Its Picatinny optic rail offers ample customization options, allowing for various scopes and sights to be easily mounted, from lightweight micro red dots to larger magnified optics. Handling the rifle, the weight distribution feels balanced, and the overall weight of 5.75 pounds is manageable, even for extended periods. Incorporating a Ruger rotary-style magazine and trigger assembly makes the rifle compatible with proven and widely used components, rather than requiring buyers to wait for the aftermarket to catch up with a new design. It also helps ensure reliability, since these components have already been in use for decades.
Every component of the Hammerli Force B1 seems thoughtfully designed. If there was something to critique, it may be that it takes a little practice to remove the magazine quickly — but I’d still say it’s noticeably easier than the Ruger 10/22 that uses the same mags. Also, the adjustable stock can be removed completely if you’re trying to adjust it too quickly. But overall, my first impression of the Force B1 is highly positive.
Above: The barrel is threaded to attach your suppressor of choice, and the adjustable stock adapts to a wide variety of users.
Range Performance
Before taking it to the range, I fitted it with an optic capable of really driving those tiny rounds home with precision. Riton’s 3 Primal 3-12×56 fit the bill. Its 56mm objective lens and 3-12x magnification provides a clear and bright image in a wide range of ambient lighting conditions. The scope is equipped with Riton’s advanced R3 reticle, fully multi-coated lenses, and has durable construction. It’s also waterproof, fog proof, and shockproof, making it suitable for various environments. With this optic, the Force B1 becomes a formidable varmint-slayer and range plinker.
Starting with the .22 LR barrel, the rifle performed exceptionally well. The straight-pull bolt action was not only smooth and responsive, but it was also a fun way to pull off rapid follow-up shots with minimal effort. Unlike a traditional bolt action, this doesn’t require two separate movements (up and back) to eject a spent case — just pull straight back and then press forward to chamber another round. This mechanism’s quiet operation was also a pleasant surprise, making it ideal for hunters needing to maintain stealth in the field or shooters who are pursuing the quietest possible rimfire suppressor host. The Ruger rotary-style magazine fed flawlessly, providing consistent and reliable performance throughout every range session.
Above: The magwell fits Ruger-style magazines, which is good news if you already own a 10/22 (as so many of us do).
Accuracy was impressive across various distances. At 50 yards, the rifle consistently held a tight shot group, and even at 100 yards, it maintained excellent precision. The adjustable stock and comfortable grip played a significant role in achieving these results, providing a stable platform I could get comfortable behind.
Overall, the Hammerli Force B1 easily met my expectations at the range. Its adaptability, smooth operation, and consistent accuracy make it a standout rimfire rifle for a variety of scenarios. The straight-pull bolt action enabled swift follow-up shots, putting a smile on my face each time I felt its click-clack and nailed a target in rapid succession.
Above: Riton’s 3 Primal scope has turrets that are easy to adjust on the fly.
Pros and Cons
Although it’s hard to find fault with the Forcec B1, I could argue that there are a few sticking points. The main one being its price, which is much higher than what you’d typically find a .22 LR bolt gun being sold for. However, to me, this is a moot point, since its price reflects the quality, heritage of the brand, and most importantly the complex design of its action. As the adage goes, you get what you pay for. Some people may also find the weight on the higher side, but again, to me, having quality components is worth a few extra ounces. Its ability to switch between calibers, adjust its stock to the shooter, and reload with quiet precision make this a notable and worthy addition to the world of rimfire rifles.
Pros:
Adaptability: The quick-change barrel system and adaptable magwell make the Force B1 highly versatile.
Ergonomics: Adjustable stock ensures a comfortable fit for various shooters.
Quiet Operation: The straight-pull bolt action operates quietly, ideal for stealthy hunting.
Cons:
Price: At an MSRP of $649, it’s substantially more expensive than your average Ruger or Savage .22 bolt gun.
Weight: While manageable, the 5.75-pound weight could be a consideration for extended field use.
Mechanical Complexity: I didn’t experience any malfunctions at all during testing, but it’ll require a little extra diligence to keep the moving parts in this action clean and lubricated.
Above: With the 3 Primal dialed up to 12x magnification, tight groupings at out to 100 yards are a walk in the park. Sliding the action back and forth is just as satisfying as it looks.
Above: Using the straight-pull bolt action makes for fast and fun follow-up shots.
Conclusion
Hammerli’s Force B1 stands out as a top-shelf option for those seeking a versatile, precise, and adaptable rimfire rifle. Its innovative design, combined with Hammerli’s long history of quality and performance, makes it a formidable choice for both hunters and target shooters. Despite its higher price point, the features and toggle action it offers justify the investment for serious enthusiasts.
Read More
Subscribe to Recoil Offgrid'sfree newsletter for more content like this.
While the term has a very different connotation to recreational drug users, in the Special Forces world, a speed ball refers to a small stash of essential fighting gear that can be quickly accessed during a protracted fight. Depending on scale, they can take the form of a bag, box, or cargo pallet, but the goal is to keep the load down to the bare necessities to get through the mission. In military context, the normal ingredients include food, water, ammunition, extra grenades, or other combat sundries.
This gave us the idea to explore what the speed ball concept might look like for a prepared citizen. Assuming a baseline EDC of flashlight, knife, pistol, and an on-body IFAK or med kit, what would you need in a hurry if the situation around you deteriorated suddenly? Let’s assume a scenario similar to what several major cities experienced during the height of COVID lockdowns: a spontaneous bout of civil unrest or premeditated “mostly peaceful protest” that turns not-so-peaceful.
You might be required to travel through the area of unrest in order to get home to your family or be sitting on the couch watching TV when the angry mob moves into your neighborhood. Or you might be a small business owner looking to protect your storefront from looting. Regardless of your particular situation, we still remember watching mayors and police chiefs going on national television to warn people that “help isn’t coming,” and people calling 9-1-1 only to be put on hold. These events fall squarely into nightmare scenario territory for people who just want to be left alone.
Above: The unobtrusive-looking backpack contains this rifle, armor, chest rig, night vision, and medical gear with room to spare.
As we’ve said before and will continue to say with vigor, your personal safety (and that of your loved ones) is ultimately your responsibility in a crisis. With this in mind, we set out to build our own speed ball to explore what a fast-access self-defense loadout might look like for us. We took three major factors into consideration: the ability to scale, the ability to protect ourselves, and the ability to defend against predators who — by design or opportunity — might seek to make victims of innocent bystanders under the cloak of chaos.
We started with a 5.11 LV Covert Carry pack. This 45L backpack was designed by 5.11 to be unobtrusive and not scream “I have a gun!” It doesn’t sport any MOLLE webbing and isn’t produced in any standard tactical colors — no coyote tan or OD green versions available. Only black and two different shades of blue.
Rifle
The Covert Carry has three compartments of varying sizes; the largest one includes dividers and straps to secure a broken-down AR-style rifle. Even our 11.5-inch SBR had to be separated into halves to fit in this bag. That rifle is built on an ambidextrous UIC receiver set from American Defense Manufacturing. We outfitted it with a Primary Arms PLx Compact 1-8x scope with offset Holosun red dot, both of which ride on a Scalarworks mount that has mounting points for both optics.
The stainless steel Rosco K9 barrel is tipped with a Cobalt RCB-KM muzzle device that’ll accept any suppressor with a KeyMo-style quick-release mount. A Cloud Defensive REIN 3.0 weapon light is also on-board, since many bad actors prefer the cover of darkness. The third-gen REIN is dual-fuel capable, so it’ll run on either a rechargeable 18650 cell or two CR123 batteries. The 18650 offers better output, but we packed some spare CR123s in the bag in case we don’t have the ability to recharge.
Above: This custom-built SBR features an ADM billet receiver set, 11.5-inch Rosco barrel, and Primary Arms LPVO with offset red dot.
Plate Carrier
The middle compartment includes a laptop sleeve for those who want to use this bag in a more administrative role. The laptop sleeve was stitched with two sets of seams — one to create the pocket and another parallel set that narrows the sleeve to make a snug fit for common laptop sizes. We sliced open these inner seams to use the sleeve at max width, which was just the right size for a medium plate carrier loaded with Level IV plates. The carrier is a Defense Mechanisms MEPC.
The Mission Essential Plate carrier is low profile and highly scalable. The front-and-back loop panels let you use just about any compatible cummerbund, but we chose DM’s own quick-release version with Tactik buckles that lock securely and release with a quick forward tug. There are no hard-sewn mag pouches, allowing you to run the carrier “slick” and hide it underneath a hoodie or light jacket if you only want armor protection without any load bearing. But the front plate bag also has loops for female buckles in case you want to attach a placard with more gear on it.
The middle compartment has just enough room for the MEPC itself, plus a detached placard. We went with a MOLLE placard from Dynamic Principles, which has female Tactik buckles so you can hook the cummerbund direct to the edges of the placard and keep your load snug against the plate carrier. It also includes a kangaroo pouch for magazine inserts, and an elastic sleeve on the bottom edge for a tourniquet. The kangaroo pouch has an insert that accepts two AR mags and two pistol mags.
We built out the MOLLE front with a 5.11 Flex IFAK and a general-purpose pouch from Arbor Arms. The GP is loaded with a Crye Precision Night Cap, Wilcox G24 mount, and an Armasight PVS-14. The Night Cap is a mesh soft cap with Wilcox-style shroud that will support NODs; it can be balled up and stuffed into a pouch or cargo pocket when not in use.
Ammo & Accessories
The PMAGs in the chest rig are retrofitted with +5 baseplates from Shield Arms. In addition to the extra ammo capacity, the extra weight will help these mags fall free faster in the event of an emergency reload. To ensure reliable feeding with the elongated mag bodies, we swapped the stock springs with +15 percent extra strength springs from MCARBO. Since the author’s EDC pistol is a Staccato C2, two full-sized 17-round 2011 magazines went into the pistol pockets, capped with anti-over-insertion basepads from Dawson Precision.
The shorter grip of the C2 allows full-size mags to be over-inserted, which can damage the ejector and induce malfunctions. Finally, we clipped a Stroup Knives Mini 2 fixed blade to the edge of the placard.
The front pouch is the smallest of the three and includes a small panel of MOLLE webbing to mount pouches inside the compartment. This was just enough real estate to mount a pouch for our Witt Machine & Tool MOD1 suppressor and a single Esstac KYWI pouch for one more 30-round PMAG. We sacrificed a third extended baseplate to keep the mag short enough to fit inside the compartment when zipped up but did make the extra power spring swap. This is advisable for mags that you plan to set-and-forget for extended periods of time. This is also where we keep the spare CR123s and a burn-proof mitt to handle a hot suppressor.
A note on ammunition: buying ammo for duty or defensive use should be a well-informed, analytical process. In a pinch, you can absolutely press your range practice ammo into service and be effective. But the amount of technology and testing that has gone into defense ammunition design over the last decade is immense, with loads tailored for all kinds of applications from barrier defeat to limited penetration to long-range precision. Take advantage of this science.
It won’t be cheap, with premium ammo often running more than $1 per round, but in a case like this where you’re only looking at $150 total, plus an extra box or two to zero your weapons, it’s a small price to pay for both peace of mind and competitive advantage when your life is on the line.
For both rifle and pistol, we chose loads from Black Hills. In 9mm, we went with a 115-grain TAC-XP projectile loaded to 1,200 fps out of a 4-inch test barrel, making it a +P load. Since our C2 sports a 3.9-inch barrel, we expect to get most of the advertised velocity out of it. Depending on your carry gun and level of skill, +P ammo may not be for everyone since the higher velocity and chamber pressure usually equates more felt recoil. But our carry gun is also fitted with a compensator.
In our experience, pistol comps function more effectively with +P ammo since the increased muzzle pressure pushes the comp to work at full potential. Since our Rosco K9 barrel has a NATO-spec 5.56mm chamber, we chose a 5.56mm spec rifle load — a 62-grain solid copper Dual Performance load. As the name implies, the Dual Performance projectile is meant to strike a happy medium between expansion in soft tissue and consistent performance against intermediate barriers.
Pack Info
Make and Model: 5.11 Tactical LV Covert Carry Pack
If you gear up with everything in the bag, you’ll have 100 rounds of carbine ammo and 50 rounds of pistol ammo (two 17-round mags on the placard, plus a flush-fit 16-round mag in the gun as carried), a knife, second med kit, and night vision. We deliberately avoided using a dangler or hanging pouch on the plate carrier since we carry appendix and wanted to minimize any obstacle to a concealed draw while wearing armor. With a focus on urban defense, we did not include long-term sustainment like food or water in this bag. But we also had a little bit of room left over and could absolutely have fit a couple water bottles or meal bars in if we’d wanted to. As always, your mileage may vary, so always pack to your needs — not ours.
Read More
Subscribe to Recoil Offgrid'sfree newsletterfor more content like this.
In physical form, The Way is in Training is a large book, measuring 11 inches tall and 1-inch thick. Outwardly, it looks more like a technical manual than a book designed to guide aspects of your self-defense proficiency, and that’s likely by design. Once you open the cover, the size of the font and the spacing in paragraphs is also remarkably generous. All of these factors are not a mistake. They are designed for a specific purpose: to make the material as digestible as possible. As a U.S. Army Special Forces combat veteran, former nationally ranked martial arts competitor, and former operational supervisor for a major metropolitan SWAT team, Matthew Little is no stranger to passing along knowledge about firearms, tactics, and combatives. What he’s put together is a bite-sized manual to address parts of life along with how those actions apply to competition shooting and the profession of arms.
The 411
This book is an enjoyable read in its format and holistic approach. There’s something to be learned for anyone. He delves into physical training techniques, nutrition for an individual and their goals, shooting drills related to competition and carrying a firearm for work, and many other topics. Whether you sit down and read in large chunks or small snippets as a busy life allows, The Way is in Training can improve your defensive capabilities.
“Books” one and two are mind and body. Each book is similar to a chapter, with subsections under each for easy reference as you go along or in the future. These first two books prepare you for the rest of the baseline knowledge you’ll need as you continue reading. As Little says, “I don’t get PTSD, I give it. I’m the carrier.” The right mental and physical state you’ll need to understand is of fundamental importance for the rest of the book to be valid. Delving into topics such as time pressure, emotion and will, and acceptance appear in later material regarding mental preparedness. On the physical side, issues Little deeply understands, such as needs analysis, durability, and longevity are addressed. Without giving anything away, Little has endured a series of events that would’ve crushed lesser men.
Books three through five have to do with applying tools and training. This is the meat of the material and includes everything from shooting drills, close contact shooting and grappling tips, and the proper selection of tools for a given mission set. A recurring theme to pay attention to throughout your reading is data usage. Little wisely quotes Thomas Harris saying, “Technique is the religion of the dangerous trades.” Regarding performance-based outcomes, Little demonstrates a deep understanding and a passion for the data used to achieve success as much as the outcome. The application becomes paramount in these three books, and readers will see the fruits of preparing their bodies and minds. Little lays a simple groundwork for success and gives enough information to start that journey.
Book six is reflective and deeply important to the other five. Little quotes Robert Heinlein: “A generation who ignores history has no past — and no future.” Books like this are rare. It is imperative not to forget where we have come from as a people and nation. Little understands that fundamentally, and it’s pervasive throughout his writing. This book is a labor of blood, sweat, tears, and, most importantly, love. On these pages, he poured everything he has for readers to use as they will.
The Verdict
There’s been a resurgence in the desire to read more often and to read works that are more than simple fiction. If you’re someone looking for easily applicable self-improvement tips with an emphasis on preparedness, this book is a great fit. For those in a profession of arms especially, this should be required reading. Gone are the days when men and women must constantly sacrifice their mental and physical well-being for a cause day in and day out. Little lays a solid groundwork for still doing the job at a high level and walking away — rather than wheeling out — at the end of your day. This book is best read when you have time to appreciate small bites of the material at a time and to reflect on them personally after.
Little is still imparting wisdom and experience through his training company Greybeard Actual. He continues to host classes nationwide in firearms and tactics, which can be found on his website. He’s also got a solid YouTube channel with various firearms information, drills, and competition videos that are worth your time.
Making time in the day is difficult in the modern world. When you can squeeze in a few minutes, The Way is in Training demands your attention. It will be worth its weight in paper, which is not light, and you will be better for applying its wisdom.
About the Book
Book & Author: The Way is in Training, By Matthew Little
“The FBI assesses that [Unmanned Aircraft Systems] will be used to facilitate an attack in the United States against a vulnerable target, such as a mass gathering … We have seen repeated and dedicated efforts to use UAS as weapons, not only by terrorist organizations, such as ISIS and Al-Qaeda, but also by transnational criminal organizations such as MS-13 and Mexican drug cartels, which may encourage use of this technique in the U.S. to conduct attacks.” – FBI Director Christopher Wray, address to the Senate Homeland Security Committee, 2017
The proliferation of drone warfare has reshaped battlefields around the world, from Syria to Ukraine and Myanmar to Gaza. There is no question that drones — often called unmanned aircraft systems (UAS) — have changed the way wars are fought. Inexpensive, readily available commercial drones have been repurposed into highly precise antipersonnel or antitank weapons, requiring little more than a single operator, an improvised explosive device (IED), and a crude drop mechanism or impact detonator.
For every one that fails or misses the mark, a dozen more are being built to take its place, continually harassing troops and supply movements and turning the tide in asymmetric wars. In more traditional wars, coordinated attacks by large fleets of military drones have been used in an attempt to overwhelm enemy anti-air defenses, as seen in Iran’s attack on Israel in April of 2024. Joshua A. Schwartz, assistant professor at the Carnegie Mellon Institute for Strategy and Technology called that incident “one of the largest drone attacks in history — possibly the largest” and explained that “aerial drones and other types of uninhabited vehicles are undoubtedly key to the future of conflict.”
But the elephant in the room remains: How will weaponized drones be used outside active war zones? Many of America’s top security experts agree that a drone attack within the U.S. is not a matter of “if” but “when.” If you found yourself caught up in the middle of a coordinated attack involving these flying IEDs, what could you do to keep yourself and innocent bystanders safe? Prior to a crisis, what steps can you take to determine if a nearby drone is innocuous or a potential threat? And during an unfolding attack, is there anything you can do to evade, intercept, or destroy a drone before it strikes?
The Scenario
Situation Type: Drone attack
Your Crew: Yourself
Location: Southern California
Season: Early fall
Weather: Clear, high 72 degrees F, low 64 degrees F
The Setup
On a Saturday morning like any other, you head to your job as manager of a small store in a popular retail center in Chula Vista, California, only a few miles from the U.S.-Mexico border. When lunchtime arrives, you walk to a restaurant on the other side of the center, buy a sandwich, and sit down on the outdoor patio to eat. The nearby stores are busy as usual, with the parking lot nearly full to capacity and many pedestrians walking to various stores. Due to the pleasant weather, several of those stores have left their glass double doors open to welcome in customers.
The Complication
Halfway through your meal, you hear a loud thud and turn to see a tower of smoke and dust rising from the middle of the shopping center. Since you carry a concealed firearm (yes, even in California) and trauma kit and have some first aid training, you decide to leave your lunch on the table and investigate. If there was some kind of accident, you might be able to render aid until paramedics show up; if it was an attack, you’re ready to deal with that, too. But what you weren’t ready for was the drone that streaked down from the sky.
This time, there was no uncertainty about the cause of the explosion. Time seemed to slow as you watched the drone zip directly into the open doorway of the police substation a few hundred yards away from where you stood. The resulting concussion felt like a punch to your chest. Chunks of rubble and glass fragments shot outward in all directions. Unsure where the source of the danger was, some bystanders began to run, while others remained frozen in fear. As you take cover and scan the sky, you can see a black speck that appears to be another quadcopter hovering in the distance.
At this point, you feel confident there’s a coordinated drone attack taking place, but you have no idea who the attackers are or what their objective might be. It could be anything from a cross-border cartel hit to a terrorist attack, but it’s clear that the intent is to target multiple locations in the vicinity. It’s also apparent that this may only be the start of the attack. The drone operators could be nearby or miles away — maybe even on the other side of the border — but either way, the danger is right on top of you.
What can you do to escape the immediate danger from airborne drones? As you witnessed, they’re fast and nimble enough to fly through open doors or windows. Also, rather than simply cowering inside a nearby business, you feel a motivation to help innocent bystanders who are injured and scared. Can you safely assess casualties, direct those who can still walk to a more secure location, and render aid to those who can’t move? What’s the best way to inform first responders about the real nature of the threat? And if you see another drone maneuvering to strike, is there anything you can do to stop or redirect it?
Drone Expert Christopher Rance's Approach
Preparation
I stood amidst the rubble of what had once been a peaceful shopping center, the air still thick with smoke and the acrid scent of burnt debris. My heart pounded, not just from the chaos that had erupted, but from the knowledge that danger still lurked above. Two first-person view (FPV) drones, sleek and predatory, hovered like vultures over a carcass, their cameras scanning for their target. I had to act — and fast.
Let’s take a knee and assess. I’m sure at this point, you’re asking, “What could have been done to prepare for an attack like this? Is this type of act even plausible on U.S. soil?” The hard truth is yes. All we must do is look to our border with Mexico and recent drone attacks carried out by cartels. Knowing that this type of threat is imminent at some point in our future, preparation is key.
Having the following training and tools can help you prepare for a drone attack. The big three are medical, communications, and having a firm understanding of drone (and in this case FPV drone) capabilities.
Training: When preparing for a potential drone attack or any mass casualty event, having a solid foundation in medical training is crucial. One invaluable resource is the Deployed Medicine website, which offers comprehensive guidelines and courses on Tactical Combat Casualty Care (TCCC). TCCC provides essential skills for managing trauma in high-stress environments, focusing on lifesaving interventions such as controlling bleeding, maintaining airways, and treating chest injuries.
Additionally, obtaining Emergency Medical Technician-Basic (EMT-B) certification equips individuals with broader emergency response skills, including patient assessment and basic life support. Familiarity with these medical practices ensures that, in an event like a drone attack, you can effectively triage and treat casualties, stabilize critical injuries, and provide support until professional first responders arrive.
Trauma Kit: Have it within easy reach for quick access. This is by far the most important piece of kit to have on you and in your vehicle. Mass casualty events suck. They require immense manpower and supplies. Having only a tourniquet and a pressure dressing on you isn’t going to cut it for an incident like this. Having a larger dedicated trauma kit in the car is a must.
Identify Safe Zones for Casualty Collection Points: Look for enclosed spaces with minimal windows, such as restrooms or storage rooms. Avoid large, open areas where drones can easily enter.
Know How to Communicate with First Responders: Clearly describe the situation, emphasizing the presence of hostile drones and multiple casualties. Provide coordinates or landmarks to help responders find you quickly. Direct first responders to your location with considerations for overhead cover and areas that can minimize the chance of striking them as they make their way to your position.
Communications: In a mass casualty or drone strike event, reliable communication is vital. There have been several instances in recent years where cellular service in the United States was disrupted or shut down, and depending on the scale of an attack, a flood of 9-1-1 calls and data may temporarily overwhelm the system. So, it’s wise to have alternate methods of communication.
Handheld radios like those from Anytone, Motorola, or Hytera are invaluable tools. These radios provide reliable line of sight communication in the VHF and UHF spectrum, which is essential for coordinating with first responders and guiding bystanders to safety. Utilizing ham repeaters, which can be located via resources like Radio Reference can extend their range, ensuring connectivity even in challenging environments. For added security, these radios can be equipped with AES-256 encryption to protect sensitive information. In addition, local ham clubs can offer valuable support in setting up and maintaining these communication networks. Tools like the Android Team Awareness Kit (ATAK) paired with mesh networking devices like GoTenna or Beartooth can add an additional layer of communications for the area. Check out my article in Issue 59 for more details on this topic.
Above: In war zones around the world, inexpensive first-person view (FPV) drones have become a powerful tool for both surveillance and targeted “kamikaze” attacks.
FPV Drone Capabilities and Limitations
First-person view (FPV) drones offer several capabilities that make them more suitable for kinetic attacks compared to typical DJI drones. These drones offer more speed, maneuverability, precise control, and payload flexibility than a typical cinematography drone. On the other hand, FPV drones also face significant limitations when operating in urban or suburban areas which can affect their performance and effectiveness.
The best way to prepare for an FPV drone attack is to exploit their weaknesses. The unfortunate truth is that the standard counter-UAS (cUAS) device isn’t available to the everyday citizen, nor is it installed and operated at soft target areas such as malls, schools, or hospitals. Even if cUAS tech was more widely available, these devices have limitations which can be exploited by the nefarious FPV drone user.
Radio Frequency Interference (RFI): Urban areas are saturated with various radio frequencies from cell towers, Wi-Fi networks, and other electronic devices, which can interfere with the control signals and video feed of FPV drones. For the pilot to control the drone, he must have a stable connection for his video transmitter and remote control. Find ways to force a failsafe for the pilot, which can trigger the pilot to lose signal with their craft and crash.
Physical Obstacles: Urban environments are filled with buildings, trees, power lines, and other structures that can obstruct flight paths and increase the risk of collisions. The presence of numerous obstacles limits the maneuvering space for FPV drones, putting their pilots at a disadvantage. Assess how buildings and foliage are laid out around you. What vantage points does a pilot have in that area? What are his limitations? Prepare an area study to assist in answering these questions.
Battery Life: FPV drones have a limitation in the form of batteries. They don’t have the same loiter times as your consumer drones, so forcing them to fly and look for targets of opportunity is paramount. Eventually, they must leave to recharge, or the drone will run its course and crash.
For devices that a citizen could wear, we must look to what is coming out of Ukraine. The Tsukorok, or “Sugar Cube,” is a portable device designed to detect unmanned aerial vehicles (UAVs) and alert soldiers to impending drone threats. This small but powerful tool is essential for warning infantry or artillery teams about incoming suicide drones like the Lancet, ZALA-Kub, or FPV drone, giving them time to find shelter. The detection range is said to be 8 to 16 km with a detection time of up to 5 minutes per target. The device mainly operates in passive scanning mode, so it doesn’t emit signals. It can also switch to tracking mode, offering detailed information on the drone’s location and movement. Not bad for a device that costs about $50!
Above: Custom-built drones can offer more speed, maneuverability, and payload capability than off-the-shelf models. This is appealing to hobbyists but can be exploited by nefarious individuals looking to covertly piece together weapon systems.
On-Site
Being able to gauge if the drone that’s flying above you has any harmful intent is quite hard. Unless you can make out and positively identify that this drone is carrying some type of payload, your first reaction is going to be to just stare up at it, which is what you don’t want to do. We all have done it before — a drone flies overhead and our first reaction is to stop and look up. What we need to do is move. It doesn’t have to be drastic, but either move slightly under some cover or make a plan about where to move in case it begins to descend.
In this scenario, after that first explosion you only have one viable option: to assess the situation as quickly as possible and come up with the best way to stay safe and help bystanders. At this point, you’re on the defensive, as you and the everyday citizen doesn’t possess the everyday carry tools to reliably take a drone out. My first order of business is to get to some type of hardened overhead cover or gain depth into a room. From there, try to get a call out for first responders. Once the call has been placed, it is now time to scan and assess the area and to see if you can gain a bearing on any more incoming drones. If you can’t hear any audible signature, start getting any wounded bystanders into safety. Begin assessing injuries based on priority and work with others to help direct first responders to your casualty collection site. Treating the wounded is about all you can do at this point.
Crisis
Knowing that the drone and their operator need to have decent line of sight to the target, my educated guess would be that they are operating from an advantageous piece of elevated terrain, that provides them the most opportune chance of maintaining a strong signal to be able to carry out the attack.
Reporting a drone attack to 9-1-1 isn’t something that you or the 9-1-1 operator are used to. The best way to approach it would be to state that you have casualties at your location, be descriptive of that piece of information, and clearly state for first responders to be cautious of drones and their approach to you and to maintain some form of overhead cover if feasible.
Determining the proximity of the drone operator is a challenge, but if in an urban or suburban area, my best guess would be 500 meters to 5 kilometers (about 3 miles). If you have high terrain or structures around you, then those would be the first places I’d look.
Conclusion
Run, hide, or fight? In this type of attack, you can only do one out of the three and that is hide and help others. Some will say that a shotgun is a viable tool for drone defense, and yes, we have seen a few cases of Ukrainian and Russian soldiers using them to knock out drones. However, the success rate has been limited, and you probably don’t walk around everywhere with a loaded 12-gauge slung across your chest. It wouldn’t hurt to keep one in the trunk or behind the store counter, but it wouldn’t be my first option. Situational awareness and developing a plan for when this type of attack will happen is the best answer that I can give you. I say “when,” as this type of attack is going to happen — it’s just a matter of when and where.
Although a drone-initiated mass casualty event may seem far-fetched, there are some predictable outcomes. The drone is merely a delivery system that we need to address later. But right now, we have casualties. In my experience being within casualty radius of multiple explosives, I can say that the first thing you need to prepare for is the immediate onset of disorienting physical and mental shock from an explosion.
Take care of yourself first, then you can worry about others. Expect to see fragmentation wounds — you’re going to see lots of blood. Knowing how to find and stop arterial bleeds is a must. In this circumstance, I had the opportunity to glean some specifics from emergency trauma expert Kerry Davis of Dark Angel Medical: “Low yield explosive energy leads to soft tissue injuries and burns. I would recommend an ankle medical kit or an EDC kit.” Personally, I like ankle kits.
A self-assessment is key in breaking the initial freeze of the “fight or flight” response. I immediately feel my body head to toe, front and back for any wet spots. This is a physical grounding technique which has helped me to not only assess for damage (blood) but also serves to pull me out of the disorienting shock of the event. Do this on the move.
Keeping an eye on another drone in my periphery, I reach the first casualty, a police officer. I see wounds indicative of a concussive fragmentation device and go through my basic assessment as a trained EMT — assess the Alertness, Breathing, and blood Circulation (ABC’s). I find lots of blood coming from the right upper thigh region. I immediately go to my Dark Angel Medical Ankle Kit. The officer is disoriented, speaking incoherently (Alert and Breathing). I apply a tourniquet as high as possible above the wound then think about moving this guy off the X.
Where can we go? That is the golden question, since that drone hovering in my periphery is getting bigger. I need to create space; I need to put hard material between us and the threat (cover and concealment). My location is seven miles from the Mexican border, so it is a pretty big leap to say the operators are on the Mexican side. A retaliatory strike on a police station in Mexico is not unheard of, but here on American soil … that would be ballsy.
These devices are operating beyond line of sight (BLOS), so they’re targeting using real-time camera navigation and GPS fixed targeting. The best thing to do is get cover and concealment so we may not be targeted in real time or find ourselves standing on the next X on their target list. If you can see it, it can see you better. Assume it has thermal and night-vision capability. I teach drone thermal signature management in my class called Anti-Tracker, so understanding the capabilities of the drone is a must.
The key techniques for trying to evade or kill a drone fall into two categories. The first is antitracking, which is passive in nature; the second is counter tracking, which is active in nature.
Above: Humans have a natural tendency to look for threats at our own level, so a drone flying hundreds of feet overhead could easily go unnoticed.
Drone Antitracking Techniques
These include any method which may slow down, confuse, or dissuade a pursuing unmanned system.
Early Detection Devices can alert you to the presence of drone activity up to and past 30 kilometers. Although difficult to find and import due to their high demand in Ukraine, it is possible to make your own with commercially available parts. Drones have optics, but so do you, so use them. A ground operator, for instance, can use commercially available amplified hearing devices to give directional orientation. Now that we have a general direction, we can orient our optics to detect movement or even the thermal signature of the drone itself. I recommend the Pulsar Merger LRF XL50, which provides excellent target acquisition and identification capabilities up to 2,500 meters with its variable 2.5x to 20x zoom, plus a Laser Range Finder. This buys you time to prepare for an aerial infiltration.
Drone Signal Jammers can interrupt GPS, data signal, and frequency transmission to make the drone return to operator or land. These are heavily restricted in the U.S., as the risk of drones crashing is a danger to the public, and because of their ability to jam cellular, Wi-Fi, and/or emergency radio frequencies.
Signature Management and masking techniques are used to mask or hide the presence of personnel and equipment. A great piece of equipment that a ground operator can carry to hide from a drone with the latest thermal capabilities is a Spectralflauge blanket, which hides the body heat of an individual. This is available through BEEZ Combat Systems and is an excellent addition to your pack or vehicle.
When it comes to daytime vision and the zoom capability of an HD camera, camouflage must be carefully selected. You’re dealing with a pixelated light gathering device at detection altitude — say 150-plus feet. The drone has a wide field of view and is looking for movement, shape, and contrast. The height will vary, but there are cases where drones are shot down by small arms, so ballistic standoff is important to an experienced operator. Throwing smoke grenades or even setting fires can help to mask your movement and obscure the drone’s vision.
You must understand that air-to-ground targeting uses something you might never expect: your shadow. Three people who are perfectly camouflaged standing in the open will fail to realize that their shadows on the ground are easy for drones to see. I recommend hugging the nearest positive space, staying in shadowed areas, moving low to the ground, and wearing blotchy camo patterns with soft edges (e.g., Nemesis Camouflage from Alpha Group Solutions). The loiter/detection altitude of a drone negates the use of small patterns designed to fool the human eye.
Evasion Planning Be aware of your surrounding geometry, especially in an urban environment. Some have subterranean networks we can use to evade the drones. Large sporting arenas, malls, casinos, and hotel resorts all have behind-the-scenes networks that allow employees to move efficiently from one side of the facility to the other. Lockpicking and breaching skills are going to be handy here, along with a flashlight for navigating dark passageways.
Drone Counter Tracking Techniques
These techniques are used to harm, kill, or exploit at least one element of the system. By system, we reference the drone support software, hardware, and the operators themselves.
Drone Guns (i.e., directional electromagnetic weapons) are widely used in Mexico and less regulated countries but trying to buy a drone gun in the U.S. is not going to happen unless you work for a major law enforcement agency. Yes, you can make one with commercially available off-the-shelf items, but doing so requires some electrical engineering skills and carries risks of serious legal trouble.
Ground-to-Air Drone Defense systems exist in the form of electronic countermeasures and are employed at every major port of entry or other tactical positions on our nation’s border. They have the capability of disabling a swarm of drones attempting to enter American airspace. One item I am particularly interested in is the Maverick Drone Systems Skynet Drone Defense shotgun shell, which is a shotgun-deployed net designed to bring down a drone. I intend to test its range and accuracy in the near future. Other shotgun shells with wide pellet spread are going to increase the chance of impacts on target as well, but keep in mind that they may not be effective against drones hovering hundreds of feet in the air.
To improvise, you can make a bolo tool with a few feet of cord plus three round objects about the size and weight of a golf ball. This primitive weapon has been used to take down anything from large game to small birds. Anyone with a little bit of grit and hand-eye coordination might be able to ambush a low-flying drone with a bolo. However, this assumes the drone pilot is bold (or foolish) enough to fly within throwing distance.
Exploitation of Data If you’re lucky enough to capture a drone relatively intact, you can use software to download all the information in the drone, including point of origin, flight pattern, IP address, target data, and corresponding layers of past activity. In long-term operations, this can help you identify sources of materials, funding, and support in order to stop future attacks from the same network.
Above: Techniques for camouflaging yourself against an observer at ground level may not be effective against aerial surveillance. Managing your shadow is especially important.
Next Steps
In this scenario, my next big decision is how to get to safety. I am going to base this decision on two criteria — the same two I have used to determine my next move in a firefight. What is the accuracy and volume of fire I am receiving? In this case, what is the frequency of explosions and what is their proximity to me? As mentioned before, the nearest port of entry is seven miles away, and the area’s main police station is only a couple of miles away. These are two locations where safety from a drone attack can be found because of electronic countermeasures built into their force protection plan.
Do your best to help those on your way out of the area to a subterranean shelter or law enforcement facility. If you have the means to acquire some of the gear and or training mentioned above, do it, because this is an ever-evolving emergent threat, and not just to our border communities.
The aftermath of this type of attack is going to be unlike anything we have seen in this country. Imagine every police car and ambulance carrying electronic countermeasure devices similar to those developed to keep troops safe against IEDs during the Global War on Terror.
I run classes that deal with small teams evading detection of Small Unmanned Aerial Systems and depend on sUAS expert Justin Anderson of Mayhem Solutions Group for the latest intel regarding this threat. He had this to say regarding drone training: “I suggest buying a drone and getting some “time behind the stick.” There are plenty of good schools out there. I personally believe getting a drone and learning as you go is also a good option. I’d recommend a DJI Mini to start.”
When asked are there any tools you can obtain that would be effective against weaponized drones, Anderson said: “Yes, the FAA has a required database where drones report their location and serial number to REMOTE-ID. Multiple apps on the market allow you to see the FAA REMOTE-ID features. This is a way to check up on the drone you see in the sky. Another slightly more expensive route is Dedrone which offers both counter drone and drone detection tools. They also offer devices that keep drones from flying in or near the airspace where they’re deployed.”
“In dealing directly with narcos on the southern border, I have been shot at with small arms and shot down a drone with a counter sUAS weapon. This drone war is already at our backdoor. I deal with it firsthand. As drone mitigation devices become harder and harder to get and drones themselves are on the verge of being banned in the USA, cartel groups in Mexico are in full swing getting better with new equipment and counter drone devices.”
Conclusion
The widespread use of weaponized drones represents a significant paradigm shift in warfare. Much like the introduction of firearms, tanks, radar, or night vision, this technology has rapidly changed how wars are being fought. Hiding from drones on the battlefield is difficult, outrunning them on foot is impossible, and even if one is shot down, it can be replaced at minimal cost and piloted by the same operator.
For those of us who live outside active warzones, this may seem like a distant threat, but many experts agree that a terrorist attack involving weaponized drones is highly likely — maybe even inevitable. Additionally, there’s a consensus that our level of domestic preparedness for such an attack is low, with the exception of certain heavily defended government facilities. As prepared individuals, we should familiarize ourselves with this technology so that we can understand its capabilities and recognize early warning signs of an impending attack. In almost every case, that drone buzzing overhead is just an amateur videographer or hobbyist having some fun … but if it’s something more sinister, do you have a plan?
Meet Our Panel
Christopher M. Rance
Christopher M. Rance, retired U.S. Army veteran, served as an Army Sniper Course Instructor and pioneered the FPV drone program at Fort Moore. Creator of The Light Fighter Manifesto, Rance advocates for mobility, self-reliance, and adaptability. His military background, law enforcement experience, and passion for outdoor adventure make him a trusted voice in survivalism. Rance travels the world, recently offering Light Fighter courses in both urban and rural areas in Switzerland, covering the use of drones, communications, software-defined radio, and shooting.
Freddy Osuna
Freddy Osuna is a trusted authority in the hard skills training industry with a focus on Visual Tracking and small unit tactics. He is the author of Index Tracking - Essential Guide to Trailing Man and Beast as well as the owner of Greenside Training LLC, one of the foremost tracking schools in the United States. A former U.S. Marine, Osuna uses knowledge based on real-world deployments and formal combat tracking instructor experience with U.S. and allied militaries, as well as with federal, state, and municipal law enforcement entities. He harnesses his Native American and Marine Corps culture to deliver holistic, powerful, and scientific-based lessons steeped in North American tracker lineage. To sign up for a class, visit greensidetraining.com
Read More
Subscribe to Recoil Offgrid's free newsletterfor more expert tips and insights on staying prepared.
The ability to make fire without being dependent on a lighter is a skill that captivates us. Being able to create such an essential source of heat, light, and comfort is an incredibly powerful feeling. For most people, starting a fire without a lighter or match seems imposing, but it’s not as difficult to achieve as you might think. With the right tools and a bit of practice, you’ll be cooking in no time.
You might know these fire-starters as flint rods or fire steels — both misnomers, as they don’t contain either flint or steel — but they’re actually called ferrocerium rods, or ferro rods for short. Ferrocerium is a complex alloy made of cerium, lanthanum, and iron with smaller amounts of praseodymium, neodymium, and magnesium. When rapidly scraped, it throws a shower of sparks that can range from 3,000 to 6,000 degrees F. Additionally, by slowly shaving small pieces from the rod and forming a small pile, these shavings can be added to your combustible material before throwing sparks, increasing your chances of getting a flame to catch on combustible material. This is substantially more efficient than if you had struck an ordinary piece of flint with steel, which ignites at roughly 800 degrees F and throws much smaller sparks.
Typically, a ferro rod is set as the A, or alternative in a P.A.C.E. — Primary, Alternate, Contingency, and Emergency — plan, serving as a backup to a lighter. Lighters are great, and you should have one in your list of carry items, but they do have drawbacks that a ferro rod doesn’t. Ferro rods are very robust tools with no moving parts and have no fluid or fuels to contend with. They only require a 90-degree angle on the spine of a knife, a key, or a piece of ceramic, and a 45-degree downward stroke against the rod to throw an umbrella of sparks. And unlike lighters, they won’t become unreliable in cold weather.
Whether you’re looking for an addition to your hiking pack or go-bag, or something a little more covert that you can have with you every day, lots of options are available. Read on as we examine the pros and cons of a few ferro rod fire-starters.
Wazoo Gear Co.: Spark Necklace
Well known in the preparedness and bushcraft communities, you’d be hard pressed to find a professional who doesn’t field at least one Wazoo item on a regular basis. The beauty of the Wazoo Gear’s Spark Necklace is in the simplicity and tribal aesthetics. It’s a functional tool that can also be worn without seeming out of place or overtly noticeable. The Zirconia ceramic pendant is available in your choice of black or white and will not dull or corrode like a steel striker.
Naturally dyed round leather cord is comfortable for all-day wear.
The ceramic scraper doubles as a glass breaker or knife sharpener.
Threaded ends in the quick-release clasp allow you to cut the cord to a custom length.
Cons:
A 1-inch-long ferro rod may be difficult to use, especially with gloved hands.
The primitive look may not fit everyone’s personal taste.
EXOTAC: FIREROD V2
This collaboration between Habilis and Exotac brings what could be considered the most widely recognized and used ferro rod for hikers and bushcrafters. The knurled aluminum handle has four color options (high-vis orange, OD green, gunmetal, or black) and a waterproof threaded cap with an O-ring. The storage compartment is large enough to keep a small piece of tinder dry. The threads are well-made to reduce the risk of cross threading.
Rods are replaceable, making this a tool you can rely on for many years.
Carries a small amount of tinder material and keeps it dry.
A great companion for any knife sheath with a built-in ferro rod carrier.
Cons:
Included lanyard is mostly useful as a pull tab. For neck wear, you’ll need to replace it with a longer cord.
Dry storage area has limited room for tinder.
Outdoor Element: Sparky & Scratch Key
Outdoor Element is a small Colorado-based company of former aerospace engineers and outdoor adventurers. They specialize in building reliable precision-crafted tools to foster confidence and skill-building in the outdoor space. This is a handy option especially for anyone who already uses a carabiner, since it retains the features you expect plus an embedded ferro rod on the back side. The options of a KW1 (Kwikset) or SC1 (Schlage) style key allow you to get the Scratch key cut to use in your own front door.
Carabiner is available in orange or silver finish and has an integrated bottle opener.
Functional keys can be cut for Kwikset or Schlage door locks.
Cons:
Accessing the key’s ¼-inch bit driver requires removing it from its keyring.
Small rod and scraper surface make this more of a “just in case” tool than one for frequent use.
Grim Workshop: Hot Shot Micro Tool Keychain
Located on a fifth-generation homestead in Texas, Grim Workshop designs high-quality and very well-thought-out mini and micro-EDC tools. Many of their tools are so convenient to carry you’ll have no excuse to leave them behind. The Hot Shot can ride a keyring or necklace, or you can remove the backing and stick it to your favorite multi-tool. It could even be used as a zipper pull on a jacket or pack.
Features both a serrated scraper and a 90-degree striker edge.
Slim enough to carry on a keyring or even use as a zipper pull.
Cons:
The small size makes it more challenging to use, and it would be easy to misplace the rod during use.
Removing the rod can be a little tricky.
Shankle Homestead: Leatherworks Fire Steel w/ Leather Sheath
Shankle Homestead Leatherworks specializes in producing heirloom-quality leather goods. Based out of Ohio, Shankle Homestead started out providing products for subscription boxes and became known for their quality and utility. Their mission is to make high-quality goods at a price everyone can afford. The Fire Steel Sheath allows for a variety of mounting applications such as beltline or a pack strap. The large 5-inch ferro rod makes it easy to throw showers of sparks at your tinder.
The oversized one-piece rod is exceptionally easy to use, even with gloved hands.
Leather loop doubles as a strop to deburr your knife edge after sharpening.
Will develop a cool patina over time.
Cons:
Leather requires repetitive care to prevent drying out or cracking.
Quite large for EDC.
Prepared4X: Survival Torch Fire Starter – Large
Founded by an Eagle Scout, Prepared4X has set out to become the most trusted name in preparedness. The Survival Torch is a unique design, and everything is large enough to use with gloves on. Most will be able to use this with cold, wet, and shaking hands. The 36-inch wax-infused hemp wick will burn even when wet and can go continuously for more than three hours or can be used hundreds of times to start fires.
In June 2024, Department of Homeland Security (DHS) personnel identified more than 400 individuals from Central Asia who had crossed illegally into the United States via an ISIS-affiliated human trafficking network. As I write this, the whereabouts of at least 50 of these individuals are still unknown. Earlier that same month, eight men from Tajikistan were arrested in New York, Philadelphia, and Los Angeles — DHS says they were part of a completely different ISIS-affiliated network.
In April, a 48-year-old Afghan man whose name was on the terrorist watch list was found in San Antonio, Texas, having spent more than a year inside the U.S. And these incidents are not rare. In 2023, Customs and Border Patrol (CBP) encountered a total of 172 individuals on the watchlist who were attempting to cross the border (169 from Mexico and 3 from Canada). Year-to-date data indicates this number is likely to increase in 2024, and those are only the individuals we know about — countless others manage to slip through the cracks.
Border security has become a highly politicized and controversial topic, but it shouldn’t be. Every developed nation has established policies for legal immigration and citizenship, and the reasons behind these policies should be just as obvious as the reasons you lock your own front door. Aside from the national security concerns of allowing terrorist and criminal organizations to gain a foothold, an unsecure border also facilitates sex trafficking and smuggling of drugs such as fentanyl, which killed an estimated 82,000 Americans in 2022.
To develop a better understanding of this problem, we interviewed someone who experiences its consequences on a daily basis: Sheriff Mark Lamb of Pinal County, Arizona. Lamb has been outspoken about the severity of the border crisis, and our ride-along with him let us witness and photograph some of the smuggling routes firsthand.
However, it’s important to remember that outsiders shouldn’t be our only source of concern. Our own citizens are willing to induce violent civil unrest from within, as we’ve seen in cities and college campuses throughout America this year. In this issue, Patrick Diedrich takes a look at the Do-It-Yourself Occupation Guide, a guide that suggests tactics for breaking, entering, and occupying structures in an effort to forcibly reshape society.
Many of our columns relate to equipment and skills that can help you maintain awareness and safety if you find yourself in the path of a violent crowd — a buyer’s guide to optics you can use for observation, an armored “Speed Ball” backpack loadout, methods for treating penetrating chest wounds in the field, and a review of a locking Steelhead Outdoors cabinet that can help secure your valuables when you’re not at home.
Last but not least, our What If scenario in this issue covers a topic that has become a constant in wars and conflicts around the world: weaponized drone attacks. We asked two experts — Army veteran and drone specialist Christopher Rance and Marine Corps veteran and tracking instructor Freddy Osuna — how they would respond during a drone attack on U.S. soil. Both agreed that this flying IED scenario is not a matter of if, but of when. They also noted the relevance to border security, since cartels have been some of the leading innovators (if you’d use that word) behind converting inexpensive consumer drones to carry payloads of drugs or explosives.
Whether the threat comes from outside our borders, inside your hometown, or even from the skies above, we hope the information in this issue will help you become more aware and prepared. Although some of these dangers may sound far-fetched, don’t fall victim to normalcy bias by assuming they won’t affect you in the future simply because they haven’t affected you yet. Stay aware and always have a plan for action.
Read More From Issue 63
Subscribe to Recoil Offgrid's free newsletterfor more expert tips and insights on staying prepared.
Throughout history, the effective range and precision of firearms have rapidly improved. In the era of smoothbore muskets, a skilled marksman might struggle to hit a man-sized target every time at 100 yards. With the introduction of rifled barrels and the transition from round musket balls to conical Minié balls, the same shooter could achieve reliable hits at double or triple this range. Improvements to metallurgy, machining, cartridge production, and magnified optics throughout the 20th century doubled and tripled this effective range yet again. Today, we’re at the point where a shooter with scoped carbine skills and an inexpensive, off-the-shelf AR-15 can get consistent hits at close to 1,000 yards with mass-produced ammunition. That’s an impressive feat, but it also leads to a question: Are you, the shooter, capable of matching the potential of your carbine?
To learn how to make the most of an AR at extended range, I took a Scoped Carbine class from Sidewinder Concepts. Adrian Leatherman, the founder of Sidewinder, is a recently retired U.S. Army sniper who teaches students based on his real-world experience. This class was hosted by local ammo manufacturer Badlands Munitions Co. on a private piece of land in the Arizona desert.
My Rifle & Ammo
Less-Than-Ideal Choices
The course description mentioned an emphasis on targets at 600 yards and closer, so I decided to bring my 13.9-inch AR with a Vortex Razor HD Gen III 1-10x optic, pictured below. I knew from previous experience (e.g., the TruKinetics LPVO class I wrote about in Issue 54) that I could ring steel at 600 yards with this rifle consistently, even with 55-grain .223 ammo. However, one of my first lessons from this class was that this rifle — albeit a very versatile setup based on high-quality parts — began to show its weaknesses at that range in anything other than ideal weather conditions, especially without heavier match-grade ammo.
We experienced strong gusty winds throughout the class, to the point that tripods were falling over and students were having to make substantial wind corrections before shooting. The 55-grain ammo I brought simply wasn’t stable enough after exiting the 13.9-inch barrel to cut through that wind, so I spent most of the day missing left and right of targets beyond 500 yards. Put simply, this wasn’t the right tool for the job.
I took this lesson to heart and decided to build a second upper receiver that’s optimized for 77-grain ammo and longer range — more on that project later in this article.
Configuring a Scoped Carbine
During the classroom portion of the Sidewinder Concepts class, Leatherman discussed some of his recommendations for scoped carbine setups:
Length of Pull (LOP) – While holding the pistol grip, adjust the stock until it’s long enough to reach just past the inner crook of your elbow. Get behind the gun and make sure the angle of your wrist is comfortable, and that you have a good 90-degree finger placement on the trigger.
Scope Placement – Position the optic on the Picatinny rail an appropriate distance away from your eye, ensuring that you have a full sight picture without any scope shadow at the edges. Try getting comfortable behind the rifle with eyes closed, and then open your eye to confirm sight picture.
Mount Height and Comb Height – Make sure you can get a completely relaxed, stable cheek weld against the stock with full sight picture. If not, a lower scope mount or taller cheek riser may be necessary. However, don’t go too tight; pressing your cheek forcefully into the stock induces muscle tension, and tension is bad for precision.
Ocular Focus – Aim your optic at the sky or a blank white surface and adjust the rear focus ring so the fine details of the reticle are perfectly sharp. Open and close your eye a few times to confirm this and check it at all magnification levels. Consider marking it with a paint pen in case another shooter (e.g., a family member or friend) needs to adjust it temporarily.
Above: This 13.9-inch upper is a jack-of-all-trades, but it wasn’t the ideal tool for shooting beyond 500 yards, especially in strong wind.
Behind the Gun
To check my rifle configuration, I got into the prone position, ensuring my spine was at the same angle as the rifle barrel. Feet are spread apart with heels flat on the ground, and arms form an A-frame, with the support hand squeezing a sandbag beneath the buttstock to control elevation. Controlling the bag is absolutely critical to controlling the rifle, and loosening your grip on it will lead to misses, much like loosening your support hand grip on a handgun. Use your support hand’s index finger and thumb to grip the stock, and the other three fingers to manipulate the bag. I found I prefer a larger sandbag, since it fills the void between my chest and the rifle and offers much more structural support. For bipods, height should be adjusted to a point where you don’t feel neck tension while holding the reticle on target. Leatherman emphasized the importance of being entirely comfortable and relaxed in this position.
As for your sight picture, remember that you should see zero scope shadow before taking a shot. Some optics have a tighter eyebox (i.e., less space for an acceptable eye placement behind the scope), and Leatherman says that’s actually a good thing for precision, since it forces you to achieve a consistent sight picture every time. Optics with forgiving eyeboxes, such as LPVOs, are good for fast shooting but may lead to inconsistency at longer range. Checking cant — the left-to-right angle of your carbine — is another important part of this process. Use a weapon-mounted bubble level to confirm your reticle is perfectly upright, because even a 2- or 3-degree cant can lead to misses on a human-sized target at longer ranges.
The firing hand grip can be either precision (thumb up) or traditional (thumb wrapped around); Leatherman says both can work well, but he prefers traditional grip for an AR with a telescoping stock. When it’s time to pull the trigger, pin it to the rear and release after you see what happens downrange. This makes corrections and follow-up shots easier.
To remember all of these steps, use the acronym BRASS:
Breathe – use the natural respiratory pause at the bottom of an exhale
Relax – don’t hold your breath or put any muscle tension into the gun
Aim – let the reticle fall onto the target as you finish exhaling
Sight – confirm clear sight picture
Squeeze – gently break the trigger
“Don’t accept a bullsh*t zero,” Leatherman emphasized. Ballistic calculators — which we’ll discuss more later — assume that your zero is perfect, so any deviation here will throw off all the data down the line. To zero my rifle, I set up on a tripod and aimed at the corner of a 1-inch box on the paper target. This serves as a highly precise aiming point and allowed me to see deviation clearly, as opposed to simply accepting any hit within the box.
Above: Adrian Leatherman, founder and lead instructor of Sidewinder Concepts, bases his curriculum on nearly a decade of experience within the U.S. Army Reconnaissance and Sniper community.
The Flight of a Bullet
In order to understand precision shooting, you need to understand what a bullet does after it leaves the barrel of your carbine. This can be summarized in three stages:
Supersonic – The bullet is traveling above the speed of sound, which makes its behavior relatively easy to predict.
Transsonic – The bullet has slowed into a transitional range (Mach 1.2 to 0.8) that generates areas of supersonic and subsonic airflow around it. As a result, it can behave very unpredictably. Leatherman calls this “the f*** you zone.”
Subsonic – As airflow around it slows entirely below the speed of sound, the bullet’s behavior becomes more predictable again.
The dividing line between supersonic and transonic is generally known as “maximum effective range” because all variables up to that point are reasonably measurable and controllable. Faster-moving projectiles will remain supersonic for longer, thereby extending the max effective range. Beyond the caliber, barrel length, ammunition, and atmospheric conditions can also dramatically affect this.
Above: RECOIL OFFGRID contributor Nate Gerhart demonstrates proper prone form, with heels flat, legs apart, and support hand gripping a shooting bag beneath his chest to control the carbine’s elevation.
Here’s a quick and dirty max effective range reference guide for some common calibers:
.223/5.56 – 600 yards
.308 – 850 yards
6.5 Creedmoor – 1,250 yards
Leatherman says that if you want to manually calculate the speed at which a bullet enters the transonic range, also known as Remaining Velocity (RemV), you can use these formulas:
Speed of Sound (SOS) in feet per second = 1061 + current temperature in Fahrenheit
Remaining Velocity (RemV) = SOS x 1.2
So, for example, if it’s 60 degrees F outside, the speed of sound should be roughly 1,121 feet per second. The real SOS formula is much more complex and yields a value of 1,117 fps, but 1,121 is close enough for our purposes. The upper end of the transonic range is typically Mach 1.2, so we multiply our speed by 1.2, which gives us a RemV value of about 1,345 fps. As long as a bullet is traveling faster than that speed, its trajectory should remain relatively predictable.
Thankfully, we don’t need to do this math manually. During the class, Leatherman taught us to use the Applied Ballistics app to quickly calculate the trajectory and holdover points for a specific day at the range. I entered the barrel twist rate, sight height, and reticle/adjustment units (MIL or MOA), followed by the bullet diameter, weight, length, and distance at which my rifle was zeroed. After testing my ammo at the range with a chronograph, I entered 2,910 fps for the average muzzle velocity. Finally, I typed in the atmospheric data for the range that day: altitude, temperature, and humidity. Wind speed was left at 0 miles per hour, since I’d need to correct for that on the fly while shooting.
For my rifle, the AB app indicated max effective range would be about 500 yards. Beyond that point, the bullet will enter the transonic range below 1,345 fps, and the shot groups will start opening up substantially.
Above: Each student’s rifle was zeroed and chrono’d at the range before we started shooting. These steps ensure a clean slate upon which ballistic data tables can be built and confirmed.
Keeping It Real
With all this data, we can predict the trajectory of a bullet and maximize our chances of hearing that satisfying “ding” as it makes impact on a distant steel plate. On a good day, you can have a lot of fun ringing steel at more than 1,000 yards with a plain-Jane 16-inch AR-15 and lightweight .223 ammo. The holdovers and wind corrections may be substantial, but with a ballistic calculator, good data, and solid shooting technique, it’s doable.
However, as Leatherman explained, “There’s a difference between fun and realistic.” Just because the ballistic data says you can hit the target does NOT mean that the round’s lethality will be maintained at that range. Lethality is unimportant for plinking and competition, but absolutely critical for hunting or combat. To gauge this, we should examine the bullet’s energy, typically measured in foot-pounds. Leatherman says that the amount of energy required to maintain reliable lethality varies based on the target:
Big-game animals (e.g., elk or bear) – 1,000 ft-lb
Other animals (e.g., deer) – 600 ft-lb
Humans – 350 ft-lb
Considering these energy requirements, my rifle’s realistic effective range with 55-grain ammo would be more like 375 yards for two-legged threats and 200 yards for game animals. With 77-grain match ammo at a muzzle velocity of 2,500 fps, the AB app indicates those ranges are extended to about 500 and 275 yards, respectively.
Above: A smartphone and ballistic app such as Applied Ballistics is invaluable to a modern sniper. Simply enter all the variables, and the app indicates the necessary elevation holds at various distances.
Wind: The X-Factor
Now that we understand max effective range (the most predictable portion of the bullet’s arc through the air) and practical lethality (the bullet’s energy on target), we need to consider one final factor that can reduce both. Wind can be unpredictable due to its constantly changing speeds and angles. It flows like water over terrain, and the speed of the wind near your target may be completely different than the speed of the wind where you are. As a result, even the best ballistic calculators won’t be able to tell you the exact left or right hold in the pivotal split second before you squeeze the trigger.
Learning to call the wind and estimate an appropriate correction is a skill that takes time and practice, but Leatherman says there are a few things you can do to reduce its impact on your shooting performance.
Know Your Rifle’s Number
Heavy, high-velocity bullets are more resistant to being pushed around by the wind. Some calibers will be affected noticeably by a smaller amount of wind, while others will require a larger amount. The crosswind speed required to blow your bullet left or right by 0.1 MIL at 100 yards (or 1 MIL at 1,000 yards) is called a “gun number” or “gun mph.” Here’s a quick approximation for common calibers:
.223/5.56 – 3 mph
.308 – 5 mph
6.5 Creedmoor – 7 mph
Once you’ve determined your rifle’s number, it’s easier to compensate for wind based on speed brackets. For a 5-mph gun, you should know corrections for 5, 10, and 15 mph full-value (90-degree) crosswinds, rather than everything in between. Speaking of which …
Make a Wind Chart
Rather than relying on a Kestrel or other wind speed meter to do all the work, take notes about wind speed and corrections every time you shoot in windy conditions. Compile this data into a paper chart or integrate it into your rifle’s existing DOPE chart.
Above: Students brought a variety of rifle setups to test on targets from 200 to over 800 yards. The first half of the day was spent on prone shooting.
Befriend Your Biggest Fan
Leatherman learned to gauge wind speed by setting up a box fan and guessing how fast the wind was blowing based on how it felt. After a guess, he would use a wind meter (such as a Kestrel) to see how close he was. With enough practice, he was able to estimate wind speeds more accurately.
Read the Environment
To estimate wind downrange, you can look at the direction the mirage in the air is blowing. With no wind, mirage will travel straight up from the ground. At 1 to 3 mph, a slight angle will be visible in its distortion; at 4 to 7 mph, it’ll travel at a 45-degree angle in the direction of the wind. At 8 to 12 mph, mirage distortions will appear almost horizontal. Movements of tall grass and trees can also be a good indicator, but plant varieties behave differently, so you’ll need observational experience to know how your local foliage moves at certain wind speeds.
Be a Spotter
Shooting will help you hone your wind calling skills, but spotting for another shooter lets you truly focus on the visual aspect of wind corrections.
A Sniper’s Definition of CQB
In a combat environment, Adrian Leatherman says that snipers generally maintain a 500-yard bubble around their position. Outside that “danger close” range, they can call in air strikes; inside that range, they’ll need to use their rifles. One statement that stuck with me was “CQB is 300 yards and in” — in other words, Leatherman considers any armed threat within three football fields to be a close-quarters battle. His reasoning is simple: An untrained shooter can still hit you with relative ease at that distance, since no substantial holdover or understanding of ballistics is required.
That said, don’t assume an enemy combatant will perceive your presence the same way. Near the start of the Global War on Terror, Leatherman said harassment fire was often effective at deterring enemy forces from 700 or even 800 yards. By the later years of the war, many insurgents were bold enough to get within 200 yards without fear of dying.
Above: Plywood barricades were set up to allow students to practice shooting skills from positions including standing, kneeling, and seated.
Building a Better Scoped Carbine
After completing the Sidewinder Concepts class, learning more about ballistics, and observing how my 13.9-inch rifle performed in windy conditions, I decided it was time to build another upper receiver tailored to engagements beyond 500 yards. This isn’t a replacement, it’s simply a different tool for a different purpose. Just as it’s nice to have a fully stocked toolbox in the garage, I like to have a variety of weapons in my gun safe — both are forms of preparedness.
As we established earlier, more velocity can produce improved stability (more likelihood of hitting what you’re aiming at) and higher energy on target (more lethality). Aside from switching calibers, one of the easiest ways to achieve higher velocity is with a longer barrel. Obviously, there are diminishing returns with barrel length, and I don’t want to lug around a massive 24-inch rifle, so I chose a Rosco Purebred 18-inch SPR barrel. This barrel drew inspiration from one of the most iconic scoped carbines in modern military history, the U.S. Navy Mk 12 Special Purpose Rifle (SPR). Built from scratch at Rosco’s Rhode Island facility from a blank piece of 416R steel, it features a balanced SPR barrel profile and a rifle-length gas port that’s sized for use with a suppressor and common precision ammo.
This barrel was paired with an American Defense Mfg. UIC billet upper receiver to match the rifle’s existing lower, as well as Rosco’s Melonite gas tube and non-adjustable gas block. The muzzle device is a Gemtech two-chamber brake that’s compatible with my Gemtech Shield quick-detach titanium suppressor.
Above: You can learn a lot by serving as a spotter for a friend who’s shooting, especially when it comes to observing foliage and mirage movements to read the wind.
For the handguard, I went with a Midwest Industries 15-inch Combat Rail and equipped it with an Atlas BT65-LW17 Gen. 2 CAL bipod. This American-made bipod offers excellent stability, precise length and angle adjustments, a Pod-Loc adjustable cant system, and an American Defense Mfg. QD mount that makes it easy to swap onto any rifle with a Picatinny rail. Much like my 13.9 upper, there’s also an Ulfhednar M-LOK to ARCA rail adapter that enables use with a shooting tripod, and a set of Walker Defense Research NILE grip panels on the rail. This rifle’s low-friction, flat dark earth DLC-coated bolt carrier group is also from Walker Defense Research. Subtle upgrades like the knurled OCKS screws on the gas key make this BCG a solid choice for long-term reliability.
Last but certainly not least is the optic — one of the most important parts of any precision rifle. I chose a Nightforce SHV 4-14x50mm F1 scope with MIL-XT first focal plane reticle. This “Christmas tree” style reticle is a new addition to Nightforce’s affordable SHV line, and its highly detailed grid of 0.2-MIL dots provides exactly the level of detail I need for precise elevation and wind holds. Of course, the glass and overall build quality are superb, as I’ve come to expect from a Nightforce scope.
Since this is a mid-power variable optic (MPVO), it doesn’t offer a 1x setting, a feature I prefer for quick target acquisition. If you’ve ever lost a target in the scope and had to sweep back and forth looking for it, you know what I’m talking about. An unmagnified red dot can also serve as an alternative to backup iron sights, works well under night vision, and in a worst-case scenario, makes it easier to engage targets well within the 300-yard CQB range (see sidebar). For these reasons, I equipped the Nightforce Ultramount with a 12-o’clock piggyback red-dot adapter from Koeng. This mount bolts onto Nightforce’s optional RAP-I accessory platform, which was intended for a laser rangefinder, and repurposes it to an Aimpoint Micro-style footprint. In this case, I installed a Primary Arms SLX MD-20 red dot, but other sights from SIG, Vortex, or Holosun could also fit.
Above: Here’s a side-by-side of my old 13.9-inch upper and my new 18-inch setup. The longer barrel, more powerful optic, and rock-solid Atlas bipod are notable upgrades.
Above: The Nightforce SHV 4-14x50mm F1 is an outstanding optic for this application, especially with its new MIL-XT reticle. The 12-o’clock red-dot mount from Koeng paired nicely with it.
Closing Thoughts
Switching from a 13.9-inch barrel to an 18-inch barrel yielded roughly 200-fps higher muzzle velocity, extending the rifle’s max effective range from 500 to 575 yards with 55-grain ammo or from 575 to 650 with 77-grain match ammo. While this is a noticeable increase in effective range, it’s less than I expected. Lethality figures tell a similar story — the 13.9 maintains 350 ft-lb of energy out to 375 yards (55-grain) or 500 yards (77-grain), and the 18 increases that to 425 yards (55-grain) or 600 yards (77-grain).
Arguably, based on this data, there’s more benefit in switching your short-barreled rifle to heavier 77-grain match ammo than there is in building an upper with a 4-inch-longer barrel. Granted, the longer barrel will still be helpful for cutting through the wind, is more resistant to heat buildup from repeated shooting, and can offer improved penetration against closer targets. But contrary to popular assumptions, slapping a longer upper on your rifle doesn’t extend its effective range by 200 or 300 yards. In our case, it turned a 500-yard gun into a 600-yard gun.
If you’re looking to reach out and touch something beyond 600 yards, it can be done with a 5.56 scoped carbine, especially if you’re only concerned about hearing the “ding” of a steel plate as opposed to terminal ballistics or lethality. But as I lobbed rounds at 700-yard targets and fought gusting crosswinds during this course, my biggest takeaway was: “Man, I wish I brought my 6.5 Creedmoor AR-10.” Sometimes there’s just no replacement for a bigger, faster caliber.
Aside from choosing the rifle and ammo, most of long-range shooting comes down to your experience and skill as a shooter. This Sidewinder Concepts class helped me develop my understanding of a rifle’s ballistics, and more importantly, how ballistic data applies to real-life applications. Next time I need to shoot beyond 500 yards, whether that’s during a competition, a hunt, or just for fun, I’ll know what it takes to score a hit without relying on guesswork or volume of fire.
Read More
Subscribe to Recoil Offgrid's free newsletterfor more expert tips and insights on staying prepared.
Welcome back to Gear Up, your go-to guide for the latest in survival gear and preparedness tools. This edition is packed with innovations and tried-and-true classics that are essential for staying ready for any situation. From cutting-edge tech to reliable gear, we aim to equip you with the knowledge and tools you need to stay ahead of the game. Whether you're gearing up for the unexpected or fine-tuning your survival kit, join us as we take a closer look at this month's must-haves.
Backpackers Pantry: New Meal Bundle
Notes:
Step up your outdoor culinary game with the Backpacker's Pantry New Meal Bundle. This bundle includes five distinct meals: Beef Bolognese, Drunken Noodles with Chicken, Fiesta Beef and Vegetable Bowl, Pesto Pasta with Chicken, and White Bean with Chicken and Green Chile Stew. Each meal provides a unique taste experience, from spicy Thai noodles to hearty Italian Bolognese, ensuring gourmet dining no matter where you are. These meals are not only delicious but also easy to prepare, making them ideal for campers, hikers, and outdoor enthusiasts. Just add boiling water, and your meal is ready in minutes. Packed with protein and essential nutrients, they offer a balanced diet on the go. Backpacker's Pantry ensures each meal is lightweight and compact, perfect for carrying in your backpack without adding unnecessary weight.
Menu: Beef Bolognese, Drunken Noodles with Chicken, Fiesta Beef & Vegetable, Pesto Pasta with Chicken, White Bean Chicken & Green Chile
When it comes to heavy-duty tasks, the Wicket XL Scandi is a knife built to perform. Crafted from tough Nitro-V steel, this knife features a robust 3-inch blade with a Scandi grind, making it perfect for carving, cutting, and other demanding outdoor tasks. The ergonomic handle, made of OD Green Micarta, measures 3.5 inches and ensures a comfortable grip during extended use. Included with the knife is a premium leather belt sheath from Badger Claw Outfitters, offering both protection and easy access. Proudly made in the USA, the Wicket XL Scandi combines durability with precision craftsmanship. Whether you're preparing firewood, building a shelter, or tackling camp chores, the Wicket XL Scandi is designed to handle it all with ease and reliability.
The Canadian Belt Knife by Marlow Knifeworks is a testament to fine craftsmanship and functional design. Hand-forged from 8670 high carbon steel, this knife has great edge retention and durability. The blade measures approximately 4 inches, paired with a 4.5-inch handle crafted from stabilized redwood burl scales, providing a comfortable and secure grip. Each knife comes with a handcrafted leather sheath, ensuring it stays protected and accessible. Ideal for various outdoor tasks, this knife combines traditional aesthetics with modern performance. The starting price of $250 varies based on the materials used, reflecting the bespoke nature of each piece. Perfect for collectors and outdoor enthusiasts alike, the Canadian Belt Knife is both a reliable tool and a piece of art.
When it comes to home defense, quick access to your firearms can be crucial, and the MM 4814 E by Hayman Safe Company delivers just that. Designed for secure storage and rapid deployment, this safe holds one long-gun up to 39 inches, keeping it at the ready for any emergency. The 1/8-inch formed steel body and door provide robust protection, while the UL-listed electronic lock (with an optional biometric upgrade) ensures only authorized access. Its interior is equipped with a motion-activated light and an adjustable hook-and-loop system for versatile storage. The luminous tape surrounding the recessed keypad aids in easy location in the dark. This safe installs seamlessly into a standard interior wall, blending security with convenience.
Navigating the wild after sunset just got safer with the NightHawk Cohutta Leg Gaiters. These gaiters are equipped with integrated LED lights, providing near-ground level illumination that enhances visibility and safety during night-time hikes or hunts. Crafted from waterproof materials, they ensure your feet stay dry in any weather condition. The LED lights can be recharged, ensuring they are always ready for your next adventure. Available in multiple sizes, these gaiters are designed to fit over your boots, providing an extra layer of protection against mud, snow, and debris. With the added benefit of making you less detectable in low-light conditions, the Cohutta Gaiters combine functionality with innovative design. (Note: Boots not included)
Constructed from 500D Tactical Nylon with a PU waterproof coating, this harness is built to withstand the harshest conditions. The structured bino compartment features a microfleece lining and extra padding, ensuring your optics remain protected. The silent magnetic lid provides quick and quiet access, keeping your position concealed. The harness includes an adjustable tech pouch, perfect for a range finder, and can be expanded with additional pouches. Two stretch side pockets and a rear zippered pocket offer extra storage for small accessories, licenses, or tags. The fully adjustable comfort harness ensures a snug fit with no loose straps, while the Hypalon MOLLE panel allows for additional attachments.
Designed for durability and reliability, the Fisher Space Pen Matte Black Trekker writes in extreme conditions — underwater, in zero gravity, at any angle, and in temperatures from -30 degrees F to 250 degrees F. The compact design features a matte black finish and includes a key ring and carabiner, allowing for easy attachment to gear or a keychain. The pressurized ink cartridge ensures consistent ink flow, making it ideal for use in rugged environments where other pens might fail. Its rugged build and versatile capabilities make it a great tool for anyone who needs a dependable pen in challenging situations.
Work Sharp: Professional Precision Adjust Knife Sharpener
Notes:
This top-of-the-line sharpening system features a metal construction and a digital angle indicator, allowing for precise angle adjustments from 15 to 30 degrees with an accuracy of 0.25 degree. The sharpener comes equipped with a full set of abrasives, including diamond plates ranging from 220 to 800 grit, a ceramic honing plate, and a leather strop for a polished finish. The V-Block Clamp securely holds knives in place, ensuring stability and repeatability. Its weighted base provides added stability, making the sharpening process safe and efficient. Designed for both professionals and enthusiasts, the Professional Precision Adjust Knife Sharpener is a great solution for keeping your blades in peak condition.
Designed for discreet cellular image capture, the Tactacam Reveal X-Pro is perfect for hunters and wildlife enthusiasts. This camera features no-glow flash technology, making it virtually undetectable to both humans and animals, day or night. It captures high-resolution 16MP images and full HD videos, providing crystal clear clarity. The built-in GPS and convenient LCD screen simplify setup and operation. Weather-resistant and equipped with a multi-carrier SIM card, it offers reliable performance in many environments. The camera operates on 12 AA batteries with an option for external solar power, ensuring long-lasting operation. With its IP66 waterproof rating and tough design, the Reveal X-Pro stands out for capturing detailed and accurate images in the wild.
Streamlight’s TLR RM 2 is a rail-mounted tactical lighting system designed for long-guns. This low-profile light delivers a powerful 1,000 lumens and 22,000 candela, projecting a beam up to 297 meters. Equipped with an HPL face cap, it provides a tighter, more focused beam. Its remote switch exits at a 90-degree angle, optimizing wire routing while preserving rail space. With a safe-off feature to prevent accidental activation, the TLR RM 2 is both practical and energy-efficient. Integrated with the white light is a 510-530nm green laser, and it can be run laser only, light only, or as a light/laser combo. It's powered by two CR123A lithium batteries, offering up to 1.5 hours of continuous runtime. Engineered for rugged use, it is IPX7 waterproof and can withstand submersion up to 1 meter for 30 minutes.
The TEREN Campfire Puffy Jacket 2.0 is a versatile outerwear option for all outdoor enthusiasts. Engineered with a blend of Lenzing FR and aramid, this jacket is fire-resistant, making it perfect for nights around the campfire. The jacket's exterior is waterproof with a 10,000mm water column, combined with a durable water repellent (DWR) coating to ensure you stay dry in wet conditions. Inside, it features 100gsm of 100-percent recycled PrimaLoft Gold insulation, offering warmth without added weight. The jacket includes six pockets, providing ample storage while keeping bulk to a minimum. Designed with an athletic fit, it also incorporates four-way stretch for maximum comfort and mobility.
ESEE’s Mess Tin Kit is a comprehensive survival package designed for those who take their preparedness seriously. Encased in a durable 1100 aluminum tin, this kit covers essential survival needs such as water, fire, signaling, food gathering, and navigation. It includes high-quality items like the ESEE Candiru knife, a Suunto compass, Potable Aqua tablets, a basic fishing kit, and a large fire steel. Additionally, it features practical tools like a survival card set, a rapid rescue whistle, Kevlar line, and waterproof matches. Compact enough to fit in a daypack, vehicle, boat or aircraft, this kit ensures you're equipped to handle any survival situation.
When a bear is charging you, your life literally depends on the decisions you made up to that point. Do you have the right equipment for the job, and are you proficient with what you have chosen? Having encountered many bears while hunting for other game as an Alaska expedition guide, I know this scenario all too well. Fortunately, most encounters involve bears that don’t want to eat you, they just need an attitude adjustment. But for those creatures that mean lethal business, what is the best bear handgun caliber?
In the backcountry I have encountered various secondary weapons, from the 500 Smith & Wesson Magnum to the 460, .44 Magnum, the 10mm, and so on. One of the questions posed by many of my clients is, “What is the best handgun for bears?” My answer is simple: shootability.
Above: There are many options that could get the job done, but some are more ideal under stress than others.
The 500 and the 460 Smith & Wesson carry five rounds and weigh in at 3 1/2 pounds, making them a low-capacity and cumbersome option to carry on your chest or hip. The .44 Magnum, although easier to manage, suffers from the same constraint of round capacity, limiting the user to 5 to 6 rounds. Wearing a handgun that slows you down when hunting is a burden, and typically, when you get tired of carrying it, it’s placed in a pack and forgotten. What good is it then?
Recoil from these heavy firearms is manageable, but you usually won’t get fast follow-up shots after the gun rises off the target when you pull the trigger. Typically, most people are not sufficiently trained with a handgun and will rush, shoot too soon, and miss their first shot.
Above: .44 Mag has plenty of power, however, round capacity and follow-up shots could become a serious concern when charged by an apex predator.
If the bear then runs away, that is a win! However, if that bear stays committed to its charge, you may be in trouble. Revolvers will make follow-up shots difficult, as there is little time before the bear reaches you, given their ability to charge up to 35 mph.
Another problem with revolvers is their limited round capacity. Most of the time when I encounter a bear, I need to yell at it and shoot a few rounds, before it gets discouraged and scampers off. But there are always that 1% to 2% of bears that are a little more determined. They are not bluffing, and warning shots won’t do the trick. If you are limited with a 5 to 6-round capacity, you reduce the chances you can utilize your handgun noise to scare the bear away. After three warning shots and the bear, for whatever reason, decides to commit to the charge, you’re now down to two rounds. This is a big problem with revolvers as a bear gun. Ideally you want 12-15 rounds, giving you ample room for warning shots to scare the bear away before you must escalate to putting it down.
Real-World Encounter
Several years ago, I was guiding a spring hunt on the Alaska Peninsula, an area where it is not uncommon to encounter bear as large as 10-feet. Spring is when bears wake up from their dens, and they are hungry because they haven’t eaten since the fall before. Typically, the ones that you have to worry about coming into camp are the younger juveniles. This spring was no exception.
We awoke to a ruckus outside of our tent early one morning on day three. Quickly getting up to investigate, I discovered a juvenile 8-foot male rummaging through our supplies. I was armed with a Glock 10mm carried in a GunFighters Inc. holster and a .375 Ruger. The hunter I was with was also out of his tent with a .416 Rigby. At only 20 yards away, the bear could have been on us in less than a second.
Above: Bears can smell food from as far as 20 miles away. This means, in some locations, no matter where you camp, a bear is going to know you're there.
This situation could have gone extremely bad quickly. However, based on the bear's body language, he was more interested in what he could steal from us, not in attacking us. With the client's .416 trained on the bear and my .375 loaded at my hip, I pulled my Glock 10mm, started shouting at the bear, and fired two warning shots.
From the bear's body language, it appeared that he was not sure what to do. He didn’t back away and he didn’t come forward, he just looked at us. A couple more warning shots and he still just looked at us like he was confused and didn’t want to leave. Finally, I fired 4 to 5 shots quickly in front of him, kicking dirt up just a few feet from his nose.
He still looked at us like he didn’t know what was going on, but this time he began to back up and walked off. We continued to shout at him as he slowly walked away. In total, it took about 8 to 10 rounds with my 10mm to convince the bear to leave. This scenario is one of the reasons why I do not believe the 500 or the 460 is the ideal bear gun for secondary protection.
Modern Semi-Automatics: The Practical Choice
In contrast to the traditional revolvers, modern semi-automatic pistols offer significant advantages in bear defense scenarios. My go-to is a modified Glock 20. Other great options are the Springfield XD-M ELITE and SIG P320-XTEN. These are great options since they can be loaded with 220-grain hard cast ammunition and have 15-16 rounds to handle bear encounters. It’s comforting to know that I can fire eight or more warning shots without running low on ammunition.
The 10mm also has significantly lower recoil than the other options discussed. If a bear decides to follow through with a charge, I’ll be able to quickly hit the bear with more rounds and still have great bullet penetration.
Above: A semi-auto 10mm is Caleb's go to bear gun.
For all these reasons, the 10mm stands out as an excellent bear defense caliber. It strikes a balance between power and manageability. This balance is crucial in high-stress situations where every second counts. Additionally, the 10mm's availability in various bullet weights and types provides flexibility for different scenarios and personal preferences.
We ran these guns side by side, and you can see for yourself how they stacked up here:
Striker fired handguns make it is easy to practice dry fire drills. Dry fire practice involves ensuring your gun is clear and safe, with no ammo, and manipulating the empty gun to get comfortable with handling it. Hunters, hikers, and everyone in between should get in as much dry fire practice as they can to become proficient with their weapons.
10mm striker-fired guns are great options for this, since revolvers can be more challenging to train with, and excessive dry-firing can potentially damage the firearm. Regular training is essential. Familiarity with your firearm's operation under stress can make the difference between a successful defense and a tragic outcome. Marksmanship when adrenaline is pumping is about muscle memory and the ability to operate your firearm instinctively.
Carrying Your Handgun
In my experience, the best way to carry whatever a firearm in bear country is on your chest. The reason being is that it’s always accessible and it will not get hung up on brush like carrying on the hip will. I use the Kenai chest holster made by Gun Fighters Inc, a USA-made product by a veteran-owned and operated company.
Above: When moving through the brush, a chest rig will keep your bear gun accessible, and reduce the chances of it being snagged by vegetation or pack straps.
Chest holsters offer several advantages over other methods of carrying:
It keeps the firearm secure and readily accessible, even when carrying a heavy pack.
The position allows for a natural draw motion, reducing the time needed to bring the weapon to aim at a charging animal.
It keeps the gun out of the way when navigating through dense brush or when scrambling over rough terrain.
What Ammo Should I Use?
When you are selecting ammo for bear defense, you need to think the opposite of what you do for personal defense. For example, in town I want a hollow point that will expand quickly and stop inside of my intended target.
With a charging bear, you want very hard ammunition that has great penetration because you are trying to get through a lot of meat and thick bone. Consider using hard-cast lead, or deep-penetration, solid copper bullets. There are several good options on the market, such as Buffalo Bore for hard-cast, and 9g Defense for solid copper.
Above: Utilizing a chest rig will accommodate a multitude of bino carriers as well.
Even though it may be a little expensive, it is important to test your carry ammo and your gun before you go out and rely on it. Some ammo that works perfectly through one of my Glocks, malfunctions regularly in my other Glock. This is not a Glock problem. It is a fact that some ammo works well with certain guns and not with others.
It all goes back to prior proper planning prevents piss poor performance.
Conclusion: The Best Bear Handgun
When considering a handgun for bear protection, the key factors are shootability, capacity, and comfort. The largest caliber isn’t always the best choice if it means compromising on your ability to quickly and accurately place multiple shots on target. The 10mm, with its balance of power, capacity, and manageability, offers an excellent option for those venturing into bear country. It provides the confidence that you have enough rounds to deter a bear without being weighed down or hindered by excessive recoil.
Remember, the best bear handgun is one that you are comfortable with and capable of using effectively under stress. Not only should it be powerful enough to stop a bear, but it should be manageable enough to allow for rapid and accurate shooting. Regular practice, proper training, and carrying your firearm in an accessible manner are all crucial components of effective bear defense.
Above: Do not underestimate the power a fully grown bear can wield. Carrying a proper bear gun in the wilderness is an important piece of protective gear.
Larger calibers like the 500 and 460 Smith & Wesson might seem like the ultimate bear defense guns, but their practicality in real-world scenarios is limited by their weight, recoil, and round capacity. Modern semi-automatic pistols, particularly in 10mm, offer a more balanced and effective solution for bear encounters. They provide the capacity for multiple warning shots, manageable recoil for quick follow-up shots, and the power to stop a charging bear. Equip yourself wisely, practice regularly, and respect the wilderness to ensure your safety and the safety of those around you.
Meet Our Panel
Caleb Stillians
Caleb Stillians, a seasoned professional in the realm of hunting, calls Alaska his playground. Specializing in guiding ventures across the state’s vast interior, peninsula, Kodiak, and coastal regions, Stillians leads hunting expeditions targeting grizzly bears, brown bears, mountain goats, Dall sheep, and moose. Embarking on his guiding journey at a young age, he finds his true calling in the wilderness, where he thrives on helping others realize their dream hunts, often spending months living in the backcountry. Beyond his guiding endeavors, Stillians is the visionary behind Outfitter Services, an online platform connecting adventurers with their next epic trip. He’s also the founder of Rise Up with Caleb Stillians, a production company crafting captivating films centered around the art of hunting.
Read More
Subscribe to Recoil Offgrid'sfree newsletterfor regular updates on more content like this.