Underwear-Clad Mountain Climber Gets Hypothermia

With the approach of colder months just around the corner, it's important to be aware of the risk of hypothermia. You can avoid this dangerous condition by avoiding exposure to the elements, wearing warm layered clothes, keeping your skin dry, and watching for initial signs of a low core temperature (such as shivering and loss of coordination). These precautions can keep you safe in cold and windy conditions.

However, in case you're wondering what can happen if you disregard these basic precautions, look no further than the recent story of Nathan French.

Photo: Nathan French / Facebook

In an effort to raise money for the charity Dementia UK, 19-year-old Nathan French decided to climb the tallest mountain in Wales — in nothing but Superman underwear. On September 9th, the teen began climbing the 3,560-foot peak of Snowdon, and successfully reached the top later that day. However, he soon started to feel the effects of hypothermia.

Photos: Nathan French / Facebook

Left, Nathan pictured before the climb. Right, Nathan at the mountain's peak. Photos: Nathan French / Facebook

Nathan told the Liverpool Echo, “This is the first time I have ever climbed a mountain like this… It was very cold and it got progressively colder the higher up we got.” Eventually, some women at the peak of Snowdon gave him their tickets to a train which returned down the mountain, but the cold had already taken its toll. He said, “I couldn’t physically stop shaking and we had to ring an ambulance.”

Photo: Nathan French / Facebook

The paramedics who treated him reportedly found his blood sugar and blood pressure were both low, and that he was suffering from hypothermia. After receiving treatment, he appears to have recovered fully, and told reporters he's glad he was able to raise money for charity through an online fundraiser page.

Mountain climber hypothermia cold weather apparel winter safety 2

Photo: Nathan French / Facebook

After the experience was covered by local news outlets, he reportedly received negative comments on social media, but he feels these were unfair since he was able to return down the mountain without needing to be rescued. In response to the criticism, he wrote, “There is no love? Where is it? A prime objective I wanted to do from all this was encourage more love and I got hate. Strange day we live in, social media is poor.”

To learn more about how to avoid hypothermia, check out the infographic “How to Survive Hypothermia” or read the survival story of a hypothermic helicopter pilot.


EDC of the Survival Experts – Pocket Dump

The importance of having the right gear on hand was made crystal clear to this author early on in life while growing up in the Great White North. In some ways Canadians are born preppers. After all, if you didn't properly prepare for winter, you'd find yourself frozen stiffer than a tauntaun in a Hoth snowstorm.

This mentality carried over into my adulthood, and we've learned even more by training and sharing knowledge with some of the best survivalists, firearm instructors, and martial artists in the world. Our everyday-carry (EDC) gear — while usually minimalistic and compact — is never left at home, even if it has to change to match the demands and restrictions of the different environments we're headed to. It's that adaptability that we're after, because adaptability equals survivability.

To that end, we present four subject-matter experts to share their daily loadouts and the way in which their EDC philosophies ensure their survival. Each professional specializes in something different, informing on their product selection and decision making.

Read on to find out how their daily carry gear compares to yours and what takeaways you might learn from the differences.

Richard Duarte

edc-of-the-survival-experts-richard-duarte

Organization
Urban Survival Tech, Inc.

Job Titles
Attorney, urban survival/preparedness consultant, instructor, and author

URL
www.quickstartsurvival.com

Survivalism/Emergency Preparedness Background
I've been studying and developing urban survival/preparedness methods and techniques since narrowly surviving a nasty Category 5 hurricane (Andrew) in 1992. The majority of my experience comes from more than 20 years of trial and error — always focusing my efforts on practical, real-world solutions that can actually help average people survive in an unpredictable and dangerous world. I'm the author of Surviving Doomsday: A Guide for Surviving an Urban Disaster and The Quick Start Guide for Urban Preparedness. In 2012 I began offering urban survival/preparedness consulting and training services to businesses and individuals.

EDC Items

edc-of-the-survival-experts-richard-duarte-everyday-carry

Brite-Strike EPLI Illumination Tool: This waterproof, shockproof bad boy isn't much larger than a standard ballpoint pen, yet it pumps out 160 lumens and is rugged enough to do double-duty as an improvised striking weapon.

Gerber Dime: This device squeezes 12 impressive tools into an ultracompact design, providing true EDC size, weight, and functionality. It allows me to carry multiple tools in an extremely practical package. I never leave home without it.

Luminox 3067 Navy SEAL Colormark: A watch is a must-have EDC tool for a variety of reasons, from telling time to calculating direction. I favor the old-school analog, glow-in-the-dark face and rarely go anywhere without it.

Smith & Wesson M&P9 Shield: It conceals easily and provides 8+1 9mm rounds. I prefer to carry a full-size handgun. But, as we all know, the EDC gods always demand a sacrifice of size and weight.

SOG Trident: I can't imagine ever being without a blade at my side. This folder is my constant companion and has served me well for many years. It feels right in my hand, deploys like a champ, holds a wicked sharp edge, and always gets the job done.

EDC Philosophy
EDC will never be one-size-fits-all. Every situation, person, and environment is different; gear that may work for me might be useless to the next guy. I don't like to carry tons of stuff in my pockets, and I especially hate carrying bags everywhere I go. To make the most of my valuable pocket space, my EDC must be well-thought-out, functional, and practical. But above all else, my EDC must address my needs and become an integral part of my regular routine. As with all my other preps, my EDC is carefully selected, tested, and refined over time — it either works in real-world conditions, or it gets tossed.

Candice Horner

edc-of-the-survival-experts-candice-horner

Name
Candice Horner

Job Title
Competitive shooter and freelance writer

URL
www.candi323.com

Prior Service
Sergeant, U.S. Marine Corps

Survivalism/Emergency Preparedness Background
Aside from my training and service in the Marine Corps, working in a federal prison as a registered nurse honed my emergency preparedness skills. As staff, we weren't provided any weapons or equipment to defend ourselves from inmates, who undoubtedly had homemade weapons.

EDC Items

edc-of-the-survival-experts-candice-horner-everyday-carry

Taran Tactical Innovations Glock 43: When allowed to legally carry a pistol, I carry this one because it's easily concealable, and I trust the reliability of Glock.

Microtech LUDT: I love the automatic opening of this knife. I carry this one in my back pocket.

Medford Knife & Tool Micro Praetorian T: This small knife is like a bulldog of knives, but is small enough to fit in the front pocket of my jeans.

The Pilot G-2: This pen has a sharp tip. As a last resort, or in a worst-case scenario where I couldn't carry a conventional weapon, this stabby pen is good at damaging soft tissue and sensitive areas (i.e. eyes or throat) of an attacker.

EDC Philosophy
Working in a prison taught me to make do with what I have, and always have a backup plan. With a gun being my best option in a life-or-death situation, I feel most comfortable having it on me. But, since laws dictate what can be carried where, I feel confident having a plan to use a pen as a weapon, if needed. Almost anything can be used as a defensive weapon; just realizing all the options is half the battle when selecting your EDC gear. The reason I carry multiple knives is because I have a special affinity for them. I always have two on me, but several more in my purse.

Michael Janich

edc-of-the-survival-experts-michael-janich

Organization
Martial Blade Concepts LLC

Job Title
Founder and lead instructor

URL
www.martialbladeconcepts.com

Prior Service
Staff Sergeant, U.S. Army
GS-12, Defense Intelligence Agency and Joint Task Force-Full Accounting

Survivalism/Emergency Preparedness Background
As a team leader for POW/MIA investigation teams in Vietnam and Laos, I worked in remote areas with very limited resources. That experience taught me improvisation, creative problem solving, and the difference between “cool” kit and really useful gear.

EDC Items

edc-of-the-survival-experts-michael-janich-everyday-carry

Glock 43 9mm Pistol and Aker IWB Statesman Holster: This combo offers an outstanding balance of comfort, concealment, and reliability that makes them easy to carry constantly.

Spyderco Yojimbo 2: I carry two — one ground down to a 2.5-inch blade length. I designed the Yojimbo 2 as a box cutter on steroids, capable of everything from picking a splinter to hard-core utility cutting and defensive application.

Streamlight ProTac 2L Flashlight: It's small enough for everyday carry, large enough for use as an impact weapon, and versatile enough for everything from low-light tactics to mundane utilitarian use.

Tuff Writer Stainless Steel Precision Press Pen: Hands down the best writing tool I've ever owned, this amazing pen (with custom Vehement Knives “Apocalypse” finish) is also the ultimate low-profile, go-everywhere personal-defense option.

Swiss Champ Swiss Army Knife: More versatile than a pliers-style multitool, there are very few things this knife won't do.

EDC Philosophy
I travel a lot, so I designed my EDC kit to be scalable based on the carry laws of the areas I visit. In more restrictive areas, I can delete the pistol and full-sized knife, but still carry the bobbed Yojimbo 2 and other items. Even on a plane, the pen and flashlight remain constant. That way I never have to change gears completely and my skills to draw and use each tool stay consistent.

Erik Lund

edc-of-the-survival-experts-erik-lund

Organization
Federal law enforcement

Job Title
Special Agent

Prior Service
Trooper, Virginia State Police

Survivalism/Emergency Preparedness Background
I've got over 24 years of law enforcement experience in tactical-style operations in urban, suburban, and rural environments — including undercover, surveillance, intelligence, and counter-surveillance operations. I take emergency preparedness very seriously as my personal experiences have taught me that the only person you can and should rely upon in any serious situation is yourself. I've seen first-hand that many unfortunate deaths could have been prevented with just the smallest amount of planning and preparation.

EDC Items

edc-of-the-survival-experts-erik-lund-everyday-carry

FNS 9mm Pistol with Two Spare Magazines: I choose to carry a firearm on a daily basis for protection because I accept the fact that there's evil in the world. I also accept the fact that regardless of how good a life I choose to lead, that one day evil will find and confront me. An unarmed man, possessing no self-protection skillsets, can only beg mercy from evil; and evil by its very definition isn't merciful. I choose to resist evil, not beg mercy from it.

SOG Kiku Large Folding Knife: Aside from the obvious benefits of having a knife for protective use and everyday tasks, many practitioners of self-preparedness overlook the use of a folding knife as an intermediate striking implement. While features such as blade length and profile, grip, and locking mechanisms are important, one aspect I consider when selecting a knife for EDC is ensuring that when in the closed position, the knife is of such length that it slightly extends past my palm on either side when placed flat across my palm. This extra length allows me to grasp the knife within my fist and, with the knife in the closed position, have a small section of the knife-end extend past either side of the fist. This provides an excellent metallic area for use in all manner of combative strikes.

Klarus XT2C Flashlight: Positive identification of a potential threat is a non-negotiable requirement prior to a use of force against that threat. Additionally, my experience has shown that I use a flashlight for so many little everyday tasks that I've taken to carrying two lights so that I don't burn out the batteries in my primary light as quickly as when I only carried one light.

Small Medical Kit: I choose to carry a personalized medical kit because in life things go wrong. On several occasions I've driven up on severe car crashes prior to the arrival of emergency medical personnel where people needed immediate medical attention. This kit and another larger medical kit kept in my vehicle helped me render aid until EMS crews arrived. This small kit has everything from simple comfort gear like Advil, Rolaids, and hand cleaner to more advanced medical items for serious traumatic injuries. This kit is always with me in my car or in my sling pack when I'm away from my vehicle.

Mobile Phone: Having the ability to communicate, either to render assistance for others or to bring assistance for yourself, is of the utmost importance.

EDC Philosophy
I choose to carry these items with me on a daily basis to confront evil when it finds me and to combat life's unpredictable nature. These items bring me peace of mind and confidence that irrespective of the difficulties that life brings to my door, on some level I'm prepared to deal with them and up to the challenge of being a provider and a protector to my family and friends.

More From Issue 22

Don’t miss essential survival insights—sign up for Recoil Offgrid's free newsletter today!

Read articles from the next issue of Recoil Offgrid: Issue 23

Read articles from the previous issue of Recoil Offgrid: Issue 21

Check out our other publications on the web: Recoil | Gun Digest | Blade | RecoilTV | RECOILtv (YouTube)

Editor's Note: This article has been modified from its original version for the web.


Curated Offers: This Portable Seat Will Be Your New Favorite Sidekick

When something is wrong, you take a stand. When you do something well, you take a bow. When you're tired of standing or bowing, you take a seat. But what if there's no seat around? The Sitpack 2.0 Compact Collapsible Seat has got you covered. And you can pick one up for just $40 — 38% off the original $65 price.

sitpack-2-compact-collapsible-seat

The Sitpack is a hassle-free, portable seat, perfect for your next quest into the wild. Its durable frame, made from glass fiber-reinforced polycarbonate, will stand up to any terrain on which you find yourself. With an alligator foot clamp and patented telescopic-locking structure, you can be sure to find a comfortable seat anywhere. It also folds up to roughly the size of a beer can and weighs only 1.3 pounds, making it an easily carried companion.

Chairs can be a little awkward to tote around, but not the Sitpack. Whether hunting in the wild, waiting for your shot, or just taking a break from hiking, just expand the Sitpack, and you'll have a comfortable seat in seconds. And it's not just a protractible stool, the Sitpack is also specifically designed to keep your spine in a healthy position and keeps your legs just active enough to prevent pelvic discomfort.

At only $40, the Sitpack 2.0 Compact Collapsible Seat will give your legs and wallet the break they need.


Seismic Science: Prepping for Earthquakes

Warning!
This article is meant to be a quick overview and not a detailed guide on precautions to take in preparation for and in response to an earthquake. To learn more about prepping for earthquakes, consult the US Geological Survey, an accredited healthcare agency, or an organization such as FEMA or the American Red Cross

Earthquakes — you never know when or where they'll happen, and how severe the damage will be. Unlike other natural disasters, you have little if any warning, as there is still no accurate way to predict their exact date, time, and location. Even if you don't live in an area that's historically prone to this type of occurrence, can you honestly say you'll never be somewhere that's affected?

As recently as April of this year, a magnitude 7.8 earthquake struck Nepal, and to date, hundreds of aftershocks have occurred, including one that reached 7.3 and another at 6.3 in the surrounding area. The devastation has killed more than 8,000 people and injured over 17,000. You may be thinking to yourself that Nepal isn't on your list of vacation destinations, but even if you're living comfortably in rural Montana, know that a magnitude 7.3 quake rocked Hebgen Lake, Montana, in 1959. And what if you're traveling overseas or even domestically to, say, California or Oregon?

While structural damage is usually inevitable, many people don't think about the other collateral damage that earthquakes inflict. Assume power outages, broken gas and water lines, and aftershocks that can intensify the problems are par for the course. In a more populated area, initial destruction may also be exacerbated by compromised transportation, disrupted communication methods, overwhelmed medical resources, and potential looting/rioting.

Here we'll help you and your loved ones formulate a plan to deal with these unfortunate occurrences by delving into the science of earthquakes, preparing for the conditions you may be up against, and outlining actions you can take during the aftermath.

What Is An Earthquake?

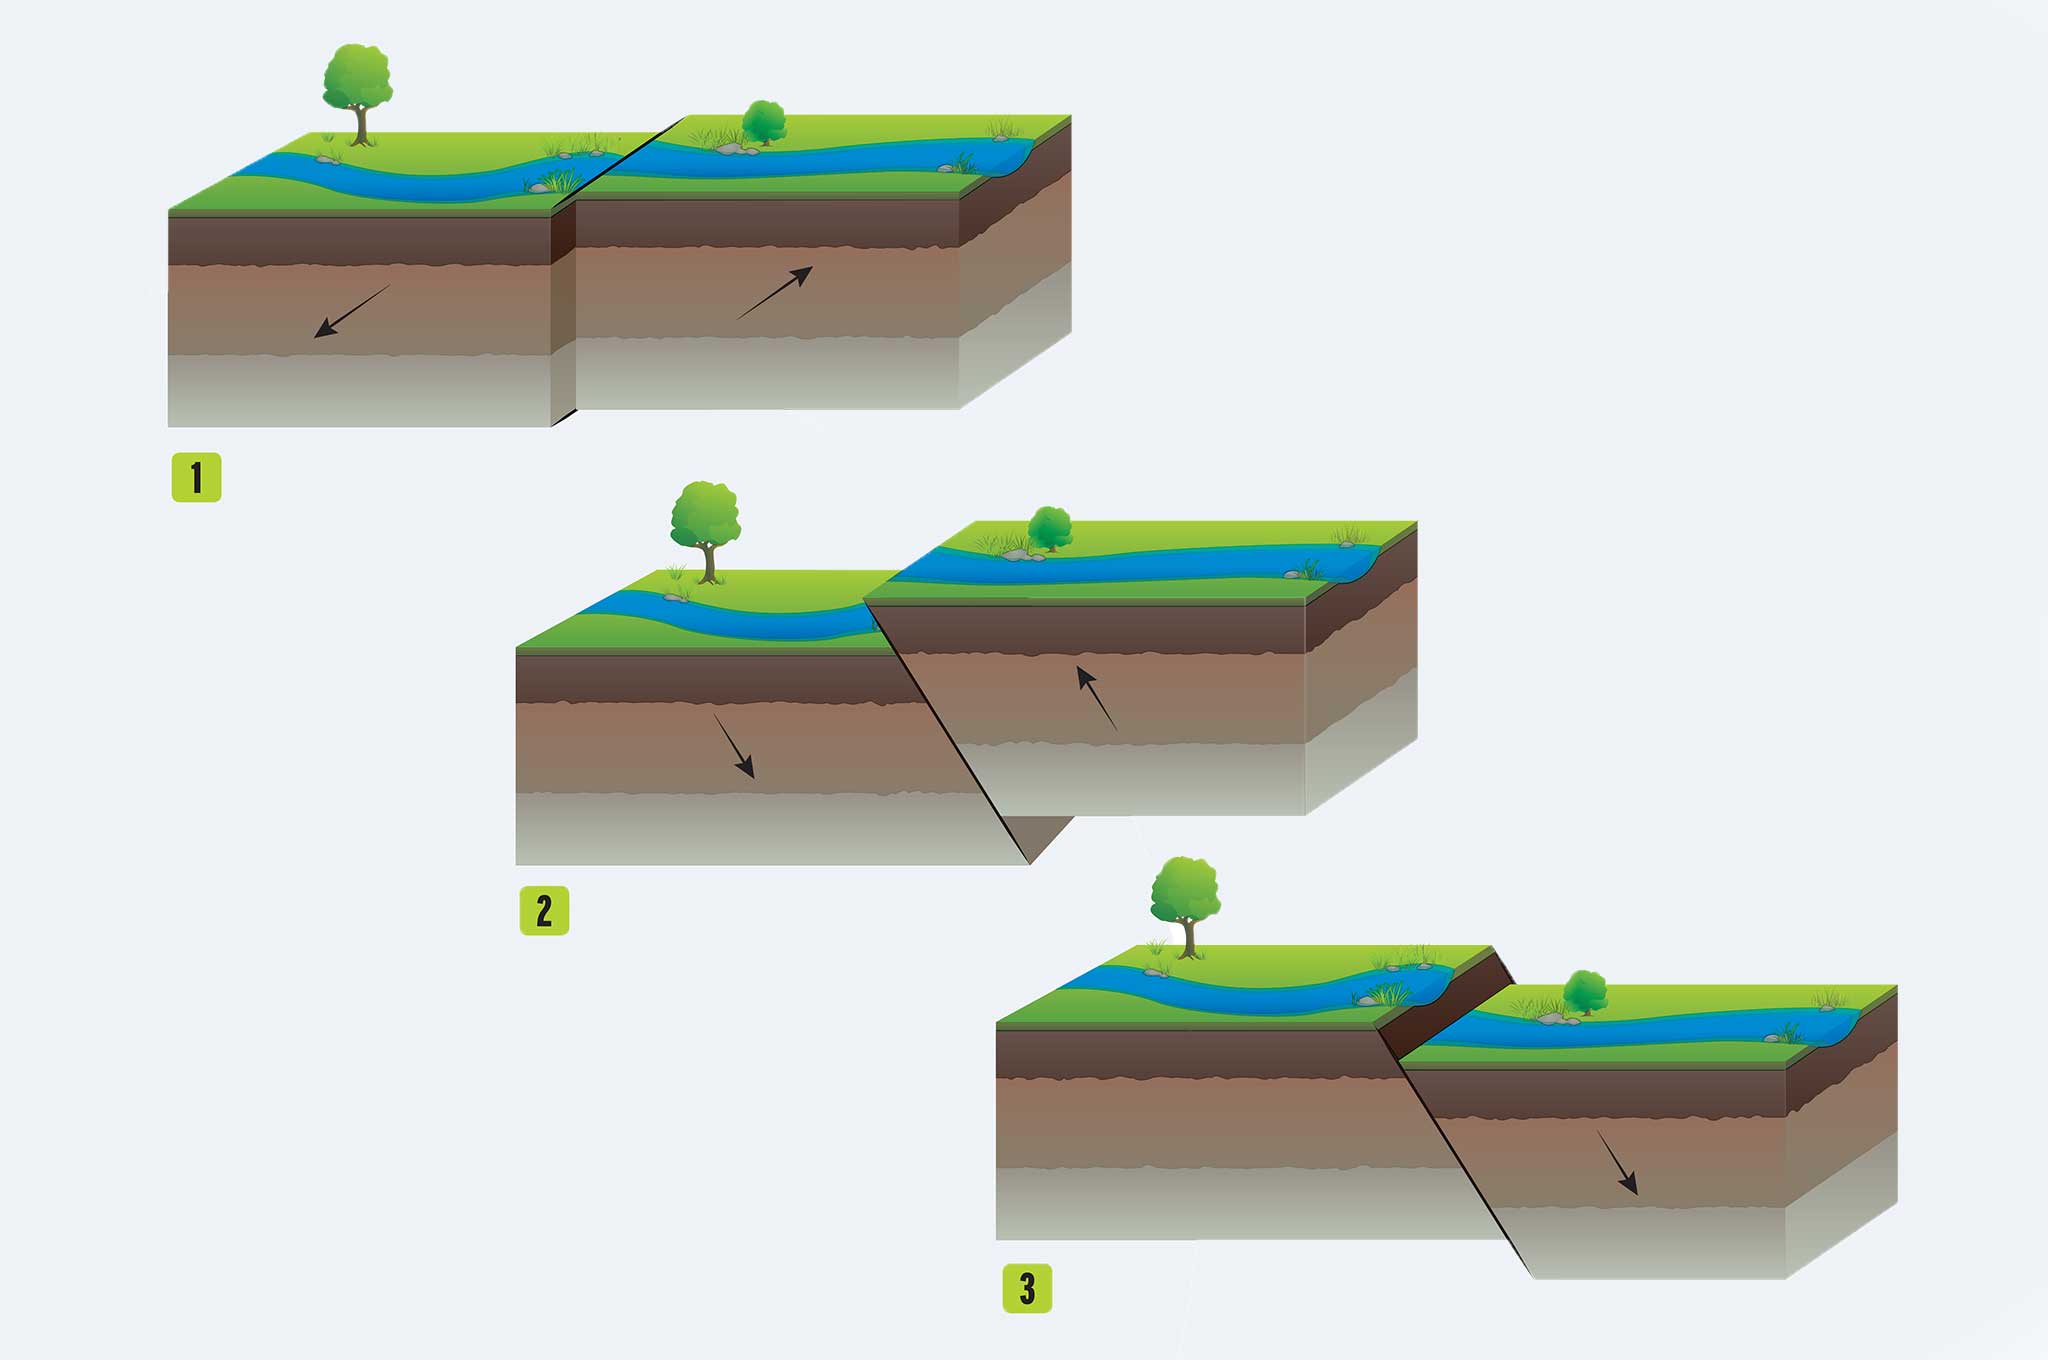
In layman's terms, an earthquake is the result of shockwaves being generated when portions of the earth's crust move past one another. Think of it like snapping your fingers. Your two fingers are blocks of the earth's crust, and friction builds up as they move past each other. That friction causes pressure to build up and then be released in the form of energy — the snap of the fingers if you will. The sound your fingers make when you snap is a pressure wave that's released in all directions. The energy that radiates outward travels through the earth's crust and becomes the shaking that we feel.

1. Strike-slip 2. Reverse fault 3. Normal fault

1. Strike-slip  2. Reverse fault  3. Normal fault

How Is Earthquake Size Calculated?

Earthquakes are complex events with numerous variables, which often leads to the conjecture among scientists about the actual “size.” The truth is that there are numerous dimensions of an earthquake that can be measured and, even though surface shaking is what we experience, the actual seismic event typically originates at great depths beneath the surface.

Seismic networks throughout the world use seismographs to measure what is typically referred to as the magnitude — a measurement of the earthquake's energy, which doesn't necessarily equate to the level of shaking you feel. Earthquakes produce two different kinds of waves, P-waves and S-waves. P-waves are the first to be recorded because they travel the fastest and have a push/pull motion. Particles subjected to a P-wave move in the same motion as the wave. The S-wave follows the P-wave, moving particles in an up-and-down and side-to-side motion.

Much like the thunder that follows lightening, the time between the arrival of the two waves determines the distance the earthquake is from the nearest seismograph, but not the direction in which it occurred. By triangulating the duration and movement of the ground recordings from other seismograph stations in the surrounding areas, the size and epicenter of the earthquake can be calculated. The Richter Scale has become an outdated method of determining earthquake size. Intensity of an earthquake is another measurement you may have heard of, but is more of an assessment of an earthquake's effects on people, structures, and the natural environment.

To give you a relative idea of size and effect, an earthquake of magnitude 6.0 has approximately 32 times more energy than a magnitude 5.0 earthquake and approximately 1,000 times more energy than a 4.0 earthquake. Does that mean there will be 1,000 times more damage from a 6.0 earthquake than a 4.0 earthquake? No. A larger earthquake lasts longer and releases more energy, but the destruction that happens at the surface can depend on many variables, from soil conditions to structural integrity.

The 1994 Northridge, California, earthquake, which happened in a suburb of Los Angeles, was a magnitude 6.7 that killed 60 people, injured more than 7,000, and damaged more than 40,000 buildings in L.A. and the surrounding counties. The 2001 Nisqually, Washington, earthquake registered at 6.8, but caused far less damage because it occurred along a fault that was much deeper.

Where Do Earthquakes Happen?

The earth is made up of numerous tectonic plates that somewhat resemble a jigsaw puzzle. These plates are always moving, and their boundaries are made up of faults. Quakes typically occur on and in close proximity to these plate margins. How do we know where faults are? Many earthquakes leave surface evidence of displaced rock formations, and continued earthquake recordings are mapped to indicate the location of the fault. However, some faults do not show these obvious signs, and seismologists will not know their location until they produce an earthquake. Several of California's earthquakes have occurred along faults that were previously unknown. In other words, you may not even know if you're living on or near a fault.

science-of-earthquakes-tectonic-plate-map

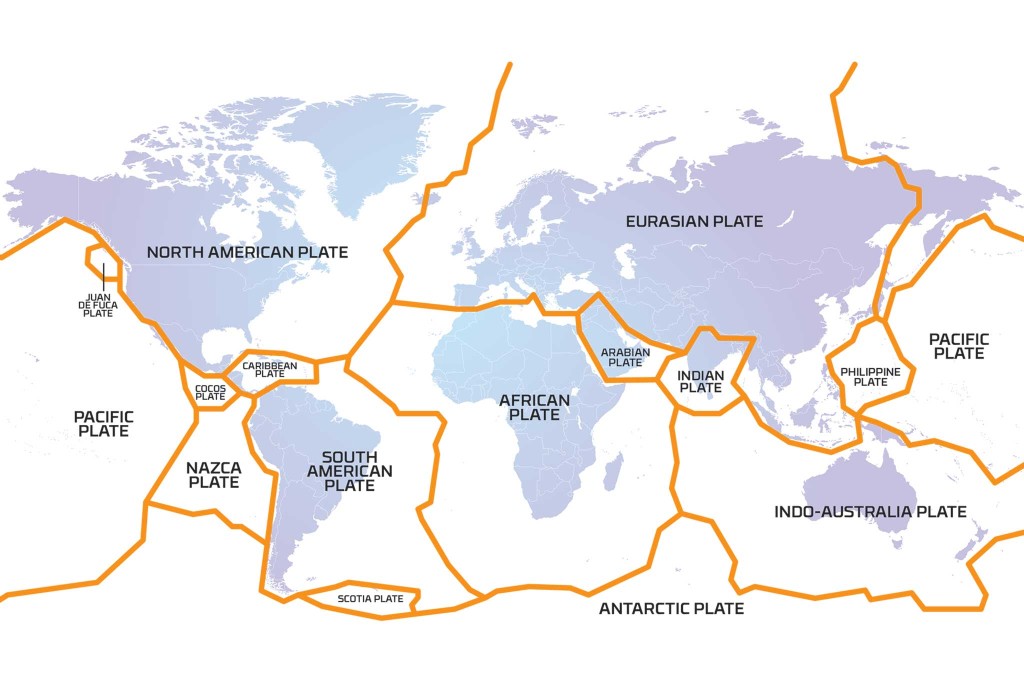
While the map shown can give you an idea where these margins are located, even though you may live a great distance from them, areas can also be subjected to induced seismicity — man-made earthquakes. Things such as dam construction have been known to cause earthquakes because the weight of the water at the surface affects stress levels of the underlying ground.

We've heard a lot about hydraulic fracturing (commonly referred to as “fracking”) as a cause of earthquakes. Fracking has only been directly linked to smaller earthquakes because it rarely occurs at seismogenic depths. However, wastewater disposal, which is often a byproduct of fracking and other drilling activities, has been known to set off substantial earthquakes. Wastewater disposal wells have existed for many decades, and there are thousands of them across the country. According to the U.S. Geological Survey, only a few dozen are known to have induced felt earthquakes. Will other wells eventually cause induced earthquakes? It is impossible to predict because many conditions must occur to trigger a seismic event strong enough to be felt, but as research continues, scientists may be able to learn more about the links between drilling, wastewater disposal, and seismic activity.

Prepping for Earthquakes

science-of-earthquakes-earthquake-prep

Many of the deaths that occur during an earthquake happen because of falling objects or furniture. Start by identifying potential hazards in your home or office. Take the time to secure the contents of your surroundings with some simple adjustments as well as to relocate items to safer places. You don't need to be Bob Vila to make these modifications. Some ideas to get you started are:

  • Move heavy or larger items to the floor or low shelves.
  • Move taller, heavier furniture away from sofas, beds, and places that people typically spend a lot of time.
  • Install latches on kitchen cabinets to prevent items from falling out.
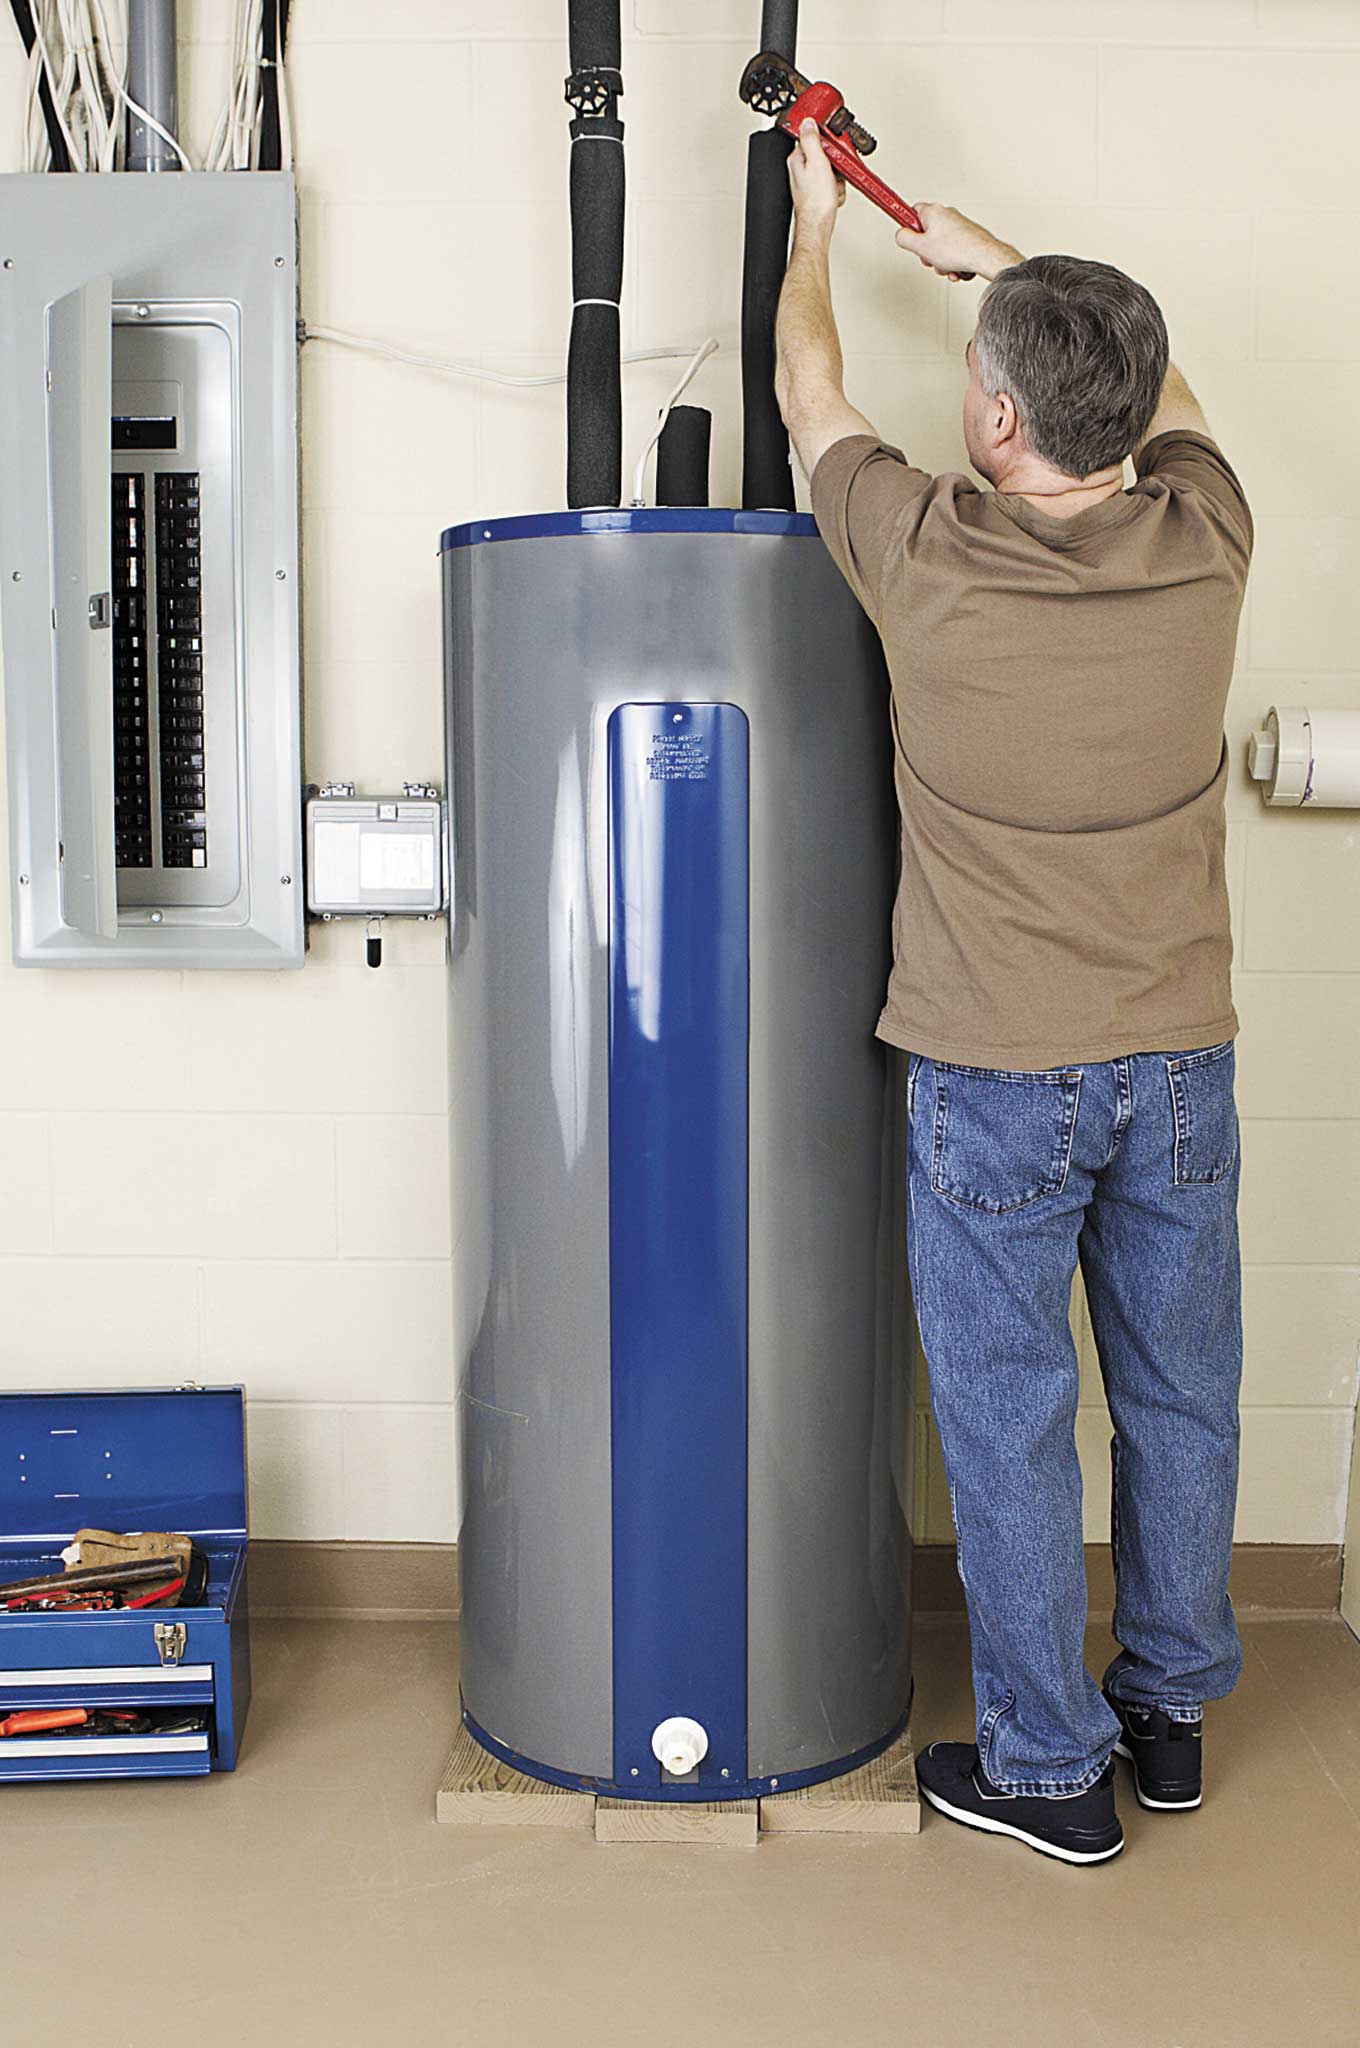
  • Secure your water heater, fridge, and other major appliances to the walls with additional metal straps.
  • Hang mirrors or pictures on closed hooks. Corners of these items can also be secured using earthquake putty.
  • Attach flexible connectors where gas lines meet appliances to reduce line breakage/fires.
  • Top-heavy furniture can be secured to the wall using flexible fasteners like nylon straps. Anchoring to the stud in the wall instead of the drywall itself will ensure a stronger hold.
  • Move flammable liquid to lower shelves or the floor to prevent spillage/fires.
  • Electronics can be secured with flexible nylon straps and buckles for easy removal and relocation.
  • Loose items on shelves such as lamps can also benefit from hook-and-loop fasteners. Earthquake putty or microcrystalline wax can also be applied to the base of these items for additional hold.

Now that you've made some potentially live-saving repairs, it's time to come up with a disaster preparedness plan. While this will vary from person to person, since an earthquake may occur when you and your family are separated while at work or school, or together at home during the night, there are a number of (constants) that include:

  • Practice “drop, cover, and hold on.” Identify safe places to remain until the earthquake is over. These can include sturdy desks or tables.
  • Take a CPR course from a certified instructor.
  • Make sure you have a good set of walking shoes and a working flashlight by your bed.
  • Invest in at least one fire extinguisher for your home.
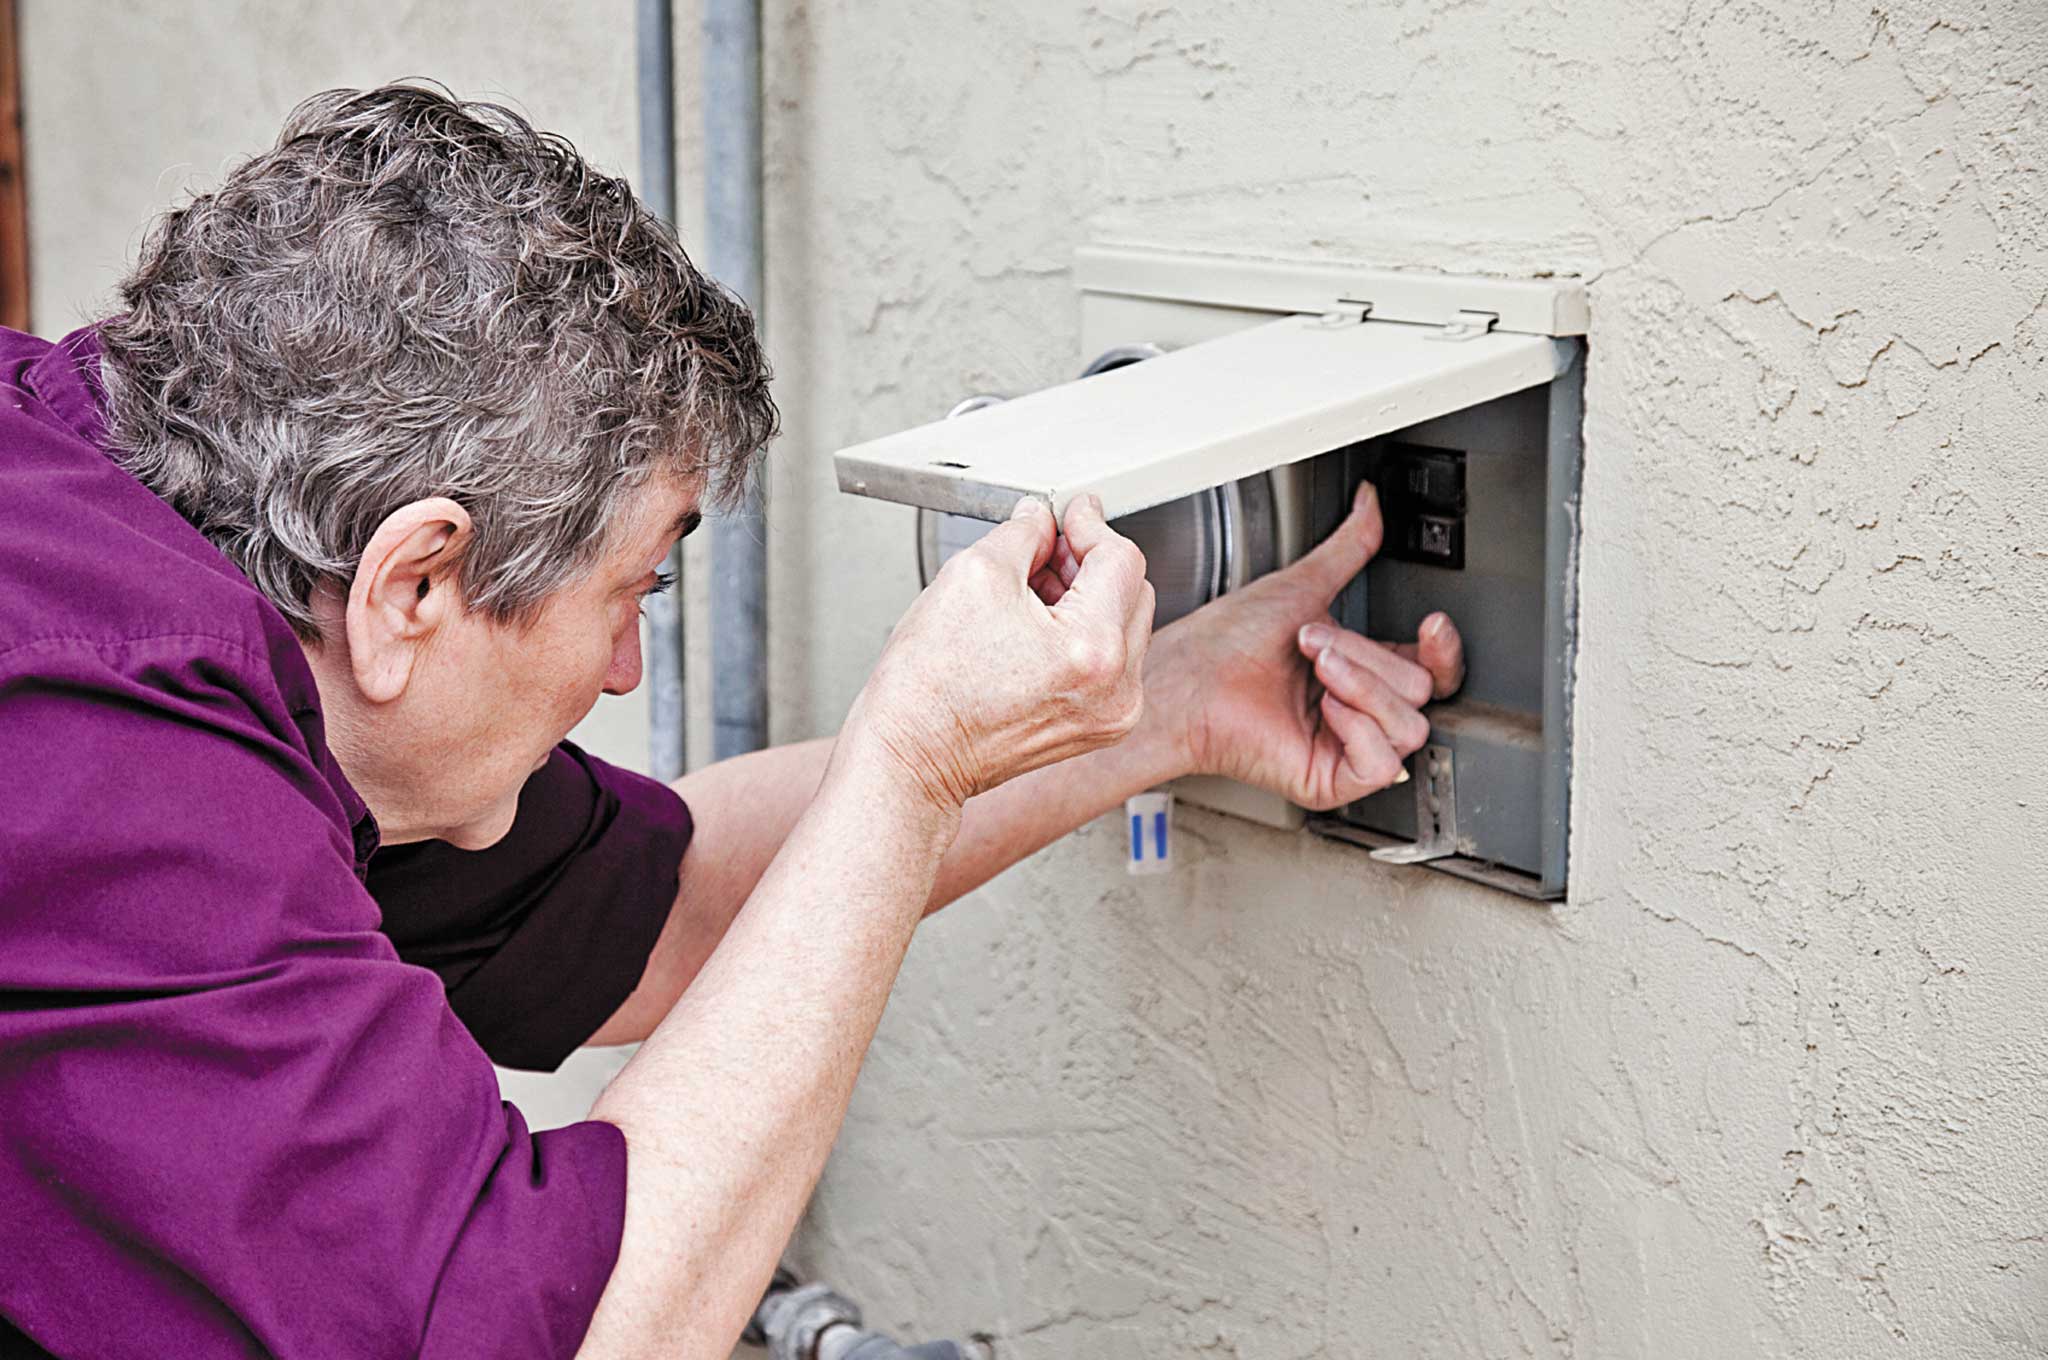
  • If a utility shutoff is necessary, know the location of the shutoffs and keep tools handy to deactivate the utilities. Only shut off the gas if you hear or smell it leaking.
  • Teach everyone emergency knocks, whistles, or other sounds to make if trapped.
  • Install smoke alarms and test them monthly.
  • Designate an outdoor meeting place for your and your family to rendezvous after the shaking stops.
  • Identify family members with special needs such as mobility issues or medical conditions and how they can be accommodated.
  • Determine where you can live if your home is uninhabitable.
  • Video or photograph your belongings and keep a list of this household inventory.
  • Keep important documents (insurance records, identification, medical information, financial records) in a secure waterproof container.
  • Got pets? Like family members with special needs, discuss safe transportation methods and what their requirements will entail. It is unlikely you'll be able to take them to a shelter due to space unless they are service animals.

You can also organize a meeting with your neighbors to identify who may have certain skills and possessions that will be useful in an emergency. You can also check with your city or county to see if a nearby Community Emergency Response Team (CERT) has been established. If not, collaborate with your neighbors and other nearby residents to start one.

In addition to selecting an emergency contact outside of the area, make sure you and your family have a list of phone numbers for close friends, relatives, and emergency facilities. Your children's school or daycare may have evacuation plans. Familiarize yourself with these so you know where they may be routed.

Gear Up

Disaster supply kits run the gamut, but you'll want to prepare a personal kit for when you're on the move and a household kit in case you are stuck at home.

Personal Disaster Kit

It's advisable to have three: one for your home, another for your office, and a third for your car, since you never know where you'll be when disaster strikes. The contents of your disaster supply kits should include at least the following items:

  • Medications, prescription list, copies of medical cards, and doctor's names and contact info
  • Medical consent forms for dependents
  • First-aid kit and handbook
  • Non-latex examination gloves
  • Dust mask
  • Spare glasses or contact lenses and cleaning solution
  • Bottled water
  • A whistle to alert people to your location
  • Sturdy shoes
  • Cash
  • Road maps
  • A list of emergency contacts that are out of the area
  • High-calorie snacks
  • Flashlight
  • Personal hygiene supplies
  • Toiletries
  • Copies of identification (drivers license, passport, etc.)

Household Disaster Kit

If you are stuck at home, emergency services, water, transportation, power, and various other resources may be unavailable indefinitely. Ideally, you should assemble a household supply kit that will last anywhere from three days to two weeks. These items should be kept together in an easily accessible location. Check expiration dates on perishable items yearly, and rotate them out with fresh supplies if needed.

  • Water (minimum 1 gallon a day per person)
  • Tools to turn off gas and water supply
  • Dining utensils and can opener
  • Work gloves and protective goggles
  • Plastic bags for waste
  • Tarps to shelter yourself from rain or serve as ponchos
  • Portable radio with extra batteries (or a hand-crank version)
  • Extra flashlights or light sticks
  • Canned and packaged food
  • Charcoal or gas grill for outdoor cooking, along with matches or a lighter
  • Pet food, and a leash or carrier
  • Warm clothing
  • Blankets or sleeping bags, and a tent
  • Copies of identification (drivers license, passport, etc.)

Other methods of prep? Identify potential weaknesses in your home. Since most people wouldn't know what exactly to look for, it's recommended that you get quotes from various contractors about what can be done to strengthen any parts of your home, especially if it's an older home built prior to more recent earthquake codes being implemented. If you rent or live in a large building, ask the landlord if any retrofitting has been done, if water heaters have been braced, and what is permitted in your rent or lease agreement to secure furniture to walls or do any other structural modifications.

Be aware that homes with crawl spaces, buildings with underground parking, unreinforced masonry, and inadequate foundations can compromise structural integrity as well. Ask your insurance carrier what, if any, provisions are in your existing policy that cover earthquakes. Do not assume your home and possessions will automatically be covered in an earthquake by standard homeowners or renters policies. If little or no earthquake-related coverage is offered, look into getting earthquake insurance to supplement any existing coverage.

When the Big One Happens

If the ground starts shaking, what do you do? This depends on your location as well as the severity of damage caused by the quake. Since we cannot cover every potential outcome, here are some guidelines to follow for an earthquake causing extreme damage.

Indoors

First, drop to your hands and knees — if you remain standing, you may lose your balance and fall. Cover your head, neck, and entire body if possible by finding shelter under a strong desk or table. If the shaking shifts your shelter, be prepared to move with it. In the event you are in bed, remain there and cover your head with a pillow. You are less likely to be injured there; many times people attempt to run from their bed only to fall or step on broken glass. Do not attempt to run outside or use the elevator. Remain where you are until the shaking stops.

Driving

Pull over and stop if the ground is shaking. Set the parking brake and if possible avoid overpasses, power lines, and bridges. If a power line falls on your car, remain there until rescue personnel can remove it.

Outdoors

science-of-earthquakes-downed-powerlines

Move to an area clear of power lines, trees, buildings, or other structures that may fall. If you're near the shore and the shaking lasts 20 seconds or longer, immediately move as far away from the shore as possible, as a tsunami may have been created and be inbound.

When the Shaking Stops

Just because the initial shaking has subsided doesn't meant you're out of the woods yet. Aftershocks may still occur. Do not panic — remember your emergency plans.

What Should I Do?

First attend to your own needs. Identify potential dangers in your surroundings (leaking gas lines, building damage, fires). If at home, try to put out small fires if possible. If you suspect a gas leak, shut the main gas valve off. Wait for the gas company to check for leaks before it's turned on again. If there is damaged electrical wiring, shut the power off at the main breaker and leave it off until repaired. Unplug any broken lights or appliances; when power is restored they could possibly start fires.

science-of-earthquakes-breaker-check

Things may continue to fall so get to a safe location. If you are trapped, do what you can to protect your eyes, nose, and mouth from dust. If you are bleeding, put pressure on the wound and elevate the injury. Try to communicate for help by knocking on solid pieces of the building, whistling, using your cell phone, or shouting. Keep doing it every few minutes as rescue personnel will be listening for distress signals.

Once you are safe, attend to others. Use any first-aid training to assist those in need. If you are unsure of what to do, wait for EMTs to arrive and administer medical attention. Do not move anyone seriously injured unless they are at risk of further injury.

Get to a Safe Location

Evacuate your home or office only if the structure is damaged or the surrounding area is unsafe. Use your disaster supply kit as needed. Relocating to a friend or relative's house that's undamaged or to a community shelter is advisable with your personal disaster kit. If the building is undamaged, it is OK to remain there even if utilities are out, but if the power remains out for several days, you may want to find another location to hold up.

Continue to follow your disaster preparation plan and remember to get in touch with your out-of-area contact to tell them your location and condition. Use your radio to get information about safety advisories or shelter locations being set up. If you remain at home, food and water is imperative. You can use up anything in your freezer within a couple days before it spoils. Water lines may be ruptured or contaminated. If your water is off or potentially unsafe, you can drink bottled water, the contents of your water heater, melted ice cubes, or liquid from canned vegetables.

In the Aftermath

Following any aftershocks, continue to use the information in your disaster plan and the supplies at your disposal. If you can remain at home and utilities are shut off, until you are sure there are no gas leaks, do not use any open flames indoors. Wait for the gas company to turn it back on. If the electricity was shut off and then reactivated, inspect your electronic equipment and appliances for potential damage. Locate or replicate any important documents that may be lost. Check on the condition of your neighbors as well.

Take pictures of any damage to your property and contact your insurance company immediately to begin your claims process. FEMA may also be able to provide financial and housing assistance. You can learn more by visiting www.fema.gov.

Continue to monitor radio and TV reports about emergency resources and advisories. If repairs are needed to your home, be sure any contractors performing the work are licensed, as fraud is common following disasters.

If you have to relocate to a shelter, take your disaster kit with you. Its contents should only entail necessities required for survival. Trying to bring valuables with you or large quantities of unnecessary items may result in theft and taking up needed space. You can also set up an alternate mailing address in person or online with the USPS.

You play an important role in the rebuilding process, so get involved and make sure you provide input in deciding how your community rebuilds.

science-of-earthquakes-quake-map

Plan for Resources that May Be Compromised by Earthquakes

Power

If the magnitude is large enough, power may go out and stay shut off indefinitely. This includes both gas and electricity. Investing in extra gas supplies and generators (both solar and gas powered) may improve your living conditions substantially.

Water

Water lines may be ruptured and stop flowing for months. In addition, broken sewage lines could contaminate damaged water lines and render tap water unsafe for up to a year. Stocking up on extra water is highly recommended.

Communications

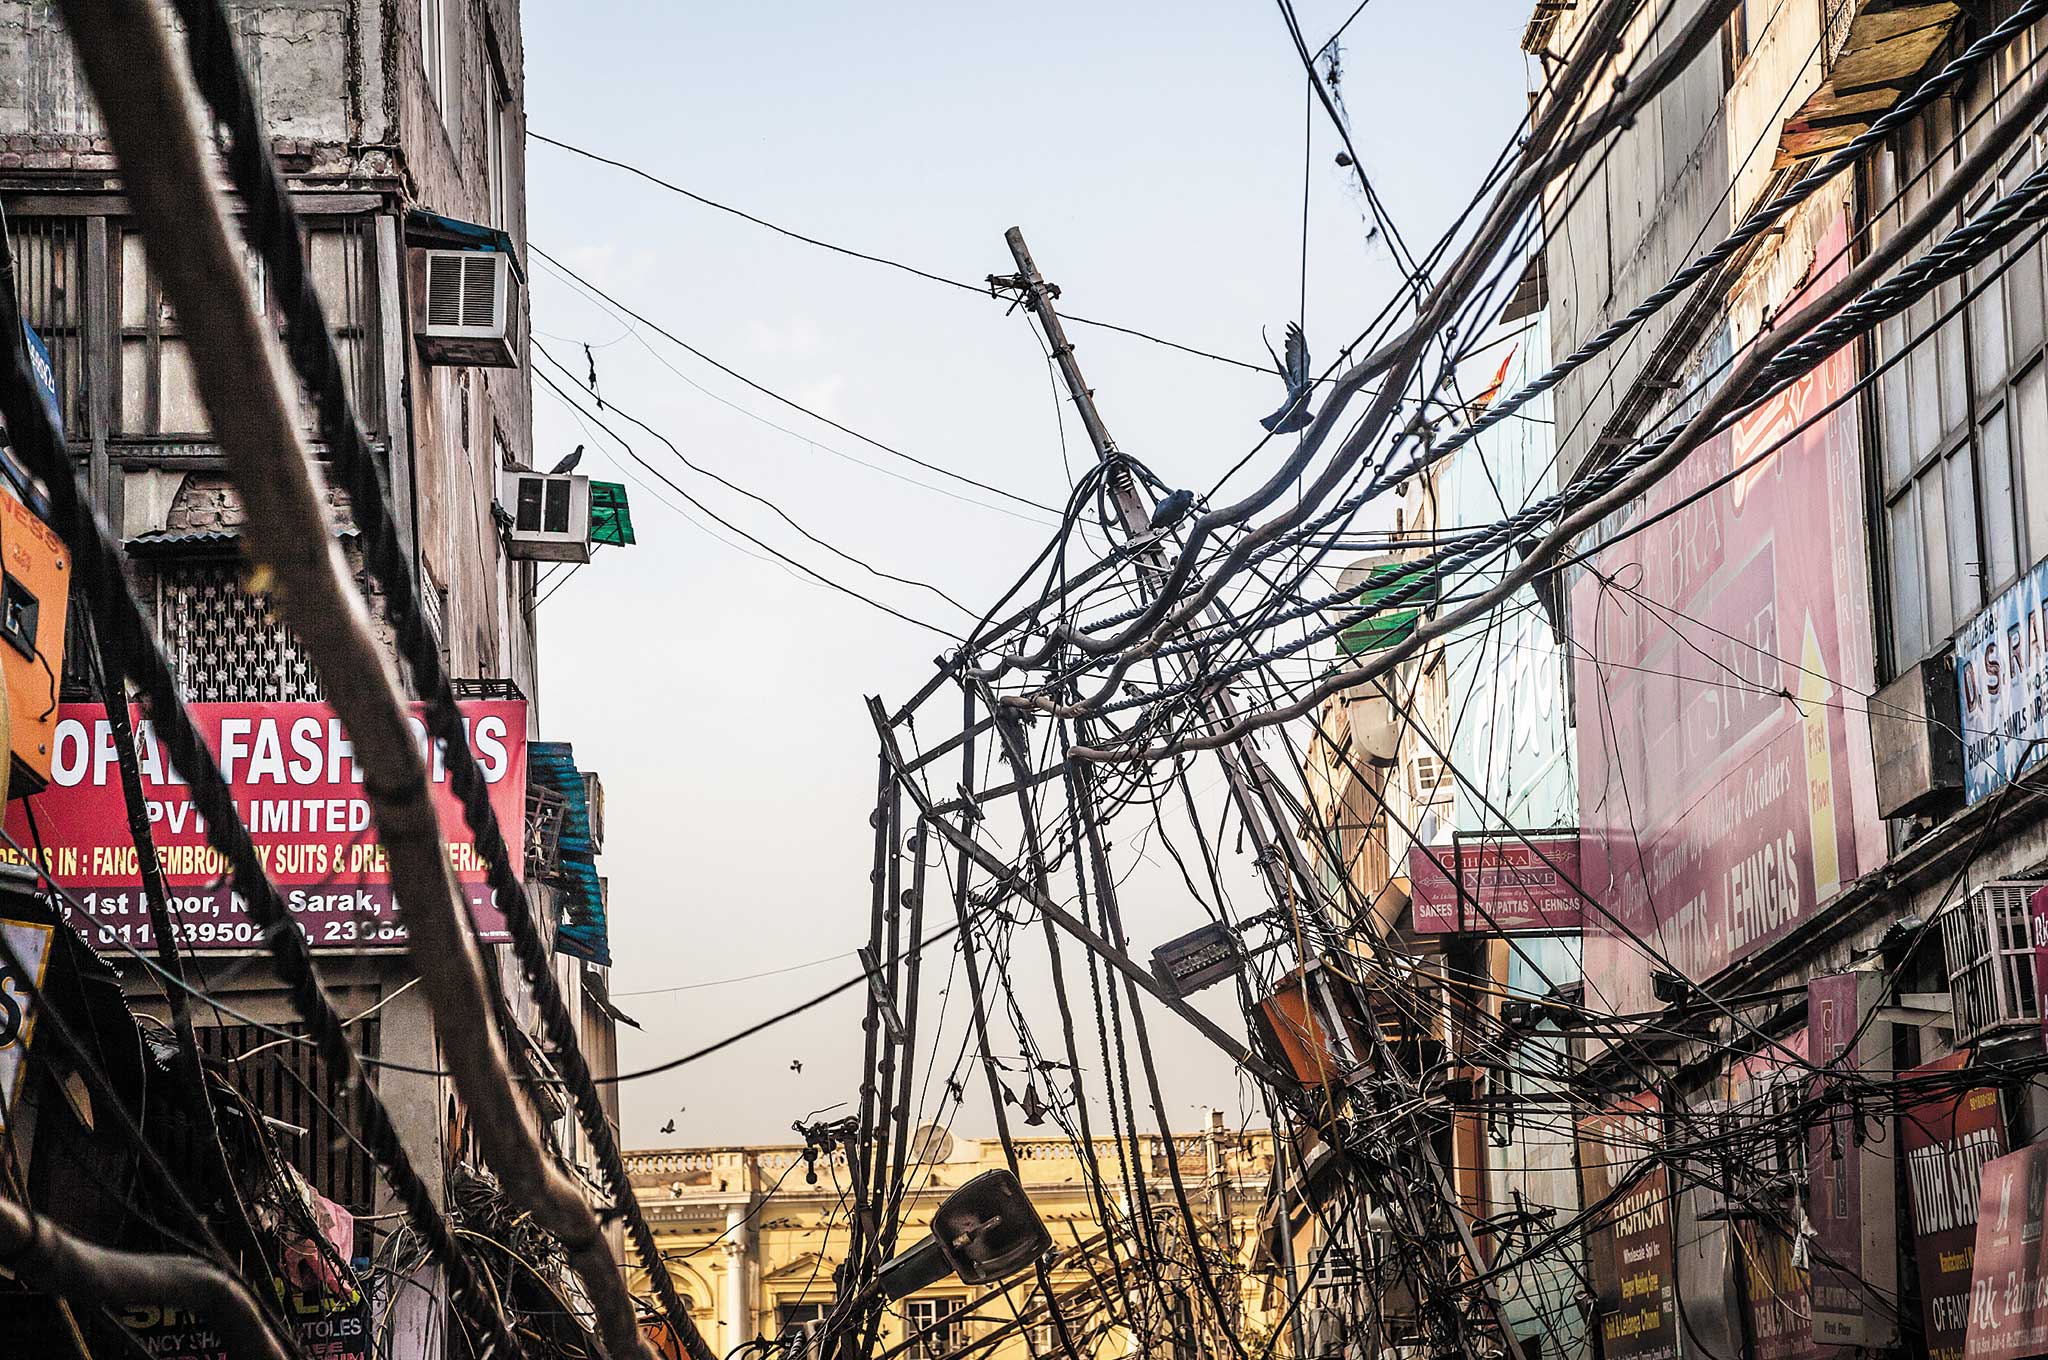
Mobile phone lines may be overwhelmed because so many are trying to call at once; this may go on indefinitely. Because the methods by which cell towers are affixed to buildings are not regulated, towers may be damaged by shaking. Downed phone lines and Internet access may contribute to interrupted communications as well. Satellite phones may prove to be a worthwhile investment.

Transportation

Damage to roads may take months to repair. Find alternate routes to work, medical help, or potential bug-out locations instead of relying on conventional highways.

Hospitals

At a time when people will need medical attention the most, earthquakes may not only cause undamaged hospitals to reach capacity and operate with limited resources and staff, but damage to other hospitals means that they could rendered unsafe and closed. The ability to be treated will be greatly reduced. Finding other means of medical care, taking first-aid courses, and coordinating with nearby residents to see if any are trained medical professionals is advisable.

5 Myths About Earthquakes

Head for the Doorway for Protection

In modern houses, doorways are no safer than any other part of your house. Do not stand in a doorway during an earthquake; you are safer under a table or desk.

Is There Such a Thing as “Earthquake Weather”?

There has been no scientific proof for earthquakes being prone to certain kinds of weather. They can happen anywhere at any time.

Scientists Can Predict Earthquakes

Modern earthquake detection systems can only sense the onset of an earthquake within seconds. Even though research continues and scientists learn more about earthquakes, no early detection system will likely be created in the foreseeable future.

Certain Animals and Some People Can Sense When an Earthquake is About to Happen

There have been reports of people or animals acting strangely immediately preceding an earthquake. To date no scientific link has been established to substantiate that animals or people can predict earthquakes. If there is some connection between behavior and earthquakes, it is still as of yet unexplainable.

Earthquakes Near Coastlines Automatically Cause Tsunamis

Although tsunamis followed the 2004 Sumatra and 2011 Japan earthquakes, that does not guarantee that earthquakes in close proximity to a coastline will cause tsunamis. The aforementioned quakes happened on subduction zone faults, on which fault slips caused a vertical uplift of the sea floor. Another earthquake of the same magnitude happened in 2012 in the same region as the previous 2004 Sumatra quake and generated no tsunami. Both occurred in deep water, but the first involved sudden vertical movement, while the second involved lateral movement.

The San Andreas fault in California cannot cause a big tsunami like the Sumatra or Japan events. While part of the San Andreas fault is offshore, the motion is mostly horizontal, so it will not cause larger vertical motions of the ocean floor that would create a tsunami; however, earthquakes on other faults offshore of California or underwater landslides could cause locally damaging tsunamis in California.


Curated Offers: 5 Everyday Watches That Won’t Break The Bank

Whether you're aware of it or not, everyone is looking at your watch. The name “watch” literally means, “to look at.” With all that attention, you might as well make your wrist look great. But a great watch doesn't need to cost a lot—function is more important than form. Here are some great watches that will have everyone asking you for the time, and then where you bought your watch.

The Classic

5-everyday-watches-that-wont-break-the-bank-mrphic-m41-watch

The watch has been a staple of humankind for centuries, and the Morphic M41 Watch is a conventional beauty. But looks can be deceiving. In addition to its orthodox design, it also boasts a non-glare scratch-proof face and gunmetal surface casing for added stamina.

Buy Now: Make a statement for just $24.99, 90% off.

The Daredevil

5-everyday-watches-that-wont-break-the-bank-morphic-m33-mens-watch

If you're the type of person whose idea of vacation is an extreme trek uphill, then you're probably looking for a Morphic M33 Men's Watch. Featuring a non-glare scratch resistant mineral crystal face, stainless steel casing and 5ATM water resistance, this timekeeper is a thrill worth seeking out.

Buy Now: A sensational deal for only $59.99—a savings of 89 percent.

The EDC Watch

5-everyday-watches-that-wont-break-the-bank-breed-raylan-mens-watch

The Breed Raylan Men's Watch is your all-in-one ace, replete with a chronograph, tachymeter, and magnified date display. And with a 316L stainless steel case and silicone strap, this watch will last you a long time. It's both stylish and practical—equally great for work and play.

Buy Now: Get this versatile watch for 87% off at only $69.99.

The Fusion Watch

5-everyday-watches-that-wont-break-the-bank-martian-mvoice-smartwatch

Caught between your love for classical watches and your desire to stick with the technological times? Then the Martian mVoice Smartwatch is perfect. This analog watch possesses push notification capability and voice command so you can send and read messages, set alerts, navigate, and more with your voice. It even takes photos, making it a great blend of past and future.

Buy Now: Get the best of both worlds for just $129.99—55% off.

The Simple Smartwatch

5-everyday-watches-that-wont-break-the-bank-ticwatch-2-active-smartwatch

Many of the big name smartwatches are expensive, but the Ticwatch 2 Active Smartwatch is a simple solution to a costly problem. Not only does it have the applications you need—heart rate monitor, calling/texting, built-in GPS—but it's both powerful and easy to use. It also charges wirelessly and is compatible with iOS and Android.

Buy Now: A smart buy for just $169.99.


RECOILtv: Full-Auto Integrally-Suppressed 10/22

The Ruger 10/22 is an excellent survival tool, and one that's at home in almost any prepper's arsenal. It's lightweight, accurate, reliable, and perfect for hunting small game as a source of calories. Adding modifications can make the 10/22 an even better weapon for these purposes, as shown in our guide, Giving the Ruger 10/22 Takedown a Survival Makeover.

A detachable suppressor can dramatically reduce the noise produced by your 10/22, but an integrally-suppressed barrel makes an even bigger difference. This setup uses baffles along the full length of the barrel to reduce decibel level and keep rounds subsonic, eliminating the distinct snap of a bullet as it breaks the sound barrier.

RecoilTV 1022 suppressor full auto gun rifle survival hunting 1

KG Made suppressors has developed an integrally-suppressed drop-in barrel for the 10/22, tested in the video below by RECOILtv's Iain Harrison. However, the KG Made crew didn't stop their modifications there — they took the rifle one step further with a custom full-auto conversion.

This full-auto integrally-suppressed 10/22 can pump out about 1800 rounds per minute. That means the gun can theoretically empty a 10-round magazine in about 1/3 of a second. This full-auto feature might not be entirely useful for survival purposes, since you'd burn through all your ammo reserves, but it certainly looks like a lot of fun.

For more Full-Auto Fridays and other firearm-related content, be sure to follow RECOILtv.


Video: Learn from this Brutal Mugging

As we go about our daily lives, we tend to assume those we encounter will be reasonably civil towards us. For example, it would be laughable to expect the barista at your local coffee shop to jump over the counter and start pummeling you if you don't provide a sufficient tip. While we're not always greeted politely by everyone we meet, society functions on a certain baseline level of human decency.

Thuggee criminal gang India murders 3

Merciless violent criminals are not a new phenomenon. Case in point: the Thuggee gangs discussed in the link below.

Unfortunately, there are a few individuals who are willing to completely disregard these unspoken rules for personal gain. As prepared individuals, we need to be always watching for these outliers, and be ready to swiftly defend against them.

John Correia of Active Self Protection discusses some lessons learned from this brutal attack.

John Correia of Active Self Protection analyzes violent encounters to teach self-defense.

In the video below from Active Self Protection, John Correia discusses a CCTV recording that shows a brutal and merciless mugging inside a convenience store. The perpetrator doesn't have a second thought about viciously beating his victim for having the gall to fight back, and the results are difficult to watch. However, there are some valuable lessons to be learned from this man's misfortune.

As John mentions, situational awareness is key. Any time you're in public, you should be watching and listening to your surroundings. By absent-mindedly looking through your wallet or using your phone, you expose your valuables and give criminals an opening to strike.

It's hard to adapt to your environment without situational awareness. Put your phone away. Pay attention.

It's hard to adapt to your environment without situational awareness. Put your phone away. Pay attention.

If situational awareness isn't sufficient to avoid the mugging or attack, you need to immediately go into an active state of self-defense. If you can escape the situation or at least put distance between yourself and your attacker, this should be your top priority. Otherwise, rely on your self-defense training to deflect the attacks and quickly counter-attack. Being prepared with a weapon — such as a firearm, knife, or other force-multiplier — can greatly increase your chances of survival.

Dead giveaways of preparedness gun holster draw 6

Most importantly, as John mentions in the video, you must be prepared to deal with an attacker who will show no mercy, and bystanders who will be frozen in fear. In these cases, deadly force against the attacker may be the only way to end the threat.


Field Dressing for Survivalists

Illustrations by Joe Oesterie

In a world where millions go to the supermarket to get their meat, it's funny how many people have no concept of the work that goes into producing that perfectly wrapped and presented protein product. We can't count the amount of times we've talked with people who eat meat, but somehow find it distasteful that others spend their fall and winter hunting to fill their freezers.

With more and more people looking for organic and free-range animals to incorporate into their diet, what would happen if they couldn't just go to the store? For some, hunting an animal and processing it from start to finish is a way of life, whereas for others who never learned the sequence of tasks necessary to prepare an animal without contaminating the meat, their “Eww! Blood and guts!” reaction could cost them their lives in dire circumstances. It's not all macabre gore.

Field dressing an animal is a practice that's been handed down for centuries and a critical part of preparing what you've hunted for consumption. If you can filet a fish, you can field dress a four-legged animal.

The hardest part of the hunt begins when the animal hits the ground. The process of gutting and butchering can be daunting for the uninitiated. If you find yourself alone and miles away from civilization, that process can become even harder. But, like any task, it comes down to using the proper methods to get the job done. With practice you'll eventually realize it's not as gruesome as many people think. We'll focus on larger game animals such as elk, deer, or moose. The approach, steps, and care to be taken are the same for all animals of the same body type.

Tool Up

Everyone has their go-to knife or knives for the job. As with many other aspects of preparation, knife selection isn't a one-size-fits-all. Dressing requirements may change from when you're butchering in a controlled environment versus in the field. Over the last year we've found two blades that have remained in our packs through many rotations. The replaceable scalpel-style knives have been the rage in recent years — a newcomer, Wiebe Knives, stood out.

The company's Vixen model has a larger handle, allowing for better control and less fatigue in cold and bloody conditions, especially if you have larger hands. While the fine scalpel-style blade works in most scenarios, we still prefer a small fixed knife with a roughly 3-inch blade, because it offers greater control inside the animal — specifically when reaching in to cut the esophagus.

For a butchering and skinning blade, the author uses a simple, semi-flexible boning knife when working at home. They're cheap and durable enough to pop joints and scrape bones. We've used the Frosts/Mora knives for the better part of 10 years; their rubberized handles are nonslip, and their blades hold an edge very well. Remember to sharpen your knives after each use or replace blades on models with that feature. A dull knife is more dangerous than a sharp one. When you have to force your knife to do the work and it doesn't cut with ease, accidents happen.

And if you're alone in the middle of the woods with a severe laceration, you might not make it to dinner.

Gut Check

Out of all the processes involved, eviscerating or gutting the animal is the task that can be the most overwhelming. But anyone can make quick work of this task when done correctly. If you plan to completely butcher the animal in the field because it's too far or too difficult to haul it back to camp, hold off on gutting it. There are better methods of butchering in that situation, which we'll discuss later.

However, if you plan to leave it overnight (assuming the temperature is fairly low), gutting the animal and putting edible organs on ice is recommended.

For the sake of clarity, we'll explain things assuming the animal is on the ground rather than hung from a gambrel.

Position the animal on a slight decline, head uphill. With the animal on its back, prop the rear legs apart. If you're working alone with a large animal like an elk, it's easier to tie the legs to neighboring trees to assist in keeping the animal stationary and legs separated.

Using a basic scalpel-style field-dressing knife, make an incision a couple inches above the anus and cut a larger circle around it. The idea is just to free a larger circle of fur around the anus from the rest of the hide. Do not cut it free from the intestine. Leave this patch of fur connected and simply separate it from the remaining fur, as we can use this later to remove the entrails. Then, make a shallow cut around the middle of the abdomen just deep enough to penetrate the flesh without going too far into the membrane below it that protects the stomach and other organs. It doesn't take much effort to slice through the flesh, so take your time. Orient the knife with the blade facing upward — don't force it. Let the knife do the work and gently cut into the skin, which (depending on the animal) usually isn't more than an inch deep. You can work two fingers of your free hand into the initial cut to help pull the fur away from the carcass as you continue cutting upward toward the bottom of the sternum where the cut should end. You can then lengthen this opening by cutting back the other way toward the genitals to create one big continuous incision.

(Note: Depending on your state, proof of sex may need to be left on the animal for transportation, so check your local regulations.)

Now you'll have complete access to the lower body cavity. Reach up into the rib cage to cut the diaphragm, a thin membrane separating the lungs, liver, and heart from the digestive organs. Then reach past and cut the esophagus, which may be hard to see — when you reach in toward the throat it feels like a bony, round tube. When both hands are out of sight and inside the body cavity, pay close attention so that you don't cut toward your other hand. Go slowly and avoid lacerating yourself on any bone shards which may be displaced by a bullet.

With most of the organs free, work to pull the lower intestine back through the pelvis, making sure not to break the bladder. With just these few cuts, all of the organs should slide out fairly easily in one group.

You should also be able to pull the initial incision you made around the anus through the open chest cavity.

Another key note: You may see some examples of field dressing where the incision is made all the way up through the rib cage, opening the entire chest cavity. However, the less you cut, the less chance of dirt, leaves, and debris entering the cavity when dragging the animal or transporting it to a vehicle. This is another reason not to split the pelvis to remove the lower intestine and anus.

After hanging the animal and skinning it, use leverage to pop the shoulder from the joint. Be mindful of the curvature of the pelvis as you work your blade through.

After hanging the animal and skinning it, use leverage to pop the shoulder from the joint. Be mindful of the curvature...

field-dressing-for-survivalists-backstrap-rib-meat-removal

Next comes the removal of the backstrap and the rib meat.

Next comes the removal of the backstrap and the rib meat.

To remove the tenderloins, use your knife tip and fingers. They should pull free from the carcass with minimal effort.

To remove the tenderloins, use your knife tip and fingers. They should pull free from the carcass with minimal effort.

A carcass with limited meat waste; just the rear legs remain.

A carcass with limited meat waste; just the rear legs remain.

Remove the rear leg in the same fashion as the front shoulder. Lessen the work by following the natural seams of the meat.

Remove the rear leg in the same fashion as the front shoulder. Lessen the work by following the natural seams of the...

Thick Skinned

The key with any big game animal is to get it cooled down as quickly as possible. Skinning is just that, shedding the animal's coat to allow heat to dissipate. While we've hung deer-sized game unskinned and allowed them to age for multiple days, we've achieved a better product when skinning the animal and allowing it to age as an exposed carcass.

Attempting to fully skin an animal on the ground is best avoided, so all these procedures are described for an animal hung from a gambrel; they don't change regardless of animal size.

With the animal securely held in the gambrel, remove the hide from the rear legs, making incisions up to the knuckle. Peel the hide around and down until you reach the tailbone. Grabbing the tail and pulling away, it'll easily detach by cutting through the joint; be sure not to cut through the hide. With the hide free of the rear legs, using your blade and some brute strength, pull the hide down until you reach the shoulders. The key is to cut toward the hide and not into the meat. For the most part, the hide will pull free with little knife work needed.

Skinning out the shoulders can be a frustrating task given the weight of the hide and curvature of the shoulder. The area where the hide goes under the armpit can be a difficult spot.

There are two approaches to making this task easier. You can cut through the hide at two points inside the shoulders, giving you three separate sections and more freedom to work. Keep in mind, though, anytime you cut through the hide, you cut more hair, resulting in more to clean up later. It's usually easier to work the hide to the back of the shoulders and make an incision through the hide up the back of the leg to the knuckle. This lets you work the hide down and around each shoulder. Continue to work the hide to the base of the head. There's usually no need for a saw — with a knife and some twisting action you can easily sever the vertebra.

The Gutless Method

If you're miles deep into your hunting trip, you probably won't want to drag the animal out whole. Your best option is to work the animal one side at a time, removing all the meat without disturbing the internal organs.

With the animal on its side, make an incision through the hide, along the backbone, and up the neck. When cutting through hide, it's always best to cut hide to hair, that is, from the inside out. This helps prevent hair from getting on the meat, making it easier to clean and package later. Work the hide down, pulling and cutting as you go. In most instances the hide should pull free if the animal was recently killed and still warm. Start at the front shoulder, peeling the hide back as you would if the animal were hanging.

Work from front to back, peeling the hide and removing major muscle groups as you go. The hide will open like a flap, giving you complete access to the quarters, back straps, making removing the tenderloins easier. After all the meat is removed from one side of the animal, simply roll the animal to the other side and remove the hide and meat in the same order, front to back.

The Aging Process

Aging meat has been done for ages — for good reason. There are two main reasons to age your animal: concentration of flavor and tenderness. As meat ages, the natural enzymes in the meat break down the protein. This is simply a controlled rot, for lack of a better term. For this to happen properly though, you need to have the right conditions or you risk all your meat spoiling.

If you're dealing with a whole animal and don't have the luxury of a walk-in cooler, the key is temperature.

This author prefers the temperature to be no higher than 45 degrees F. Of course, if it's warmer or you can't hang the entire animal, you can age your animal in the fridge. Place the primal cuts on sheet trays lined with parchment paper then cover with plastic wrap. Age for up to five days if the animal is whole or quartered in the fridge.

Note: When aging meat in its quarters, you'll lose a bit more yield since more surfaces are exposed and more trimming will be needed.

Butcher It

This is a personal choice, and the process will vary due to what's needed. Some hunters turn both front shoulders into ground meat or sausage and leave the rest for steaks and roasts. Keep the meat in larger cuts, so roasts are fully trimmed and packaged and back straps are portioned in larger pieces rather than cut down to steaks. Larger pieces keep better in the freezer than smaller cuts, resulting in a better product months down the line.

When trimming and boning out the meat, you'll be left with scraps. You can immediately turn this all to grind, but you might consider keeping a pound of trim set aside to use later in a sausage. It might come in handy to prevent you from over grinding a sausage mix.

Pack It Up

Vacuum-sealing machines have become so prevalent and inexpensive, they're a no-brainer when packing meat. The clear bags are easily labeled, last longer, and the process is far quicker than wrapping cuts in butcher paper. [Editor's note: If you decide to get one, see our buyer's guide in RECOIL OFFGRID Issue 10 for some shopping advice.]

Industrial meat and even internet-ordered groceries mean we're growing even further from the roots of the food chain. At least, if you're reading this, you've considered the steps to eviscerate, butcher, and package your own game.

Butchering an animal is largely preferential. Storing meat in larger pieces helps it last longer in the freezer.

Butchering an animal is largely preferential. Storing meat in larger pieces helps it last longer in the freezer.

For some, taking game to a local processor is the easier route. But you may find that resource isn't an option if the world goes to pot, so these skills will be valuable. You'll have to rely on yourself to do the dirty work of a trade many people have long taken for granted. If the need arises in a survival situation, you'll be much closer to self-sufficiency.

About the Author

Matthew Cosenzo is a graduate of The Culinary Institute of America, focusing heavily on field-to-table cooking. His passion for the outdoors combined with his approach to game creates a full circle experience. Cosenzo is always looking for the next challenge — be it on the range or in the field — to help him become a more efficient and educated hunter.

More From Issue 22

Don’t miss essential survival insights—sign up for Recoil Offgrid's free newsletter today!

Read articles from the next issue of Recoil Offgrid: Issue 23

Read articles from the previous issue of Recoil Offgrid: Issue 21

Check out our other publications on the web: Recoil | Gun Digest | Blade | RecoilTV | RECOILtv (YouTube)

Editor's Note: This article has been modified from its original version for the web.


The Myth of Drinking Urine When You’re Out of Water

Thinking about drinking some pee? You're not the only one. Every time I teach a survival class, someone asks about drinking urine when we get to the section on water. But just because it's yellow, I tell them, doesn't make it lemonade!

The Myth: Thanks to the exploits of certain shock-value survival TV personalities and the misadventure of Aron Ralston (and the subsequent movie adaptation of 127 Hours), many rookie survivalists think it's OK to drink urine when you run out of water.

The Reality: The average person can live about four days without any water to drink, if they have adequate shelter during that time. And while a few lucky survivors have lasted an extra day or two from pee drinking, looking at a few special cases doesn't mean it's a good practice. Even the urine from a well-hydrated human is still laden with waste compounds — no, pee isn't sterile. After all, our bodies are getting rid of it for a reason. In fact, over 3,000 compounds have been found in our lemon-colored liquid. Almost 100 of these are bacteria getting flushed from the body, and nearly 1,500 are waste from bodily processes. This leaves more than 2,000 chemicals coming from our diet, environment, medicines, and cosmetics. In short, urine contains a lot of alarming waste products, and they're all things our body is trying to eliminate (not recycle). Furthermore, if conditions are grim enough that you're considering peeing into a cup and drinking it, there's likely a higher concentration of bacteria in your urine than usual since you're already approaching a hydration deficit.

Normal urine is approximately 95-percent water and 5-percent waste, but as a person becomes more dehydrated, these numbers change dramatically (making piss consumption even less desirable). Medically documented side effects of urine drinking include diarrhea, vomiting (more water loss), and electrolyte imbalance, along with other unhealthy effects.

Want more proof? Ask the U.S. Army. In its field manual for survival, piss is specifically called out on the “Do not drink” list, right beside ocean water and blood. Furthermore, the pee of someone with crushing injuries is even more dangerous than the whiz of an unharmed survivor. Damaged muscle fibers leak potassium, among other substances, into the bloodstream, raising the level of salts and waste in urine. Even a pee guzzler with strong kidneys may not be able to handle this. And when the injured person is drinking their own tinkle, they're taking in salts their body definitely doesn't want.

Alternative Uses: Here are some other ways to stay hydrated, and for the adventurous, here are some alternative uses for your urine. Just because pee isn't a great beverage choice, doesn't mean it's worthless.

  • Worth the squeeze. Except in the driest deserts, there's usually some alternative source of drinking water. Numerous plants contain water that can be extracted or tapped during certain seasons. Make sure to positively identify the species you're considering, and determine which season it provides water and how to collect it. Squeezing the juice from edible berries is a good strategy. This way you don't have to waste water pooping out all the seeds and pulp.
  • Get it on tap. My favorite wild water source is maple sap, which can be collected between February and March by drilling a hole into the right tree. The water is perfectly safe to drink, being filtered by the woody tissues of the tree. The sap even has a trace of sugar, making it taste slightly sweet (and giving us the raw material to boil down maple syrup).
  • If it's yellow, let it mellow. Stale piss has been used for thousands of years for a wide range of purposes. Once the urine breaks down for a few days, it has a high concentration of ammonia. This was used by the ancient Romans to whiten their teeth, among other revolting chores. Later people used stale pee to dye their clothing, tan animal skins, make gunpowder, and even fertilize crops.

Web Exclusive

Not convinced that we busted this myth? Maybe it's because you watched Internet “survivalists” drink their own piss through a LifeStraw for views and infamy. Read our web exclusive on why using a water filtration system still doesn't make urine safe to drink here.


Infographic: Color-Coded Nutrition for Healthier Survival

Many survivalists tend to focus on defending against external threats — natural disasters, civil unrest, terrorist attacks, car crashes, and home invasions. These are all valid dangers to prepare for, but we also shouldn't overlook internal threats to our well-being. This is why we frequently emphasize physical fitness, mental fortitude, and a healthy diet.

Vegetable fruit food nutrition health diet tomatoes lettuce 1

Anyone who spends all day sitting on the couch slowly clogging his or her arteries with junk food isn't going to fare well in a survival scenario. Similarly, if you think you're going to subsist on nothing but a stockpile of protein bars and water, you may end up seriously unhealthy. A balanced diet is key to good nutrition, and good nutrition is key to long-term survival.

Mutliple clinical studies have shown that avocado consumption helps support cardiovascular health.

Fresh fruits and vegetables are an ideal way to supplement your diet, and much of this produce can be grown in a backyard garden or with an indoor hydroponic setup. If neither of these options is viable, you can still stockpile shelf-stable canned, dehydrated, or freeze-dried produce. Additional processing extends shelf life, but also reduces nutrient content, so you can find the balance that fits your needs.

Dehydrated freeze dried food sweet snacks dessert 24

Freeze-dried fruits such as these peaches lose some nutritional value, but can be preserved for years.

The following infographic from Rockwell Nutrition shows scientifically-supported health benefits of various fruits and vegetables, and categorizes them by color. These tips can help you decide which items to grow at home in your garden, or the produce you pick up on your next trip to the grocery store. Click here to download a full-size version of this graphic.

Vegetable fruit food nutrition health diet infographic 4

Vegetable fruit food nutrition health diet infographic 5

Vegetable fruit food nutrition health diet infographic 6

Vegetable fruit food nutrition health diet infographic 7