Knife Informer’s Essential Guide to Lock Types

Many of us never leave home without a folding knife. This simple tool is incredibly useful for both daily life and survival in the wilderness, so unless you're in a non-permissive environment that explicitly prevents you from carrying one, it's advisable to have one at your disposal.

However, how do you choose a specific knife to carry? That's a complex question that involves quite a few variables. Blade steel is an important consideration, since it'll determine the corrosion resistance and wear characteristics of your knife. Heat treat, edge geometry, and blade profile also affect cutting performance and durability. But for folding knives, the lock mechanism is an especially important consideration. It keeps your blade firmly in place, reducing the risk of damage to the knife's structural integrity — and your hand.

saber-grip-on-knife

Folding knife manufacturers have engineered a variety of lock types, each with its upsides and downsides. Read on for some helpful excerpts from the Essential Guide to Lock Types by Knife Informer, published here with permission:

Back Lock

Knife Informer blade lock types folding pocket knives 1

Illustration courtesy of KnifeInformer.com

The back lock (or lockback) uses a lock bar pinned to the scales of the blade, pivoting in the middle, and a bent spring which presses the front of the lock bar downward. The classic Buck 110 folding knife is a good example of this mechanism.

Pros: Ambidextrous, very strong
Cons: Repeated use can lead to play in the lockup, one-handed closing is often difficult

Liner Lock

Knife Informer blade lock types folding pocket knives 2

Illustration courtesy of KnifeInformer.com

The liner lock is simple and extremely common. It uses a section of one of the handle liners, cut out and bent to create a spring effect. This lock engages the back of the blade tang when the blade is opened. Modern versions of the design use a stop pin for added strength, and a detent ball for smoothness.

Pros: Simple, inexpensive, allows for fast opening
Cons: Not suited for heavy chopping, not ambidextrous, places user's finger in front of the blade's path when closing

Frame Lock

Knife Informer blade lock types folding pocket knives 3

Illustration courtesy of KnifeInformer.com

The frame lock is common on higher-end knives, such as the titanium frame lock on the Zero Tolerance 0630. This mechanism is stronger than a liner lock, using a thick piece of the handle frame as the lock bar instead of a thin liner. Most frame locks include a stop pin and detent ball, but designers have made many other incremental improvements — read about them here.

Pros: Extremely strong, simple construction
Cons: Titanium-on-steel galling can cause sticky lockup if not fitted with a lockbar insert, pivot tension must be fine-tuned, not ambidextrous, places user's finger in front of the blade's path when closing

Compression Lock

Knife Informer blade lock types folding pocket knives 4

Illustration courtesy of KnifeInformer.com

The compression lock is patented by Spyderco, and it can be thought of as an improved, inverted liner lock. It's located along the spine of the blade, and engages between the stop pin and the tang of the blade.

Pros: Stronger than a liner lock, doesn't require the user to put a finger in the blade's path, can be flipped open and shut one-handed
Cons: Requires precise tension and machining tolerances

Axis Lock

Knife Informer blade lock types folding pocket knives 5

Illustration courtesy of KnifeInformer.com

The Axis Lock is patented by Benchmade and found on most of the company's knives, though similar mechanisms have been developed by other manufacturers. This mechanism uses a sliding steel lock bar under tension provided by two omega springs.

Pros: Ambidextrous, strong, doesn't require the user to put a finger in the blade's path, can be flipped open and shut one-handed
Cons: Complex, may be susceptible to spring breakage, requires tight tolerances

Button Lock

Knife Informer blade lock types folding pocket knives 6

Illustration courtesy of KnifeInformer.com

Button locks (or plunge locks) are often found on automatic knives, but they're also present on some manual folders (like the Spartan Pallas) and assisted-openers (like the Gerber US-Assist). The button lock uses a spring-loaded plunger to hold the knife open; pressing the button lines up a notch in the plunger and allows the blade to pivot.

Pros: Strong, doesn't require the user to put a finger in the blade's path, fast and easy to use
Cons: Difficult and expensive to manufacture, not ambidextrous, some jurisdictions may have laws which designate button-lock knives as switchblades

More Lock Types & Non-Locking Mechanisms

For more details on variations within these categories, tips on how to find the right knife for your needs, and information on non-locking slipjoint and friction-folding knives, check out the complete Essential Guide to Lock Types from Knife Informer.


Video: Fishing for Snakes

In any survival scenario, it's an uphill battle to provide enough calories to stay alive. When you're out in the wilderness and don't have access to stockpiled food reserves, you'll need to be clever to find substantial sources of food and avoid starvation.

Snake fishing fish trap hunt water survival 1

The easiest place to start is by searching for small and slow-moving prey, like grubs, grasshoppers, shellfish, crabs, and other invertebrates. Cooking up a few handfuls of these creatures can keep you going, but for long-term survival you'll need larger meals. The next logical step is to use these invertebrates to bait a hook, and step up to fishing.

Snake fishing fish trap hunt water survival 2

Once you've caught a fish, you could simply eat it, or you could use part of it to move up one more level in the food chain. In certain areas, a small fish can be used as bait to catch larger predatory species, further accelerating your calorie intake. In the following video, YouTube survivalist Bob Hansler shows how a fish can be used to catch snakes.

Keep in mind that this technique is most likely illegal in most jurisdictions (check your local laws), and is also inherently dangerous.

Catching snakes could provide you with a large amount of meat, or it could result in a snakebite if handled improperly. When you're in the backwoods without access to medical treatment, a venomous snakebite could easily be fatal. Even a non-venomous snakebite could lead to a dangerous infection, so if you're not comfortable with these risks, you may be better off looking for easier sources of food.


Insect Repellent 101

Chikungunya. Ever heard of it? Although you might not be familiar with it (much less able to pronounce it), trust us — you don't want it. How about Dengue? Ring any bells? What about Lyme disease, West Nile virus, Yellow fever, Rocky Mountain spotted fever, malaria, and one that's a pretty recent addition to this list of lovely afflictions — Zika. According to the Centers for Disease Control and Prevention (CDC), in 2015 there were 61 symptomatic Zika virus cases reported in the USA and nine cases in U.S. territories. In 2016 those numbers jumped to 5,102 in the States and 36,079 in the territories. What does that tell you?

And here's some more alarming information: You don't even have to be bitten by a mosquito carrying Zika to contract it. It can be passed through sexual contact, blood transfusions, and from infected pregnant mothers to their unborn babies, resulting in birth defects. Also, presently there aren't any specific medicines or vaccines available for Zika, and infected individuals may not even become symptomatic.

Frightening, yes, but you're not completely without countermeasures for preventing Zika and other vector-borne illnesses. In this article, we examine the ins and outs of insect repellents to help you combat disease-carrying pests — which may be in your own backyard right now.

The reason these particular vectors are of great concern is that they're generally parasitic. In other words, they need blood from other animals to survive, so they're constantly looking for hosts to feed off of — this is how their contagions are spread. Humans give off various odors and other attractants that entice these types of vectors. Repellents temporarily block a vector's ability to detect these bodily emissions, reducing their ability to find you.

Insect repellents won't protect against all vectors, many of which aren't insects. Rats fall into this category. On the other hand, rats aren't parasitic, and some insect repellents can be effective against certain insects that bite, but aren't considered vectors, such as ants.

However, don't assume that repellents are automatically effective against anything with more than four legs. Bites and stings from spiders, ants, or wasps are generally a defense mechanism against their habitat being disturbed. If you stumble into a nest of black widows, the chances that they'll be discouraged by your insect repellent are slim to none.

Thankfully, bugs like ants, wasps, bees, spiders, and bed bugs aren't known vectors and don't spread the kinds of illnesses that insect repellents aim to prevent. However, allergic reactions to toxins they carry or bacterial infections can still occur through contact.

Spray repellents provide better coverage than lotions and should be applied whenever in an area where vectors are present.

Spray repellents provide better coverage than lotions and should be applied whenever in an area where vectors are...

What You Should Use

The litany of insect repellent choices on the shelves and online may be mind-boggling. Nowadays there are even products that claim to be natural alternatives with essential oils, electrostatic repellent properties, or spatial repellents that come in the form of clip-on fans/foggers. Where does one start? Are they all equal?

The CDC recommends using topical insect repellents that are registered by the Environmental Protection Agency (EPA), which regulates insect repellents in the United States. The CDC lists five active ingredients with repellency properties that have been studied extensively and shown to be effective:

  • DEET
  • Picaridin
  • IR3535
  • Oil of lemon eucalyptus (OLE) or para-menthane-diol (PMD)
  • 2-undecanone

“We deal a lot with our members traveling globally to places where they want to protect themselves from vector-borne diseases,” says Dr. William Hauptman of International SOS, a company that provides medical assistance, international healthcare, and security service consulting. “We would only recommend, at International SOS, in addition to whatever vaccines or medical prophylaxis may be available, that you use an insect repellent registered by the EPA.”

Topical repellents typically only contain one active ingredient from the above list, and as a general rule, the higher the concentration of the ingredient, the longer your period of protection. There's also typically a ceiling for the effectiveness of each active ingredient.

“With DEET you're going to get greater efficacy with increased percentage, but once you get beyond 50 percent it tends to plateau,” Hauptman says.

An EPA-registered repellent will have a registration number on the container. In 2014, the EPA introduced a Repellency Awareness Graphic (below), similar to the SPF levels you see on sunblock. This label provides information about the duration of the repellent's efficacy. To qualify for an EPA registration and Repellency Awareness Graphic, companies must provide the EPA with data that meets accepted scientific protocol showing the safety and efficacy of the submitted product.

Keep three criteria in mind when selecting an insect repellent: the active ingredient, its level of concentration, and verification that the repellent is EPA registered. Read and follow the directions.

insect-repellent-101-repellency-awareness-graphic

What You Shouldn't Use

In recent years you may have heard information suggesting that products containing DEET may be toxic, and that alternatives advertised as natural are just as effective at repelling insects without subjecting you to potential negative side effects that synthetic chemicals are assumed to have. While the idea of using natural products may sound good, their effectiveness compared to conventional insect repellents is questionable at best.

Permethrin is an effective insect repellent when applied on clothing or gear, but shouldn't be applied directly on skin.

Permethrin is an effective insect repellent when applied on clothing or gear, but shouldn't be applied directly...

Repellents containing DEET are very safe and effective in repelling vector insects.

Repellents containing DEET are very safe and effective in repelling vector insects.

“DEET has been extensively studied, and I even looked at it again recently,” Hauptman says. “An occasional person may have an allergic reaction to one of the five recommended active ingredients, but you can have an allergic reaction to anything. DEET is confidently felt by the CDC and EPA to be safe.”

Alternative active ingredients recommended by the CDC and EPA, such as picaridin, are available in various concentrations.

Alternative active ingredients recommended by the CDC and EPA, such as picaridin, are available in various...

Because products advertised as natural generally contain chemicals that are considered harmless, they aren't held to the same testing standards; many companies have exploited this exception. A recent article by Consumer Reports found natural repellents to be comparatively inferior to EPA-evaluated-and-registered products.

Research has shown that so-called natural repellents don't offer the same protection as EPA-registered products. Always look for an EPA registration number on the container.

Research has shown that so-called natural repellents don't offer the same protection as EPA-registered products....

“It's tempting to use something natural, but we always actively discourage our members of that notion because the products that are EPA registered have been shown to be safe at the concentrations sold,” says Hauptman.

He also adds, “None of the electrostatic or sprayer products you can wear that disperse repellent in the ambient area are going to have a degree of efficacy such that you don't also need a topical spray with active ingredient shown to be effective.”

General Guidelines

Reapplying throughout the day is advised, particularly if circumstances would diminish the efficacy of the repellent. People often make the mistake of believing that if they apply their repellent once, their coverage will last all day, regardless of their activity. If there's a lot of sweating, heat, and abrasion, the duration will be reduced.

Be mindful of your activity level and activity type — the advertised duration levels aren't guaranteed under strenuous circumstances. In addition to that, you must also examine situations that would put you in contact with vectors.

Will you be outside a lot? Will you be sweating profusely or swimming? If so, you may want to reapply at the halfway point of the product's advertised duration time. If you notice you're getting bitten even before that, it's time to reapply as well.

People may also be concerned about using repellents in conjunction with sunscreen.

“We advise against using combination products and recommend using two separate products,” says Hauptman. “Apply the sunscreen first, and the repellent second. If you use a product with DEET, it may reduce the efficacy of the sunscreen, so you can use a sunscreen with a higher SPF or reapply the sunscreen more frequently.”

Situational Awareness

While concentrations of certain vector insects and the contagions they carry may vary from region to region, the bottom line is that they can be found everywhere. For example, even if you live in Montana and don't plan on vacationing in any regions rocked by Zika, the Rocky Mountain wood tick is endemic to that state and a known carrier of Rocky Mountain spotted fever and tularemia.

Get proactive and use the CDC's website. It's a great resource to learn about vector alerts in your area (www.cdc.gov/ncezid/dvbd/) and abroad (wwwnc.cdc.gov/travel). Registering with the U.S. Department of State website is another way to stay aware of health bulletins pertaining to vector-related illnesses of concern in a country you intend to visit.

Signing up for memberships with companies like International SOS is an additional measure of coverage, particularly if you fall ill and local health care providers are unavailable or lacking in their resources. See our article “Condition Red” in the Winter 2015 Issue of RECOIL OFFGRID about health considerations while traveling.
As for clothing, if you know you'll be in an infested area, do the following:

  • Wear long-sleeve shirts and pants (not shorts)
  • Tuck pants into socks, and tuck in shirts
  • Wear close-toed shoes, preferably boots
  • Wear hats

Also, be cognizant of the other outdoor conditions that are conducive to the presence of vector insects. Do you own pets? Is there a great deal of vegetation around your home, or places where standing water can accumulate?

Standing water is a common breeding ground for mosquitos. Empty accumulated water and ditch accidental water vessels to reduce insect populations near your home.

Standing water is a common breeding ground for mosquitos. Empty accumulated water and ditch accidental water vessels to...

One can mitigate exposure by trimming tall grass and shrubs, spraying insecticide around one's property, and emptying vessels such as tires or flowerpots that collect stagnant water. If you have ponds on your property, adding fish — which are natural predators — can also help control insect populations. If you have pets, whether they're outdoor or not, check them frequently for signs of ticks or fleas and speak to your veterinarian about effective flea and tick products.

Although many argue that using diatomaceous earth around your property or having plants like lemongrass and lavender may discourage the presence of certain insects, don't assume that whatever measure of protection they provide is substantial enough to obviate the need for topical repellents. Much like citronella candles, their level of repellency is too diluted to have a worthwhile effect.

Additional Countermeasures

Speak with your doctor about additional preventive measures. Although there isn't a vaccine for malaria, your health care provider can recommend certain drugs that can reduce the chances of infection. Vaccines for illnesses such as Japanese Encephalitis or Yellow fever (which can both be transmitted through mosquitos) are also available.

Insect-repellent clothing is another method of prevention. Companies such as Insect Shield treat their clothing with permethrin, which has been proven to be effective against vectors and is an EPA-registered repellent. Insect Shield claims that their technology is effective up to 70 washes.

insect-repellent-101-spray-insecticides

“Other repellents like DEET aren't effective on textiles,” says Janine Robertson, marketing and PR manager for Insect Shield. “They don't adhere and can ruin the fabrics. After 70 washes the fibers tend to diminish, wear away, and there's less available permethrin on the garment, so the clothing can't be retreated after that many washes, but we do have a program where people can send their own clothing and we can treat them before we send it back. Products with a DWR finish can't be treated though.”

Bed netting and window screens should also be a part of your protection efforts. Speak to different manufacturers about the threshold of thread counts per square inch to keep vectors of concern from penetrating the barrier. These can also be used to cover strollers and cribs. Many bed nets come treated with permethrin as well.

Conclusion

While these recommendations may help create an integrated approach to insect repellency, no single method is 100 percent effective in preventing a potential bite from occurring. Topical repellents can be used in conjunction with insect-repellent clothing on exposed skin, although the CDC discourages using repellent under your clothing.

And even if you take malaria pills and are vaccinated against Yellow fever, that doesn't mean you have guaranteed protection against those contagions or can't contract another illness altogether. “While these measures are critical, they are not 100-percent effective, and that the best protective protocol, even for diseases for which vaccination or prophylactic pills are available, still requires a multi-pronged approach, including insect repellent,” says Hauptman. Inoculations should never be relied upon in lieu of topical repellents. Many vectors carry more than one contagion, so even though you think you're protected against one that's endemic to your area, there are still others to watch out for.

Deploy all effective methods to stay as protected as possible, particularly in the hot and humid seasons when bugs tend to be at their greatest population. Putting repellent on your arms won't protect your legs if you don't apply any there. If you're at risk, get in the habit of using repellent. Think of it like applying deodorant, a normal part of your routine. If you don't use it, you'll call attention to yourself in all the wrong ways.

Who are the Culprits?

When we talk about insect repellents, and the critters they're effective against, we're referring to “vectors” — living organisms that can transmit infectious diseases between humans or from animals to humans. The best-known examples are:

insect-repellent-101-most-common-vectors

Did You Know?

  • Using your air conditioner can discourage mosquitos from entering your home.
  • Replacing your outdoor lights with yellow “bug” lights will attract fewer bugs.
  • Wearing light-colored clothing can enable you to see bugs easier.
  • The aedes aegypti mosquito is a known carrier of at least five diseases.
  • Even certain aquatic snails are considered vectors and carry worms that cause Schistosomiasis.

Insect Repellent FAQs

People often have questions about proper application of insect repellent to themselves and their children. This link can help answer some common questions.
www.cdc.gov/westnile/faq/repellent.html

Tick Removal

Yes, there's a right and wrong way to do this. Removing a tick incorrectly may result in mouthparts remaining lodged in your skin or squeezing toxins into your bloodstream. See this link for proper tick removal.
www.cdc.gov/lyme/removal/index.html

Sources

Centers for Disease Control and Prevention
www.cdc.gov

Environmental Protection Agency
www.epa.gov

International SOS
www.internationalsos.com

National Center for Biotechnology Information
www.ncbi.nlm.nih.gov

World Health Organization
www.who.int

More From Issue 21

Don’t miss essential survival insights—sign up for Recoil Offgrid's free newsletter today!

Read articles from the next issue of Recoil Offgrid: Issue 22

Read articles from the previous issue of Recoil Offgrid: Issue 20

Check out our other publications on the web: Recoil | Gun Digest | Blade | RecoilTV | RECOILtv (YouTube)

Editor's Note: This article has been modified from its original version for the web.


New: Kid Patriot Backpacks

When we consider emergency scenarios, many of us think, how would I survive? However, for most of us, a better question is, how would we survive? It's important to include all members of your family in your survival plans, and prepare each individual to help the group in any way possible. This also includes your kids — in case something happens to you, they shouldn't be completely reliant on your knowledge and gear.

Kid Patriot backpack bug out bag children family survival 7

Kid Patriot is a new company that offers custom backpacks made specifically for kids. These packs could work well for everyday use at school, or could be filled with bug-out gear and stashed in your kids' rooms in case of emergency. They're hand-made to order in Tennessee, and can be ordered in your choice of six fabric choices and a selection of handle, zipper pull, and shoulder strap colors.

Each Kid Patriot backpack is built from a tough 500-denier Cordura fabric exterior and a black ripstop nylon lining. The carry handle and straps are made from durable seatbelt material, and large YKK zippers ensure long-lasting operation. The pack has a capacity of 14 liters and an MSRP of $89.

Kid Patriot backpack bug out bag children family survival 1

When ordering a Kid Patriot pack, you can choose from the following options:

  • Exterior fabric: black, grey, coyote brown, MultiCam, MultiCam black, or Kryptek Typhon
  • Handle color: black, red, blue, orange, coyote, yellow, teal, fuchsia, or lime green
  • Zipper pull color: black, red, blue, orange, coyote, yellow, teal, fuchsia, or lime green
  • Shoulder strap color: black, red, blue, orange, yellow, teal, fuchsia, or lime green
  • Optional velcro strip for morale patches

Since these packs are custom-made to order, there is a lead time for all orders — at the time of this article, it's 7-10 days. For more info on the Kid Patriot backpacks and other products, go to KidPatriot.com.


Language Lesson: Lumens

The term lumens is often mentioned in reference to flashlights, and most of us know by now that more lumens means more light output. But we've often wondered how this is this quantified, and how effective it is at determining real-world effectiveness of a flashlight. The article below from Breach Bang Clear explains some of the details behind this measurement, and also how it differs from other common lighting terms.

Flashlight lumens light LED tool EDC gear 1

Editor's Note: The following article was originally published by our friends at Breach Bang Clear. It appears here in its entirety with their permission. For more from the Mad Duo and crew, go to BreachBangClear.com or follow them on Facebook or Instagram.

Flashlight lumens light LED tool EDC gear 2

Term: Lumens

Relates to: Light intensity

Application(s) of Use: flashlights, weapon lights, light bulbs — anything that emits light

Definition: a measure of the total quantity of visible light emitted by a source

Why it Matters: There are several different ways to measure light intensity, but lumens (symbol: “lm”) are the current gold standard.

Into the Weeds: We used to roll with candlepower, which is an old and obsolete measurement which assesses the amount of light falling onto a target rather than the total amount of light emitted. The lumen equivalent of candlepower is called lux, which is used to measure luminous flux (i.e. perceived light power) per unit area.

Pre-fluorescent and LED bulbs often stated brightness levels in watts. Though this is an extremely dated method, many LED and CFL bulbs will list watt equivalency numbers on the box — likely so your grandparents won’t be confused.

What’s particularly noteworthy about lumens is that it’s a measurement mostly used only for frequencies the human eye can detect, rather than the entire spectrum emitted by a given light source. There are several methods to measuring lumens, but the current industry standard is to use a integration sphere which completely diffuses any light source.

Flashlight lumens light LED tool EDC gear 3

To really dive deep into the subject of lumens and flashlights you’ll want to read this post and this one.

The TL;DR version is this: Higher lumens just means more light from the source, not necessarily a better flashlight or light bulb.

In Summary, a lumen is just a way to measure total light output of a given source. In and of itself it offers no other performance information.


A Buyer’s Guide to UPF Shirts

When it comes to seeking shelter, we've been conditioned over the past 200 years to focus on having a roof over our heads. What's less obvious is that “shelter” in some cases may consist of a broad-brimmed hat or, less conspicuously, the pants and shirts we wear. Especially in dry, arid climates, simply covering your skin will instantly drop your temperature to something approaching tolerable.

And even when it's hot and humid, protecting your skin from the sun's rays will help you stay outside longer and maintain your endurance.

Clothing with an Ultraviolet Protection Factor rating is specifically designed to shield your skin from the sun's rays. It may incorporate a dense weave, thicker fabric, and/or special color dyes that help prevent transmission of ultraviolet rays through the fabric. UPF ratings range from 1 to 50, although the numbers don't correspond to protection in a straight-line manner, as you might think they would. The higher the number, the greater the protection:

  • UPF 1: All UV light is transmitted to the skin
  • UPF 25: About 4 percent of UV light transmitted
  • UPF 50: About 2 percent of UV light transmitted

Keep in mind, all clothing provides some level of UV protection. A white cotton T-shirt may provide a UPF rating between 5 and 8, while dark jeans provide protection much greater than 50. However, a denim jacket might not be the most breathable or comfortable garment when you're on a daylong hike or getting out of Dodge as the sky falls. For this reason, when shopping for UPF-rated shirts, you want to focus on products that provide a UPF rating of 30 or more while remaining breathable, quick-drying, and providing good range of motion and flexibility.

Rated S for Scientific

The UPF system was first standardized in Australia in 1996 and is now used worldwide. It was developed in part because the Australian government saw consumers purchasing swimwear and outdoor active wear under the assumption certain garments provided maximum solar protection, when in fact they didn't. They sought to provide a uniform, easy-to-understand labeling system so consumers could easily identify which garments would provide suitable skin protection from the sun.

In the United States, three primary guidelines are used to specify laboratory testing and labeling standards. The guidelines are produced by ASTM International (formerly the American Society for Testing and Materials) and the American Association of Textile Chemists and Colorists (AATCC). These groups are non-government associations and have no role in enforcement, although governments and manufacturers rely on them to produce referenced standards.

1. First, ASTM D6544 specifies the process where textiles are washed and dried repeatedly 40 times to simulate repeated home launderings. The fabric is then exposed to 100 hours of UV light to simulate long-term use.

2. After this wear-and-tear simulation is performed on the textile , AATCC Test Method 183 spells out how to place it between an artificial light source and a light measurement device. At this point, the amount of light passing through the fabric can be measured and recorded.

3. Finally, ASTM D6603 describes labeling requirements, basically what manufacturers can (and can't) put on the tag. You should be aware that clothing companies are not routinely audited to check on their testing results. Unlike an FDA-regulated product, the standard only requires companies to self-report their results, therefore a little bit of trust and knowledge of the manufacturer is helpful.

Doctor's Orders

To learn more about the state of the art in protective clothing technology we spoke with Dr. Neil Fenske, professor and endowed chair of the Department of Dermatology & Cutaneous Surgery at the University of South Florida. This skincare expert recommends UPF-rated clothing instead of sunscreen wherever possible.

“I actually prefer UPF-rated clothing over sunscreens,” he said, “because you don't have to apply chemicals to your skin. Also, the clothing's protection won't wash off when it gets wet like sunscreen can.”

Dr. Fenske added that the older technology sun protective clothing from the '90s and early 2000s lost some of its protective value when it got too wet or sweaty. Also, it had a bad habit of taking forever to dry. By contrast, the use of new textile technologies, including perforated fabric, is providing us with gear that usually does a better job of getting dry and staying that way.

With this in mind we set out to perform our own field evaluations of five of the latest offerings. We tested these UPF shirts on long road-trip drives, while working outside, and while exploring some blazing-hot swamps and prairies in South Florida. We're happy to report that our skin did not get so much as red or even pink under the areas covered by these fabrics.

By contrast, we repeatedly slathered sunscreen on exposed areas (like our hands and neck) throughout the day, but they still got burned. Apparently the sunscreen just couldn't keep up with the rigors of hiking, slapping bugs, and sweating all day.

So right off the bat, all of our shirts were winners in the department of protecting our skin. As we mentioned with the denim jacket, however, modern textile technology has come so far that we now expect more than just sun protection &mash; a lot more. We hope this guide helps to inform your purchasing decisions when shopping for your own skin-shelter. That way, when you really need your clothing to perform, your shirt will have your back in more ways than one.

UPF Shirts

  • Clothing Arts Pick-Pocket Proof Travel Shirt

    Make & Model - Clothing Arts Pick-Pocket Proof Travel Shirt
    UPF Rating - 30+
    Materials - 12-ounce 100-percent nylon
    Colors - Dark gray, light blue, tan (shown), white
    MSRP - $70
    URL - http://www.clothingarts.com

    This shirt is designed to blend into an urban setting, yet be perfectly at home in the outdoors &mash; and the execution absolutely nailed it.

  • KÜHL Airspeed Long Sleeve Shirt

    Make & Model - KÜHL Airspeed Long Sleeve Shirt
    UPF Rating - 30
    Materials - 2.5-ounce to 4.7-ounce cotton/nylon/polyester blends
    Colors - Agave green, carbon (shown), khaki, natural, pirate blue, sky blue
    MSRP - $85
    URL - http://www.kuhl.com

    This KÜHL shirt was the most expensive of the garments we tested, but every detail of its design and performance testified to money well spent.

  • Mountain Khakis Men's Trail Creek Short Sleeve Shirt

    Make & Model - Mountain Khakis Men's Trail Creek Short Sleeve Shirt
    UPF Rating - 40+
    Materials - 2.9-ounce polyester
    Colors - Blue ridge, cornflower plaid (shown), firma, freestone plaid
    MSRP - $65
    URL - http://www.mountainkhakis.com

    This generously cut, lightweight polyester shirt looks plain vanilla on the surface, but has some hidden features.

  • Royal Robbins Painted Canyon Plaid Long Sleeve Shirt

    Make & Model - Royal Robbins Painted Canyon Plaid Long Sleeve Shirt
    UPF Rating - 25+
    Materials - 2.8-ounce 100-percent cotton
    Colors - Marmalade, Oceania, olivine (shown)
    MSRP - $58
    URL - http://www.royalrobbins.com

    Though this Royal Robbins long-sleeve has the lowest UPF rating among the tops we tested, we didn't so much as get a suntan in the areas it covered

  • Under Armour UA Sunblock Short Sleeve Shirt

    Make & Model - Under Armour UA Sunblock Short Sleeve Shirt
    UPF Rating - 50+
    Materials - Polyester
    Colors - Absinthe green, black, blackout navy, blue marker, smash yellow, white
    MSRP - $45
    URL - http://www.underarmour.com

    This is a function-forward T-shirt, focused squarely on doing a single job really well: helping your performance during athletic pursuits no matter how sunny it is outside.

Don't Shrink It and Pink It

Whether you're looking to buy a gift for the adventurous lady in your life or you're a female survivalist yourself, trying to find a shirt that's both functional and cut to fit a woman's frame can be as daunting as finding fresh water in a drought. Far too often male-centric manufacturers simply “shrink it and pink it” &mash; make a smaller version of a man's shirt and offering it in bright colors. This patronizing practice usually results in a low sales, which leads to less R&D in female-dedicated garments and gear, which leads to low sales &mash; can you say vicious cycle?

Fortunately, some companies are changing that standard by crafting apparel specifically for women's requirements. The following are just a few of the brands offering UPF-rated shirts for outdoorswomen. Maybe there's one that'll fit your or your loved one's summer needs.

upf-shirts-buyers-guide-kuhl-kiley

Make & Model:KÜHL Kiley
UPF Rating:50
Materials:Three fabric blends, including cotton, spandex, Tencel, and polyester.
Colors:Ash, charcoal, denim blue
MSRP:$75
URL:www.kuhl.com

upf-shirts-buyers-guide-mountain-khakis-women-equatorial-long-sleeve-shirt

Make & Model:Mountain Khakis Women's Equatorial Long Sleeve Shirt
UPF Rating:45+
Materials:Polyester
Colors:Cirrus, lilac (shown)
MSRP:$90
URL:www.mountainkhakis.com

upf-shirts-buyers-guide-royal-robbins-expedition-chill-stretch-tunic

Make & Model:Royal Robbins Expedition Chill Stretch Tunic
UPF Rating:50+
Materials:Polyester
Colors:Aster (shown), nasturtium, navy, white
MSRP:$72
URL:www.royalrobbins.com

When Shirts Aren't Enough

Protective clothing like UPF-rated long-sleeve shirts will help against the sun's harmful rays, but your hands, face, and neck may still be exposed and in need of protection. Besides the suggestion to wear a broad-brimmed canvas hat, Dr. Neil Fenske gave us these tips for selecting a sunscreen to use in combination with our UPF-rated shirts:

  • The most important thing when buying sunscreen is to look for “Broad Spectrum” protection on the label. This means it shields you from both UVA and UVB rays, thus providing much better coverage. (UVA causes melanoma and wrinkling and UVB causes other types of skin cancer.)
  • Don't bother buying higher than SPF 30. An SPF 30 sunscreen blocks 97% of the sun's rays. Spending additional money (and adding more chemicals to the mix) for an SPF rating of 50 or higher is not usually justifiable, unless you have pale sensitive skin or are working in an extreme environment, like the White Sands Missile Range.
  • For even greater sun protection than sunscreen alone, consider using an antioxidant serum applied first under the sunscreen. Apparently the antioxidants help quench free radicals and block infrared rays, which might seem like a marketing gimmick but is, in fact, science.

About the Author

Andrew Schrader is a licensed professional engineer and an urban search and rescue (USAR) consultant. He deployed to Steinhatchee, Florida, last year in support of SAR operations following Hurricane Hermine, and recently assisted the U.S. Department of State in developing post-earthquake rescue and response protocol for their Italian Consulate. His company, Recon Response Engineering, teaches technical rescue teams, state and federal government agencies on the subject of structural collapse.
Instagram: @reconresponse
www.reconresponse.com

More From Issue 21

Don’t miss essential survival insights—sign up for Recoil Offgrid's free newsletter today!

Read articles from the next issue of Recoil Offgrid: Issue 22

Read articles from the previous issue of Recoil Offgrid: Issue 20

Check out our other publications on the web: Recoil | Gun Digest | Blade | RecoilTV | RECOILtv (YouTube)

Editor's Note: This article has been modified from its original version for the web.


Sara Liberte: Exclusive 2017 GMC Bug-Out Van Tour

If you've been following us here on OFFGRIDweb or our social media channels, you'll probably recognize Sara Liberte. She's the traveling photographer and videographer who has been working on a custom 2017 GMC Savana home-on-wheels/bug-out vehicle known to this point as the Battle Van. For those who haven't seen our previous articles yet, we'd suggest you check them out: Part 1 and Part 2.

Sara Liberte Battle Van GMC vehicle bugout truck RV build 5v2

Sara Liberte's van build has been progressing nicely in the past few months, and we were glad to hear she has received lots of useful feedback from RECOIL OFFGRID readers. So, as a thank you to all of you who have been following her build, she created an exclusive tour video that shows off her van's interior and exterior upgrades.

Sara Liberte Battle Van GMC vehicle bugout truck RV build 1

There's a custom mattress, computer desk, refrigerator, sound system, auxiliary electrical system with solar panels, tons of storage compartments, and much more. Watch the full video tour below:

Since the Battle Van name was just a working title, Sara also ran a naming contest with our friends at Breach Bang Clear, and has officially chosen a new name. She reveals the new official name in the following video:

It may not be able to outrun an Imperial starship and complete the Kessel Run in less than twelve parsecs, but we certainly wouldn't call Van Solo scruffy-lookin'.

Han Solo never tell me the odds

Seriously though, we'll keep you posted with new updates from Sara as she continues the van build, but in the mean time you can check out Sara’s blog or follow her page on Facebook.


Social Engineering: 5 Manipulation Techniques

Despite what it may sound like, social engineering is not the sort of thing you’d get a degree in from an Ivy League school. In fact, this kind of nefarious so-called engineering is quite the opposite. It could easily be called social reverse-engineering, since it has little to do with building up positive social interactions, and everything to do with deconstructing them for personal gain.

What is Social Engineering?

One definition of social engineering comes from prominent Russian cyber security firm Kaspersky Labs. The firm defines it as a category of techniques employed by cyber-criminals, designed to trick unsuspecting victims into disclosing their confidential data, infecting their computers with malware, or opening links to infected sites.

Although it's certainly true that many social engineering attacks happen on the internet, there's an equally large risk of falling prey to social engineering outside the digital realm. In a broader sense, social engineering is just skillful psychological manipulation, and it can occur in any interaction between two or more people.

Social engineering attacks often occur over the phone, in the mail, or even during face-to-face interactions. Certainly, protecting ourselves every day while using technology is critical, but in a grid-down or emergency situation, eliminating the risk of someone eliciting personally identifiable information (PII) is the key to protecting your assets and identity. Most importantly, countering these attacks will keep you and your interests safe during a chaotic situation.

Social engineering attacks can happen anywhere two or more people interact.

If a large-scale disaster were to affect your region, your priorities would consist of keeping yourself and your family safe, fed, and calm until some sort of order is restored. Naturally, during this type of crisis you will encounter strangers whether you’re at home bugging-in, or going mobile to a bug-out location.

No matter where you are, a heightened sense of situational awareness is worth a fortune if employed by all members of your family. When the excrement hits the proverbial fan, the general population becomes more desperate for resources, and will employ tactics like those used on the web to exploit your weaknesses.

Even outside of a disaster scenario, especially brazen criminals may use these techniques to mislead you or take advantage of you.

If you can get your family more involved in the identification and countermeasures to defeat these five types of social engineering attack, your chances of survival will greatly increase.

1. Piggybacking or Tailgating

Gaining entry to a restricted area — whether it's a home, business, or high-security building — is a desirable skill for criminals. It's also the first step towards compromising other levels of physical security.

A sign at the Apple headquarters warns employees to watch for tailgating. (via Wikipedia)

A sign at the Apple headquarters warns employees to watch for tailgating. (Photo: Wikipedia)

One of the simplest but most effective ways of entering a prohibited area is by tailgating. No, this isn’t just referring to the road-rage-inducing driving technique — it covers any method of closely following an authorized individual to achieve access to restricted places.

This can mean sneaking behind someone who is unaware of your presence, or manipulating and piggybacking an authorized person to gain entry. In countless spy movies, the hero sneaks into the middle of a group of enemies to walk through a checkpoint — that's an example of this technique.

Security cameras and access controls can help prevent

Live-monitored security cameras and access controls can help prevent this form of social engineering attack.

In an everyday scenario, this may involve a bad guy gaining access to a location with critical telecom equipment in order to plant a harmful device, or someone attempting to steal confidential information. To prevent this, most companies will live-monitor CCTV cameras, install anti-passback systems in their access controls, or just rely on employees to not hold the door for unknown individuals. Sounds easy, right? But what about during pandemonium? How can one prevent someone with nefarious intentions from harming them or compromising their bug-out spot?

How to Defend Against Tailgating:

If you’re finding a safe place to bed down and take shelter for the night, or keeping supplies in a predetermined bug-out location, you must protect the integrity of your hideaway. With limited supplies, this may be difficult, but maintaining high ground, securing a wide perimeter, and memorizing your surroundings can assist in keeping unwanted visitors out.

riding-bicycle-through-forest-at-sunset

If you're headed to a secure location, consider taking alternate paths to make sure you're not followed.

Try to pick locations with considerable cover, whether it’s in a forest or urban environment. Avoid well-lit areas, and keep your own light signature in mind when traveling at night. Use surrounding material to conceal your hideaway and lessen the risk of blowing your cover.

Whenever you’re mobile, try to keep eyes in the back of your head, and your ears to the ground, figuratively. One thing that could bust your hard-earned cache of supplies or personal safety is a compromise of position. Take stock in your surroundings constantly, and maintain situational awareness. As stated above, keep your personal light signature in mind when traveling after sundown. That being said, if you must use a flashlight to navigate, use a lower-lumen setting or moonlight mode found on most tactical lights. Ideally, 5 or 10 lumens will still allow you to see where you’re going, while still offering you some concealment.

That bright flashlight might help you navigate, but it can also give away your position.

That bright flashlight might help you navigate, but it can also give away your position.

Once you arrive at your bug out spot, tone the lumen setting down even more. If your light has a red light setting, opt for this as it will still allow you to see what is directly in front of you without casting any additional beam around your position. A better(but more costly) solution to operating in low light is to pack a pair of night vision goggles (NVGs). Whichever you choose, make sure that concealment is the number one priority.

2. Baiting

In the digital world, a link that looks too good to be true, such as a free cruise or free iPad, can easily trap an unknowing user into a well-laid-out baiting scheme. This technique is often the precursor to something even worse, such as ransomware or malware — both equally scary violations of your digital security. However, these attacks aren't always so obvious.

This email appears to contain a UPS package tracking link, but the link actually downloads a ZIP file containing malware.

This email appears to contain a UPS package tracking link, but the link actually downloads a ZIP file containing...

The recent ultra-ransomware attacks WannaCry and Petya were prime examples of how many people can be tempted by baiting through a link or random email. These two attacks affected nearly half million users across the globe, and could have been much worse if worldwide media coverage hadn’t alerted those who received suspicious emails, but had not yet opened the embedded links.

Ransomware cyber crime computer tech virus backup data 1

Clicking a baited web link can open the door to ransomware and other malware infections.

Baiting relates seamlessly to a grid-down situation as well. Whether you’re finding a safe area away from the chaos, looking for useful provisions, or generally avoiding danger, getting fooled by a baiting attack can be just as bad as falling for the illusion of a lake in the middle of the Sahara Desert. In a SHTF situation, countering these methods can be just as easy as when you’re browsing the web — although there’s no pop-up blocker or anti-malware plugin to help you detect real-life scams.

How to Defend Against Baiting:

Just like most attacks, general situational awareness can prevent a myriad of incidents. If you see something that you feel could be useful, or that appears curious, look around you before going near the object.

Social engineering mental manipulation techniques tech crime 7

These items may have been dropped accidentally, or they may be a form of bait, so approach with caution.

For example, rumors have circulated about criminals targeting individuals in parking lots late at night by placing bait to lure the victim away from their driver’s side door. As the victim steps away from his or her car to inspect the out-of-place item, the assailant could move in and commit whatever act they intended on carrying out.

If you’re familiar with the area that you’re in, it's best to stay in the parts of town that you know best. Unexpected incidents often happen in unfamiliar places, so sticking to the familiar areas will likely be more beneficial for your own personal safety. If it’s a foreign environment, do your best to stay nondescript and don’t linger. Just like with cyber safety, staying out of questionable websites and avoiding unknown links will promise you more safety than browsing to them.

3. Phishing

The call

The call you just received from your bank or your child's school may not always be what it seems.

Just recently, many US residents were victims of a giant telephone phishing scheme by a group of unknown social engineers who attempted to steal large amounts of money. These hackers would call their targets and claim to be the IRS, stating the individual owed the federal government funds due to a tax audit, or mistake in back taxes. This scheme is still active, and has worked frequently over the past year. Even worse, many different forms of it have popped up from copycat hackers.

Just like on the web, phishing can be dangerous in the real world as well. During a grid-down scenario, unsavory characters may attempt to slyly elicit information from you regarding your past, your profession, and even personal notes like marital status. These pieces of information, as trivial as they may seem, can all be used against you in some way or another. Now, this doesn’t mean lie to everyone you know, but be sure to take caution if someone is asking way too many questions all of a sudden.

Casual conversation at local businesses

Casual conversations in public can be used by clever criminals to obtain information about your personal life.

How to Defend Against Phishing:

Be careful what information you surrender to those you have just met. Your belongings, such as gas, ammunition/firearms, generators, and food, aren’t something to brag about during an emergency. Mentioning this to the wrong individual might put a target on your back.

Be very careful about disclosing the extent of your gear and supplies, as this may entice criminals to target your home.

Be very careful about disclosing the extent of your gear and supplies, as this may entice criminals to target your home.

It’s best not to offer any information that isn’t obvious about your family or personal life. These are all things that can be held against you if you are the victim of a nefarious social engineer. The last thing you want is for a family member to be taken hostage because a rogue group wants something that you have—if society collapses, many individuals will have no qualms about seizing any advantage they can.

Skills can be just as valuable as tangible items, so be cautious of what you put on display to those that don’t know you all too well. If someone notices you’re a medical professional, they may show up on your doorstep injured and begging to be let in — or worse yet, demanding your assistance at gunpoint.

4. Manipulation and Pretexting

An outward appearance of authority or vulnerability can distort your perception of an individual.

An outward appearance of authority or vulnerability can distort your perception of an individual.

The line between awareness and paranoia must be drawn very finely when identifying pretexting. This technique involves convincing those around you that you’re something you’re not, or manipulating perception– a very powerful social engineering skill. For example, someone who’s up to no good might dress up as a police officer or another figure of authority to gain access to an area.

Pretexting can be used during times of panic to make advances on targets that would otherwise be off-limits to the average Joe, opening up many opportunities to wreak havoc. Gaining trust as someone else is a surefire way to deceive the unsuspecting.

In Star Wars: A New Hope, Luke and Han use the illusion of escorting Chewie to sneak through the Death Star.

In Star Wars, the heroes bypass security by pretending to be stormtroopers escorting a prisoner. (Photo: Lucasfilm)

How to Defend Against Manipulation and Pretexting:

To detect pretexting, ask leading questions about the person’s association with who they claim to be. Don’t come off as insulting, but use conversational questions about how long they’ve been doing what they do or how they obtained their credentials to figure out if the water is truly murky.

Inquire about their situation, how they’re surviving, where they’re from, and other non-intrusive questions about their life. A friendly demeanor and good acting skills are essential to pulling this off convincingly.

police-talking-to-civilians-after-an-electromagnetic-pulse

Criminals have tried to take advantage of the unsuspecting by impersonating law enforcement officers.

If after all of this, you’re still questioning their expertise or authority, find polite ways to get out of the situation. Look for visual cues when they are answering your questions. Shaking or fidgeting of the hands, limited eye contact, voice trembling, hesitation, and answers that don’t particularly line up are red flags that should signal you to get out of Dodge before it’s too late.

5. Diversion

Diversion is exactly what it sounds like: diverting someone’s attention away from something that they really should be paying attention to, thus opening the opportunity to commit a nefarious act.

Criminals may claim to be experiencing a car break-down or medical emergency to distract you.

Criminals may request your assistance with a car break-down or medical emergency to distract you.

As one can imagine, there are a myriad of situations in the real world where diversion is effective. Most popular is the around-the-corner trick, where a group of individuals work to draw their victim away from the target of the operation (such as a vehicle, home, or security post). When the victim is away from the target, another member of the criminal group strikes and takes action on the target, thus completing the diversion attack and leaving the victim with their pants around their ankles.

If you are the target of this social engineering attack, it may be difficult to determine if you are being led down a path of lies by a stranger, or if there is indeed something going on that may require your attention. Combating these attacks is difficult, so attempt to pick up on any odd behavior that a shady character may display before your time to evaluate runs out.

If the distraction is successful, you may end up leaving yourself wide open to intrusion or theft.

If the distraction is successful, you may end up leaving yourself wide open to intrusion or theft.

How to Defend Against Diversion:

Claiming that someone is in medical distress or in danger is a common way that one could be tricked into leaving a vehicle, possessions, or family behind for just a minute. These situations get your blood pressure pumping, raise your heart rate, and stop you from thinking clearly about being deceived. Everyone wants to believe somebody wouldn’t lie about an actual emergency, but stay alert and pay attention to your surroundings— not everything is what it seems.

Don't store your valuables in obvious locations, and always keep them secured, especially during emergencies.

Don't store your valuables in obvious locations, and always keep them secured, especially during emergencies.

The easiest way to avoid this attack is heightening your sense of personal security. If mobile, avoid leaving supplies out on display. This just makes them easy pickings if you aren’t around. Also, make sure you make things as theft-proof as possible at your bug-out location. It’s not always easy to do, but stashing valuables in hidden spots can save you some heartache if anyone ever loots your hideaway.

Final Thoughts

When dealing with experienced social engineers, you may not even know someone is taking advantage of you, so it's essential to watch for warning signs.

The attacks we have presented are some of the most common types that are carried out by cunning criminals. Above all, the best way to prevent being a victim is by having a heightened sense of awareness, and taking preventative steps to protect your belongings. The countermeasures we've discussed will enable you to be more cautious and prepared in the event of a catastrophe.

About the Author

Jim Henry is a physical security and surveillance expert who has spent all of his adult life working to keep people out of places they shouldn’t be, and locating individuals who need to be found. Prior to his current employment in the private sector, where he works as a government contractor, Henry was a Surveillance Investigator for The Rivers Casino in Pittsburgh, PA. He also worked in Erie, PA in a similar role. Before that, Henry was busy building a diverse portfolio of education, studying countersurveillance, critical infrastructure protection, and threat detection. Even though most of his current work remains secret, Henry is very vocal about his love for firearms, writing, EDC gear, hiking with his dog, and spending time with his family.


Building a DIY Parabolic Solar Cooker

The end of the world as we know it will also mean the end of pizza delivery and fast-food cheeseburgers. When your Happy Meal no longer lives up to its name, you'll not only have to worry about what to eat, but how to cook it without a functioning power grid. And one option you should consider for post-apocalyptic food prep is a solar cooker.

While not ideal when it's cloudy, in cold environments, or in a bug-out situation, a sun-powered cooker can work wonders in a grid-down scenario. Remember when a fire at a substation caused a power outage that crippled San Francisco for seven hours back in April? Considering how fragile our power grid is, it's not hard to imagine something similar happening on a wider scale — and for a longer period.

Enter the DIY parabolic solar cooker. “A para what now?” you might ask.

There are basically three types of solar-powered cookers: a solar oven, a solar panel cooker, and a parabolic cooker.

Parabolic cookers are like shiny satellite dishes that focus sunlight on a central point. Their concentrated focus can generate extreme heat quickly and can actually be used to fry food. (If you're thinking heat ray or Death Star, well, me too.) This design cooks faster and takes better advantage of short periods of sunlight, so it was the perfect choice for this DIY project.

Cardboard, and Lots of it

The inspiration for my parabolic solar cooker was actually a large cardboard box from an industrial shelving unit in my garage. Too big to fit in the recycle bin and made of the heavy, double-thickness corrugated cardboard that's a pain in the ass to break down, it ended up being the perfect “free” material for a reflector body. It was also typical of the material you might actually be able to scrounge in a TEOTWAWKI scenario.

I wanted to design the reflector so it was as large as possible, given the material on hand. Although a reflector can have as many panels as you want, the more you have, the more efficient it is. I also wanted the focal point to be above the reflector, to provide easy access to the cooking pot. To do all that, you need to get your math geek on and discover the wonders of parabolas.

A parabola is an arc formed by a series of points that are equidistant from a single point and a line. For things like reflectors and satellite dishes, the single point is the focal point where the reflected rays will converge and the line is a straight reference line below it.

The Recipe

Here are the basic tools and materials you'll need to build this DIY solar cooker. Since the premise was to use scavenged cardboard as the basis for the reflector, the size of your scrounged cardboard will determine the size of your finished cooker and the dimensions of the other components, like 2x4s, plywood, etc. That's why no specific dimensions are given for them.

Tools:

  • Measuring tape
  • T-square
  • Spring clamp
  • 550 cord
  • Pencil
  • Heavy-duty duct tape
  • Utility knife
  • Scissors
  • Jigsaw
  • Drill and drill bits
  • Hammer

Materials:

  • 1/2-inch plywood (for the panel form)
  • Two 1×4 boards (for the panel form)
  • Sheet of paper
  • Large corrugated cardboard box(es)
  • Spray adhesive
  • Heavy-duty aluminum foil
  • Metal drywall corner
  • Two 1-inch 8-32 screws with flat washers and nuts
  • Three 6-inch 1/4-20 carriage bolts with flat washers and wing nuts
  • 2x4s (for the supporting frame)
  • 3-inch deck screws
  • Three lengths of 1/2-inch electrical conduit
  • Grill grate
  • Binding wire

Tee (Square) Time

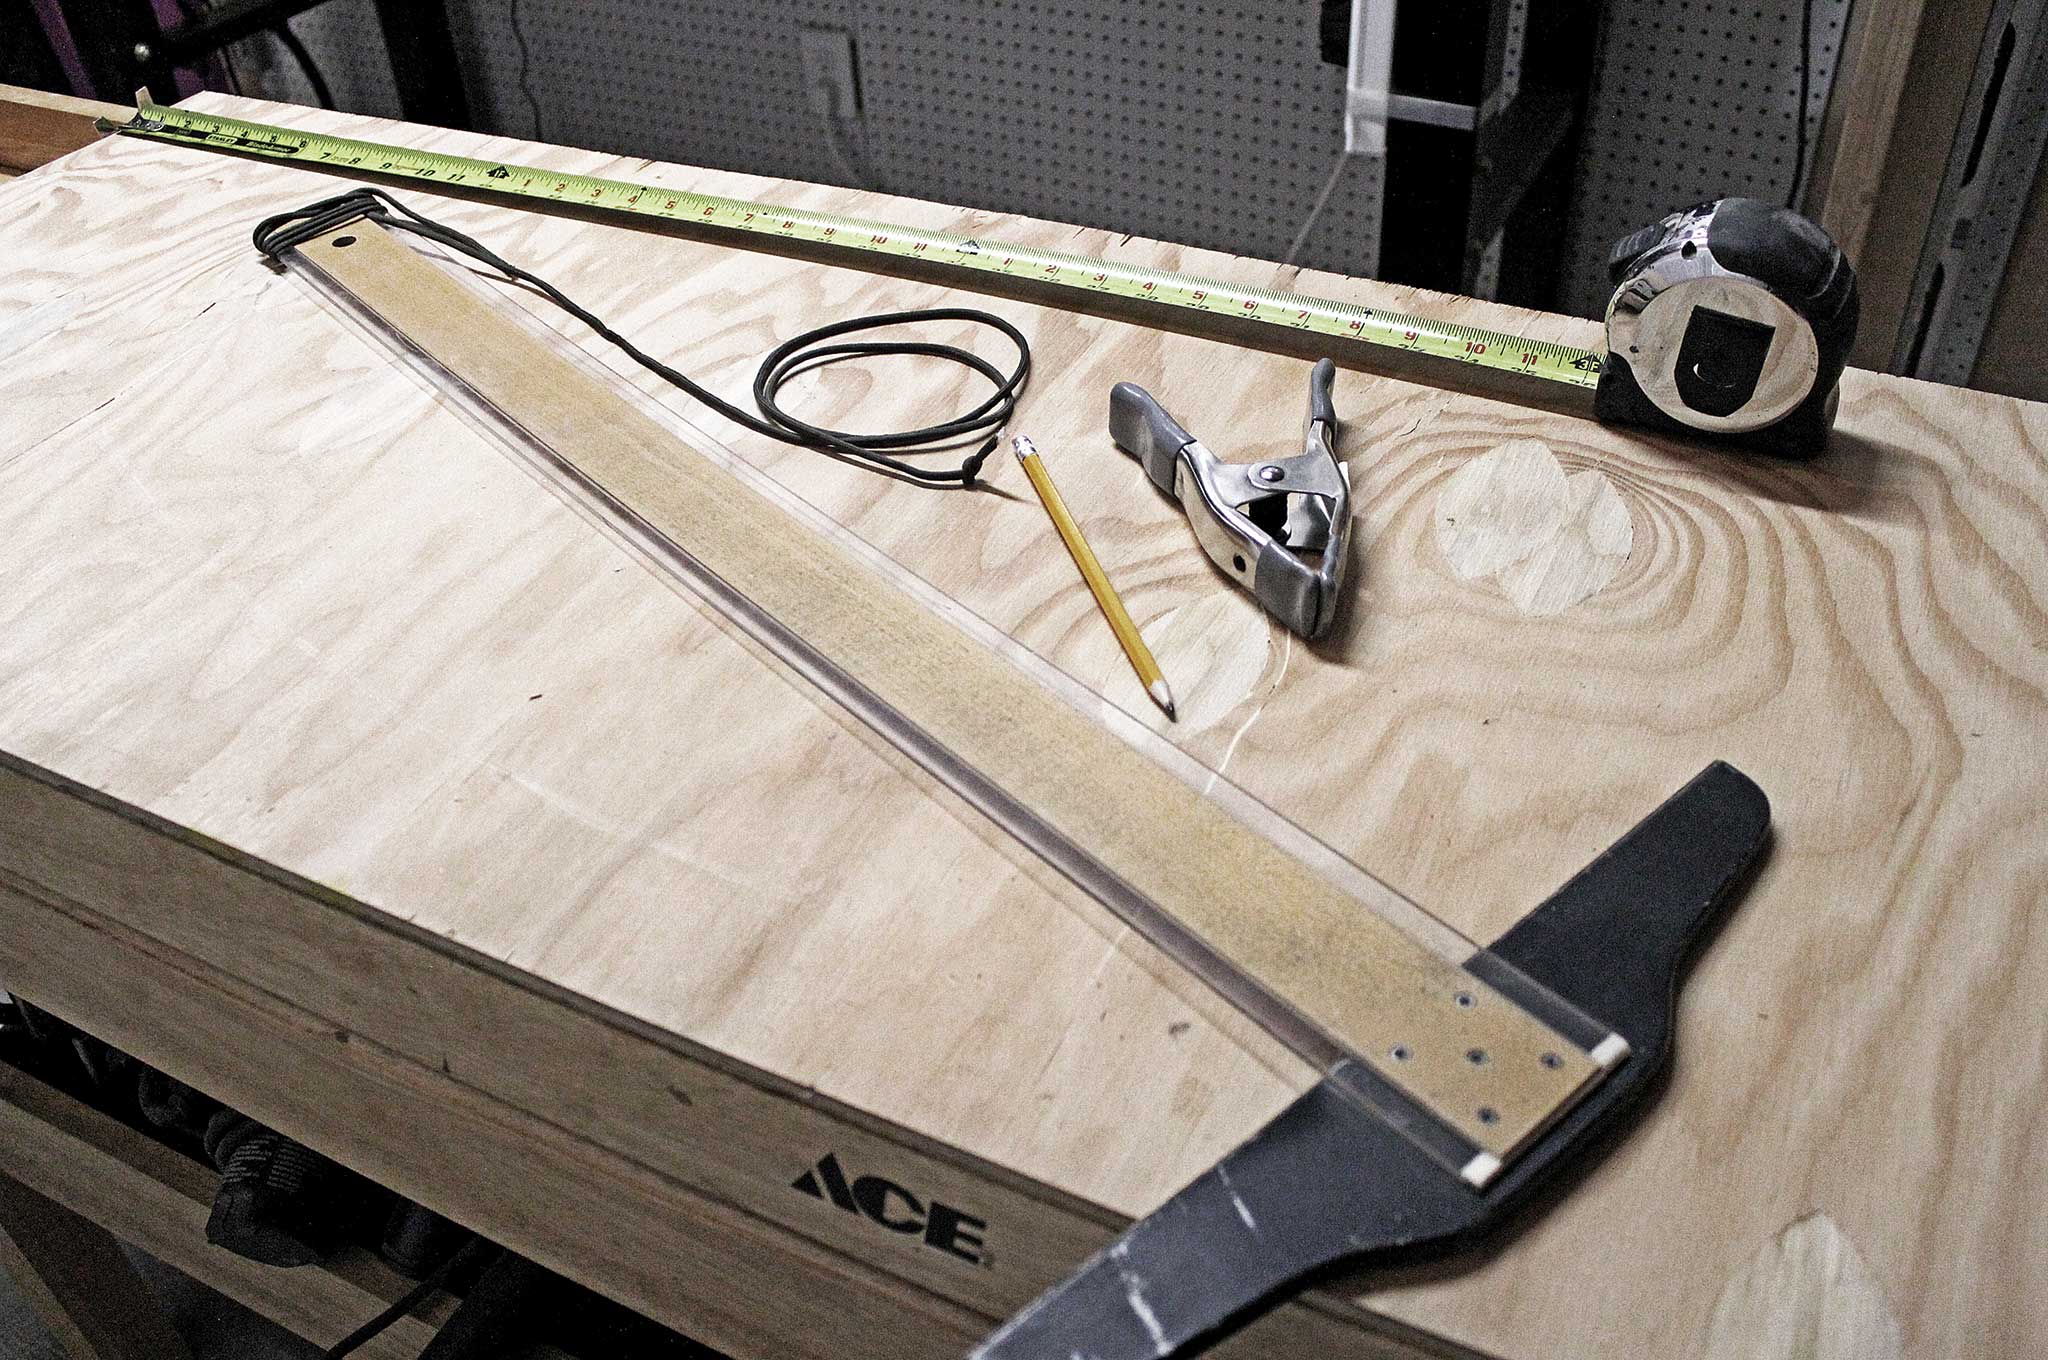
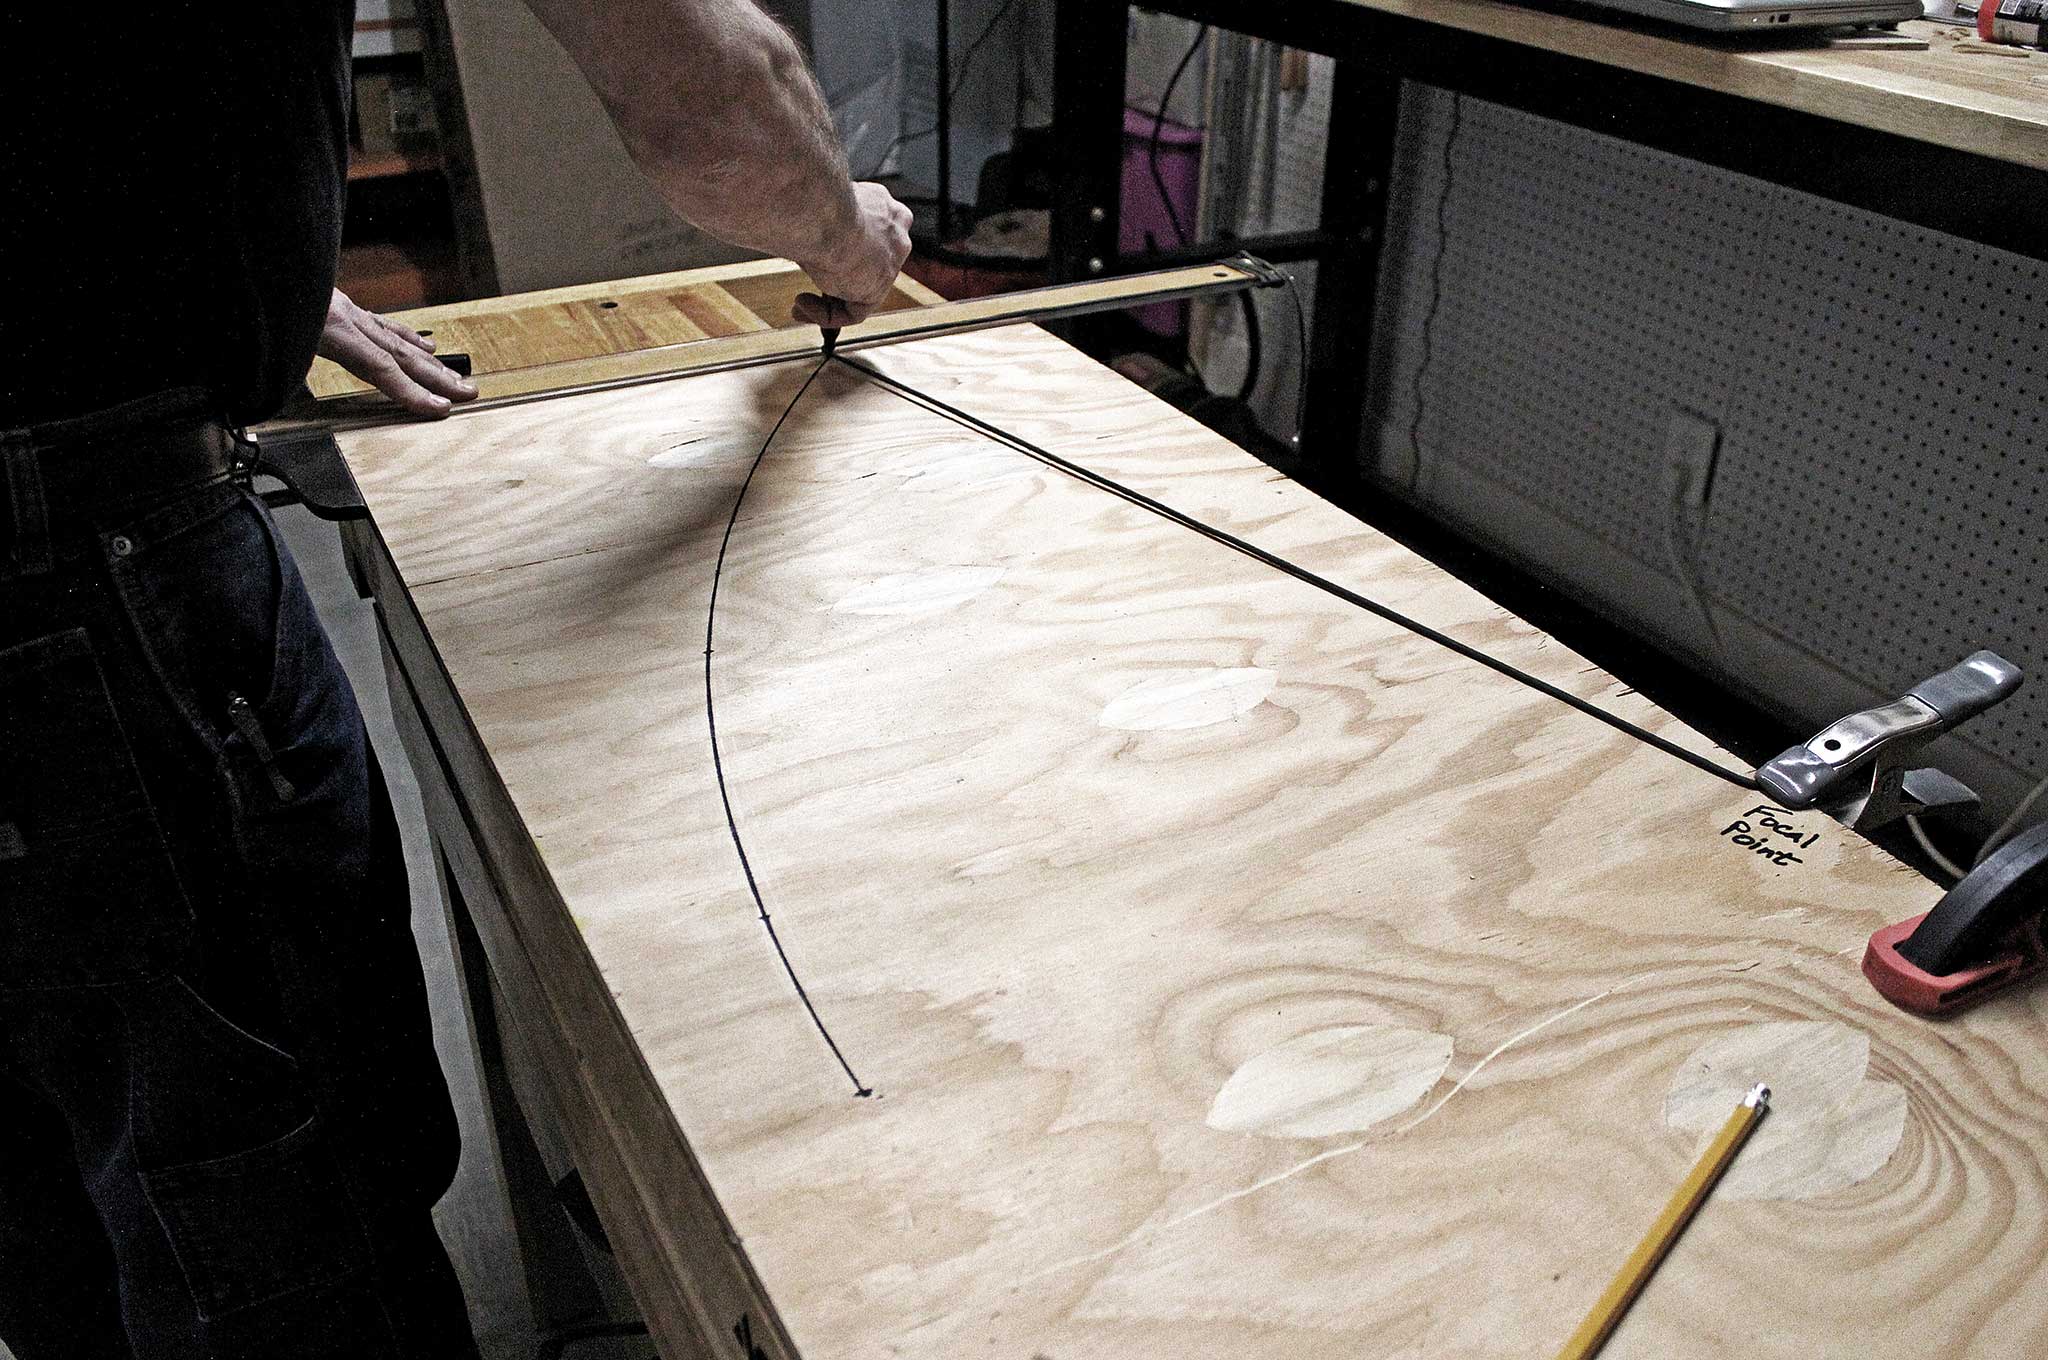
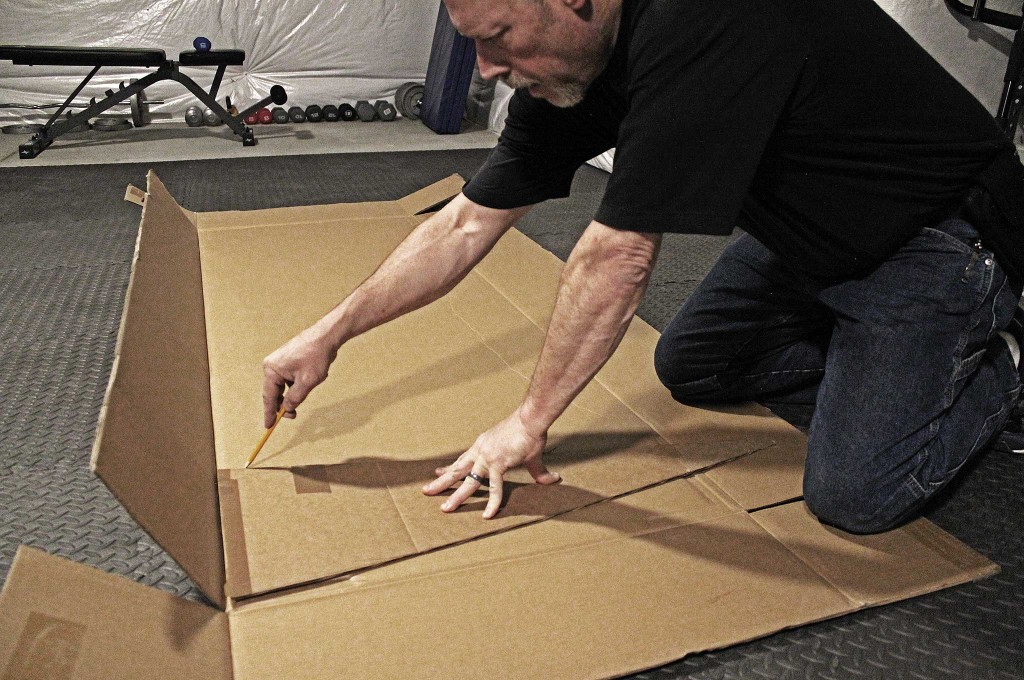
To draw the arc of the parabola, get a rectangle of plywood a little longer than your planned panel length and about two-thirds as tall. The bottom edge of the plywood should be straight. You'll also need some 550 cord and a long T-square.

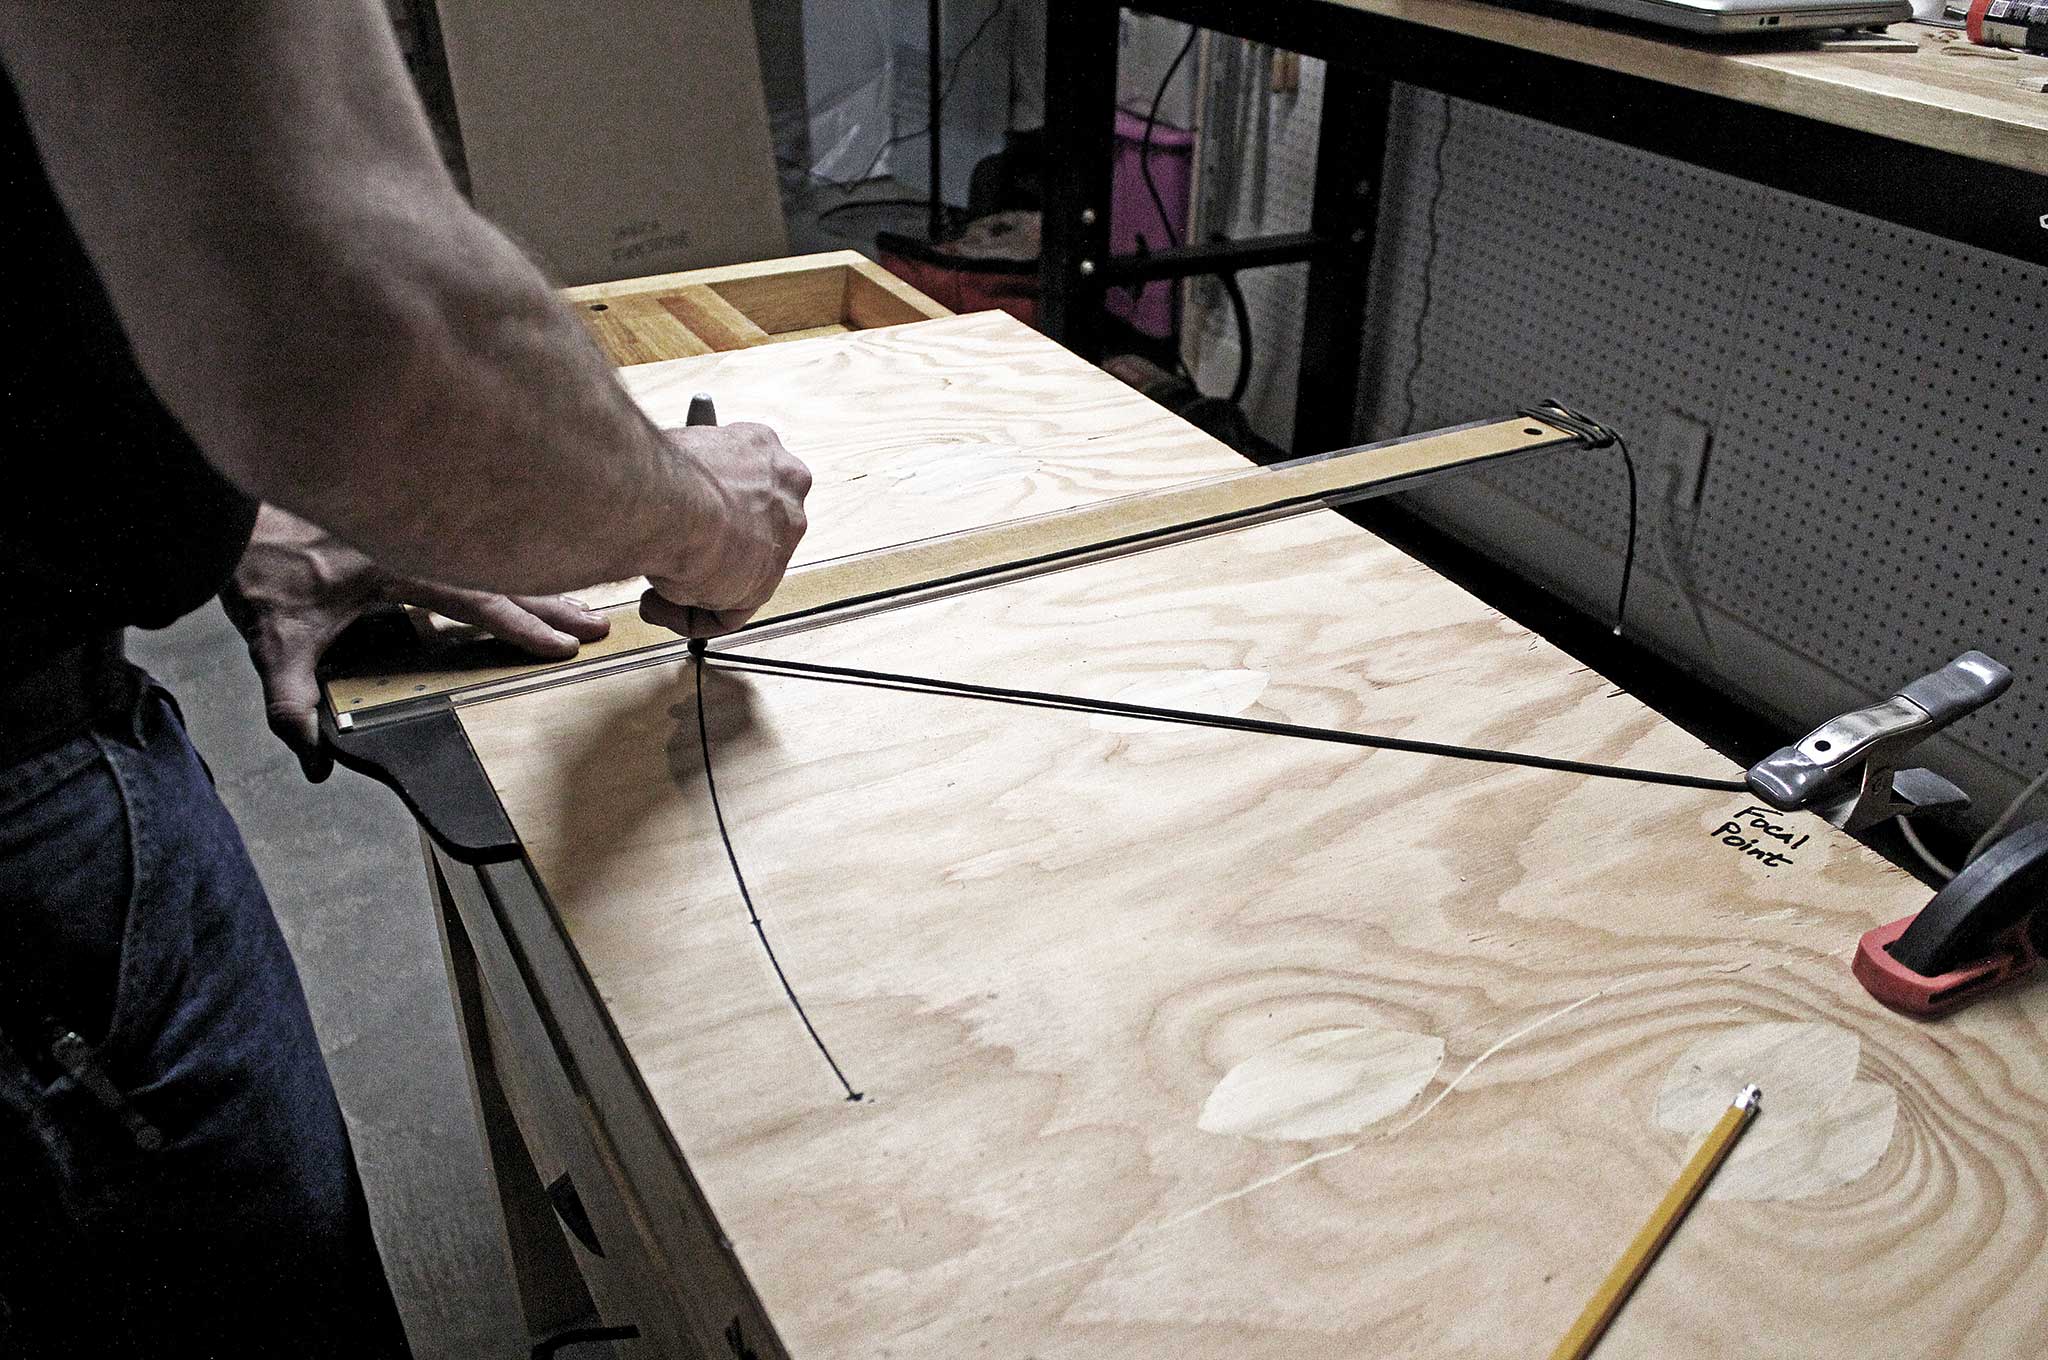
Take the length of your cardboard material and subtract 8 inches. Using that measurement and starting from the left edge of the plywood, measure along the top edge and make a mark. That will become the focal point. Anchor one end of the 550 cord to the focal point and attach the other end to the end of the T-square. The loop of cord between the focal point and the T-square, when doubled, should come a few inches short of the plywood's straight edge.

Starting with the head of the T-Square against the straight edge at the bottom of the plywood, place a marker in the cord loop and pull it tight. Now, slide the T-square to the left along the straight edge, keeping pressure on the marker so the 550 cord attached to the T-square stays perpendicular to the bottom edge of the plywood. As you do this, the marker will ride the string to scribe a parabolic arc.

If all that sounds too confusing, search the internet for videos of “drawing a parabola with string,” and you'll get a better idea.

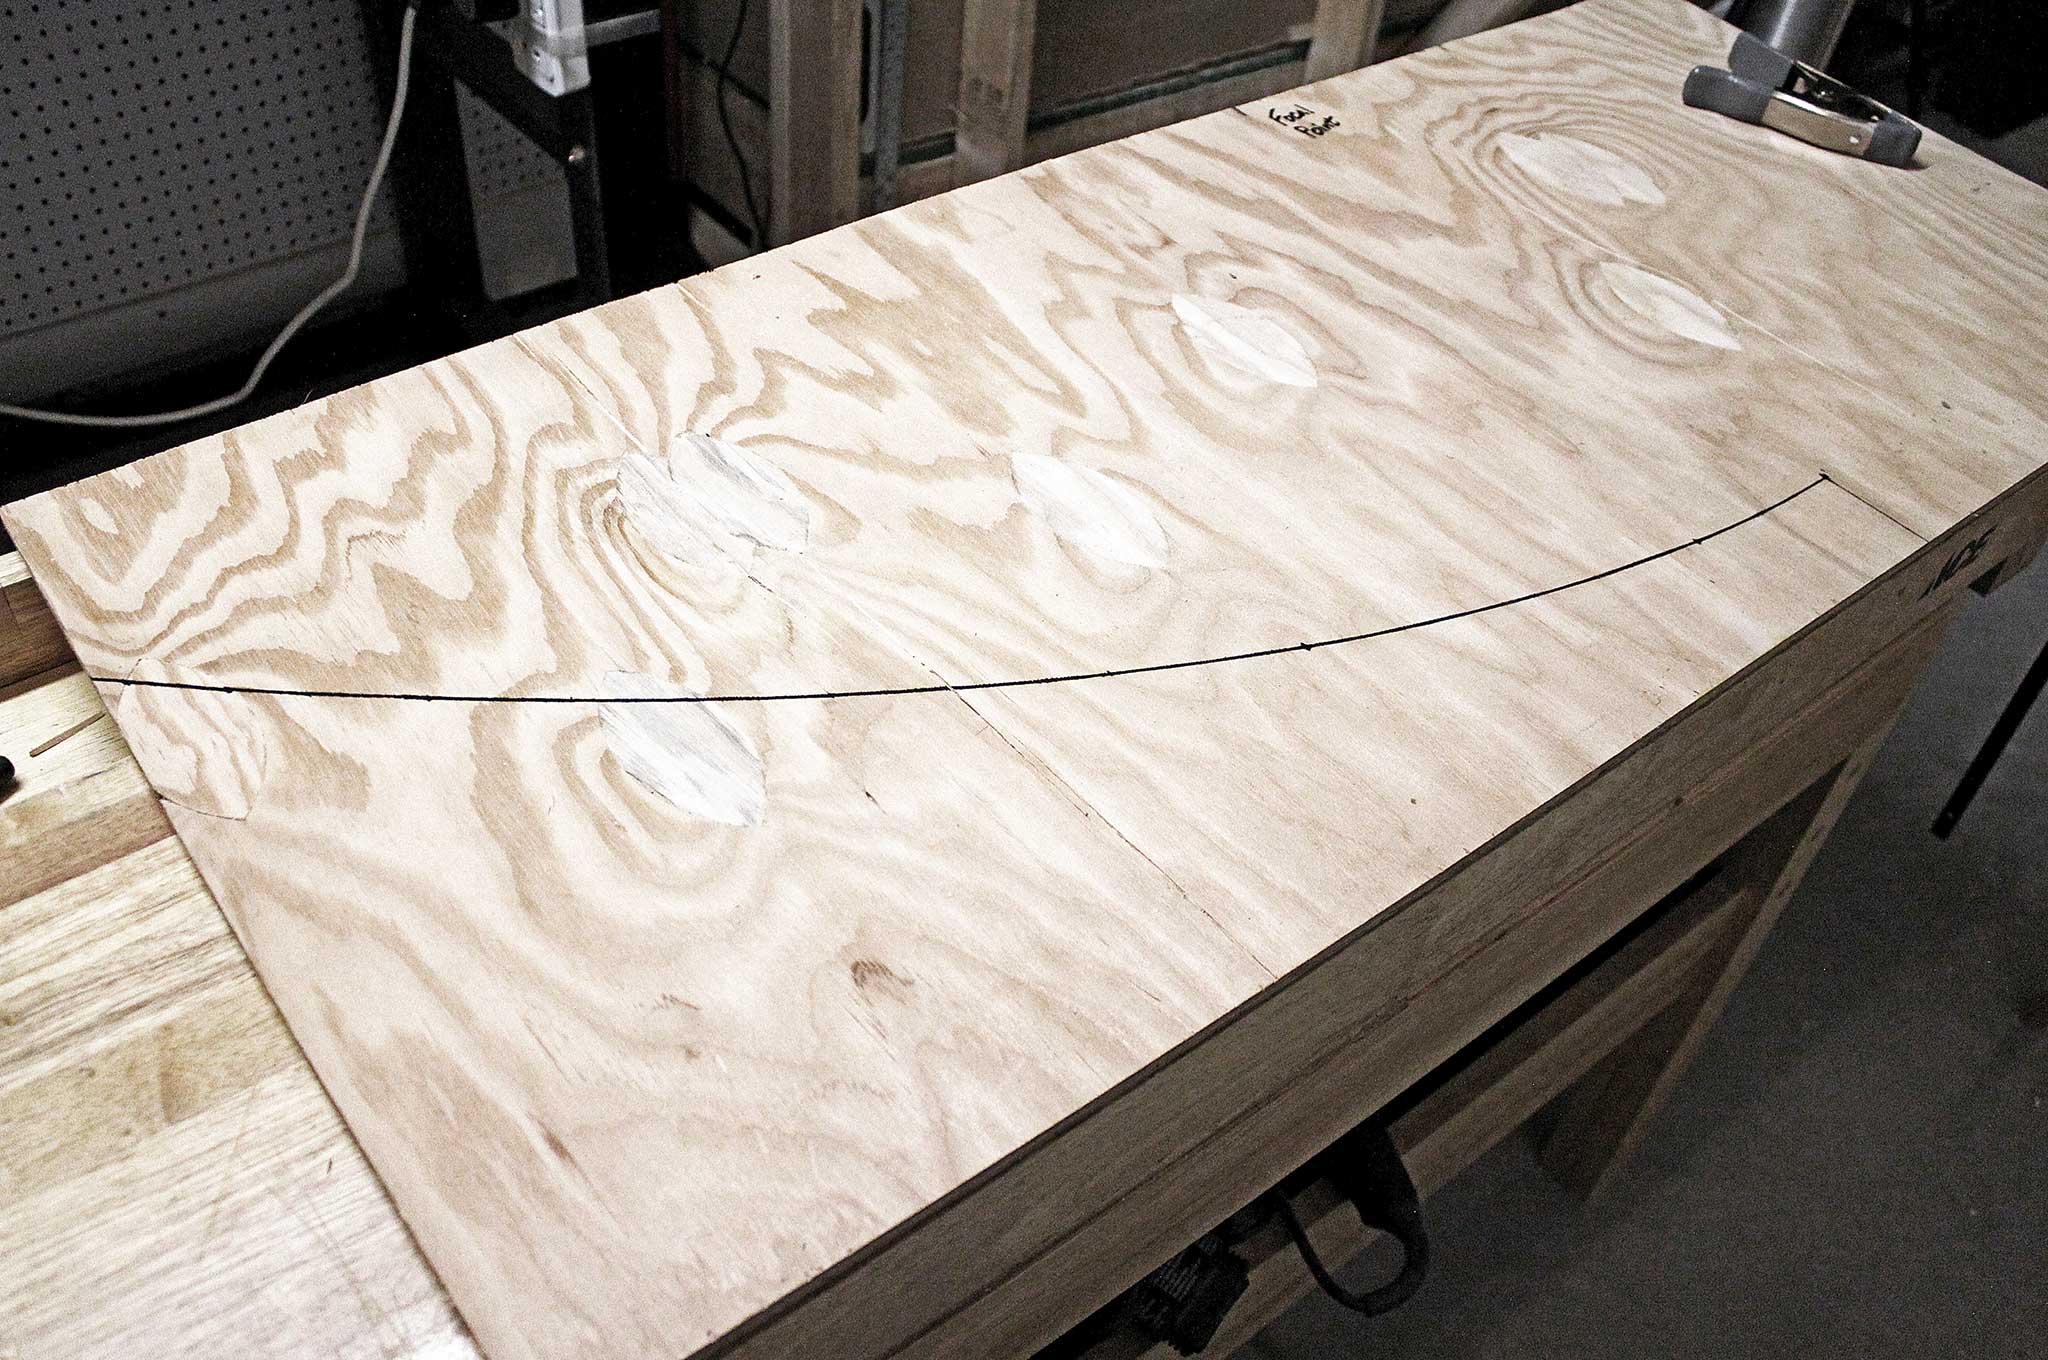
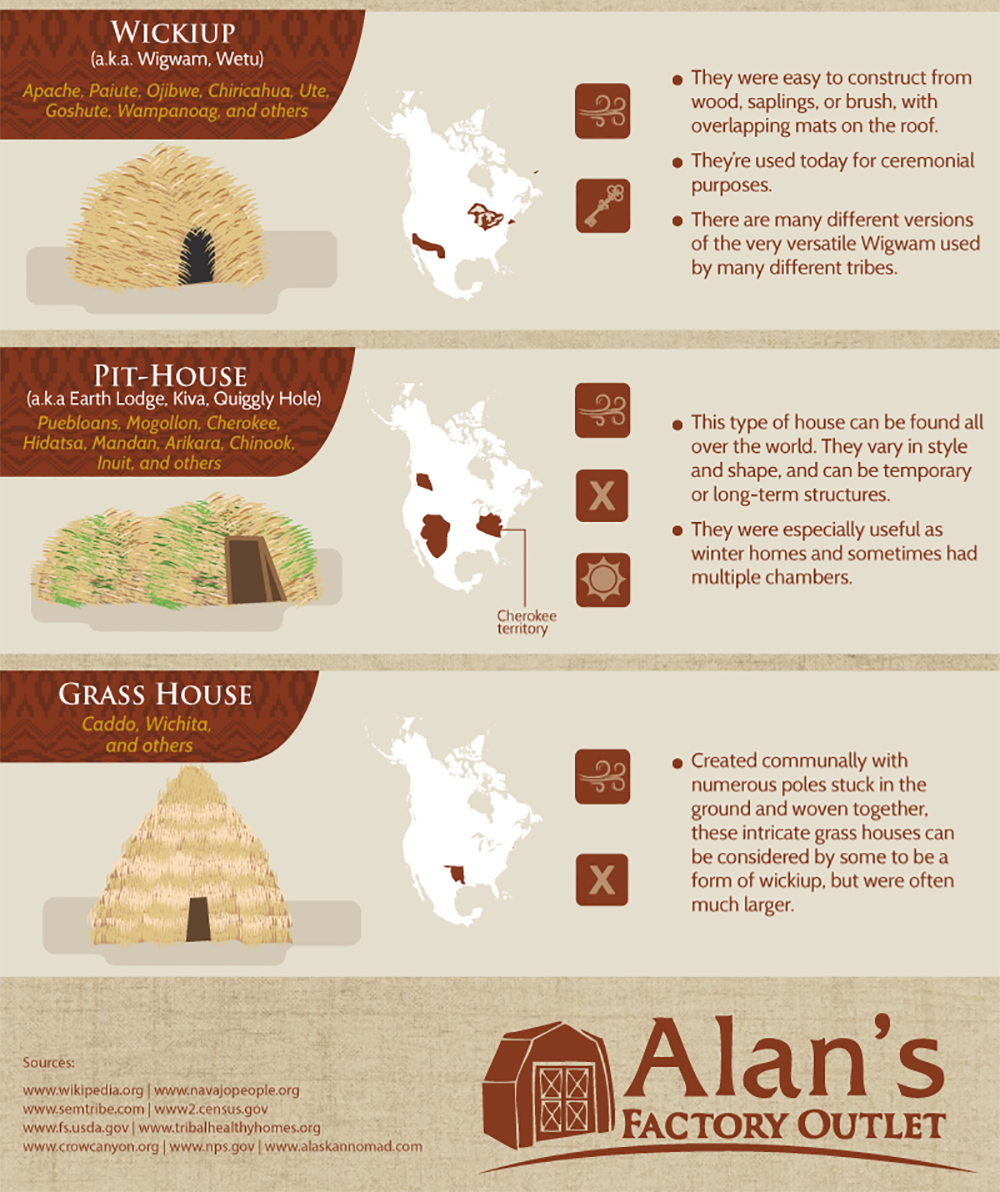
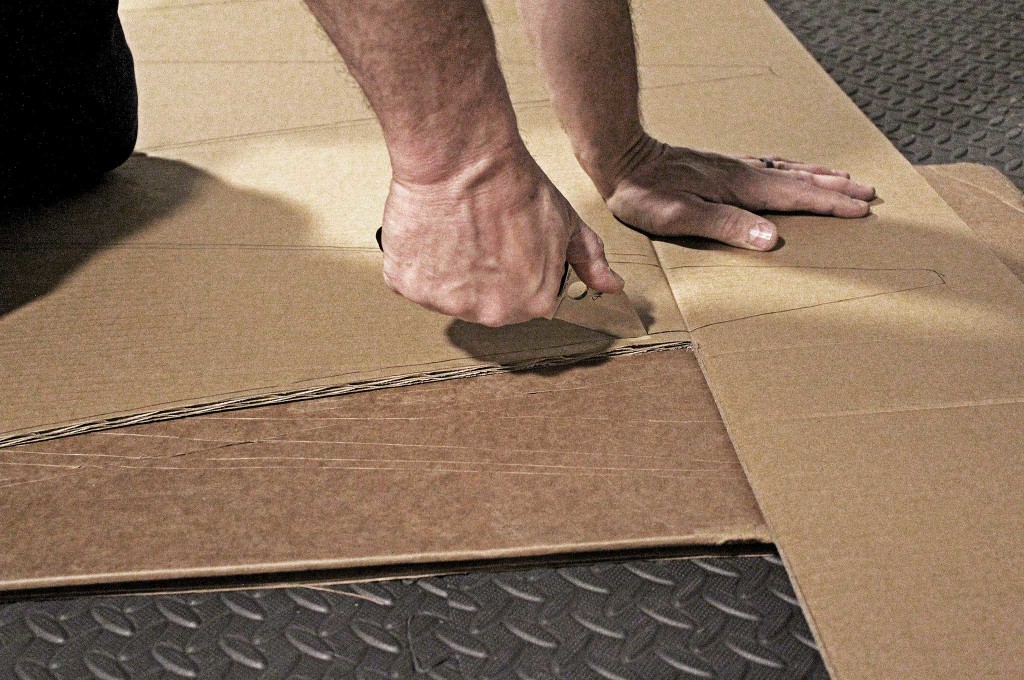
The arc on the plywood is half the shape of your parabola, and the distance between the bottom of the arc and the focal point is its focal length. Measure that distance and write it down. Then, draw a line perpendicular to the plywood's bottom edge up to the focal point. The L-shaped area enclosed by that line, the arc, the left side of the plywood, and the bottom edge will be your parabola form. Cut it out with a saber saw, place it on the remaining piece of plywood, trace around it, and cut out another matching piece.

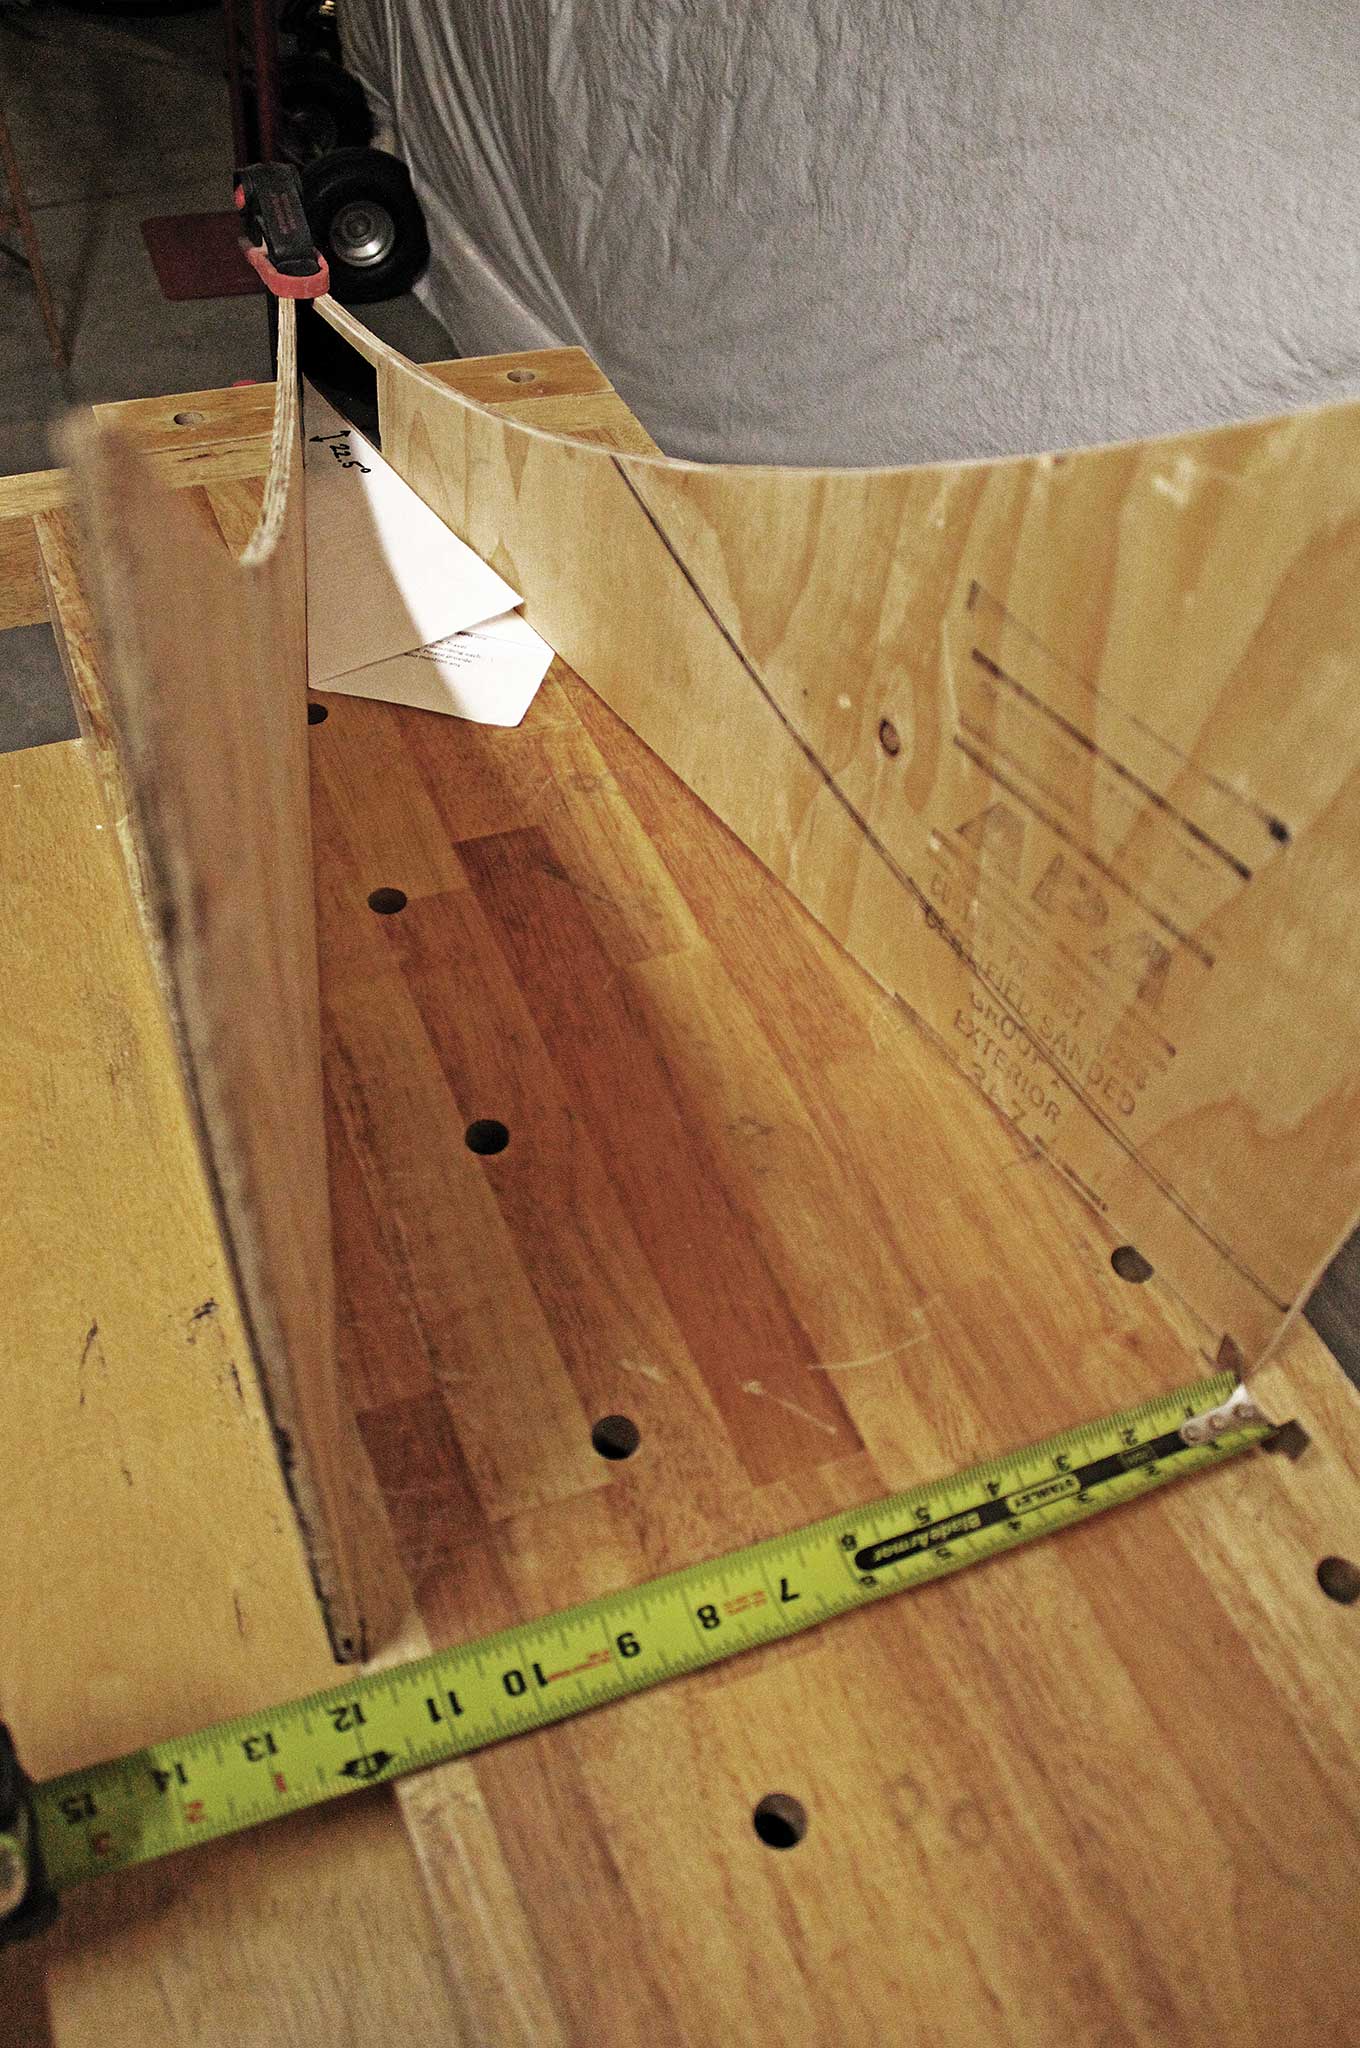
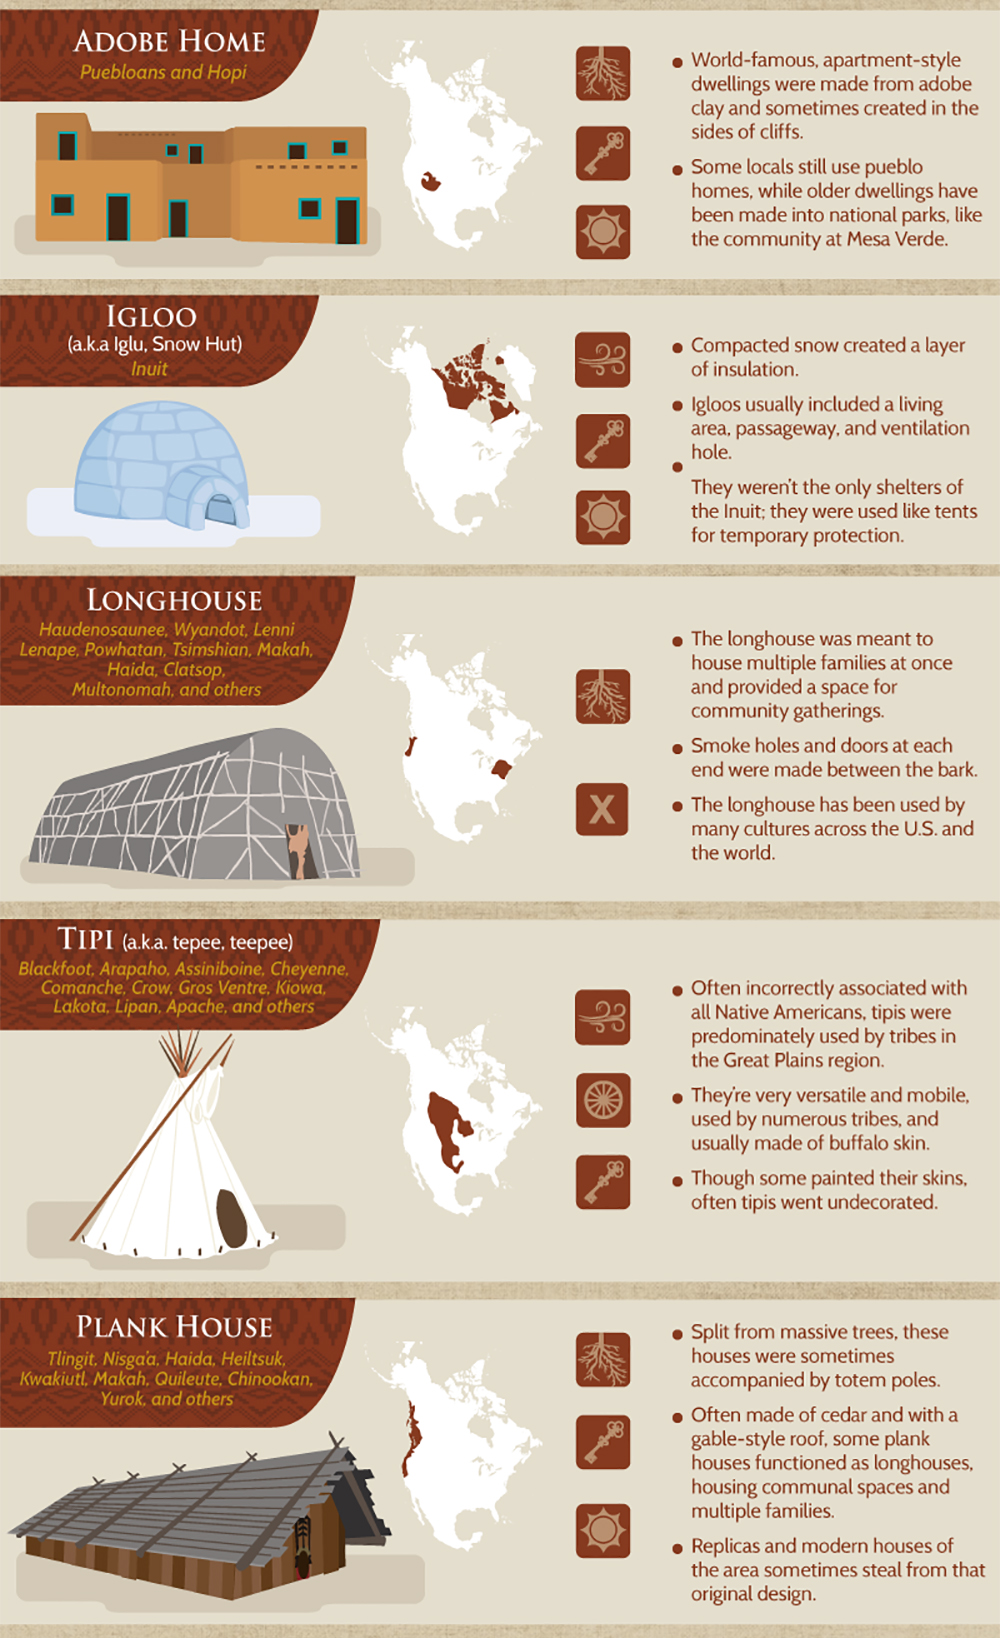
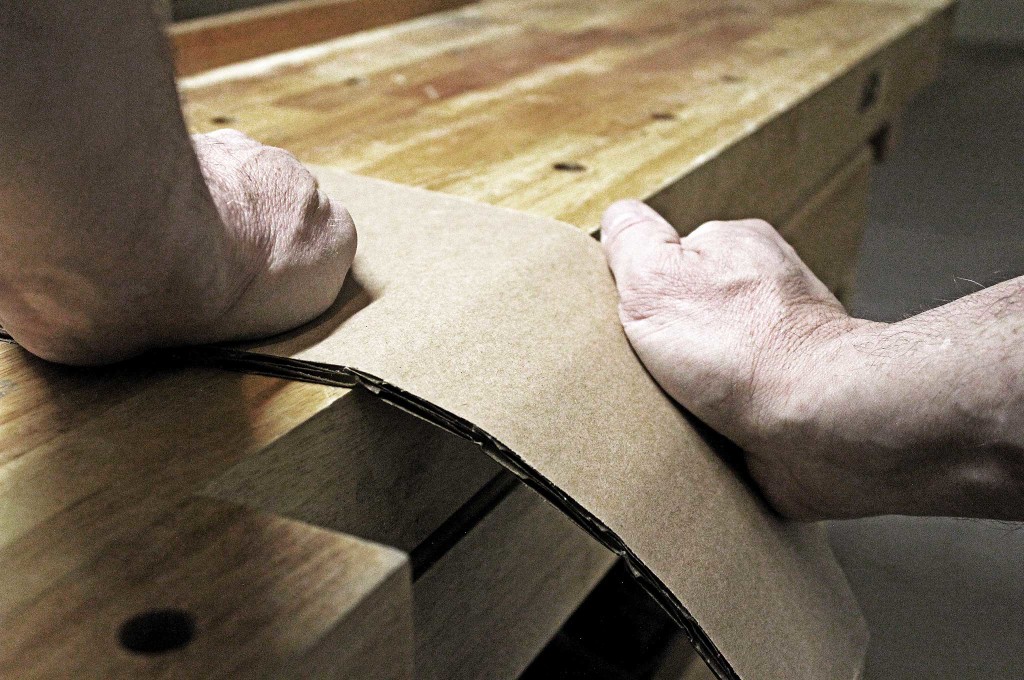
Use a piece of heavy-duty duct tape to secure the narrow ends of the plywood pieces together like a hinge. Fold a piece of paper once to get a 45-degree angle, then again to get 22.5 degrees — 1/16 of a 360-degree circle. Spread the wide ends of the forms apart until the interior angle matches the paper's 22.5 degrees, then measure the gap at the wide end and cut two pieces of board to that length. Tape or nail the boards in place, making a form for your panels (or the start of a really small skateboard ramp).

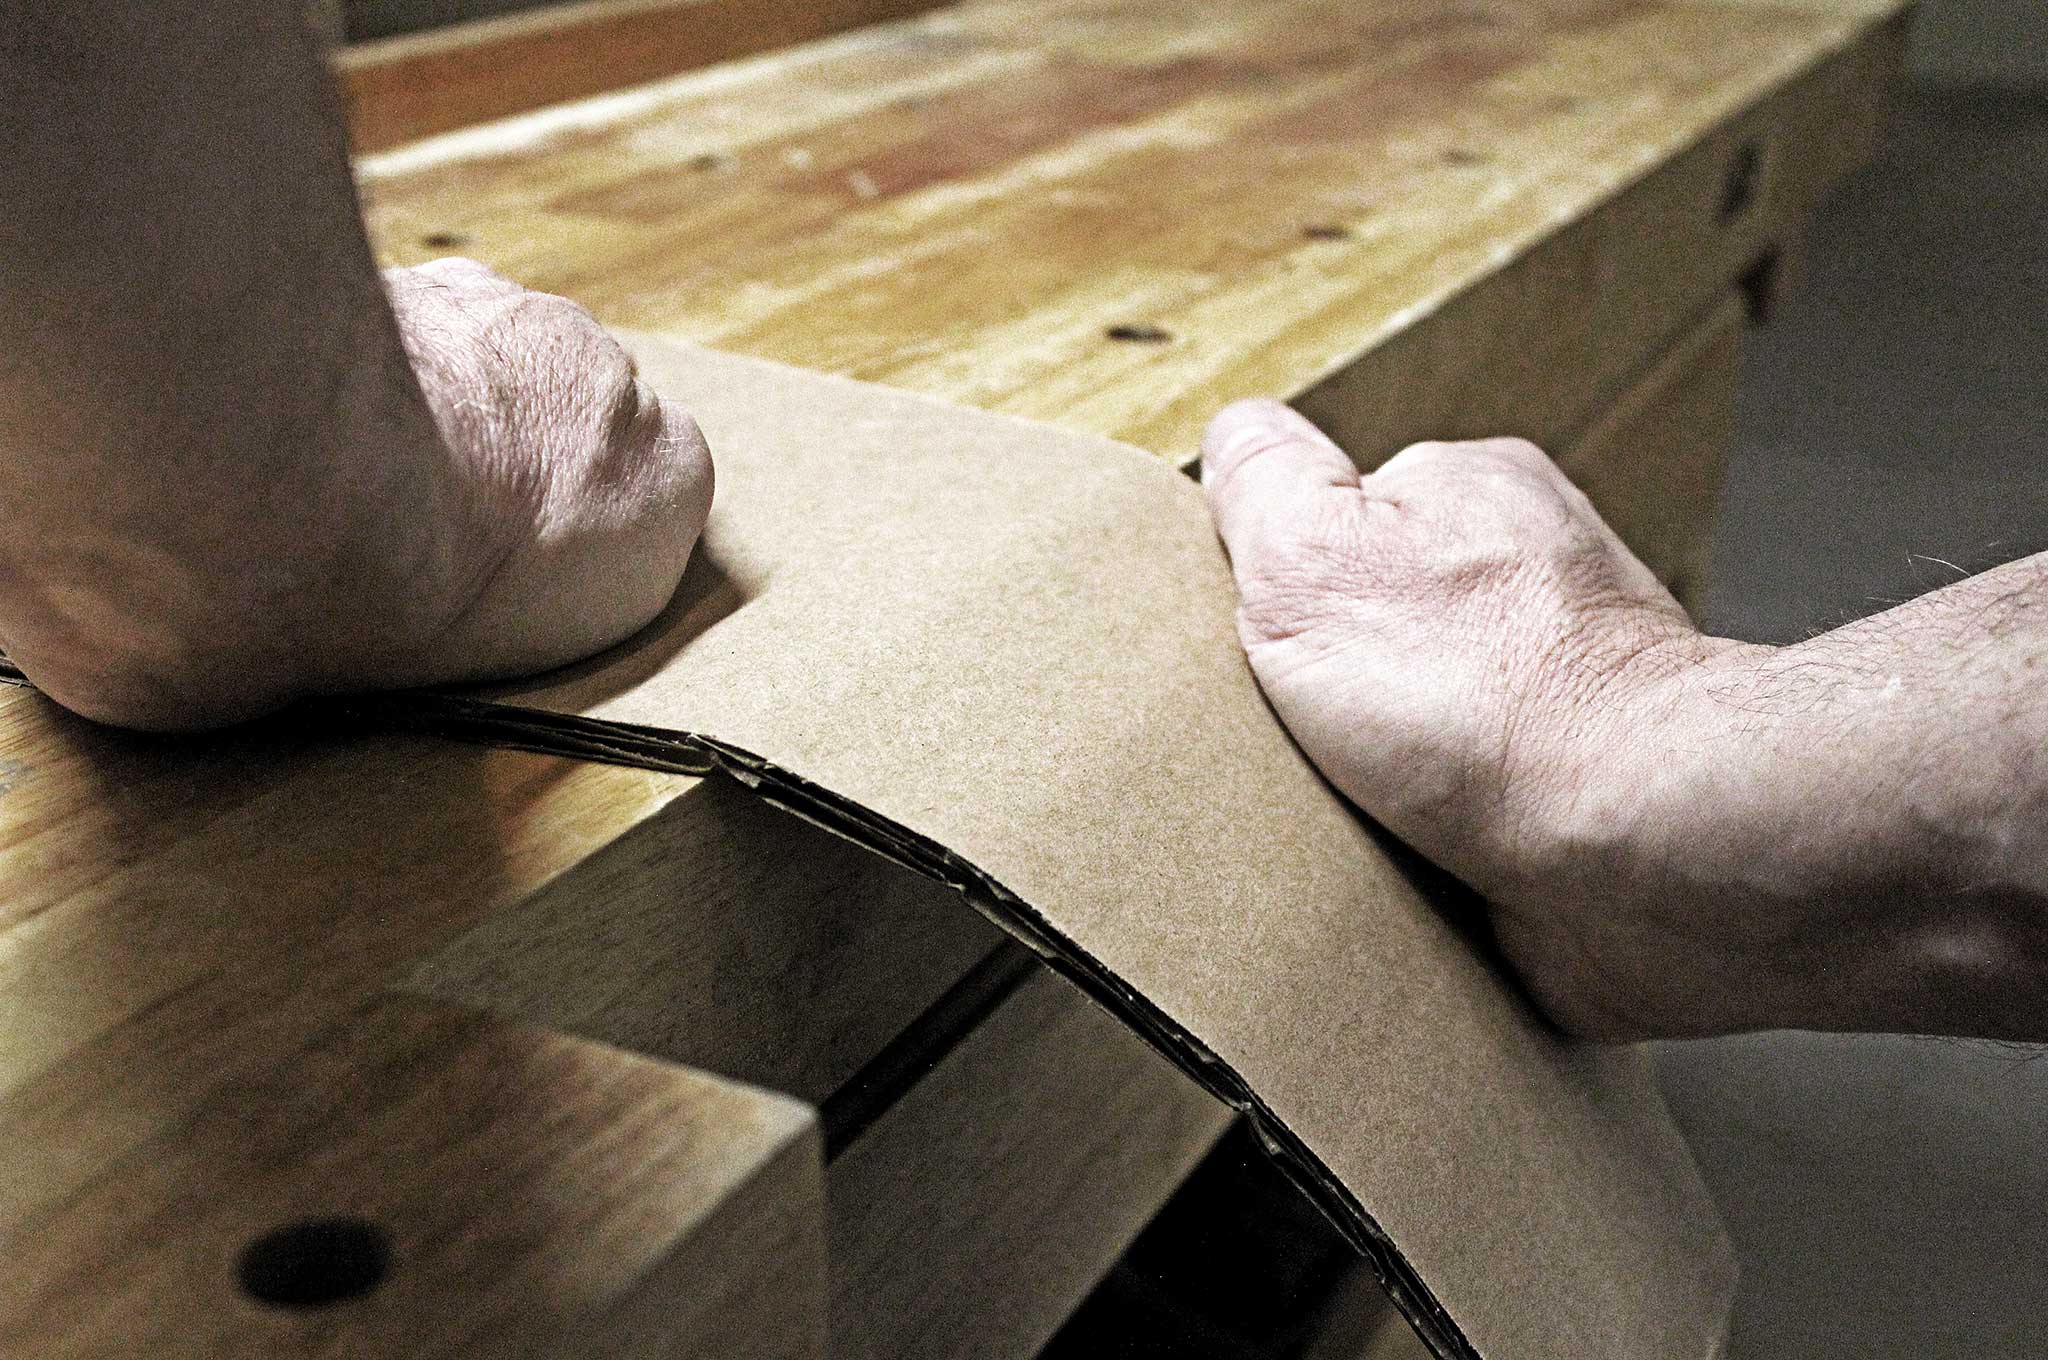
Cut a rectangle of cardboard as wide as the back of your form and longer than its base. Clamp one end to the front of the form, press the cardboard down to fit the curve, and use a pencil to trace along the outside of the form on each side. These are your cutting lines for your panel pattern. Cut it out, then trace around it on your cardboard material, “nesting” all 16 pieces to minimize waste.

After cutting out all 16 panels, use the edge of a table to crease each one every few inches so they bend to fit the curve of the plywood form.

Shiny Things

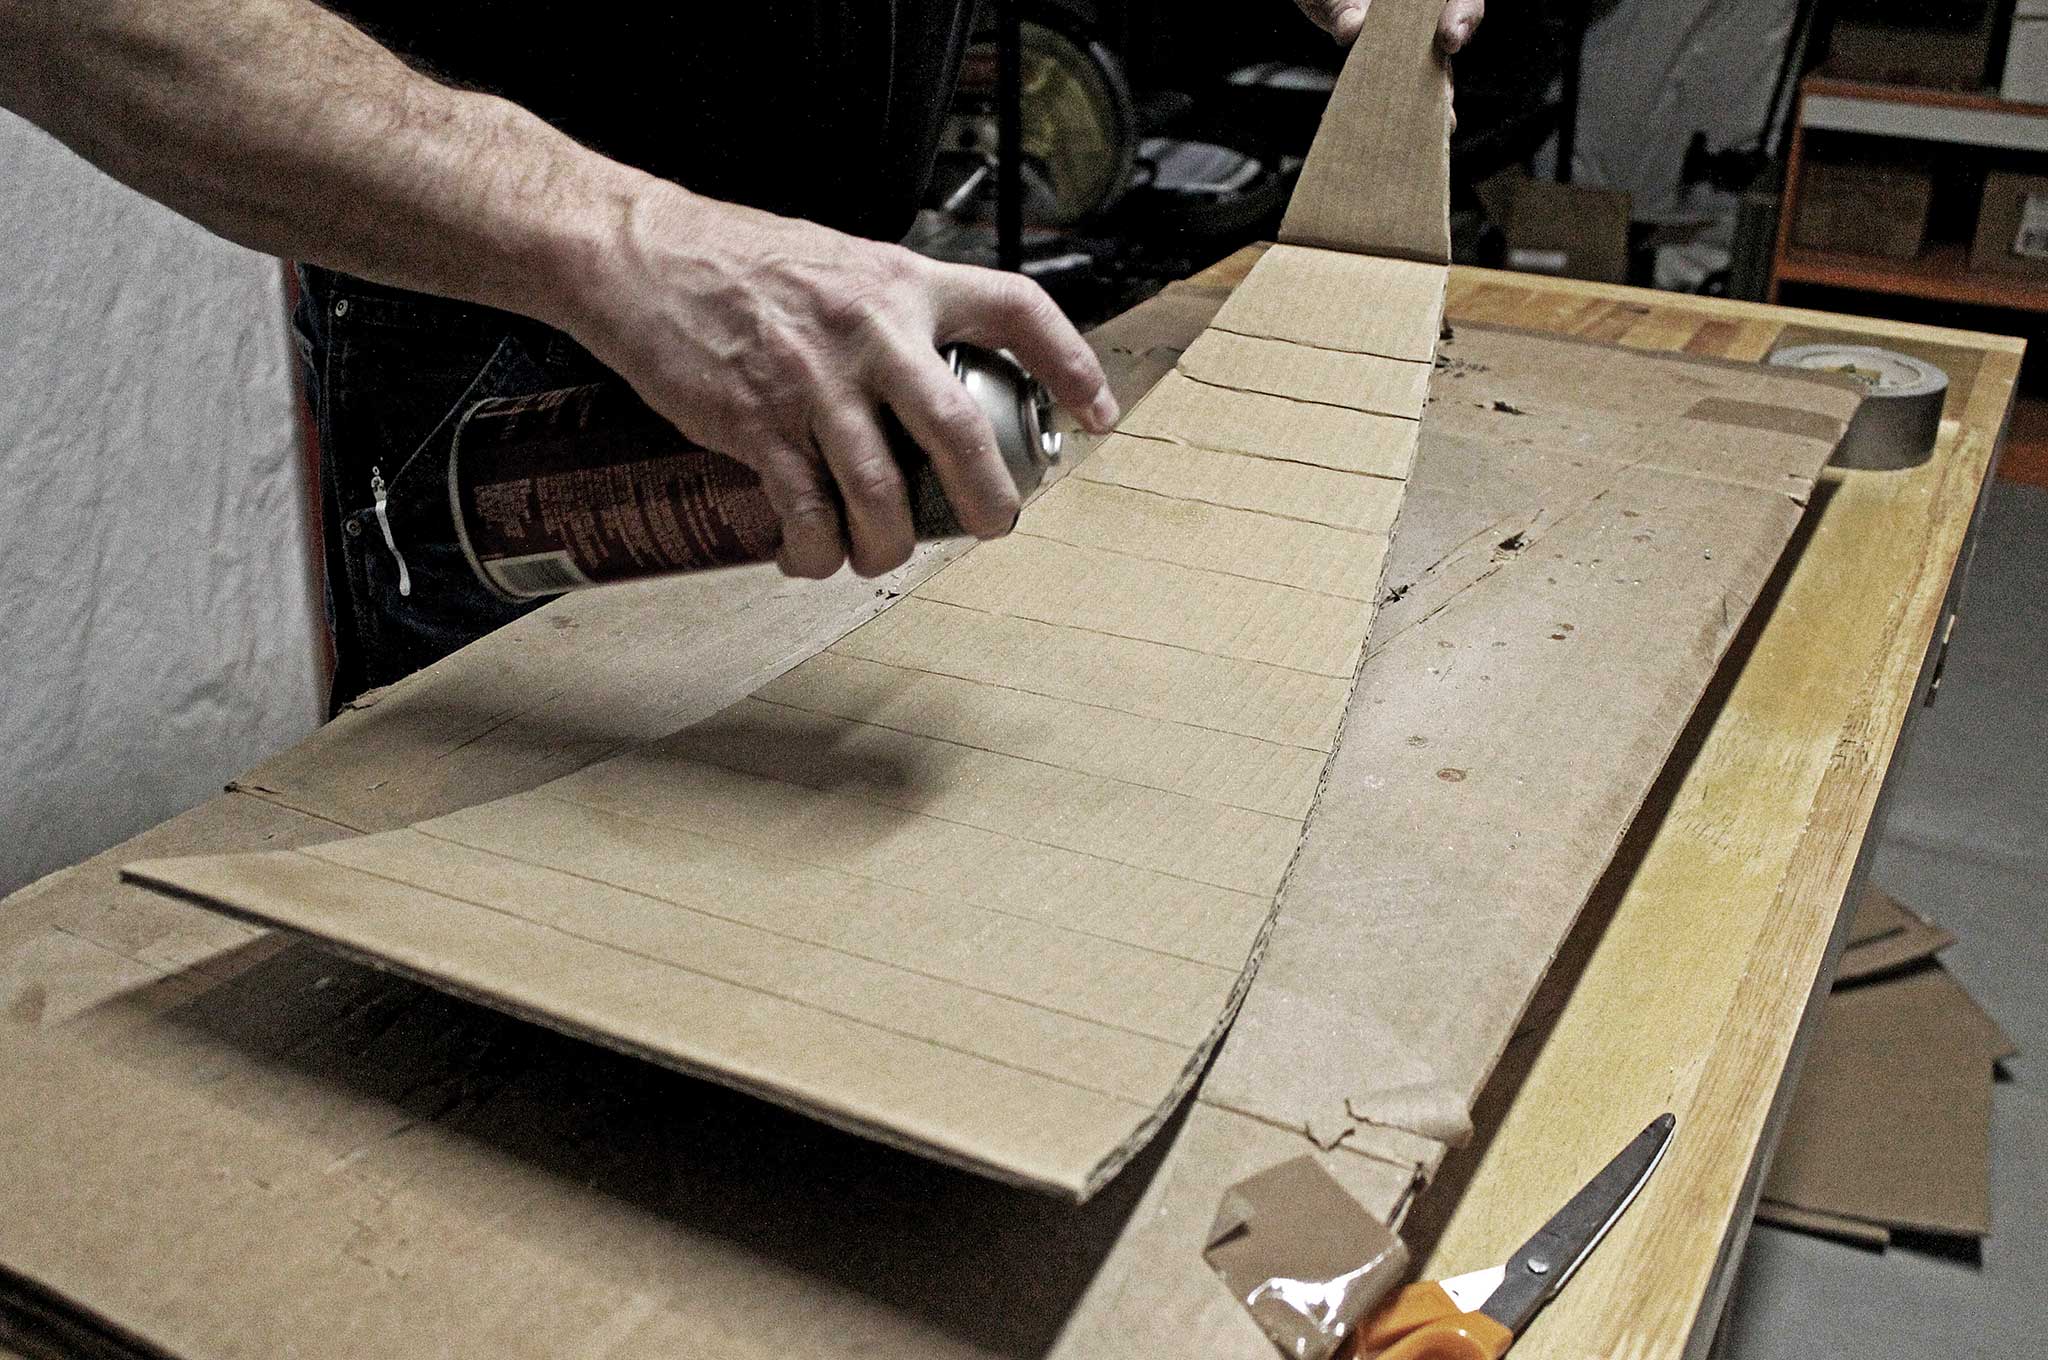
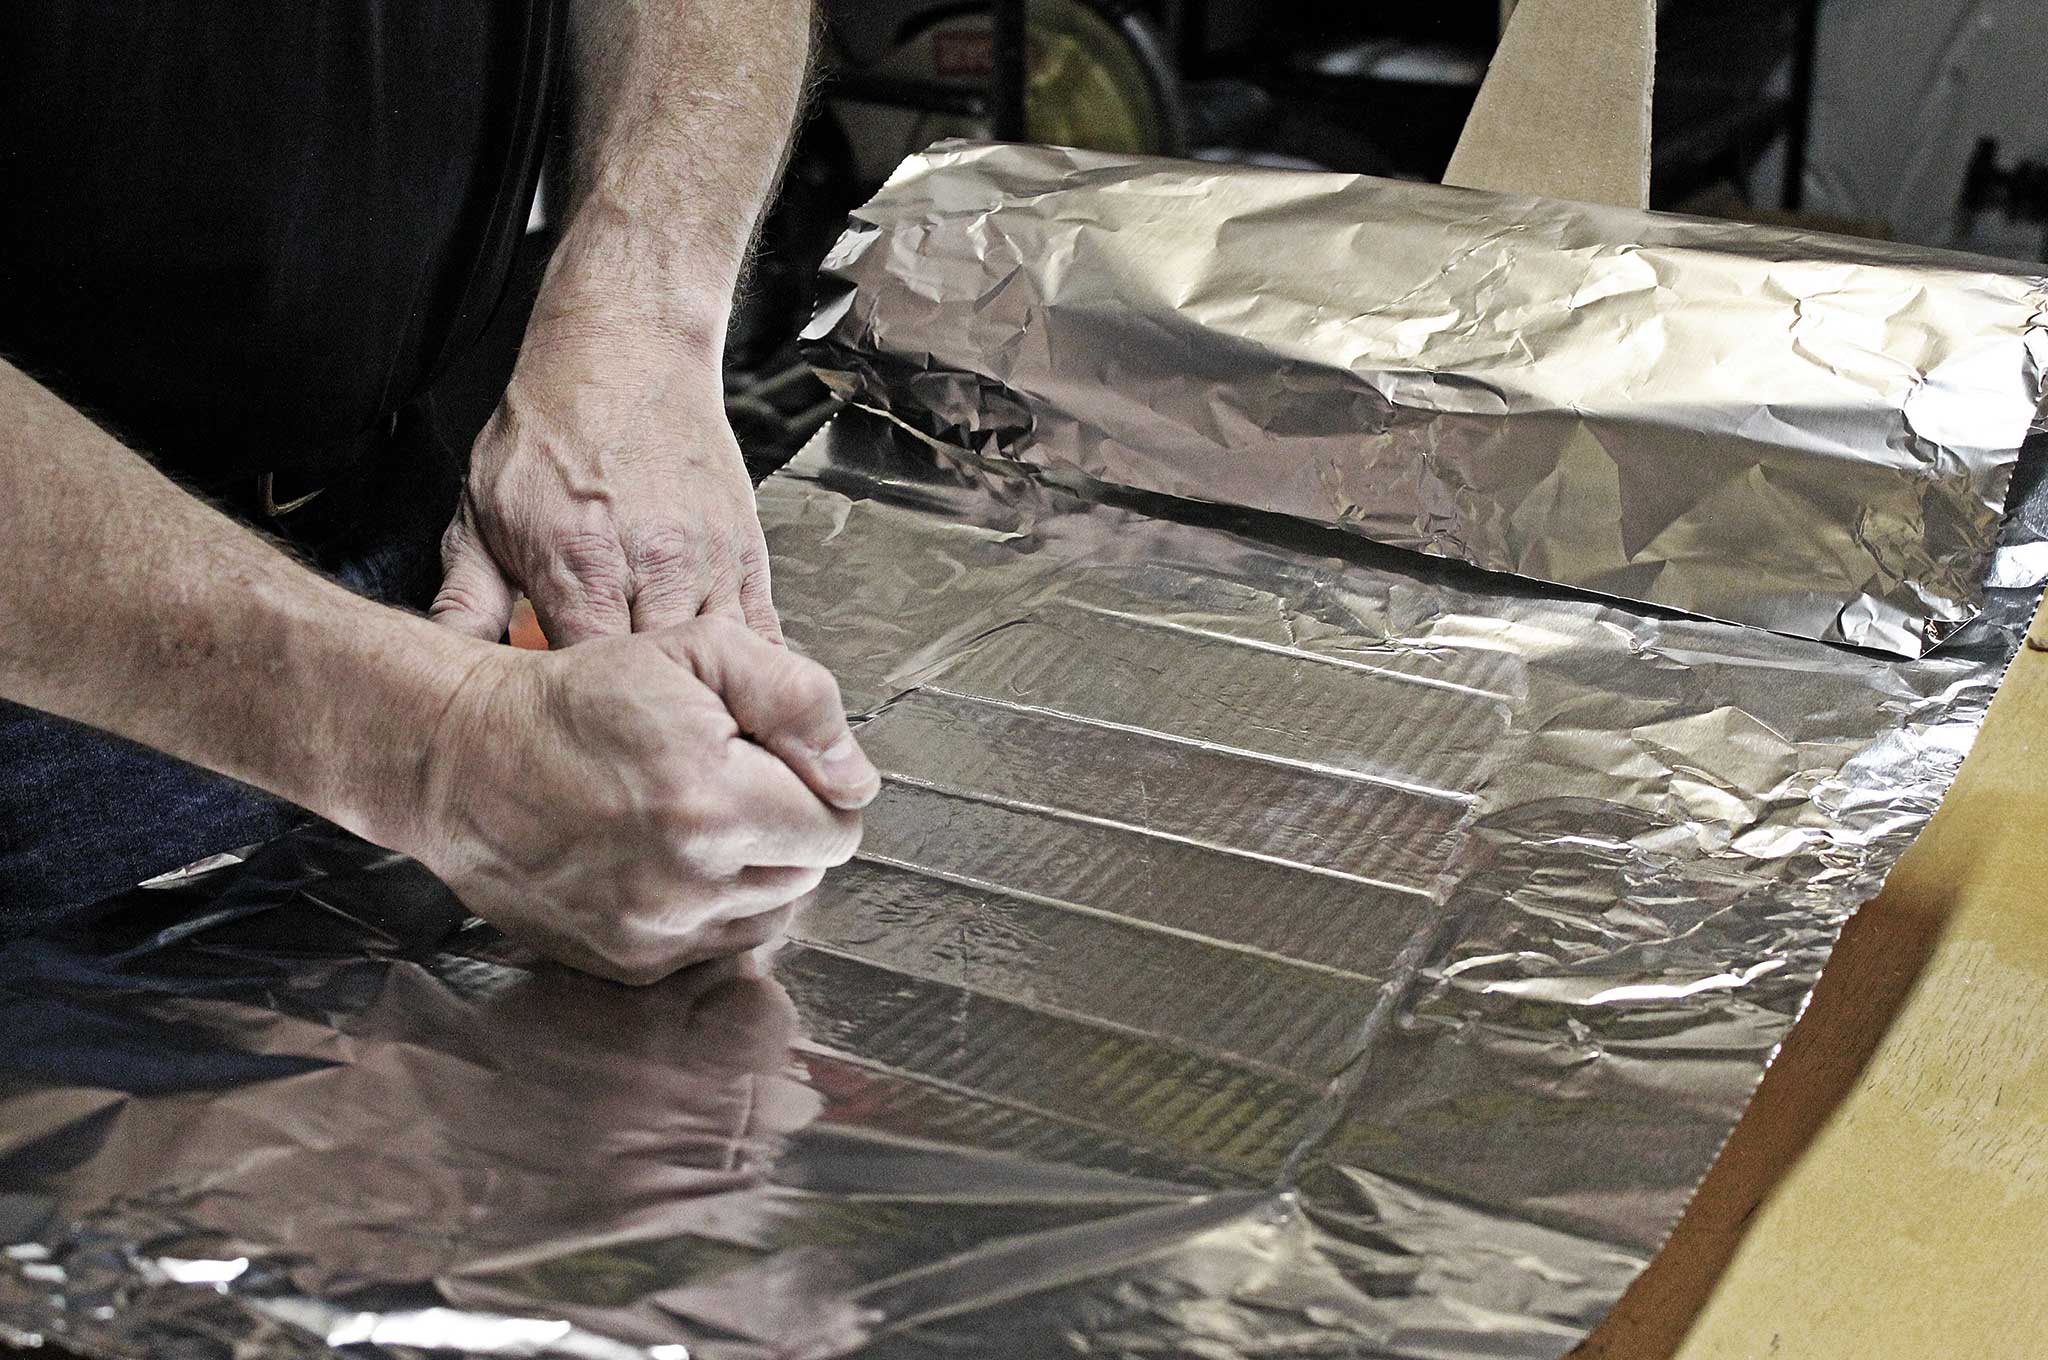
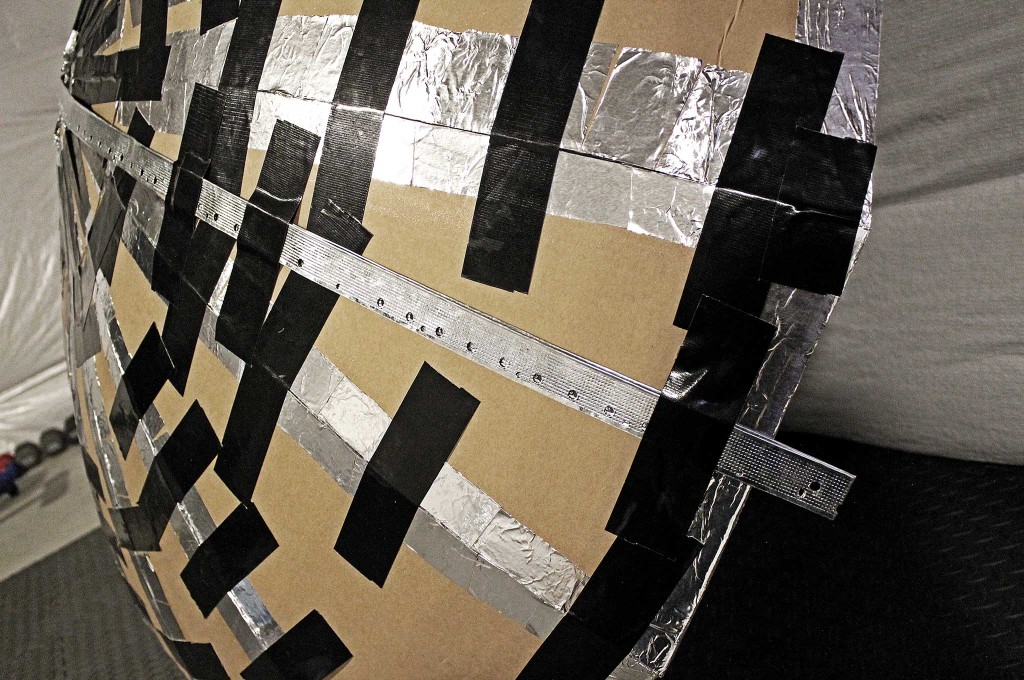
For the reflective surface of the panels, hit the grocery store and get several rolls of heavy-duty aluminum foil. Apply a light coat of spray adhesive to each panel, then carefully apply the foil. I found folding it in half lengthwise, positioning the center, and then smoothing it from the center out worked best. Use the base of your palm or fingertips — not your fingernails — to keep it as smooth and reflective as possible. Then, trim the foil a couple of inches around the perimeter of the panel, notch the edge every few inches with scissors to create relief tabs, and stick the tabs to the back of the panel with more spray adhesive.

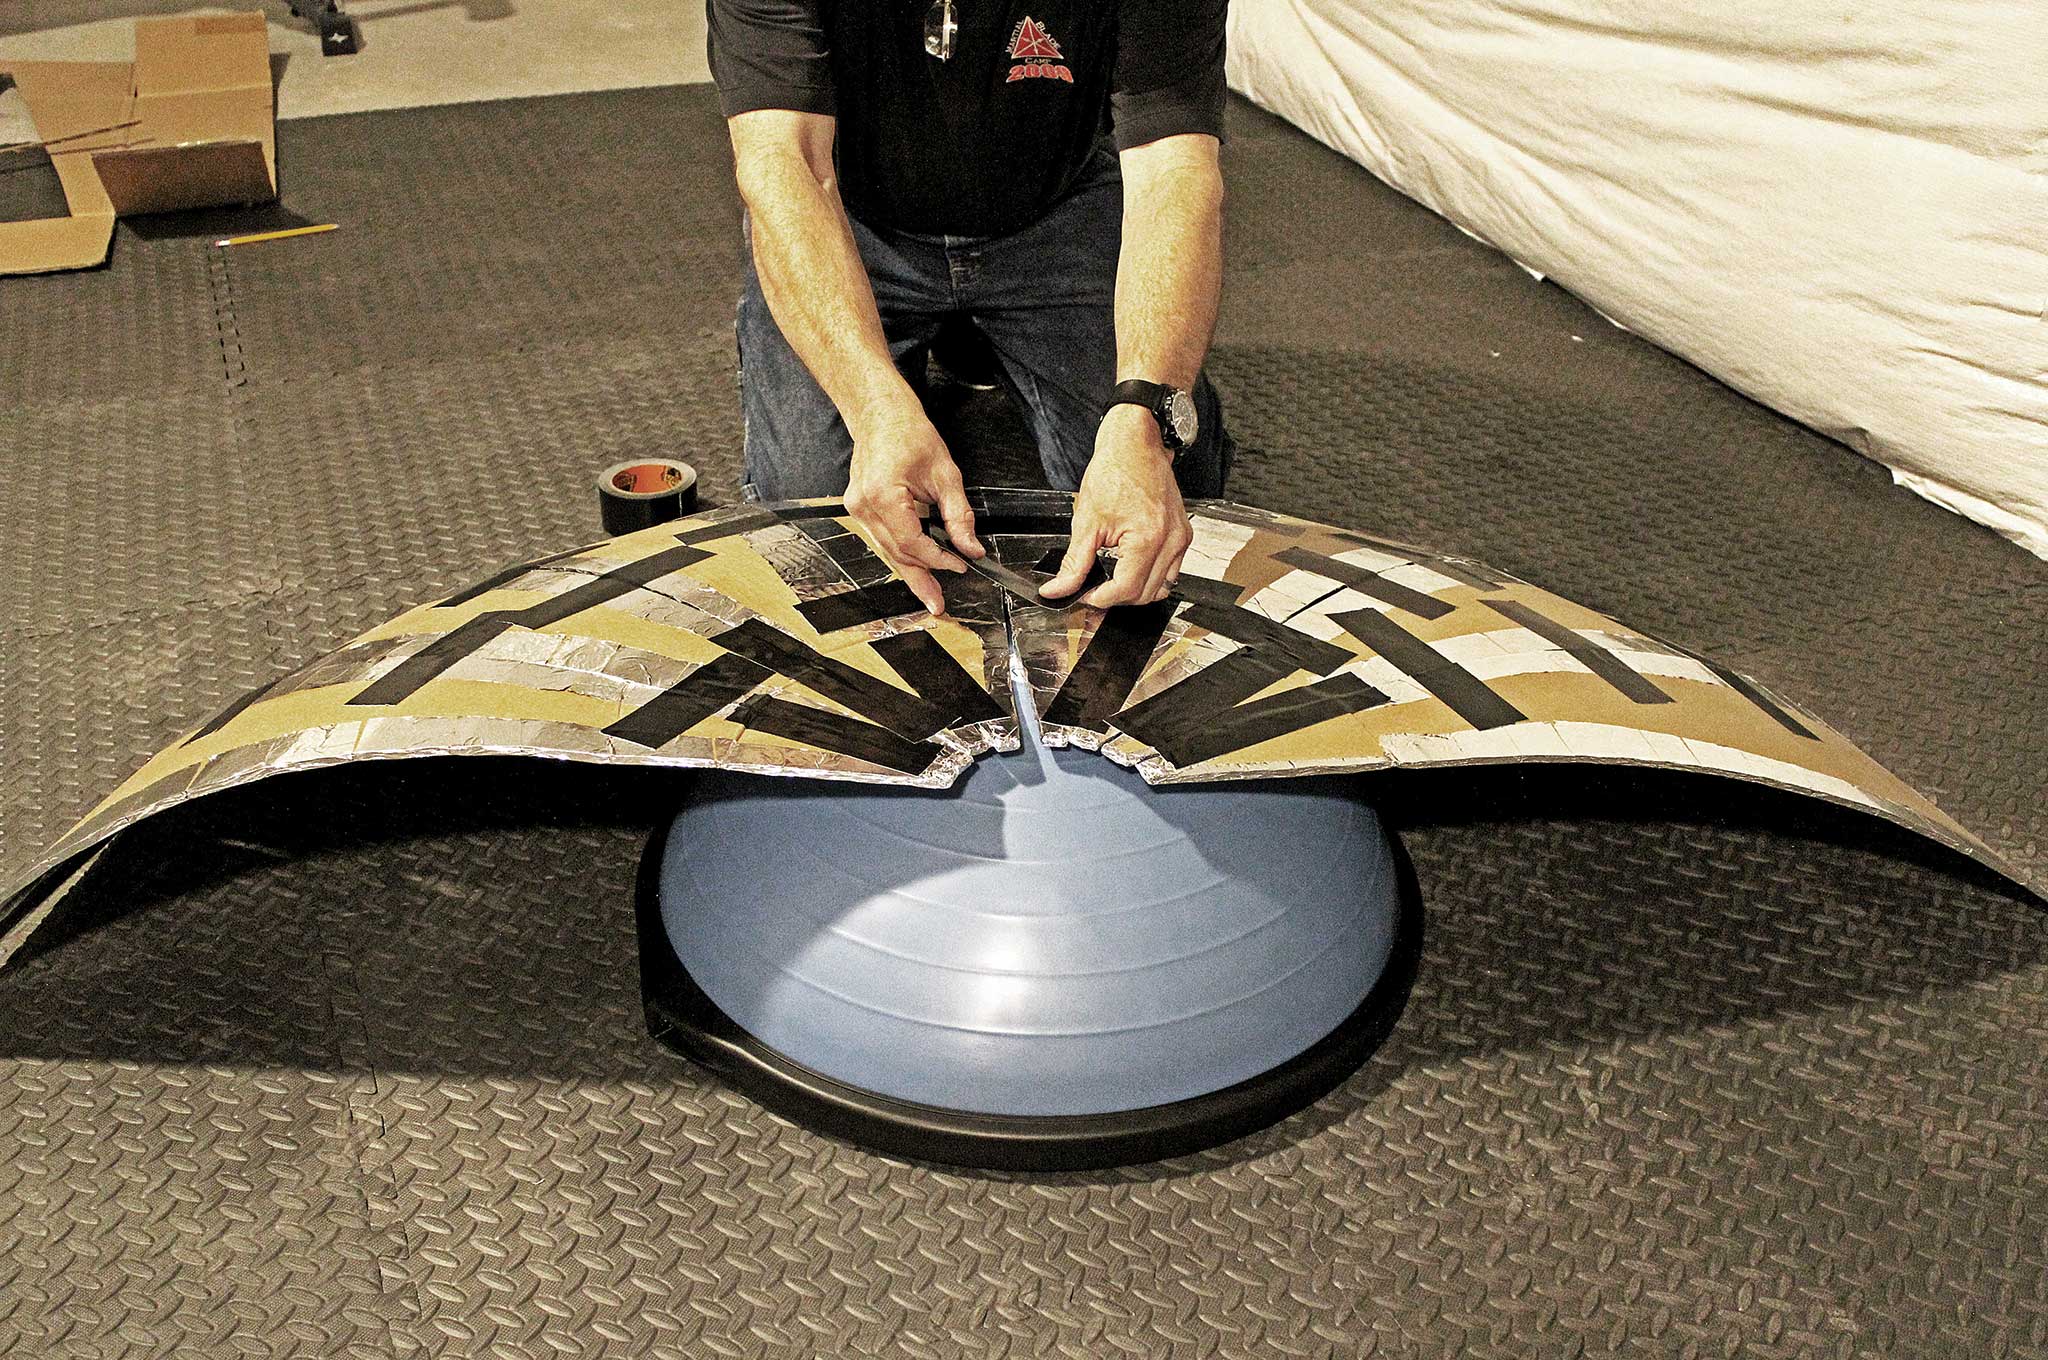
Begin assembling your reflector by using Gorilla Tape to attach the panels together. Start at the wide end, butt the edges together, and secure them with tape. Then align the narrow ends, match the curve of each piece, and tape that end. Add a piece of tape every 8 to 12 inches as needed to form a solid seam.

Don't try to build the entire panel at once; instead make two, two-panel pieces. Join them to make four, then eight, and finally assemble both halves to form the whole dish. It helps to use a short support like a bucket or something similar to hold up the center of the reflector while putting the finishing touches on the tape job.

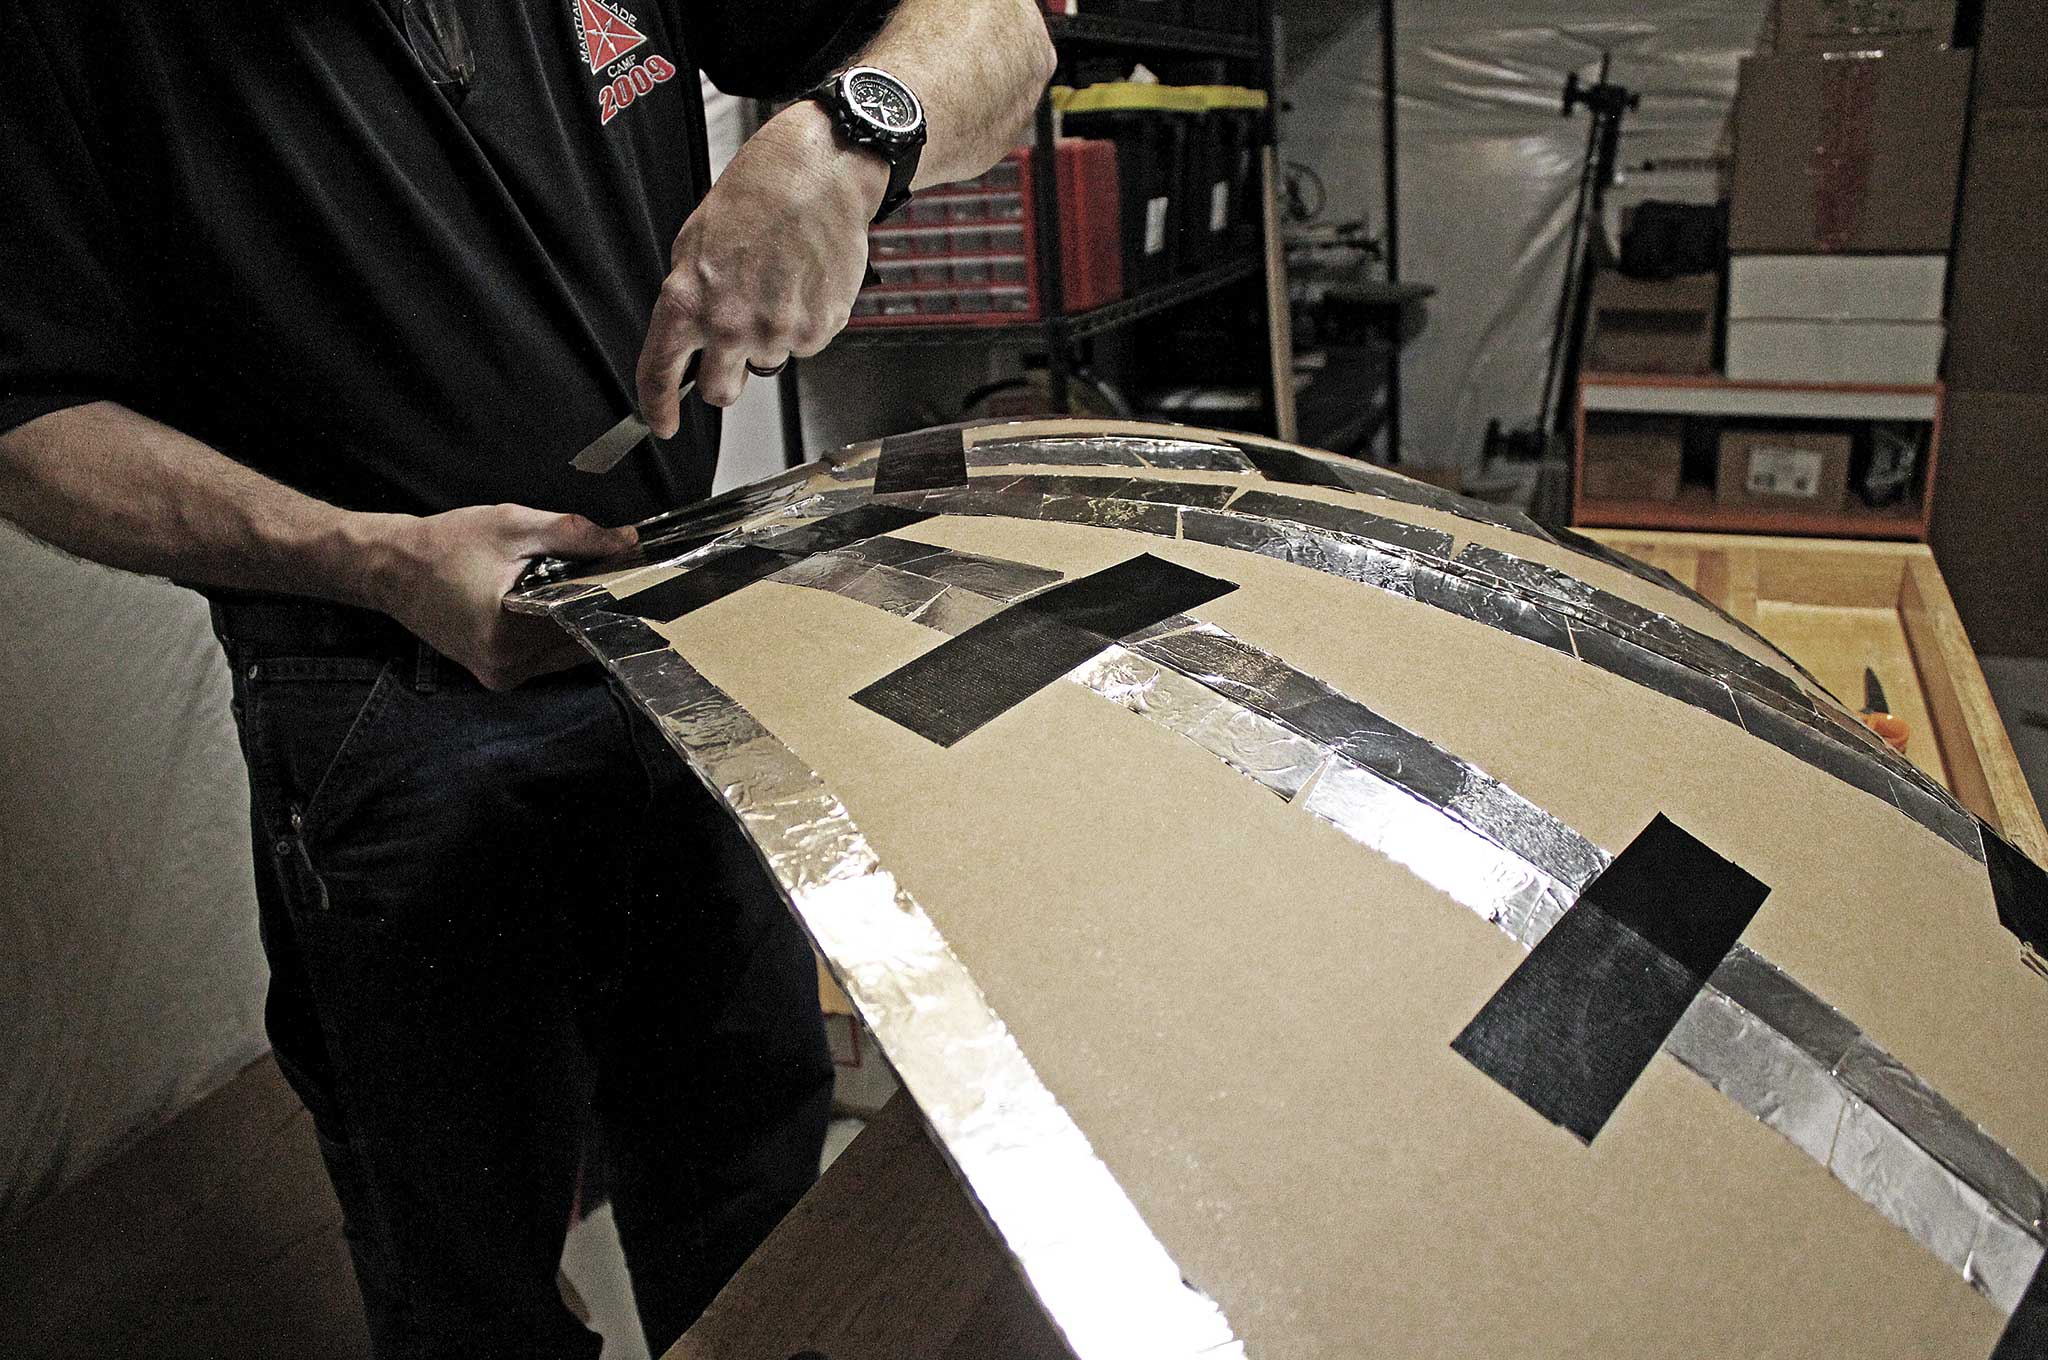
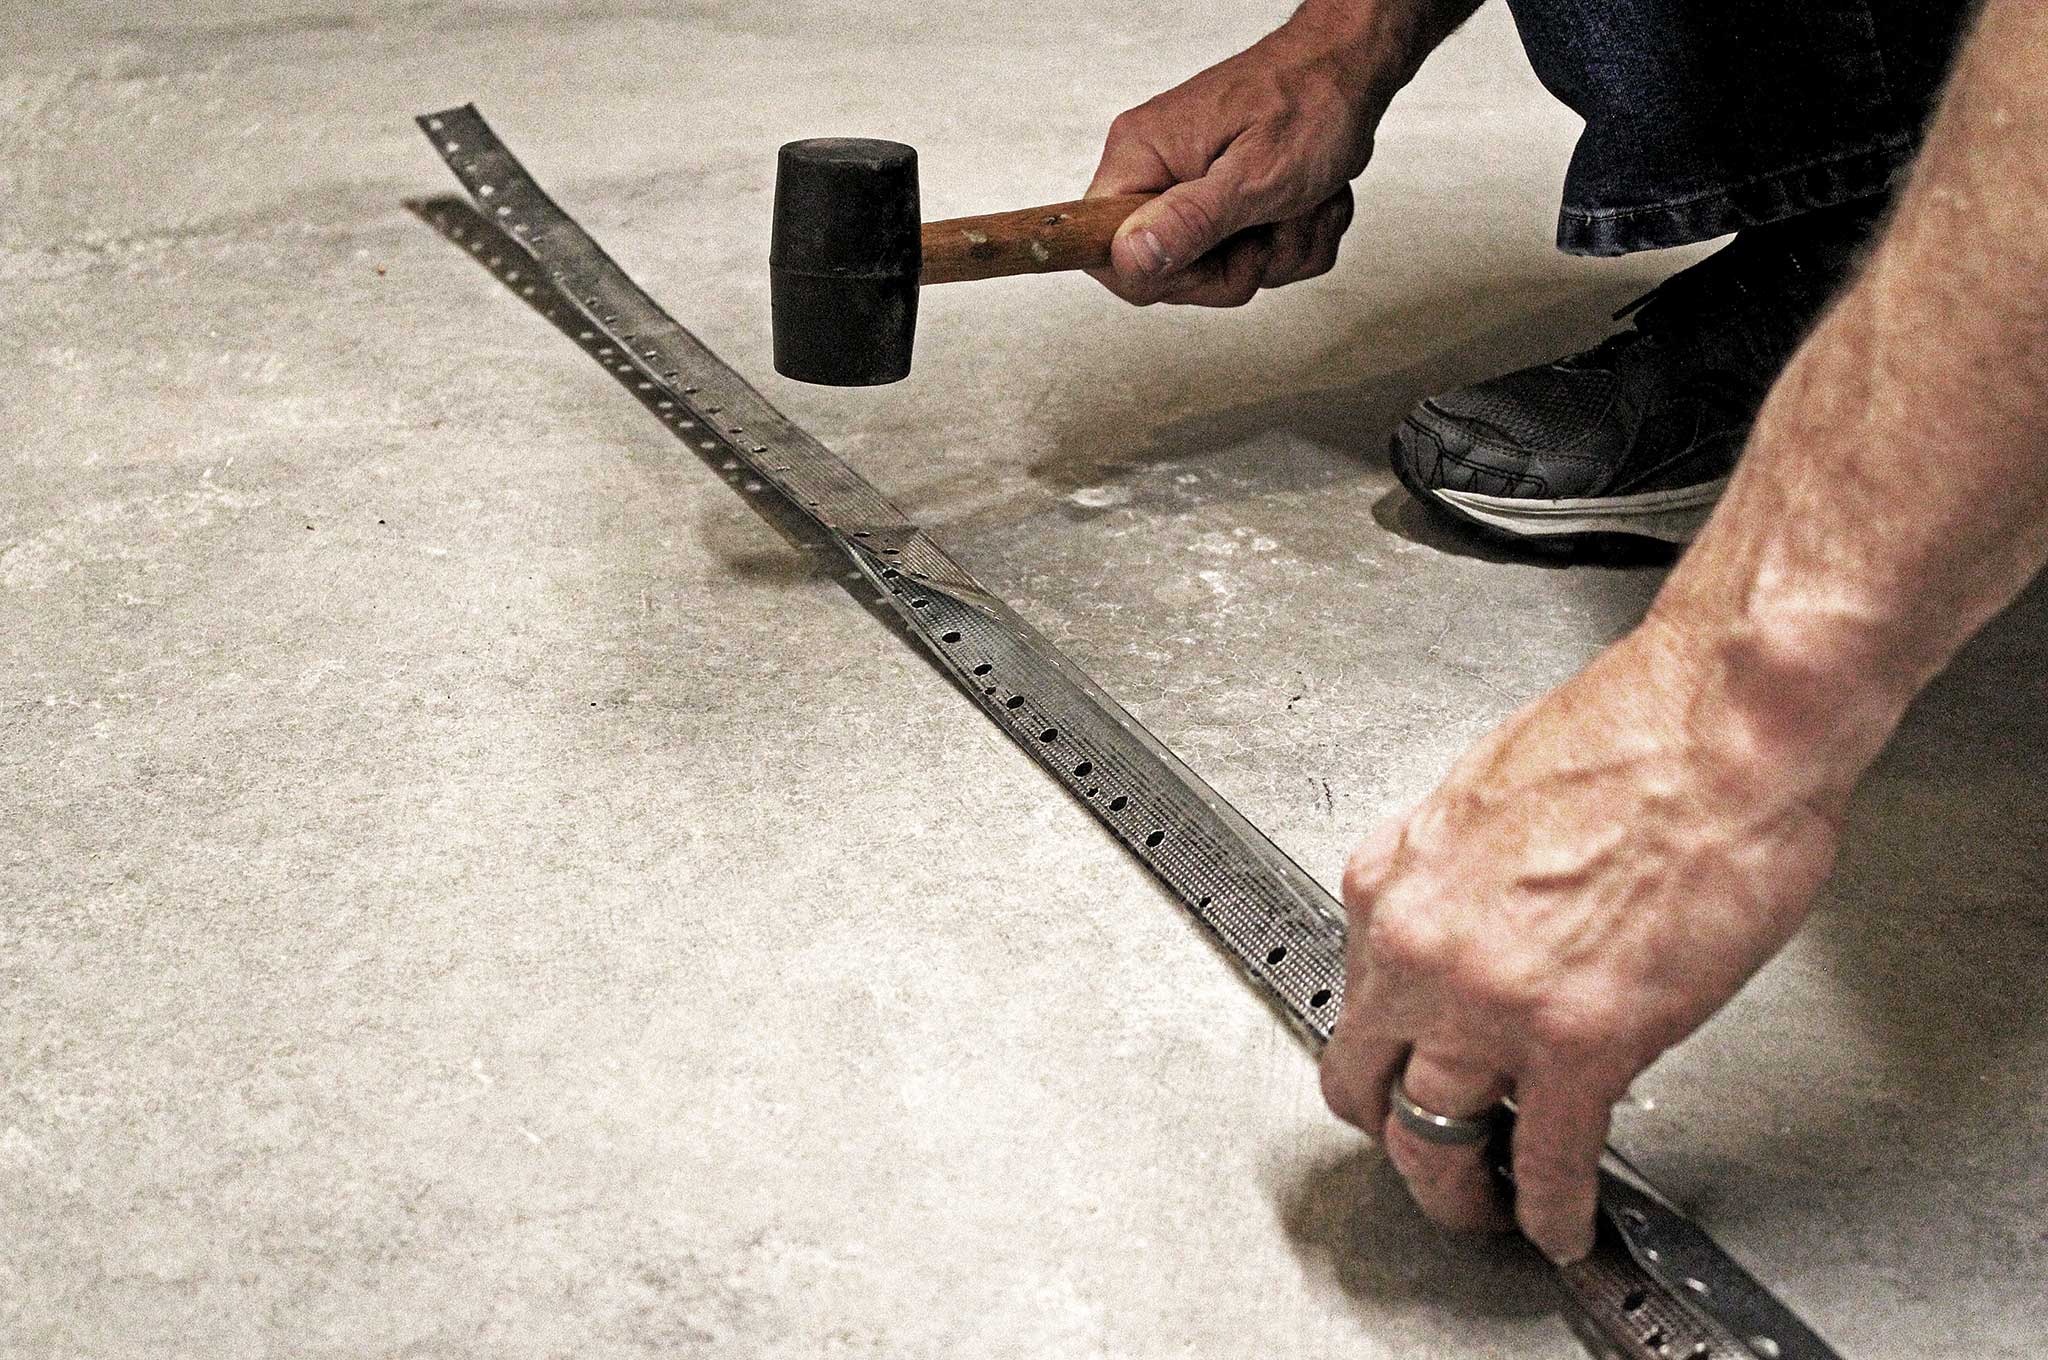
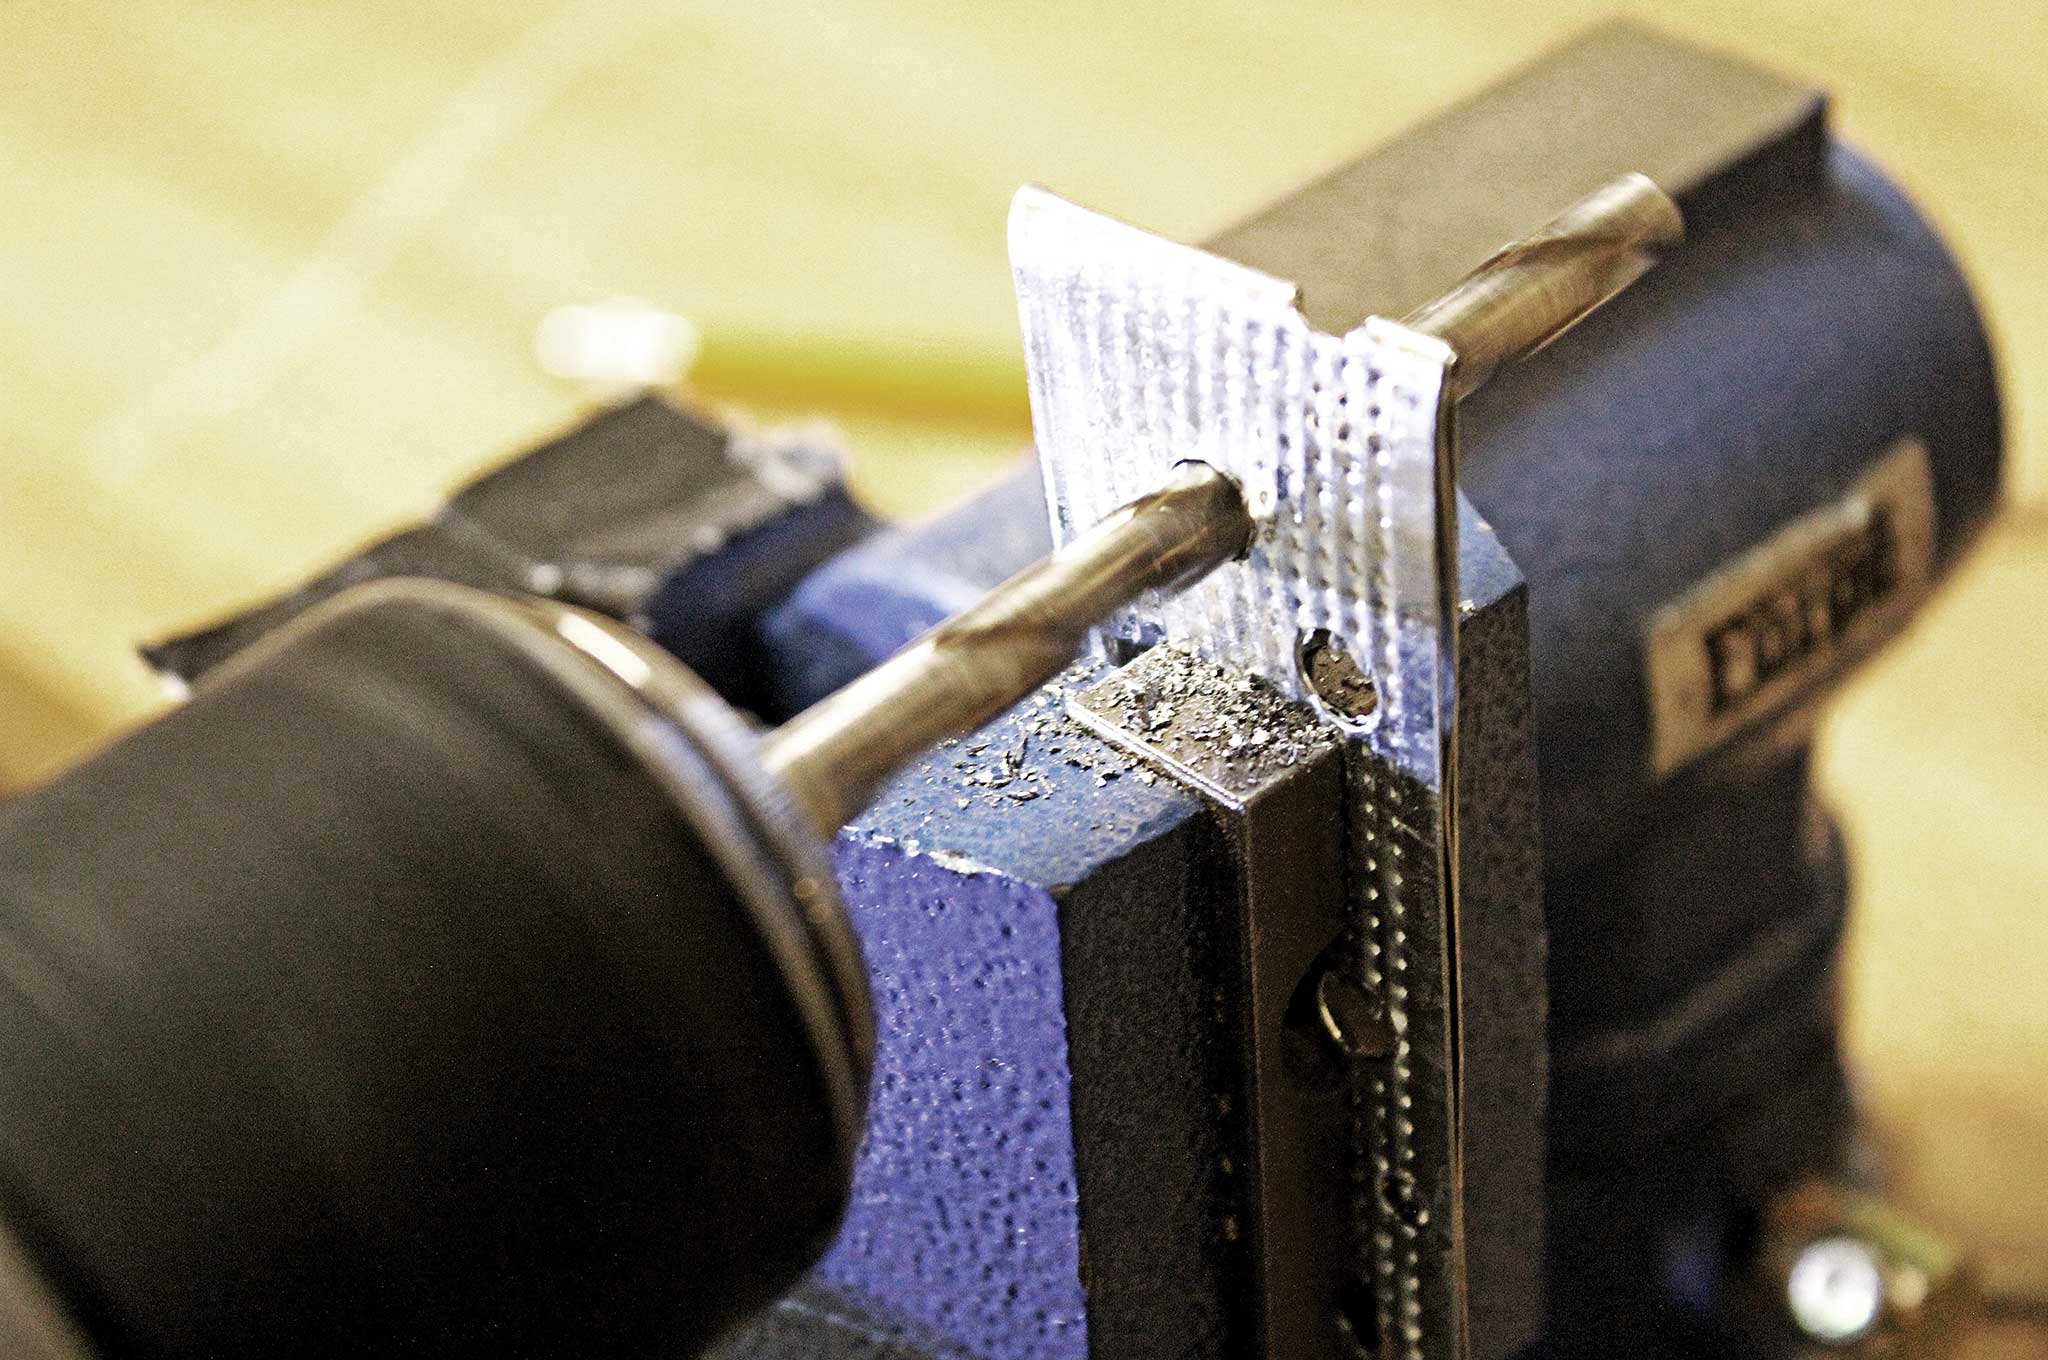
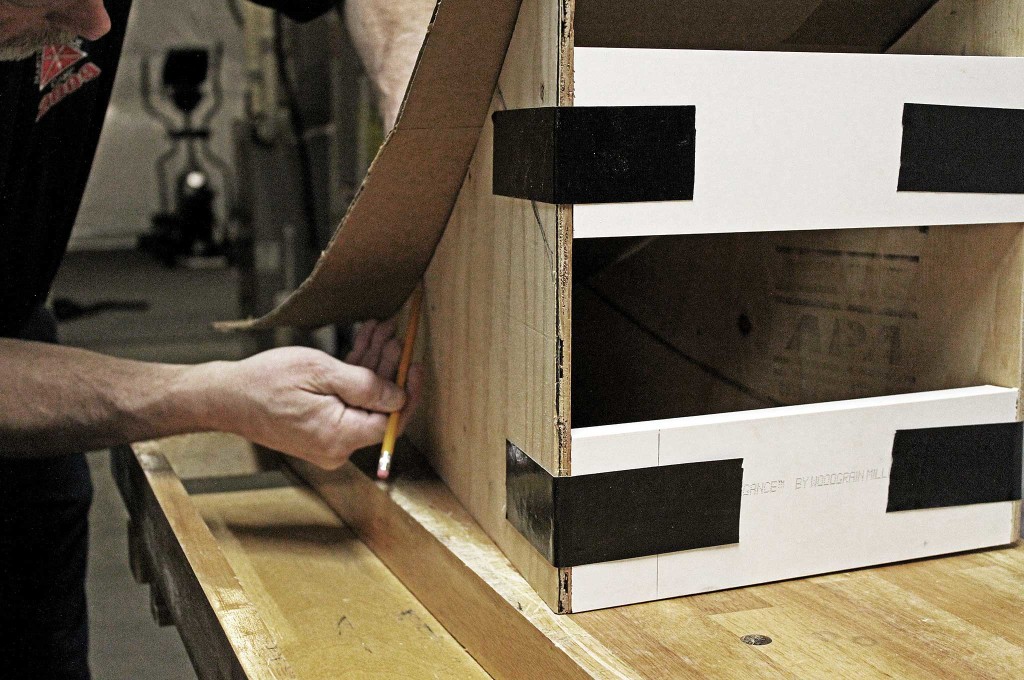
To support the reflector and allow its angle to be changed easily, contour a thin strip of steel or aluminum across the back so its ends extend an inch or so beyond the rim on each side. A cheap way to do this is to take drywall corner strip, hammer it flat to double it, and then fold the ends back for even more strength. Attach it with Gorilla tape and then reinforce the ends by drilling holes through it and the reflector near the rim on each side. Use machine screws, washers, and nuts to cinch it all together. Then, drill a 1/4-inch hole in the center of each tab just above the rim to hang the reflector.

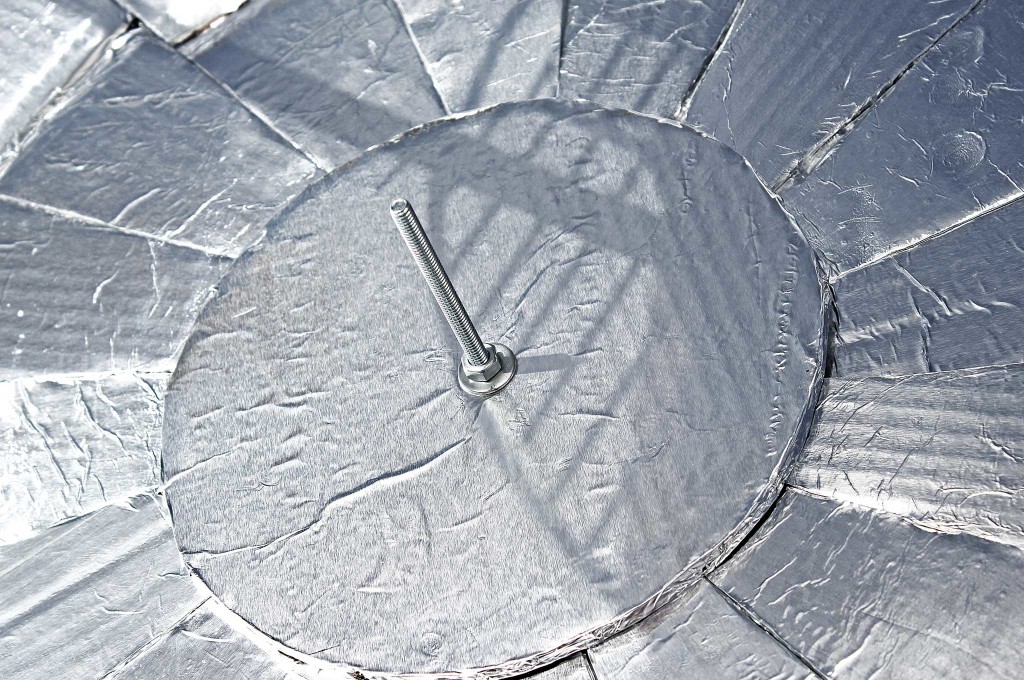
To close the hole in the center of the reflector and further strengthen its structure, cut a cardboard circle, cover it with foil, and drill a hole through its center and the center of the reinforcing metal strip. Use a 6-inch 1/4-20 threaded screw, flat washers, and a nut to secure the circle in place and create a sun dial-like aiming post. When the reflector is perfectly aimed at the sun, the post won't cast a shadow.
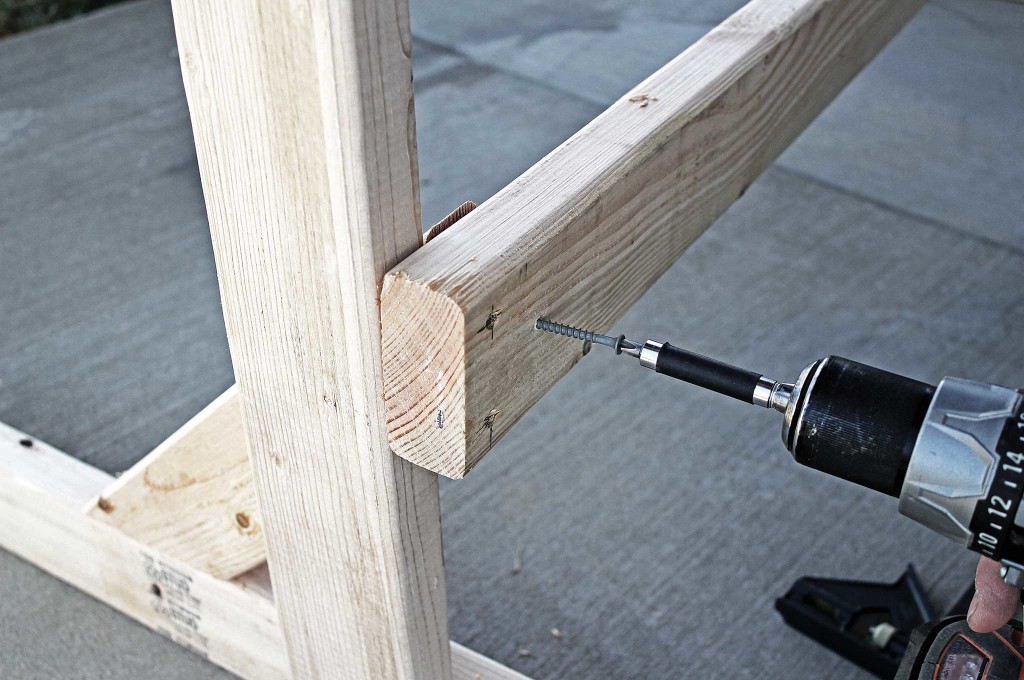
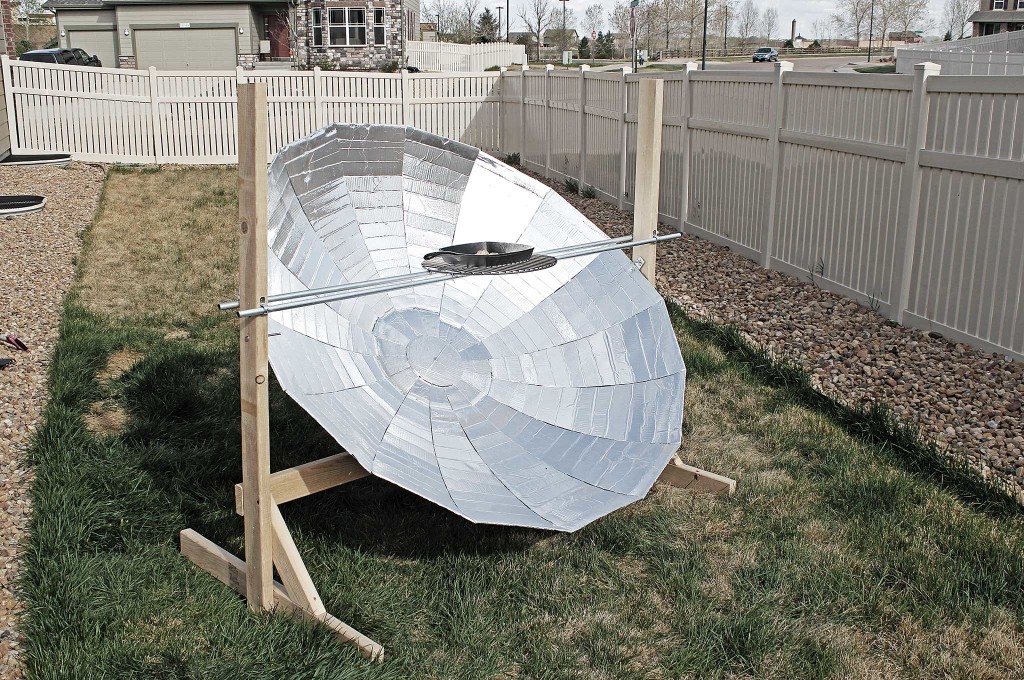
Frame Up

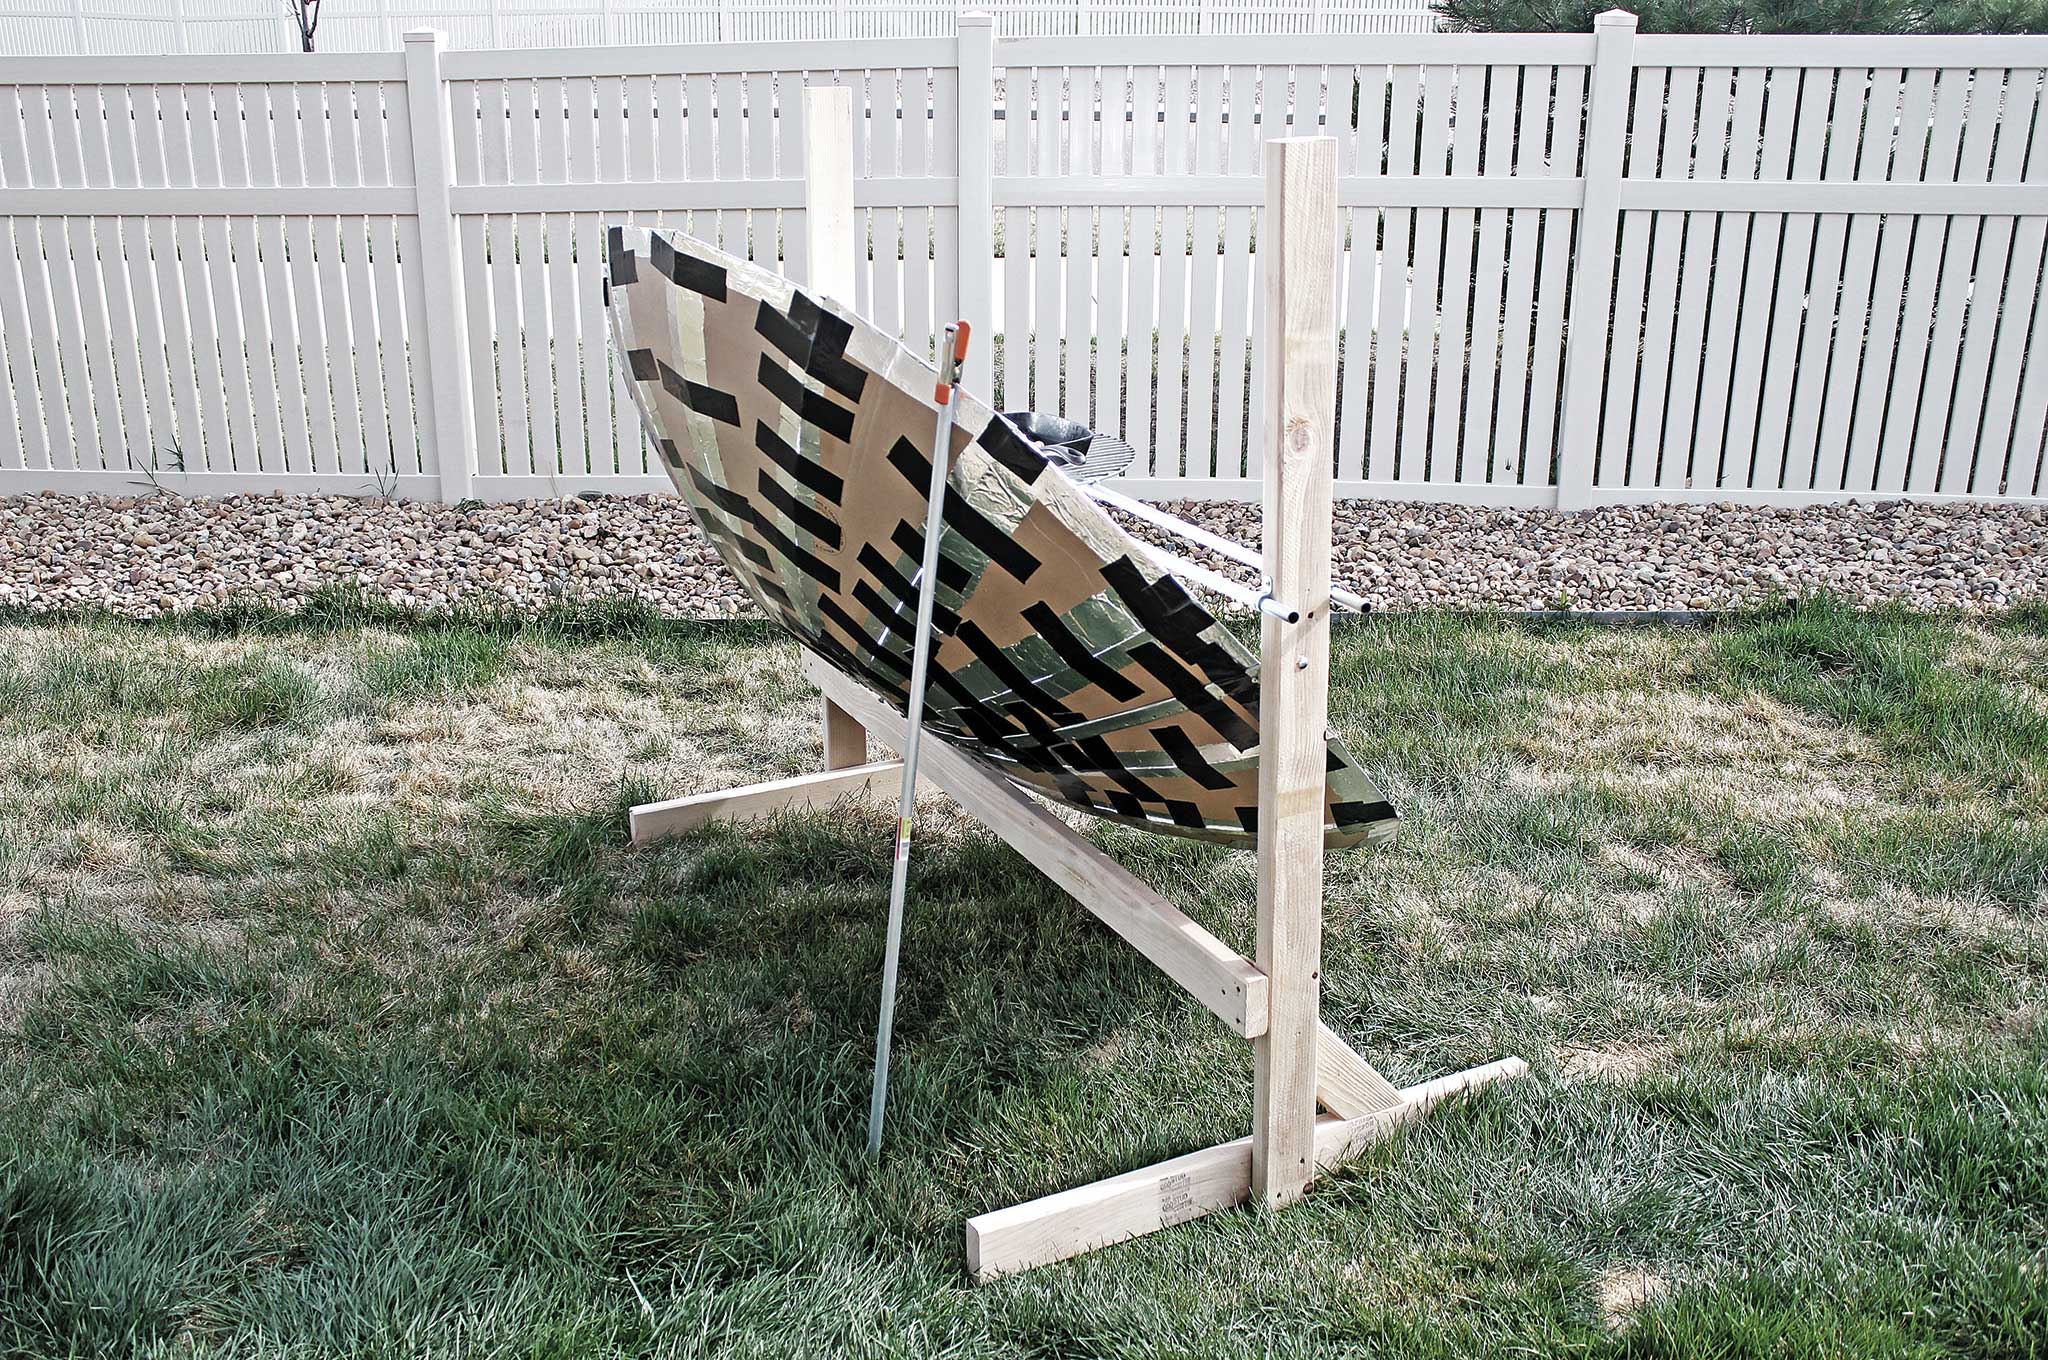
The base for this solar cooker design is a simple 2×4 frame — braced T-shaped ends connected by another 2×4 across the bottom, all held together with wood screws.

Make sure the distance between the uprights matches the diameter of your reflector, and make the uprights almost as tall. Drill a 1/4-inch hole in each upright half the diameter of your reflector up from the ground. To mount the reflector, place a long 1/4-20 carriage bolt or screw through each hole in the upright and the tabs at each end of the metal strip on the dish. Use flat washers and wing nuts to hold them in place.

To make the cooking surface, get two pieces of 1/2-inch electrical conduit tube and an old barbecue grill grate. Use binding wire to attach the grate to the center of the conduit pieces so they are spaced about 4 inches apart. With the reflector hanging horizontally in the frame, place clamps on the frame uprights and set the grate assembly in place so the conduits straddle the uprights and are supported by the clamps.

Now, measure from the center of the reflector up to the grate and adjust the height of the clamps until the grate is at the focal point height (you wrote that down, right?). Once it's all set, use 1/2-inch conduit straps and wood screws to lock it in place.

The final piece of the puzzle is another piece of conduit or a wooden dowel roughly as tall as your uprights. This, plus a sturdy spring clamp, will allow you to adjust the vertical angle of the reflector.

Get Cookin'

To set up your solar cooker, place it on a level surface in an area of direct sunlight and orient it toward our massive star in the sky. Look at the sundial in the center of the reflector and turn the unit until the screw casts a shadow perpendicular to the conduits. Raise the reflector until the shadow shortens and eventually disappears, confirming the reflector is now pointed directly at the sun. Maintain that orientation and clamp the dowel or conduit support to the rim at the rear of the reflector to hold it in place.

In this position, the reflector should focus all the sunlight hitting it on the grate at the focal point. To confirm that, get a piece of paper and place it on the grate. Move it up, down, and under the grate and compare the size of the focused light at different heights above the reflector. It should be smallest and most focused at the exact level of the grate. If not, adjust the grate height to correspond with the most focused spot.

For the actual cooking, use a dark-colored pot or pan — ideally made of cast iron with a lid. Place it on the grate and let the sun work its magic. Check on the cooker periodically and reorient it as necessary to optimize its performance as the sun moves.

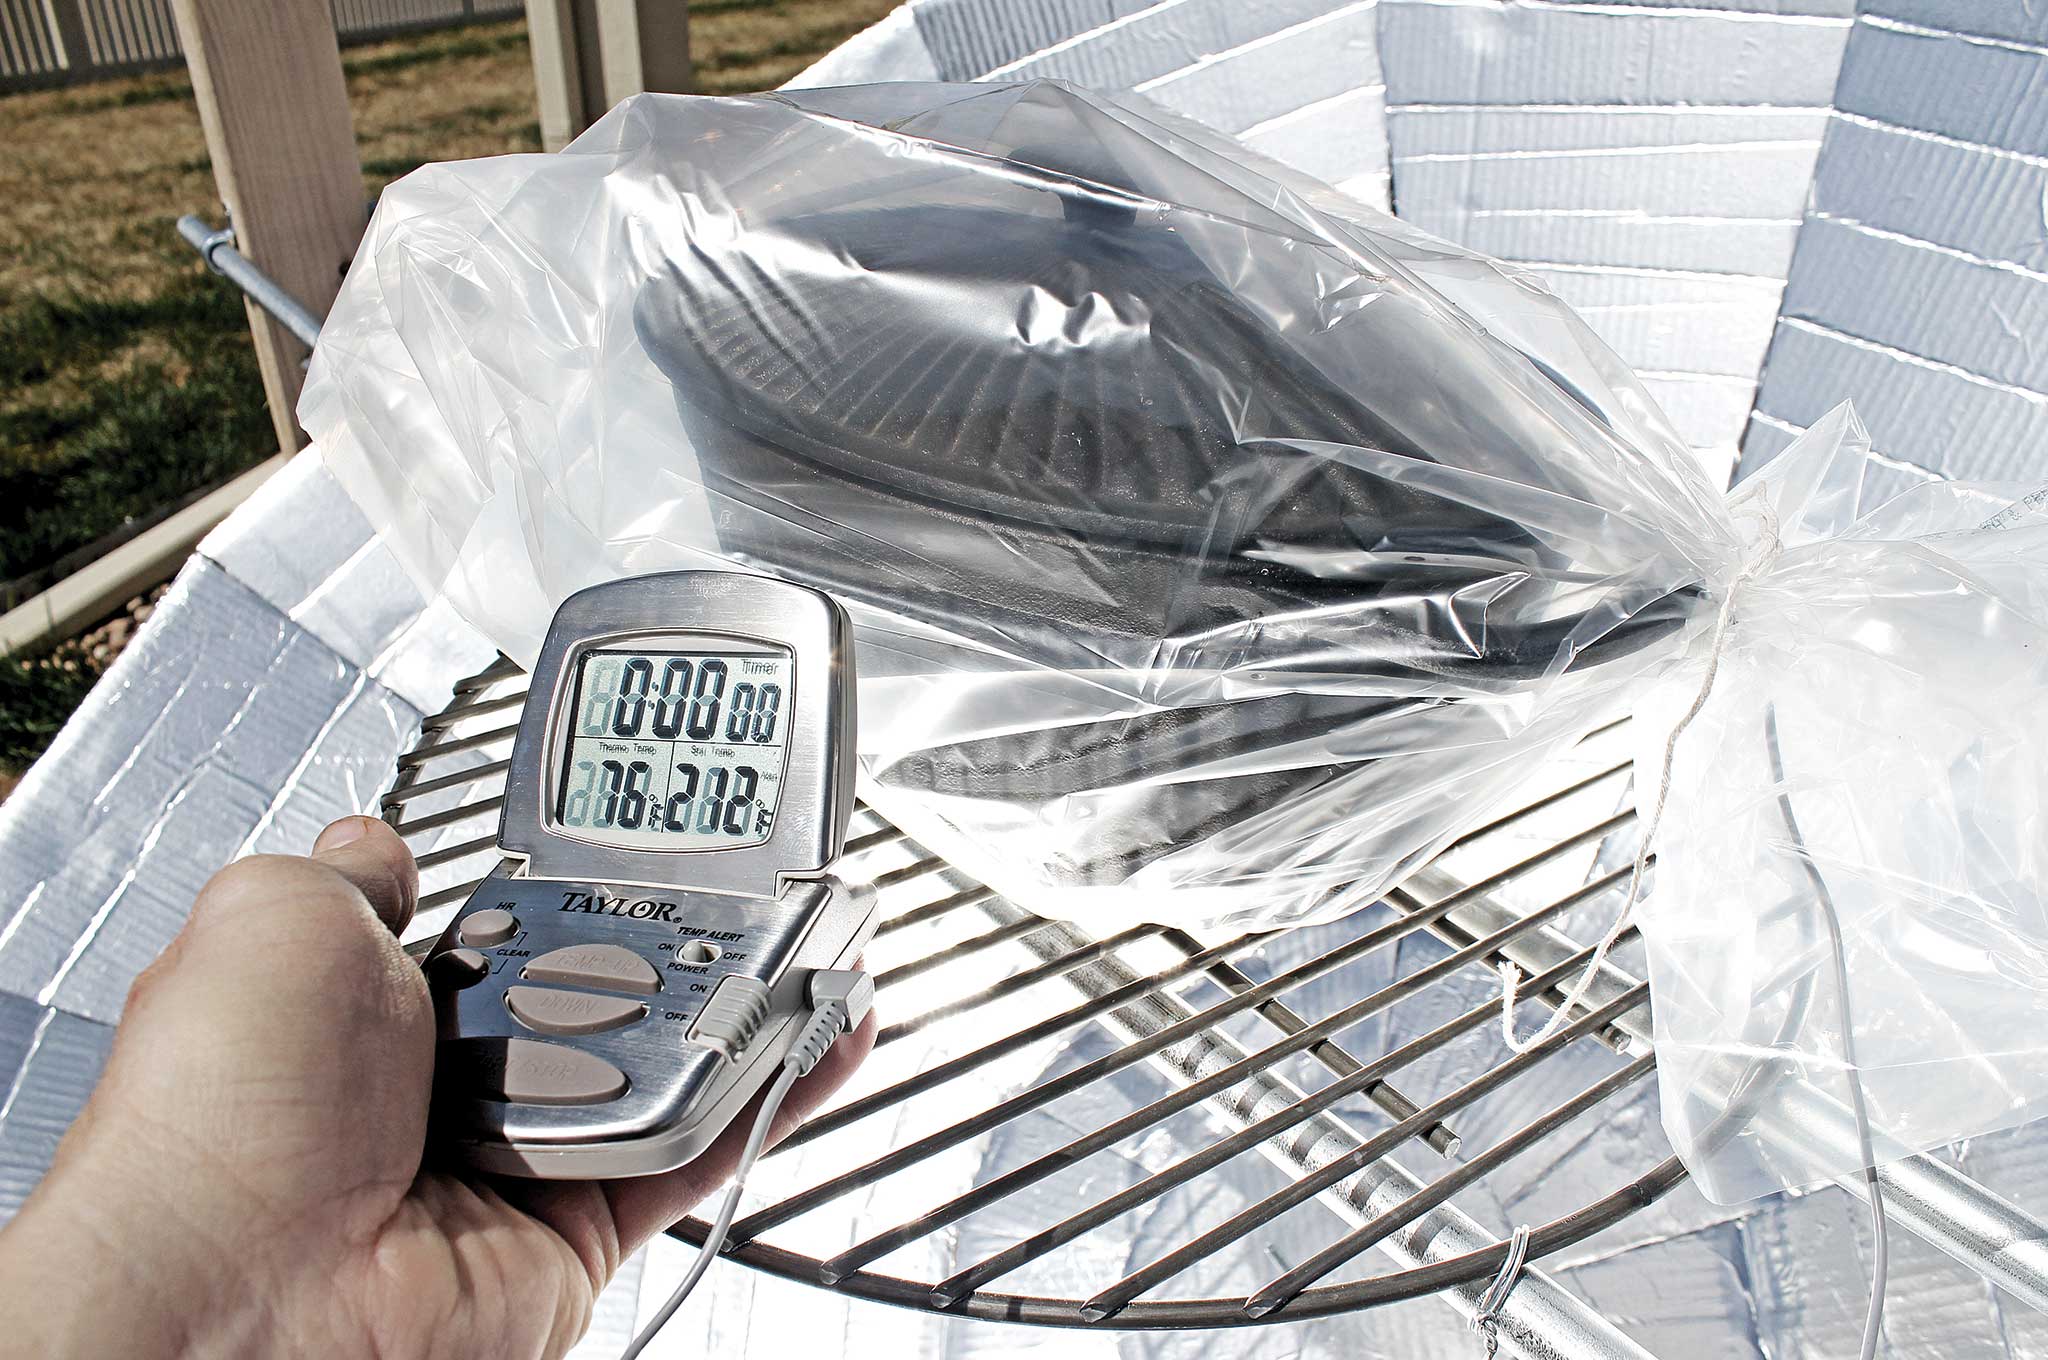
You can also incorporate the greenhouse effect in your cooking by enclosing cast-iron Dutch ovens in plastic roasting bags to retain heat and moisture even better.

As long as the sun does its part, this parabolic solar cooker definitely works and works well. In addition to cooking, it's a great way to quickly pasteurize water without burning fuel and an excellent addition to any off-grid plan. While it's not the solar death ray I was hoping for, I haven't given up hope yet. Maybe with some shinier aluminum foil ….

building-a-diy-parabolic-solar-cooker-parabola-tools

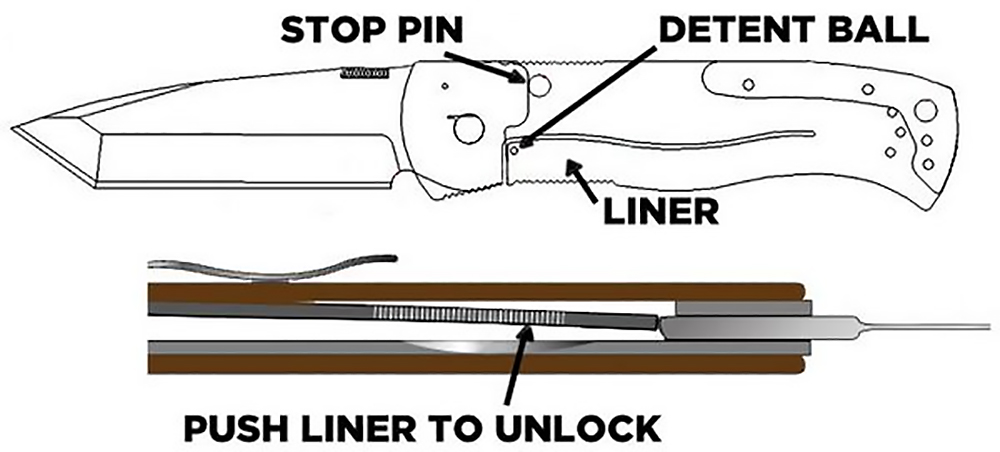
Hey, math boy … these tools are how real parabolas are made.

building-a-diy-parabolic-solar-cooker-drawing-the-parabola-01

building-a-diy-parabolic-solar-cooker-drawing-the-parabola-02

Drawing the parabola to make the panel form.

building-a-diy-parabolic-solar-cooker-panel-form

Once the parabola form is drawn, cut it out with a jigsaw and make an identical second one.

building-a-diy-parabolic-solar-cooker-paper-angle-reference

To make a reflector with 16 panels, each is one 1/16 of a 360-degree circle, or 22.5 degrees. Fold a piece of paper twice to get a reference.

building-a-diy-parabolic-solar-cooker-measuring-panel-form

Use the paper reference to set the angle at the apex of the form, then measure the wide end.

building-a-diy-parabolic-solar-cooker-finished-panel-form

The finished form for marking the panel template.

building-a-diy-parabolic-panel-template-tracing

Clamp a piece of cardboard to the form and trace both sides to make a template.

building-a-diy-parabolic-solar-cooker-template-marking

Use the template to mark the cardboard for the panels.

building-a-diy-parabolic-solar-cooker-panel-cutting

Carefully cut out the panels … all 16 of them.

building-a-diy-parabolic-solar-cooker-panel-creasing

Crease the panels every couple of inches to create a curve.

building-a-diy-parabolic-solar-cooker-adhesive-spray

A light coat of spray adhesive will allow the aluminum foil to stick.

building-a-diy-parabolic-solar-cooker-foil-smoothing

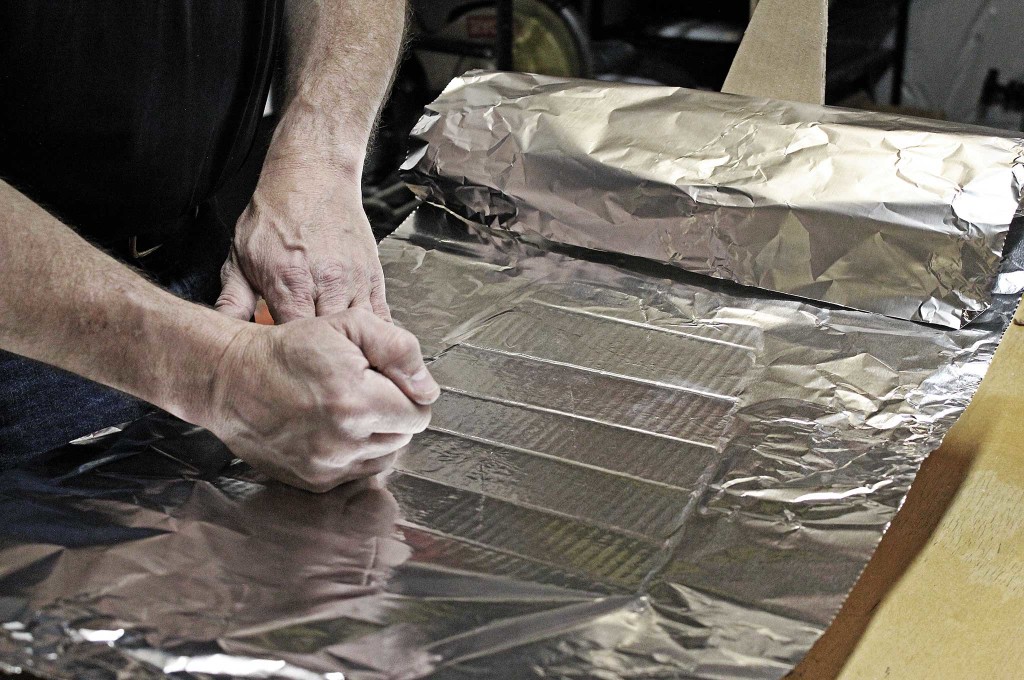
Use the soft bottom of your fist to smooth the foil and work from the center out.

building-a-diy-parabolic-solar-cooker-foil-trimming

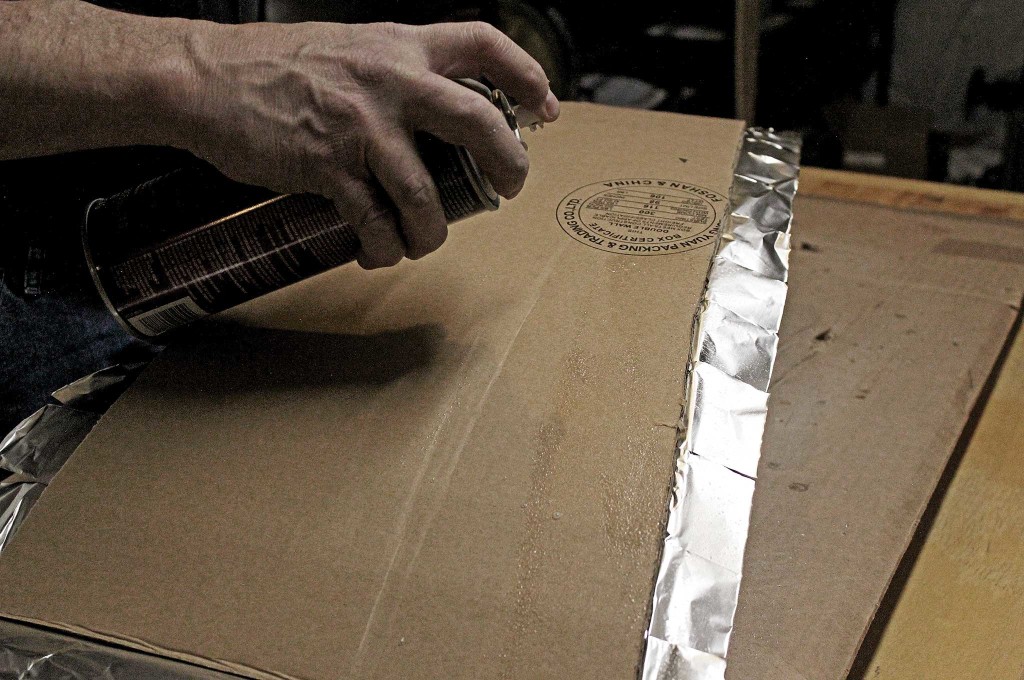
Trim the foil around the panel, notch it every few inches, turn it over, and apply another light coat of spray adhesive.

building-a-diy-parabolic-solar-cooker-foil-tabs

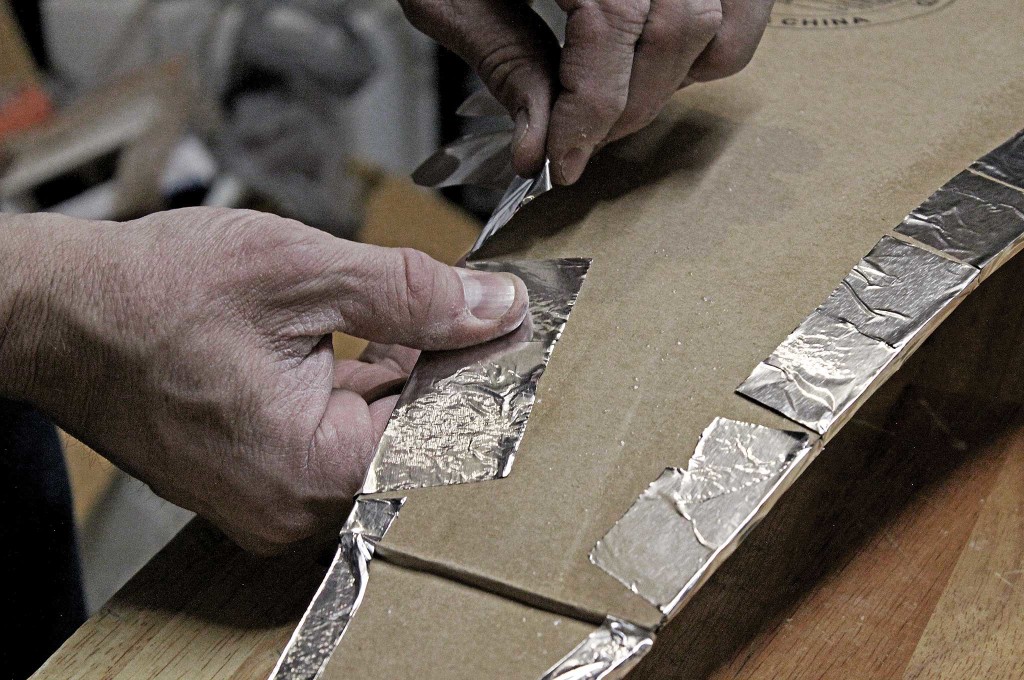
Fold the tabs of foil and stick them to the back of the panel.

building-a-diy-parabolic-solar-cooker-gorilla-tape

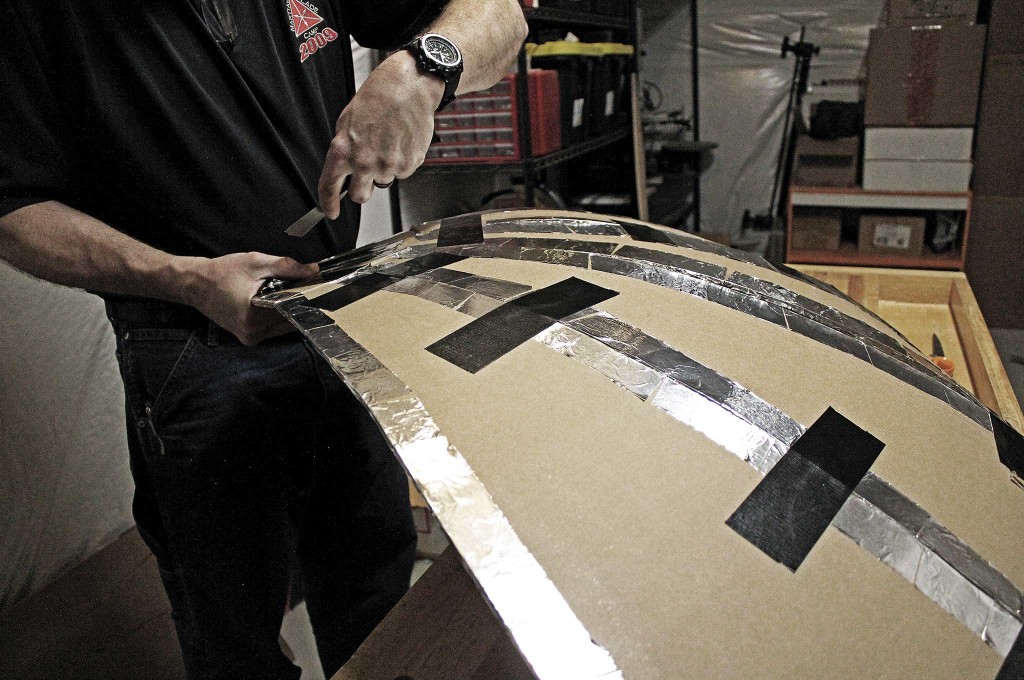
Attach panels edge to edge with Gorilla Tape.

building-a-diy-parabolic-solar-cooker-attaching-panel-sectins-together

Use something to support the center of the dish as you tape the panel sections together.

building-a-diy-parabolic-solar-cooker-fully-assembled-parabolic-reflector

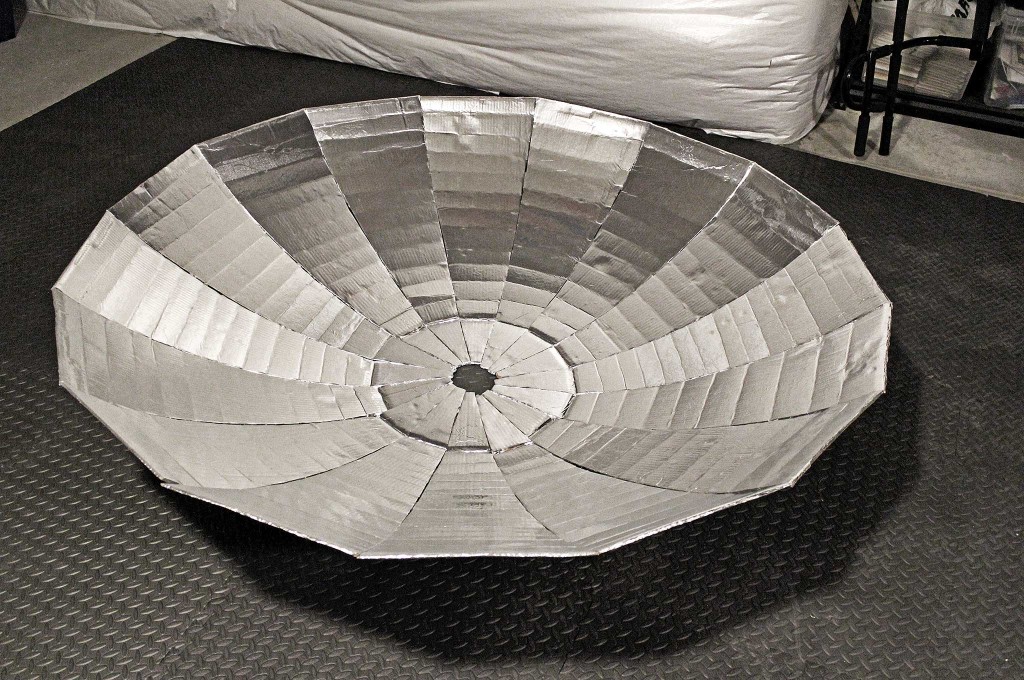
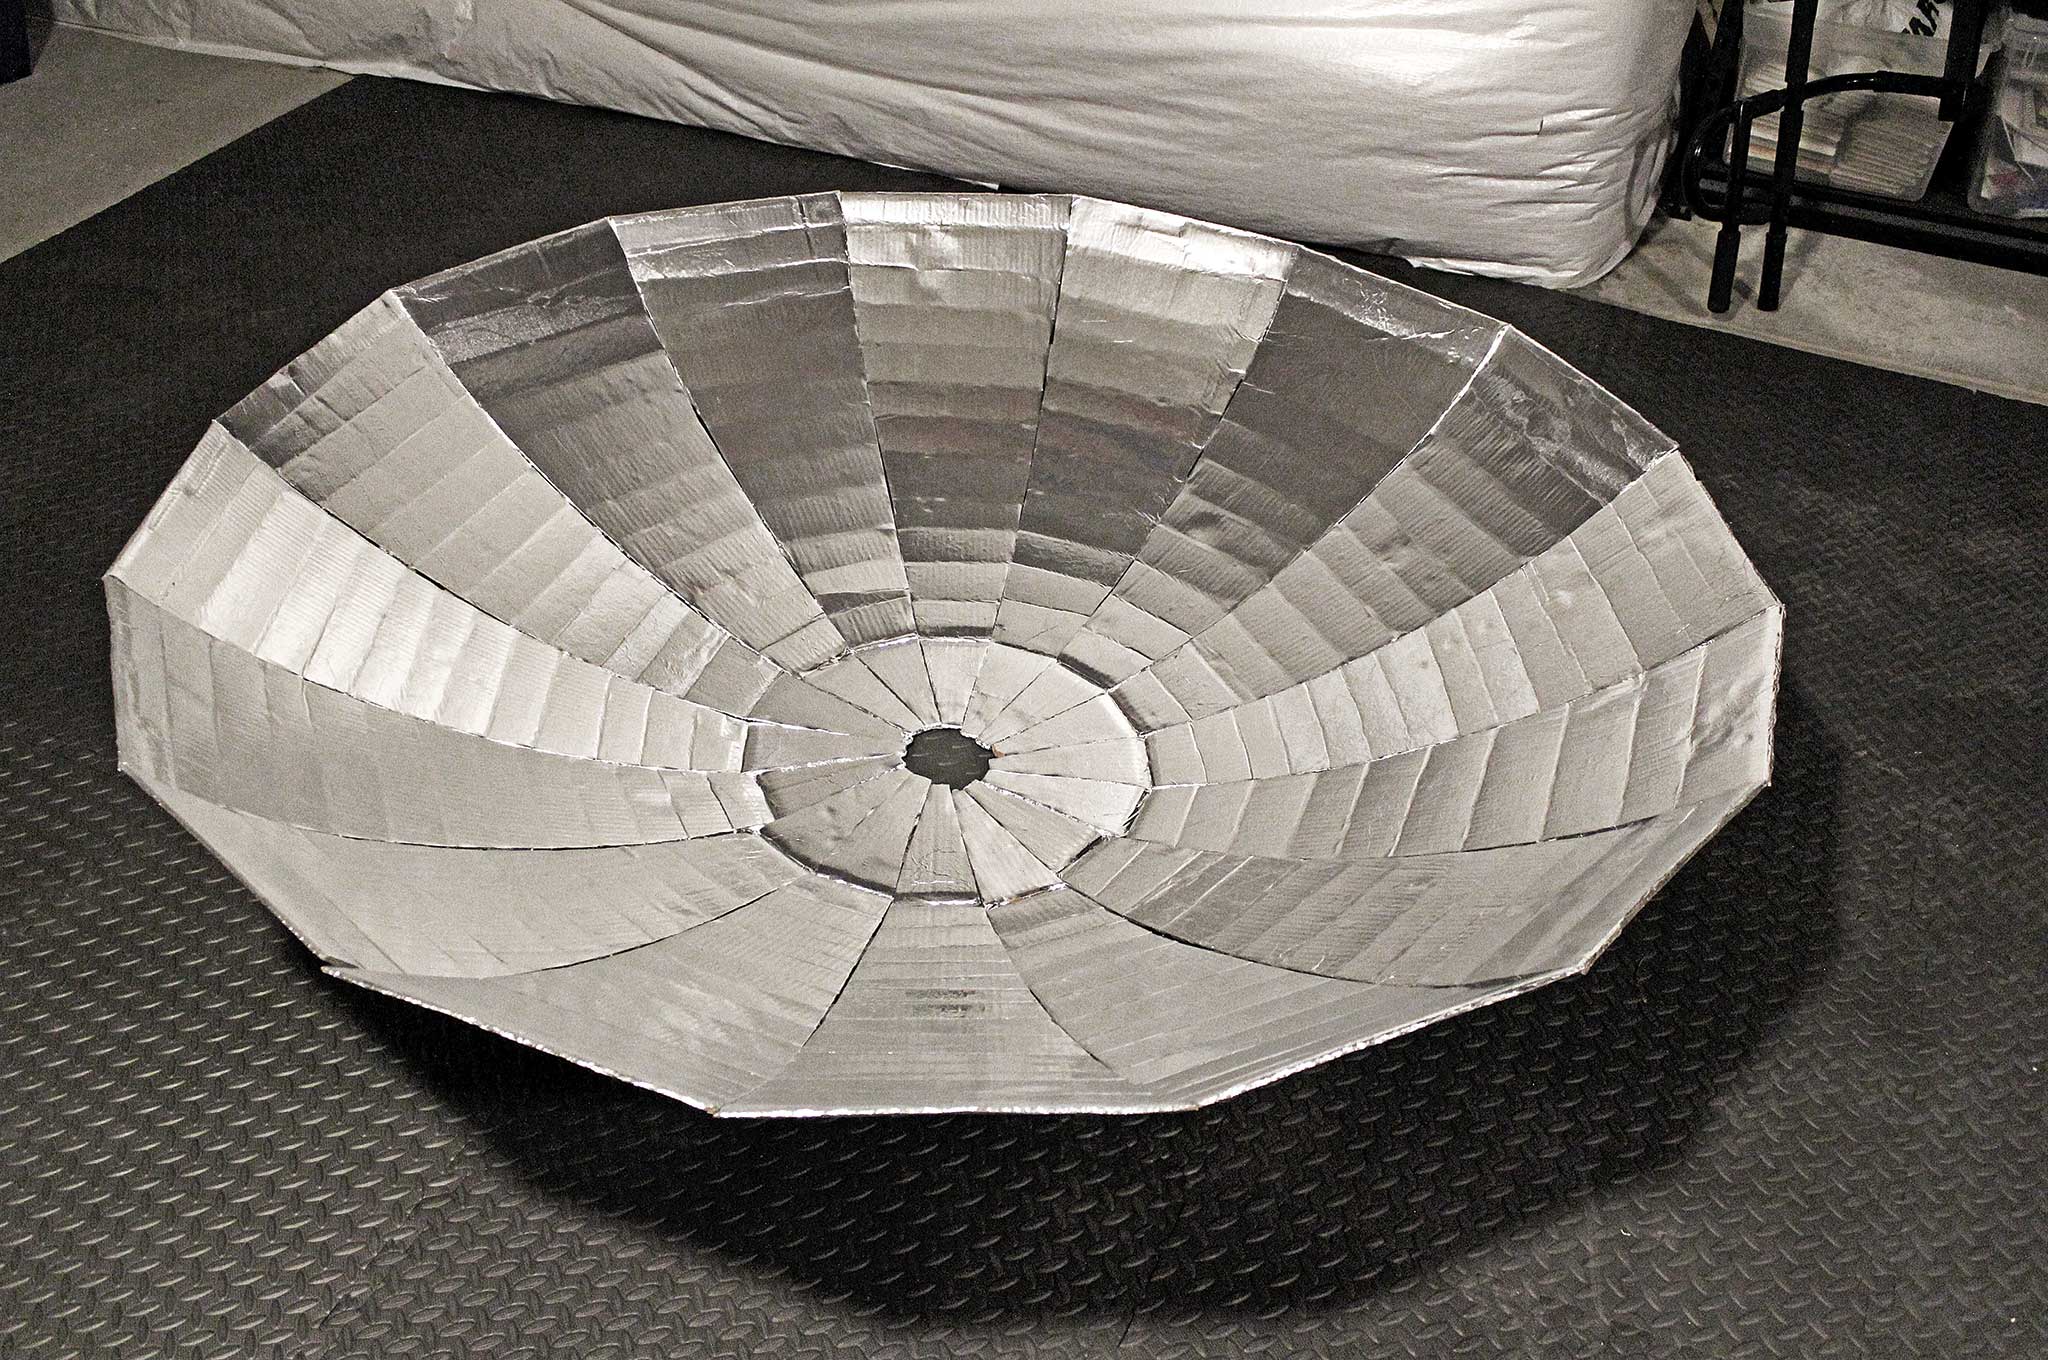
The fully assembled parabolic reflector.

building-a-diy-parabolic-solar-cooker-support-strip

Flatten out some drywall corner to make the support strip. Any similar metal strip will work as well.

building-a-diy-parabolic-solar-cooker-reflector-mount

Drill 1/4-inch holes in the tabs at the end of the strip to mount the reflector and allow it to pivot.

building-a-diy-parabolic-solar-cooker-taping-support-strip

The support strip taped in place.

building-a-diy-parabolic-solar-cooker-support-strip-attachment-hardware

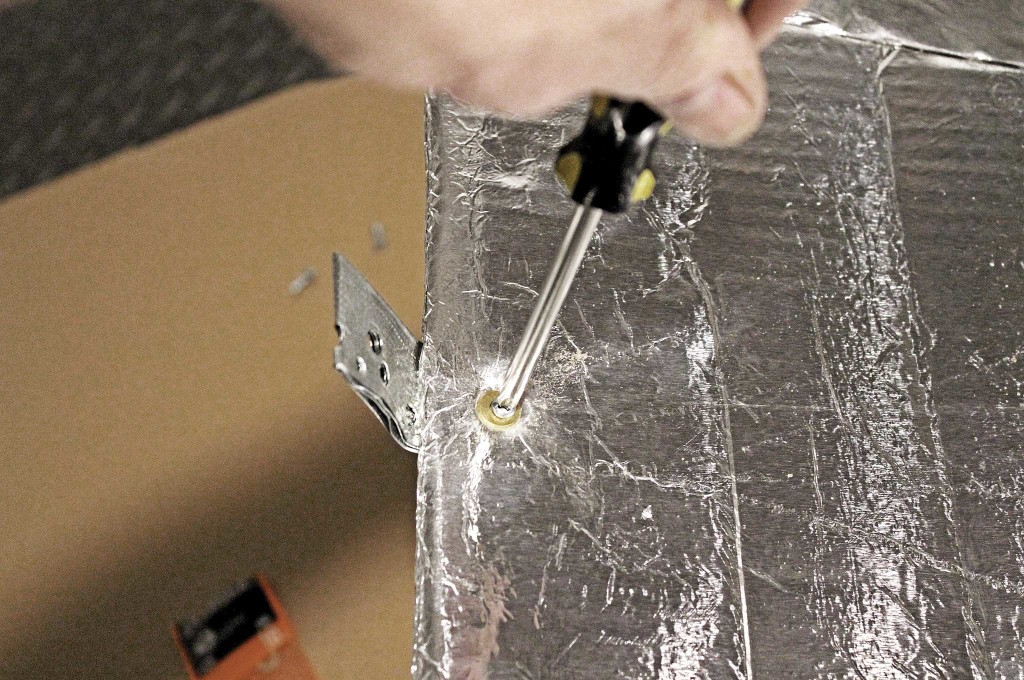
Attach the ends of the strip to the reflector with screws, washers, and nuts.

building-a-diy-parabolic-solar-cooker-reflector-center

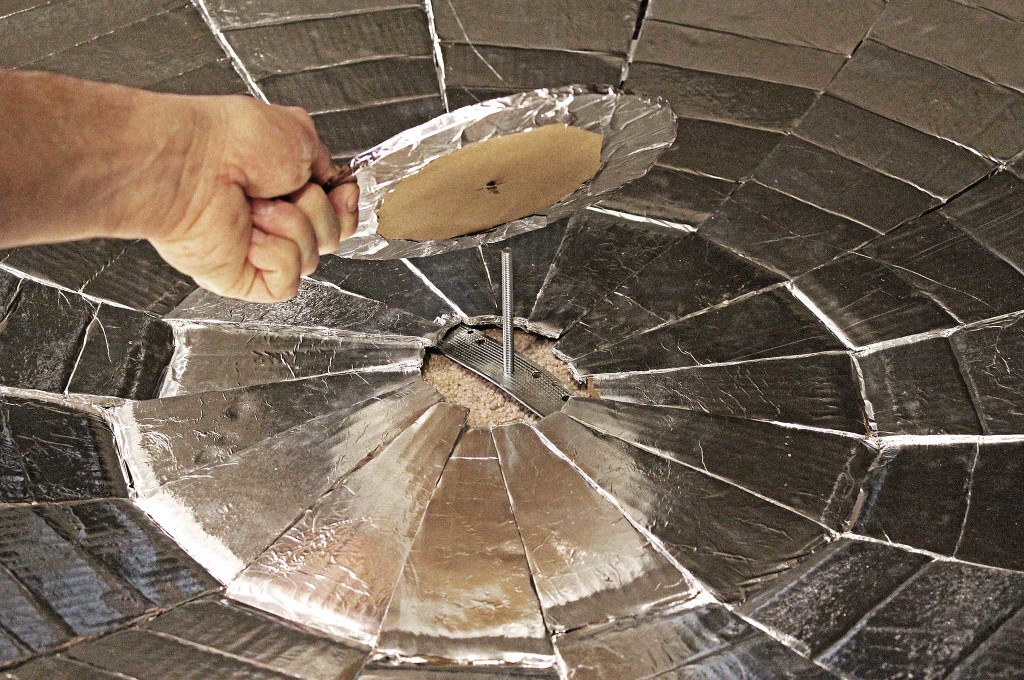
The center of the reflector is covered by a foil-covered cardboard circle secured with a long screw that also helps “aim” the reflector.

building-a-diy-parabolic-solar-cooker-cooker-frame

The frame for the cooker is a simple 2×4 structure.

building-a-diy-parabolic-solar-cooker-cooker-grate

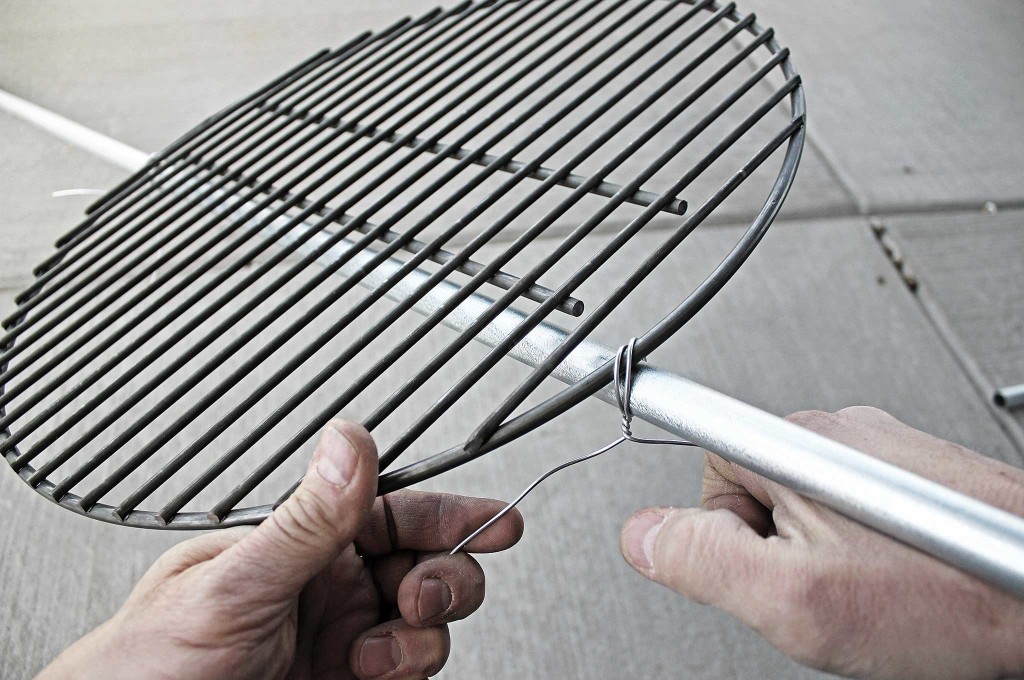
The cooker grate is made with electrical conduit and a grill grate.

building-a-diy-parabolic-solar-focal-point-measuring

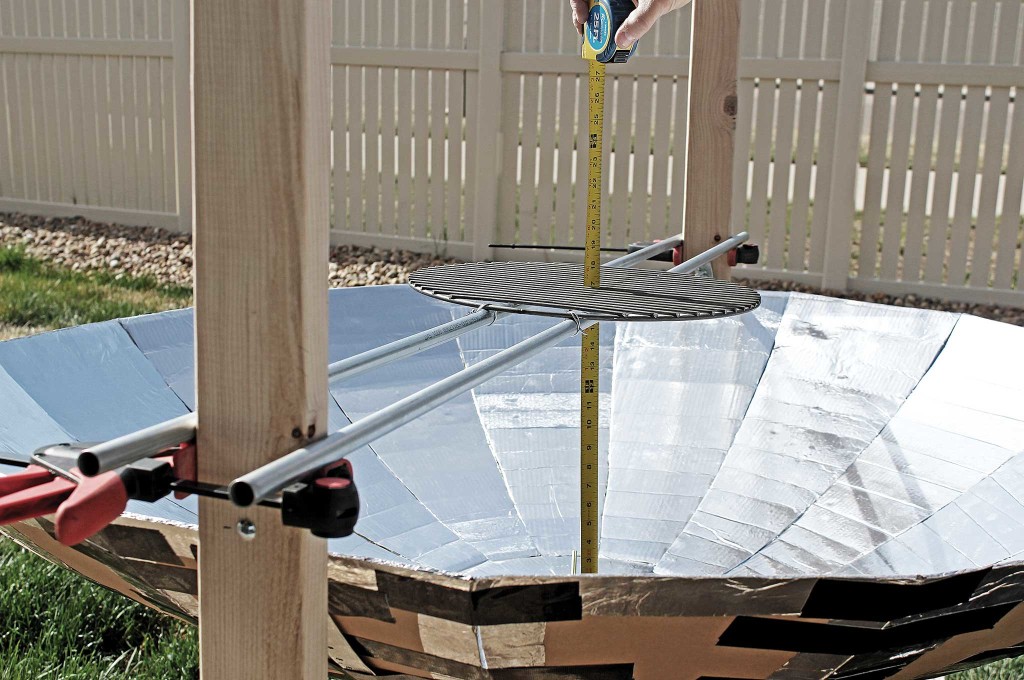
Use clamps to get the cooking grate at the exact focal point before securing the conduit tubes with straps.

building-a-diy-parabolic-solar-cooker-angle-adjustment

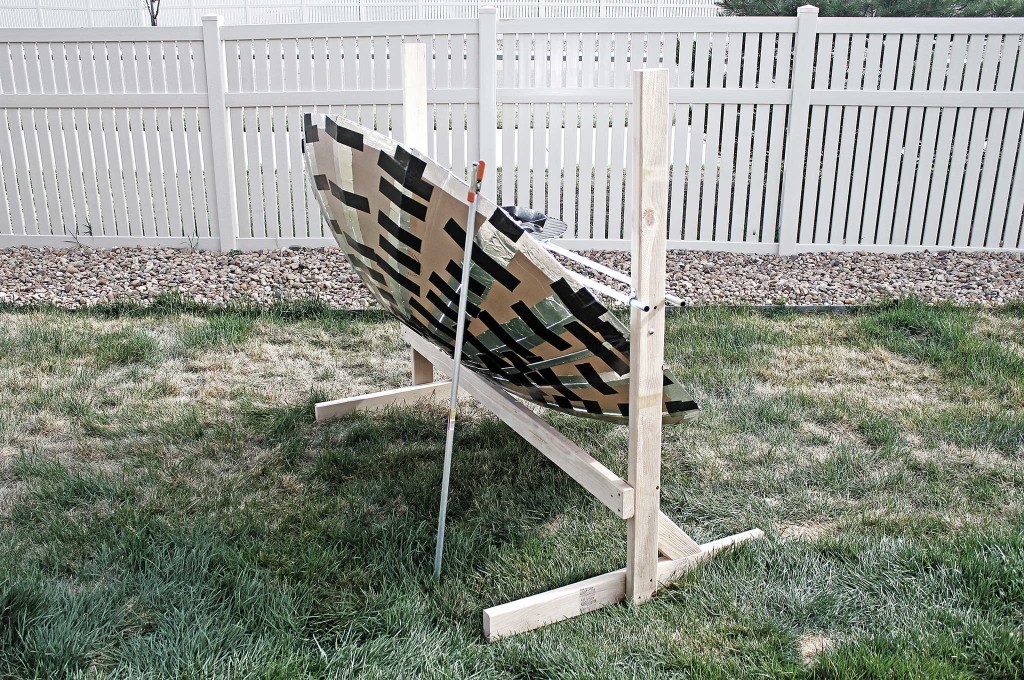
A simple dowel and clamp allow the angle of the reflector to be precisely adjusted.

building-a-diy-parabolic-solar-cooker-sundial

Use the “sundial” to align the reflector. When its shadow disappears, it's perfectly aligned.

building-a-diy-parabolic-solar-cooker-cooking-test

Testing the parabolic solar cooker.

building-a-diy-parabolic-solar-cooker-bacon

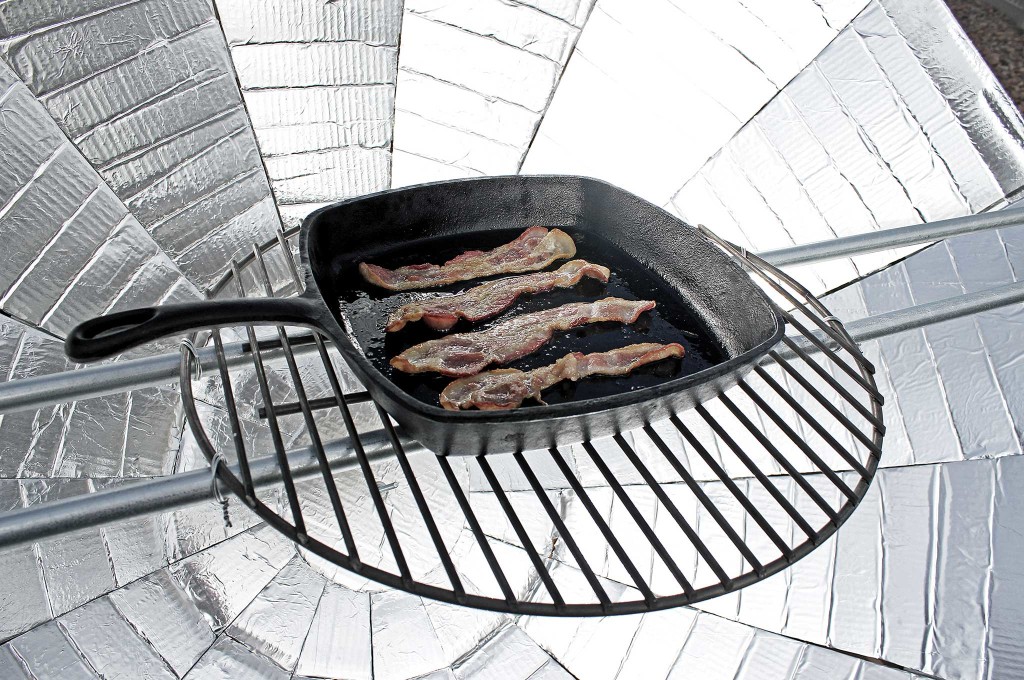
Anything that yields crispy bacon HAS to be good!

building-a-diy-parabolic-solar-cooker-water-pasteurization

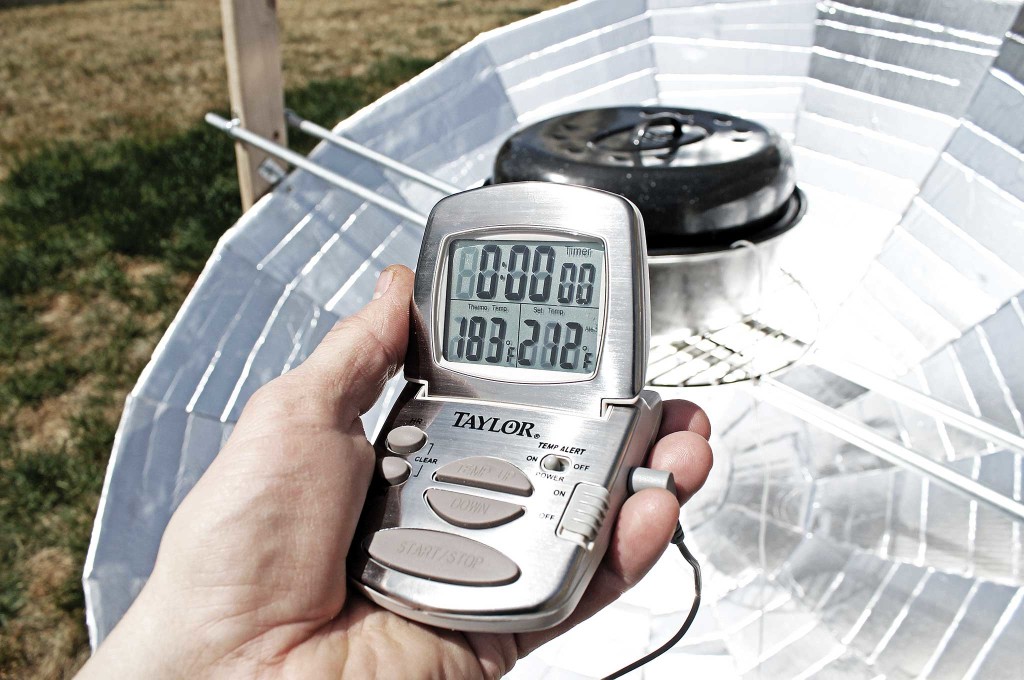
The DIY solar cooker got one gallon of water in this roasting pan up to 183 degrees Fahrenheit in just over an hour — plenty hot to effectively pasteurize it.

building-a-diy-parabolic-solar-cooker-roasting-bag

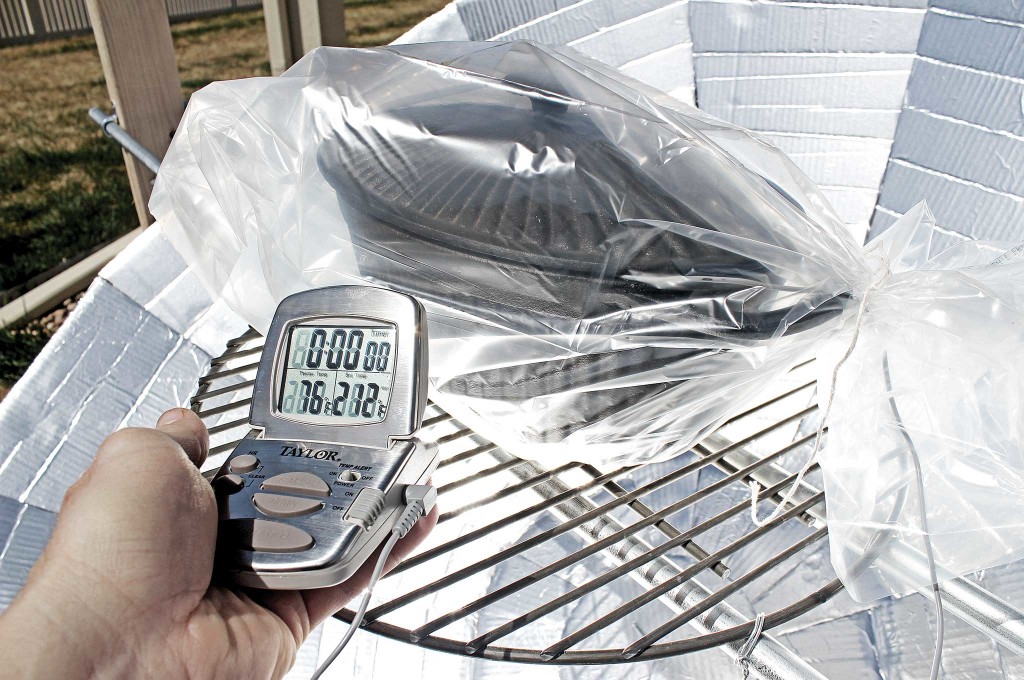
The start of cooking rice in a Dutch oven, sealed inside a roasting bag to maximize the greenhouse effect.

building-a-diy-parabolic-solar-cooker-rice

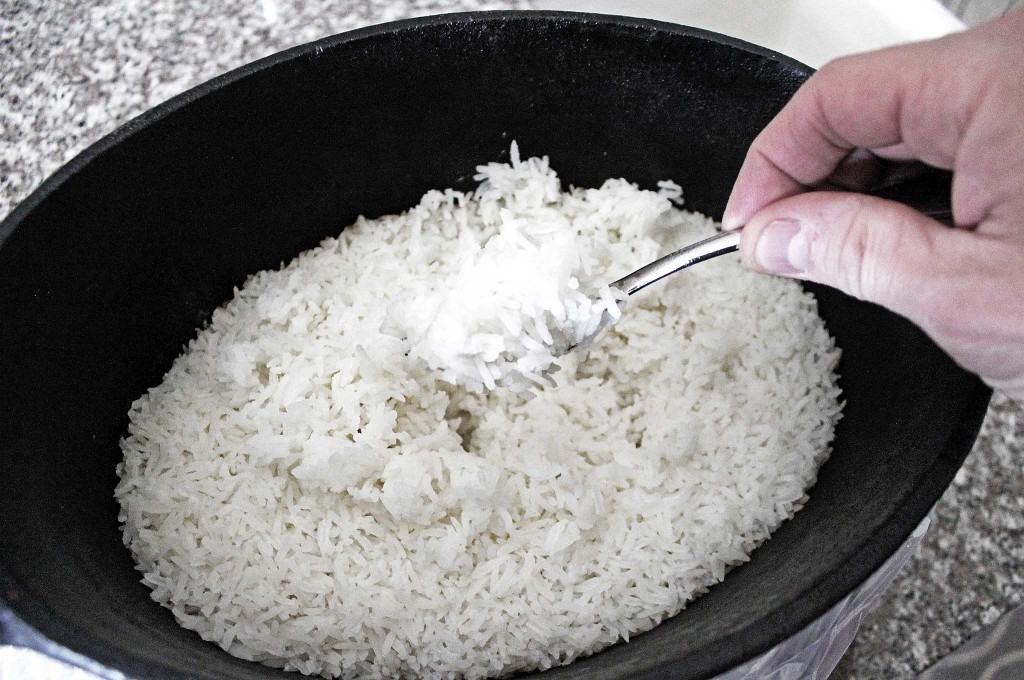
In just over an hour, the rice is perfectly cooked.

building-a-diy-parabolic-solar-cooker-finished-cooker

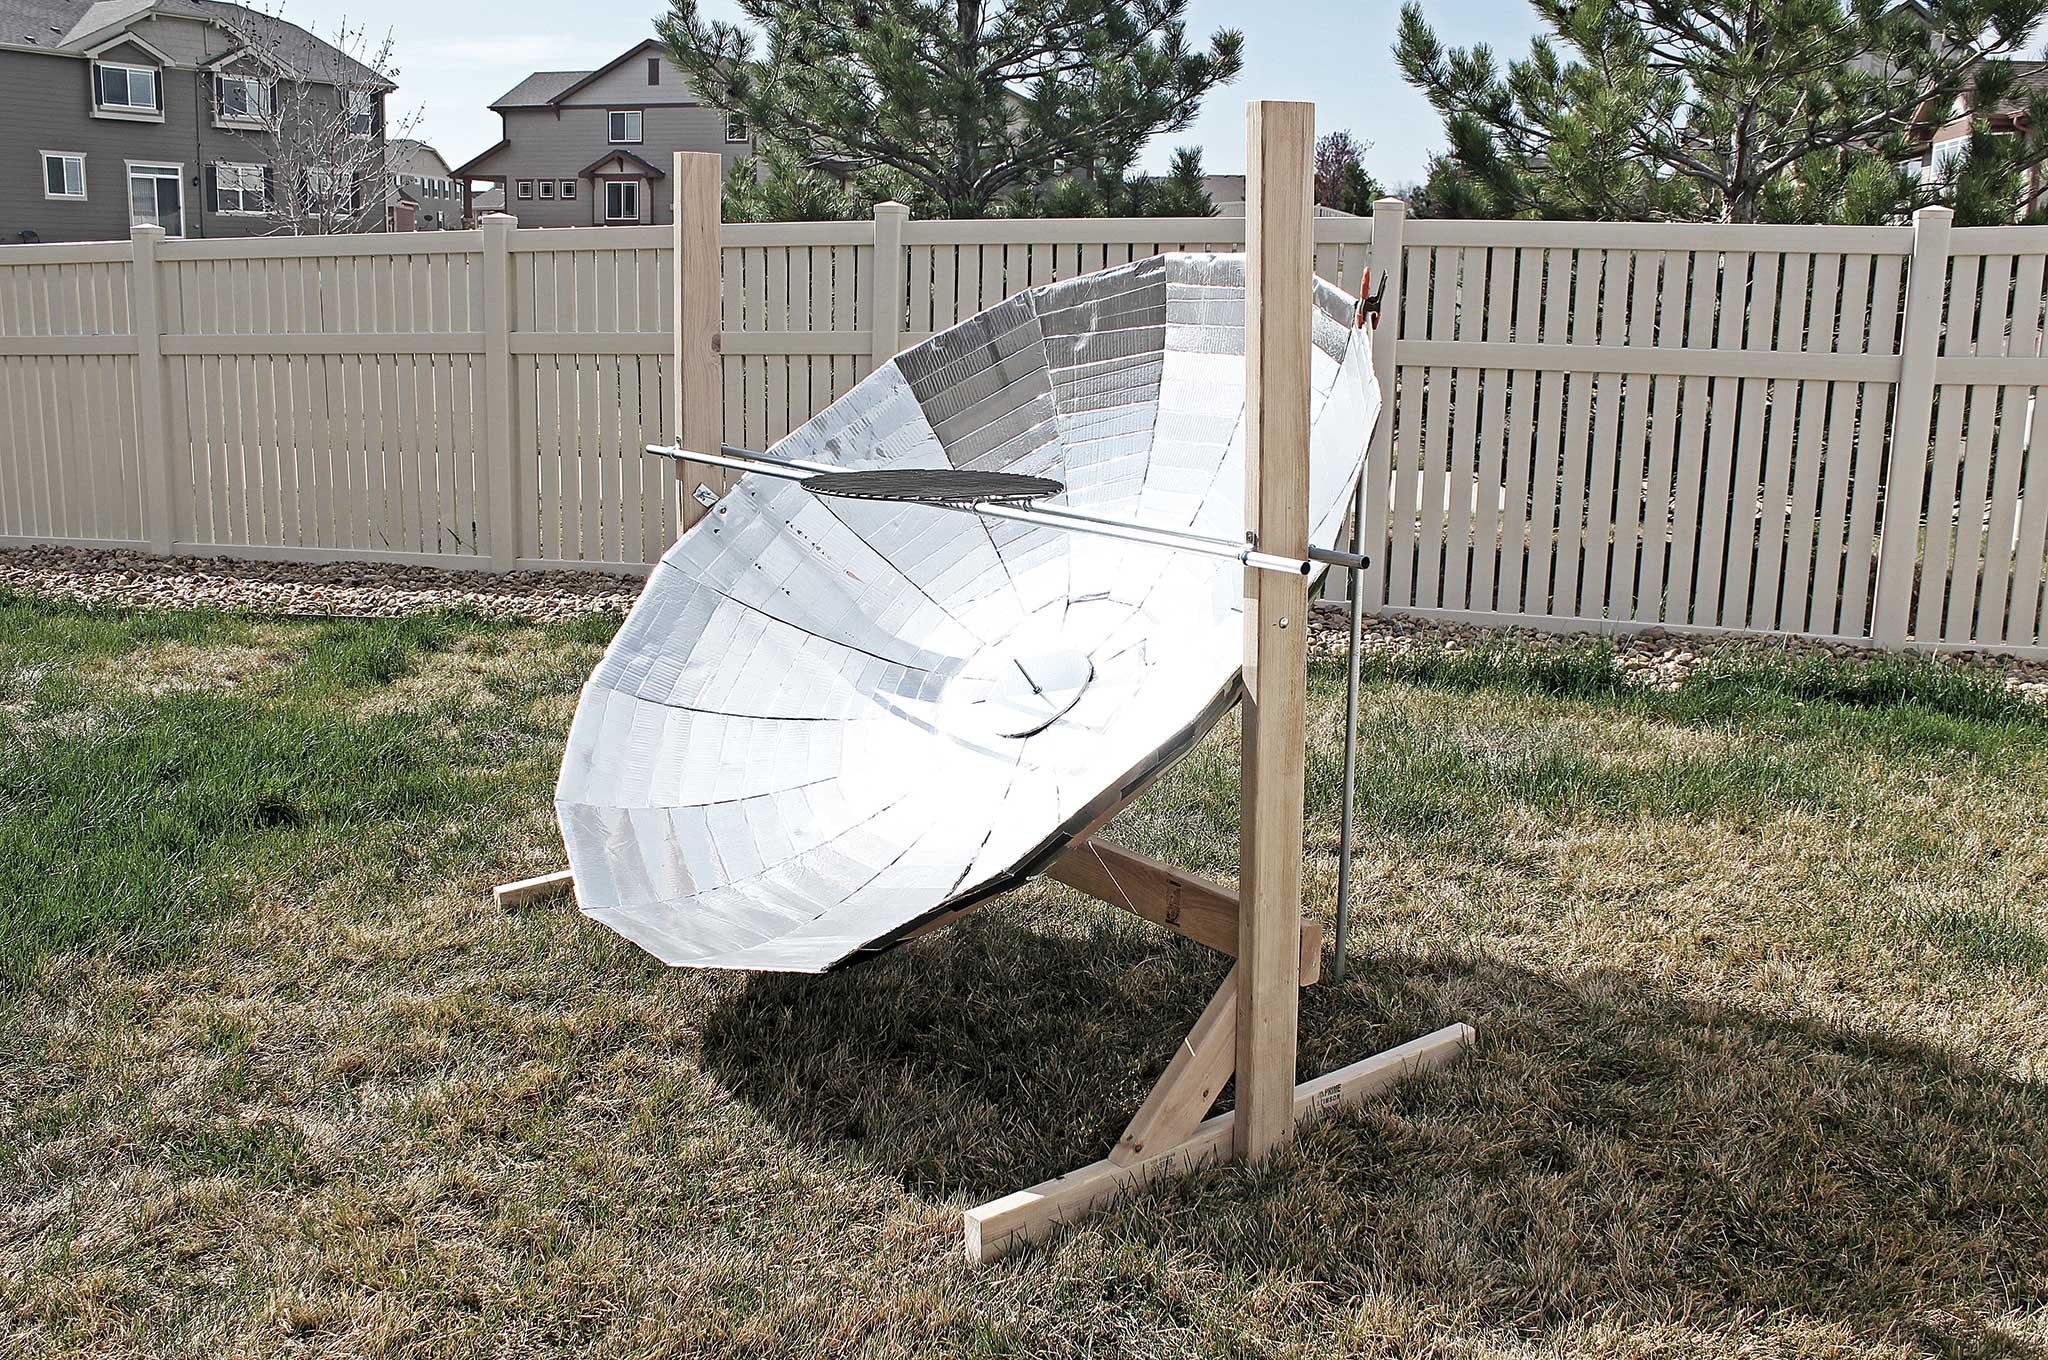
The finished parabolic solar cooker.

Solar Cooker Performance

You're hungry and it's sunny outside — so what exactly happens next?

To answer that question, I tested the solar cooker in mid-April in Colorado. The ambient air temperature was 62 degrees F, and it was a mostly sunny day. I put 2 cups of white rice and four cups of tap water in a cast-iron Dutch oven, put the oven in a plastic roasting bag (the big turkey-sized kind), stuck a thermometer in it, and put it on the cooker.

The tap water started out at 76 degrees F. In 20 minutes, it was up to 150 degrees, and in 40 minutes it was at 170. Just shy of an hour after the cooking started, the temperature inside the Dutch oven hit a max of 204 degrees, and the bag was filled with steam and condensed water. When the steaming stopped at about 65 minutes, I carefully took it off the grate and opened it up. The rice was perfectly cooked and delicious.

To evaluate its potential for pasteurizing water, I put a gallon of water in a roasting pan, realigned the cooker, and put it to work. It took about 70 minutes for the water to go from 74 degrees to the 149 degrees needed for pasteurization, and it maxed out at a respectable 183 degrees after about two hours.

Direct cooking using a cast-iron frying pan was also successful.

While definitely slower than flame-based cooking methods, it still managed to cook bacon to that delightfully crispy state. And when you've got crisp bacon, who cares if civilization is collapsing?

About the Author

Michael Janich is a U.S. Army veteran and a former intelligence officer for the Defense Intelligence Agency. As a POW/MIA investigation team leader, he worked in remote areas of Vietnam and Laos and has extensive experience making do with limited resources. An avid prepper, he was also the co-host of The Best Defense: Survival!, a TV show on the Outdoor Channel. Janich is also the founder of Martial Blade Concepts.
www.martialbladeconcepts.com

More From Issue 21

Don’t miss essential survival insights—sign up for Recoil Offgrid's free newsletter today!

Read articles from the next issue of Recoil Offgrid: Issue 22

Read articles from the previous issue of Recoil Offgrid: Issue 20

Check out our other publications on the web: Recoil | Gun Digest | Blade | RecoilTV | RECOILtv (YouTube)

Editor's Note: This article has been modified from its original version for the web.


Infographic: Traditional Native American Shelters

When it comes to survival, there's much we can learn from so-called primitive cultures. In fact, many of their time-tested skills remain incredibly valuable to this day, so we should never discount them as relics of the past. By studying primitive survival techniques, we can improve our chances of staying alive in situations where modern tools and resources are limited.

Pueblo Indian dwellings at Bandelier National Monument in Los Alamos, New Mexico.

Pueblo Indian adobe and cliff dwellings at Bandelier National Monument in Los Alamos, New Mexico.

If you live in North America, studying the shelters built by Native American cultures in your region is a great way to prepare for long-term survival. We emphasize local because this ensures the structures will be adapted to your climate, weather conditions, and natural resources. If you try to build an adobe structure in Alaska or an igloo in Arizona, you're going to fail spectacularly — these structures became traditional in their respective regions because they worked well there.

These wigwams were built in the style of the Algonquin tribe.

These wigwams were built in the style of the Algonquin tribe.

The following infographic from Alan's Factory Outlet shows 11 types of traditional Native American shelters, including the wigwam, wickiup, hogan, longhouse, and tipi. It also gives information on where each was used, and whether it was temporary, permanent, or portable. Click here to download a full-size version of this infographic.

Infographic Native American survival shelters rain snow wood building 2Infographic Native American survival shelters rain snow wood building 3Infographic Native American survival shelters rain snow wood building 4