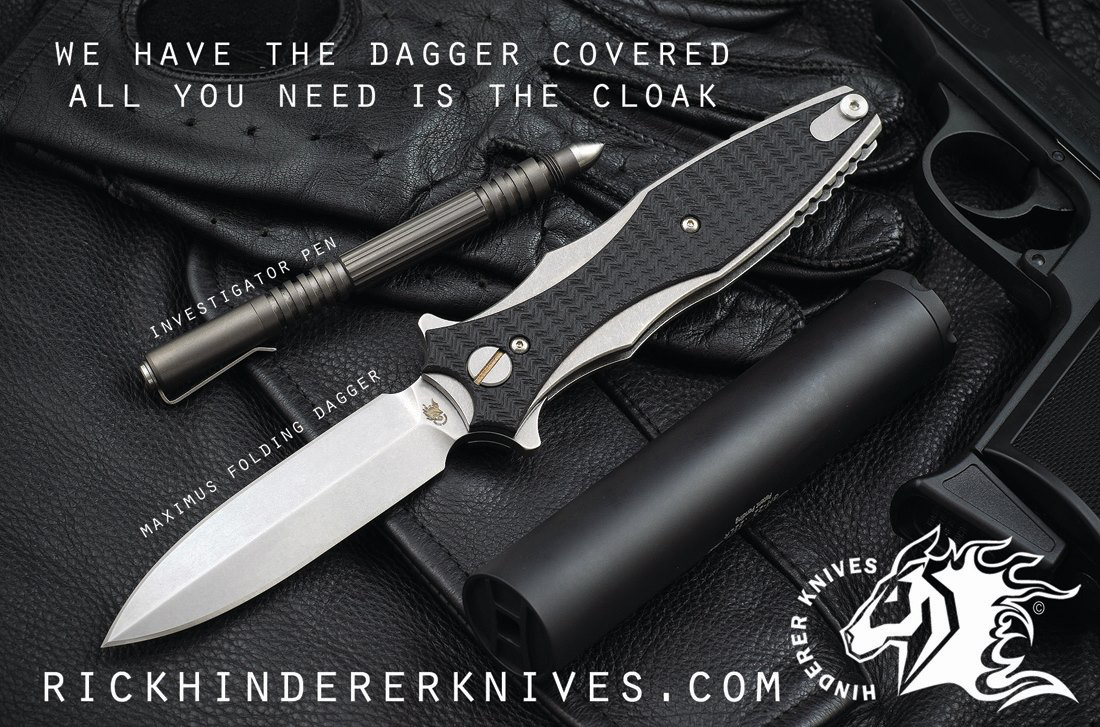
If you're into high-end knives and EDC gear, you've undoubtedly heard of Rick Hinderer. This Ohio-based knifemaker has been crafting blades since the mid-1980s, and his company makes several extremely popular folding knives, including the iconic Hinderer XM-18 (you can read our review here). These blades are made of top-shelf materials and come at a premium price — most sell for north of $400, and have strong residual value on the used market.
The latest addition to the company's production lineup is the Hinderer Maximus. Rick has designed several folding daggers over the years, and says this is the most refined version yet. We handled one of the first 20 production models at Blade Show 2017, and snapped some of the photos seen here.
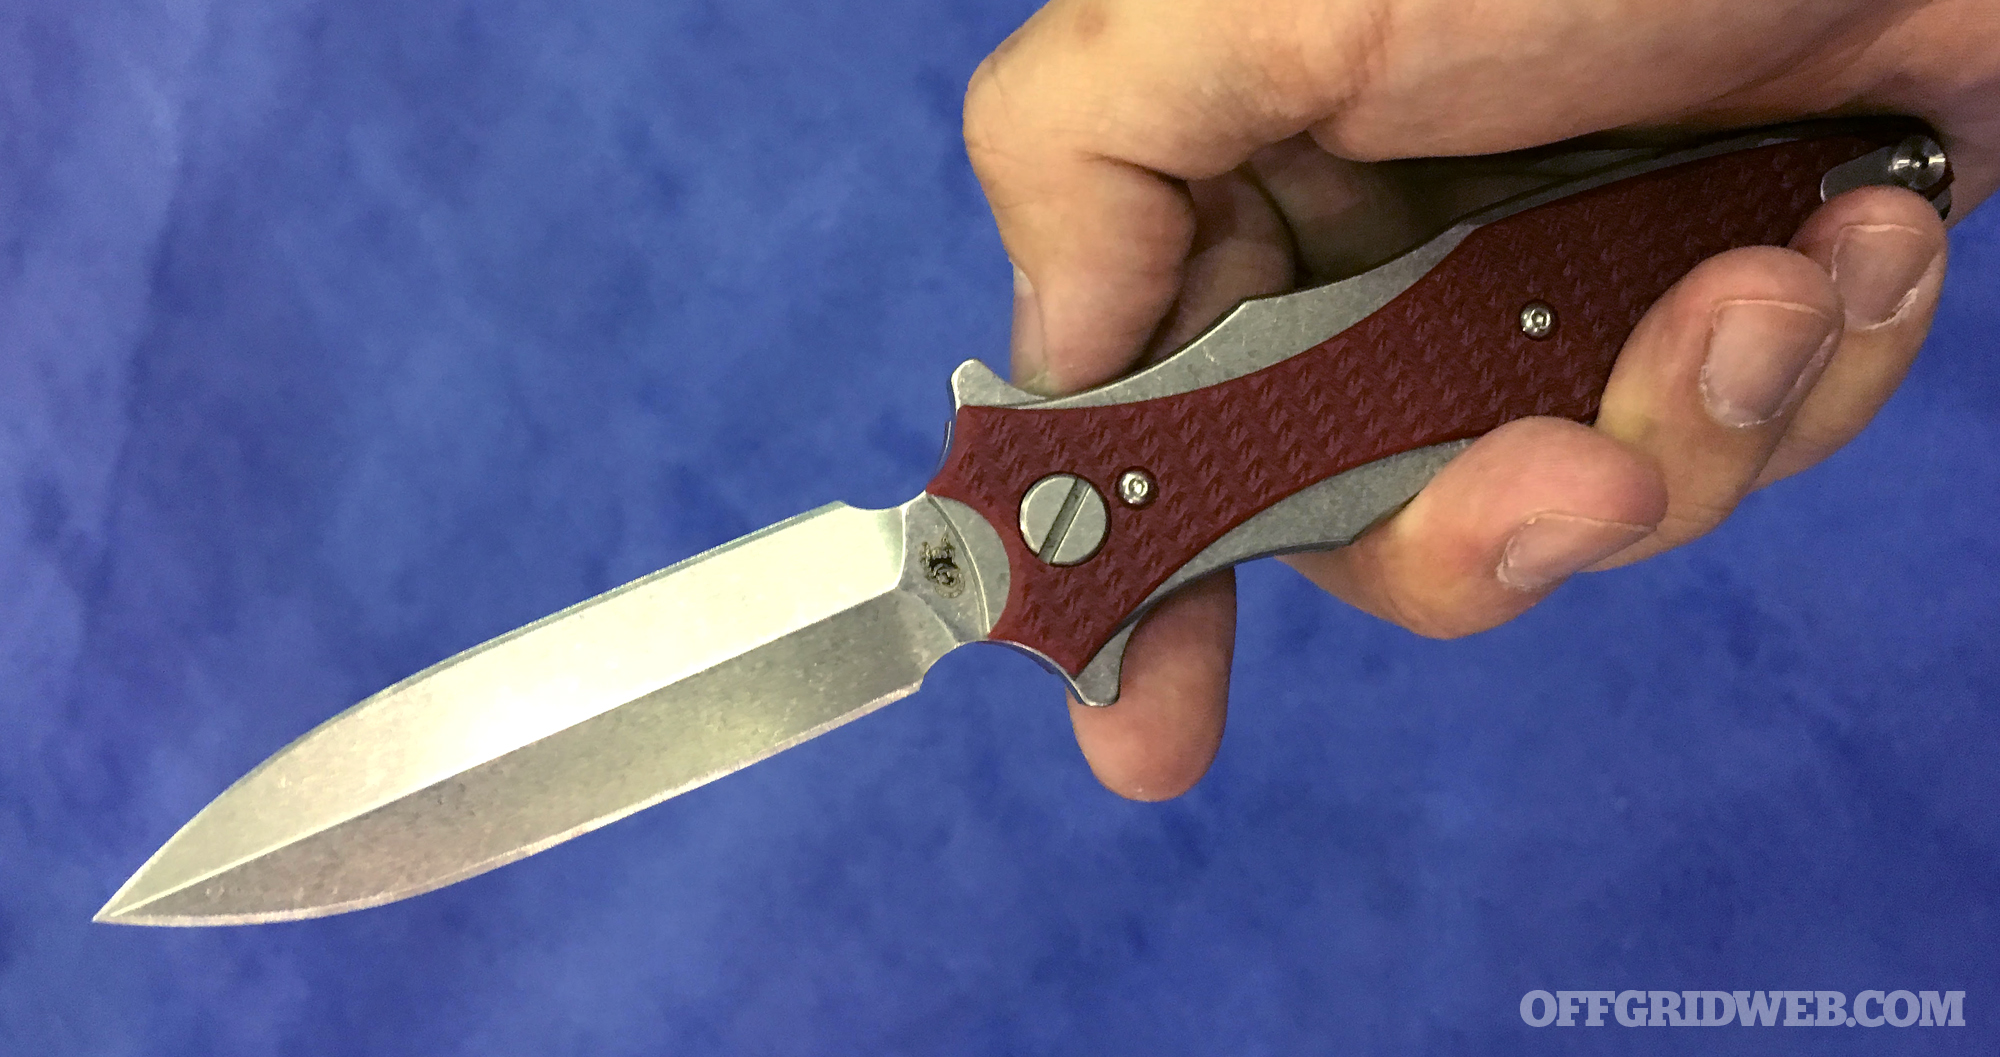
The 3.5-inch dual-edged blade has a symmetrical design with finger guards on each side. This appearance may leave you scratching your head at first, since one (and only one) of the guards serves as a flipper lever to deploy the CPM 20CV stainless steel blade.
You'll also want to be extremely careful when closing the blade, since muscle memory may lead you to reach for the spine like you would on a single-edged folder. Hinderer's site puts it like so: “You can’t be an idiot with it or you can cut yourself. Just realize the other side is sharp and one-hand close it using the tab rather than the spine of the blade.”
The Maximus' handle is composed of lightweight titanium, with a frame lock mechanism and textured G10 scales. A reversible titanium pocket clip allows for tip-up left- or right-handed carry. Overall weight is 4 ounces, and MSRP is $425. For more info on the Hinderer Maximus dagger, go to RickHindererKnives.com.
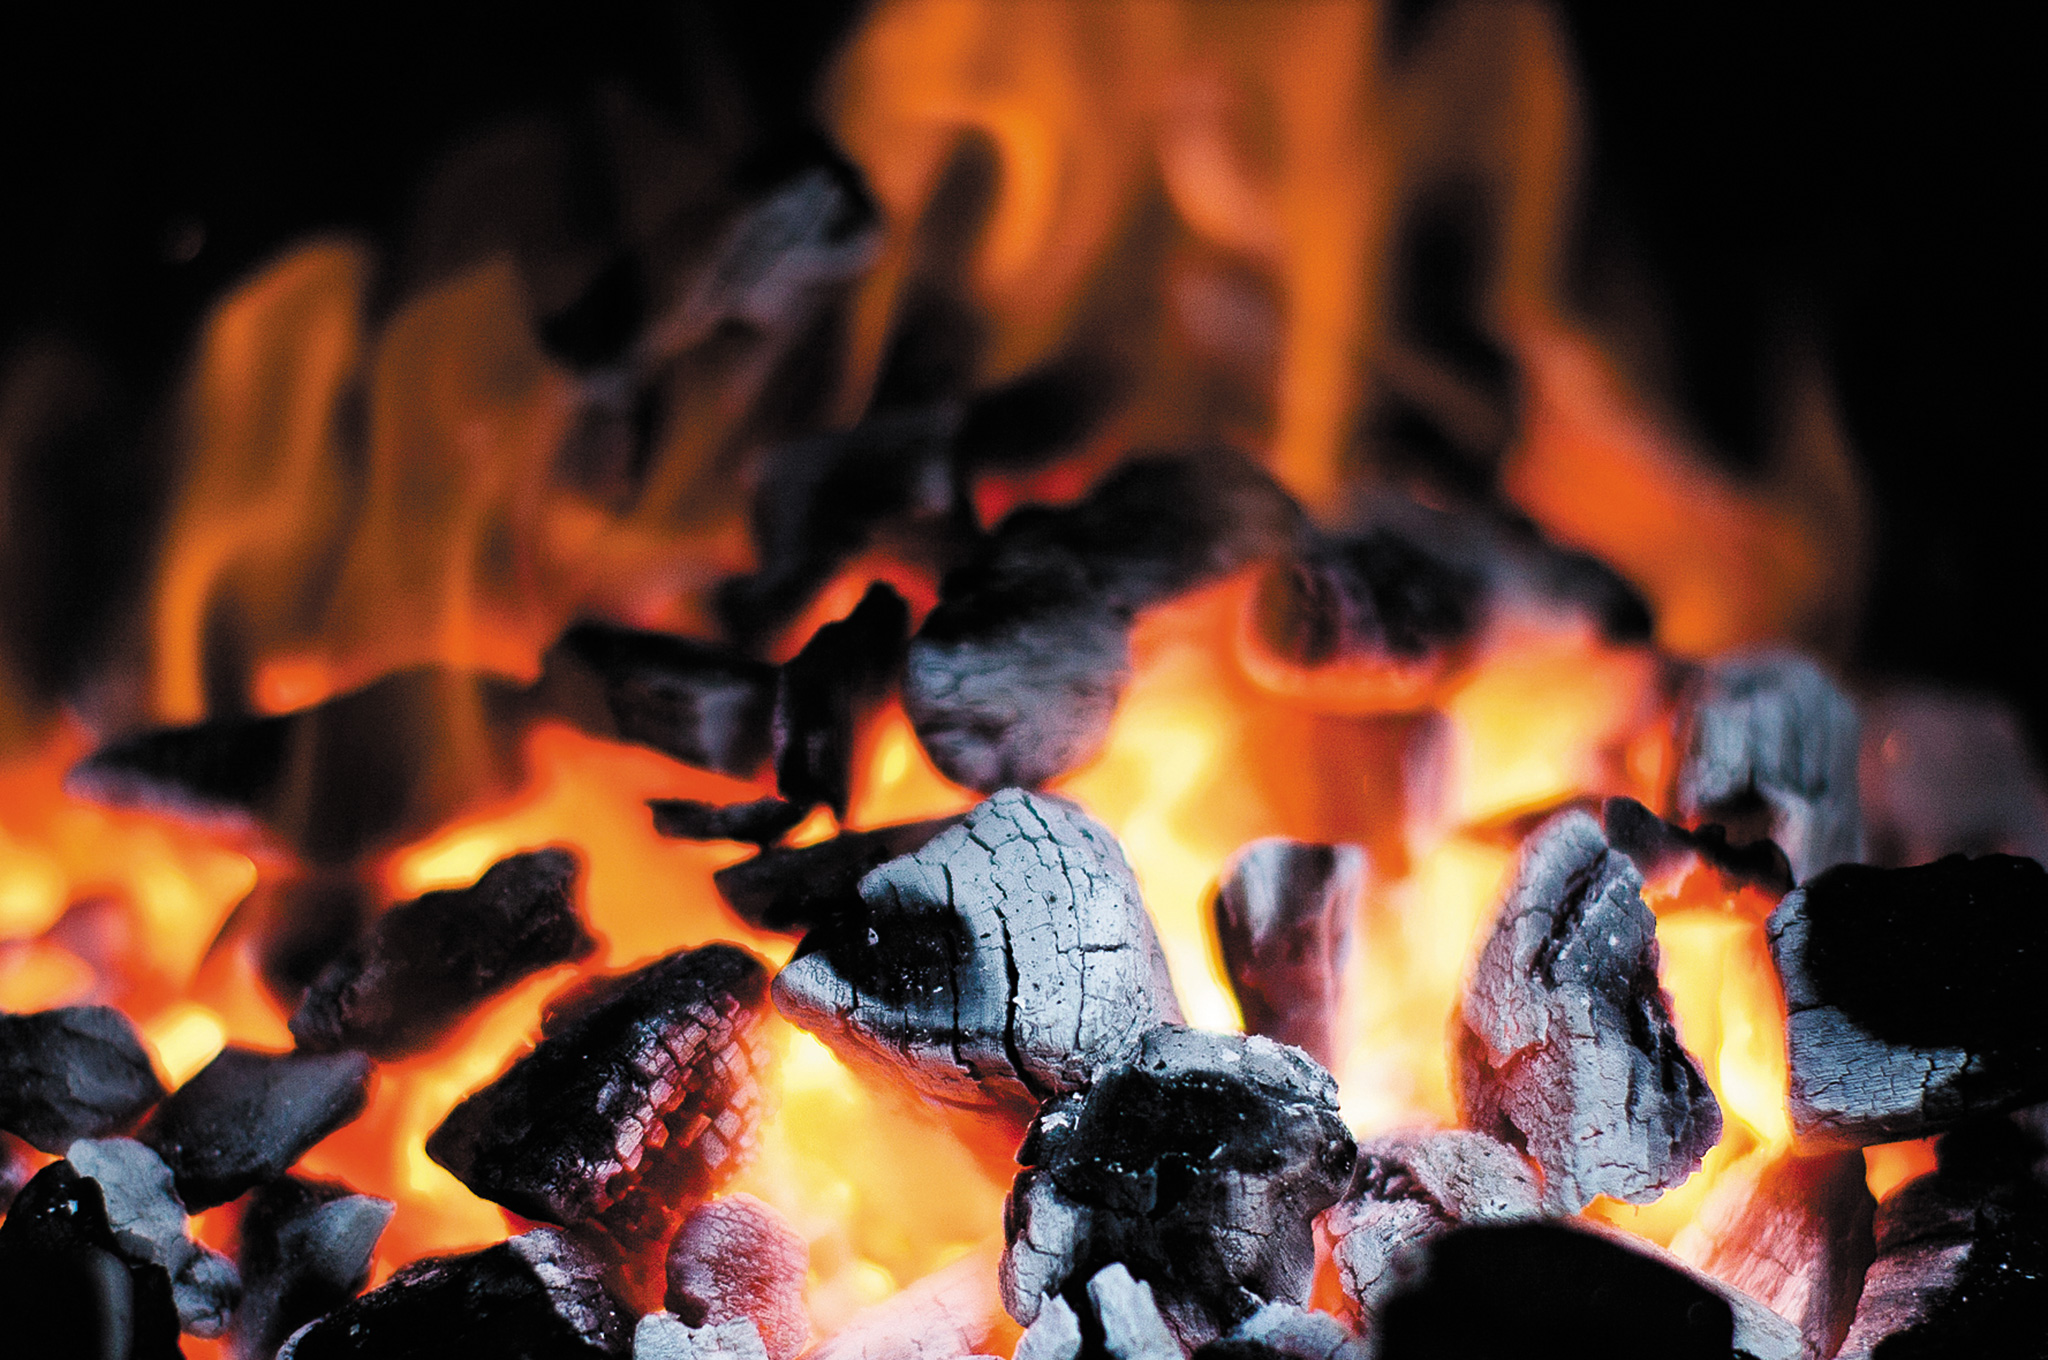
Tinder is a subject that often comes up in the survival and bushcraft community — and no, we're not referring to the internet matchmaking app. That's not helping anyone survive, unless you're really desperate for a hookup. We're referring to the original analog tinder: combustible material. There's a wide range of tinder types to choose from, and each has its own advantages and disadvantages.
Some tinder materials take a spark easily but fizzle quickly, while others burn longer but are harder to ignite. Cost, size, weight, water resistance, temperature sensitivity, and availability are also worthwhile considerations. Even then, an excellent tinder for arid desert environments may fail spectacularly in the wet rainforest or icy tundra. It's important to consider all these variables when you're assembling a fire-starting kit for your bug-out bag or survival pack.
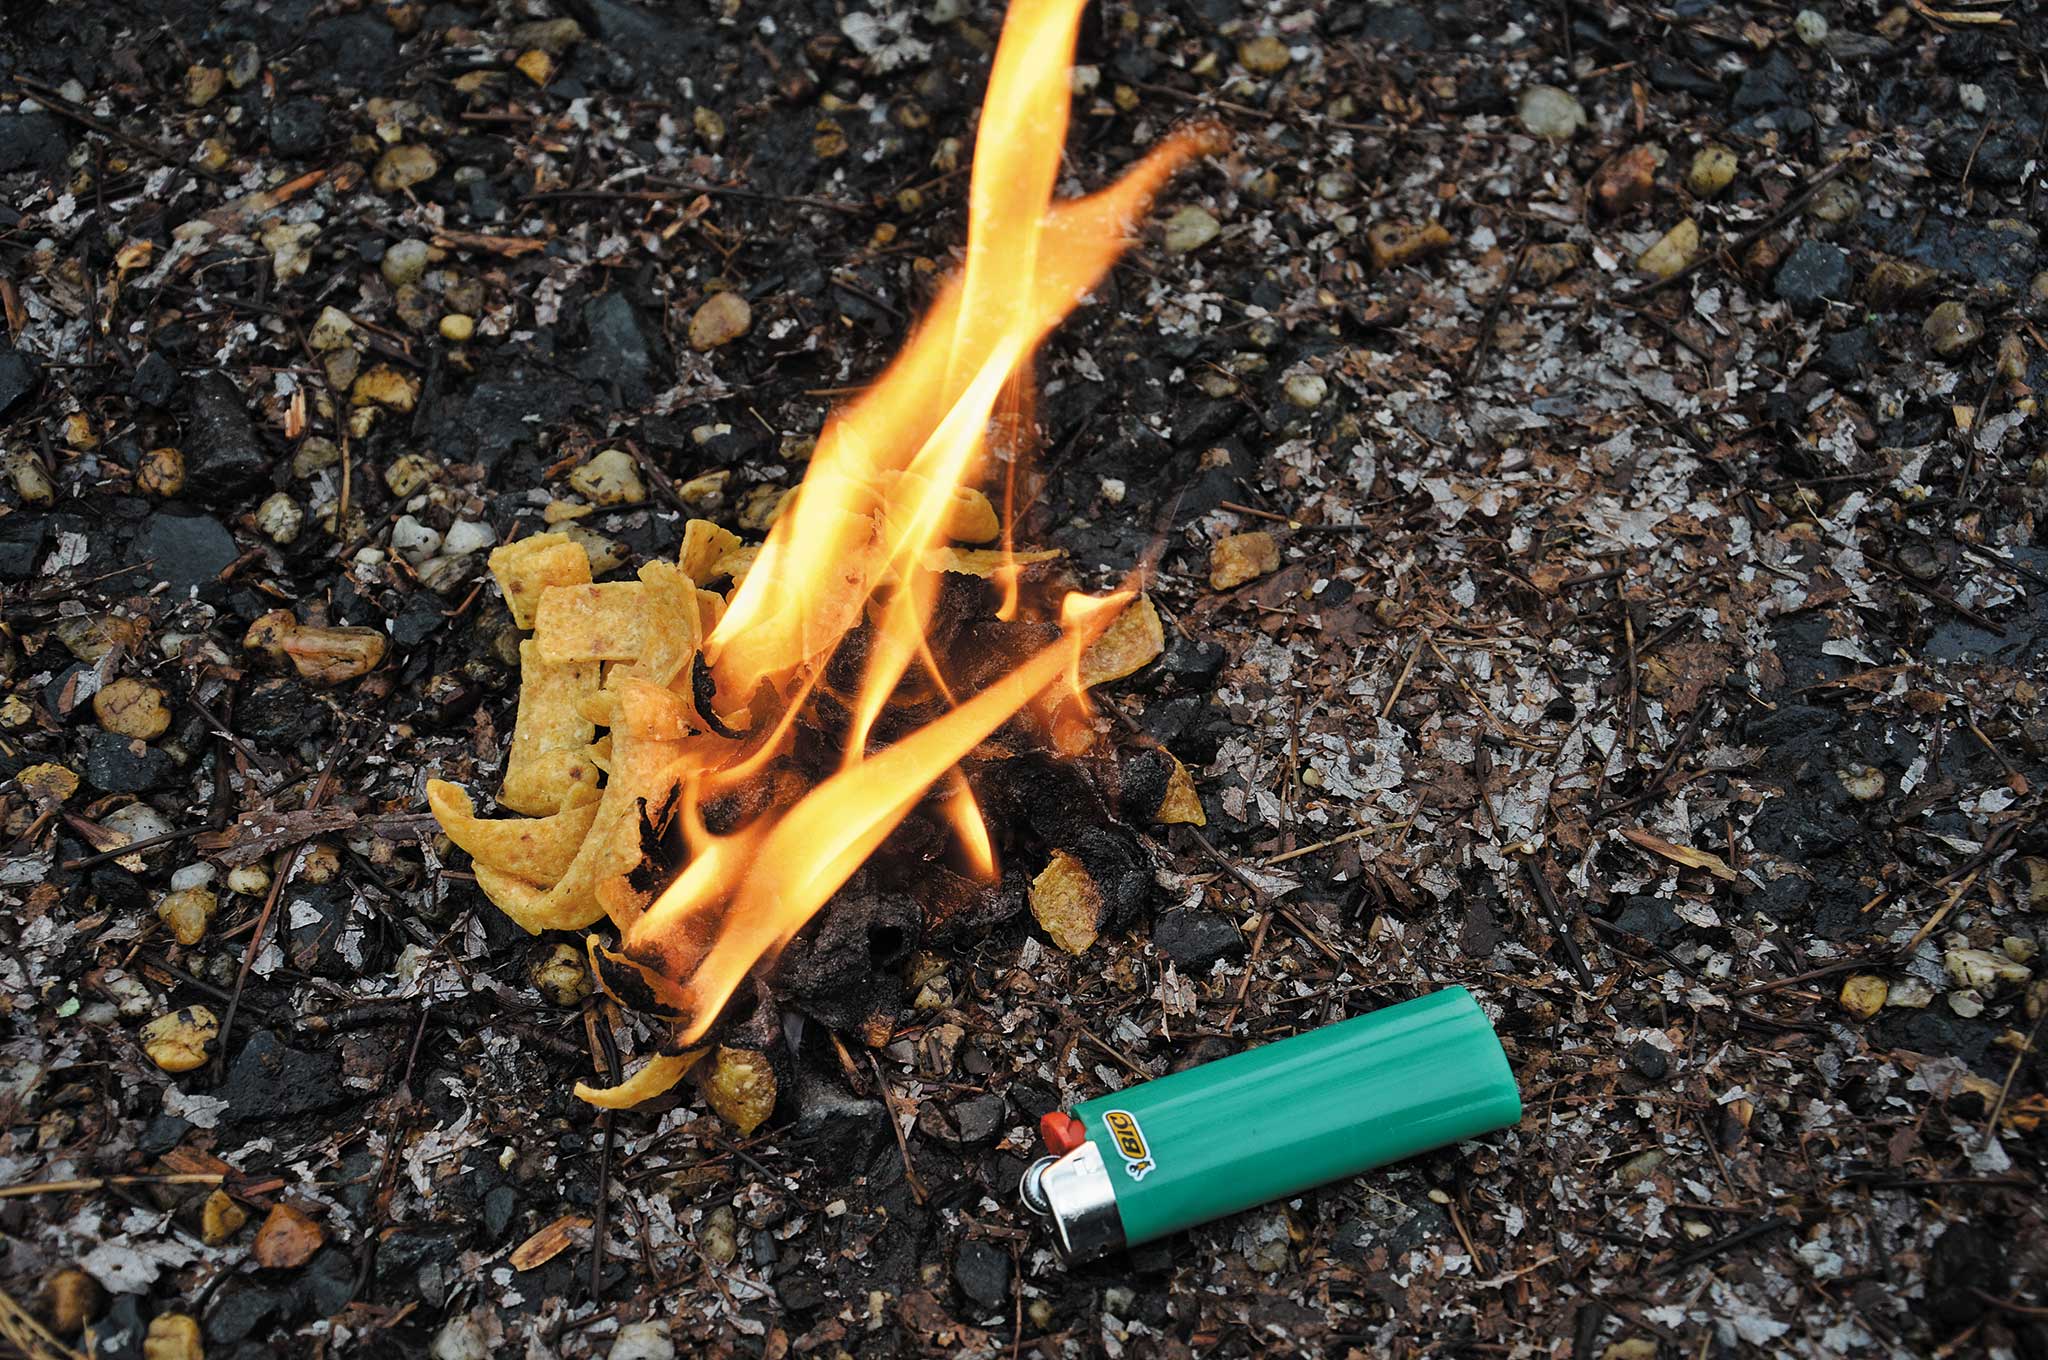
Even oily Fritos corn chips can be used as an effective tinder material.
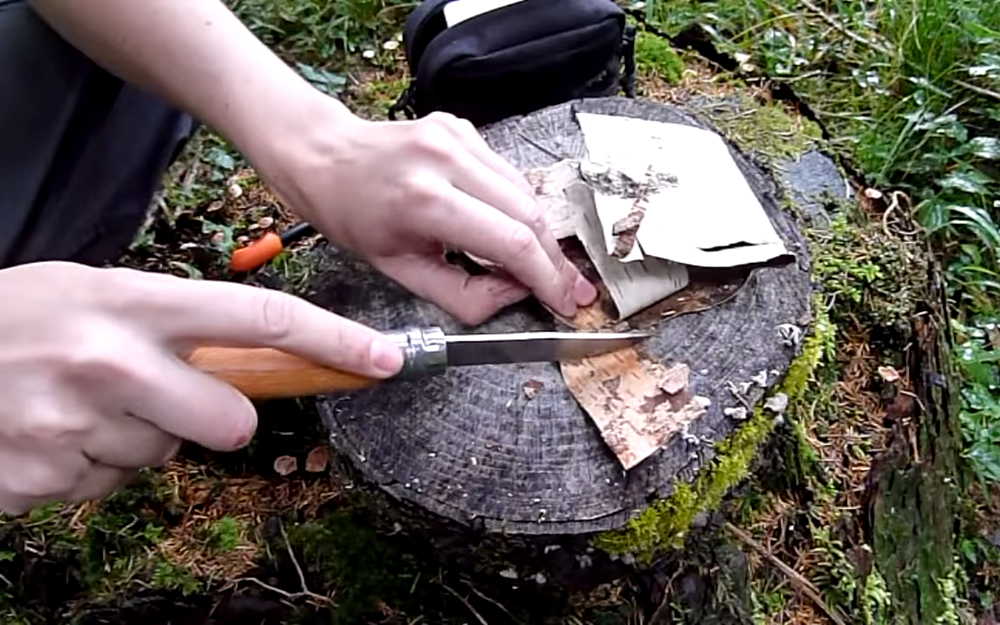
Off-the-shelf tinder materials, such as the resin-soaked fatwood sticks found at your local camping store, often boast long burn times. But how do they fare in the real world? The following video from YouTube channel TinMan Bushcraft compares four commonly-available tinder materials: untreated cotton from a tampon, a petroleum-jelly-coated cotton ball, a strip of natural birch bark, and fatwood.
For those who can't watch the whole video at the moment, here's a recap of the burn times:
Untreated cotton tampon – 1:03
Petroleum-jelly-coated cotton ball – 2:10
Shredded birch bark – 1:38
Fatwood shavings – 1:40
It also appears as though the Vaseline-soaked cotton burned most energetically, followed somewhat surprisingly by the birch bark, then the fatwood, and finally the cotton. While the petroleum-jelly-coated cotton looks great on paper, it's also not a naturally-occurring item you can find in the forest, and it requires a bag, bottle, or tin to prevent the Vaseline from getting all over your gear. The reviewer says he prefers the birch bark for these reasons.
We'd like to see this format applied to an even bigger comparison test, including off-the-shelf tinder blocks, ranger bands, cattails, char cloth, and other common tinder sources, but for now this provides a good baseline. What's your favorite tinder material? Let us know in the comments.
If you were out running errands at the mall, and a truck careened into a crowd of pedestrians, would you know what to do? What about in a mass-shooting scenario, a structural collapse, or a residential fire? Would you immediately know the steps necessary to save the lives of those around you? These are difficult questions, but necessary ones.
As prepared individuals, we must know how to assess injuries and how to stabilize life-threatening cases during a disaster. That's not to say you need to be military, law enforcement, or a medical professional, or even have any kind of formal training in trauma care — learning the basics is something anyone can do.
You might have a tourniquet or trauma kit, but do you know how to use it?
However, emergency medical care can seem imposing, and the use of complex tools and technical jargon can make it seem more difficult than it needs to be. This is why we're always glad to see emergency medical care guides that keep things simple. The Tactical Emergency Casualty Care (TECC) guidelines are one of the best examples we've come across in this regard.
Without proper on-scene care, innocents' lives may be lost long before they can reach a hospital.
These TECC guidelines are produced by the Committee for Tactical Emergency Casualty Care (C-TECC), a not-for-profit (501c3) organization composed of medical experts who volunteer their time in order to prepare urban areas for major mass casualty events. The TECC guidelines is “a set of evidenced-based and best practice trauma care guidelines for civilian high-threat pre-hospital environments.” You can view the guidelines below, or click here to download or print a copy.
These TECC guidelines cover what to do during direct threats, where your life and the life of the casualties may still be in imminent danger, as well as indirect threats, where the risk of continued bodily harm is low. Each of these steps is presented in simple layman's terms, and in order of importance — controlling life-threatening blood loss, clearing the patient's airway, monitoring breathing and circulation, and so on.
If you're not certain you'd know what to do during an emergency medical situation, we'd suggest studying these guidelines, and possibly printing them out for future reference. Building this knowledge now could help you save lives when seconds count.
Hat tip to Andy Schrader for letting us know about these TECC guidelines.
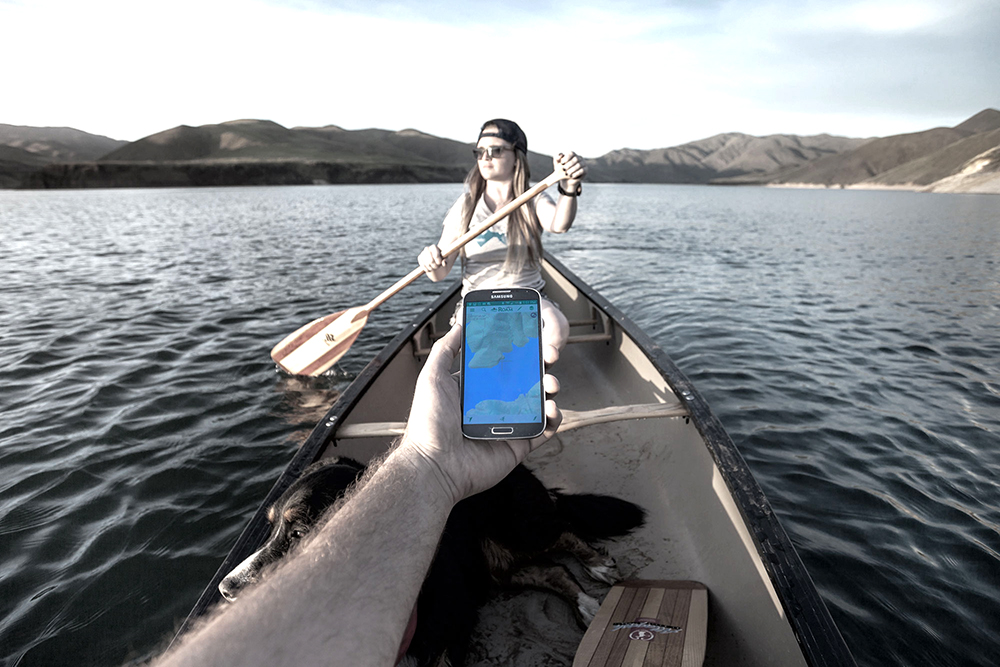
Some survivalists like to throw shade on using modern technology when survival techniques are involved. You’ll never find a power outlet in the woods! Your satellites can’t triangulate your position when they just got smoked by an EMP-filled nuke, they say.
Absolute doomsday scenarios aside, there are lots of times when technology can be used to get you out of a terrible situation. Or in the case of using your cell phone to navigate, maybe keep you from ever getting into a terrible situation in the first place.
There are a few obvious challenges to using your phone in a place without free Wi-Fi, wakeup calls, or complimentary continental breakfasts. These would include powering your phone, accessing maps of your area, and actually pinpointing and tracking your location. We’ll address some of these concerns here.
Map Download and App Selection
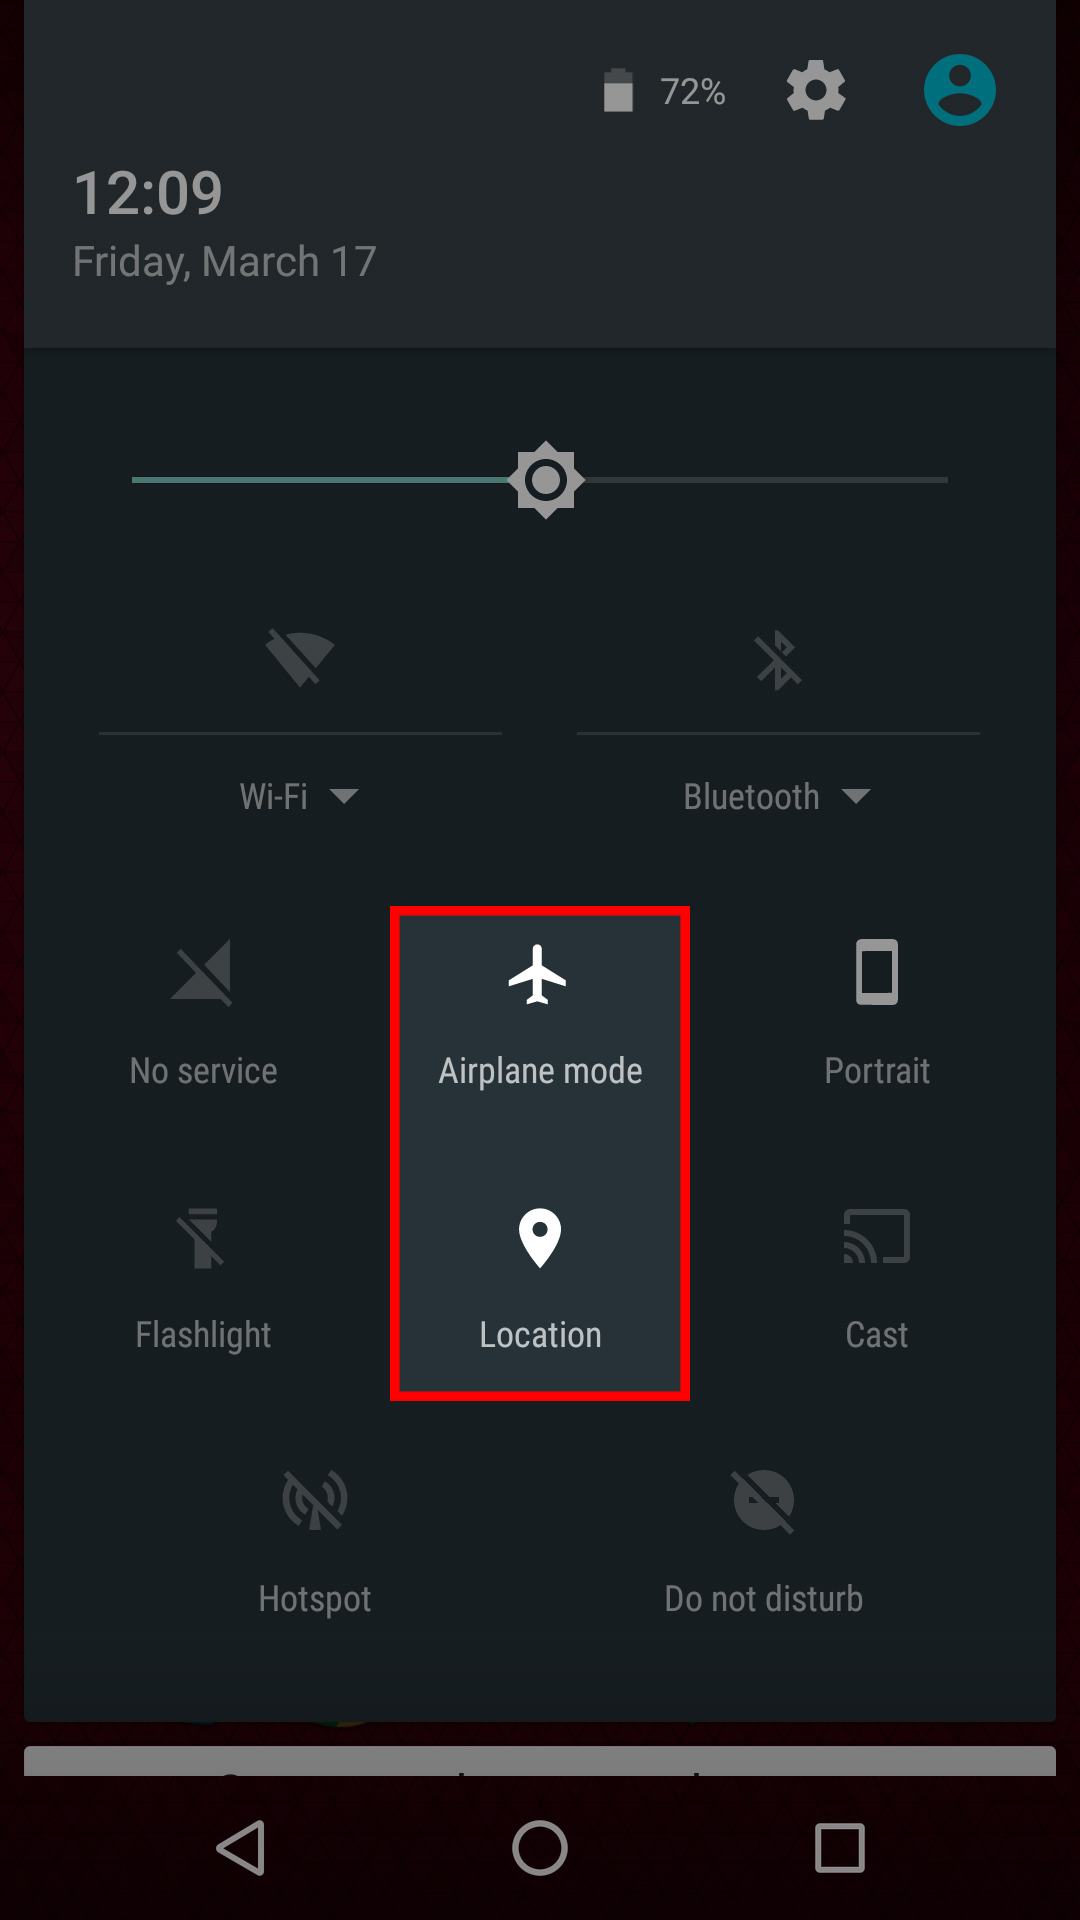
Rule #1 for using your cell phone as an off-the-grid land navigation device is to make sure that it’s in Airplane Mode as much as possible. This will help prevent unnecessary apps from running in the background, and stop your phone from pointlessly draining your battery by searching for a data connection that's unavailable in the backcountry.
This screenshot shows how to activate airplane mode without disabling location on Android.
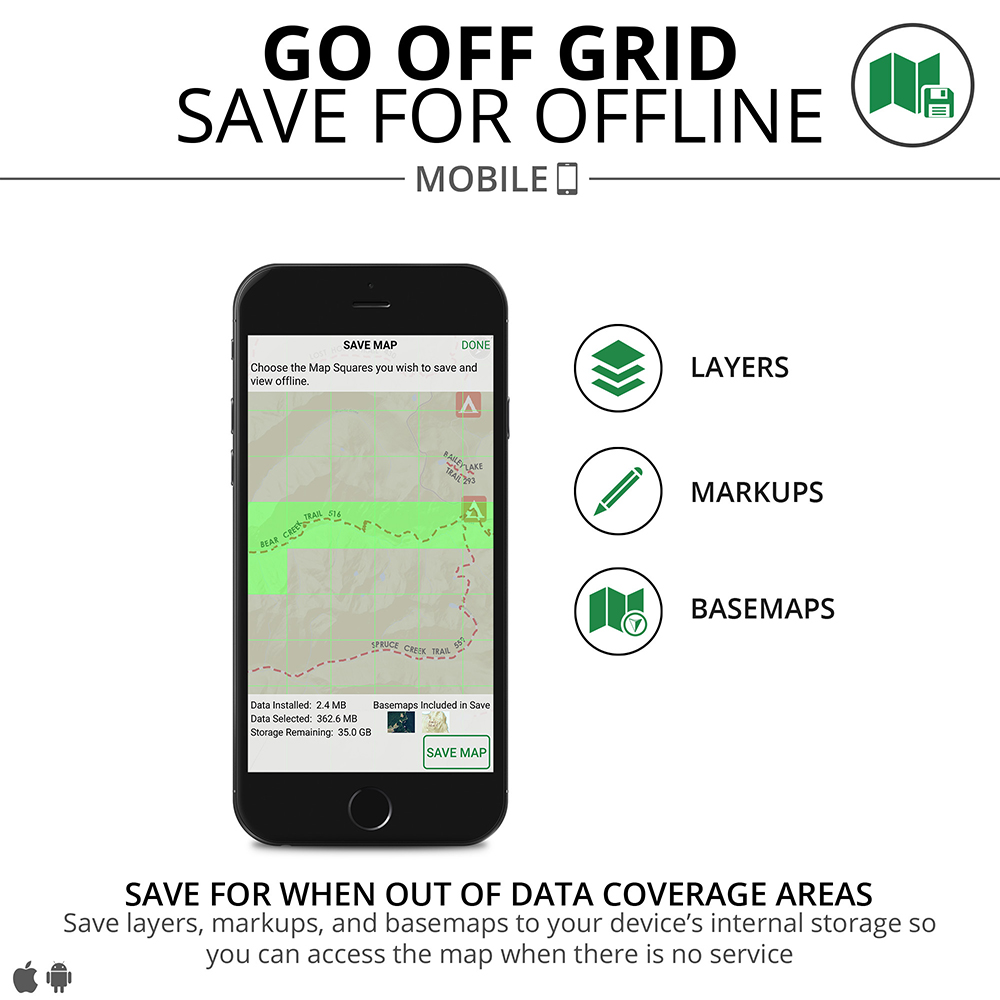
You may be thinking, “How can I access maps if I don't have a data connection?” The trick is to download maps to your phone ahead of time so you can pinpoint where you are, even when there's no signal.
This doesn’t mean download the map at the trailhead or after the apocalypse hits, because you probably won’t have service at that point anyway. It means to download the maps of the area you leave before your trip, or at least before you get off the main highway. The doomsday version of this tip would be to download maps of your intended bug-out region before mass panic over a random “covfefe” tweet inadvertently leads to thermonuclear war.
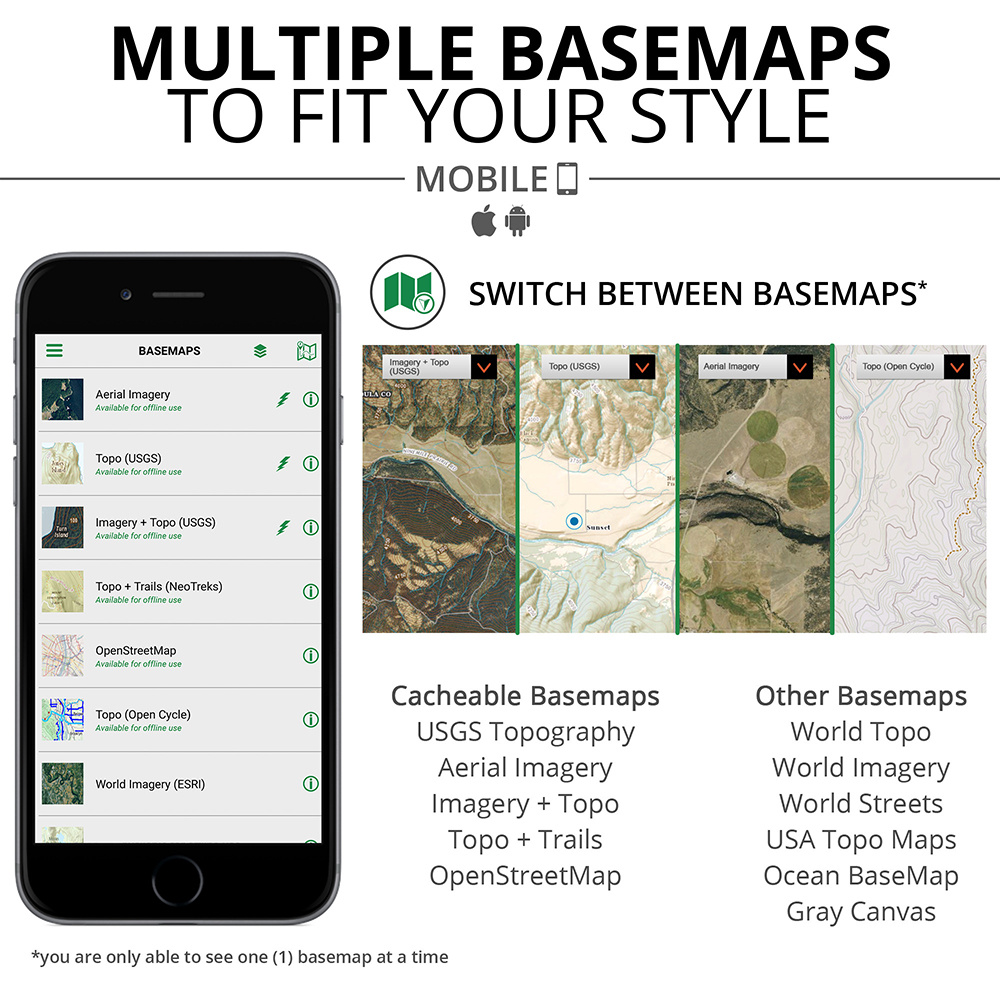
Many mapping services, such as Roam, offer offline map downloads.
The good news is you have a choice of apps for this purpose. Google Maps and its offline download option is arguably the most popular, and it’s free. It allows you to download maps on your phone for offline use, although it’s not really designed for wilderness areas, so it can be hard to locate trails.
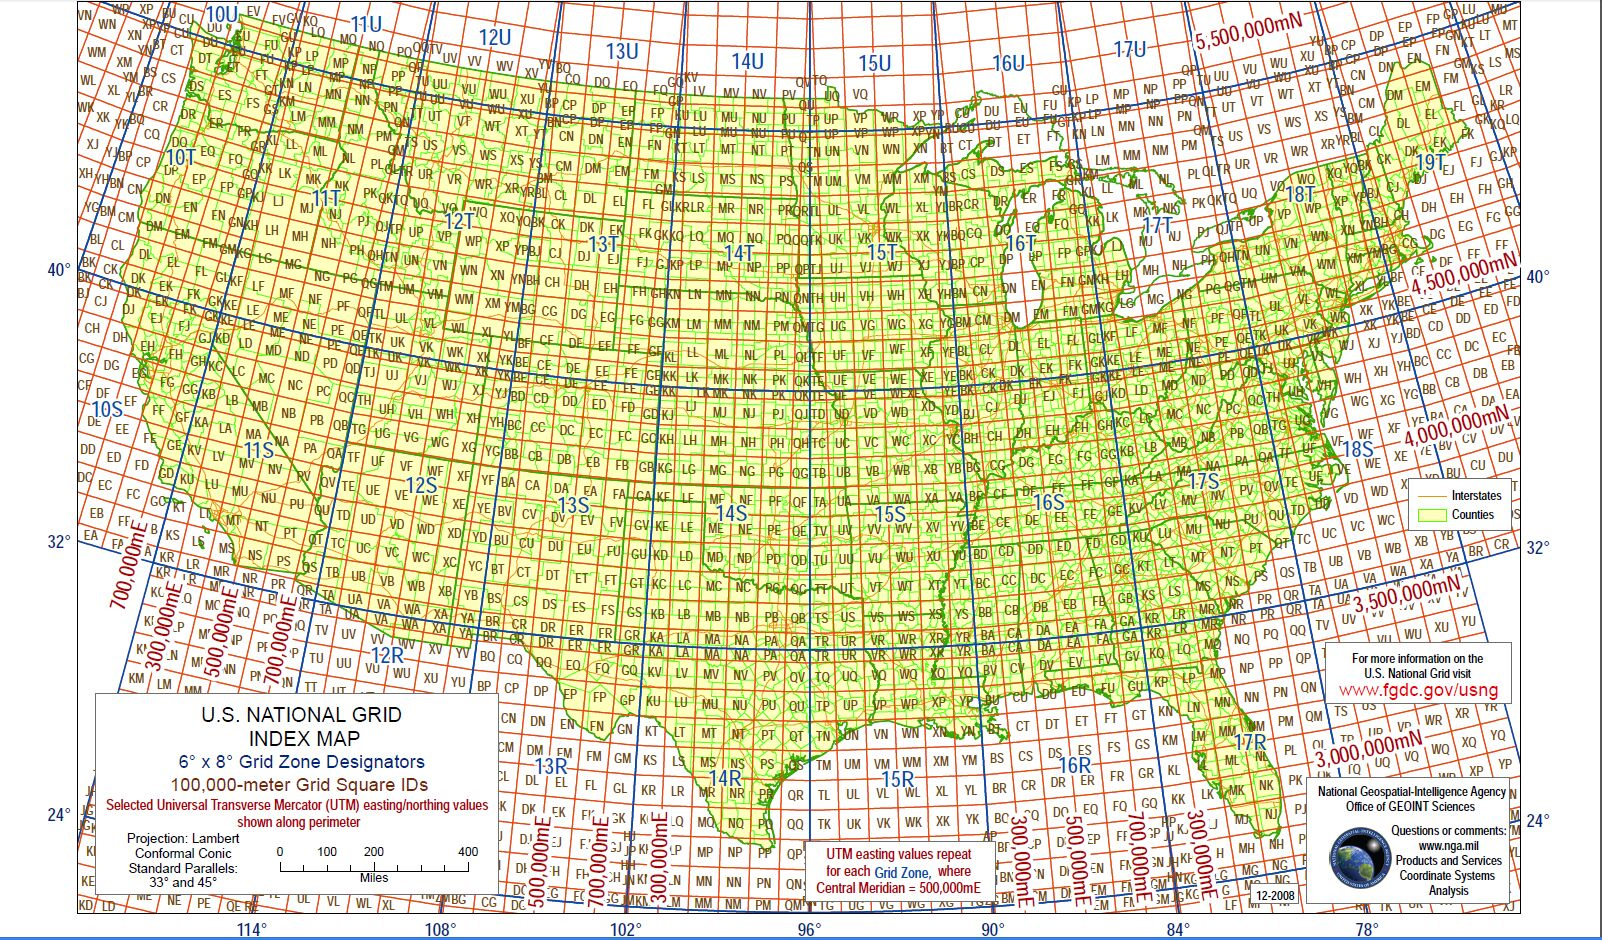
The Gmap4 app is also free, and includes automatic conversions to United States National Grid (USNG) coordinates. This would make it simple to convey your location to other people or potential rescuers. It includes access to detailed topo maps, and can even function without the internet, although that trick requires a multi-step workaround that’s easy to do wrong. This is not the most user-friendly mapping system, but it’s free, so even if you decide you hate it you’ll only have lost some time. For someone who likes to tinker and spend some time exploring an app’s hidden functionality, this is not a bad choice.
With proper training, your Gmap4 coordinates can be converted to the standard USNG grid format.
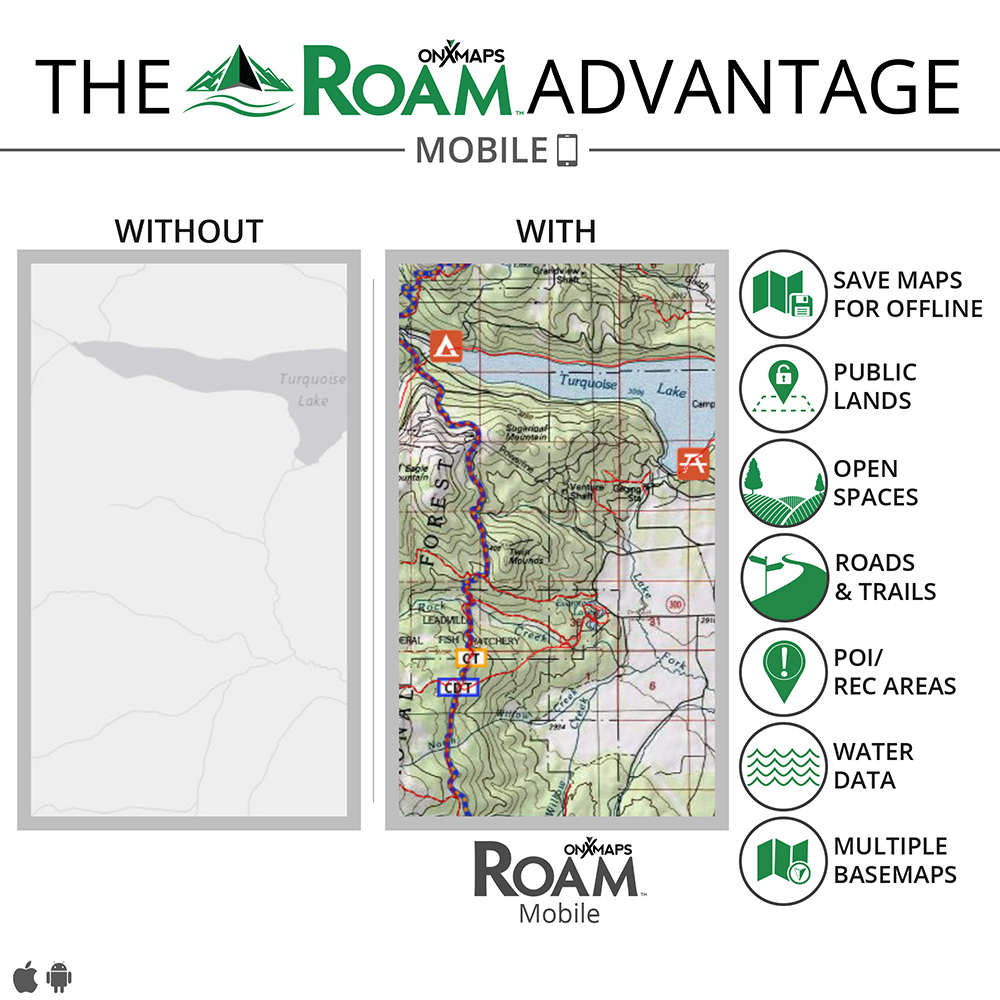
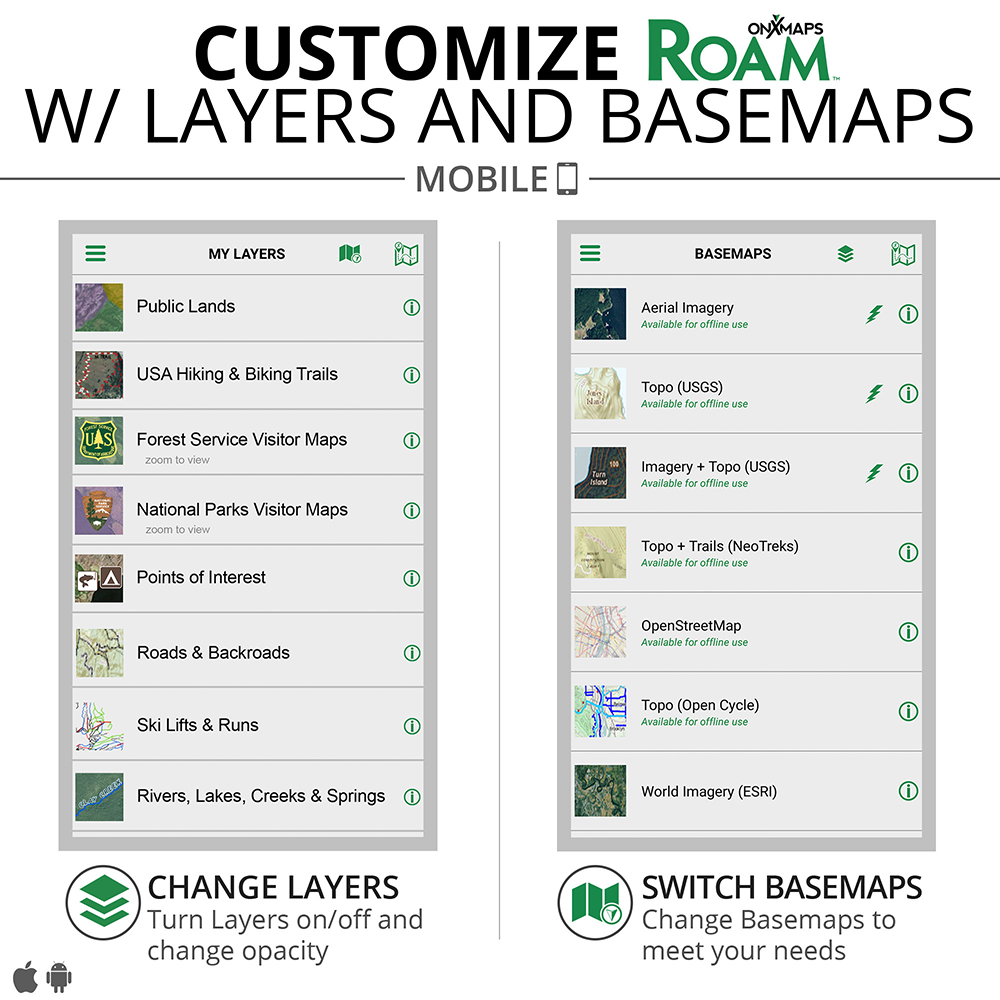
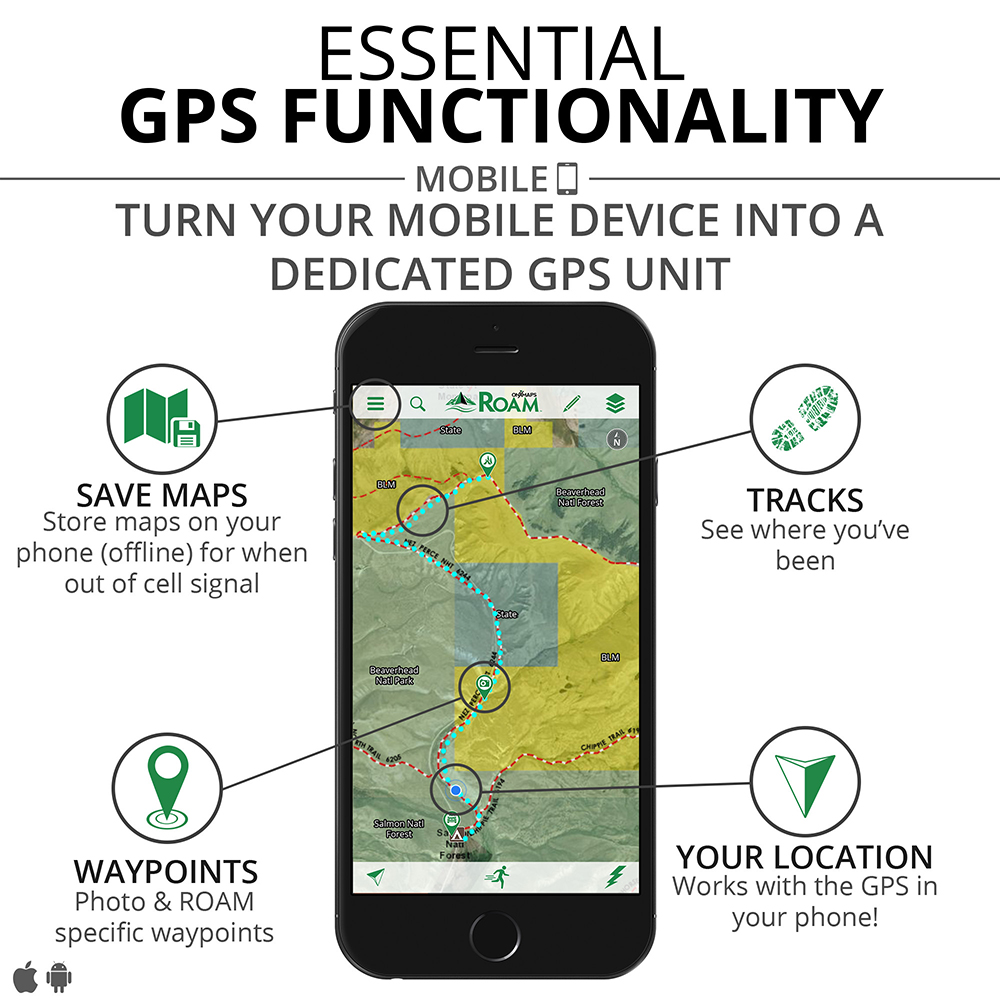
Over the past few months we’ve been using Roam by onXmaps. This modestly-priced app uses a $10-per-year subscription service to seamlessly download location maps (choosing high or low detail), easily record where you’ve been, and draw out a planned path ahead of time which you can follow along during the hike (or drive).
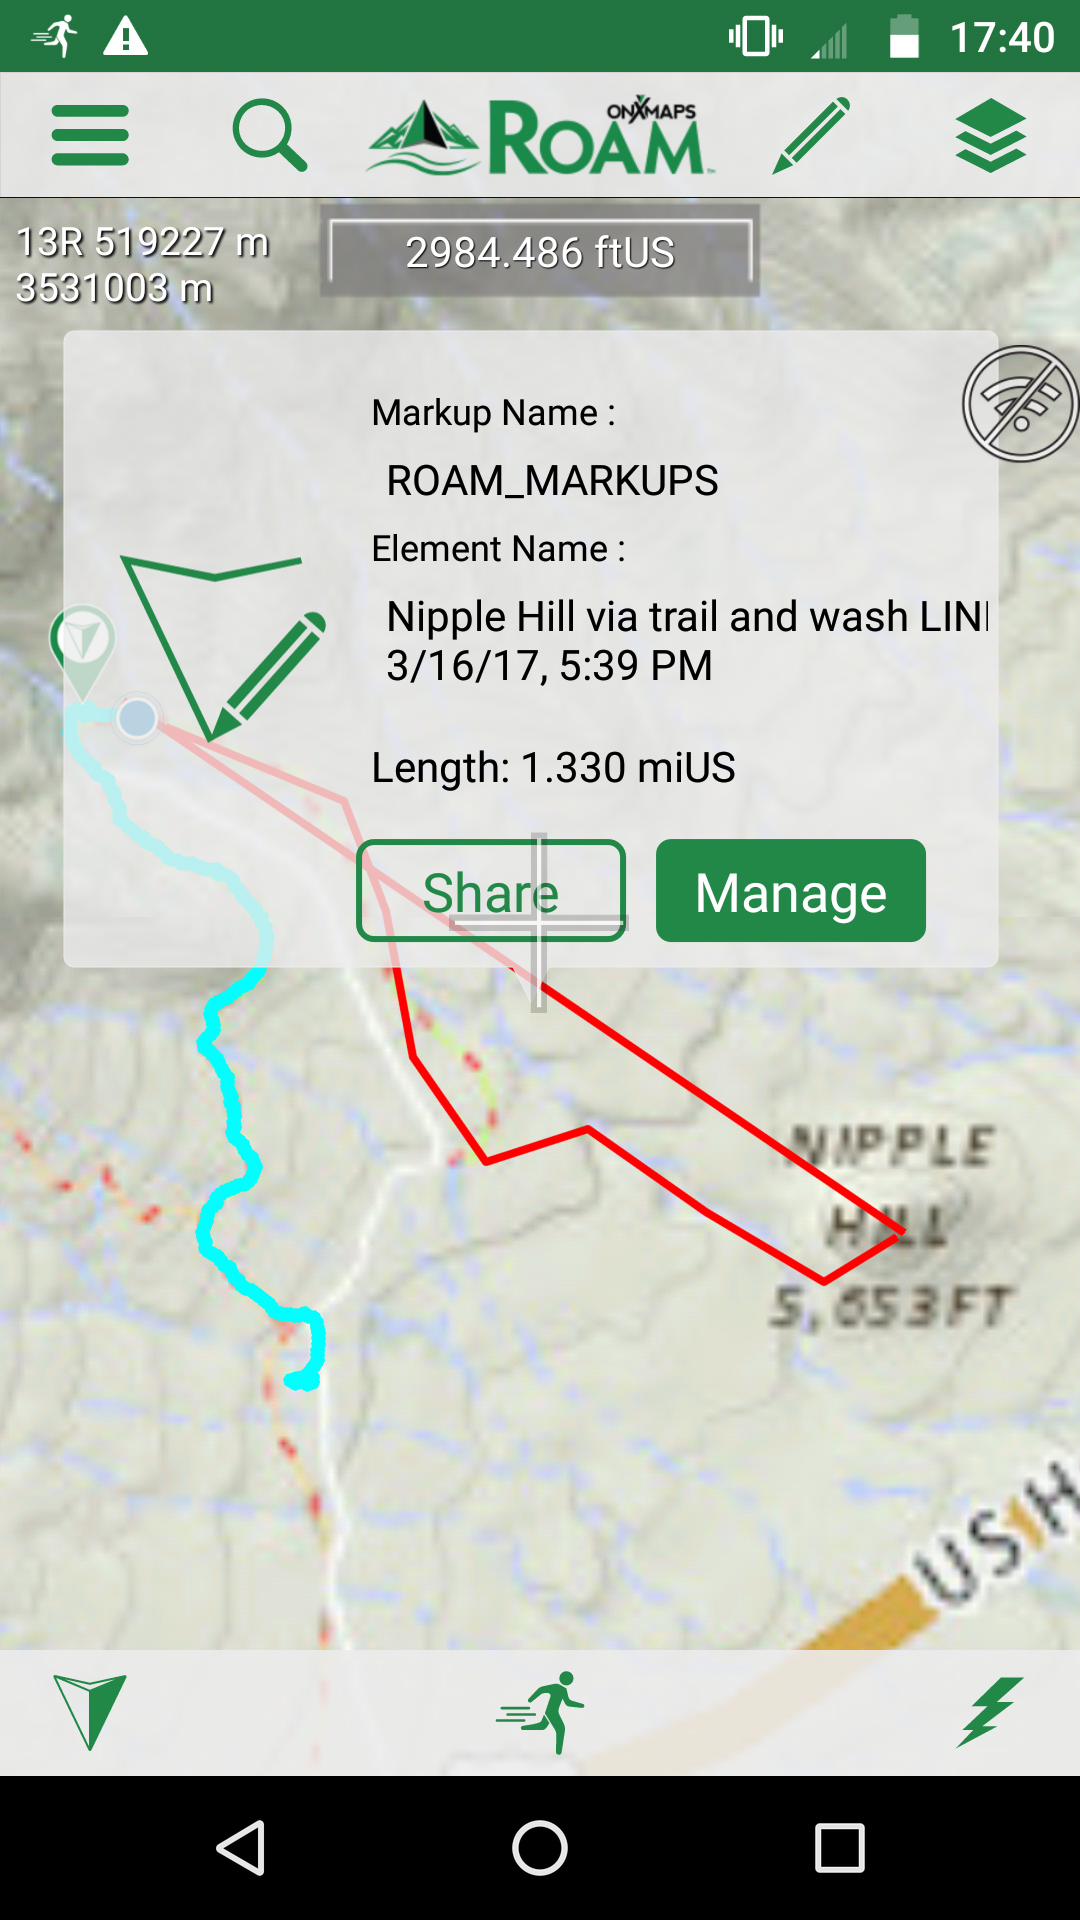
We really liked the Roam app for the variety of maps we could download in advance, including national park maps and specialty topo maps with National Scenic Trails (such as the Florida Trail and the Appalachian Trail) clearly outlined. We were also able to easily compute the distance between where we were and where we wanted to go, by simply drawing a line with our finger on the map.
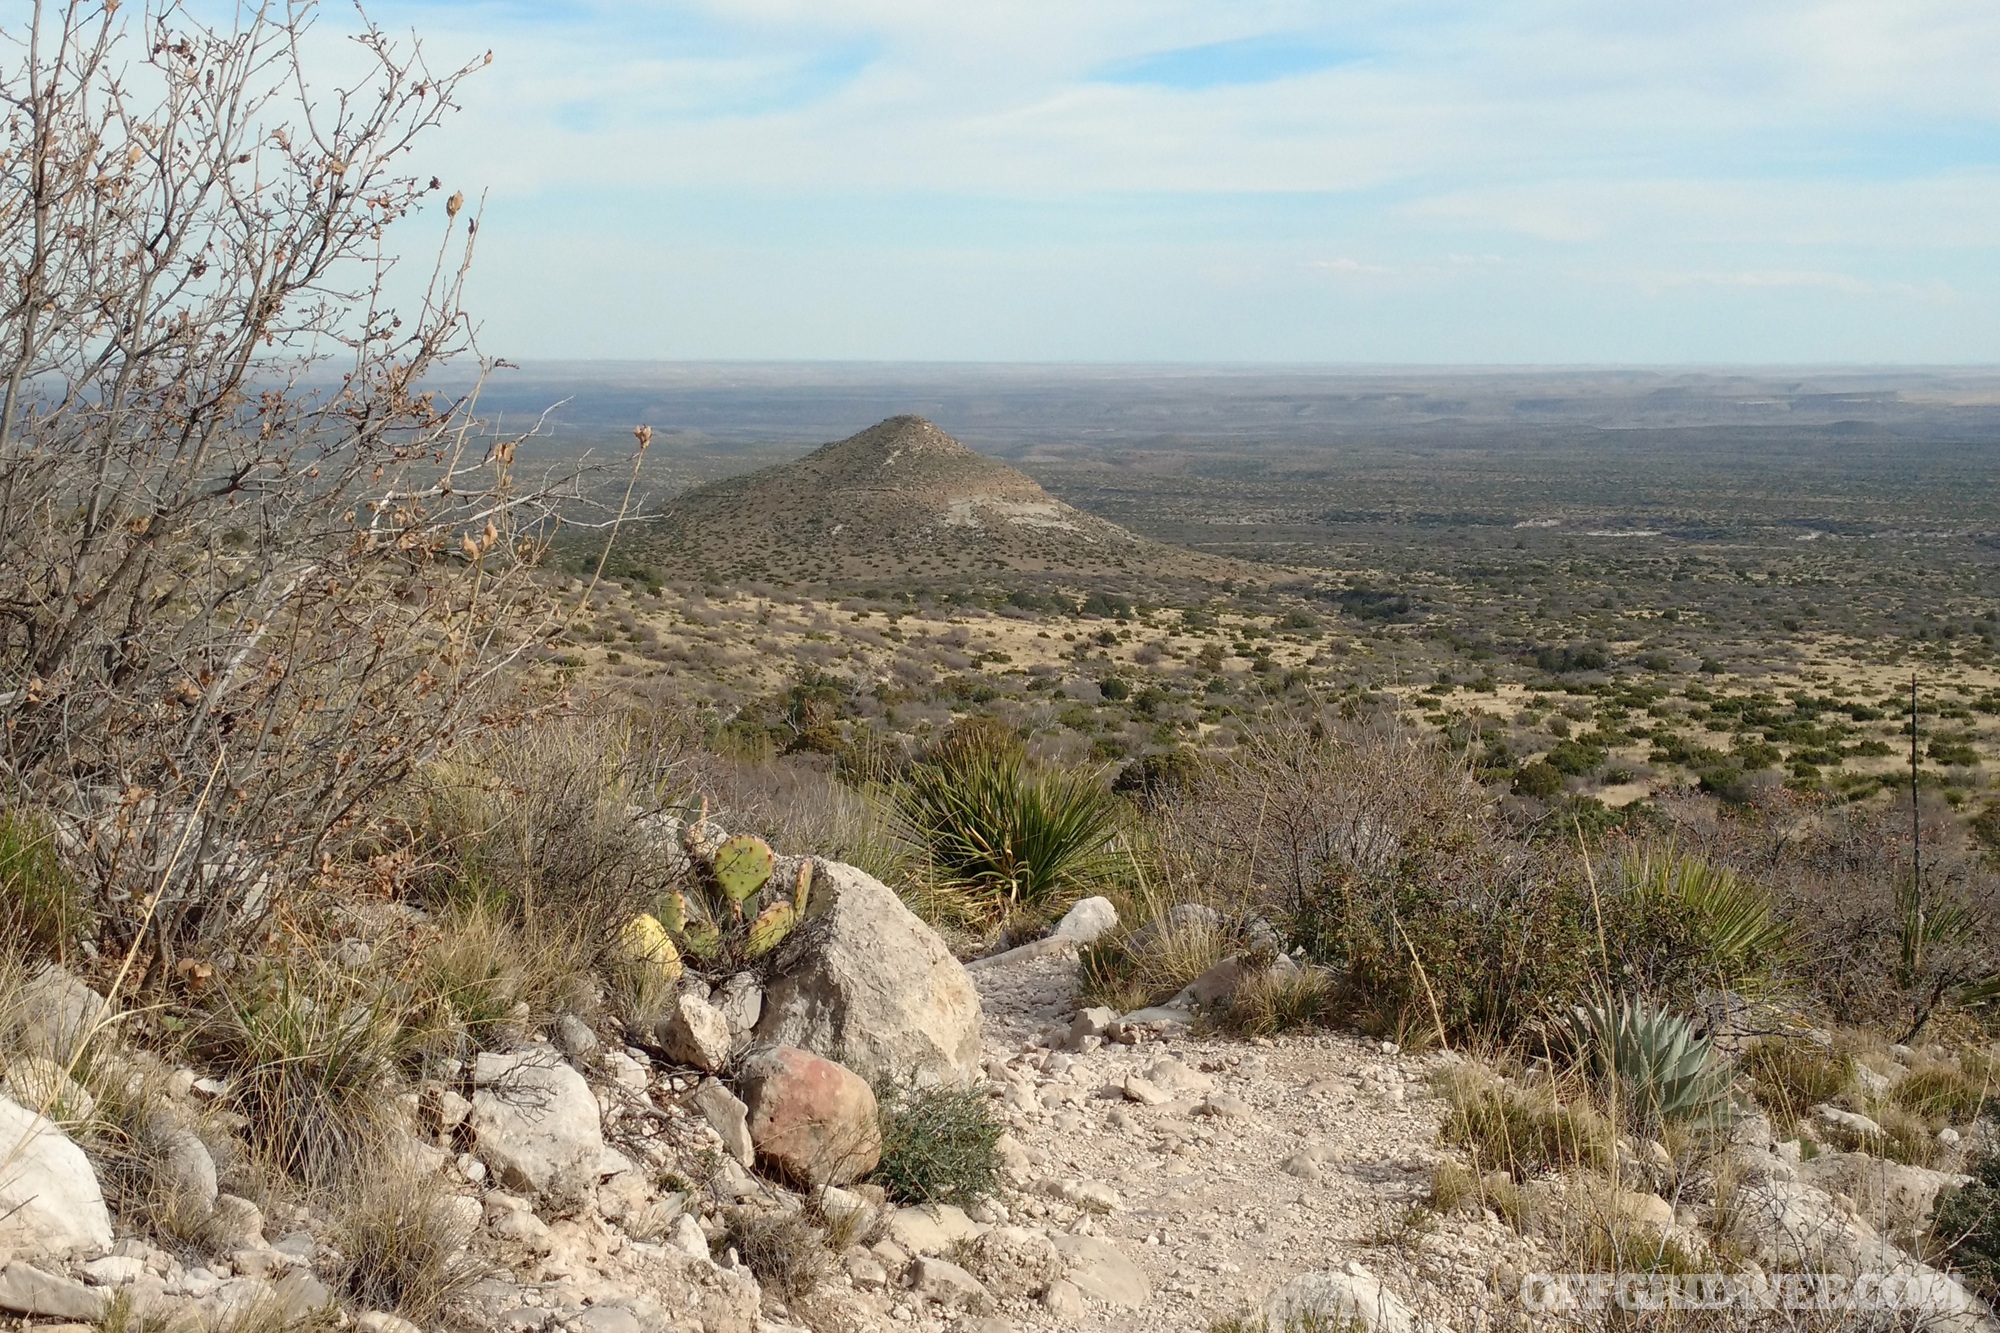
We used the app on backcountry hikes in Big Bend National Park and Guadalupe Mountains National Park in Texas, as well as Big Cypress National Preserve in Florida. We found that we could download the low-resolution maps for the entire state in order to have a guide for driving, and then with just one more press of a button download high resolution maps for the areas we wanted to hike. Or alternately, if we had an idea of where our base camp would be, we would download that surrounding area in high-resolution ahead of time.
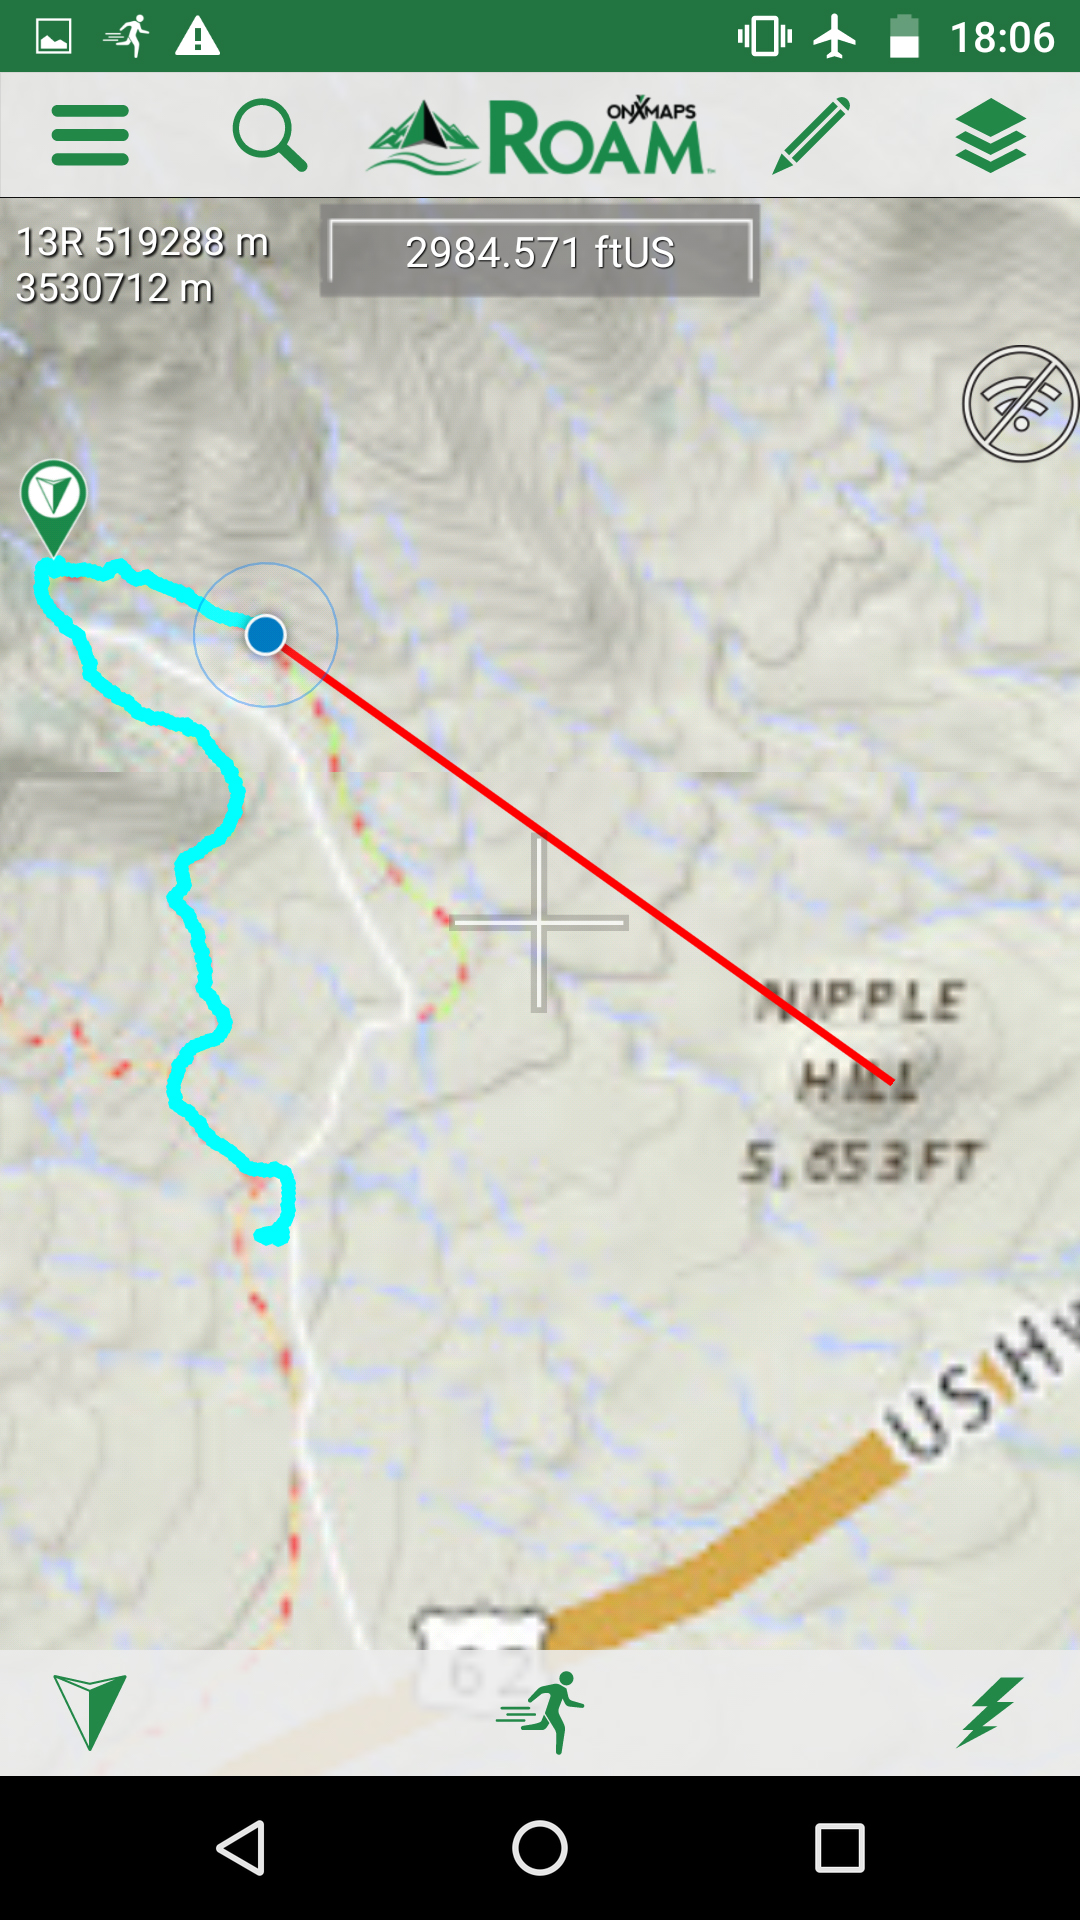
The suggestively-named Nipple Hill in this photo provided a target for plotting our location and course.
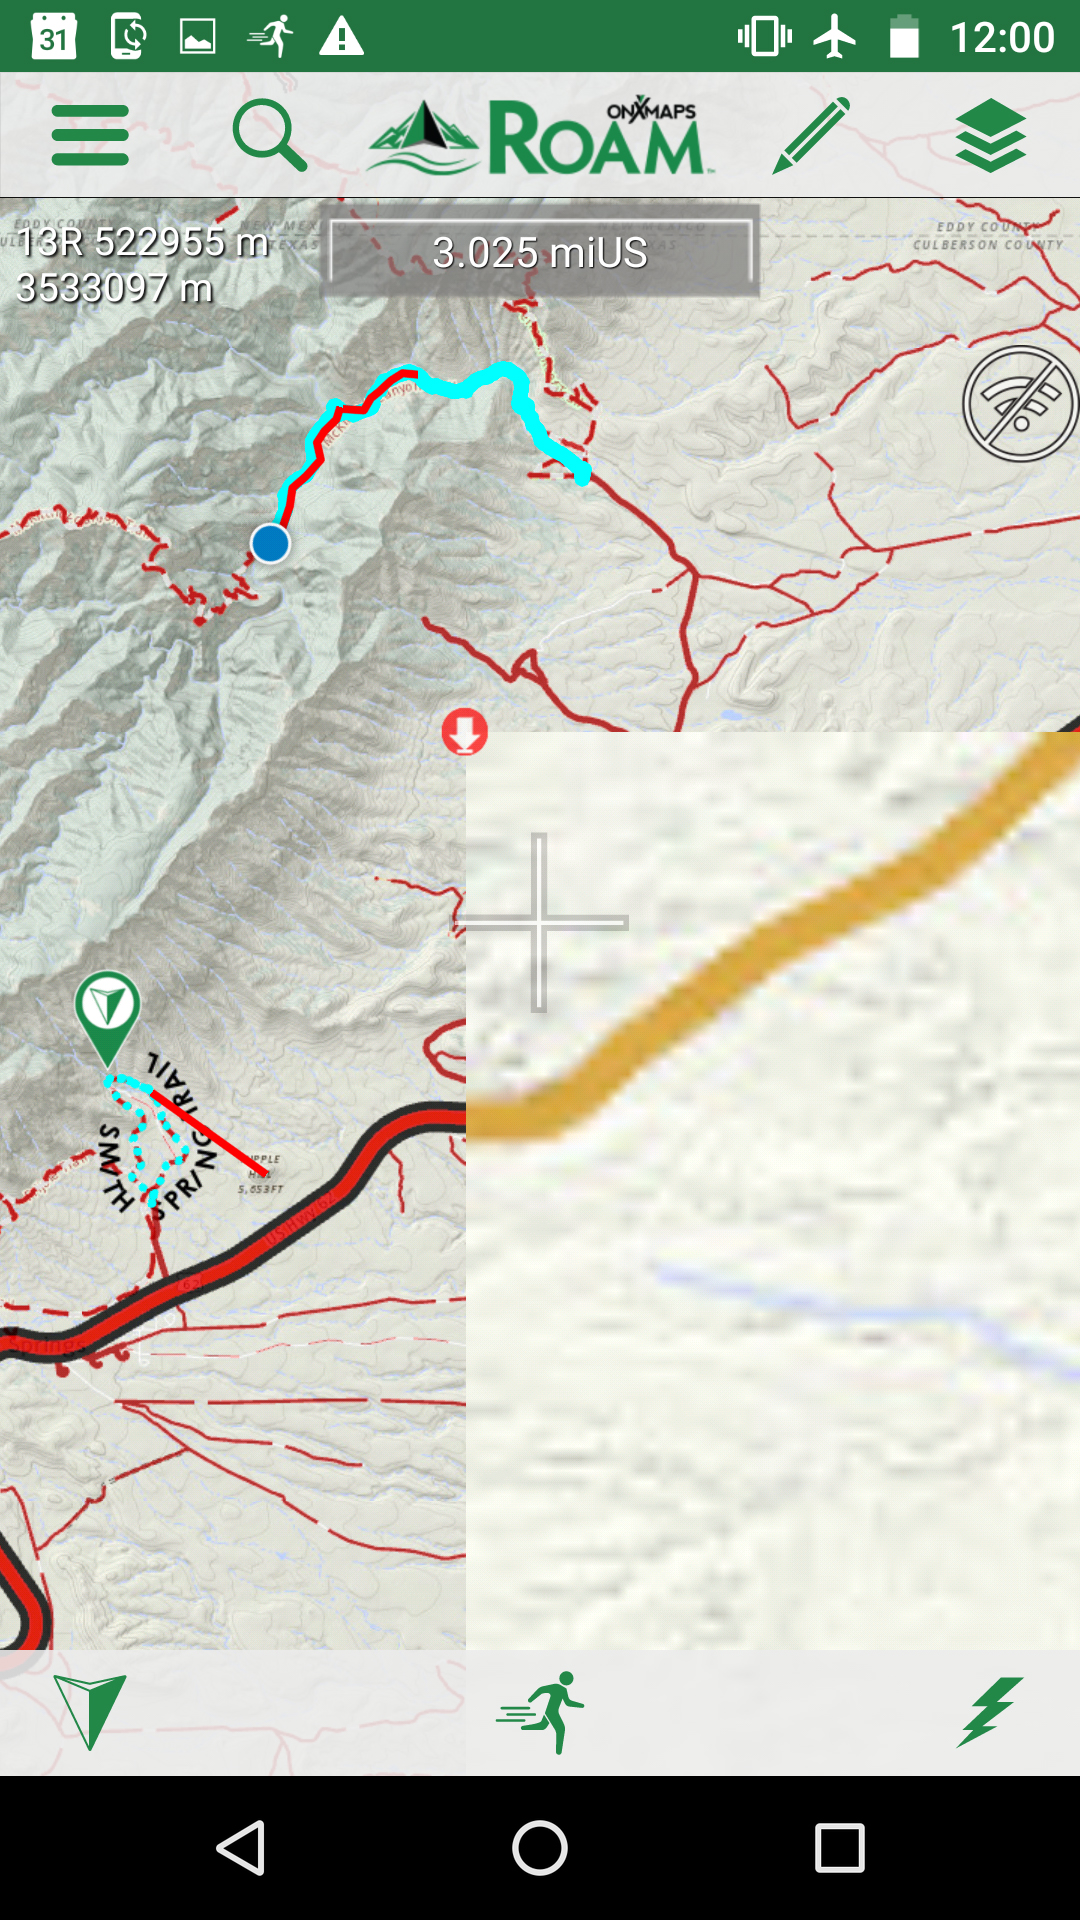
Click through the screenshots below to see how we navigated towards the visible landmark aabove and tracked our progress using Roam.
The Roam maps high-res view, left, shows more info than the low-res view, right.
Drawing a line from current position to a landmark.
Calculating direct distance to the landmark, as the crow flies.
Calculating actual trail distance to the landmark.
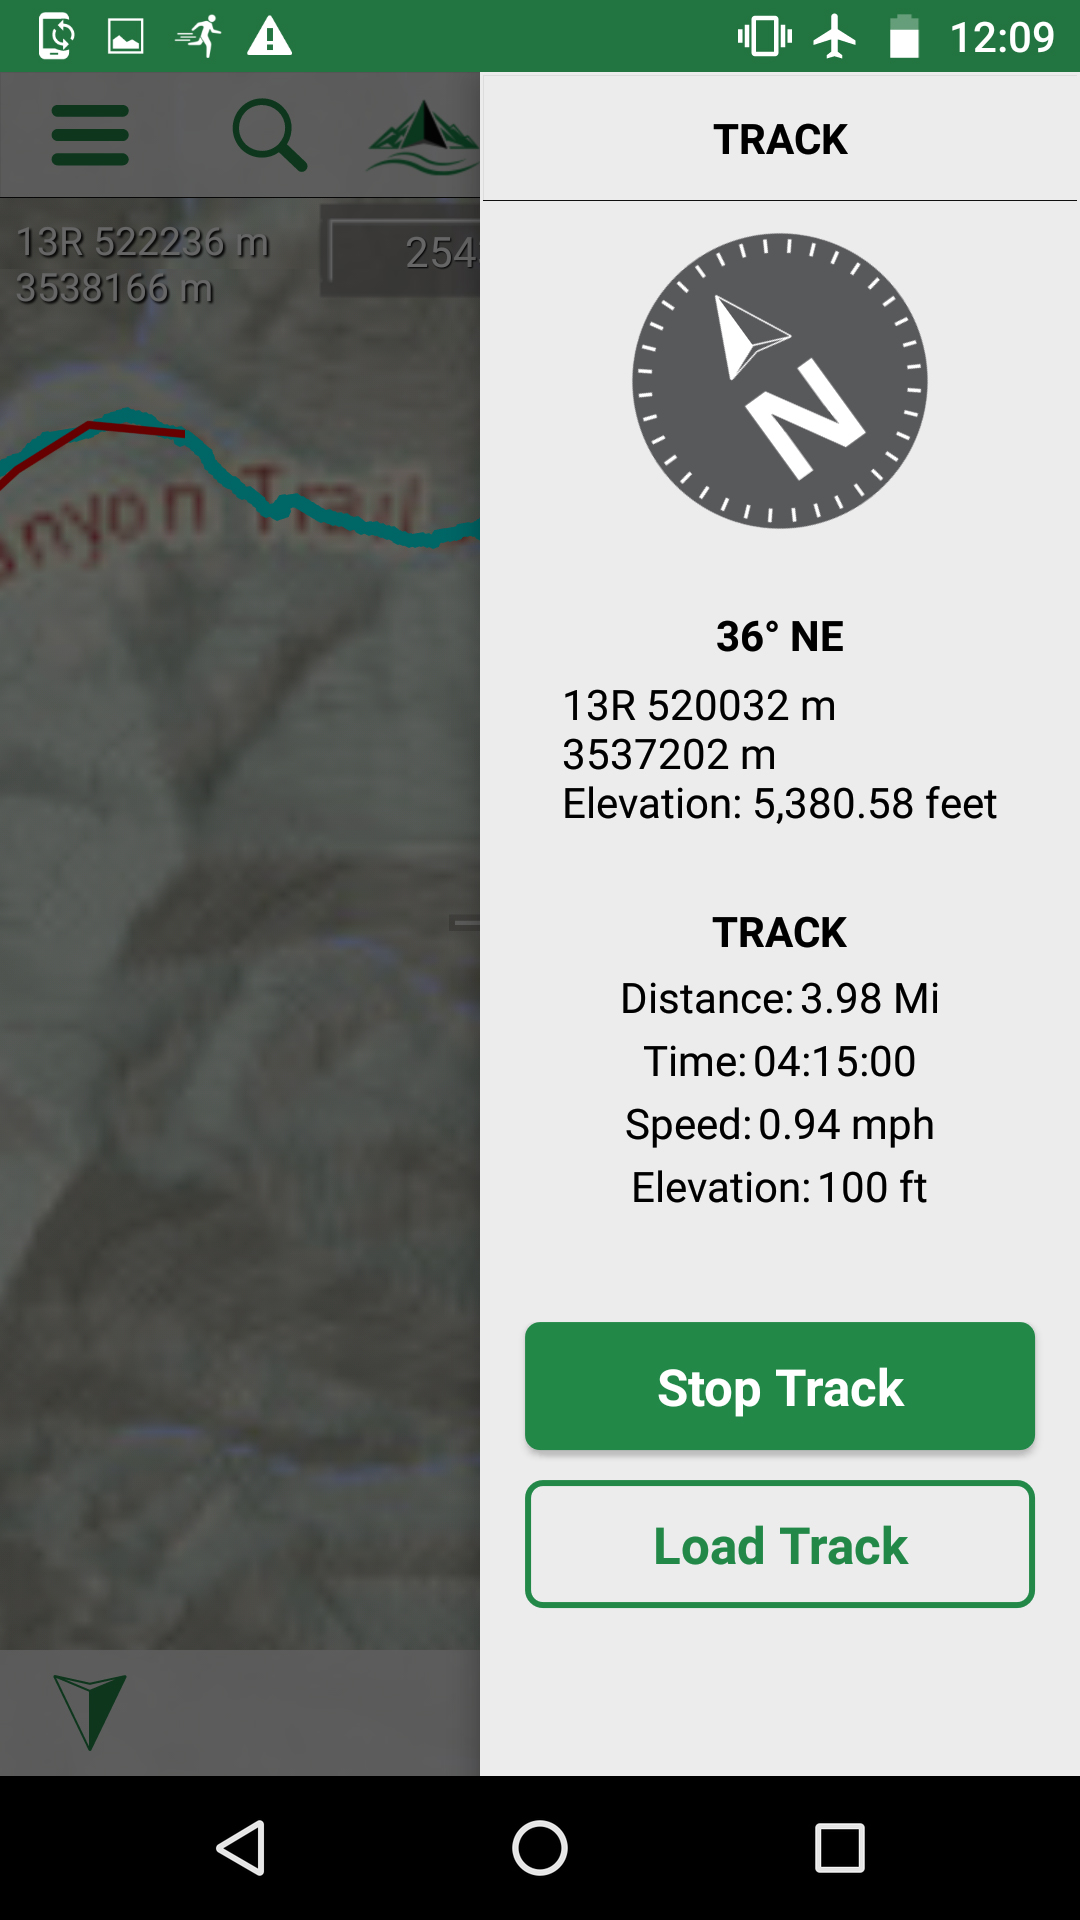
Tracking functions include distance, time, speed, elevation, and more.
The subscription service is only required to download new maps. So in theory, if you downloaded all the maps you needed and kept your phone in perfect working order you could cancel the subscription. In our case, however, we’re always exploring new locations so the $10 yearly subscription makes sense.
Phone Protection
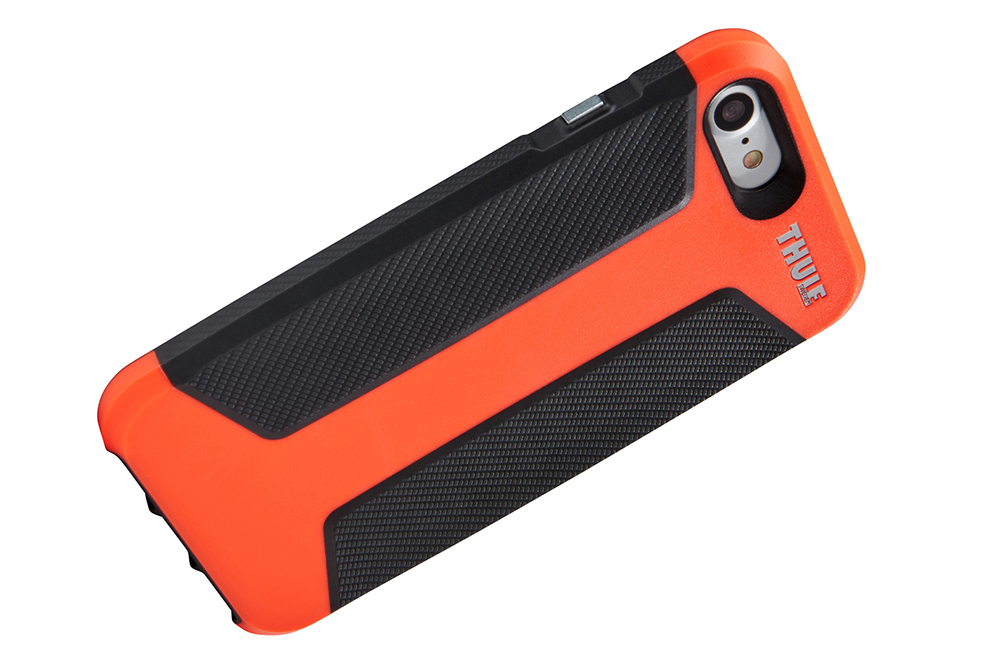
It sounds obvious, but it’s worth mentioning that a durable case will help keep your phone from breaking during use. We use Thule kayak racks on our trucks, so we were glad to find the Thule Atmos X3 cell phone case available for use. The tough polycarbonate case with inlaid rubber grips made us feel much more secure knowing our cell phone navigation device could make it through the backcountry and then back home safely.
Power and Mobile Charging Stations
If using your phone for navigation, conserving its power should be the foremost thought in your mind. It’s a lot easier to maintain power when you have it as opposed to trying to recharge a dead phone. To accomplish this, there are a couple of things to keep in mind.
If you’re confident that you’re in the right place and will be heading in the right direction for some time, try to turn the phone off if you can. This will reduce your urge to constantly check the phone for your updated position, and allow you to focus more on your surroundings and situational awareness. As long as you have the maps downloaded already, your phone can easily find your location when you turn it back on. Just make sure that the GPS or Location Services setting is on and the phone is in Airplane Mode to preserve the battery life.
If keeping your phone on because you need to frequently check your position, at least make sure that the brightness is down as far as possible. In daylight the screen can often be turned to the bare minimum and still be legible. Again, this helps conserve the battery.
Depending on the duration of your backcountry land navigation needs, it may not be possible for the phone to last on just one charge. In this case you can use pre-charged power sources and/or supplement those charging stations using solar power or alkaline batteries.
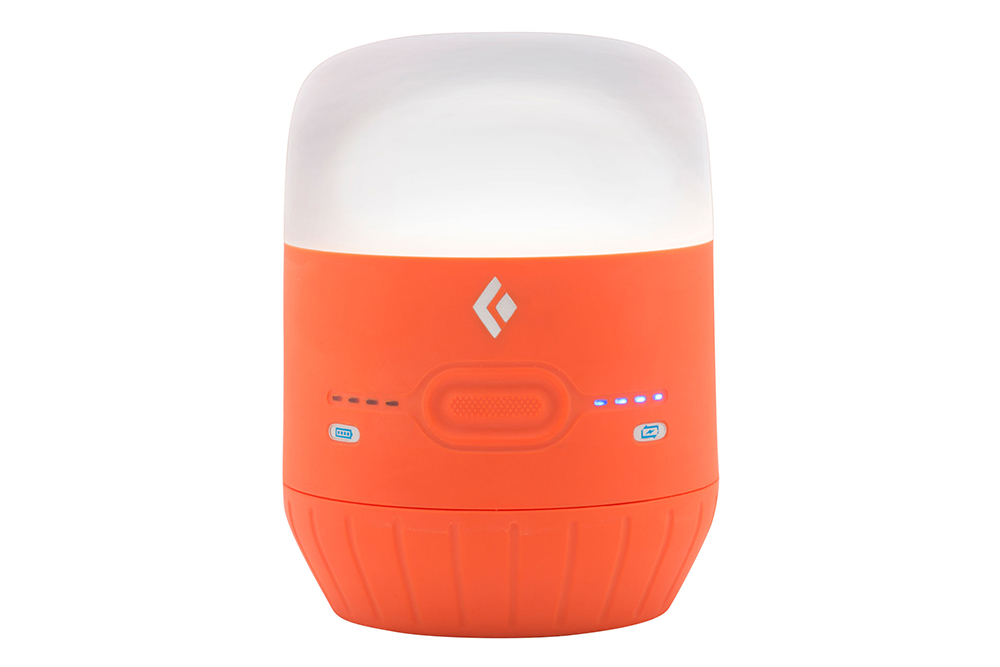
On our backcountry trips, we first tried out the Moji Charging Station and Lantern from Black Diamond Equipment. This ruggedized device offers up to 250 lumens of illumination and an SOS flashing mode, as well as a thoughtful lockout feature to prevent it from accidentally being turned on during storage or transport. It includes a rechargeable internal battery in addition to AA battery slots, and charges portable electronics using a USB output. So when the internal battery cuts out, you can simply drop in some AA batteries to continue charging your devices.
During testing, we were impressed by how durable and well-made the Moji lantern seemed. This is in part due to its weight—nearly ¾ of a pound without the AA batteries inside, so it’s maybe not the best choice for lightweight backpacking. But of course the weight is in part because there’s a internal battery.
We liked how the lantern held a charge for weeks and months at a time while being stored. Additionally, the lantern is IPX4 rated for water resistance so a little bit of rain won’t hurt it. The only thing we didn’t appreciate was that while charging our phone, the charging function seemed to turn off after 10 minutes or so of charging. When this happened, we’d have to unplug the phone and plug it back in to so the charging function would kick back on. Our phone would eventually charge, although it was inconvenient that we couldn’t just let it sit.
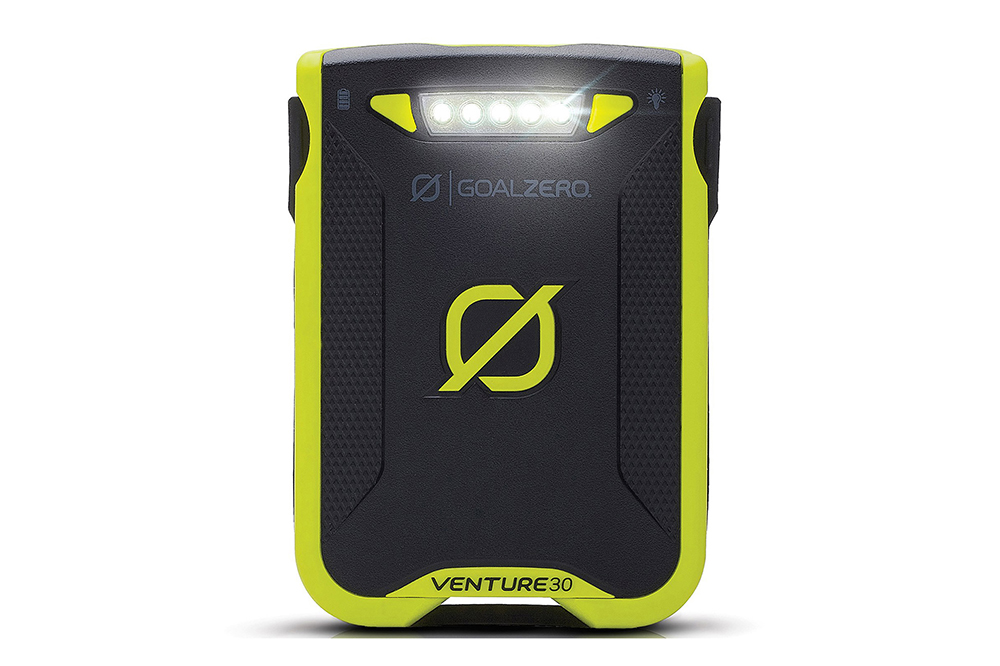
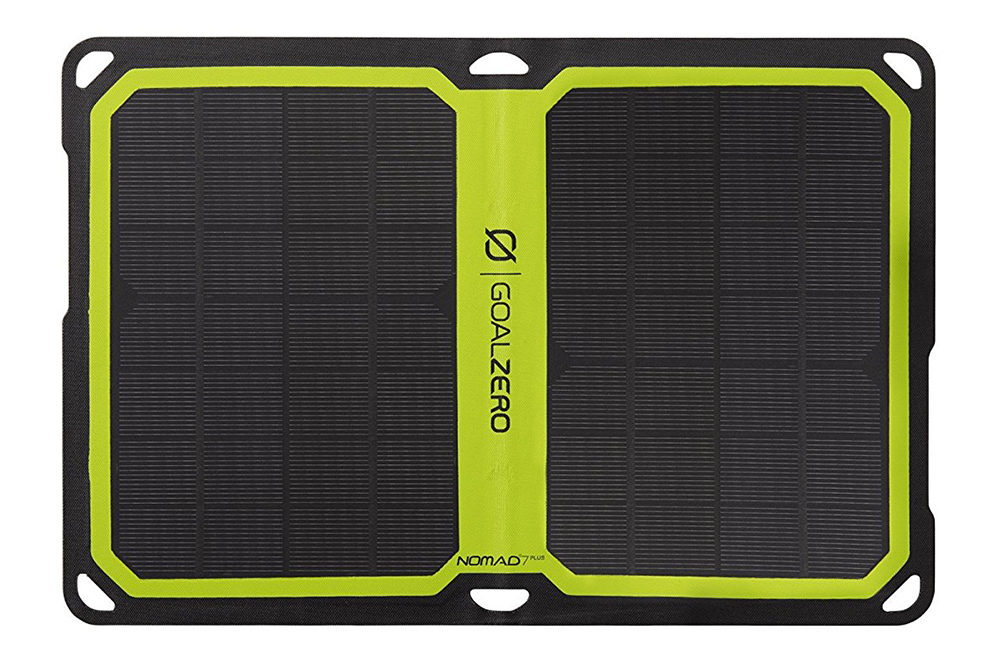
The second system we tried was the Nomad 7 solar charger and Venture 30 charging station and flashlight from Goal Zero. The Venture 30 is a rechargeable portable battery pack similar in some ways to Black Diamond's Moji Charger. It’s more compact and half the weight of the the Moji, although its power capacity and light output isn't directly comparable. The Venture 30 cannot hold AA batteries, although it warrants an excellent water resistance rating of IPX6 which means it can be absolutely blasted with rain, but not submerged.
The Nomad 7 solar charger can be paired with the Venture 30, so it can be recharged even if you’re 50 miles away from the nearest wall outlet. During our testing, we noticed that the solar panel only worked in bright sunlight when directly pointed at the sun. So although the concept is fine if you’re going to be stationary in an exposed position, don’t plan on just randomly attaching it to your backpack and thinking it will charge while you’re hiking. At the same time, if you were going to be in a remote camp for months at a time, the solar panels would probably be preferable to packing in 1,000 AA batteries.
All in all, both charging systems were good although both of them required compromises and pre-planning — just like a lot of backcountry hikes we take with our own families.
It's always wise to have a backup navigation tool, preferably a good analog compass like this vintage 1960s...
Andrew Schrader is a licensed professional engineer and is certified by the U.S. Army Corps of Engineers as an Urban Search and Rescue (USAR) Structures Specialist. His company, Recon Response Engineering LLC, advises state and federal government organizations on the subject of urban search and rescue and building collapse. He recently assisted the U.S. Department of State’s Italian Consulate in the development of their post-earthquake response and rescue protocol. You can follow him on Instagram at @reconresponse.
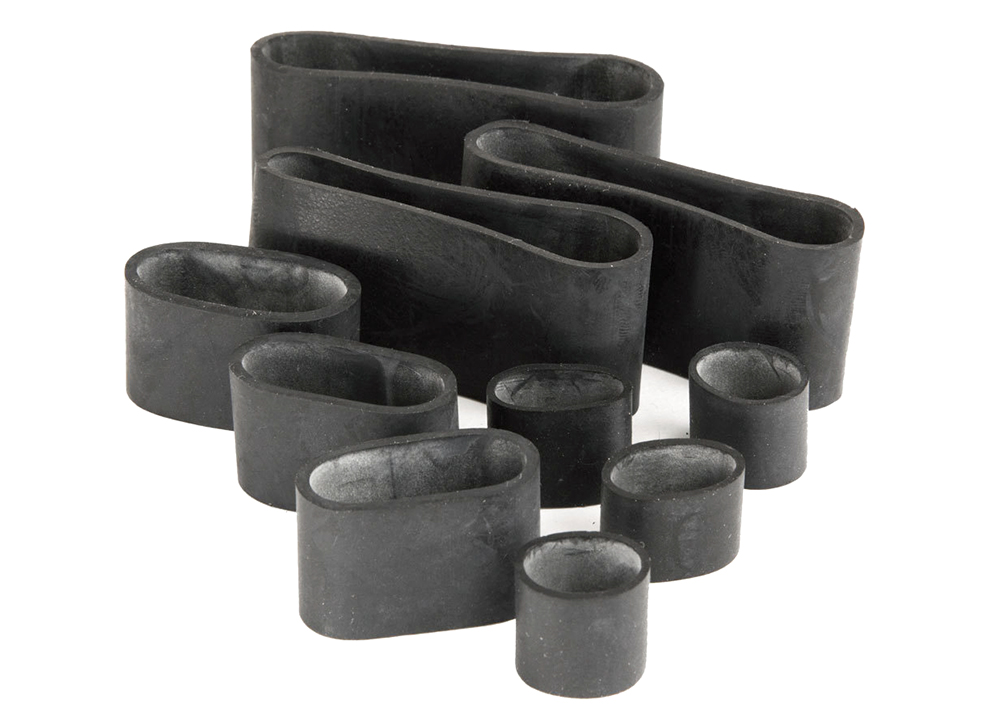
We've all had the experience of stretching a rubber band, only to have it snap in our hands, instantly becoming a useless strand of rubber. It's a mild annoyance when that rubber band is preventing a bag of tortilla chips in your pantry from going stale; it's a major headache when the band is retaining an important piece of gear in the field. Even heavy-duty rubber bands become old and brittle over time, so they're not entirely dependable.
These flimsy rubber bands may be fine around the house, but they don't belong in your emergency gear.
Enter the ranger band. These tough stretchy bands are far stronger than the rubber bands you'll find at WalMart, and they weren't originally designed as rubber bands — they're actually just rings cut from bicycle inner tubes.
Photo: Wazoo Survival Gear
Supposedly the “ranger band” name came from the fact that these first saw use by U.S. Army Rangers and other military personnel to lash together gear, but they have a wide variety of uses in any survival setting.
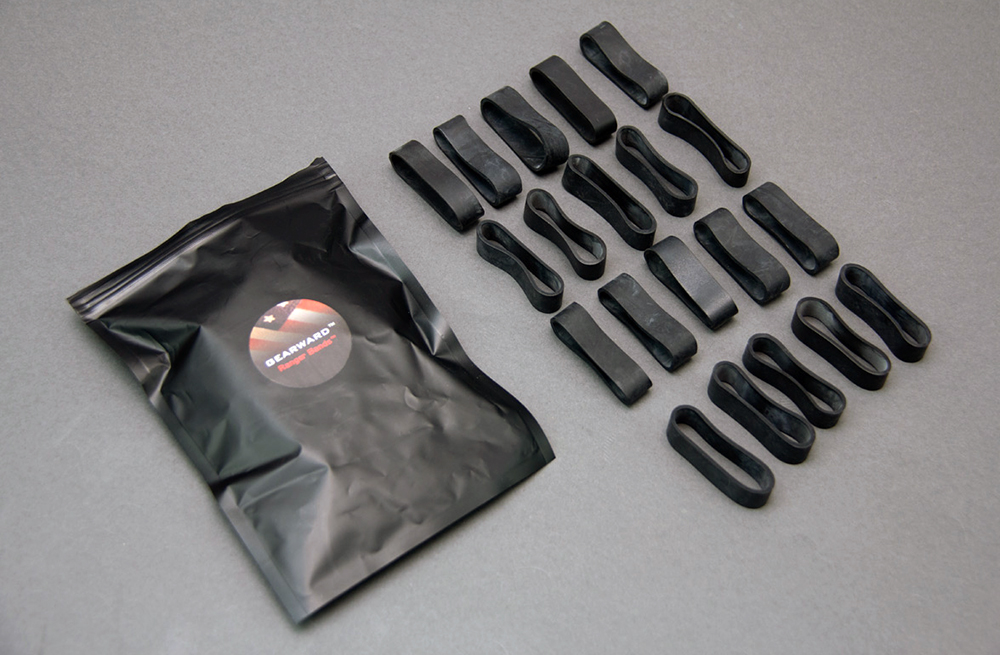
Photos: Gearward
So, what makes ranger bands so much better than normal rubber bands?
First, they're far stronger, providing more tension and durability. Second, they're often wider, resulting in better coverage for gear — they can even be used to wrap the seams on a container or Zippo lighter for waterproofing. They also burn energetically for about 3 minutes, so they're a good tool for fire-starting. Gearward founder Mark Greenman writes, “I've used ranger bands for many years now, and I find they are up there with duct tape and cordage in terms of versatility. There's really so many things you can do with a really strong rubber band.”
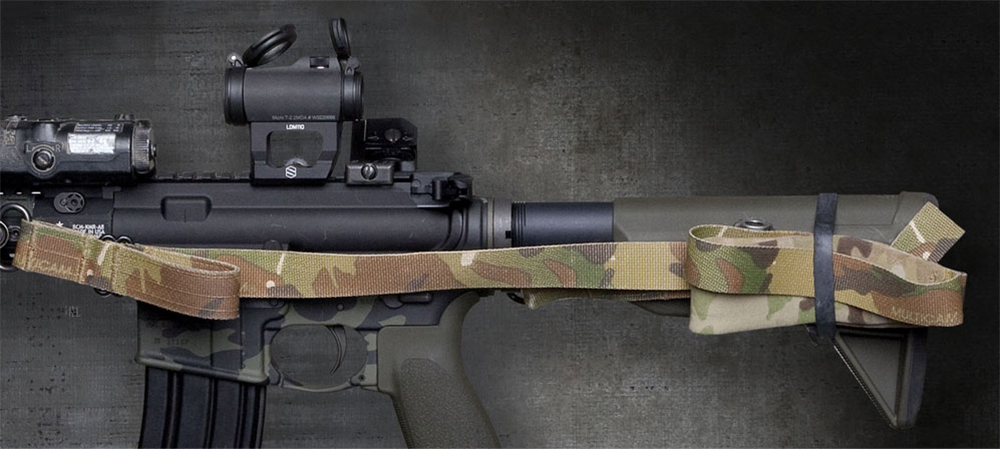
A ranger band shown on a BCM Mod 0 stock, retaining a sling for vehicle-borne operations. Photo: BCM
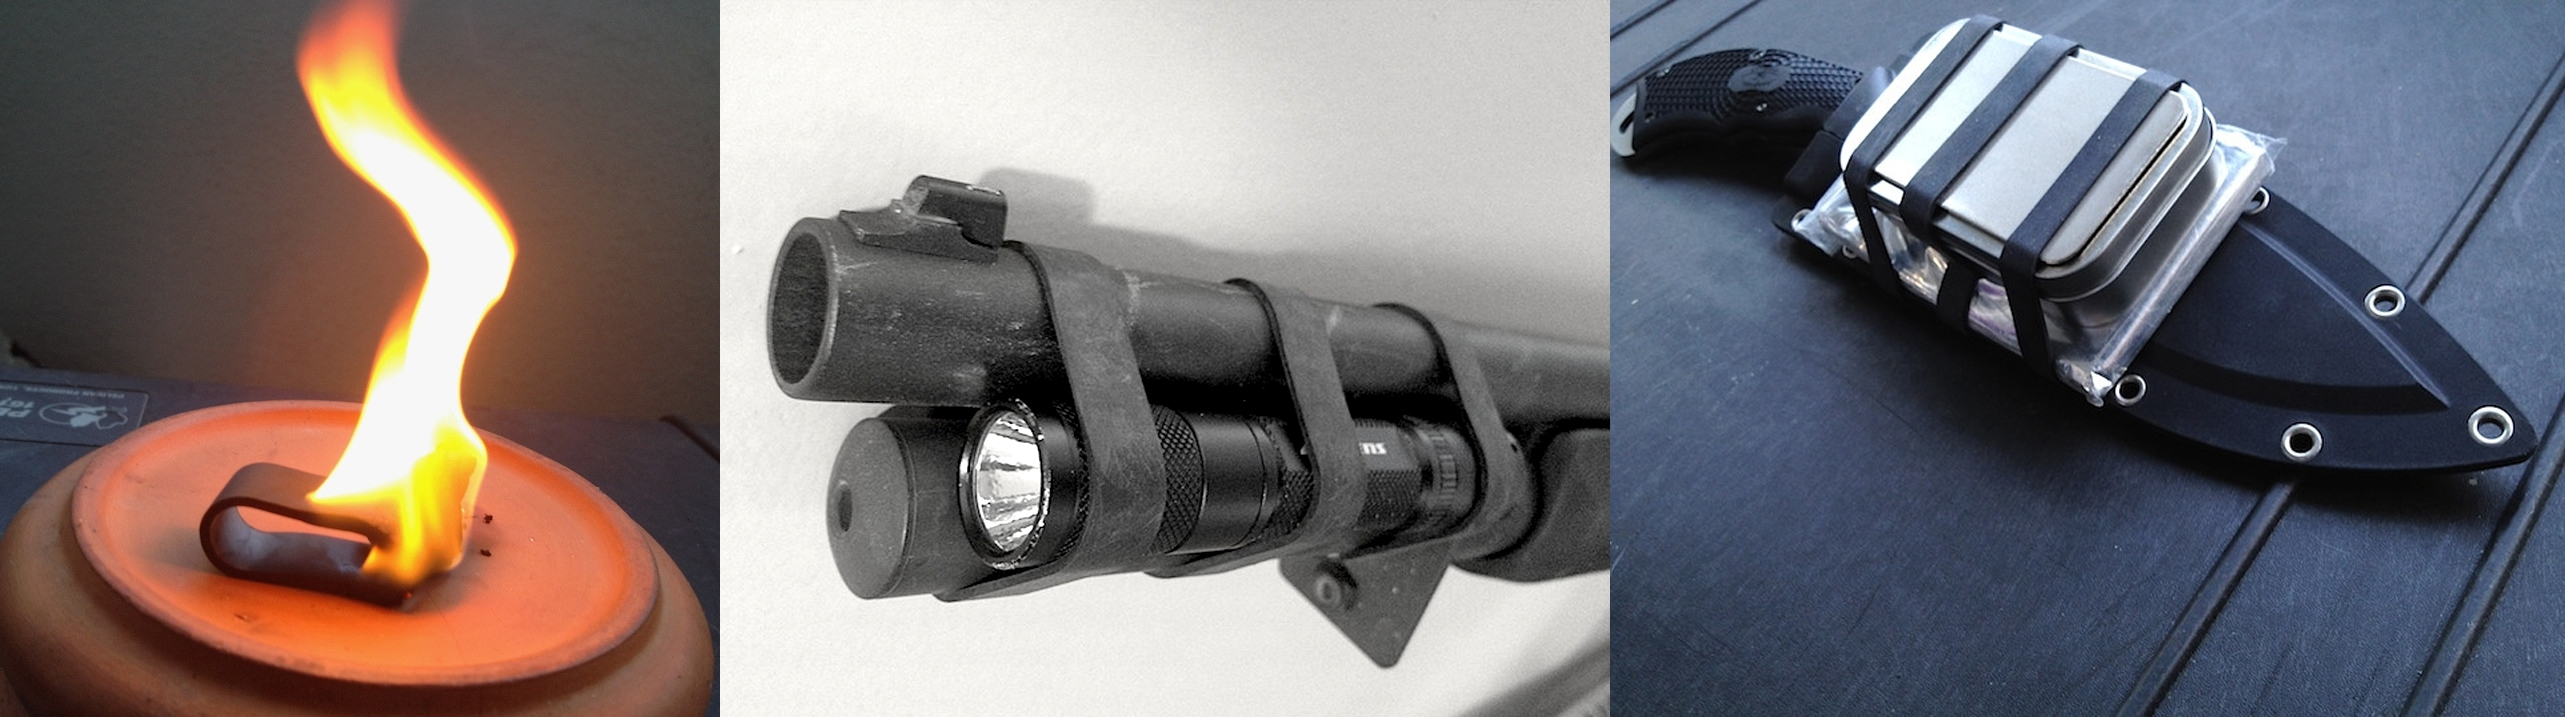
Ranger bands are often used to lash gear together, such as temporarily strapping a flashlight to a gun barrel, holding a P38 can opener on a paracord bracelet, or keeping the lid on an Altoids tin survival kit firmly sealed. They can also be used the same way as rubber bands to bind items to MOLLE-compatible bags or packs:
The cheapest way to get your hands on some ranger bands is to find an old punctured bicycle tire, strip out the inner tube, and cut it into segments. Failing that free option, you can purchase inner tubes from a local sporting goods store or bike shop, or buy pre-cut packs of ranger bands for $10 or less from companies like Wazoo Survival Gear or Gearward. Some of these purpose-built bands are said to be thicker than inner tubes, and they're available in a variety of sizes.
If you're already an experienced user of ranger bands, what roles do they fulfill in your bug-out bag or survival kit? Let us know in the comments.
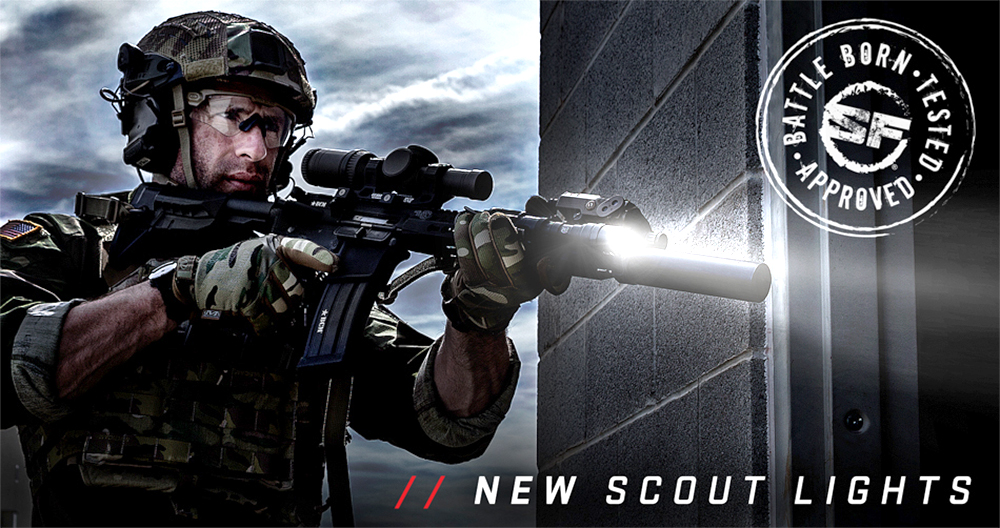
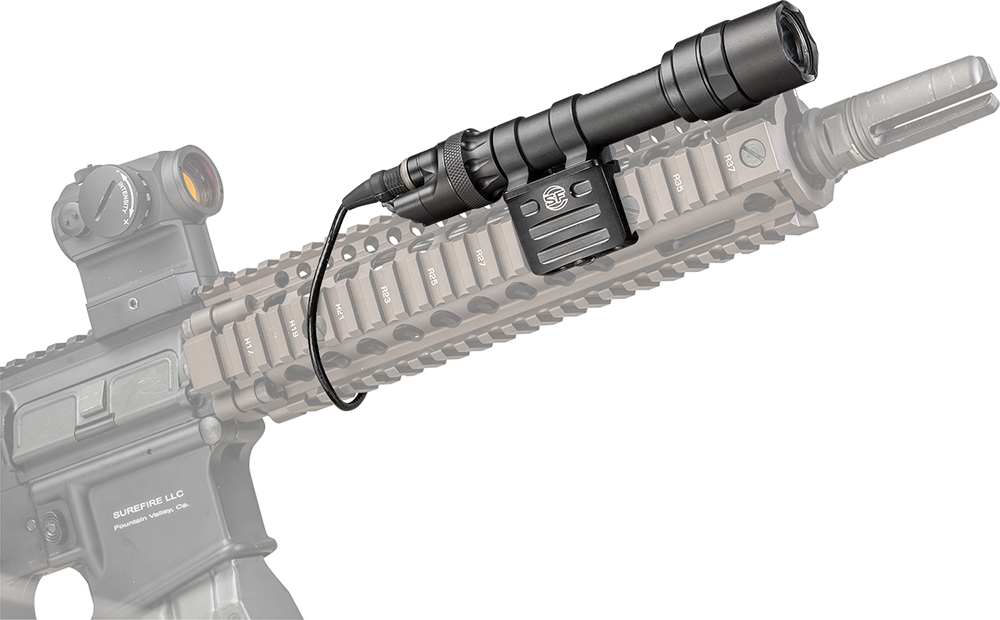
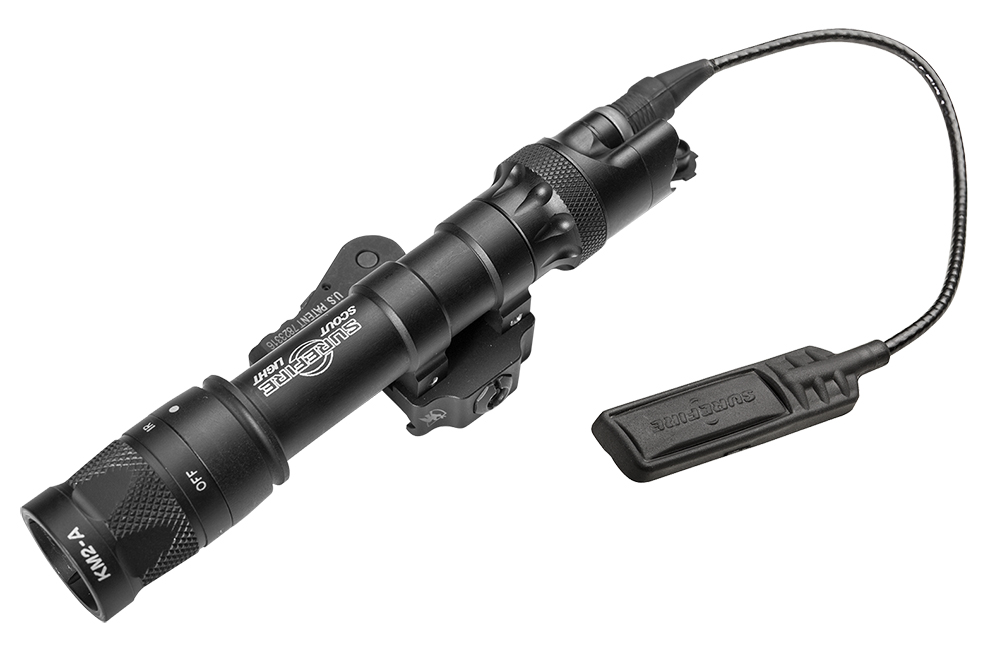
In the split seconds as you shoulder your rifle to defend yourself and your family, clear visibility is crucial. Many home-defense scenarios occur at night, so you'll be flying blind without an external light source. That's why it's often advisable to have a bright and reliable flashlight mounted to your bedside gun.
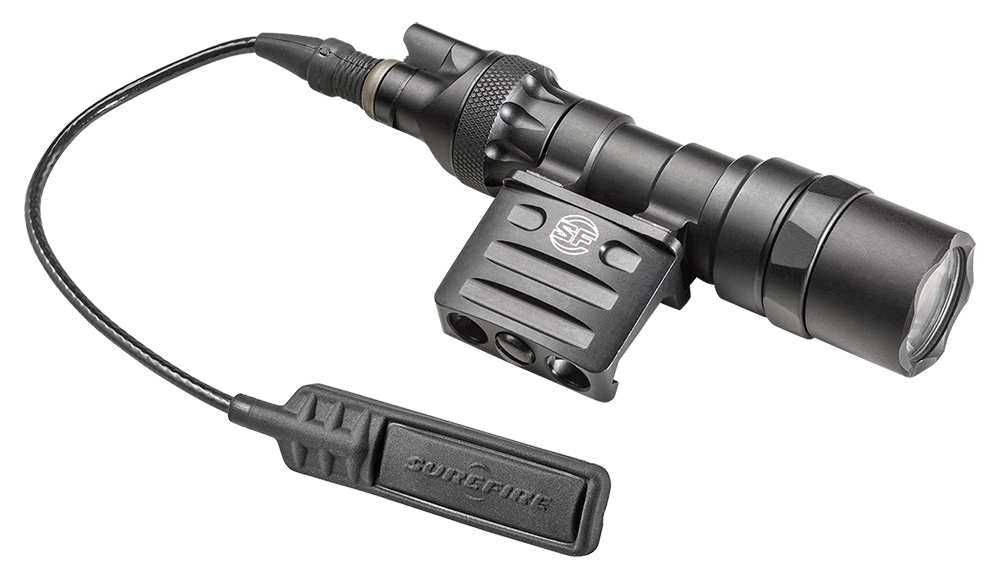
Each of these lights includes a dual switch tail cap, which allows for both standard push-button activation and activation using the included remote pressure switch. The new lights also feature included rail mounts, either a standard M75 thumbscrew mount, an RM45 offset mount, or an ADM quick-disconnect mount.
Here's a list of the seven new models for 2017:
M312C – 3 Volt Scout Light with DS07 Switch Assembly and RM45 Offset Mount
M322C – 3 Volt Scout Light with DS07 Switch Assembly and ADM Quick-Detach Weapon Mount
M603V – 6 Volt Vampire Scout Light with DS-SR07-D-IT Switch Assembly and M75 Thumbscrew Mount
M612U – 6 Volt Scout Light with DS07 Switch Assembly and RM45 Offset Mount
M612V – 6 Volt Vampire Scout Light with DS07 Switch Assembly and RM45 Offset Mount
M622U – 6 Volt Scout Light with DS07 Switch Assembly and ADM Quick-Detach Weapon Mount
M622V – 6 Volt Vampire Scout Light with DS07 Switch Assembly and ADM Weapon Mount
The Vampire light models provide can be toggled between white and infrared (IR) light for night vision applications, while the standard models produce white light only. For more info on these new SureFire Scout Light flashlight models, go to SureFire.com.
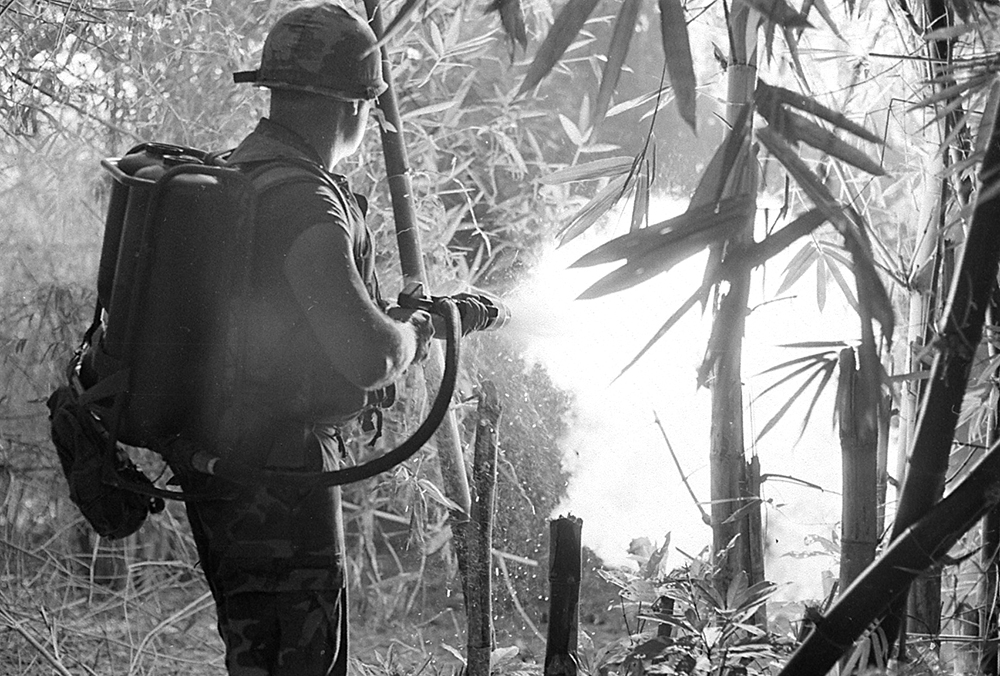
Outside over-the-top action movies like Mad Max, you won't see flamethrowers very much these days. Liquid- or gas-based flamethrowers were used extensively in WWI, WWII, and the Korean and Vietnam Wars. But due to restrictions from the Geneva Convention and the extreme danger associated with wearing a large tank of flammable fuel on a battlefield, these incendiary weapons are no longer a part of conventional military warfare.
However, that's not to say that they're no longer effective. As we've said before, prison inmates often invent deadly improvised weapons from limited resources, and these aren't just limited to shanks. Believe it or not, inmates have reportedly fashioned crude flamethrowers which don't run on liquid or gaseous fuel. C.T. O'Reilly, the Assistant Warden of Darrington Prison in Texas, once told a reporter, “The inmates would roll up a piece of paper, put Coffee-Mate in it, put a cigarette lighter in front of it, blow it out and it's just like a flamethrower.” This apparently led to all powdered creamer being removed from the commissary at Darrington.
You might not look at this and see “flamethrower fuel”, but necessity breeds invention.
These powder-based flamethrowers disperse a cloud of combustible material — such as flour, cornstarch, or coffee creamer — and enhance its ability to burn quickly. It's the same principle which sometimes leads to deadly dust explosions in industrial environments, and was demonstrated on the Mythbusters TV show “Creamer Cannon” episode.
The video below shows a creamer-based homemade flamethrower in action.
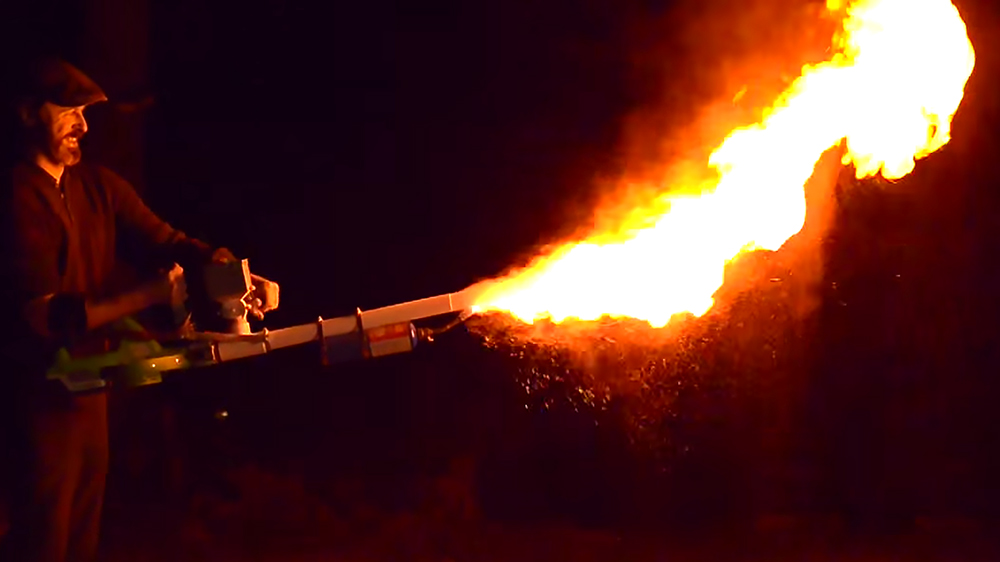
While we definitely would not recommend trying this at home, it's possible to make a flamethrower by simply blowing a cloud of flour through a tube and across an open flame. If no other weapons were available, this could provide a last-ditch improvised means of self-defense. Or, the concept can be taken to the next level as shown in the video below:
These guys cobbled together a leaf blower, a hand-crank powder dispenser, some PVC pipe, and a blowtorch to create an incredibly effective improvised weapon. It might not be a military-grade flamethrower, but we'd be willing to bet no attacker would want to get anywhere near the business end.
For many of us, chemistry wasn't exactly a riveting subject in school. After all, knowing everything about covalent bonds, stoichiometry, and endothermic reactions probably isn't a necessity during your daily routine. However, a basic understanding of chemistry and chemical reactions can be helpful in survival situations. Don't worry, you won't need to whip out your lab coat and Erlenmeyer flask this time.
WARNING: This chemical is highly corrosive and burns violently, so be careful when handling and storing it. Follow all safety precautions and only use it at your own risk.
When added to water, potassium permanganate creates a bright pink or purple solution.
Potassium permanganate, or KMnO4, is one chemical which has many survival applications. This purplish-black crystalline powder can be found in bulk at pet stores, pool supply shops, and hardware stores. It doesn't cost much, and a tiny amount goes a long way.
In powdered form, potassium permanganate is an effective fire-starting tool. You just need to add a few drops of glycerin (from a drug store) or ethylene glycol (found in automotive antifreeze and some brake fluids) and the powder will energetically burst into a white-hot flame:
The powdered form of this chemical will also work as a preservative for fruit. One study showed that by placing bananas in a sealed bag with KMnO4, the shelf life of this fruit was extended by two weeks. While interesting, this use is a little obscure — but the chemical has many other survival-oriented functions.
Mixing just a few small crystals of potassium permanganate into a glass of water creates a bright pink solution. This may work as an improvised water purifier if no other options are available, though the CDC does not recommend it “for primary water disinfection at low doses in the field”. We'd agree with the CDC that carrying a purpose-built water filter or purifier is always the best option, but KMnO4 might work in a pinch.
Adding more KMnO4 to water creates a darker purple solution, which can be used as an antiseptic for wounds or sores. The World Health Organization includes it on its list of Essential Medicines, and recommends diluting it in a 1:10,000 ratio. Stronger solutions fight fungal infections such as athlete's foot, but be careful not to go overboard — excessively-concentrated solutions can burn your skin.
Finally, a concentrated solution will stain items purple, and you can use this to your advantage. Strips of stained cloth or splashes of purple liquid in snow could be used to signal for rescue, since this unnaturally-vibrant color will stand out against a natural backdrop.
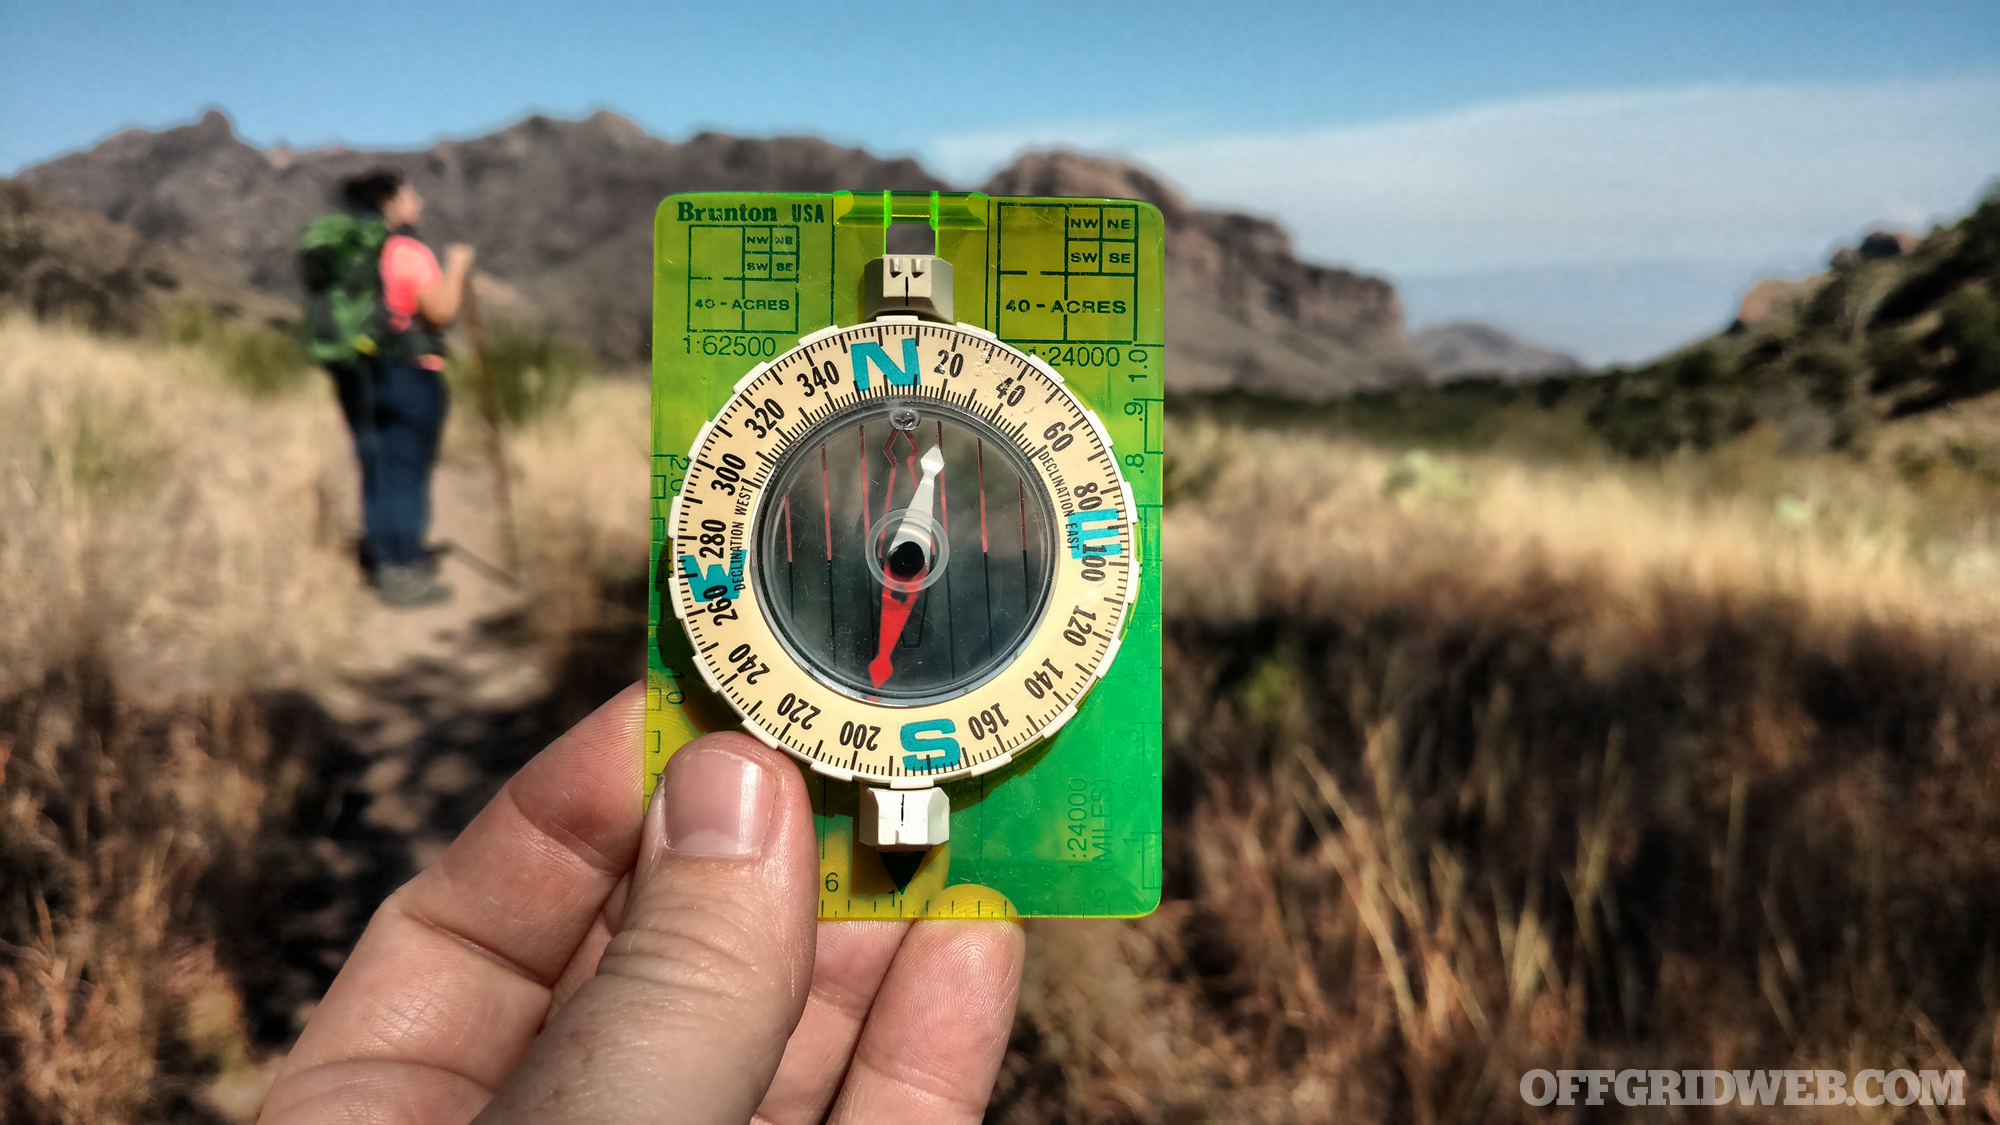
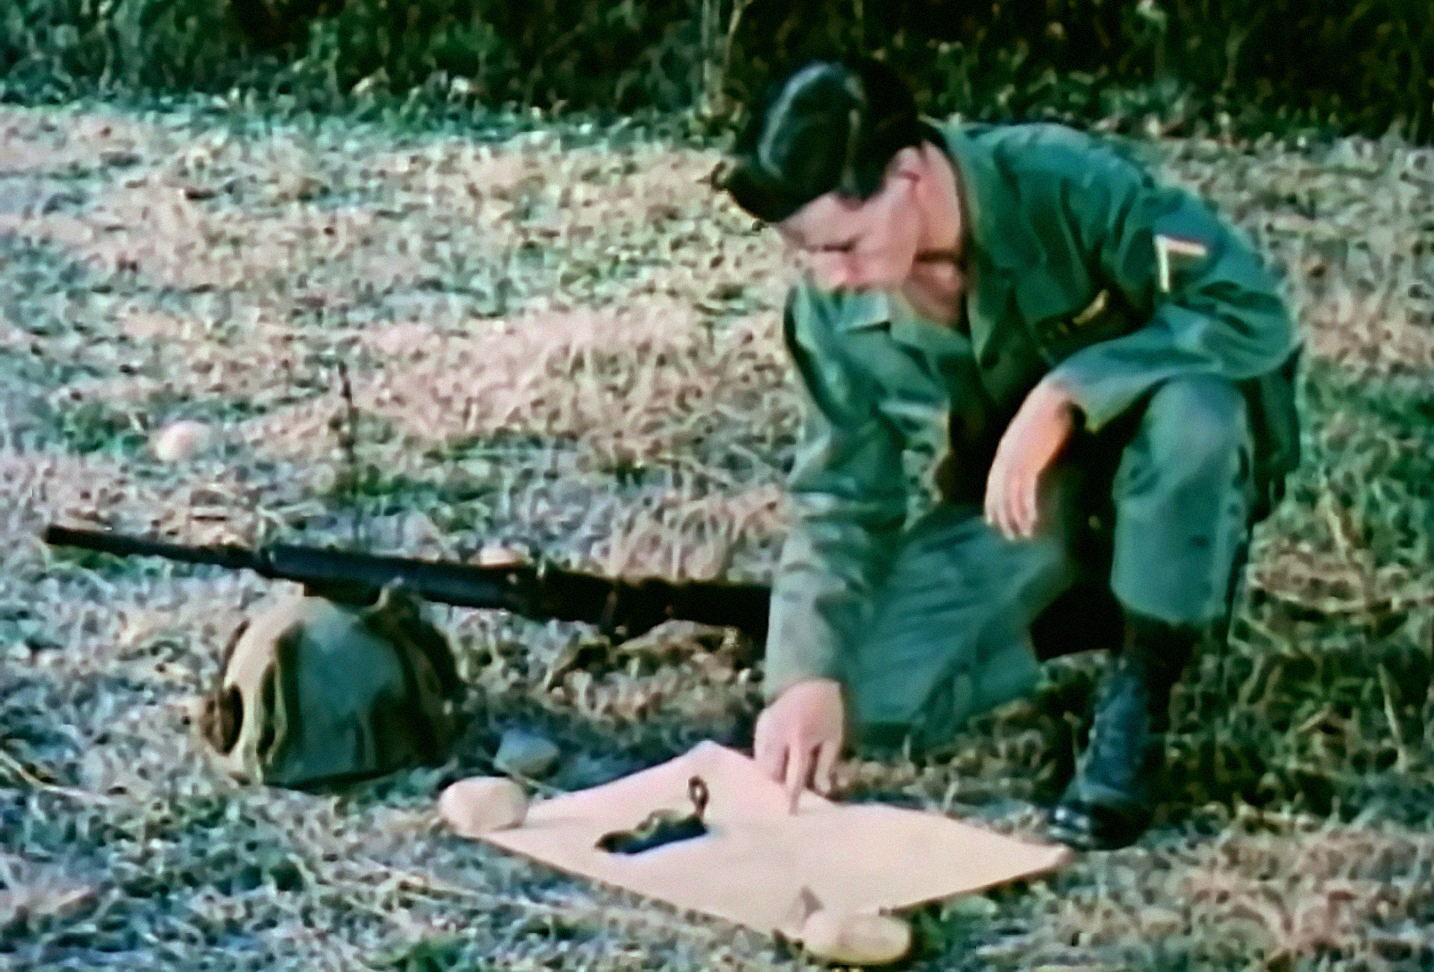
A lot has changed since the mid-1960s. We landed on the moon, developed powerful microchips, invented the internet, and mapped the human genome. But despite all these innovations, certain principles remain the same. Basic land navigation is one such concept — it's still done essentially the same way today as it was back then.
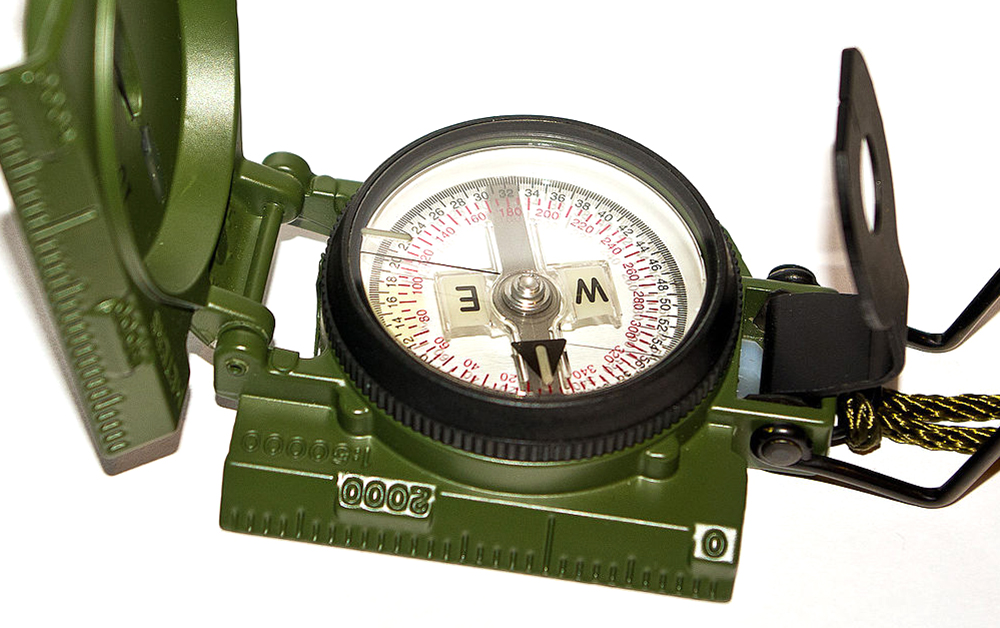
Today, we have an advanced network of GPS satellites and portable navigation devices, and these tools can be an excellent resource. However, you'd be foolish to rely wholly on this modern tech in a disaster scenario. It's wise to have a magnetic compass and know the basics of navigating the old-fashioned way.
The U.S. military M-1950 lensatic compass shown in this video is still in use today. Photo: Wikipedia
The following 30-minute U.S. Army training video from 1966 shows how to find your direction, orientation, and location with a mil-spec lensatic compass. The narration and imagery may seem old-timey in this era of high-def computer graphics, but the lessons are still relevant today. It addresses how to orient a map, compensate for declination, and shoot an azimuth to a landmark.
This may seem like a lot to digest if you're not familiar with land navigation. The best way to get comfortable with these concepts is to go out and practice, preferably with a friend who has some experience in this area and can correct you if you make mistakes. With a little patience, your lensatic compass can become an invaluable resource for survival.
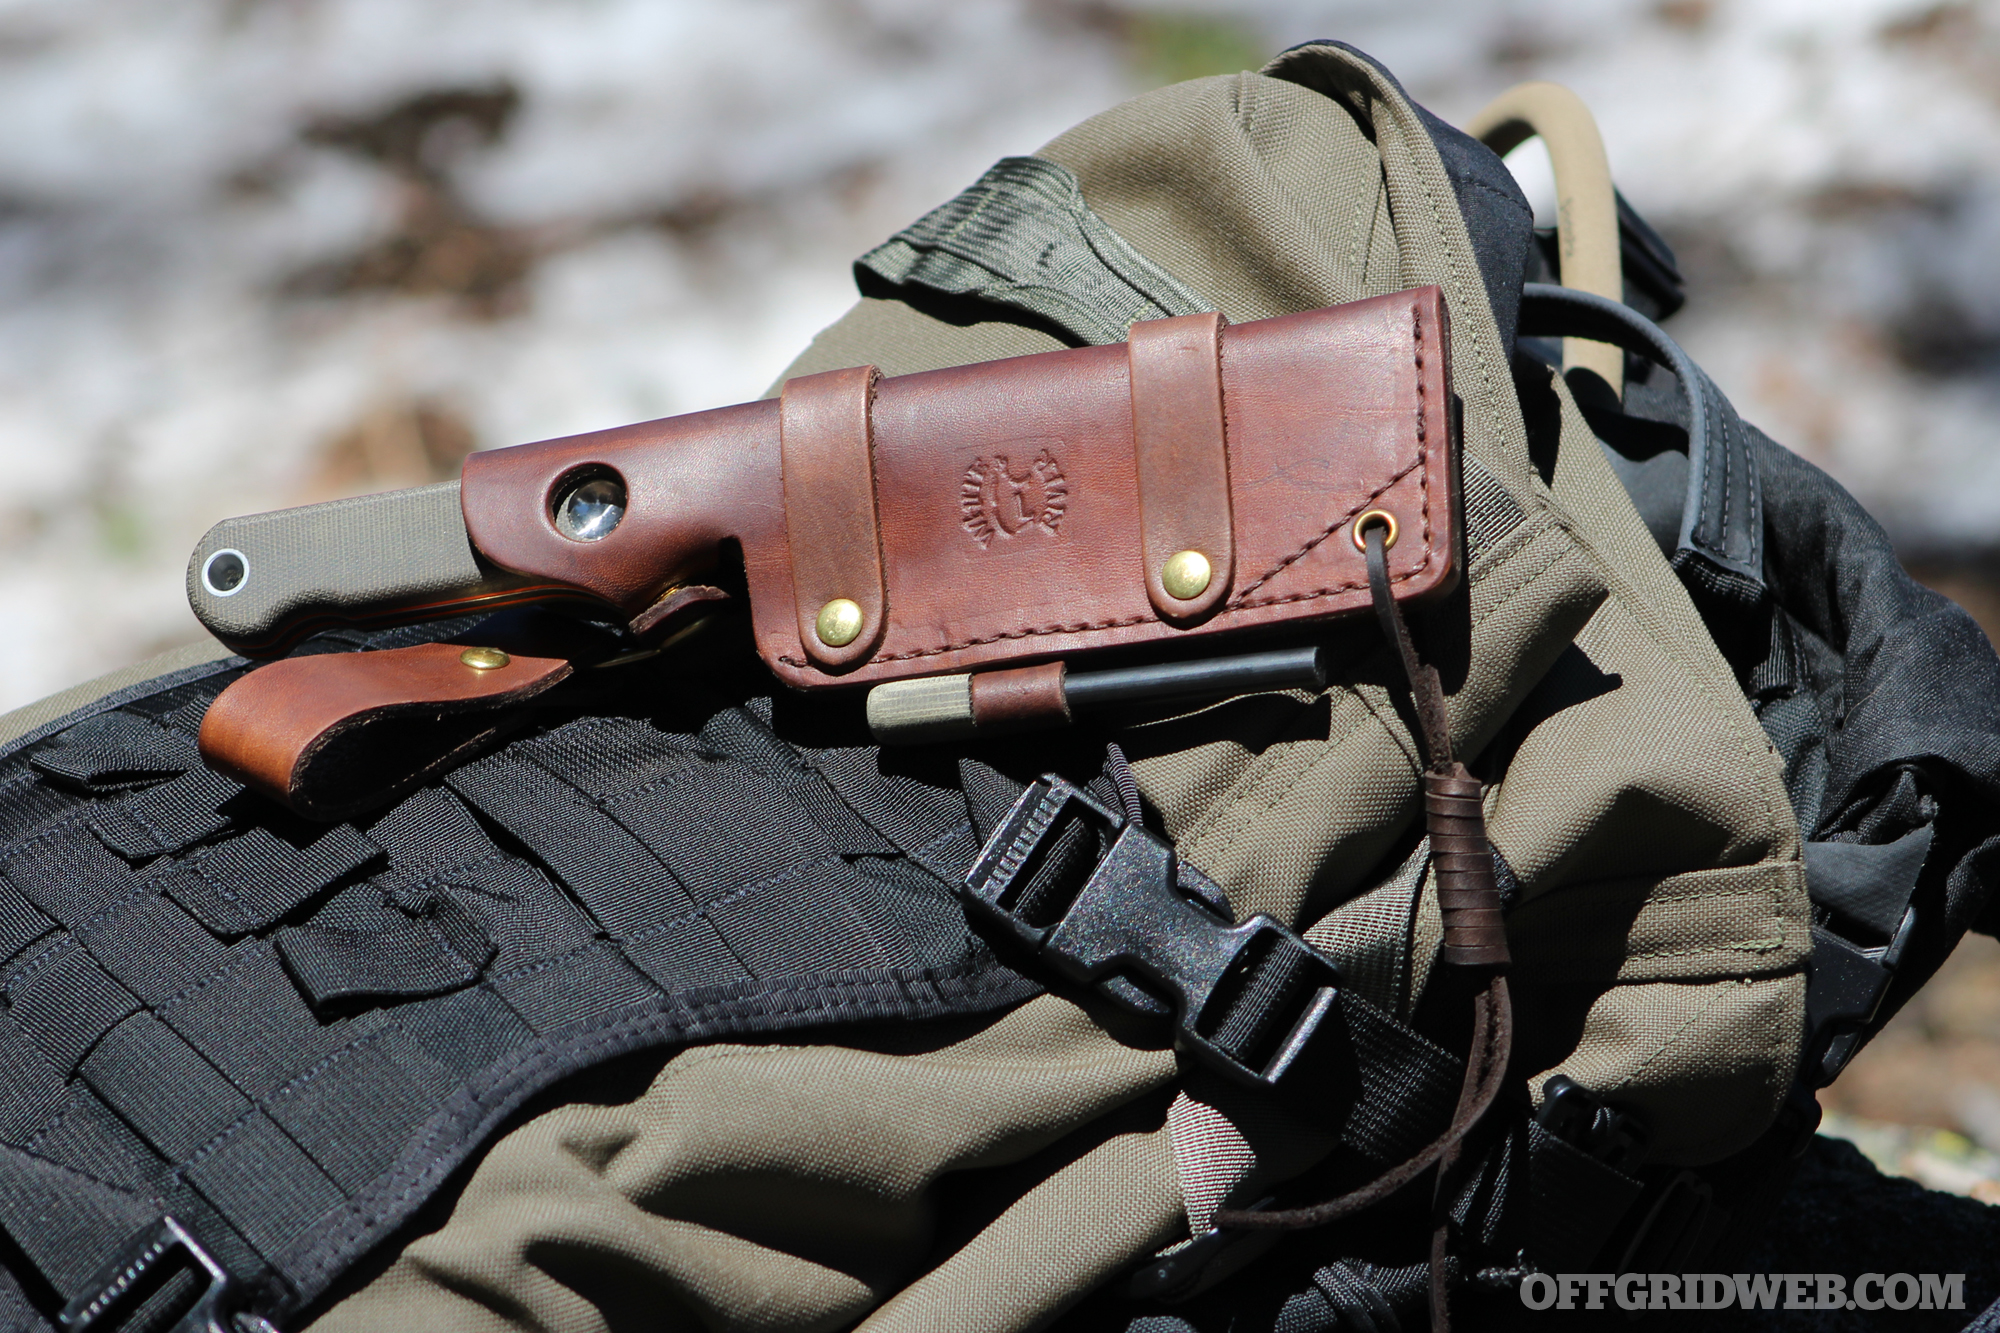
What would your ideal survival knife look like? Due to variations in personal preferences, intended uses, and surrounding environments, the answers to this question will be substantially different from one survivalist to the next. However, there will also certainly be some common ground in these responses.
First and foremost, a survival knife must be dependable. This means it needs a strong spine, a durable edge, and a handle mounted securely to the tang. Second, it must be efficient — the blade should be long and sharp enough to chop, whittle, skin, and slice effortlessly without becoming ungainly. It can't be too heavy to carry on long hikes, but can't be so light it cracks or bends under pressure.
A comfortable and secure grip is also essential, as is a tough sheath with solid rentention. As with all tools, value is a consideration. Many of us prefer to spend our hard-earned dollars on American-made products, but we also can't afford to break the bank.
At this point, you may be thinking that a blade which meets every last one of these criteria sounds like a mythical Holy Grail, and you're not wrong. But that hasn't stopped knife makers from pursuing the quest for an ultimate survival knife. The White River Knives blade seen here is a byproduct of this never-ending journey towards survival knife perfection.
About White River Knives
White River Knife and Tool is a small business based in Coopersville, Michigan. It is owned and operated by John and Susan Cammenga, and their sons John Cammenga Jr. and Matt Cammenga.
The company proudly states that every single component of its knives — from the steel to the thread in its leather sheaths — is sourced and produced in the USA. That's an impressive statement to say the least, and one which should appeal to those of us who go out of our way to support American businesses.
White River also offers a lifetime guarantee on every one of its knives. If you own one of the company's knives and aren't 100% satisfied with it, you can send it back for free repair or replacement — no questions asked, no receipt needed. “We want people to feel confident when they finally make that buying decision that they're getting something that they're going to have for the rest of their lives,” said Matt Cammenga.
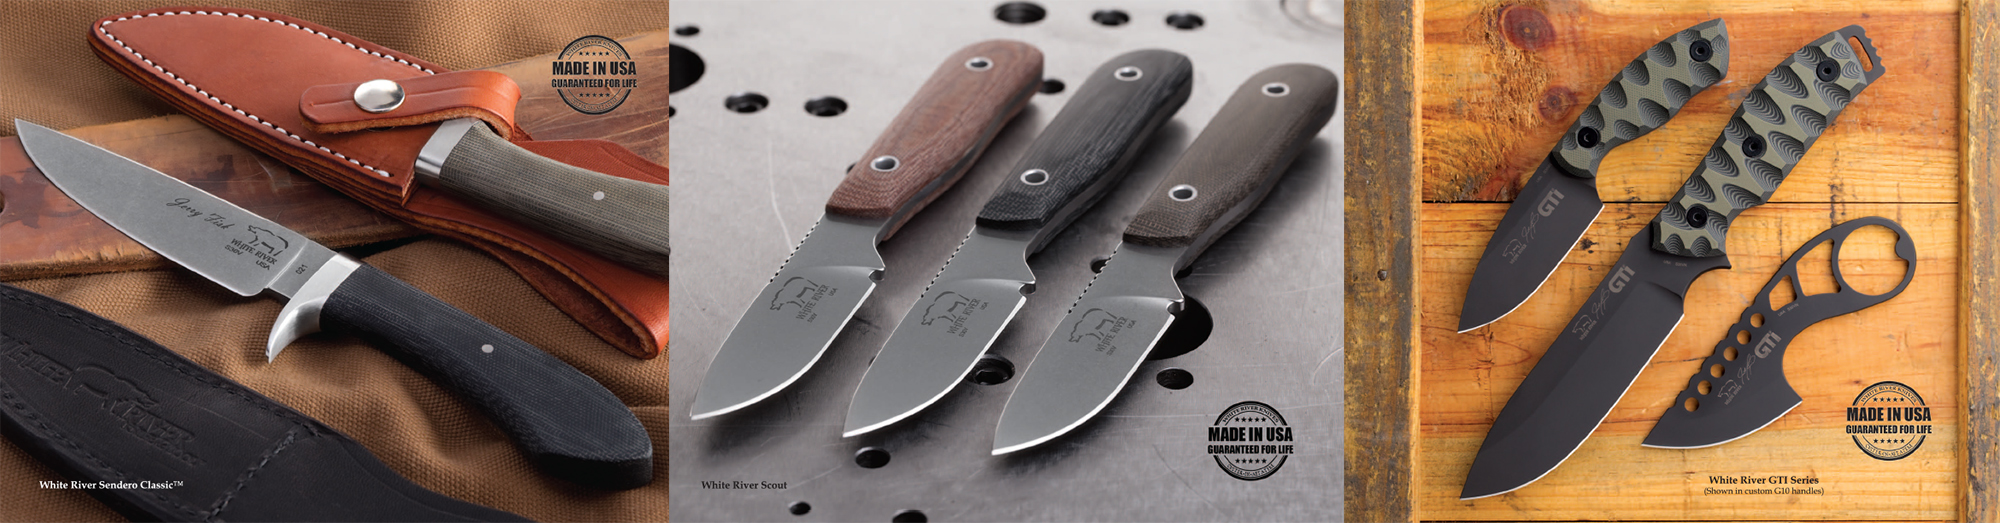
From left to right: the White River Sendero Classic, Scout, and GTI Series.
In addition to producing a variety of outdoor-oriented hunting, fishing, and bushcraft knives, the shop also grinds blades and makes private-labeled tools for other well-known brands. So even if you haven't handled a knife with the White River bear logo, you may have used one of the company's blades without knowing it.
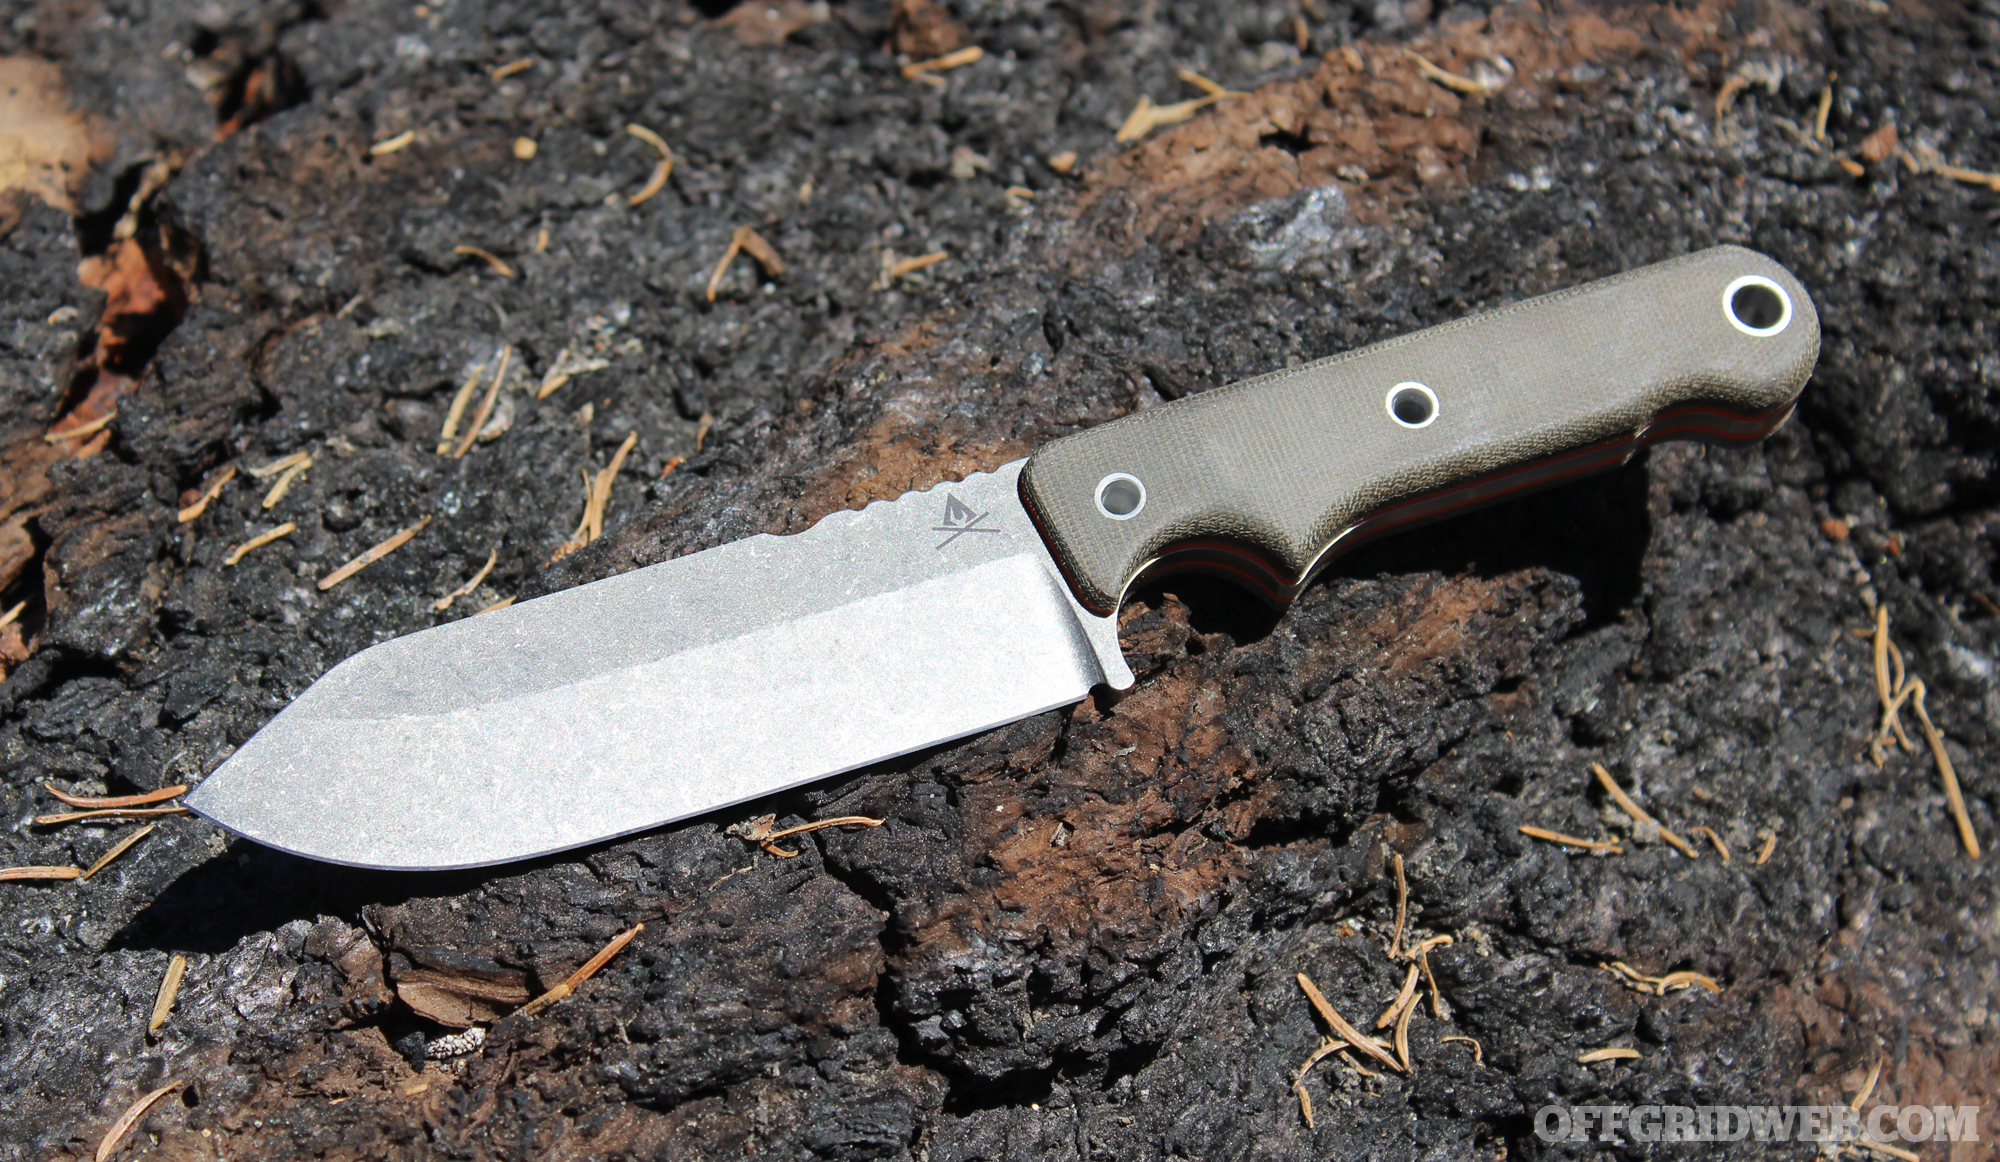
The White River Firecraft FC5
We first handled the White River Firecraft production knife series at SHOT Show 2017, and these blades immediately caught our attention. Based on the design and our initial impressions, we awarded the Firecraft series our “Best Knife of SHOT Show” award. We also said we'd get our hands on one of the Firecraft knives for a full review. That day has finally come.
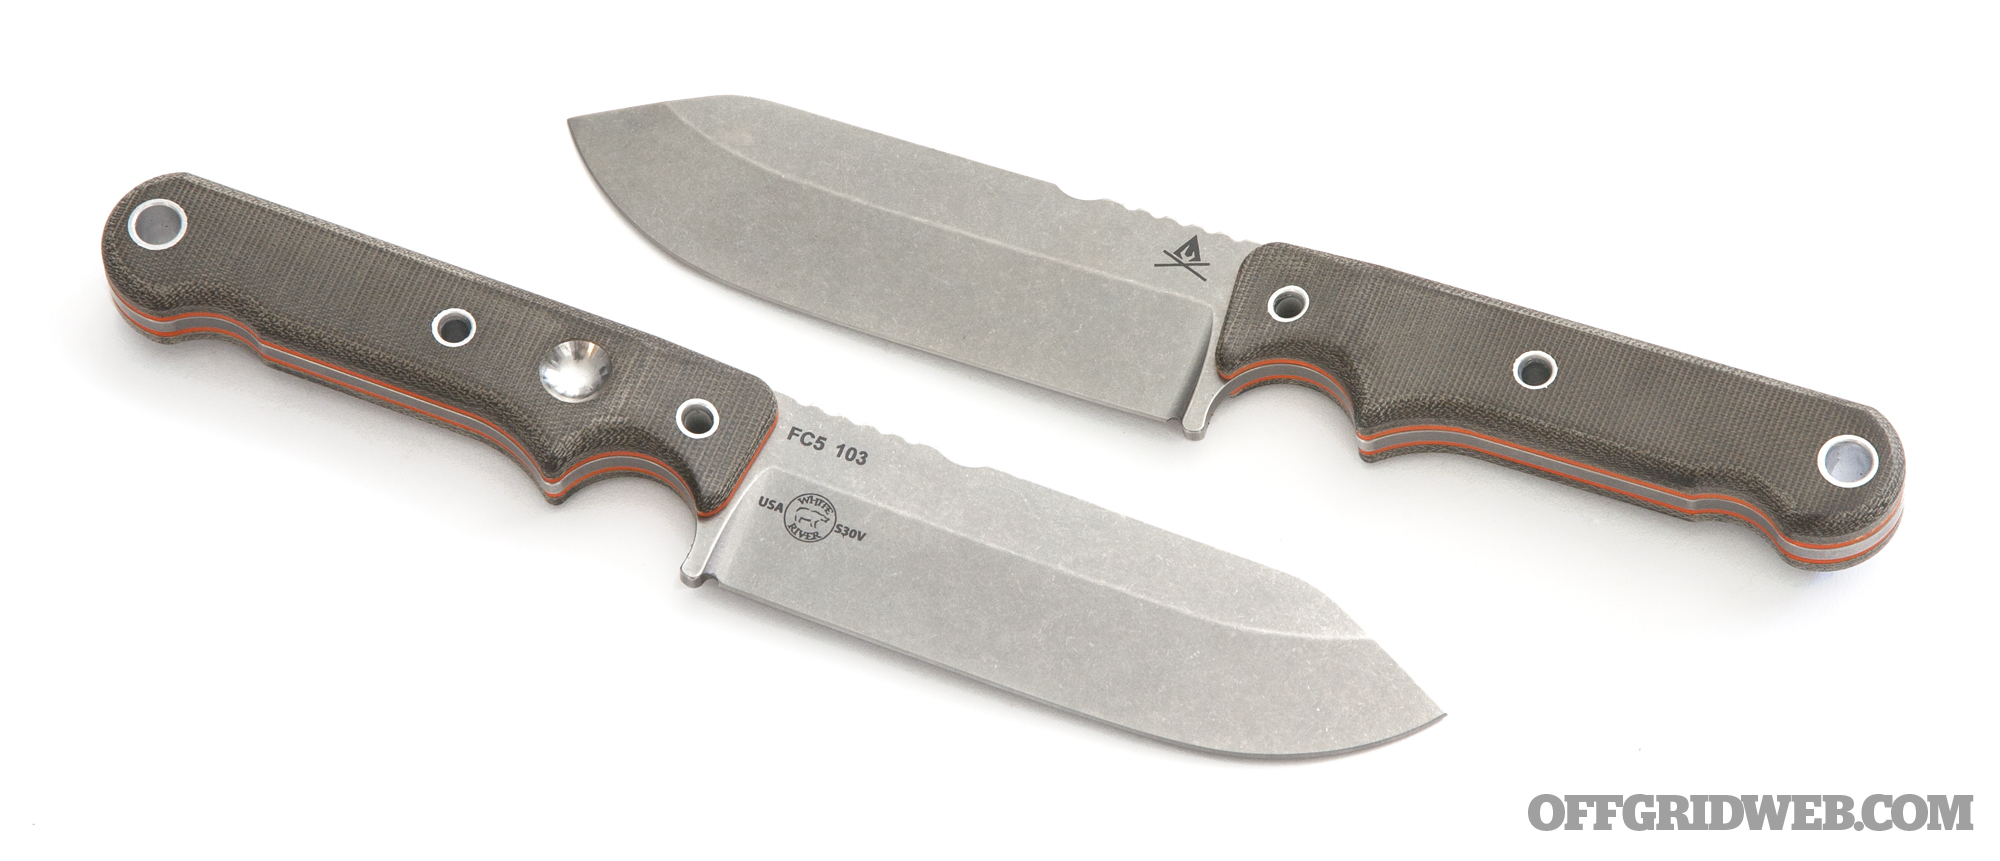
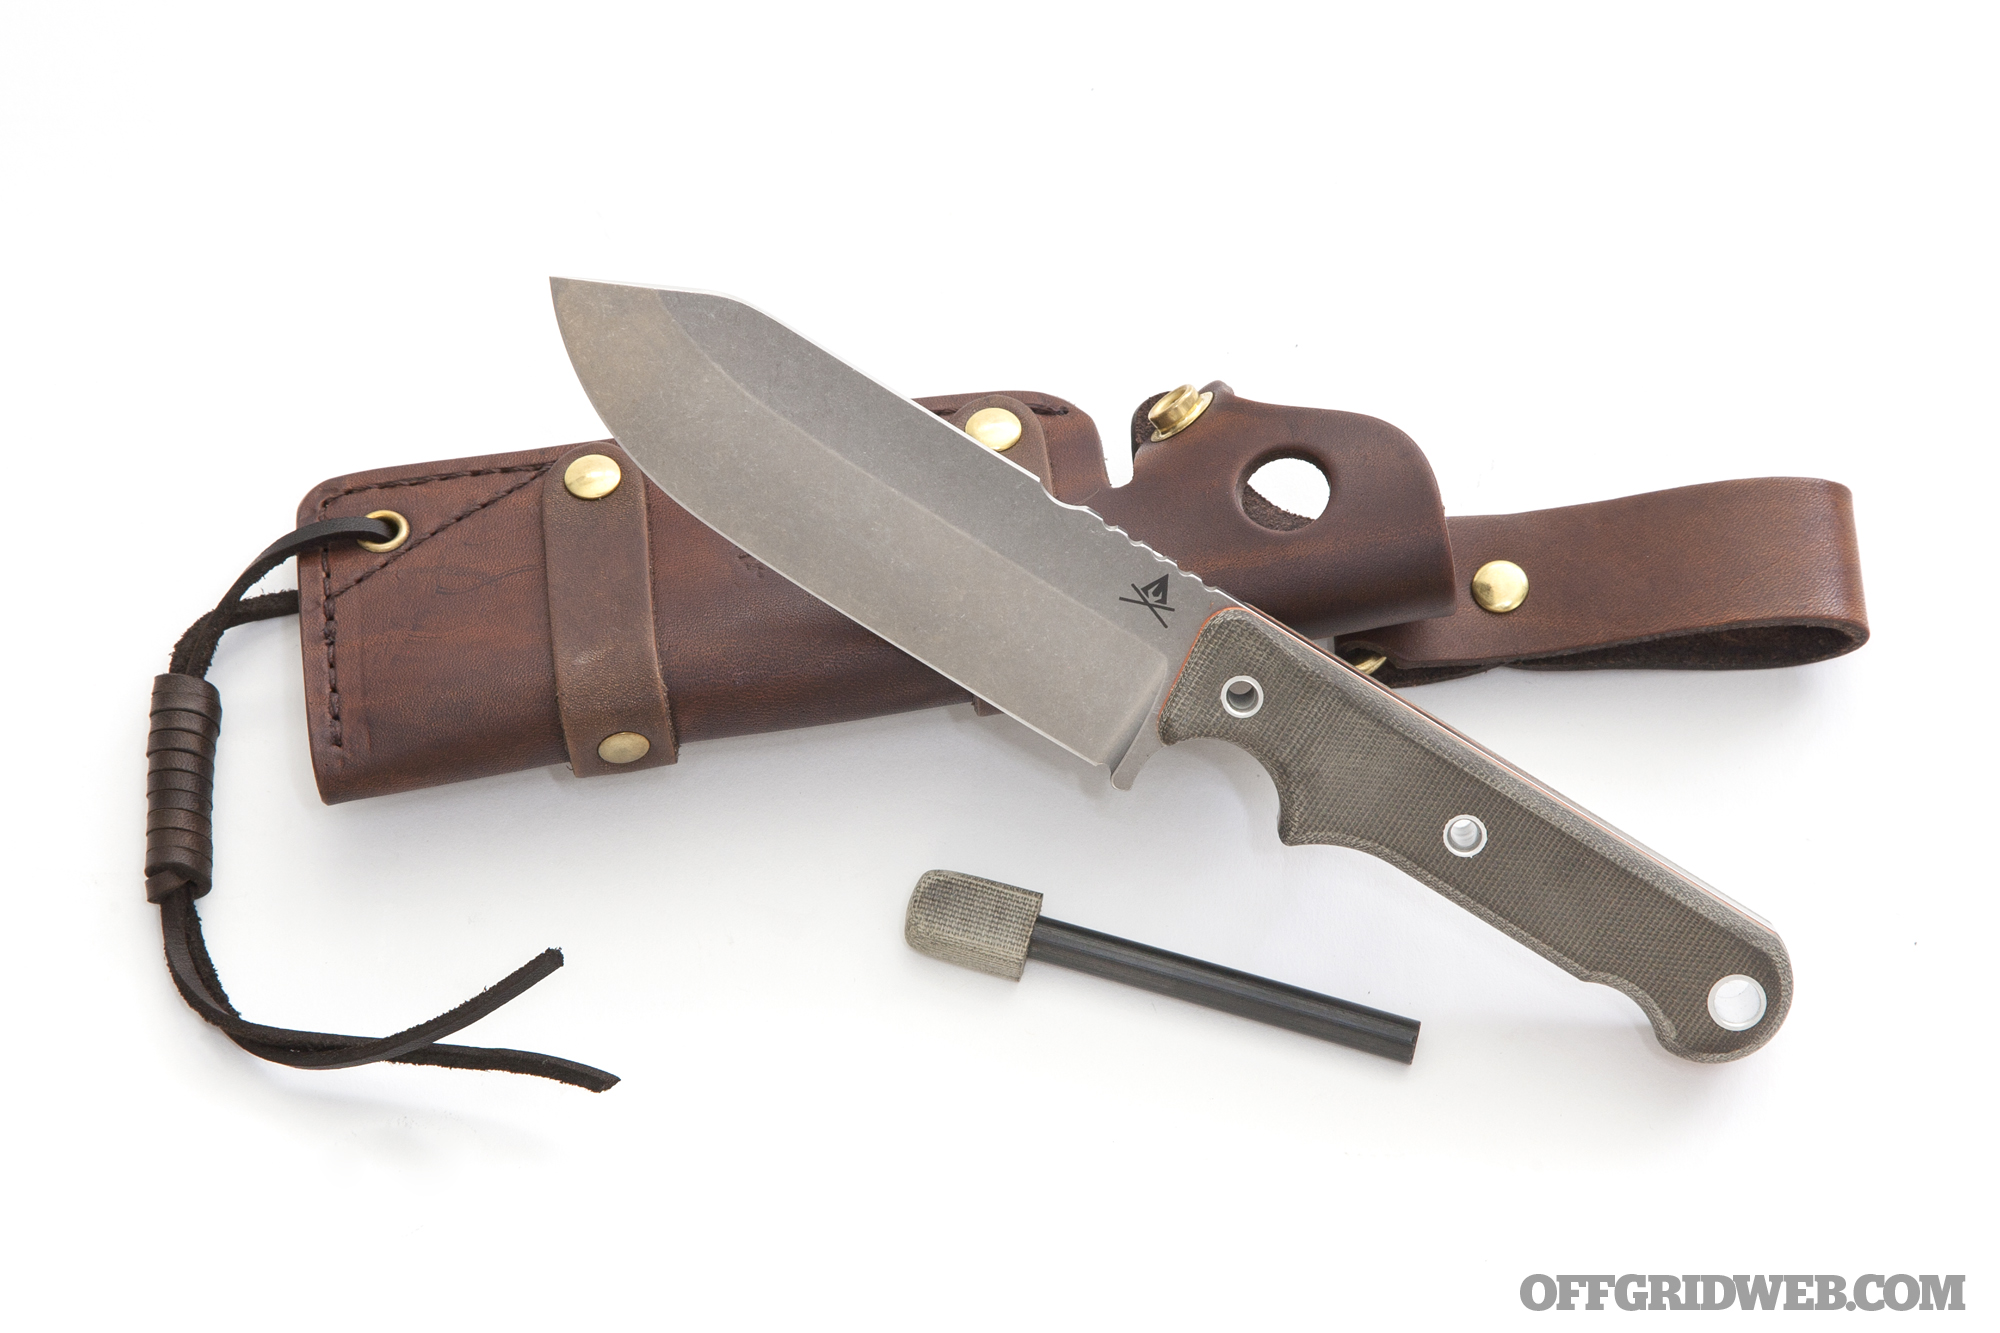
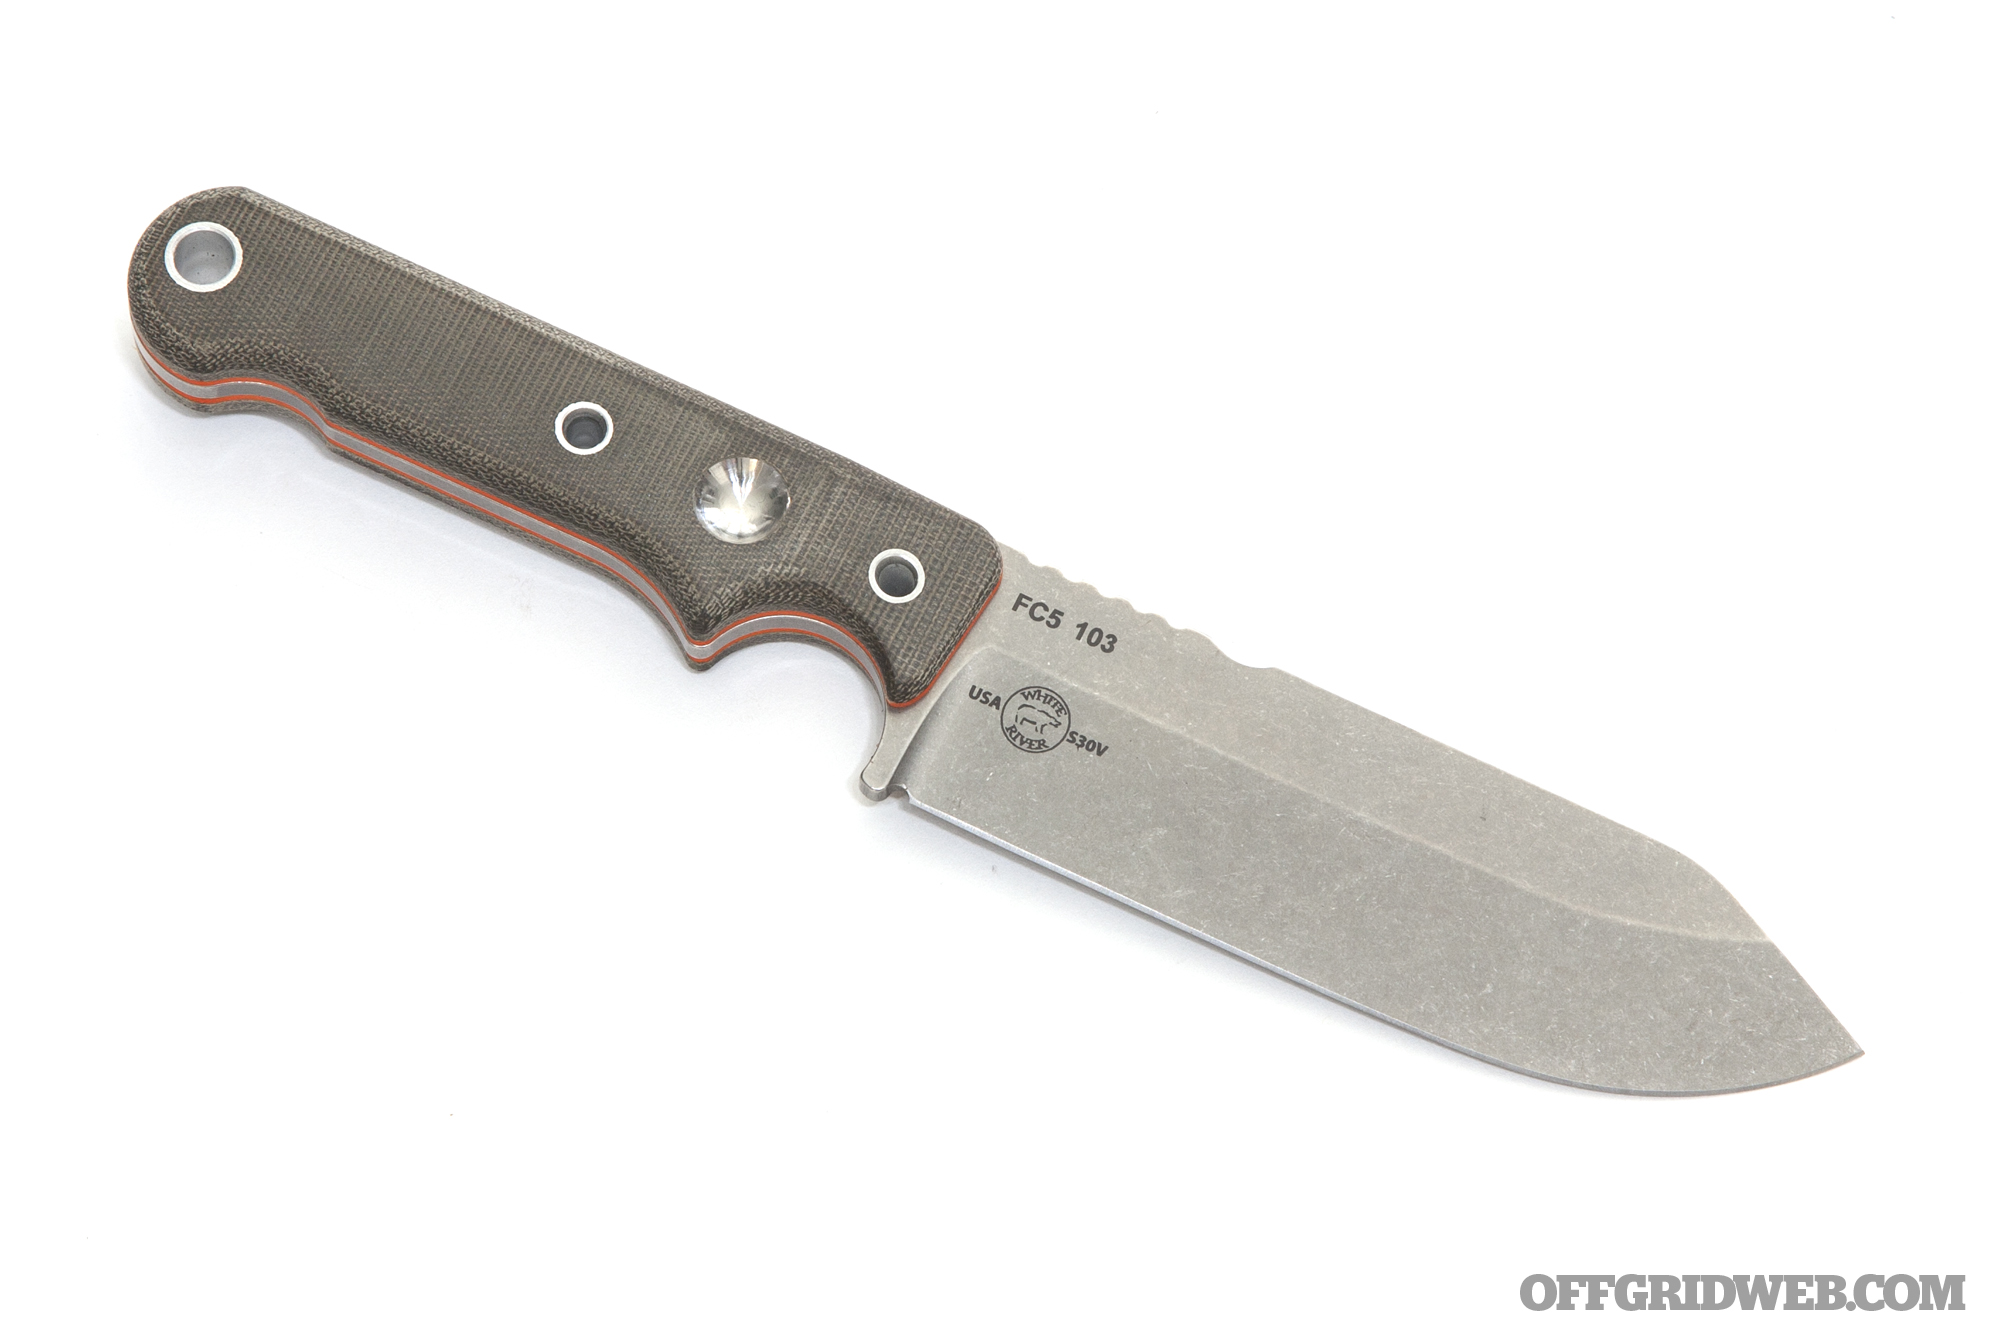
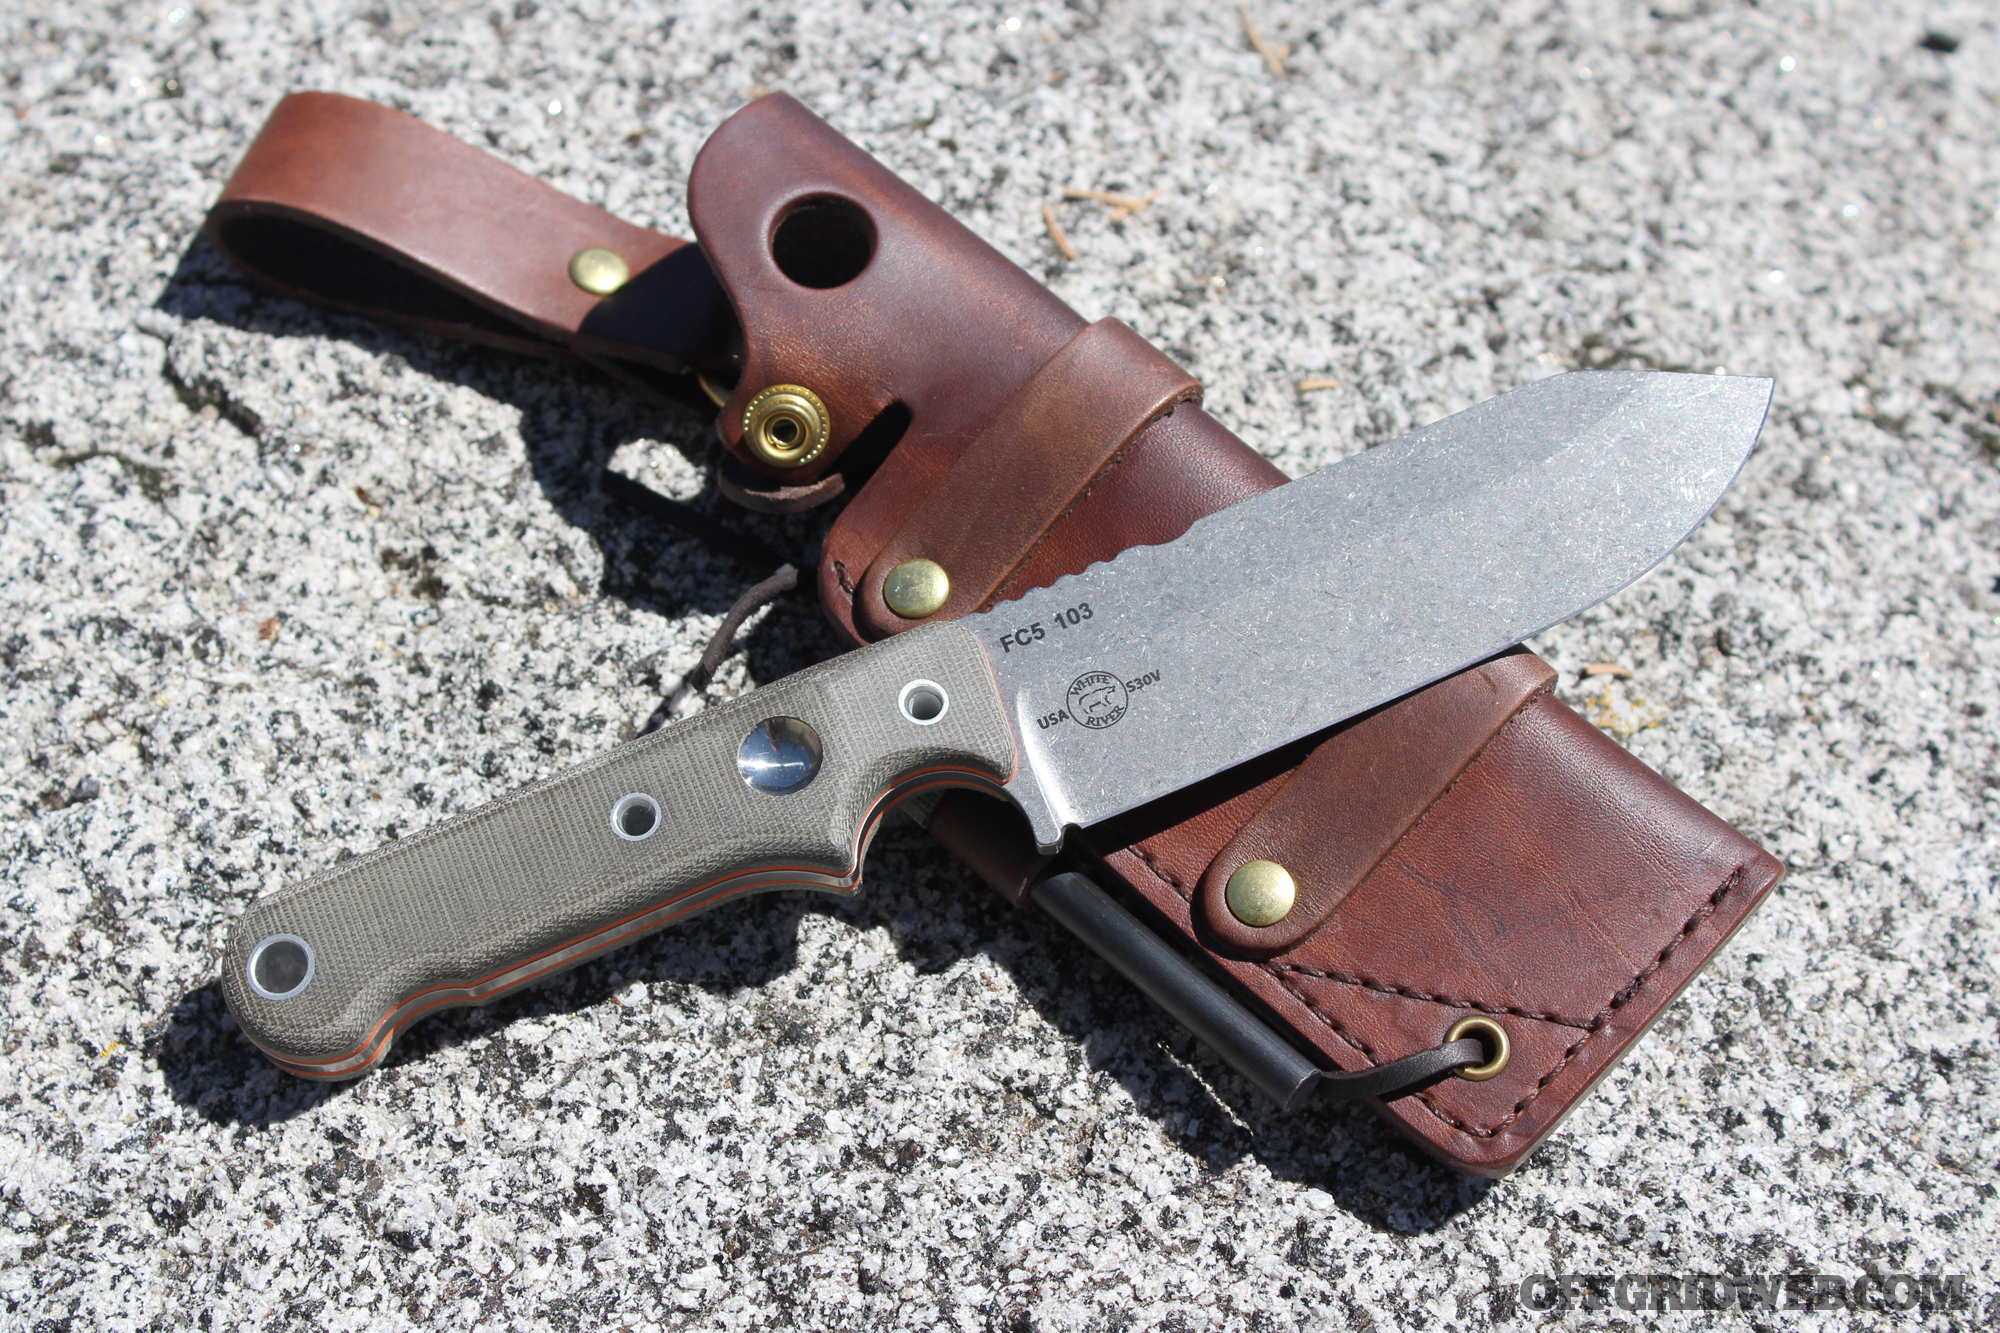
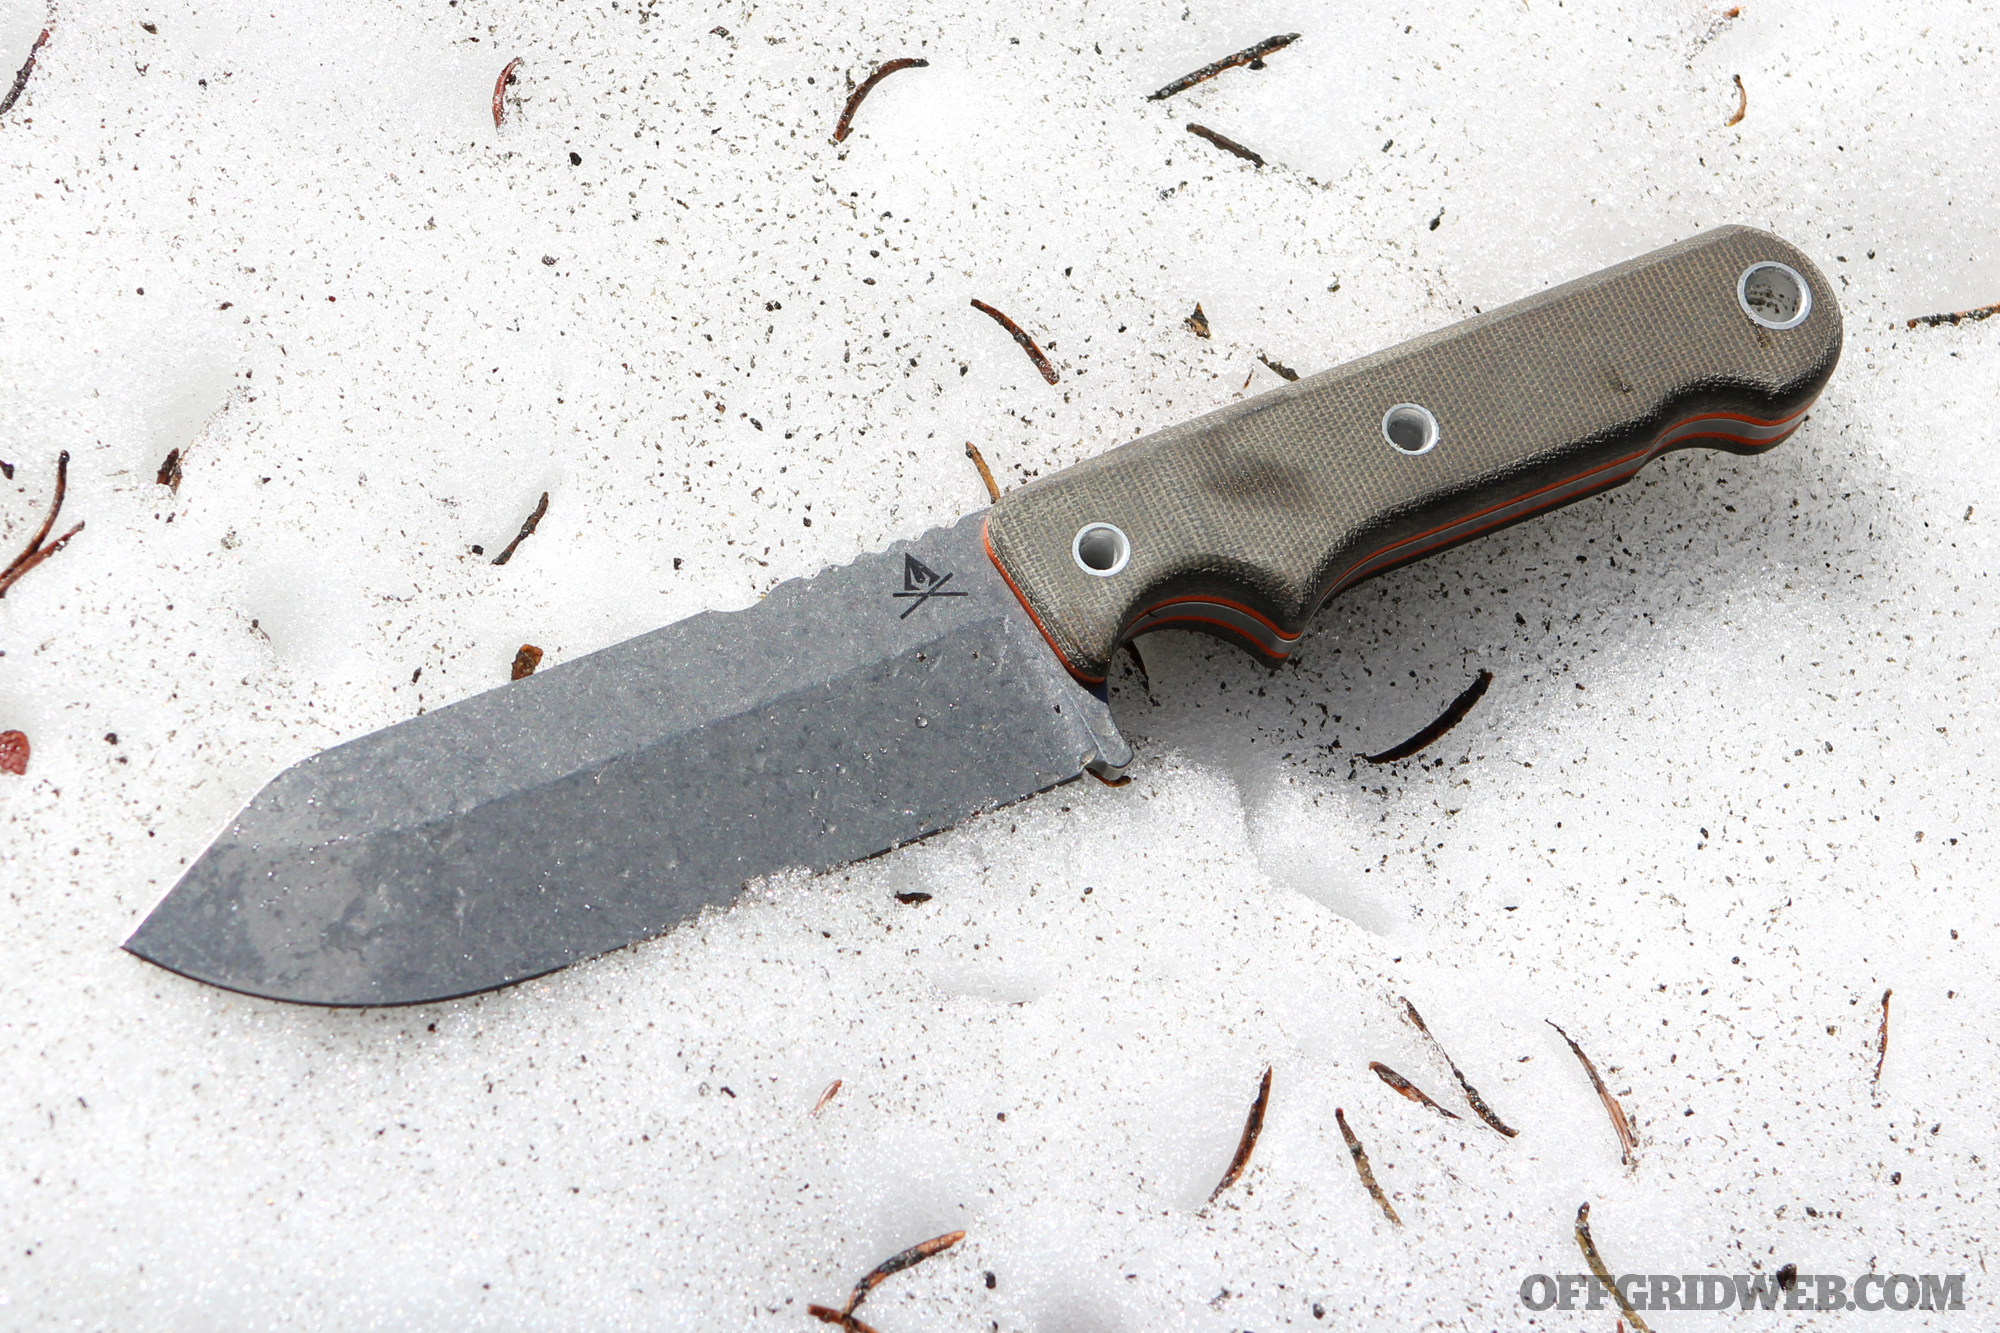
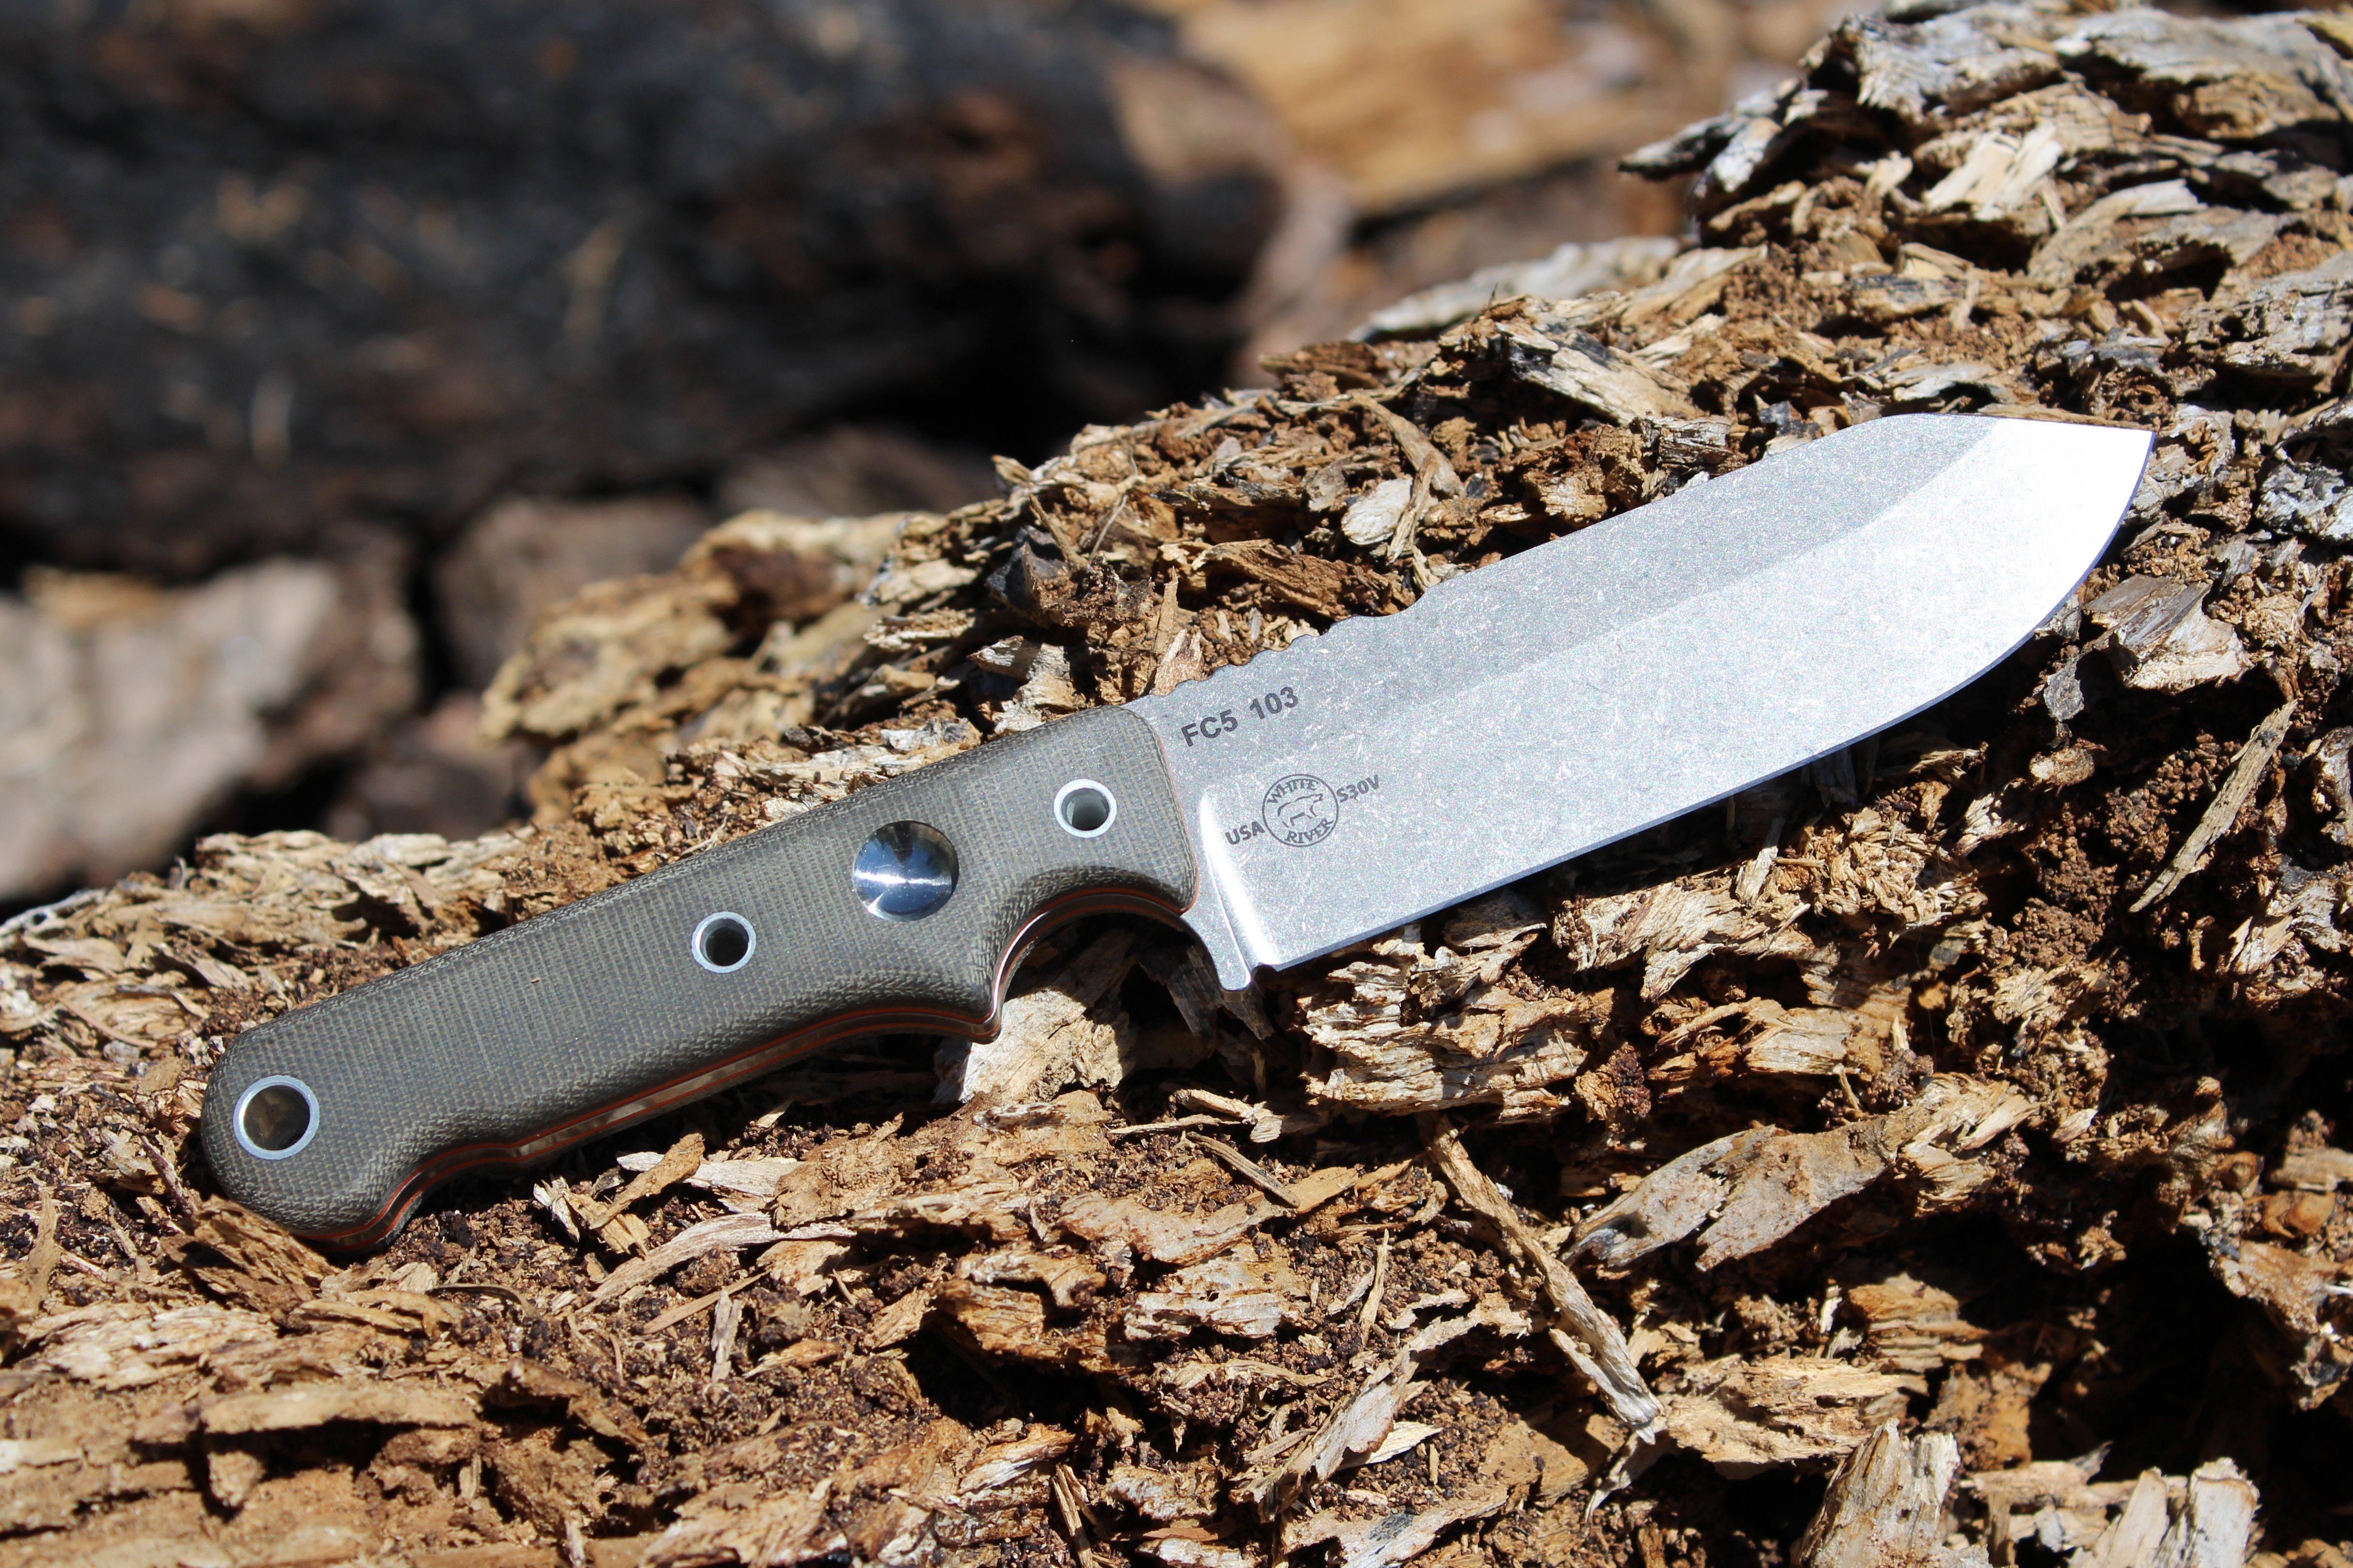
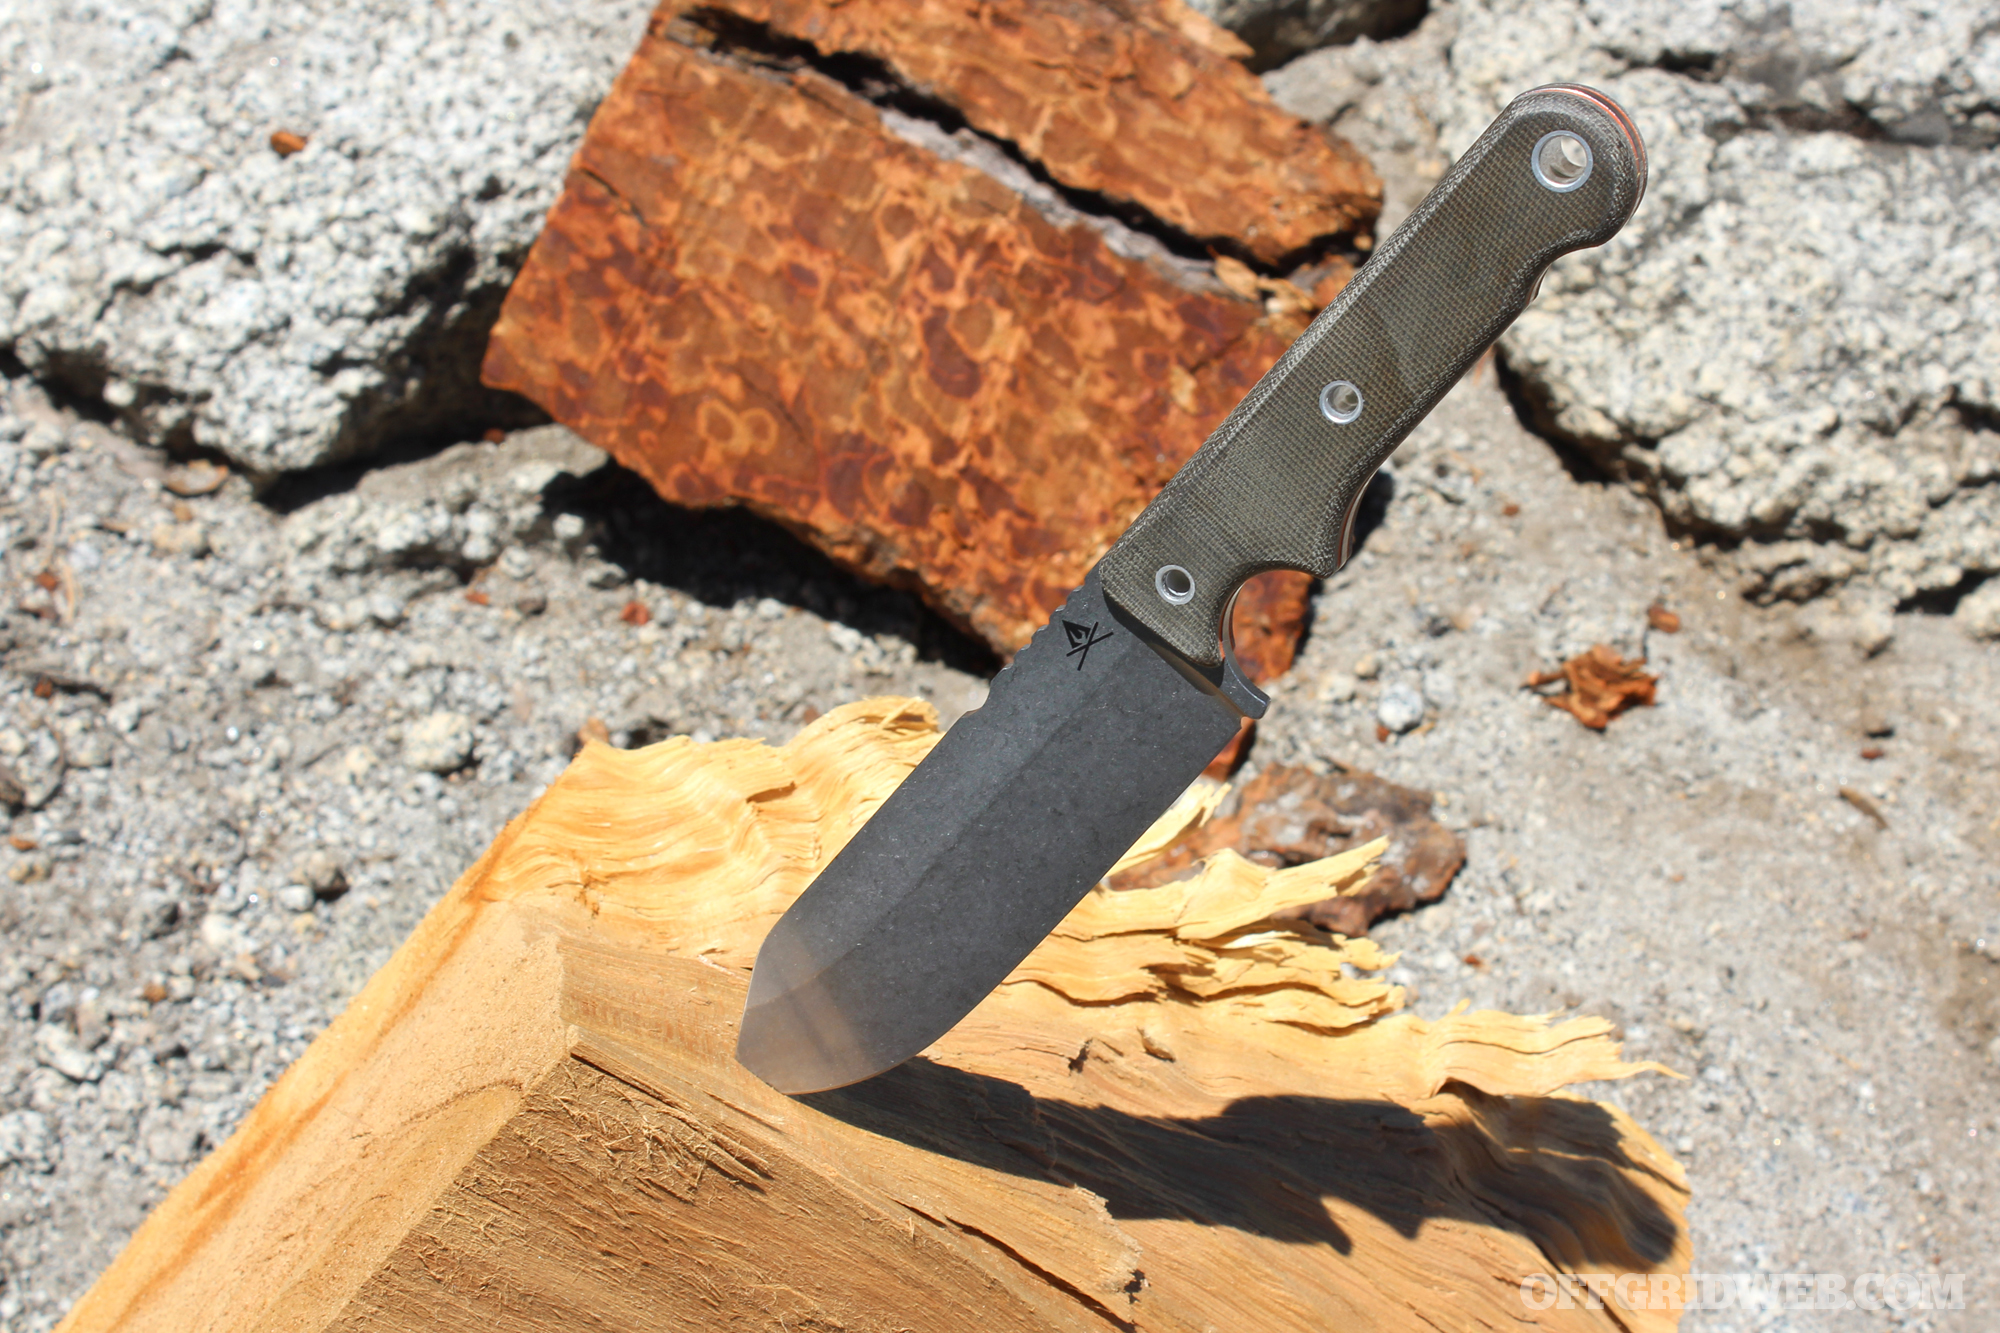
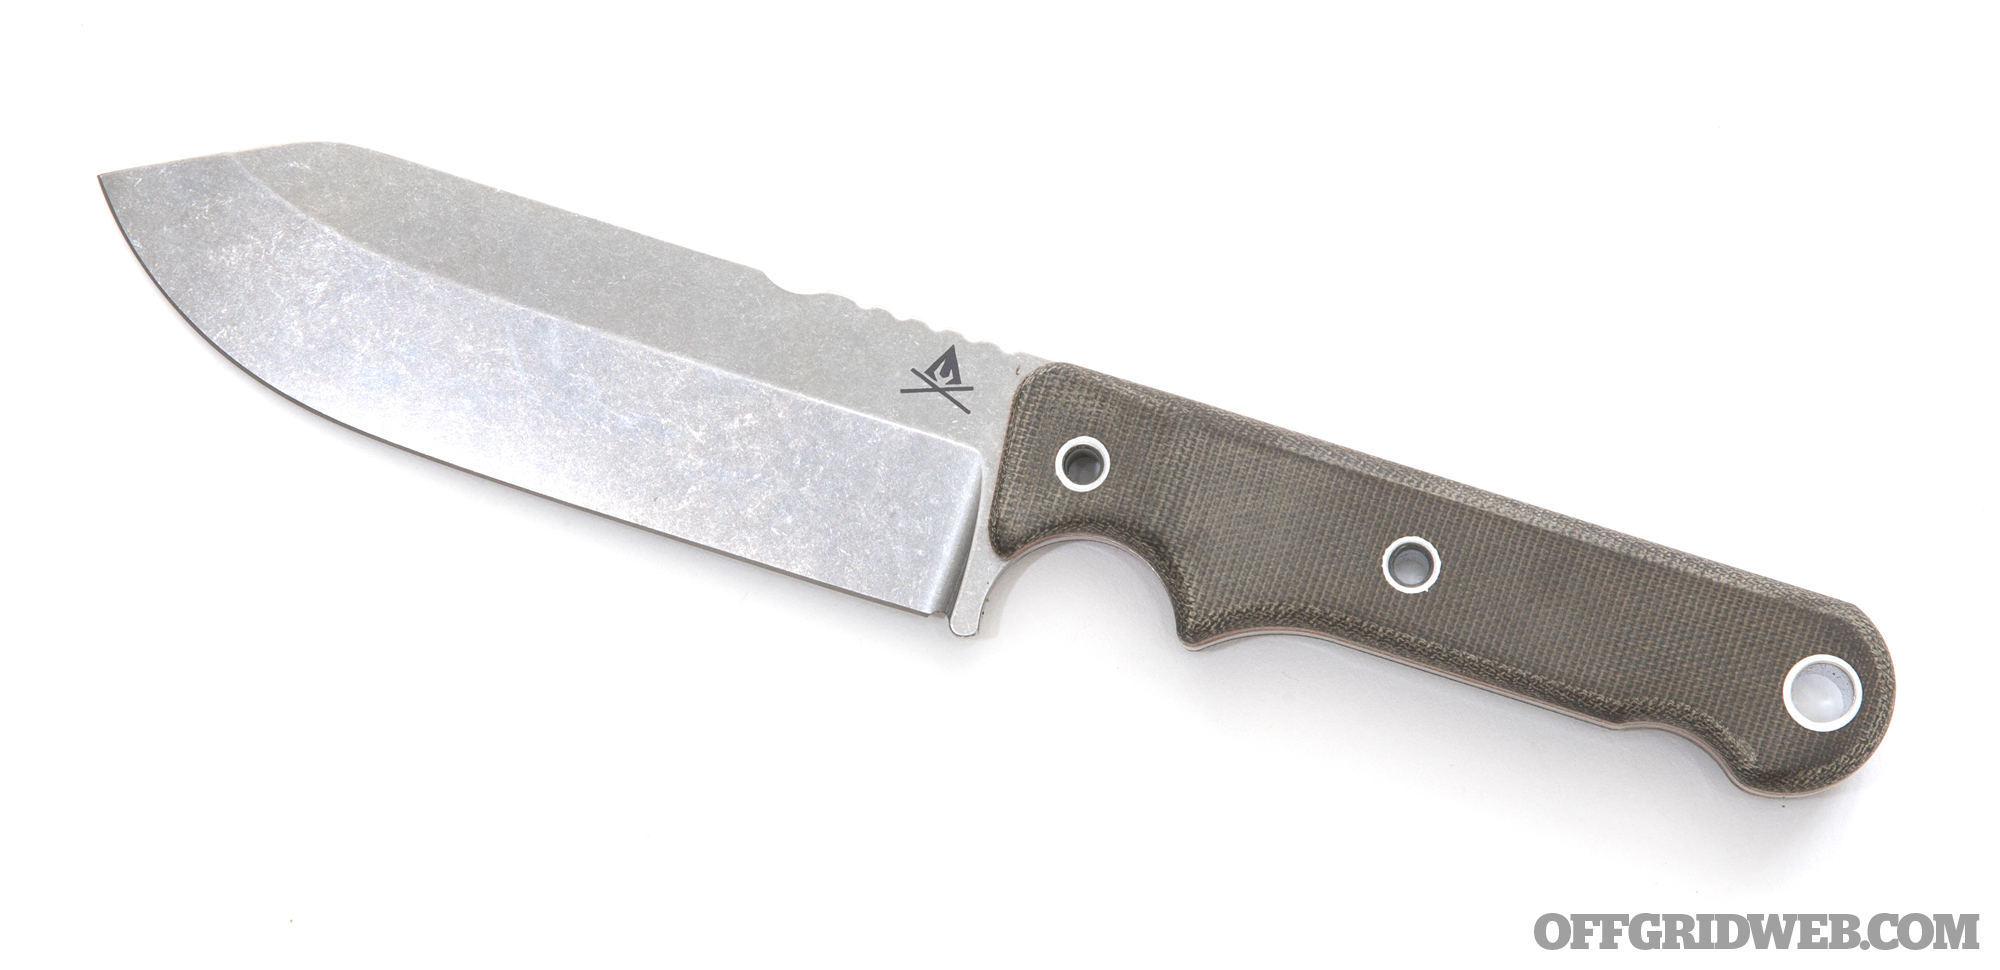
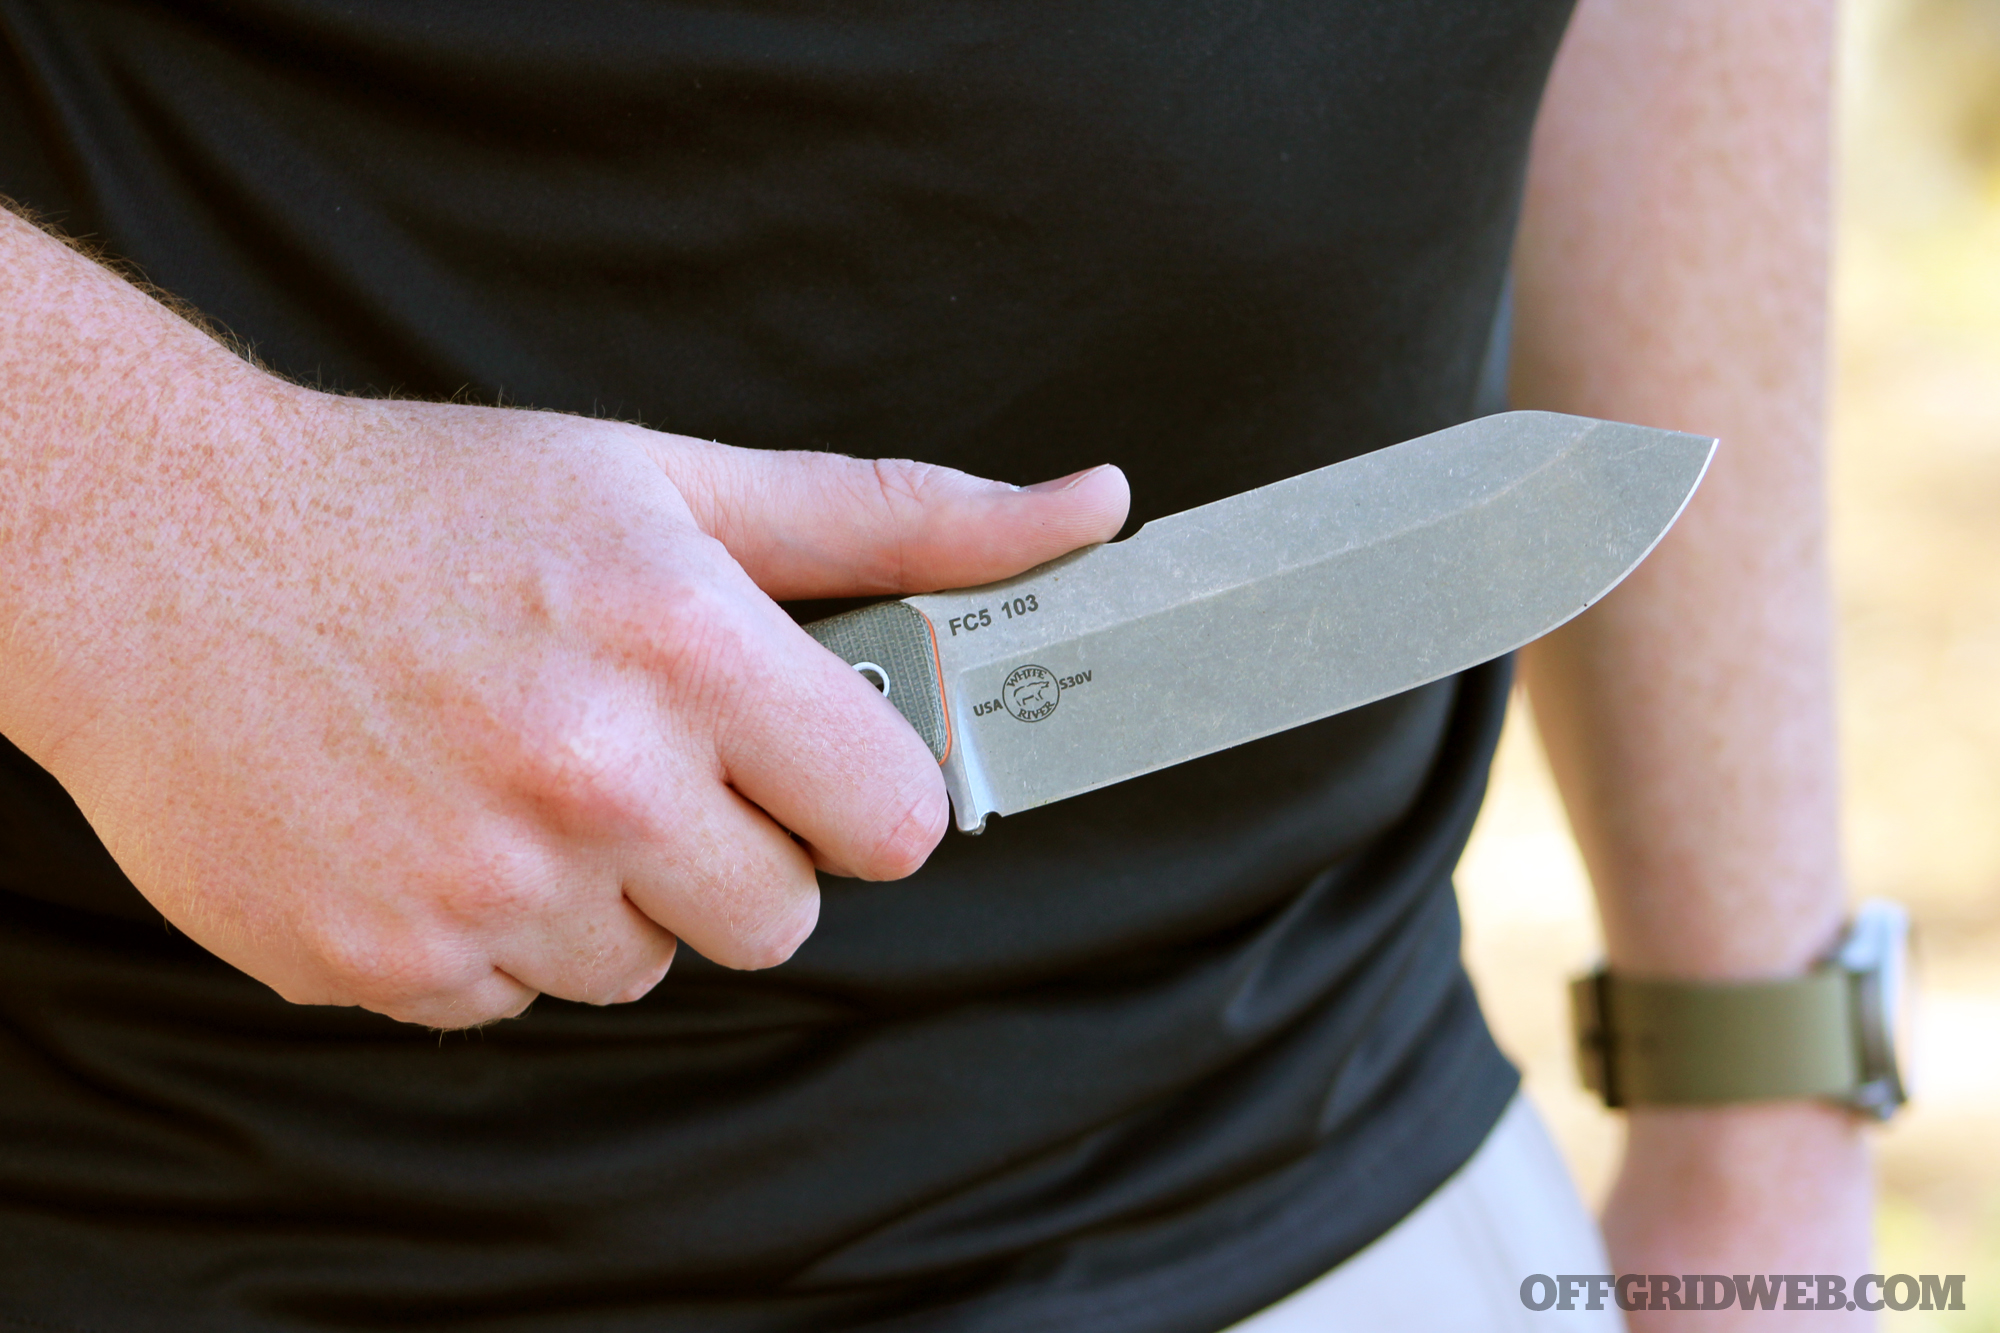
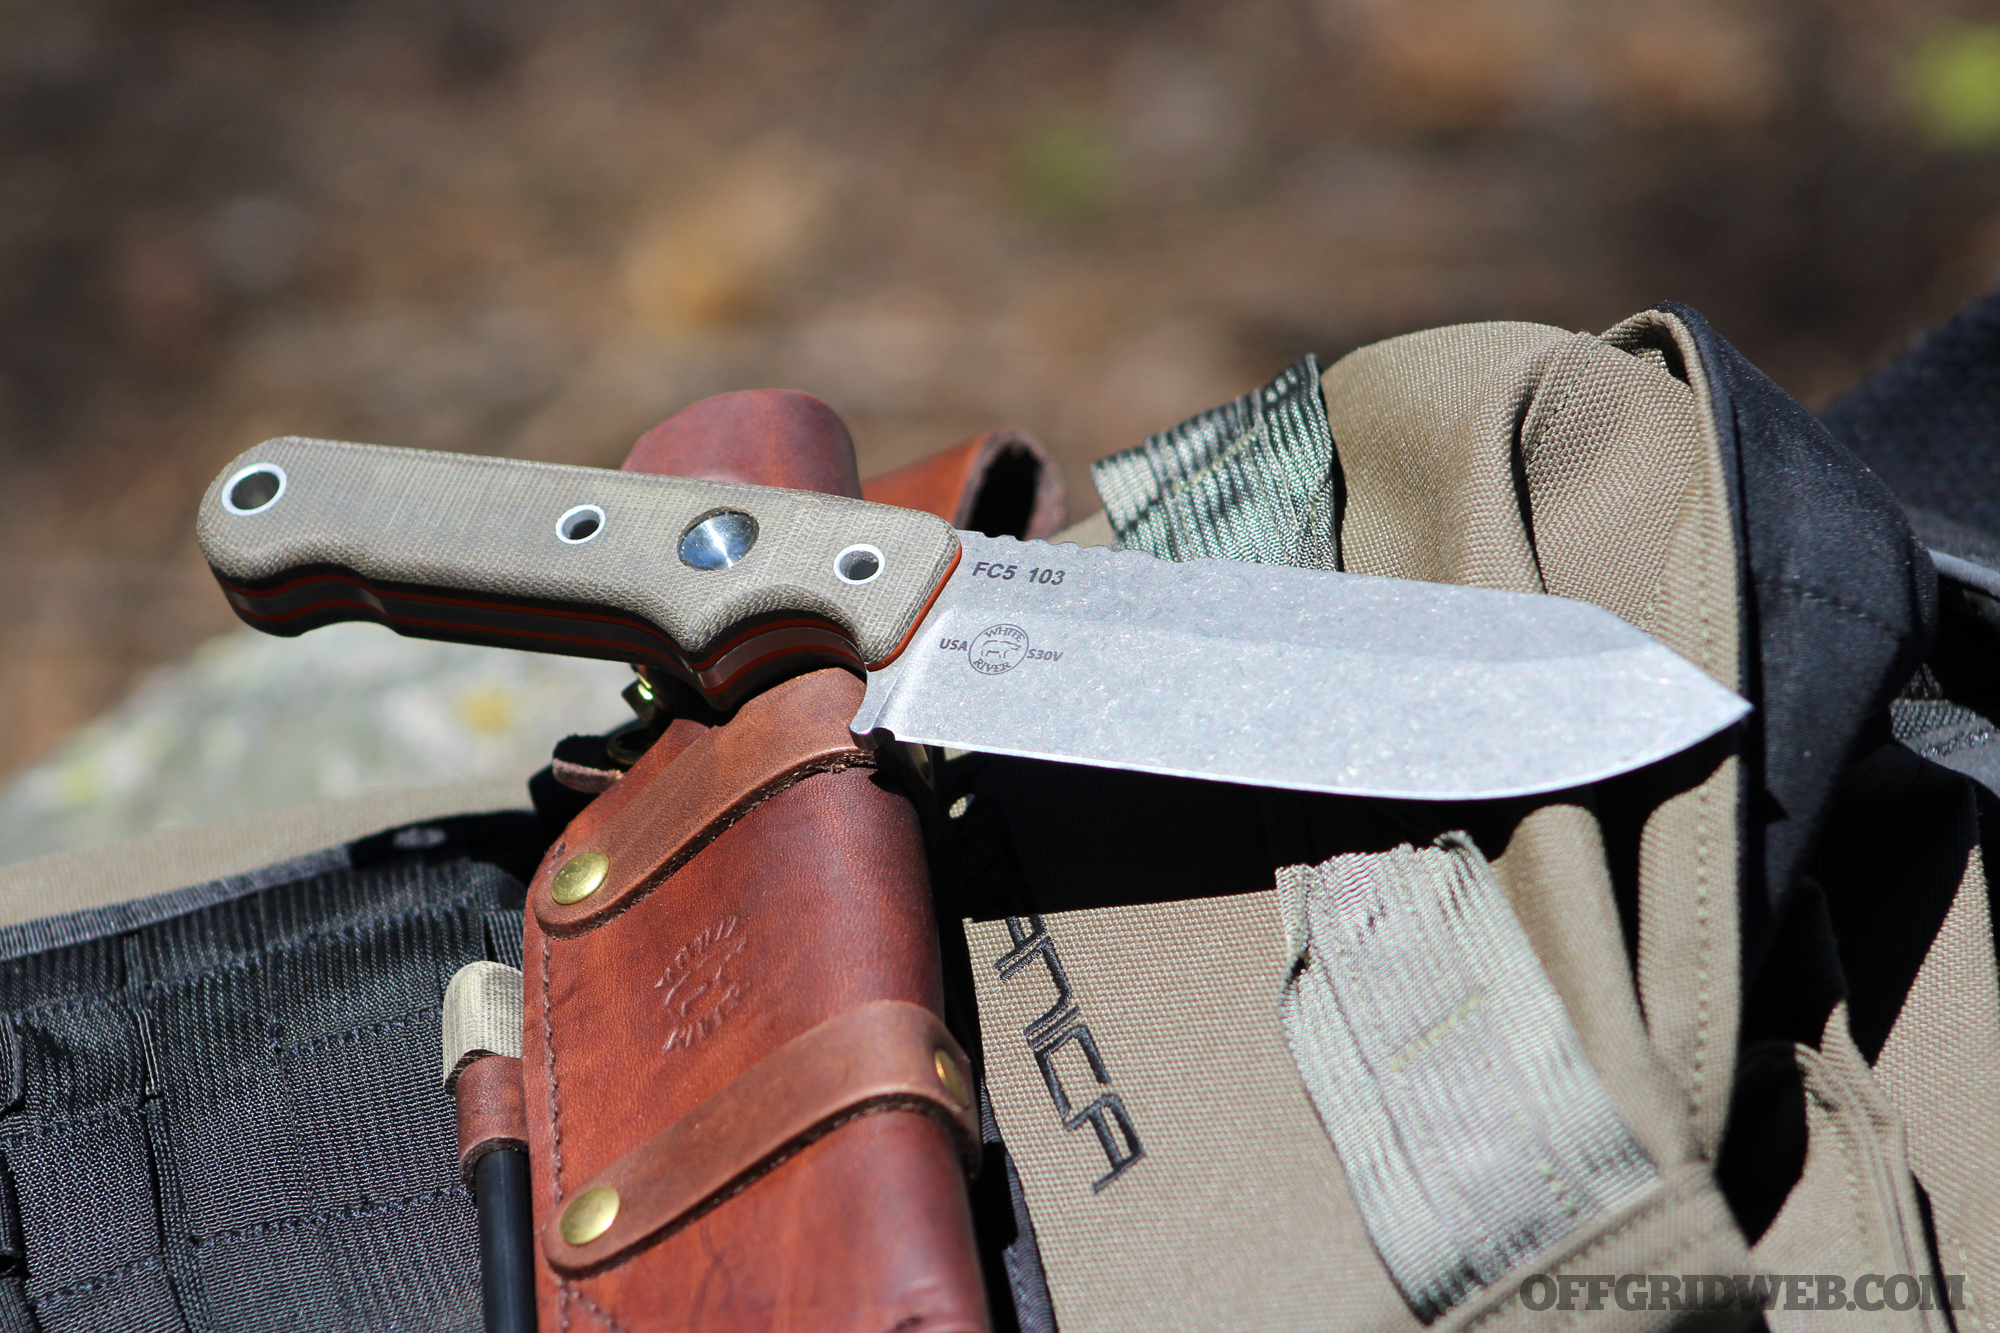
The White River Firecraft FC5 occupies the mid-range position between the smaller FC4 and larger FC7. This 10-inch knife features a broad 5-inch blade made of CPM S30V, a corrosion-resistant stainless steel infused with chromium and vanadium for added toughness. The blade is heat-treated to 59 HRC and wears a utilitarian stonewashed finish.
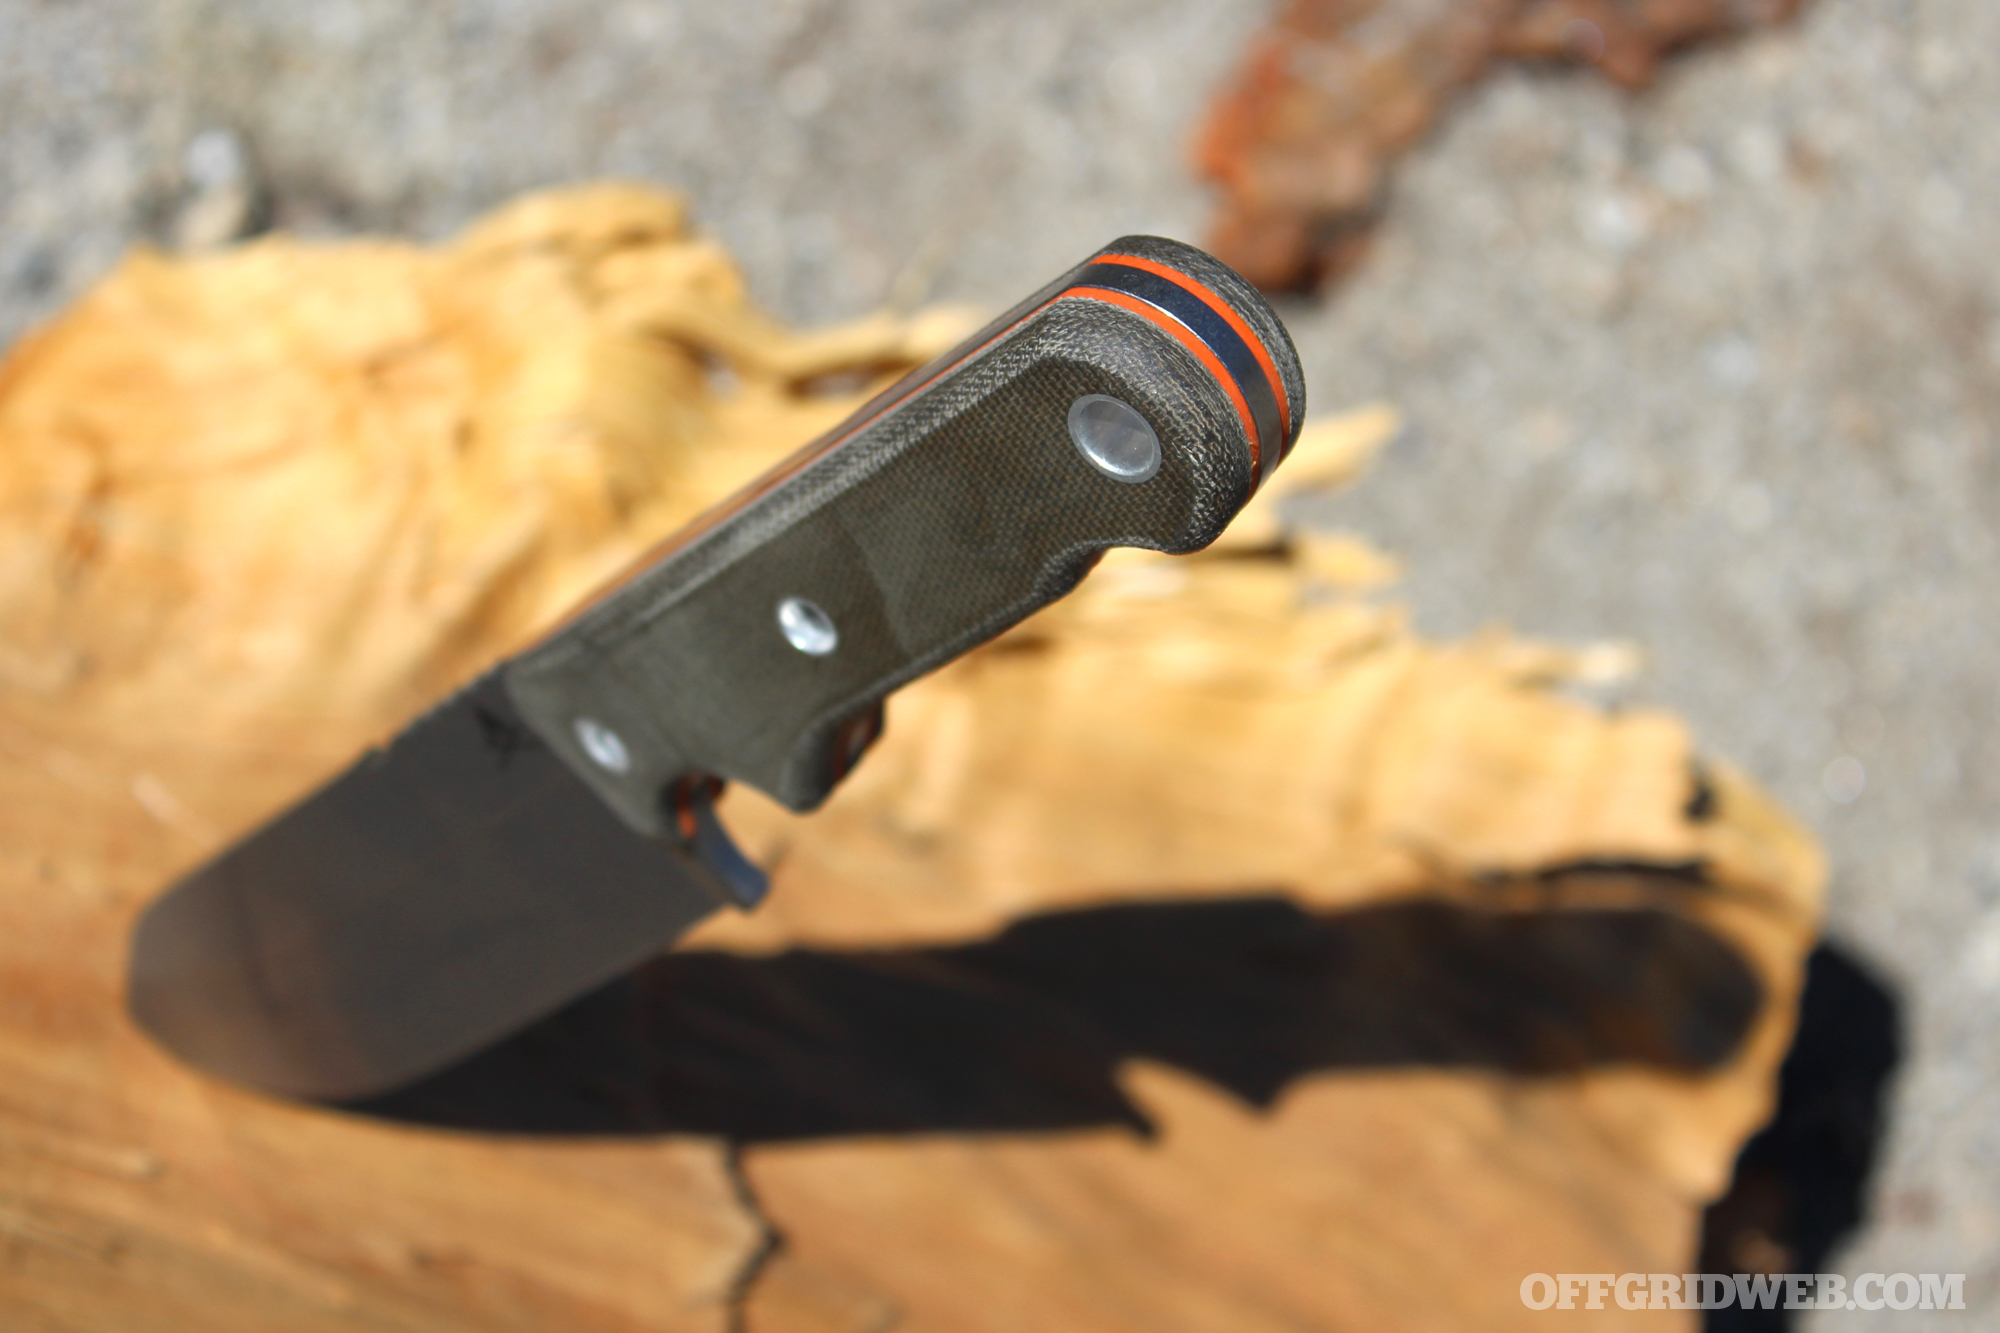
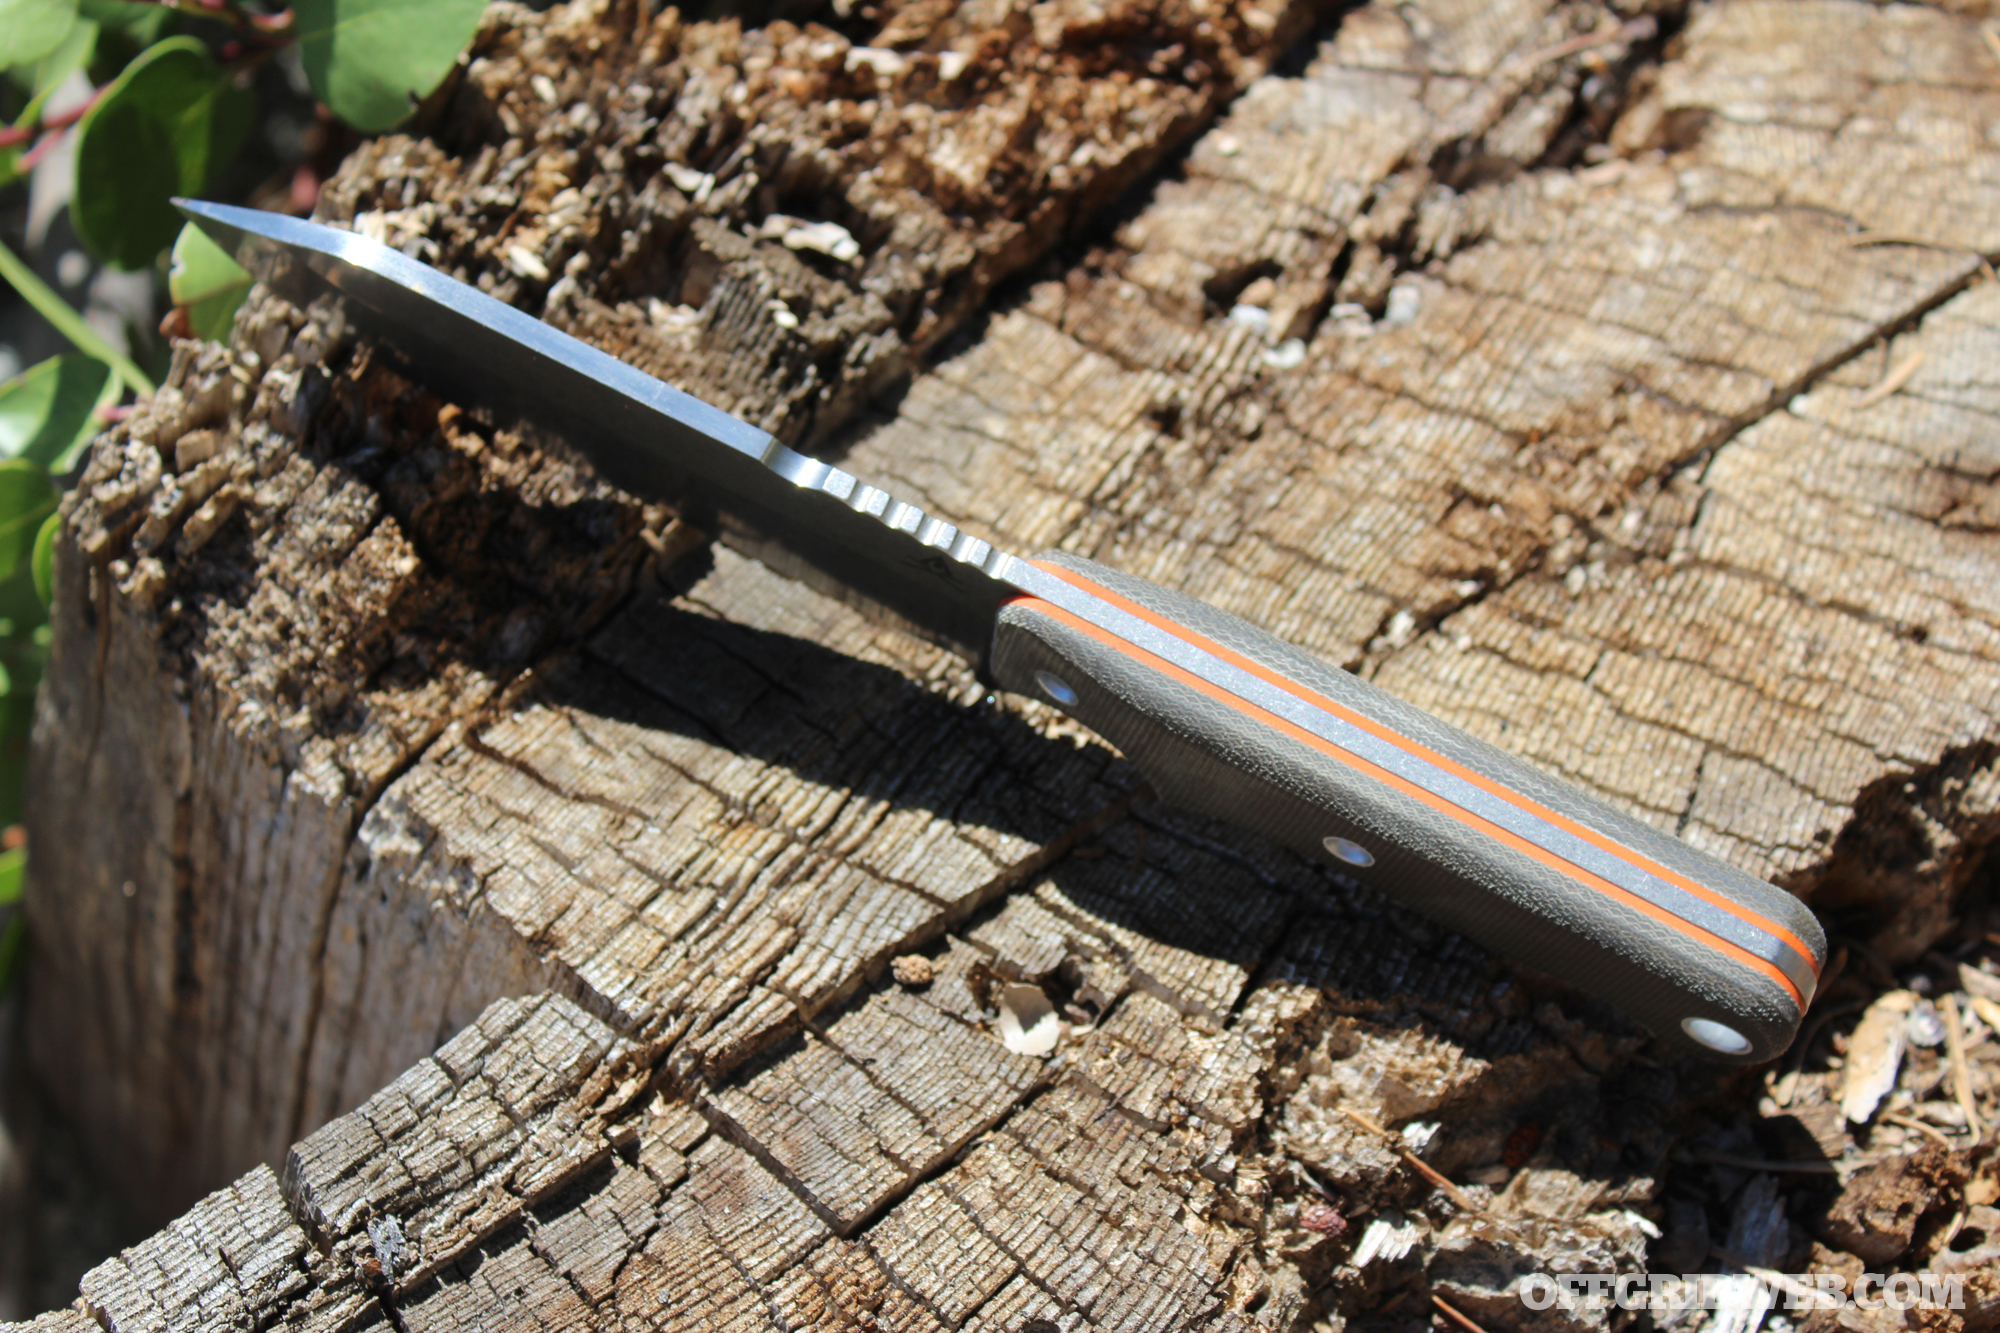
The Firecraft FC5 lives up to its name by providing two fire-starting resources. One of the notches along the spine offers a 90-degree edge for striking a ferrocerium rod (more on that shortly). There's also a polished stainless divot on the right side of the handle that's intended for stabilizing a bow drill.
This knife's full-tang design includes a large forefinger choil and additional contours for improved grip. Green canvas micarta scales and orange G10 spacers are attached to the tang via three hollow metal pins, with the third pin doubling as a lanyard hole.
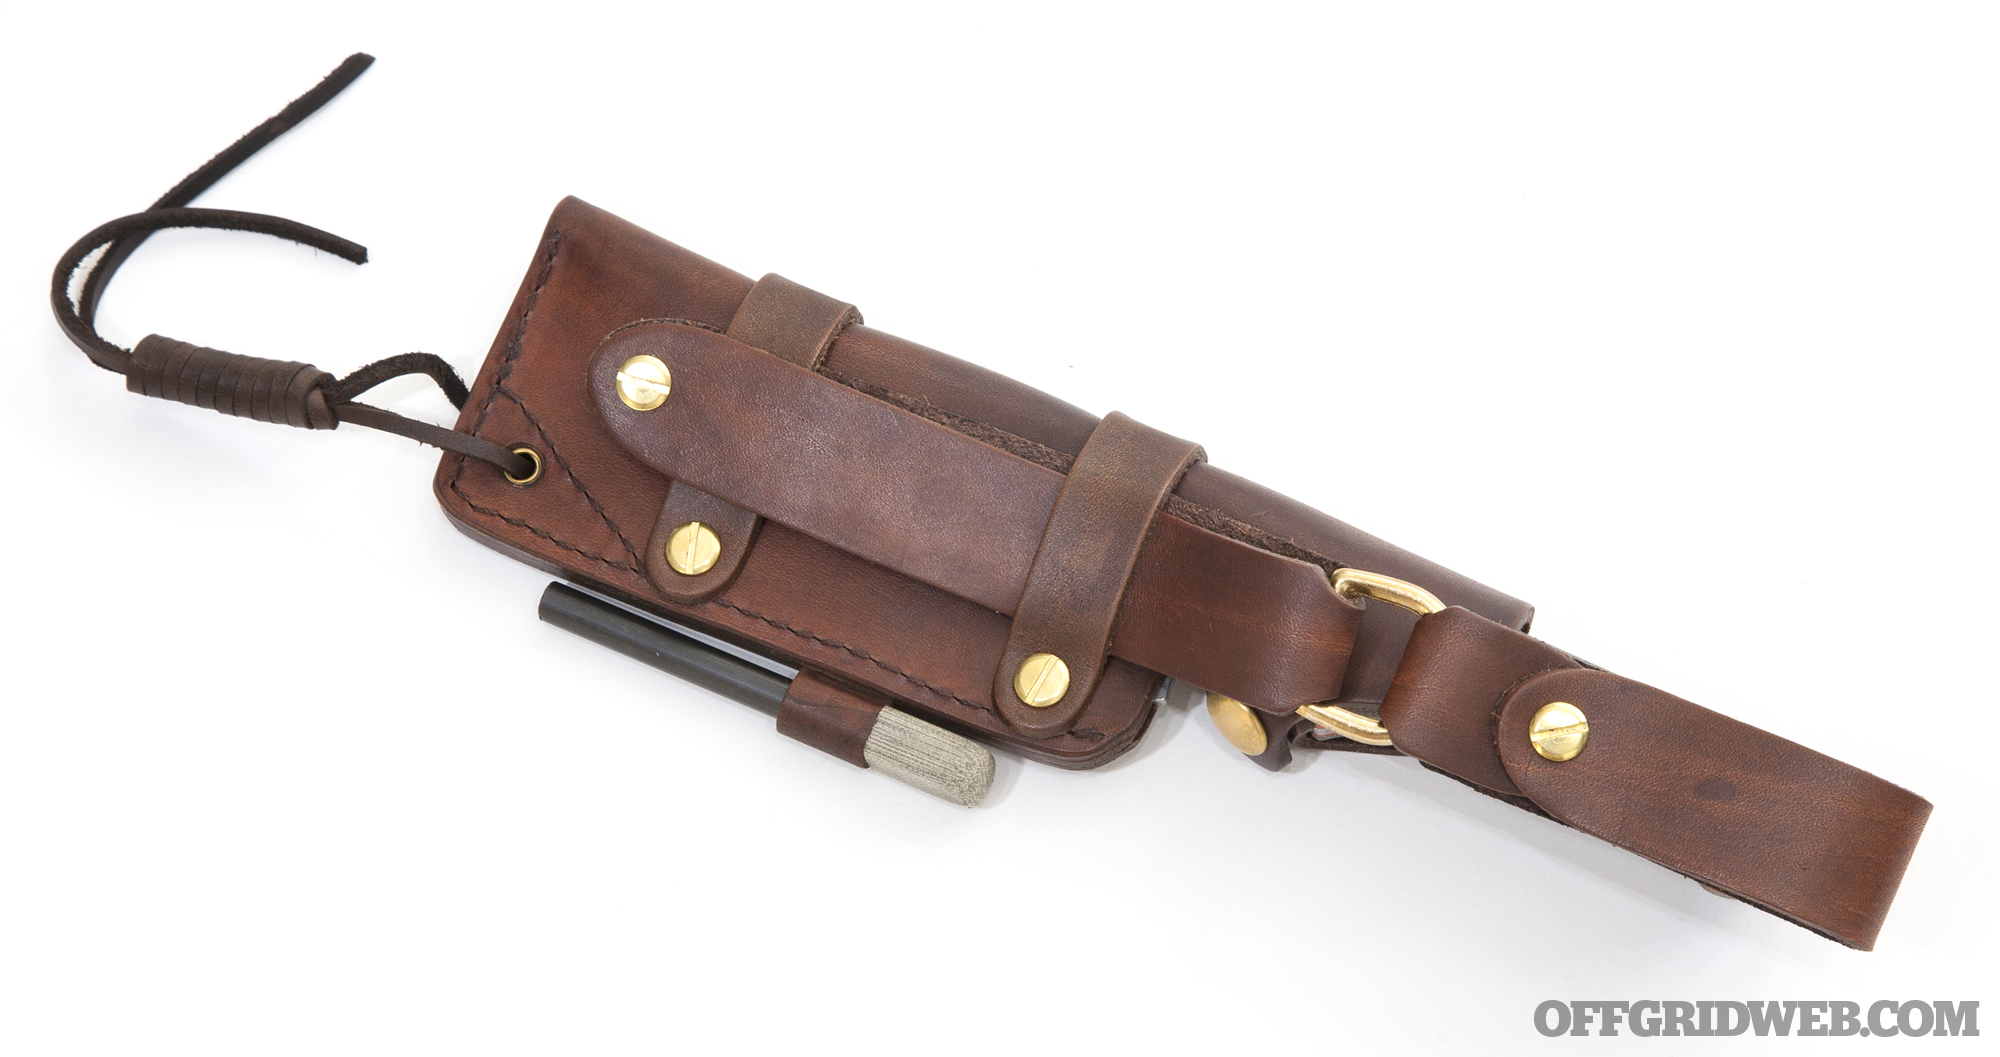
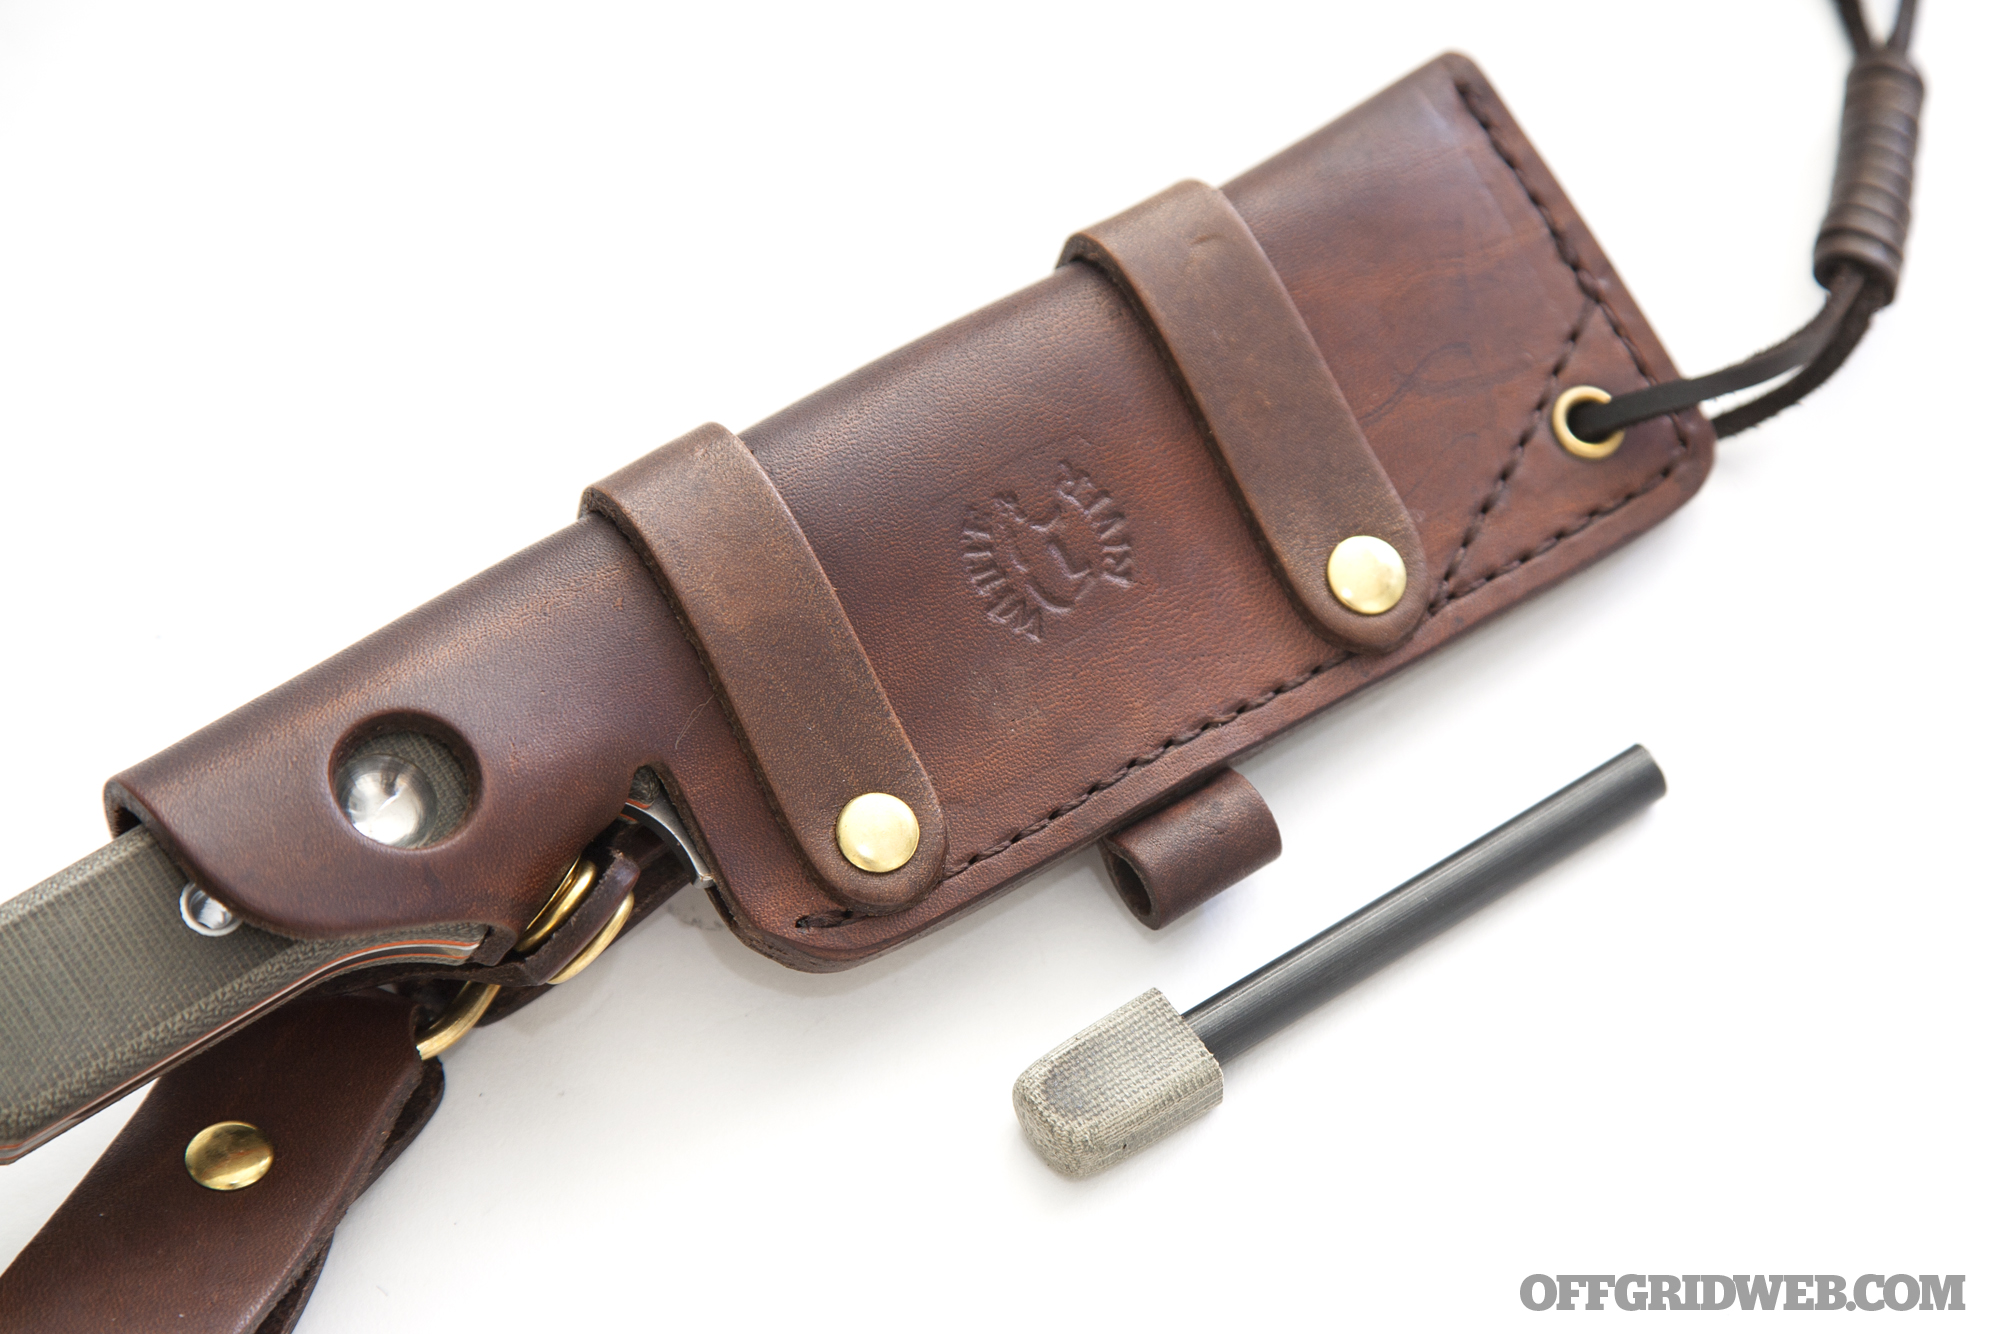
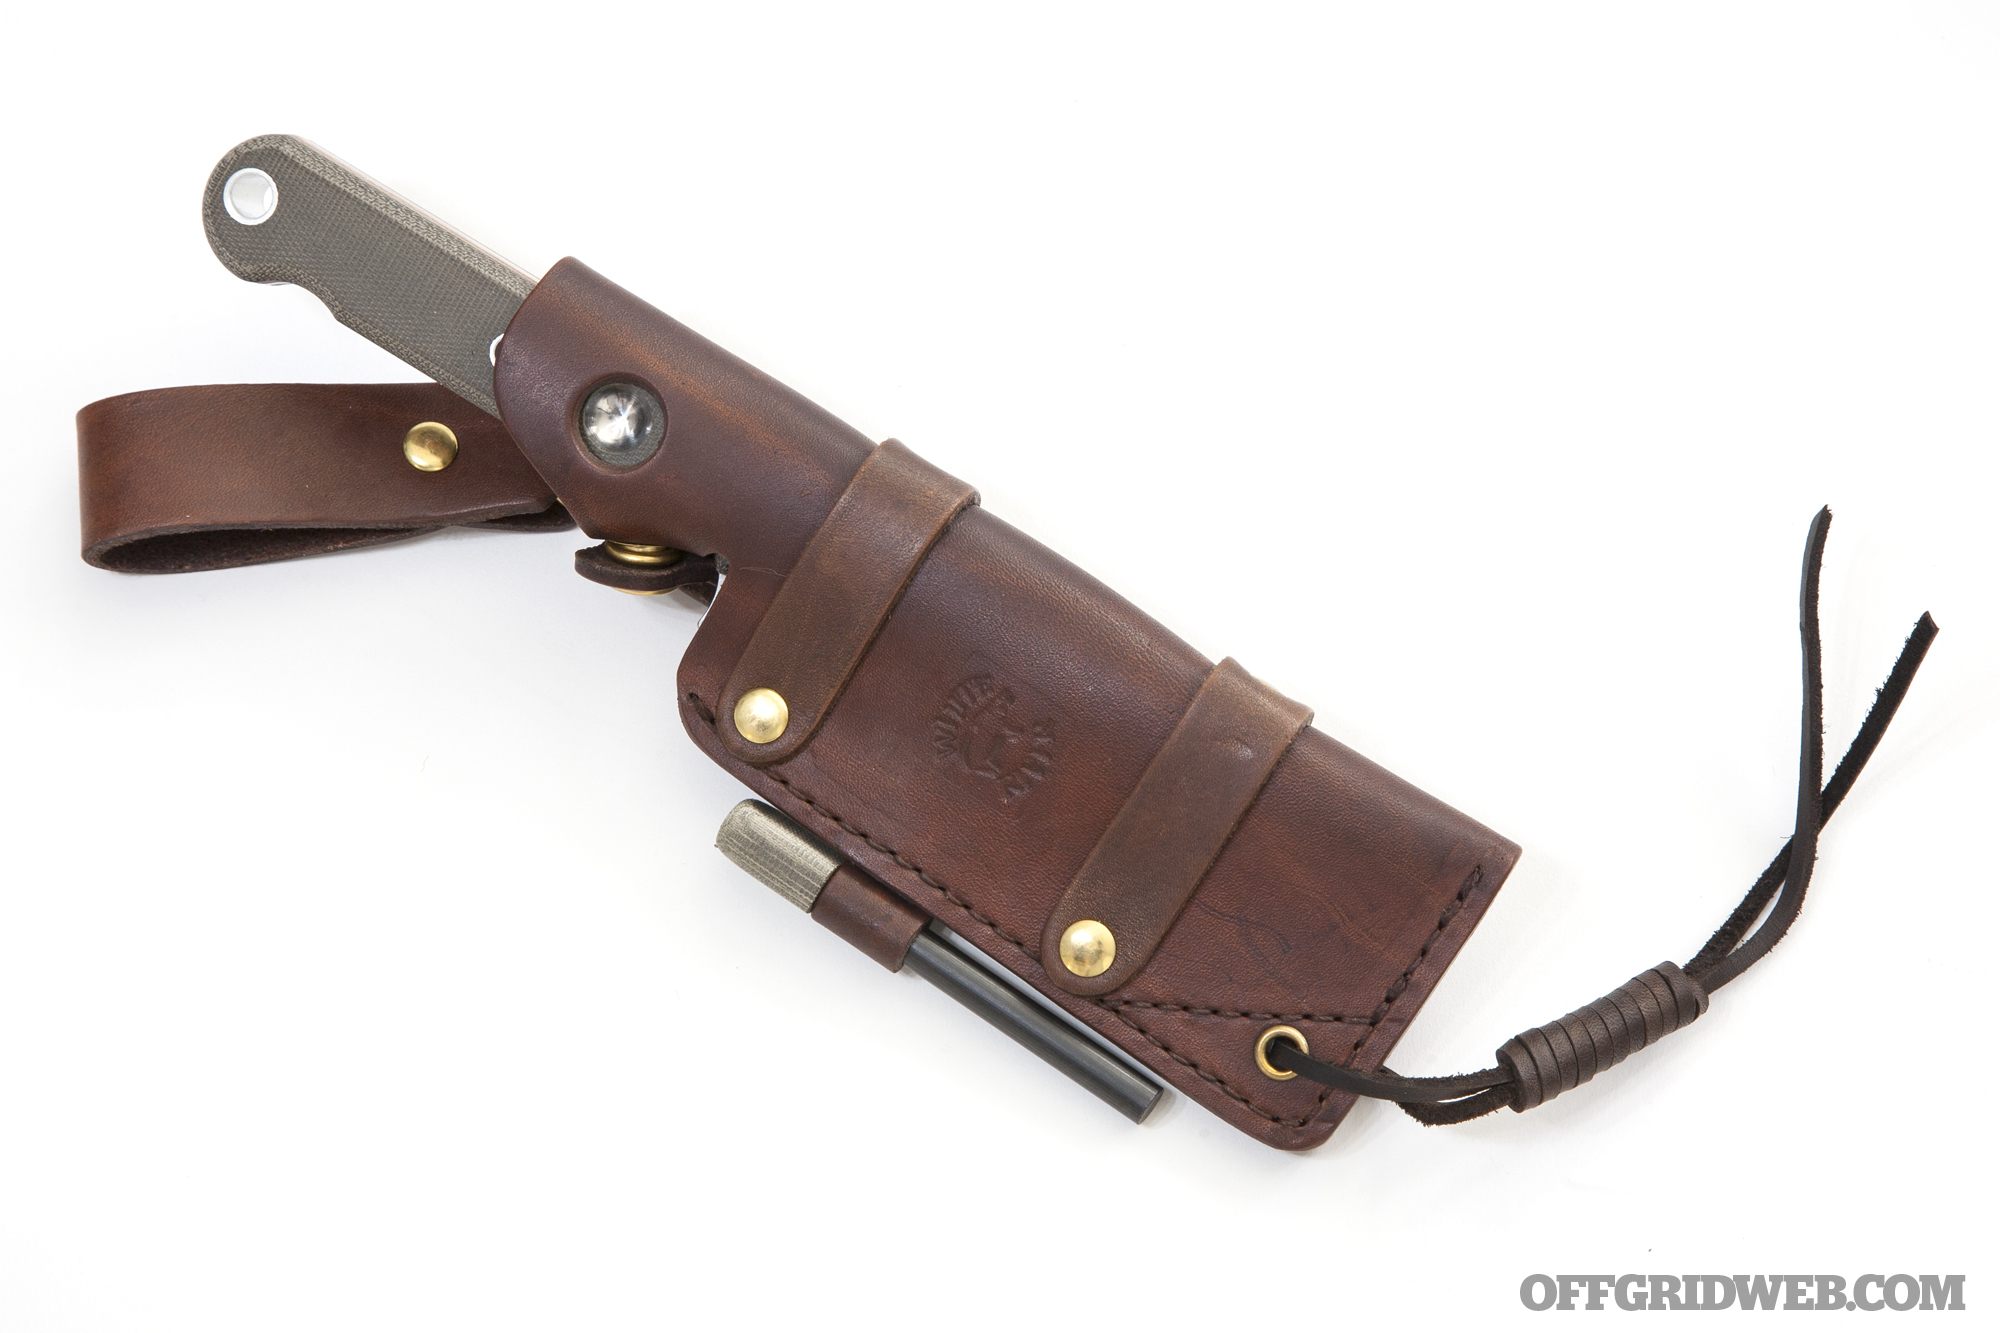
Each Firecraft knife includes an American-made leather sheath embossed with the White River bear logo. A series of leather bands and brass hardware attaches the drop-leg belt loop, while a leather strip and eyelet allow the sheath to be tied around the wearer's thigh. If the drop-leg portion is unscrewed and removed, the sheath can also be worn in horizontal configuration on belts up to about 1.5 inches wide. (A 1.5-inch 5.11 Tactical belt worked in this configuration, but was a very tight fit.)
The knife is retained by a brass snap in the forefinger area, and its bow drill divot is still accessible when sheathed thanks to a circular cutout in the leather. A small loop on the edge of the sheath holds a 1/4-inch-diameter ferro rod, which is included with the knife and features a matching green canvas micarta handle.
Our Impressions
Before we even laid hands on this knife, we were impressed with the list of materials it employs. S30V is a great steel for every-day-carry blades, hence its use on EDC folding knives by the likes of Spyderco, Benchmade, and Zero Tolerance.
It's somewhat of an unconventional steel choice for an outdoor fixed blade, since we'd usually expect something akin to 1095 high-carbon in a blade this size. However, S30V's excellent edge retention and corrosion resistance make for a low-maintenance setup — unlike high-carbon steel, it won't need to be cleaned and oiled frequently to keep the rust at bay.
Canvas micarta handle scales were another smart choice, since they tend to absorb moisture and provide improved grip in wet conditions. The orange G10 scale liners don't affect functionality, but they do show attention to detail and make the knife more visually-appealing.
Upon unboxing the knife, we immediately noticed the quality of the sheath. It's made of thick and tough American-sourced leather — none of that bonded pleather junk here. The brass fasteners and belt loop D-ring feel equally robust. We appreciate the inclusion of a leather thigh strap, since many knives skimp in this area.
Drawing the FC5 revealed one weakness of the sheath. Its retention snap keeps the blade secure and is easy enough to release, but the shape of the leather causes it to curve inward towards the blade. If you're not careful to firmly push these flaps out of the way as you draw the knife, the leather can be accidentally sliced as the edge moves past. If this happens enough times, it could permanently damage the sheath's retention flaps, so it's worth being cautious as you draw.
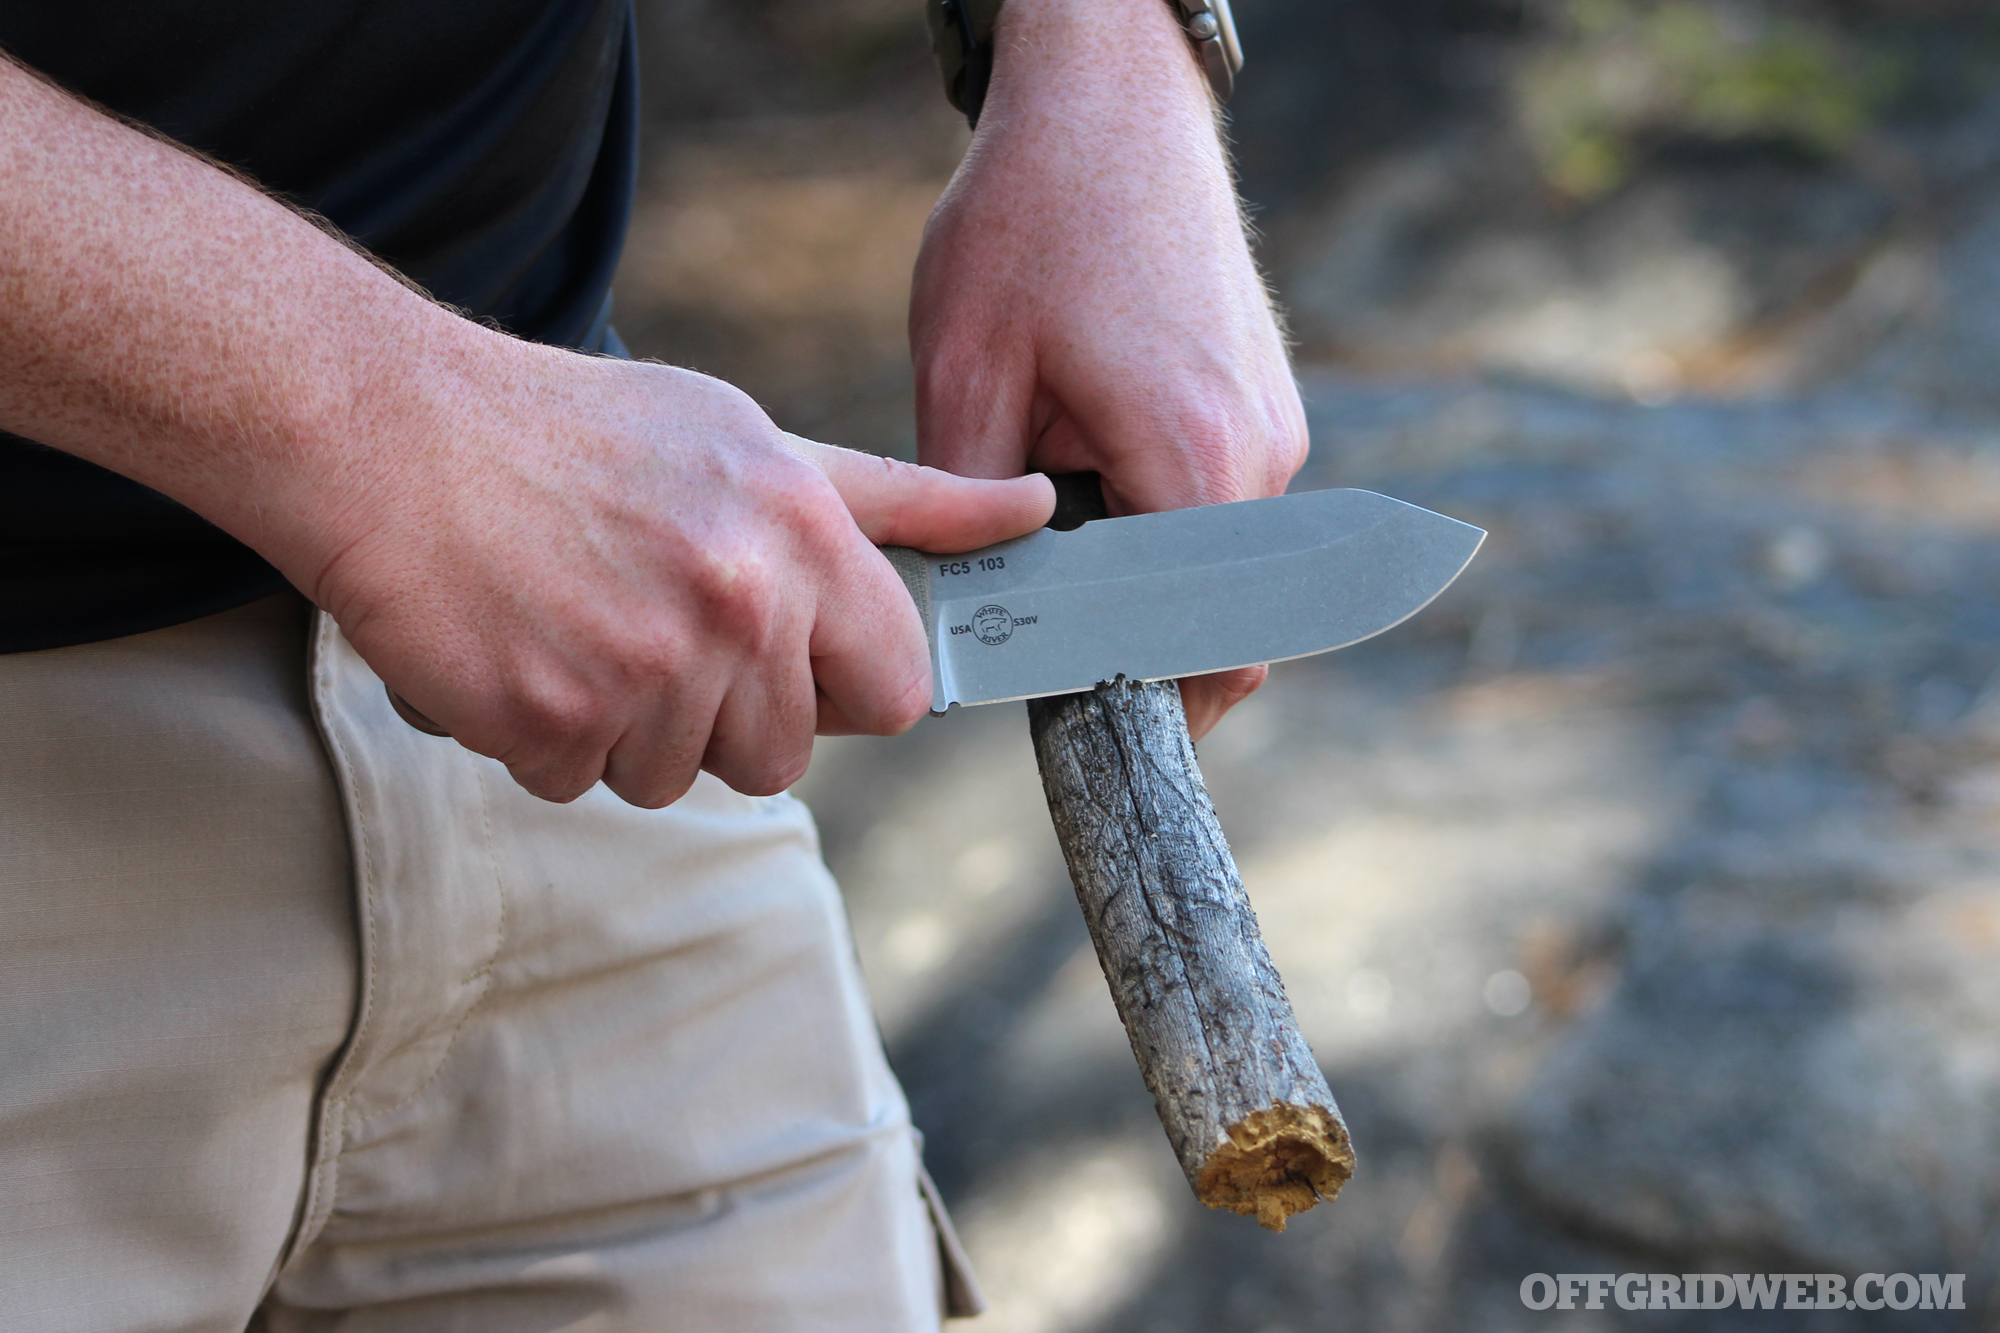
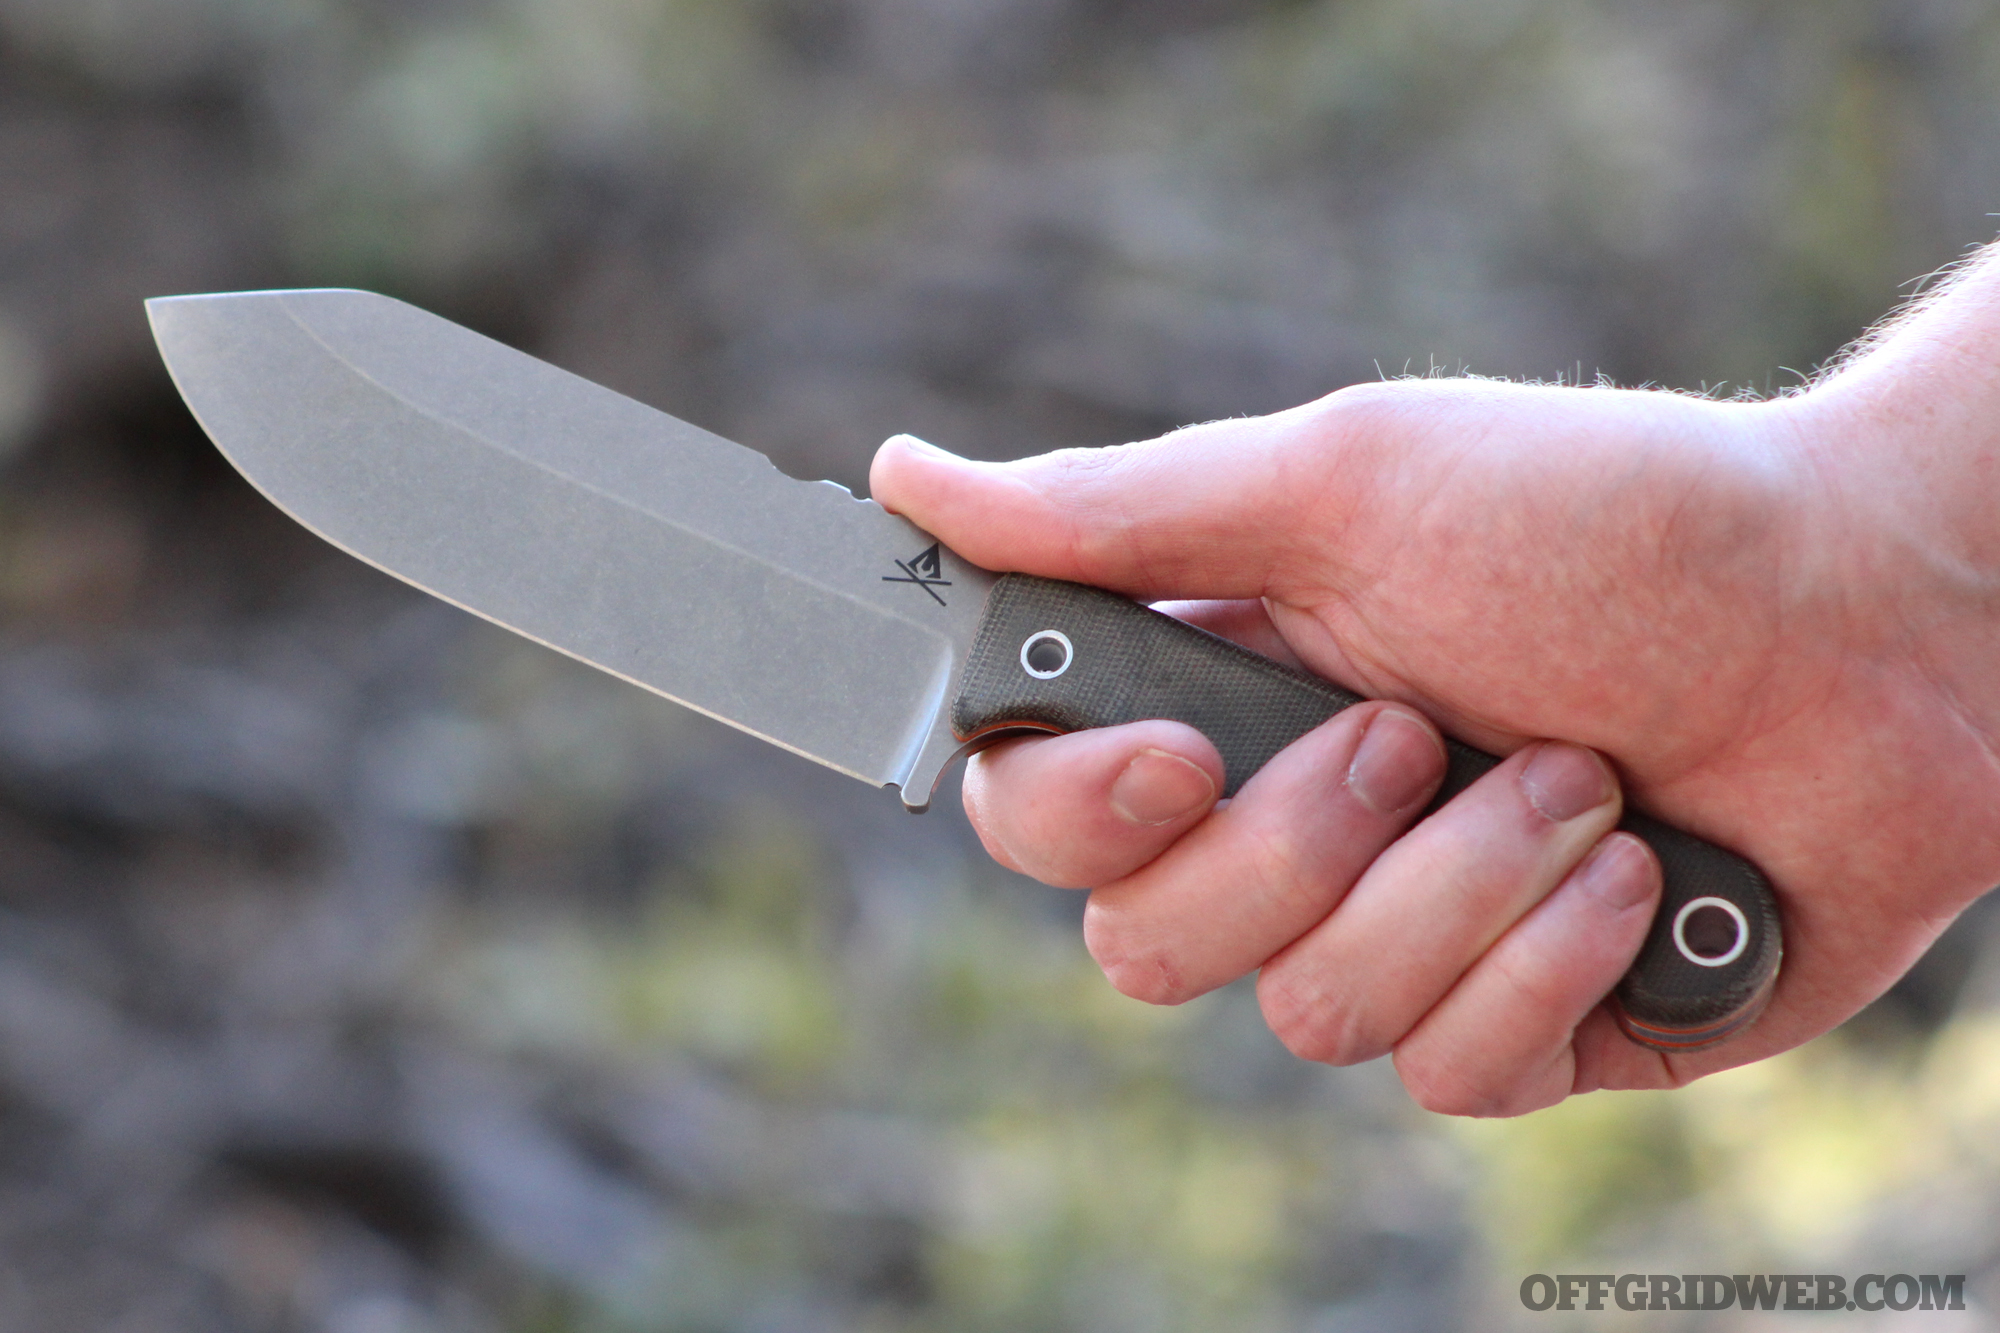
Once you get past the draw stroke, the Firecraft FC5's ergonomic design is absolutely outstanding. The extra-large choil and slight taper on the front of the handle lock into your index and middle fingers, while a smaller groove near the butt yields a secure grip point for your pinkie finger. The handle is also just thick enough to feel substantial, even in this author's large hands.
The micarta handle effectively soaks up sweat and moisture, but we would've been open to a slightly rougher texture on the faces of the scales. Even with the smooth finish, manipulating the FC5 is effortless. We might even say this is the best handle design of any survival knife we've used. It simply feels right.
Moving on to the business end, the Firecraft FC5's blade design is just as efficient as that of its handle. The S30V blade is just over 1/8-inch thick and 1-1/2 inches wide. It has been sculpted into a distinctive profile penned by designer Jason Tietz — some might call it a modified drop point, while others may say it's closer to a clip point or spey. Whatever you call it, it's clearly designed for slicing and chopping rather than piercing, and that's just what we'd want from a survival knife.
The deep primary flat grind on this broad blade culminates in a razor-sharp compound-ground edge. We used it to peel, whittle, baton, and hack through a variety of materials, and saw no chipping or deformation to speak of. Even if we had managed to break it, we recalled that White River Knives guarantees its products for life, no questions asked — that's reassuring if you're hard on your gear.
As for the fire portion of our Firecraft, we're extremely appreciative of the 90-degree-edge notch in the spine. It's perfect for striking the included ferro rod, and saves you from the cringe-inducing process of dulling your sharp blade edge on the ferrocerium. Far too many survival knives from major manufacturers omit this feature, so we're glad White River didn't forget it.
We usually view making a bow drill as a last resort due to the relative difficulty of starting a friction fire compared to other ignition methods. If you've got a lighter, matches, and ferro rod but jump at the chance to make a bow drill, you might be a bit of a masochist. But the included divot sure beats hunting for a dome-shaped palm rock, so we're glad it's present in case we ever need it.
Conclusions
So, does the White River Knives Firecraft FC5 tick off all the items on the “ultimate survival knife” checklist we mentioned earlier? No. It's not perfect, and no knife ever will be — especially not for every survivalist and every scenario. That said, this is a superb knife, and it continually exceeded our expectations.
The materials are high-quality, and they're sourced and assembled in America. We couldn't ask for much more from the design of the FC5 — it has great balance and grip, cuts beautifully, and stayed sharp throughout our tests. It's even aesthetically pleasing, with a handsome shape, nice stonewashed finish, and a classy leather sheath. It doesn't look like something dug out of grandpa's basement, but it's not treading in the realm of tacticool mall ninjas, either.
Our critiques of this blade are relatively minor. The sheath retention snap takes getting used to, and we put a few nicks in it before learning to be more cautious. The S30V steel, while very good for most tasks, will be much harder to sharpen than a high-carbon variety once it eventually dulls. And we would've preferred a slightly rougher texture on the micarta handle scales.
There's also the matter of price, as this knife will set you back $280 — that may sound like a lot to some, but remember it's made in America, includes a leather sheath, and offers a no-questions-asked lifetime warranty. As long as you don't lose it in the woods, this is a knife you might pass on to your kids someday.
Pros:
Outstanding design and ergonomics
Sharp, durable, and corrosion-resistant S30V steel
Ferro rod, striker notch, and bow drill divot assist with fire-starting
Includes nicely-crafted leather sheath
Made in the USA with a lifetime warranty
Cons:
Sheath retention snap may get in the way of the blade while drawing the knife
Handle scales could use a little more texture
S30V steel is durable but relatively hard to sharpen in the field
$280 MSRP may be a turn-off for some budget-oriented survivalists
For more information on the Firecraft FC5 and other White River products, go to WhiteRiverKnives.com.