Recipe for Impracticality

The Premise: As of this writing, four of the top five best-selling books in Amazon's outdoor survival skills section are written by Dave Canterbury. His latest offering, The Bushcraft Field Guide to Trapping, Gathering, & Cooking in the Wild, is one of them. Upon initial gaze, this manual appears to go into great detail about how to procure and prepare foods when civilization is well out of reach. Canterbury's straightforward approach is easy to read, and the text is laid out so you can find pertinent information quickly. But can the reader trust the source?

The 411: For those who didn't follow the drama surrounding Discovery Channel's Dual Survival, in order to land the role of cohost, Canterbury reportedly embellished his Army record by claiming that he served as a paratrooper and a sniper, among other things, when, in fact, he was military police. The ensuing dustup caused him to be fired after the second season. While misrepresenting one's military record is an abhorrent act, one can still have strong survival skills in the woods.

This leads to the question: Can the merits of a book stand on their own despite the tarnished past of the author? It's possible — but in this case, no, they can't.

The Verdict: Despite being called The Bushcraft Field Guide to Trapping, Gathering, & Cooking in the Wild, the first 100 pages has little to do with bushcraft skills. Though the entire book is laden with useful snippets regarding general camping, food preparation, and gear needed to be comfortable in the outdoors, it falls short of its claims that it's a field guide for bushcrafters. It's more like a manual for casual campers.

Under the confines of “trapping, gathering, and cooking,” the book focuses too heavily on impractical recipes and doesn't concentrate enough on the skills a real bushcrafter craves: tracking, hunting, fishing, foraging, water-sourcing, and container construction.

If you've picked up this book with the intention of learning about real bushcraft survival, skip ahead 129 pages to Chapter 11 (“Hunting and Trapping Game”), the first chapter that offers any discourse on dealing with life in the wild — but ironically it doesn't deal with hunting or trapping game. Instead, it briefly introduces how to locate animals, but does so in a mere four pages. This includes a chart of animal tracks containing those that can be found within city limits (cat? dog? crow?).

A redeeming section, “Chapter 13 Trapping: Beyond the Basics,” is a thorough, nicely illustrated guide to various types of traps and snares, what they can be used for, and how to construct them, especially the section on primitive traps. It's a well-thought-out chapter that would be useful when attaining fauna from the wood.

A blight, however, is Canterbury's recipes at the end of some chapters (in addition to Chapter 16, which is chock-full of impractical dishes). Though they're very creative and probably quite delicious — if you're desperate enough to eat opossum, squirrels, and pond frogs — you're unlikely to have a box of hushpuppy mix, Cholula hot sauce, or a jar of raspberry preserves tucked into your ruck sack.

Probably most damning, the book exploits the spirit of bushcraft, misrepresents the concepts, ideals, and essence of the skills needed, and poorly represents the general topics purported in its name. The title proclaims “…In the Wild” whereas most of this book relies on the reader having a fully stocked kitchen. Subjects are broached broadly and watered down for a general understanding of the concepts without giving the details needed to successfully employ them in the wilderness.

Ultimately, this book doesn't have enough recipes to be called a cookbook, nor does it have enough information to be called a practical field guide. It lumbers incomplete somewhere in the middle, trying too hard to be too many things without succeeding at any one thing. In the introduction, Canterbury writes: “…we cannot go on a weeklong hunting camp and expect to live completely from what we can provide by rod and gun or even necessarily from traps and foraging.” Many would take umbrage with this claim, and an author who would make such an assertion probably shouldn't write a book about bushcraft.

bushcraft-field-guide-to-trapping-gathering-and-cooking-in-the-wild

Novel & Author
The Bushcraft Field Guide to Trapping, Gathering, & Cooking in the Wild, Dave Canterbury

Publisher
Adams Media

MSRP
$17

URL
www.simonandschuster.com

Pages
264

Rating
Die


New: Zombie Tools El Choppo

Me gusta la biblioteca. ¿Que hora es y dónde está el baño? That pretty much exhausts our Spanish 101 language skills, but you don't have to be un experto to recognize the name El Chapo. Chapo, meaning Shorty, is the alias of ruthless Sinaloa Cartel drug lord Joaquín Guzmán. This seriously bad hombre was once worth $1 billion US, was called “the most powerful drug trafficker in the world” by the U.S. Department of the Treasury, and escaped from prison twice before being extradited to the United States in January 2017.

Zombie Tools El Choppo knife blade 03

El Chapo's fearsome reputation inspired the crew at Zombie Tools to name their latest blade El Choppo — we can't deny it, that's a pretty solid pun. ZT doubles up on the artful wordplay with its description of the new knife:

If you have the huevos to wander the narrow street of the barrio late, late at night, when tequila worms dream in the bellies of snoring whores, you can sometimes hear slurred songs stumble out the doors of certain cantinas, songs in the style of the narcocorrido, that tell the tale of the knife, El Choppo. Forged in the high mountains to a family that looked up to dirt, El Choppo was raised thwacking at banana trees and cane, chopping kindling for the stove, and fighting back a forest avowed to reclaim all fields.

Zombie Tools El Choppo knife blade 02

Putting aside the clever product description, we'll get down to the facts. The Zombie Tools El Choppo is a 24.75-inch knife forged from sturdy 5160 steel. The 8.5-inch curved handle is clad in dark aluminum scales, and then wrapped in a strip of black leather. It includes a fitted Kydex sheath, and like all Zombie Tools blades, it's handmade in America (specifically Missoula, Montana) from American materials.

Zombie Tools El Choppo knife blade 04

The El Choppo will set you back $290, and it's made to order, so there's a 6-8 week wait time. However, if our past experience with the company's Vakra kukri is any indication, this blade will be able to take a beating. For more information on the Zombie Tools El Choppo and other ZT blades, go to ZombieTools.net.

Zombie Tools El Choppo knife blade 05


Solar Water Purification: Misconceptions and Facts

The internet is a great resource for survival knowledge, but it also has the potential to spread survival myths and misconceptions at an alarming rate. All it takes is for one ignorant individual to post a blog article or YouTube video to a large online audience, and the idea spreads like wildfire. Pretty soon, you may even see less-than-reputable online publications re-posting these myths without fact-checking them, luring thousands of new readers in with sensational clickbait headlines — Bear Grylls doesn't want you to know about this one cool survival trick! You won't believe it! Click here!!, the headlines insist.

Drinking urine through LifeStraw 1

Drinking urine through a LifeStraw is a really bad idea, yet it still spread rapidly online.

Those who know the truth behind these survival myths will roll their eyes and move on, but innocent or uneducated readers may fall for it hook, line, and sinker. The clickbait articles go viral on social media, and the misconceptions continue to spread. If you want to see this phenomenon in action, check out our previous articles on the myths of “safely” drinking urine with a LifeStraw and making a fire-starter from a lemon battery. The source videos for those myths received 6 million and 22 million views, respectively. That's infuriating, but it also motivates us to spread the word about the truth.

When is Water Safe to Drink?

Due to the complex nature of the microbiological science involved, water purification is often the subject of these survival myths, like the urine-through-a-LifeStraw video above. We can't observe the bacteria present in a sample of water with the naked eye, and we can't necessarily smell or taste them either. Obviously foul, murky, and stinking water is a red flag. But crystal-clear stream water or even water direct from the tap can harbor dangerous microbes. This leads to all sorts of folk remedies and tall tales about ways to make water potable. Some have elements of truth; others are obviously false.

(For an in-depth look at how water filters and purifiers remove or inactivate bacteria, protozoa, and viruses, check out the article H2O Hygiene from Issue 15 of our magazine.)

Water purification pollution runoff

We recently stumbled upon an interesting water-related misconception in a comment on social media:

“Calm, shallow water exposed to the sun is pretty safe because surface bacteria are killed by the sun and most everything else settles to the bottom. If you really need to drink untreated water, you are generally better off skimming a calm pond than dipping out of a stream or river.”

This statement is almost entirely false, and it contains potentially dangerous misinformation, but there's also a grain of truth as well. To shed some light on this issue — forgive the pun — we'll delve into the concept of solar water purification. First, we'll discuss what's wrong about the statement above, and then we'll establish the truth about the sun's power to kill bacteria in water.

Misunderstandings About Solar Water Purification

Solar water disinfection purifier pond lake 8

So, would direct sunlight really kill pathogens in a calm pond, making its water safe to drink? If you've studied water purification at all, you should know that the answer is emphatically NO. In fact, water in a stagnant pond is likely some of the most dangerous water you could find in a survival situation. The World Health Organization states, “Stagnant pools should not be considered a safe source of potable water.”

The dangers of stagnant water are twofold. First of all, warm and still water provides an ideal breeding ground for pathogens. Giardia thrives in water at a balmy 70°F (21°C), and its harmful cysts can remain viable for almost one month at this temperature, according to the EPA. Even at a scalding 129°F (54°C), hot enough to burn your skin, the EPA states that Giardia cysts can survive for 10 minutes.

Even in the hottest areas, it's extremely unlikely that the sun would heat a pond's surface to a temperature sufficient to kill all pathogens, much less raise the temperature uniformly throughout the stagnant water. A few inches below the surface, the water may still be cool enough to harbor bacteria or other pathogens. Most ponds also have shaded areas and surface vegetation where bacteria can flourish and spread throughout the water. Then consider that animals may be drinking from this water source, defecating in it, or dying and rotting in it.

Solar water disinfection purifier pond lake 11

Secondly, there's the risk of mosquitoes and other disease-spreading organisms. Warm, stagnant water is frequently a breeding ground for mosquitoes and other insects, and a little bit of sunlight won't deter them. In many parts of the world, malaria and Dengue fever are serious risks around stagnant water.

Again, even the warm surface layer of a stagnant pool is likely to be contaminated in some way, and should not be considered safe to drink without boiling or other purification. Then again, the same can be said for running water, like streams and rivers. Regardless of the flow rate of the natural source, you should always purify water before consuming it if at all possible.

Solar water disinfection purifier pond lake 10

The Truth About Solar Water Purification

Now, we mentioned earlier that there's a grain of truth in the original quote — specifically, it's the phrase “bacteria are killed by the sun”. Exposing water to sunlight for extended periods is actually a viable method of water purification, but it's not going to happen naturally in a pond. It takes effort and human intervention to purify water with the sun's rays.

Solar water disinfection purifier filter bacteria drink bottle 2

Solar water disinfection, also called SODIS, has been studied extensively by the Swiss Federal Institute of Environmental Science and Technology. This research has also been supported by one of the world's largest humanitarian organizations and providers of aid in developing nations, the United Nations Children's Fund (UNICEF). Here's a quote from a UNICEF document titled “Promotion of Water Treatment and Safe Storage in UNICEF Wash Programmes”:

Solar disinfection, which combines thermal and UV radiation, has been repeatedly shown to be effective for eliminating microbial pathogens and reduce diarrhoeal morbidity (Hobbins 2004) including epidemic cholera (Conroy 2001). Among the most practical and economical is the “SODIS” system, developed and promoted by the Swiss Federal Institute for Environmental Science and Technology.

Solar water disinfection purifier filter bacteria drink bottle 3

It consists of placing low turbidity (<30NTU) water in clear plastic bottles (normally 2L PET beverage bottles) after aerating it to increase oxygenation and exposing the bottles to the sun, usually by placing them on roofs. Exposure times vary from 6 to 48 hours depending on the intensity of sunlight. Like filters, thermal and solar disinfection do not provide residual protection against recontamination. Accordingly, householders must have a sufficient number of bottles to allow them to cool and maintain treated water in the bottles until it is actually consumed.

Solar water disinfection purifier filter bacteria drink bottle 1

For a complete guide to this solar water treatment process, refer to the SODIS training materials page. These materials are available free of charge in more than a dozen languages. For more information on solar water purification, and the Swiss research which has proven its effectiveness, click here to view a PDF of the 2016 SODIS Manual.

This method of placing water in a sealed clear plastic bottle and exposing it to direct sunlight is highly effective at creating clean potable water. Unlike the exposed warm water on the surface of a pond, this creates a closed system with a small volume of water. Under these conditions, sunlight can effectively purify the water in most cases.

Conclusions

Solar water disinfection purifier filter bacteria drink bottle 6

Like all water purification methods, solar water purification is not foolproof, since the research indicates that certain pathogenic viruses and protozoa will still survive the treatment. However, it's far superior to drinking untreated water, and has dramatically reduced the incidence of waterborne illnesses in developing nations. One study showed that children in Bolivia who drank water that had been treated with the SODIS method were 70% less likely to suffer from diarrhea than those who drank untreated water.

If you ever find yourself in a survival situation without access to clean water, remember the simple technique of solar water purification. If you can fill a clean plastic water bottle and expose it to sunlight for a full day, you can create potable water and avoid illness. Just be sure to follow the SODIS method, and don't assume that all water exposed to sunlight is automatically clean.


Review: Prometheus Design Werx Ti Watch Band Compass

Nobody likes to admit they're lost. Fortunately, the Ti Expedition Watch Band Compass Kit from Prometheus Design Werx will give you no excuse to lose your bearings. Inspired by the NATO watch band compasses worn by UDT divers and the special forces of the 80’s, this compass is extra insurance to your safety; even if you aren’t working behind enemy lines or in the line of fire. The PDW Ti Expedition Watch Band Compass Kit relies on proven magnetic fields instead of digital technology. Even if all electronic devices go down, this watch band compass will prove reliable.

Prometheus Design Werx watch band compass navigation 4

In these photos, the compass is pictured on a Marathon Search & Rescue Diver's Quartz (TSAR) with 20mm black nylon NATO strap.

We’ve used our PDW compass in many conditions and it never disappointed. From high up in the cold mountains while skiing and backcountry hiking to spear fishing and diving in the tropics and during numerous trips to the range, the PDW compass went unnoticed until it was needed. It worked as promised while finding our bearings in the great outdoors, and it helped with general wayfinding in urban environments. The accuracy of the compass was tested against a couple dedicated baseplate compasses and magnetic north registered the same.

Prometheus Design Werx watch band compass navigation 5

At only .72 ounces, the PDW titanium watch band compass doesn’t add any noticeable weight to the wrist. The oil-filled 20mm x 8mm compass functions flawlessly above and below water. Even in  the extreme cold of the Northeast, the compass did not freeze.

Prometheus Design Werx watch band compass navigation 1

The markings are luminous and rechargeable with a flashlight or exposure to sunlight. This attribute helps the user navigate in dark conditions and preserves their night vision.

Prometheus Design Werx watch band compass navigation 7

The compass is water resistant to 100 meters, a rare attribute found in few compasses of this variety. Both aluminum and titanium versions of this compass case are considerably more durable than the plastic housings of lesser-quality watch band compasses.

Prometheus Design Werx watch band compass navigation 3v2

The silicone carrier with UV inhibitors allows the user to carry it girth-hitched around multiple points on gear, and it adds some color and visual flair to your loadout if desired. The PDW Ti Watch Band Compass also makes an excellent addition to a pocket emergency kit if carrying it exposed is not possible.

Prometheus Design Werx watch band compass navigation 6

Navigation and a sense of direction are important for the adventurer, outdoorsman, soldier, and prepared citizen. When batteries fail in your GPS or when you lose your primary compass, this little tool will help you stay on the right track and prevent you from having to ask for directions like a helpless tourist.

PDW Watch Band Compass Specs

Dimensions: 1.063” x .455”
Compatible Watch Bands: NATO style — recommended for bands up to 22mm wide, but 24mm bands may fit with some effort
Materials: 6AL-4V Titanium Body (machined in the USA), acetylcellulose oil-filled compass, luminous gasket
Weight: .72 ounces
Water Resistance: 100 meters
Silicone Carrier Colors: Orange, OD Green, Black
MSRP: $114.00
URL: PrometheusDesignWerx.com

About the Author

Ruck survival fitness backpack bag bugout medical 12

Kevin Estela is the owner/head instructor of Estela Wilderness Education, a bushcraft and survival school in New England. He is a Sayoc Kali Associate Instructor, Brazilian Jiu-Jitsu practitioner, and an avid marksman. As a “survival athlete” he can be found regularly testing his physical and mental limitations in the gym, woods, and urban landscape preparing for the fight.

www.kevinestela.com


Infographic: The Growth of Computer Processing Power

Have you ever heard of Gordon E. Moore? This name may not have entered the common lexicon like Steve Jobs or Bill Gates, but Moore made some monumental changes to technology and the world as we know it today. He is the co-founder of a little company called Intel Corporation, and today he has an estimated net worth of over $7 billion. However, aside from founding one of the largest computing companies on Earth, Moore proved to be almost clairvoyant about the future of technology.

Processing power graphed on a logarithmic vertical scale via Wikipedia.

Processing power over time, graphed on a logarithmic vertical scale. Source: Wikipedia

During an interview in 1970, Moore was asked to estimate the growth of computer technology. In a claim which would later become known as Moore's Law, he stated that the number of transistors in an integrated circuit would double every two years. That statement may not mean much to you, but in layman's terms, this effectively means that the processing power of computers will double every two years. This brazen prediction has been proven true for decades, and despite many claims that it is dead and obsolete, Intel CEO Brian Krzanich stated in January 2017 that “Moore's Law is alive and well and flourishing.”

Computer technology circuit board 1

To those of us looking to prepare for the future of technology, this is an important principle to understand, since it shows that computer development will frequently exceed our expectations.

The processing power of a computer processor (or CPU) can be measured in Floating Operations Per Second (FLOPS). In the following infographic from Experts-Exchange.com (good thing for that hyphen), comparisons are drawn between the most powerful computer processors from 1956 to 2015. Over that time period, the authors claim that there has been a one-trillion-fold increase in FLOPS of computer processing power. (Click here to download a full-size version of this graphic.)

Computer power infographic tech phone video game 2Computer power infographic tech phone video game 3Computer power infographic tech phone video game 4Computer power infographic tech phone video game 5


Planning an Ultralight Bug-Out Bag

The concept of packing light is not a new idea. Horace Kephart, one of the men who helped establish Great Smoky Mountains National Park, had this to say about it in his 1916 classic book Camping and Woodcraft“This is the hardest problem in outfitting. To equip a pedestrian with shelter, bedding, utensils, food, and other necessities, in a pack so light and small that he can carry it without overstrain, is really a fine art.”

Kephart’s idea of “light” varied with the individual and the performance expectations, as you might expect. “If you are a middle-aged city man, soft from a year or more of office work, about 20 pounds on your back is all you ought to carry. A younger man, or one who gets a good deal of daily exercise in the open air, can do the same with 30 pounds, until he gets in training, and then go considerably more.”

Bugout bag pack gear emergency backpack

Items from the author's lightweight bug-out bag inspired the plan for an even lighter version.

His ideal mild-weather loadout was around 25 pounds, still a reasonable number even by today’s standards. But his dream bag was closer to 10 pounds, what he called a “featherweight kit” made from specially manufactured materials and products. One hundred years after Kephhart published his recommendations, we wanted to see how close we could come to his ideal weight, using modern-day equipment while keeping one eye on his recommendations.

Keep in mind that the production (and upkeep) of a bug-out bag is a dynamic process, not a one-and-done creation. The contents are going to change over time based on your evolving skillset, gear preferences, budget, and even your interests and hobbies. There’s no single way to build a featherweight bag. There are dozens of approaches — the following is one potential combination. Don't just copy the list of gear we provide, use it as food for thought to plan your own ultralight bug-out bag.

Bedding and Shelter

“Don’t bed down on the cold, hard earth,” Kephart recommends. We tend to agree with this advice. Trying to tough it out by sleeping on hard ground can short-circuit your decision-making ability, and directly impact your stamina the next day.

Ultralight bug out bag tent shelter sleeping pad

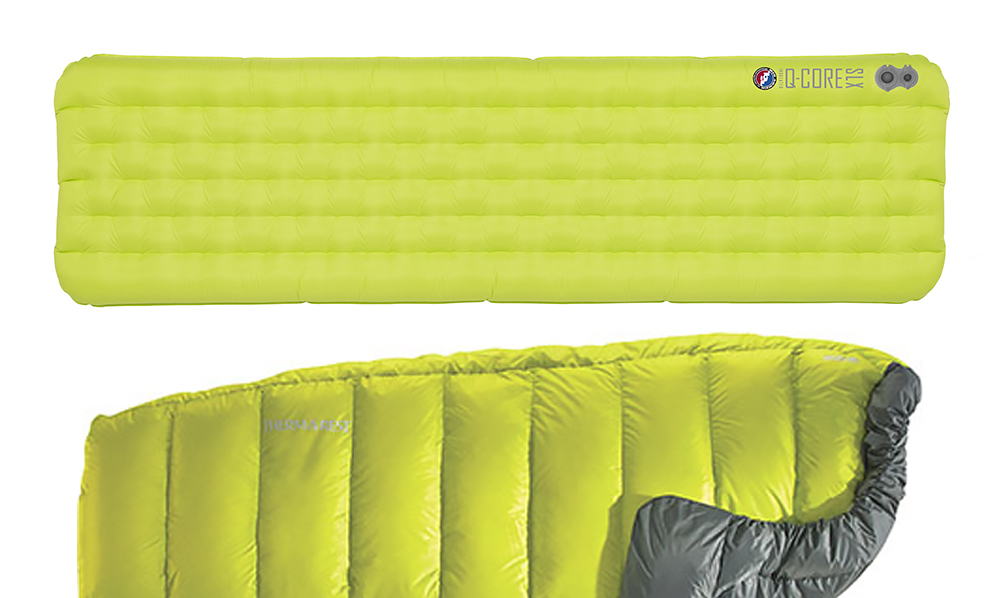
Top: the Q-Core SLX sleeping pad. Bottom: the Corus HD Technical Quilt.

His choice for bedding was a lightweight cloth bag stuffed with leaves, and a smaller leaf-stuffed bag for a pillow. Without the leaves these bags weighed in at 1.2 pounds. Primitive by today's standards, but it got the job done in the early 1900s. Fast-forward to 2017, and we’d favor the Q-Core SLX Insulated Sleeping Pad from Big Agnes, weighing in at 1.1 pounds. For warmth, a Corus HD Technical Quilt from Thermarest only weighs 1.4 pounds more. So far, so good.

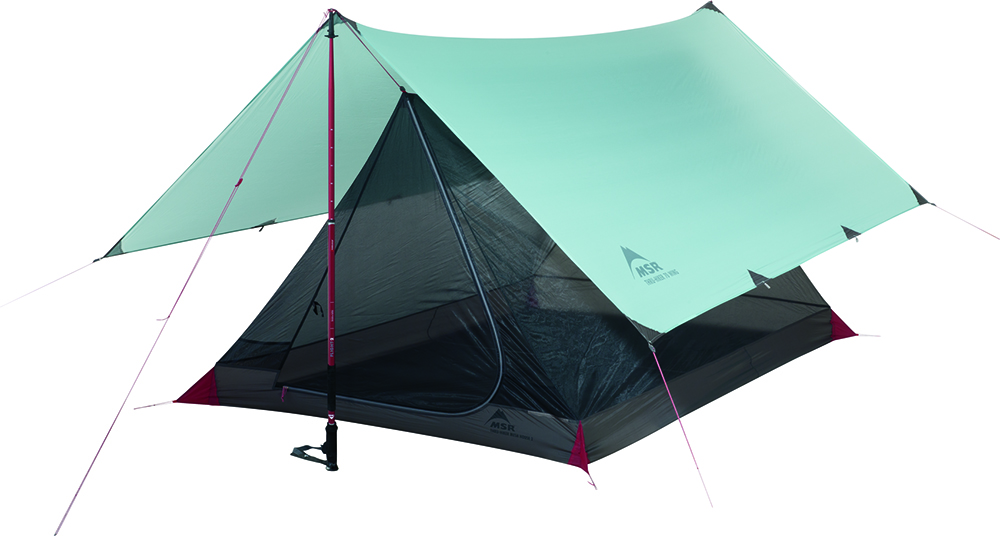
To Kephart, a tent was only feasible if two or more people were hiking together. When going alone (at least in moderate temperatures), a shelter cloth and mosquito netting worked just fine and weighed about 2.5 pounds. It could be rigged between two small trees or forked stakes as necessary. The modern day version of this idea would be the Thru-Hiker 70 Wing Shelter paired with a Thru-Hiker Mesh House 2 from MSR. The shelter weighs just 12 ounces while the mesh weighs 14 ounces, for a total of 26 ounces or just over 1.5 pounds.

©Earl Harper

Trekking poles support a rain fly over the Mesh House shelter. Photo courtesy of MSR / Earl Harper.

This mesh-shelter system can still be rigged using trees or forked stakes, as Kephart did. But we like the idea of using trekking poles for covering long distances, in order to minimize strain on our legs and increase our daily range. So with that pound we saved by using ultra-light materials, we’ll add one more pound back and throw in a pair of lightweight trekking poles. We’ll use them all day and at night when it’s time to set up shelter, we don’t have to waste time looking for suitable trees or sticks since we can just anchor the poles into the ground to use as shelter supports.

Clothing

“Footwear is the most important item,” Kephart says. “When you seek a guide in the mountains he looks first in your eyes and then at your shoes. If both are right, you are right.”

Ultralight bug out bag Keen Targhee boots shoes

There are lots of places to try and skimp on weight, but when you're long-distance trekking, your footwear is not that place. Whatever boots you decide on, make sure they fit you perfectly without having to use tricks like very thick or thin socks. We’ve had great luck with hiking boots from Keen such as the Targhee II Mid.

Kephart recommended against carrying a heavy waterproof jacket, instead electing to layer with a lightweight waterproof jacket coupled with a medium-weight sweater. These days we’d find a midweight fleece and couple it with the Airshed Pullover from Patagonia. This soft-shell jacket, weighing in at a ridiculously minimal 3.7 ounces, converts into its own stuff sack with a built-in carabiner loop so that you can always keep it within reach.

Ultralight bug out bag jacket rain coat

The Patagonia Airshed pullover packs down into a stuff sack for compact storage.

We won’t get into pants or shirts in this article, as the requirements vary so widely based on an individual's circumstances. However, we will talk to you about your underwear. Carry spares. As Kephart says, “When on a hike, take your bath at close of day, instead of in the morning; then change to fresh underwear and socks, and put on your sweater and trousers to sleep in. Fresh dry underclothes are as warm as an extra blanket would be if one slept in the sweaty garments he wore during the day — to say nothing of cleanliness.”

Hydration and Nutrition

Kephart’s cooking kit revolved around a frying pan, aluminum utensils, a broad shallow pot (to boil water faster), and a little tin cup he hooked to the outside of his pack. His kit weighed about 2.1 pounds.

Coconut food ration bar meal bugout bag

Of course, he was planning on cooking over an open fire. And if you’re in the woods like he was planning to be, then cooking fuel is literally growing on trees. However, what if you’re bugging out to an arid region, or a ruined urban area where old-growth forests and wild game are the kind of thing you only see in museum dioramas? And how far away will the smoke from your campfire be visible, broadcasting your location?

Personally, we’re not trying to cook Instagram-worthy blueberry flapjacks in a frying pan. This isn’t Memorial Day Weekend at the lake, and we’re not trying to impress anyone here. We’re focusing on what can give us a head start on survival and can stay fresh in our packs for years.

Coconut-flavored lifeboat rations are compact and ready-to-eat food source.

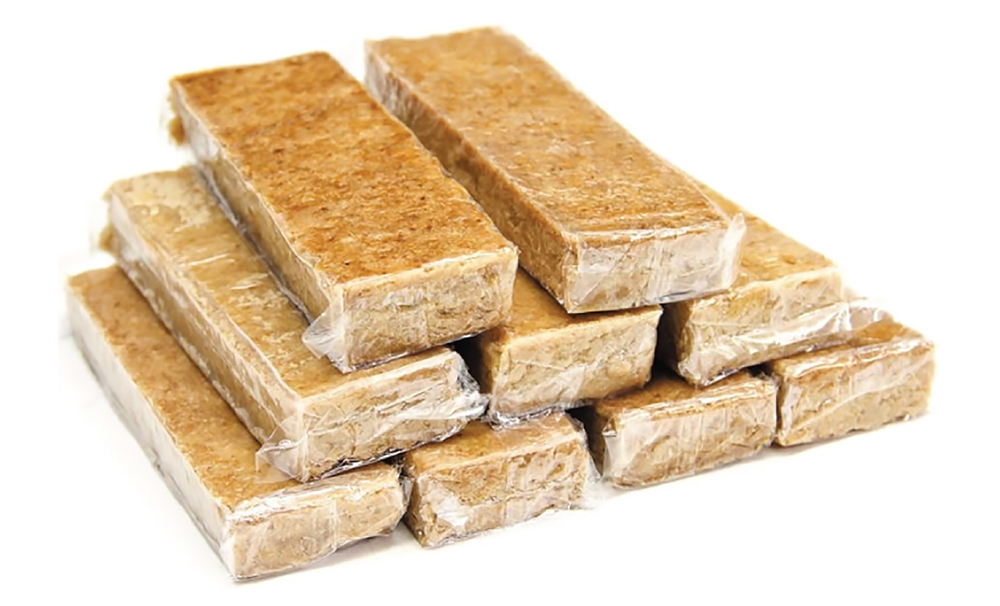
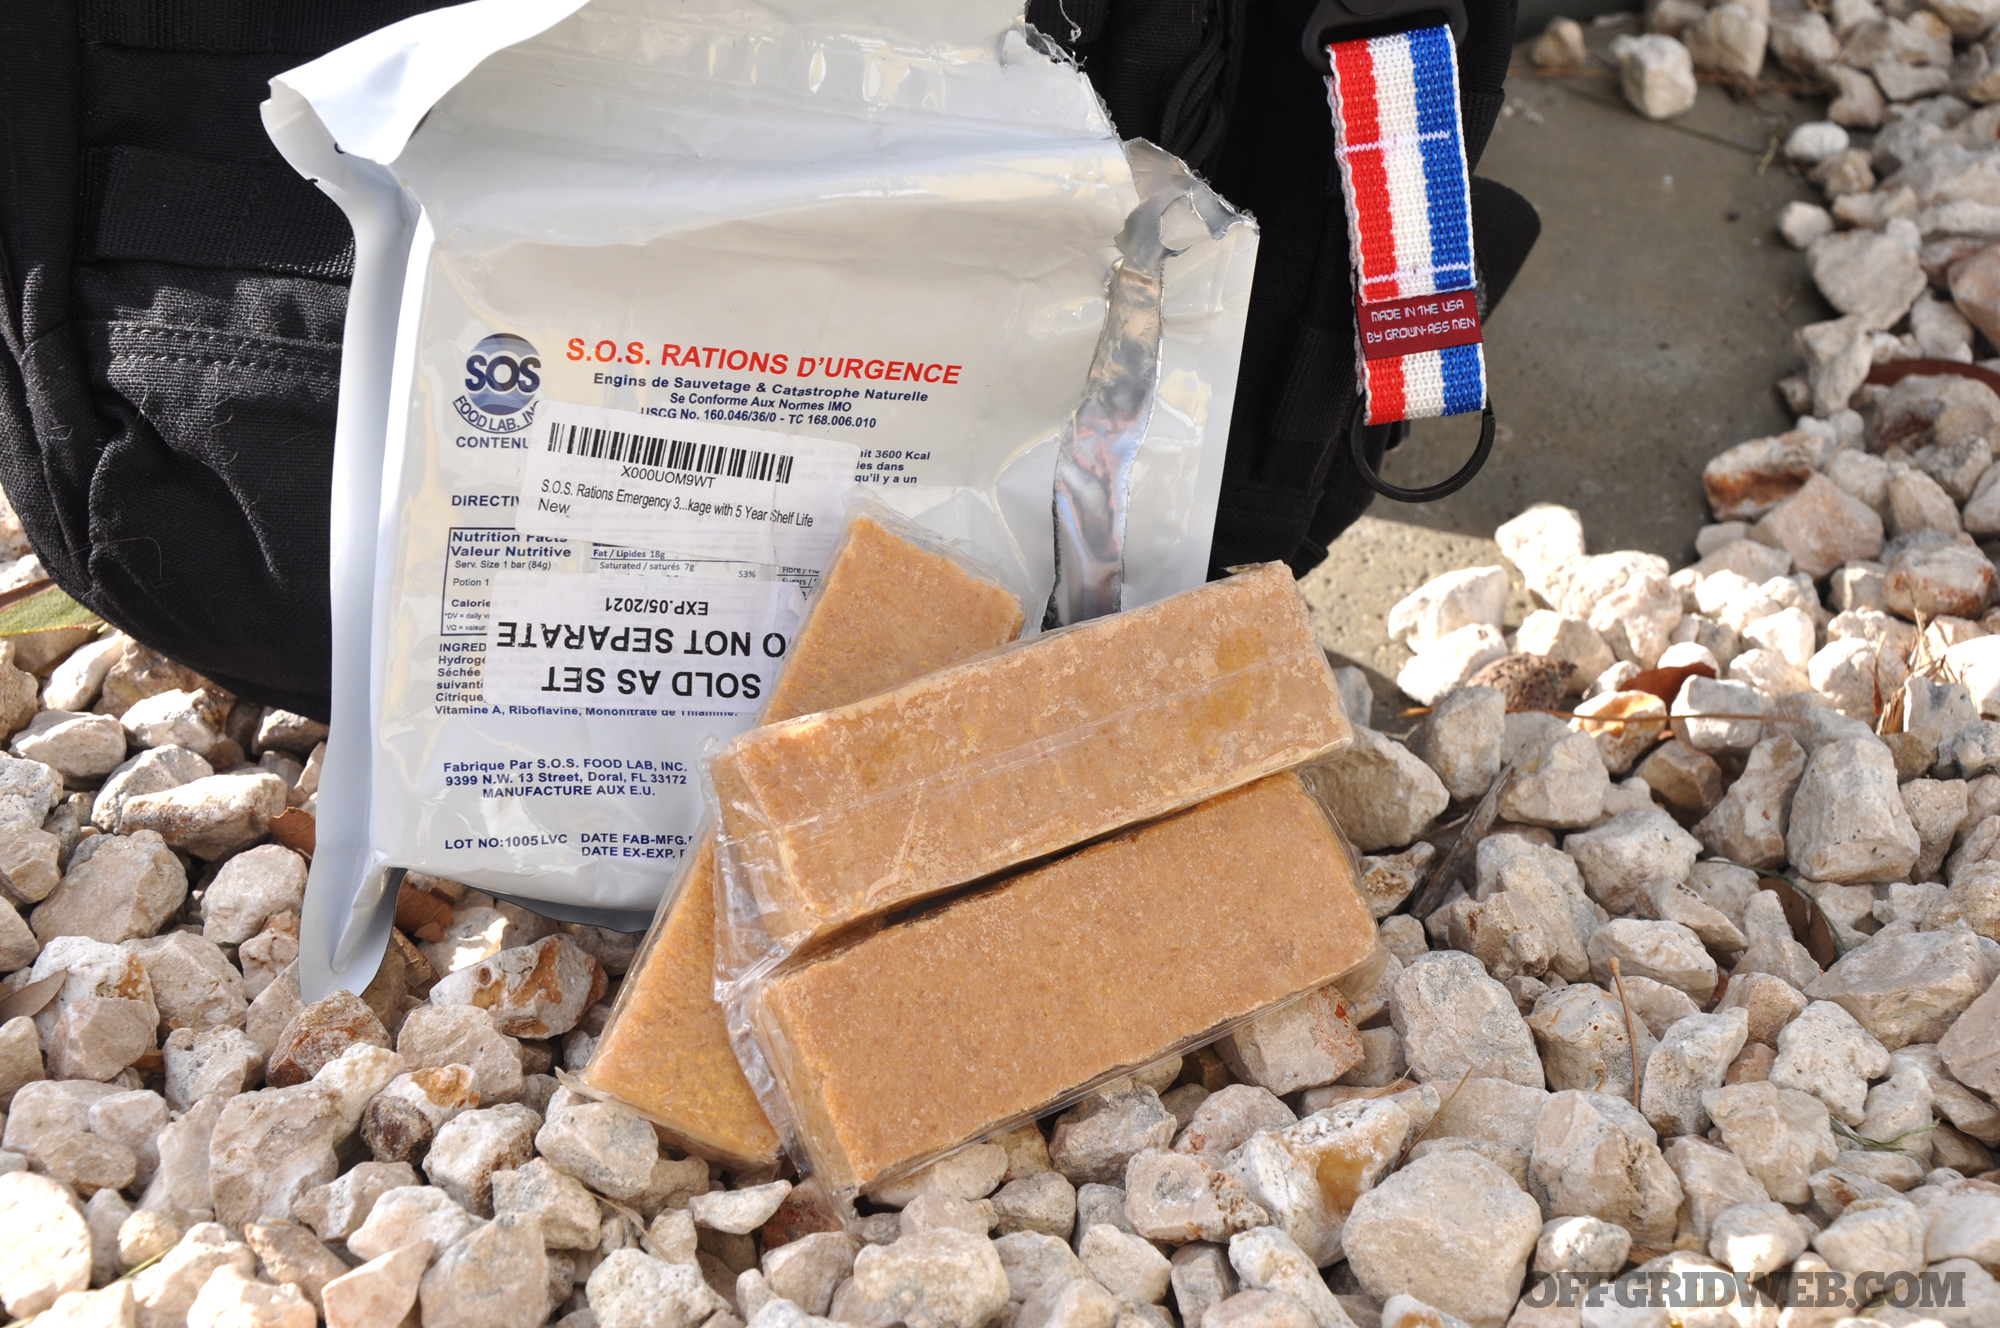
These coconut-flavored lifeboat rations are a compact and ready-to-eat food source.

We thought of packing a small butane camp stove with fuel and a bunch of freeze-dried meals, but then reconsidered. The stove and fuel add extra weight. And cooking the meals will require lots of water that we may or may not need to conserve for drinking. So with that in mind, we’ll just pack our coconut-flavored lifeboat rations. They are, surprisingly, not horrible. Nor do they make you thirsty like a salty freeze-dried meal would. Six days’ worth of rations will only set you back 2.2 pounds, so we’re all set.

Ultralight bug out bag tent water bottle

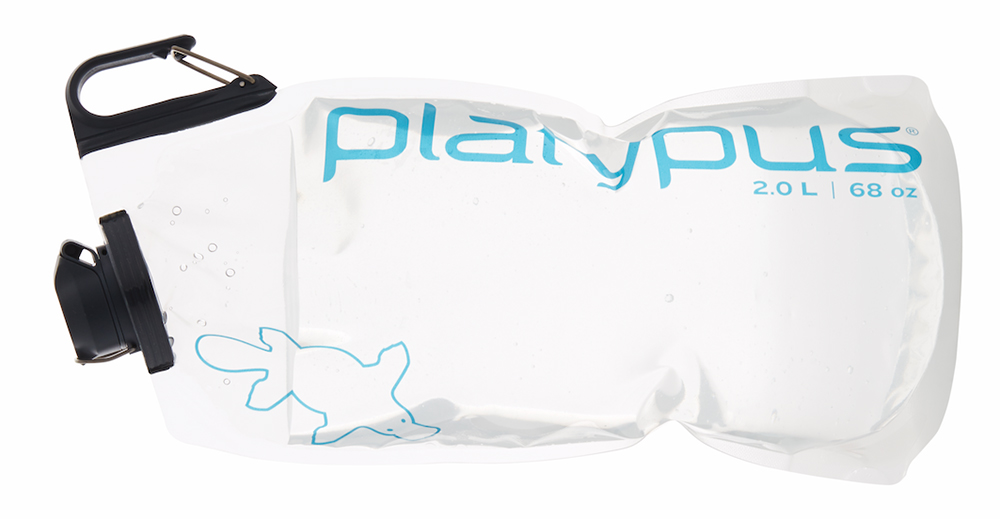
The Platypus water bottles collapse and roll up when empty, and they weigh virtually nothing when dry.

Next up is a hydration plan — even more important than food. We’ll add dual 2.0 liter collapsible water bottles from Platypus (1.8 ounces each) and a TrailShot Pocket-Sized Water Filter from MSR (5 ounces) so we can pump clean water into the bottles. This brings us to a total of 2.7 pounds for our hydration gear and rations. Our choices here are a little bit heavier than Kephart’s, but he also only carried about two to three days’ worth of rations. In our case, we like a bit more caloric leeway.

Keep in mind, a liter of water weighs 2.2 pounds. So if you fill up both of those big Platypus bottles you’ll have nearly 9 extra pounds on your back. This isn’t necessarily a bad thing, since 1 gallon (3.8 liters) of water is a good minimum estimate for how much you’ll consume each day. But if you know you’ll be encountering good water sources, you might consider leaving one of the bottles empty, or even dumping one out if you're certain you’re getting close.

©Earl Harper

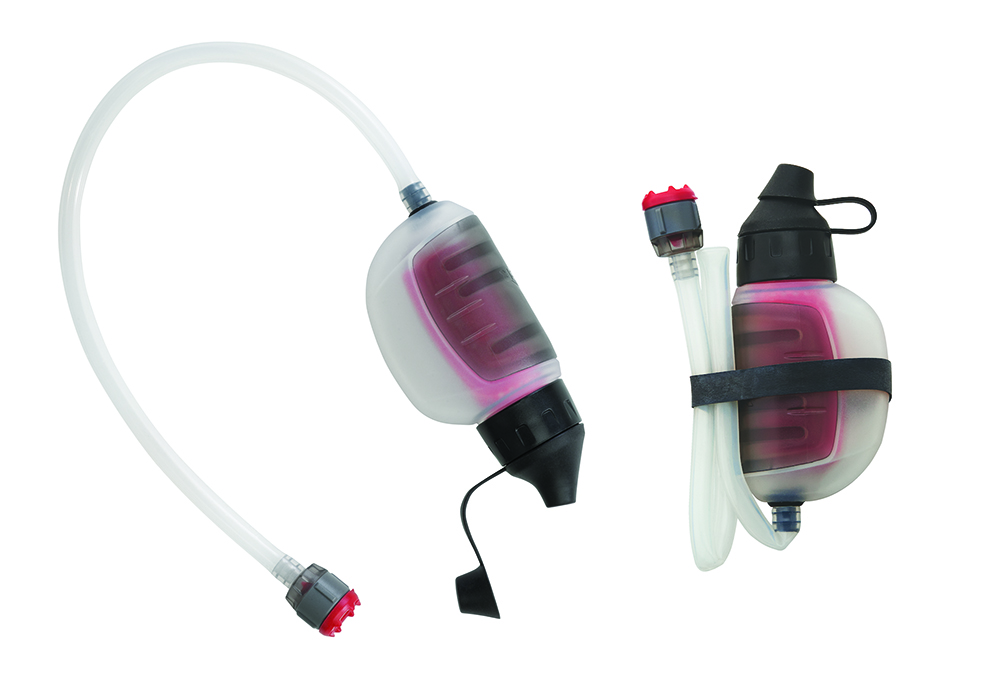
This MSR TrailShot provides a quick clean water source for our Platypus vessels. Photo courtesy of MSR / Earl Harper.

Another way to save on water weight is by “topping off” as much as possible before leaving any water source. If you’ve got a stash of water in your car and you’re about to set out on foot, make sure to take a few extra swallows before stepping off.

Tools

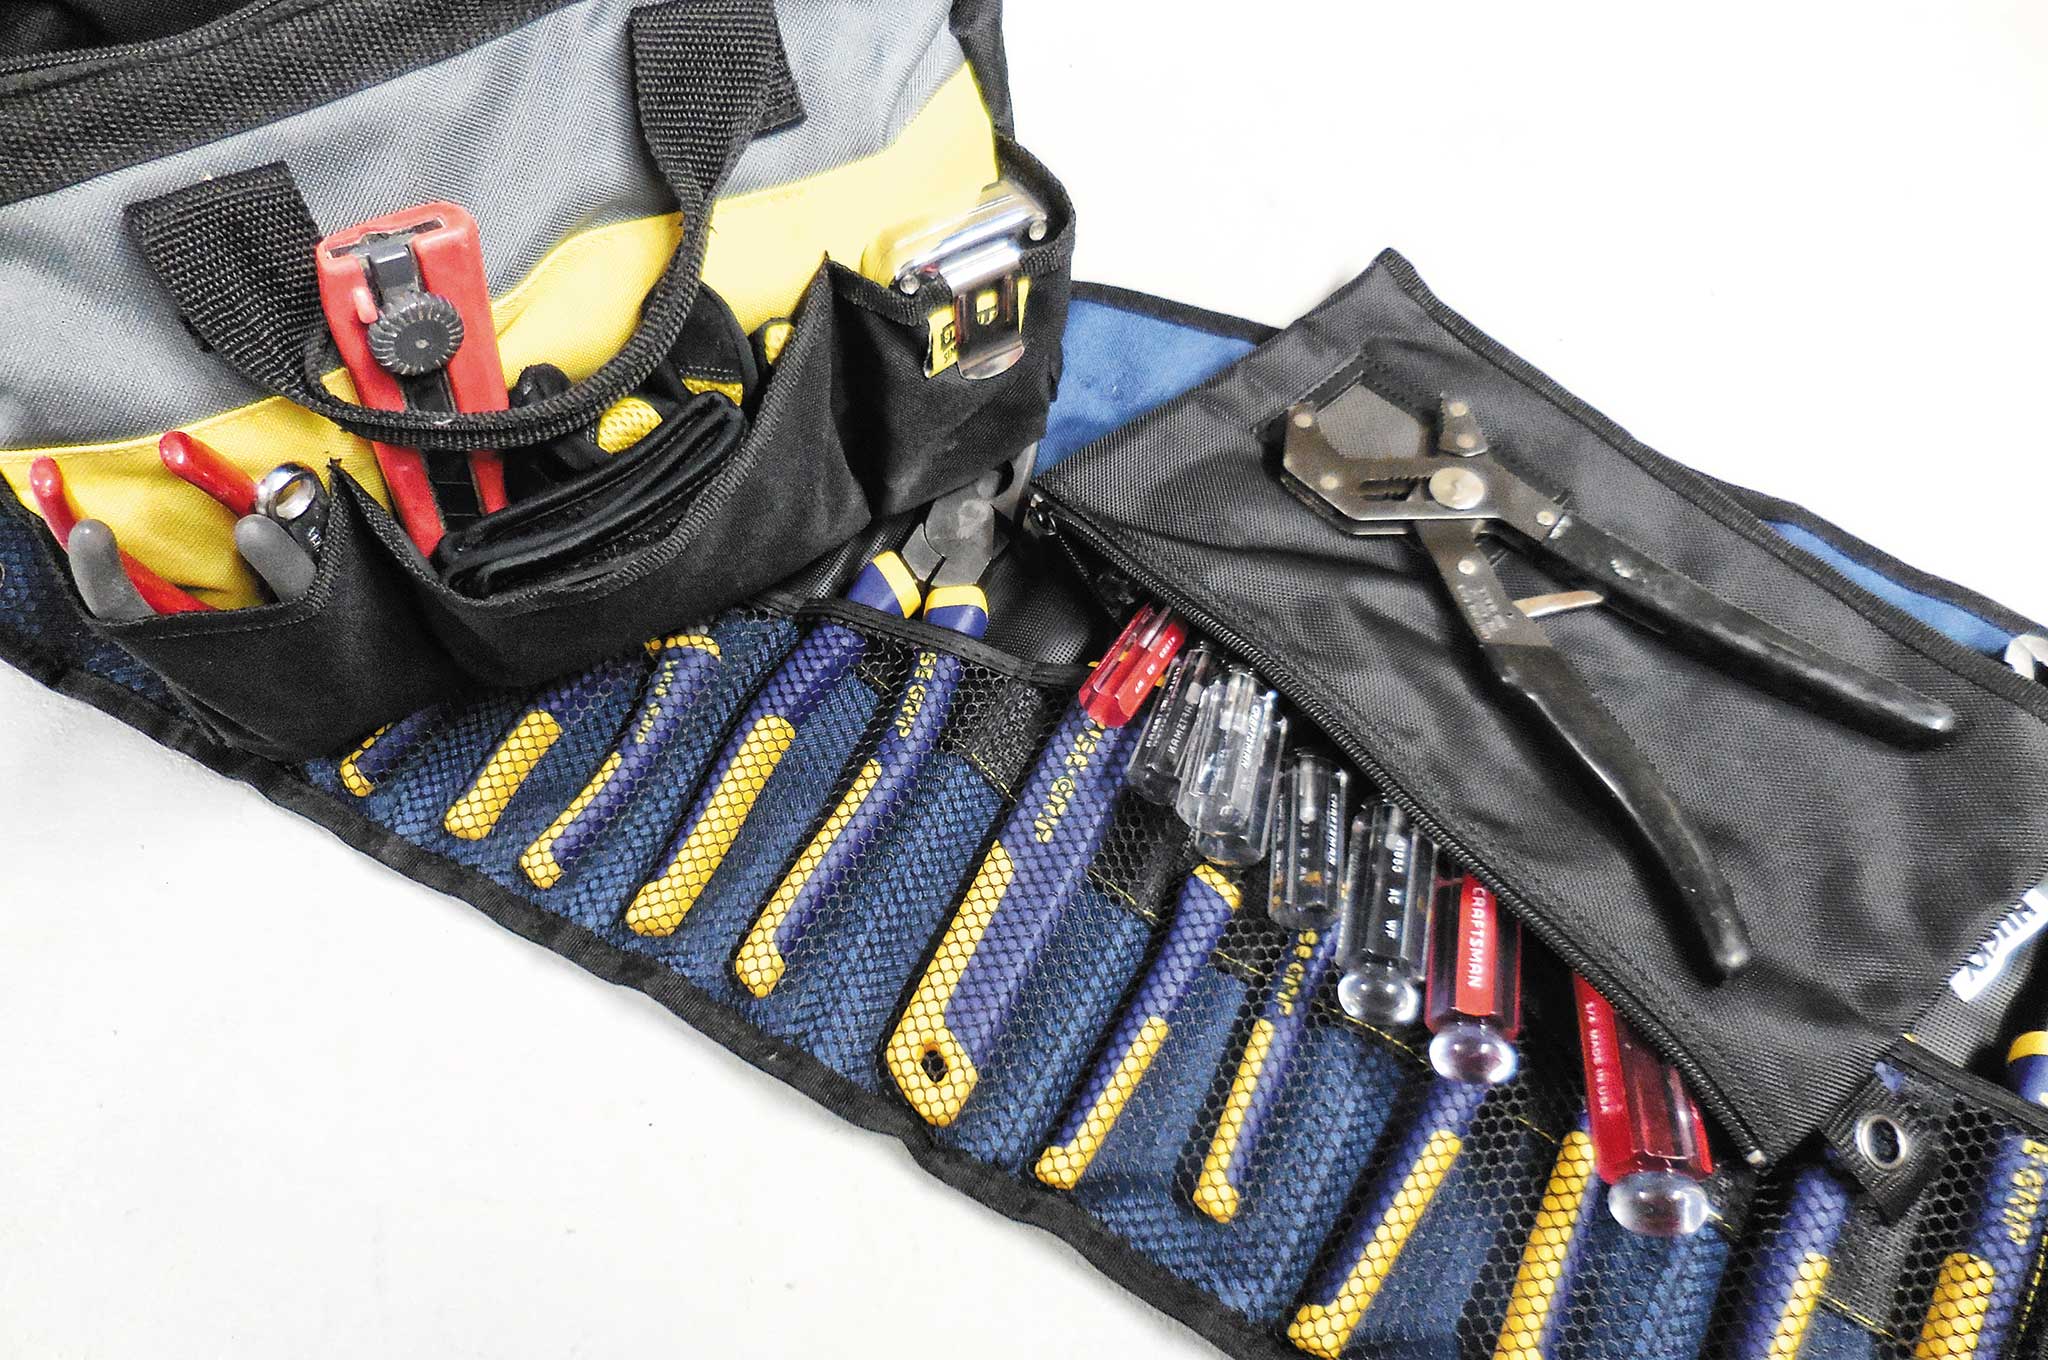
Hand tools are the downfall of many an aspiring survivalist’s light-weight rig. We love tools. And usually we have so many that we can’t wait to stuff our pack with them. Especially when they’re small and light, it’s easy to simply toss one more tool into the bag. I might need that mini titanium prybar. You never know!

10-most-neglected-preps-tools

They're useful in your toolbox or truck, but you don't want to be lugging all this around on your back.

That’s true, you never do know. But unfortunately, we also don’t know if we’ll even get a chance to use this lightweight bag. If we want to keep it packed and ready that means we probably won’t be using it on an everyday basis. So if it’s just going to sit somewhere, then we won’t plan on stuffing a lot of every-day-use tools in there. Tools, after all, have a habit of never returning to the bug-out bag.

Trust us, we know. If you invest in high-end gear, you’re going to want to use it. But if you're going to raid your bug-out bag on a regular basis, at least create a packing list for it detailing everything that's inside once you consider it completed for the first time. Then have a logistics day on a regular basis (at least yearly) where you unpack the bag, review the list, and make sure everything that you assumed was going to be available is actually still present and accounted for.

Ultralight bug out bag folding knife

Speaking of gear lists, most of them start with a knife. And the knives that many people carry are over-sized in relation to what they actually end up using them for. With that in mind, we’ll start with the Ultralight LST from Gerber.

This is an inexpensive, diminutive, and somewhat plain-looking American-made knife that will perform a myriad of tasks without complaint. It is a folder, but it's of the tough lockback variety, so the mechanism shouldn't be much of a weak point. As with the cooking, we’re not trying to impress anyone here. And we’re still waiting on that phone call from Delta Force to use our Chuck Norris reflexes and help them take out the leader of ISIS in an epic knife fight. So until that day arrives, we’ll get by with this simple yet functional 1.2-ounce knife.

Tools for Survival - Axe

A heavy cutting tool like this ax would put us way over our ultralight weight goal. So we'll make do with a small...

Actually, since we'd be in serious trouble if something should happen to our only cutting tool, we’ll throw in a spare. These two knives provide redundancy, and still weigh far less combined than a single outdoor fixed blade and sheath. You may opt for a single heavier fixed blade, like the 4.3-ounce Mora Basic 511, but then you'll have no backup if you lose or damage it. That's a choice you'll have to consider.

When you enter ultralight territory, even a handheld flashlight can

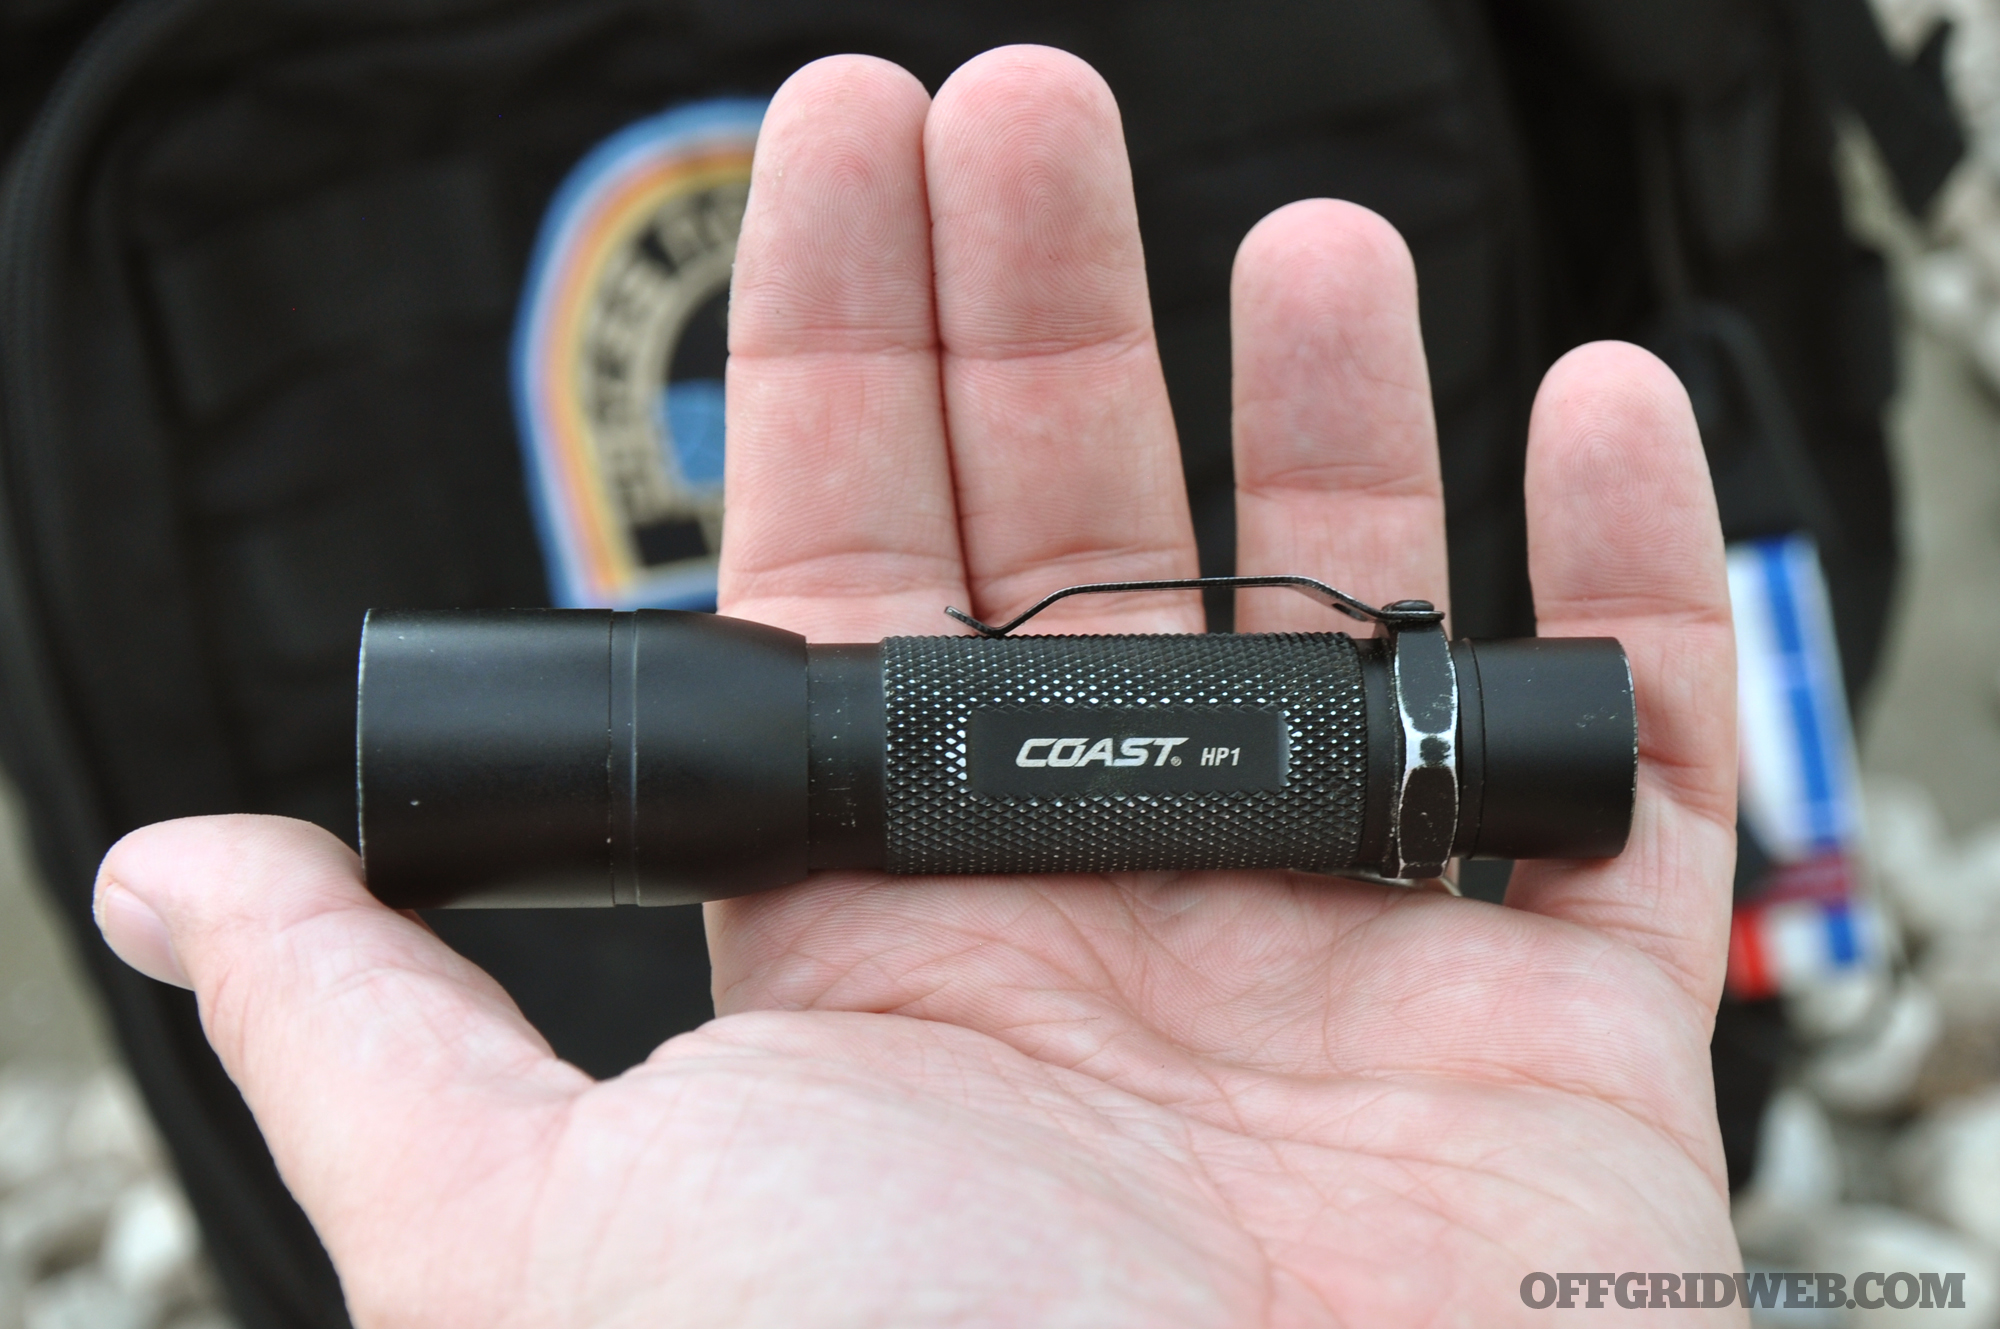
When you enter ultralight territory, even a handheld flashlight can be far too heavy to include. We'll need...

We’ll take the same “two is one and one is none” approach to a light source as we do to our knife. As much as we’d love to bring our behemoth Coast HP17 flashlight, which we may (or may not) have used to transmit profane Morse code signals to the International Space Station, we just can’t afford to haul the extra two pounds (three with its D cell batteries). Instead we’ll pack two compact Coast G19 Inspection Beam Penlights, with the batteries stored reversed to prevent terminal corrosion. They sip power, using a single AAA battery, and weigh only 1.5 ounces each (2 ounces with the battery inside).

Ultralight bug out bag flashlight

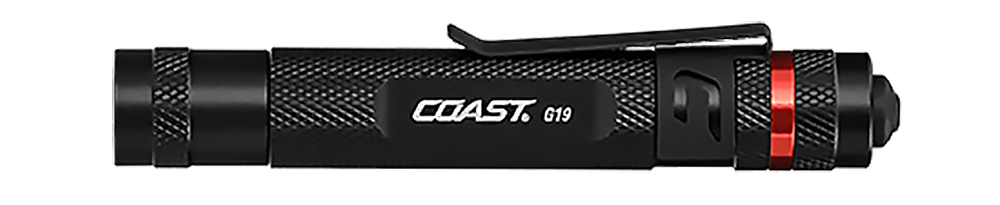
This tiny Coast G19 runs on a single AAA battery, but provides enough light for basic tasks at night.

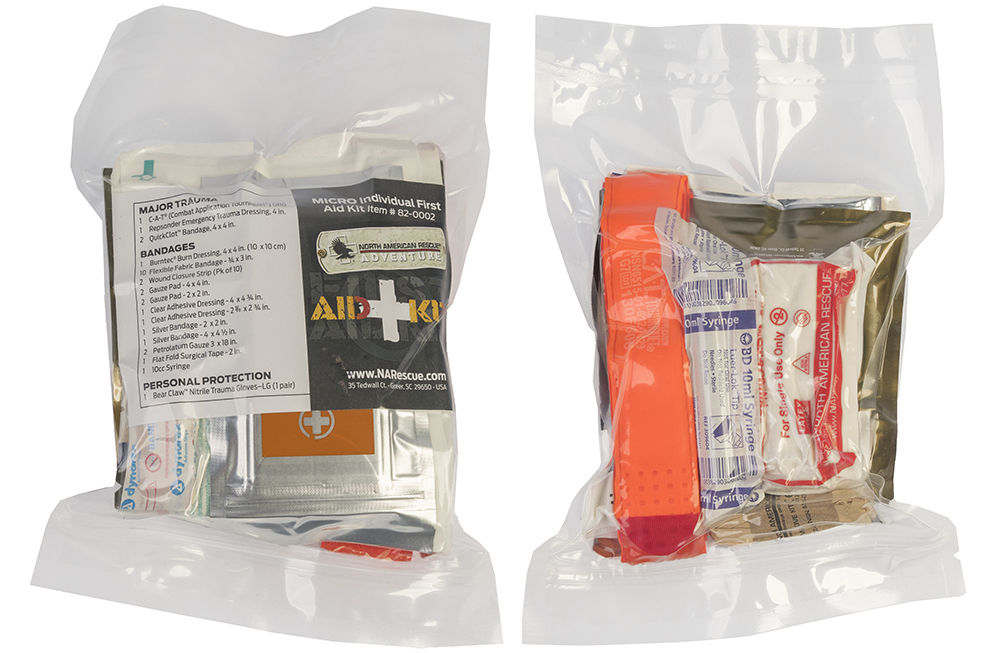
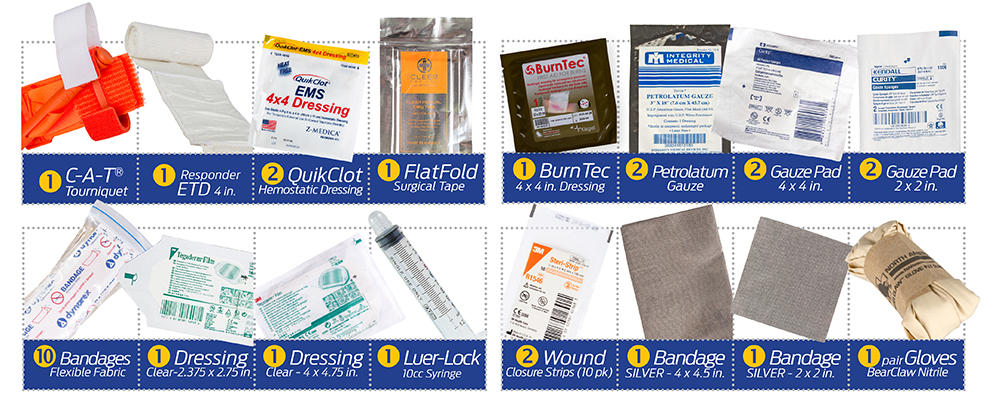
We don’t go anywhere without carrying some type of first aid kit. In this case we’d choose the Micro IFAK from North American Rescue. It weighs 12 ounces and gives us the ability to treat anything from abrasions and cuts to bleeding in major extremities. The kit comes vacuum-sealed, helping to prevent deterioration of the contents, improving its shelf life, and making it that much easier to stick into our pack and forget about — until we need it.

Ultralight bug out bag first aid kit IFAK

Ultralight bug out bag first aid kit IFAK 2

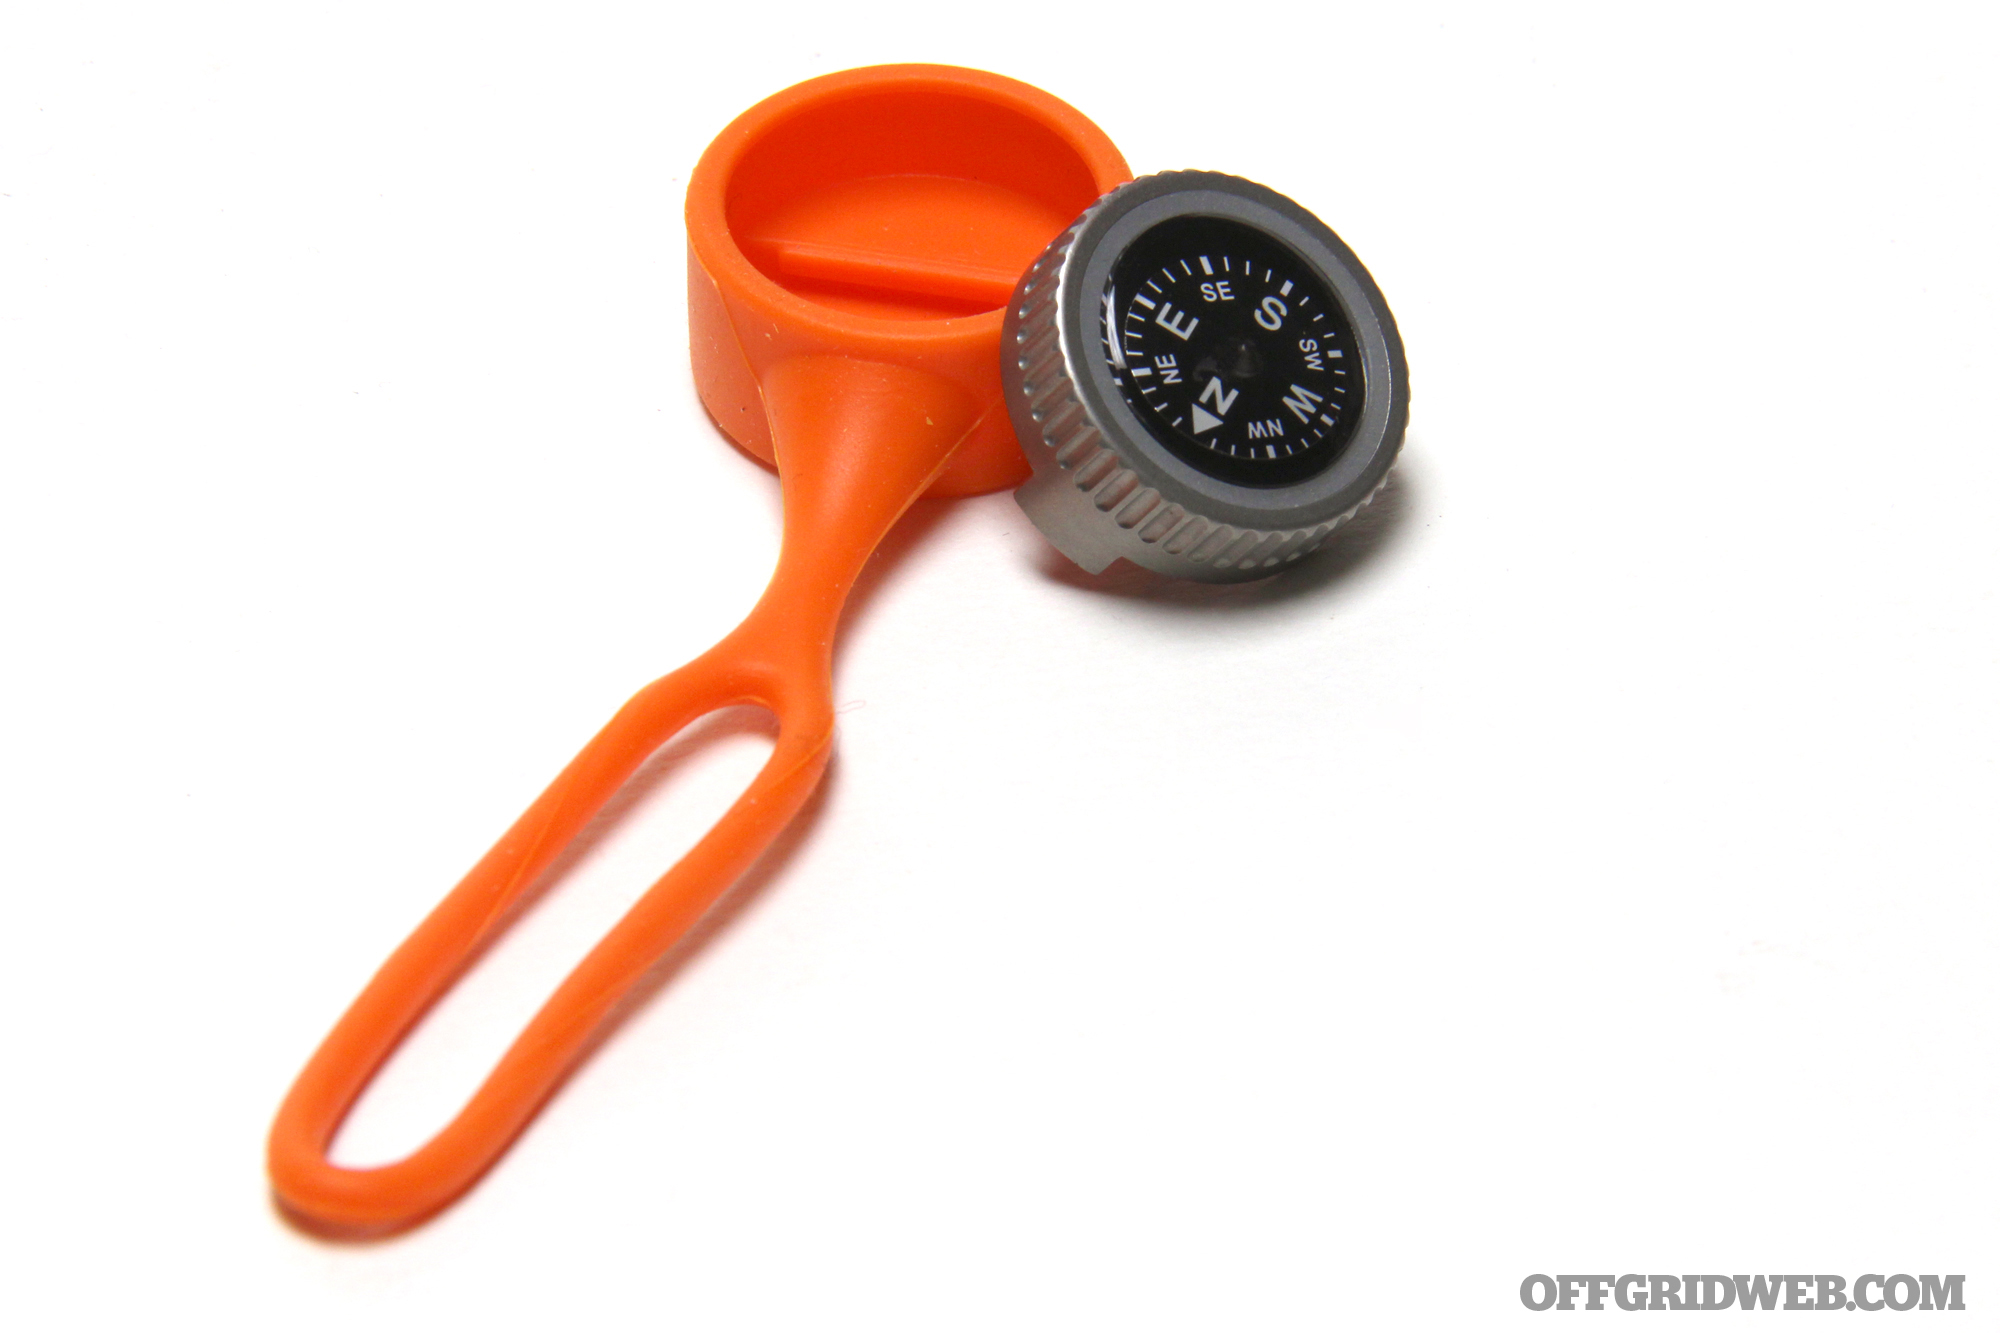
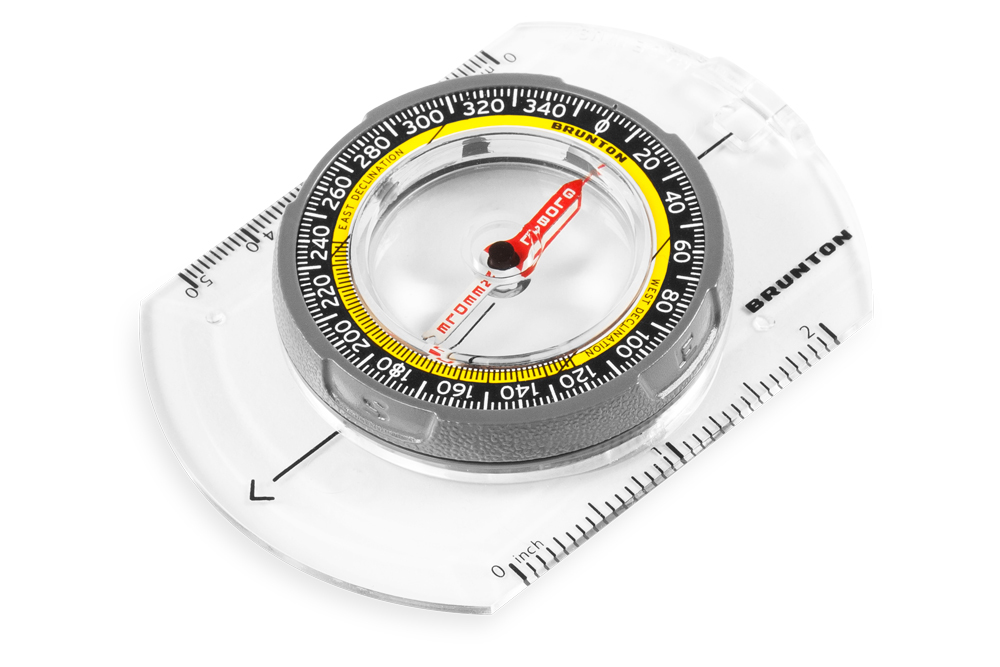
We also want a basic, no-frills compass that still includes scale tools for easily reading distances off a map. The Brunton TruArc 3 Base Plate Compass fills that role, weighing only 1.1 ounces yet remaining reliable and easy to read.

Ultralight bug out bag compass navigation

Last, we’ll add a few small necessities into our pack, including stormproof matches and a mylar space blanket. These are detailed in our packing list table below.

Minimizing Empty Space

So where’s the rest of the stuff, you say? Great question. We’re keeping both empty pack space and weight to a minimum for several reasons.

First, you’re fooling yourself if you think you won't be tempted to impulsively grab a few less-than-necessary items around the house, in the car, or wherever you happen to be when you need to grab your pack and go. These items might include the half-eaten box of Oreos on the kitchen counter. The extra pair of sneakers. A second firearm in addition to your EDC. The framing hammer? Seriously? If there's a ton of extra room in your pack, it's possible you'll fill it up with hoarded gear once panic sets in, defeating the purpose of this project.

Ultralight bug out bag gear table

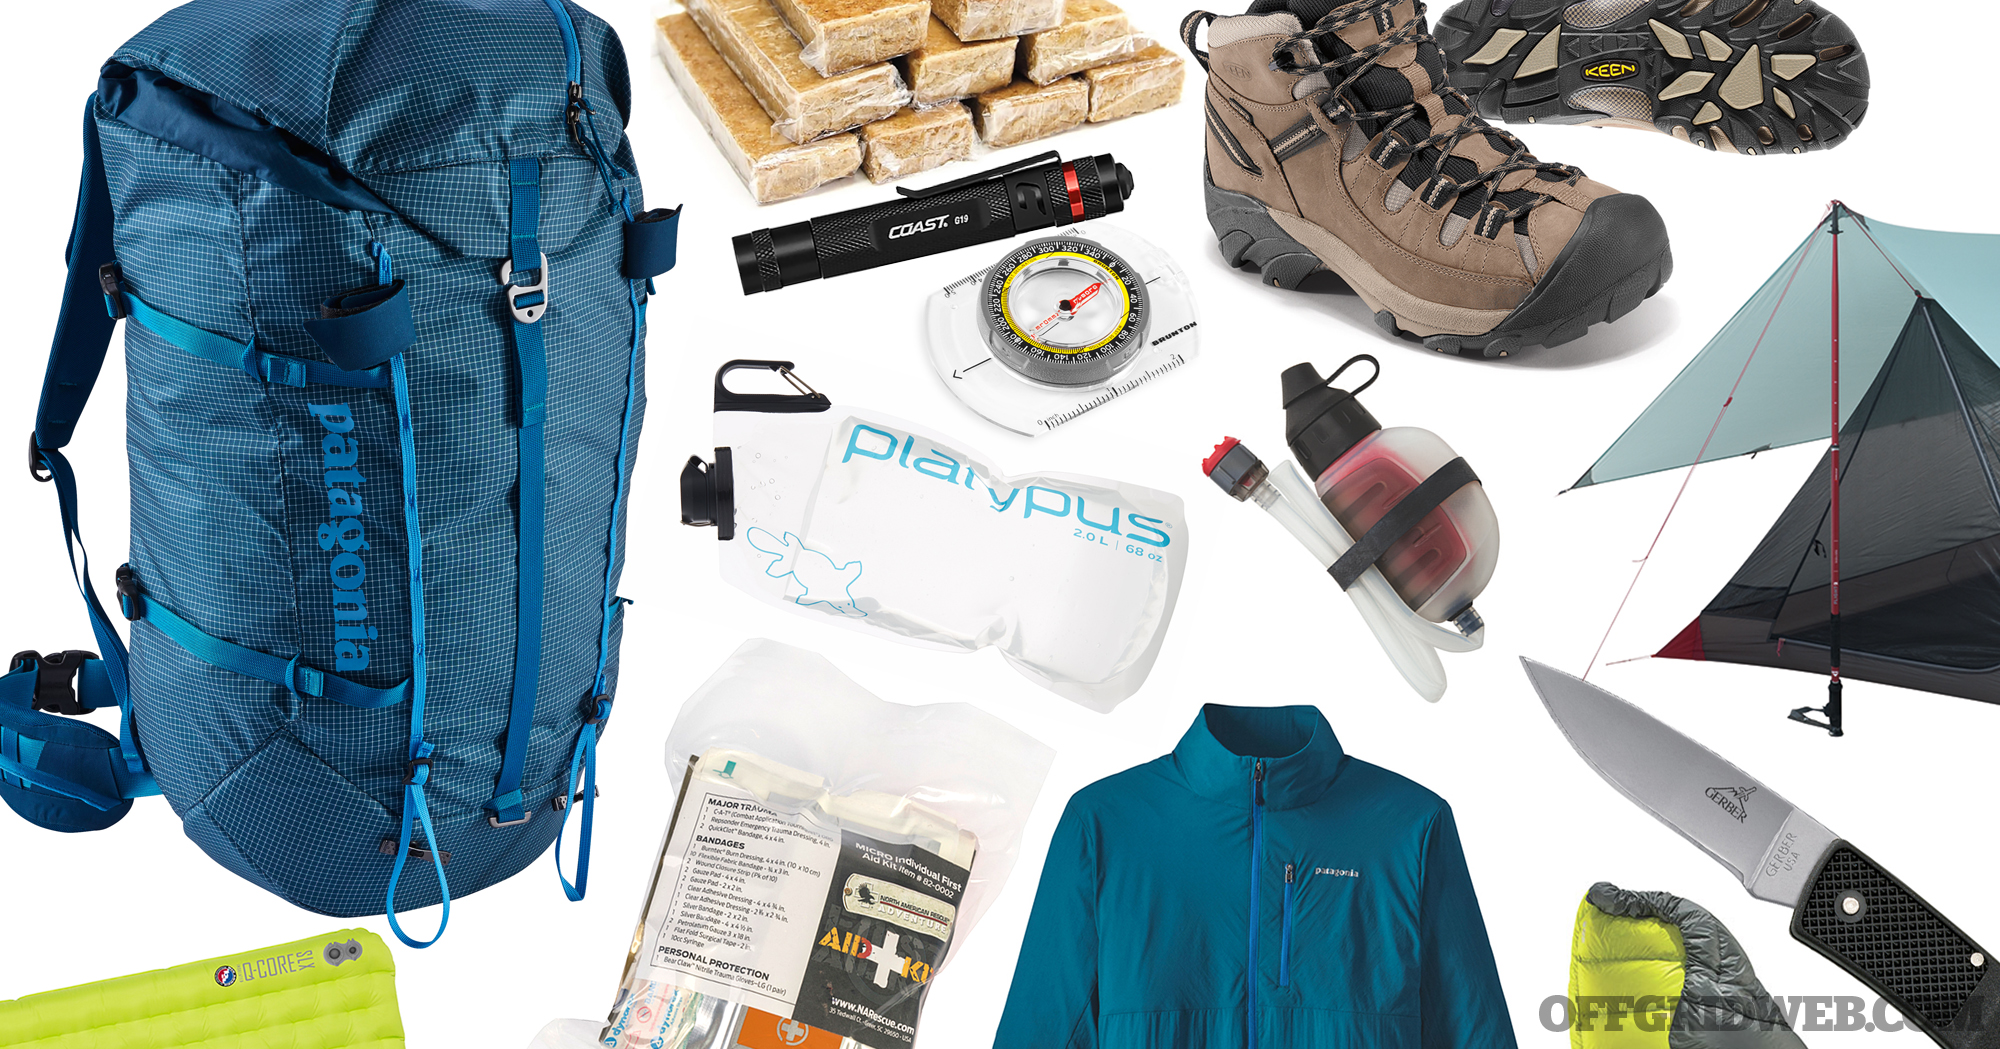
Here's a run-down of all the items we included in our ultralight bug-out bag setup.

Second, having everything we might possibly need just isn’t the point of our ultralight bug-out bag. The point is to have the bare minimum of necessities so that we can stay mobile, walk all day, and even run if we have to. We’re looking for a head start, not an Ark. Otherwise we’d bring a bug-out diesel generator and a bug-out big green egg BBQ grill — we might even save up for a bug-out RV so we don't have to walk.

Ultralight bug out bag backpack

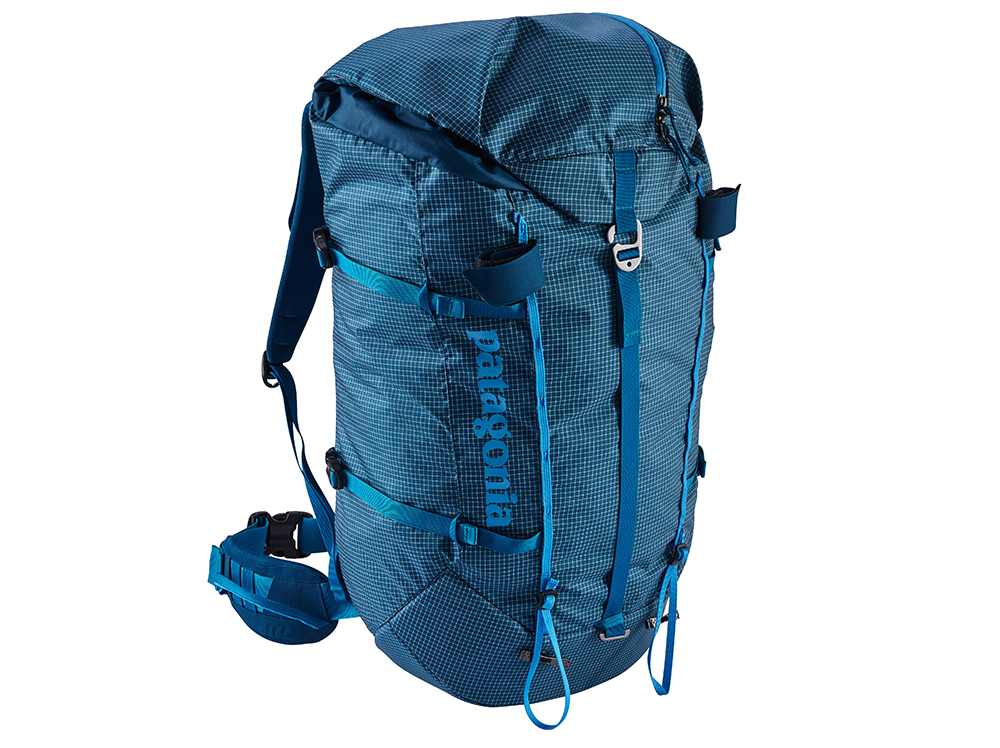
The light 30L Ascensionist pack will serve as the vessel for our gear.

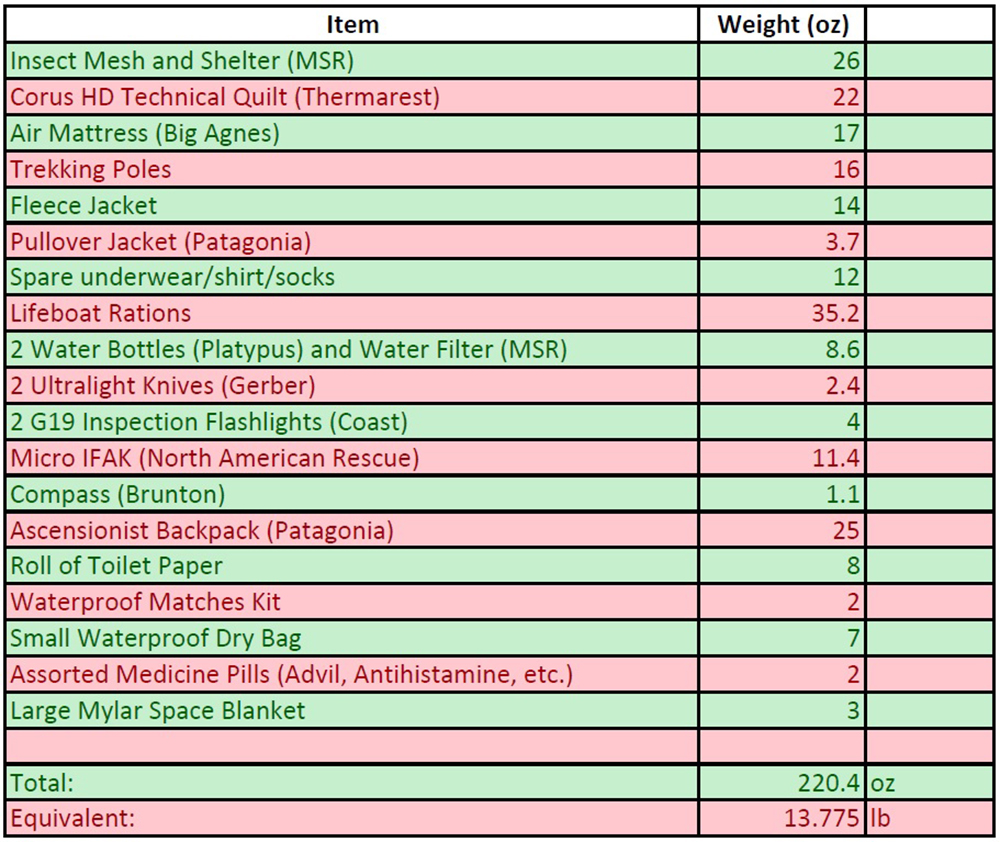
With this minimal philosophy in mind, each of these items will get stuffed into an Ascensionist 30L backpack from Patagonia. At 1.6 pounds,  it’s small and extremely light. We want a small pack for this type of ultralight loadout. It helps keep us from inadvertently over-packing, and falling into the trap of adding more gear just because we have more room (like we mentioned above). As shown in the detailed list, our total weight at this point is just under 14 pounds which we think is a great start.

Ultralight bug out bag lead image

We’re also not going to strap a bunch of stuff to the outside of our pack, looking like some casting reject from Call of Duty: Future Infinity Galactic Warfare VII. For the same reason we probably won’t go around making campfires — we want to maintain a low profile. Kephart himself pioneered this Gray Man concept years ahead of his time. “The whole equipment, except the few light articles worn on the person, stows inside a pack sack of moderate dimensions. There is nothing exposed to advertise your mission; so you give the idle curious something to puzzle and fret over — which is good for them.”

We couldn’t have said it better ourselves. Cheers to you, Mr. Kephart. And cheers to producing an ultralight bug-out bag that won't slow us down when the time comes.

To learn more, check out our 12 Tools for Survival, our buyer's guide to bug-out hammocks or even learn how to love backpacking in the rain.

About the Author

Andrew Schrader is a licensed professional engineer and is certified by the U.S. Army Corps of Engineers as an Urban Search and Rescue (USAR) Structures Specialist. His company, Recon Response Engineering LLC, advises state and federal government organizations on the subject of urban search and rescue and building collapse. He recently assisted the U.S. Department of State’s Italian Consulate in the development of their post-earthquake response and rescue protocol. You can follow him on Instagram at @reconresponse.


DIY Flowerpot Smoker & Grill

We love re-purposing trash into treasure. With the right mindset and a little ingenuity, it's possible to turn discarded junk into useful items. These quick DIY projects can boost morale in a survival situation, and also yield useful tools for the long-term. Take for example the soda can alcohol stovebicycle generator, PVC pipe bow, or plastic bottle cordage.

Clay flower plant pot oven grill diy 2

Clay flowerpots are plentiful in most urban areas — you may have some in your own backyard already, but if you don't, you'll find stacks of them at any hardware store or garden center. This means that they should be easy to find, even in a SHTF scenario.

Clay flower plant pot oven grill diy 1

The heat-resistant properties of these pots would make them a good candidate for cooking vessels, but most of them are designed with drainage holes at the base. So, we can make use of this ventilation and turn them into a DIY flowerpot smoker and grill. Being able to smoke food is especially useful, since it adds flavor, kills bacteria, and acts as a natural preservative for long-term survival situations.

The video below from Cook with Meat shows the technique — just prepare your ears for a loop of upbeat guitar and synthesizer, or get ready to mute the audio.

Here's a checklist of the materials you'll need for your flowerpot smoker/grill:

  • Two large clean terracotta clay flower pots, identical diameter
  • Perforated metal pan to hold coals
  • Round grill grate to fit inside pot (this could be made from wire if pre-welded grills are unavailable)
  • Drill or awl to add air holes to the pots
  • Fireproof gasket material, such as nomex or high-temperature silicon RTV (found at hardware stores)
  • Charcoal fuel and wood chips for smoking
  • Optional: foil pan heat deflector, meat thermometer, handle

Video: “5 Days Without a Truck”

Today's society offers many conveniences. If you need food, you drive a few miles to the store and buy some. If your car needs gas, you stop by the local gas station and fill up. When your trash can is full, you take it out to the curb, and it gets emptied the next morning. If you want to buy something on the internet, you click the “free shipping” option, and it arrives on your doorstep a few days later. Unfortunately, we rarely think about the infrastructure that makes all of these conveniences possible — each of these systems relies on trucks.

Semi truck work railroad shipping transportation road 1

Trucks are responsible for delivering fresh food to your grocery store, refilling the gas station's reserves, taking your trash to the dump, and delivering those packages to your home. If for any reason the trucks ground to a halt, so too would these services. Now imagine what your city would be like with no food in the grocery stores, no fuel at the pumps, and rancid trash piling up on the sidewalk. Our civil society would quickly spiral into chaos.

A disabled transportation infrastructure would also mean no access to fire trucks or emergency services.

A disabled transportation infrastructure could also mean no access to fire trucks or emergency services.

A documentary called Be Prepared to Stop examines the potential consequences if every truck in America stopped rolling. Check out the clip below, which lists a rough timeline of the day-by-day effects a catastrophic shutdown of America's highways might have:

“Basically, to the general public, we are invisible unless something goes wrong.” – Stephanie Klang, a truck driver

Like many documentaries, it appears that there may be a political motivation behind elements of this film. However, the core message holds true: our current system of roadways, trucks, and truck drivers is essential to many of the conveniences we enjoy. If something interrupts that system, things could go downhill quickly, so it's important to support that infrastructure and prepare ourselves for the worst.

To learn more about Be Prepared to Stop, or watch the full-length documentary, go to BePreparedtoStop.org.


5 Threat Identification Tips from a Surveillance Professional

“If you know the enemy and know yourself, you need not fear the results of a hundred battles.” — Sun Tzu

This ancient quote from The Art of War reminds us that if you know the enemy, and are aware of your own abilities, you’ll never be in fear of the dangerous situations you may encounter. However, part of the problem with knowing your enemy is identifying who the enemy might be. Day after day, one could go through life with the proper training, mindset, and tools to protect oneself, but distinguishing a wolf in sheep’s clothing from an innocent bystander can be a challenging task for the untrained eye. That’s why threat identification is an essential skill.

The Principles of Observation

Human nature has always been, and continues to be, exceptionally difficult to decode. Trying to predict a random stranger’s actions is nearly impossible upon first sight. To add to the difficulty, the philosophical debate of whether humans are inherently good or evil is still raging to this day. Regardless of what side of that argument you’re on, one thing is undeniable; bad guys exist in plain sight everywhere.

The Gray Man crowd

There’s no class, piece of gear, or handbook that can teach someone to become an expert at predicting a person’s next move. The best way to improve at threat identification is to expose oneself to different locations and settings, and observe what people do. Identify those who might look unsavory. Why did you pick that person? What were they doing that made them stand out? If you don’t know the answer right away, continued observation of that particular mark will reveal more about what they’re doing, or why a particular action stands out to you.

As one observes longer, that mark may become nothing more than a passerby who was lost or confused. On the flip side, the threat level may also escalate and trigger you to start making decisions to leave the area or take another course of action. All of these factors are important in assessing your vulnerability to danger. As said before, real-world practice is essential to threat identification training, but these five tips can hammer home the fundamentals of what to look for to initiate the threat identification process.

1. Watch for Countersurveillance

Countersurveillance that is, actively attempting to avoid observation — is important to perpetrators because it acts as an investment for the attack they plan on carrying out. Someone who partakes in countersurveillance will often have some sort of skill allowing them to identify and possibly avoid surveillance measures that would otherwise impede their plan. Lucky for you, this is not always the case.

Surveillance security camera CCTV observation grey man 2

In order to identify someone running countersurveillance, you have to capitalize on their mistakes. Observe their actions, and catch the individual slipping up and revealing their true intentions. Someone who is constantly looking up towards the corners of buildings or above doorways may be looking for cameras, perimeter lights, or motion detection devices. One who checks doors by leaning casually on handles to see if they’re unlocked, or overtly asks odd questions about security and business processes could be quietly running a countersurveillance operation. The overly-inquisitive person may simply be curious, but repetitive actions should certainly raise both suspicion and your personal threat level.

Surveillance security camera CCTV observation grey man 8

2. Identify Clothing and Wearables

As simple as it may seem, clothing can tell you a lot about a person, and how much of a threat they could be. Simple identifiers, such as raggedy, worn out, dirty clothing may easily suggest that the scruffy guy approaching you in a back alleyway is homeless. Statistically, a homeless individual may be more likely to commit crimes of desperation, so this should be an easy threat identification flag for anyone, as long as you can prioritize your safety over your sense of compassion.

Surveillance security observation grey man homeless 6

It's the more technical aspects of observation that allow you to quickly ID someone who may be up to no good, rather than trigger other senses like compassion, or plain curiosity. Someone acting suspicious while wearing the stereotypical hat and sunglasses may seem a bit odd, but this tactic actually has a pretty good chance of thwarting any surveillance cameras and facial recognition from identifying them by appearance alone. This sentiment also goes for the lone repairman or maintenance worker. They may seem normal at first glance — they have an excuse to be in a secure area, and they can get around with ease due to their job function. But if it appears they’re toting unused tools, wearing clean shoes, and donning a freshly-pressed uniform, something may be off.

Surveillance security observation grey man construction worker 8

As many would guess, large, heavy clothing in late spring or summer could signify someone who is trying to conceal something, such as a weapon or goods that they have lifted off of unknowing victims. But what about the tougher observations? Very light clothing, such as only a t-shirt in the winter, should raise just as much suspicion as baggy clothing in the summer. Factor in why a person would approach you while not wearing a jacket in the winter. They may seem in distress, and that will get them within feet of you. Maybe they just told you they were robbed and need your phone to contact police? Just like pulling over to help a motorist on the side of the road, it’s tough to separate the desire to be a good Samaritan from the risk of being taken advantage of. So, make sure to use caution when identifying someone based on clothing, but also use common sense.

3. Spot Visual Cues of Anxiety

Most people would argue that nervousness is the tell-tale sign of suspicious activity. Contrary to the popular belief, anxiety itself isn’t the warning sign — it produces the warning signs. A nervous individual will often display some visual “tells” that something may be up, but anxiety is the root cause of the sweating, shaking, and skin tone change associated with an individual that is about commit an act of aggression. Rubbing fingers together rapidly, clenching a fist, tightening of the jaw, and pacing will also give that individual away almost instantly, just in time for you to formulate a plan of action.

Frostbite snow cold winter man smoking cigarette 12

Aside from acts of aggression, thieves and petty criminals will appear extremely anxious if they aren’t experienced in the act of stealing. Look for that person to furtively glance around with spurts of paranoia, sit and put their head in between their legs, and tap their feet vigorously before they decide to either flee or go for the steal. A seasoned thief won’t think twice when shoplifting or snatching a purse, but they may very well display one of our other 4 threat identification behaviors, so pay close attention to your surroundings.

4. Look for Atypical Activity

Another key starting point that can escalate depending on location is the observation of atypical activity. These behaviors will appear unusual, regardless of your location. Avoiding eye contact at all costs in a crowd of people can be classified as atypical activity, due to the effort involved in milling around without as much as a look, nod, or smile to passersby. An abnormally chatty or outgoing individual can also be a red flag, depending on the setting.

Surveillance security observation grey man backpack 3

Another atypical activity that we have had the unfortunate chance to observe was the method that the Tsarnaev brothers used to bomb the Boston Marathon in April of 2013. Even though there were plenty of people at the marathon wearing backpacks, the brothers set their concealed bombs down and nonchalantly walked away. No one noticed this as strange, even though it would be highly unlikely for someone to abandon their bag in a large crowd at the marathon. They assumed correctly that everyone was watching the marathon, thus distracting them from the atypical activity of dumping large backpacks on the sidewalk.

Lastly, observe the individual who seems to try hard to stay unseen. Ducking behind visual obstacles can seem easy, but someone who has perfected staying out of the way should escalate your threat level immediately. Standing near a blind corner of a building or hallway, behind a pillar in a low-traffic area, or even actively avoiding areas with windows inside of an office building can be initial signs of someone being up to no good.

5. Notice the “Frequent Flyer”

One of the easiest possible threats to observe is someone who seems to be making rounds in a particular area. Not to be confused with countersurveillance, someone who classifies as a frequent flyer doesn’t typically care who is watching, but rather who they are going to harm, and when they plan to strike. This individual will leave an area after a period of observation and return on a schedule to check up on their target.

Surveillance security observation grey man crowd 5

This method of threat identification is more ambiguous than the others in that the schedule of the individual can vary from minutes to hours. The frequent flyer is usually a thief, pickpocket, or petty criminal who is out for a quick score, not thinking of the repercussions that could be avoided by using countersurveillance. Quickly taking stock of the area of mischief, the individual will identify the target or item they desire, make sure they are able to succeed, and go all-in. This person may also follow a target after observation, depending on the level of success they believe they may have. This is why it’s important to be able to spot the threat quickly.

The best way to avoid being the target of a frequent flyer is to identify their repetitive behavior and get out of the way before things get dangerous.

Conclusions

Practicing these tips can be as easy as going to the local shopping mall and engaging in people-watching. There are potential threats everywhere, even if we’d prefer to remain blissfully ignorant. An unsavory individual who commits small thefts is still a threat, although you may not be the intended target.

Surveillance security observation grey man homeless 7

Applying these principles can be a bit harder. Hopefully, you won’t find yourself in a situation where you’ll need to escalate the threat level enough to take any sort of action, but the reason to practice threat identification is to be able to bail out before the strike. By keeping these five tips in mind, you can keep yourself and your family safe, and also protect those around you from falling victim to the dangers you observe.

About the Author

Jim Henry is a physical security and surveillance expert who has spent all of his adult life working to keep people out of places they shouldn’t be, and locating individuals who need to be found. Prior to his current employment in the private sector, where he works as a government contractor, Henry was a Surveillance Investigator for The Rivers Casino in Pittsburgh, PA. He also worked in Erie, PA in a similar role. Before that, Henry was busy building a diverse portfolio of education, studying countersurveillance, critical infrastructure protection, and threat detection. Even though most of his current work remains secret, Henry is very vocal about his love for firearms, writing, EDC gear, hiking with his dog, and spending time with his family.


New: Baja Designs S2 Ultra-Compact LED Lights

LED light bars have made a huge impact on the off-road market — it's rare these days to see a bug-out truck that doesn't have at least one or two LED lights. However, there are some downsides to the traditional 3- to 5-foot-long light bars. While they produce immense amounts of light, full-size light bars also draw high amperage, and can overload the electrical systems of smaller vehicles such as ATVs and side-by-sides. They also throw light in a wide line or arc, and are more difficult to aim precisely for targeted needs. Finally, their large dimensions can block radiator grilles or impede visibility, depending on placement.

Baja Designs LED light bars truck 4

The Baja Designs S2 line is available in several beam pattern configurations, from spot to wide flood beam.

In these instances, running a smaller light pod is beneficial. This is why Baja Designs has released the S2 series of ultra-compact LED lights. They measure just 3 inches by 2 inches and weigh 8 ounces, so they're ideal for mounting in grilles, on bumpers or roof racks, or for use as back-up lights. These lights are also designed for low amperage draw, so they won't add too much strain to a smaller vehicle's electrical system.

Baja Designs LED light bars truck 3

The S2 Pro is available in flush-mount configuration for installation on bumpers and grilles.

The Baja Designs series is split into two categories: S2 Sport and S2 Pro. The S2 Sport is the entry-level model, and produces 1,130 lumens, with a draw of 12 watts at 0.9 amperes. Pricing for the S2 Sport starts at $110.

The S2 Pro is what Baja Designs calls “quite literally the brightest LED light ounce for ounce on the market”. It produces 2,450 lumens with a draw of 20 watts at 1.6 amperes. Pricing for the S2 Pro starts at $175.

Baja Designs LED light bars truck 2

Color lenses are available for red, blue, green, and amber light output.

A variety of beam patterns are available — Driving/Combo, Spot, Wide Cornering and a Work/Scene light. The S2 lights also offer either black or white powdercoated housings. All are available with optional amber colored lenses, and the Spot model is also available with optional red, green or blue color lenses.

For more information on the new Baja Designs S2 series, visit BajaDesigns.com.