Warning
The concepts shown here are for illustrative purposes only. Seek professional training from a reputable instructor before attempting any techniques discussed or shown in this story.
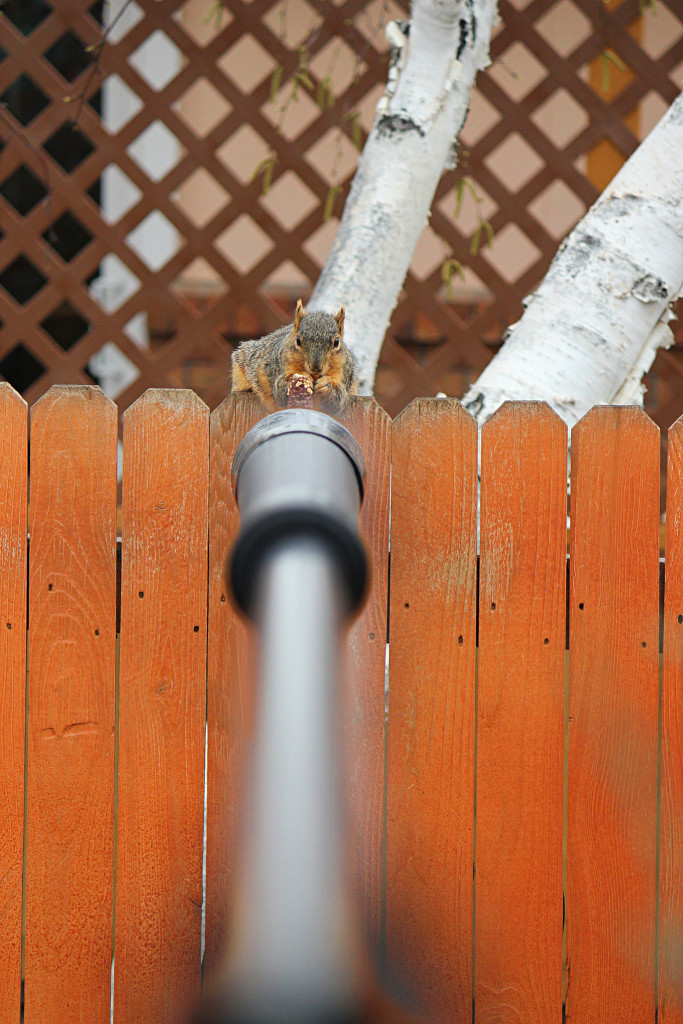
Long before anyone ever lit a cannon fuse or pressed a trigger, some evil genius in a tactical loincloth discovered that if you put something into a hollow tube and blew into one end, it would fly out the other end with enough energy to cause trouble. That simple discovery, the blowgun, ultimately became the basis of all barreled weapons — especially when another evil genius figured out how to replace lung power with gunpowder.
Although the exact history of the blowgun is unclear, it appears that people in various parts of the world independently discovered the concept of a breath-powered weapon over a thousand years ago. Blowguns were widely used in the Philippines, Japan, and among Native American tribes in the Southeastern USA, but they reached their greatest potential in the Amazon basin of South America and the Malay Archipelago. That's no coincidence, as both those areas had species of plants that could be used to make potent poisons — the kind that transformed low-powered blowgun darts into true killing projectiles and made them effective against more than snack-sized animals.
Even without poison, blowguns are surprisingly powerful and accurate. With the right kind of projectiles, they're very capable of taking down many types of small game. They also offer some unique advantages that make them ideal weapons for preppers. If you don't already have one in your TEOTWAWKI kit, by the time you're done reading this article, you'll want one.
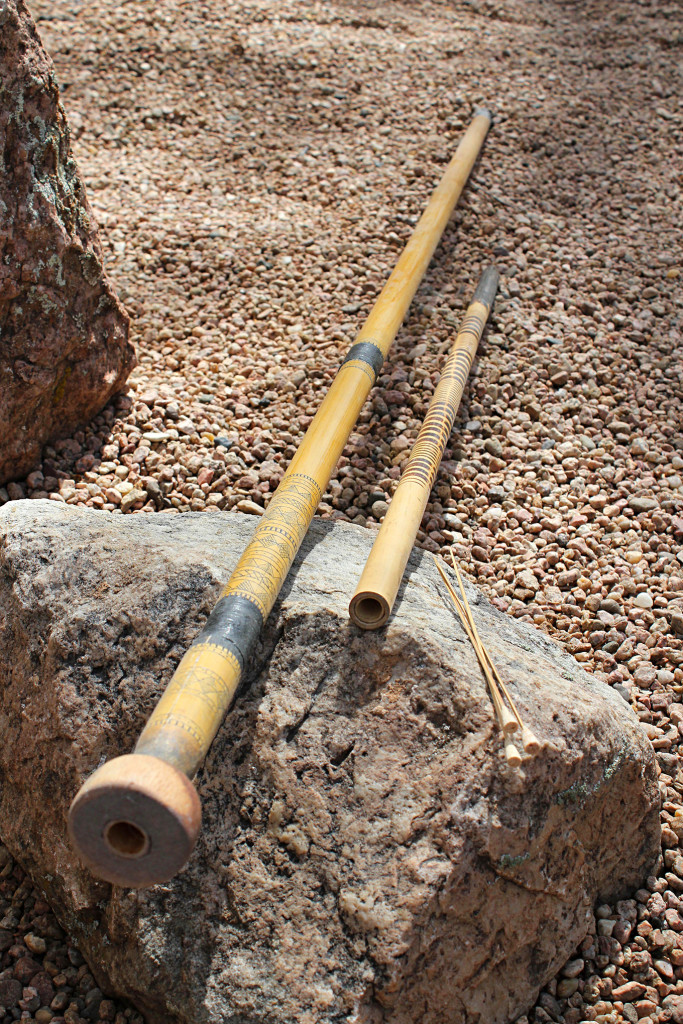
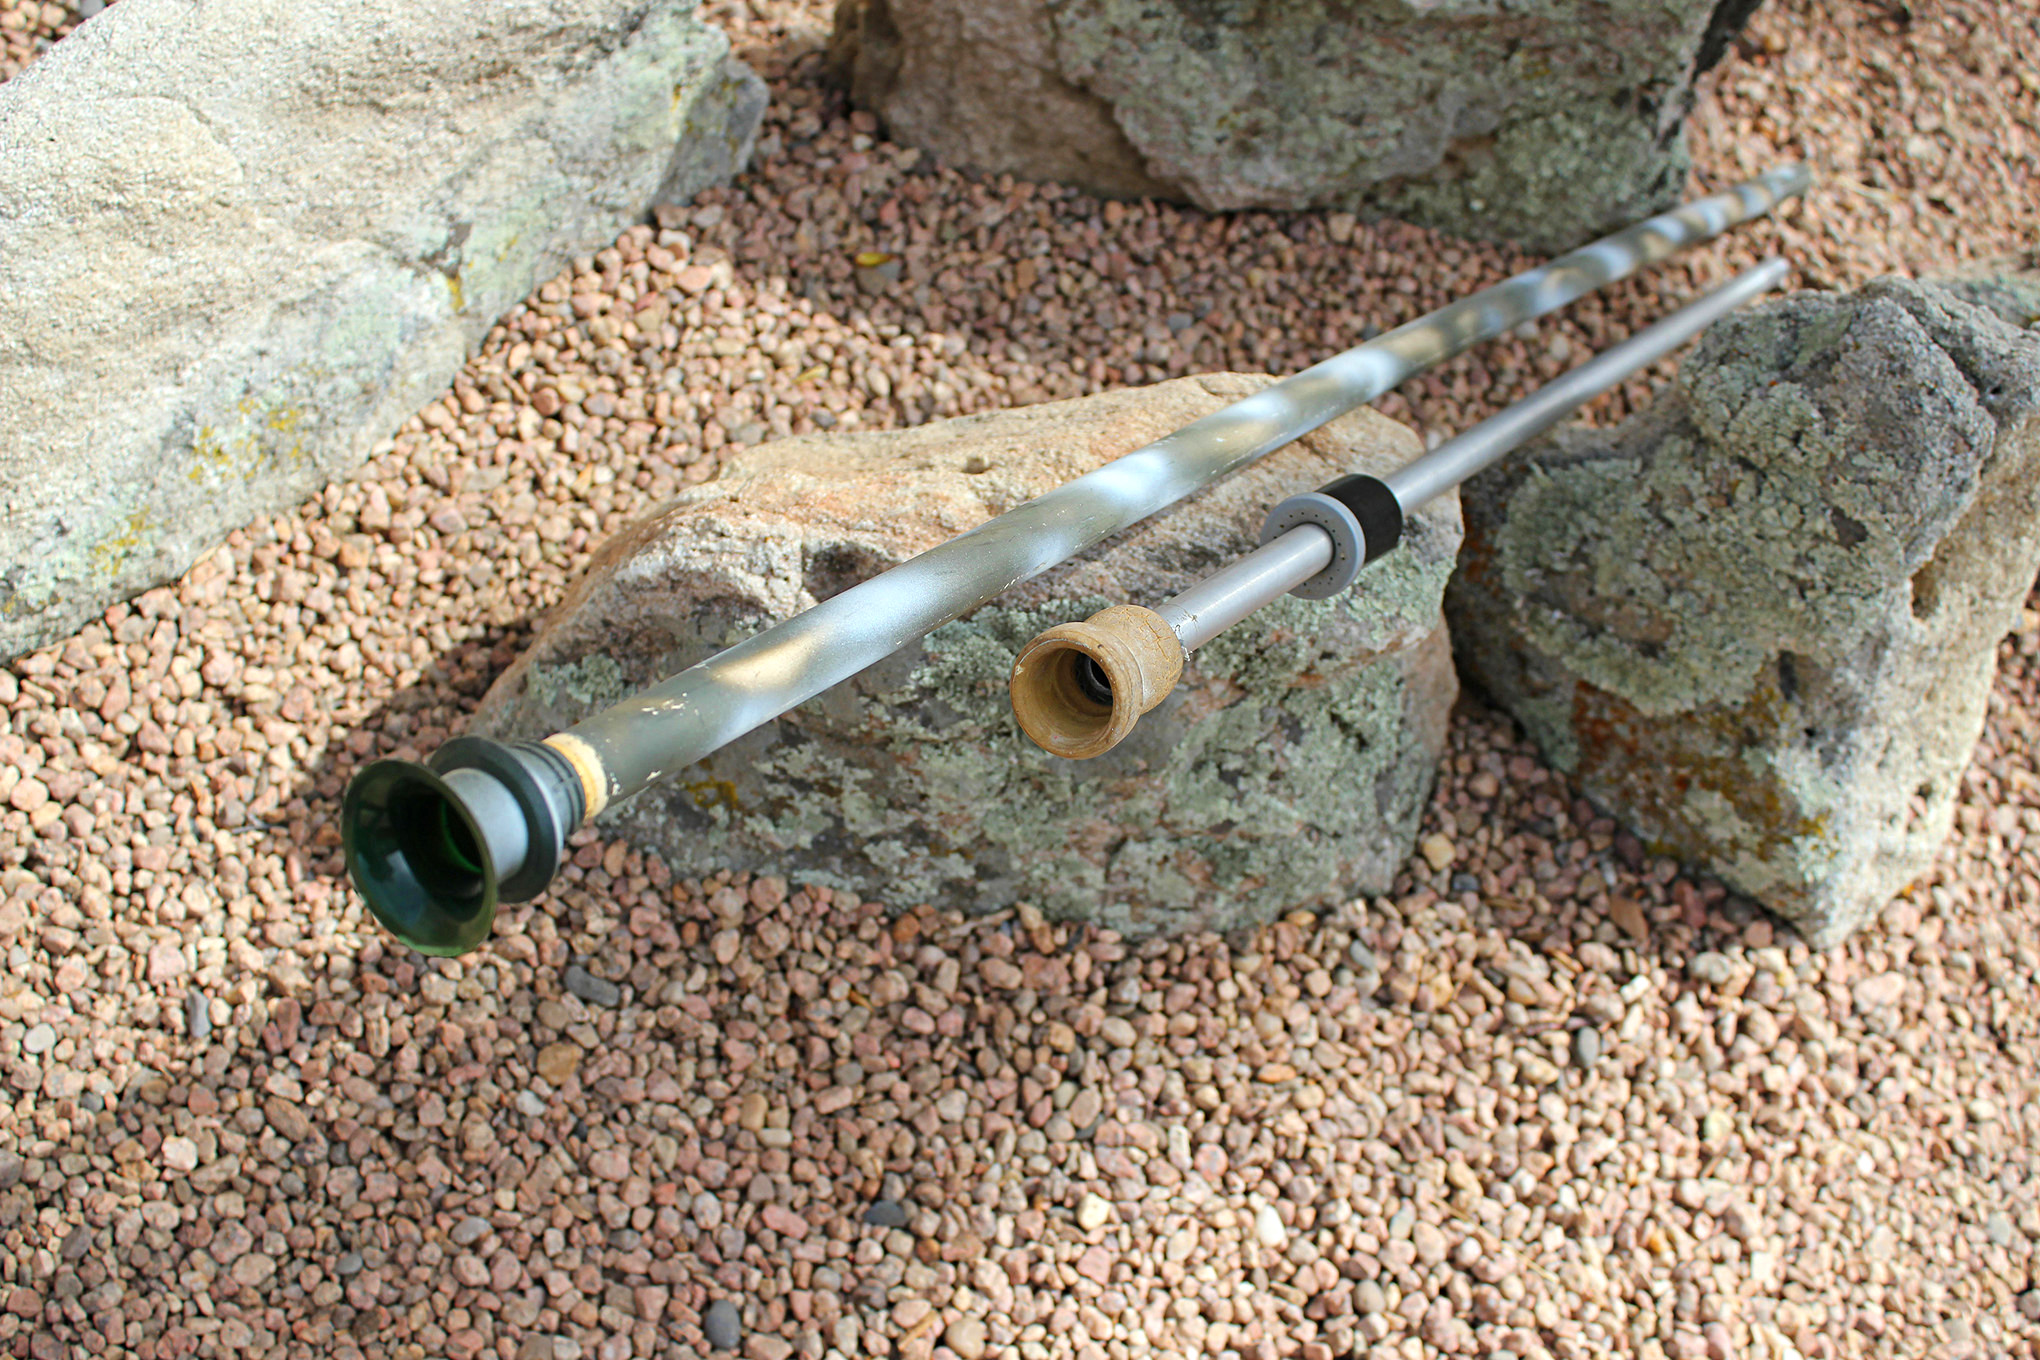
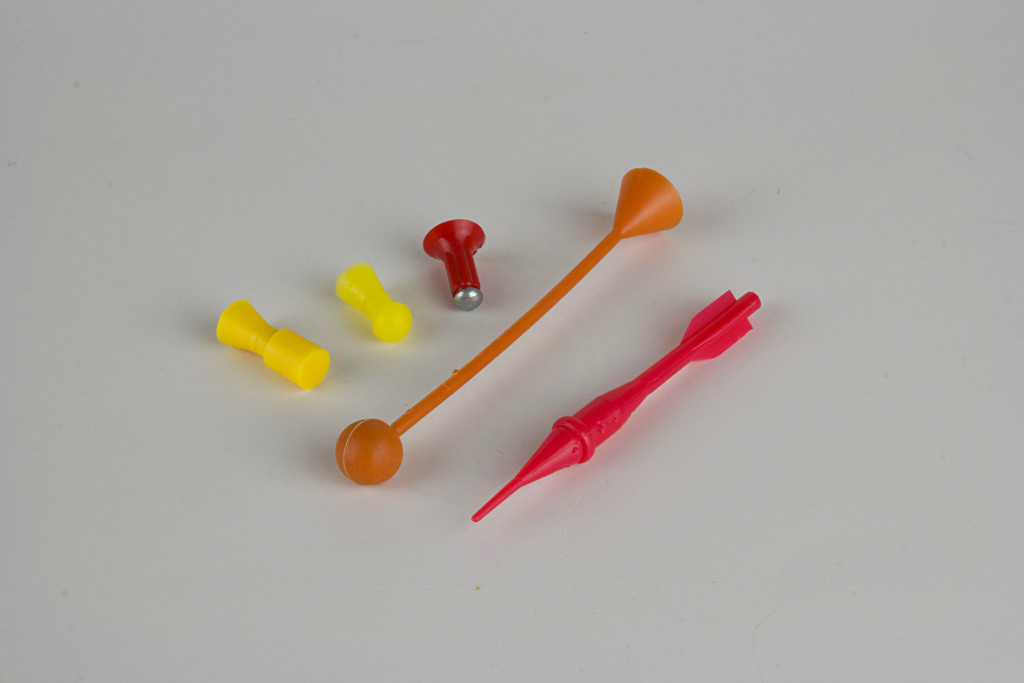
Two traditional blowguns, from Malaysia (with mouthpiece on left) and the Philippines. Their darts consisted of thin...
Blowgun Basics
A blowgun is about as simple as it gets. In its basic form, it consists of a rigid tube with a smooth bore typically somewhere between 3?8 and 5?8 inch in diameter and anywhere from 2 to more than 10 feet long. Typically it's equipped with a mouthpiece at the breech end to allow a better air seal and more effectively focus the shooter's breath into the tube. That's it.
Traditional blowguns were usually made of wood or natural reeds, sometimes even featuring composite tube-within-a-tube construction. Southeast Asian ‘guns were most often made of bamboo, providing a significant head start for fashioning the bore. In South America, however, blowguns were crafted by the laborious process of either drilling through the length of a solid piece of wood or splitting the wood, carving a groove in each half, and gluing it back together to create the bore. Longer ‘guns were also either pre-bent or bored on a bias to compensate for the sagging effects of gravity.

Modern blowguns are generally made of seamless aluminum tubing with injection-molded plastic mouthpieces and quivers...
Today's commercial blowguns take the same simple design and render it with precision tolerances and more modern materials — seamless aluminum tubing for the barrel and injection-molded plastic mouthpieces. These improvements minimize leakage of air around the projectile and make the most of what your lungs have to offer. Forty-caliber ‘guns are by far the most common, but .38-, .50-, and .625-caliber are also readily available. In addition to conventional one-piece blowguns, you can also find backpackable takedown models with multiple barrel sections joined by plastic or metal couplings.
Projectiles
The most common type of blowgun projectile is a dart consisting of a needle-like shaft and a “stopper” of some sort at the rear end that creates an air seal in the bore of the ‘gun. Native darts were generally made of thin shafts of bamboo or hardwood with cork, kapok, or thistledown seals. Poison-coated darts were small and lightweight, but unpoisoned darts sometimes had hand-carved broadhead points and functioned like small arrows.
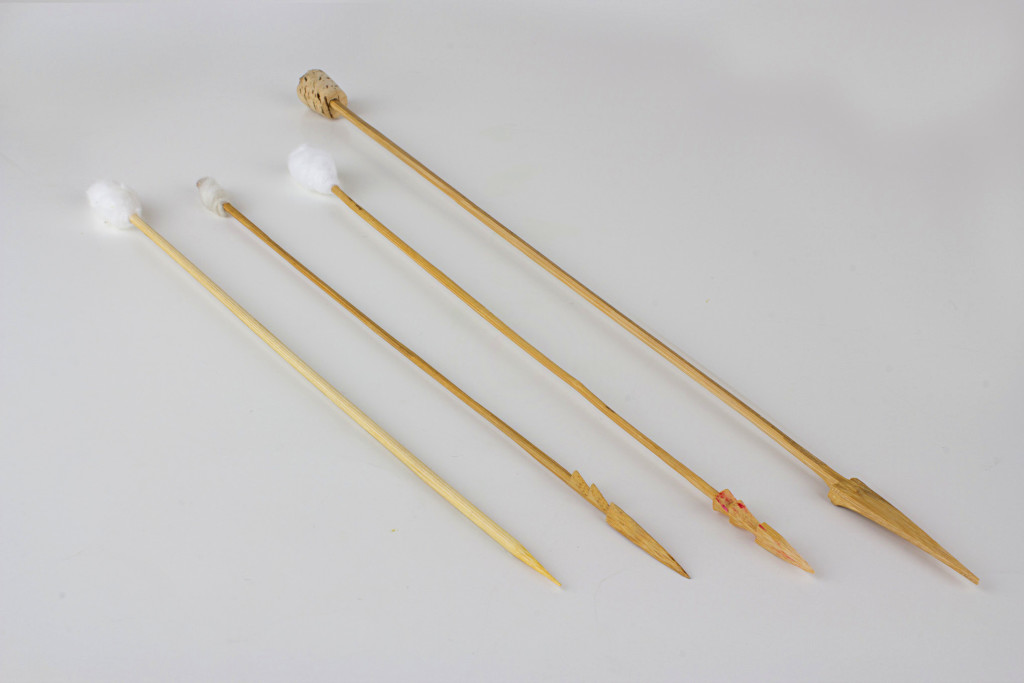
Native darts often had points carved into miniature broadheads to increase their effectiveness on game. Instead of...
Modern blowgun darts are more high-tech, using spring steel wire for the shaft and aerodynamic injection-molded plastic cones for the seal. Since the wire creates a very small wound channel, hunting darts sometimes also have plastic or steel broadheads to increase their lethality.
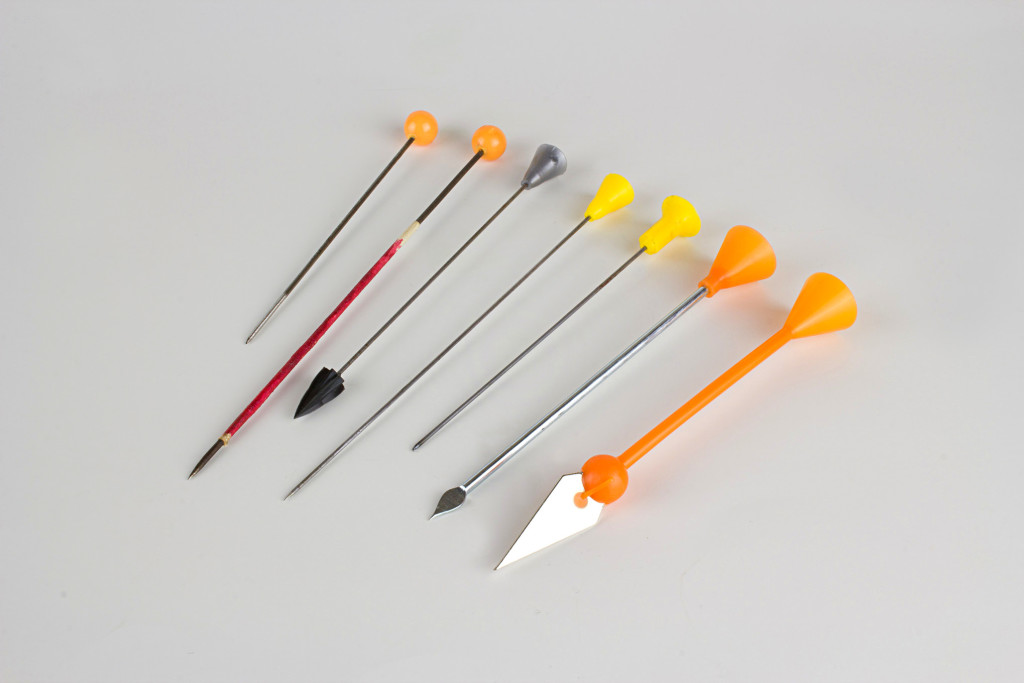
Modern blowgun darts have mild steel or spring steel shafts and molded plastic beads or cones to provide a seal in the...
In addition to darts, both primitive and modern blowguns can also shoot impact projectiles ranging from hardened clay pellets to blunt steel-tipped darts to paintballs.
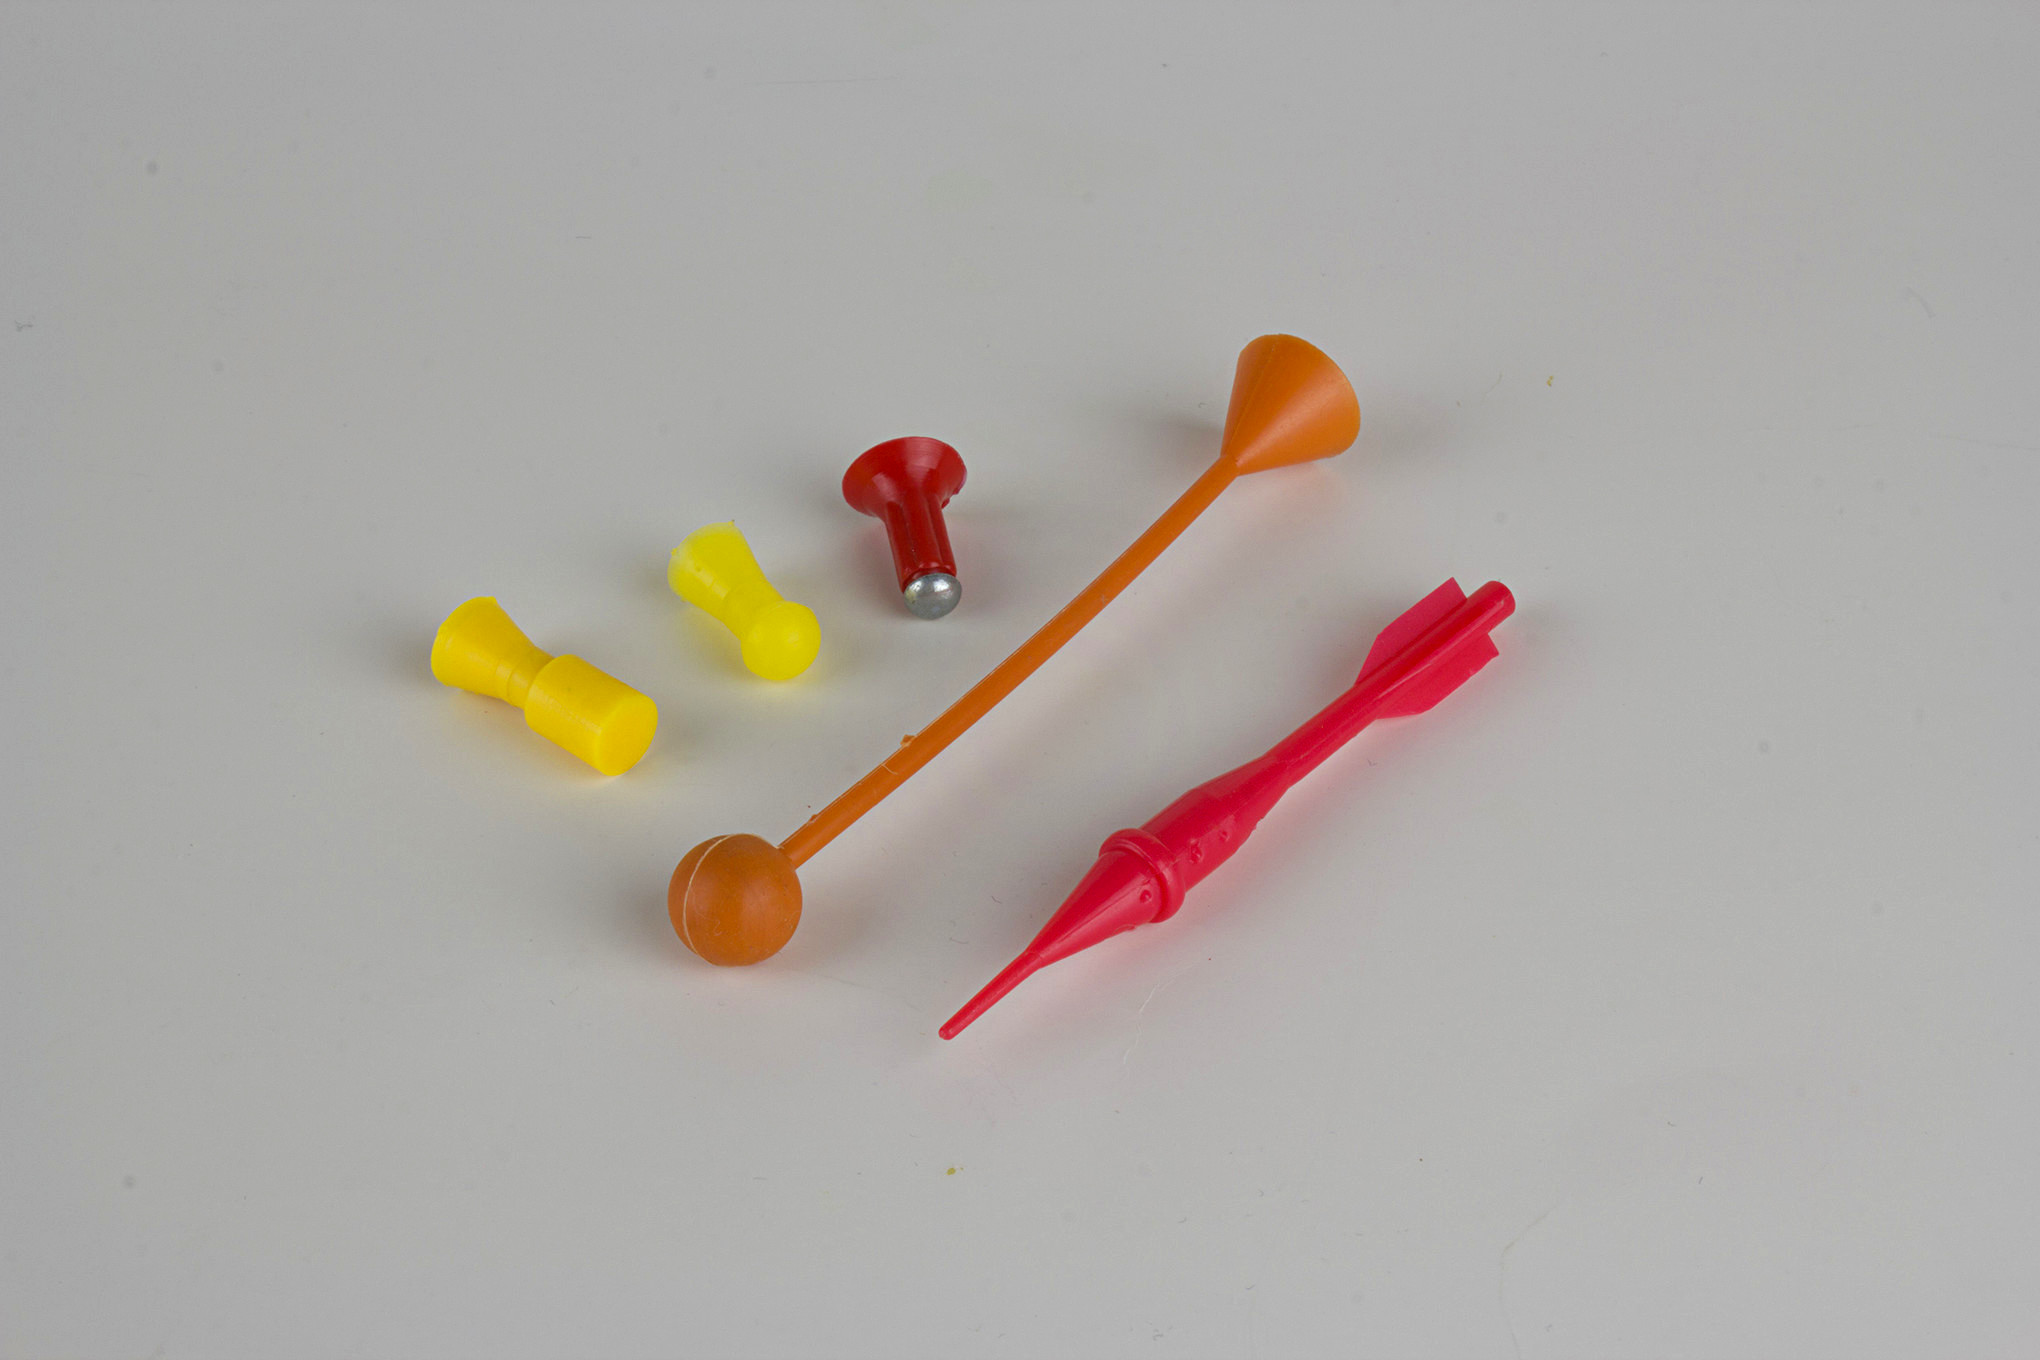
Factory-made blowgun projectiles also include impact or “stun” darts and even safety-tipped darts for use...
Performance Check
So what can a blowgun really do? Well, in terms of muzzle energy, they're not nearly as potent as more advanced weapons like firearms. The average .40-caliber blowgun dart weighs about 14 grains. Out of a 4-foot blowgun, that dart will achieve a muzzle velocity of about 155 fps, yielding a muzzle energy of about 0.76 ft-lb. Ballistically, that's nothing to brag about; however, it's still enough to bury the shaft of a sharp spring steel dart several inches deep into soft flesh.
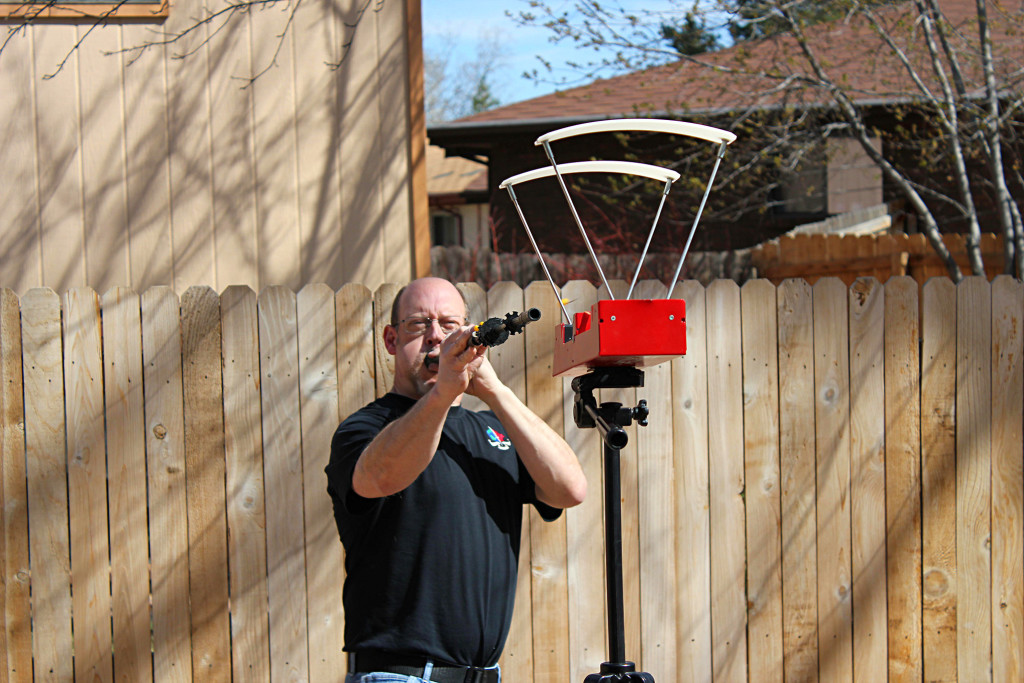
The author chronographing a .40-caliber blowgun. Note that the dart has just exited the muzzle. Blowguns can typically...
Larger calibers, like .625, usually use much heavier darts (about 44 grains), but produce about the same muzzle velocity. That translates to greater muzzle energy — about 2.33 ft-lb — but at the expense of a shorter effective range. In 40 years of making, shooting, and testing blowguns of all different sizes, I've found that bore diameters of .50 to .625 harness a shooter's breath best and are generally the most powerful. While they don't hold a candle to a firearm or even an airgun, a well-shot blowgun dart can easily penetrate 3?8-inch plywood — more than enough power to skewer a small animal.
The blowgun is deceptively powerful. Well-shot darts can penetrate 3?8-inch plywood and even a steel trashcan lid.
The maximum range of a typical 6-foot, .40-caliber blowgun is about 100 yards. Its maximum effective range, however, is substantially less. Most blowguns don't have sights and are aimed instinctively — like “gap” shooting with a bow. Their low velocities also mean rainbow-like trajectories, further limiting practical accuracy. Nevertheless, with a little practice, even novice shooters can consistently hit a grapefruit-sized target at up to 50 feet with enough energy to penetrate deeply.
What Good Is It?
Besides being tons of fun to shoot, blowguns offer a number of advantages to survivalists, including:
- They're inexpensive.
- They're virtually silent.
- Both ‘guns and ammo can be stored indefinitely.
- Ammo can be reused many times.
- They can be shot safely and inconspicuously in areas where ‘guns can't.
- They shoot a wide range of projectiles.
What does all that mean? Well, if society crumbles and a gang of looters is approaching your house, spitting darts at them shouldn't be your first choice. However, if the system is down, it's been a month since your garbage has been picked up, and you're worried about the newly arrived vermin frolicking in your trashcans, the blowgun is the perfect tool.
Similarly, a blowgun would allow you to hunt any meal-worthy critters that wander into range without endangering neighbors, revealing your activity, or burning firearm ammo that might be better reserved for more serious needs.

While working in Vietnam and Laos in the early 1990s, the author included a .40-caliber takedown blowgun in his kit to...
In the late 1980s and early '90s, I worked for U.S. government agencies investigating the fates of American POW/MIAs from the Vietnam War. I regularly worked in remote areas of Vietnam and Laos and in refugee camps throughout Southeast Asia — places that had two things in common: They didn't permit firearms, and they were heavily populated by rats. After a few unpleasant rodent run-ins, I was determined to fight back and started packing a .40-caliber takedown blowgun in my kit. Unlike a firearm or even an airgun, it didn't look like a weapon (especially disassembled) and was innocuous enough to fly under my hosts' radar.
At first, I used the standard 3- to 4-inch spring steel darts that came with the ‘gun. Although I had no problem hitting the rats and burying the darts completely into their nasty little bodies, the result was a population of very pissed off rodent versions of Pinhead from Hellraiser. To fix the problem, I crafted more potent darts with thicker, longer spring steel shafts and paper cone stoppers. If possible, I tried to shoot the rats as they scurried along the baseboard.
The longer, heavier darts would go right through the rat and have enough power to stick into the wall, pinning it in place for an easy second shot or a quick smack with a hammer. Even if it wasn't stuck to the wall as a rat kebob, it was a lot harder for the critter to run into holes, crevices, and all the other places wounded rats go to die — again providing the opportunity for follow-up shots if necessary.
DIY
Because blowguns and the projectiles they shoot are so simple, they make outstanding expedient weapons and are great DIY projects for preppers. For the ‘gun itself, all you need is a length of straight, rigid tubing 4- to 6-feet long with a smooth interior and a suitable bore diameter. Aluminum tubing, plastic, PVC, and copper plumbing pipe, and even electrical conduit all work well, as long as you deburr or chamfer both ends of the tube so your darts will fly true. A simple mouthpiece can be crafted from the neck of a 2-liter soda bottle and a few wraps of duct tape, but rubber crutch tips and pill bottles also work great.
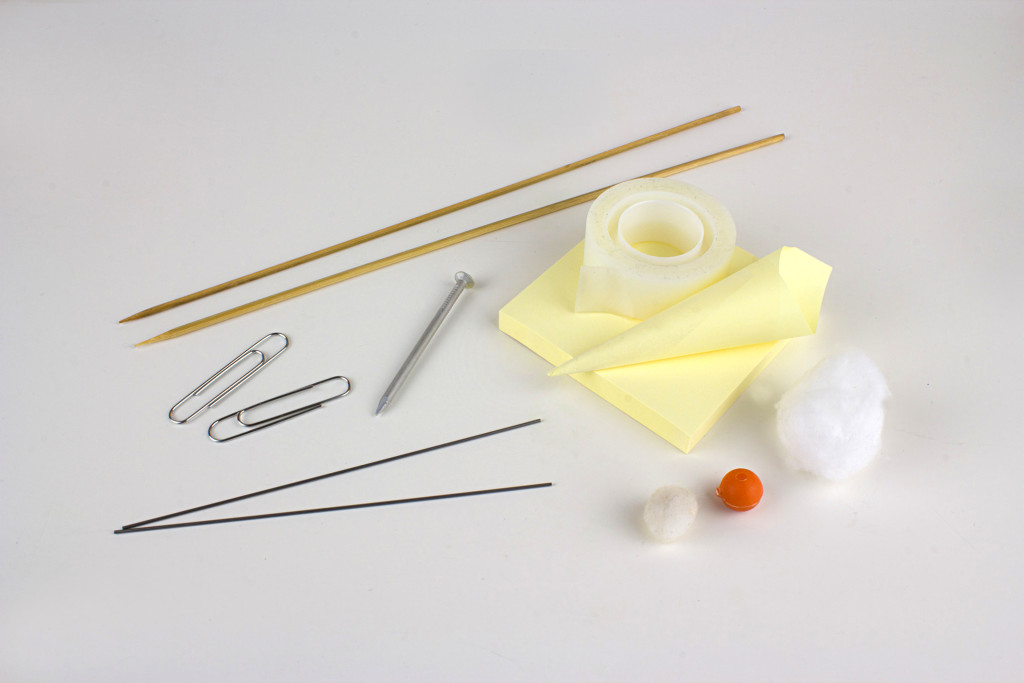
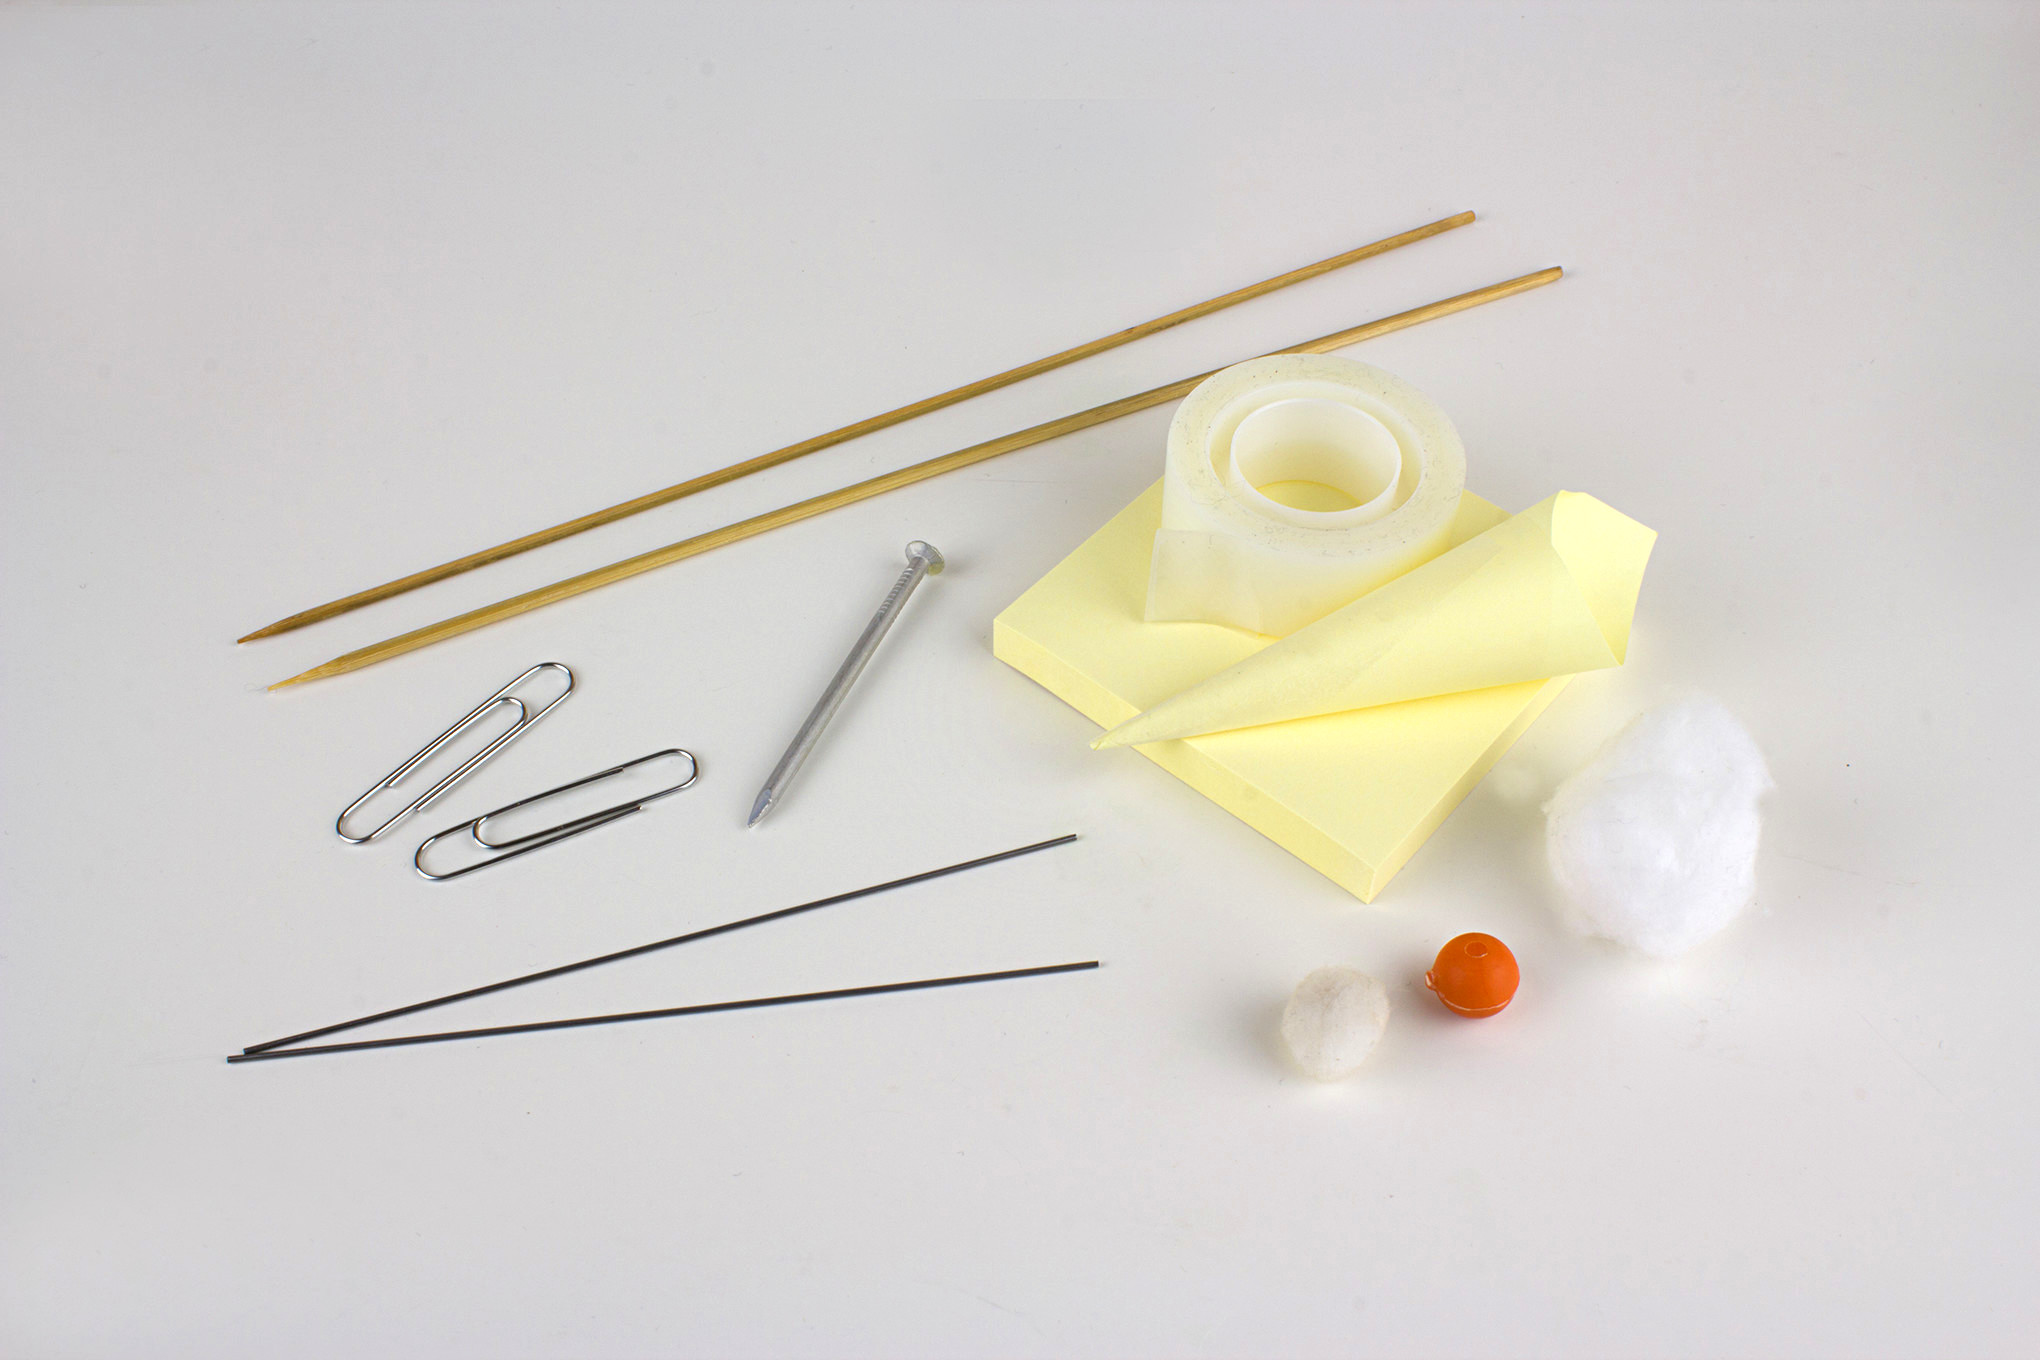
Improvised dart shafts can be crafted from music wire, bicycle spokes, nails, bamboo BBQ skewers, and even paper clips....
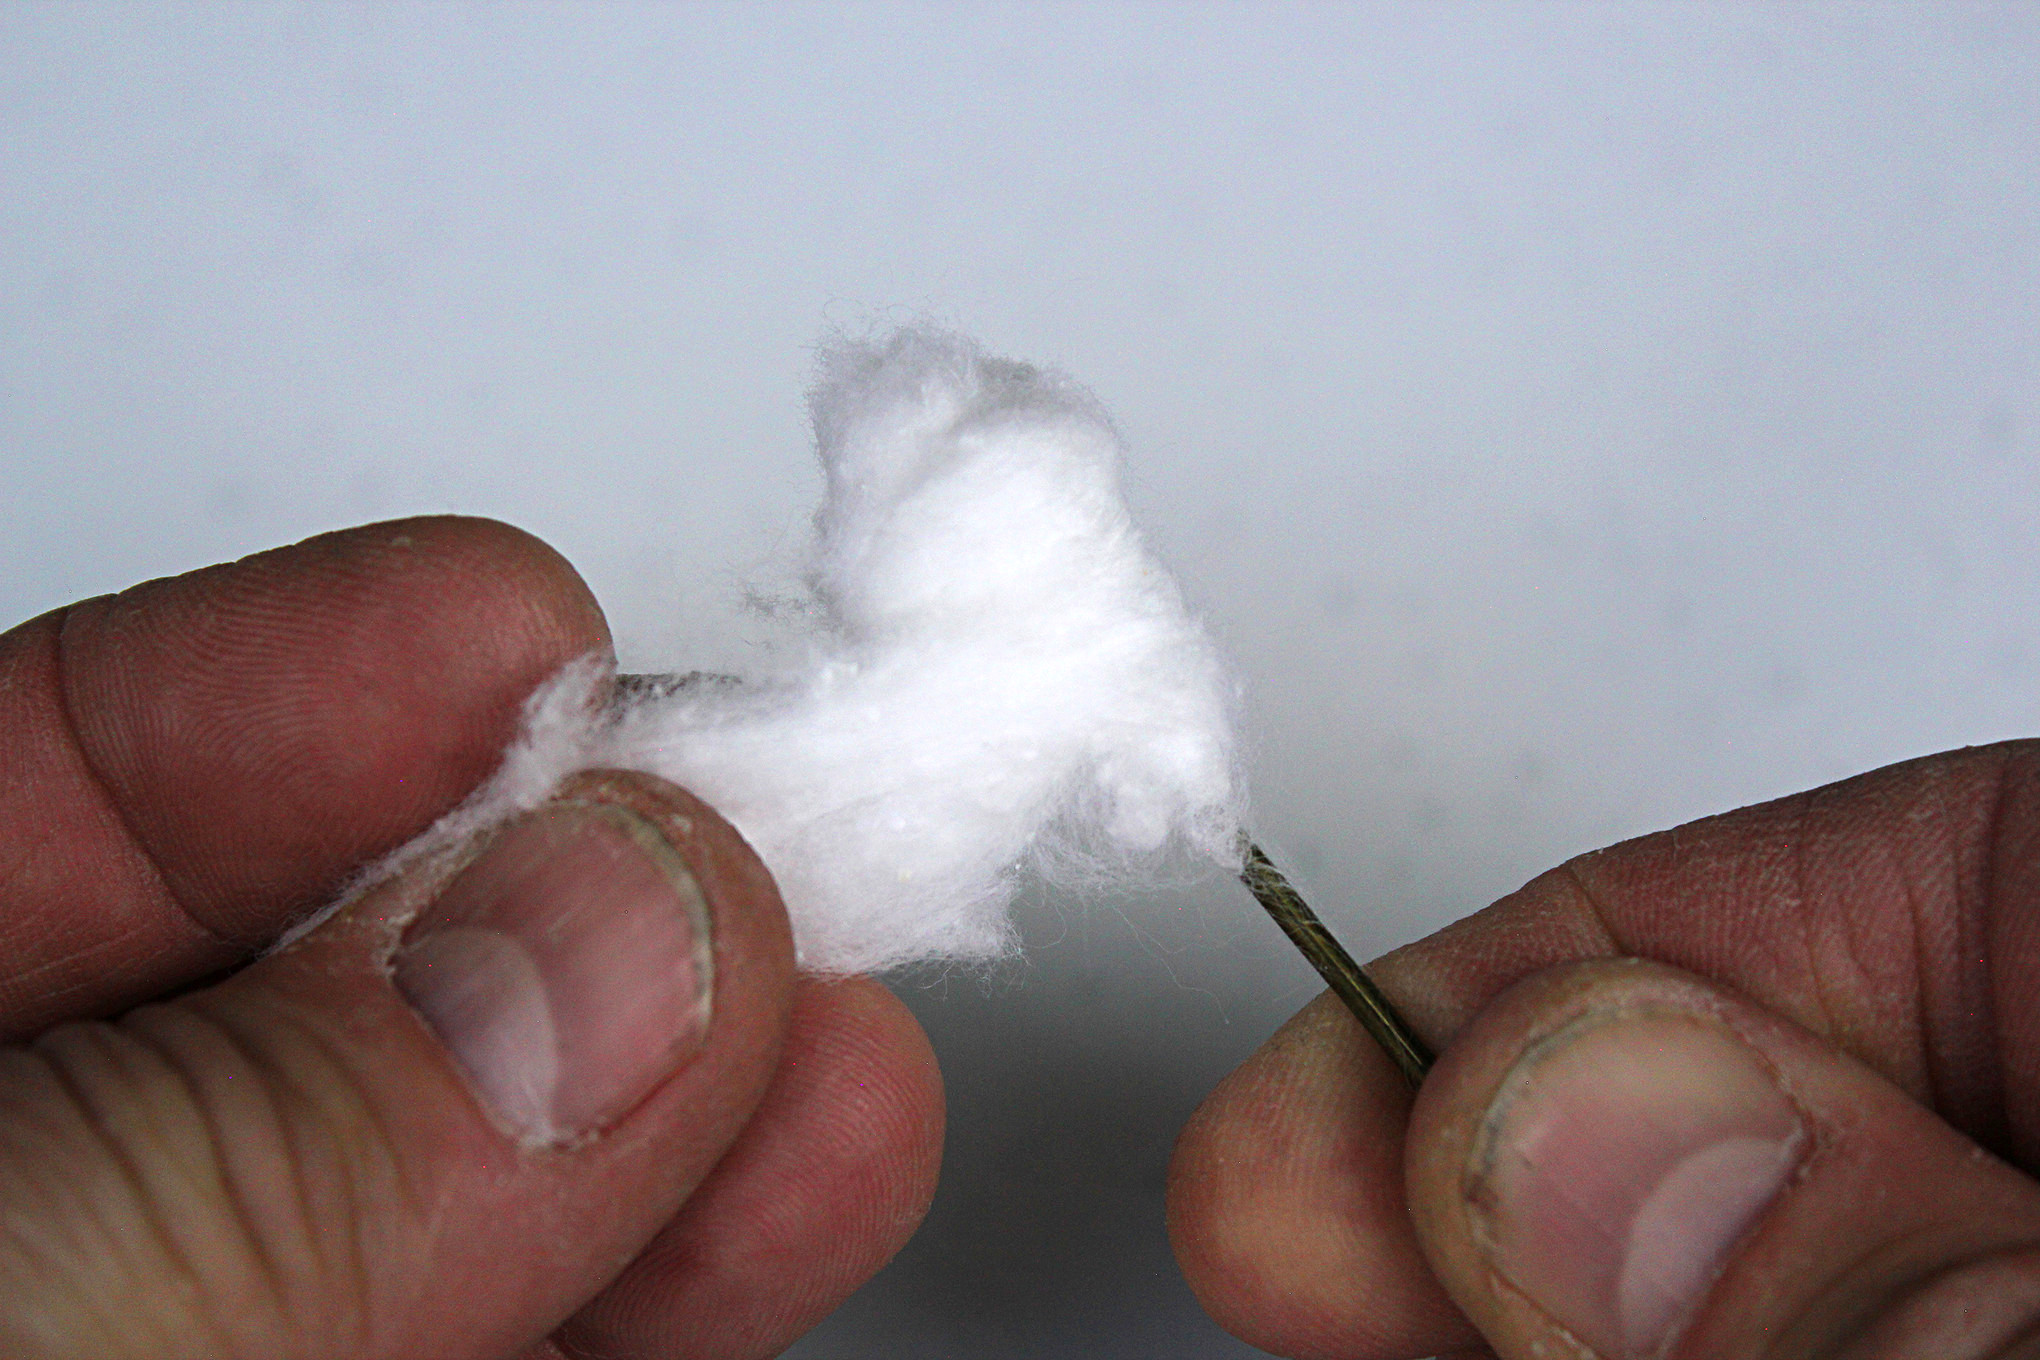
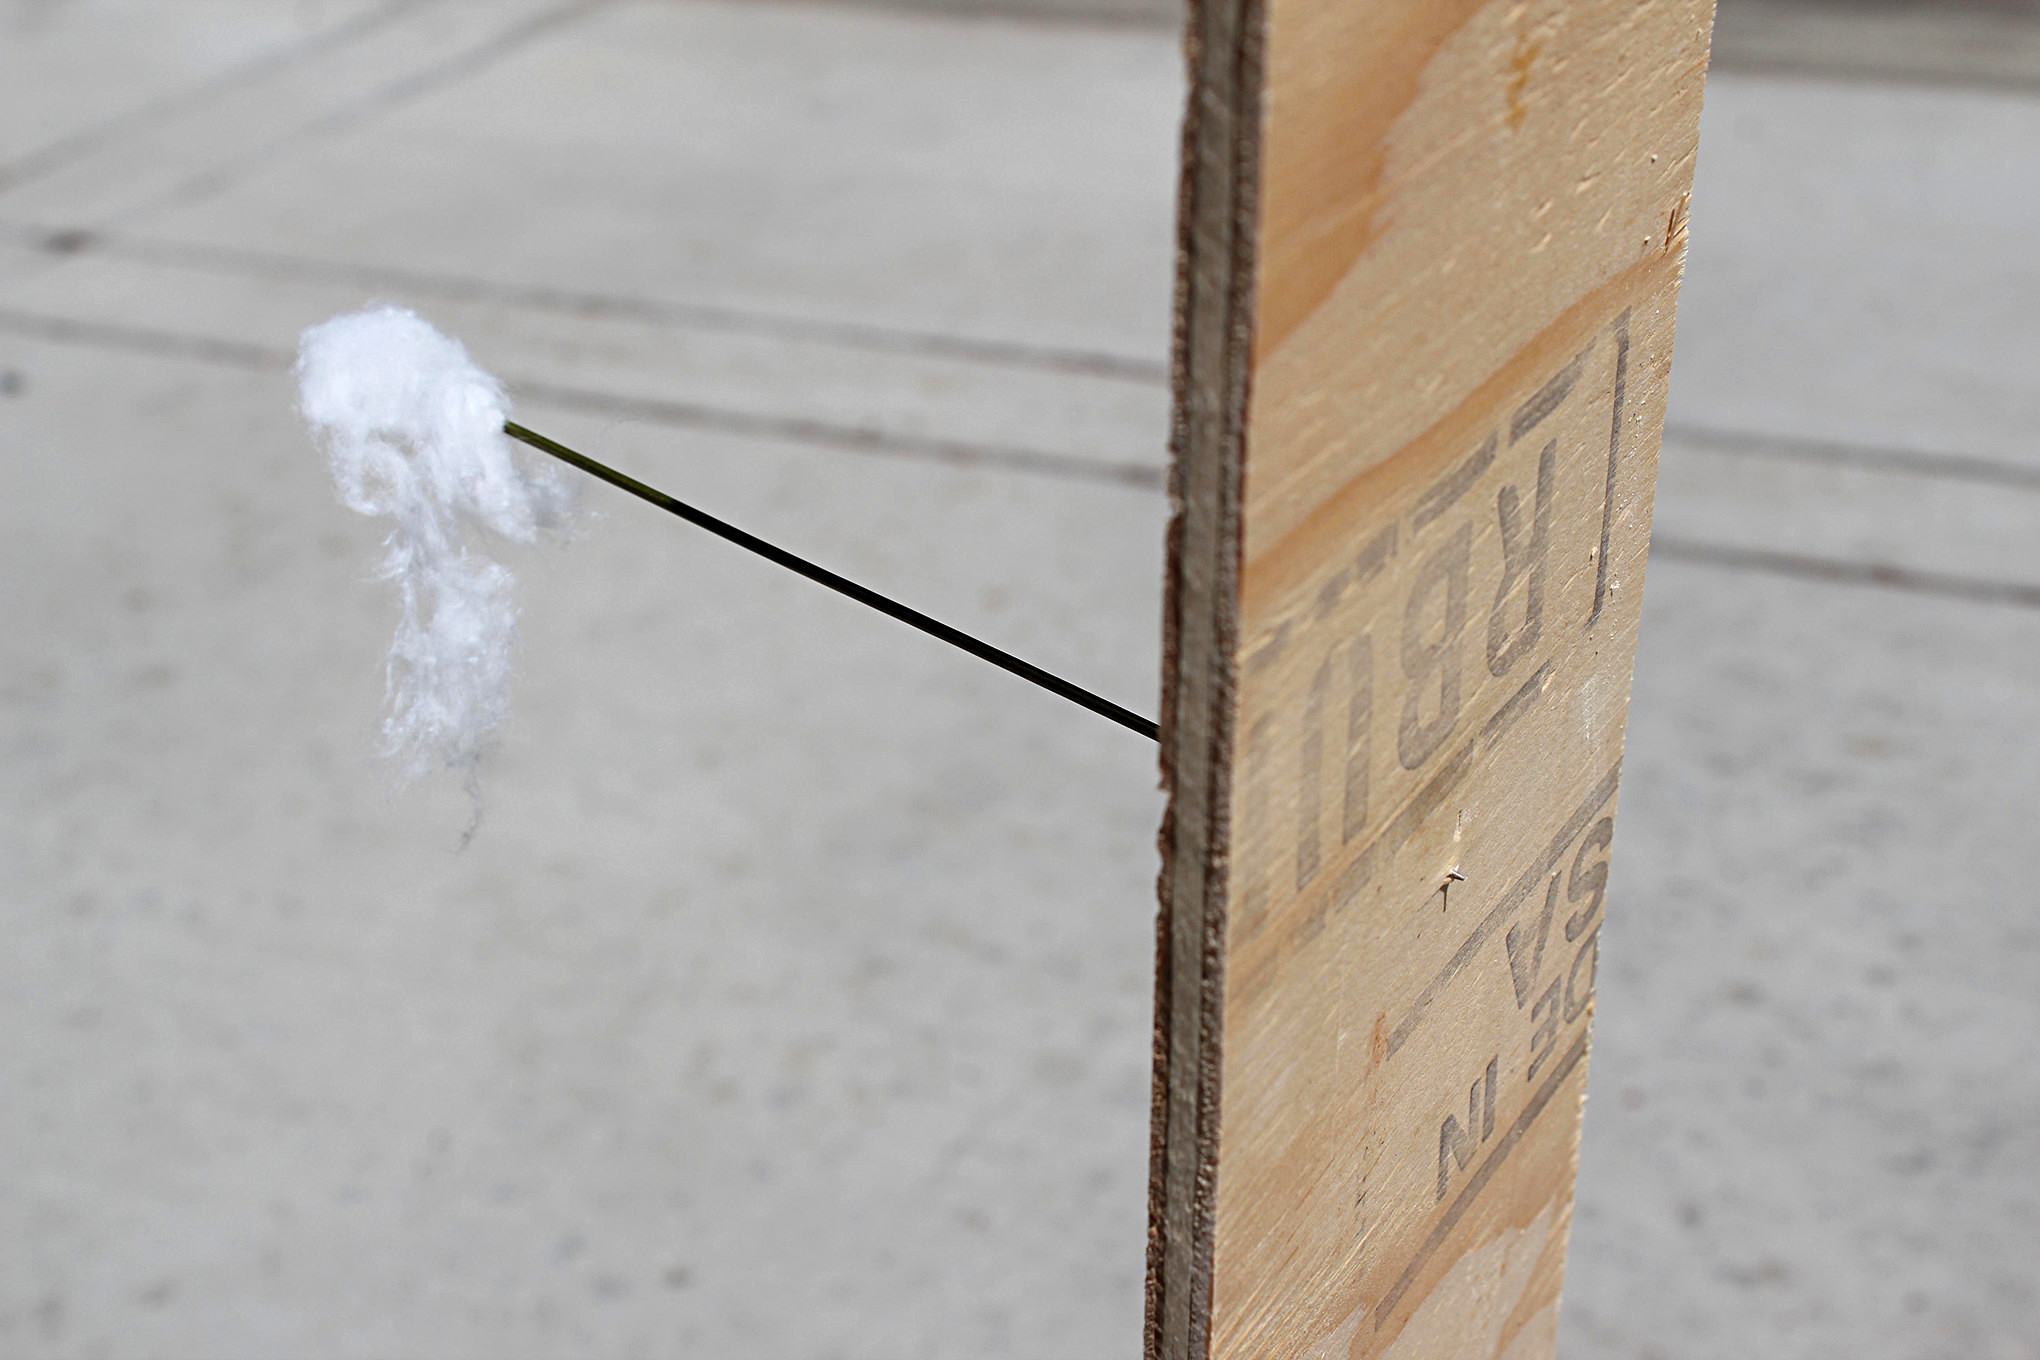
Darts are also quick and easy to make. For the shaft material you can use bamboo BBQ skewers, bicycle spokes, nails, wire clothes hangers, straightened paperclips, and of course spring steel wire from the hobby shop. The easiest way to make an air seal is to notch the rear end of the dart or coat it with a drop of Super Glue and then wind a cotton ball around it. Pull the cotton ball apart a bit and spin the dart in your fingers so the cotton wraps around the shaft. Keep going until you achieve the appropriate diameter for a good air seal in your ‘gun's bore.
Cotton ball seals are great because they act almost like the fletching of an arrow to help stabilize darts in flight, though they don't hold up well to multiple shots and must be replaced. If you prefer darts that can be reused more readily, air seals can also be made from rolled paper cones (secured with Scotch tape), plastic beads, corks, golf tees, or anything else that fits your bore snugly and isn't too heavy. When crafting your darts, it helps a lot to cut a short section of your barrel tubing as a size gauge. If they're too big, it's much easier to push a stuck dart out of a 2-inch tube than a 6-foot one.
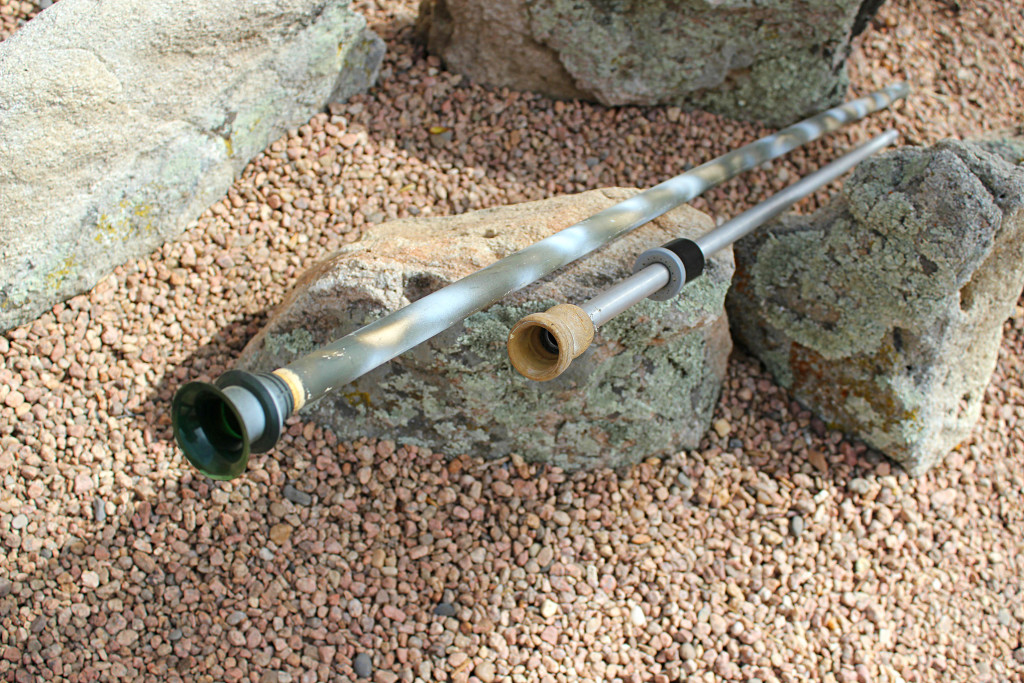
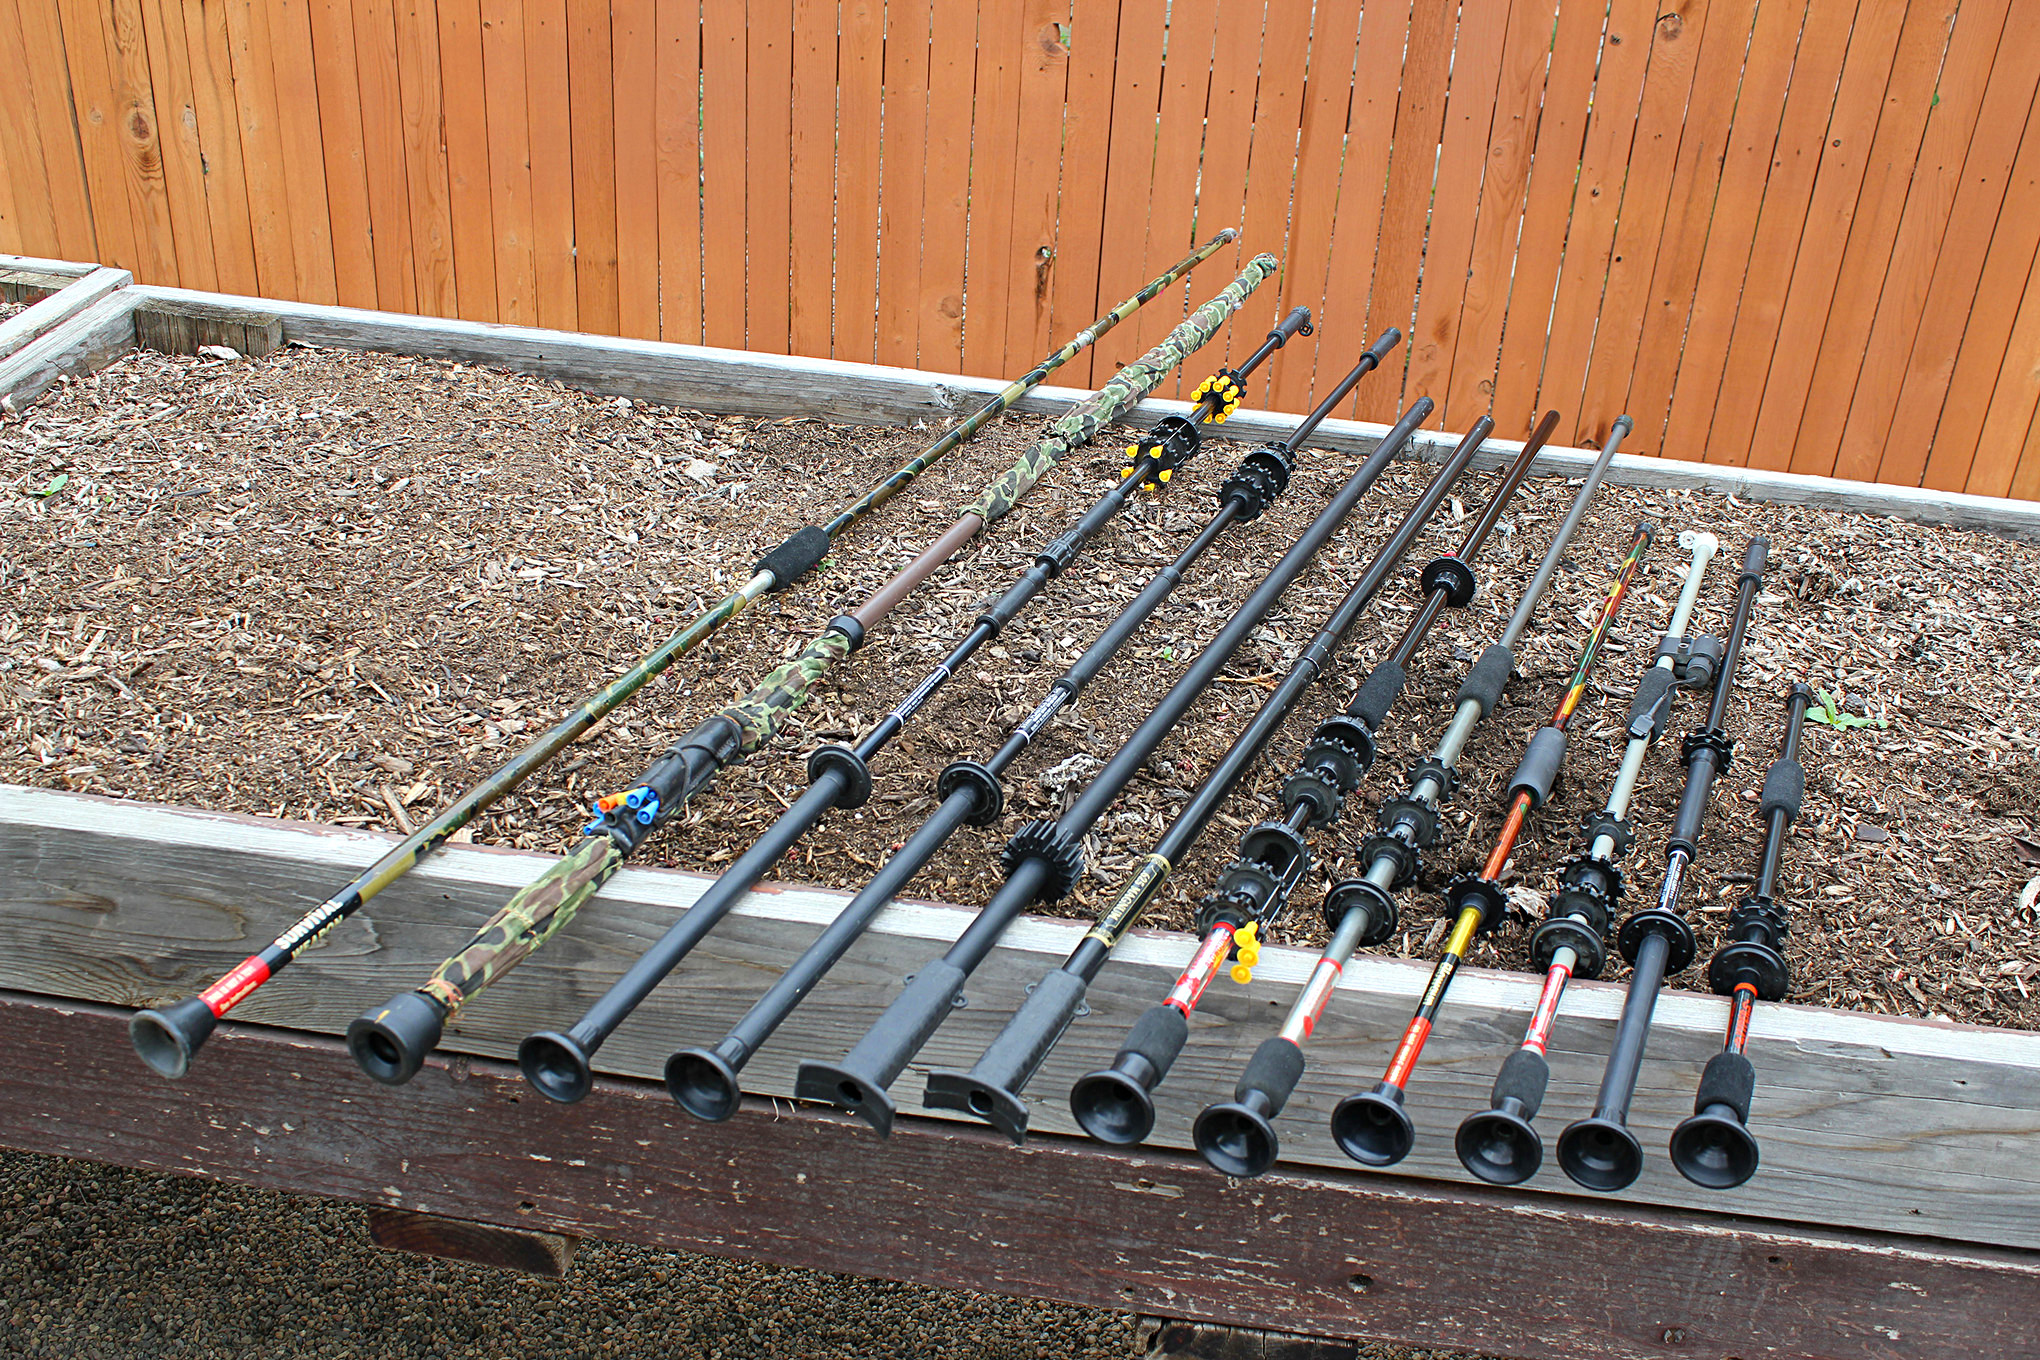
Because of their simplicity, blowguns are very easy to make from readily available materials, as these DIY ‘guns...
If you're not the DIY type, the internet is full of sources for commercial blowguns, dart kits, impact projectiles, ‘gun-mounted quivers, and lots of other stuff. Some overachieving types have even developed magazine-fed and revolver-style multi-shot attachments as well as laser sights to pimp your blowgun. Give a man a rope and he wants to be a cowboy ….
Blowgun Technique
Before shooting your blowgun, first find an appropriate target. Steel-shafted darts easily penetrate deep enough into wood to require pliers to pull them out, so opt for a thick piece of foam or layered, corrugated cardboard instead. You want enough density to stop the dart without shearing off its head, while allowing the shaft to be easily removed. Place your target in a safe, controlled area away from people, pets, and anything else that you really wouldn't want to skewer with a fast-moving, sharp piece of steel.
Hold your blowgun with one hand near the mouthpiece and the other supporting the body of the ‘gun. I prefer to put my dominant hand in front with my index finger extended along the barrel to help point the ‘gun naturally.
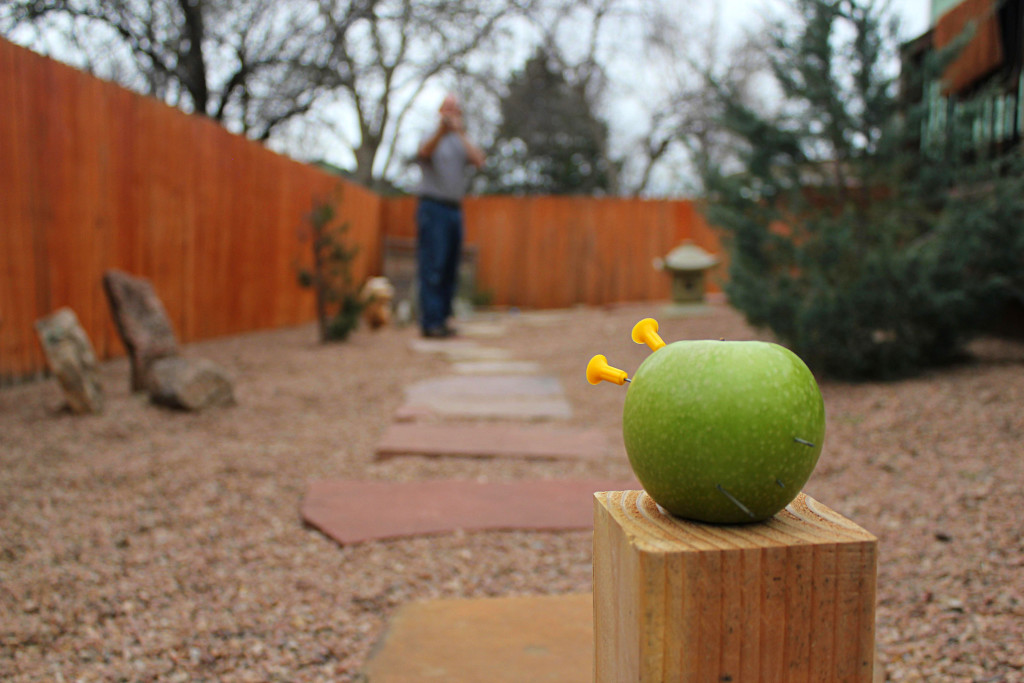
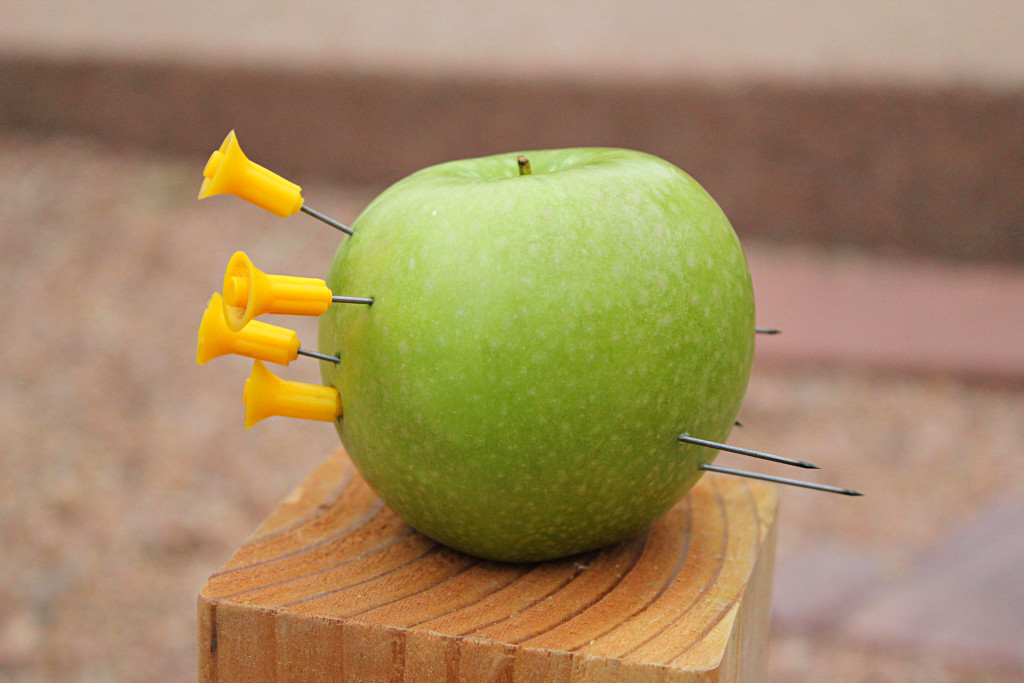
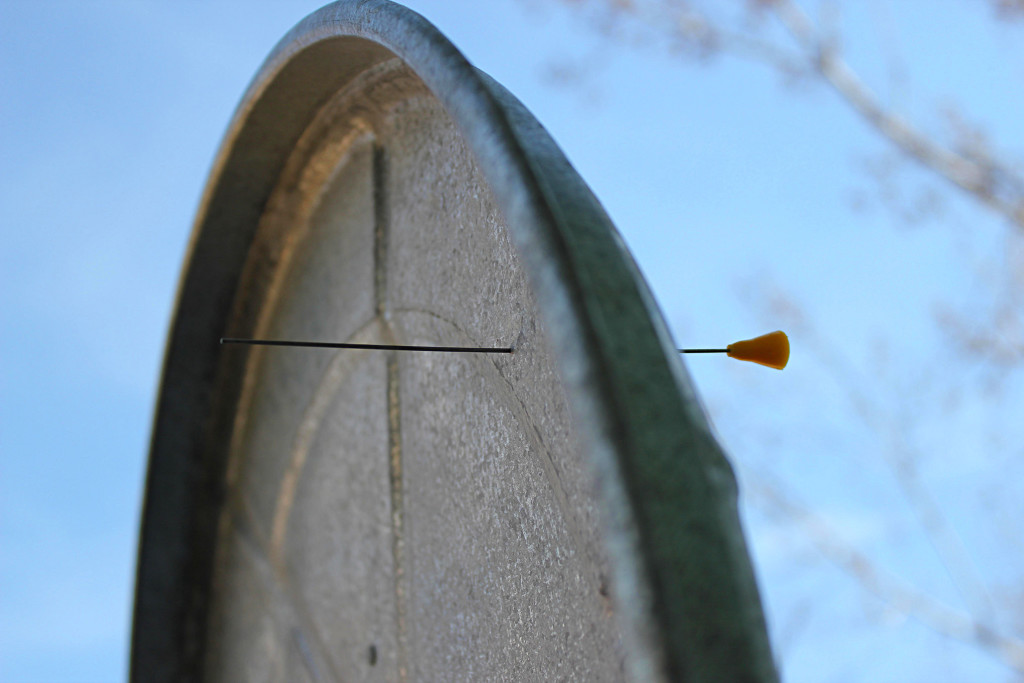
Although it doesn't have sights, the blowgun can be amazingly accurate. Here the author easily puts a cluster of...
Load the dart into the breech end and, with your mouth well away from the mouthpiece, take a deep breath. Press the mouthpiece tightly to your lips, aim the ‘gun at the target, and blow explosively into the ‘gun. Don't use a steady stream of breath; contract your diaphragm hard and try to replicate the explosion of gunpowder with your lungs. As you get more comfortable with the process, focus on making the power of your breath consistent so you can achieve consistent velocity and flight of your darts.
Next, mark a specific aiming point on the target and orient the muzzle of the ‘gun so it appears to point right at it. Because your line of sight is above the ‘gun, you'll naturally point high, compensating for the dart's drop. Shoot a few more darts to achieve a consistent group, and then adjust your point of aim to move your group to the desired point of impact. Then, do the same thing at different ranges until you can quickly judge distance to the target and adjust your aim appropriately.
Because they're virtually silent and low powered, blowguns can also be used to hunt meals of opportunity in...
If you plan to hunt or control pests with your blowgun, practice shooting 3D targets like fruit, vegetables, and stuffed animals you bought your ex-girlfriend. Try it from various angles and distances. Unlike flat targets, they'll give you a better idea of the path of your dart's wound channel through the “animal's” vitals. Make sure you back your targets with a suitable backstop, as missed shots can fly a long way and trying to find lost darts in your lawn can be a painful process.
Blowguns are not the mysterious assassin's weapons you've seen in bad ninja movies, nor are they just oversized spitball launchers. Cheap, silent, versatile, easy to make, and easy to use, they offer convenient, controllable close-range killing power that can be very useful in many survival contexts.
Told you you'd want one ….
The 90-Second Blowgun DIY
How easy is it to make a functional blowgun and dart? You don't need to be MacGyver to do it. After 40 years of rolling my own blowguns, I've come up with a dead simple DIY method that anyone can do at almost no cost. How simple? How about 90 seconds from parts and tools to the first shot?

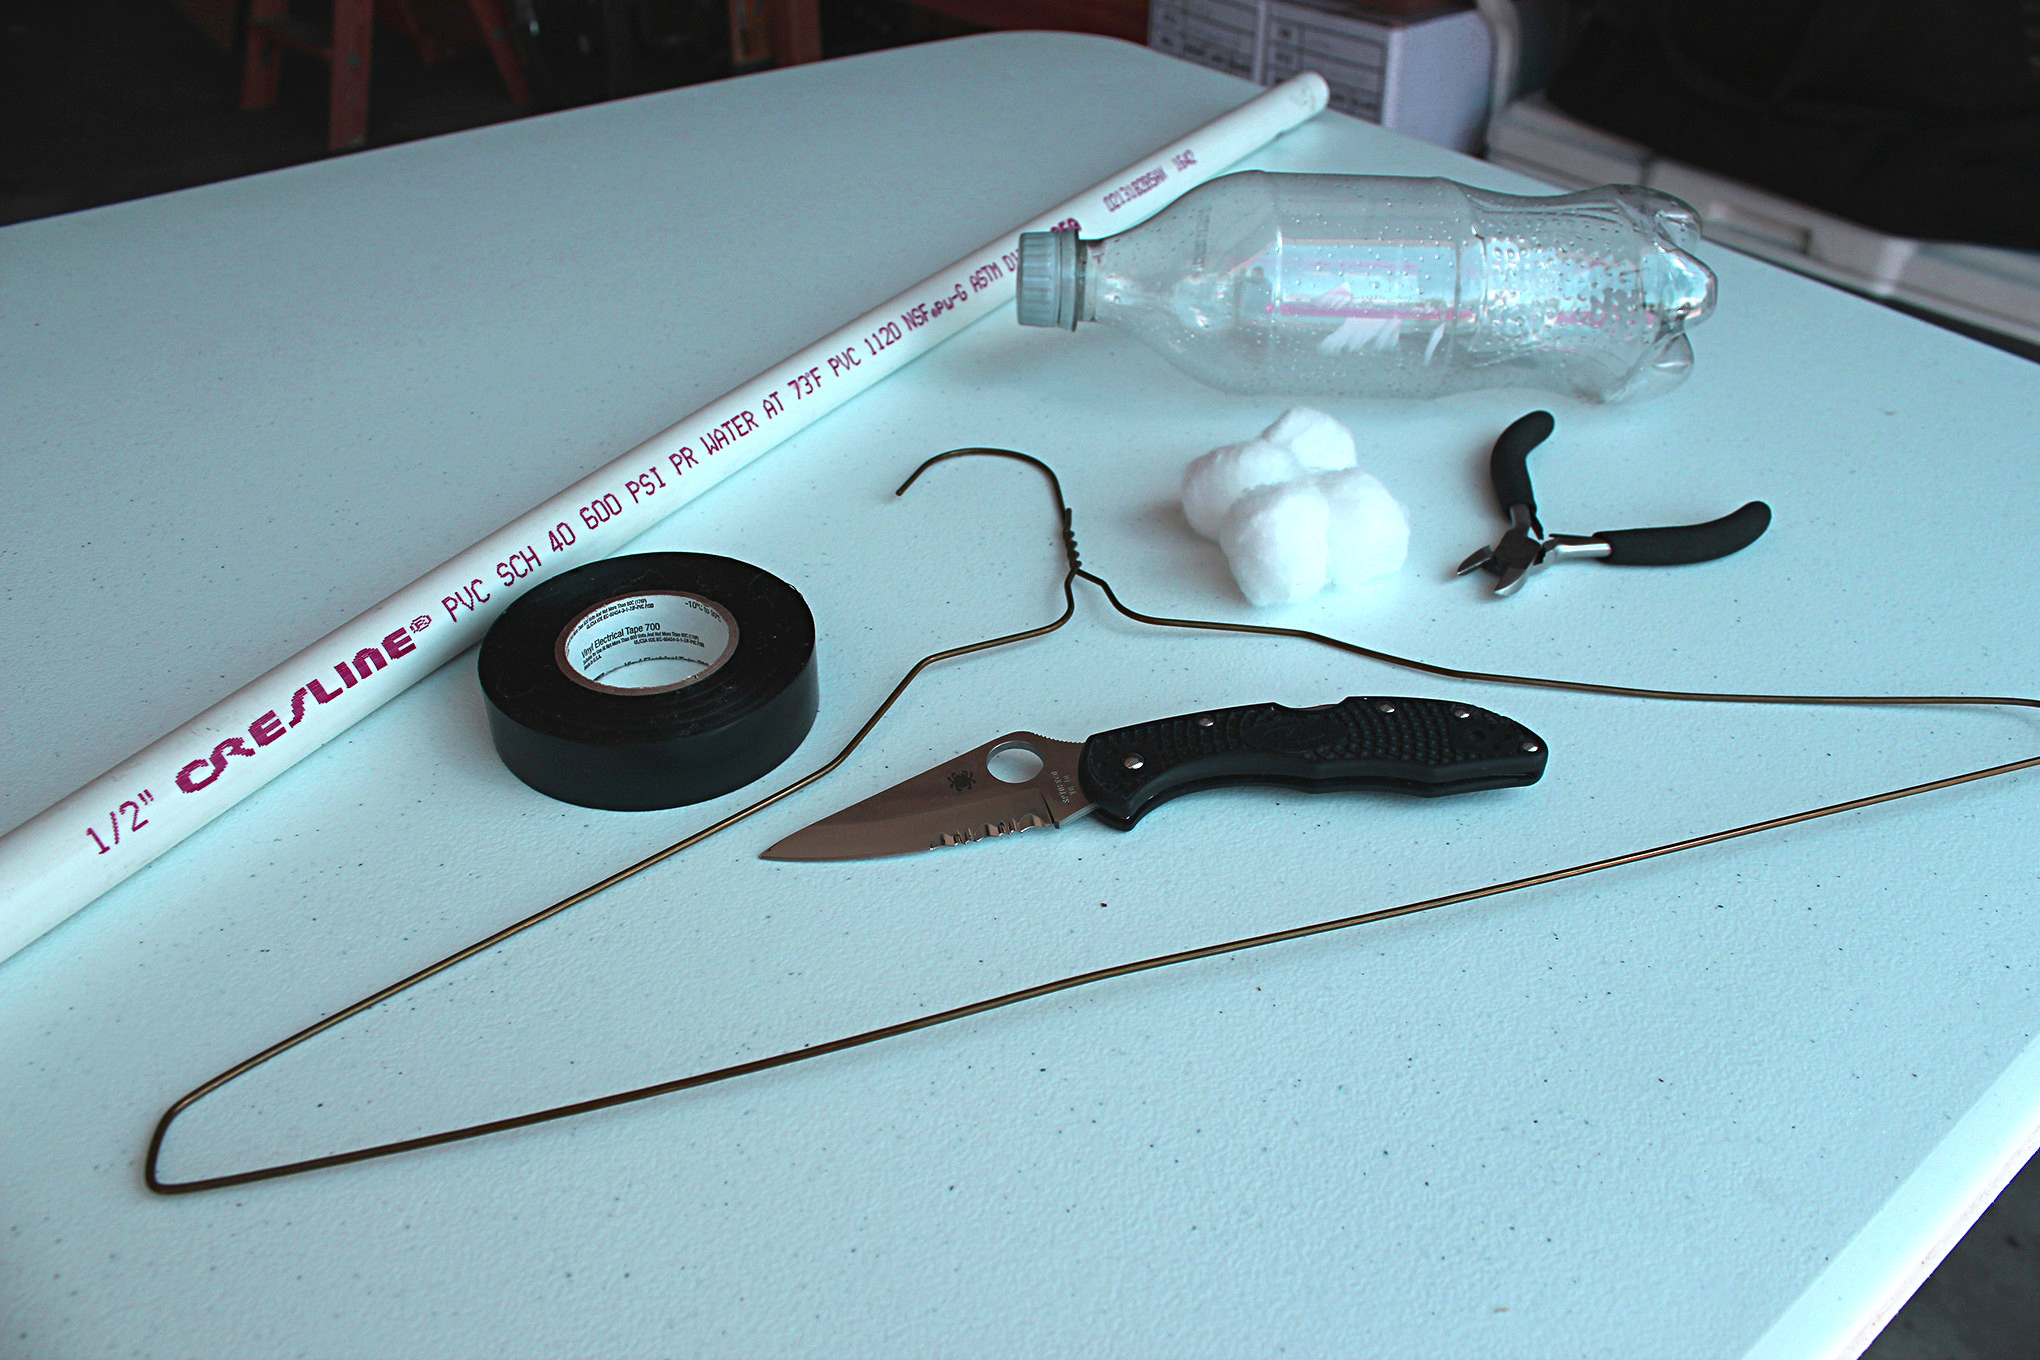
1. Here's what you'll need:
- A 5-foot length of 1/2-inch Schedule 40 PVC tubing
- An empty soda bottle
- Electrical tape or duct tape
- A wire coat hanger
- Cotton balls
- Wire cutters
- A knife and/or scissors

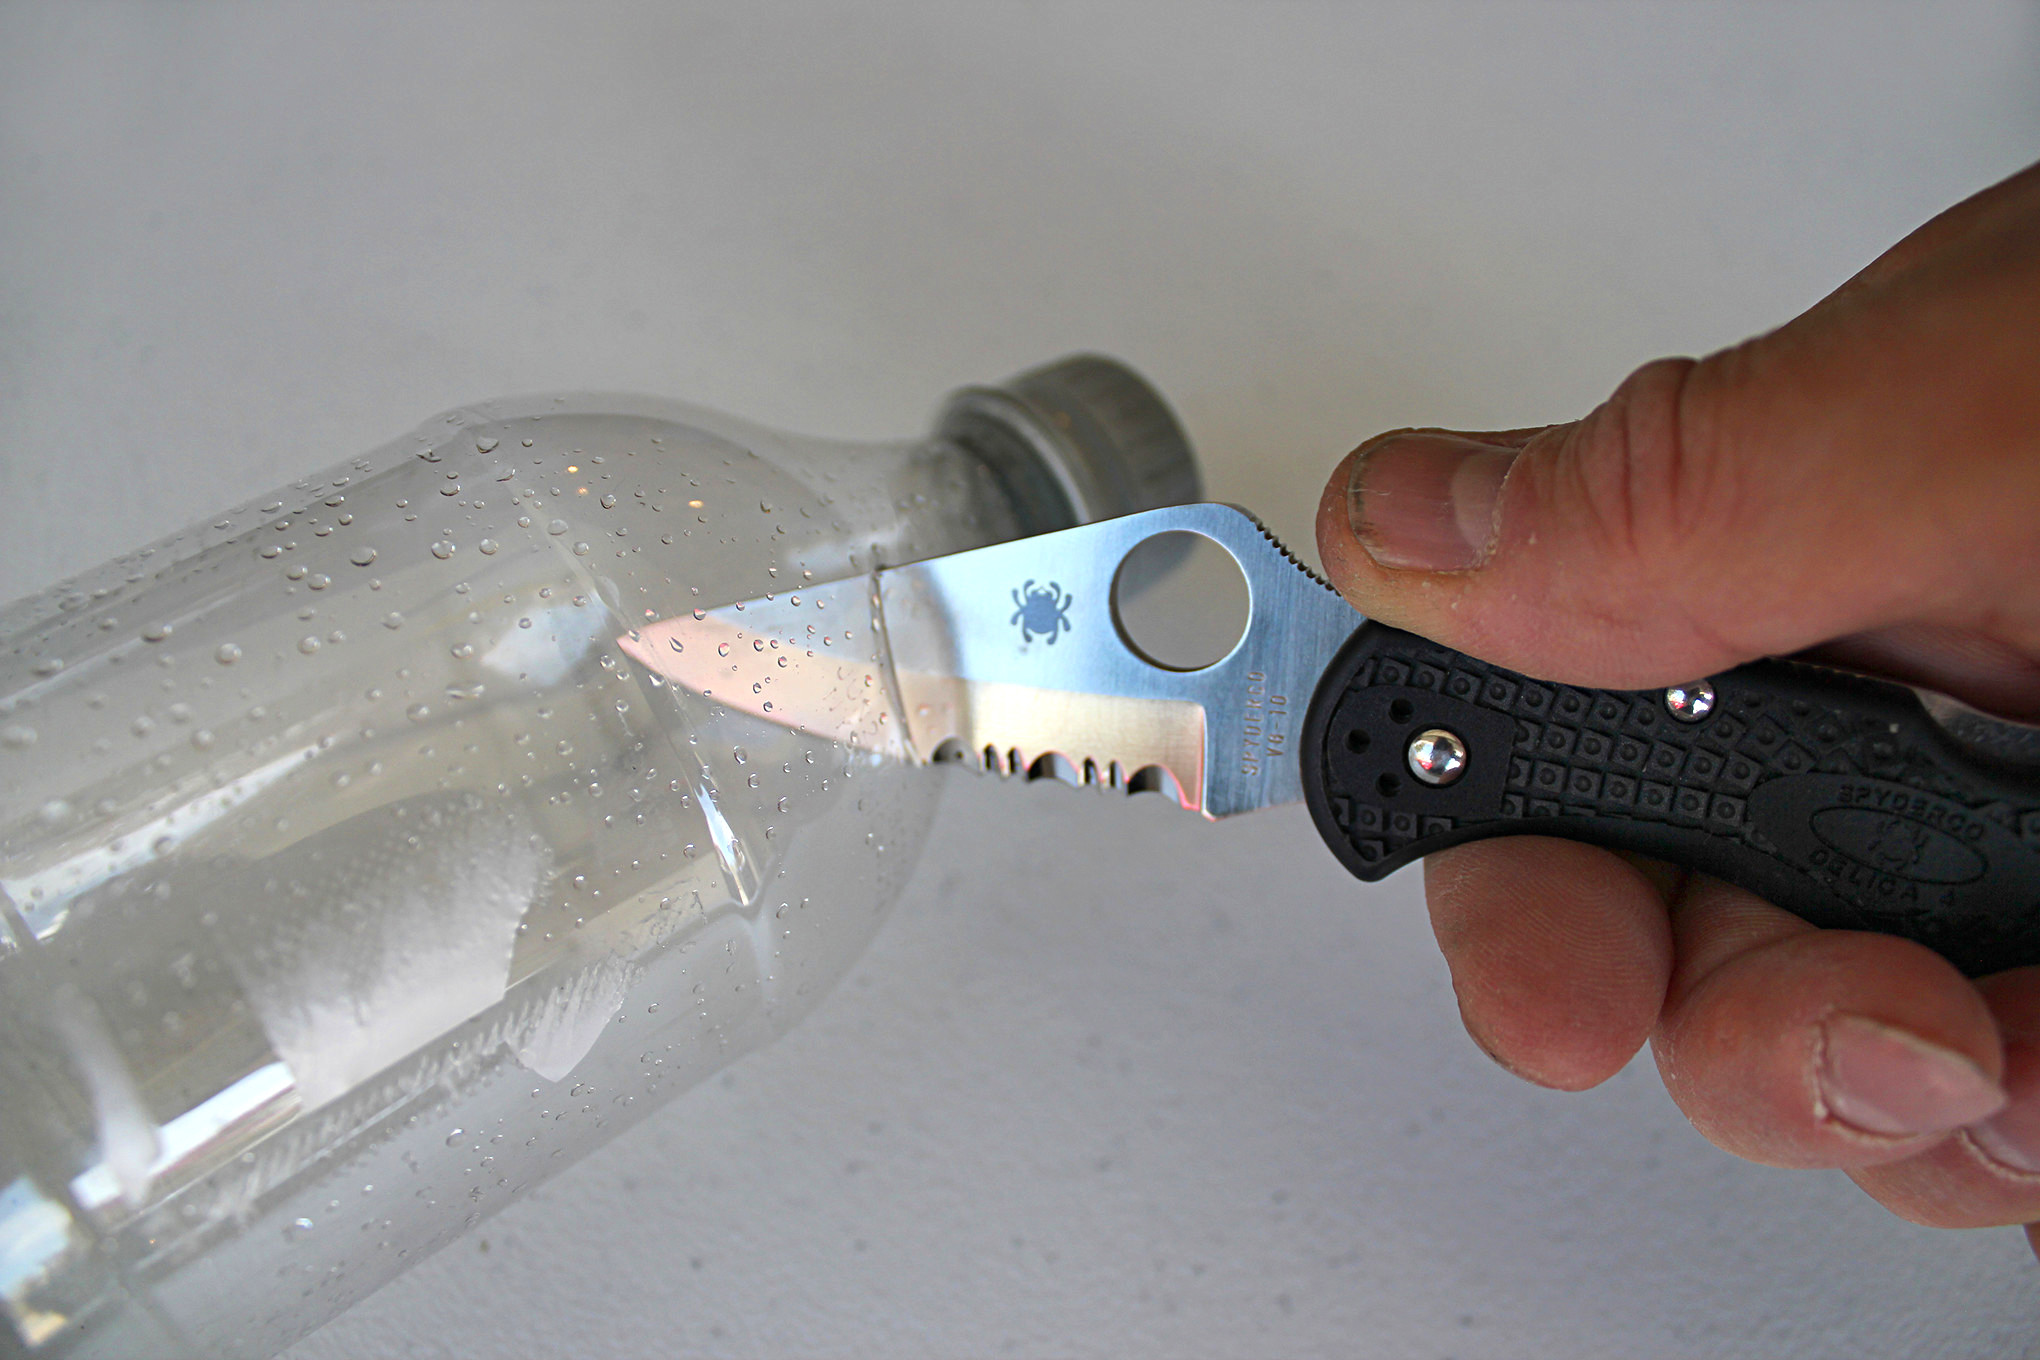
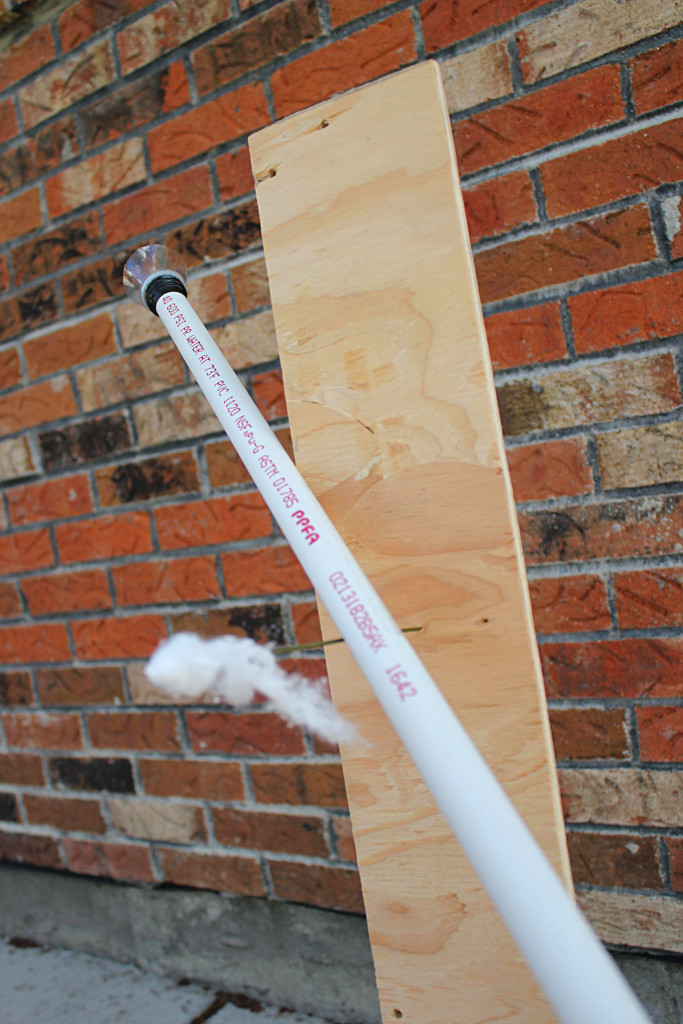
2. First, use the knife to cut the neck off the soda bottle and trim it so there are no sharp edges. You want the last couple of inches for your mouthpiece.
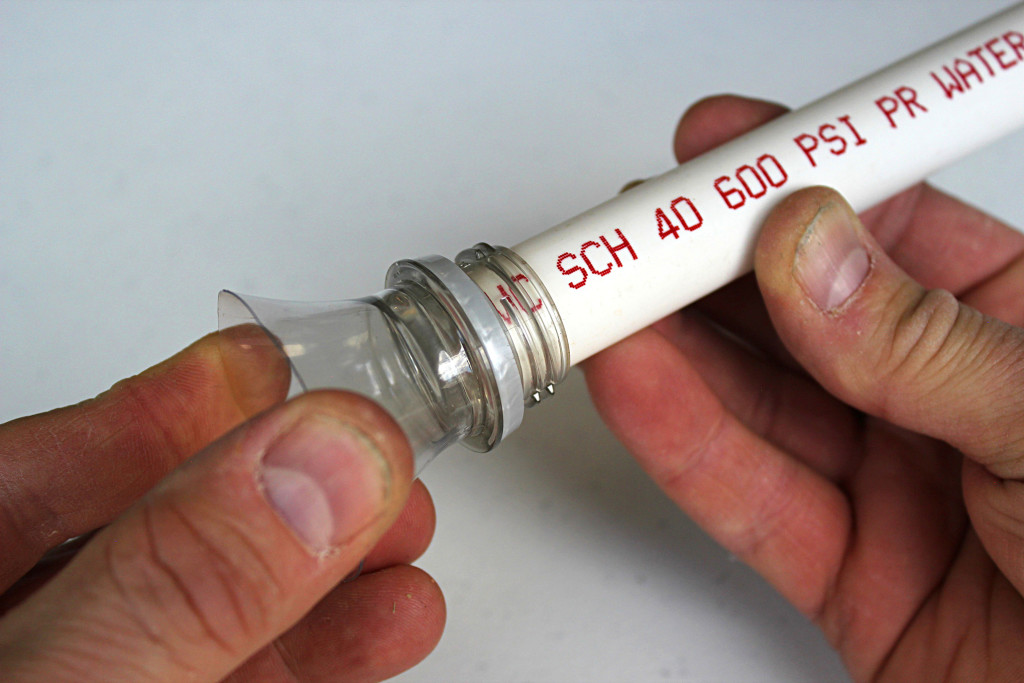
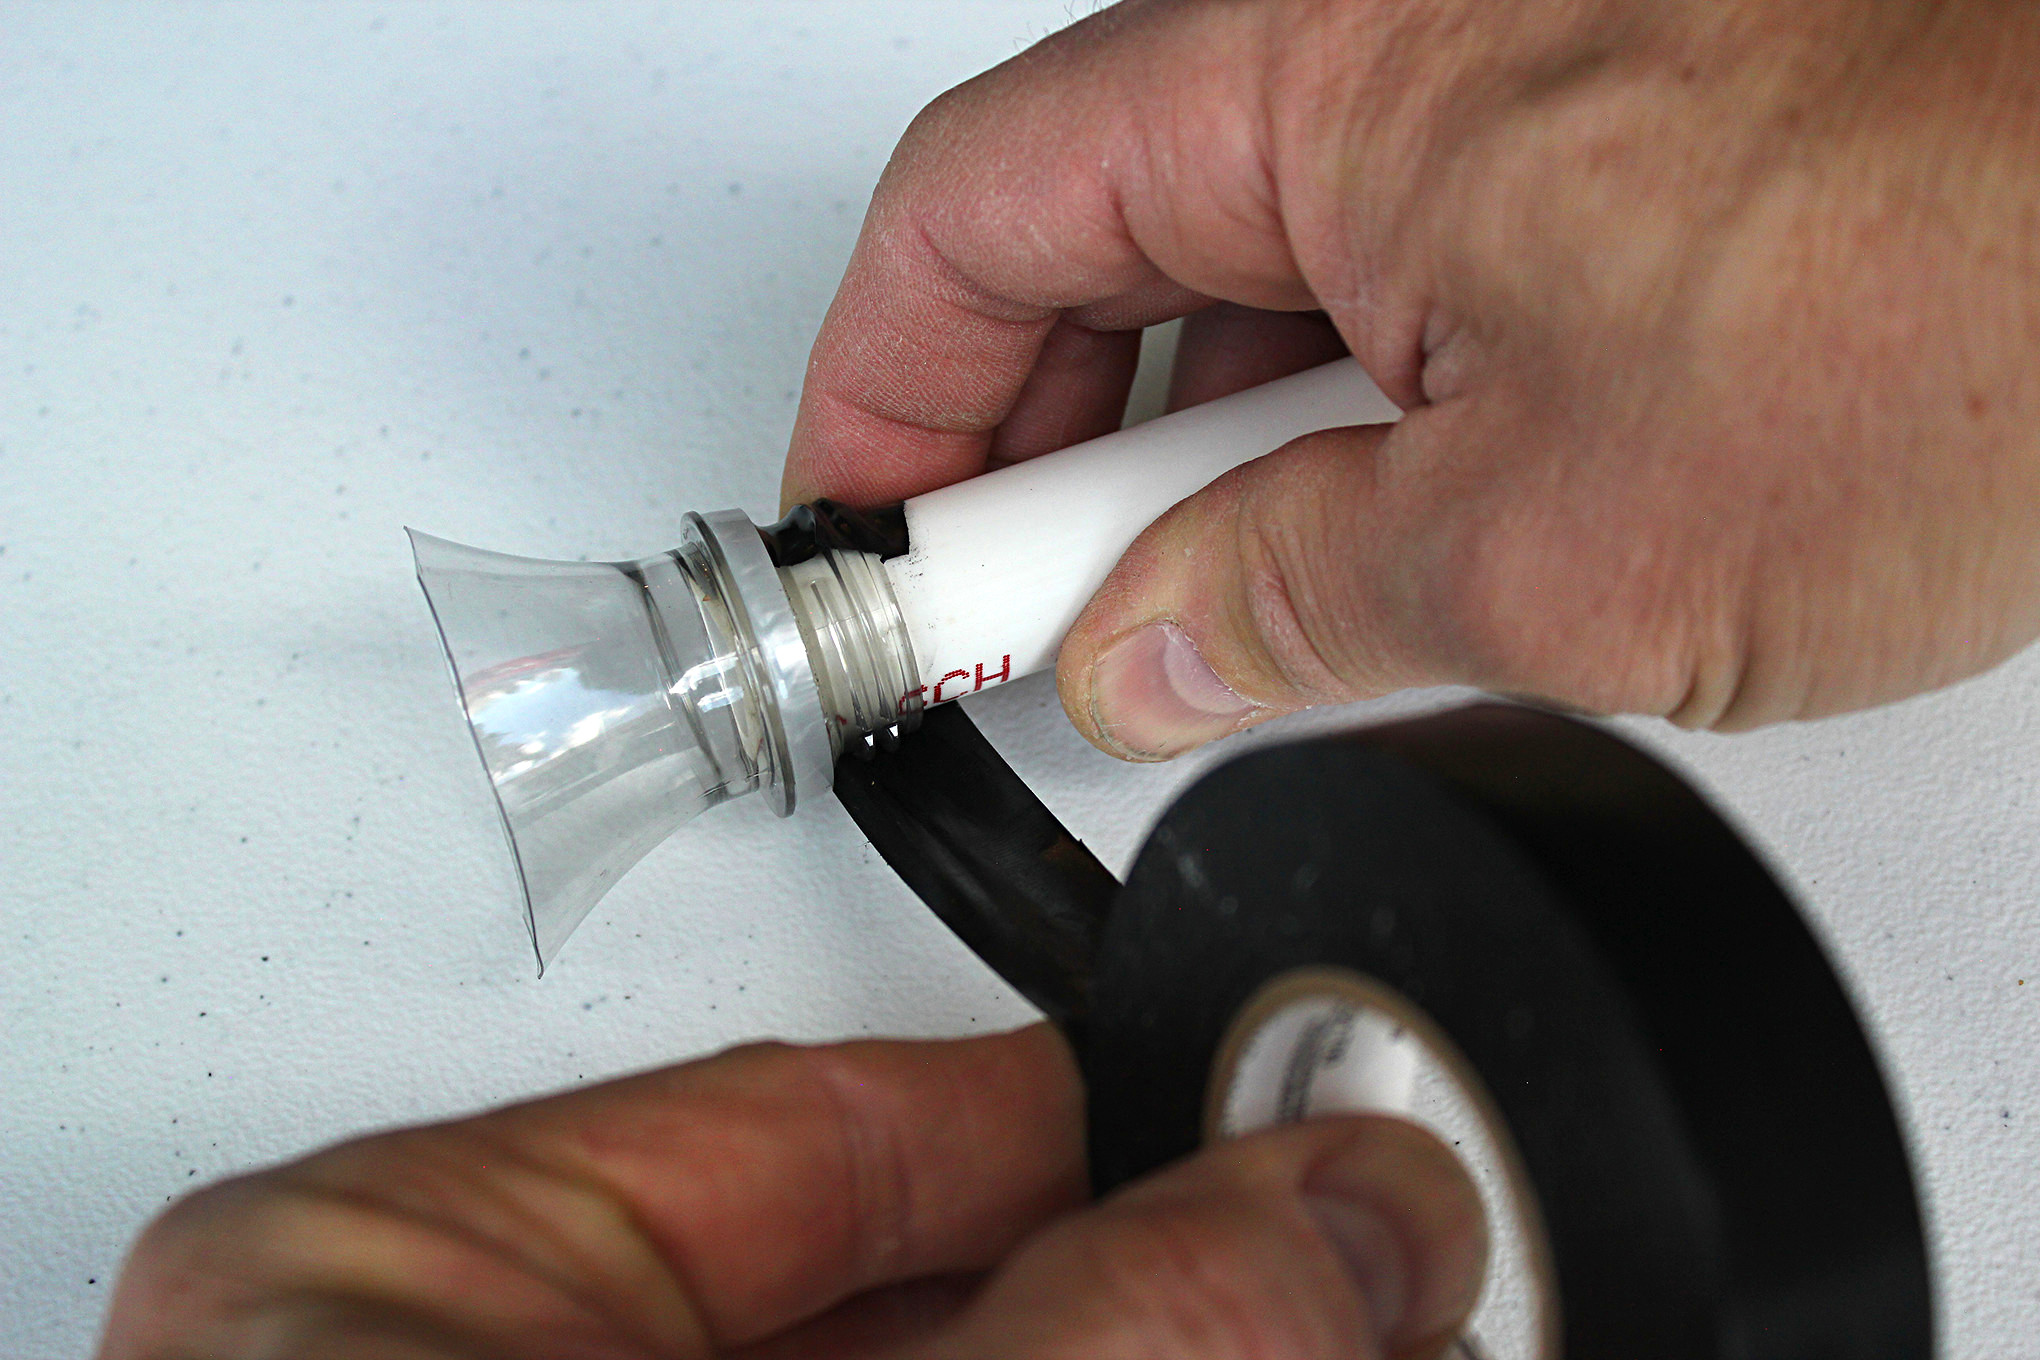
3. Slip the mouthpiece over one end of the barrel tube.

4. It's inside diameter is slightly larger than the outside diameter of the tube (0.84-inch), so add a few wraps of tape to hold it in place and ensure a good air seal. Your blowgun is finished.
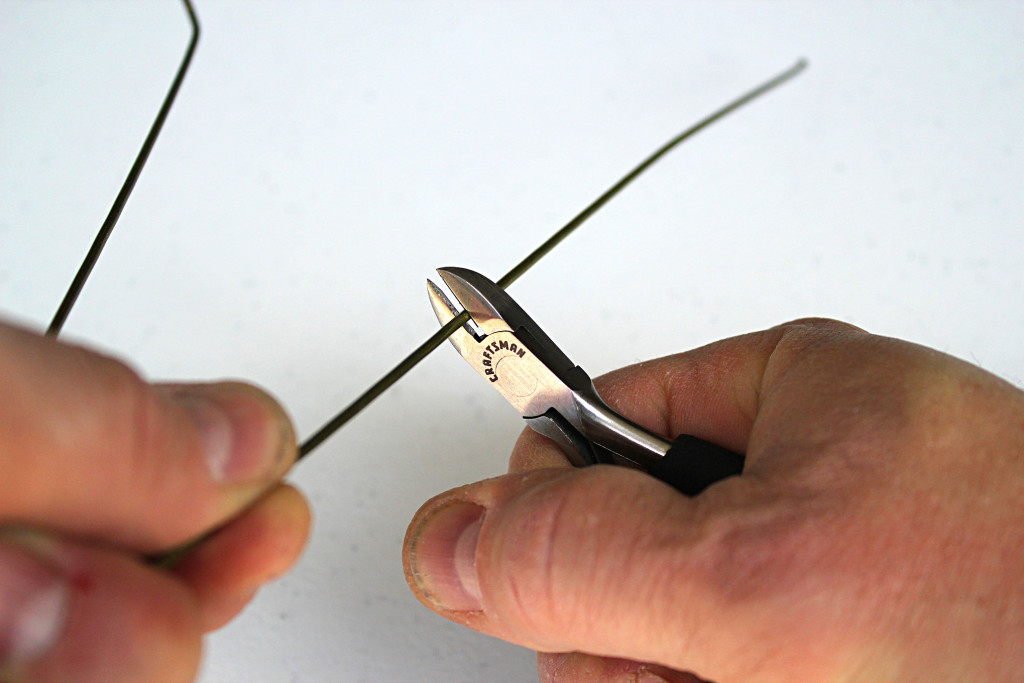
5. To make a dart, cut a section of wire from the coat hanger about 8 inches long. Then use the wire cutters to make a few notches in one end of the wire.

6. Holding the wire in one hand and a cotton ball in the other, spin the wire between your fingers and allow the notches to snag the cotton. Keep spinning and allow the cotton ball to unravel as it winds around the wire. Keep going until it looks like a big Q-Tip and keep shaping it with your fingers until it fits into the bore of your ‘gun well enough to create a good air seal.
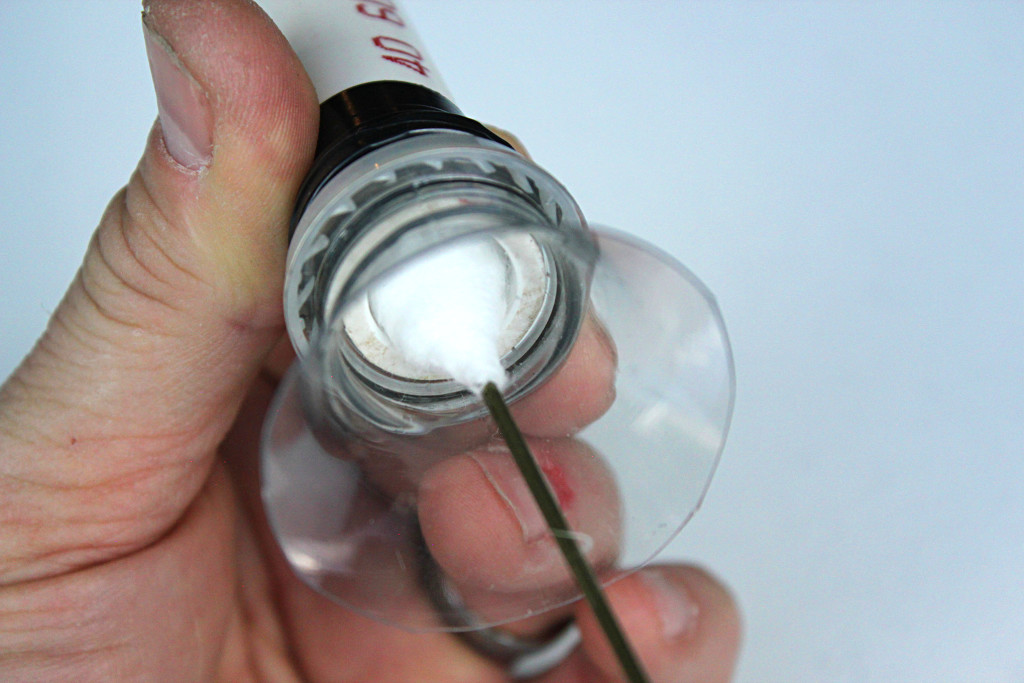
7. Test the fit of your dart seal in the ‘gun then reshape it as necessary.
8. Then load and shoot.
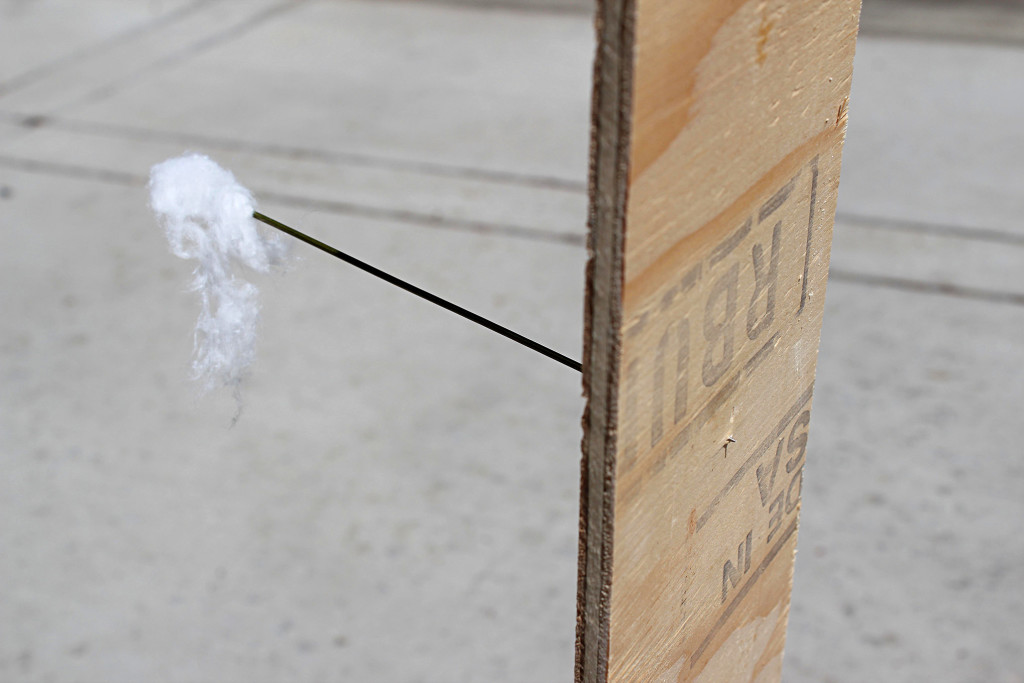
9. I did this entire process — including firing my first dart into a target — in 92 seconds. (OK, OK, so I was 2 seconds over … I took a moment to aim, alright?) The dart stuck solidly into a piece of 3?8-inch plywood with about 1?8-inch of the point poking out the other side. Take that, MacGyver.
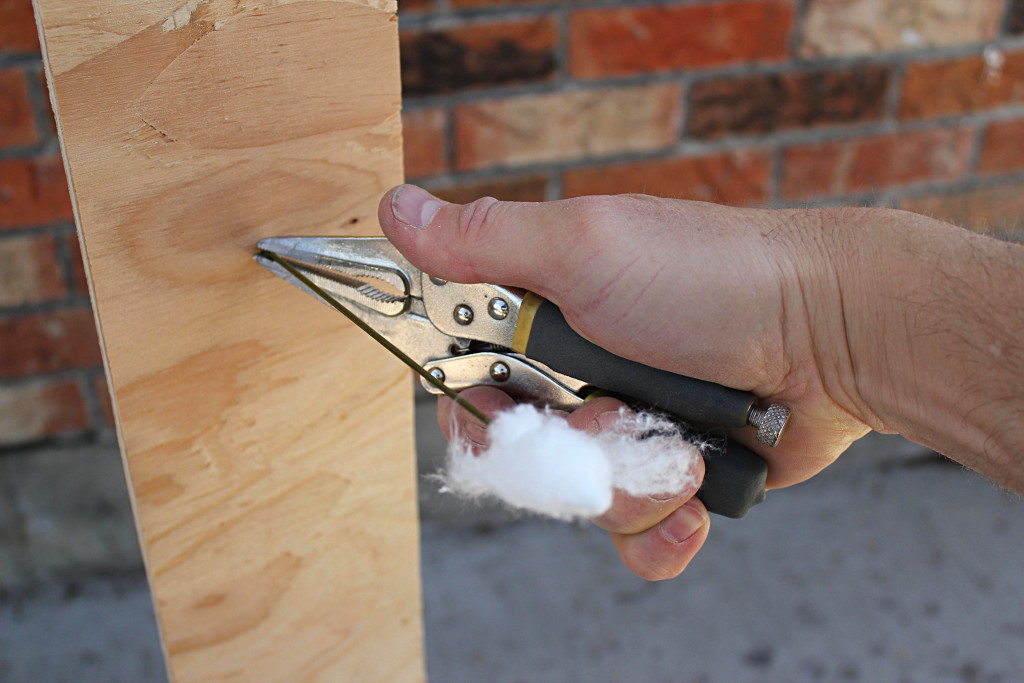
10. Vise Grips are a great investment for blowgunners and are the best (sometimes only) way to pull darts out of wooden targets or backstops.
More From Issue 16
Don’t miss essential survival insights—sign up for Recoil Offgrid's free newsletter today.
Read articles from the next issue of Recoil Offgrid: Issue 17
Read articles from the previous issue of Recoil Offgrid: Issue 15
Check out our other publications on the web: Recoil | Gun Digest | Blade | RecoilTV | RECOILtv (YouTube)
Editor's Note: This article has been modified from its original print version for the web.