Grey Ghost Wanderer Messenger Bag

Whether you're running for your life in a survival situation, or simply walking down a peaceful city street, the ability to blend in is valuable. By acting as a “gray man” and disguising your preparedness from the general public, you can reduce your risk of being hassled, mugged, or worse. On the other hand, strolling around a major metropolitan area with a camouflage pack covered in PALS webbing and morale patches will certainly turn some heads—and not in a good way.

Grey Ghost Wanderer bag 6

The new Grey Ghost Wanderer bag has a low-profile look that doesn't scream “tactical”.

Grey Ghost Gear is well aware of the importance of flying under the radar—after all, this philosophy is clearly evident in the company's name.

Earlier this year, Grey Ghost released a new backpack constructed of waxed canvas, known as the Gypsy. Now, the company has unveiled a messenger bag in this same understated style. It's called the Grey Ghost Wanderer, and it's said to be “imminently suitable for customers who must by necessity remain inconspicuous and low profile”.

Grey Ghost Wanderer bag 2

The Wanderer is constructed of waxed canvas, and uses waterproof zippers to keep its contents bone-dry in case of rain. Grey Ghost also says this material feels “like furry walls on a chill, foggy morning”, so that's pretty cool too. This bag is available in four colors: black, charcoal, field tan, or olive drab.

Grey Ghost Wanderer bag 7

Here are some other key specs:

  • Measurements: 20.5 in. long, 11.5 in. tall, 4.5 in. deep
  • Carry strap with adjustable seatbelt webbing
    Grey Ghost Wanderer bag 1
  • End pockets: 2 each on either end. One zippered and flap-closed, expanding to carry a water bottle. The other an open stash pocket that will hold a small umbrella, a couple of AR magazines or an IFAK.
  • Body Flap: pull-over courier style flap secures with 2 magnetic snaps and contains 2 9×5 in. zippered, tricot-lined pockets for smart devices, eye pro, or other small valuables.
    Grey Ghost Wanderer bag 3
  • Interior Organization: The primary compartment is divided into a 2/3-1/3 configuration. The smaller of the 2 will carry a laptop. The other will secure anything from a PDW with stock collapsed to your carry-on luggage. A simple side release web-and-buckle feature secures contents from spillage.
  • Further Compartmentalization: 2 vertical zippers in the front compartment open a gate to access loose, small items. The reverse side of the gate contains 4 stretch mesh pockets and a pen scabbard. Above those is yet another pocket with sufficient accommodation for an iPad Mini or similar device.
    Grey Ghost Wanderer bag 4

The Grey Ghost Wanderer is available at an MSRP of $235. For more information, visit GreyGhostGear.com.


Tom Clancy’s The Division – Pixelated Pandemic

Images courtesy of Ubisoft

You've just finished brushing your teeth as you prep for work when you hear that dreaded buzzing of the Emergency Broadcast System come across your TV. Although you assume it's just another test, you realize there's a far greater degree of urgency and detail than those you've heard so many times in the past. The terms “outbreak,” “contamination,” “quarantine,” “infections,” and “fatalities” begin permeating the message repeatedly.

You look out the window of your Manhattan high-rise in the Chelsea district and begin thinking of a million things at once: your kids at school, your wife at work, and if you can get to them. You call your wife, but the calls keep dropping — probably due to a flooded cellular network — and you no longer have a landline. Then you see people running down the street, some breaking into storefronts and others throwing Molotov cocktails.

Has it begun? Are you watching the initial stages of the world falling apart? That just may be the case.

Fortunately for you, it's not a real-life situation — although it has a very high chance of becoming one. We've seen it depicted in movies for decades, but in recent years video games have offered much more realistic and immersive fact-based scenarios. Ubisoft, a premier name in video game industry, recently released Tom Clancy's The Division, which is based on the aforementioned catastrophe. We decided to chat with the folks at Ubisoft about the game to find out what survival lessons can be learned and how it relates to survival prepping.

tom-clancys-the-division-fire-fight-in-the-street

Gear is Gold

Basically, the game's premise is that a viral pandemic has ravaged the United States. “The Division,” a group of agents trained to operate independently, have been deployed to save society. As one of these agents, you coordinate with other team members to reclaim the Big Apple from various rogue gangs competing with you for control of what's left. In an effort to accomplish your mission, your character can recover and use equipment (“loot”) left behind by the military. You can also set up strongholds in different locations to plan, craft, and receive extracted loot, as well as use them to develop your character and increase progression of bases in each district. For instance, items like Mechanix Wear gloves have stats attached to them, which means they can potentially boost your character once you acquire them. In real life, better gear means better survival odds.

One thing that makes the game unique in its features and playability compared to other MMO/RPG-style games is the Snowdrop engine, which allows the game and editor to be unified, meaning the engine runs in real time and the ongoing project is always playable. There are also seamless transitions among solo, cooperative, and adversarial play. Also, you won't see any loading screens as you transition from cooperative to adversarial play, so that aspect of the game gives the sense of total immersion.

tom-clancys-the-division-hanging-dead-bodies

An example would be an area of the game called “The Dark Zone,” which was closed off after the outbreak and chaos quickly ensued. There are no restrictions on how you can interact with other players there. You can team up or betray them and take their loot, so you never know what to expect — much like how things would be in real-life survival situations.

Reality-Based Pandemic

There are probably those of you out there who are shouting, “What do I care? It's not real!” Or, “I don't even play video games.” We hear ya, and here's where things differentiate this game from your character being some Italian plumber looking to rescue the mushroom princess. As you may have seen, our previous edition of OG (Issue 12) had a lot of aspects focused on viral outbreaks and how much of a potential danger they pose. As we delved into The Division, our suspicions of how true to life this “game” could be were affirmed by research that was scary to say the least.

“There were a few reasons we went with a virus,” says Martin Hultberg, IP director for Ubisoft Massive. “It's a very contemporary threat that people are somewhat aware about, but don't really comprehend. It's also a very clear and present danger to our fragile society. This gives us something to work with; a relevant scenario that resonates with people.”

So is this game based on any historical or real-world context? The crew at Ubisoft did their homework when making this game reflect actual events. “The Division is, as we say, ‘grounded in reality,' meaning everything can be explained in a plausible way,” Hultberg says. “The very scenario we depict has actually been exercised and analyzed by the U.S. government already, back in 2001 during what was called Operation Dark Winter. This exercise, and others following it, have revealed exactly how vulnerable our society is to an incident like this.

tom-clancys-the-division-agents-fighting-civilians

“The foundation for the agency featured in the game, called The Division, comes from the concept of the ‘stay behind' movement. This idea was originally created by the British during WWII — then focused on setting up a guerilla force before the Nazis even invaded. Regular people, living among us, trained and equipped to deal with a specific threat and activated should the worst come to pass.

“We take that concept one step further and connect it to something called Directive 51. Directive 51 is a classified presidential directive signed in 2007, which details the United States continuity of government plans in case of a catastrophic emergency. So Dark Winter, ‘stay behind,' and Directive 51, all real, are the basis for this game.”

To learn more about Directive 51, you can visit www.fema.gov/guidance-directives. Still don't believe us? Learn more about one of Operation Dark Winter's architects here: www.dhs.gov/tara-otoole.

Digital Prep

Ubisoft says it spent a lot of time speaking with subject-matter experts to validate its findings. “We, for example, worked with virologists and doctors here in Sweden to verify things about the pandemic and virus,” Hultberg says. “We talked to military, law enforcement, and disaster management experts from the USA, most of whom want to remain anonymous. We also talked about the threat of bioterrorism with former government officials. All of this together helped us create a plausible scenario and world.”

We here at OG are devoted to providing our readers with the information that can mean the difference between surviving a disaster and becoming a statistic. This game seems to reiterate a lot of what we preach: Stock up on the best survival gear you can find. Look for ways to be self-sufficient in the event that utilities and supplies are compromised. Learn self-defense techniques and how to make improvised weapons. Partner with people you can trust and begin rebuilding if disaster strikes. At any moment, a crisis can occur, and it's better to plan than to be complacent.

“I hope we raise awareness about the fragility of our society — how much we take for granted and how easily we can lose it,” Hultberg says. “In terms of gameplay, we hope people will learn that working together helps if you want to stay alive. A life lesson, to be sure!” We couldn't agree more.

SOURCE

Ubisoft
www.ubisoft.com

More From Issue 13

Don’t miss essential survival insights—sign up for Recoil Offgrid's free newsletter today.

Read articles from the next issue of Recoil Offgrid: Issue 14

Read articles from the previous issue of Recoil Offgrid: Issue 12

Editor's Note: This article has been modified from its original print version for the web.


RECOIL Editorial: “Terrifying Truth” About Shooting an AR-15

Earlier this week, our friend David Reeder at RECOILweb.com wrote an editorial titled The Terrifying Truth About Shooting an AR-15. This post was a response to NY Daily News reporter Gersh Kuntzman, who published an article earlier this month about his experience firing an AR-15 for the first time. In his article, Kuntzman wrote:

“Squeeze lightly on the trigger and the resulting explosion of firepower is humbling and deafening (even with ear protection).

The recoil bruised my shoulder, which can happen if you don’t know what you’re doing. The brass shell casings disoriented me as they flew past my face. The smell of sulfur and destruction made me sick. The explosions — loud like a bomb — gave me a temporary form of PTSD. For at least an hour after firing the gun just a few times, I was anxious and irritable.”

Shooting an AR-15

Kuntzman, left, could barely contain his terror while shooting an AR-15.

After reading a few sentences, we found ourselves wondering, is this guy for real? But, alas, there's no satire to be found in Kuntzman's article. He's evidently very serious about his traumatic and terrifying experience at a supervised firing range. Frankly, it's incredible he survived unscathed.

It appears that Kuntzman later received some complaints about his use of the term PTSD, as he posted a brief apology, stating “I regret the inarticulate use of the term to describe my in-the-moment impression of the gun's firepower”. However, he then went on to write an inflammatory follow-up article complaining about all the “angry mail” he received as a result of his first article.

RECOIL's hilarious response to this traumatized “journalist” is definitely worth a read. Here's a link to the full article on RECOILweb.com.


High-Visibility Flashlights

Let's think about the times that we've suddenly and unexpectedly needed a flashlight. For many of us, the last blackout we experienced probably comes to mind. Blackouts, like emergencies, are almost always a surprise. Whether we find ourselves in the dark due to an overloaded circuit breaker or a much greater disaster, being able to locate a flashlight to assess what's going on becomes an urgent concern.

If you don't happen to have a flashlight in your pocket when darkness descends — how many people keep flashlights in their PJs — how would you quickly find a torch with no electricity?

Yes, our tactically black flashlights may look sexy, but their stealthy color can make them harder to find than a ninja on a nighttime mission. This is where we reach for a brighter alternative, and by brightness we're not talking about lumens. Torches with high-visibility bodies aren't just for construction sites. With their brightly colored housings, they're inherently easy to spot in dim environments or smoke- and dust-filled areas. That's why firefighters use them. Some models even have glow-in-the-dark bodies.

If you need to pack an easy-to-find light source in a go-bag or in your nightstand, consider going with a high-vis flashlight. It could prevent you from scrambling when there's a real crisis or, at the least, save you from stubbing a toe in the middle of the night.

Let's browse six of the latest high-visibility flashlights and see which deserves glowing praise.

High-Visibility Flashlights

  • 5.11 Tactical TPT L2 251

    Make & Model - 5.11 Tactical TPT L2 251
    Max Lumen Output - 251
    Max Runtime - 58.5 hrs. (low mode)
    Overall Length - 5.25 in.
    Weight with Batteries - 3 oz.
    Battery Type - 2 CR123A (included)
    Controls - Tail-cap switch; light press for momentary, twist for constant on.
    MSRP - $45
    URL - http://www.511tactical.com

    5.11's TPT L2 251 has a square-shaped head that prevents it from inadvertent rolling and is built from water- and impact-resistant polymer composite for maximum durability.

  • LED Lenser D14

    Make & Model - LED Lenser D14
    Max Lumen Output - 135
    Max Runtime - 15 hrs.
    Overall Length - 6.3 in.
    Weight with Batteries - 7.8 oz.
    Battery Type - AA (four, included)
    Controls - three-position constant on selector switch
    MSRP - $70
    URL - http://www.ledlenserusa.com

    Originally developed for underwater use, the bright yellow D14 is equipped with a unique cooling system that allows it to be operated on land as well in the depths of the sea.

  • Nightstick NSP-2422R

    Make & Model - Nightstick NSP-2422R
    Max Lumen Output - 130
    Max Runtime - 10.5 hrs.
    Overall Length - 7 in.
    Weight with Batteries - 6.4 oz.
    Battery Type - AA (three, included)
    Controls - Dual constant on/momentary side push-button switches
    MSRP - $23
    URL - http://www.baycoproducts.com

    Finished in safety orange, the NSP-2422R is a dual-light flashlight that not only has a long throw spotlight, but a wide view floodlight as well.

  • Pelican SabreLight 2010PL

    Make & Pelican - SabreLight 2010PL
    Max Lumen Output - 161
    Max Runtime - 22 hrs.
    Overall Length - 8.11 in.
    Weight with Batteries - 13.4 oz.
    Battery Type - C (three, not included)
    Controls - Bezel activated, twist to turn on and off
    MSRP - $86
    URL - http://www.pelican.com

    Even quicker to spot than its neon-yellow-colored body, the 2010PL is outfitted with a photo luminescent bezel shroud that allows it to glow brightly in the dark.

  • Streamlight 3AA ProPolymer Dualie

    Make & Model - Streamlight 3AA ProPolymer Dualie
    Max Lumen Output - 140
    Max Runtime - 18 hrs.
    Overall Length - 7 in.
    Weight with Batteries - 6.8 oz.
    Battery Type - AA (three, included)
    Controls - Dual Constant on/momentary side push-button switches
    MSRP - $52
    URL - http://www.streamlight.com

    The 3AA ProPolymer Dualie is made of a shock-resistant, antistatic, nonconductive, and lightweight polymer and is finished in high-visibility florescent yellow.

  • Surefire G2X Pro

    Make & Model - SureFire G2X Pro
    Max Lumen Output - 320
    Max Runtime - 45 hrs. (low mode)
    Overall Length - 5.2 in.
    Weight with Batteries - 4.4 oz.
    Battery Type - CR123A (two, included)
    Controls - Tail-cap switch; light press for momentary, click for constant on.
    MSRP - $70
    URL - http://www.surefire.com

    This school-bus yellow version of the G2X Pro might be the brightest-colored SureFire flashlight that we've seen yet.

More From Issue 14

Don’t miss essential survival insights—sign up for Recoil Offgrid's free newsletter today.

Read articles from the next issue of Recoil Offgrid: Issue 15

Read articles from the previous issue of Recoil Offgrid: Issue 13

Editor's Note: This article has been modified from its original print version for the web.


Motorbike Basics – (No) Easy Rider

The power's out, the food's gone, and the grocery stores are sold out or completely looted. You were prepared with a generator and a decent cache of supplies, but it's looking grimmer by the day. There's no telling how long the city will stay dark. With no indication that help is arriving anytime soon, it's time to hit the road to your backup location. Unfortunately, lots of people panicked early on and the main highways instantly turned to gridlock, never quite recovering. All it took was a few ill-maintained vehicles to start overheating for drivers to start abandoning their cars and trying their luck on foot. This turned the jammed freeways into miles-long parking lots.

You're not making it through that mess in your fuel-sipping commuter sedan, let alone a full-size truck. You need agility. You need fuel efficiency. You need a dirt bike.

Long the favorite of weekend warriors looking to escape for a day or two before returning home to grind another week out, it's time to mount your new best friend and bypass the shells of the ill-prepared and stretch your legs on the open road. With unmatched maneuverability and fuel mileage, even the strictest hyper-miler will have trouble matching a small- or medium-capacity motorcycle. As such, a motorbike could be the ideal vehicle in a bug-out scenario. But before you kick that engine over and crack the throttle, you'll need some seat time to make sure you're comfortable maneuvering not just through the crowded highways, but off the beaten path as well. Just like hunting or fire-starting, you shouldn't train on the job, so to speak. Trust us, it's not as easy as it looks in the movies.

The Kawasaki KLX 140 is a small-capacity off-road motorcycle weighing in at only 210 pounds, ready to ride. Its light weight makes it ideal for learning how to ride a motorcycle in the dirt and over obstacles that you may encounter while fleeing the city.

The Kawasaki KLX 140 is a small-capacity off-road motorcycle weighing in at only 210 pounds, ready to ride. Its light...

The Motorcycle Safety Foundation (MSF) has been teaching new and experienced riders proper riding techniques on both asphalt and dirt for years. OFFGRID recently attended a course backed by Kawasaki to brush up on our riding skills and learn from the best, so we could provide you with the know-how to get yourself out of a mess by using a two-wheeled solution.

Cockpit Controls

Familiarity with the machine is important. Knowing exactly where the kill switch is located on the handlebars without looking, how to find neutral with the gear shifter, how applying pressure to both front and rear brakes feels, and how the engine reacts when applying varying amounts of throttle are key elements that can be practiced while standing still.

The clutch (functionally the same as a clutch in a manual-transmission automobile) is operated by squeezing a handlebar-mounted lever with the rider's left hand. The front brake is controlled by squeezing the handlebar-mounted lever with the rider's right hand. The rear brake is operated by pressing a lever in front of the right foot peg. The gear selector is operated with the rider's left foot, moving the lever up and down with the toe of your riding boot. Finding neutral in a maze of up and down shifts can be difficult and frustrating at first, so spend time early to become familiar with the typical configuration: one click down for first gear and four (or five, depending on your machine) clicks up for the higher gears. Neutral is located between first and second gear, and while many modern street bikes have neutral indicators, many dirt bikes lack such amenities.

kawasaki-klx-140-off-road-motorcycle-cockpit-controls

Once confident in locating these important controls, learning to operate the clutch is the next step to freedom. Much like driving a manual-transmission car, many new riders are overwhelmed by the thought of having to shift a motorcycle. It's not uncommon, however, for a dozen brand-new riders at an MSF course to spend less than half an hour becoming familiar with operating the clutch and shifting gears well enough to move on to the next skill. A little patience mastering this part of riding will make for a more enjoyable experience later.

In the Saddle

The basic riding position should have you seated centered on the motorcycle. While a dirt bike looks tall and daunting on its own, once a rider is seated the suspension will settle. There's a lot of space on the long narrow seat, but the rider should sit toward the front of the saddle, nestled into the crook just behind the fuel tank. This centralizes the loaded weight, which can greatly affect handling, as well as preventing the rider from sliding during acceleration and braking.

Textured seat pads provide a

Textured seat pads provide a “grippier” surface to keep the rider from sliding during acceleration and...

Using your knees, gently squeeze the fuel tank to stay connected with the motorcycle. Sitting upright, elbows should be rotated up and pointed out. Wrists should be straight, leaving plenty of rotational travel once the throttle is ready to twist open. This is considered the “attack” position, ready for whatever lies ahead.

 The seated riding position maintains a straight line from forearm through the wrist, elbows pointed out, knees hugging the tank, upright posture, and eyes scanning the route ahead.

The seated riding position maintains a straight line from forearm through the wrist, elbows pointed out, knees hugging...

Field of Vision

One of the first things to sear into your memory when riding is to always look where you're headed, not where you are. There's no time to react to something you're seeing for the first time when it's right in front of you. By continually scanning the path ahead, you can prepare for obstacles well before closing the gap in front of it.

Turning while riding a motorcycle can be intimidating, and many new riders will fall victim to target fixation. For example, if you're fleeing an urban disaster and get fixated on an overturned car along the outside of a turn, the likelihood of veering directly toward the car is greatly increased. When riding through a turn, your eyes should guide you all the way through.

A major benefit of enrolling in an MSF course is the time allotted to repeating drills while overemphasizing proper technique. Much like weapons training, these repetitive drills begin forming muscle memory that will be crucial to performing properly when there is no time to think, just to act.

The importance of scanning the route ahead of you cannot be overstated, providing time to prepare for obstacles and guiding your way through turns.

The importance of scanning the route ahead of you cannot be overstated, providing time to prepare for obstacles and...

Turn It Up

When performed with proper technique, turning a motorcycle can feel much more solid and comfortable than it may first appear. Simply leaning to the left or right initiates a turn, while small movements on the handlebars are all that are necessary. Once in the middle of the turn, applying pressure with your foot on the outside peg transfers pressure that helps keep the tires planted. On loose surfaces this can mean the difference between slipping into the woods safely and laying the bike down. By leaning into a turn, you're letting the motorcycle do the work of turning itself.

Riders practice slaloming while standinag during a class hosted by Kawasaki and the Motorcycle Safety Foundation.

Riders practice slaloming while standinag during a class hosted by Kawasaki and the Motorcycle Safety Foundation.

It can be difficult at first to overcome the urge to keep the motorcycle upright and just turn the handlebars, though performing low-speed drills while turning in both directions will quickly build confidence.

Slow Your Roll

On pavement, braking should be performed primarily before entering a turn. In the dirt, it isn't that much different. The front wheel performs the majority of the braking process in a straight line, while a slight application of the rear brake can provide a balanced and settled reduction in speed. When braking off-road, the rear brake plays a greater role. As a general rule, the front brake should not be used in a turn on loose surfaces, as it's likely to tuck under and take the motorcycle and its rider for a slide. Shifting weight over the rear of the motorcycle while braking helps reduce the likelihood of locking up the rear wheel and sliding.

Modern disc brakes have made their way to both the front and rear of most motorcycles, providing a superior stopping system.

Modern disc brakes have made their way to both the front and rear of most motorcycles, providing a superior stopping...

(Note that advanced riders will use the rear brake to lock up and swing the rear of the motorcycle around in some situations.)

Standing Tall

Although dual-sport and motocross bikes have an extreme amount of suspension travel, the rider's body also acts as a suspension component. When watching video footage of off-road desert racers, you'll notice how the motorcycle moves beneath a standing rider. To achieve this, proper posture is vital to a stable ride. It's recommended for beginning riders to place the foot pegs near the arch of the foot. More experienced riders often opt for placement on the balls of their feet. It's again important to remember to scan the road ahead, and look through turns.

Sawtooth edges on footpads provide a sure grip for muddy boots. The smaller pedal in front of the peg is the rear brake lever.

Sawtooth edges on footpads provide a sure grip for muddy boots. The smaller pedal in front of the peg is the rear brake...

Avoid locking joints straight, as bent knees and elbows provide the shock-absorber effect that makes standing riding so useful. Higher speeds and less fatigue are possible when using this technique.

When it comes time to turn while standing up, the rider's body position should stay neutral, with pressure on the pegs again initiating and guiding the turn. This technique would come in handy when traversing an open, rutted field at high speed.

Proper standing position places the arch of your foot over the foot peg.

Proper standing position places the arch of your foot over the foot peg.

Might As Well Jump

Eventually, and especially in a bug-out scenario, you'll encounter obstacles that need to be ridden over. When fleeing a metropolis in a crisis, it's not unreasonable to expect a detour through a park, riding up and down stairs, or plowing through bushy planters. Jumping a curb at the last second might prevent being taken out by panicked motorists.

Once again, a centered, upright, balanced riding position is the key to staying on two wheels. As the motorcycle ascends the obstacle, the rider should lean forward to keep the front wheel planted on the ground. Once the obstacle is crested and the descent begins, the rider should shift his or her weight to the rear, keeping the back tire firmly in touch with terra firma. Quick stabs of the brakes can spell disaster, and grabbing a fistful of front brake on a descent will send you ass over teakettle.

climbing-up-hill

By staying upright while climbing uphill, you're keeping weight over the front tire and preventing an unintentional backflip. When descending, shifting your weight toward the rear keeps the drive wheel planted and able to slow the motorcycle when you apply the rear brakes.

By staying upright while climbing uphill, you're keeping weight over the front tire and preventing an...

Conclusion

Becoming capable on two wheels is at once freeing, enjoyable, and overwhelming. There can be a lot to remember, from maintaining proper riding posture and squeezing the tank with your knees to finding neutral with the gear selector and shifting your body to keep balance. Oh, and don't forget to squeeze the clutch in when you come to a stop!

While executing your emergency plan, you'll no doubt have a lot more on your mind than riding techniques, so regular practice ahead of the real deal is a necessity. Whether your escape route is a short jaunt or a cross-country ordeal, there's nothing more comforting than having confidence in your bug-out bike skills.

kawasaki-klx-140-off-road-motorcycle-rear-view

Common Rookie Mistakes to Avoid

Overusing the Front Brake
Though street riders primarily use the front brake, grabbing a fistful of front brake mid-turn in the dirt is a great way to lay a dirt bike down.

Neglecting Your Bike
Poor motorcycle maintenance will slow you down, possibly leaving you stranded in the middle of nowhere.

Neglecting Your Body
Off-road riding can be very strenuous. Fuel for your body is just as important as it is for your motorcycle. Eat and hydrate so you can make the correct decisions.

Maintenance 101

Keep the Chain Clean
Squirt WD-40 to prevent dirt from wearing through the chain's O-rings.

Keep the Proper Chain Tension
Tight chains can snap. Loose chains can wear, or even jump off the sprocket.

Use a Fuel Filter
Modern motorcycles with fuel injection need clean fuel. Use a filter when pouring new gas, and become familiar with the process of cleaning and replacing the post-tank filter.

Change Your Oil Regularly
Oil-change intervals for motorcycles are shorter than for automobiles, especially when used in harsh and dirty environments.

Know How to Change an Inner-tube
It's not the easiest roadside fix, but it could be the difference between riding to your destination and hiking to it.

Pump it Up
Tire air pressure can greatly affect handling and tire wear patterns.

Adjust the Suspension
Adjusting the suspension varies among motorcycles, but can often be performed for extra load capacity.

Have Extras
Spare fuses and bulbs are small and easy to pack.

Know and Customize Your Toolkit
A small toolkit is often included from the manufacturer, but knowing how to use it, and what's not included, is the rider's responsibility.

Safety Gear

There are enough options for every type of rider, in every type of weather, that comfort is no longer an excuse for leaving safety equipment behind. In a bug-out situation, you can't help yourself or your family if you brain yourself on a rock or the pavement. While most motocross gear is brightly colored, all of these items are also available in more discreet colors that are less likely to bring unwanted attention.kawasaki-klx-140-off-road-motorcycle-safety-gear

Helmets
Helmets top the list of suggested safety equipment. Full-face variants provide the most protection, as a majority of impacts occur to the front of a rider's head. Off-road helmets are engineered to provide maximum fresh airflow, though the visor can make the helmet less stable at high speeds. More expensive helmets aren't necessarily safer, but are often lighter and better ventilated, along with having removable and washable liners. Dual-sport helmets are a recent hybrid, featuring a flip-up viewport shield from on-road helmets, along with the sun visor and an extended chin bar from off-road helmets.

Gloves
These can mean the difference between getting back on the bike after a spill and not being able to grab the handlebars. Options range from thin leather with mesh tops to armored gauntlets meant to wrap around jacket sleeves. Insulated and even electric options are available for cold-weather adventures.

Riding Jackets
There's a huge range. You can find everything from lightweight armored mesh pieces to enduro-specific options with cargo pockets, hydration bladder pouches, and weatherproofing.

Pants
While jeans are better than shorts, denim still shreds easily in a crash. The ideal pants for a bug-out scenario may be high-strength nylon or Kevlar-reinforced riding pants with internal, padded armor.

Boots
Footwear comes in street and off-road variants. Street boots typically have more mobility built into their design, while off-road boots feature stiffer soles for ultimate stability. The larger lugs may also make off-bike hiking easier if you forgot to pack bug-out boots.

About The Author:

Known to his friends as an impulse hobbyist, Adam has had a hand in whatever looks to be a good time. From fabrication and metal shaping for tube buggies and hot rods to racing mountain bikes and throwing motorcycles around a flat track, he's done it all while photographing and writing about his adventures along the way.

www.adambendig.com

Street Bike Versus Dirt Bike

There are a few key differences between a super sport street bike and a dirt bike:

  • A dirt bike's larger (often 21-inch) front wheel rolls over objects easier than smaller diameters. The narrower rim is stronger when plowing into obstacles.
  • Dirt bikes are often lighter weight, making for easier maneuverability
  • The upright riding position can be more comfortable, while ergonomics allow for a standing riding position. But at high speeds, wind blast can make dirt bikes feel unstable.
  • Pure motocross machines can have higher performance engines that need more attention and feature less longevity. Dual-sport and endurance motorcycles maintain off-road capability with some on-road manners.

Sources

Kawasaki Motors Corp., USA > www.kawasaki.com
Motorcycle Safety Foundation > www.msf-usa.org


How to Tie a Shemagh: 7 Head Wrap Styles

In a survival scenario, it's easy to see how headwear can be beneficial. A good hat can shield your skin from the intense rays of the sun, stop sweat from running into your eyes, and help maintain your body temperature. On top of these benefits, apparel that covers your face provides additional protection from dust, and can even be used to conceal your identity in emergency situations.

How to tie a shemagh 3

A pair of BLACKHAWK! brand cotton shemaghs.

For cold-weather settings, a wool or fleece balaclava (often called a “ski mask”) can be a great choice for full-face cover, but its form-fitting design will likely be stifling in summer heat. When temperatures rise into the triple-digits, you'll need something loose and breathable that still provides maximum protection. Enter the shemagh (a.k.a. keffiyeh), a square scarf which has been a prominent head covering in the Middle East region for centuries.

How to tie a shemagh 2

A U.S. Marine in Afghanistan wearing a shemagh. Photo: U.S. Department of Defense / Wikipedia

A shemagh is essentially just a large square of fabric, much like a bigger bandana. It's typically made of woven cotton for breathability, but cotton/wool blends and other synthetic fabrics are also available. You've probably seen them worn by insurgent forces in the Middle East, as well as by various western special-operations forces.

Whether you've already got a shemagh in your survival pack, or you're thinking about buying one in the future, it's helpful to know how to form this fabric square into a head covering. There are many methods, but the video below from Dakota Jennings on YouTube shows 7 useful styles.


Where Is Your Pain Coming From?

Warning!
The exercises and content expressed in this column are for illustrative purposes only. Consult a medical professional before trying any physical activity or nutritional plan.

People tend to think that all they need to do is pop a pill (of both the medicinal and supplemental kind) and their joints will be perfectly fine. What they don't realize is that the first step in joint health is to stay active, a key component in preventing injuries and also alleviating past pains.

You might be asking, “What does joint pain have to do with prepping?” Sure, it's easy to focus on working on bushcraft or testing out your latest bug-out bag. But how will you worry about any of that if you've blown out your knee while fleeing the initial catastrophe? Prepping also includes preparing and repairing the hardware you were born with, not just the ones you buy at the army surplus store. So, how can a prepper do this?

Body

Let's say your knee starts giving you trouble. You figure it's just the awkward way you hopped over the fallen tree while lugging your gear to the next safe zone. It'll go away in a day or two, you tell yourself. Well, when it still persists days or weeks later, maybe something else is going on. The problem is, it's far too common to think that knee pain equates to a knee problem. Most of the time, it's not your knee. Just because you feel pain there doesn't mean that it's the source of your problem.

Your whole body moves through an interconnected series of joints — some of which need to be more stable, while others need to be more mobile. In simplified terms, your shoulder and hips need to be mobile, while your lower back and knees need to be more stable. When you don't have enough stability or mobility in these joints, other areas need to pick up the slack. This extra slack is what we're looking to eliminate. Sometimes, it can lead to debilitating back pain or a painful shoulder. Let's take a look at some tests and corrective exercises to fix your ailing joints.

Self-Tests

Complete the following self-tests to determine which areas of your body need further work.apley-scratch-test

1 Shoulder: Apley Scratch Test

To test range of motion of the shoulder, we're going to use the Apley Scratch Test. To do this, reach behind your head to touch the upper part of your opposite side shoulder blade. Then, reach behind your back to touch the lower part of the opposite side shoulder blade. If you can't reach your shoulder blade, this is an area on which to focus.

straight-leg-raise

2 Hip and Lower Back: Straight-Leg Raise

Begin lying on your back with your feet together and toes up, arms out to your sides with palms down. Lie next to a stationary object, such as the end of a wall, at the middle of your thigh.

Keeping both legs straight, raise the leg closest to the wall as high as you can. Do this test on both sides. If you're unable to raise your leg at the same level or higher than the wall, you'll need to focus on this.

birddog

3 Lower Back: Birddog

Begin on the ground on all fours. Simultaneously, reach your right arm forward and stretch your left leg backwards. Try to make yourself as long as possible and hold for 20 seconds on each side. If you're unable to hold for the duration, we'll look at fixing this area.

overhead-squat

4 Knee, Hip, Lower Back, and Shoulder: Overhead Squat

Begin standing 6 inches in front of a doorway. Your feet should be hip-width apart with your toes pointed forward. Hold a dowel or broomstick overhead with your hands, about twice your shoulder width apart. Keep your arms as straight and vertical as possible.

Keeping your heels flat on the floor and your toes straight ahead, squat down as deeply as possible. Your hips should be able to get below your knees, with your toes staying straight ahead, and you shouldn't touch anything on the way down or up.

wall-ankle-mobilization

5 Knee: Wall Ankle Mobilization

Begin by standing and facing a wall with one foot about 4 inches away from the wall. Place your hands on the wall. Keeping your heel on the floor, move your knee forward to reach the wall with your knee. If you're unable to reach the wall, there's a restriction we'll need to address.

hurdle-step

6 Knee and Hip: Hurdle Step

Begin by placing a piece of tape across a door frame just beneath the height of your knee. Stand directly in front of the tape. Raise one leg up and over the tape, and place your heel on the ground in front. Bring the same leg back over and return to the starting position. If you make contact with the tape during this process, this will be an area we'll focus on improving.

Corrective Exercises

Once you've determined which areas of your body you need to address, focus on the following corrective exercises.

Shoulders

The shoulder is a structurally unstable joint. Unlike your hip, which has a much deeper socket, your shoulder joint resembles a golf ball on a tee. The key to keeping your shoulders healthy involves keeping your rotator cuff strong, your shoulder blades stable, and your spine mobile in the area between your shoulder blades (thoracic spine).

quadrupled-extention-rotation

1 Quadruped Extension/Rotation

Begin down on all fours and rock back, slightly arching your lower back. Place one hand behind your head. Start by rotating down and bring your elbow toward your opposite knee. Then, rotate your elbow up toward the ceiling. Follow your elbow with your eyes. Complete two sets of 10 repetitions per side.

90-90-hip-lift

2 90/90 Hip Lift With Breathing

Improper breathing can have a huge impact on shoulder function. If you're recruiting larger muscles to aid in breathing, this will cause the overuse of many muscles of the shoulder and upper body, causing them to become very tight and restrict movement. Begin by lying on your back with your feet flat on a wall. Position yourself so there are 90-degree angles at your hips and knees, with your right arm overhead. Breathe in through your nose, and as you exhale, pull down through your heels to curl only your hips off the floor. Hold this position as you breathe all of your air out and pause for three seconds, before inhaling again. Complete 2our to five sets of four to five breaths.

Hips

As explained earlier, the hips are a more stable structure than the shoulders, mainly due to the hip socket depth. It's a ball-and-socket joint, meaning there's a considerable amount of motion available. Keeping the hips healthy is all about retaining mobility, but also being able to stabilize when need be. It's when you lose range of motion or stability that problems arise.

hip-rotator-stretch

1 Hip Rotator Stretch

Begin in a push-up position and bring one knee forward. Rotate that leg outward, bringing your front shin perpendicular to your body. Slowly lower yourself down, relaxing into the stretched hip. Focus on breathing slowly and deeply, trying to deepen the stretch throughout the time frame. Complete one set of 40 to 60 seconds on each side.

single-leg-romanian-deadlift

2 Single-Leg Romanian Deadlift

Begin in a standing position. Simultaneously reach both arms forward and stretch your other leg far back behind you. Push your planted foot through the floor to return to the starting position. Complete three sets of eight repetitions per side.

all-fours-glute-mobilization

3 All Fours Glute Mobilization

Start in an all fours position. Place one foot behind the opposite knee. Slowly rock your hips back and to the rotated side. Complete one set of eight repetitions per side.

Knees

The knee is commonly referred to as a dumb joint because it's mainly a product of the hip and ankle. It lies between these two joints, both of which should be highly mobile. The knee primarily bends and straightens, so you need the hip and ankle to be mobile enough to move through their full range of motion, but also stable enough to resist any motion that would put the knee in jeopardy. Therefore, it's key to focus on the hip and ankle when keeping knees healthy and pain-free. Work on the hip mobility exercises described earlier, as well as the following exercises.

wall-ankle-mobilization

1 Wall Ankle Mobilization

Begin standing and facing a wall. Place your hands on the wall, and put one foot in front of the other. Keeping your front heel flat on the floor, slowly rock your knee forward until you reach the wall. Continue to move your foot further away from the wall until it becomes difficult but achievable to reach the wall. Complete two sets of 10 repetitions per side.

single-leg-squat-with-tennis-ball

2 Single-Leg Squat With Tennis Ball

Begin standing about a foot in front of a chair or bench. Place a tennis ball under the ball of one foot. Keep your weight mostly on the other foot, and slowly reach forward as you sit back and down. Gently tap the chair or bench, then return to the starting position. If it's too difficult to reach the chair, place additional objects on it, such as a book or two, until you are able to complete eight repetitions. Complete three sets per side.

Lower Back

Who hasn't had lower back pain at some point? Unfortunately, it's far too prevalent. The lower back is an area that needs a lot of stability. Not only does that area of the spine allow much less movement, it's also where force gets transferred between the upper and lower body. If there isn't adequate stability, you won't be able to transfer force very well, and you'll probably have some pain.

Much like the other joints we've discussed, the lower back will have to make up for any mobility that's lacking in the surrounding joints. We're specifically talking about your hips, shoulders, and middle spine segment (thoracic spine). To address these areas, work on the shoulder and hip mobility exercises outlined above, as well as the following exercises.

straight-arm-plank-with-shoulder-tap

1 Straight-Arm Plank With Shoulder Tap

Begin in push-up position with your feet a little wider than shoulder-width apart. Keeping your whole body rigid, alternately place one arm on the opposite shoulder. Move as little as possible. Complete three sets of 30 seconds.

hip-hinge-with-dowel

2 Hip Hinge with Dowel

Learning to move through your hips can drastically reduce the amount of strain on your lower back. Begin by holding a dowel or broomstick along your back, touching the back of your head, spine, and tailbone. Soften your knees. Keeping the dowel in contact with all three points, drive your hips backward until you feel a stretch in your hamstrings. Push your feet into the floor to return to the starting position. Complete three sets of 10 repetitions.

Conclusion

The bottom line is that rarely is an issue in one joint isolated to that particular joint. Most often, it's the surrounding joints — or even more distant joints — that have a significant impact on how well it functions. Oftentimes, you can help yourself overcome aches and pains simply by knowing how to take care of yourself. Self care is one of the best assurances to provide maximum advantage when disaster strikes. So learn what you need to do to become more durable and to take care of yourself and others when crap starts hitting the fan.

Sources

Athletic Body In Balance > http://www.humankinetics.com
Movement: Functional Movement Systems > http://www.otpbooks.com

About The Author:

A frequent Recoil Offgrid contributor, Ryne Gioviano is the co-owner of Welligee Personal Training & Lifestyle located in Naperville, Illinois. He holds a master's degree in exercise physiology and is certified through the National Strength and Conditioning Association.
http://www.welligee.com


Pan-Fried Bannock Bread

Centuries ago, survivalists and outdoorsmen learned to live in the wilderness, and they did so without the vast resources we now have available. Back then, they couldn't just stroll into Wal-Mart and buy some Power Bars and Gatorade—they had to make survival food from simple ingredients. One such recipe is known as bannock bread.

Bannock bread 2

The core ingredients in bannock are simple: water, flour, and a leavening agent (such as baking powder).

Bannock is a form of quick bread, similar to a scone or biscuit. It's usually composed of water, flour, and baking powder, although other ingredients and flavorings can be added. The ingredients are mixed together to form dough, and that dough may then be baked in an oven, heated on a flat rock, grilled, fried, or even cooked on a stick. This versatility makes it an easy food to whip up at a campsite—just carry a pre-mixed bag of flour and baking powder, and add water as needed.

Bannock bread 4

For an excellent tutorial on how to make bannock bread, watch the video below from Black Owl Outdoors. The host uses a cast-iron skillet and a squeeze-bottle of cooking oil to pan-fry the dough into a golden-brown cake. He even added a little cinnamon and sugar to sweeten the mixture—sounds pretty mouthwatering, right?

As the host mentions, it's easy to make this recipe your own by adding toppings or other ingredients. Here's a quick list of some suggestions we've found:

  • Salt and lard or oil (a traditional savory recipe)
  • Dried raisins, cherries, cranberries, or blueberries
  • Honey and oats
  • Nuts and chocolate chips
  • Diced dried meats, such as bacon bits
  • Garlic and herbs
  • Milk or cheese

You get the idea. The possibilities are endless, and you can make a different recipe every day with a handful of shelf-stable ingredients. This recipe is one to practice at home, so you can perfect it on your future journeys.


Do You Know Your Blade Grinds and Profiles?

Do you ever start shopping for a new knife, read a few catalogs, browse a few websites, or thumb through a magazine, and suddenly feel like you forgot how to speak English?

Knife manufacturers love to litter their marketing with all sorts of fancy terms like flat grinds, chisel grinds, Scandi grinds, zero bevels, mid-tech, forged, stock removal, textured G-10, S30V, Damascus, and pattern-welded — but what do all these terms mean? How does understanding these terms make one a better prepper?

They really are pretty easy to understand once you get your head wrapped around them. Knife-makers are a sensible lot and most of these terms have pretty direct meanings, but even after knowing what they mean, it still takes a little trial and error to determine which grind, edge, pattern, or profile works best for the task at hand.

Considering that we're always striving to provide the most in-depth knowledge on survival, we've compiled the following tutorial on knife grinds and blade profiles to help you understand each one, and let you pick the best tool for your needs.

On the Grind

The heart of the blade is essentially in the grind, or how the cutting edge is formed. This is the working part of the knife for 90 percent of its tasks and reflects how well it'll cut and, to a degree, retain its sharpness. There are many types of grinds out there. Here's a look at the most common types you might find:
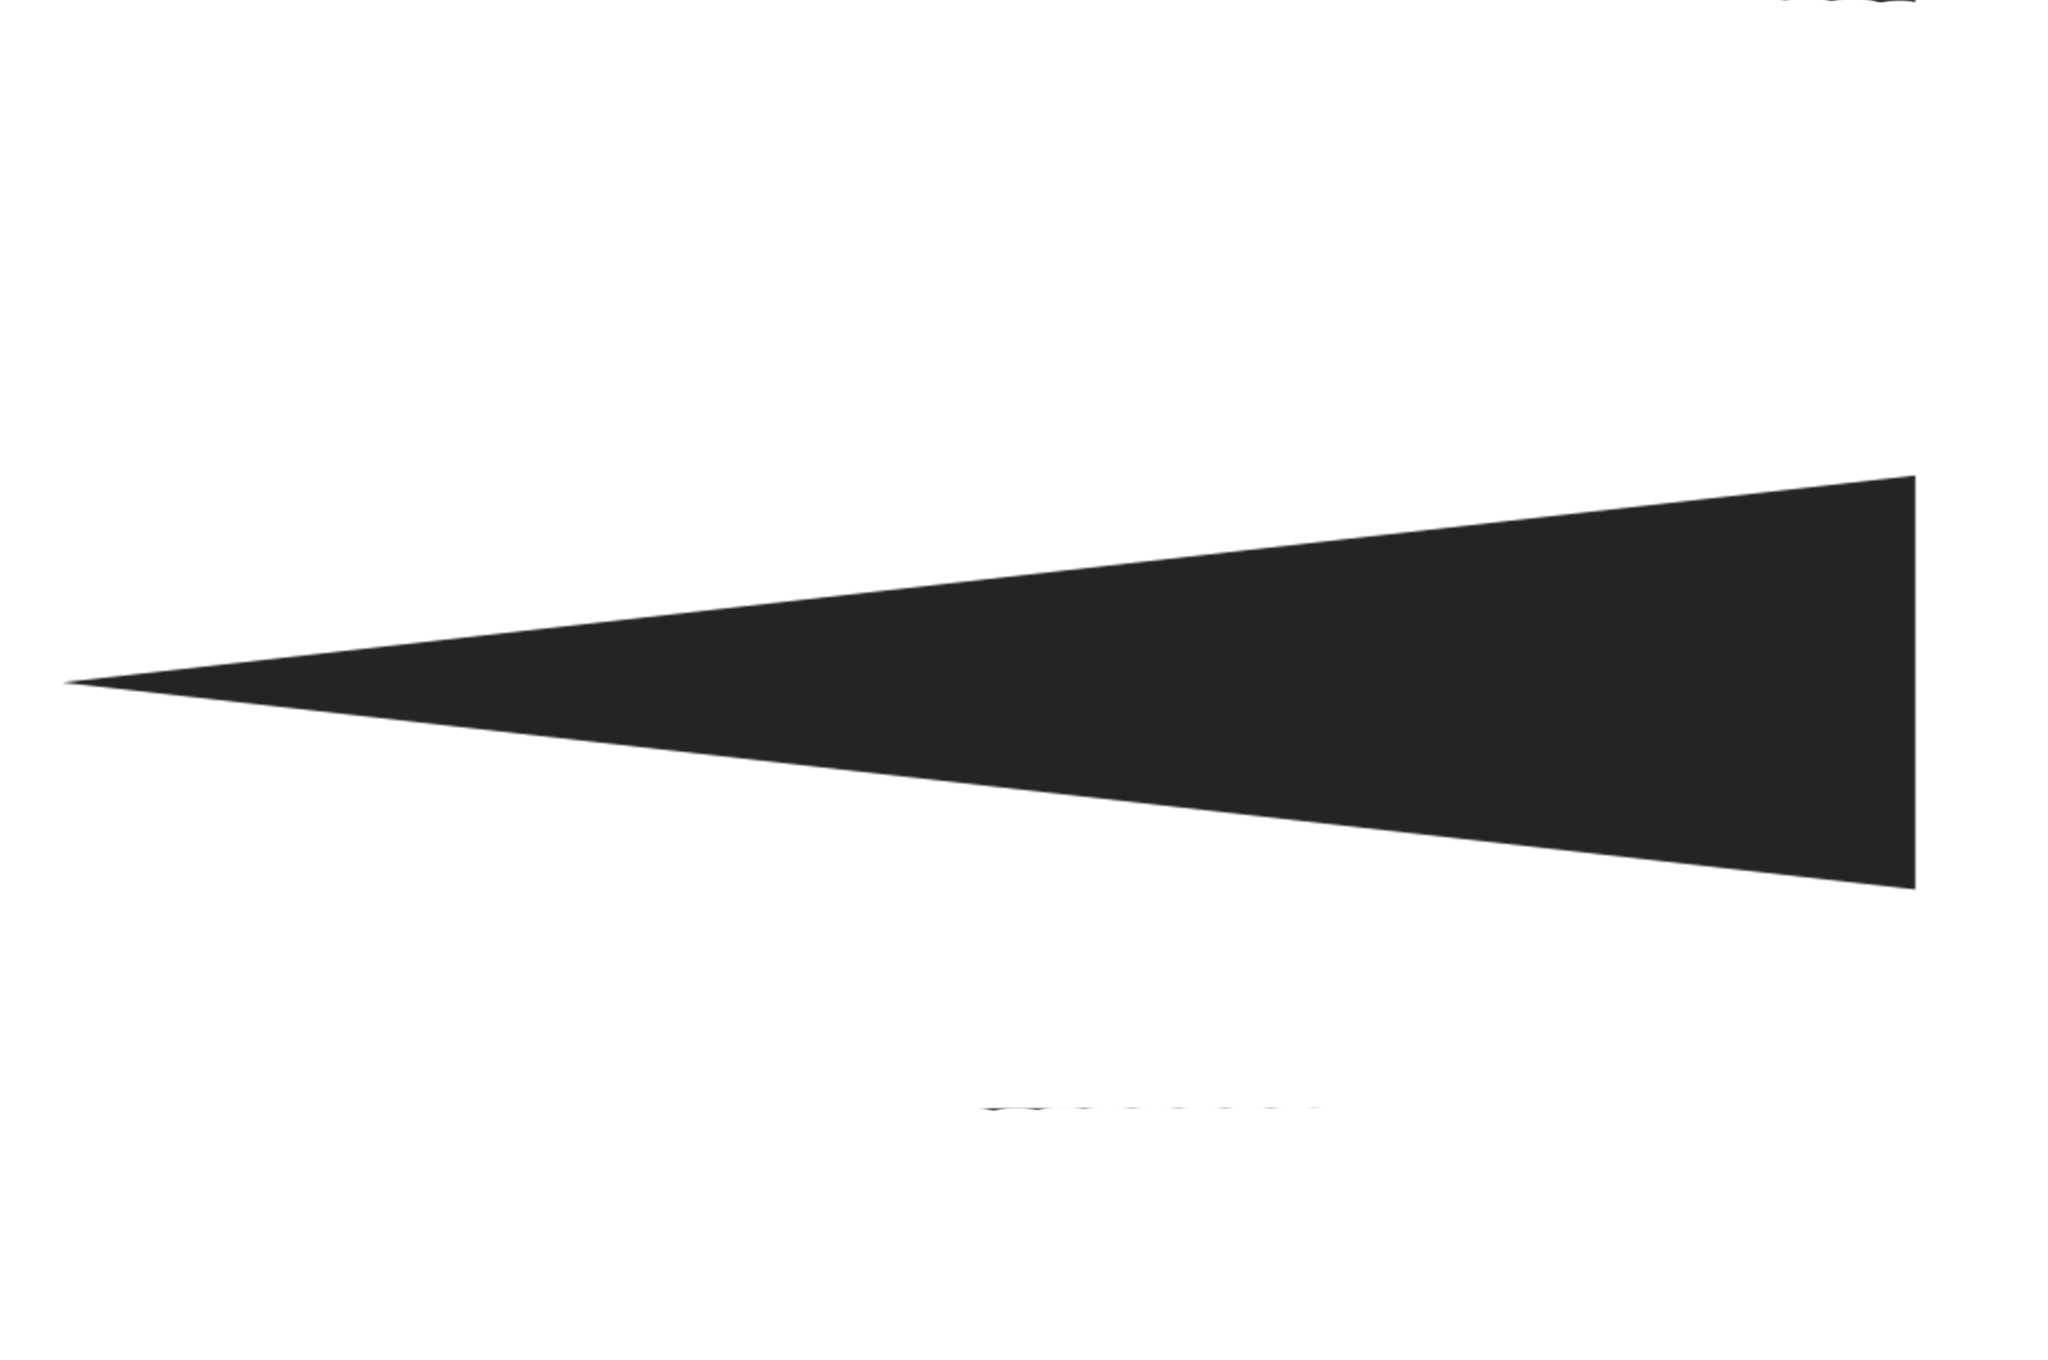
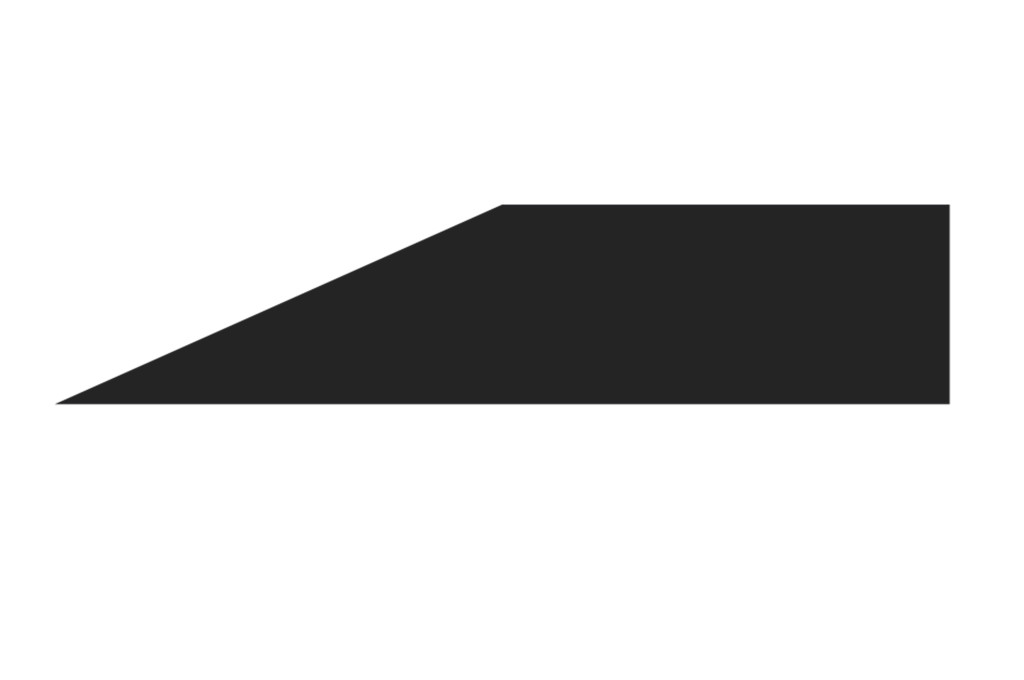
Flat Grind

flat-grind

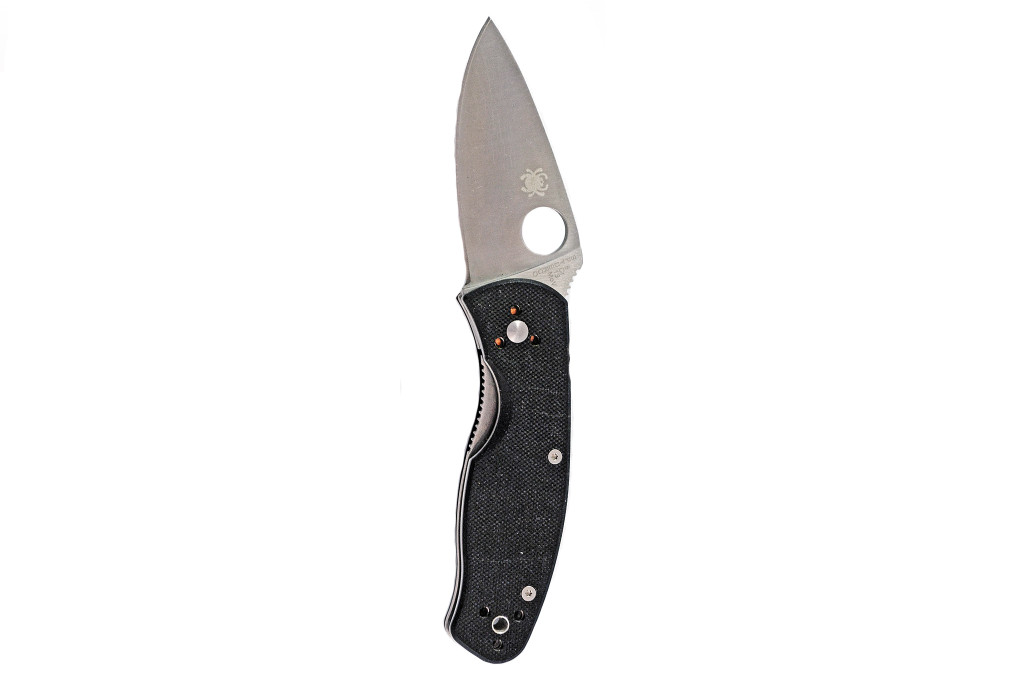
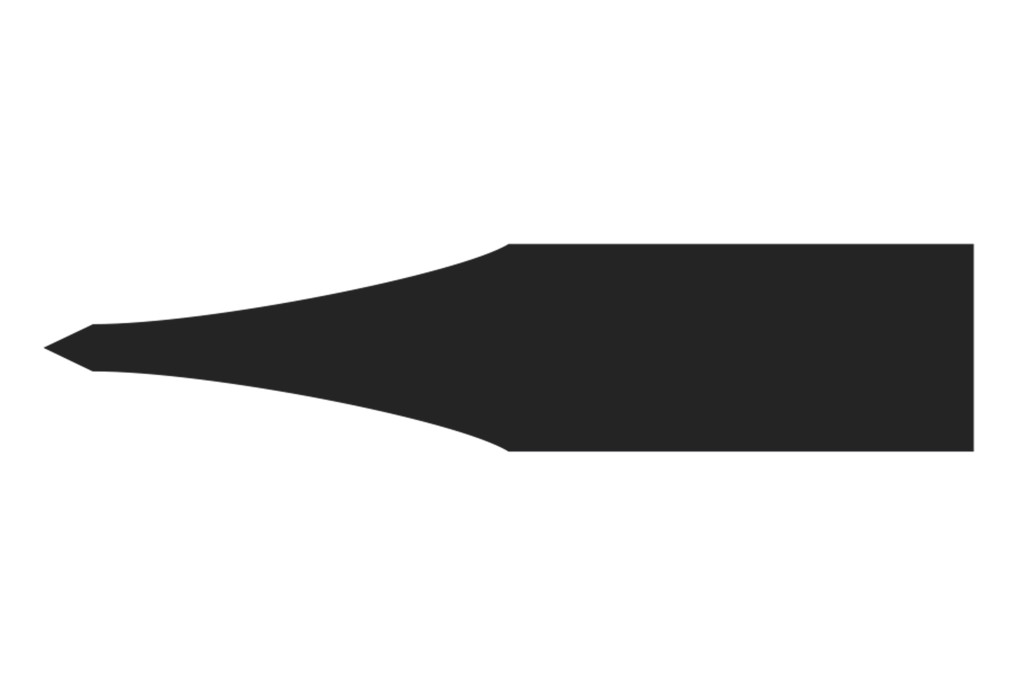
The flat-ground or “V ground” blade is one of the most basic edge styles in existence. In a flat-ground blade, both sides taper toward each other at a consistent angle from the spine of the blade to the edge, where they meet. The flat grind is most commonly found in kitchen knives, as well as many blades manufactured by Spyderco and Strider Knives.

Flat-ground knives have a distinct advantage in that they are possibly among the easiest to maintain.
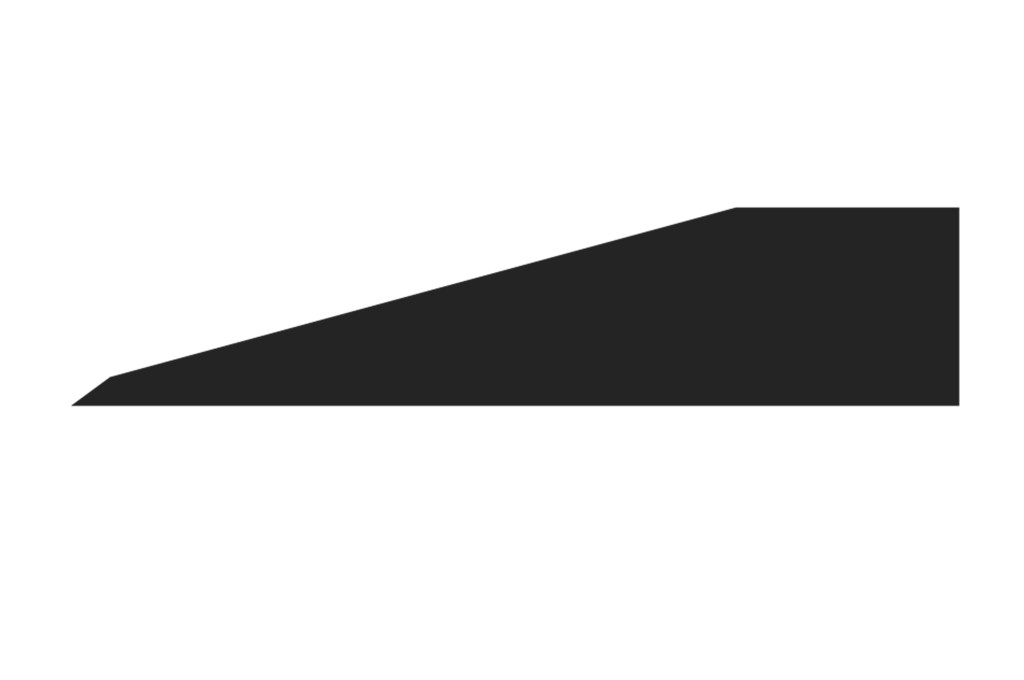
flat-grind-blade

Hollow Grind

hollow-grind

Emerging in the 19th century as a grind to use on a straight razor, the hollow-ground blade gained popularity in the hunting and sporting community in the late 1950s. It has a distinctive concave grind to the edge, so that both sides of the knife have a bevel that bows inward until they meet in a thin, sharp edge.

Unfortunately, these are not the most durable edges, and proper maintenance needs to be performed more frequently by stropping or sharpening. Buck hunting knives, straight razors, and a number of custom knives make use of this thin and extremely sharp edge. Maintenance of a hollow-ground blade is not difficult, but must be performed often.
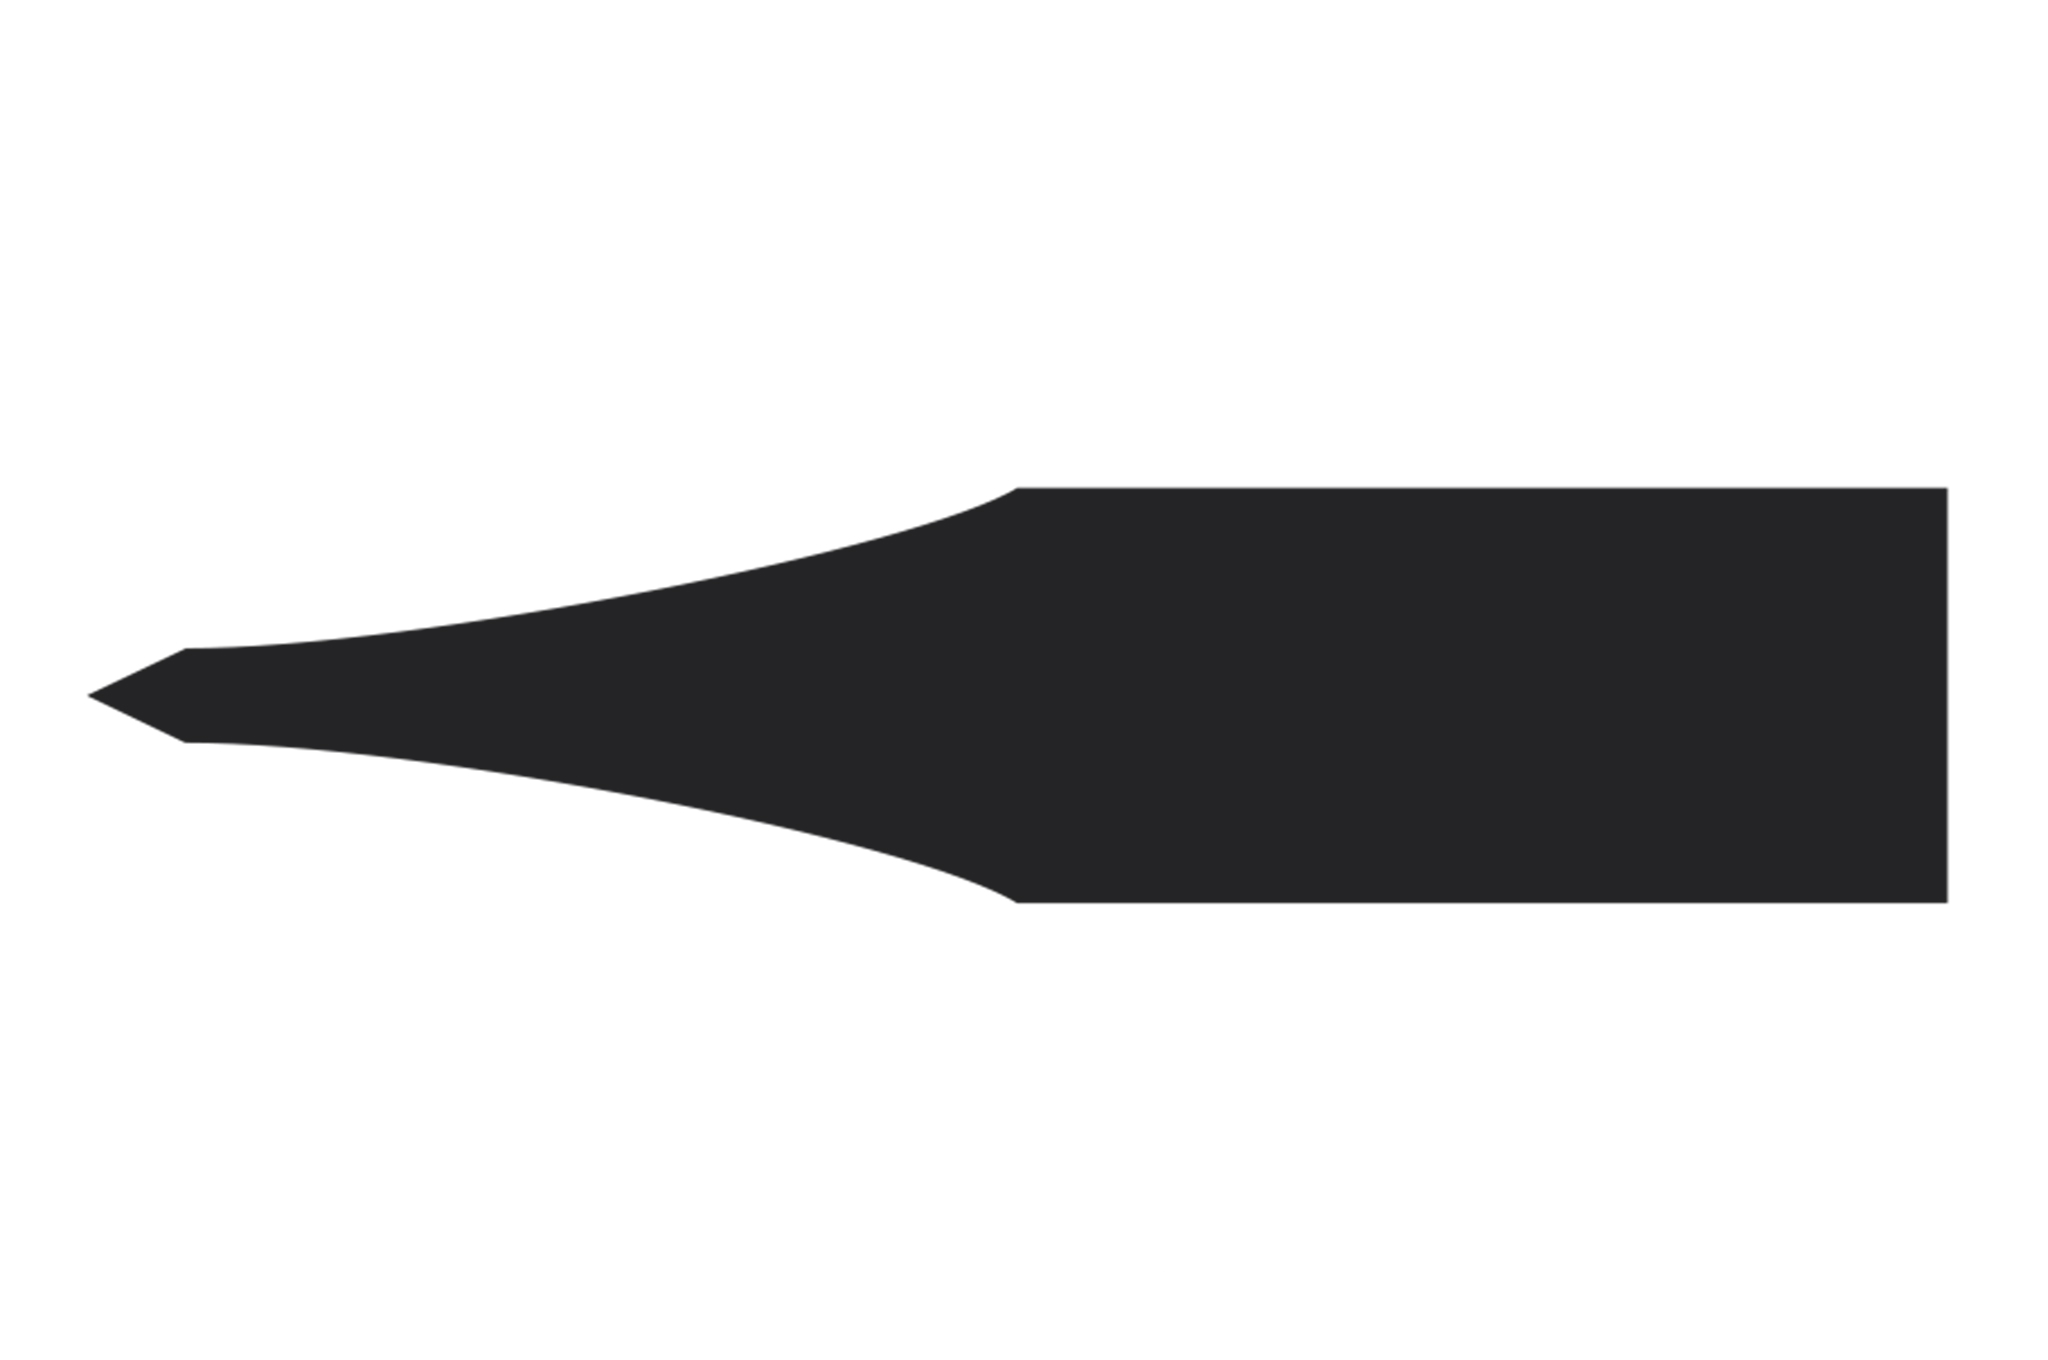
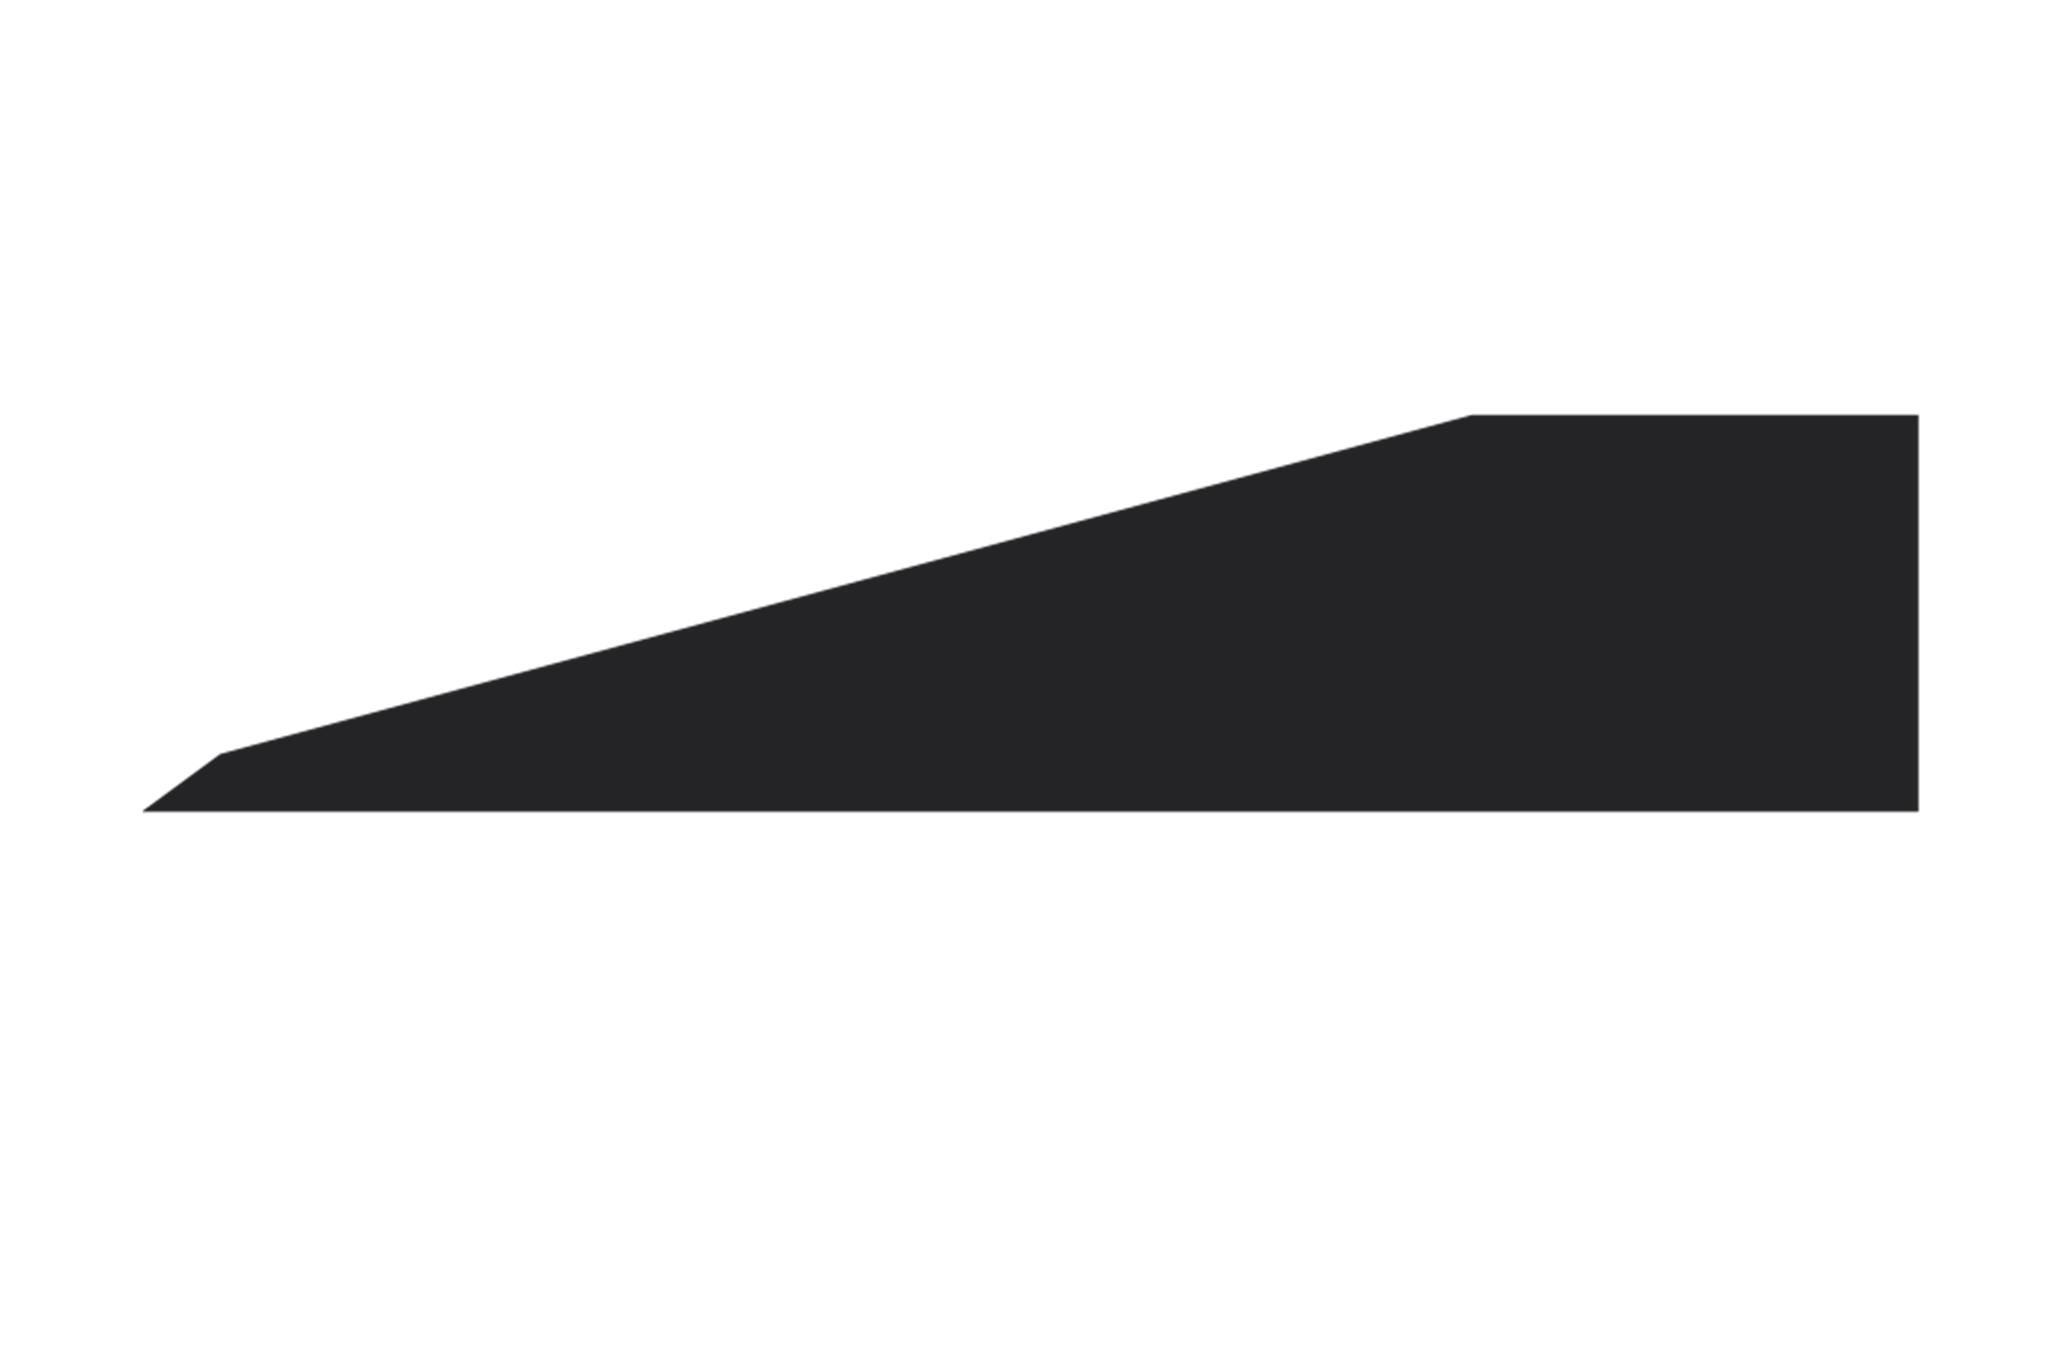
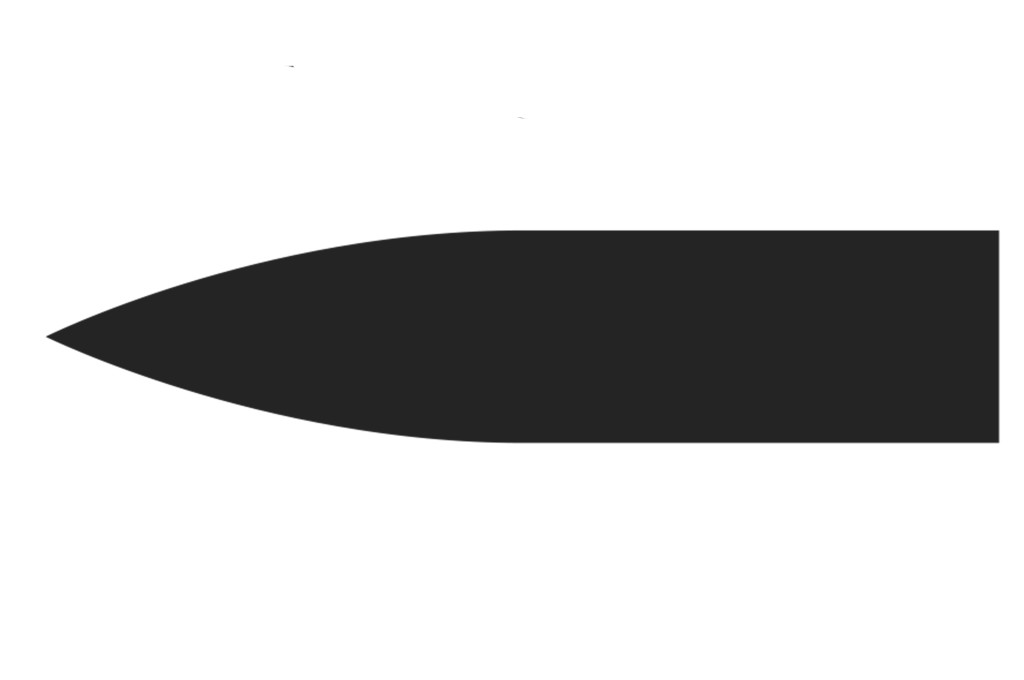
hollow-grind-blade

Scandinavian Grind

scandinavian-grind

This grind, sometimes shortened to Scandi grind, starts below the halfway point and has no secondary bevel on the edge. Scandi-ground blades are ideal for whittling, woodworking, and bushcraft. The high bevel was desired so that the user could keep an eye on the wood grain while carving.

More of a carver than a chopper (which will certainly ruin the edge), the Scandi grind requires frequent stropping to maintain its sharpness. Using any other type of sharpener will ruin the edge or at least change the grind by adding a secondary bevel.

scandinavian-grind-blade

Convex Grind

convex-grind

Convex edges can be some of the most difficult to sharpen, but the edges are extremely durable and sharp. A convex edge features a bevel on each side of the blade, slightly rounded (convex) as they taper to form the edge.

Convex grinds are very specialized and are commonly found on heavy-duty chopping tools such as axes and machetes. The somewhat rounded shape of the edge will not bind in wood and helps to separate the two halves of the wood while they're being split. This is why it is also referred to as the axe grind.
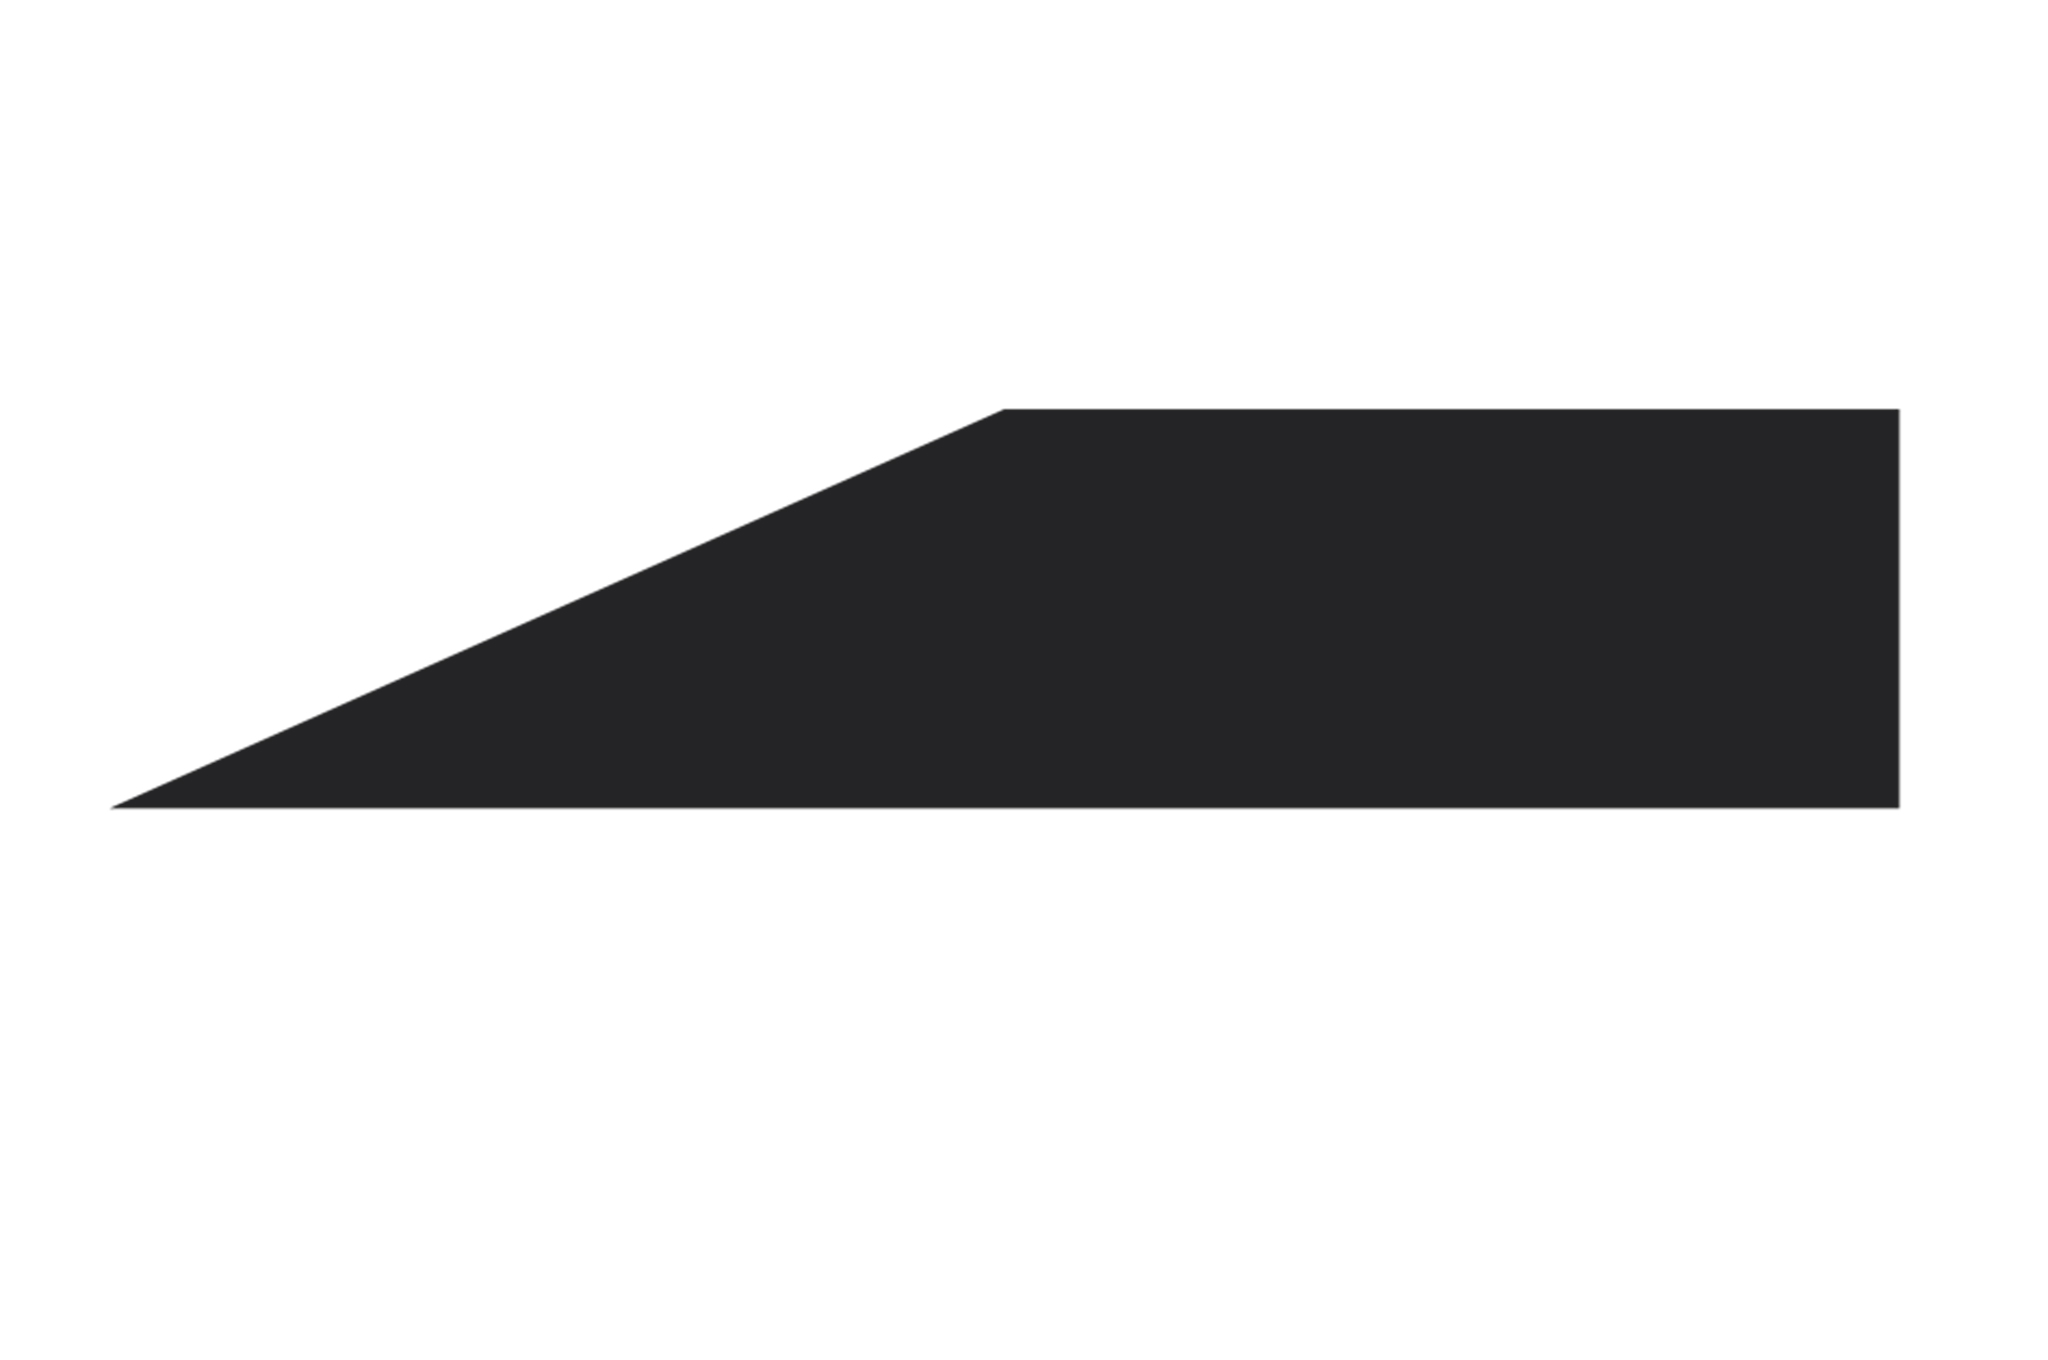
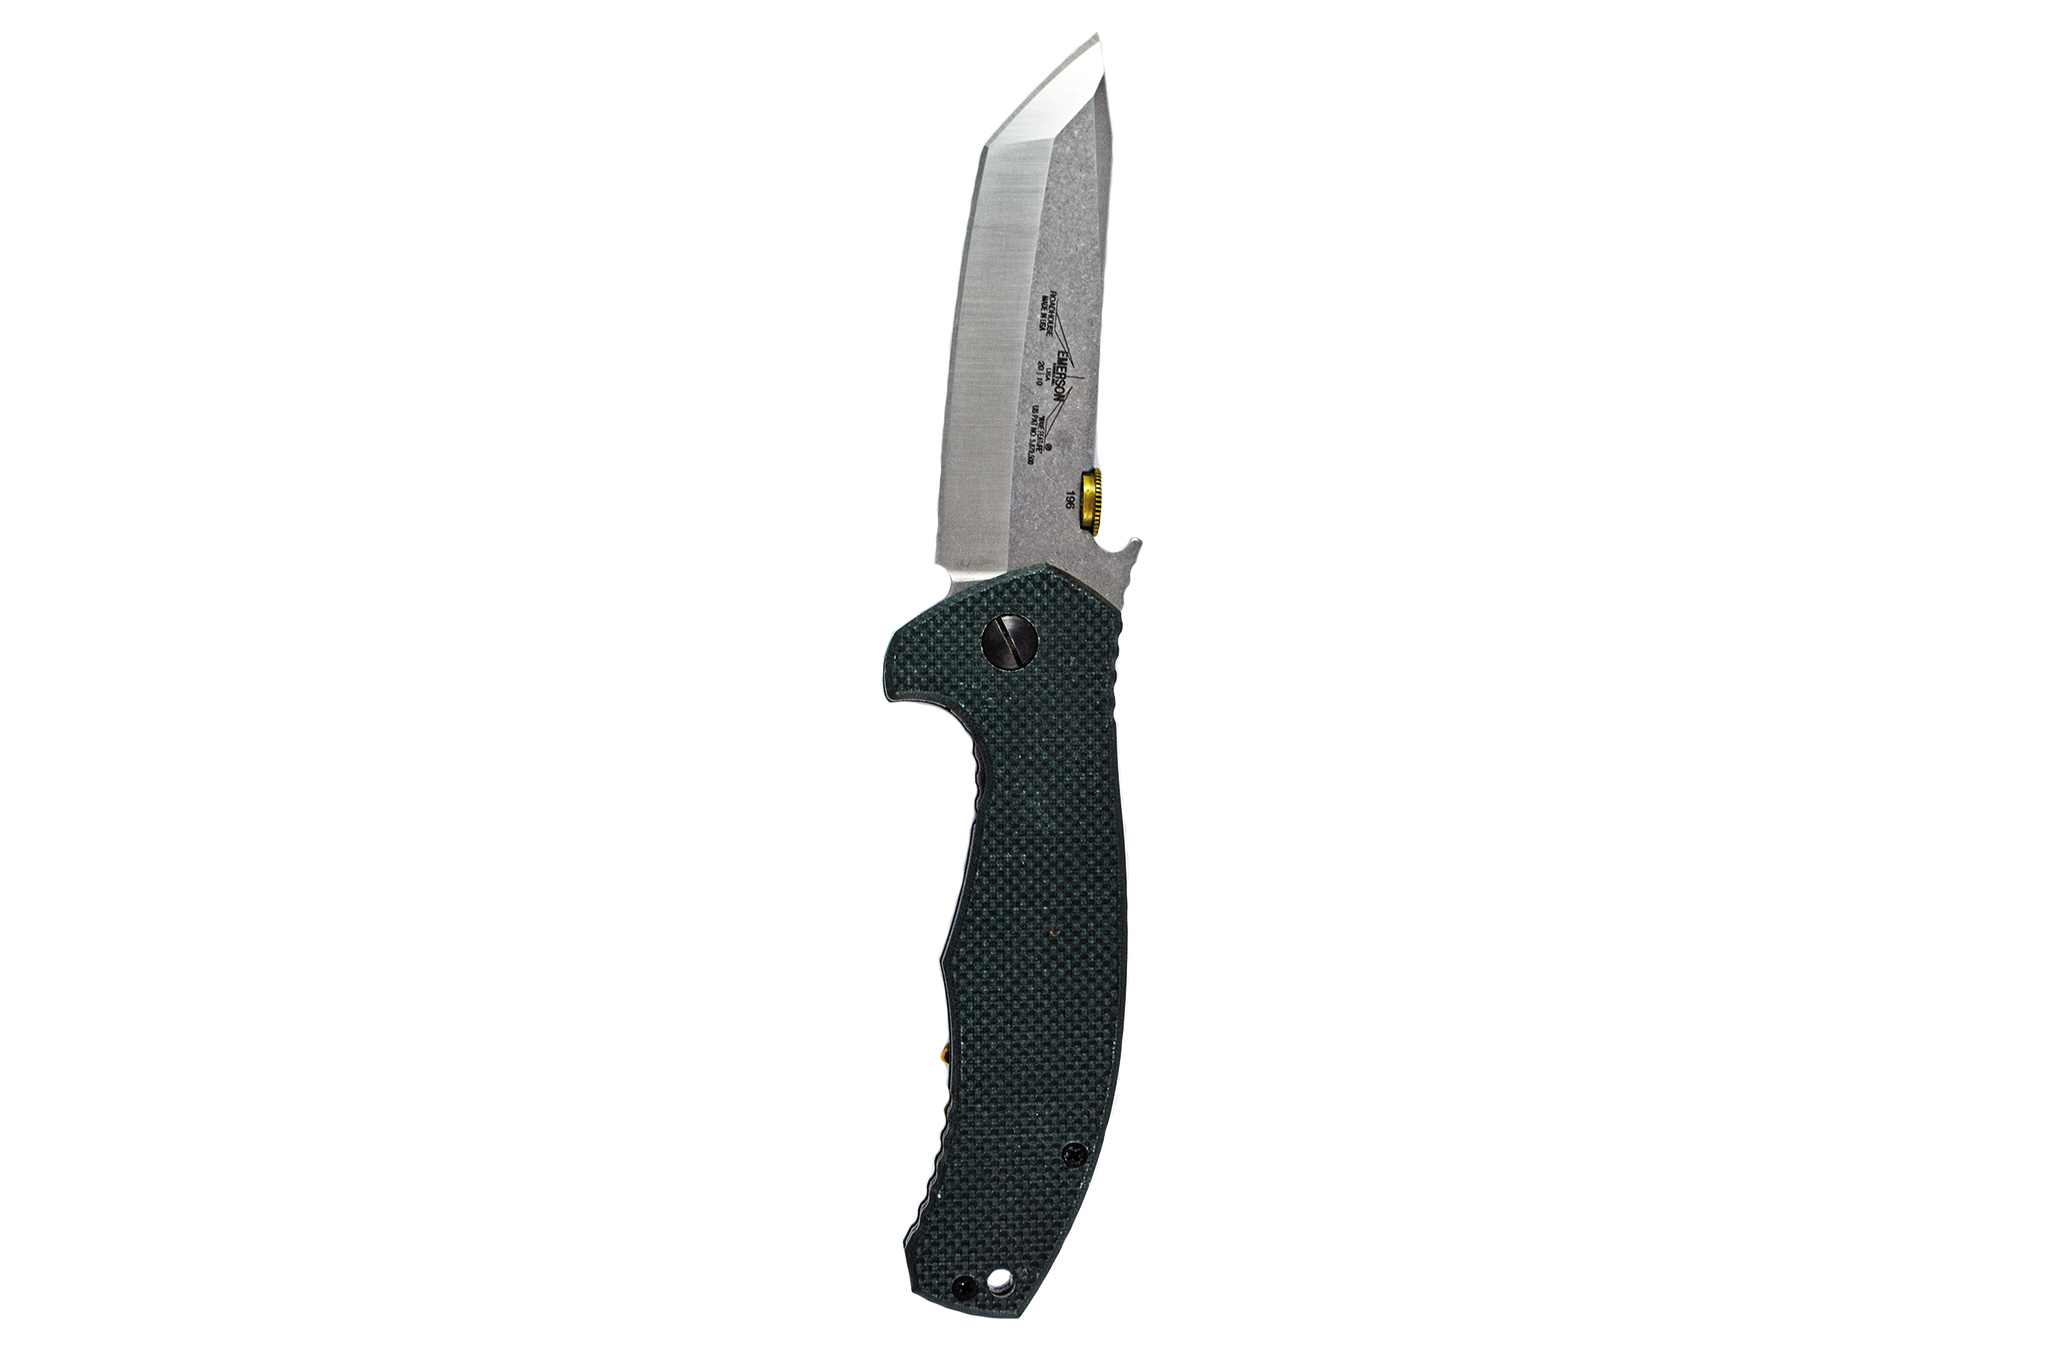
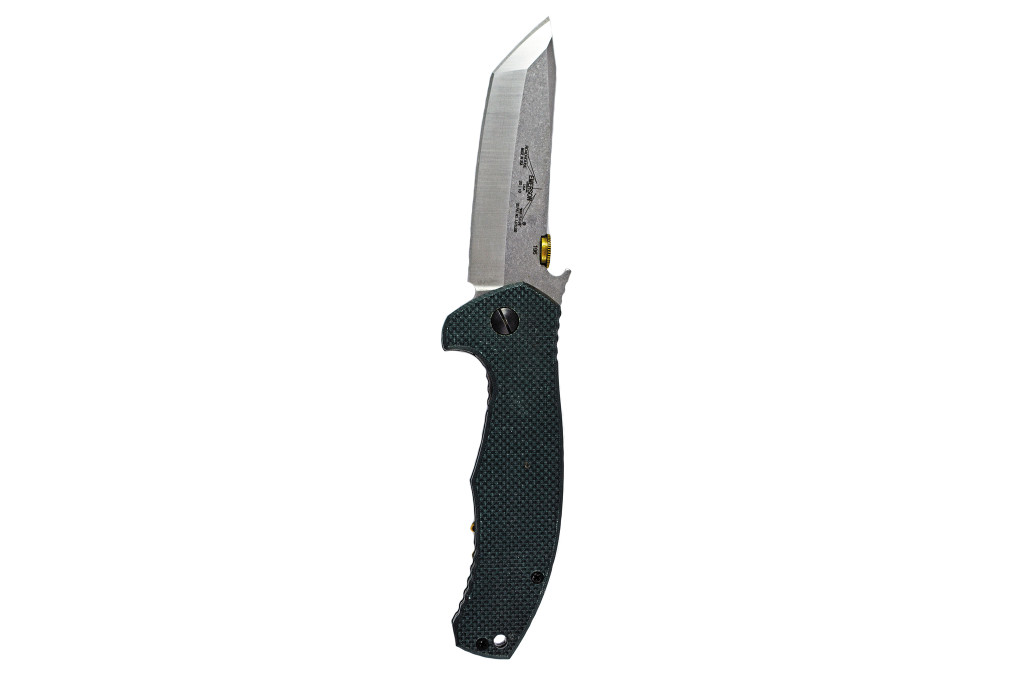
convex-grind-blade

Chisel Grind

chisel-grind-1

chisel-grind-2

The chisel ground blade is an older design from Asia that is very similar to the type of grind found on woodworking chisels. Only one side of the blade is ground, with the opposing side left flat. The chisel grind was popular on expensive Japanese kitchen knives and was introduced to the United States by the late Phill Hartsfield in the 1960s.

Hartsfield put them on his combat-oriented knives, which became popular with Navy SEALs and Army Special Forces. In the mid-1980s, another California-based knife-maker, Ernest Emerson, asked Hartsfield's permission to use this grind on his tactical folding knives, and within a decade they began appearing on all types of tactical knives. (See Issue 21 of our sister publication RECOIL for an exclusive interview with Emerson.) The chisel-ground blade carries no parasitic drag and can be made extremely sharp when there is no secondary bevel in what is known as a zero grind.

However, a zero-ground blade will need religious stropping to keep it that sharp. Sharpening this type of edge on a stone, a sharpener, or anything other than a strop or buffing wheel will put a secondary or compound bevel on the knife. The majority of factory chisel-ground blades have this bevel, which actually makes the knife easier to maintain in the field, but takes away some of its real cutting potential.

chisel-grind-blades

Compound Bevel

compound-bevel-grind

The compound bevel or double bevel is another grind that is commonly found on many modern knives. In essence, it's one of the aforementioned grinds with a secondary bevel. It adds durability and ease of maintenance to the grind.

compound-grind-blade

Asymmetrical Grind

asymmetrical-grind

Typically a combination of two of the previous designs, the asymmetrical grind uses two distinct separate bevel angles for each side of the blade. (For example, one side may be convex and the opposite side flat.) The thought behind this is to produce a more durable edge by giving the user the best of both worlds.

Some makers and manufacturers take a different approach by grinding portions of the blade differently, such as making the front half a flat grind and the rear half a hollow grind.

User Profile

By looking at the various edges, the user can get an idea of what he needs in a blade. A hunter or trapper might prefer the hollow grind for skinning and dressing game, a Navy SEAL might prefer a chisel grind with a secondary bevel on a folder for its ease of sharpening or cutting ability, but turn to a convex grind on a machete for clearing brush.

The next question might be to think what profile is best for a particular knife. If the edge is the heart of a blade, the profile is its soul. This conveys much of the overall look of the knife and defines its function.
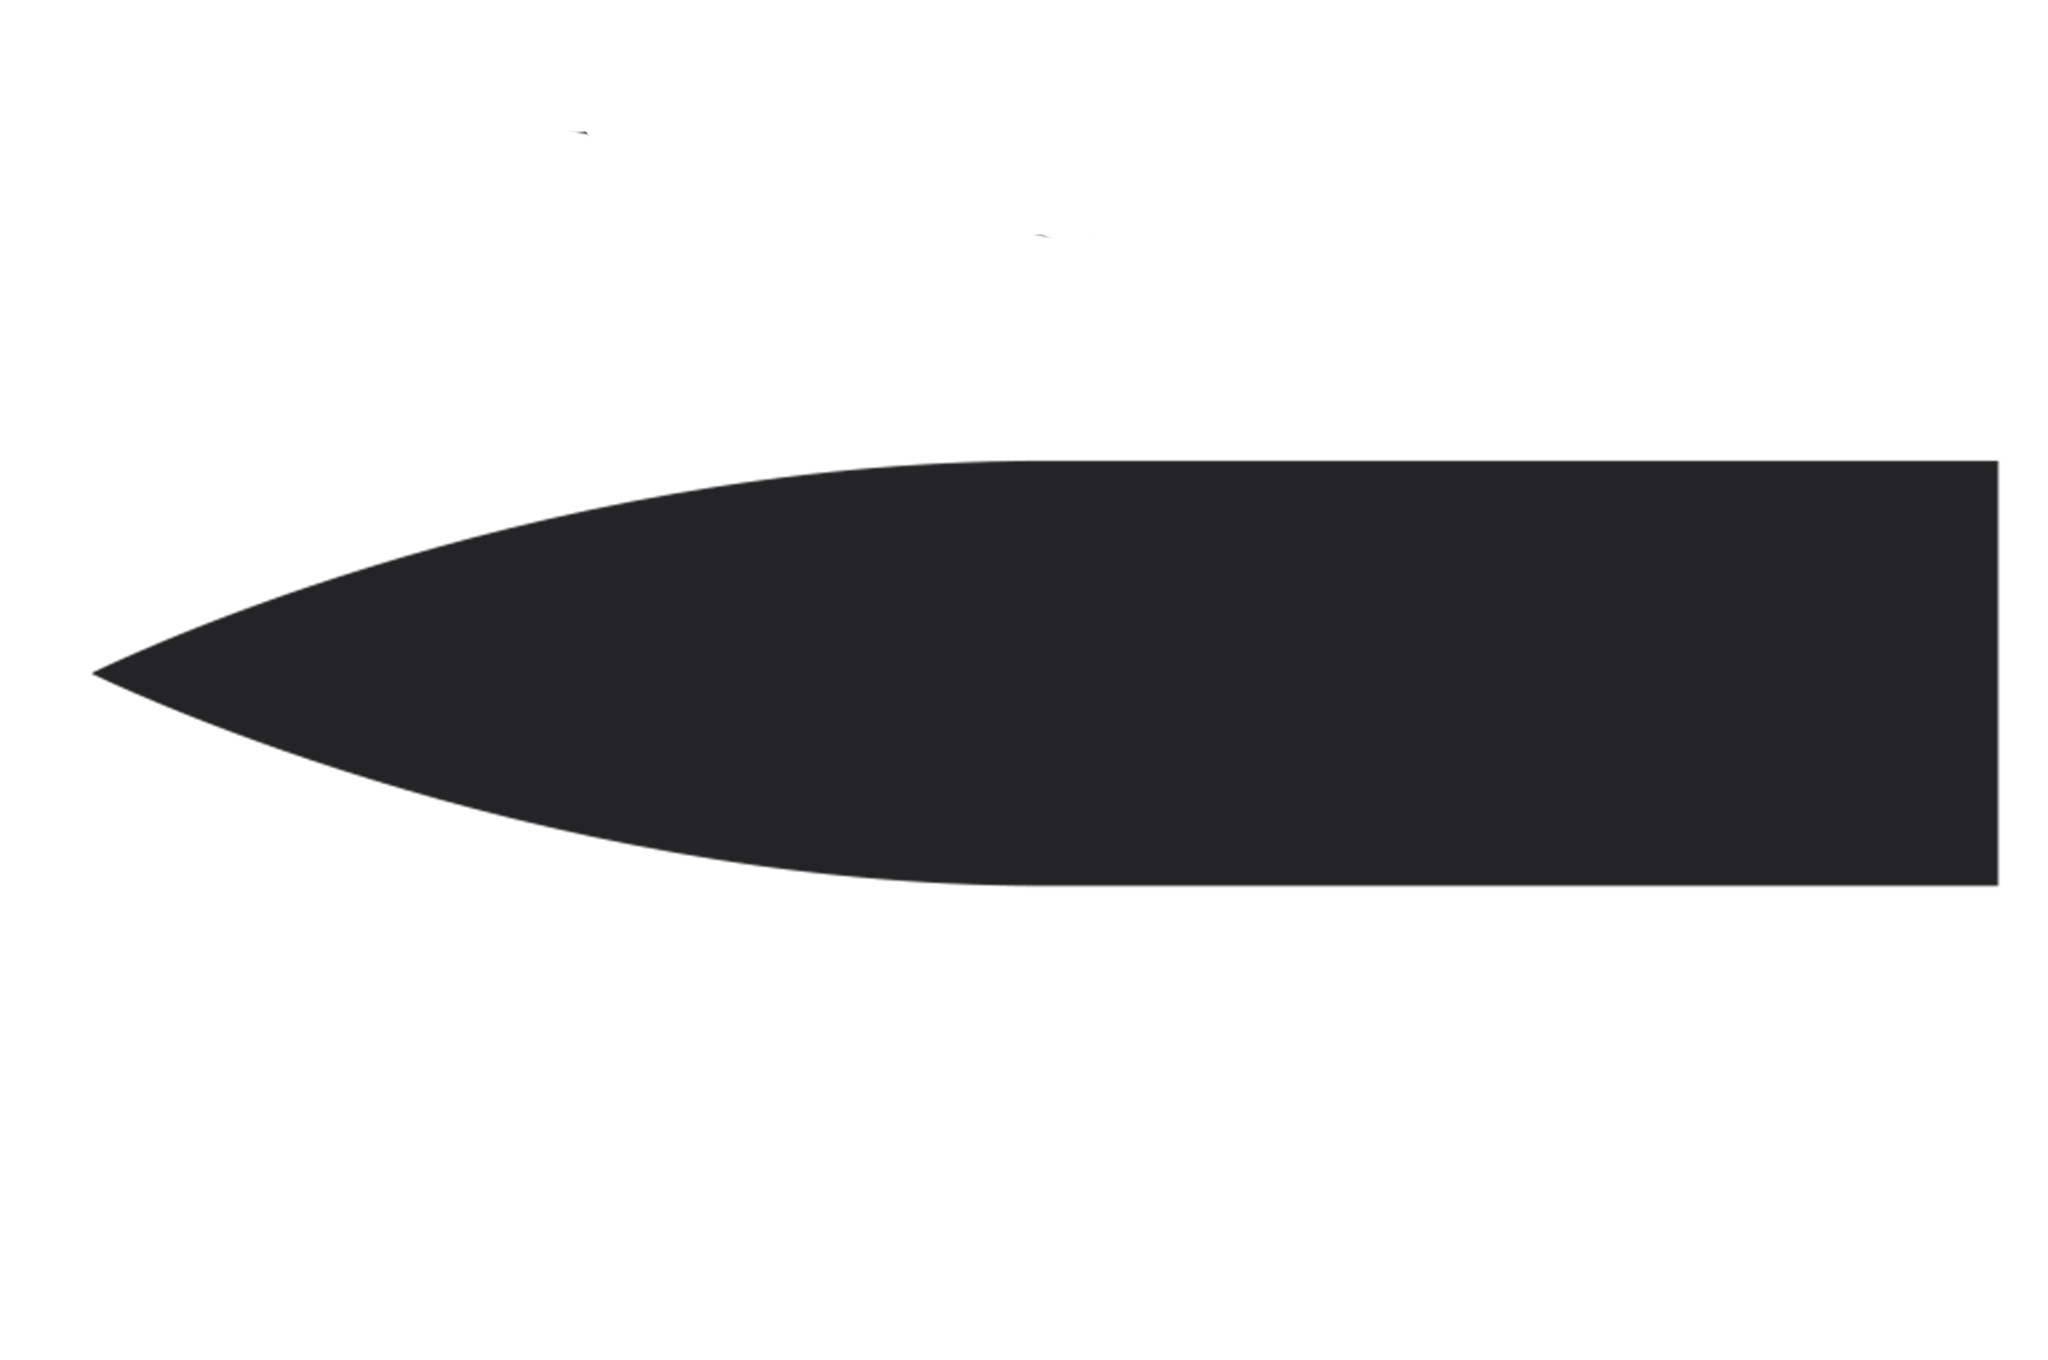
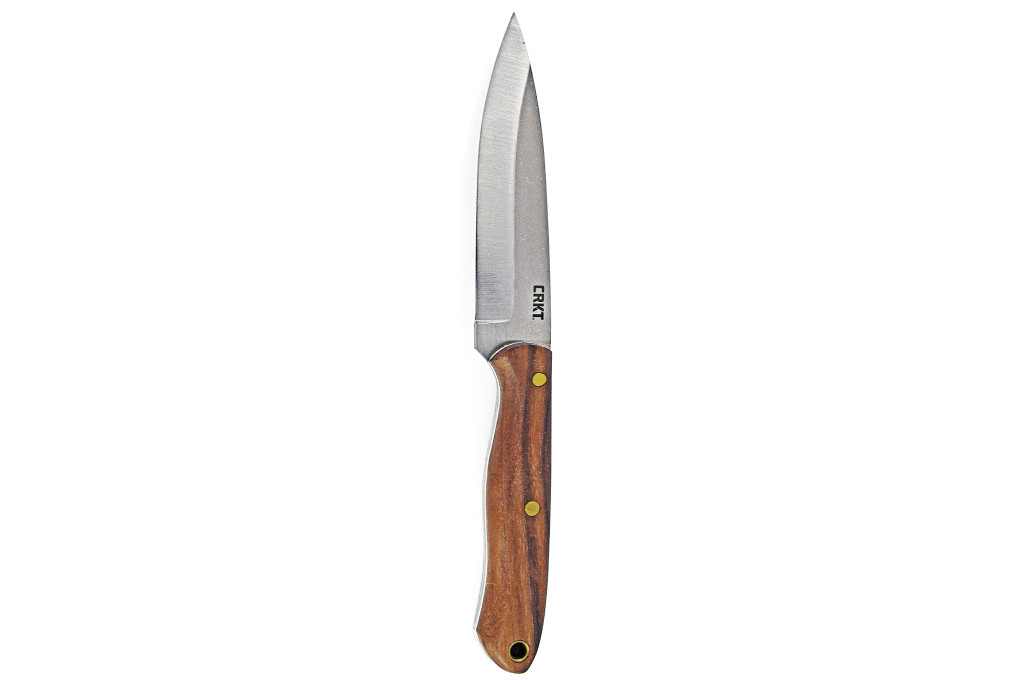
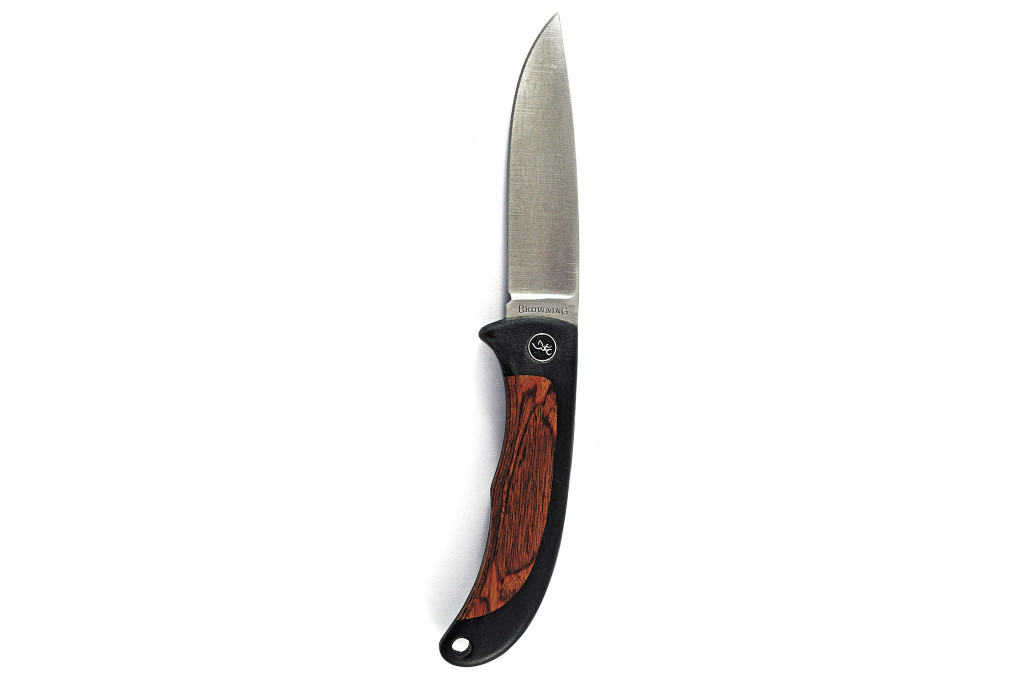
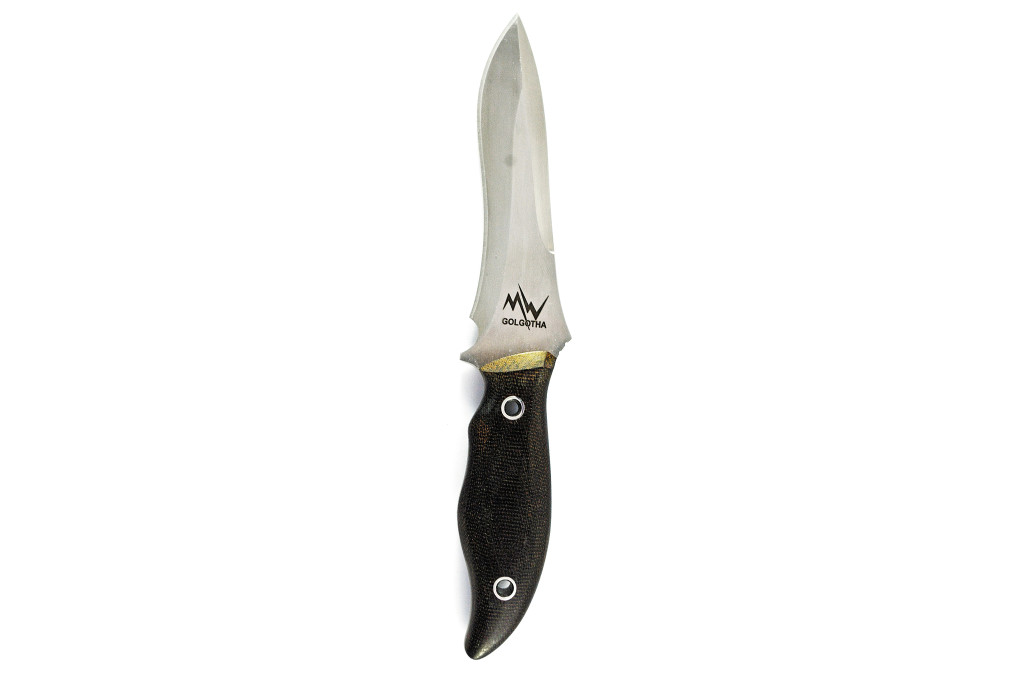
Drop Point

Today the drop point is one of the most prolific blade styles — but it was not always so. The late Bob Loveless popularized this style in the 1950s by grinding in such a manner to give the blade's spine the same strength and thickness from hilt to tip. It is one of the most practical profiles for a daily-use knife.

The tip is lowered, giving the user extra control when cutting with the edge without sacrificing too much power if the knife needs to pierce with the tip. This makes it extremely versatile, which is why you see it on knives for a wide range of functions: hunting, skinning, caping, woodworking, self-defense, etc.
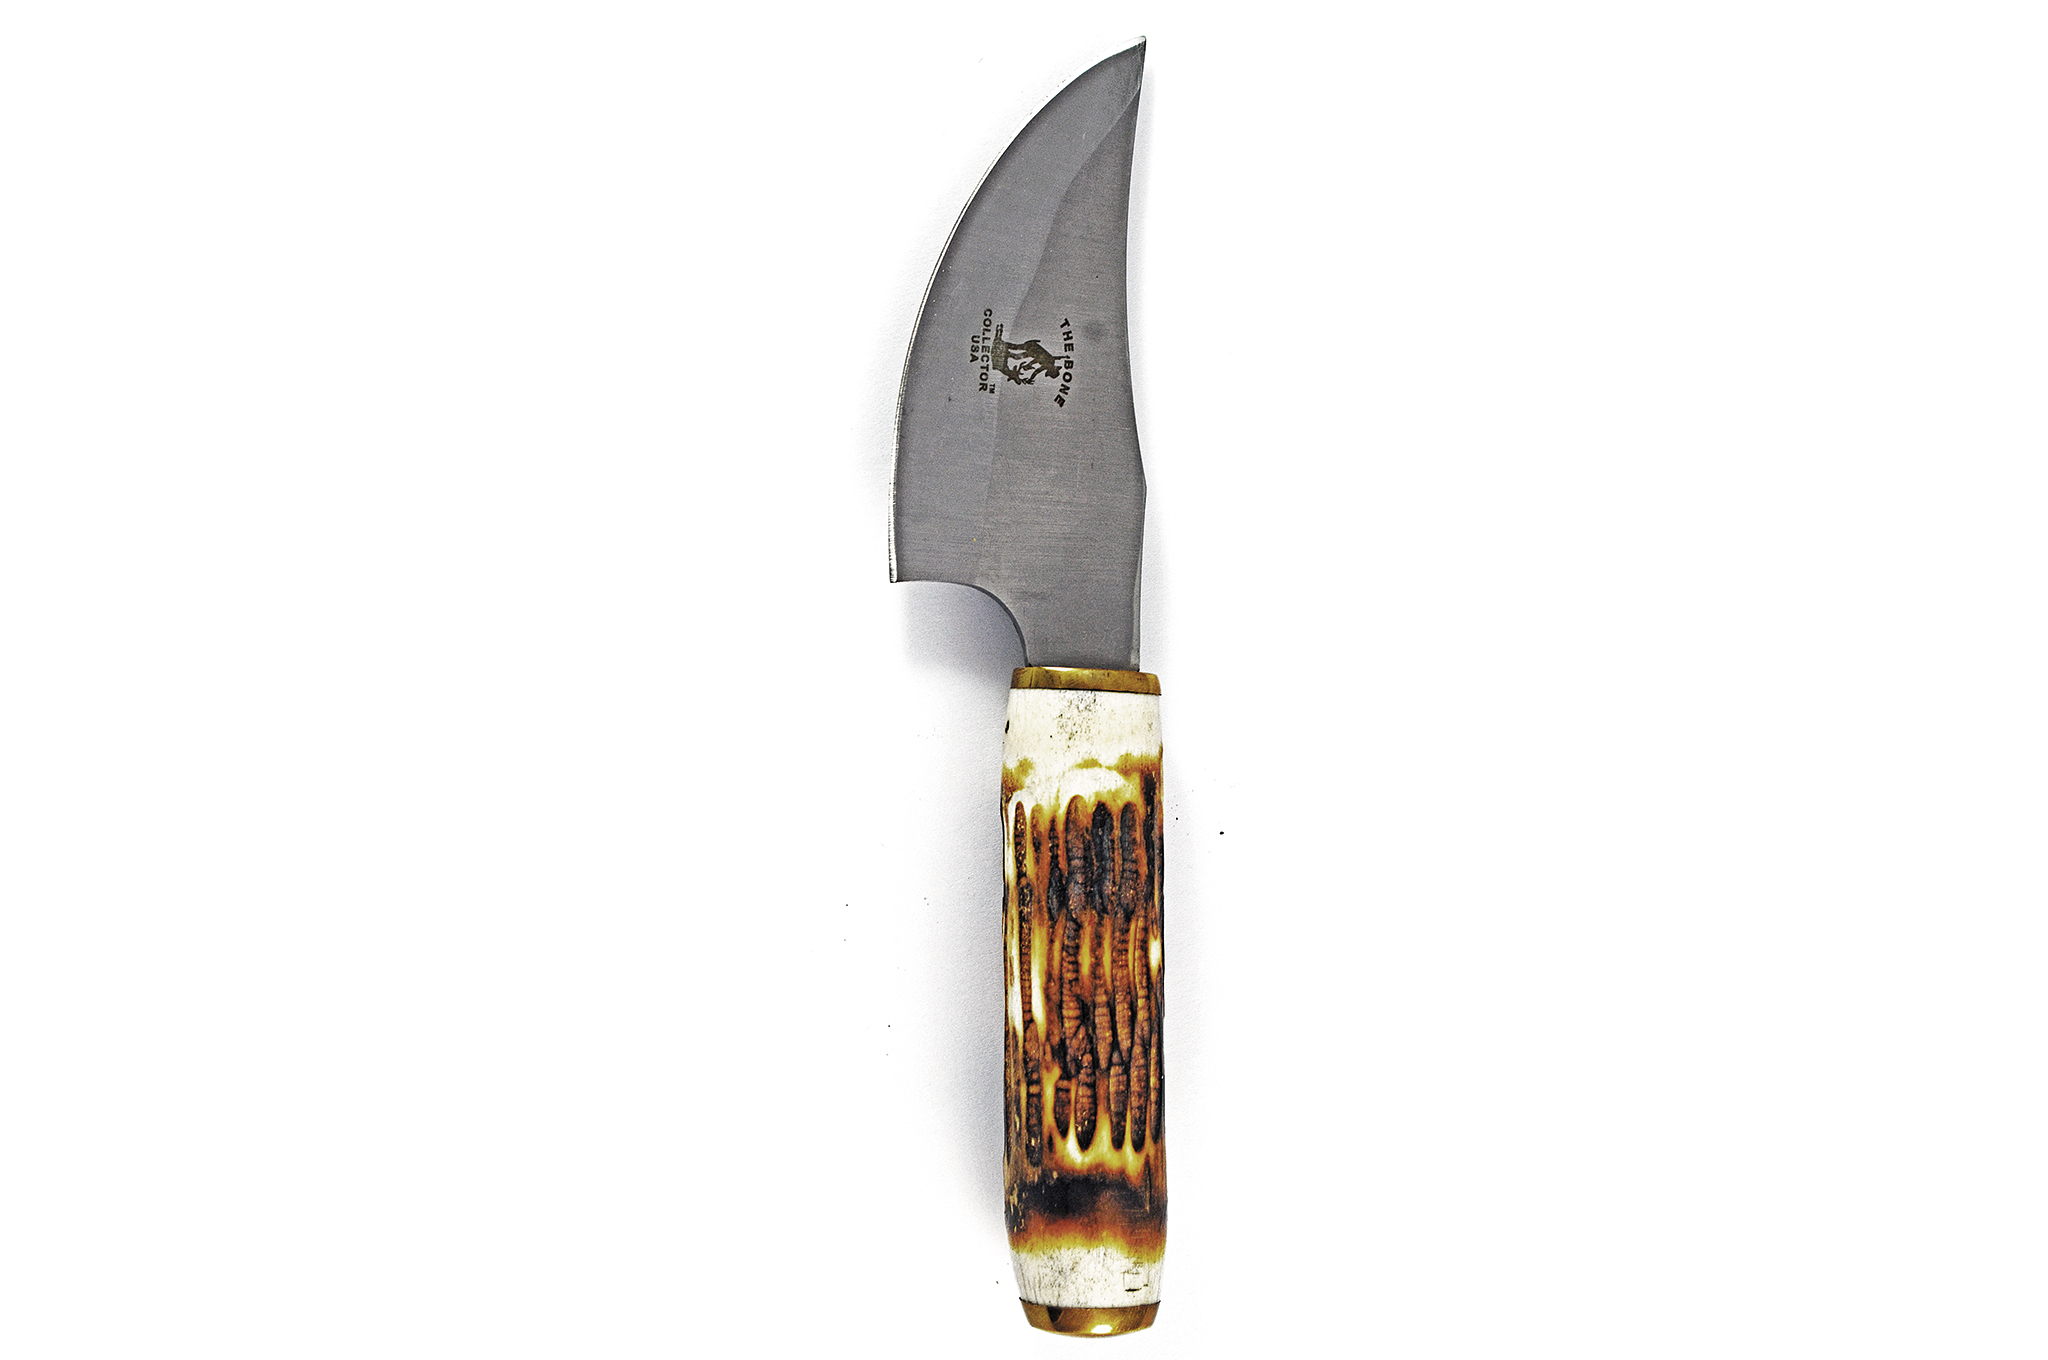
drop-point-blade

Clip Point

At one time the clip point blade was the predominant blade style throughout most of the world. Originally, it was driven by the forging process, as the tip of the blade naturally curves upward due to the heat and hammering. As machine-ground blades replaced forged ones, the style stayed around through familiarity and perhaps as homage to the Bowie knife of the 19th century.

It gets its name from the back of the blade nearest the tip being clipped in either a straight or concave fashion. Common on pocket knives as a means of safely accommodating the blade within the handle when closed, the clip may have a false edge to aid in penetration. This profile is good for general use, hunting, skinning, caping, woodworking, and self-defense.

clip-point-blade

Sheepsfoot

This blade was originally designed to trim the hooves of sheep and goats. It has a straight edge and a straight dull back with a rounded and unsharpened tip that curves to the edge. This special purpose knife is designed to be held by the fingers very close to the edge for more control.

Today, it's become increasingly popular on rescue knives as they allow a first-responder to cut someone free of a seatbelt, rope, or clothes, while keeping the sharp tip away from the accident victim's skin. You'll also find sheepsfoot blades on knives used for skinning, woodworking, and sometimes self-defense.
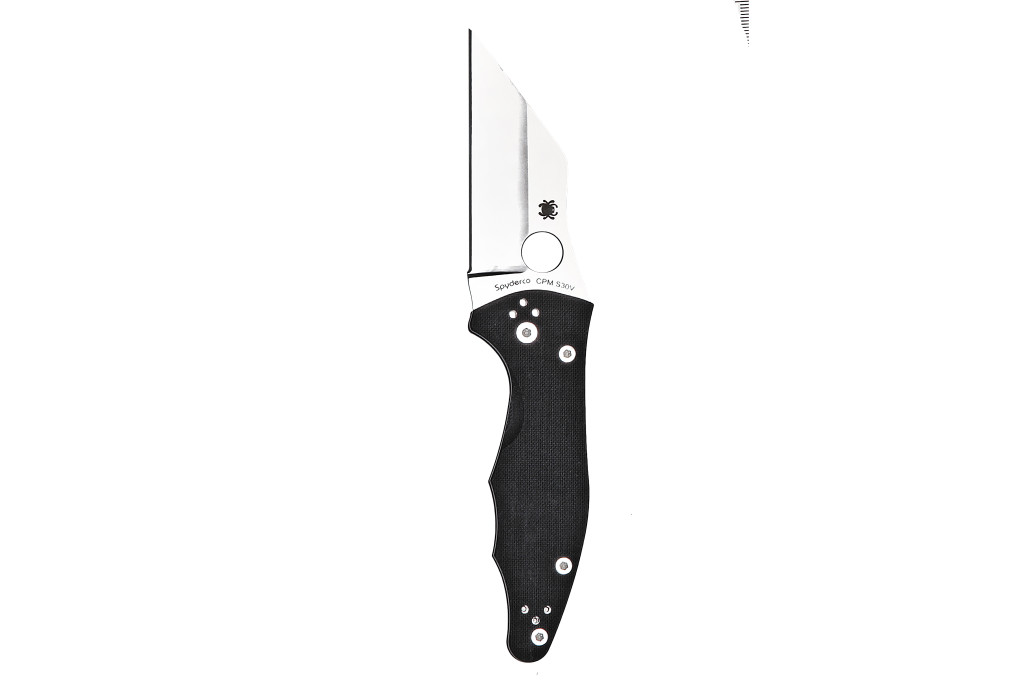
sheepsfoot-blade

Wharncliffe

Similar to the sheepsfoot, its curve on the back edge is more gradual and is typically thicker than knives of a similar size. This specialty blade was designed for use by mariners on sailing ships of old. The flat blade makes for predictable cutting action; important when the swaying movement of ship could cause a drop-point-shaped blade to slip from the work and penetrate a sail or a hand. Its tip is also excellent for fine work and the flat edge is easy to maintain.

Nowadays, you'll most commonly find a Wharncliffe on box-cutters, as well as other blades for rescue, skinning, woodworking, and self-defense.

whamcliffe-blade

Hawkbill

Resembles the previous two profiles, with one exception: The tip is pointed to add in penetration when used to strike and cut. This makes for a potent self-defense blade when used properly and with the correct technique.

hawkbill-blade

Persian

This design is usually the opposite of the three previous types, as it curves upward with a pointed tip. This profile excels best at filleting, though you'll also see it on certain combat and general-use knives, as well.
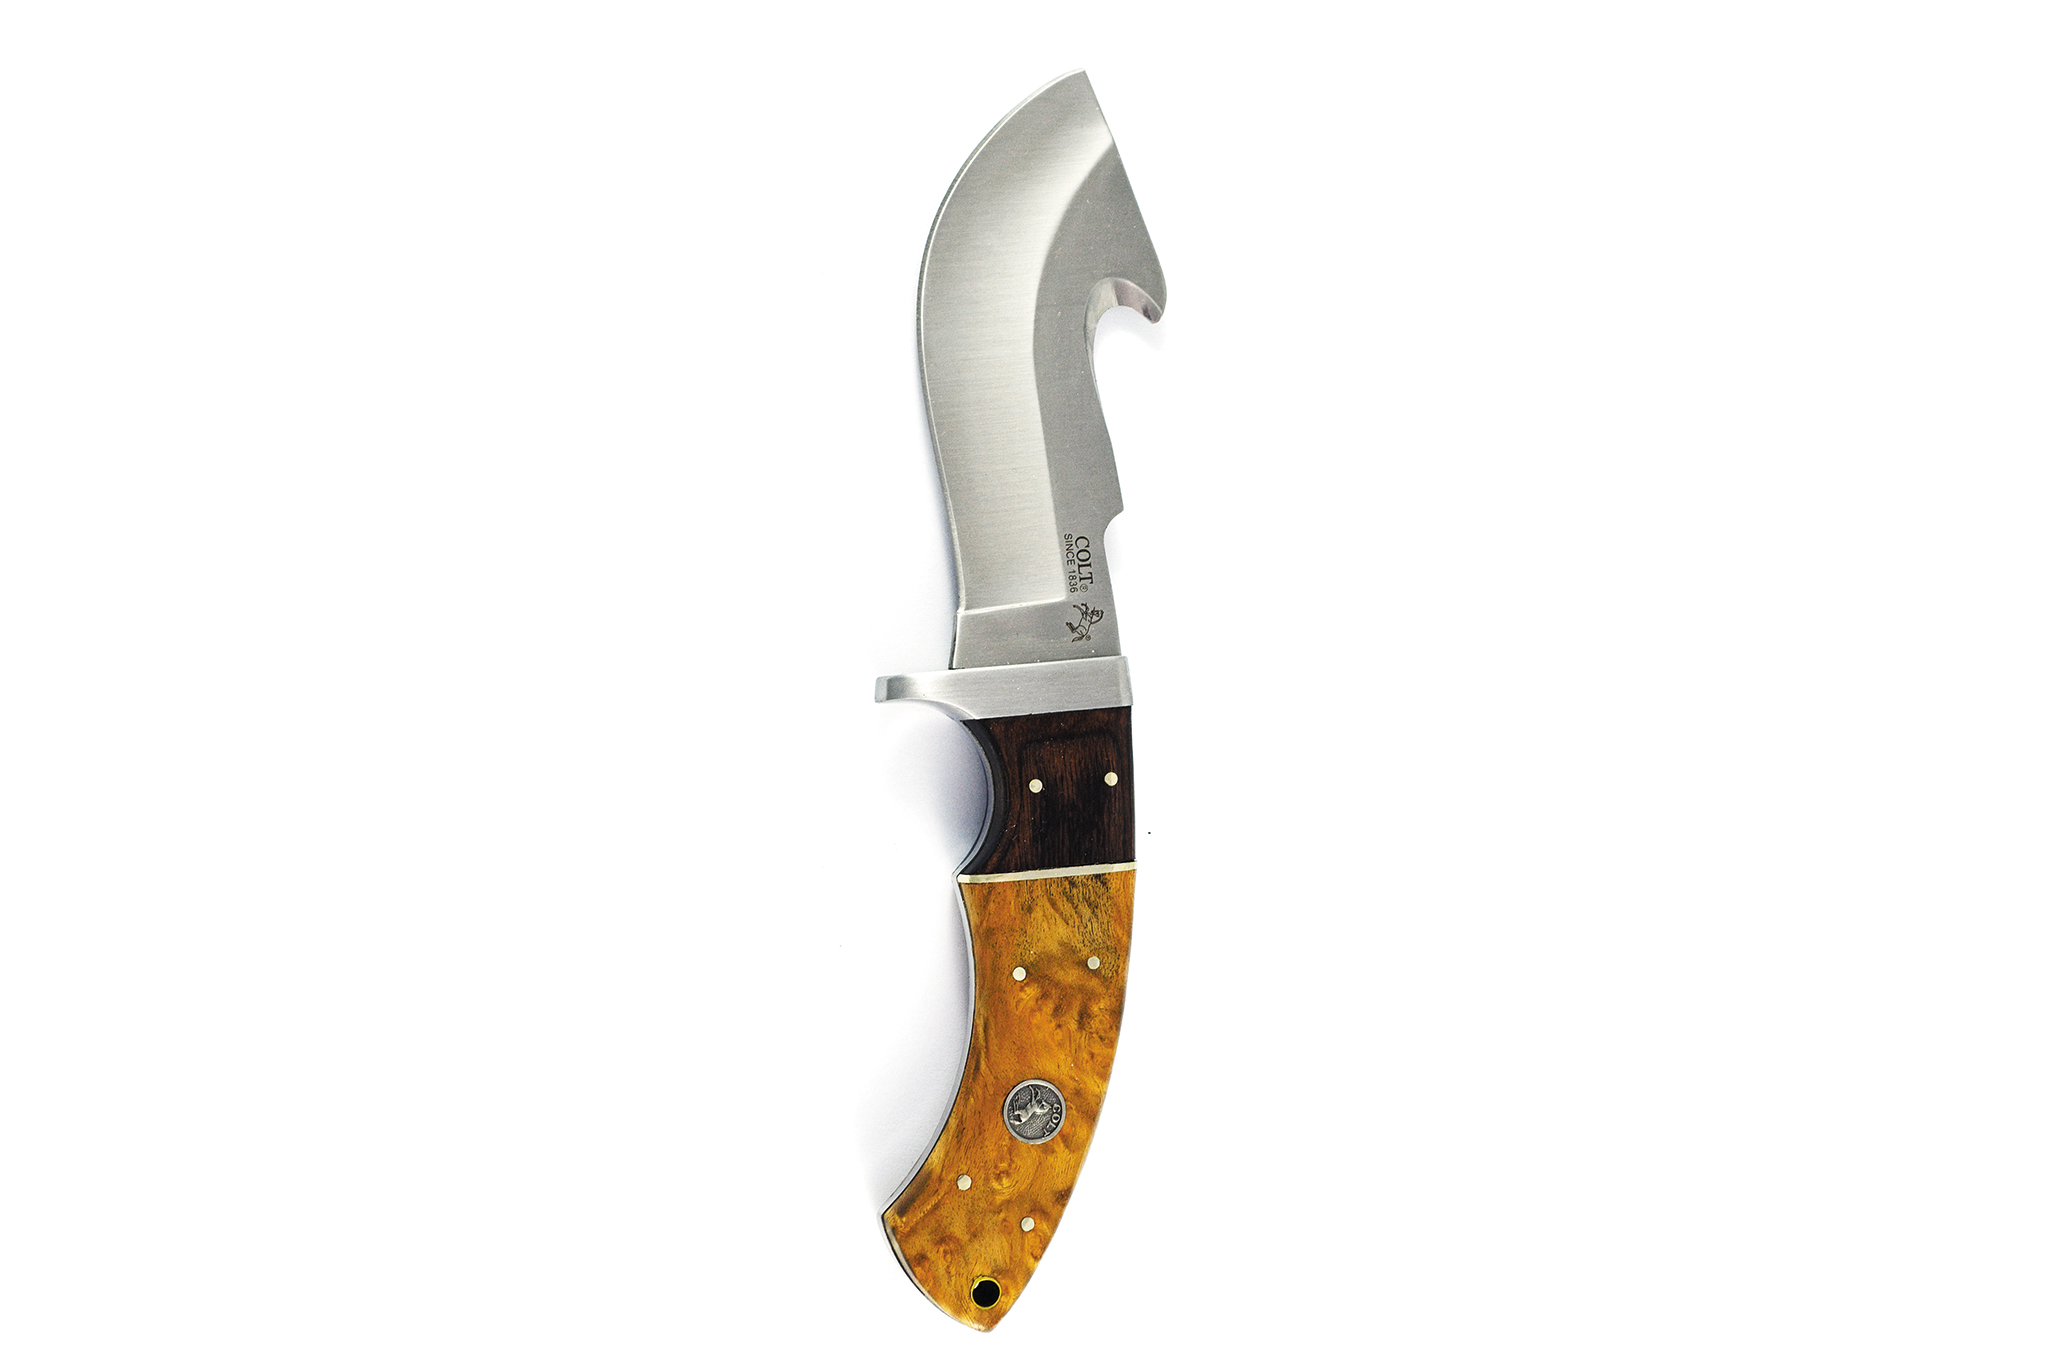
persian-blade

Gut-hook

A gut-hook might be found on other blade profiles as an added accessory, but the true gut-hook has a blunt edge with a beveled and sharpened single serration usually cut in the top plane of the blade. This was originally intended to aid in the skinning of animals, where the blunt tip would not damage the hide or cut the intestines while dressing it out.

Common on hunting blades, the gut-hook is also found on rescue and military knives. The shrouded hook is a great way to cut seatbelts and cordage without risking injury from an exposed knife tip.
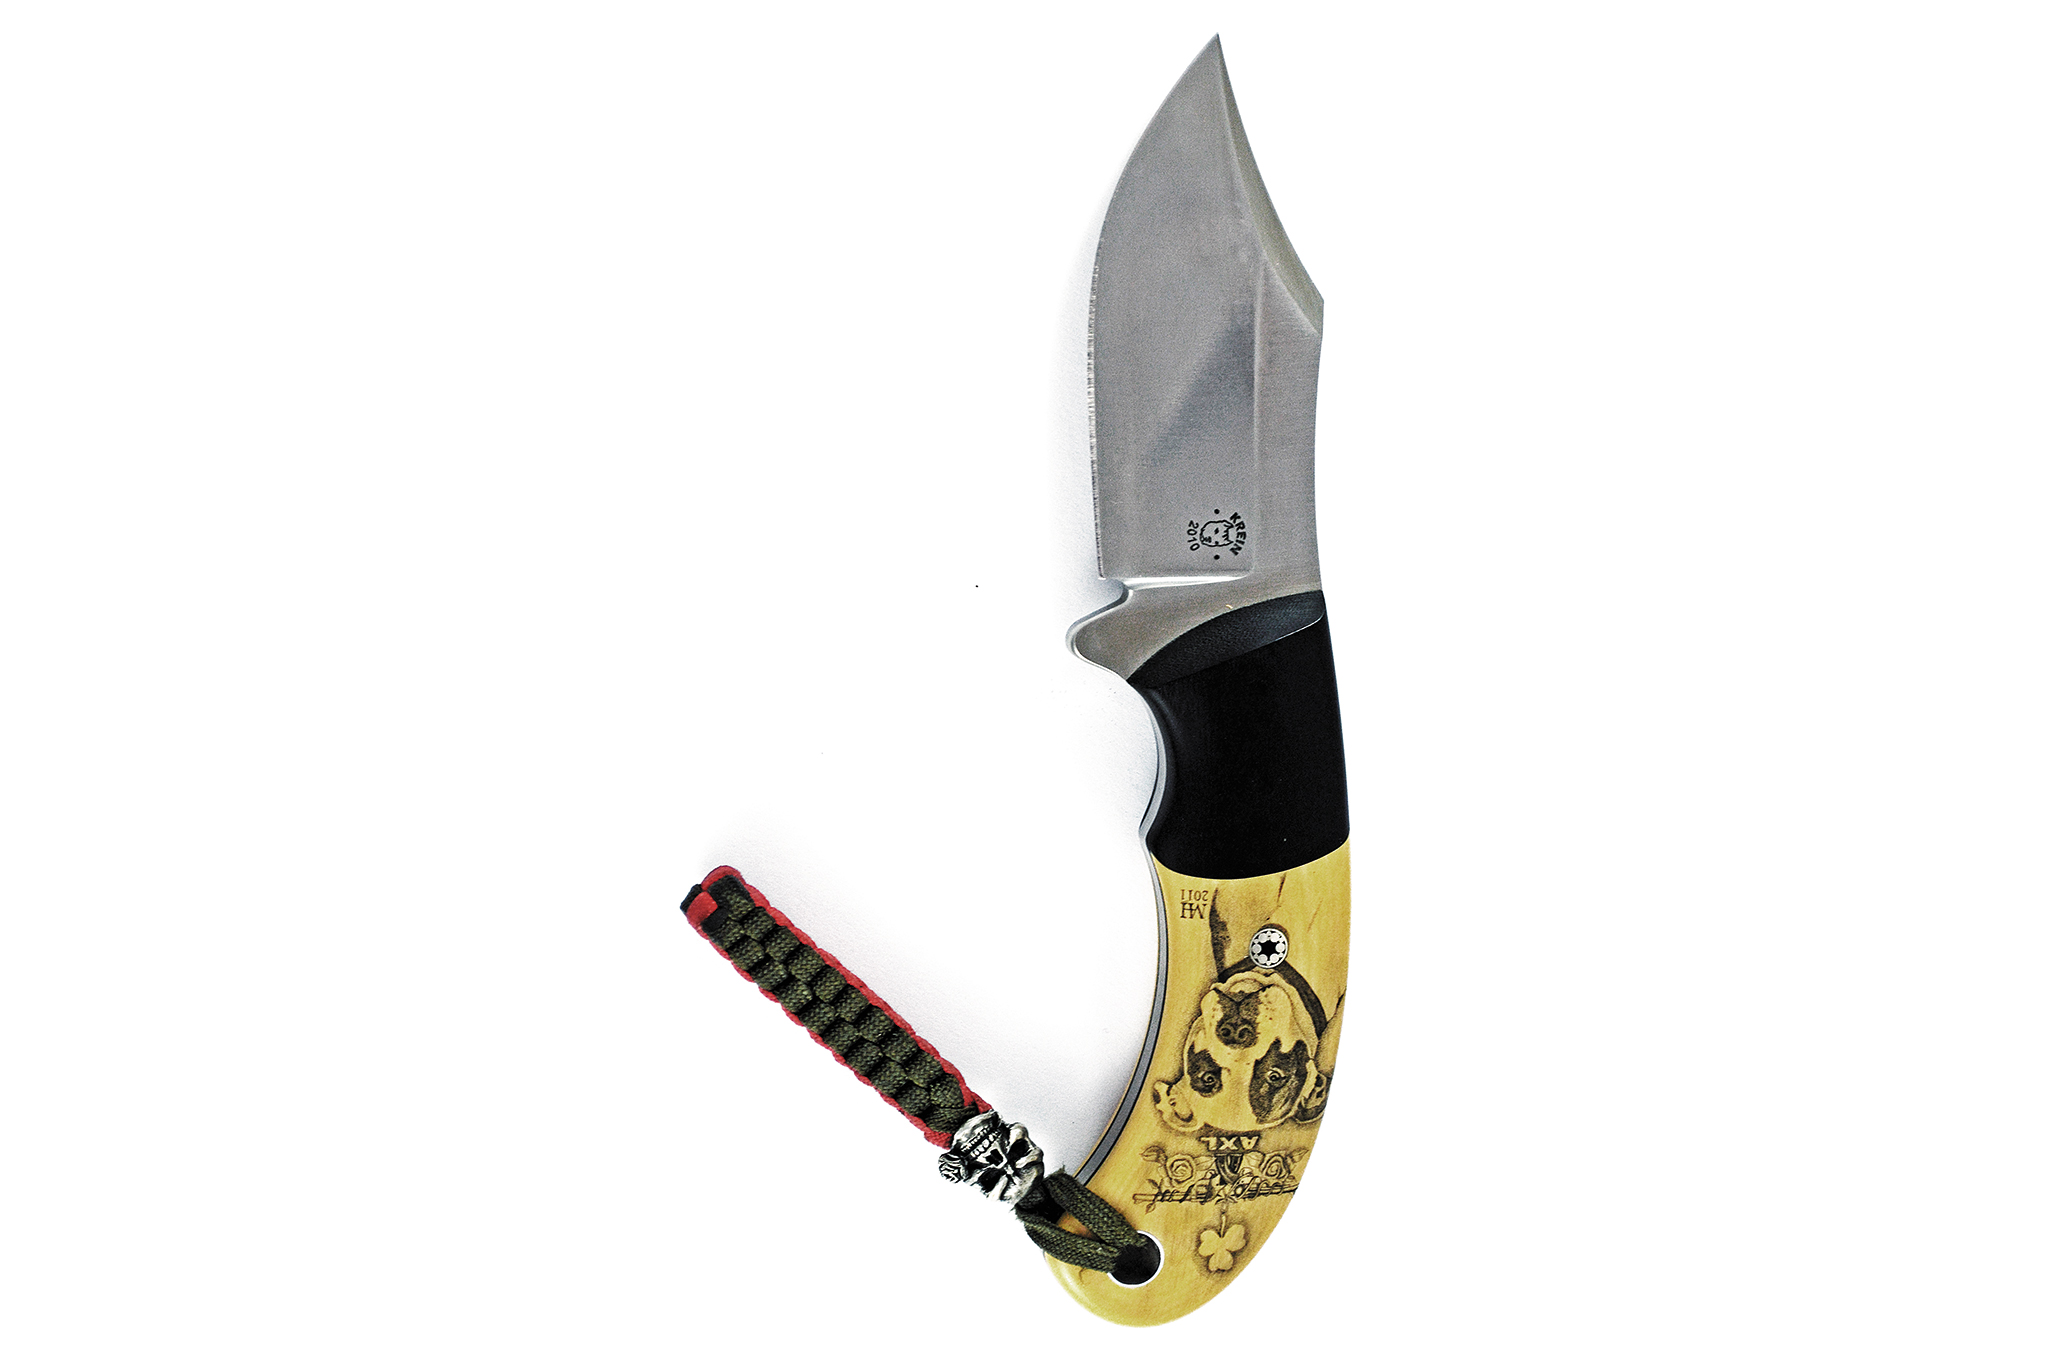
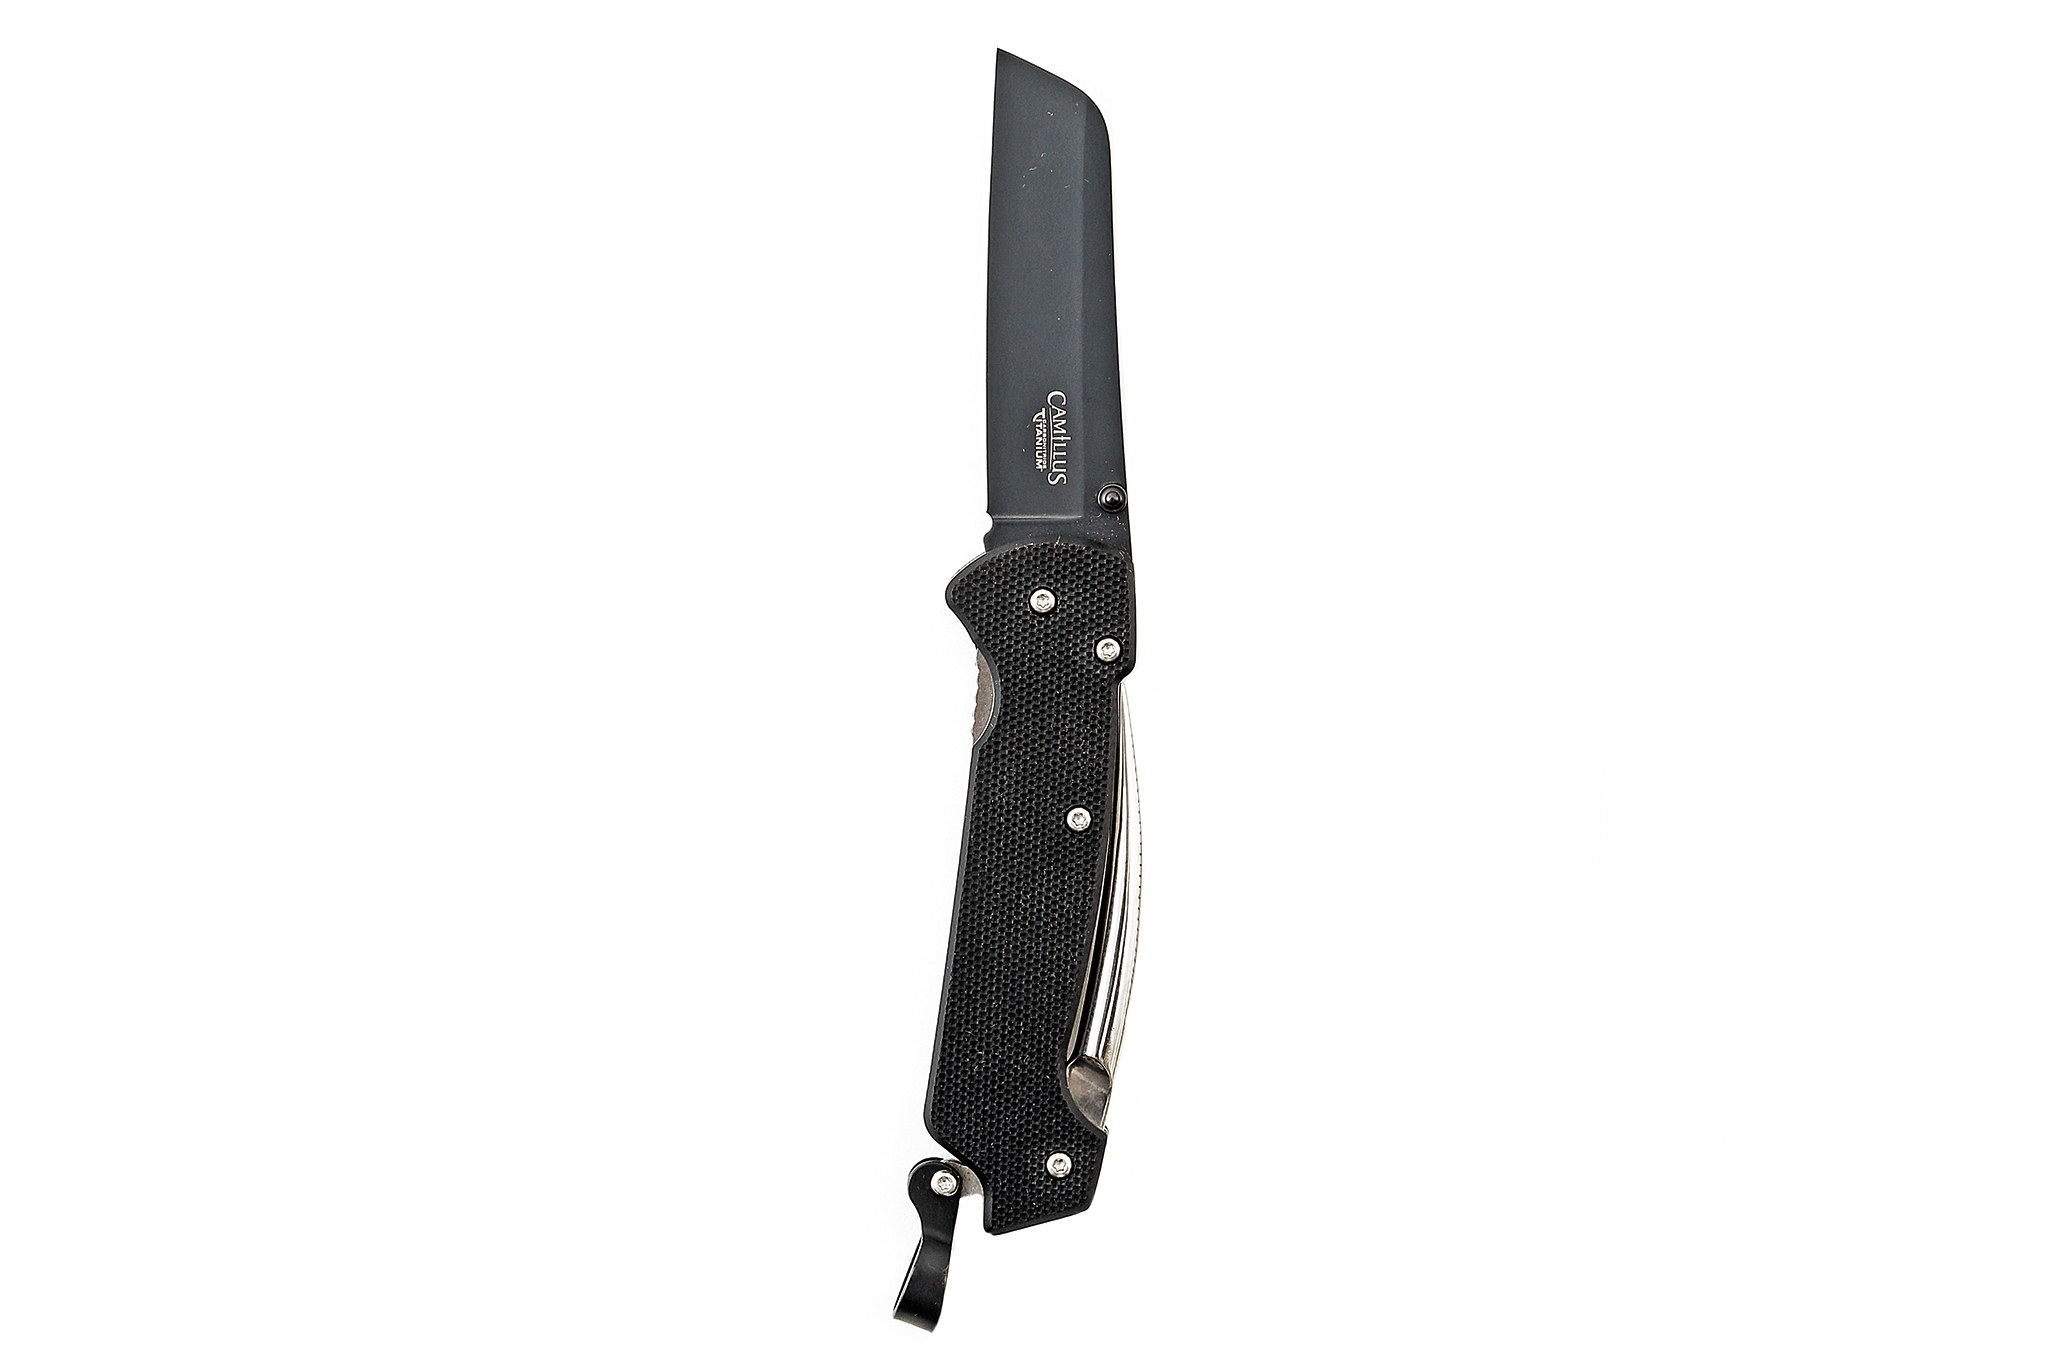
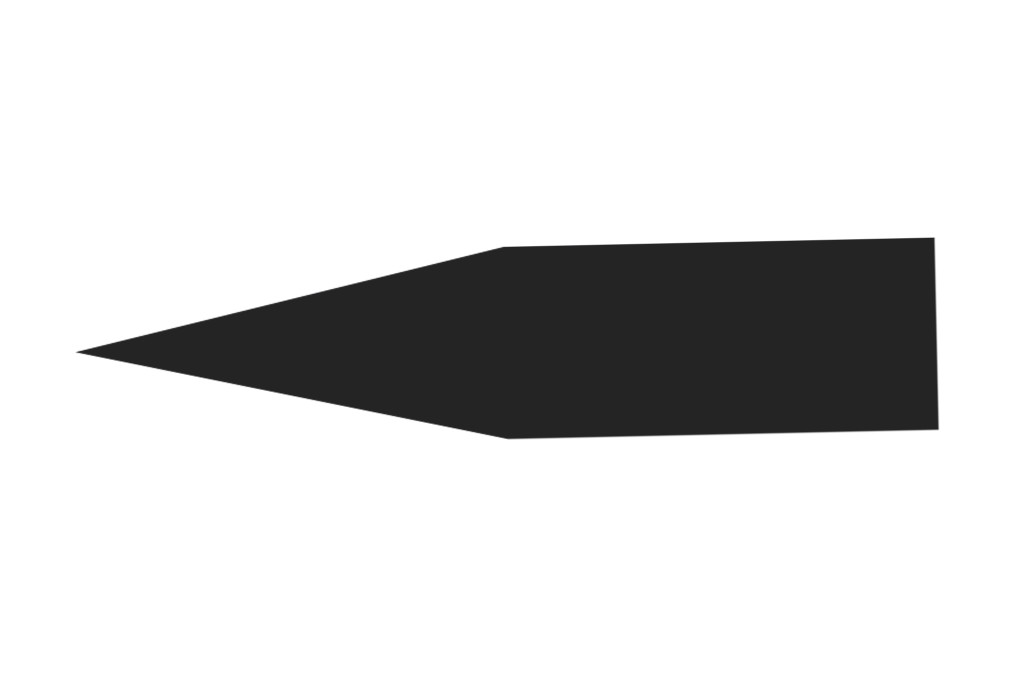
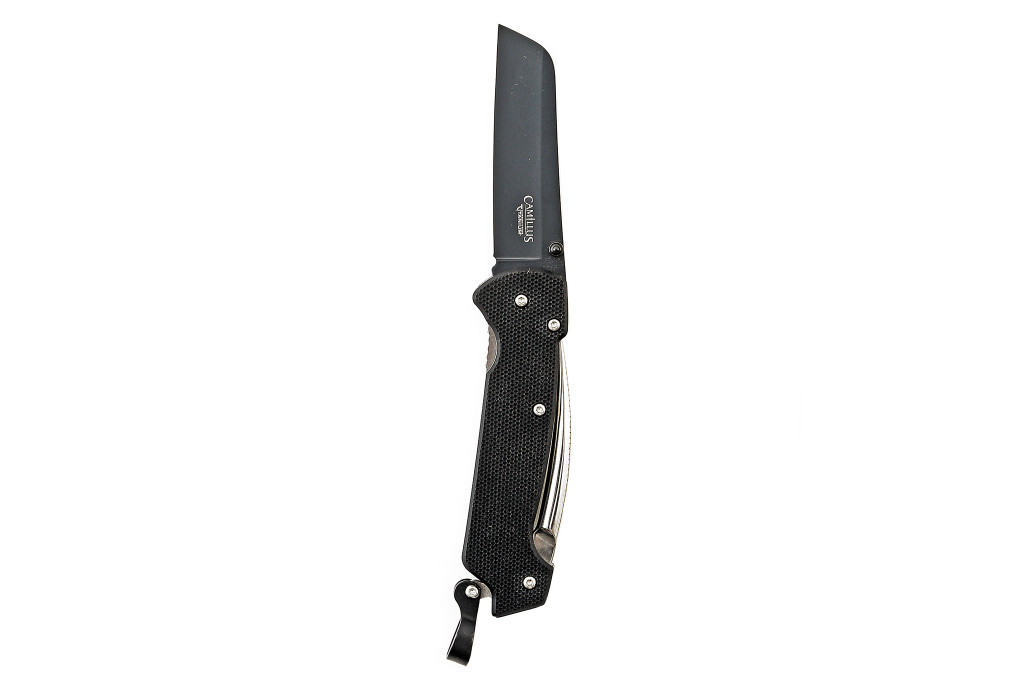
gut-hook-blade

Tanto

The distinctive tanto stands out in the crowd. This type of profile was introduced to the United States on custom knives by the late Bob Lum. It gained popularity in the 1980s when companies like Cold Steel produced them under a variety of names and configurations. They exploded in the 1990s when tactical knives began to overtake the cutlery industry with tanto designs from makers such as Bob Terzuola, Allen Elishewitz, and the aforementioned Emerson. These modern U.S. blades have a flat spine, but the tip is most often set at an obtuse angle to the edge. Some have the spine angled toward the tip, creating a sort of triangle at the business end.

They're great for penetrating, but are less versatile than drop-points due to the obtuse angles near the tip. You'll see tanto profiles on tactical knives, everyday-carry (EDC) blades, and sometimes hunting knives.
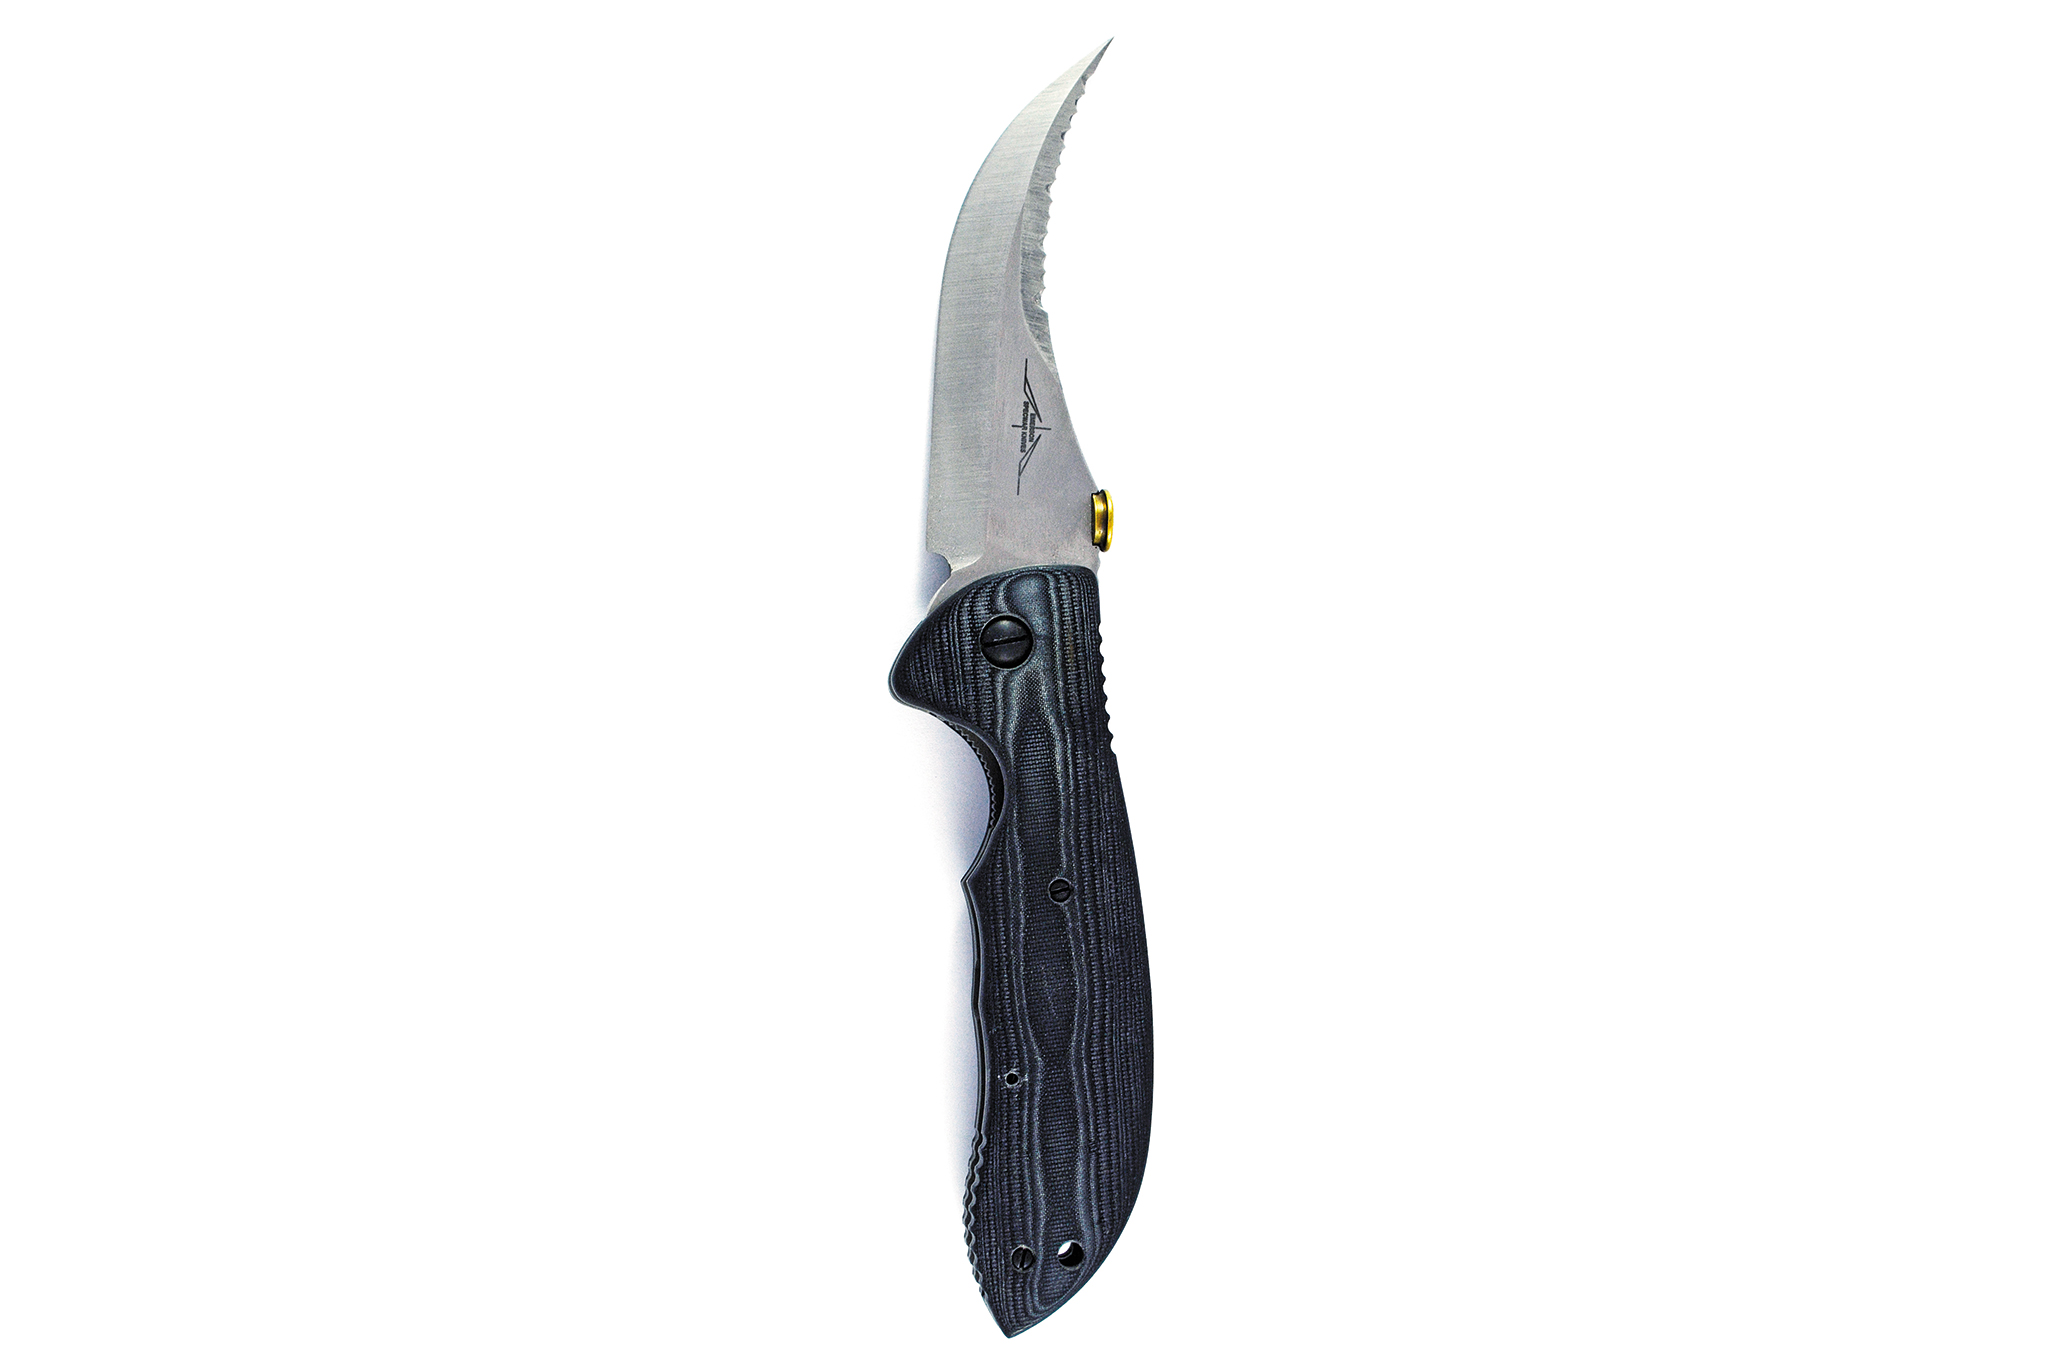
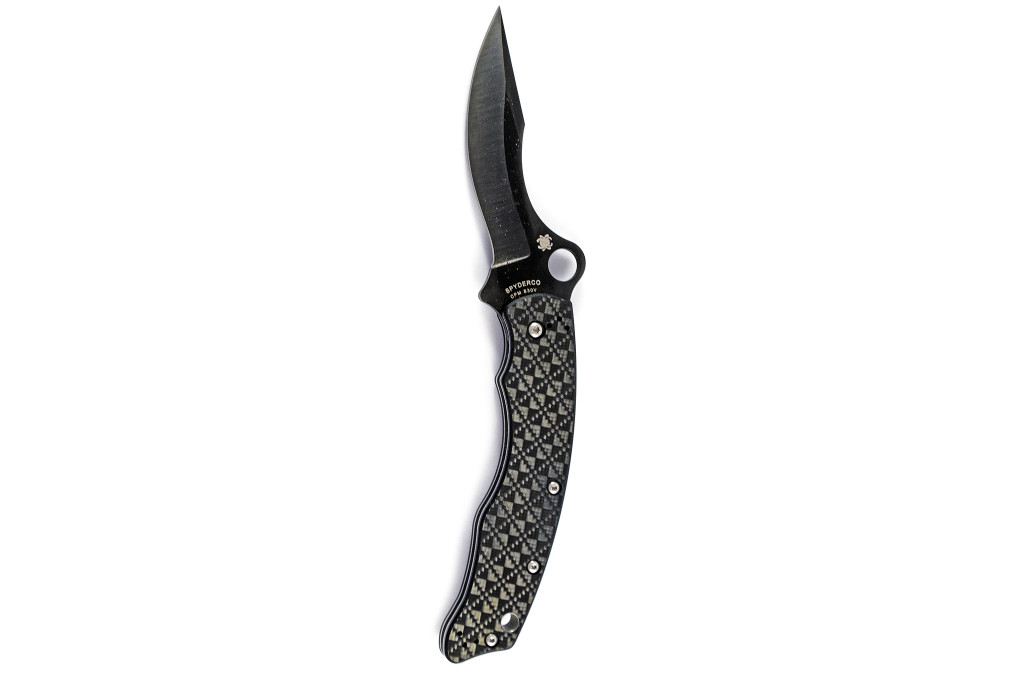
tanto-blade

Recurve

If there was ever a knife of the new millennium, it would have to be the recurve blade. On a recurve, the “belly” of the knife bows out from the edge before the point and gives more surface area for cutting. Recurves proved popular following the turn of the new millennium on many custom and factory designs.

These can be found on hunting knives, skinning blades, self-defense tools, and some EDC models.
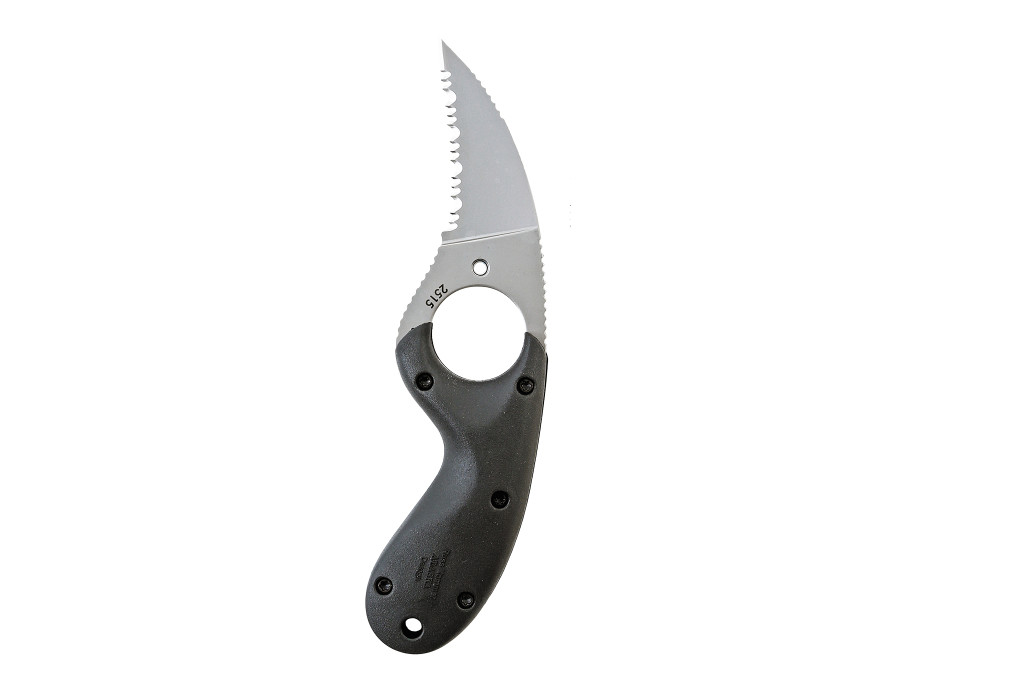
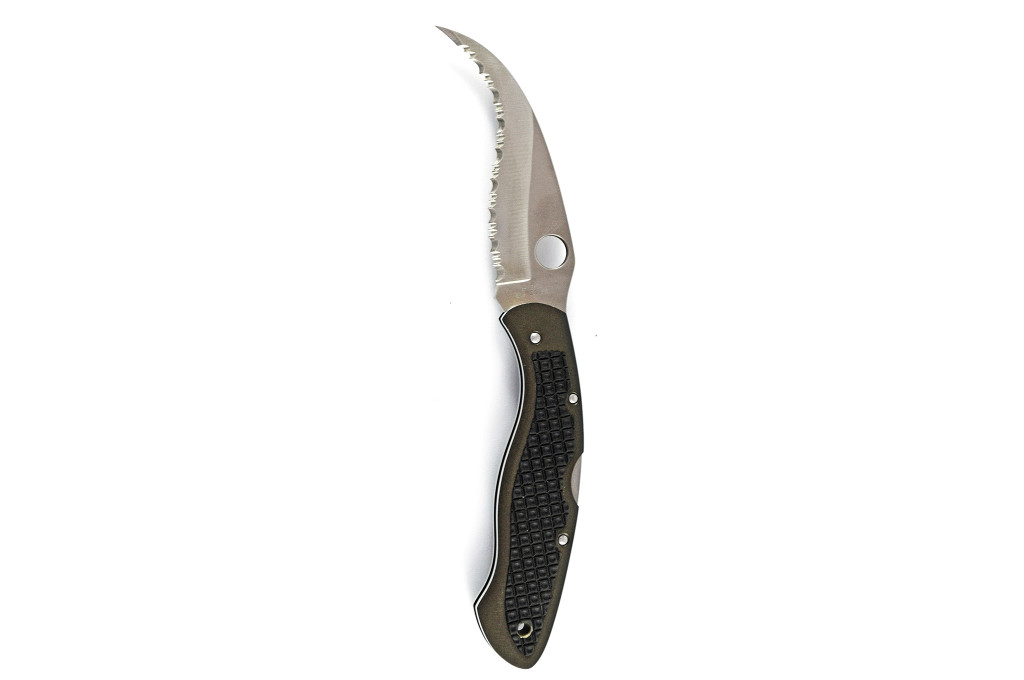
recurve-blade

Reverse S

This design was popularized by Spyderco and is found on many of their designs, such as the Cricket, Dodo, Matriarch, and Civilian. The sweeping curve allows for more surface area on the cutting edge than a typical straight edge or even the recurve. Hence, the blade in question might be right at the legal limit in most jurisdictions, but the extra surface area gives the cutting performance of a somewhat larger blade.
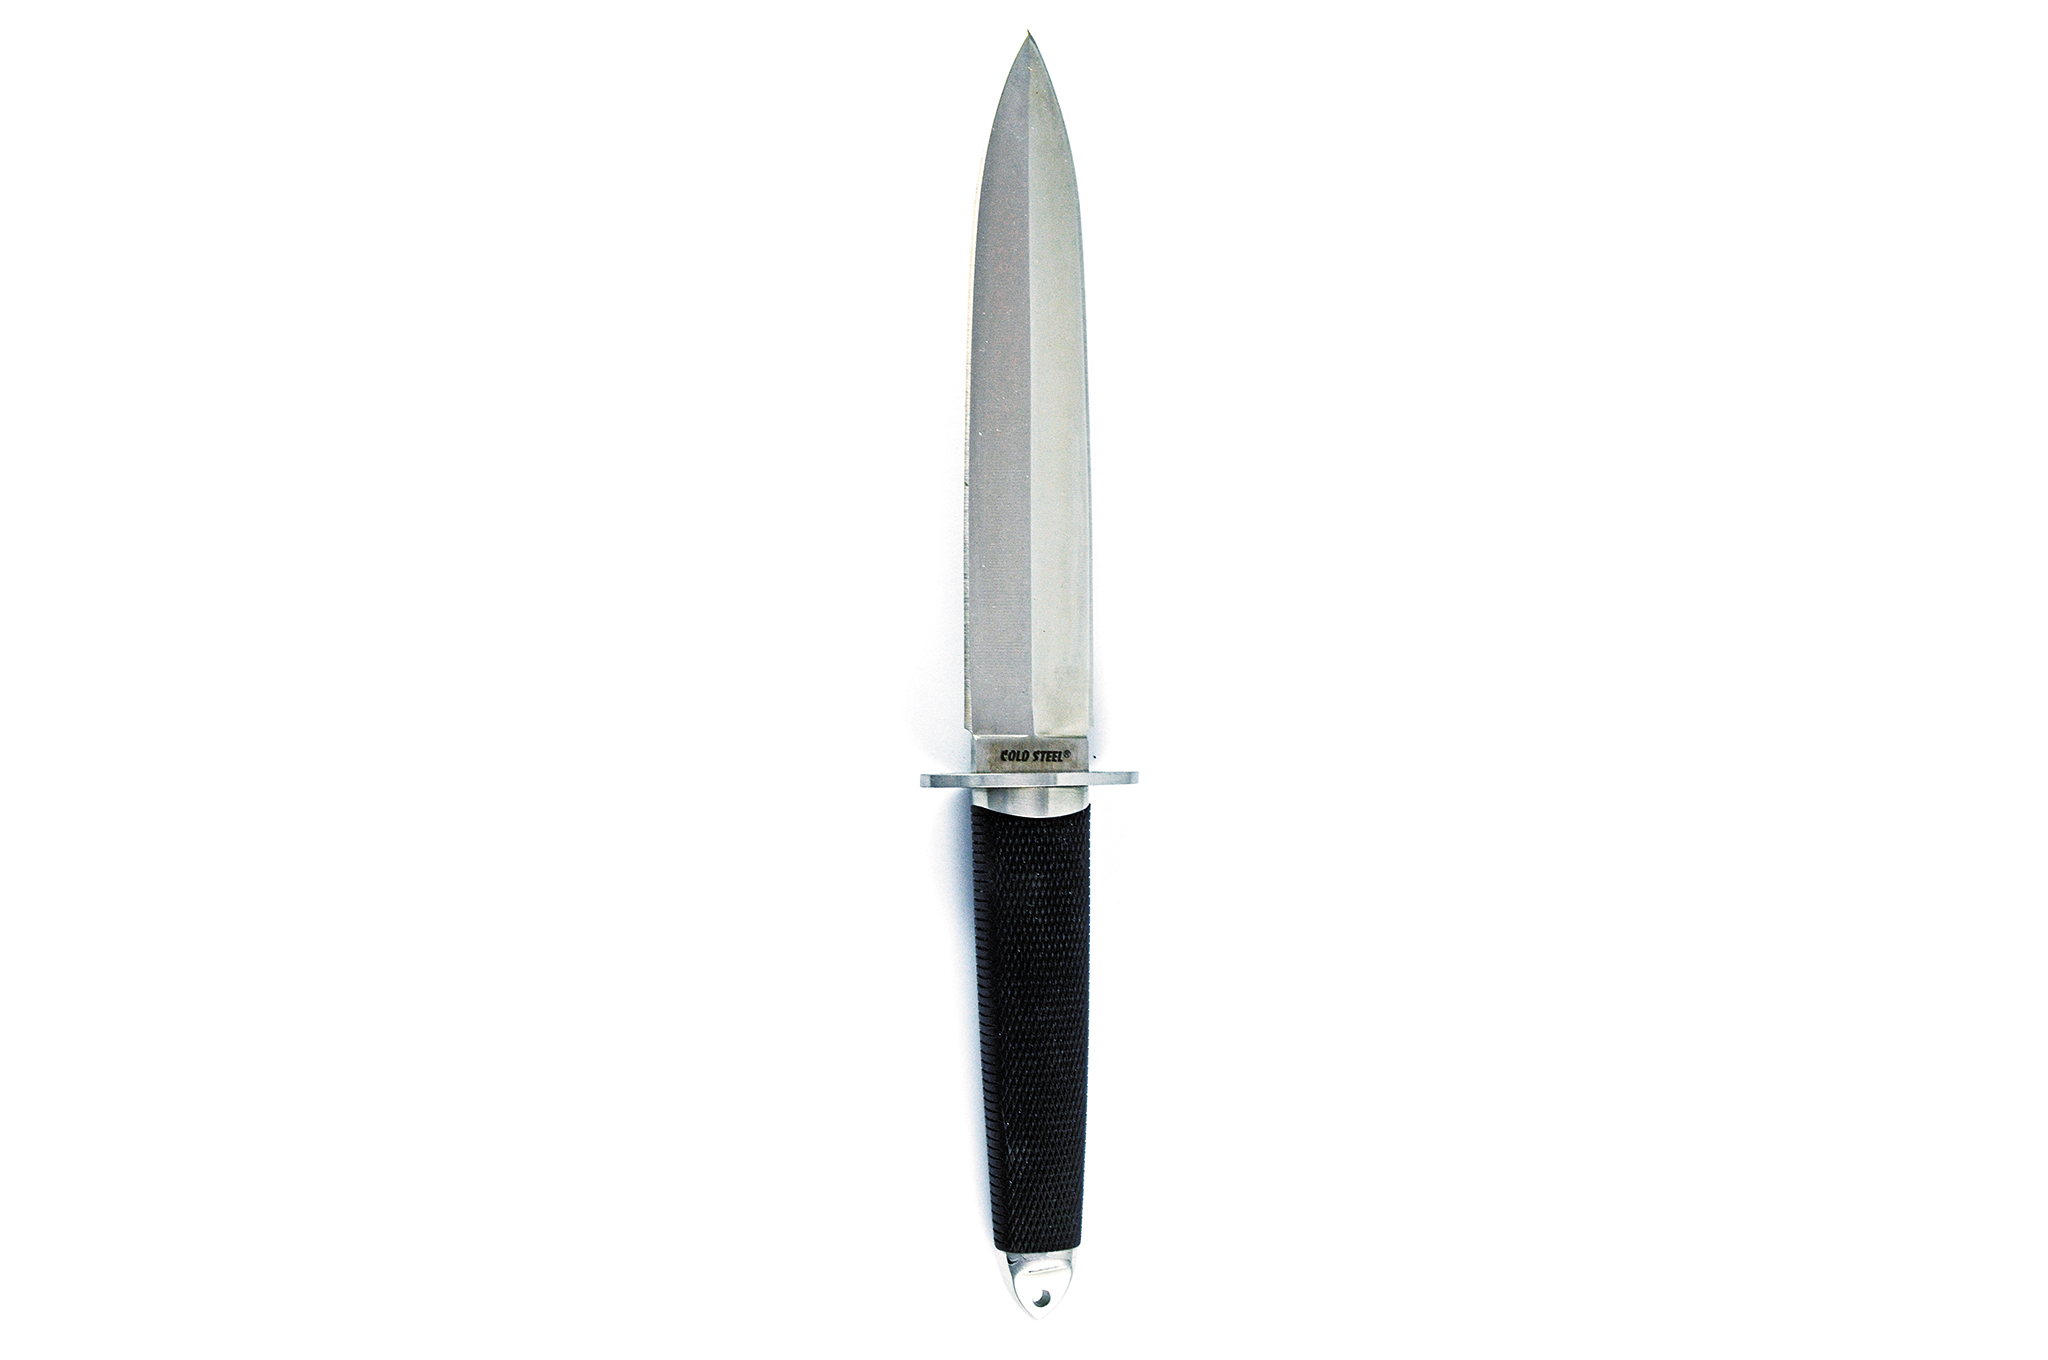
reverse-s-blade

Dagger

It has had a single purpose for centuries: combat. This ancient profile is steeped in symbolism and due to its symmetry has been the base design of many art knives. Originally a scaled-down version of a double-edged sword, the dagger features two symmetrical sharpened edges. Some modern makers prefer to make the top edge unsharpened to avoid nefarious weapon laws in most jurisdictions and to make a more utilitarian blade. Its strength is in stabbing as the double edge (or top false edge) aids in penetration.

Carry of a dagger is heavily restricted, if not outright prohibited, in most jurisdictions. In response to this, a number of makers have refined the design into what is more commonly known as a spear-point blade or a bull-nose profile, in which one side of the blade has a false edge or is not ground, but maintains the symmetrical profile.

dagger

What Combo is Best?

Now that we've just downloaded a gang of knife knowledge on your internal CPU, you might be asking, “Great! I have all this info…now which knife do I buy?” Like pretty much any survival gear you invest in, the best knife is the one that fits your needs and your wallet.

If you're pretty much an urbanite who seldom even goes for walks in the park, let alone day-hikes or hunts, then a gut-hook skinner will probably be a waste of money. Likewise, if you find yourself in the woods most of the time, a double-edged dagger would make for a pitiful bushcraft knife. Looking for an all-in-one survival blade to keep in your go-bag? Keep looking past a sheepsfoot with a hollow grind. What does this all mean? Each design has inherent strengths and weaknesses.

When evaluating vastly different types of knives, sometimes it's pure aesthetics that win out. That is, much of this comes down to personal preference and what appeals to you visually. At the same time, be realistic and remember that just because a knife looks cool doesn't mean it's the most useful.

Tanto Myth-Busting

The tanto is a popular blade profile, but unfortunately there are some misnomers floating out there, mostly due to its name.

In feudal Japan, a tanto referred to a knife or dagger worn by samurai. It could have been single or double edged and was used mainly for stabbing (though it was also capable of slashing). Its profile resembled a straight-back blade: the cutting edge curved at the end where it met the flat spine to form the tip (similar to modern, high-end cutlery knives). Many of today's tanto blades today look nothing like the ones used by the samurai.

Another myth about the tanto that persists is that they're excellent at penetrating armor and the like. This has more to do with the thickness and strength of the steel in the blade as opposed to its profile.

The other falsehood is that the popular CQC series of knives by Emerson are based on the tanto. In actuality, that tip was designed as a point that would shear and chop in the manner of the guillotine blade. Unfortunately, knife collectors and writers at the time looked at the blade, saw that it superficially resembled a tanto coupled with the Japanese chisel grind, and assumed that the knife was a tanto.


Kickstarter: Renovo MUV Modular Water Filter

Renovo has recently added a new water filter design to its lineup, and it features some unique design elements. The new filter, known as the Renovo MUV (pronounced “move”), is a modular and adaptable 3-piece design.

Renovo MUV water filter

Many water filters on the market use a single-stage filter, such as a hollow-fiber membrane. Previous Renovo filters (such as the Trio) have used a 3-stage filtration system, but the real key to the MUV is that each stage is housed in a separate module. These modules interlock, allowing users to choose only the modules they need for their environment.

Renovo MUV water filter 5

In addition to its interchangeable modules, the MUV can be adapted to different use styles.

You may think: “why not use all three modules all the time for maximum protection?” This is a valid question, but it's easy enough to answer. As a water filter increases in effectiveness, it generally also increases in size, weight, cost of replacement parts, and complexity. Extremely thorough water filters also have a tendency to slow water flow rate to a trickle. So, it's valuable to only use the highest level of protection you actually need, thereby avoiding these drawbacks.

With the MUV, there are many configurations to choose from. If you're just looking to remove the hard water taste and odor from tap water, you can use only Module 1 (activated carbon). If you need to drink from a local stream while hiking or camping, adding Module 2 (hollow fibers) will block bacteria and protozoa that could make you sick. Finally, Module 3 uses high-tech Nanalum compound to trap viruses like Hepatitis A found in heavily-contaminated water sources.

Renovo MUV water filter 1

The Renovo MUV filter has already doubled its original $30,000 funding goal on Kickstarter, and there are still several days left on this campaign. If you'd like to learn more about the modular filter's capabilities or back this project, visit the Renovo MUV Kickstarter page.