Survive, Evade, Resist & Escape

The little voice in the back of your mind has always worried that this day would come, and it finally has. As you glance back at the city skyline burning in your wake, you hear the gunshots, blood-curdling screams, and smashing of glass. You wonder nervously if your family is safe, as you egress from this dying metropolis. All the gear and food you've stored, all the hours spent training and improving, and here you are — hundreds of miles away from your hometown and your family, on a business trip with a group of people you barely know.

You pass an abandoned police car, painfully glancing inside at the empty rifle rack. The sounds of gunfire grow closer, and your group picks up the pace. People are going feral, primitive. The menacing armed men you spied back there seem to be done with their current victims, and now they're hunting the people in tailored suits and $500 loafers who seem utterly defenseless: you and your colleagues.

OK, so this scenario is fictional. But it's not entirely unrealistic. Whether it's caused by civil unrest, a terrorist attack, an invading foreign army, or a natural disaster, society can go sideways really fast. That's why we jumped when we got an industry-exclusive invite to participate in 88 Tactical's SERE (survive, evade, resist, and escape) Level 1 Course. Based in Nebraska, this elite training organization provides instruction to civilians, law enforcement, and military personnel on a whole range of survival knowledge, from women's self-defense and carrying a concealed weapon to bushcraft and tactical medicine. The two-day class made us feel that, should the aforementioned human-prey situation strike, we could not only survive it, but also make it home in one piece.

So, we've absorbed the loads of information, tactics, and experience from the 88 Tactical class and distilled it here, into the top five lessons learned. Read on to find out.

Lesson 1 You Are Only As Strong As Your Team

In the corporate world, there are good leaders and there are bad leaders. The difference is that during a crisis or in a post-crisis world, the latter could get you killed — whether through negligence or straight incompetence. So it goes without saying that it's vitally important that you pick the right member to assume the role. It's wise to avoid those who are overeager to take the helm, and odds are the best pick will be the member who's already universally respected. This person will need to keep everyone on track, issue responsibilities and tasks, and hold everyone accountable for their actions.

sere-class-group-in-confined-space

That's why the assigning of leaders is one of the first tasks 88 Tactical gives to students in its SERE class, and it will affect the remainder of the training. This decision falls on the group to pick the alpha dog. But that doesn't necessarily mean that he or she has to be a tyrant. If a leader's style is too heavy handed, members of the group might mutiny or fracture off on their own. Many collective decisions and plans can be made in an open forum, with all contributing to the subject. This is a smart way to make everyone feel appreciated and part of the new family. It also results in a stronger plan, one which everyone believes and is invested in. However, in the end, it should be the appointed leader who assigns tasks and has the final say. This is the burden of leadership, and they will be held accountable for their actions the same as the rest of your group.

Who would you follow into a dark abandoned building on a desperate scavenging run? Picking the leader of your survival group is more than just voting for the loudest, strongest, or smartest person. It's chosing someone who knows when to deliberate, when to delegate, and when to take action.

Who would you follow into a dark abandoned building on a desperate scavenging run? Picking the leader of your survival...

As in the military, or in certain sports, it's all about “the team.” It becomes your own micro-culture, with an evolving set of unique customs and values. It has been said that as humans, our values are shaped by our environment. When a person is exposed to a new environment, their values change accordingly to that setting. If your Prius-and-Frappuccino world has turned into the end of the days, expect your perspective on things to change. They'll change to coincide with those of your entire group, or you'll leave. Group absolution is a timeless aspect of being human, so don't be surprised when you realize how primitive things become.

Lesson 2 Sleep Is A Luxury…That'll Get You Killed

You aren't going to sleep, and if you do it's going to get you killed. This is a fact that many soldiers already know, but it's an important lesson that runs the entire length of the 88 Tactical course. In a survival situation, it's likely that you'll end up on foot, otherwise you would simply drive yourself out of danger in the first place. All the energy expended hiking will leave you spent at the end of the day, but that doesn't mean you get to punch out when the sun sets.

The 88 Tactical SERE class simulates a raid on our camp.

The 88 Tactical SERE class simulates a raid on our camp.

Historically, many armies have attacked at night or close to dawn. This hasn't changed, as some of America's top commandos continue to use this proven tactic to gain an upper hand.

You will need to have your group post a nightlong watch, which rotates so everyone gets some rest. Maintaining security at all times is critical. Having a nice big tent and comfy sleeping bag seems nice, but kicking your boots off and crawling into the bag is a great way to get your throat slit in your slumber. If there are men actively hunting you who wish to visit harm upon you, why would you switch off your defenses as darkness descends? You simply cannot, and having your lookout fall asleep while on watch can be a death sentence to the entire group.

The cadre at 88 Tactical teaches their students how to construct simple, effective shelters that can be erected and torn down in a few minutes. The use of tarp shelters allows for a lightweight, versatile, and effective means of making camp. In an emergency, they can be cut down and stowed on the run or abandoned completely.

When you're on the run, a tarp is an effective shelter that's lightweight, quick to assemble, and expendable if need be.

When you're on the run, a tarp is an effective shelter that's lightweight, quick to assemble, and...

Lesson 3 Good Guys Get Hurt, Too

We all want to smite the bad guys and bring them a little payback. However tempting this might be, avoiding conflict is your best bet. Tangling with mixed bands of looters, marauders, and violent gangs is how you'll lose people in your group.

When someone gets hurt, where will you take them? When there are no more ambulances, hospitals, or doctors to be found, you'll be limited to what's in your medical bag or first-aid kit. Fighting for resources or in self-defense will likely result in severe trauma, which might be otherwise survivable in times of normalcy. But without modern medicine, many injuries will likely prove fatal here in the “after.” That's not to say that primitive medicine can't work if you have the knowledge and supplies, but we all want to avoid Civil-War-era medicine at all costs. Having a med kit, and knowing how to use it, is as important as having a firearm.

Attempting to rescue a

Attempting to rescue a “friend” via water.

You have to understand that bad things can happen to everyone, and that needs to be planned for. A careless slip of a knife in camp, a bad fall down a ravine, or a gunshot wound to the thigh can threaten your life instantly. The medical aspect of the SERE course is one of the most important lessons many of the students walk away with. Paired with the firearms portion of the class, this is often the first exposure many have to administering care under fire and handling triage.

Lesson 4 A Good Plan Today Is Better Than A Perfect Plan Tomorrow

Indecision, arguing, or simple lack of action will anchor you and your team when things need to be moving along. Sitting around the camp talking about getting food doesn't actually put it in your belly, but not discussing the plan in full detail so all members understand it is foolish. Rushing into a situation can get you killed, but so can avoiding all risk. Everything you do, or fail to do, can get you killed.

But by making well thought-out decisions, this risk can be mitigated significantly. This is where your good leaders will excel, and individual skills will shine. (See lesson 1.)

Everyone in your survival group needs to understand the plan - and what to do when it goes south.

Everyone in your survival group needs to understand the plan – and what to do when it goes south.

Remember that all your teammates have skillsets that are unique to their old jobs and lifestyles, and this is a huge advantage to the group. If you have a mechanical engineer in your ranks, have him take the lead on building a protective structure or rope bridge. If you have an ER nurse, he will have insight on building a medical plan that others will not. Lastly, just because a guy hangs drywall for a living now doesn't mean he forgot everything he learned during his yearlong deployment to Afghanistan in the National Guard.

Take all of this in, share perspectives, and formulate good, simple, and easy-to-execute plans. Make your subject-matter experts the “project managers” of their specialty. Use this knowledge and experience to the fullest advantage, and incorporate it into all of your plans.

Lesson 5 Plan For Your Plan To Not Work

Speaking of plans, there is one lesson you are guaranteed to learn at the 88 Tactical's SERE class that will resound for the rest of your life. It's a universal truth that many simply refuse to acknowledge: A plan is just a list of things that aren't going to happen.

People are creatures of habit. We like clear-cut plans, schedules, and routines. Without the safety of this structure, people will lose faith in society extremely fast. Disorder and chaos won't be far behind. The ability to think, problem solve, and act under pressure are important — and equally hard to teach. As Darwin showed us, adaptation to whatever is thrown at you will likely be the key to your survival. Fortunately for us, our ancestors knew how to adapt. After all, we're still walking the earth.

Not for the faint of heat: Sudents at 88 Tactical's SERE class get to experience what it's like to get captured and detained.

Not for the faint of heat: Sudents at 88 Tactical's SERE class get to experience what it's like to get...

Understand that things are not going to go as planned, but that doesn't mean you shouldn't take the time to craft them, or create your own order. If you lose a member of your group to a kidnapping, what will you do? If it was a particularly unpopular member of the group, well that's one thing…but what if it's the most loved and trusted? The resolve of the team should require your group to do the best they can to recover him. Maybe the new strategy is to trade supplies with the captors and use verbal jiu-jitsu. Or maybe an early morning surprise raid is the best option. You might not know until it happens, and the plan will have to be changed on the move.

Once you come to terms with this, it will only help you. You need to learn to be as fluid as water and as hard as rock.

sere-class-couple-of-people-with-their-heads-covered

Conclusion

The best tool you can give yourself for a crisis is knowledge, and that's exactly what the 88 Tactical's SERE Level 1 Course can give you. You earn this knowledge through a series of challenging tasks and missions, and because they are earned through difficulty, they'll likely stick in your memory for years to come.

sere-class-captured-and-detained

The class is set up to challenge the students mentally and physically, just as a real-life scenario would. The difference is that by attending courses such as this you can actually learn in a relatively safe environment some very important skills, such as bushcraft, rope work, small-unit tactics, and team building. Don't be surprised if you walk away with a few new lifelong friends from attending the class. It's an amazingly empowering thing to do things you never thought you could, while being forged into a solid, cohesive team of trusted friends.

When the unthinkable happens, no one rises to the occasion — you are reduced to your level of training and preparedness. Similarly, a crisis doesn't make heroes or cowards of people; it simply reveals their true nature. The more a person refines their character and skill ahead of time, the more likely they are to survive.

The Mentor

Terry Barney

Terry Barney

As a law-enforcement vet with more than 14 years of experience, Shea Degan founded 88 Tactical in 2010 after seeing a need for highly adaptive training courses taught by experts with real-life experience using the latest technology on state-of-the-art facilities.

In a short five years or so, Degan's attracted an impressive and diverse collection of instructors, from current Army Special Forces to former Navy SEALs. He and his team believe in having the right person for the right job, and for this reason the SERE Level 1 Course has many skills being taught by Terry Barney. He's an accomplished SERE and bushcraft instructor, with his experience dating back to his days in the military. A former U.S. Air Force survival instructor, Terry Barney taught hundreds of DOD personnel before moving on to do the same in the private sector with 88 Tactical. His love of the outdoors led him to become a respected backcountry guide with both pack and paddle, as well as volunteer his time as winter camping instructor for the Boy Scouts of America.

Barney has spent decades honing his diverse skillsets, and his knowledge and humorous approach to teaching made him a favorite of many who attended the course we took. His big brother/mentor approach to instruction brings a humble vibe to a man who has mastered high angle rope rescue, rescue diving, emergency medicine as a paramedic, and a whole slew of other dirty, dangerous jobs.

In 2010, Barney opened the Midwest School of Bushcraft. He has traveled to many parts of the country and has trained hundreds of people. He has a popular YouTube channel (under the username “IA Woodsman”) and is an integral part of 88 Tactical's instructor cadre.

http://www.88tactical.com
http://www.youtube.com/user/iawoodsman

F*ck the Ruck

You know that go-bag you've meticulously stuffed full of expensive gear? Leave it at home. Sometimes less is more, especially when rucking the wooded hills of Nebraska. Many students will bring 40 pounds or more of kit to the course, most of which remains dead weight that the instructors will happily let you carry. So, what do you need to be successful in a changing environment of urban chaos to wooded danger? Check out the list below for a starting point:

  • A reliable fixed-blade knife or robust folder
  • Firesteel, the bigger the better. Leave the garbage magnesium-bar types alone.
  • Footwear you'd want to wear for the rest of your life, over different terrains and through different climates
  • A good-quality, mid-sized individual tarp made of nylon
  • As much 550 parachute cord as you can carry
  • A metal water vessel you can boil water in, such as the Heavy Cover canteen
  • A poncho liner or blanket for cold nights and shelter
  • Pair of good gloves. They don't have to be fancy — even leather farm gloves work great.
  • Gore-Tex jacket and warming layers, including a spare set of socks

Packception: Propper Packable Bags

Have you ever gone on a trip with a tightly-packed backpack or suitcase, only to wish you had more storage space for the return trip? It's a common issue that can be frustrating if you're on vacation or a business trip. However, in a survival situation, running out of room for supplies can be a much more serious issue. If you're out scavenging, and you come across a large cache of useful resources, you might be left with a tough decision: ditch some of your existing gear, or leave behind the valuable items you just found.

mechanix-wear-gear-bag-top-open

If your bag is already almost full to the brim, cramming in more gear can be a difficult task.

Fortunately, now there's a solution from Propper that lets you expand your storage space on the go. It's simple: a bag within a bag. Cue the “BWAHHH” sound effect from Inception, because we're about to go deeper.

Propper has released two new packable bags. First, there's the Packable Backpack, with five separate compartments for an MSRP of only $35. There's also a Packable Duffle bag, with a large main compartment and two smaller side compartments, which is available for an MSRP of $40. Either bag can be had in black, coyote tan, or olive green.

Both Propper packable bags are constructed of lightweight micro ripstop nylon, and feature a durable water repellent finish. When not in use, each bag can be stored in its built-in pouch, which compresses down to 8″ x 7″ x 1″. We could see this design being useful for traveling with a backpack in your carry-on suitcase, or for stowing a spare bag in your vehicle or office.

For more information on these Propper packable bags, visit Propper.com.


Down and Dirty: RECOIL Real-World EDC Loadouts

Time for a reality check: many of the every-day carry loadouts you'll find on Instagram, Facebook, and forums are thinly-veiled gear porn. Now, hold your horses, there's nothing wrong with that. We love drooling over high-end gear that looks like it just came out of the box, and seeing all the creative gear pairings people come up with. However, a large portion of these EDC kits are not exactly what we'd call realistic.

Legit-EDC-RECOILWEB-8

When you use a tool enough, it's going to get dirty and scratched. That's a fact of life.

RECOIL staff summarized this “fantasy EDC” cliche nicely:

“Here’s my [insert pistol brand here] in a [choose holster type here], backup gun on my ankle, mini-IFAK on my other ankle, beard comb though I’m clean shaven ‘cuz someone might need it, Zippo lighter though I don’t smoke ‘cuz someone might need it, folding knife in right back pocket, fixed blade in scout style crossdraw sheath, wallet, task light clipped to my left pocket, tactical light down inside where no one can see it, watch with man-bling, multitool-keyholder, custom Ti prybar, spare mag for primary, spare mag for BUG, cell phone, inkpen and notebook, bootknife, Firefly IR beacon, extra TQ in belt pouch, x-ray glasses and bottle of hand lotion.”

Unless you want to look like Batman with a sweet utility belt as you walk around downtown, that seems like a lot of gear to carry.

We'll admit it takes some serious cojones to get a $1000+ watch this dirty.

You won't usually see photos of a $1000 Smith & Bradley Rogue Atlantis watch in this condition, but it was...

Also, most of us aren't going to spend thousands of dollars on a watch, and then wear it while we're elbow-deep in mud and grime. Similarly, you may see EDC loadouts online showing off $500 customized folding knives, but the majority of those guys probably aren't really putting them through the wringer every day. Fortunately, our friends at RECOILweb recently posted an article titled “Every Day Carry for Real” that shows a handful of real-world EDC loadouts tackling some dirty bathroom repairs. It may not be pretty, but it's 100% real.

Legit-EDC-RECOILWEB-7

Some may find these photos horrifying, and we can see why—it's not always easy to look at nice gear in this condition. However, we also find these photos refreshing, since the real-world EDC loadouts provide a much-needed reality check.

For even more photos of the carnage, check out the full article on RECOILweb.com.


Bugging Out With A Baby

We love stories and movies about a lone survivor. A single man in the apocalypse, roaming the ruined world on a dual-sport bike. Maybe there's a canine sidekick. He is always getting into adventures, and while he's not a bad guy, he'll often do bad things for the right reasons. He's the stoic badass underdog it seems every American man wishes he could be.

But you know what he rarely has? Children. In the few stories where there are children, they're always at a useful age and can largely act independently. I don't blame publishers for this. There's not a whole lot of badass gun-fighting action going on when you're changing diapers or cooing them to sleep, and it's hard to keep a baby alive on a dual-sport.

So, what does our swashbuckling hero do when he has an infant? This is something that I've had to figure out for myself.

Even a quick trip to the grocery store, something that was so cavalierly performed as a bachelor, has turned into an affair that requires more time, thought, and consideration than ever before. A venture anywhere now requires logistics and safety checking akin to a pilot going through a preflight checklist. There is a little human with you who cannot survive on its own, likely made from half of your DNA, for whom you are responsible. Now imagine it's a disaster scenario — the potential complications ramp up very quickly, and your learning curve gets considerably steeper.

If you are not currently a parent or never intend to be one, you can still get something out of this article. You may find yourself among friends or family members with infants or small children when the worst happens. Plus, condoms could break — if you can find any in a post-apocalyptic world.

The innocent victims of any large-scale disaster or mass movement of people are infants, and it isn't their fault. You can't verbally reason with them or have a discussion because they can't even control their bowels, let alone understand language. They're needy, complicated, and entirely unprepared for any situation — hell, many of them can't even fall asleep by themselves. To make matters worse, parents and caregivers of small children can be easy targets for predators.

The raw fact of the matter is that many children die. Sometimes it's just a bad roll of the dice, but all too often it's due to a failure of preparation by the guardians. We prepare because we don't want to rely on outside agencies to see us through. We prepare because historically it gives us a higher chance of survival. So, let's go through some of the lessons learned, often by examining the failures of others.

The Baby Bug-Out Bag

Right after buying canned ravioli and terrible ramen noodles, one of the first things people try to square away when they start seriously considering prepping is their bug-out bag (BOB). If you're a parent, the good news is that you probably already have at least the skeletal architecture of a BOB for your kid — you just call it something else: the diaper bag.

In fact, just adding some additional items (many of which you may already have in there) and weatherproofing can make it a complete baby BOB, when combined with the contents of your own.

From left, the author's bug-out bag, the baby's BOB, and the baby carrier.

From left, the author's bug-out bag, the baby's BOB, and the baby carrier.

In my house, the major sticking point for the baby BOB was exactly what kind of bag to use. I wanted something that was tough and modular, and so many of the dedicated baby bags are cheap to the point of being disposable. The ability to carry it independently or as an add-on to my own bug-out bag for easy carrying was mandatory. I ended up with an assault pack from Tactical Tailor. Originally designed to be worn on the back or attached to a plate carrier, the shoulder straps can be stowed internally and there are provisions to attach it to another pack via Fastex clips.

Weatherproofing is important. Even if you have a waterproof bag, packing like components together in Ziplocs or similar not only keeps water out, but helps organize the bag.

Ultimately, you may end up with several bags of different sizes. A larger one for a vehicle where space and weight is less of a concern, and an essentials bag if you have to ruck it.

Clothing

Infants, being so small, are far more subject to the environmental changes than adults are, so clothing has to be well thought out. It doesn't have to be cute (though my wife disagrees), but it absolutely does have to be utilitarian. Warm clothes for cold weather, and light clothes for hot weather. Children grow rapidly, so while for your own personal BOB you may have a set of X clothes for summer and Y clothes for winter, it's more complex with a baby. Instead of swapping clothes out seasonally, you have to do it every couple of months. Thrift store clothing is perfectly suitable for this application and buying a size up is advisable.

Baby clothes are small, and even smaller if you use a vacuum sealer. This is good, as even the newest parents learn that babies can soil their clothing rapidly.

Blankets and warming layers are often needed even in hot weather. What isn't used for physical warmth can double as a sunshade. If your kiddo is uncomfortable, you'll definitely hear about it, and so will others around you.

Diapers & Sanitation

Like clothing, diapers come in different sizes as your kiddo grows. As such, they need to be changed out regularly. Even if you use cloth diapers at home, you're probably going to want some disposables in the diaper bag. My infant BOB is full of nighttime diapers. While they are marginally more expensive, they'll keep the baby drier for a longer period of time. You don't want have to worry about storing soiled diapers or about cleaning until you have to.

bugging-out-with-a-baby-diapers-and-sanitation-003

Depending on how long of a scenario you're planning for, at some point you may have to worry about cleaning. In a pinch, just about anything absorbent will work as an impromptu diaper or wipe. I have wet wipes and cloth wipes. You may want to include a biodegradable soap or powdered sanitizer for longer-term prepping.

Specific medical and grooming needs are up to you. A fever reducer, teething medication, nail clippers, and other such items fall into this category. As an example, I have one of those disgusting Snotsucker nasal aspirators in there. She gets stuffed up? I snake the snot right out. The joys of parenting.

bugging-out-with-a-baby-diapers-004

Food and Water

Having water — and the ability to make potable water — is essential in any disaster, but it's of even higher importance if you are traveling with an infant. Babies easily become victims of dehydration through dysentery; diarrhea is the top killer of children in developing nations. Though when you're changing a diaper it may seem like there's an endless supply of liquids in there, it actually doesn't take much to put a baby at risk.

Even if your infant is exclusively breast fed (my wife calls it “EBF”), you're still going to need a lot of water. Why? Well if momma gets dehydrated, she can lose her breast milk. Very quickly you could have both a hungry baby and a sick companion. Not exactly the trouble you want when you've already left home due to an emerging disaster. For the situation that my wife's milk dries up, or if she isn't there because she's succumbed to injury or been carried off by a zombie biker hoard, I keep a supply of premixed formula in the bag. There are single-serving powdered options you may wish to consider as well.

The author's bug-out breast-feeding kit.

The author's bug-out breast-feeding kit.

TV commercials and ads in baby magazines would have us all believe that your little monster needs specially formulated colored goop that comes in a squeeze bag or glass bottle with a side of rice cereal. This is nonsense. With little exception, your baby can eat the same things you do, provided they're smashed or masticated small enough. If push comes to shove, I'll chew a piece of meat or other food first like a momma bird.

Transportation

If you're in a car, this is a no-brainer. The real trouble starts when you have to ruck it. Sure, you can just carry the baby. And your arms will get tired. And you won't be able to negotiate many obstacles. And you'll never have your hands free.

There are dedicated baby framed backpacks out there, mostly catering to the outdoors crowd. I found a few problems with these: First, the amount of gear you can carry in addition to the infant is dismal. Good luck getting anything more than what you'd need for a simple day hike. Secondly, with the baby on your back, you can't wear an additional backpack. Nor can you monitor them. And you're going to get puke all over your head at some point. Ask me how I know this.

I found carrying the baby on a front carrier or using baby wrapping to be the best method. Your hands are free, you can wear a backpack, you can still access your weapons (concealed or otherwise, though your carry configuration may have to be modded), you can monitor your child, and you can keep him or her warm and protected from the environment.

My go-to is a KinderPack. The ride height is comfortable, makes for great visibility, and it's easy to take your infant in and out.

If you look at pictures of tribal women in National Geographic, it looks like they just obtained some cloth and went to town. And sure, you can do that, but your results won't be as secure or safe. What can look so haphazard is actually carefully crafted. Believe it or not, there is a whole quasi-cultist subculture of baby wearing in the United States. They have forums, meet-ups, Facebook groups, and potlucks, all centering around physically wearing your baby. This is a resource you should pursue for your prepping. Even toddlers and beyond can be carried safely when they're tired if you have the right gear; think of it like a piggyback ride where you don't have to use your hands.

Stealth Mode

The catch-22 of having an infant: When it's more important than ever that you don't attract attention to yourself, you have a ticking time bomb of noise. Your baby will cry and scream. You can't blame them, it's the only surefire communication tool they have. But invariably there are times you need to be extra quiet. You'll probably know the best way to keep your baby happy, but warm and fed makes for the quietest baby.

bugging-out-with-a-baby-toy-007

Attaching a pacifier and toy to your emergency gear can go a long way when silence equals survival.

Attaching a pacifier and toy to your emergency gear can go a long way when silence equals survival.

Pacifiers can go a long way, just be sure to dummy cord them to your rig, lest they be lost. While a favorite toy is ideal, you probably can't keep that in the BOB for prep purposes, so try to keep a favored toy in there. My daughter will want the mutant dragonfly-bee thing named Hamilton, but Elephonte Bellafonte the elephant is in the bag.

Depending on the age of your child, a nice thick lollipop may also work. You don't want something they'll choke on, just something to work on when needed. Additionally I keep a teething ring in the bag.

Have a Team

Having a team makes everything easier. [Editor's Note: For more on group survival, see “It Takes a Village” in Issue 7 of OG.] Since this isn't a pulpy survival novel set in the 1980s, your most likely team member will be a spouse or roommate — and not a bunch of experts at a Rawles ranch. The chance of survival with just you and an infant decreases exponentially the longer you're away from civilization. The ability to take turns caring for an infant while another provides security is a force multiplier, and it only increases with capable and supply-flushed people. But…

The idea that you can live off the land and out of your pack forever is pure fantasy. If you haven't figured it out by now, the chain of logistical needs for an infant is long. You'll have to seek civilization sooner rather than later if you have an infant. You don't need to last indefinitely, but you want enough to get out of Dodge and get somewhere else on your own terms.

Marsupial Carry Options

bugging-out-with-a-baby-improvised-wrap-009

Improvised Wrap: From a pillowcase with duct tape to a torso carry with a beach towel, a quick Internet search will yield a plethora of improvised baby carriers. Knowledge on how to safely and securely carry your baby or small child in an improvised carrier could save their life in an emergency. The example shown here was crafted from three cotton T-shirts.

bugging-out-with-a-baby-soft-structured-carrier-010

Soft Structured Carrier: Typically made of canvas, a soft structured carrier (SSC) is a durable pack built to withstand heavy use. The buckles and straps are easy to adjust for multiple wearers, and the ergonomic support makes these carriers comfortable for both you and your child. This is the author's preferred carry option. Shown here is a KinderPack (www.mykinderpack.com).

bugging-out-with-a-baby-ring-sling-011

Ring Sling: The ring sling is great for situations in which you need to get the baby quickly up and wrapped. With the ring sling you can carry from newborn to toddler age, however, extended wear with a heavier baby can quickly become uncomfortable. The example shown is from Cassiope Woven (www.cassiopewoven.com).

bugging-out-with-a-baby-woven-wrap-012

Woven Wrap: Although it carries a steep learning curve, a woven wrap is the most versatile baby carrier. It can be used to comfortably carry babies from infant to preschool age, and can even carry an injured adult in a pinch. A wrap can also be used as a blanket or a hammock. This is the author's wife's preference. Shown here is from Oscha Slings (www.oschaslings.com).

About the Author

Dave Merrill is an Eagle Scout, U.S. Marine Corps veteran, and avid outdoorsman. Spending time in the backwoods canoeing and backpacking sparked his initial interest in survivalism at a young age. This attraction was hammered into enthusiasm by witnessing the effects of catastrophe first hand in developing nations. Dave is also a moderator on the forum for Zombie Squad (www.zombiehunters.org), a multinational nongovernmental organization focused on promoting personal preparation for disasters. And, yes, he's well aware the zombie theme has worn out its campy welcome.

More From Issue 11

Don’t miss essential survival insights—sign up for Recoil Offgrid's free newsletter today.

Read articles from the next issue of Recoil Offgrid: Issue 12

Editor's Note: This article has been modified from its original print version for the web.


Protect Your Knees with the Hiking Rest Step

If you've ever hiked up a steep hill with a heavy backpack, you'll know how hard it can be on your leg muscles and your knees. Individuals in peak physical condition may be able to withstand this strain temporarily, but sooner or later, fatigue will inevitably set in. Luckily, it's possible to delay this process and preserve your muscles and joints with the right technique.

uphill

Notice how both legs are bent at the same time. This form may become tiring with a heavy backpack, or without poles.

As you walk uphill, pay attention to how you bend your knees. Without proper training, most of us will default to bending both knees at once—the front leg will bend close to 90 degrees, while the back leg will be almost straight (but not quite locked at the knee). This motion continually puts strain on both legs, since the muscles are the only thing keeping them from collapsing out from under you. It may be fine for short hikes with a light pack, but for all-day backpacking treks, it will become tiring.

stay-or-go-hiking-solo

The solution is simple, and it's known as the rest step. The rest step ensures that your rear knee is locked straight while your other leg bends forward. By locking the knee, it takes the load off your muscles, and supports part of your weight with your leg bone for a split second with each step. These split-second rests add up over time, and reduce the overall strain on your leg muscles and joints.

Here's a video from Backpacker Magazine that shows how it's done:

When you practice this technique, take it slow and steady, with short pauses between each step. Mountain climbers in extreme conditions may need as much as 10 seconds of rest between steps, but for the average backpacker, half a second per step should be adequate.

Special thanks to Evan J. for showing us the rest step!


Review: Serac Classic Camping Hammock

In the outdoor gear industry, the following piece of conventional wisdom is often repeated: “Reliable, light, or affordable. Pick two.” This statement indicates that it's seemingly impossible to accomplish all three goals at once. For example, it's easy to find high-quality, reliable, and lightweight gear—but it's usually going to cost an arm and a leg. On the other hand, you can buy inexpensive items that are lightweight and compact, but they may end up breaking after one use. You get the idea.

So, given this saying, we're always a little skeptical when we hear about a product that seems to meet this supposedly-unattainable trifecta of dependable, light, and affordable. On the other hand, we never say never, so we're always willing to test gear manufacturers' claims and tell you the results. No matter what, we're honest about our impressions.

Serac Hammocks

Serac hammock review 15

Recently, the team at Serac Hammocks reached out to us, and suggested we try out their Classic Camping Hammock. After browsing around the company's site, it's clear that this hammock is claimed to meet the three criteria above, so we were curious to see if it really does. Read on to see what the Serac web site states with regards to each goal.

Reliable: Serac's hammock uses strong 100% parachute nylon, triple-stitched seams, durable polyester straps, and carbon steel carabiners. It is rated to support up to 350 pounds. The company also offers a 30-day money-back guarantee, and a 5-year no-questions-asked warranty.

Serac hammock review 02

Light: The hammock itself is said to weigh 14 ounces, which is several ounces lighter than hammocks offered by competitors such as Grand Trunk, Eno, and Kammok. The included straps weigh 4 ounces each, for a total packed weight of about 1.4 pounds (22 ounces).

Affordable: The Classic Camping Hammock is available for $37.95 with free shipping. That's considerably less than the big-name competitors—especially when you consider the Serac hammock includes straps at this price (most other manufacturers sell them separately).

Ok, so now we know what Serac says about their hammock, but we also know talk is cheap. In order to find out if this product really covers all the bases, we got our hands on one for a full review.

First Impressions

Serac hammock review 01

The Serac Classic Camping Hammock is sold through Amazon.com. If you've got a Prime account like we do, it's available with 1-day free shipping. Otherwise, the $37.95 hammock still ships for free, but only if you can add another item to get your order up to $49 or more.

Serac hammock review 03

When we received the hammock in the mail, we were impressed by how compact it is. In the included stuff sack with the straps, it packs down to under 7 inches by 6 inches—easily small enough to pack into a backpack or bug-out bag. We did find that the hammock weighed slightly more than claimed online, reading 1.86 pounds on our scale (Serac's site says 1.4 pounds). That's a fairly small difference unless you're an ultralight backpacker, but it's still worth noting.

The Serac with included straps, next to an ENO with separate straps.

The Serac hammock with included straps, next to an ENO with separate straps.

For comparative purposes, we set the Serac stuff sack next to another hammock from ENO (Eagle's Nest Outdoors). The ENO sack seems smaller, at about 4.5 inches by 5.5 inches, until you realize the straps come in a separate bag. With the straps and hammock all in the same stuff sack, the Serac is definitely more compact than the ENO.

Serac hammock review 05

Serac offers three color combinations to choose from: Golden State Yellow/Blue, Wildflower Purple/Teal, and Iceberg Blue/Grey. The first two were a little bright for our tastes, so we selected the third blue and grey option. All Serac hammock variants come with black polyester straps.

Unpacking and Setup

Serac hammock review 07

Serac states that their hammocks can be set up in one minute, since they require no knots, ropes, or poles. We don't have too much experience hammocking, so we figured it would probably take us longer than that. Nevertheless, we were surprised to find unpacking and setup was much easier than expected.

Serac hammock review 09

First things first: you'll need to find an optimal location with two sturdy trees. The hammock is 9 feet long, so you'll want to select anchor points about 10 to 15 feet from each other. The 6-foot straps can accommodate a wide range of tree sizes—just make sure you find trees big enough to support your weight. If you can't wrap your hands fully around the trunk, it's probably big enough. Also, be sure to avoid young saplings (which will bend) and dead trees (which may snap or drop “widowmaker” branches on your head).

Serac hammock review 08

After finding a suitable location, we released the drawstring on the stuff sack, and removed the straps. Looping a strap around each tree at about chest or shoulder height, we then pulled one end through the other. Finally, we removed the hammock from its stuff sack, and grabbed the carabiner ends. One carabiner was clipped onto to each strap, and the straps were pulled firmly to make sure they were secure. Within less than a minute, the Serac hammock was set up and swinging in the breeze.

Ideally, you'll want to adjust the hang to place the hammock at about chair level, as this will make getting into and out of the hammock easier. Some cases may call for increasing this height, but it's a safe bet to never hang higher than you're willing to fall.

Conclusions

Serac hammock review 13

We've mentioned before that hammocks in general are a great choice for survival situations for a number of reasons. They're compact and easy to carry in your existing bug-out bag, and they can be set up and torn down quickly without leaving a trace on the ground below (unlike a tent). They're also quite comfortable when set up correctly, and can elevate you away from insects and other nocturnal creepy-crawlies on the ground. The Serac Classic Camping Hammock is no exception to these points.

Serac hammock review 14

More importantly, however, we need to compare this hammock to others in its category. That said, we found the Serac to be an excellent hammock for the price. We didn't have astronomical expectations at the sub-$40 price point, but it really delivered great bang for the buck. Its materials feel strong and durable, and we appreciate the fact that straps are included with each hammock. We will say we wish there were some more subdued color choices available, and maybe even a larger “double” hammock similar to those offered by competitors, but overall we were satisfied with what we got from Serac.

Serac hammock review 16

Despite the common saying that you can't have gear that's reliable, light, and affordable all at once, the Serac hammock seems to meet all of these criteria. Even if you're already prepared with a tent or another form of survival shelter, you'd be wise to consider adding one of these to your bug-out bag as an inexpensive back-up option.

Serac hammock review 17

For more information on Serac hammocks, visit ExploreSerac.com.

To summarize, here's a final list of pros and cons:

Pros:

  • Very affordable at less than $40. Also includes straps at no extra charge.
  • Compact and lightweight.
  • Strong materials with good build quality.
  • 30-day money-back guarantee and 5-year warranty.

Cons:

  • Limited color choices.
  • Only one size available.
  • As with most other hammocks, you'll need to buy a sleeping pad or underquilt to prevent freezing your rear end at night, and a rain fly or tarp for inclement weather.

How to Purify Water with Bleach

We all know that it's possible to purify water by boiling it, but this can be difficult in certain circumstances. For example, if you're stuck in a small apartment during a disaster, the utilities may be shut off and the running water may be contaminated. You probably won't want to start a smoky wood-burning fire in the kitchen, so it's important to have a backup plan for purifying drinking water. Fortunately, this is easy to do with a cleaning chemical most people already have in their homes: bleach.

Purify water with bleach 2

Clean drinking water is a vital resource that may become difficult to obtain in an emergency.

It's extremely easy to purify water with bleach, but you'll need to know the right ratio of bleach to water. Too much bleach, and the chemical itself will harm your digestive system—too little, and bacteria in the water will make you sick. You've got to get the balance just right.

If you're not at home, look for bleach in a kitchen or janitorial closet.

If you're not at home, look for pure bleach in a kitchen or janitorial closet.

Most household bleach contains 8.25% sodium hypochlorite, which is the active ingredient you'll want to look for on the label. If your label indicates that the sodium hypochlorite levels are lower than 8%, you may want to carefully add a few extra drops of bleach to your water to reach the correct concentration. Also, be sure your bleach is of the regular unscented variety, without any added ingredients that may not be safe to consume.

The United States Environmental Protection Agency (EPA) recommends the following amounts  of 8.25% sodium hypochlorite bleach to add to water:

Purify water with bleach 1

Here's an easy way to remember the ratio: 2 drops per 1 liter of water gives us “21”, just like the legal drinking age in the US. So, just remember “drinking starts at 21”.

Here are some other tips:

  • Find a brand-new bottle of bleach, if possible. If not, get a clean used bottle that has been stored at room temperatures for less than a year.
  • Use a clean eyedropper to portion out the bleach carefully, and be sure to use a clean container for your water.
  • If the water is cloudy, colored, or very cold, double the amount of bleach used. You may also want to filter the water through a cloth or paper filter to remove debris.
  • Stir the bleach into the water, and let it stand for at least 30 minutes.
  • When it's ready to drink, the water should have a slight chlorine odor. If it doesn't, add a repeat dosage, stir, and wait another 15 minutes before drinking.

How to Baton Wood With a Knife

Armchair preppers seem to think that splitting firewood (and every other skill) is pretty easy in a survival situation. It must be — those survival guys on TV make it look so quick and easy, and they probably didn't even go to college. But when the harsh reality sets in, and these watchers try to become doers, they find that cutting wood is like every other worthy activity in life — there's some skill involved and practice required.

These soft-palmed TV addicts might not even be able to chop a little piece of wood in two with their expensive survival knives. And this is the point where they realize that they don't know the right technique. If they only knew how to use a baton …

Warning!

This is not meant to be an exhaustive guide to cutting wood. Using blades of any kind, especially in conjunction with a baton, can be dangerous. Seek a professional guide or a reputable instructor for more information.

What Is Baton Work?

Wood batoning is the act of splitting or carving wood using a knife and a wooden baton to tap the back of the blade, thus driving it through the wood you mean to shape or split. The physics involved is similar to hatchet wielding. There's a sharp cutting edge and some weight behind it. But the difference lies in the fact that the weight and the edge come from two separate objects.

By placing the blade exactly where you want it, you have far more control over the splitting and cutting process than if you just swung a hatchet or machete at the “target.” You can use your folding pocket knife or, better yet, your fixed blade to split kindling out of logs, branches, pallets, or furniture. You can also use this technique to make slats, notches, and other shapes in pieces of wood to build tools, traps, weapons, and many other items in a post-disaster scenario.

Learn how to baton, and you'll finally have proof that size doesn't matter, all that matters is how you use it.

Get Started

The basic technique is so simple that we could have put this article together without words — just a few pictures. But since we know many of you are the thorough kind, we put some together some explanations.

gloves-and-safety-goggles

Step 1 (Safety Check): I've had bark chips and bits of wood in my eyes before, and I don't recommend it. And I've had more splinters in my hands than a blind guy stumbling through a toothpick factory — not fun either. You'll want to wear gloves and some kind of eye protection while splitting wood, just to stay on the safe side. It's also very helpful to have a large log, tree stump, or some other surface to act as a “workbench” or “chopping block.” It should provide a stable platform to set up the item you intend to cut or split.

hard-wood-to-baton-and-large-knife

Step 2 (Pick Your Tool): The baton should be an appropriately sized piece of hardwood. For large splitting jobs with a big knife, you'll want a baton a little smaller than a baseball bat. For small tasks with small knives, a little 1-pound wooden club will work fine. It should be hardwood and dry. Wet wood will be softer (even if it's hardwood), and the spine of the knife will dig into it excessively upon impact.

hammering-wood-split-with-knife-and-wooden-club

splitting-wood-with-large-knife
Step 3 (Get To Work):
Once you're ready, start hammering the knife down through the wood by tapping the blade's spine. If the knife is really long, you'll have plenty of spine to hit. Consequently, it gets a little dicey when using knives that are too short. Hammer the knife spine until you've finished the cut or split — or you need to stop and adjust the blade. Knife adjustment is common and will happen often in baton work. Just be careful as you pry the stuck knife from the piece of wood that it's stuck in; this is the maneuver in batoning with the highest risk of injury.

splitting-wood-again

Step 4 (Repeat As Needed): This process can be used over and over to reduce logs into splinters and to perform elaborate carvings. In colonial times, house shingles were even made with this technique, using a heavy baton and a special large blade with an angled handle called a froe. But since you don't need to make a lot of shingles in an urban survival setting, let's talk about more practical uses for this technique.

Baton Your Way to Glory!

Let's say a storm knocked out your power, and you need a fire to boil your water and cook food. To confound your situation further, the closest thing to firewood you have are a few pallets you found behind a neighborhood store and some ugly furniture you've always wanted gone. With a little nail pulling and unscrewing, the pallets and hideous chairs will come apart, but they won't exactly fit in your apartment's fireplace or the balcony hamburger grill.

Enter the baton and knife. Using a chair leg for your baton, the chair seat as your “chopping block,” and your favorite survival knife, you can proceed to split the pieces of lumber and chair parts in half. Once split in two, these more slender pieces are even easier to split again and again. Soon enough, you have a wonderful pile of split wood.

And if these split sticks are too long, use the knife and baton to partially chop them and then break them to shorter lengths. Light up the smallest wood splinters first, then add slightly larger split pieces until your fire is established.

Conclusion

tower-of-wooden-stands

With the simple technique of using a baton, it's easy to make a small knife act like a large knife. This means that we don't have to carry as much weight in tools to get the tasks of survival accomplished. It also means that we stay safer. There's a lot less that can go wrong when splitting or carving with a baton, compared to swinging a machete or hatchet around.

It's even easier to stay under the radar with the smaller blade during a crisis event. Imagine trying to smuggle a machete through a police checkpoint during a crisis situation. Or perhaps you're trying to stay low-profile as you work your way home from the office after a blackout engulfs your community. Then imagine how much easier it would be to walk around with a fixed-blade knife in your boot or bag, without raising so much as an eyebrow.

Being able to baton wood lets you work smarter, not harder. And at the end of it all, isn't that the way we should approach all survival skills?

Best Blades

By far, the best knife for baton work is a large, fixed-blade knife with a full tang, square spine, and beefy handle scales. A tool like that is built for abuse, and if beating your knife with a hardwood baton isn't abuse — we don't know what is. The average survival knife should meet most or all of these criteria.

But as your knife starts to deviate from the baton-knife formula, the chances of damaging the tool increase. If the knife isn't a fixed blade, you run the risk of breaking the pin that allows it to be a folding blade. If the blade metal doesn't fill up the handle area (full tang), you may separate the blade from the handle by beating it. If the handle is wimpy, or the spine is sharp (like a double-edged dagger), it just won't perform well when batoning. Use a beast of a knife for baton work, or go buy a hatchet. Keep your pocket knife in your pocket.

Non-Fire Uses

You could use a baton technique to create shingles from blocks of wood, but kindling and shingles aren't the only things your knife and baton can create. Some careful baton work can shave down a staff of flexible hardwood to create a self-bow or a crossbow prod. Careful shaving and some knowledge of bow-making and tillering are required for best results, but anybody can try it. You could also use a knife and baton to create tent stakes, boards for friction fire sets, trap parts, stabbing weapons, spits, sticks for primitive cooking techniques, camp furniture, and a wide range of other useful items. You can even use the technique to cut rope and vines by setting them on a log as a chopping block.


Machetes: The Original Survival Multitools

Warning!
Using a machete is inherently dangerous. Don't attempt to recreate the images and techniques depicted here. For more, seek consultation or instruction from a reputable survival instructor or martial artist.

Media depictions of hardcore survival scenarios like to feature big knives — especially machetes and their brethren. From the zombie chopping of The Walking Dead to Denzel's well-choreographed limb-lopping in The Book of Eli, it seems that no good apocalypse is complete without a serious big blade.

All fiction aside, that's actually a pretty accurate statement. A good machete is an amazingly versatile implement that can effectively substitute for many other more mission-specific tools. When wielded with moderate skill, it's also an effective surrogate sword and a potent close-combat weapon. Think about it, no matter what type of survival situation you might imagine, the basic context is that something bad has happened that disrupts the normal operation of modern society. That disruption forces us to make do with more primitive technology for a while. Well, if you look at third-world countries that make do with more primitive technology all the time, you'll find that most of them regard machetes as indispensable all-purpose tools and folks in those societies are pretty damned skilled with them. That should be a hint.

(For the record, when I refer to “machete,” I use that as a term of convenience to represent any large, utilitarian chopping blade from any culture. If you prefer a golok, barong, bolo, or something similar, the same basic principles apply — with the possible exception of a thrust-worthy point.)

With this in mind, the following is a look at this bladed tool and its many uses (improvised and conventional) and how best to apply them in a real-world or SHTF scenario.

Weed Whacker

My affinity for machetes began a few careers ago when I was working for the U.S. government trying to resolve the fates of American POW/MIAs in Vietnam and Laos. Much of our work involved humping through the bush looking for aircraft crash sites and alleged burial sites. I was issued a standard G.I. machete and quickly learned its value as a tool for clearing trails, cutting helicopter LZs (landing zones), and other forms of weed whacking.

Light enough to wield without fatigue, yet heavy enough that the mass of the blade did most of the work, it easily handled everything from light foliage to thick, over-your-head elephant grass.

machete-used-as-a-weedwacker

Axe

In a survival situation, you probably won't need to fell a redwood, but lopping branches or even taking down small saplings might make sense. For this kind of chopping, a machete is ideal, especially if you learn to vary the impact point of the edge. Typically the “sweet spot” for maximum energy transfer in a chop is about one-third of the way down from the blade's tip. Although this spot maximizes the power of the chop, it can also cause the blade to bind in thick material. Moving the impact point closer to your hand reduces sticking and increases control.

machete-used-as-an-axe

Froe

A froe, also known as a shake axe, is an old-school woodwright's tool used for splitting wood. It's basically an L-shaped tool with a wooden handle and a straight steel blade mounted perpendicular to it. The outside edge of the blade was sharpened, so you can hold the handle vertically while you baton the blade into the wood. Once it's in, lever the handle down to cleanly split the wood.

machete-used-as-a-froe

The advantage of a froe over an axe is that it allows you to precisely place the blade's edge — something that's difficult to do with a ballistic chop. For detail work, this kind of control is ideal. To duplicate it with a machete, place the edge on the end grain of the wood to be split so the blade extends at least a few inches beyond it. Using a short branch as a baton, strike the spine of the blade near the tip to drive the blade into the wood. Once you've gone to the desired depth, twist the blade to split the wood. If necessary, you can fashion a notched stick or split handle to provide greater leverage when twisting the blade. (Editor's note: For more on wood batoning, see “Firewood Fundamentals” on page 40.)

Hammer

On quality machetes, the blade is quite thick and its spine is flat. This makes the spine of the blade a great improvised hammer for driving stakes, cracking coconuts, and other focused striking. (Naturally, you'll want to be careful when you draw back the tool to deliver another strike, as the edge will be pointing toward you.)

machete-used-as-a-hammer

Drawknife

Another old-school woodworking tool is a drawknife, which is traditionally a single-edged blade about a foot long with handles on both ends. Gripped by both ends, it is drawn toward the user to shave a piece of wood.

The machete's wide blade makes it easy to grip with one hand on the handle and one wrapped over the spine of the blade (carefully avoiding the edge). Gripped like this, drawing the tool toward you naturally allows it to function as a drawknife. This style of use is great for removing bark, sharpening stakes, and similar tasks.

machete-used-as-a-drawknife

Shovel

If your big blade has a broad tip, you can use it as an improvised entrenching tool for limited digging and grubbing. Grip it with both hands by the handle and the back of the blade and keep your fingers away from the sharp edge.

machete-used-as-a-shovel

Saw

Some machetes are available with sawteeth on the spine. While this makes them less comfortable to use as drawknives and entrenching tools, sawteeth can be useful for some specific tasks, like cutting notches for fireboards, traps, and bowstrings. Personally, I feel a blunt blade spine makes the tool more versatile, but the option is out there.

Traditional big blades come in many shapes and sizes. Some are specialized for certain tasks while others are more generic - and versatile.

Traditional big blades come in many shapes and sizes. Some are specialized for certain tasks while others are more...

Sword

A machete or any similar large-bladed knife is, for all intents and purposes, a sword. Whether it's lopping limbs off a tree or a marauding gangbanger, when wielded with skill and force, it makes an extremely potent and versatile weapon. The Filipino martial arts have a saying: “Wood seeks bone; steel seeks flesh.” In other words, impact weapons (like sticks) work best for breaking bones, while edged weapons are most effective at cutting muscles and tendons and making big holes in soft tissue.

Because of its unique attributes, the machete actually fills both these roles very well. The edge can be used to hack and cleave, and the back of the blade provides focused-impact for breaking bones. Adding the flat of the blade to the mix provides controlled, but still very impressive, impact to the mix. If you've ever seen a cop's flat leather sap, imagine feeding it some Viagra and rendering it in hardened steel and you've got one hell of a persuasion tool.

machete-demonstrated-as-a-short-sword

The broad, flat surface of a machete blade also makes applying proper sword/big knife blocking and parrying techniques easier. Unlike the movies, where actors bang their swords together indiscriminately, real sword tactics are designed to preserve the cutting edge by focusing blocks and parries on the back and, preferably, the flat of the blade. This avoids damage to the edge, keeps the edge from binding in softer weapons (like sticks), and spreads the force of impact over a larger surface area.

A machete can be used as a short sword. You can block with the flat of the blade, then immediately control the attacking arm with your left hand as you chop the bad guy's arm. If necessary, finish with a mobility-killing cut to the quadriceps just above the knee or to the neck.

1

1

2

2

3

3

4

4

5

5

6

6

7

7

1

1

2

2

using-machete-as-a-short-sword3

4

4

5

5

6

6

7

7

De Cuerdas

Based on the goal of blocking with the flat of the blade and the need to make your close-combat skills as foolproof as possible, my preferred method of using the machete combatively is a tactic from the Filipino martial arts called de cuerdas. Start by gripping the machete in a normal grip in your dominant hand (since most of the world is right handed, I'll describe it from that perspective). Put your right foot forward and hold the machete vertically in front of your body with the edge facing to the left and the plane of the blade parallel to your chest. Now place the palm of your left hand on the flat of the blade, being careful to avoid the edge.

In this guard position, you literally “hide” behind the flat of the blade, using it as a shield. If an attack comes in, pivot toward it and drive both arms out simultaneously to block the incoming weapon or, even better, crush the fingers of the hand swinging it. Since you're starting with the flat of the blade pre-positioned for a proper block, you don't have to worry about trashing the edge of your blade.

Once you've stopped the incoming strike, quickly grab or check the attacker's arm with your left hand as you chamber your right hand to chop. With the attacker's arm momentarily frozen in place, clear your left hand if necessary and deliver a short, focused, downward chop to his bicep or triceps. Done properly, this will sever the muscle and instantly disable the arm. On the biceps side, it could also sever the nerves that control the hand and the brachial artery, which carries 10 percent of the body's blood flow — more than the carotid artery of the neck. Done with extreme enthusiasm, you could quite literally disarm your attacker.

To finish the job, deliver a powerful forehand cut to the front of the thigh, just above the knee. This will sever the quadriceps muscle, responsible for extending the knee and allowing that leg to support weight. Destroying this function creates a “mobility kill,” dropping your attacker in place and allowing you to create distance and safety.

To put maximum power in your machete cuts, learn to use a reinforced grip. Rather than swinging the weapon only with the dominant hand, place the palm of your support hand on the thumb side of the wrist of your weapon-wielding hand. This reinforced grip transfers the power of the support arm into the swing, increasing your cutting force substantially. It also helps you manage the follow-through of the weapon to safely decelerate and chamber it for a follow-up.

de-cuerdas-machete-guard-position-grip

Assuming this grip from the de cuerdas guard position is easily accomplished by simply sliding your support hand down the spine of the blade to the wrist. Once you're there, learn to harness the rotation of your hips and shoulders to generate powerful forehand, backhand, and downward cuts, while using the reinforced grip as a “brake” to safely manage your follow through. When you're comfortable working with the edge, experiment with changing the plane of the blade relative to the plane of motion of the weapon to slap with the flat. If a situation doesn't warrant lethal force, a flat-blade slap across the knuckles or shin could be the less-lethal game changer you need to manage it effectively.

Machete-style big blades are the original survival multitools with a long, bloody history of effectiveness in combat. Inexpensive, readily available, and amazingly versatile, no well-stocked SHTF tool kit is complete without one.

Bad-Ass Barongs

Two of my all-time favorite knives actually began life as aluminum trainers that I designed for practicing big-blade tactics. The first one was a custom barong trainer that I designed as one of the souvenir items for my 2005 Martial Blade Camp training event. Made by Edges 2, the trainers and the tactics I taught to go with them were very well received by my students at the camp. To thank me for that experience, one of my certified instructors, Michael Rigg, took up a collection from the students and approached Canadian custom knife-maker Brent Beshara to render the trainer design as a live blade. After Brent did a portion of the work, he realized that the heat treating was beyond the capabilities of his shop and enlisted the help of his mentor, Canadian mastersmith Wally Hayes. The resulting barong is an extraordinary, one-of-a-kind weapon and the only co-authored work made by Hayes and Beshara. Needless to say, it's one of my prized possessions.

The author's most prized big blades are two custom barongs he designed, shown here a longside their training versions. From left: the Edges 2 trainer and its live-blade counterpart, the Besh-Hayes Barong (a one-of-a-kind custom and the only collaboration between Canadian knife-makers Brent Beshara and Wally Hayes), a Bud Nealy custom (only one of three in existence), and the Keen Edge Knives trainer that it was based on.

The author's most prized big blades are two custom barongs he designed, shown here a longside their training...

In 2008, history repeated itself. Working with my good friend Steve Rollert (who is also an amazingly skilled martial artist and head bladesmith of Keen Edge Knives), I designed another barong trainer that was a variant of one of his outstanding stock designs. After the students at camp had a chance to experience big-blade training, my friend Marc Galli, now an associate instructor in my Martial Blade Concepts system, approached renowned custom knife-maker Bud Nealy to translate the trainer into live steel. To date, Nealy has made three of these barongs (one for me and two for Marc) and they are simply incredible.

http://www.beshknives.com
http://www.budnealyknifemaker.com
http://www.hayesknives.com
http://www.keenedgeknives.com

Big-Blade Odyssey

My first real machete was a classic U.S. Army-issue parkerized machete made by Ontario that was part of the field kit issued to me when I was a team leader for POW/MIA investigation teams in Vietnam and Laos. After using it in the field a few times, I learned to hate the clunky handle scales that were about as ergonomic as a 2-by-4. After I replaced them with some home-spun scales made from Hawaiian Koa wood, it worked a whole lot better.

After experimenting with a number of native Vietnamese and Lao machete patterns, I finally invested in a Blackjack Knives Panga — a lightweight, extremely fast machete that was more like a Filipino barong than a traditional swept-point African panga. Its injection-molded rubber scales were extremely comfortable and offered an outstanding grip. Although the light blade was not well suited for hard chopping, it performed well on foliage up to and including green bamboo. In addition to clearing more than its share of landing zones, the Blackjack Panga also had the unique quality of “singing” every time it cut. Compared to the thick, primitively heat-treated knives of the local folks, the Panga's spring temper created a high-pitched “ping” with every cut — something that scared the snot out of my indigenous counterparts. Since our mission was a direct reflection of Cold War politics at their best, that was just fine with me.

vintage-photo-of-army-issued-machete-named-brush-demon

Although my old-school big blades are still alive and well, since Blackjack's Panga has been long discontinued, I've retired them both for sentimental reasons. Their extremely worthy replacement is the Outdoor Edge Brush Demon.

Designed by noted custom knife-maker Jerry Hossom, the Brush Demon faithfully incorporates all the high-speed design features and performance characteristics of his coveted handmade blades into a budget-priced factory chopper. Its wickedly shaped blade is ground from tough 65Mn carbon steel and cloaked in a tough black powdercoat finish. The thermoplastic rubber handle brackets the user's hand for an extremely positive grip and dampens impact shock for fatigue-free cutting. Unlike most machetes, which have terrible sheaths, the Brush Demon comes complete with a high-quality nylon scabbard that offers multiple carry options. At an MSRP of $70 and street prices even lower, the Brush Demon is an outstanding value and a key component of my current kit.


What If Yellowstone’s Underground Supervolcano Erupts?

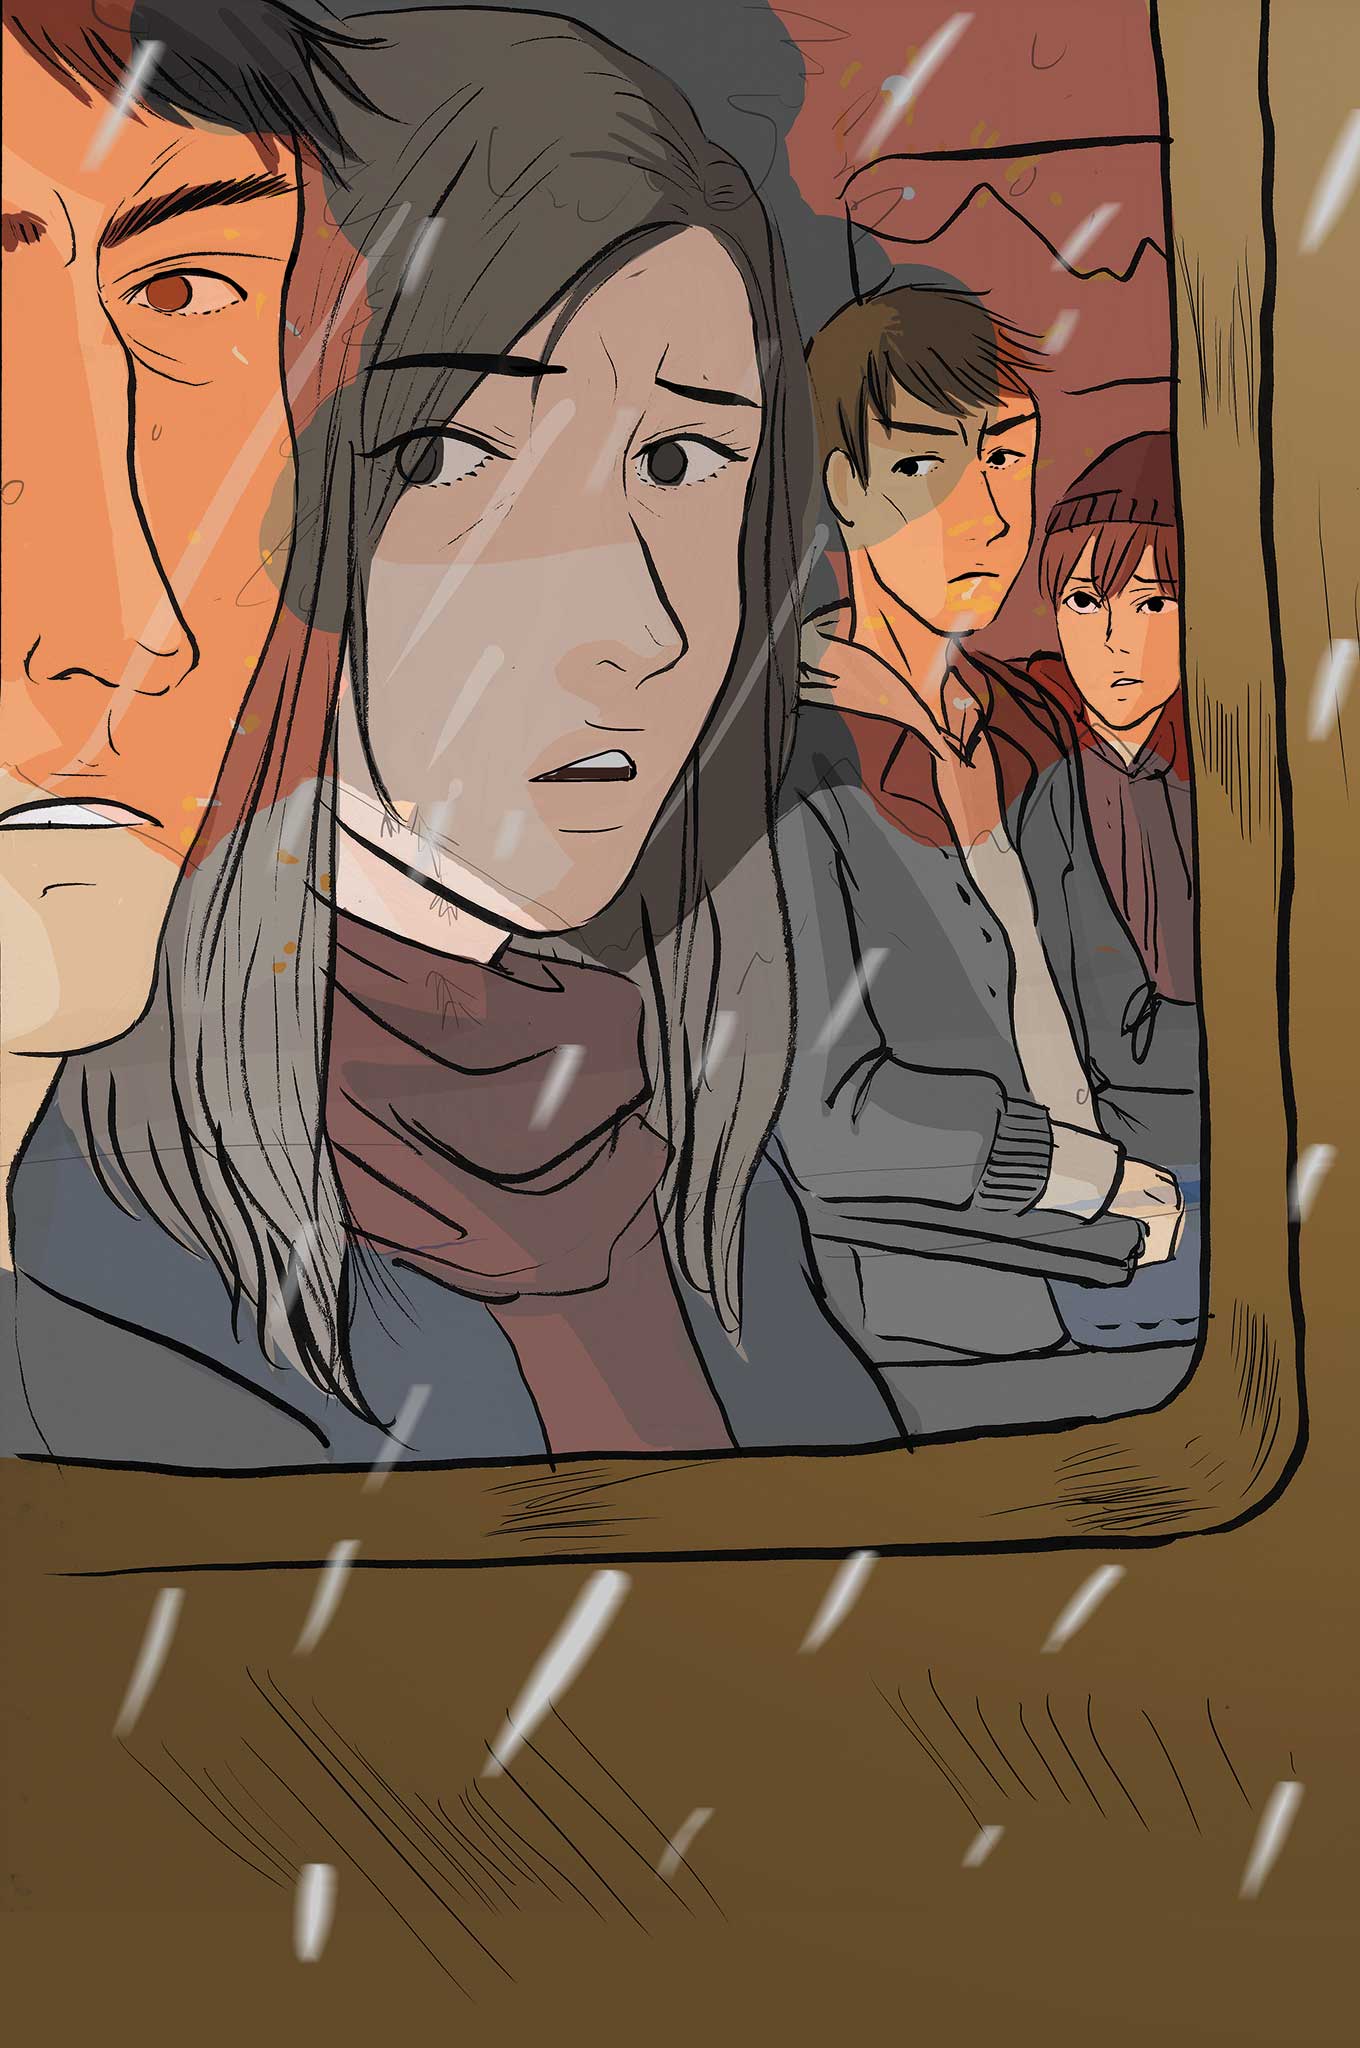
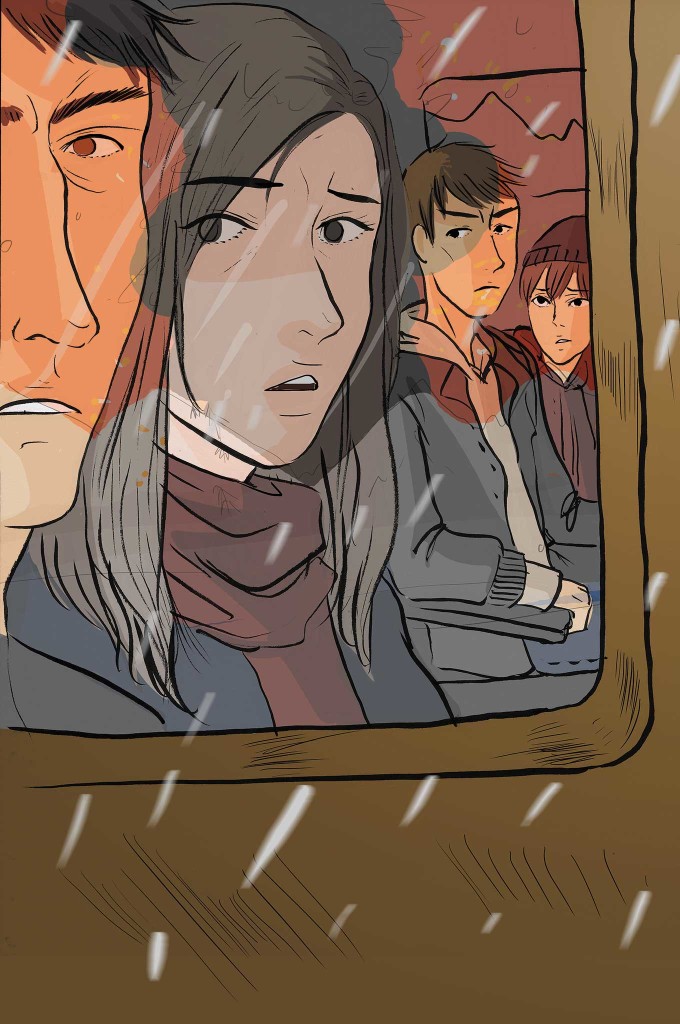
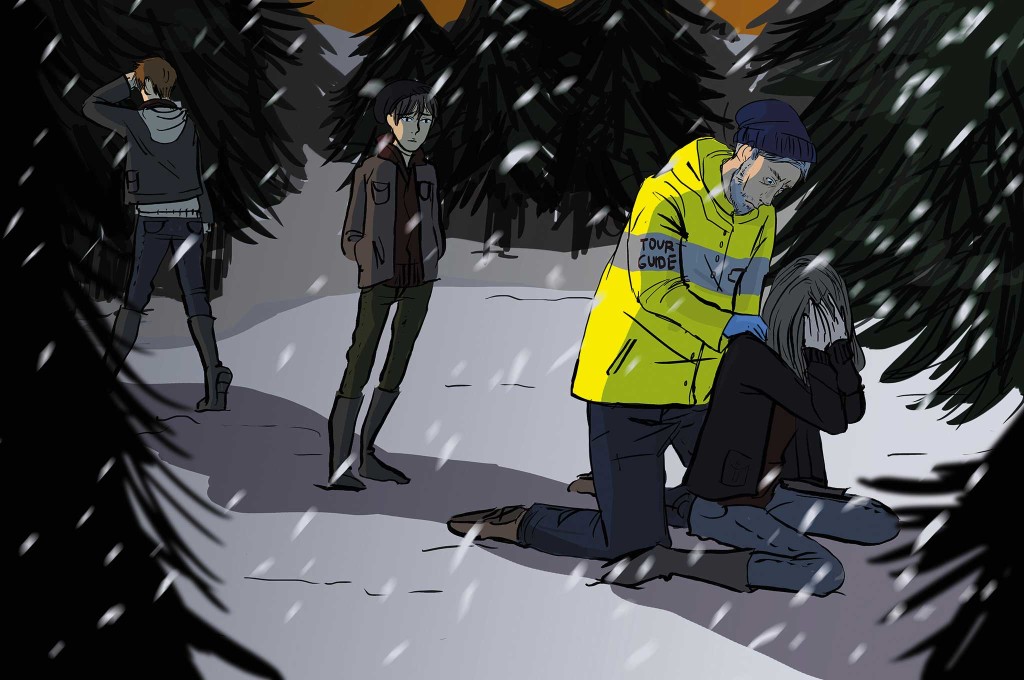
The monotonous rumbling of the snow coach was almost lulling your passengers to sleep after the busy day you'd all had. The machine chugged softly, almost like a slow train, until the sharp jolt hit and slid you and your passengers into the window. The mother in your tour group let out a shriek of surprise and covered her mouth with her hand quickly, embarrassed, as if this were part of the ride. Her family straightened themselves in their seats, wide-eyed. No sooner than everyone regained their seating and composure, another blow struck the snow machine, much stronger than the first. The impact was accompanied by a loud sound like thunder that wouldn't stop.

You halted the snow machine and quickly looked around through the large square windows. The sun was hanging low in the southwest, bathing the snow-covered terrain in a golden light. But to your dismay, an enormous dark-gray cloud began to boil up from the ground and block the light of sunset. As soon as the thundering sound started to subside, your senses were assaulted again by the shuddering of the earth, which shook the snow coach and nearby trees violently. The base of the grayish black ash cloud had widened and the speed it was growing had increased. Rocks began pelting the vehicle, some large, hurled into the sky by the force of the volcanic upheaval. The light had diminished to a surreal and sudden twilight.

You and your tour group sat in shock, looking at this hellish display of volcanic activity. The churning cloud of ash and gas grew in the southwest, in the direction you were headed to get back to the lodge.

In this diabolical installment of What If? we will see what happens to a small group when the earth cracks open and the bowels of the underworld spew forth. For three different views on surviving this catastrophic event, OG asked three survival experts to spin a tale of nature versus mankind. With us is Jim Cobb, who has published numerous prepper books and is a well- respected disaster-preparedness consultant. We also have Rudy Reyes, an actor, martial-arts instructor, and former special-operations member with the U.S. Marine Corp's 1st Reconnaissance Battalion. He knows “a little something” about thriving in the face of adversity. And finally there's me, Tim MacWelch, longtime survival instructor and author of several survival manuals.

Is there any way to survive when the very ground beneath you tries to take your life? Read on, and see for yourself.

The Scenario

Situation Type
Natural Disaster

Your Crew
You and a private tour group

Location
Yellowstone National Park, Wyoming

Season
Winter

Weather
Daytime: 20 degrees F; nighttime: -20? F

The Setup: You're a male guide for a snow coach tour company in your late 50s. You drive a snow coach, a touring van with tracks and skis instead of wheels and tires. Your vehicle has large glass windows for your customers to take photos of the winter wonderland that is the Yellowstone National Park. A family has booked a private full-day tour around Old Faithful and Geyser Basins. The father, Marcus, and the mother, Katerina, are in their early 40s. Their oldest boy, David, is 15, and the youngest, Eugene, is 13.

The Complication: Most of the tour has gone without a hitch despite the teens being slightly annoying. You're winding down the day and heading back to basecamp when multiple earthquakes rock your stagecoach. Then, moments later, the Yellowstone caldera blows, sending lava, rocks, and harmful ash everywhere!

Disaster-Prep Expert: Jim Cobb's Approach

We found out later that folks in the area had felt the ground trembling for at least a couple of hours before the first eruption. We hadn't felt a thing, due to the rumbling of our own in the snow coach.

When the volcano erupted, we suddenly had rocks and flaming globs of lava raining down around us. The snow coach slid and skidded from side to side. We finally came to a standstill with the back end resting against a pine tree. We were OK, but shaken up a bit. No one was injured, though, thankfully. I tried raising Doreen at home base, but there was no response, not even a crackle in the static. Of course, we all had cell phones, but service was spotty in this area on a good day…and this was far from a good day.

The light outside was already dimming due not only to the waning sunlight, but also the falling ash. The father, Marcus, began opening his door and I told him to stop — we didn't know what we were dealing with yet. Before he could slam the door closed, we all caught a whiff of something acrid and foul in the air.

The lava flow was moving downhill slowly, almost like syrup down a pile of pancakes…if the syrup was glowing red and igniting every tree and shrub it touched, that is. The flow was several hundred yards away, but it would get to us eventually. The steam rising from the melting snow wasn't helping our visibility issues, either. I knew we had to bolt. Immediately.

As I started to pull the snow coach forward, several large rocks tumbled down the hill. One of them hit the front skis, pushing us to the side a bit. I couldn't get the skis to straighten out. Before I could do it myself, Marcus jumped out of the snow coach and ran over to the skis. He'd pulled his scarf up over his face and was frantically kicking at the rock, trying to break it loose. Marcus began coughing and heaving as the rock finally rolled free. He tried walking back to his side of the snow coach and collapsed. I pulled my goggles down over my eyes, took a deep breath, and covered my mouth and nose with my scarf. Jumping outside, I managed to drag Marcus to his door. His son, David, helped me get him inside and the door closed again in just a few seconds. I managed to climb back into the driver's seat and close the door. As I sat down and sucked in air, mentally vowing to start a workout plan if I survived this.

what-if-yellowstones-super-volcano-erupts-snow-coach-002

His wife, Katerina, was sobbing and yelling while shaking Marcus. There was blood leaking out from his nose. His eyes were half open and vacant. Their other son, Eugene, tried pushing his mother aside, hollering something about CPR and Boy Scouts.

Eugene was still valiantly doing chest compressions in vain as I put the snow coach in gear. We'd moved no more than 50 feet when a boulder struck the passenger side of the snow coach, giving us whiplash. We lurched to a stop. Stuck. We needed to ditch the coach and go on foot — ash and bad air be damned. I grabbed the soft-sided cooler that held the remains of our packed lunches and bottled water and tossed in the small first-aid kit from where it hung on the dashboard. I pulled out the small toolkit from under my seat and the flares that were strapped to the inside of the door.

I turned in my seat and told everyone that we needed to get out of Dodge. We all came to the same conclusion at the same time: There was no way we could carry Marcus' body.

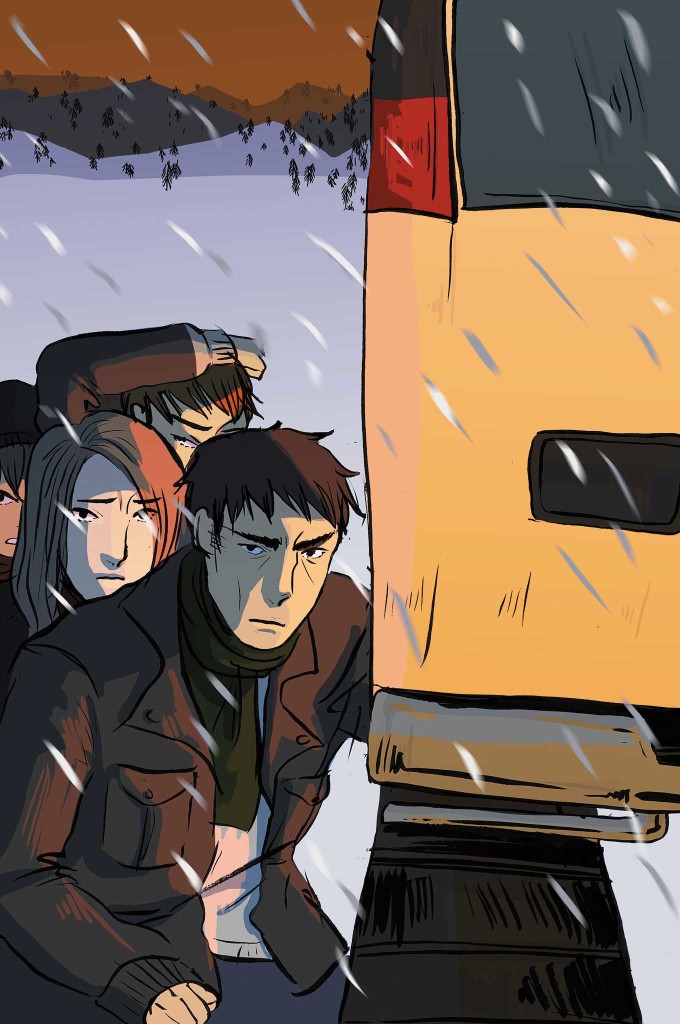
“Listen, I know this sucks, but there's nothing we can do about it right now,” I said. “He'd have wanted you all to survive, right? That's not going to happen if we stay here.” I told them to put on their ski goggles, pull up their scarves, and take shallow breaths. I handed David the toolkit, and we all piled out of the snow coach. I carried the cooler, Katerina the flares.

We walked sideways down the hill, moving across rather than straight down. The snow wasn't too deep here. I realized we were headed toward a small cavern I'd explored several months earlier. It wasn't much, but it would provide some degree of shelter and hopefully time to figure out our next move. Plus, the mouth of the cave faced away from the danger, which couldn't be a bad thing. I told everyone to grab some of the low-hanging dead branches from the trees we were passing, and I did the same.

We reached the cavern about 10 minutes later. I'd not been the first person to find it, of course, and previous visitors had left evidence of their visits behind. There was some graffiti on the walls and the usual assortment of old beer bottles, cigarette butts, and food wrappers on the floor. There were even the remnants of an old campfire near the cave opening. I pulled down my scarf and took some tentative breaths. The air seemed OK.

We were sweating due to our exertion, but I knew that wouldn't last. The temperature was going to fall overnight. Sweat plus cold equals hypothermia. The first order of business: light a fire, hence all the pine branches. I toyed with the idea of trying to get a branch lit with the lava, but figured that might just lead to bad things. I didn't want to waste one of the flares, either, if I could avoid it.

I asked the boys to start breaking the branches into smaller pieces as I searched the cave. I found a foil gum wrapper and asked Eugene if he still had his DSLR camera with him. He passed me his camera, and I popped out one AA battery from his high-powered flash. I took the gum wrapper and tore a bit off each side, so it was thin in the middle and wide at each end. Picking up a fast food bag, I twisted it up a bit and asked Eugene to hold it for me. I held the AA battery just under the fast food wrapper. Pinching one of the wide ends of the gum wrapper against the positive side of the battery, foil side touching the battery, I held the other end of the wrapper against the negative terminal. Almost immediately, the thinner middle of the wrapper started on fire. Eugene was quick to hold the paper bag close to that little flame and got the fire burning. We gently placed this under a pile of the thinnest branches and soon we had a nice little fire going.

Then both boys helped me roll a good-sized rock, maybe 3 feet across, between the fire and the cave opening. Taking an emergency blanket from the first-aid kit, I draped the blanket over the rock and secured it with a few smaller stones. The foil on the blanket reflected the fire's heat back at us, keeping us warm and allowing our clothes to dry.

I suggested we all try to eat a little something and drink some water, knowing we were all in need of hydration whether we'd admit it or not. We finished off what was left of the sandwiches and chips and drank a bottle of water each, leaving us with just two bottles to split between us later, should it come to that.

The fire was giving off some serious heat, so I showed them that by sitting or lying on the coats, we'd insulate ourselves a bit from the ground, keeping us warmer. We took turns adding wood to the fire as the night wore on, but I think we each managed to get at least a little sleep. Exhaustion will do that, I guess.

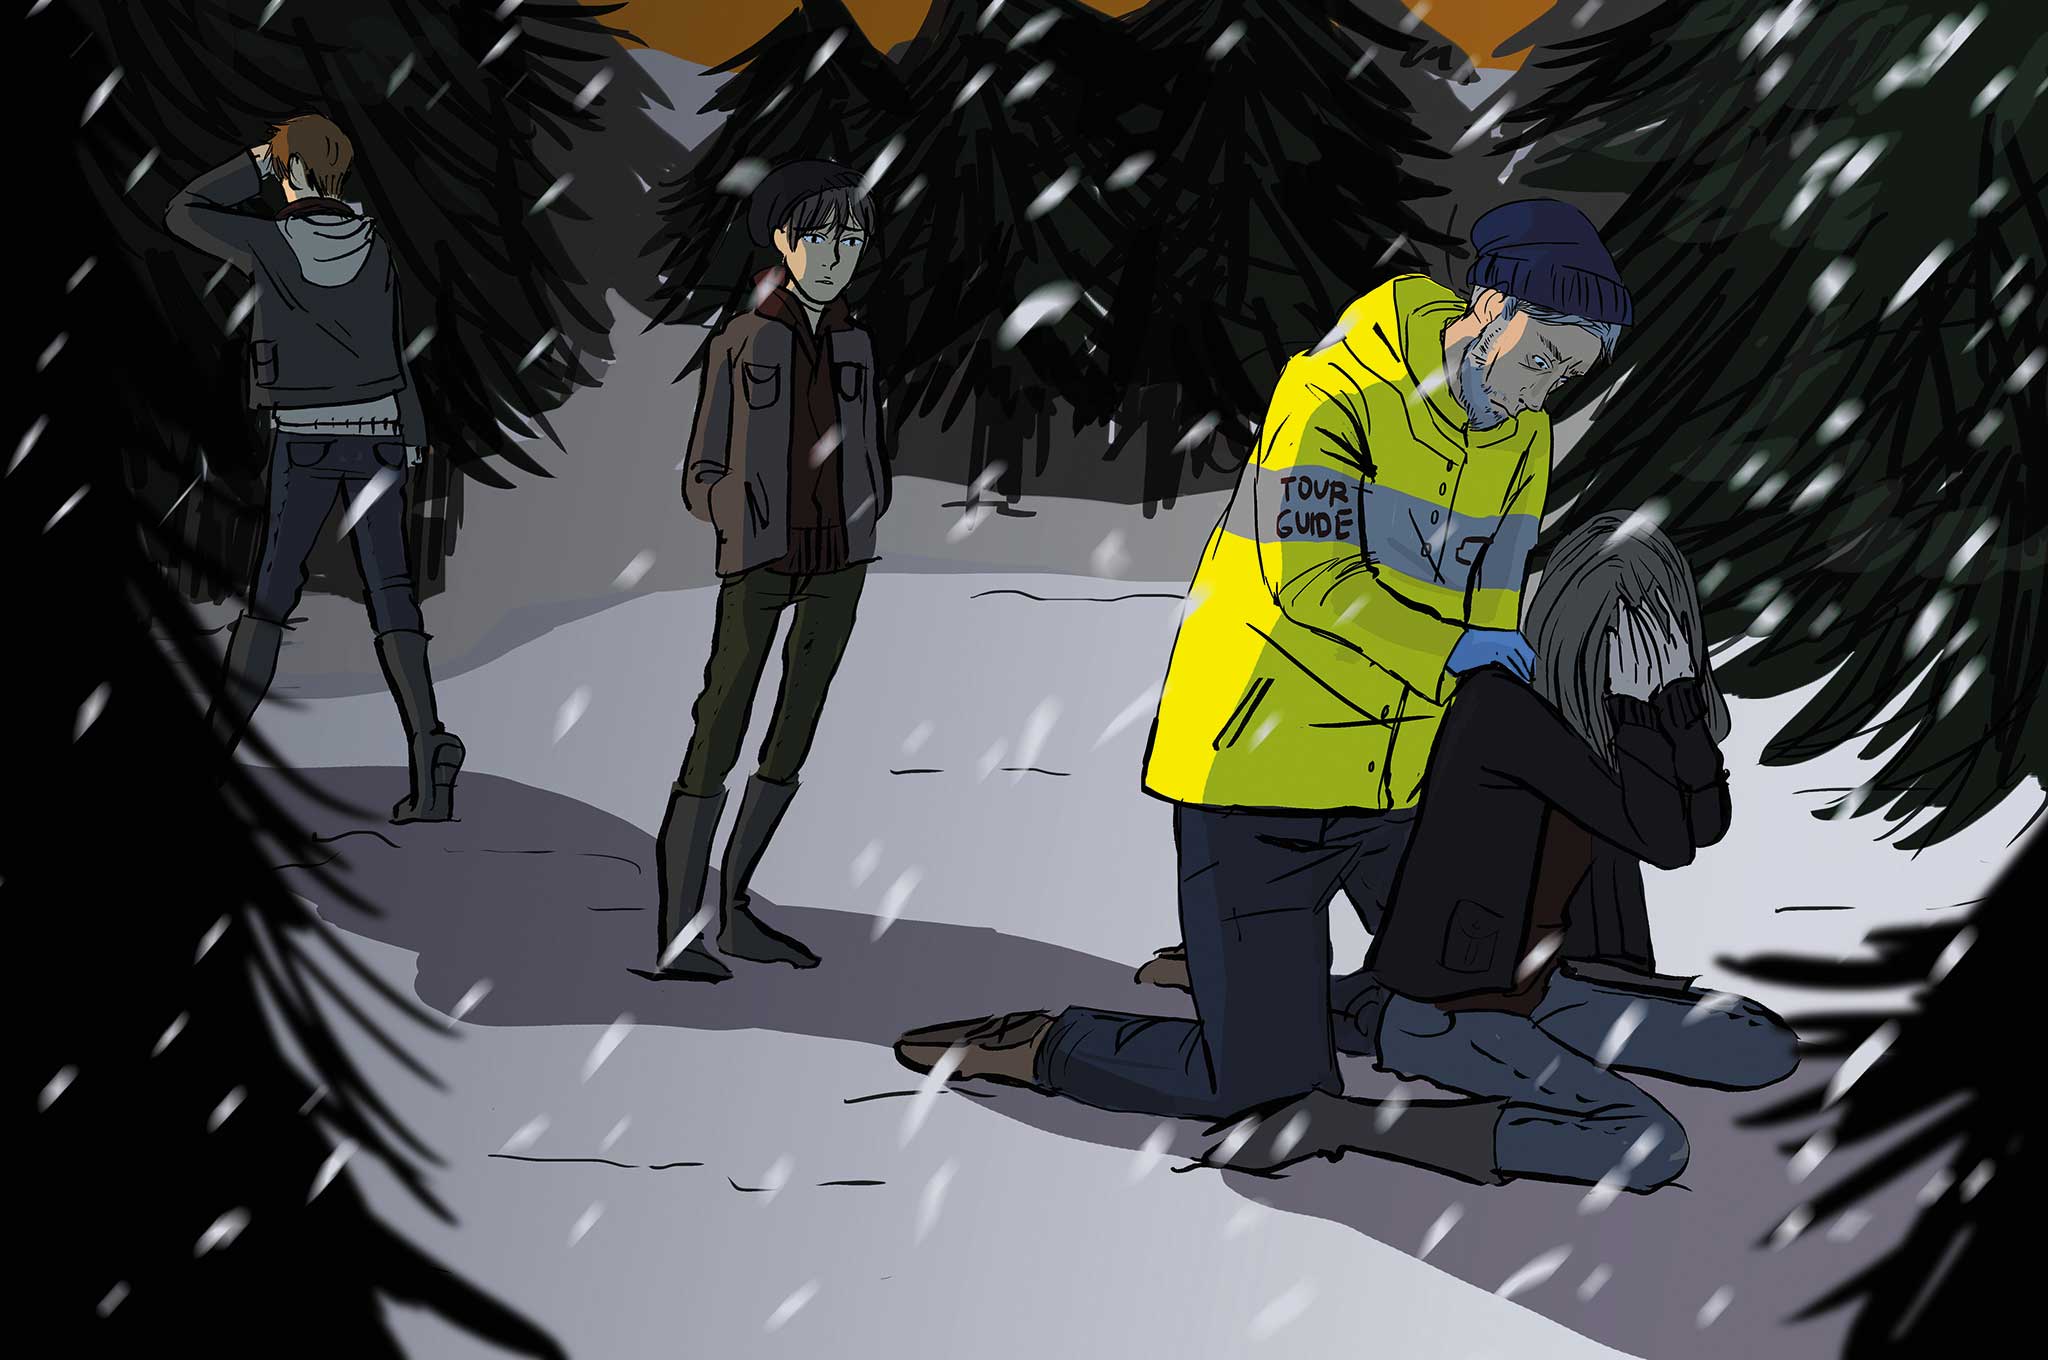
When morning arrived, I carefully bundled my mouth and nose, then walked outside to see what's what. As I went around the hill and looked in the direction of the snow coach, I could see it was still there, though charred and almost unrecognizable. The ash had continued to fall throughout the night, adding several inches of depth to the snow still on the ground. The ash was wet and sticky, adding considerable weight to my boots as I walked. The hike to base was going to be rough. It was only about 2 miles, but traveling through this muck the entire way was going to not only slow us down, but wear us out. While the company staff obviously knew we were out there, I had no way to know how, or even if, they'd be able to search for us.

I went back to the cave and broke the news. Katerina insisted she stop and say one last goodbye to Marcus. Making sure our campfire was completely out first, we slogged our way through the wet ash toward the snow coach. We couldn't get much closer than 75 feet or so as the ground was still too hot. They each bowed their heads, crying once again, as they said their final goodbyes. I did the same, praying for help from above to get this family to safety without any more casualties.

With sad hearts, we began to make our way toward base, hoping against hope that we'd find help there.

Ex-Military Commando: Rudy Reyes' Approach

The sun began its decent over the western ridge of Yellowstone National Park as my private tour was getting in their last pictures of Old Faithful when swarms of birds caught my attention. They too were heading west. I panned the vast terrain before me, the animals, from predators to prey were also moving west in unison.

I knew something wasn't right. I had that eerie feeling in the back of neck. It was time to leave.

I called to Marcus, his wife Katerina, and their two teenage sons, Eugene and David, “Folks, time to go!” Marcus acknowledged me with a wave and began to lackadaisically move toward me. I looked toward the snow coach in the parking area. Again I called, but this time I summoned the deepest voice I could muster, “We need to move! Now!” The startled family responded. Moments later they caught up to me, I had already begun walking to our vehicle.

“Hey, man, we still have some time here in our itinerary,” a winded Marcus said. “What's with the ‘tude?”

Without breaking stride, I said, “Sir, I'm trying to get your family back safely.” Suddenly, the ground jolted — wave after wave of quakes shook, sending our group to the snow-covered path. Once it subsided, I righted myself and quickly helped the group to their feet. The post-quake silence was shattered with a horrific boom!

The shockwave hit seconds later; the force sent the group flying backwards for 25 yards. I got to my knees facing east, in the direction of Thumb Lake nearly 20 miles away, when the twilight glowed and a mushroom cloud began to form. The stench of sulfur dioxide filled my nostrils. “Cover your faces with your scarves,” I screamed out as I cinched my scarf. I knew, given the topography of the park and where we were, the poison gas would be upon us soon. We needed to get to elevation.

The family was screaming in fear. I barked, “You need to focus. Listen to me now if you want to live. You hear me? Run!” They nodded in agreement as fire began raining from the sky.

what-if-yellowstones-super-volcano-erupts-snow-coach-003

Beyond the coach, the surrounding buildings were leveled, fires were igniting everywhere from the ejected lava-covered boulders. The air burned and our breathing was labored. As I jumped into the coach, I noticed Marcus was missing. “Close the door,” I said. “I'll get him.” I headed back through the ash whiteout. He was 100 yards away, on the ground coughing, and turning blue. He couldn't walk, so I grabbed him and carried him to the vehicle. The door swung open and the boys helped my put their father on the floor. “Give him mouth to mouth,” I said as I started and drove the coach as fast as it would go to higher ground. The coughing stopped, and I knew he had passed.

Shutting out the hysteria behind me, I needed to focus. With the volcano to my east, I knew the park's southern exit would be blocked; it runs along Thumb Lake. My only option was to get to Yellowstone West, 30 miles away. I also knew this must be a localized volcanic eruption — if it were the “super volcano” scientists feared, I'd already be dead.

The driving was tough, but I knew the road well. The glow of the fires, which were everywhere, also helped silhouette the terrain. The ashy sky was riddled with fireballs. As I turned to check on the family, still crying and huddling together, a large flaming boulder crashed broadside into the coach. The impact shattered the windows and split the vehicle almost in two. I stayed conscious, but the daze lasted for seconds. Instinctively, I reached for the fire extinguisher next to me and put out the flames. I then jumped, opened the side door, and ordered the boys to get out. Then I rushed to the other side to put out the rest of the flames. I used my iPhone flashlight to survey the damage…the coach was destroyed.

I walked back to the family to see the boys holding their unresponsive mother. She was bleeding heavily from severe head trauma. I pulled the father's lifeless body out, took off his heavy coat, and unzipped the lined hood. Handing David the hood, I said, “Keep this on her head and cover her with the jacket.” Then, I told them to take everything useful.

I grabbed the backpacks, med kit, and a small toolbox, and dumped them by the side door. David and Eugene were combing through the mess, while I jumped up front and went through the glovebox where I found three flares. Using the toolbox, I managed to dismantle the main 8-foot ski and dragged it to where David sat organizing the supplies while Eugene treated his mom.

“Good work, men,” I called out. “What do we have?” David looked up and said, “We have five packs, four bottles of water, two sandwiches, four Powerbars, I found your snow-shoes, five cellphones, and my dad's camera.” I pulled the flares out of my jacket and put them in my ruck.

Then I called the boys. We all took a knee, away from a distraught Katerina. “Men, we are in a world of shit, but we can make it through this if we work together,” I said. “We have about a 20-mile hike to Yellowstone West. We'll be safe there, but it's going to be tough. I know we will make it. Are you with me?” The boys sprung to the feet as I stood up, ready for the challenge.

I handed David my knife, telling him to cut out the seatbelts and bring them to me. I dragged the ski and the snow boots over to the mother. Eugene was back to holding some gauze he found in the med kit along with the hood on his mother's head. David returned with the belts, which I used to fasten the snow boots to the ski to creating a sled gurney. I jumped back into the coach and cut away seat covers.

We lined the gurney with the seat covers to create insulation for Katerina and then carefully placed her on it. I covered her in the emergency blanket from the med kit and then laid the heavy coat on top of her before I strapped her in. We then created two towlines from the remaining belts, each about 8 feet long, as well as a tailing line to slow the gurney on descents. With the remaining room on the gurney, we stowed two rucks and set off down U.S. Route 287 North.

We walked for hours in the frigged cold, but the boys kept up. The ash was getting thicker, but the toxic fumes dissipated in the higher elevation. Yet, the decent to the Firehole River area near the Grand Prismatic Spring brought back the higher levels of sulfur dioxide. Luckily the the strong westerly wind kept the gas from settling on the valley floor. “Keep your scarves tight over your faces and breathe slowly,” I instructed the boys.

The glow ahead of us was brighter than the surrounding fires in the hills. As we neared, the glow was not a fire, but a lava vent that was spewing from what was the Grand Prismatic, and the highway was blocked.

I reached into my pocket for my iPhone 6 Plus and was amazed to see I had a signal. I pulled up Google Maps. To the right of the spring area was higher ground, which would enable us to bypass the lava flow and return to highway on the other side. I tried to call the basecamp, but the signal faded. I told the boys to rest for two minutes, drink some water, and eat only half a Powerbar each — we'd need consistent nourishment and could eat the other halves in a couple of hours.

The hike around the lava flow was extreme, but the boys were fit. I took both towlines and tied them together, and then around my waist. After an hour climb, we made it to the top and away from the flow of the hill. The increased winds made the air clearer, enabling us to see the surrounding area and the route ahead looked clear of lava, though steep and dark. We used flares to navigate. A short time later we were back on the highway.

As dawn broke we tried to make calls, but the service was down. For breakfast, we shared one of the sandwiches and some water. Even in daylight, it was still hard to see much, but the temperature was rising.

By mid afternoon we had finally made it to the outskirts of Yellowstone West. The ash thinned, and in the distance I saw brake lights of what looked to be a convoy. The brake lights turned to driving lights. I yelled to Eugene, “Get the camera!” Seconds later and camera in my hand, I started running while setting off the flash as a fast as it would reboot. Soon, the brake lights reappeared and a Humvee stopped, turned, and was driving towards us.

As it pulled up, the driver, an Army reservist said, “Lucky, I saw that flash. We evacuated the entire town, and we're pulling out.” The door opened and we jumped in. “Thank you,” was all I could say. “Thank you.”

Survival Expert: Tim MacWelch's Approach

I was no stranger to tremors. Working in Yellowstone, one of the most seismically active places in the country, I thought that I'd seen and felt it all — until today. Had it been the super caldera explosion that many doomsayers had predicted, we would have been dead already. But I didn't count my good luck yet. Time was not on our side. We had to get out of there, and quickly.

The prevailing winds would be blowing the ash and fumes our way. But we couldn't take our intended route, and we couldn't go back to the lodge. The eruption looked like it was close to our destination, maybe even underneath it. I tried the two-way radio, but to no avail.

I began to run through my mental list of places where we could seek safety. My friend had a rental cabin northeast of our position, but that was the direction the wind was headed. Aside from the violence of an eruption and our proximity to the event, I knew the wind played a major role in a person's survival of volcanic events. The ash and gases blown in the wind would create other dangerous conditions. Then I remembered a vacation house that was due south of our position. I told my tour group to stay calm, that I knew a place where we'd all be safe. The mother, Katerina, and youngest boy, Eugene, were crying, and the oldest boy, David, looked like he would start at any moment. The father, Marcus, however, looked as if he were in complete shock.

I picked our path south through the fallen trees and the cracks in the ground. Visibility was becoming an issue, since the already low sun was blocked by ash and steam vents everywhere. Katerina and the boys tried calling 911, friends, and relatives. No could get through. Our path was growing more treacherous. Larger rocks were strewn about. They were still hot, melting the nearby snow. While taking the snow coach up a hillside, the vehicle began to skid, scooping up a rock into the tracks and lodging it there. I revved the engine and shifted gears, but we couldn't go forward or backward.

I muttered to myself, “We'll have to clear the tracks.” Marcus' voice cut the silence: “I'll do it.” Apparently, he was snapping out of his catatonic state.

I told him no, it was getting too dangerous — ash, fog, and toxic gases were everywhere. But Marcus already zipped up his coat to the top and stuck his nose down into the collar. “I'll be all right,” he told his family. Cracking open the door and squeezing through to keep the ashes out, Marcus climbed out and down to the ground. He found the wedge-shaped rock that had jammed the track, and began kicking it to dislodge the stone.

Suddenly, a tremor hit and threw the father to the ground. A fissure opened in the ground near Marcus and a grayish steam rose up, enveloping the man. He crawled backward quickly and tried to stand, but fell. This was bad, we all knew it. He crawled back to the vehicle's stuck track and began to tug on the stone. It finally fell free. Marcus crawled to the door and his family quickly pulled him inside. I hit the accelerator and began rolling us away from the toxic fumes.

When I felt we were clear of the gases, I stopped the vehicle to check on the patriarch. Marcus was still gasping. His skin burned from the steam, his eyes weak. He began to cough, a deep uncontrollable hacking, then he grasped again for a few moments. Then he didn't inhale. We all waited a moment, stunned. Then I pushed his family out of the way and started doing chest compressions, deep and hard. I felt some slight cracking under my hands — his ribs were breaking — but I pushed on.

Surprisingly, it was Katerina who stopped me. “We have to go now,” she said. “Or we all die.” A wave of guilt washed over me, as I nodded.

We drove on when we heard more booming in the distance and more stones clattering against the snow coach's windows. But then came a glow out of the darkness. Orange streaks shot out of the gloom. Great globs of glowing hot rock shot through the air, and small dark stones started breaking the glass and roof. Massive ones fell all around. Then the vehicle lurched, struck by a larger piece. The rear window began to crack from the heat. Flames began to rise from the back of the left track, ignited by the lava rock ball.

I grabbed the emergency bag, told everyone to grab their things, and pushed everyone out the door. Only Eugene refused to go. He clung fiercely to his father's body: “We can't leave him! We can't!”

what-if-yellowstones-super-volcano-erupts-walking-to-safety-004

“Take my bag to your mom,” I said. “I'll get your dad.” I dragged him clear, and joined by his family, and leaned up against a large pine. “We have to hurry to get to the house,” I said. “We'll come back for him later” I struck a flare to light the darkness and started leading the survivors in the direction of the house.

No doubt, we would have wandered in circles in the frigid darkness without the compass app in my smartphone. We only had three 30-minute flares, and I used two of them to light our way to higher ground. Ash fell around us and we did our best to keep our mouths and noses covered with clothing. After an hour's hike, and the consumption of two flares, we stopped to rest for a moment. We had only limited gear to begin with, and left some of that behind in the snow coach. We were carrying some basic tools and supplies, sack lunch leftovers, phones, and we had one flare left.

Then Eugene started shivering and crying. He was the worst dressed of the group, and the smallest. He had sweated and was now getting dangerously chilled. I thought about stuffing vegetation into his clothing for insulation, but had a better idea. I found a softball-sized rock which had obviously been hotter earlier — the snow melted near it. I removed my glove and held my hand near it. The warmth was undeniable, then I touched it. It was hot to the touch, but not dangerously so. I put my glove back on and picked up the rock. I asked the boy to unzip his coat. Through his tears, he looked at me as if I were crazy. “Trust me,” I said. I placed the hot stone against his sweater and helped him zip the coat back up. After I wrapped him in our only space blanket, he soon looked much better. Soon enough, we all had a hot stone under our coats.

Finally, we found the road. It looked like a war had passed through. The pavement was broken, cracked, strewn with rocks and boulders, impassable. I had hoped we could flag down a vehicle, but no one would be driving down this road tonight.

It was still many miles to the house — If it's still standing, I thought grimly. Katerina started crying, slumping to the ground. Her boys joined in. They were exhausted, terrified, and overwhelmed with grief. They needed rest, and they needed to release their grief. I stood vigil near them.

After half an hour, I noticed that the hot rock in my coat wasn't offering me heat anymore. I let it fall out of my coat and wondered if I could scale the operation up, significantly. I spotted three large volcano-spewed boulders with plenty of radiant heat. I called to the family, “Come over here, I found a place to get warm!” The hot boulders had warmed up the asphalt and ground beneath it. Soon we were sitting in a circle, huddling for warmth. Despite the frigid conditions, we dozed off and on for several hours.

I awoke freezing. Our boulders had finally lost their heat and were now barely warm to the touch. As the faint glow of dawn illuminated the distant east, we divided the little food that we had and ate it. Our remaining water was quickly downed as well.

Even though I wasn't feeling very optimistic, or rested, I suggested that it was time to pick our path toward the house. My thirst had grown after our dry breakfast. The ash would make any snow we could melt undrinkable. We plodded along carefully through the debris, and finally came to a road cut that was facing north. This spot had a large snowdrift that was covered with ash. A hot rock had plunged through it and melted a column of water that hadn't refrozen yet. The water was ice cold and tasted of dirt and rock, but was each took turns drinking several handfuls to moisten our mouths.

Again, our trek continued heading southeast down the broken road. I thought I could see a spire of wood smoke rising in the distance. I prayed that it meant the home was near and occupied. Perhaps the smoke was from a chimney or a wood stove. I pointed to the smoke. “I think that's it,” I told them, and the boys rushed past me to get a better look.

As they crested the last hill, they both stopped in their tracks. I trotted up to stand beside them with their mother close on my heels. The smoke was from the house, more correctly, the ruins of the house. The lawn was full of boulders and the home had burned to the ground. Only one small area was still smoking. This was what we had seen. The boys and the woman looked at me, and in turn I looked at each of them. I didn't know what to say. The next house I knew of was many miles away, and I didn't think we could make it in the condition we were in. We stood there silently for many minutes, and I finally started walking toward the burned rubble. I hoped I could find something that could be useful, something that had survived the fire. The mother and her sons just stood there on the shattered road.

Conclusion

Major natural disasters are just part of the deal when it comes to living on this planet. Certainly, long stretches of time can pass when nothing bad happens and human populations grow. During these peaceful quiet times, we tend to think we are in charge of everything and able to do as we like indefinitely. But there's always the potential of some calamity that will put us in our place.

As preppers and survivalists, we always want to believe that we could survive any scenario, but in all truth there are some situations that are simply “game over” events. A volcano in your proximity can be one of those events. Poisonous gases, pyroclastic flows, and flying blobs of lava aren't the things you can beat with some duct tape and a “can-do” attitude. But look on the bright side: We pretty much know where volcanic activity is likely to occur. If you're not willing to take the risk, perhaps you shouldn't tempt fate by visiting or living nearby.

How would you react to the same scenario as played out by our panel? Share your plan with us on our Facebook page: www.facebook.com/OFFGRIDmag.

Meet Our Panel

Tim MacWelch

Tim MacWelch has been a survival instructor for more than 20 years, training people from all walks of life, including members from all branches of the U.S. Armed Forces, the State Department, DOD, and DOJ personnel. He’s a frequent public speaker for preparedness groups and events. He’s also the author of three New York Times-bestselling survival books, and the new Ultimate Bushcraft Survival Manual. When he’s not teaching survival or writing about it, MacWelch lives a self-reliant lifestyle with his family in Virginia. Check out his wide range of hands-on training courses that are open to the public at www.advancedsurvivaltraining.com.

Jim Cobb

Jim Cobb has studied, practiced, and taught survival strategies for about 30 years and resides in the upper Midwest. His books include Prepper’s Home Defense, Countdown to Preparedness, and Prepper’s Long-Term Survival Guide. Jim’s primary home online is www.survivalweekly.com. He is also active on Facebook at www.facebook.com/jimcobbsurvival. Jim ofers a consulting service as well as educational opportunities at www.disasterprepconsultants.com.

Rudy Reyes

Rudy Reyes is a former member of Force Reconnaissance, one of the U.S. Marine Corps' elite special-operations units. He ran combat missions in Afghanistan then, as part of the 1st Reconnaissance Battalion, helped lead the invasion of Iraq. This mission was documented in the book Generation Kill and the HBO adaptation of the same name, which he costarred in. Later, he served as a Defense Department contractor, trained African wildlife preserve rangers, and authored his book, Hero Living. For more information, go to www.rudyreyes.com.

More From Issue 11

Don’t miss essential survival insights—sign up for Recoil Offgrid's free newsletter today.

Read articles from the next issue of Recoil Offgrid: Issue 12

Editor's Note: This article has been modified from its original print version for the web.