A plate carrier, a modular handgun, and an AR-15 go hand in hand for more than one reason. First of all, they belong in the hands of military, law enforcement, and civilians. Second, each carries a sense of urgency and personal responsibility. Finally, each takes a shape of its own depending on how the owner chooses to set it up. While a plate carrier setup will inherently bear some subjectivity to the wearer, some rules should be followed as well. Here's how to set up a plate carrier.
Know the Plate Carrier Rules
The fit of the body armor comes first, before pouches are incorporated. The process of continual refinement reflects both on individual users, and those developing new gear. In the past, plate carriers have gone through something of a pattern resembling orthodoxy-reform-new orthodoxy, where a certain setup was considered absolute and gospel, only to be eventually challenged replaced with a new trend. Many of these were highly directed by various military and police standard operating procedures, or SOP's.
But in the last years, a much broader approach has become mainstream, with more focus on the end user's performance and a little more room for experimentation. As a result, a short list of rules cannot be broken, but outside that small circle, guidelines, suggestions, and trends shift depending on use. Above all other rules, propper plate carrier fit reigns supreme.
A Level III, Level VI, or Special Threat Plate is designed to stop a specific set of projectiles. By protecting the heart and lungs, it gives the wearer a distinct, but limited advantage in a violent encounter. The body is made up of timers and switches, and the heart and lungs have the shortest timers if damaged, short of the brain and spine. The front plate, then, needs to ride roughly from the center notch of the collar bone and cover down to about the base of rib cage. The rear plate mirrors this, though typically rests a little higher, with the top edge sitting about even with the tops of the shoulder blades.
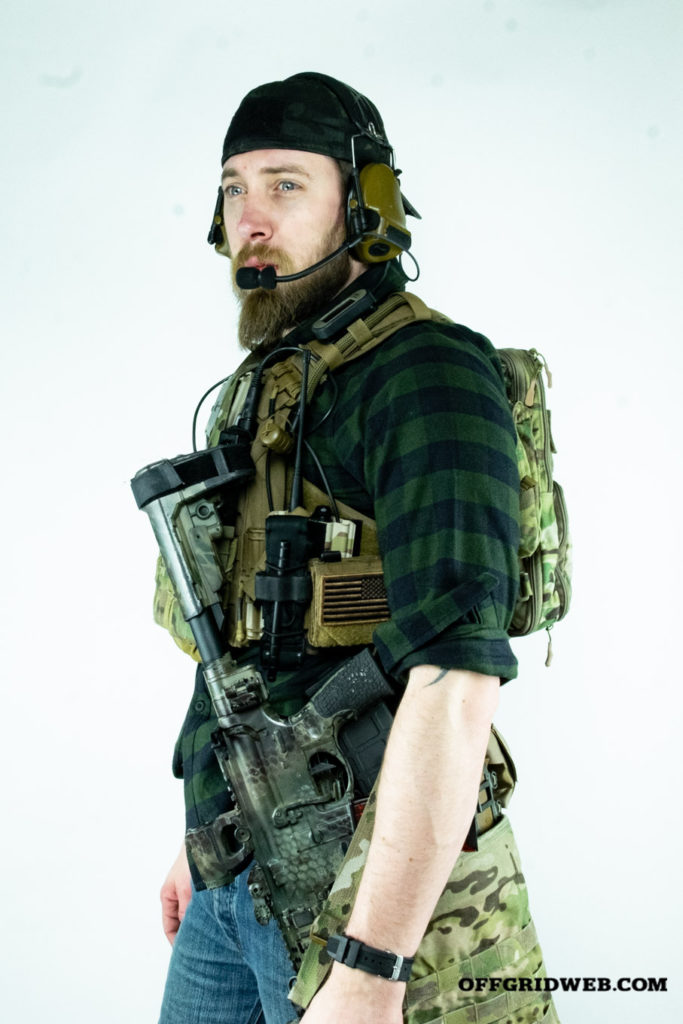
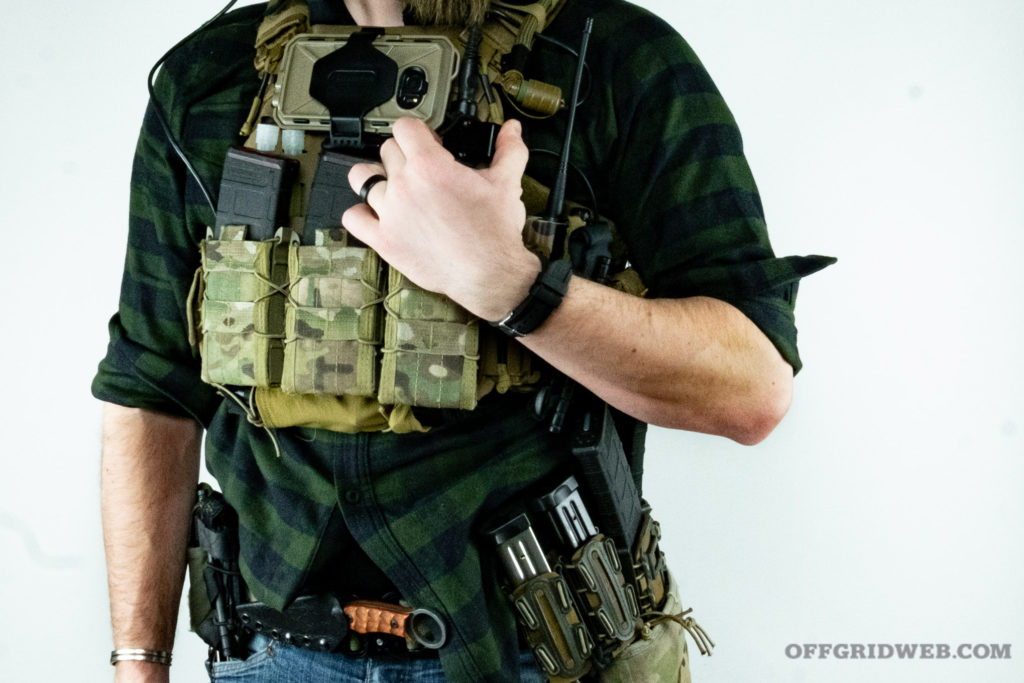
Above: First Spear Plate Bags with a Crye AVS Harness. Custom assembly. HSGI Tacos, and KAGWERKS Kit, Disco 32 Tactical PTT, to Kenwood Connector on a Baofeng UV5R.
A properly fit plate carrier keeps the plates secure when running, climbing, moving through buildings, and diving for cover, all while not inhibiting one's range of motion too much. The shoulder straps should adjust to set height, and the cumberbund to prevent the plates from bouncing when running. Mags, pouches, and plates jostling and bouncing around rapidly wear out the bearer, and pose a risk of injury when climbing. While most of the weight will rest on the shoulders, a slightly tighter cummerbund reduces this pressure.
Propper Plate Carrier Loadout
As a principle, loaded pouches should ride as close to the body as possible. This may sound like a pithy maxim, but it goes unheeded far too often, at the wearer's expense. The emphasis on minimalism has gone a long way since earlier days, but can be mistaken for trimming the wrong gear. Those buying their own kit have the opportunity afforded by years of development to choose between a variety of equipment manufacturers, mixing and matching where they see fit.
The four categories of gear worn divide into ammunition, medical supplies, admin, and the ever ambiguous mission-specific equipment. Though lighter gear of the same capability will almost always be preferred, so long as it performs the same or better, this imperative often pits the good against the great.
Ammunition
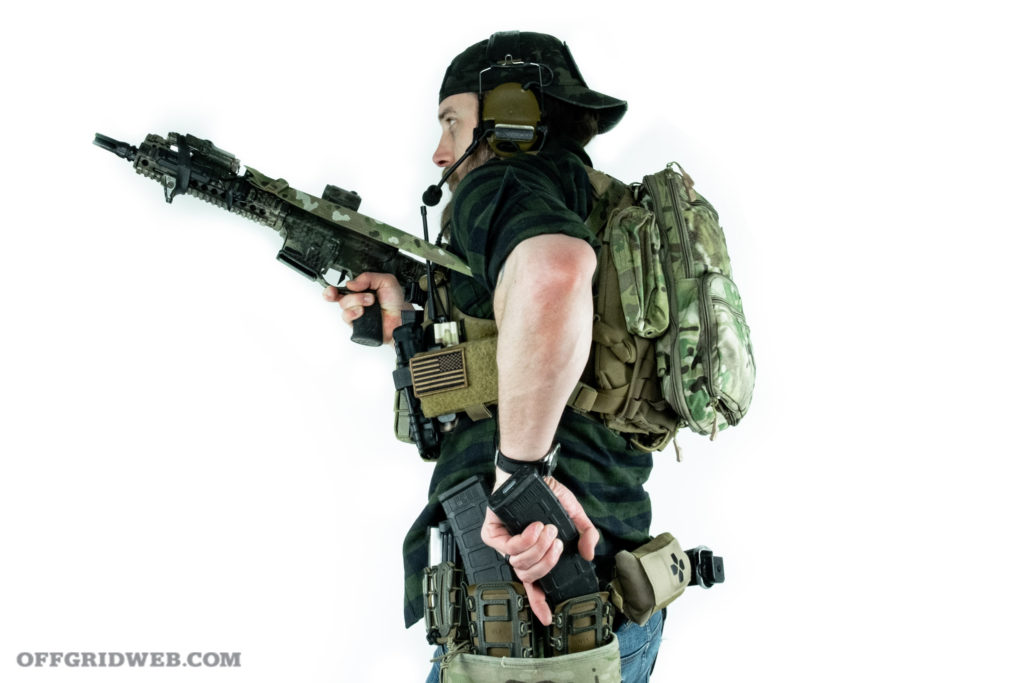
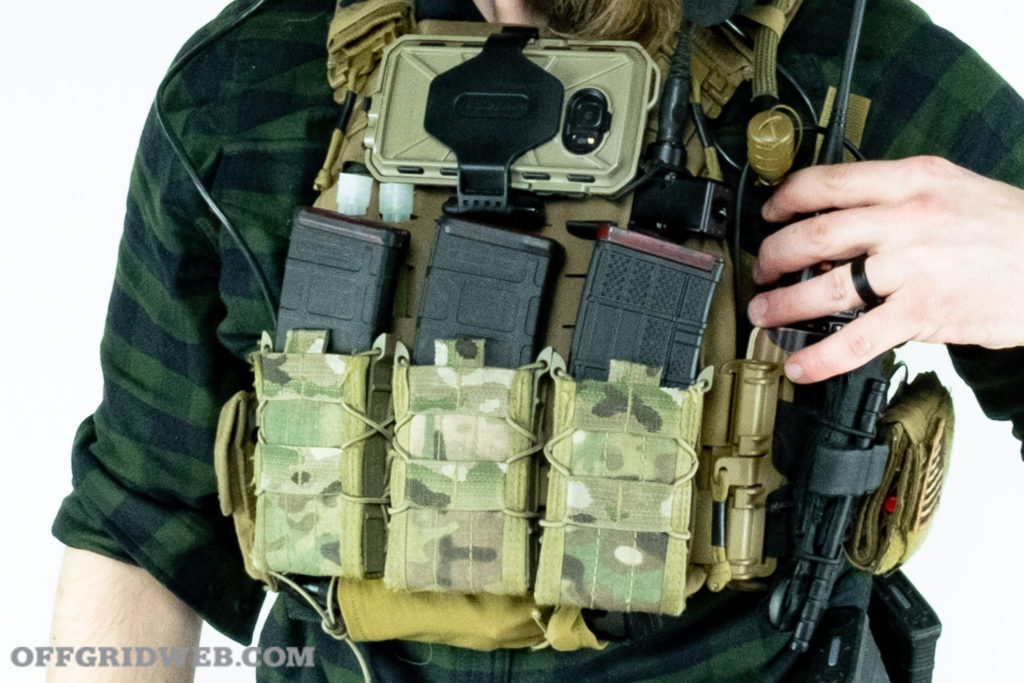
The 3-wide, single layer mag “shingle” reigns as as the clear de rigueur of our time, with a mag sometimes referred to as the “speed mag” mounted to the cumberbund on the non-dominant arm side. In the last ten years, the trend has pushed some magazines typically carried on the Plate Carrier to the Belt, with many opting to reload off the belt first as habit. As magazines are expended, fresh mags are shifted first to the speed pouch, so that in the event of an emergency reload, the shooter can go straight to their fastest mag.
Above: Belt: Ronin Tactics Senshi Belt, with G-Code Scorpion Caddies, Blue Force Gear Micro Trauma Kit, Unknown Drop Pouch.
Magazines worn on the front of the carrier should only “double-up” in very rare, specific circumstances. It's nearly impossible to translate how badly more gear directly turns into an inability to effectively lay prone behind low cover.
Medical
Often personal medical gear gets stowed on the belt, or according to unit SOP's. If able to choose for yourself where a personal first aid kit will integrate, pick a location accessible by both hands in the event one receives disabling injuries. Outside of the kit, tourniquets should be distributed across the body where they can again be accessed by both hands.
Individual application will vary, but generally speaking at least one tourniquet should be attached to the plate carrier, even when worn in conjunction with a duty belt. This serves as insurance in the event the belt is lost, or one does not have time to put it on. Recently various forms of “danglers” have sought ot accomplish this, while others opt to use a breakable rubber band or shock chord.
Admin
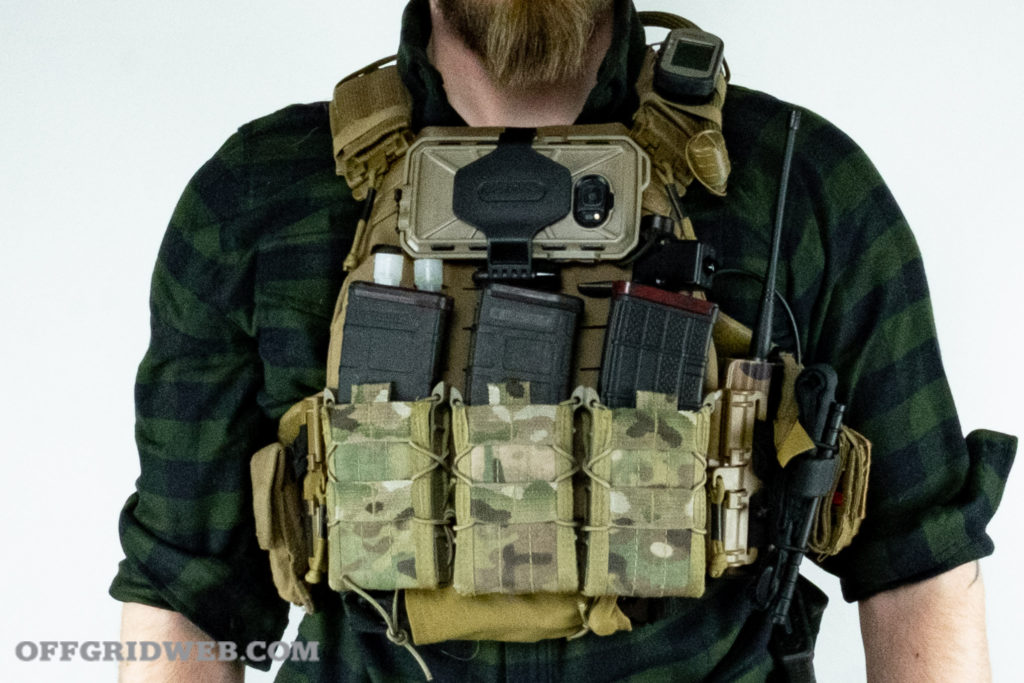
Before chest-mounted cellphones were a thing, the top section of a plate carrier was typically kept slick or an admin pouch with maps, pens, and spare batteries and other miscellaneous items were often placed just above the magazines for easy access. Lately, gear like KAGWERKS or Juggernaut cases have dominated this space, offering users a video-game-like access to information with programs like ATAK.
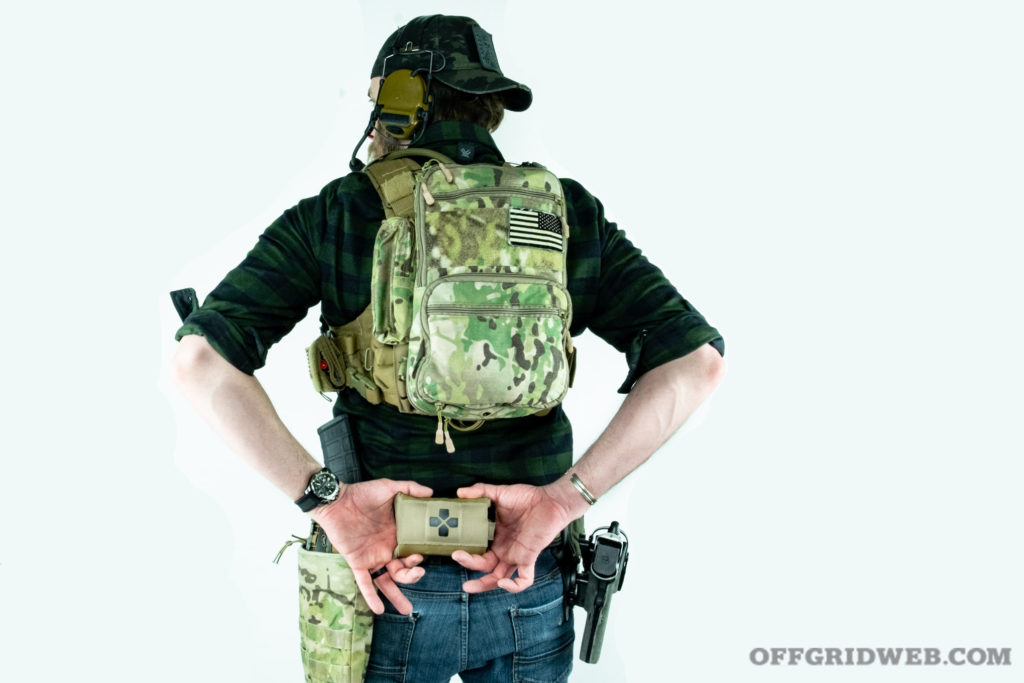
Above: Toor Knives Vandal, fits on Kit and as a Belt Knife.
Even when using a chest-mounted computer, it is recommended to have a dedicated admin pouch if one is not designated on a uniform. The U.S. Army's attempt at putting pen holders on their sleeves might have looked like a good choice, but more often than not, “in the field” those pens were broken before use. Dedicating a specific admin pouch on a plate carrier takes one step out of putting on one's gear, saving time and making it easier to keep stocked up.
Radios have always presented a difficult decision to the bearer. If carried on the front, they could be accessed easier, at the cost of real estate. If carried on the back, a radio would be out of the way but often forcing the wearer to depend on a teammate to access it if a battery needed to be changed out or a frequency was lost. The black magic element of radios is their propensity to attract Murphy's Law.
Either way, the most common location to integrate a push-to-talk or PTT, which connects a radio to a communications capable headset, has long been the front non-dominant side of a plate carrier, to allow access while keeping a finger on the trigger of a firearm. Attempts have been made to drop it onto to cumberbund, but this has mixed opinions. If carrying two radios, one does not want to have to think about which PTT they are activating while in the middle of a tense situation.
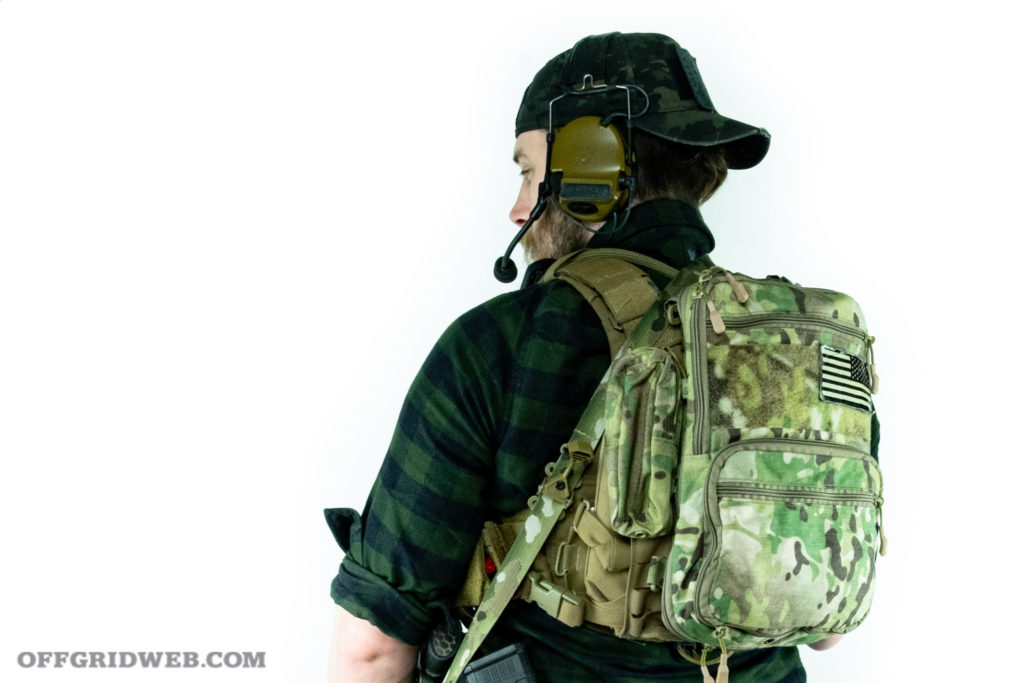
The back of the plate carrier draws the ire of many a zealous minimalist, as it follows the same rule of motorcycle saddlebags and backpacks: if there is free space, something will end up filling it, quickly adding both weight and bulk. A survivalist plate carrier setup, those preparing for a longer operation, or when carrying larger gear, it is possible to opt for a full backpack instead, worn over the plate carrier. If this is the case, once again, less is more. If not carried in the pack, a water bladder can be attached to the back, so long as it is protected by some sort of sleeve or pouch.
Mission Specific Gear
Those in the military or law enforcement should be able to look to their leadership for guidance with mission-specific gear. Allowing for ingenuity should be encouraged, but limited to training scenarios and vetted for some time before potentially seeing combat.
With a plate carrier load-out, the little things have a big impact, such as finding out where gear pinches, or moves. As each piece is added, the bearer should test it for movement and jostle by donning the plate carrier. Like a backpack, heavy equipment stored further from the body only exhausts precious energy, and potentially gives away one's position by banging against walls, cars, and other objects.
Keeping a small amount of shock or bungee chord on hand can take the extra play out some things that move, and if a thing can fall out on it's own, expect it to when needed most. Dampen the noise of metal buckles with electrical tape, Ranger Bands, and elastic sleeves. Trim loose ends, and make sure nothing dangles off the belt or back of a carrier. It will inevitably snag, risking injury, exposure, or destroying equipment in the middle of a high-speed airsoft match.
Final Thoughts
Building a plate carrier is a highly personal process, and requires a fair bit of humility to acknowledge just one is doing so. The difficulty with this kind of equipment is much like a permit to carry: we should truly hope that we never have to use it, and a responsible owner will be honest about their capabilities. A weighted vest helps greatly for improving fitness, and things like the Tactical Games have brought a new opportunity landscape to popular firearm competitions. Accessible by all, and physically demanding, Tactical Games Skirmishes make excellent gut checks to ego, and help trim the dead weight off a plate carrier.
Two extremes stand out in regards to plate carrier setup: the hyper orthodox who demands compliance to a rigid SOP without explaining it to his men, and the rogue experimenter who sticks out by challenging the norm, often with no specific problem to solve. Millions of hours of experience from the last near 20 years of war slowly trickle into gear companies, and the change is often slow, tempered by the reality that we're dealing with serious life-saving equipment.
Read More
Subscribe to Recoil Offgrid's free newsletter for updates, offers and more.
Ninety years ago, gas was only $0.18 per gallon. Although this statement is accurate, it's also a little confusing, because $1 in 1932 is equivalent to more than $21 today. This is also why the prices for many consumer goods — from a $3,500 Corvette to a $200 Thompson submachine gun to a $0.05 bottle of Coca-Cola — sound staggeringly low these days. If we want a more accurate perspective on how gas prices have changed over time relative to the rest of the economy, we should adjust prices in previous years to 2022 dollars. The following infographic from TitleMax did exactly that, showing average gas prices from 1929 through the present.
Update:The average price of gasoline dropped 5.3% in the 12 months ending October as compared to the annual increase of 3.0 % in September, according to the most recent inflation data published Nov. 14, 2023, by the U.S. Labor Department's Bureau of Labor Statistics (BLS).
More Gas Data
In addition to the raw prices and 2022-adjusted gas prices, this infographic includes some markers for major historical events that influenced these numbers, such as wars, recessions, and the OPEC crisis. Following the bar graph, there's a line graph that shows gas price compared to electricity and common household staples (milk, bread, and bananas). While the prices for these other items have risen over time, they're clearly less volatile than gas prices, and have not matched the skyrocketing price per gallon over the last two years.
Final Thoughts
So, as preparedness-minded individuals, what can we learn from this? Gas prices are inherently volatile due to factors outside our direct control (unless you happen to be an oil sheik or high-ranking politician) and they have become much more volatile in the last 20 years. Gasoline expiration makes it almost impossible to stockpile fuel safely for more than a few years, so we should do our best to avoid being overly dependent on it as a fuel source — obviously, that's easier said than done. It may be worthwhile to consider acquiring a fuel-efficient motorcycle, e-bike, or vehicle converted to run on biodiesel to weather the storm in times such as these.
Read More
Subscribe to Recoil Offgrid's free newsletterfor updates, offers and more.
It usually starts with one of those conversations: If you could only have one gun …
Personally, I really don’t want to live in a world where I’d be restricted to one firearm. However, if you go on an extended trip off the grid in a hunting or survival situation, you probably won’t be able to tote your entire collection of firearms with you.
You can pick out a rifle and handgun for your situation, but you’ll still find gaps between the two. Your rifle may be able to reach out at long ranges and your pistol may be enough to keep you safe from two-legged predators, but will either excel at harvesting game, keeping varmints in check, or providing defense against a four-legged predator?
What if you did have one gun that could do it all, or at least get you close to that goal?
When it first debuted in 1967, the Thompson Center Contender was mostly a curiosity. The barrels were all below 10 inches in length, were octagonal, and represented the lower end of the power spectrum (.22 Jet, .22 LR, .38 Special, etc.). They were accurate, but not particularly useful beyond the firing line at the local outdoor range. By the 1970s, the barrels became round and were offered in rifle calibers such as .223 Remington, .30-30 Winchester, .35 Remington, and .45-70. Magnum. Handgun calibers such as .357 Magnum, .41 Magnum, .44 Magnum, .357 Maximum, and .45 Winchester Magnum followed, and the Contender was reborn as a highly accurate long-distance pistol for metallic silhouette shooting and a suitable hunting arm in either rifle or pistol configuration.
Although they were never intended or marketed as a “bug-out” gun, it’s a role at which they can excel.
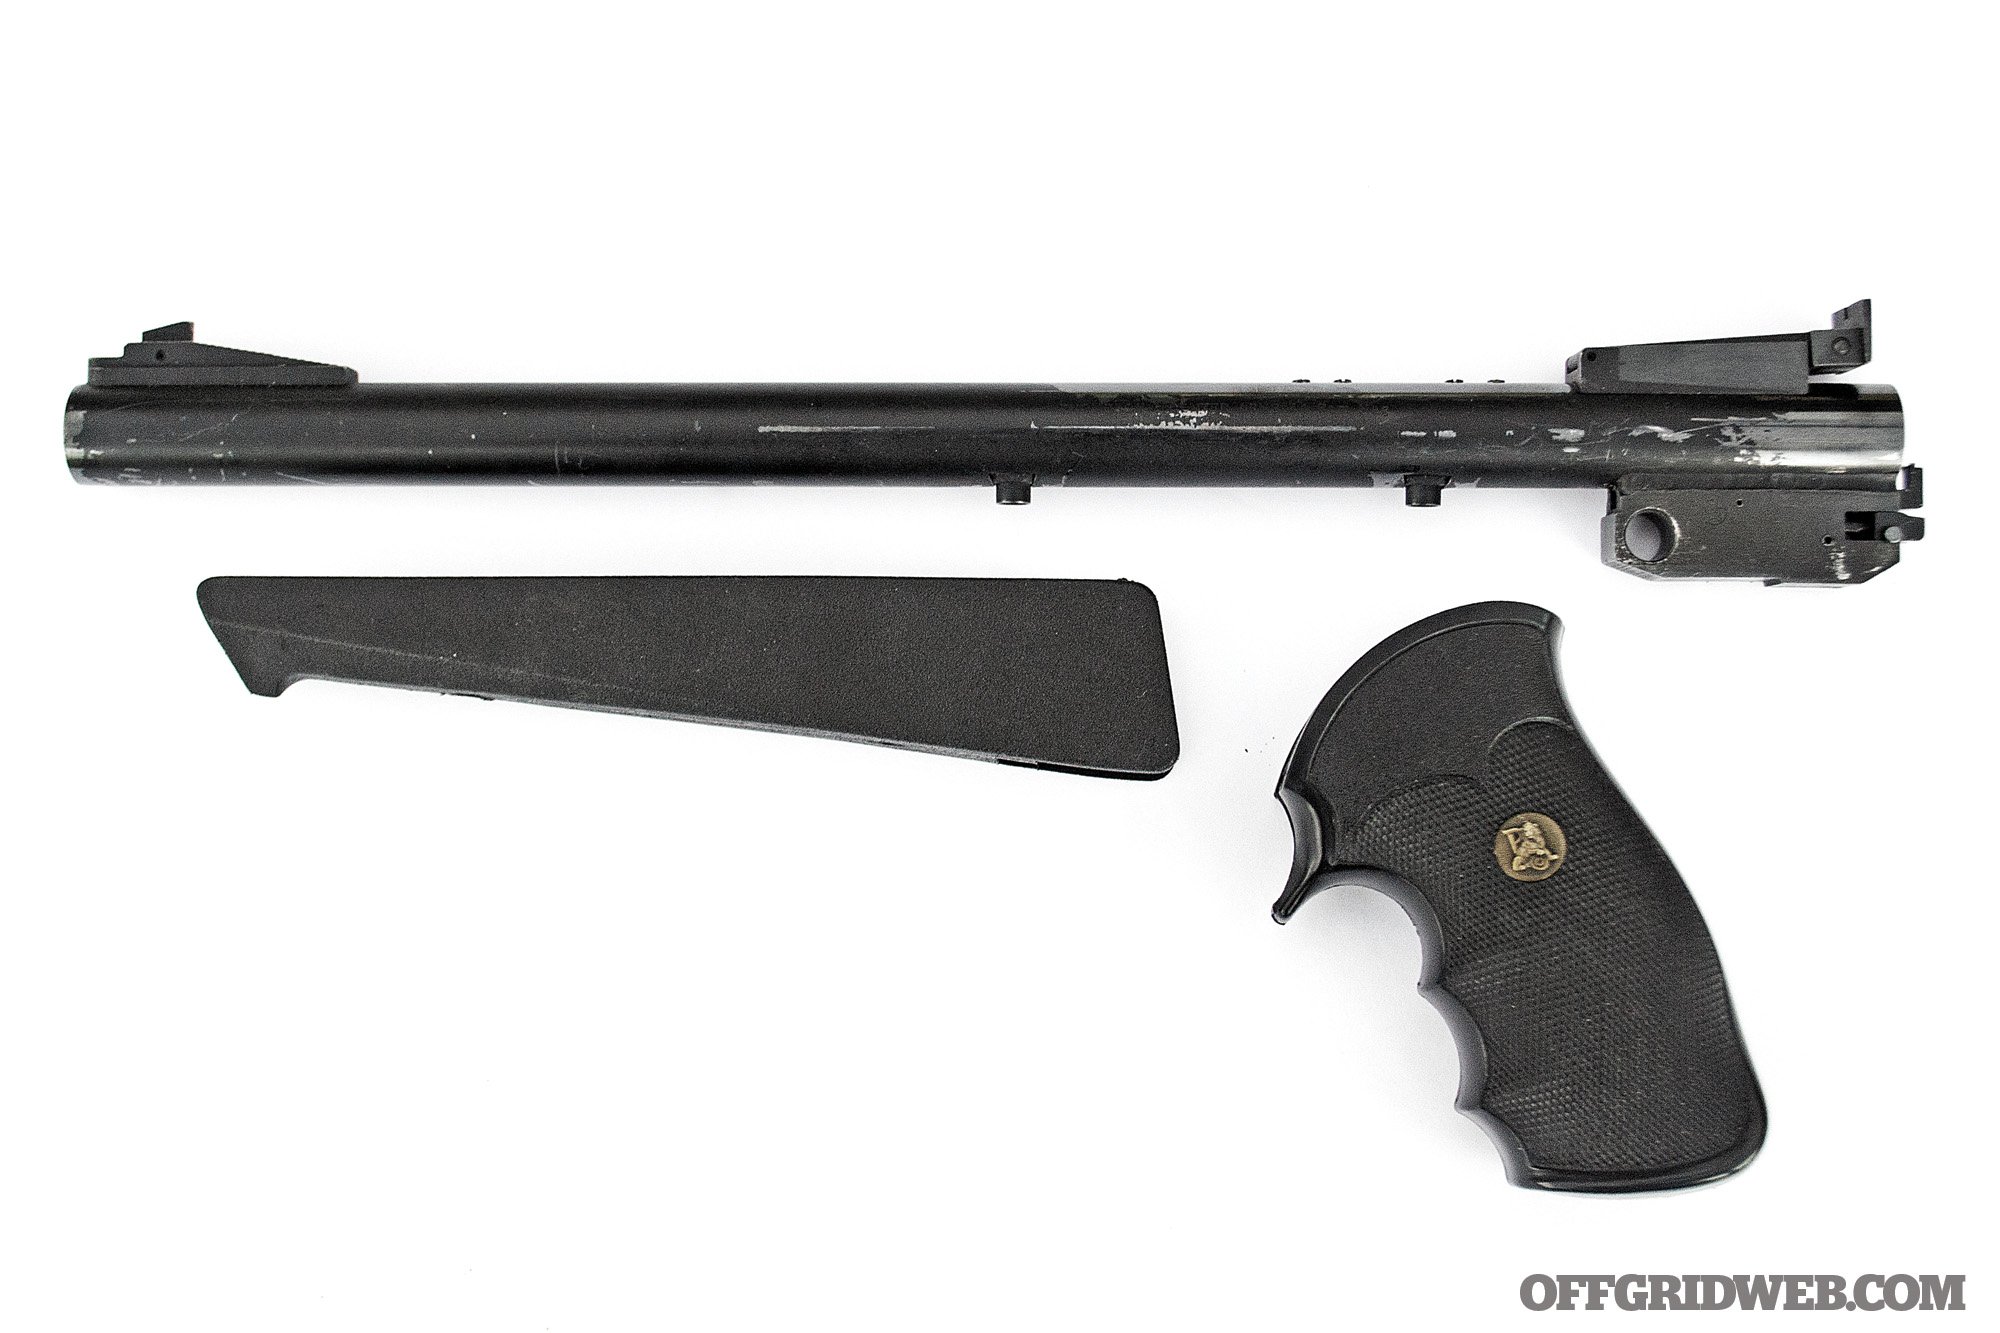
Part of the beauty of a Contender is that you can change calibers in a matter of minutes. Remove the forend with a screwdriver, pop out the hinge pin, remove the barrel, install the new one, replace the hinge pin and the forend, and you’re done.
There’s no need to fit, check headspace, or set cylinder gap. Additionally, there’s no need to re-sight the Contender, as the sights or optics are mounted on the barrel. Your zero is always maintained.
Because there’s a 52-year manufacturing period with small changes here and there, some older barrel and frame combinations may require fitting. This has mostly been eliminated with the newest incarnation of the Contender known as the G2 frame, which debuted in 1998. However, even the most accurate barrels and custom frames can still be a bit tight-fitting. The biggest complaint outside of being a single-shot firearm is having to slap the barrel down to get it to break open at times with the older models. The older models do have a better trigger than the G2, however.
Rifle length barrels and a buttstock can be attached to the Contender to give the shooter a single shot rifle. We will not delve into this here, as it doesn’t fit the nature of keeping a battery of several calibers in a small package, but the option is there.
The Thompson Center Contender breaks open like an old-school single-shot shotgun.
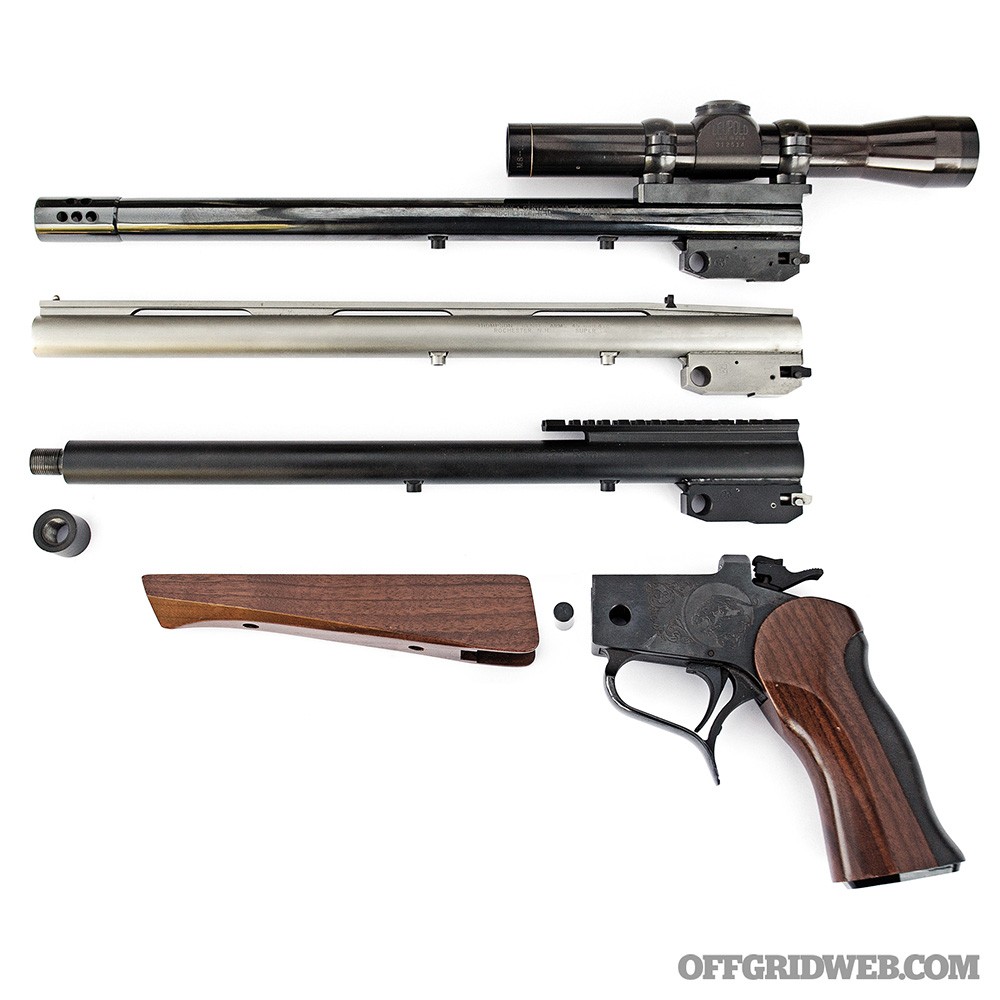
My personal favorite combination for the Contender as a bug-out handgun is the following three 14-inch barrels: .45-70 Government, .223 Remington, and .410/.45 Colt.
Each one covers a potential need in most survival scenarios, particularly if you’re looking to hunt your own game. Most importantly, Thompson Center Arms still makes these three barrels for the G2 series.
.45-70 Government
When most people think of the .45-70 round, either single-shot rolling block or falling block rifles come to mind, or possibly a 19th-century lever-action carbine.
The .45-70 barrel represents the upper threshold of power for the Contender in a currently produced factory barrel. It’s capable of taking any animal in North America, from feral hogs and whitetail deer to brown bear, elk, moose, or buffalo.
Because of its power level, many shooters are put off by this caliber in a 14-inch-barreled pistol. When I bought my first Contender barrel in this caliber, the salesman at the counter called me “a f***ing nut” and said he saw someone fire it and break every bone in his hand. Like most gun shop sages, I ignored him and found the recoil somewhere between a .44 Magnum and .454 Casull. I won’t lie; the pistol has quite a bit of kick to it. The high bore axis and the recoil from the large, heavy slow bullet push the Contender back sharply into your hand. My barrel has the factory muzzle brake installed and is topped with a Leupold extended eye relief 2x scope.
As with most Contender barrels of this length, accuracy is outstanding.
Above: The versatile Contender from top to bottom — 45-70 with 2x Leupold scope; stainless 410/45 Colt with ventilated rib and brass bead; .223 with threaded barrel and rail; wood forend and grip on a blued frame.
.223 Remington
This has always been one of the most popular choices for the Contender pistol. It’s an outstanding varmint round, and if you stick to the 14-inch-barreled version, your velocity, accuracy, and power levels will be on par with what you’d get from an AR rifle with similar-length barrel.
I’ve had my barrel for many years and used it on various frames with no problems. My barrel is threaded ½x28-inch and serves well for silencer testing. If you run suppressors, the Contender makes for one of the quietest hosts out there, because it’s a completely closed action for the entire duration of the firing sequence.
Most often, I mount a red-dot sight on the rail. My barrel started life in a factory blue finish that rapidly deteriorated in service as a field gun for over 20 years. Today, it’s coated in a black Cerakote finish by Nevada Cerakote. My next stage in the world of Contenders is to have all my non-stainless barrels coated the same way.
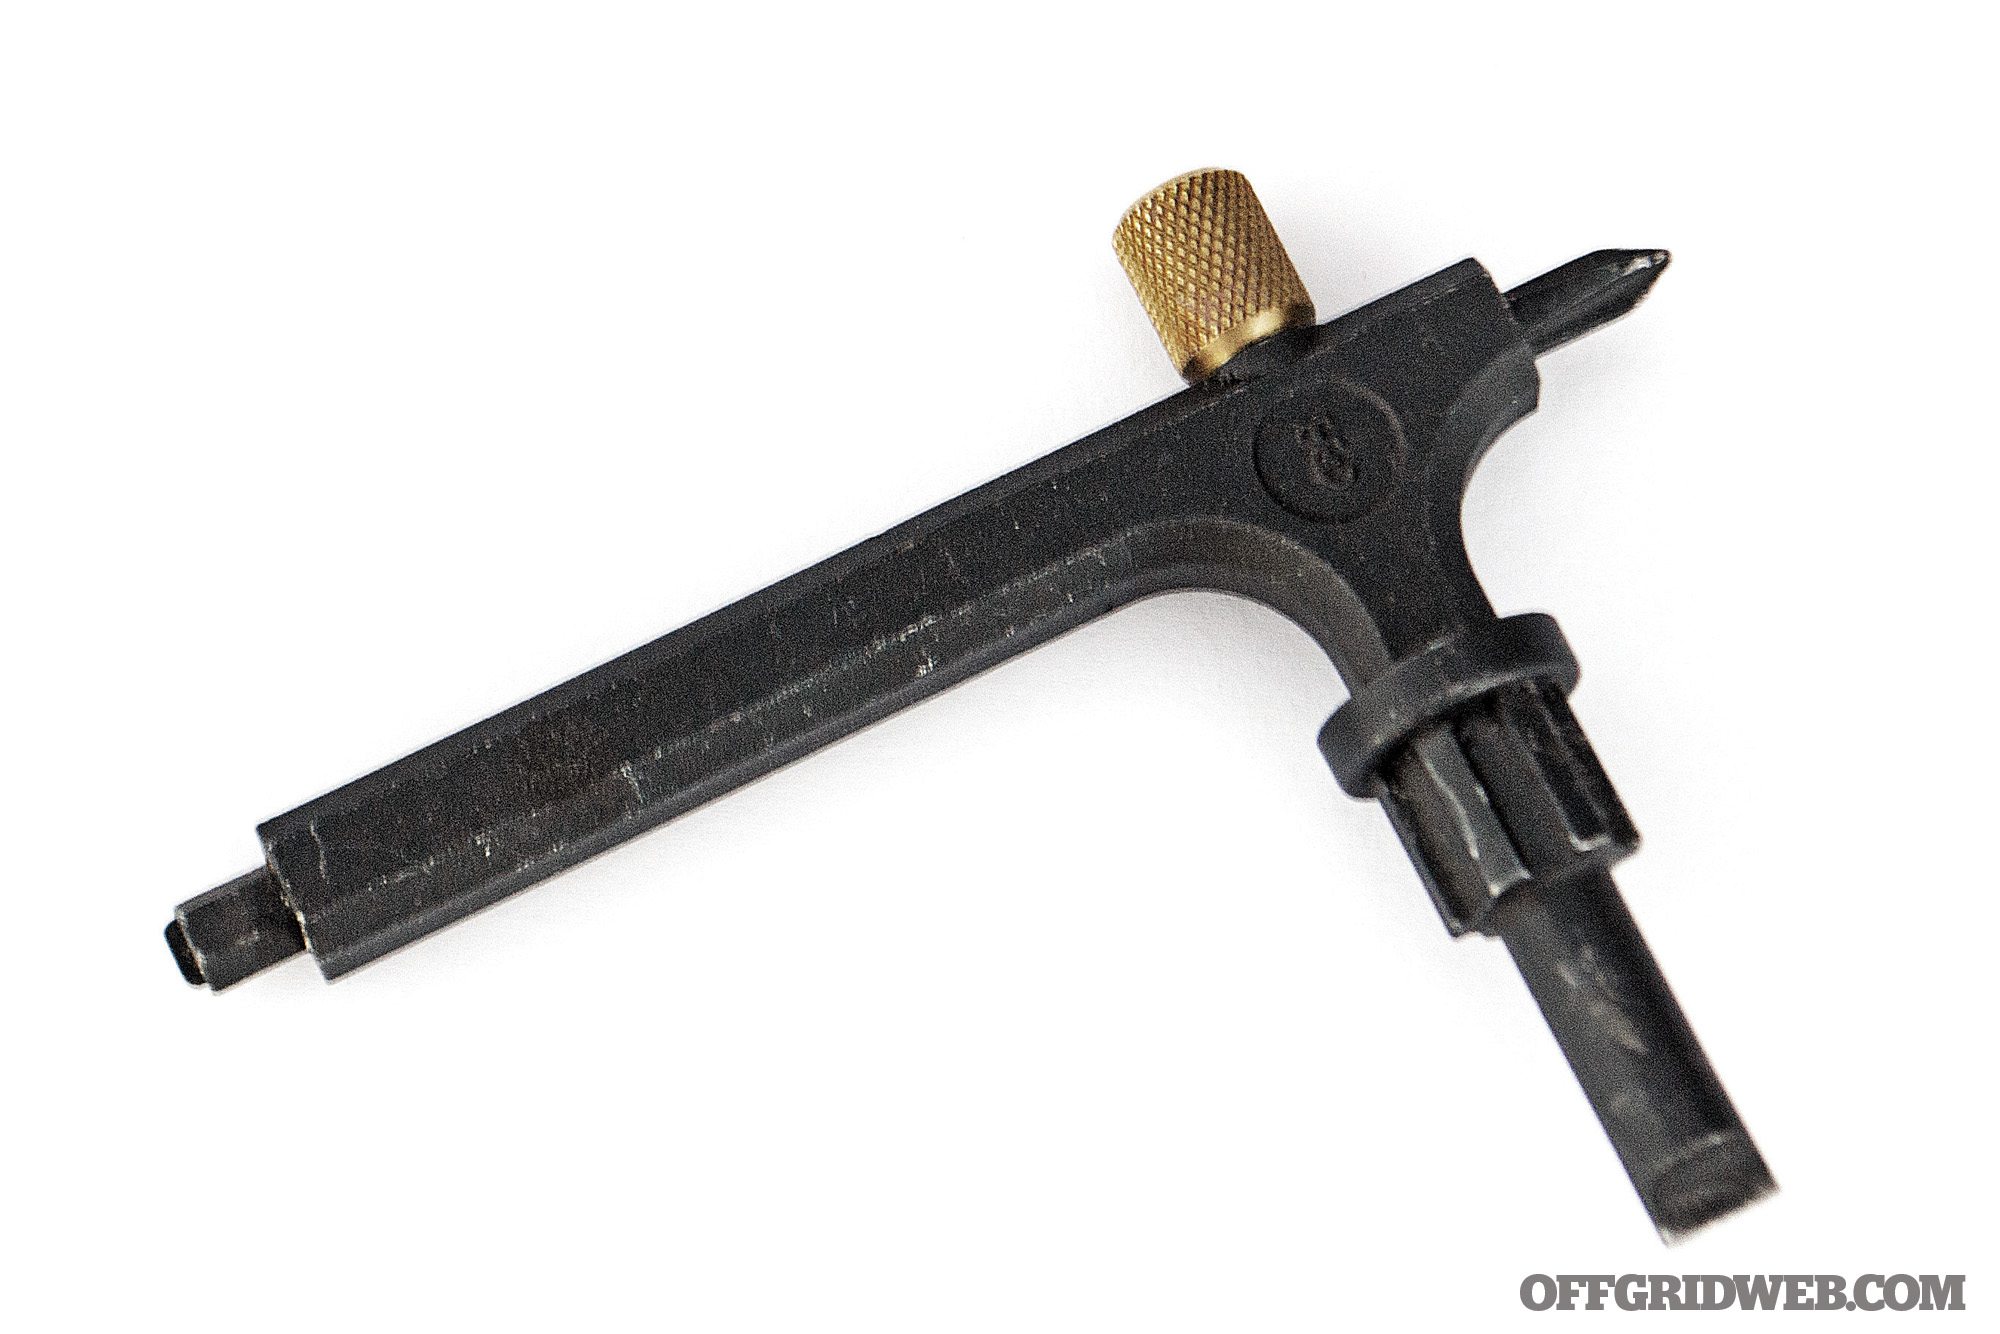
The Contender tool, used to remove the forend, hinge pin, and barrel.
.45 Colt/.410 Shotgun
The .45 Colt/.410 barrel for the Contender is a bit controversial, like most firearms that fire this cartridge combination. This is because a sub-16-inch barrel needs rifling or else it’s considered an NFA item, requiring a $200 tax stamp. That rifling doesn’t help the .410 shot pattern at all. Likewise, the 3-inch chamber for the shotgun shell means the .45 Colt bullet has a significant jump in the chamber before it makes contact with the lands and grooves in the barrel. As a result, the accuracy of the .45 Colt will suffer in the Contender. This is a shame, because you can really bump up the power level of the .45 Colt in this pistol to outshine the .44 Magnum.
Still, with the factory choke and the right ammunition, the .410 shotgun round in a Contender is more than adequate for rabbit, grouse, quail, pheasant, and dove within 50 yards. It’s a good option if you find yourself in a situation where you need to forage for small game and neglected to bring a full-size shotgun.
This barrel is legal in every state except California, where a sub-18-inch barrel on any firearm capable of discharging a shotgun shell makes it a short-barreled shotgun under state law.
Above: A well-used 44 Magnum barrel, synthetic forend, and Pachmayr rubber grip can be practical accessories to have on hand.
Other Options
I have other barrels in various calibers, as a lifetime of shooting and hand-loading has gotten the better of me. All the Magnum handgun calibers work extremely well in a Contender. Another surprisingly good round is the old .30-30 Winchester. In the Contender, you can really tap into the accuracy inherent in this round by loading conical, pointed bullets instead of the old round-nosed ammunition designed for use in lever-action rifles.
Ironically, the .300 Whisper designed by JD Jones was not only intended for use in the AR, but in the Contender as well. This round is known today as the .300 Blackout and some folks might prefer this to the .223 or .30-30 chamberings.
Additionally, you can find sub-caliber chamber inserts that’ll allow you to fire .22 LR or .22 Magnum out of your .223 Remington barrels, for example. These inserts are cheap, and although they don’t provide the accuracy of a dedicated barrel in that caliber, they can be fun to play around with.
The .22 long rifle Contender barrels are among the most accurate you can find this side of a European Free-Pistol. I left them out as part of the bug-out barrel battery because I find a dedicated .22 semiauto or revolver more useful for the same amount of weight as the Contender barrel.
Handloading
While the three barrels I specified were chosen because they fill certain needs, another factor was that there’s an abundance of off-the-shelf ammunition choices for those barrels. The real magic of the Contender platform is that you can tailor your handloads to your individual barrel to increase performance.
If you’re not already reloading ammunition, the Contender will easily get you into it as well as turn you into an accuracy nut!
More Power
Thompson Center Arms offers another option if you find these choices lacking, although all three are available in this platform as well in 15-inch instead of 14-inch barrels. It’s called the Encore and was designed to allow the shooter to fire rounds such as .308 Winchester, .30-06, .460 Smith & Wesson, and in the long-gun configuration, shotgun and muzzle-loading options. Barrels don’t interchange between Contenders and Encores, but a battery of potent hunting guns can be built from a single frame.
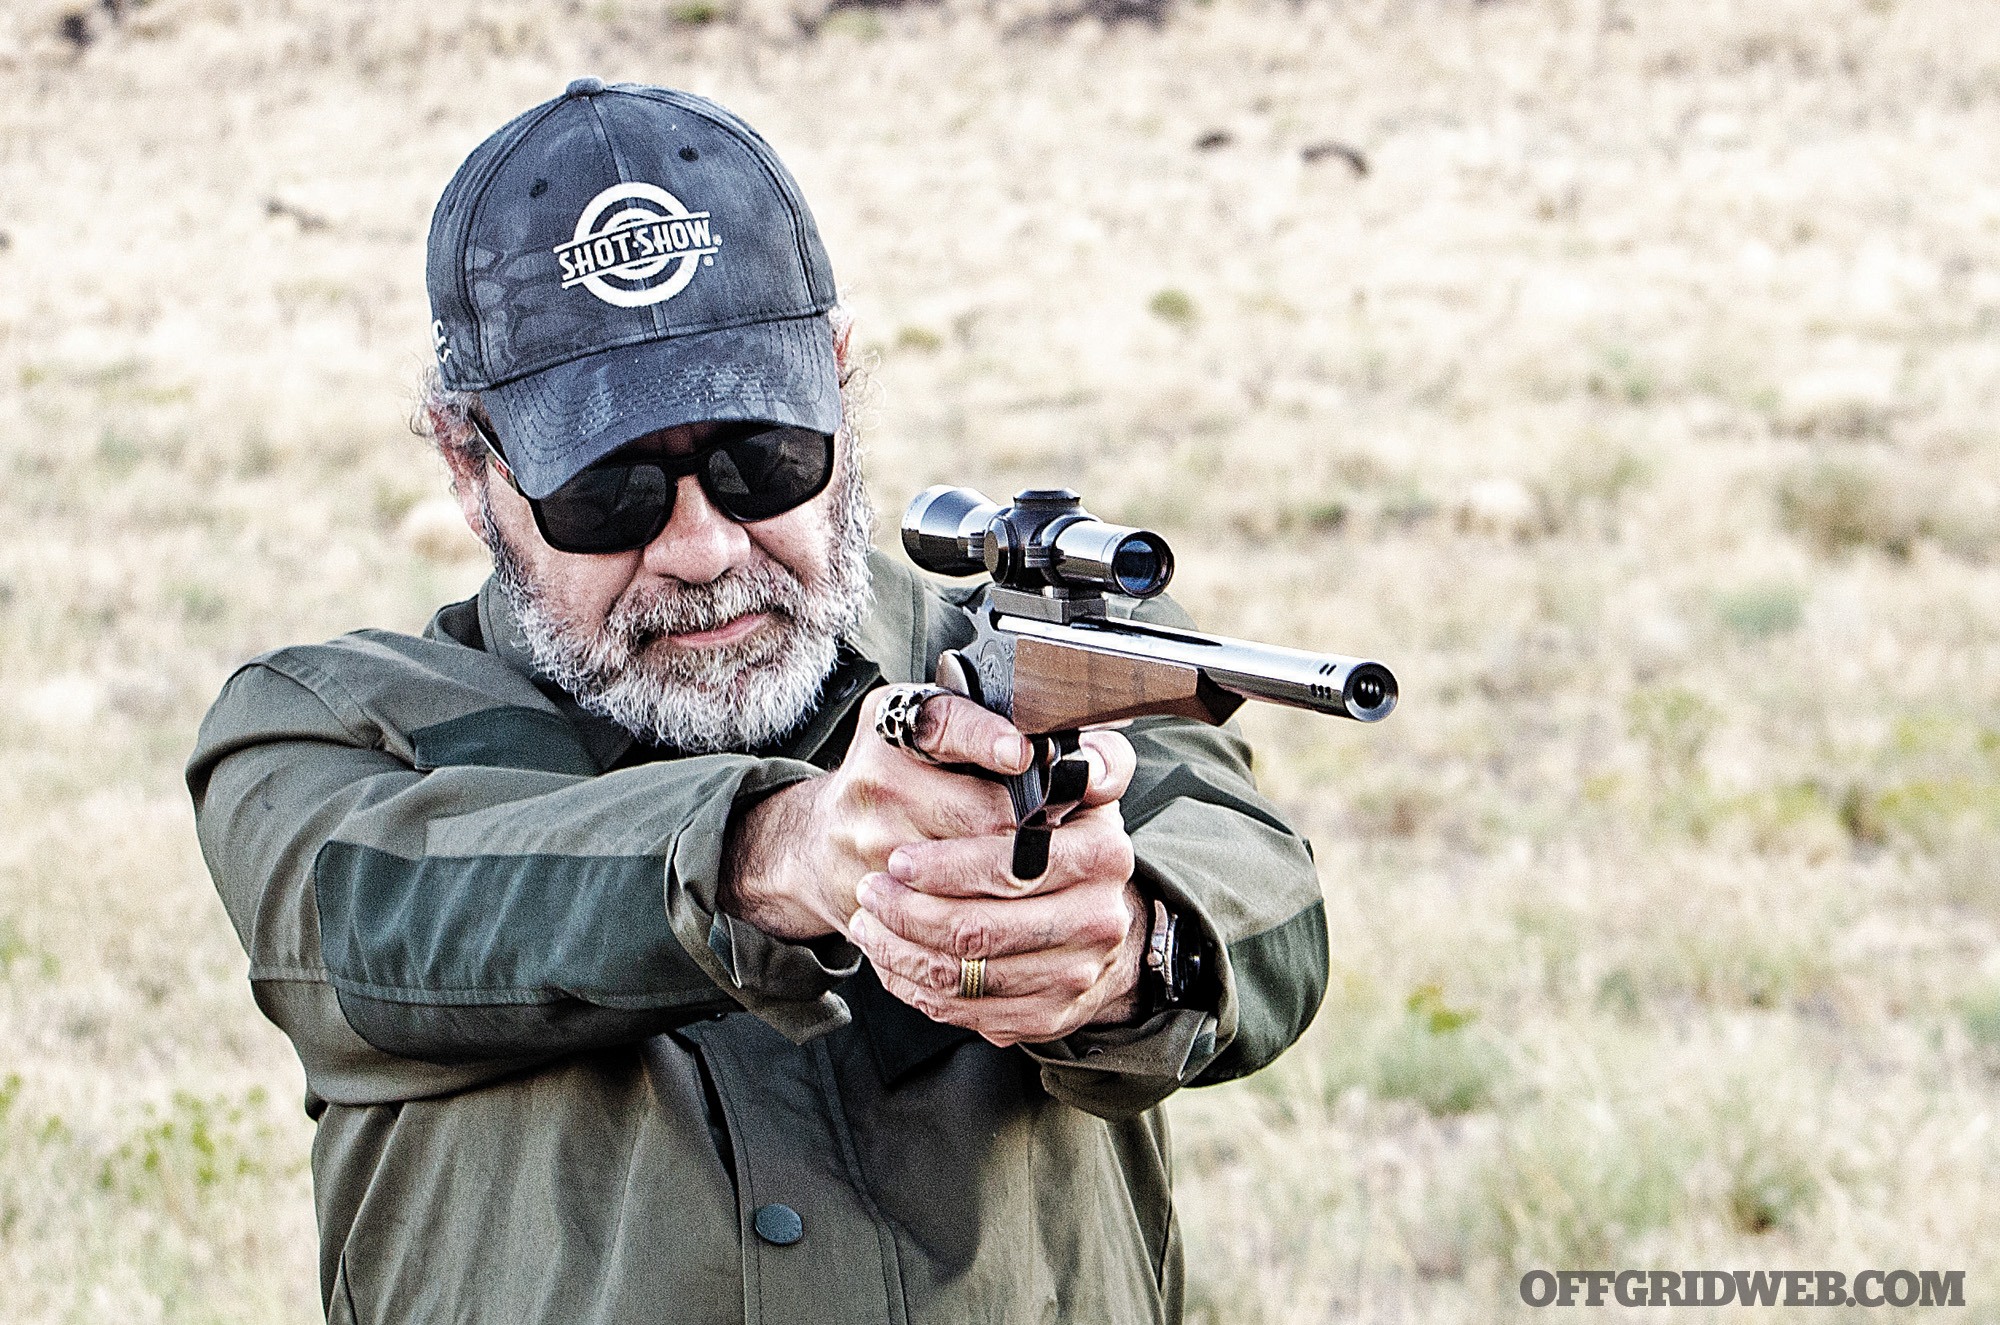
Shooting the Contender
My way of shooting the Contender is with a standard two-hand grip that you’d use on any large revolver. I’ve mounted bipods on them, shot them across the hood of my truck, or from a rest built into an ATV. I’ve even laid on my back in the Creedmoor position with the side of the forend braced on the top of my boot for long range with open sights.
Some people cradle the forend in their non-shooting hand, and for a flicker in time there were companies making extremely tall scope mounts to allow the shooter to fire from the mid chest area and the ability to get closer eye relief from a more powerful scope. Those particular mounts are no longer made for good reason.
Ignore the forend — it’s there to look nice and protect the hinge pin. You don’t and probably shouldn’t use it for shooting unless you installed a stud to mount a bipod or are using a rest of some sort.
Pricing
The Contender used to be a more affordable firearm in the $400 price range, and the average price of a barrel would run from $50 to $199 with used ones at the lower end of this spectrum. The current MSRP on a new G2 Contender pistol frame runs from $523 for walnut furniture and blue finish to $548 for stainless and synthetic. New pistol barrels are about $229 each. A complete handgun in one caliber starts at $729 from the factory.
In Summary
I wouldn’t recommend a Contender as an “only gun,” although some old-school preppers have used one successfully as such. I think they have a place as a hunting and varmint gun, especially when keeping your loadout on the lighter side. The single-barrel lockup and single-action trigger make them accurate and very reliable. Their size and weight make them easily portable, whether you add sling swivels to the grip and forend or keep them in a holster of some type on the hip or across the chest. Other firearms may come and go from my collection, but I’ll always make room for a Contender (or two).
FAQ
Q: How much is a G2 Contender?
A: Presently (2023) around $799
Q: What is the difference between a G1 and G2 Contender? A:Due to the changes in the trigger mechanism, and to differences in the angle of the grip relative to the boreline of the gun, the buttstocks and pistol grips are different between the G1 and G2 Contenders.
Q: How many barrels were made for the Thompson Contender? A: By removing a few pins and screws, the modern Contender can be transformed from a carbine to a pistol, and there are more than 40 different barrel options, which allow the shooter to quickly swap between chamberings.
Read More
Subscribe to Recoil Offgrid's free newsletter for updates, offers and more.
In the ever-evolving world of survival and preparedness, the wisdom of experience often provides the most valuable insights. For this reason, we've tapped into our community of avid readers as a resource for survival knowledge, and are sharing tips that stand out for their simplicity and effectiveness. This Readers' Survival Tip comes from the great state of Texas, and will help you get that friction fire roaring.
Readers' Bio
Name/Alias: The Bearded Burton
Location: Dallas, TX
Age: 37
The Bearded Burton's Survival Tip
Increasing Your Success with Friction Fire This tip/trick works for any method of fire, but it truly shines when your source of heat is small and fragile. We always want to stack the deck in our favor when it comes to fire. Fire is one of the most valuable tools we have in nature and truly separates us from the wild. When we are able to freely create it with instant flame methods like lighters and matches, we often are more careless. But when we have to sweat and work for a flame, we don’t want to waste all of our hard work!
While there are many friction fire methods and resources out there now to learn how to be successful with achieving flame, this trick is one I don’t see very often.
What we choose to use as a catchment for the ember is very crucial. The ember that comes from friction fire is fragile and we need everything to work a certain way for it to grow into flame. Grabbing a quick leaf or piece of bark is usually what I see done and there’s nothing wrong with that. But, why not add to our success by using something the ember can immediately start consuming as it grows? This is where using a piece of “punkwood” as your catchment under the hearth board takes your success up a notch!
Punkwood is rotted, spongy wood that one can find on dead and decaying trees. It’s lightweight and accepts sparks very easily. It can be placed in a metal tin and placed in a fire to be turned into charred material for flint and steel fire techniques. What we want though, is the raw piece that has not been charred.
By using it as the place mat for our ember to fall onto, it immediately allows the heat the ember creates to have fuel to grow on. The Punkwood will begin to smolder and even if the ember we worked hard for falls off or gets blown away in the wind, the Punkwood will stay burning. We have a longer window of time now to turn this smoldering material into flame by utilizing this trick and we essentially have an ember that’s doubled in size as well. Being able to move and transport the ember becomes much easier by using this method as opposed to just a leaf or piece of bark.
The pros definitely outweighs the cons here but we do need to be aware of a few things. The Punkwood we use MUST be dry. It cannot have any moisture lest it rob the ember of the precious heat it needs to continue burning. We also need a piece of Punkwood that is appropriately sized to fit under the board without creating a lot of movement and wiggle during the friction fire process. What is nice though is Punkwood squishes down to form fit into the notch of the hearth board.
I hope this trick helps with the success of your friction fire practices! There is always more to learn and fun things to keep the hands busy. Keeping rubbing sticks together and doing the things that connect us to nature! Get Outside and Enjoy the Woods!
Have recent weather events across the United States, and across the world, given you pause to contemplate preparedness? If you are like me, and find yourself constantly asking what if, then perhaps the idea of firearms operation in winter environments, or making a winter ready AR, has become a source of concern. This is certainly not a new topic.
Above: Simple tasks, such as aiming, become more difficult when wearing bulky winter clothing.
On the contrary, as long as firearms have been available, they have been used successfully in cold conditions. However, there are some major differences between filling a muzzleloader with a colonial powder horn, and cycling through a malfunction on 21st century AR.
After scouring through a multitude of online sources regarding operating an AR in the winter, and spending hours outside at a snow-covered range, I have collected a few key takeaways that may come in handy the next time you encounter a tactical or self-defense situation when the flakes are flying.
Dealing With Bulk
When the mercury drops, the first thing most sane people do before they venture into the cold, is cover exposed skin with bulky, insulative apparel. The more cold it gets, the more layers get added. This excess clothing bulk is the first friction point a cold weather AR user will encounter.
Hunters who spend time in higher elevations or in northern latitudes, typically find a suitable location to hunker down, get set up, and train their firearms where they believe a target will present itself. This extra time makes it easier for a cold-weather hunter to position the buttstock in a way that compensates for added clothing.
Unfortunately, in a tactical or defensive situation, this extra prep time will most likely not exist. Extra attention must be given to the way bulky winter gear changes the way an AR is slung and shouldered. It may mean giving the sling extra slack, or making shouldering movements more exaggerated so the firearm clears the extra girth of additional clothing.
Reducing bulkiness to the optimal level is an art in itself. In many cases, bulk can be reduced by investing in what is known in snow-sports as technical clothing. These are garments with synthetic or modern wool fibers that have been weaved and coated in such a way so as to minimize the risk of penetration from the elements, maximize heat retention, and afford greater maneuverability.
The layers of technical clothing can be added to or taken away depending on the level of activity. For still hunting, more layers at the expense of extra bulkiness will be preferred. But for activity that is physically intense, like trudging long distances through the snow, layers can be reduced to the point where it feels like nothing but a spring jacket is being worn.
Above: Manipulating small items, or trying to grab magazines can feel clumsy and awkward when wearing thick gloves. Adding things like paracord straps or rubber grips will aid in these endeavors.
Gloves, hats, boots and face masks have all experienced similar modernization and it is well worth upgrading those decades old items to something more efficient. Getting the right combination takes a little experimentation, but once it's dialed in, going out in the cold no longer seems formidable.
It seems like an overly simplistic step, but having modern cold weather clothing can drastically reduce the amount of added bulk that needs to be dealt with. As the old saying goes, “there is no bad weather, only unsuitable clothing.”
Keeping it Functional
Other than polymer grips and buttstocks, the AR is metal, which means it quickly mirrors the ambient temperature. Thin gloves will be a one-way ticket to frostbite, and no gloves could lead to contact freezing when bare skin contacts the hand guard or receiver. Thick gloves or finger mitts are a must, especially if the situation demands an extended time outside.
An ideal pair of winter gloves will have a thin liner, and an outer shell component This will keep your fingers toasty, but it will make manipulating the functioning elements of an AR a real challenge unless a few modifications are made to the platform.
Probably one of the most important modifications to an AR adapted to the cold, should be to widen the trigger guard. For a bare hand, or shooting gloves, the stock trigger guard is just fine. But try adding an extra inch of padded diameter to your trigger finger. Many people experience how gloves can get in the way of simple activities without even giving it a second thought.
Above: Taking your gloves off when temperatures are below freezing can cause bare skin to freeze to metal. Even “shooters gloves” can lead to cold injuries due to their lack of insulation.
Just put gloves on and try getting house keys out of a pocket while holding a grocery bag. A pocket that fits an ungloved hand with room to spare, suddenly becomes a warded lock and the source of much irritation. Before long, there is a glove being held between teeth, while one hand is blindly fumbling for the right key to use.
It's not an identical scenario to firing an AR, but it highlights the convenience of having extra room to access the trigger. Without this extra wiggle room, it becomes a recipe for negligent discharges, or preventing the shooter from being able to fire at all.
Firing the weapon is important, but other functions can be adapted for cold environments as well. When fingers are covered with extra padding, their dexterity is greatly reduced. Instead of the charging handle meeting the stiff resistance of skin tissue, it is met with the soft give of insulated fabric. Maybe you will assert enough pressure to compensate for this and chamber a round.
Or maybe the glove will slip, costing extra time that you may not have. Either way, why take an unnecessary chance? Things like the bolt lock, charging handle, safety and magazine release can be replaced with inexpensive upgrades that offer larger access points for gloved hands. These simple changes will make operation and manipulation much easier while still being able to keep your fingers and hands safe from cold weather injuries.
A Little Lube Goes a Long Way
There is a lot of conjecture about lube and its functionality in cold conditions. Thankfully, a lot of progress has been made over the past century in synthetic petroleum products. One of the most common gun lubricants available, CLP, can be used in temperatures ranging from -60° to 160°F. Many gun lubricants operate well within this temperature range, and it is difficult to find a better substitute.
Operating an AR at the coldest end of the spectrum, may result in the lube becoming more viscous, but unless you are located in Antarctica, Greenland or Siberia, it should not be too much of a concern.
Above: Utilizing magazines made from composite materials instead of the old-school aluminum mags, will prevent them from sticking due to condensation.
There is a lot of back and forth about using dry graphite lubricants in cold weather, which may work for some firearms, but it should be avoided with the AR due to the composition of its upper receiver. Turns out that graphite has a corrosive effect on aluminum if a little moisture is added. Which means if you are using graphite lube in the cold, and you fire a few rounds, the condensation created from the heat will create damage to the inside of the AR’s receiver.
A handy item to have in the cold is a cloth soaked in silicon spray, kept in a plastic bag, and stored in an inside pocket next to your body to keep it warm. This can be any silicone based lube, including the ultimate remedy for any stuck metal, WD-40. If the lube on the AR starts to get gummy because of the cold, or some mechanism seems to be sticking, the residual silicone on the cloth can be wiped on it to get it back up and running smoothly again.
Snow Hazards
As snow accumulates, it creates potential hazards. Anyone who has wandered too close to a snow-laden tree may have succumbed to the startling, and aptly named tree well. Tree wells occur when tree boughs capture large quantities of snow, while snow accumulates around the outer perimeter of the boughs. This creates a deep and hidden cavity that the unaware could fall into and become trapped.
They are more prevalent near evergreen trees. Snow piled up on the boughs can also drop to the ground due to wind, radiant heat from the sun, or bumping into them by accident.
Drifting occurs when the strong wind blows snow, piling it into powdery waves, concealing tripping and slipping hazards. Drifts conceal the topography of the land, making it difficult to determine the depth of the snow at any given point. When walking through an unknown area that has been drifted over, becoming mired in a snow depression could be a costly mistake.
Above: Moving with a firearm can present challenges in the best of conditions. Moving with a firearm in thick snow can be potentially fatal.
They may be fun to bust through with a car, or throw your neighbor’s misbehaving child into, but snow drifts may present an underestimated risk in a tactical situation.
Moving with an unprotected AR barrel through these obstacles will most likely result in frozen flakes or ice particles getting inside the barrel, maybe even plugging it. The last thing anyone needs is a critical barrel malfunction when firing.
There are a variety of barrel covers and plugs that will easily prevent this, but even a simple layer of electric tape will do the trick in a pinch. It is crucial that, when traveling through the snow, extra caution and increased muzzle awareness be practiced.
Frosty Concerns
Keeping an AR lightly lubed and modified for easier access will keep it firing well for sentient snowmen. But for those of us who may have to come back inside, or transition from warm to cold or vice versa, there are a few additional measures that are worth taking. Moisture from breath, smoke, or making quick temperature transitions will cause the lenses from optics to fog up.
A simple step to mitigate this is to apply your favorite anti-fog product to the glass, ensuring a safe and effective aim.
Breath can fog an optic, but it can also stop your AR from firing in a bad way. Breathing in freezing air causes the sensitive lining of your nose and lungs to become irritated. To prevent this, your body will start secreting more mucus, the reason why freezing temps seem to make your nose run constantly.
Above: Smaller components used to manipulate the function of an AR should be replaced with larger versions.
This biological feature to prevent damage to your airways, could become a serious problem if you are not paying attention to where your nose is dripping. Be aware of where your AR is slung. If it is in the path of a drippy nose or beard stalactite, the mucus could be collecting and freezing, causing components to seize until they have been thawed out.
Many optics these days, especially popular red dots, have batteries. As the temperature drops, chemical reactions taking place within a battery slow down, producing less current. After becoming cold enough, there is no longer enough energy produced to power the device. One technique is to wear a tactical harness with an admin pouch close to your body, underneath your technical clothing layers.
The heat from your core will keep anything stored in the admin pouch warm, including extra batteries. Although there is not a great way to mitigate frozen batteries, it pays to be cognizant that, if there is a powered optic or light on your AR platform, your operating window to use those devices is limited in cold weather.
Spend Some Time in the Cold
A common adage in military circles is to train how you fight, and nothing will prepare you more for AR use in cold weather, than to go out in cold weather and practice operating it. It is easy to watch videos, read articles, and become lulled into a false sense of security by thinking this has made you prepared. Avoid this common mistake by being proactive, and going through the motions in as realistic of a setting as possible.
Above: Training with your gear in realistic conditions is the only way to know for sure what needs to be altered, replaced, or removed.
Even if there are no nearby outdoor ranges open in the winter, simply going outside wearing all of your winter gear and physically going through motions will give you a much better understanding. Start with it unloaded, or with dummy rounds, and practice shouldering, aiming, loading/unloading, swapping mags, charging, and correcting malfunctions.
By going through the motions, it will become quickly apparent where changes need to be made, and how to operate the AR more effectively. No two biomes are the same, even across relatively short distances, and the only way to find out what works in yours is to get out there and rehearse.
Read More
Subscribe to Recoil Offgrid's free newsletter for more content like this.
Turn on your go-to news source, talk to your neighbor, or simply look outside, and you will discover that the weather is always an important topic most people have become concerned about. Extreme weather is quickly becoming normal weather, as old meteorological patterns and cycles seem to have become disrupted, and storms have become more intense. That's why training, such the winter survival training offered by Corvus Survival, is so important.
Recently in the United States, we have experienced numerous winter storms that stretch across the entire continent. Places that typically do not deal with frozen precipitation find its inhabitants shoveling gobs of white powder off of sidewalks and out of driveways.
All of this climate chaos is making many aware that they may lack the necessary skills to stay healthy and safe in environmental conditions they are not used to. Which is why people who live in the northern regions of North America have a lot they can share with our southern brethren.
Above: After introductions, students of discuss gear loadouts, and why normal mylar blankets won't cut it in the cold weather.
Beyond the common knowledge most northerners practice, such as dressing warm and sealing drafts in your window, there is a contingent of folks who know the techniques that will allow one to thrive in more remote wintery places. Jerry Saunders, founder of Corvus Survival is one of those people, and I was able to tag along during a training session he put together for Superior Search and Rescue (SAR) volunteers in Upper Michigan.
Our training location, the Lake Linden School Forest, is even further north than Toronto, and the 8am start time is still forty minutes until sunrise. Over one hundred inches of snow has fallen by this time in the year, the forest floor and surrounding trees are blanketed in sound deadening powder.
It is a brisk morning, close to zero degrees fahrenheit, and we emerge from the warmth of our vehicles to the greetings of grey wolves howling from the surrounding forest. The setting seems ominous, but this is a typical morning for the inhabitants of the U.P., and the SAR volunteers arriving to hone their winter survival skills are enthusiastic about getting started.
Introductions
Jerry starts the session by sharing with us his background and experience, and it is quite extensive. After spending over a decade in the Marine Corps, where he established their current winter survival program, he went on to train both law enforcement, and SAR teams in Yosemite National Park. After consulting for participants and crews on several survival shows, he decided to run his own business, training anyone willing to learn a wide array of survival skills.
The SAR crew is a mixed bag of age and experience. Some are in their early 20’s, students at their local universities. A few in their 50’s and 60’s, from all walks of life and backgrounds. We all have one thing in common though, we want to level up our survival skills so we can help keep missing persons, and ourselves, alive during a SAR operation in an unforgiving wilderness. With initial formalities out of the way, we begin by discussing some winter basics.
Above: Instructor Jerry Saunders discusses several effective ways of starting fire in winter conditions.
Dress to Stay Warm
Common sense like this may seem like a no brainer, but there is a lot more to it than most people realize. Before we dive into the nuances of clothing, we are reminded of a phrase uttered by many cold-weather outdoorsmen, cotton kills. Properties of cotton give any clothing made from it terrible insulative properties. Cotton traps moisture, and wet clothing has a profound cooling effect on the body in the form of conduction.
Most have probably experienced conduction on a hot day when we cool ourselves by standing in front of a fan. Sweat on our skin conducts heat away from the body, and the air forced past the moisture speeds up this heat transfer. When this happens outside in the winter, it cools the body too rapidly, which can lead to hypothermia and even death.
The solution to this dilemma is to adopt a strict no-cotton policy when dressing for the cold. Wool is often a reliable and inexpensive substitute, but there are a myriad of synthetic fibers out there, such as acrylic, that accomplish the same task. Sometimes referred to as technical clothing, they will trap heat and allow moisture to evaporate through, keeping the wearer dry and toasty.
There are still some folks who roll their eyes at the idea of wearing wool, but modern wool is light, affordable, and does not itch like its predecessors.
Dressing in layers is the next step to successfully staying warm, starting with a base layer, which should fit snugly against the skin, but not so much that it compresses. This base should cover the entire body from neck to ankles. Socks are a part of this as well, but we are reminded that if we decided to wear two pairs of socks, the outer sock should be a size bigger so as not to compress the fibers.
What makes a layer insulative is the amount of airspace between the skin and the next layer, and when you compress a layer of clothing, you are reducing those little pockets of air.
Depending on how cold it is, the next layer is typically just for insulative purposes. This could be loft jackets or pants, or just another looser fitting article of clothing as the base layer. Determining how many insulative layers to wear is a personal choice, which depends on an individual's metabolism and how much heat their body produces.
For example, my body tends to run on the warmer side, so my insulative layers are either thin, or non-existent. A final outer layer is added to break the wind, or prevent precipitation from soaking through. It is not uncommon on days above 20 fahrenheit for some outdoorsmen to wear only a base layer and outer layer. Especially if intense physical work is being done.
The idea behind all of this is to adjust the layers to suit the work you are doing, so that moisture from sweat or from the environment does not soak your clothes, preventing too much heat loss via conduction.
Boots are another topic of discussion, which catches many of us by surprise. We all think that we have footwear that is appropriate for our environment, but it seems the temperature ratings manufacturers claim can be misleading. It turns out that there is no regulatory policy that prohibits a company from stretching the truth about what their boots can stand up to.
Above: A method known as the “Finnish doughnut”, is a way to create liquid water from snow as long as it is close enough to a heat source.
A boot may say that it is rated to -20, but that does not mean that it is comfortable to the wearer, or a guarantee that your feet will stay warm. Other than testing a boot out in cold conditions, or doing research on product reviews, a good way to tell if a boot is suitable for extended durations in the cold is to find out if it comes with a liner. As with layering clothes on the body, a liner acts as an insulating layer between your sock and the outer layer of the boot.
To demonstrate the effects of heat loss through clothing, and perhaps point out where our clothing may be failing to keep us warm, Jerry pulls out a thermal camera. By using the camera, we are able to see hot zones on our body. These regions that are dramatically warmer than the ambient temperature indicate that what we are using as an insulative layer is either insufficient, or too compressed to be efficient at trapping heat.
Cold Considerations
Unless you hit the slopes on vacation, you may not be familiar with some tricks of the cold weather trade. One such tip that makes life easier is the use of a mat to stand on. Mats to stand on can be what you might put under a sleeping bag, a simple rug, or a chunk of a yoga mat. The idea here is utilizing something between your feet and the frozen ground that you can use to change clothes or socks, without worrying about frostbite on your toes.
An example of its use is when you get out of your car, throw the mat down before taking off your shoes and putting your cold weather boots on. It is meant to make life a little easier, more comfortable, and prevent cold weather injuries.
Remember the movie, “A Christmas Story”? Then you may also remember when Flick is triple-dog-dared into sticking his tongue to a frozen pole. This example highlights what contact freezing is all about. When metal items are cold enough, they will instantly freeze any water that touches it. Using a knife, multi-tool, or touching a metal zipper with bare skin can lead to potential cold weather injuries.
Sweaty fingers, moist skin, and tongues are susceptible to this. Also, beware of alcohol gels that are commonly used for sanitary purposes. Alcohol has a freezing threshold many times higher than water, so a bottle of hand sanitizer that has been left in freezing conditions could instantly freeze any skin that it touches.
Above: Fire starting principles are the same in the snow as they are in dry conditions; however, the base of the fire should be as close to the ground as possible and sheltered from the wind.
Frozen metal, as Jerry points out, is not the only thing to worry about. Many people carry lighters as a quick way to start a fire in an emergency. But when the temperature drops below freezing, the vaporization of butane can slow or stop all together, rendering it useless until it warms up. Similarly, any devices with batteries will rapidly lose their charge in the cold.
To prevent these problems, it is advised to keep important or sensitive items as close to the body as possible. If the pocket space of a jacket is insufficient, wearing a tactical harness with an admin pouch over your base layer and under the jacket, is a useful way to keep those items nearly as toasty as your core temperature. It is also recommended to keep those items essential to survival as close to your person as possible.
This could include your compass, knife, fire starting kit. If these items are kept in an outside pocket or kept on a pack, it increases the chances that they may fall out undetected, or detach moving through thick brush.
Snow and ice over the landscape could make slips and falls inevitable, and unless your items are para-corded to a tactical harness or backpack, those items could disappear in the powder forever. This scenario suggests it is always important to consider implementing some form of redundancy. For example, instead of relying on the only lighter you have to start a fire, pack a ferro rod, some waterproof matches, or both.
Keep a few utility knives in different places instead of counting on that one singular multitool. Having backup tools is also useful when something breaks or fails. A tip Jerry shares with us is to buy two of an item we bring regularly to the field. One to test out and use, and another kept back in case it needs to be replaced. This will ensure that the items used most will always be available when it is needed.
We are reminded that it is important to test our gear before heading out on any type of operation or excursion. Getting a new piece of gear or equipment is exciting, and it is easy to simply toss it in a pack and head out the door without giving it a second thought. But using the item or gear first allows the user to catch issues that may arise in a low-stakes environment versus on an operation when every second counts.
To highlight this point, we are asked about the emergency thermal blankets we carry to treat hypothermia. These are common items found in most camping sections, and many look like aluminum foil blankets. The problem is, since we do not unfold them until there is an emergency, we are completely oblivious to the fact that freezing temperatures cause the blankets to become extremely brittle.
Above: A thermal cloak is an insulated tarp used by Scandinavian military units to sleep in and stay warm in the snow.
Hypothermia blankets designed for cold weather do exist, but we most likely would have never looked into it if it was not for this important learning lesson.
As SAR volunteers, we can spend many hours at a time in the field during operations, and Jerry asks us how many calories we could potentially burn doing so in the cold. One volunteer suggests that it could be as many as 3,000. Jerry points a finger to the sky indicating it was higher. The next volunteer suggests 5,000, and is answered with another finger to the sky. 6,000? No, the correct answer is north of 9,000 calories.
This is because, not only are we burning hundreds of additional calories because of the additional activity, our bodies are also burning hundreds of more calories staying warm enough to maintain its core temperature. It is not uncommon in cultures in cold climates to maintain a diet that is high in fats and sugars to keep up with the additional calorie needs of the body, and Jerry states that nothing hits the spot quite like buttered hot chocolate when it's cold outside.
Shelter from the Storm
Snow has many forms, ranging from wet and heavy, to soft and powdery. Surrounded by the latter, Jerry talks about how it can be manipulated into building one of the most iconic winter shelters, the Quinzee hut. When liquid precipitation freezes, it takes on the crystalline structures we call snowflakes. By applying pressure to break these structures into smaller pieces, a small amount of heat is temporarily released.
This heat melts a small amount of the crystal into water before refreezing again. The result is a harder, more dense snowpack, more similar to solid ice than of powdery snow. It's the reason why, when the snow plow pushes a berm of white stuff into the end of your driveway, it feels like you are shoveling concrete when an attempt is made to clear it. We will use this property to create our shelter.
Two items exist that everyone who operates in the snow should bring with incase of an emergency, one is an avalanche probe, and the other is a collapsible snow shovel. Both are typically carried by alpine and backcountry recreationalists, but they are an important addition to any cold weather kit. Jerry uses the avalanche probe to circumscribe a circle on the ground. This outline will be the circumference of our Quinzee Hut.
Next, half of our group is instructed to shovel snow into the circle, while the other half steps on it to break down the structure of the snowflakes and create a more dense product. This process continues until we have a circular mound of compressed snow approximately five feet in height. The work is tough with a group, and we talk about how much longer and how much more effort would be required to build a Quinzee Hut alone.
Above: Piling snow into a large mound is the first step to building a successful quinzee hut, and goes a lot faster when there are many people helping.
The next stage of the building process is to let the snow sit for a few hours so the compressed snow has time to freeze and solidify.
Since the Quinzee Hut is more of a long term solution to shelter, we are shown a type of shelter that can be put in place immediately. A hasty shelter can be made using a 10×10 tarp, insulated tarp, or better yet a thermal cloak. By folding the tarp into a taco shape and stringing it up between two trees so the bottom of the “taco” is resting on the ground, it becomes a windbreak style of tent that can be used by climbing inside.
This method keeps the inside surprisingly warm, and allows moisture to escape through the top. Making a shelter such as this, is preferable to finding something natural like a cave, due to the fact that wild mammals, including bats, overwinter in caves. Living and sleeping in areas that have accumulated animal waste will eventually make most humans sick.
Staying warm in a hasty or long term shelter can be made easier by sleeping with gear. Extra clothes, boot liners, socks, hats and gloves, can all add to the insulative properties of a sleeping arrangement. Another factor involved with staying warm while one sleeps, is the choice to get out of the relative comfort of a shelter and relieve oneself.
The human body has to work extra hard to keep a full bladder warm, and emptying it is a way to stay warmer for longer. It may seem unsavory, but if a bladder is relieved into a spare water bottle, the heat from the liquid through the bottle can be tucked nearby as an additional item to help stay warm through the night.
Fire and Signaling for Help
Preventing exposure and shielding the body from the negative effects of the elements is the first step to success in any survival situation. The next step is staying warm, and attracting the attention of search parties. Starting a fire is a skill that predates human history, and up until modern times, it was a task most were proficient in. Now it is less common, but it is fairly simple to pick up. To sustain a fire, three things are required: fuel, heat and oxygen.
Above: Improvised gear, such as these Canadian snowshoes, can make traveling over deep powder much easier.
Before we start looking for fuel, we need to prepare a place to start a fire. Using a collapsible snow shovel is the easy way to clear a space that accommodates a person and room for a fire, but anything with a long flat surface can be used, including the face of a backpack pocket. Jerry emphasizes the importance of improvisation if the perfect tool is missing.
By clearing the snow as close to ground level as we are capable of, we are also making a depression that shields the fire from the wind and reflects heat back to the person within. Fire site established, we head out looking for fuel.
Tinder is the finest combustible material we need to look for. It needs to be dry and as close to the consistency of wood. There are a myriad of commercial tinders that can be purchased like fire plugs or cubes, but a homemade tinder can be made by mixing petroleum jelly with cotton balls. If comercial products are unavailable, chances are nature can provide what is necessary.
Here in the U.P., we have one of the best natural tinders around, Paper Birch bark. The bark of Paper Birch is resinous, can light even if it is wet, and is easily identifiable by its white paper-like appearance. Having one full handful of tinder is the recommended amount before starting a fire.
As tempting as it is to put the tinder to light, we also need two full handfuls of kindling. Kindling is dry combustible material roughly between the diameter of a toothpick and a pencil. It is important to note that kindling must be dry. An easy way to tell if kindling is dry or not is simply to bend the twig, stick or branch that has kindling potential. If it is dry, it will crack and break off easily.
If not, it will bend without breaking, in which case it should be left alone. Both the tinder and the kindling should be kept dry and placed close together so that the fire starting process will be more efficient.
One last element is needed to get a fire going, and that is fuel wood, this is anything than a pencil in diameter. Enough fuel wood should be gathered to keep the fire going for as long as required. The amount of wood required varies by need. Much less wood is required to stay warm, and much more wood is required if there is any cooking going on.
But a safe place to start is to gather enough fuel wood to fill a space five feet wide by four feet high for a night's worth of warmth. When gathering fuel wood in the winter, only saws should be used for cutting. When moisture in the wood freezes, it can send the axe of an inexperienced wielder flying dangerously in random directions.
Above: It takes a lot more wood to stay warm through the night than most people realize. Preparing an ample supply before its need is crucial.
Not only does this put the axeman at risk, it will most likely be an inefficient waste of energy, as the wood is likely to remain uncut. Using a portable saw, like a Silky folding saw, is a much safer and more effective option.
With all the tinder, kindling and fuel wood carefully prepared, it is now time to start the fire. Instead of easy to use fire starting tools like lighters or fire cubes, we are given ferro rods. If we can start a fire with a spark, anything else will be that much easier in the future. Our ferro rods are given to us with a warning, do not drop them in the fire, as this will cause the entire rod to ignite and become useless.
Using a sharp 90 degree edge of a knife or other piece of metal, we send sparks into our tinder, which has been crushed between our hands to be as fibrous as possible. Once the spark ignites the tinder, we place our two handfuls of dry kindling loosely over the top, and it does not take long before the flames are hot enough to get our fuel wood burning.
Flames in the snow keep us warm, but it is also a great contrast for searchers to locate or position, especially at night. In fact, three fires in a row is a signal for help that aerial SAR personnel are trained to identify. Outside of fires, signal mirrors can be a useful tool during the day. Light from the sun can be reflected and aimed at passing aircraft to catch their attention.
Araning logs or stones in the shape of an “X” is also a distress signal, but in a heavily wooded area, X-shaped placements can become difficult to distinguish from other items that have fallen over naturally in the shape of an X. Jerry explains that other useful items to use for signaling during the day can include anything that contrasts with the white of snow, like kool aid powder, mounding snow to create deep shadows, or colored smoke flares.
Quinzee Hut Part II
Several hours have passed since we compressed our dome of snow, and it is now time to hollow it out. Before we dig in Jerry asks each of us to grab a handful of sticks about a foot long, and stick them into the sides of the Hut. By doing so, we will have an idea of where to stop digging out the inside of the shelter.
Instead of boring a small entrance and trying to remove all of the inner snow through a small point, Jerry shows us a more simplistic method. By using our snow shovels to remove cubes from one side of the shelter, we can open a broader space to carve out the rest of the inside.
Above: Using teamwork, snow being removed from the inside of the quinzee hut, can be shoveled further away by others who are outside completing other survival tasks.
Moisture from our breath quickly creates a humid environment inside the dome, and Jerry recommends keeping a hood up, and removing any insulative layers we are wearing. Wearing only a base layer and waterproof outer layer is the most effective way of staying dry while finishing the last of our shelter. With the inside cleared out, Jerry takes the blade of the shovel and smooths the inner wall.
The smoother the inside of the shelter is, the more evenly breath moisture will freeze to ice, preventing water drips from falling on any inhabitants.
To complete the Quinzee Hut, we replace the cubes we cut out from the side, and fill any cracks with powder to create a finished wall. A small door, only large enough for one individual to squeeze through, and small enough to plug with a backpack, is cut into the side facing away from prevailing winds. The final part is to create a small ventilation hole to allow excess moisture and carbon dioxide to escape.
We are warned not to light any fires on the inside of the Hut, as this will cause the inside of the dome to melt precipitously and ultimately destroy it.
The Journey Comes to an End
Winter, by its nature, is cold and dark. To those who have not had to experience a trek through a frozen wilderness, or be subjected to the wrath of a blizzard, be aware that surviving these things is not an insurmountable task. In fact, with a little practice, living in the cold can be a comfortable and enjoyable experience.
Above: After a long day of learning to build a winter shelter, signal for help, and stay warm in extreme cold, the quinzee hut is finally complete.
Spending over seven hours with Jerry, our group of SAR volunteers was inundated with tips and advice that could fill a small book. Things like keeping your water bottle upside down so the tip doesn’t freeze first, melting water via Finnish doughnut, how to make Canadian snowshoes, or using a sock to make an improvised sling. Having a true cold weather legend to learn from was truly an honor.
Read More
Subscribe to Recoil Offgrid's free newsletterfor more content like this.
From classics like Survivorman to long-running series like Alone, we've enjoyed many TV shows in the broader survival genre. Whether they lean more toward hard-core realism or entertainment value, there's almost always something valuable we can glean from the comfort of our couch — even if it's just “I'm never going to make the same dumb mistake that person did.” The latest addition to this genre, Netflix's Outlast, incorporates a competitive group dynamic that's reminiscent of Lord of the Flies. The series' tagline, “the enemy isn't Mother Nature, it's human nature,” attests to this fact.
We spoke with series Executive Producer Grant Kahler regarding the intricacies of planning Outlast, keeping the contestants and crew safe, and what it takes to survive in the Alaskan wilderness. If you're not already familiar with the show, you can watch it on Netflix now. Otherwise, read on for our exclusive Q&A with Kahler. And for those who haven't finished the series, don't worry, it doesn't contain any spoilers.
Above: The rugged Alaskan wilderness served as the setting for this eight-episode series.
Behind the Scenes of Outlast
RECOIL OFFGRID: Tell us a little bit about yourself and how you got into TV/movie production.
Grant Kahler: Being in TV production is simply something I always wanted to do. After college I moved to New York, and my first job was in TV production on a television show called Ed for NBC. I worked in every aspect of production, from directing to accounting, on projects from Bruckheimer films to independent music videos, and eventually landed in documentary and unscripted TV production.
What exactly does an executive producer do?
There’s a huge range of responsibilities that an executive producer might be responsible for — from simply helping with the development of a show to physically being in the field and making the show. My role on Outlast was a little of both. I created the format as well as oversaw production from creative to logistics.
Above: Executive Producer Grant Kahler said capturing all the action in such a remote setting was both challenging and rewarding.
How did you get into survival reality shows, and what do you think the draw is for the audience in this kind of program?
I was originally drawn to this type of programming because I simply loved the environments we would shoot them in. I loved being deep in the jungles of Southeast Asia or up in the mountains of Alaska. I have lived in big cities most of my life, so the opportunity to get to go to these far-out places has always been a very special perk of the job for me.
And I think that is also part of the answer to the second part of the question — I believe that’s partly why people like to watch these shows. It’s in these beautiful places where we get to watch people as we take them back to the basics of human survival. Our society and technology has evolved so incredibly rapidly that I think it’s nice to see what life is like when we strip ourselves of those things — both physically and socially.
And there is always that question that a viewer asks themselves, “Could I do it?”
Logistically, what kind of hurdles do you face putting a show like this together?
I make these shows incredibly difficult on myself and my crew because location is always so important to me. With these extremely remote locations, often comes massive logistical challenges. But in the end, I think it’s worth it. It makes the experience more real for the cast, which often translates into a better show.
I’d say the number-one logistical challenge is transportation. I can’t count the number of times we have had to dig trucks out of ditches, race a rising tide to get to a destination, hike around washed-out roads, dig vehicles out of snow, or drag beached boats back to the water. We tend to film these shows in pretty extreme environments with little to no infrastructure, so transportation must be reimagined every time in order to move crew and allow for emergency access and evacuation.
What kind of off-set or behind-the-scenes safety precautions are there for the contestants?
For Outlast, we always had medics and bear guards on standby in the event of an emergency. We had to constantly be aware that hypothermia or a bear mauling, among many other things, were very real possibilities. So, we employed people to be able to handle those situations.
What kind of support do you utilize, in terms of real-world survival experts, to conceptualize or guide the show through production?
I always bring in experts to help figure out the details of a show. On this one, for example, we hired an ex SBS operative (UK Special Forces) who has special jungle warfare, SERE and combat medicine training, among many other things. He’s an expert in all things survival, from both his military experience to personal interest, so I leaned on him a lot to help with the logistics and some creative decisions.
On Outlast, we were lucky to have a Native American village by the name of Hoonah about 30 miles from our location. We employed them to help with safety consultation, plant and animal questions, logistical support and just about everything else you can imagine. We couldn’t have pulled this off without the people of Hoonah.
What do you look for in an Outlast contestant, and how do you find them?
This is hard to answer because it’s never one specific thing. Some people might have a unique skillset while others might simply have an interesting backstory. For shows like this, the only real requirement is that they have some sort of extensive outdoor experience. These are hard-core environments we’re putting people into, so for the sake of safety, they need to at the very least know what they might be getting themselves into.
We typically find cast through online forums, social media, or even outdoor gatherings. Oftentimes, it’s word of mouth that ends up getting the application to the right people.
Above: As a result of the show's positive reception, Netflix has confirmed that it will be coming back for season two in the future.
Based on your experience/observation, what qualities does a successful contestant have?
At the end of the day, no matter what the format is, a successful contestant is going to be incredibly skilled in all things outdoors. All of the psychological, sociological, and strategic advantages go out the window if someone doesn’t have basic skills. Beyond that, they must be patient. People often don’t understand how difficult these shows can be to get through. Patience can be everything — something most people just don’t have anymore.
Read More
Subscribe to Recoil Offgrid's free newsletterfor more content like this.
In the ever-evolving world of survival and preparedness, the wisdom of experience often provides the most valuable insights. For this reason, we've tapped into our community of avid readers as a resource for survival knowledge, and are sharing tips that stand out for their simplicity and effectiveness. This Readers' Survival Tip comes from the east coast of the United States, and discusses escaping restraints.
Readers' Bio
Name/Alias: Superesse
Location: North Carolina
Age: 18+
Superesse's Survival Tip
Hip Pocket Brief: Escape Common Restraints
BLUF: Defeat most duct tape (DT), ziptie (ZT), and rope-tied (RT) restraints using simple techniques and no special tools.
PREPPING TO INCREASE ESCAPE ABILITY Positioning while being restrained – If being DT or ZT, lean forward, tuck elbows and forearms together, and present closed fists. If being RT, keep wrists as far apart as allowable, spread elbows out, palms open and parallel to the ground, in an upside V shape or together. For DT/ZT you want the restraint tight, for RT you want it loose.
ESCAPING TECHNIQUES & PROCEDURES Defeating restraint – When the opportunity presents itself, attempt escape. For DT/ZT raise your hands above your head then in a swift/forceful motion, drive your arms down and to the side past your hips (in a motion such as elbowing someone behind you). The motion must carry through as far behind you as you can. For DT, each subsequent attempt may make the break more difficult as DT will fold/lip and increase durability. For ZT, before attempting break, rotate the lock square to where your palms meet. For RT, put your forearms/palms together and forward in front slightly tilted down, alternatively shimmy arms back and forth until rope slides off (such as the friction motion made with hands when you're cold).
This is an excerpt from the Hip Pocket Brief Vol 2. The book is available in digital and hardcopy formats at hip2.graymanbriefing.com
Submit Your Own Tip
Want to see your own survival tip featured in our publications? Simply fill out the form here: Share Your Survival Tips
We are looking for your best tips, tactics and techniques to share with our audience!
Read More
Subscribe to Recoil Offgrid's free newsletter for more content like this.
In this issue, we’re breaking a tradition. Typically, this column focuses on knives or pocket tools that are carried in the pocket and are photographed at a 1:1 ratio so they appear life-sized. While that’s great for most typical EDC gear, it shortchanges the reader on some knives or tools that are larger than the height of the magazine. So be forewarned, the camp and field knives seen here are larger in reality than they appear on this page.
While knife steels and knife designs have improved by leaps and bounds over the past 50 years, so much that a typical pocketknife can perform most daily tasks, there are times when you really need a bigger blade. These are the knives we want to reach for when we’re truly off the grid.
Your typical EDC knife from CRKT, Spyderco, or WE Knife might be wonderful for cutting paracord, slicing open delivery boxes, or pinch-hitting for a steak knife. However, if you need to baton wood, make fire, butcher game, or perform real survival chores, you’ll most likely need a bigger blade.
True survival knives kind of caught a bad rap back in the ’80s and ’90s. The theme was “bigger is better,” and we saw designs with 14-inch blades, hollow handles to hold mostly useless survival kits, and gaudy serrations. As a Marine Infantryman and knife-aholic, I quickly learned that many of these knives were simply too heavy, and a canteen of water or extra magazines would be more useful.
The problem was worsened by cheap knock-offs that’d fail when put to real-world use. Yet, as knives have improved in the years since, there are many designs that have absolute real-world potential. They might not fit in your pocket, but you’ll certainly want one on your belt when you’re out in the wilderness.
CRKT
Clever Girl Kukri
The Clever Girl Kukri is Austin McGlaun’s take on the classic Kukri-style blade made famous by the Gurkha troops of Nepal. While a bit scaled down from the size of a traditional Kukri, it’s still big enough to prevent a true-to-size photograph for our usual columns, or else we would’ve featured it long ago. The good news is that it has allowed us to get a lot more use out of this knife than we normally would have under a tight deadline. McGlaun designed this one for CRKT as part of the company’s Forged by War program. This program allows veterans to design knives and tools for CRKT and direct a portion of the proceeds toward a charity of the maker’s choice. McGlaun’s choice is the Green Beret Foundation.
Overall length: 13.3 inches
Blade Length: 7.8 inches
Weight: 14.2 ounces
Blade Steel: SK-5
Price: $88
Pros:
Very sharp out of the box with a nice thin edge for slicing.
SK-5 is an excellent knife steel with superb edge retention and a reputation for toughness.
The handle has a very positive feel to it with no hot spots.
Cons:
As good a steel as SK-5 is, it can be difficult to sharpen due to its toughness.
Cold Steel has been producing this design for at least 30 years, and it still holds up today. This is a very minimalist survival type knife that’s at home in the woods, the desert, or the jungle for a wide variety of tasks. It has a hollow handle that allows the knife to be affixed to a shaft for use as a spear or harpoon. A honing steel is included in the sheath so you can touch up the blade if necessary. It may not give you a shaving sharp edge, but you can fix any nicks without having to regrind it. The Bushman has an almost cultlike following among its users, and some of the mods they make to this knife make it a real standout. Whether it’s a regrind or special handle treatment, you can really make this your own.
Overall length: 12.23 inches
Blade Length: 7 inches
Weight: 9.8 ounces
Blade Steel: SK-5
Price: $25
Pros:
A lot of usable blade for your money
You can easily affix it to a handle to fashion a spear for hunting or fishing.
The included honing steel can be used to straighten out any burrs or nicks.
Cons:
While it’s a bare-bones blade, you might want to wrap the handle in paracord or rubber for better grip.
When most of us hear, “Glock,” we think of the polymer-framed, striker-fired pistol. Yet, before they made their world-famous pistols, Glock produced knives, bayonets, and entrenching tools for the Austrian army. Glock still produces these knives, and the price doesn’t seem to have changed in the past 25 years or so. The quality is still there, and, in many ways, it represents one of our favorite field knives. The sheath is amazing, the serrations are well thought out, and the guard incorporates a bottle opener, but it’s not shipped incredibly sharp and has a relatively thick edge. Glock doesn’t usually list the M81 on their website, but it’s available through retailers such as Midway USA.
Overall length: 11.4 inches
Blade Length: 6.5 inches
Weight: 7.13 ounces
Blade Steel: 1095
Price: $30
Pros:
Once the blade has been reprofiled and sharpened, these knives are absolute workhorses.
Amazing serrations.
The sheath looks flimsy but is extremely effective.
Cons:
They ship dull and with a rather thick edge. Being 1095 steel, it takes a while to turn it into a decent working blade.
Be sure to maintain the blade after a regrind; 1095 is prone to rusting.
While the traditional KaBar is a favorite and iconic knife, sometimes even a classic can be improved, particularly with regard to blade steel and handle treatment. About 30 years ago, KaBar upgraded their classic military knife into a version using D2 tool steel, and variants were made with serrations. The Extreme Straight Edge model has more of the classic look of the iconic KaBar without these serrations. It comes with a rugged thermoplastic sheath that can be worn on a belt or lashed to a pack or load-bearing equipment. If you love your KaBar but want a more rugged and weather-resistant version, this may be ideal.
Overall length: 12 inches
Blade Length: 7 inches
Weight: 12 ounces
Blade Steel: D2
Price: $206
Pros:
D2 steel is a working-class tool steel that’s unbelievably tough.
Razor sharp out of the box, the way all knives should ship.
The handle is comfortable and follows the contour of the traditional leather stacked washer pattern.
Cons:
D2 steel is great, but the uncoated edge can rust if not maintained. It can also be tough to sharpen.
Skallywag Tactical produces great designs, and the Gunners Mate is a bit of a legend in that lineup. It was designed to “remove limbs,” be they trees or other types. There’s a lot to love about an 8.5-inch blade of D2 that’s razor sharp when you take it out of the box. It has more of the heft and feel of a boarding cutlass as opposed to a knife. The blade coating is nicely done, and it really holds up even if you put a lot of use into your knives. It makes for a great camp knife without encroaching into machete territory. It’d make for an impressive fighting blade as well.
Overall length: 14.5 inches
Blade Length: 8.5 inches
Weight: 16 ounces
Blade Steel: D2
Price: $190
Pros:
The blade is generously sized and can tackle just about any task you have in store for it.
Handle is extremely comfortable.
The D2 steel blade is sharp from the box and incredibly tough.
Cons:
A bit on the large side as a daily carry blade, but completely at home in the wild.
Even though the steel is coated, keep the exposed edge well-oiled if you’re in a humid or wet environment.
Oliver Hannan of Slysteel designed this model for a CIA operative who wanted a large knife for fieldcraft and self-defense. Hannan’s designs have been featured on several TV shows about wilderness survival and often include design details for tasks beyond cutting. This isn’t just another big chopper; it’s surprisingly light and balanced. The hole in the blade works as a bullet puller so you can use the powder as a fire-starting aid. The spine of the knife can be held comfortably as a draw knife because of the forward tumbled edge. The section of 90-degree spine can be used as a scraper to remove bark from branches or as a ferro rod striker. The more rounded, tumbled edge of the spine prolongs the life of your baton when using it for splitting. The Micarta handle incorporates a spindle divot for fire-starting.
Overall length: 15.5 inches
Blade Length: 9.3 inches
Weight: 23 ounces
Blade Steel: 1095
Price: $370
Pros:
Very handy and light for a large knife.
Versatile handle.
Both sheath options are ingenious; the MOLLE sheath is perfect to strap to a pack or belt and can hold extra gear.
The Tracker was designed by survivalist guru Tom Brown, and it’s one of the most popular and controversial knives made by TOPS. This is a special-purpose survival knife that can help you perform numerous tasks using one tool instead of five different ones. You have a draw blade, a filet-style blade, and a thicker chopping or batoning section, as well as serrations on the spine. The sheath sports two spring clips so it can be secured to the belt, a pack, or even mounted inside the door pocket of a truck. TOPS offers several scaled-down versions of this knife, but this one seems to be the best survival tool of the bunch.
Overall length: 11.9 inches
Blade Length: 6.4 inches
Weight: 21 ounces
Blade Steel: 1095
Price: $320
Pros:
The forward grind is a powerful chopper; the rear grind is angled perfectly for drawing and slicing.
This gives you a chopper, skinner, baton, filet, and a saw all in one package without hauling an entire toolbox around.
The Kydex sheath is outstanding.
Cons:
At 21 ounces, it’s not exactly light.
It lacks a stabby tip. If you need to dress game, you may need to carry a second knife.
As we look towards the future of automotive technology, Tesla's Cybertruck emerges as a potential game-changer, or perhaps, an ambitious experiment. This futuristic electric pickup has generated considerable buzz, but as it finally steps on to the market, questions arise about its role in the evolving landscape of off-road vehicles.
Design and Development
Unveiled in November 2019 by Tesla CEO Elon Musk, the Cybertruck's design was unlike anything seen before in the pickup truck market. Its sharp, angular lines and a stainless-steel exterior promised a revolution in vehicle design. Musk initially promised deliveries by 2021, yet the timeline for the Cybertruck has seen multiple delays, with its first production shift set for 2022, and then to 2023.
Pricing: A Spectrum of Options
The Cybertruck offers a range of models with varying capabilities and prices. The base model, a rear-wheel-drive with a single electric motor, carries a price tag of $60,990. For those seeking more power and versatility, the dual and three electric motor models, both featuring all-wheel drive, are priced at $79,990 and $99,900, respectively. This pricing strategy places the Cybertruck out of reach for some consumers, and more into the hands of hardcore off-road enthusiasts.
Production Challenges and Technological Advancements
Despite its innovative design, the Cybertruck's journey to production has not been without its challenges. Musk has openly discussed the difficulties in ramping up production, attributing some delays to the development of Tesla's new 4680 battery cell. This battery technology is crucial for the Cybertruck, as it aims to support the production of over 1,000 vehicles per week. These production challenges raise questions about the feasibility and readiness of such a groundbreaking vehicle.
Off-Road Marvel or Questionable Experiment?
The Cybertruck finally hit the pavement November 30, 2023, and it stands at a crossroads. On one hand, it represents a bold step into the future, potentially redefining the off-road vehicle segment with its electric powertrain and unique design. On the other hand, the delays and production challenges hint at the complexities and uncertainties involved in bringing such a novel concept to market.
The Cybertruck's impact on the electric vehicle market and its suitability as an off-road vehicle remain to be seen. Will it be a marvel that sets new standards for electric off-road vehicles, or will it be remembered as an ambitious but ill-fated experiment? The answer lies in its performance, public reception, and the ability of Tesla to overcome the production hurdles it currently faces. Whether it will revolutionize the market or serve as a cautionary tale of over-ambition, the Tesla Cybertruck is undoubtedly one of the most intriguing automotive developments of our time.
Q: Will the Cybertruck have autopilot? A: Every model will feature Tesla's self-driving autopilot feature, and the company says it will offer Full Self-Driving as an option (source).
Q: How long is the wait for Cybertruck? A: At planned production rates, and the number of pre-orders accrued to date, it may take more than four or five years to receive one (source).
Q: Will Cybertruck have a steering wheel? A:The design is a fusion of yoke and round wheel styles, featuring touch-sensitive buttons (source).
Q: How many people are on the Cybertruck waitlist? A:As of September, 2023, according to one user-managed tally, the Cybertruck has topped two million reservations ahead of its official launch (source).
Q: Will Cybertruck have outlets? A: The Tesla Cybertruck has three power outlets, two of which are 110 volt and one is a 220 volt output (source).
Q: Will Cybertruck fit in a normal garage? A:The length of a standard garage in North America is from 20 to 24 feet. According to Musk's comments during the Q2 call, Cybertruck will fit in a 20 feet garage. “This is the first truck that we're aware of that will have 4 doors, over a six-foot bed, and will fit into a 20-foot garage,” he said (source).
Read More
Subscribe to Recoil Offgrid's free newsletter for more content like this.