Few things can ruin a nice vacation faster than explosive diarrhea and vomiting. If you waste a few hours of your trip stuck on the porcelain throne in your hotel room, it’s certainly unpleasant. If you’re out hiking miles from civilization, this condition can be extremely dangerous.
Travelers’ diarrhea, “Montezuma’s revenge”, and other gastrointestinal illnesses can be a common side effect of consuming suspect food and water in foreign countries — especially developing nations. Even food and water that appear perfectly clean can carry invisible bacteria that will really ruin your day. This is why the Centers for Disease Control and Prevention (CDC) recommends carefully considering what you eat and drink while abroad.
The CDC has created the following infographic to quickly illustrate some of the most dangerous foods for international travel, as well as some safer alternatives. Some of these items are pretty obvious — you probably shouldn’t be gulping down raw eggs and mystery meat kebabs from sketchy street vendors, no matter where you are. However, other potentially dangerous foods are more innocuous — sliced strawberries with breakfast, a side salad at a restaurant, the ice cubes in your drink.
Note that the specific word used is “safer” not “safe”. Just like in your own home town, there’s no guarantee that food hasn’t been contaminated at some point. If you’re concerned about the sanitation of food while you travel, you may want to bring some pre-packaged meals, or at least carefully choose and prepare local food yourself, thoroughly washing it in clean water.
Speaking of water, this is the root cause of many traveler’s illnesses. You may get sick from drinking it directly, or you may get sick after your food has been washed in it. To avoid waterborne pathogens like E. coli and giardia, bring water to a rolling boil before use, or filter it with a water filter or purifier. Even if you’re fairly certain the water is safe, bringing a portable water filter on your international travels is a wise precaution.
If you’re a kid on a hot day in the middle of summer, a backyard slip-and-slide is a recipe for fun. When you’re an adult on a frigid day in the middle of winter, that slip-and-slide experience is anything but fun. Walking on ice in slick rubber boots often leads to a string of expletives and a bruised rear end — that is, if you don’t fall flat on your face.
Crampons are great if you’re a hardcore ice-climber, but they’re overkill for walking or hiking. Photo: Wikipedia / Clayoquot
There are a few potential solutions to avert this impromptu winter slip-and-slide. Experienced ice climbers use devices called crampons, with long steel spikes that dig into the ice. Unfortunately, crampons are bulky and restrict arch movement, making walking smoothly a difficult task. On the less-extreme side, Yaktrax has offered a variety of traction devices for walking, running, and hiking in winter. But, these devices may not provide adequate traction for very slippery surfaces like hard-packed snow or glacial ice.
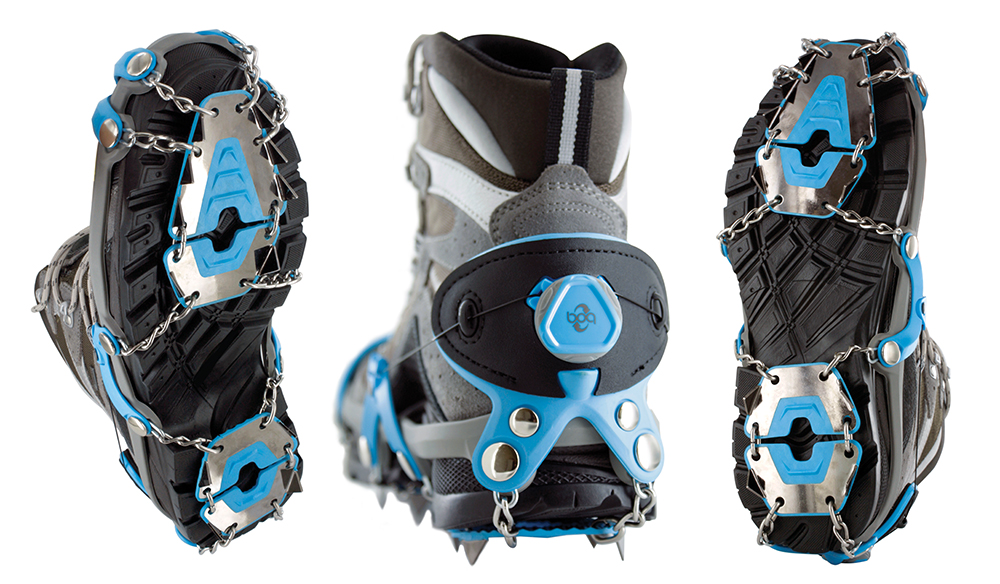
The Yaktrax Summit bridges the gap between ice-climbing crampons and spikeless traction devices.
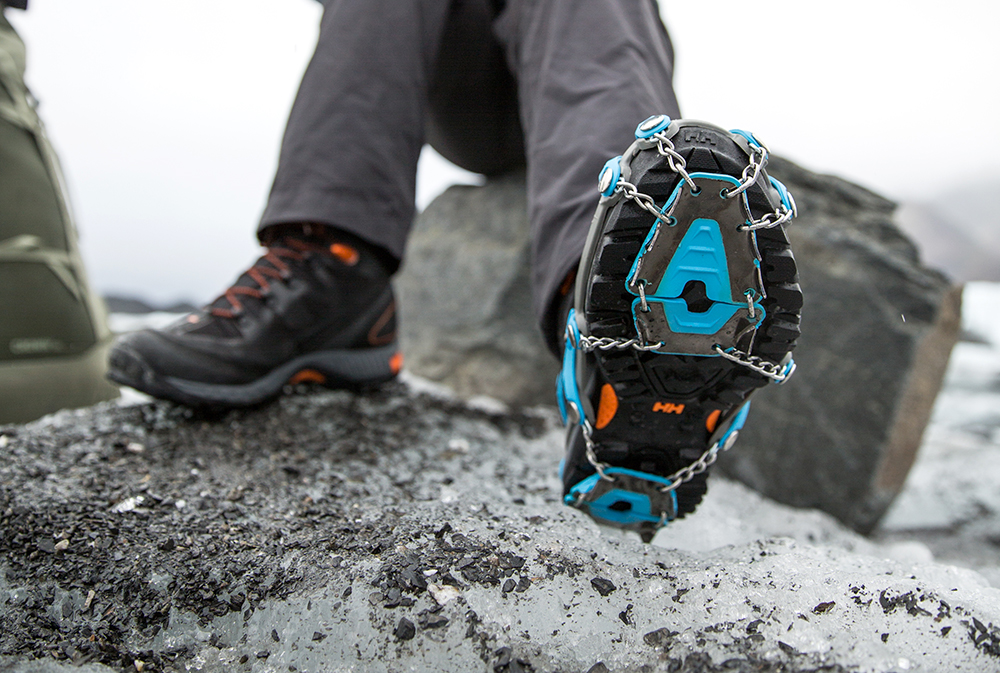
Recognizing the gap between its existing line of consumer-grade traction devices and pro-grade crampons, Yaktrax has launched a new heavy duty traction device called the Yaktrax Summit. This system uses 3/8-inch triangular carbon steel spikes to bite into ice, yet also retains comfort and natural foot flexibility.
The Yaktrax Summit system fits over most types of footwear, and uses a Boa closure system to ratchet down tightly around your boot. Molded rubber bands fit the toe, heel, and each side of the arch, and attach to the sole plates via welded stainless steel chain links.
The sole plates are made from flexible rubber, and are molded around twelve 3/8 inch abrasion-resistant carbon steel spikes per shoe. This design maximizes grip while retaining flexibility and preventing snow buildup between the spikes.
The Yaktrax Summit traction device is available now in sizes from small to extra-large, fitting a range of U.S. men’s shoe sizes from 5 to 14+, or U.S. women’s 6.5 to 15.5+. MSRP for this system is $90. For more information, go to Yaktrax.com.
WARNING! The exercises and content expressed in this column are for illustrative purposes only. Consult a medical professional before trying any physical activity or nutritional plan.
Don’t jump on that bandwagon. Don’t let mainstream media tell you endurance training is dead and some “seven-minute fitness phenomenon” is all it takes to stay in shape. In Issue 11, we focused on developing sprinting skills. In this edition, we turn to its complement: endurance training.
Being able to sustain optimal physical performance over long periods is the foundation from which other fitness components are built. Especially with the unknown ahead, enjoy the peace of mind knowing you’ve taken the precautions to be ready. Long-term survival situations can require endurance as your means to safety. Ever tried practicing your preplanned escape route? We don’t mean walking on flat sidewalks — we’re talking about really hoofing it through uneven terrain in the backwoods with your 72-hour pack. Or have you attempted to tread water for more than five minutes to simulate being caught in a flood or stranded at sea?
That being said, if walking to the mailbox has you winded, how can you boost your endurance?
The Why
You’d be hard pressed to find a more critical component of physical fitness than endurance. By endurance, we’re referring to aerobic fitness, which is the foundation of your conditioning. Your body relies on the aerobic system as the largest source (by a substantial margin) of energy produced to fuel activity and daily function. So, yeah, it’s pretty important.
By definition, aerobic means relating to, requiring, or involving oxygen. In the event you have to trek across an open field or make a series of sprints to avoid detection, the aerobic system is at work. Without a decent aerobic fitness level, not only would you barely be able to make it any appreciable distance with equipment, but you’ll also be limiting your ability to make progress in other areas of your physical fitness.
When we build up our level of aerobic fitness, it has carryover into other aspects of general fitness. This includes improved exercise recovery, better oxygen delivery to muscles, shorter rest intervals between activities, and more blood pumped from your heart at each beat (termed cardiac output), and many more adaptations. Basically, you become more efficient at handling physically active situations.
The How
When we’re training for endurance, we’re going to be doing some longer, slower activities that most fitness enthusiasts turn their noses up at. “Train slow, be slow,” they tell themselves. Well, they couldn’t be more wrong. The activities may not be as exhausting as kettlebell swings, but they’ll set the stage for further improvement and enhanced recovery.
Let’s first cover what it means to train the aerobic system. Generally, the main components of an aerobic fitness program include exercise sessions lasting 30 to 90 minutes with exercises of lower intensity, which should get your heart up to 120 to 140 beats per minute (bpm). This is what’s typical, and while we will include some of this type of training, we’re also going to mix it up a bit.
Aside from just using a heart rate monitor (which you’ll be unlikely to have in many circumstances), we can measure heart rate one of two ways. First, we can take a measurement finding your radial artery and counting heart beats for 15 seconds, and multiplying that number by four. See the sidebar for a detailed description of how to do this. If a watch or clock is unavailable, the “talk test” can do, but should be a last resort as it’s not very accurate. The talk test is simply exercising at an intensity that allows you to just barely hold a conversation.
We can use many types of exercises, but let’s focus on ones that are practical to survival and have been tested on athletes of all kinds. We’re going to play with some of the training variables to give you options to work with. This will give you some ideas and won’t require you to do something you loathe except exercising. If you don’t like to exercise, you’re SOL.
Running
Running will be one of your most important types of aerobic exercise in a disaster scenario, as you’re likely to be moving on foot quite a bit. (Jammed freeways with panicked drivers will make driving a difficult option.) Becoming a proficient runner will also make traveling with equipment easier, especially in any case where you really need to book it. The same case can be made for swimming, which could easily be trained similarly. This would be a great addition if you’re near a coastline or large body of water.
How to Train It: We’ll follow traditional aerobic training and focus on the cardiac output method of training. This is what most people are familiar with when we use the term “cardio,” which is low-intensity exercise (heart rate at 120 to 140 bpm) completed for 30 to 90 minutes, one to three times per week. Think of this as going out for a jog.
If you’re newer to aerobic training, you can start at 30 minutes — or even start at 15 minutes and gradually build up to it. The key is a gradual increase in volume. Use the 10-percent rule by only increasing the time you’re running no more than 10 percent per week.
Jump Rope
Unlike other activities like hockey, this is a great option due to the limited amount of equipment needed. It does have good carryover into running, which is another plus. It’s pretty simple, so we won’t go into too much detail in jump rope technique outside of just staying tall and trying to make contact through the balls of your feet.
How to Train It: We’re going to switch it up and use cardiac power intervals. Cardiac power intervals involve several brief periods of high-intensity activity followed by long rest periods. So, we’ll jump rope as fast as possible either jumping regularly, or, if you can, doing double-unders (rope passes under feet twice with one jump). The key here is high intensity for one to two minutes followed by two to five minutes of rest. Repeat this four to 10 times in one workout, and only complete this one to two times per week.
Weight Training
Weight training can be manipulated to give us the result we’re after. While this idea may have you thinking about heavy bench presses and squats (yes, you need to train your legs), we can play with other exercises, rest periods, sets, and repetitions to get a more aerobic benefit.
How to Train It: In order to get resistance training to give us an aerobic benefit, we’re going to use a method called high-intensity continuous training. This involves completing an exercise with high resistance continuously for 10 to 20 minutes per set with lower speed. In our example, we’re going to use step-ups, but you can certainly use something like a bike or lunges up a hill, just as long as the resistance is high.
You’ll begin by choosing dumbbells or a bar with weight that is heavy enough to make a step-up challenging. Ensure the box you’re stepping up to is at a height that creates a 90-degree angle at your hip and knee when your foot is placed on it.
1. Place your entire foot on the box.
2. Drive your heel into the step as you bring your other foot on top of the box, then step down.
3. Pause briefly (one to three seconds) before stepping up again with the opposite foot.
Complete two sets per workout with five to 10 minutes of active rest between sets. Do one to two workouts per week.
Choosing a Jump Rope
Stand on the jump rope with both feet. Bring both handles straight up toward your chest.
A rope that fits will reach your lower chest or nipple area.
Anything higher or lower than this will be the incorrect size.
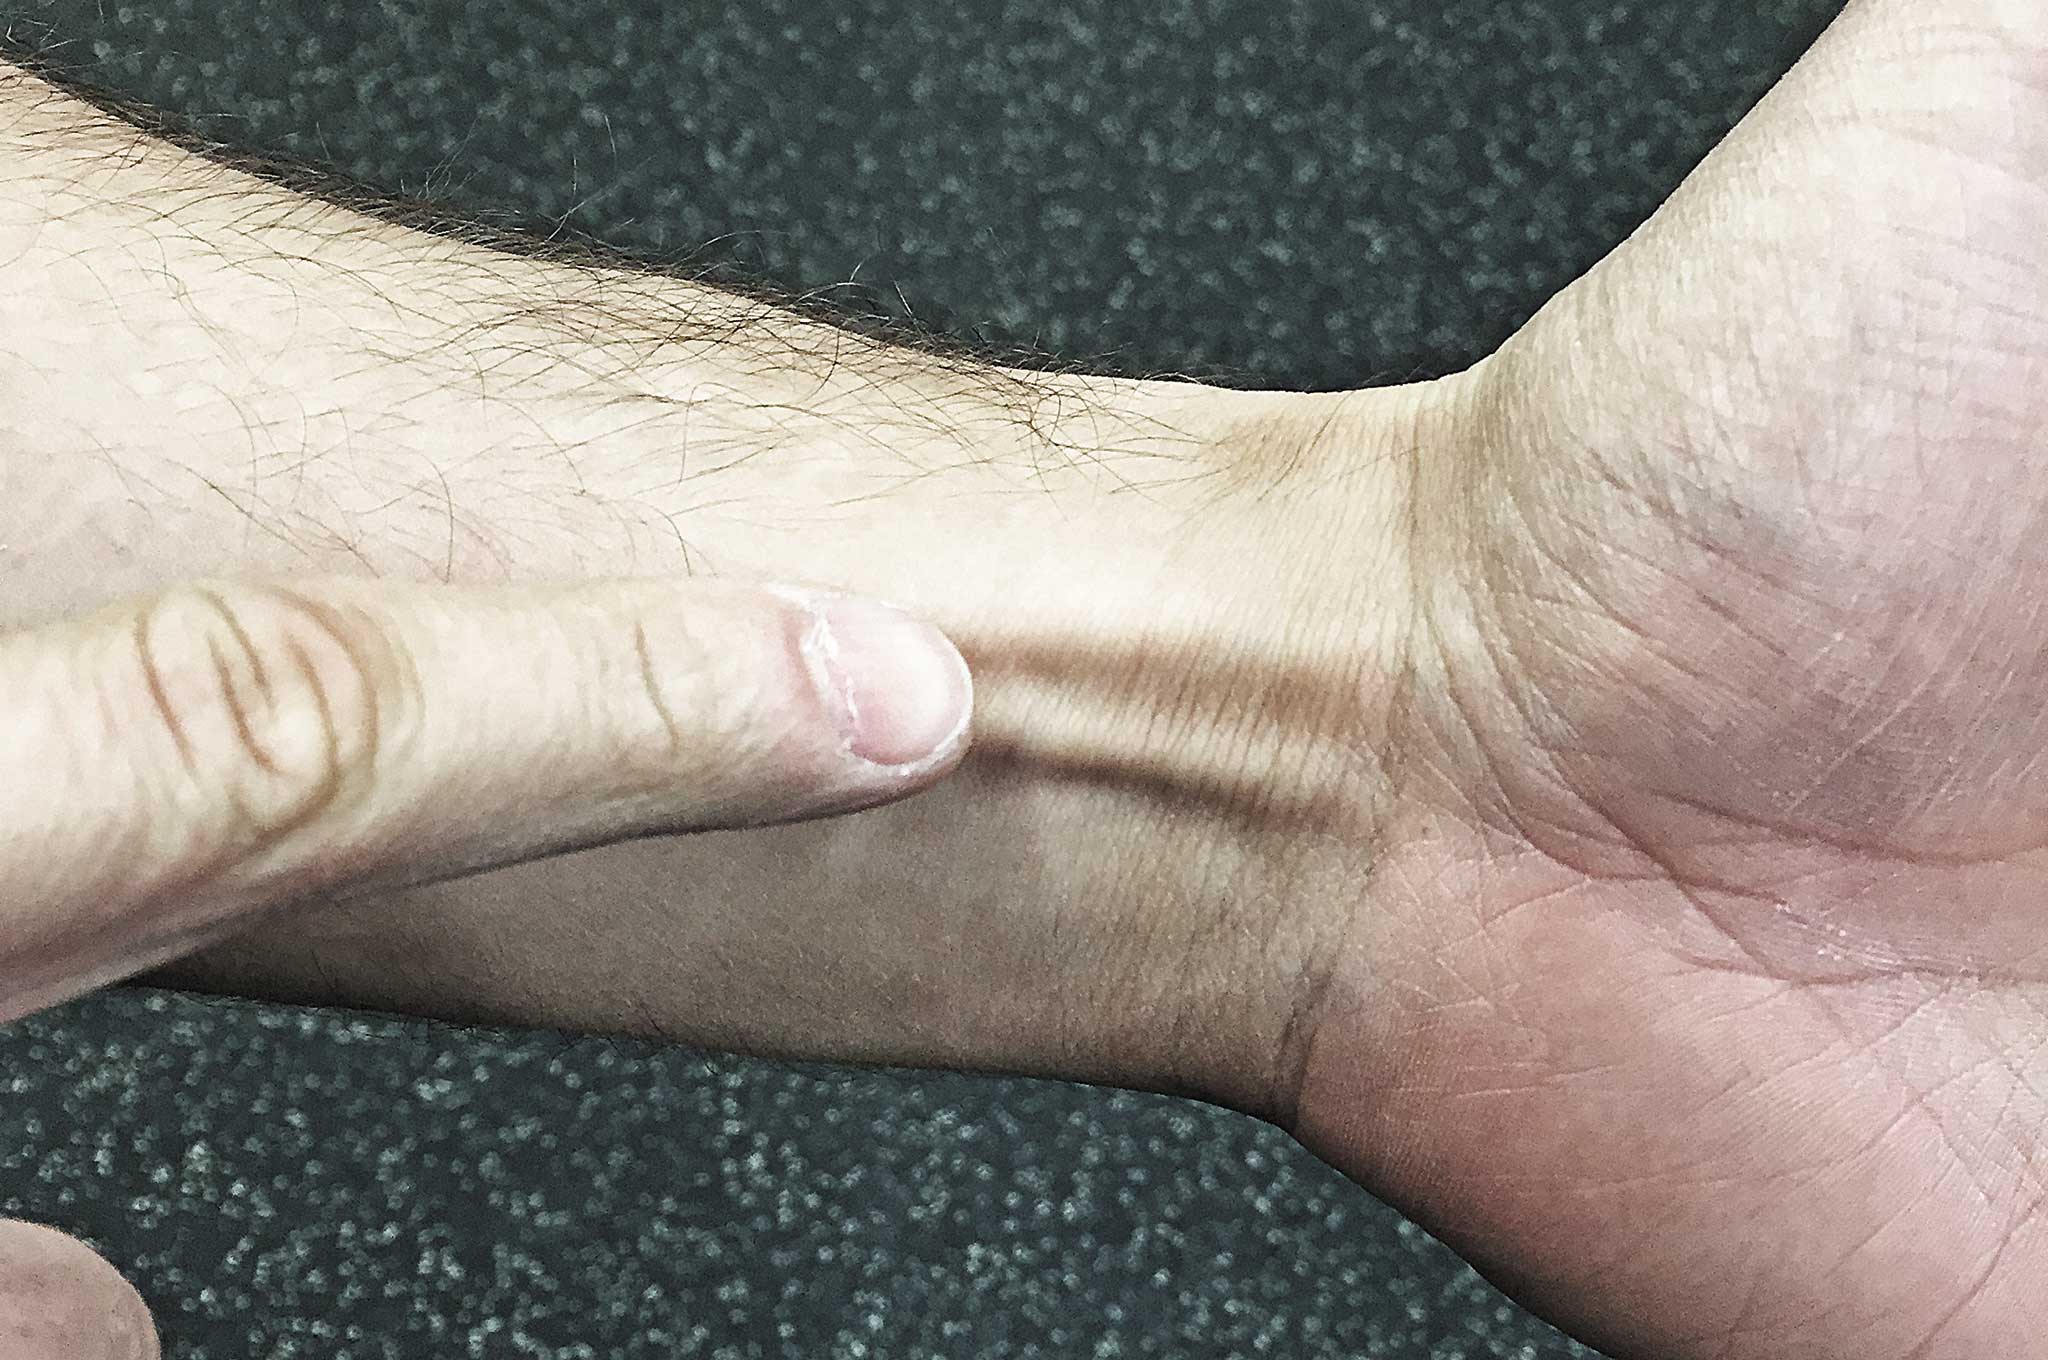
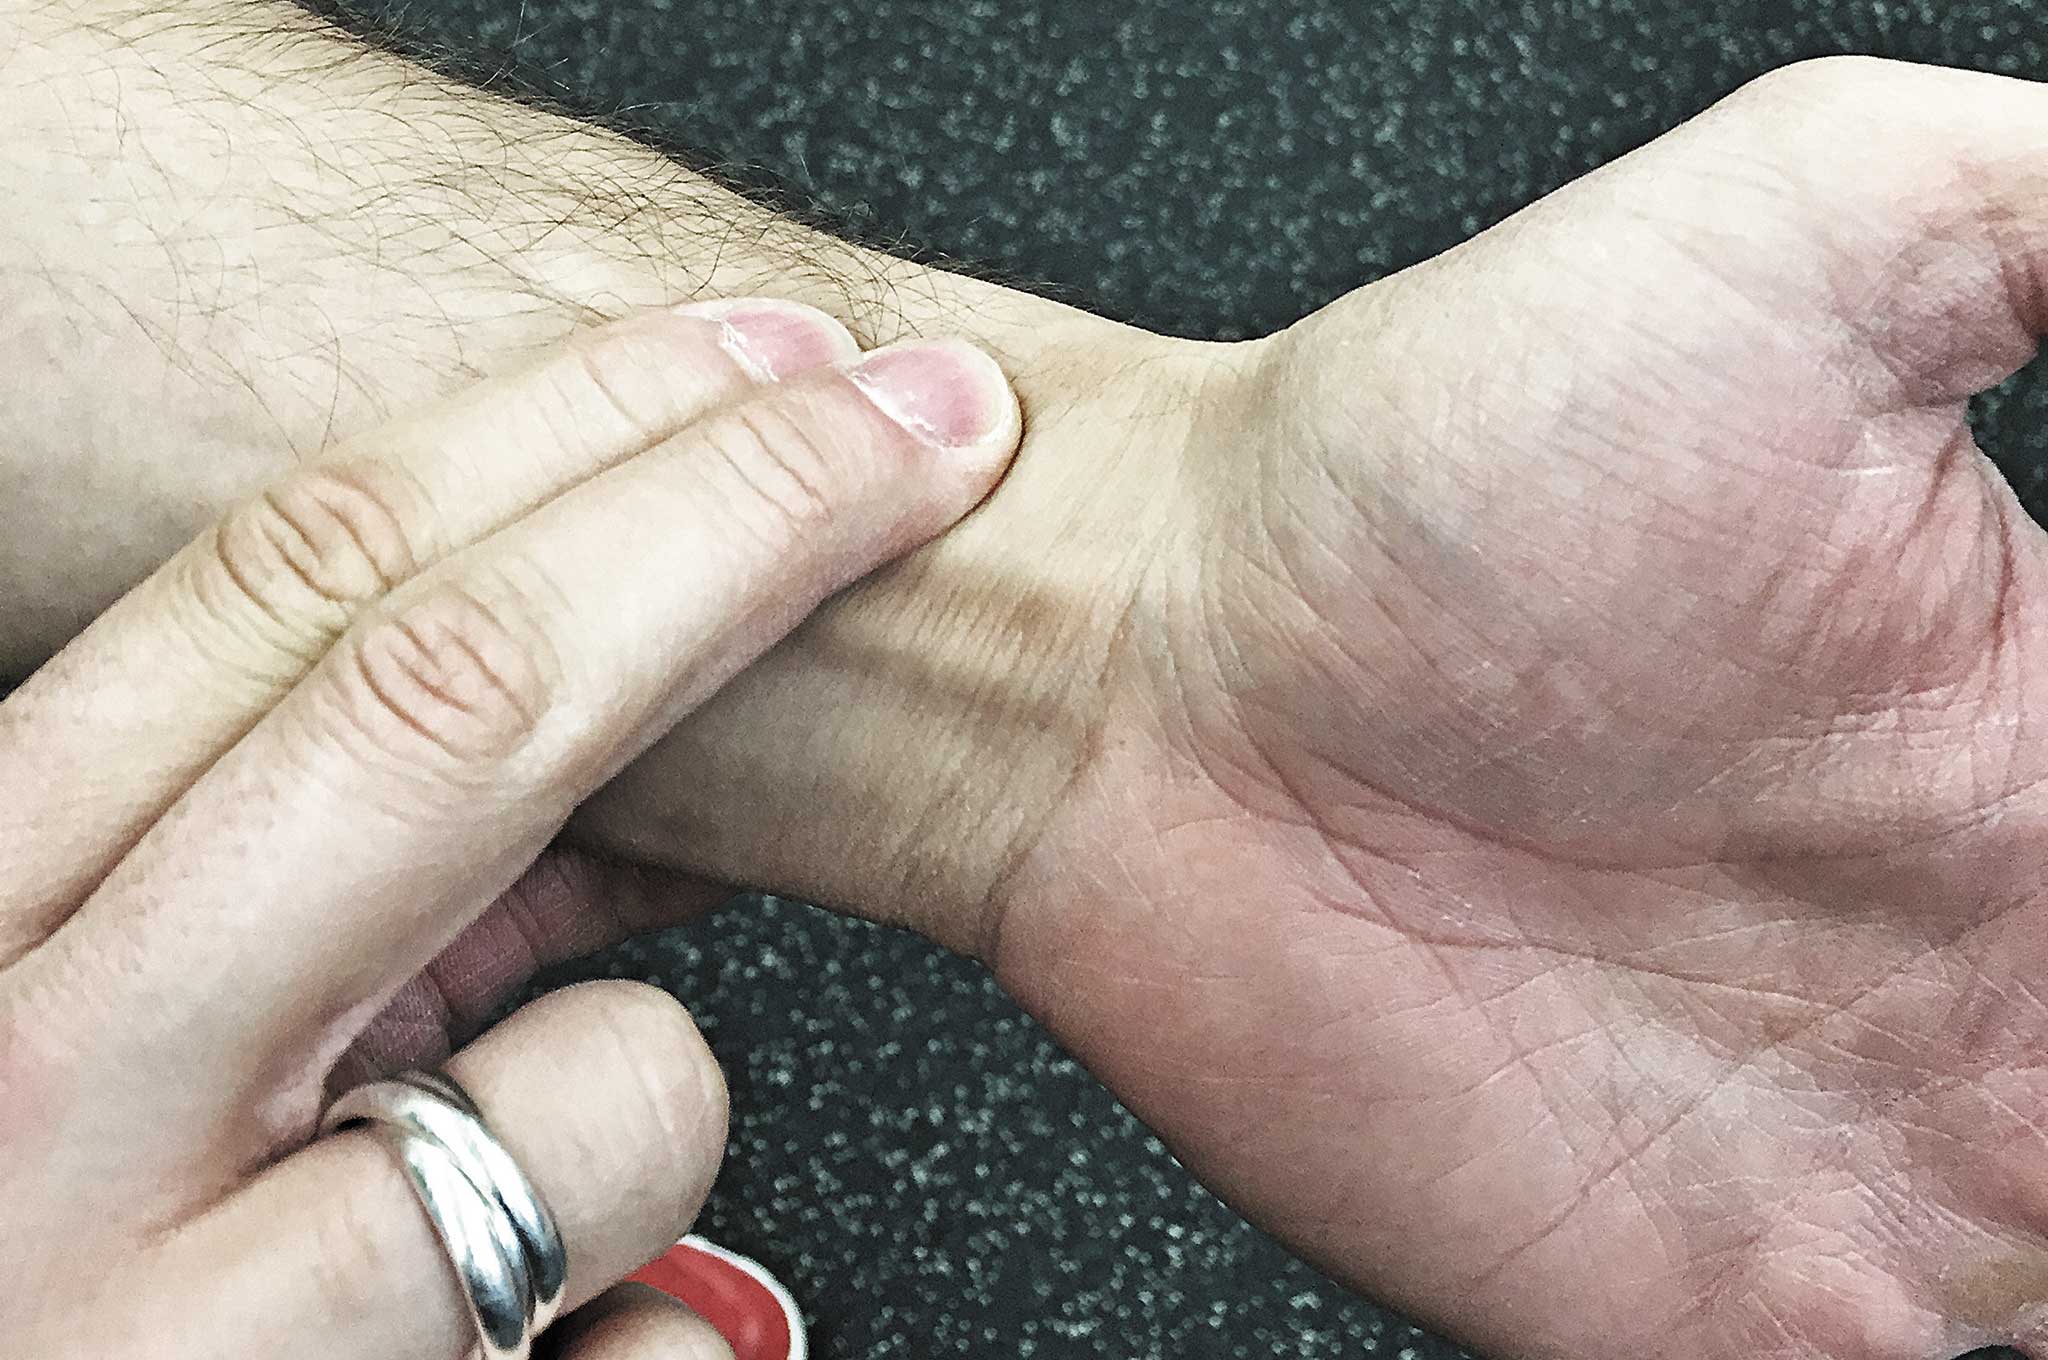
Manual Heart Monitor
Find your radial artery by placing your index and middle fingers on the inside of your wrist.
Feel for tendons running along the middle of the inside of your wrist.
Move your fingers closer to the thumb-side, in between the prominent bone (radius) and those tendons.
Apply gentle pressure. Too much pressure and you’ll restrict blood flow, while too little won’t allow you to feel blood pumping.
Conclusion
As you can see, not everything has to do with a mega high-intensity, sets-to-failure type of training. It’s best to choose one or two of the recommended exercises and training methods, rather than all of them. There has to be a balance, especially if your physical fitness needs must be well-rounded, which it does if we’re going to plan for the unknown. Take this information into consideration, and be ready for whatever the future may hold.
When it comes to binding two items together, it’s hard to beat modern adhesives. Duct tape, Cyanoacrylate superglue, two-part epoxy, and even construction adhesives like Liquid Nails can be indispensable for repairing gear and crafting useful items in a survival situation. If you’re in a long-term survival scenario, these resources will be limited and will inevitably run out. Even if the situation isn’t dire, you may find yourself with a need for glue, and no modern adhesives on hand. Improvising an adhesive from the resources around you is a valuable skill.
Today, we’ll be taking the term “glue stick” a bit more literally.
One time-tested source of adhesive in nature is pine resin, also called pine sap. This substance is naturally sticky and viscous, but can be transformed into an excellent glue through careful application of heat and a temper material. The heat liquefies the resin, and the temper thickens and strengthens it into a pliable yet sticky gel.
The basic steps to making pine resin glue are as follows. First, find some suitable trees. Pine is used in this example, but other evergreen conifers such as spruce, fir, or cedar can work as well. Look for sap running down the bark. It should be thick and tacky, but not completely solidified. Use a stick to scrape this resin into a metal tin.
Once you have a substantial amount of resin, you’ll also need a temper material. Crushed charcoal powder is frequently used, but finely-ground dry grass or even pulverized rabbit droppings can be substituted. Heat the tin of resin over hot coals, and stir the resin frequently until thoroughly liquefied, gradually adding temper material until the desired consistency is reached. Just don’t boil the glue, as this may cause it to become brittle.
The following video from Primitive Pathways demonstrates this technique, and gives other helpful tips:
These primitive pine resin glue sticks provide an easy way to transport and store adhesive in usable amounts. When you need some glue, just hold one of these sticks over the fire until it softens, and brush or dab it onto a surface to apply it. It may not be super glue or JB-Weld, but it’s the next best thing — and it won’t cost you a dime.
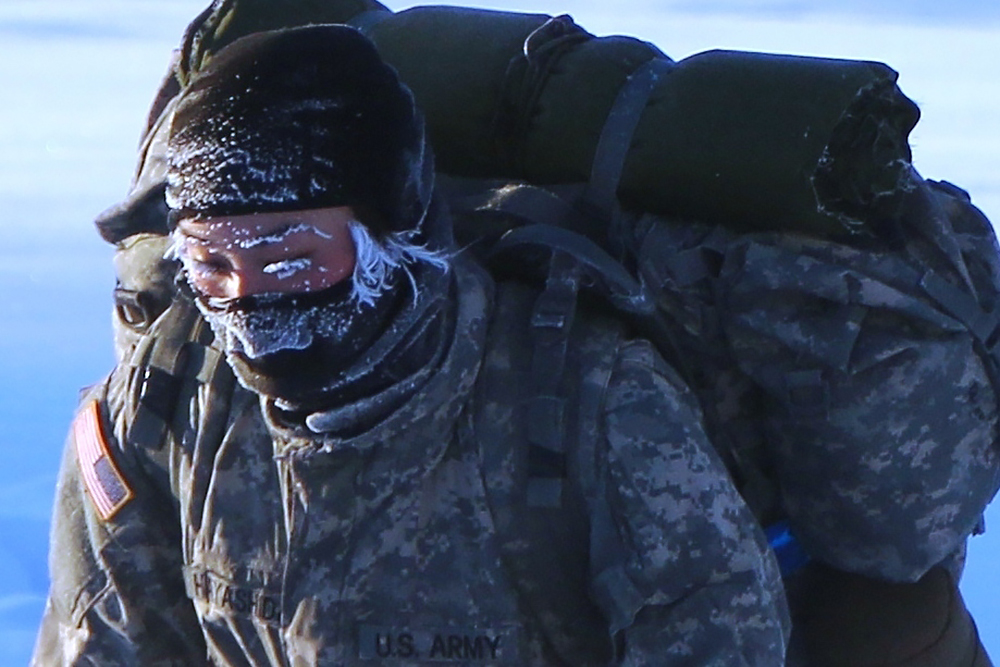
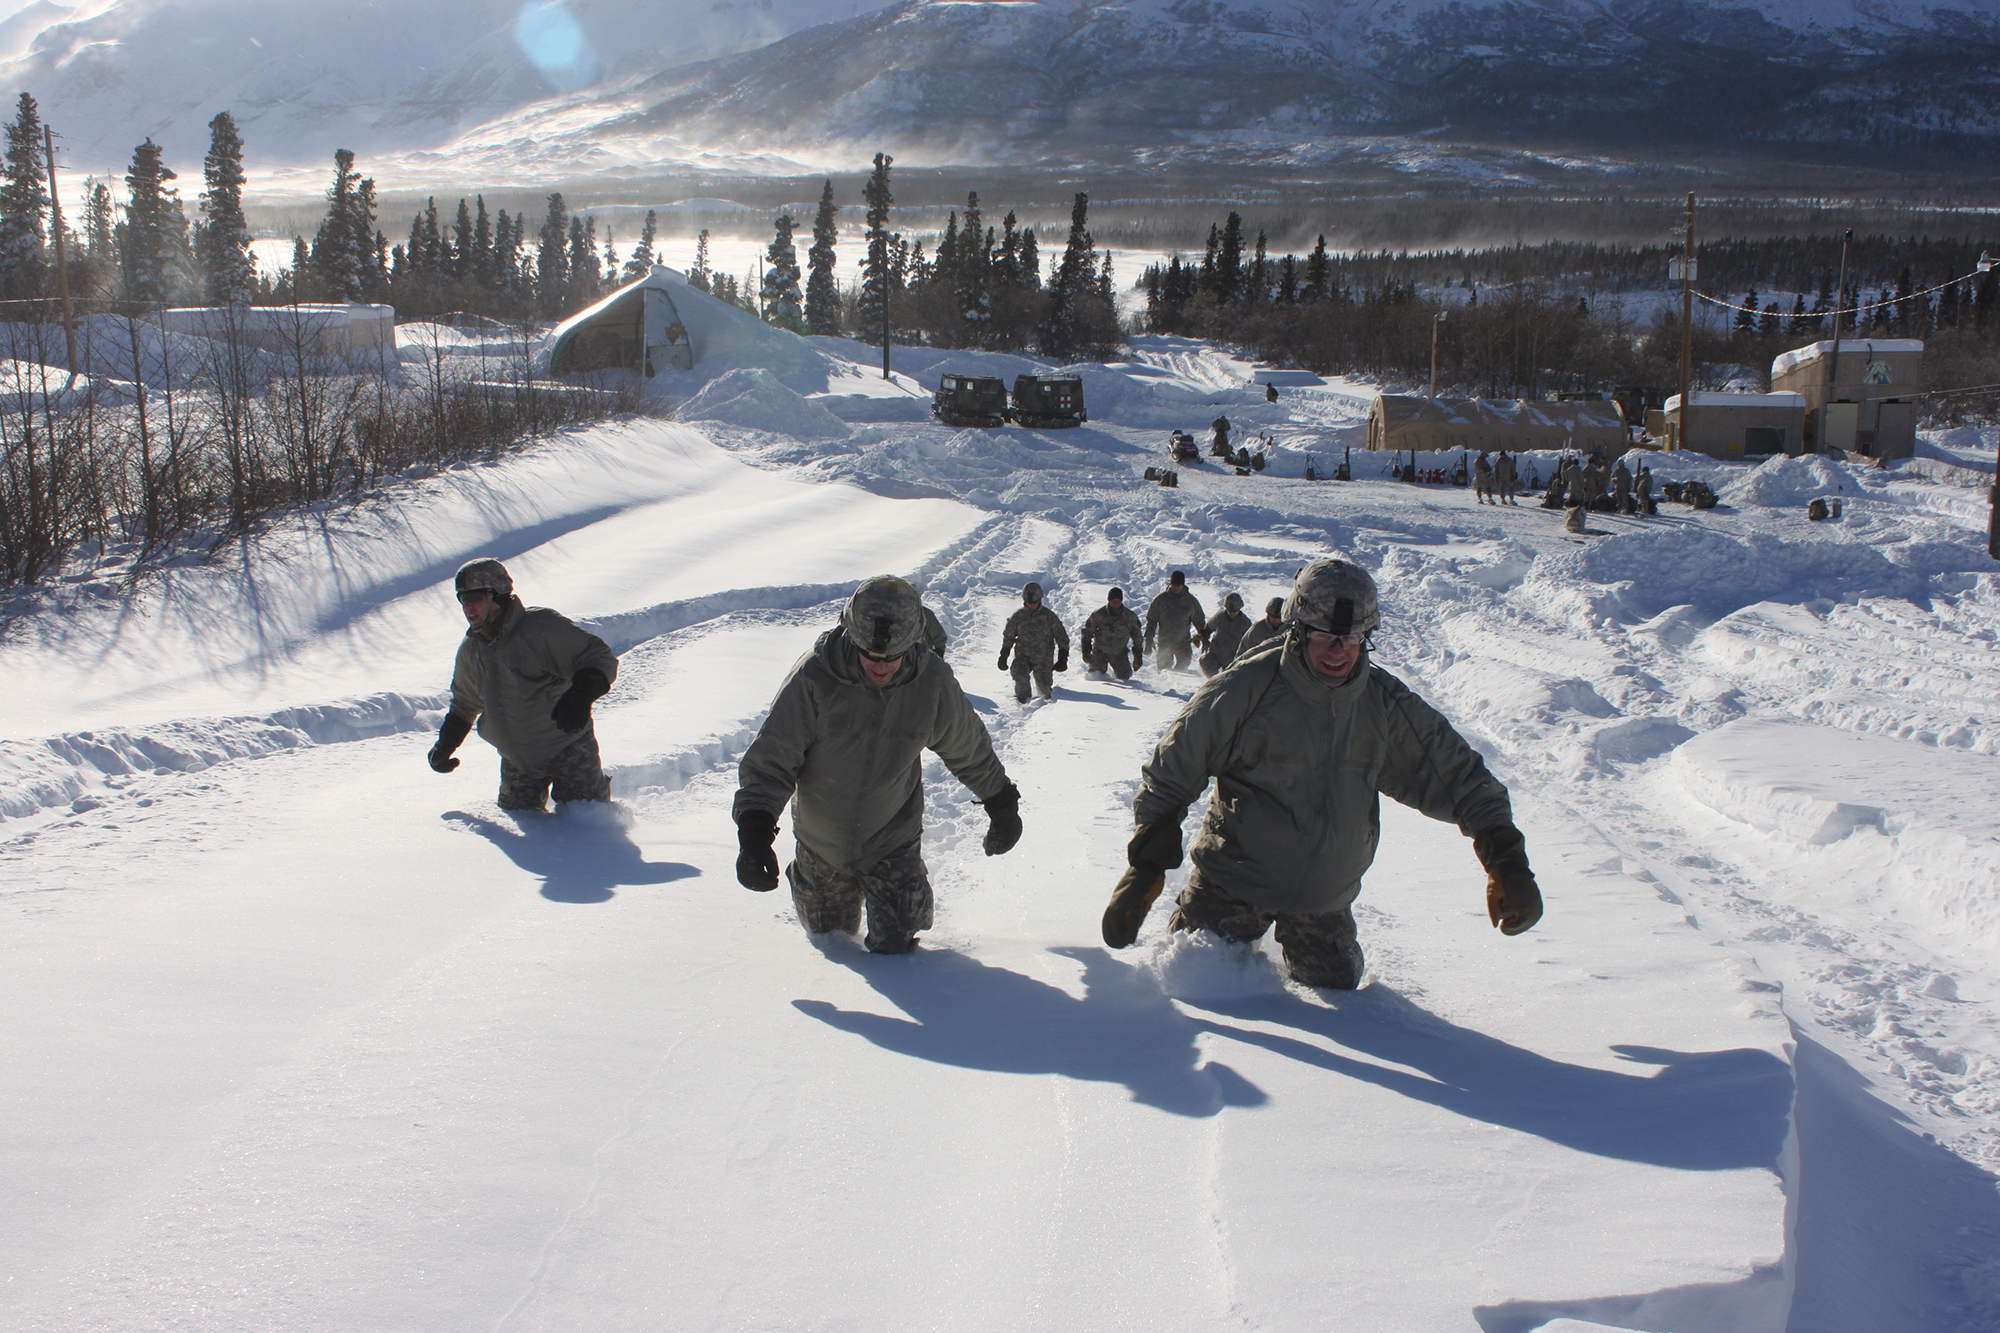
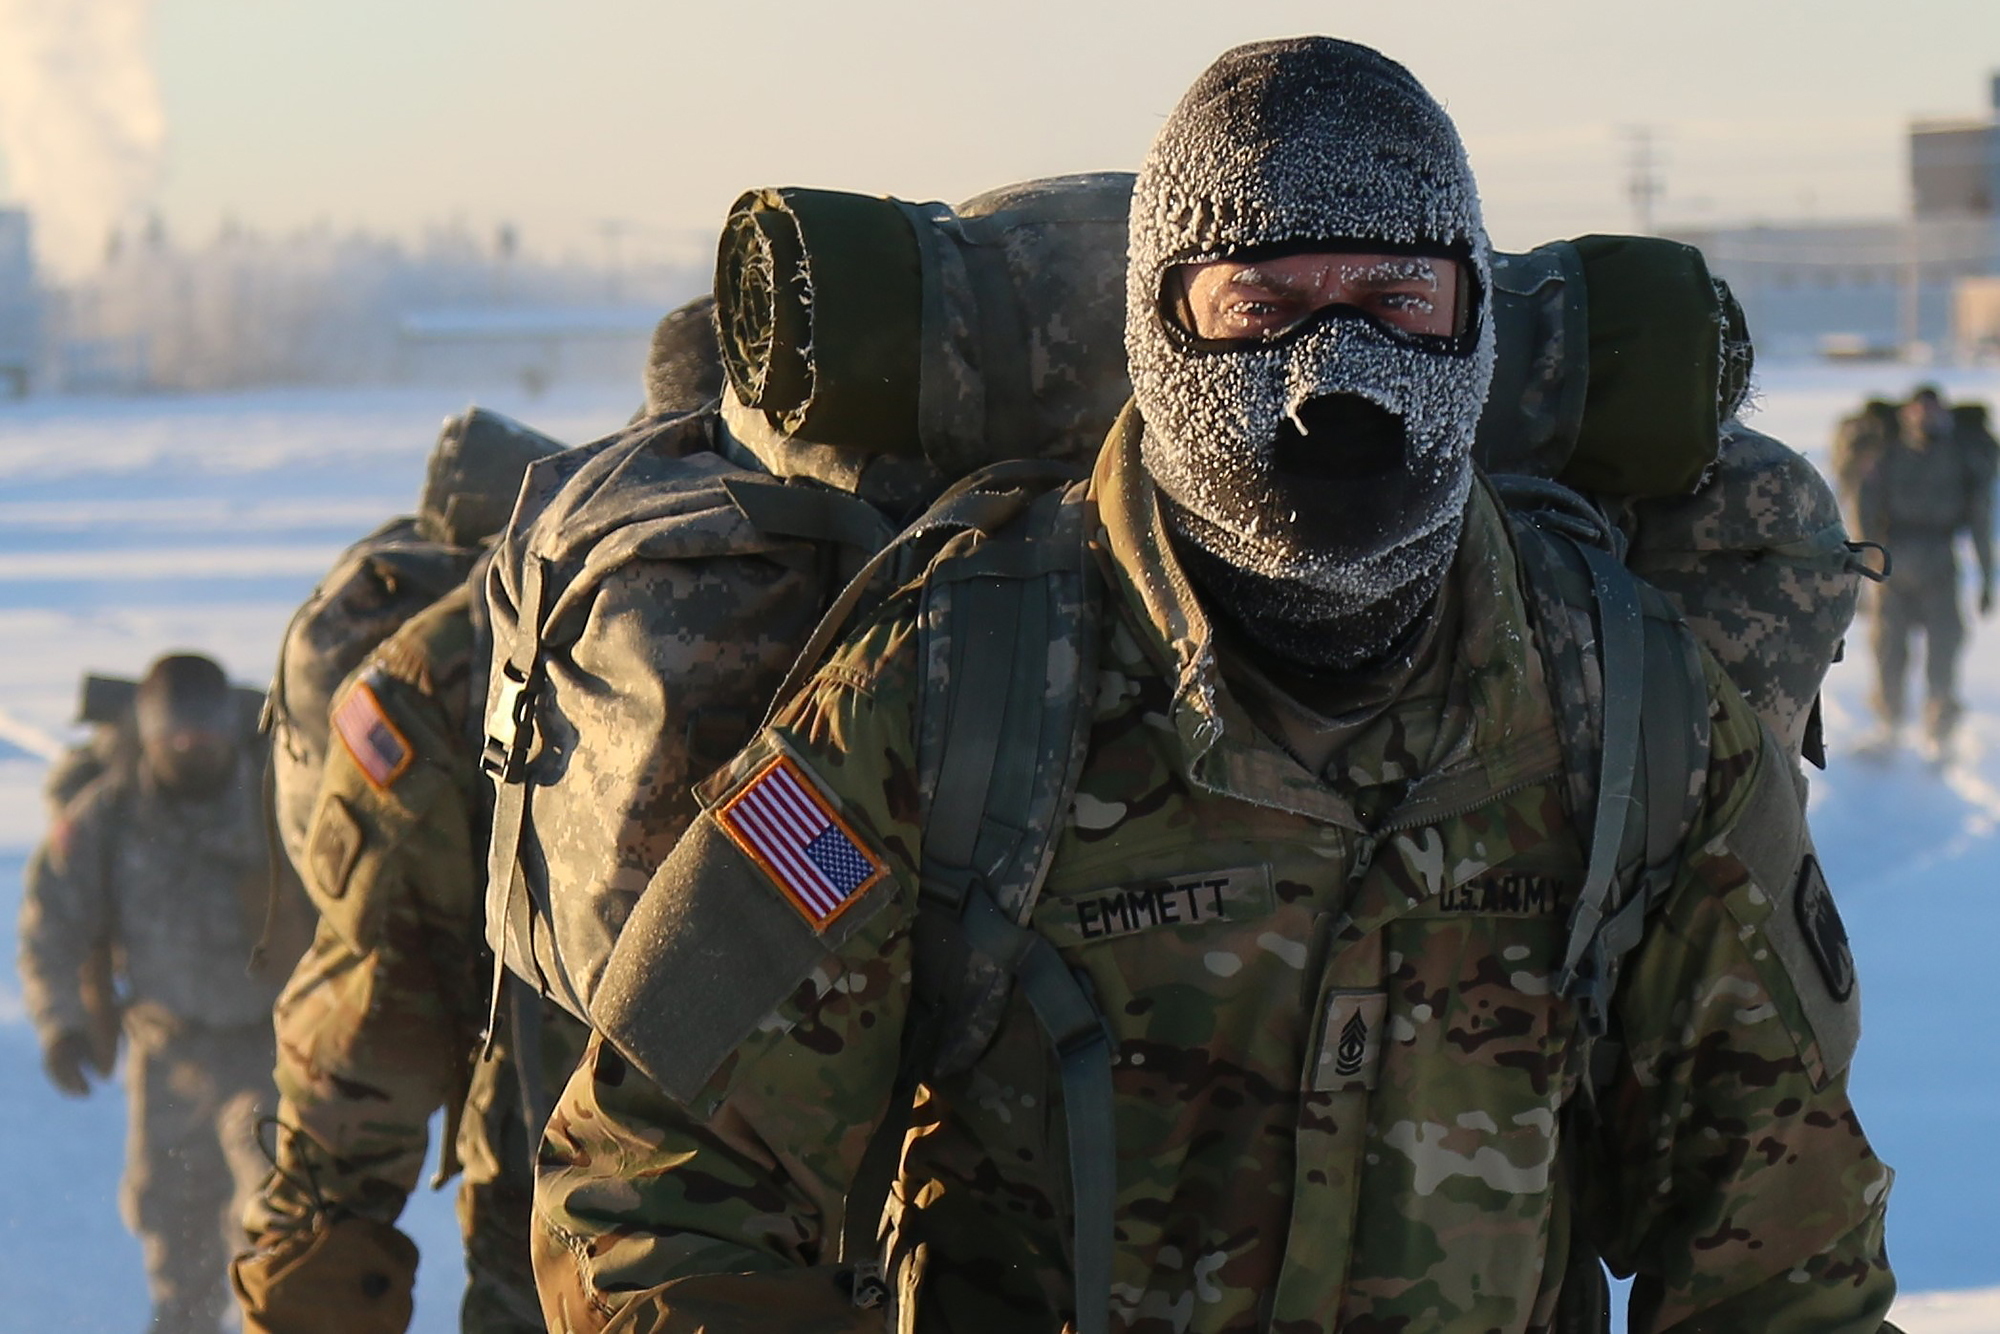
Arctic Tough 1st Sgt. Jonathan M. Emmett leads U.S. Army Alaska Aviation Task Force Soldiers assigned to Headquarters Company, 1-52 Aviation Regiment, at Fort Wainwright, Alaska, as they conduct Cold Weather Indoctrination Course II (CWIC) training November 19, 2015. These Soldiers completed a three-mile snow shoe ruck march to their bivouac site and spent the night sleeping in Arctic 10-man tents. CWIC training is required of all Soldiers assigned to U.S. Army Alaska annually to ensure America's Arctic Warriors have the knowledge and experience to survive, train, operate, fight and win in extreme cold weather and high altitude environments. (Photos by Spc. Liliana S. Magers, U.S. Army Alaska Public Affairs.)
The recent return of the “polar vortex” has brought life-threatening temperatures and Day After Tomorrow-style frozen landscapes to cities which rarely see this weather. The fortunate few, through a combination of preparation and or/luck, can curl up on the couch with extra blankets and a small(ish) glass of warming bourbon. But what if you had to not only survive in these conditions, but actually work outside in them and get things done? Regardless of where you call home, you may end up visiting one of these regions at exactly the wrong time. Or you may have to help your snowbound family members.
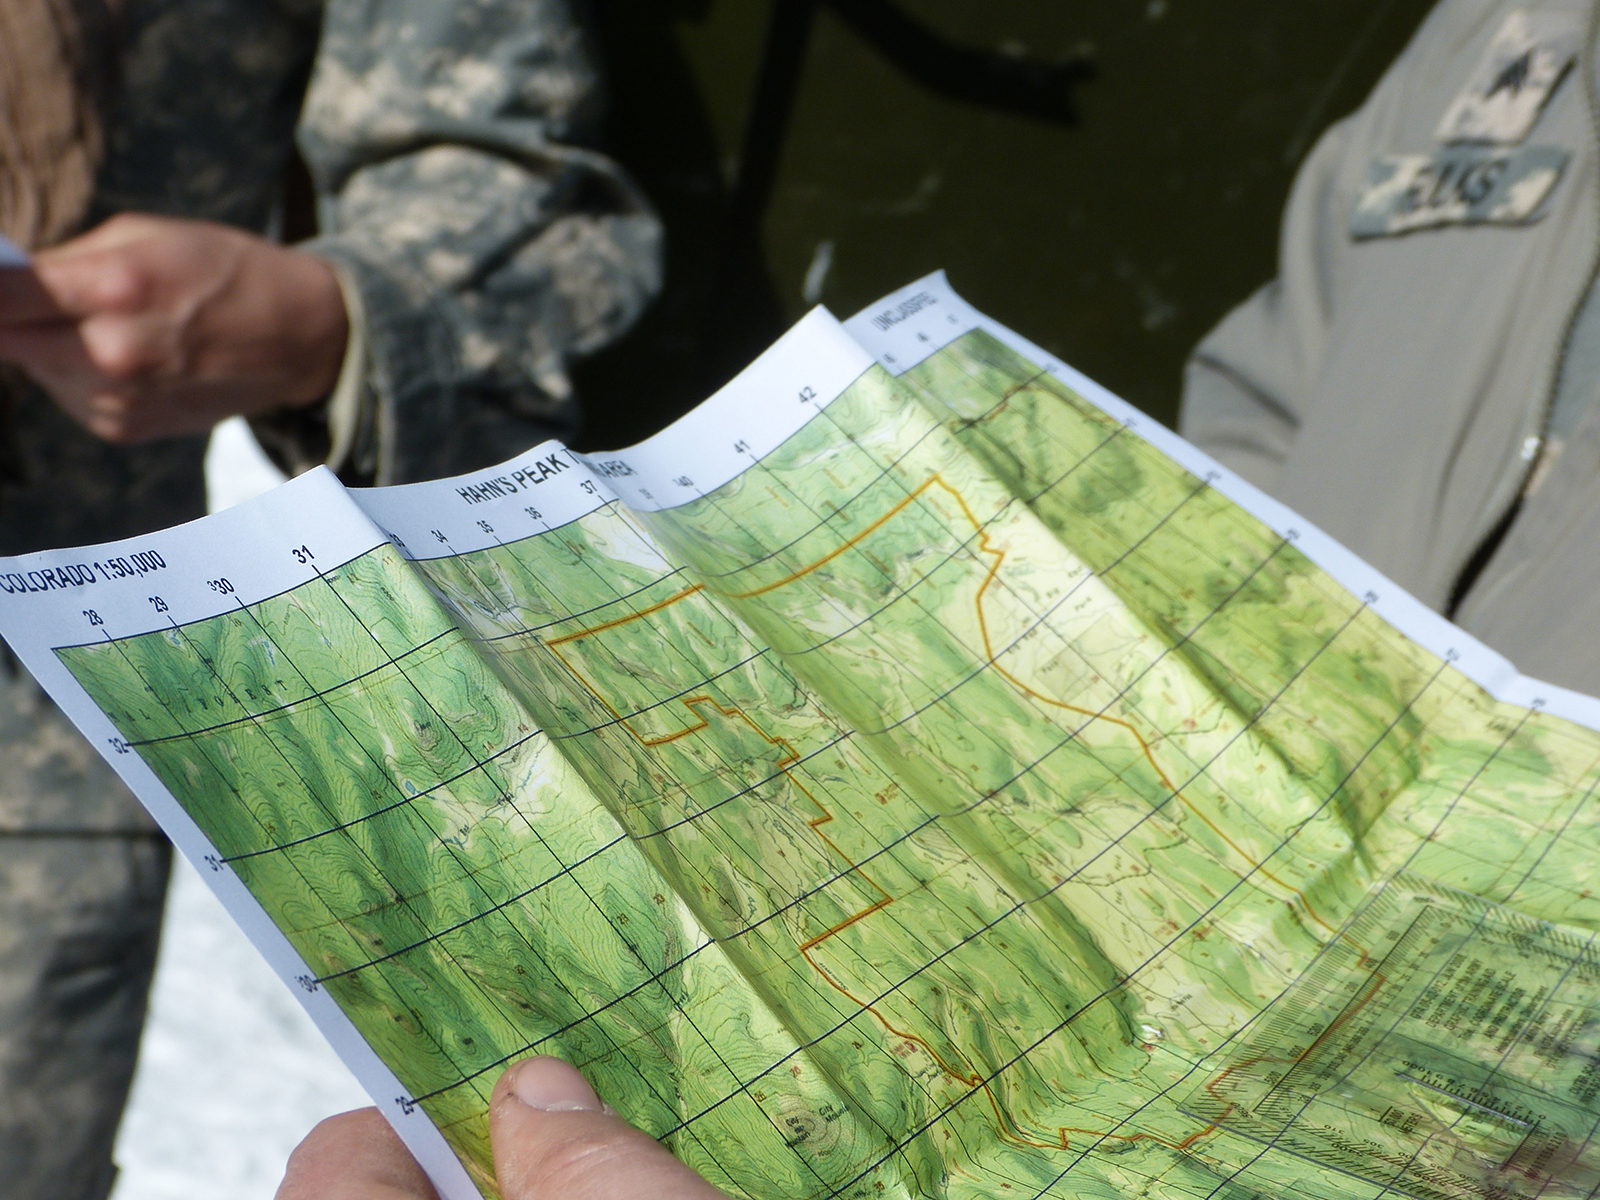
With that in mind, RECOIL OFFGRID presents the first installment in a series on Cold Weather Operations. It’s based on the U.S. Army’s recently updated Mountain Warfare and Cold Weather Operations Manual, as well as in-person interviews with the U.S. Army Corps of Engineers. The previous Cold Weather Manual was released in 2011, so the new 2016 version incorporates hard-won lessons from the last five years of war in the high-altitude bleakness of Afghanistan and other locales. Don’t wait to learn the hard way—use these tips to learn ahead of time how to deal with icy issues.
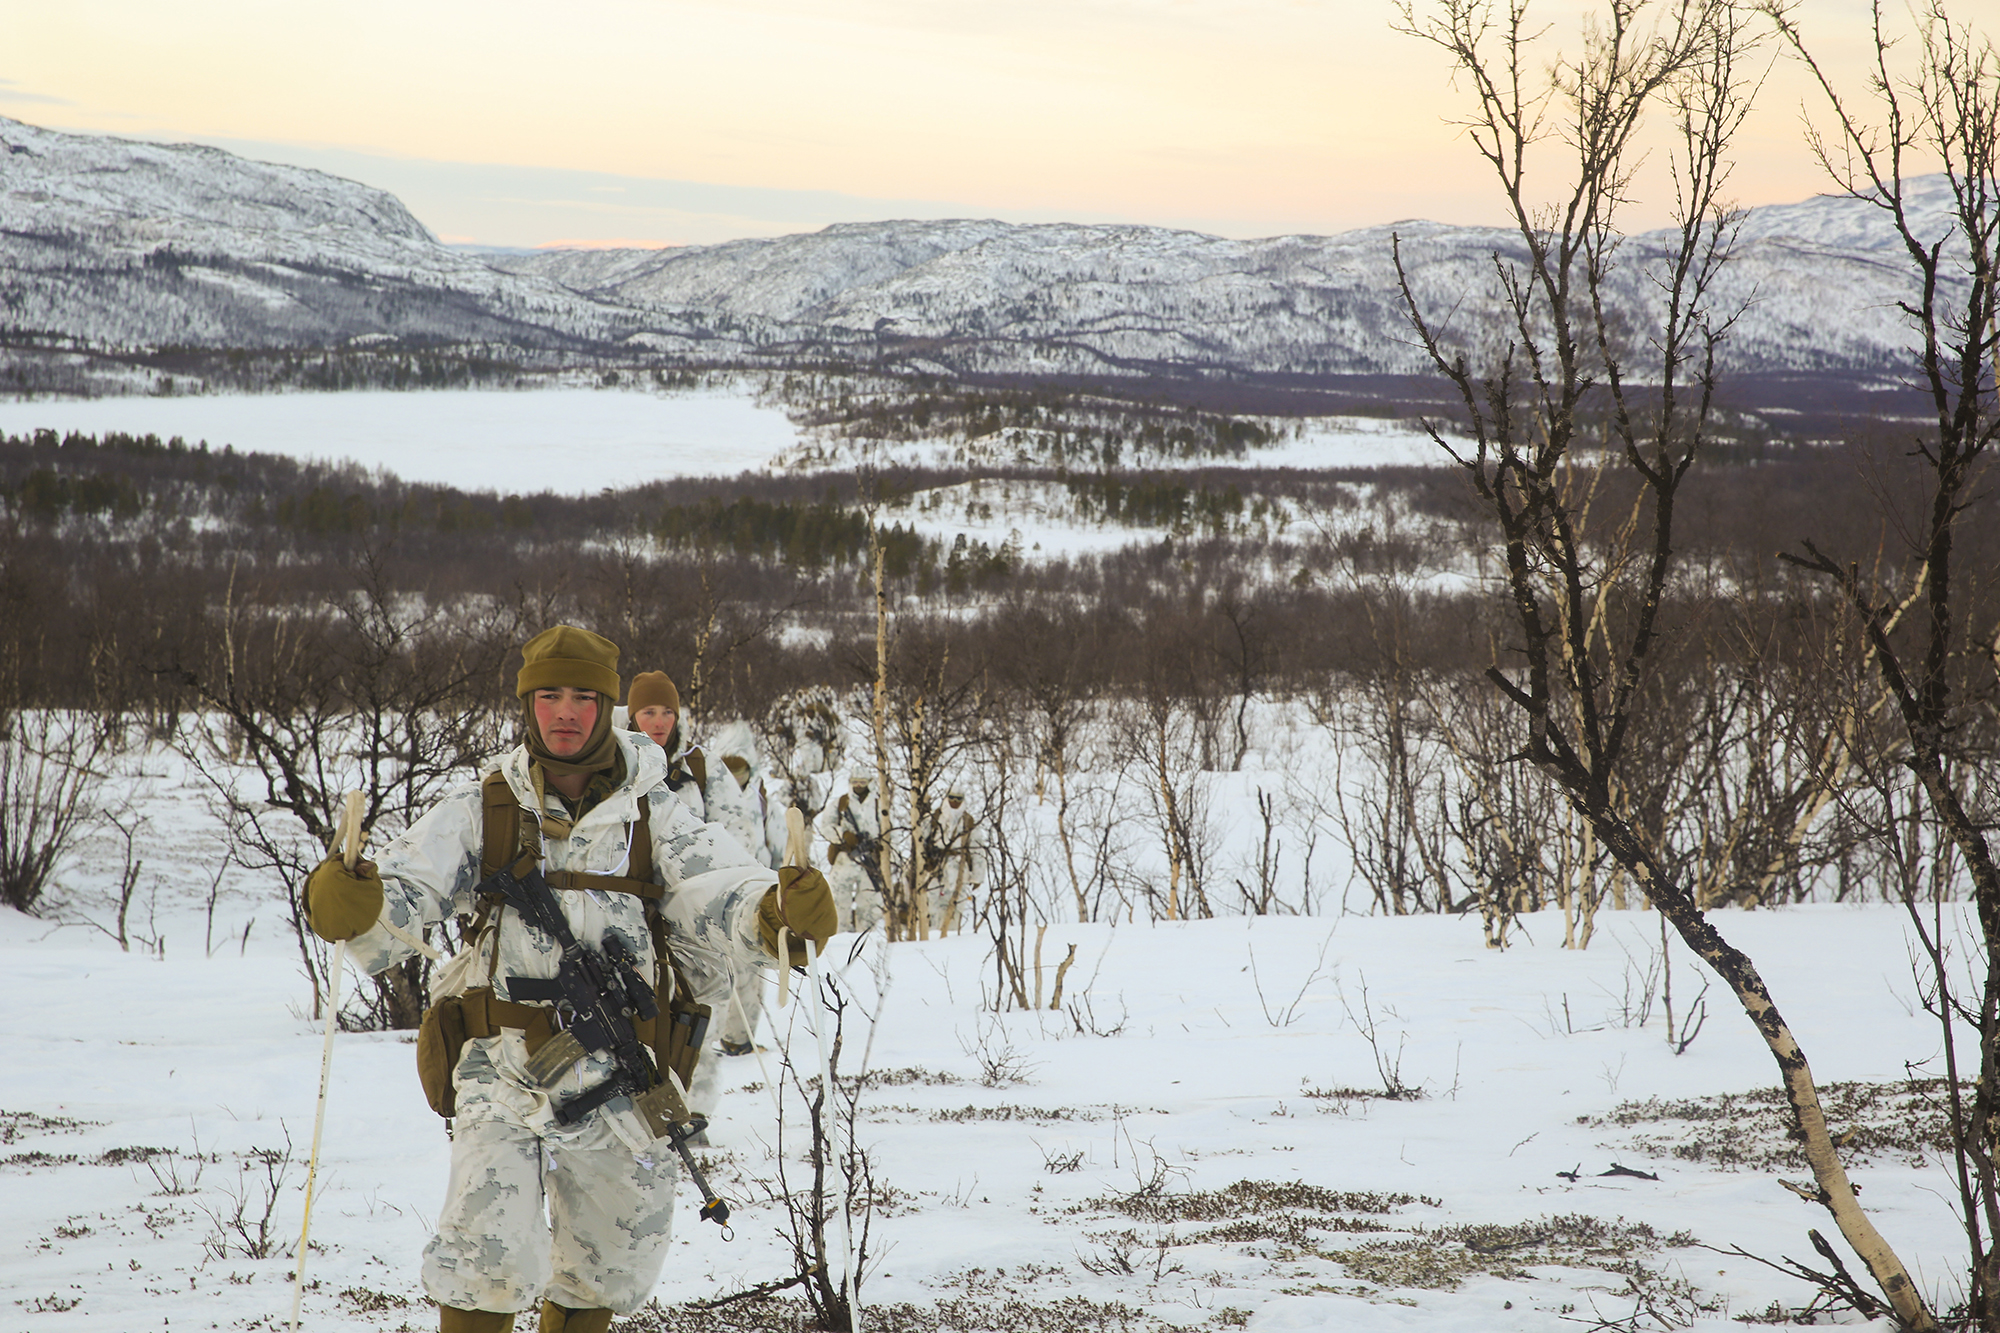
Know Thy Enemy: Cold Weather
Photo by Spc. Liliana S. Magers, U.S. Army Alaska Public Affairs
The Army defines five different categories of cold:
Wet cold, +39° F to +20° F
Dry cold, +19° F to -4° F
Intense cold, -5° F to -24° F
Extreme cold, -25° F to -40° F
Hazardous cold, -40° F and below
Though it might seem the opposite to those who grew up not having to scrape ice off of the windshield, dry cold is actually easier to handle than wet cold. In wet cold conditions your gear, clothing, and body are constantly damp. Your body’s core temperature will drop faster since wet skin and clothing negates any insulating effects. Simply walking becomes difficult because the ground becomes a muddy slush. However, once the temperature drops to a dry cold, humans and equipment generally work more effectively due to the consistently-frozen state.
Photo by Spc. Liliana S. Magers, U.S. Army Alaska Public Affairs
Intense cold is where the term “mind-numbing” starts to apply. Everything takes longer, not just because of the thicker clothing layers but because your brain instinctively starts to focus on survival and less on attention to detail.
The Army’s definition of extreme cold seems to say it best. “It is easy for individuals to prioritize comfort above all else. Personnel withdraw into themselves and adopt a cocoon-like existence.” Unless you’ve survived in this environment before, it’s likely that whatever plans you thought would work are no longer feasible. Obviously hazardous cold is even worse, and extensive training is required for anyone to operate effectively.
Bugging Out …Or In
U.S. Army National Guard photo by Sgt. Manda Walters
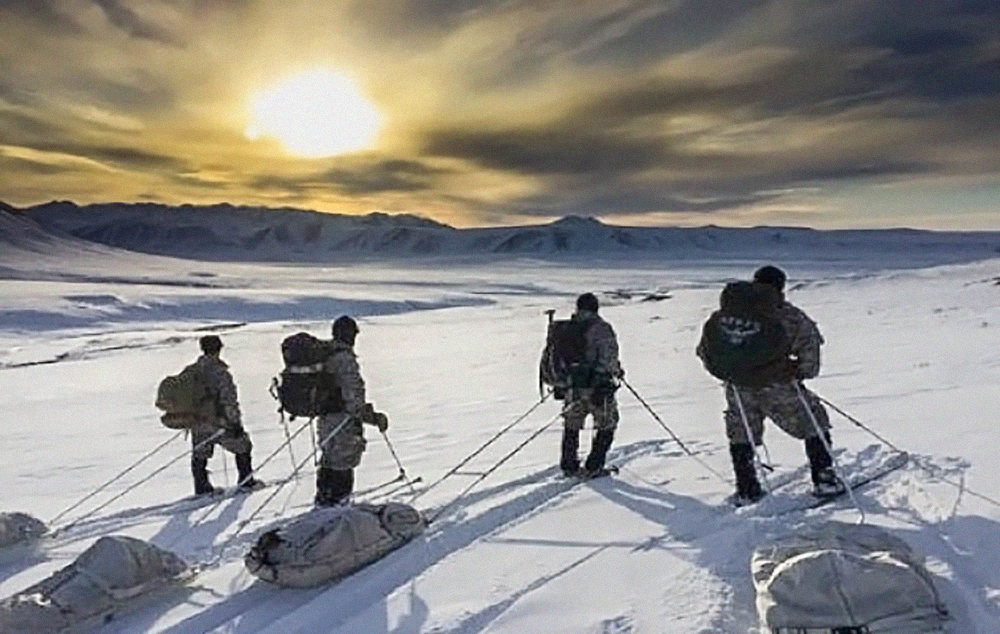
Regardless of why you’re having to operate in extreme cold, one thing will hold true. You’ve either got to get in to help someone or get out to help yourself. Otherwise you would stay inside by the fireplace like a sensible human being.
In a worst-case scenario, roads will be clogged with snow and you’ll have to cover the distance by foot. Once you determine how far you need to travel you can figure out how long you’ll be outside. On foot in the mountains, on an unbroken trail, you’ll need one hour to cover every mile of distance. Add one more hour for every 1,000 feet of ascent or 2,000 feet of descent.
How much gear (extra weight) you’ll take with you is a primary consideration. Only the bare essentials should be carried, although defining “essential” is a dynamic process all its own that depends on the individual and the situation. If you’re anticipating conflict and trying to figure out whether to bring more weapons or more ammunition, bring more ammunition and fewer weapons. Because it sucks to have to throw a gun at someone.
U.S. Marine Corps photo by Cpl. Immanuel Johnson
If you live in an area where inaccessible roads are more than a remote possibility, it might be high-time to bring some beasts of burden to the ranch. Most Americans will think horses when they consider animal transportation. Think about the Marlboro Man, or Brokeback Mountain. Okay, don’t think about Brokeback Mountain. However, despite the fact that they’re beautiful and they’re what your 15-year-old daughter likely wants for her next birthday, horses may not be the best option for transporting you and/or your gear. Instead the real MVP (and the ultimate organic off-road vehicle) is the mule. Yes, the unglamorous, un-sexy, and sterile mule.
Compared to horses, mules are more sure-footed, less prone to injury and less likely to panic (a plus if firearms may be involved). They can carry about 200 pounds and traverse about 20 miles per day. Keep in mind, though, that they’ll eat about 2% of their body weight in feed per day, and even more once the temperature drops below freezing. Those of us without animal expertise (or year-round funding for their food and upkeep) may consider an all-terrain utility vehicle such as the Gator series from John Deere, or a snowmobile with a small trailer or Ahkio sled.
Winter Transportation: Ditch the Prius
Photo by Sgt. 1st Class Adam McQuiston
If you’re lucky enough to be able to use a large vehicle, life is better but care must still be taken. At a minimum ensure that the vehicle is winterized to include things like tire chains, tire chain repair kit, deicer, scraper, non-freeze wiper fluid, and windshield cover to reduce the buildup of ice and frost. If you’ve got a trailer, bring chains for those wheels as well. Since E-brakes can freeze easily, carry chock blocks to set your wheels when parking. In cold and wet conditions, use some scrap like cardboard boxes or tree branches to park on top of so your tires won’t freeze to the ground.
“Combat load” your vehicle, putting the items of lowest priority in first so that high priority items are on top and easy to reach. This includes things like first aid and vehicle recovery/repair equipment — basically the stuff that can keep your vehicle moving and keep you in one piece. If you must stop, try to start the engine regularly, running it for at least 10 minutes every three to four hours. If the temperature is below -25˚F then the engine may need to run continuously.
U.S. Army photo by Staff Sgt. Michael O’Brien
Vehicle selection can become much more important in extreme cold conditions. Using a heated vehicle for shelter is an obvious choice. However, what if your wife convinced you to buy the hybrid last year? Oh that’s right — most hybrid engines will shut off when the vehicle is stopped. You’ll freeze to death, but at least you’ll die knowing that you reduced your carbon footprint.
Despite what Al Gore may think, over-sized vehicles with plenty of interior space start to pay off here. They will have room for not only all the gear you’ll want but also your bulky, Michelin Man-inspired outfit with its three, four, or five layers of insulating clothing. So don’t worry, we’ll just go ahead and pretend that you needed one more excuse to buy that full-size bug-out truck.
Photo by Spc. Liliana S. Magers, U.S. Army Alaska Public Affairs
Andrew Schrader is a licensed professional engineer and is certified by the U.S. Army Corps of Engineers as an Urban Search and Rescue (USAR) Structures Specialist. His company, Recon Response Engineering LLC, advises state and federal government organizations on the subject of urban search and rescue and building collapse. He recently assisted the U.S. Department of State’s Italian Consulate in the development of their post-earthquake response and rescue protocol. You can follow him on Instagram at @reconresponse.
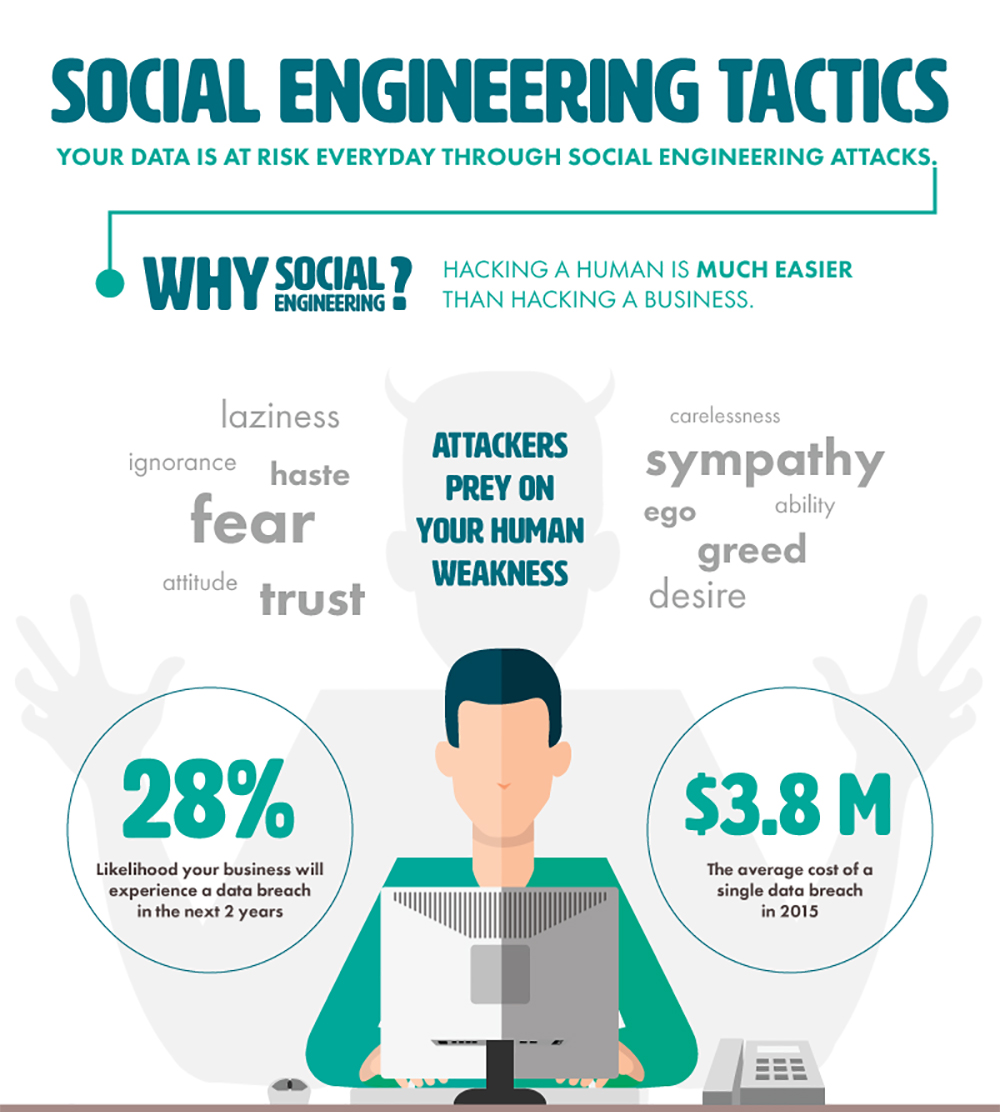
Personal interaction is a fine balance of trust and suspicion. On one hand, we shouldn’t be too trusting of strangers, as this may allow malicious individuals to take advantage of our blind trust. On the other hand, we can’t exactly go through life cynically doubting and scrutinizing everyone we know at all times — that would be sheer paranoia. In order to find a middle ground between trust and suspicion, it’s important to recognize warning signs. A heightened sense of awareness can help you know when to be suspicious, and when to let your guard down a little.
Criminals won’t always look like “the bad guy”. More often than not, they’ll be smooth and charismatic.
A technique known as social engineering is used by criminals to exploit the grey areas in this balance of trust and suspicion. Social engineering is defined as “the art of manipulating people so they give up confidential information.” In essence, social engineers prey on those who tend to sway too far towards trust and gullibility, and use smooth talking charisma to steal credit card information, account passwords, PIN numbers, and other sensitive data. A social engineer may pose as a customer service associate, technician, security guard, family member, or other trusted figure.
The term social engineering is most often used in reference to internet-based attacks — phishing, a technique we’ve discussed in the past, falls under the umbrella of social engineering. Online social engineering has played a major role in some high-profile scandals recently, such as the DNC email leaks.
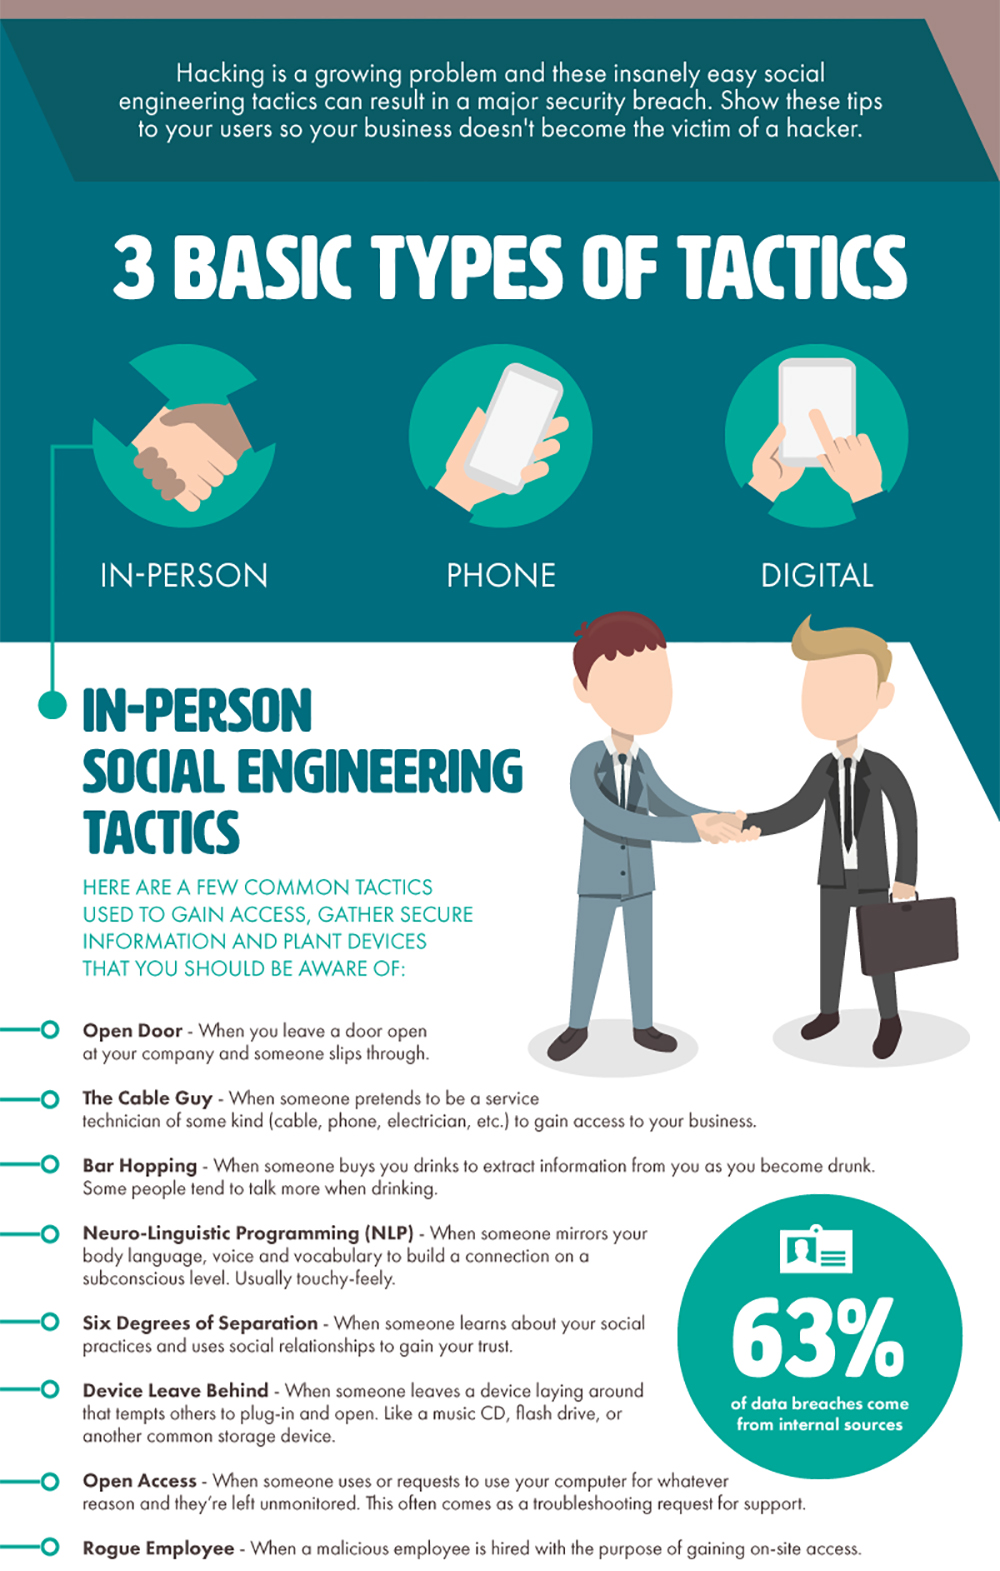
However, social engineering doesn’t occur solely on the web. It can happen over the phone, or even through in-person interactions. The following infographic from SmartFile shows the three basic types of social engineering tactics, and can help us identify the warning signs of an attack. Click here for a full-size version.
Someday, the world is going to bend you over. You think you’ll be ready, but you won’t. Your snowmobile breaks down miles from civilization, a shifting boulder traps your arm, or a mountain lion decides one of your hiking troop is a tasty snack. If you spend enough time exploring the edges of the map you’re going to find yourself taking a backseat to destiny.
The SPOT Gen3 satellite messenger is 4 ounces of ass-saving technology that uses the Globalstar constellation of low-earth-orbiting satellites to transmit GPS location and canned messages to family, friends, social networks, and — in the gravest extreme — the GEOS international rescue service.
On the Spot
With SPOT, you’re able to email or text three preset, 110-character long messages to a user-defined recipient list administered using SPOT’s website. A fourth message is an SOS alert that sends identity and precise location information to the GEOS service, initiating an emergency response.
Running the device is straightforward. It’s got one button for each job. There’s no need for Konami-Code-level memorization. To send one of the four preset messages, press and hold the corresponding button until the LED above it tells you it’s working. Same drill when it comes to activating or deactivating the device’s tracking mode.
Pressing one uncovered button sends the “I’m OK” message, pushing another sends a custom message. The other two buttons send help messages and have a little flap to guard against accidental activation. One marked with cute little hands sends a message that tells recipients that you could use some help dealing with a nonlife-threatening situation. The other covered button, marked SOS, sends your identity and location to the GEOS command center telling them to activate the nearest search-and-rescue assets.
The ability to let family and friends know how things are going and SOS features are great features on their own, but the real beauty of the SPOT Gen3 is the tracking feature. Turn it on and the unit drops bread crumbs on a Google maps-enabled web page that’s easily accessed via a link sent in every message. Depending on the level of service you’ve paid for, the web page is updated with your current position at 2.5-, 5-, 10-, 30-, or 60-minute intervals. The service allows per-page password protection and up to 10 pages per device. You can choose different levels of message detail to share and even share the location of several SPOT devices on a single map. This is handy if you’ve got a few people on an expedition. Set up a page showing everyone’s progress, or make individual pages so each team member’s parents or fans can track just them.
Setup
Activating the unit is pretty painless. Go to www.findmespot.com and punch in the numbers found inside the unit’s battery compartment and choose a service plan.
The Basic service is $150 a year and offers 10-minute tracking intervals, messaging, and SOS response. The $200 Unlimited service unlocks 5-, 10-, 30-, or 60-minute tracking intervals and the $300 Extreme service adds the option of 2.5-, 5-, 10-, 30-, or 60-minute tracking intervals. You can pay monthly, but it’ll cost a bit more; and there’s no option for month-to-month service. A year is the minimum term for all services.
Once you’re paid up, customize the messages then add a list of email addresses and text numbers the device’s messages should go to. Lastly, give SPOT your contact info so GEOS can contact you in the event of an SOS button press to confirm the need for a full-blown rescue response. You can also adjust the tracking frequency and add Facebook and Twitter accounts to update when you hit the device’s OK button.
Power
Since the Globalstar satellites are low earth orbiting, the device only needs to transmit a low-power signal (less than 500 milliwatts) to the reach them. This low power requirement is great for power conservation.
But, the ability of this signal to reach one of orbiting satellites overhead is dependent on the same factors that limit GPS signal reception. Dense tree canopy and canyoning can block the signal and increase power consumption as the GPS chip searches for a signal. It’s important to note SPOT communication is one-way, and despite the flashing green LEDs, there’s no way to know if your message actually got to the satellite.
To save power, the device contains a movement sensor and only sends tracking updates when you’re moving. The four lithium AAAs in our test unit ran for three all-day hikes, transmitting location data every 10 minutes with a few OK check-ins thrown in without putting a dent in the batteries. We tracked our path around town for four more days while running errands, tracked a horse’s movement for a day around his pasture, and skied two more days with it and the batteries were still in the green. We never saw the battery LED flash red.
We figure, setting the device to the 30- or 60-minute tracking interval, the SPOT Gen3 could run for nearly a month on a single set of batteries. Turning off tracking and only using the device to send OK or HELP/SOS messages would net months of use. For even more extended use or more frequent updates, the device can be powered through its USB port.
On the Ground
Our hikes were tracked faithfully on SPOT’s website. The tracking points indicated position without speed, but lines connected the dots and gave an indication of direction.
The antenna is in on the front face and SPOT says it should be pointed up with a clear view of the sky for best GPS reception and tracking/messaging transmission. Messages were all sent successfully and nearly all the generated emails and texts arrived within a minute of pushing a button. To see how it’d do in adverse conditions, we hit the HELP button with the device purposely positioned face down at the bottom of a pack while we ate lunch in a deep gully. As expected, the unit had trouble getting a signal out, but it didn’t give up. The transmission made it after about 30 minutes with the unit still in the pack once we took it out of the gully. Other than our abuse, the unit had no trouble doing its appointed duty.
One thing we didn’t like about the SPOT Gen3 is the need for the website to change message content, recipients, and the tracking frequency. In the age of the smartphone, it seems ridiculous that we couldn’t adjust these settings using the SPOT smartphone app. The iPhone app only allowed us to track the unit on a map and receive messages.
Overall, the device was worth the space it took up in our pack. It worked as advertised and gave us and our relations a sense of security that’s unobtainable outside the cellphone coverage area. The $150 price tag seems reasonable, though infrequent adventurers may find the subscription fee tough to swallow.
Make & Model SPOT Gen3
Weight 4 ounces with batteries
Size 3.5×1 inches
Coverage 75-percent global coverage using the Globalstar satellite network
Services – GPS assisted emergency beacon – One-way satellite messaging – Near real-time position tracking via website and mobile app
MSRP $150
Service Plan Required, $150/year minimum
URL www.findmespot.com
Pros:
Excellent battery life
Shockproof and waterproof to 1 meter
Uncomplicated setup and use
Easily available batteries
Can be powered externally
Many options for sharing track info
Cons:
Lack of month-to-month subscription
Inability to change settings offline
USB port cover is easily ripped off
No service in Arctic and Antarctic
Reduced service in some regions of South America, central Africa, western Asia, Russia, and Pacific Ocean
Low power can limit transmission of messages in some locations
You might think the ability to determine if someone is lying only applies to interactions with lawyers, car salesmen, and late-night infomercial hosts. But it’s difficult to imagine that anyone reading this article has never been told a lie. Just go to any nightclub on a Saturday night and you will definitely receive an overdose of bad pickup lines and deceptive statements.
Unfortunately, shouting “Liar, liar, pants on fire!” at someone you suspect of lying to you is not a very effective technique at getting to the truth. And, your chances of running into a wooden puppet named Pinocchio would be slim to none.
So, in this article, we’re delving into how you can get complete and accurate information to help you or your loved ones survive when SHTF. While you won’t turn into living lie detectors like Colombo or Daredevil, you can read on to find out how to improve your B.S. meter.
Physiology of Lying
As with most things within the behavioral sciences arena, there has been an ongoing battle regarding the validity of people as human lie detectors. Researchers have even gotten to the point where they discuss what are called micro-expressions, which are so small that they need to be evaluated on specialized computers. For this article we’re going to stick with those movements, gestures, postures, and statements that might indicate that someone is lying to you or, in the least, attempting to be deceptive. It’s going to be your responsibility to determine which one or combination of the lie indicators works best for you.
When you’re talking to someone, whether at a party, casual meeting, date, or business, there’s typically one clue that holds true in the majority of those situations. We tend not to look other people directly in the eyes for any length of time other than checking for fake eyelashes or plastic surgery. Unfortunately, we spend very little time evaluating the statements of another person by carefully analyzing their facial expressions.
Though most people get uncomfortable after a few seconds, sustained eye contact is vital to detecting deception in others.
Many scientists have stated that the eyes are the key to emotions. Your eyes may actually be one of the most expressive organ systems in the entire body. Unfortunately, most people are very uncomfortable maintaining eye contact for longer than two to three seconds. In attempting to become a human lie detector, you need to travel into the realm of behaviors that could cause you slight discomfort, but the rewards may pay significant dividends. Maintaining eye contact is an essential part of determining if the individual you are assessing is lying. Very seldom do people lie only once. If they have been telling lies of convenience since childhood, the habit is hard to break and can become an automatic response, especially in high-stress situations.
The most important aspect of lie detection is to realize that, unless someone is a professional liar or a pathological liar, there will in most cases be an automatic physiological response. Reactions such as sweating, increased breathing, increased heart rate, eye movements, and vocalization changes due to constriction of the muscles surrounding the larynx are all typical automatic responses associated with an increase in anxiety levels triggered by lying.
Professional liars spend years perfecting their craft of controlling all aspects that could be a tipoff. If an individual’s voice went up one octave every time he or she lied, they would probably not last very long as an individual trying to deceive others on a regular basis. As an example, try to remember back to a time when you may have been called to the principal’s office. Even if you did nothing to warrant the trip, you would still find yourself sweating, fidgeting, and may even have a dry mouth and squeak to your voice. Ask yourself if it’s possible to stop yourself from sweating. Certain unnamed spy agencies teach their operatives how to mentally block any physiological changes generated by anxiety or fear.
Indications of Lying
In the high-stakes world of poker there is a term used to detect if someone is bluffing about their hand and these are called “tells.” This is why in so many high-stakes poker games the competitors are wearing dark sunglasses; so other players can’t detect eye movement. A good poker player is always aware of his hands and fingers, even when they take a drink. What you’re going to be doing is looking for tells in other people.
The Hands: When someone repeatedly covers their mouth or puts their hand near their mouth when speaking, that may indicate the possibility of a lie. Wringing of hands or nervous, sweaty, and clammy hands can be indicators of deception.
The Mouth: Small twitching motions at the corners of the mouth or the upper lip can be a clue of untruthful statements. If someone (the liar) is aware that they experience twitching around the mouth, when stressed or lying, this may cause them to try and cover the behavior with their hand when they speak, even the subtlety of pretending that they are yawning.
The Eyes: Our peepers may be the easiest indicator to detect, since a majority of the movements and behaviors are unconscious. For example, an increase in blinking could possibly indicate untruthfulness. But before you call someone out, ask if he or she has allergies since that could also be the cause of the blinking. There are many studies that purport to show that if you look up to the right or up to the left, you are lying. Unfortunately there isn’t consistency within the scientific field in this particular category.
Hand movement can indicate a lie, such as when someone covers his mouth.
The Twitches: Twitching is a very difficult indicator to quantify. Restless movements may simply be a function of sitting too long, lower back pain, or just being bored. Once again, it’s going to take some detective work on your part to determine if the twitching correlates to a lie. Unlike some of the other clues, twitching may take multiple contacts with the individual over a period of time to decipher.
The Throat: Throat clearing or verbal hesitation is a rather easy indicator of possible deception, unless they have a cold or are a heavy cigarette or cigar smoker. Typically, if an individual knows that he’s about to tell a lie, he might clear his throat in an attempt to modulate his voice, which inadvertently lets you know that a lie is right around the bend.
The Voice: If the voice goes up an octave or two, or the basic timbre of the voice changes, this may be a good clue that the stress of telling a lie is causing muscles to tighten in the throat and thereby constricting the vocal cords. You need to listen carefully to not only the words, but also what happens to the voice.
The Words: Sentence structure and content can, at times, be good indicators of deception. A liar might try too hard to convince you that their statements are truthful. Shakespeare hit it out of the park in Hamlet when Queen Gertrude, Hamlet’s mother states, “The lady doth protest too much, methinks.” If someone keeps repeating a statement more than a few times, methinks you should seriously evaluate what is being said. Consider saying to the individual, “Let me think about that and I’ll get back to you later.” If they become upset and keep pushing, you might have your answer right there.
Learning to Be a Human Lie Detector
Unless you wield Wonder Woman’s Lasso of Truth, there is no magic tool to learning how to detect deception. You have to develop the skills of observing, listening, and evaluating what people are telling you. This will require you to maintain eye contact, focus on their verbal content, and most importantly, be aware of what is happening to the individual physiologically and verbally when they do attempt to lie.
This is not a skill that is gained in one or two conversations. It’s going to require an effort on your part, but it can also reap significant rewards. Here is the five L’s to get started:
Look the person directly in his or her eyes when you first meet and maintain a minimum of 70-percent eye contact throughout the interaction.
Listen to the tone and timbre of their voice.
Look for extra body movements, especially if they are repetitive.
Live in the moment. Don’t get caught daydreaming.
Leave if all the warning signs go off.
Here are some real life examples: Mandy Miller from Miami went to a specialty store to buy a long-term supply of food for her household. Always preparation-minded, she carefully checked the expiration dates on the outside of the box, which was within the appropriate dates. Normally she would not have opened the carton when she got home, but “something told me that I should open it and found out that everything would expire in two months.” Mandy went back to the store for a refund and thought it strange that the storeowner could not look her in the eye when she complained about the expiration date. Evidently the seller had switched boxes.
Bill Norling from Scottsdale, Arizona, had been looking for an older Jeep to use if SHTF. He liked a particular vehicle and was going to buy it with cash. He noticed that the seller became very hurried and pushed to close the deal even before Bill had fully inspected the car. The seller had begun to sweat and could not stand still. He said that he had to get home to his daughter’s birthday and could not be late. Bill realized something was not right and told the seller that he was going to “sleep on it.” The seller then dropped the price another $200, but Bill left. While inspecting the Jeep, Bill had written down the VIN number. The next day he went to the Department of Motor Vehicles and found that the Jeep had been stolen in New Mexico.
So here’s the deal: If you want to be a human lie detector, you’re going to have to work at it. Although it would be nice if we had superhuman hearing like Daredevil and could detect rapid heart rate when someone wasn’t telling the truth, the truth is you’ll need to practice just like any other worthwhile skill, such as fire-starting or navigation. This doesn’t mean that while talking to someone at a party you should be staring at them like a creeper, but it does mean that you need to develop awareness of not only what the person is telling you, but how they are telling it to you.
Lastly, bring intuition into play. When you can factor in your intuition with your observations, your ability to detect lies and deceptions will be significantly enhanced. If your intuition tells you that something is wrong in the individual’s presentation, then it would be a good idea to bring into play your skills of observation.
Ask Dr.O
Do you have your own methods of determining if someone is lying? Want to find more resources or learn more about this topic? Do you have an idea for a column on the psychology and physiology of survival or self-defense? Email Dr. Neal H. Olshan at mindsetdoc@gmail.com.
About the Author
Dr. Neal H. Olshan is the developer of Evolution of Mindset and is a consulting psychologist for corporations and the sports industry for athletic improvement through the use of the Mindset program. He is also a pilot, an award-winning photographer, an author of both fiction and nonfiction books, and the chief combat psychologist for LMS Defense.
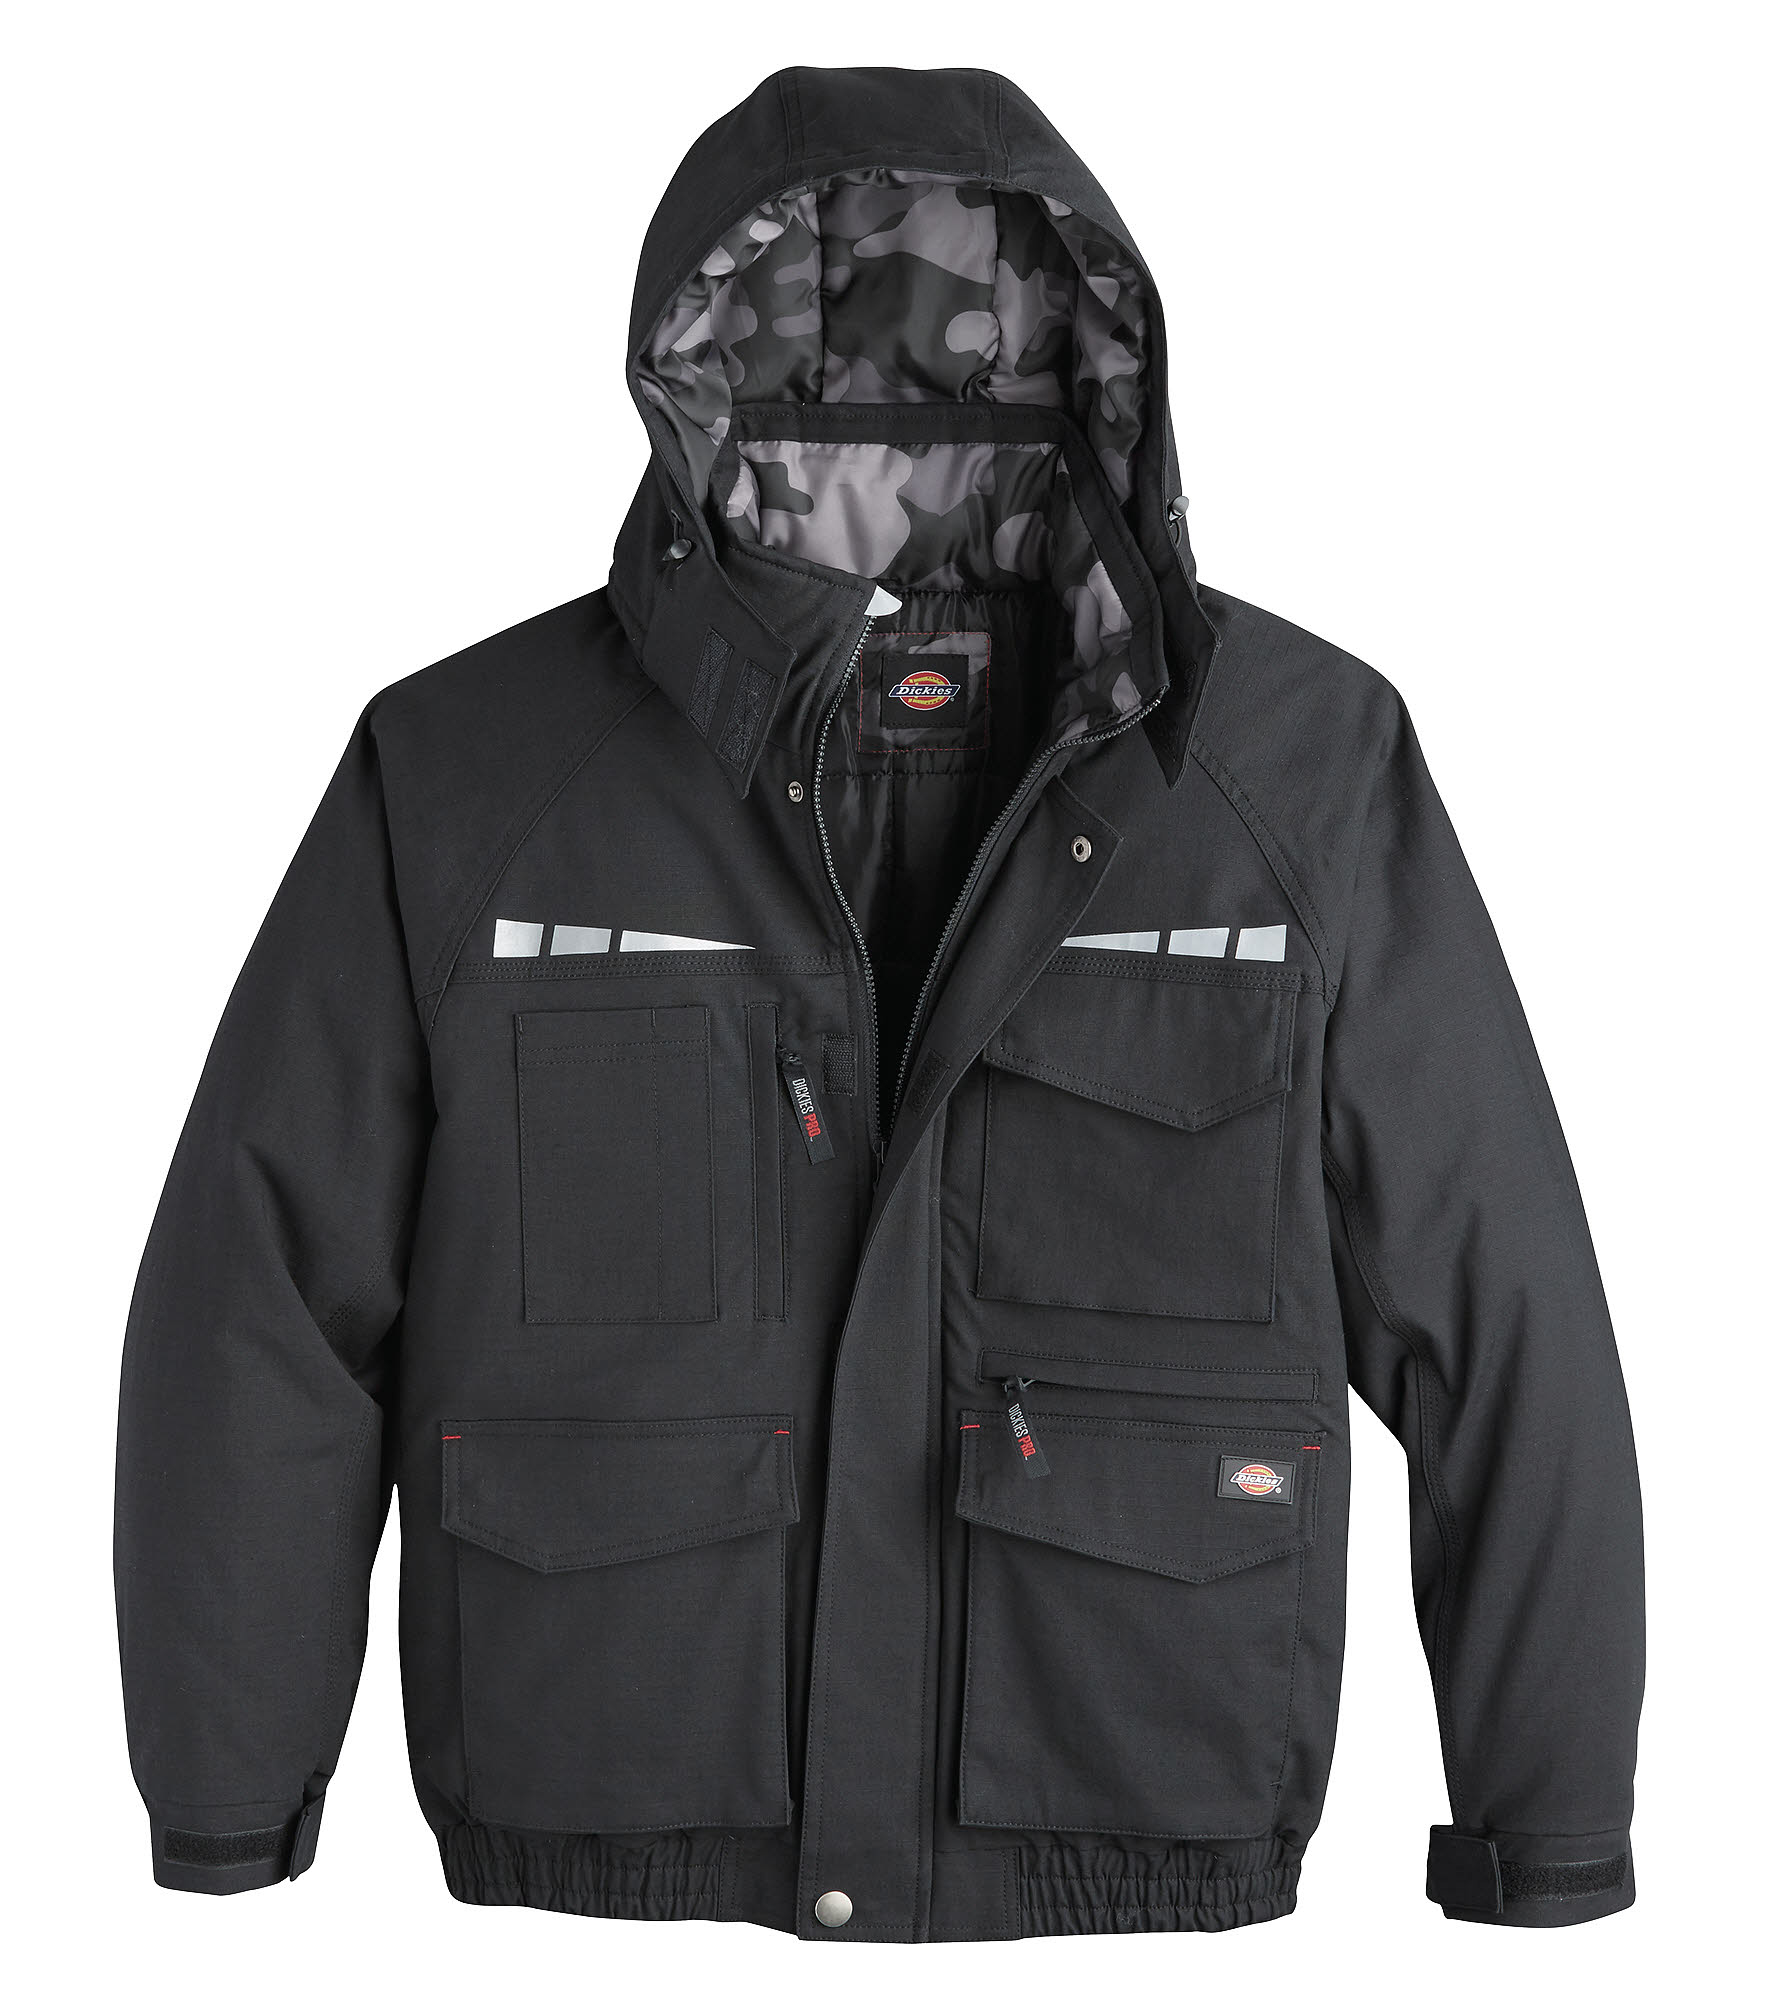
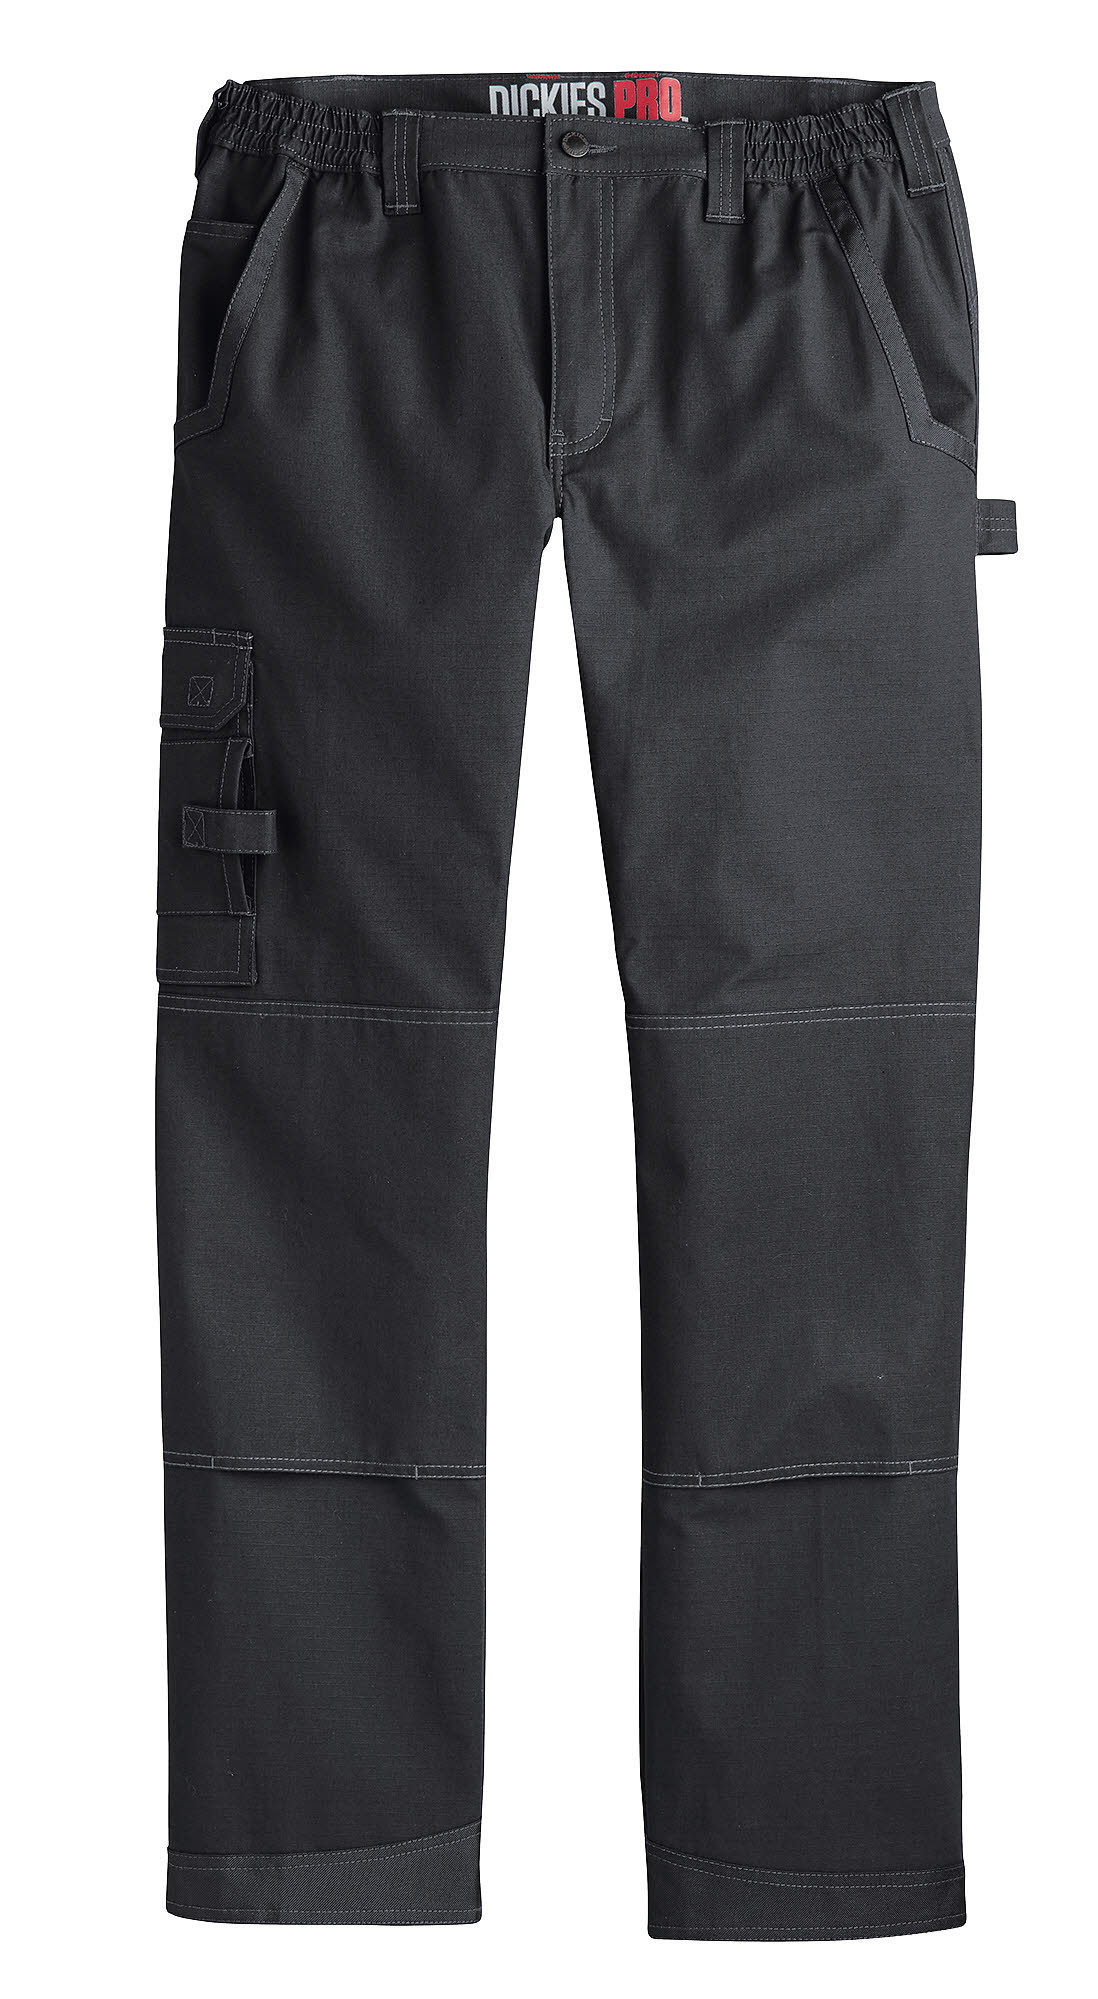
Whether you’re working a shift on a construction site or trying to stay alive in an emergency scenario, dependable gear matters. In either case, few items are more essential than the clothes on your back, since they insulate you from the cold and the rain, and protect you from cuts and scrapes. Dickies is one of the leading providers of work wear in America because the company understands the importance of durable clothing in hard-use settings.
Dickies recently announced a new development that should provide even tougher apparel. Military-grade Invista Cordura fabric will now be used in its Dickies Pro apparel line.
Cordura is often found on military gear and high-end backpacks due to its abrasion-resistance and light weight. In fact, Dickies says the new patent-pending T420HT Cordura nylon/cotton fabric is six times more abrasion-resistant than comparable cotton/polyester fabric. A small amount of FLEX spandex is also included in the fabric to aid flexibility.
The Dickies Pro with Cordura line consists of three new pieces of apparel:
The Field Coat features Thinsulate DWR (durable water-repellent) insulation, plus a variety of pockets for carrying essential gear. Reflective accents aid visibility in low-light conditions.
The Bomber Jacket has a removable insulated hood, headphone stabilizer bungee cord, and adjustable tab cuffs to seal in warmth.
The Ripstop Pants have reinforced stress points and FLEX fabric for durable mobility. Cargo pockets add versatile storage space, and double knees can accommodate knee pads for job-site use.
Dickies announced the new Pro with Cordura line at the 2017 Outdoor Retailer Winter Market show, and says these items will be available for purchase in Fall 2017. For more info, keep an eye on Dickies.com.
Consider the tools you use every single day. Most of us would say items like a knife, scissors, a flashlight, or a screwdriver. However, there’s another category of tool which we all use many times each day, but often overlook due to its ubiquity. You’ll find them in every home, office, hospital, and restaurant. They’re known as utensils, and if you’ve ever tried to cook or eat a meal without them, you’ll understand their importance.
Finding utensils in urban areas shouldn’t be too difficult — plastic spoons and forks are plentiful in every fast-food joint. But, in a wilderness survival situation, they’ll be a bit harder to come by. It’s wise to carry a small metal spork in your mess kit, but it’s also a good idea to know how to craft backup utensils. It’s possible to get by without a fork, but a spoon is especially important for eating soups and stews, or for stirring and tasting items as you cook them.
The process starts with a straight tree branch or sapling, with its bark shaved off.
In the following video from David’s Passage on YouTube, the host shows a technique for making a bushcraft spoon without special tools. Many other YouTube videos show how to make a wooden spoon with a curved spoon knife, but if you already own and carry a spoon knife it seems likely that you A) should know how to make a spoon and B) should probably have ditched the spoon knife and carried an actual spoon instead. So, this technique is more practical for a real outdoor survival scenario.
Obviously, it’s going to take some patience to carve a spoon this way, but it’s also a rewarding process. In addition to creating a useful tool, carving projects like this can keep your mind occupied and focused during a survival situation.