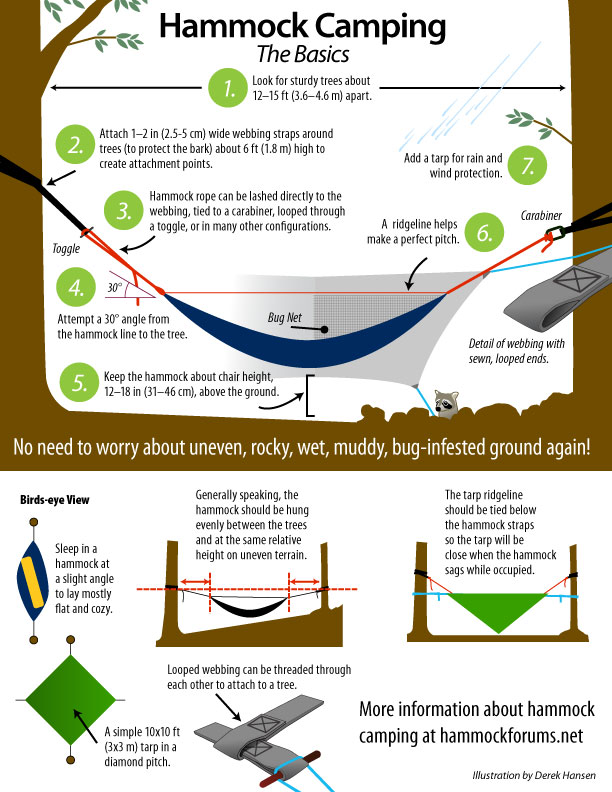
In This Article
If the city comes crumbling down around you and you have no choice but to bug out, what kind of vehicle would you choose to get out of town in? It sounds like a simple question, but reality makes it a lot tougher to answer than we'd like it to be.
Ask 10 people this question, and you're bound to get at least 10 different answers. Some might say an old carbureted truck, others swear by diesel power, yet others still would ride off on a motorcycle. Then there are those who would reach for their paddles instead. Because everyone's situation and needs are different, there's no one-size-fits-all answer. What type of area you live in and the number of people in your household are just two in a long list of variables that determine what type of transportation you end up selecting.
For Mike Shin, choosing his daily driver (and just-in-case bug-out truck) was dictated by several factors. After a couple of outings over a few dirt trails in his previous ride, a two-wheel drive Nissan Xterra, Shin quickly realized that he needed a ride swap if he were to drive more aggressive routes. While the Xterra was great to run errands around town, it was not suited for the unpaved regions of the mountains and deserts of Southern California — the very areas he might need to bug out to one day.
Make and Model
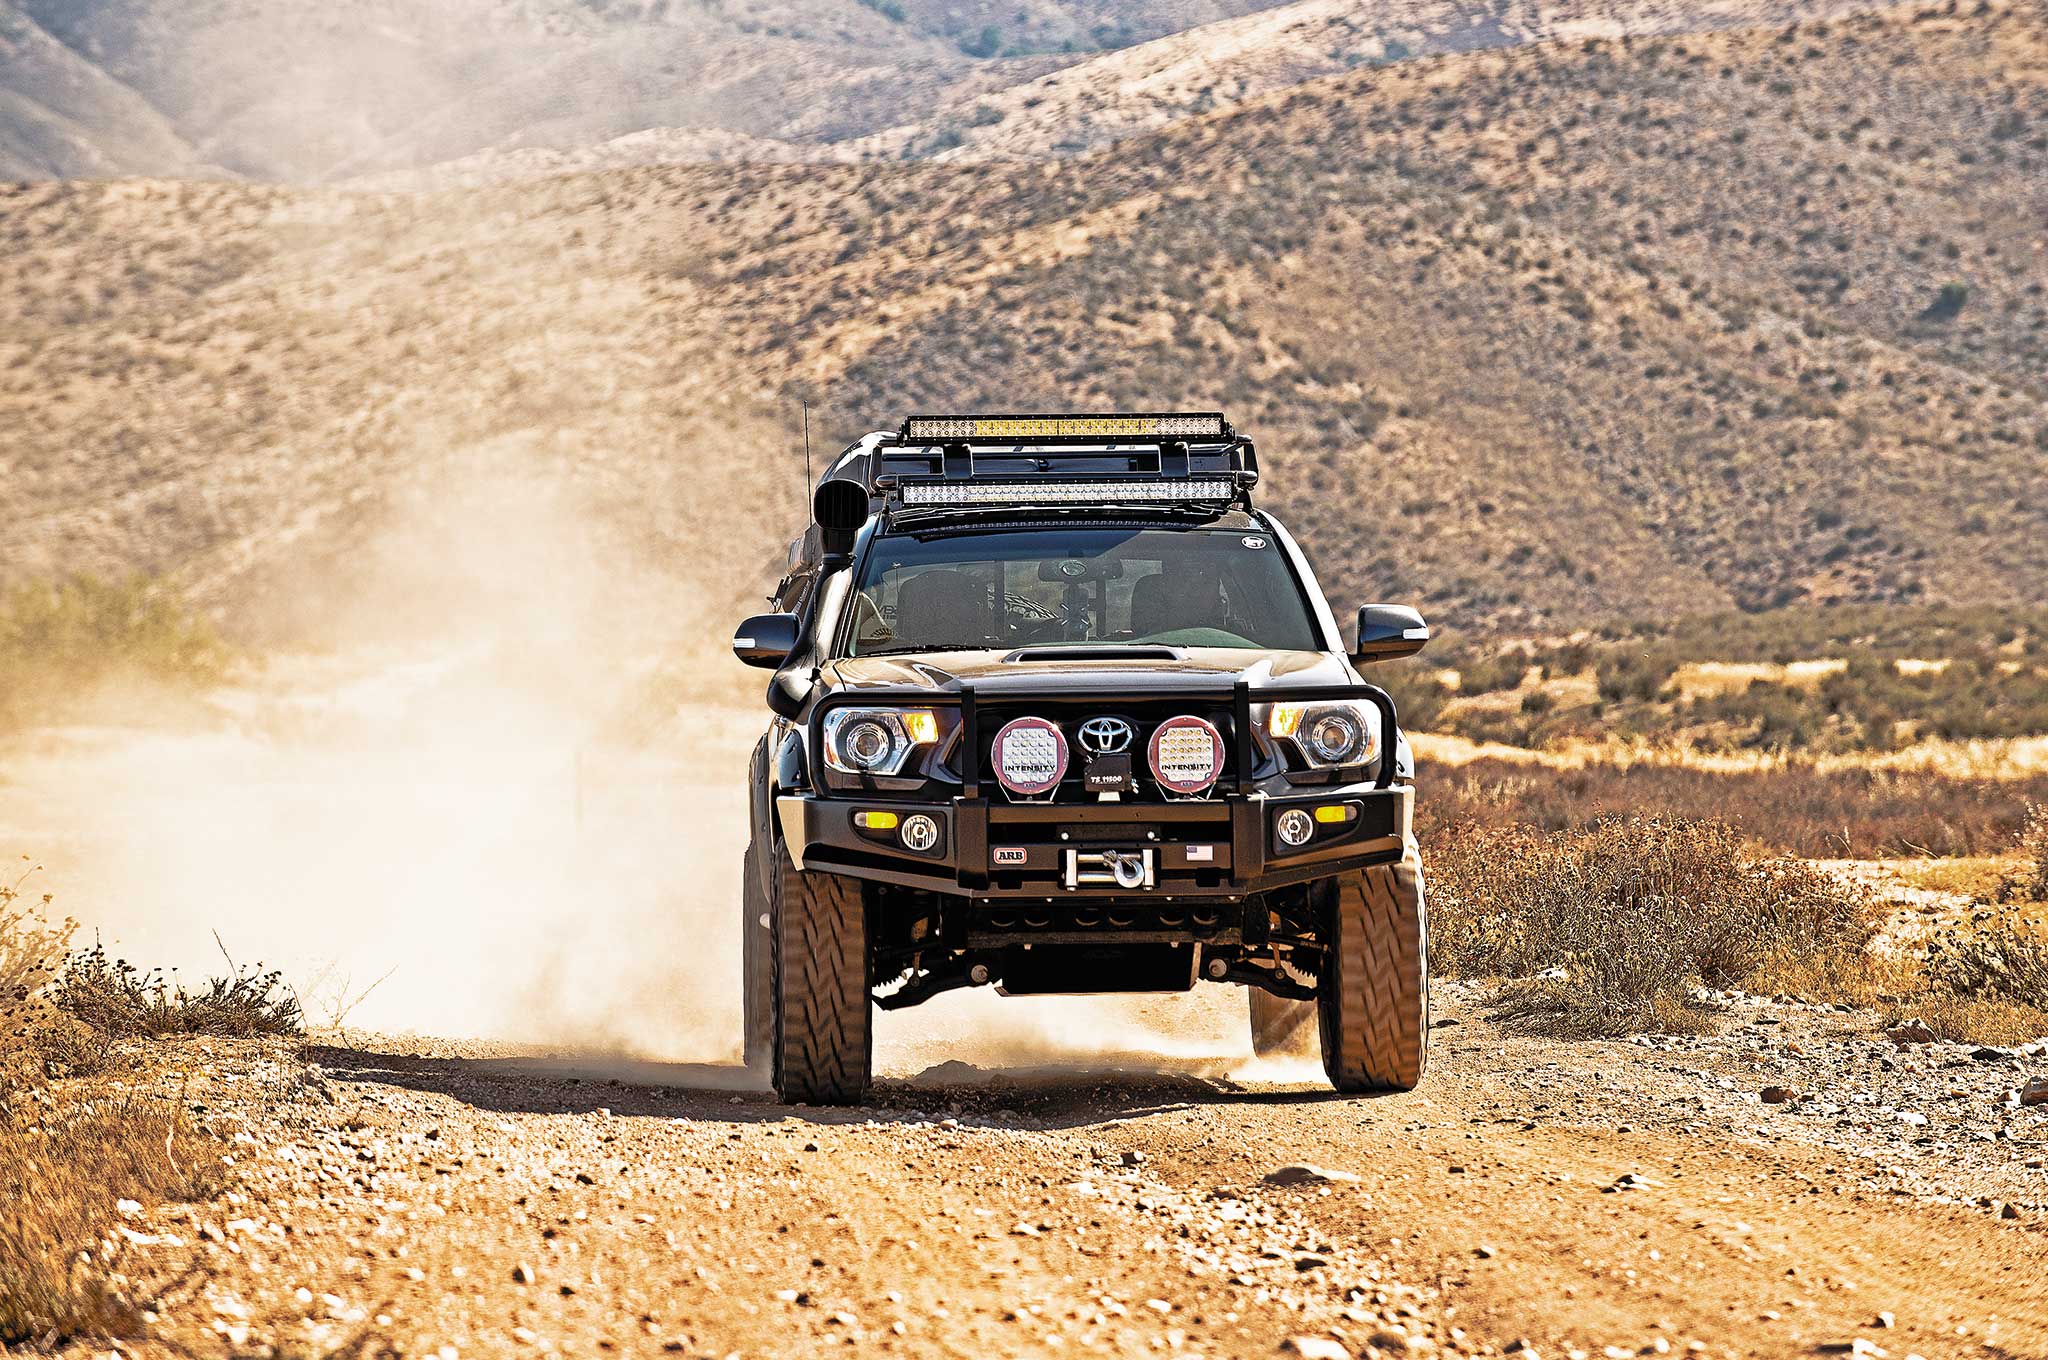
Shin drew inspiration from go-anywhere Australian Outback-style 4x4s. One of his dream trucks was the venerable Toyota Land Cruiser Hardtop 150. He considered traveling to his wife's home country of Guatemala to drive one back, but soon realized that the logistics and legalities of owning such a vehicle in the United States was more work than he was willing to take on. Instead, he looked at more readily available stateside options. Shin quickly discovered the 2013 Toyota Tacoma Double Cab 4×4 TRD Sport Package and figured it would more than meet his requirements.
From Show to Go
The ball really got moving when Shin, a former employee at Toyo Tires, got the call to display his truck at the Toyo Tires booth at the 2013 Specialty Equipment Market Association (SEMA) Show being held in Las Vegas, Nevada, with the caveat that he build a show- and off-road-worthy truck out of his Tacoma in less than three months' time — and on his own dime. Considering the time and budget concerns, it was far from certain that he would be able to pull this endeavor off. Even so, he was up to the challenge.
An ARB Deluxe Bull Bar replaces the factory front bumper. The All Pro Off-Road Front IFS Skid Plate was added to armor...
Engine
Its 1GR-FE model V-6 engine displaces 4 liters and runs on regular-grade fuel. That's good enough to churn out a factory-rated 236 horsepower and 266 lb-ft of torque. To help it breathe easier, an Australian-made Airflow Cold Air Induction System (ACAIS) snorkel was installed to force in air that is free of water and other contaminants. According to Airflow, the high positioning of the ACAIS' snorkel air inlet also allows for cleaner, colder air to be driven into the engine's induction system. Colder air contains more oxygen, helping to improve fuel efficiency and power.
To keep the entire system free flowing, Shin coupled the ACAIS with a custom-fitted MagnaFlow Race Series exhaust system. The fully stainless-steel cat-back exhaust system optimizes exhaust flow and is mounted just behind the factory catalytic converter. We noticed that it also gives the truck a refined yet throaty sound.
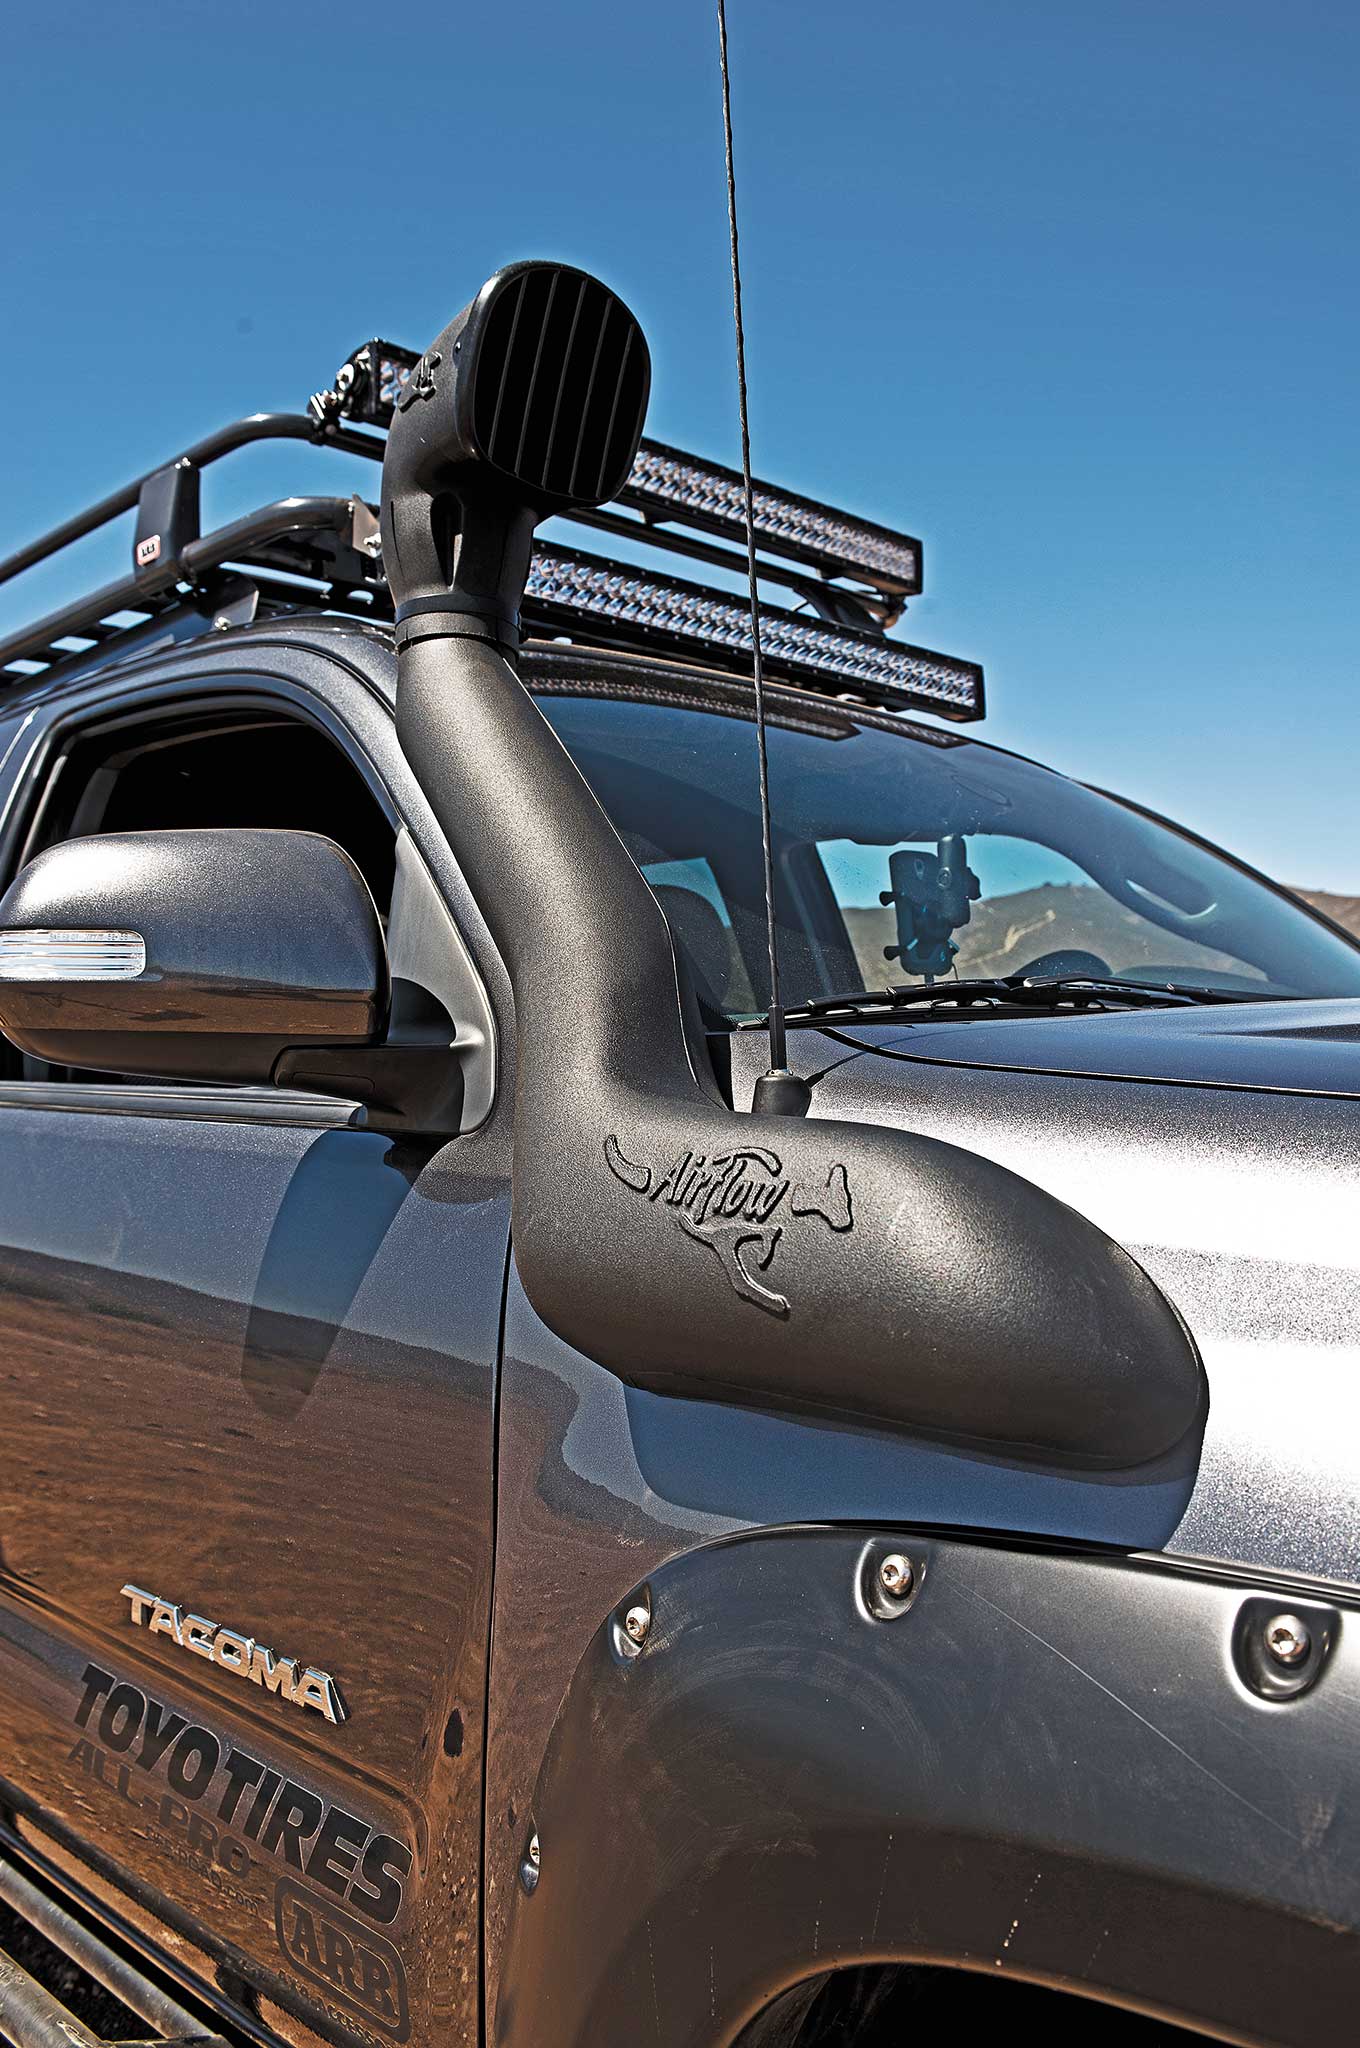
The high positioning of the ACAIS snorkel air inlet allows for cleaner, colder air to be driven into the engine's...
Suspension
The Tacoma was lifted 2 inches for additional ground clearance to get over natural and manmade obstructions. Shin opted for an Old Man Emu Lift Kit for the front that consisted of sets of Nitrocharger shock absorbers and coil springs. He matched the rearend with Old Man Emu Dakar Leaf Springs and shocks, as well. These suspension upgrades not only improve the ride, handling, and load-carrying capability of a heavily laden truck, but also decreases the chance of suspension-component failure. Because of the 2-inch height increase, an Old Man Emu Driveshaft Spacer kit was installed to reduce driveline vibration common to lifts on Tacomas of this type.
Shin further beefed up the frontend by installing a set of ReadyLIFT Off-Road Upper Control Arms. These arms are stronger than stock and feature zerk fittings that make re-greasing its urethane bushings a breeze. Because the wheel and tire combination he's running is heavier than stock, he went with ReadyLIFT's Off-Road Heavy Duty Steering Kit to avoid possible parts breakage down the road. The kit consists of heavy-duty aftermarket tie-rod assemblies that are suited for lifted trucks running larger tires.

ReadyLIFT's Off-Road Heavy Duty Steering Kit consists of heavy-duty aftermarket tie-rod assemblies that are...
Differentials
This Toyota drives power to all four wheels with aftermarket ratio ring-and-pinion gears made by Nitro Gear and Axle, that are encased in the factory 8-inch front and 8.4-inch rear clamshell IFS differential housings. The stock 3.72 gear ratio is better suited for economy and the truck's standard 30-inch tires, but it doesn't cut it with the larger wheels and tires that Shin went with. Due to the increase in rolling mass of larger 33-inch tires, both power and fuel economy are lost with the factory setup. The new ring and pinion by Nitro Gear and Axle “lower” the ratio to 4.56, which better compensates for the larger tires.
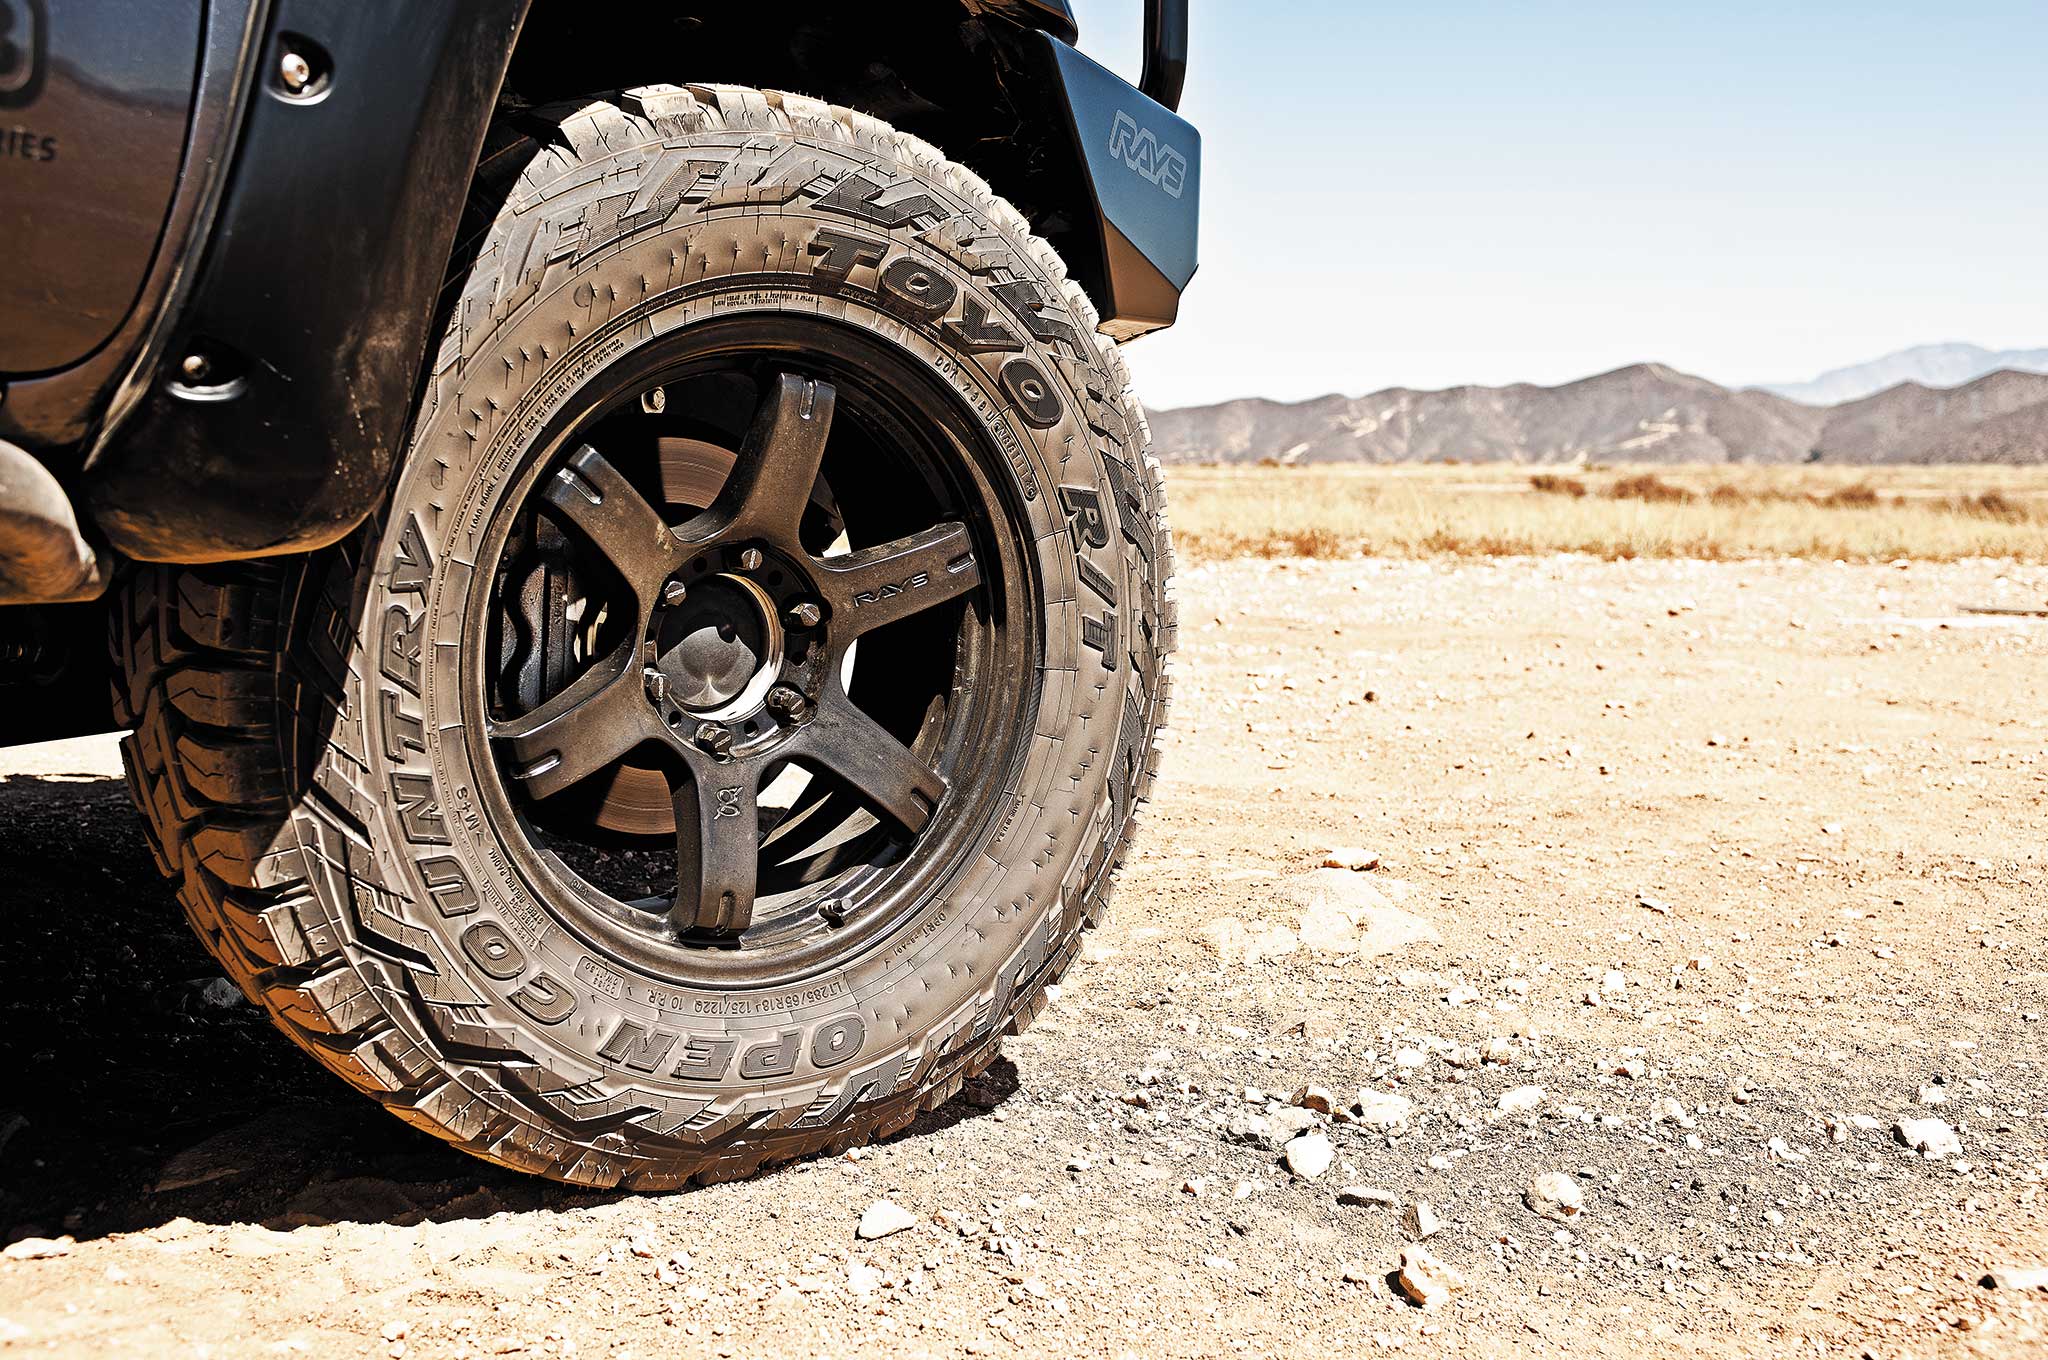
Rays Gram Lights 57JX6 rims in 18×8-inch sizing are mounted with Toyo Tires' all-new Open Country R/Ts.
Body Armor
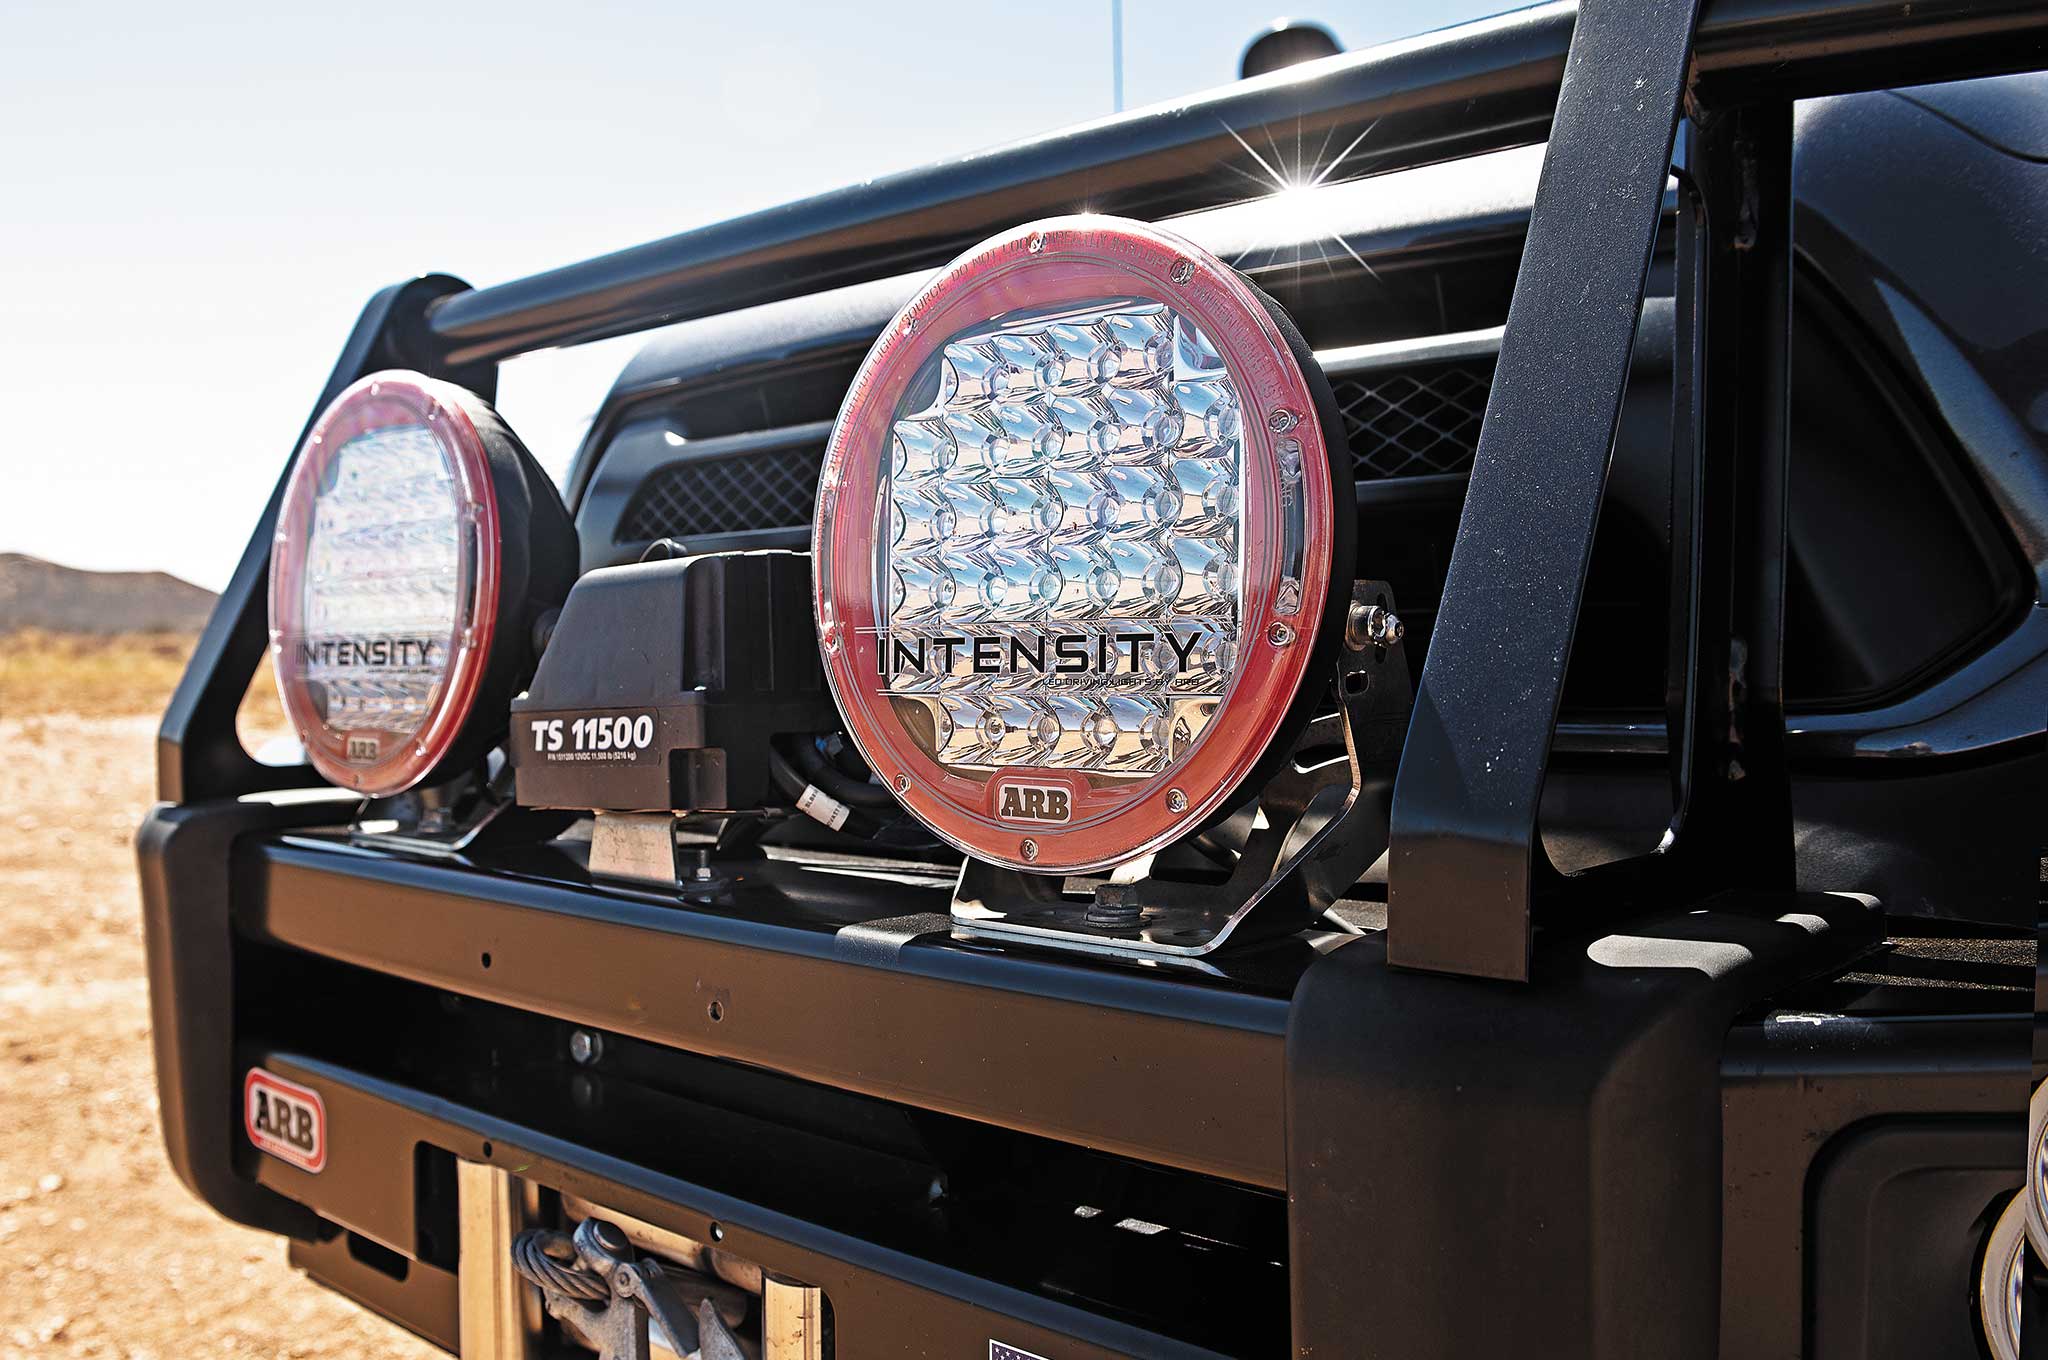
To protect the truck's body and better increase approach and departure angles, Shin added some heavy-duty truck armor. Up front an ARB Deluxe Bull Bar replaces the factory front bumper. Stronger and capable of mounting a winch and several lights, the ARB bumper has become ubiquitous in the off-road world and is available for many makes and models of trucks.
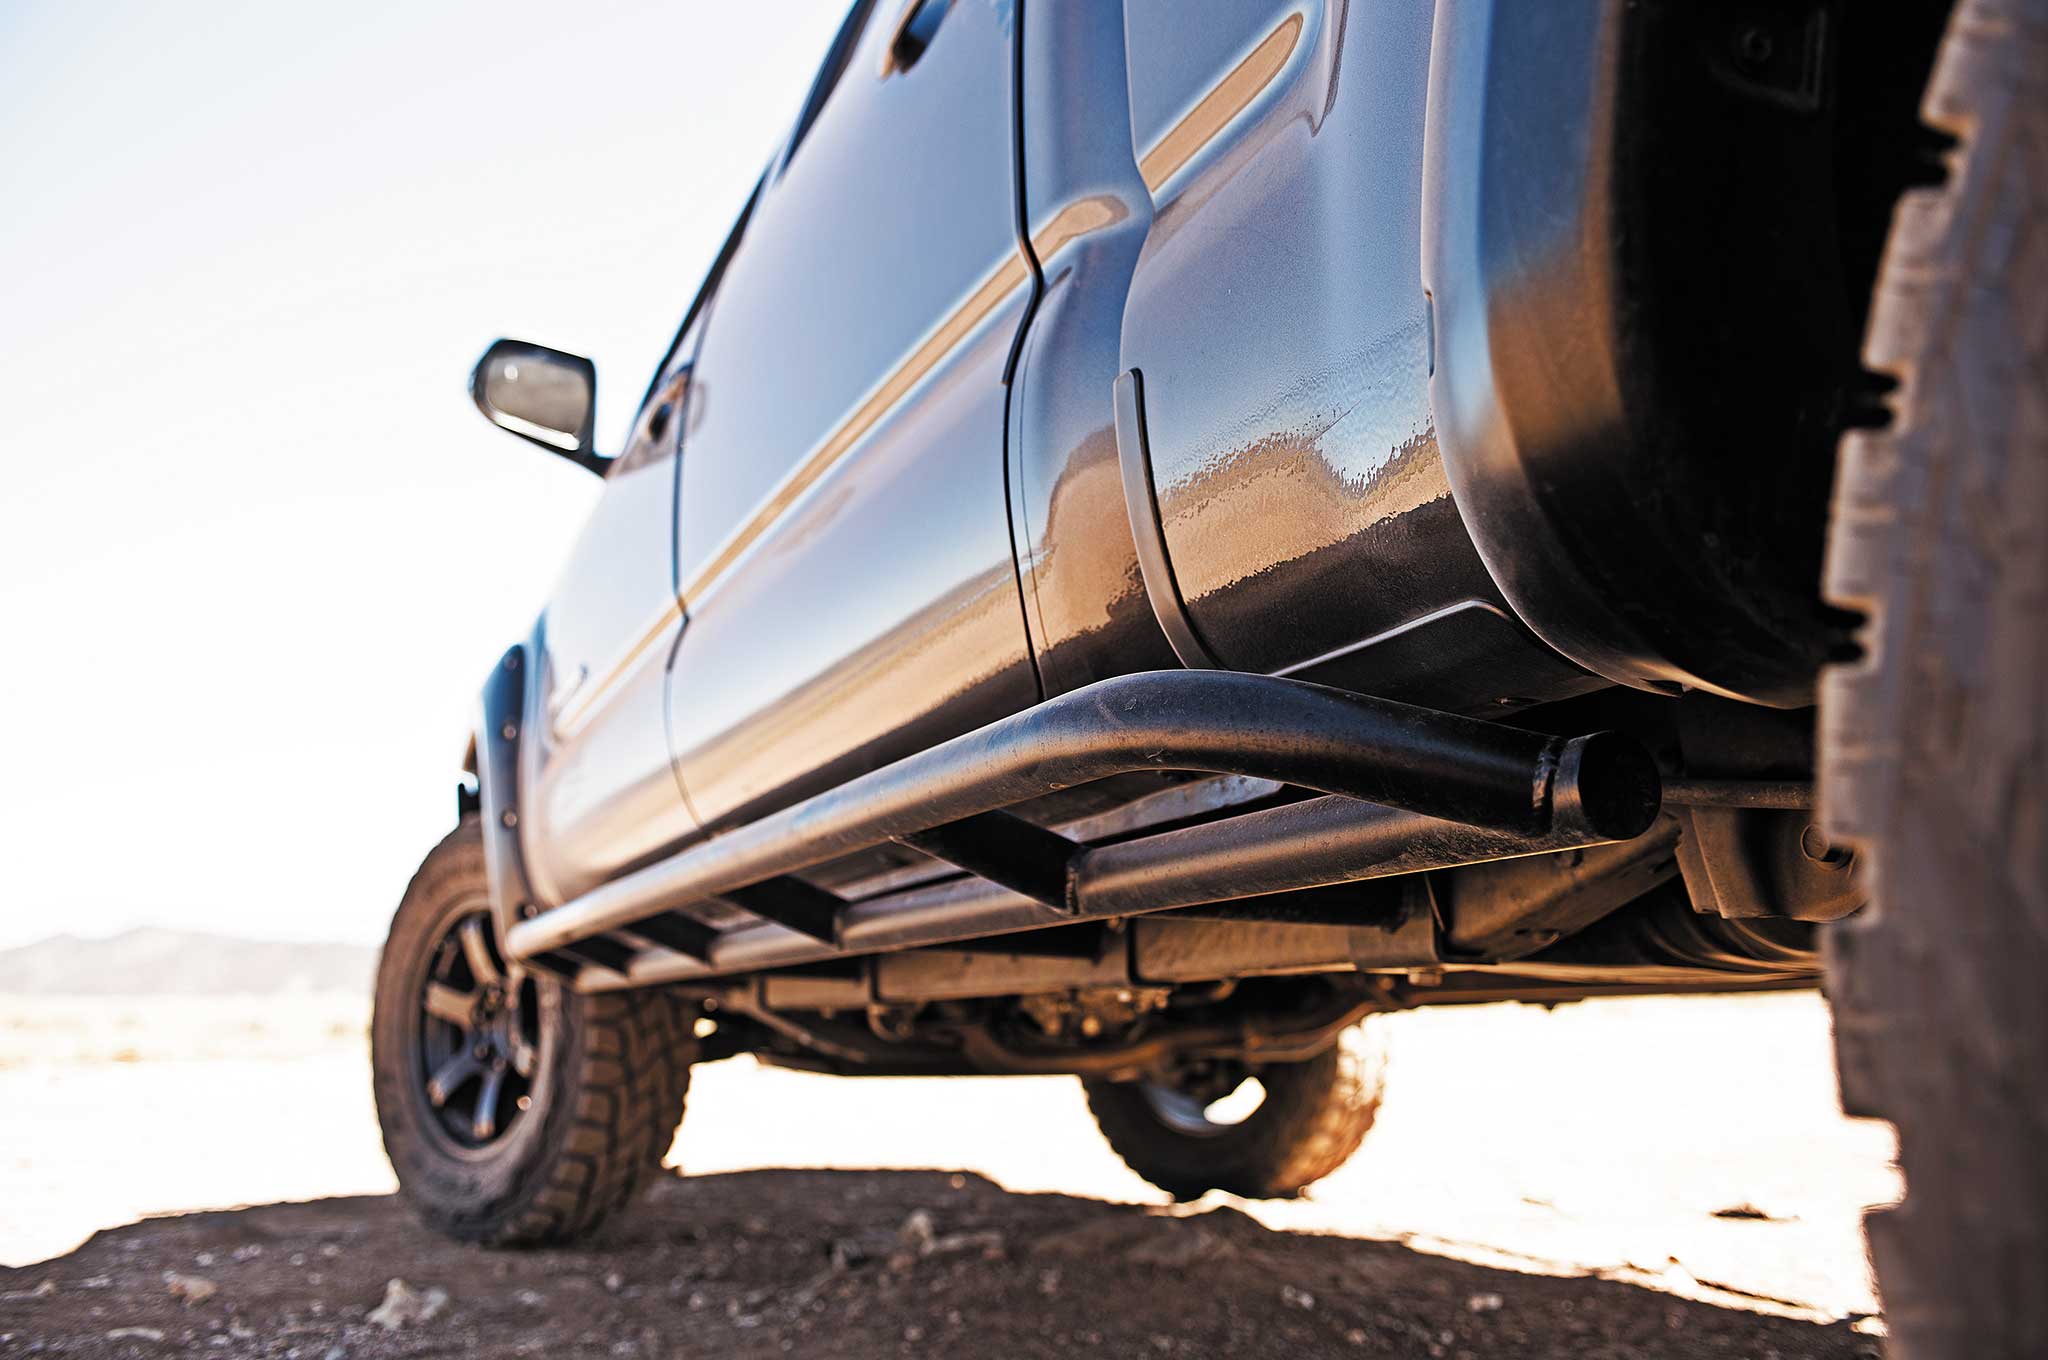
CBI Off-Road Rock Sliders help protect the doors and doorsills from impact with obstacles.
Underneath, a laser-cut 3/16-inch steel All Pro Off-Road Front IFS Skidplate was added to armor up the vulnerable IFS third member and steering components. Running along the bottom of the truck body between the front and rear wheels are CBI Off-Road Rock Sliders. These rock sliders help protect the doors and doorsills from impact with obstacles (fallen tree branches, boulders, etc.) and keep the body in pristine shape even if the sliders themselves are bumped.
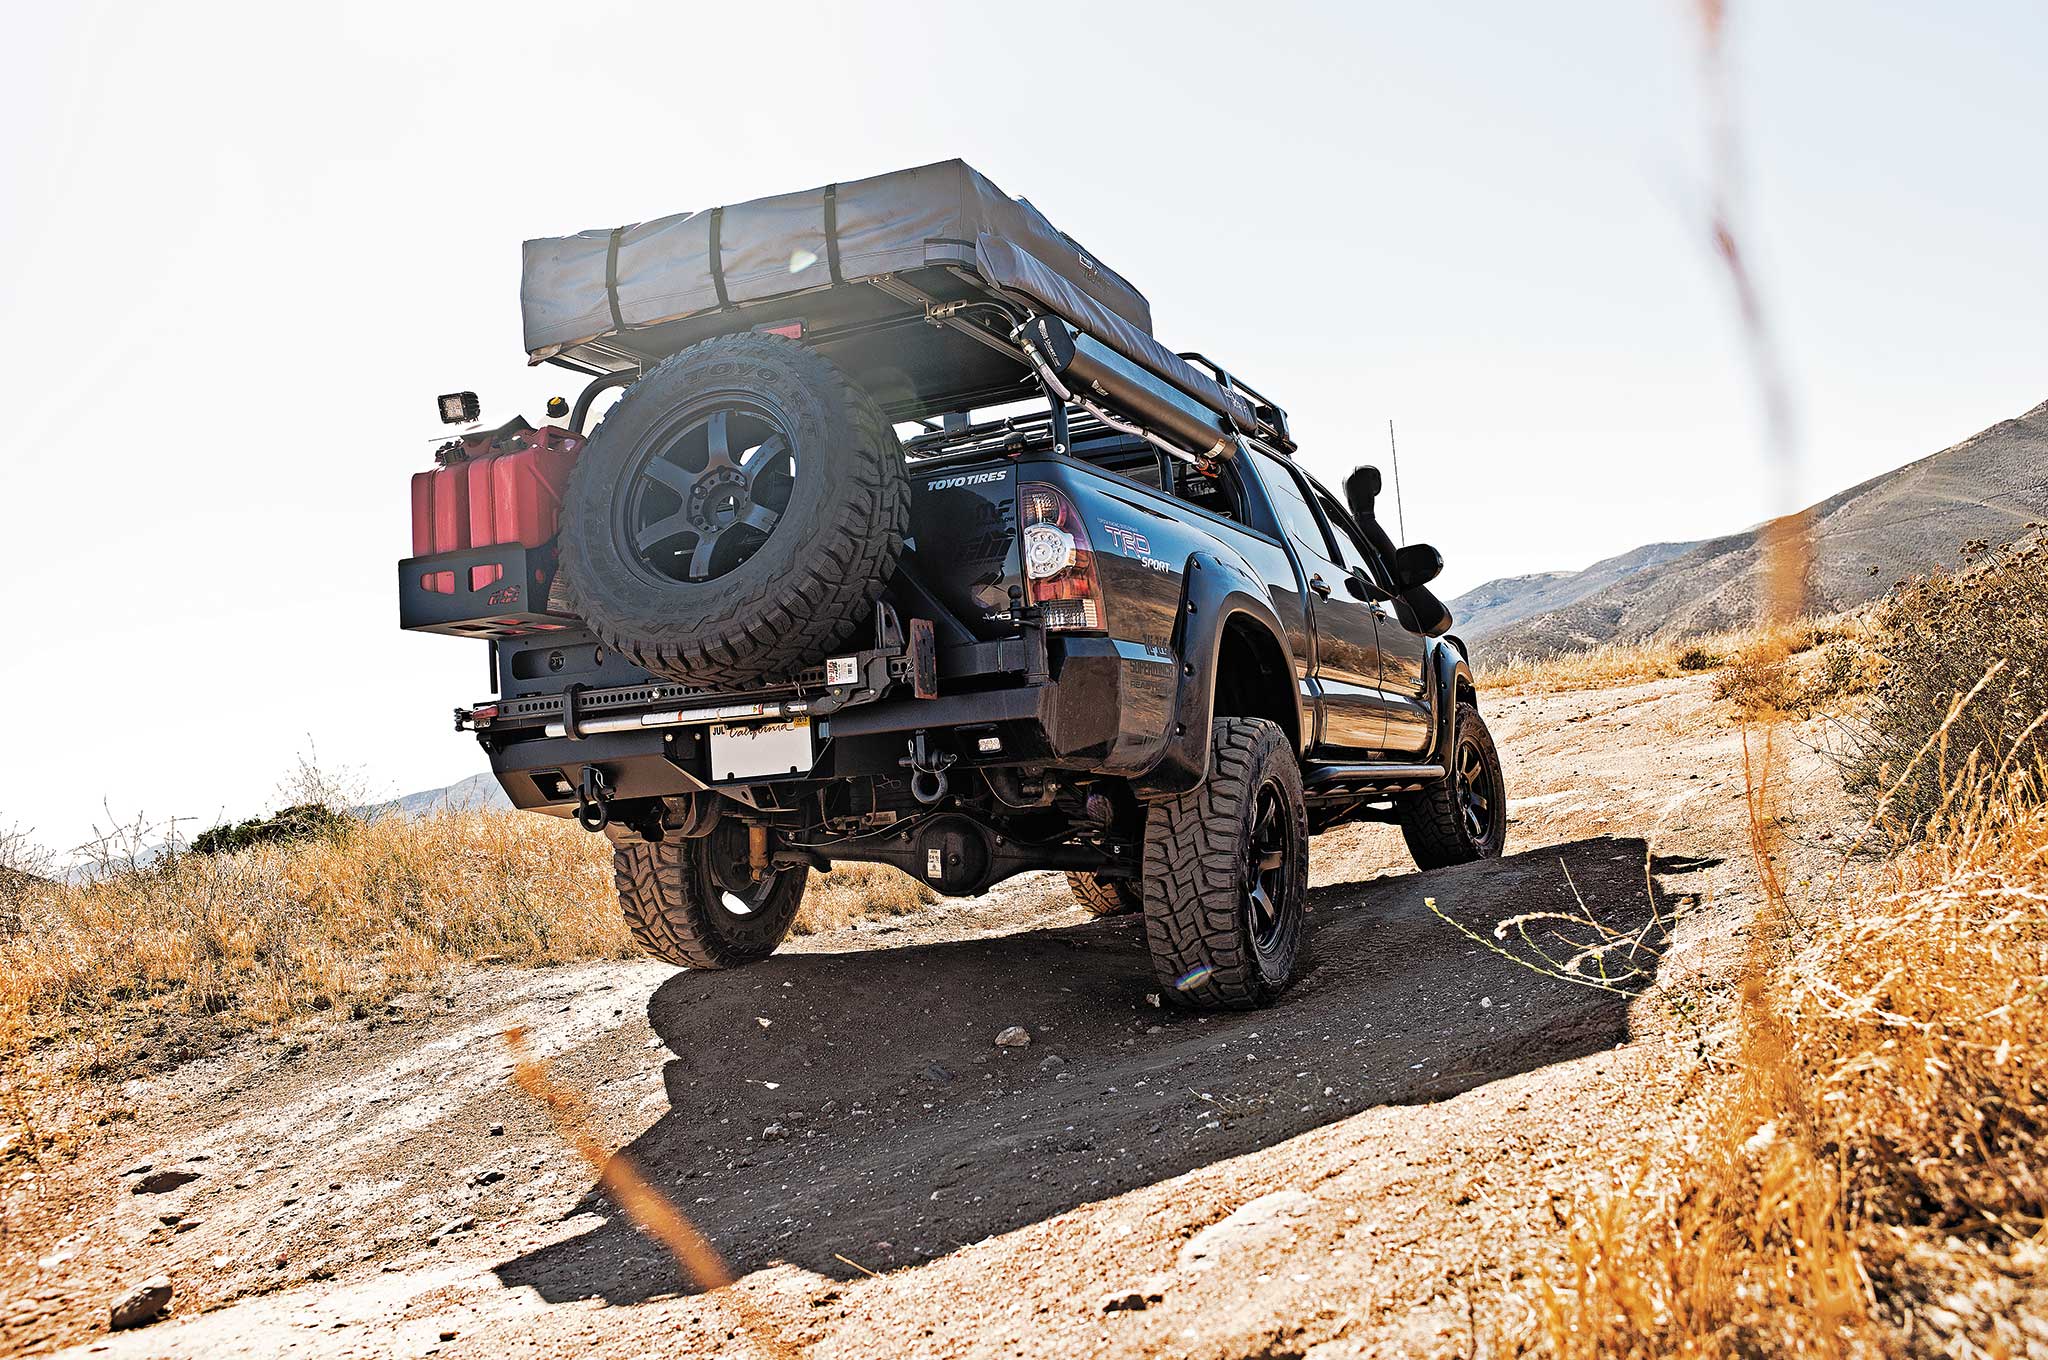
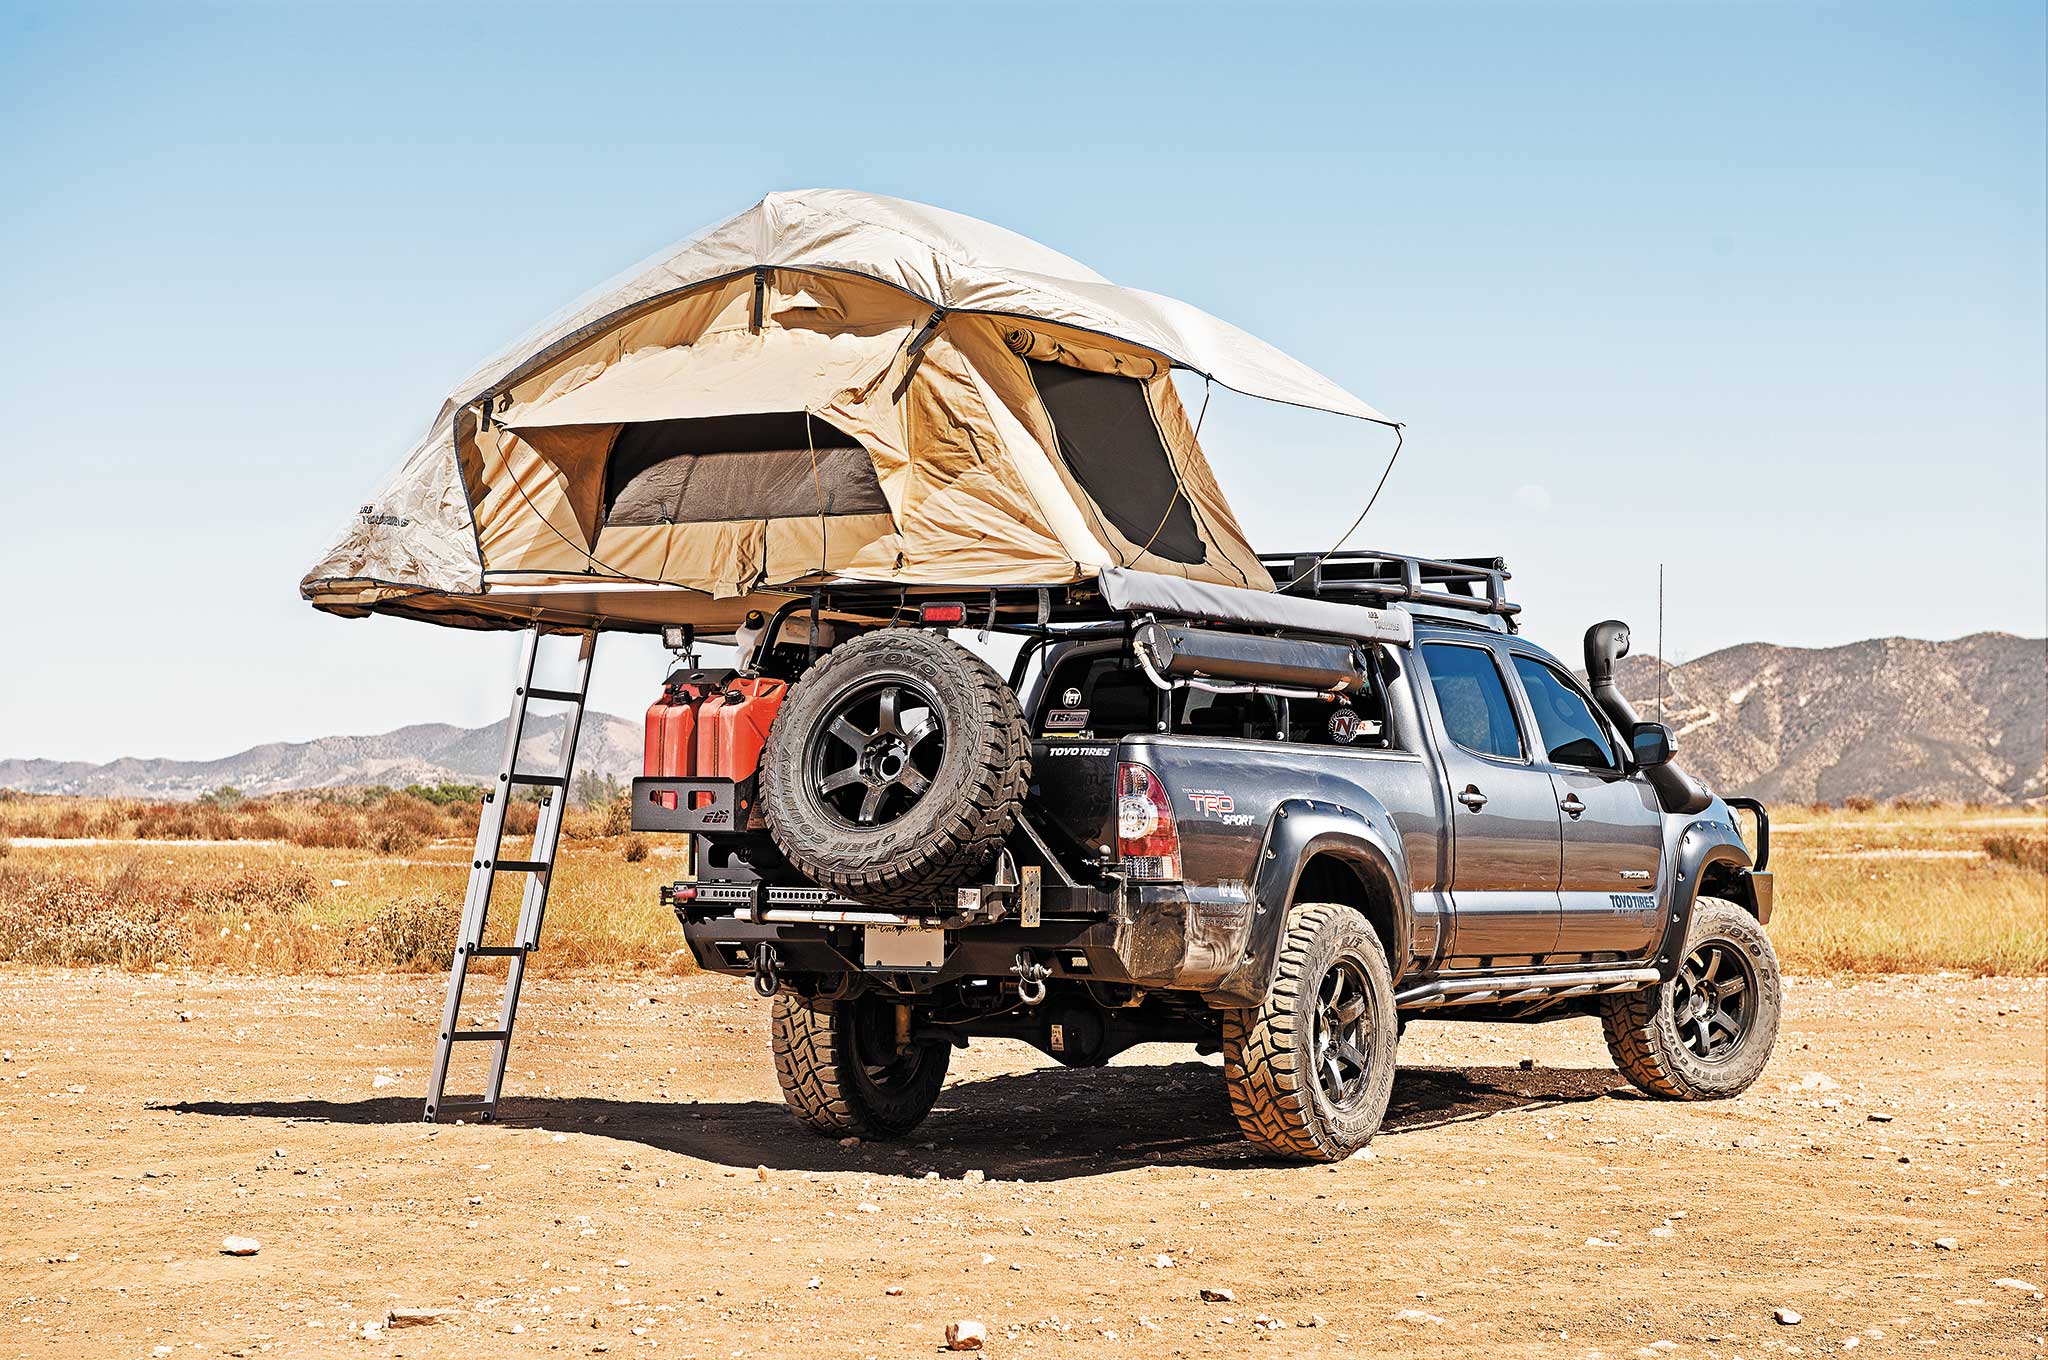
A CBI Off-Road Trail Rider 2.0 bumper with swing-away tire carrier protects the rear end. Tucked below the spare tire...
A CBI Off-Road Trail Rider 2.0 bumper protects the rear. Because having extra fuel on hand is a bug-out essential, it's fitted with two 5-gallon Jerry Can fuel carriers and a spare wheel and tire. The tire carrier swings away, allowing for easy access to the tailgate and bed. It even conceals a fold-down camp table further increasing its usability. The bumper's higher undercut allows for the truck to clear steeper departure angles that the stock bumper can't.
Storage and Gear
Storage is always at a premium whether you're packing for a camping trip or trying to haul you, your loved ones, and your gear out of a bad situation. Shin wanted to maximize the organizational space of his truck bed with the use of a bed rack.
The All Pro-Off Road Expedition Series Pack Rack helped him do just that all without compromising the hauling capacity of the truck's bed. The Rack Pack allows him to carry an ARB Series III Simpson Roof Top Tent up top that comfortably sleeps two adults and an ARB Awning 2000 that deploys to the side, providing about 53 square feet of overhead coverage from the elements.
Keeping clean is a real morale booster — imagine being able to take a warm shower when bugging out. A Road Shower sits on the side of the rack and holds 5 gallons of water, heats up in the sun, and works by either having gravity push water out of its 55-inch length hose or alternatively, the tank can be pressurized with an air compressor or bike tire pump to provide a more powerful jet of water.
The All Pro-Off Road Expedition Series Pack Rack bed rack helps create organized storage space over the truck bed...
On the opposite side of the Pack Rack sits a Rotopax 2-gallon water container and a Rotopax First Aid+Preparedness Kit. The efficient kit contains everything from medical supplies and a shovel to toilet paper and zip ties.
To add even more storage area, Shin custom-mounted an ARB 52×44-inch Steel Roof Rack Basket above the truck's cab using a fitment kit made for a Toyota Hilux. The roof rack basket allows for gear and other supplies to be stored as well as a high position for roof rack lights to be mounted.
Lighting
For better forward view in low light and blacked-out moonless nights, Shin decked his truck out with a wide range of lighting options. He went to The Retrofit Source (TRS) for a set of OEM-quality Morimoto FX-R Bi-Xenon HID projectors to retrofit his stock halogen lights. The reason for going with an HID retrofit is to improve light quality, as the factory halogens are generally pretty dim, especially when in off-road environments. The problem with sticking any cheap aftermarket HIDs in existing halogen housings is that they typically cast an uncontrolled beam pattern due to higher light output. This ends up blinding other drivers while giving the user only mediocre visibility.
Opting for OEM-quality HIDs results in a piercing beam that is controlled and distributed with a crisp and focused cut-off beam pattern, delivering maximum visibility to the driver with higher light output that doesn't also blind oncoming drivers. To install the TRS-sourced HID projectors, Shin relied on a company called Essential Lites to do the painstaking work of retrofitting them into his factory headlights.
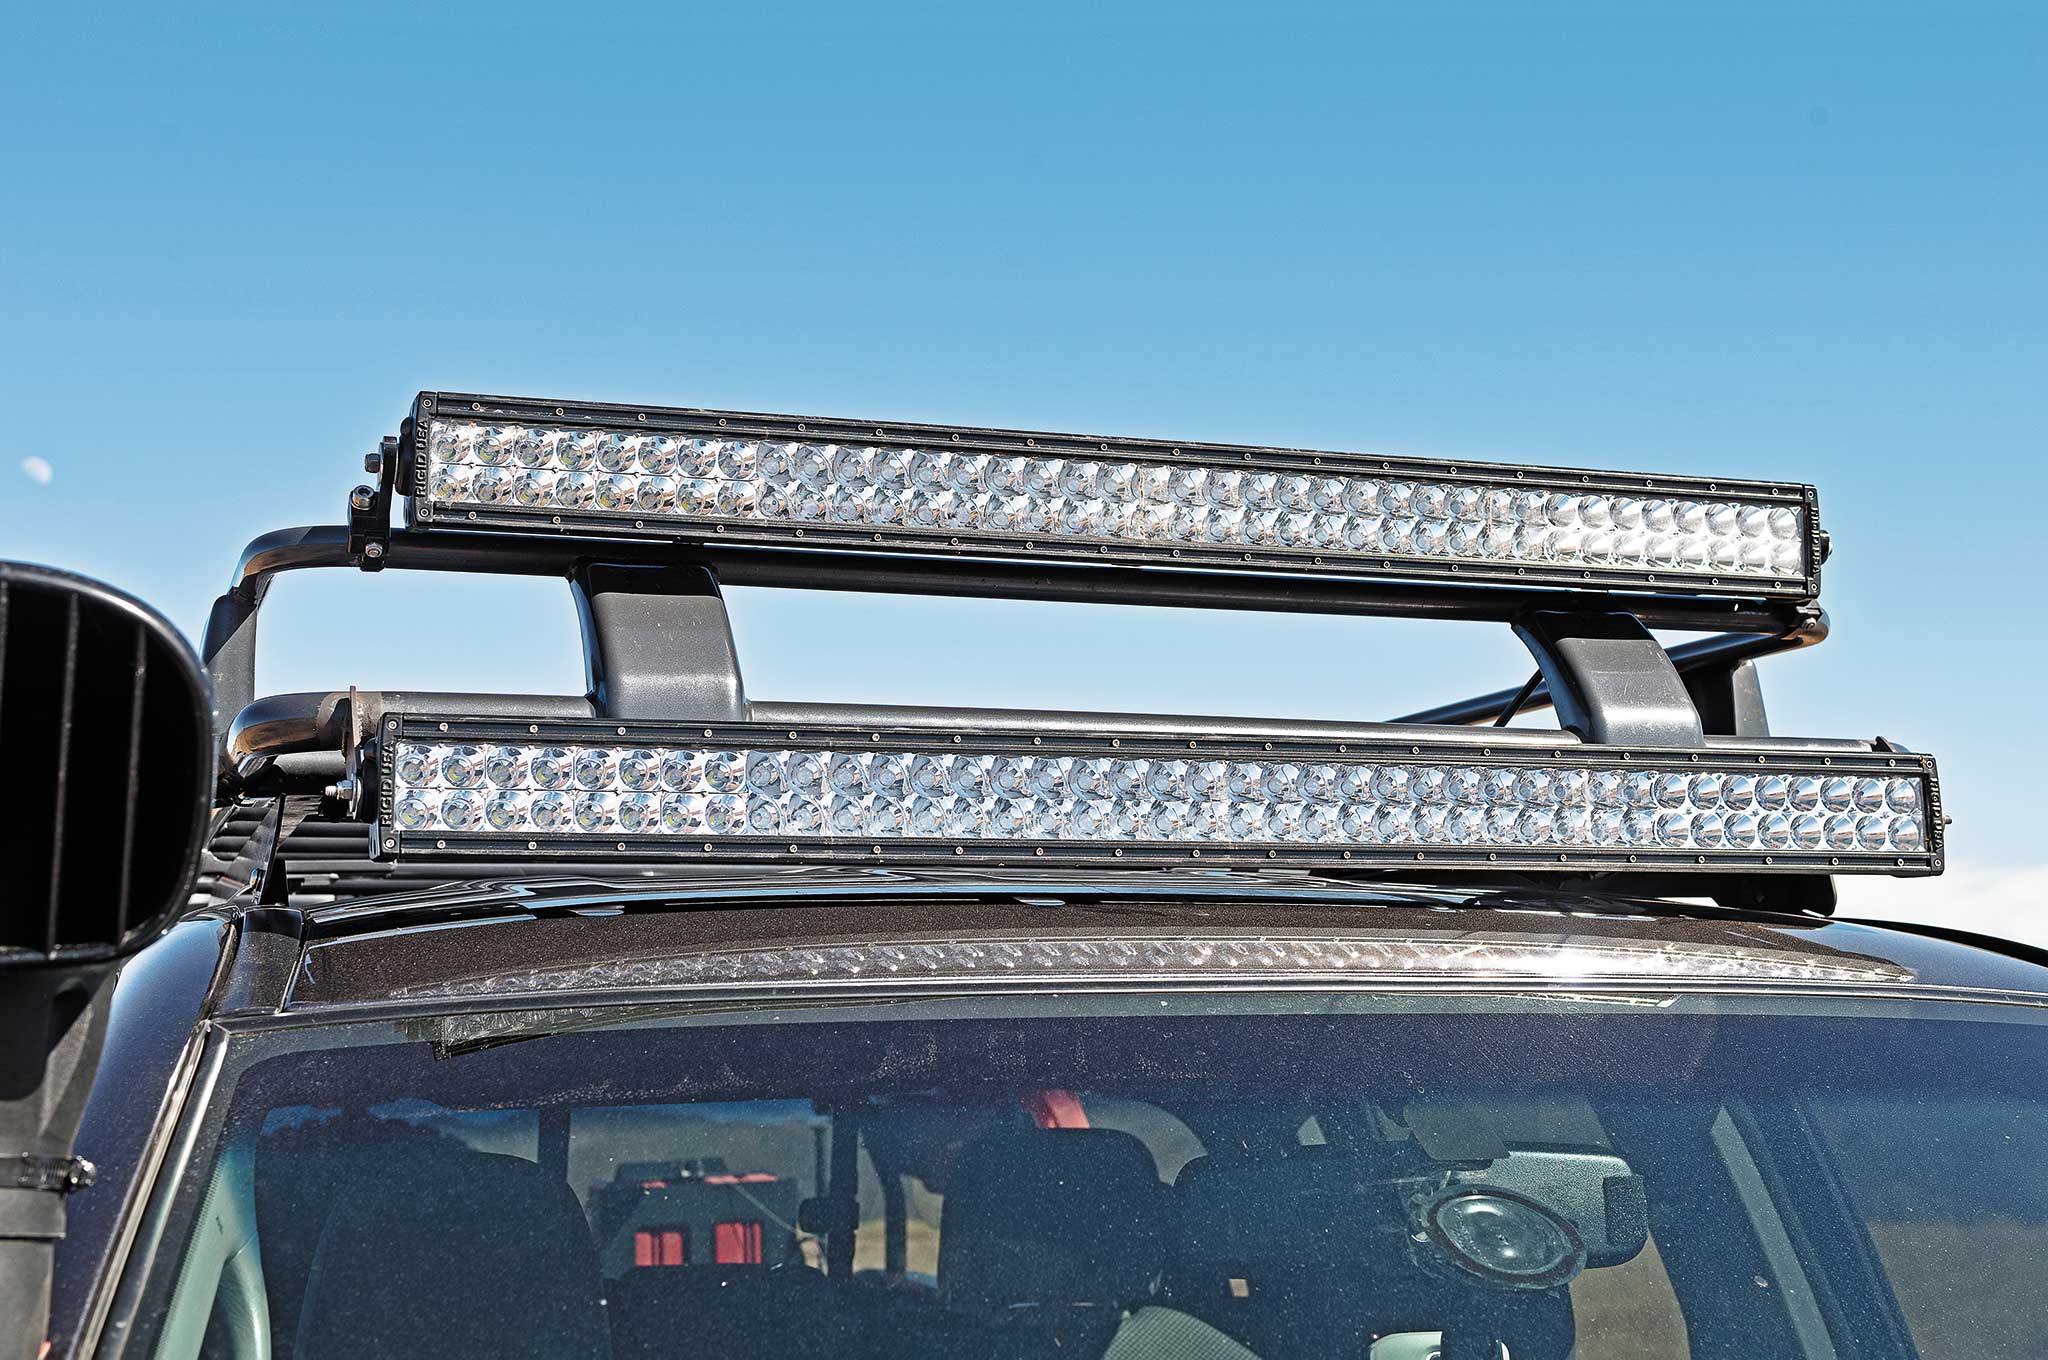
These Rigid Industries 38- and 40-inch E-Series LED light bars are configured in a spot-and-flood-light combination.
He continued by adding dual rows of high-mounted lights to the roof rack. Sitting on the top row is a Rigid Industries 38-inch E-Series LED Light Bar, which is configured in a spot and flood light combination. This combination is rated at 17,480 raw lumens and allows him to see a wide swath immediately forward as well as out to more than 1,300 meters ahead of the vehicle. If that isn't enough, a second 40-inch E-Series LED Light Bar sits just under the 38-incher. Also in spot-and-flood-combination configuration, this bar spits out 18,400 raw lumens of light up to a distance of 1,400 meters. For those keeping count, that's a range of almost 13 football fields.
Each of the 9-inch ARB Intensity LED Driving Lights that are mounted to the front bumper contain 32 LEDs, producing...
As if he plans on exploring the eternal darkness of a black hole, Shin found a need to further mount a pair of 9-inch ARB Intensity LED Driving Lights to the front bumper. The flood and spot combination lights each contain 32 LEDs that produce 8,200 raw lumens and a spot reach of almost 1,000 meters.
Not to be outdone, the rear end was treated to a bank of LED lights as well. Rigid SR-M Back-Up lights, a Rigid SR-M Bed Light, and a Rigid Q-Series Camp Light mounted on the tire carrier round out the rear facing light fixtures.
Electronics

A Scan Gauge II monitors the vehicle's performance and is programmable to display information, such as trip data,...
A Scan Gauge II monitors the vehicle's performance and is programmable to display information such as trip data, transmission temperature, fuel economy, engine speed, and vehicle speed, among other statistics. What's really useful too is that it is capable of displaying trouble codes, so you can troubleshoot problems.
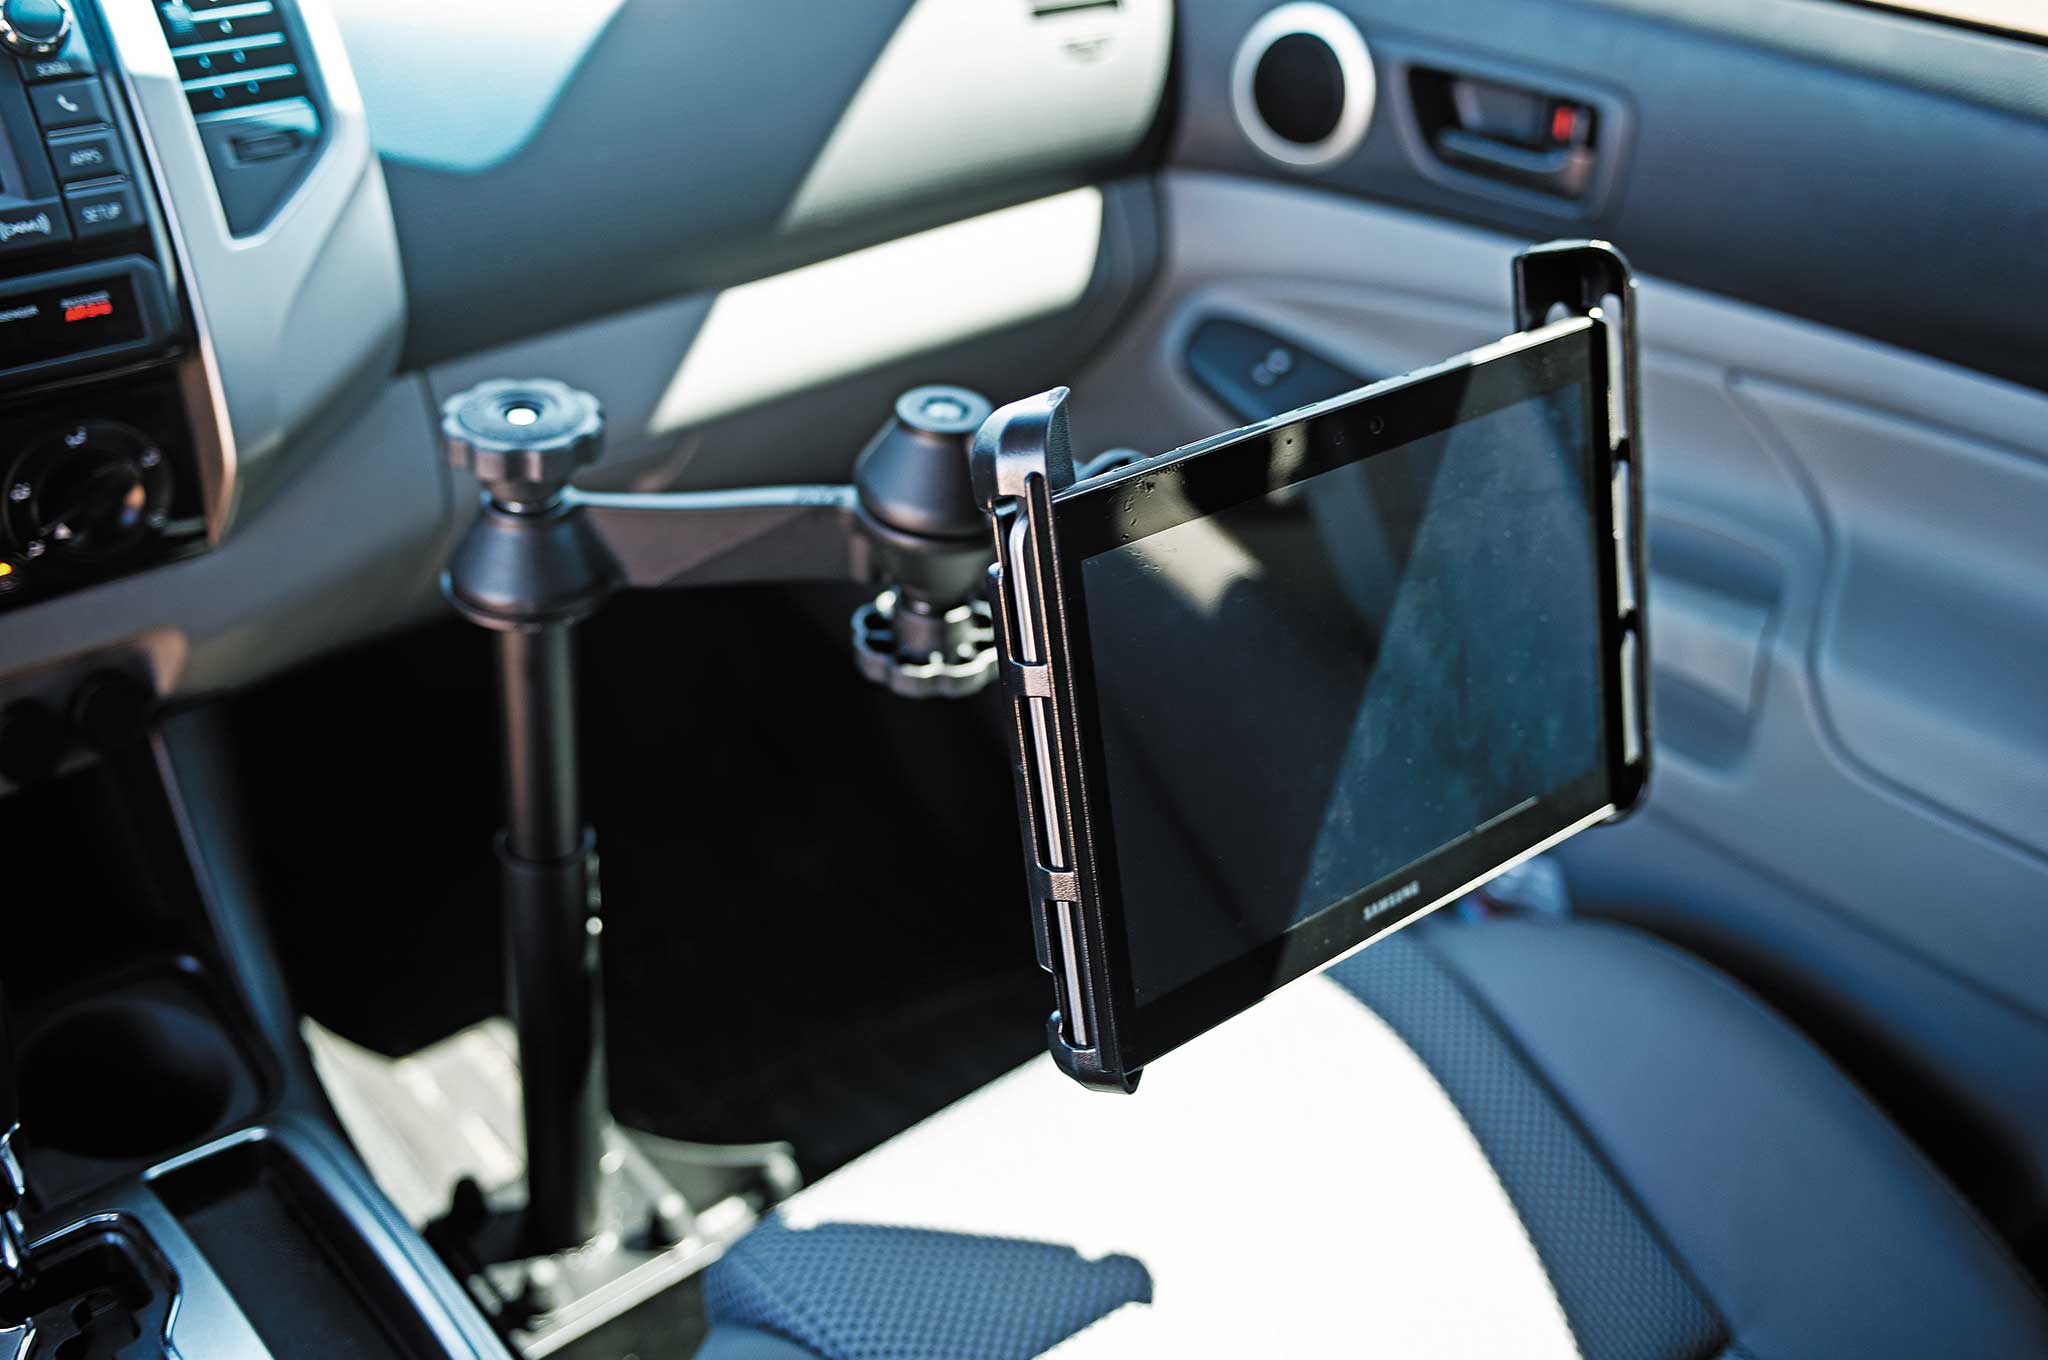
Ram Mount's versatile No Drill Laptop Mount can be configured to use with a tablet.
Ram Mount Phone and No Drill Laptop Mounts help keep what otherwise would be loose electronics in place, even over the roughest of turf. The versatile No Drill Laptop Mount, as its name implies, requires no drilling for installation into your vehicle and, as seen here, can be configured to use with a tablet. Other than accessing electronic maps over his phone or tablet, Shin also carries an old-fashioned Thomas Guide (remember those?) and a compass for backup land navigation.
Never Done
Shin's Tacoma fits each of the roles he initially outlined quite nicely. It's a reliable daily driver that's a blast to take out for the occasional trail run. If push ever comes to shove, it looks as if this pickup will be a capable rolling urban escape plan as well. But automotive enthusiasts know that a project is rarely ever complete. When asked what the next step for his truck was, Shin mischievously smiled and said that he was done with it…somehow we're not so convinced.
Make & Model
2013 Toyota Tacoma Double Cab 4×4 TRD Sport Package
Owner
Mike Shin of Gardena, California
Engine
4.0L six-cylinder (V-6)
Drivetrain
4WD
Horsepower
236
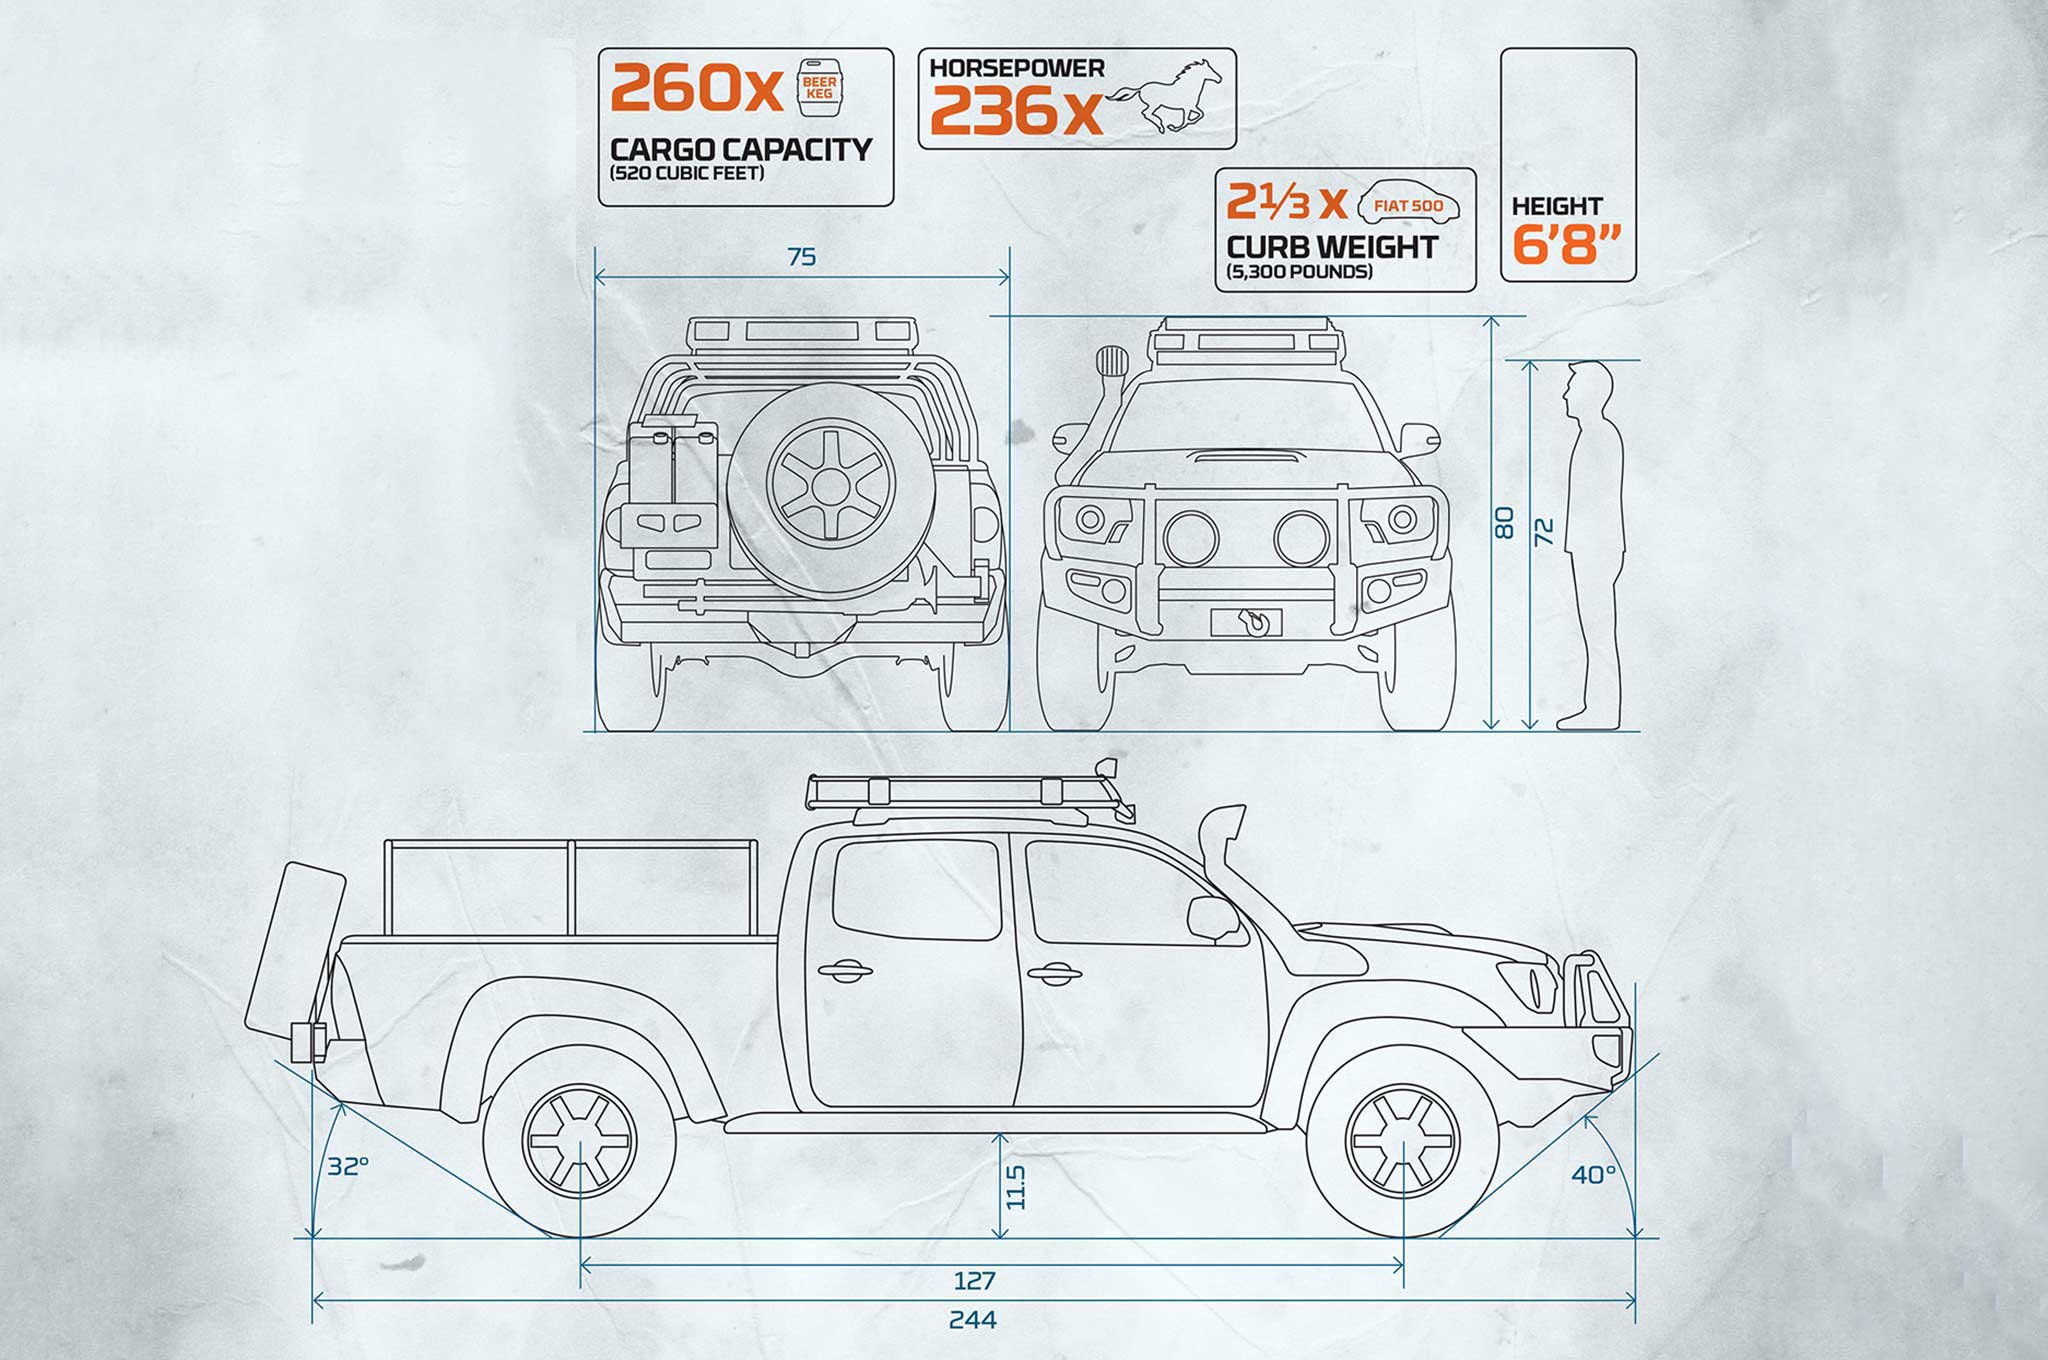
Height
80 inches
Length
244 inches
Width
75 inches
Wheelbase
127 inches
Ground Clearance
11.5 inches
Cargo Capacity
– Standard 6-foot bed: 427 cubic feet
– ARB Roof Rack: 93 cubic feet
– Total: 520 cubic feet
Curb Weight
5,300 pounds
*Measurements are approximations