Building a Pipe Shotgun with the Pop-A 410 DIY Kit

Disclaimer: It’s legal for you to build your own firearms. Convicted felons or other prohibited persons, however, cannot. There may also be other applicable laws where you live, so double check the regulations in your jurisdiction. CMG West, its parent entities, and subsidiaries shall be held harmless in the event any entity acts on information provided in this article.

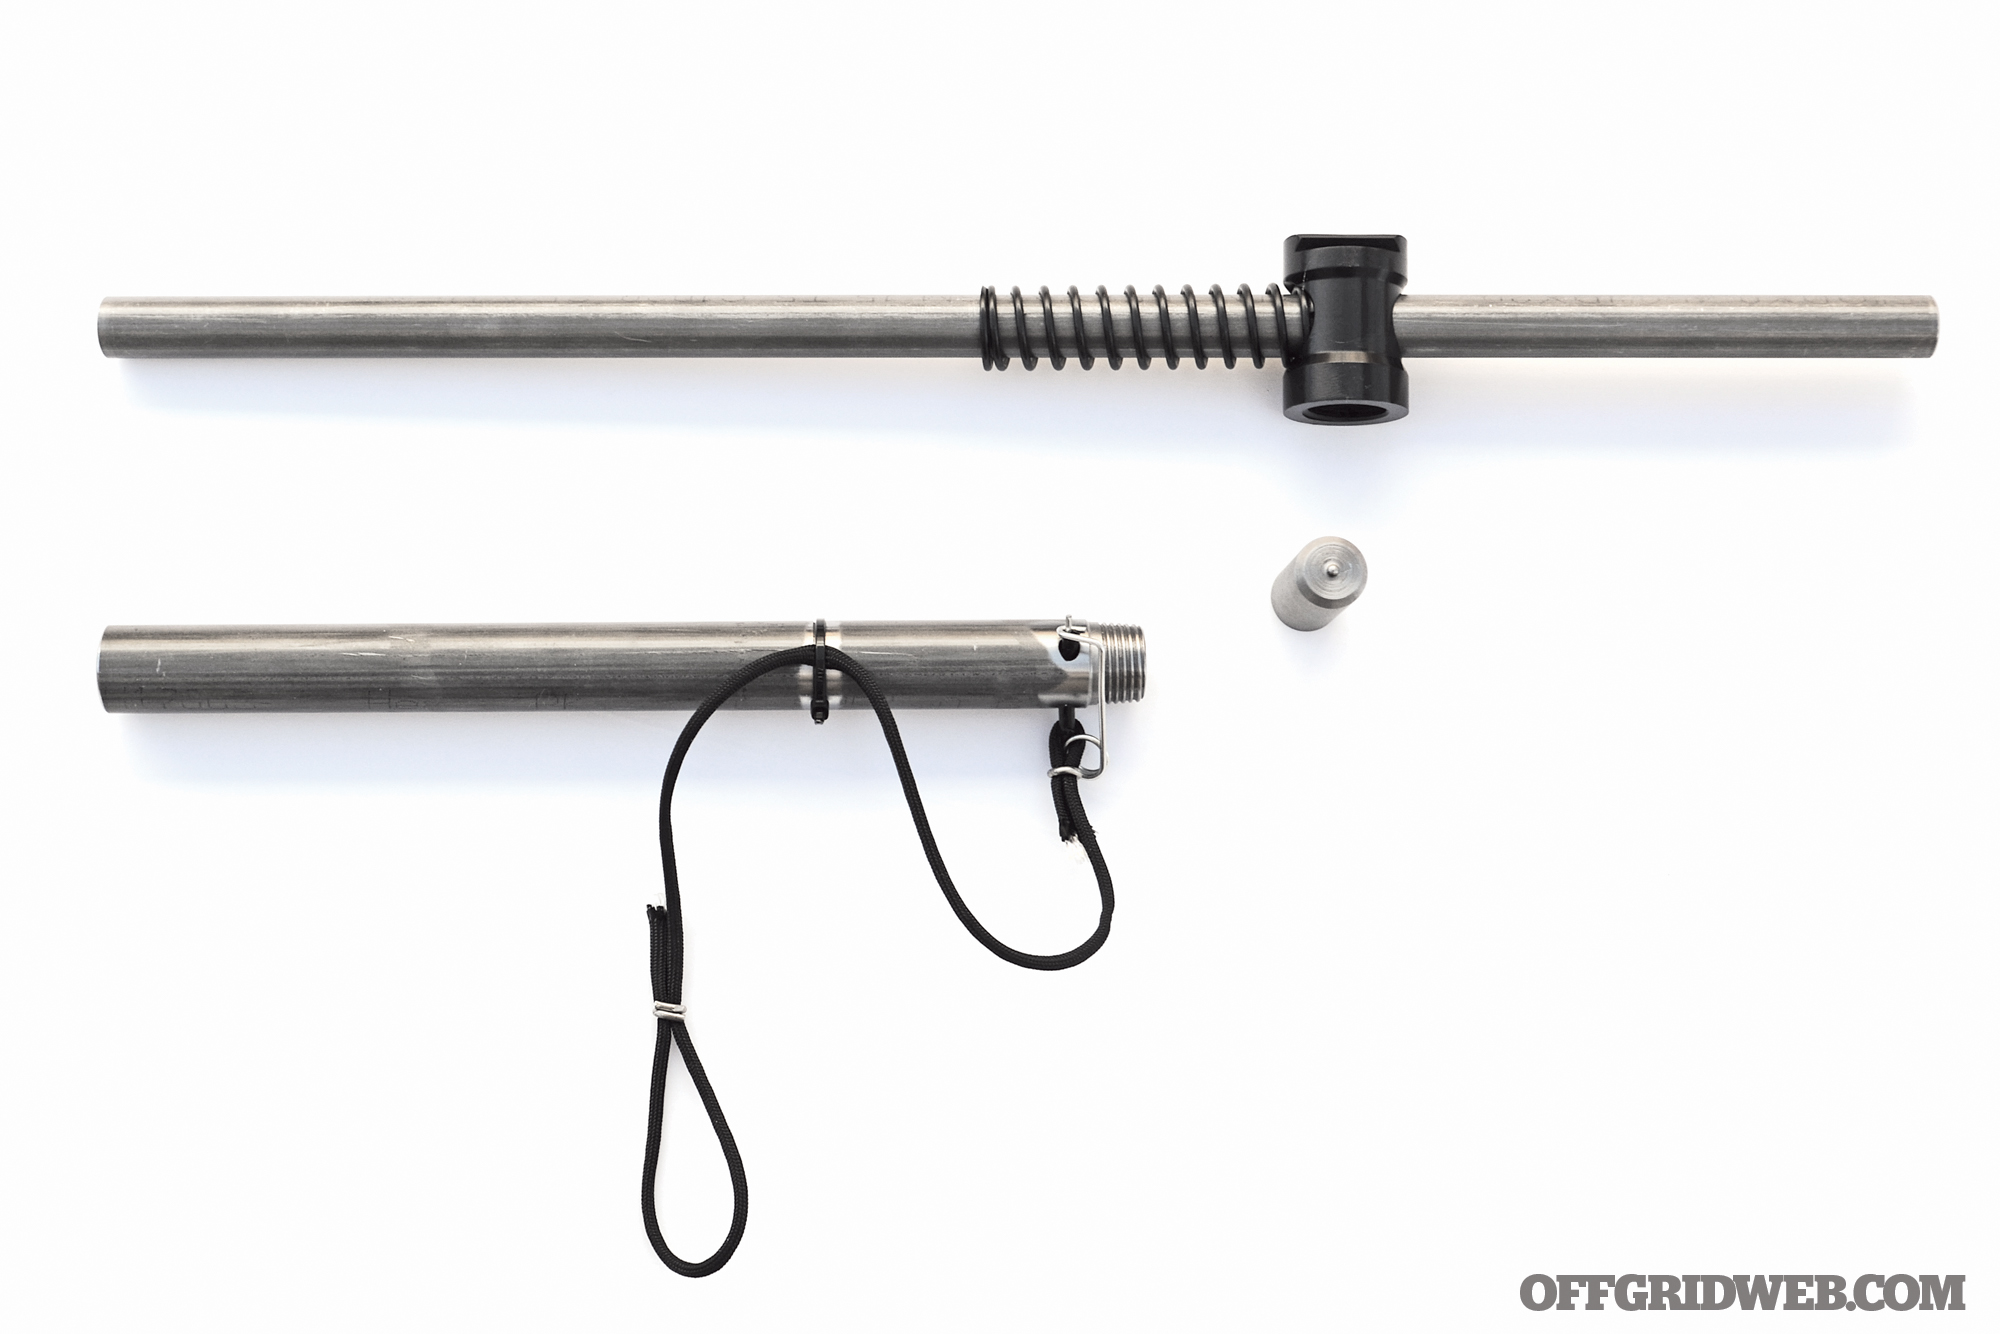
In the past few years, a “do-it-yourself shotgun” kit has become popular, billed as a survival gun. It’s made by Runway Sub-Cal, a manufacturer known for producing rifled flare gun inserts to allow shooters to fire pistol rounds through 26.5mm flare guns. Essentially, they provide a barrel, firing pin, and an outer barrel sleeve; the rest of the pipe shotgun is built from steel pipe fittings. I was a bit hesitant going into this assignment, but read on and see why it’s important for a number of reasons.

For more useful survival gun DIY builds and tips, check out our book DIY Guns: RECOIL Magazine’s Guide To Homebuilt Suppressors, 80 Percent Lowers, Rifle Mods And More

Building a Pipe Shotgun

Several retailers carry this kit. We ordered ours from Bud-K for $130 with free shipping.

The pipe shotgun package arrived via FedEx Smart Solutions, meaning that FedEx did all the heavy lifting getting it to within 20 miles of me and transferring final delivery to my local post office. Bud-K packaged it well enough, but after opening it up I realized there was no instruction sheet.

This wasn’t a big deal, as the kit is straightforward with a video on the company’s website. When compiling the items needed to finish it up, I went to double check on the website what a “jam nipple” was and realized the firing pin wasn’t included in the shipment.

Bud-K’s customer service desk began looking for extras in their warehouse. If they were unsuccessful, they’d have me return the kit in exchange for a new one. A few days later, they advised that the manufacturer would ship out the missing components directly. After about a week, it arrived.

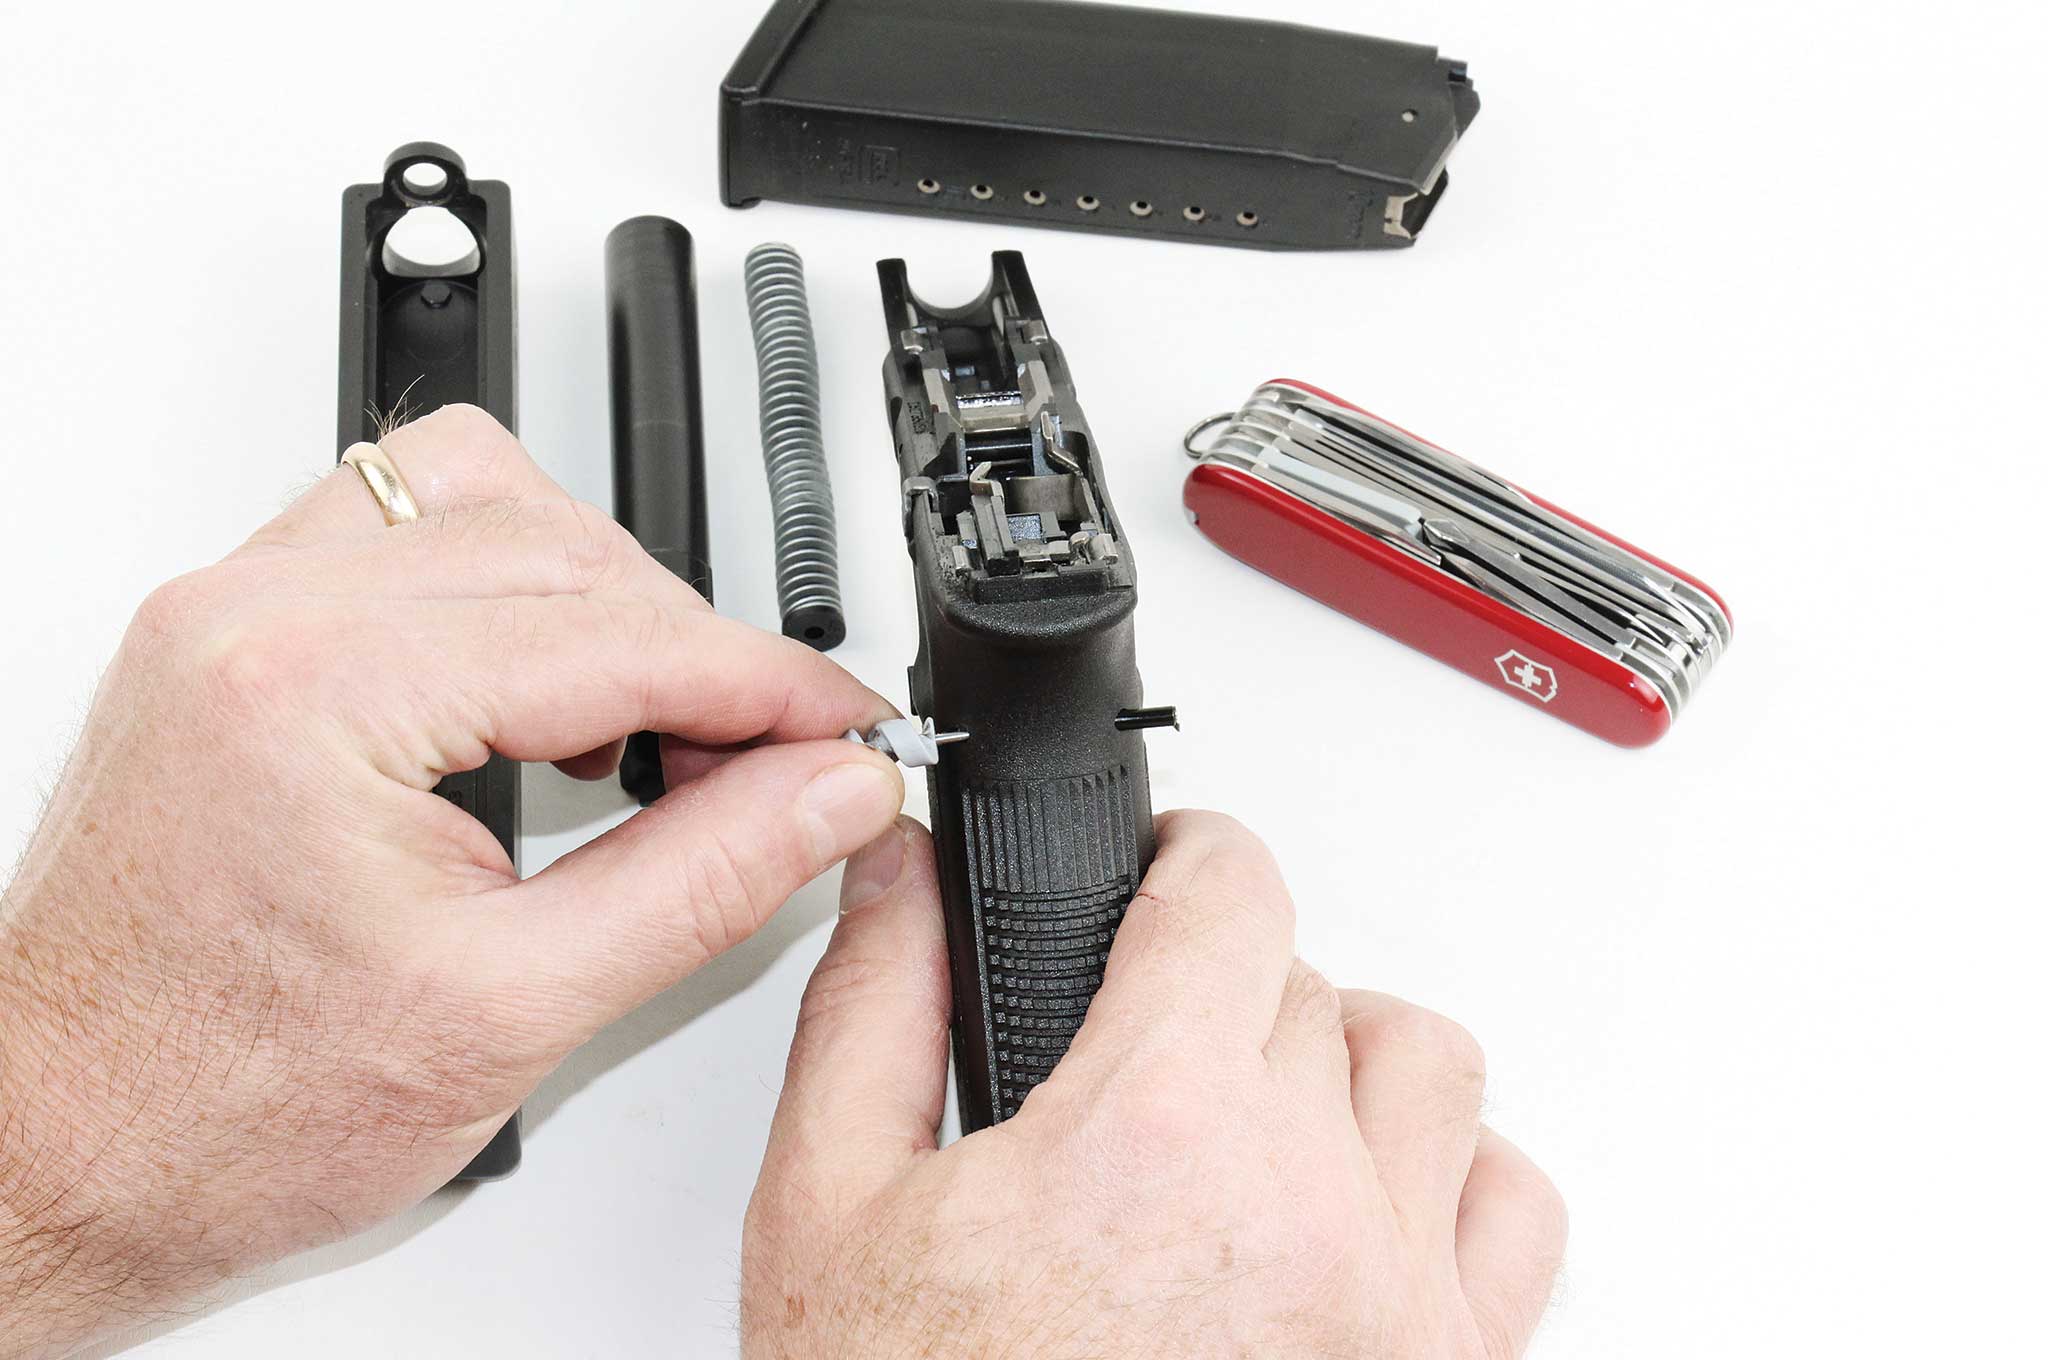
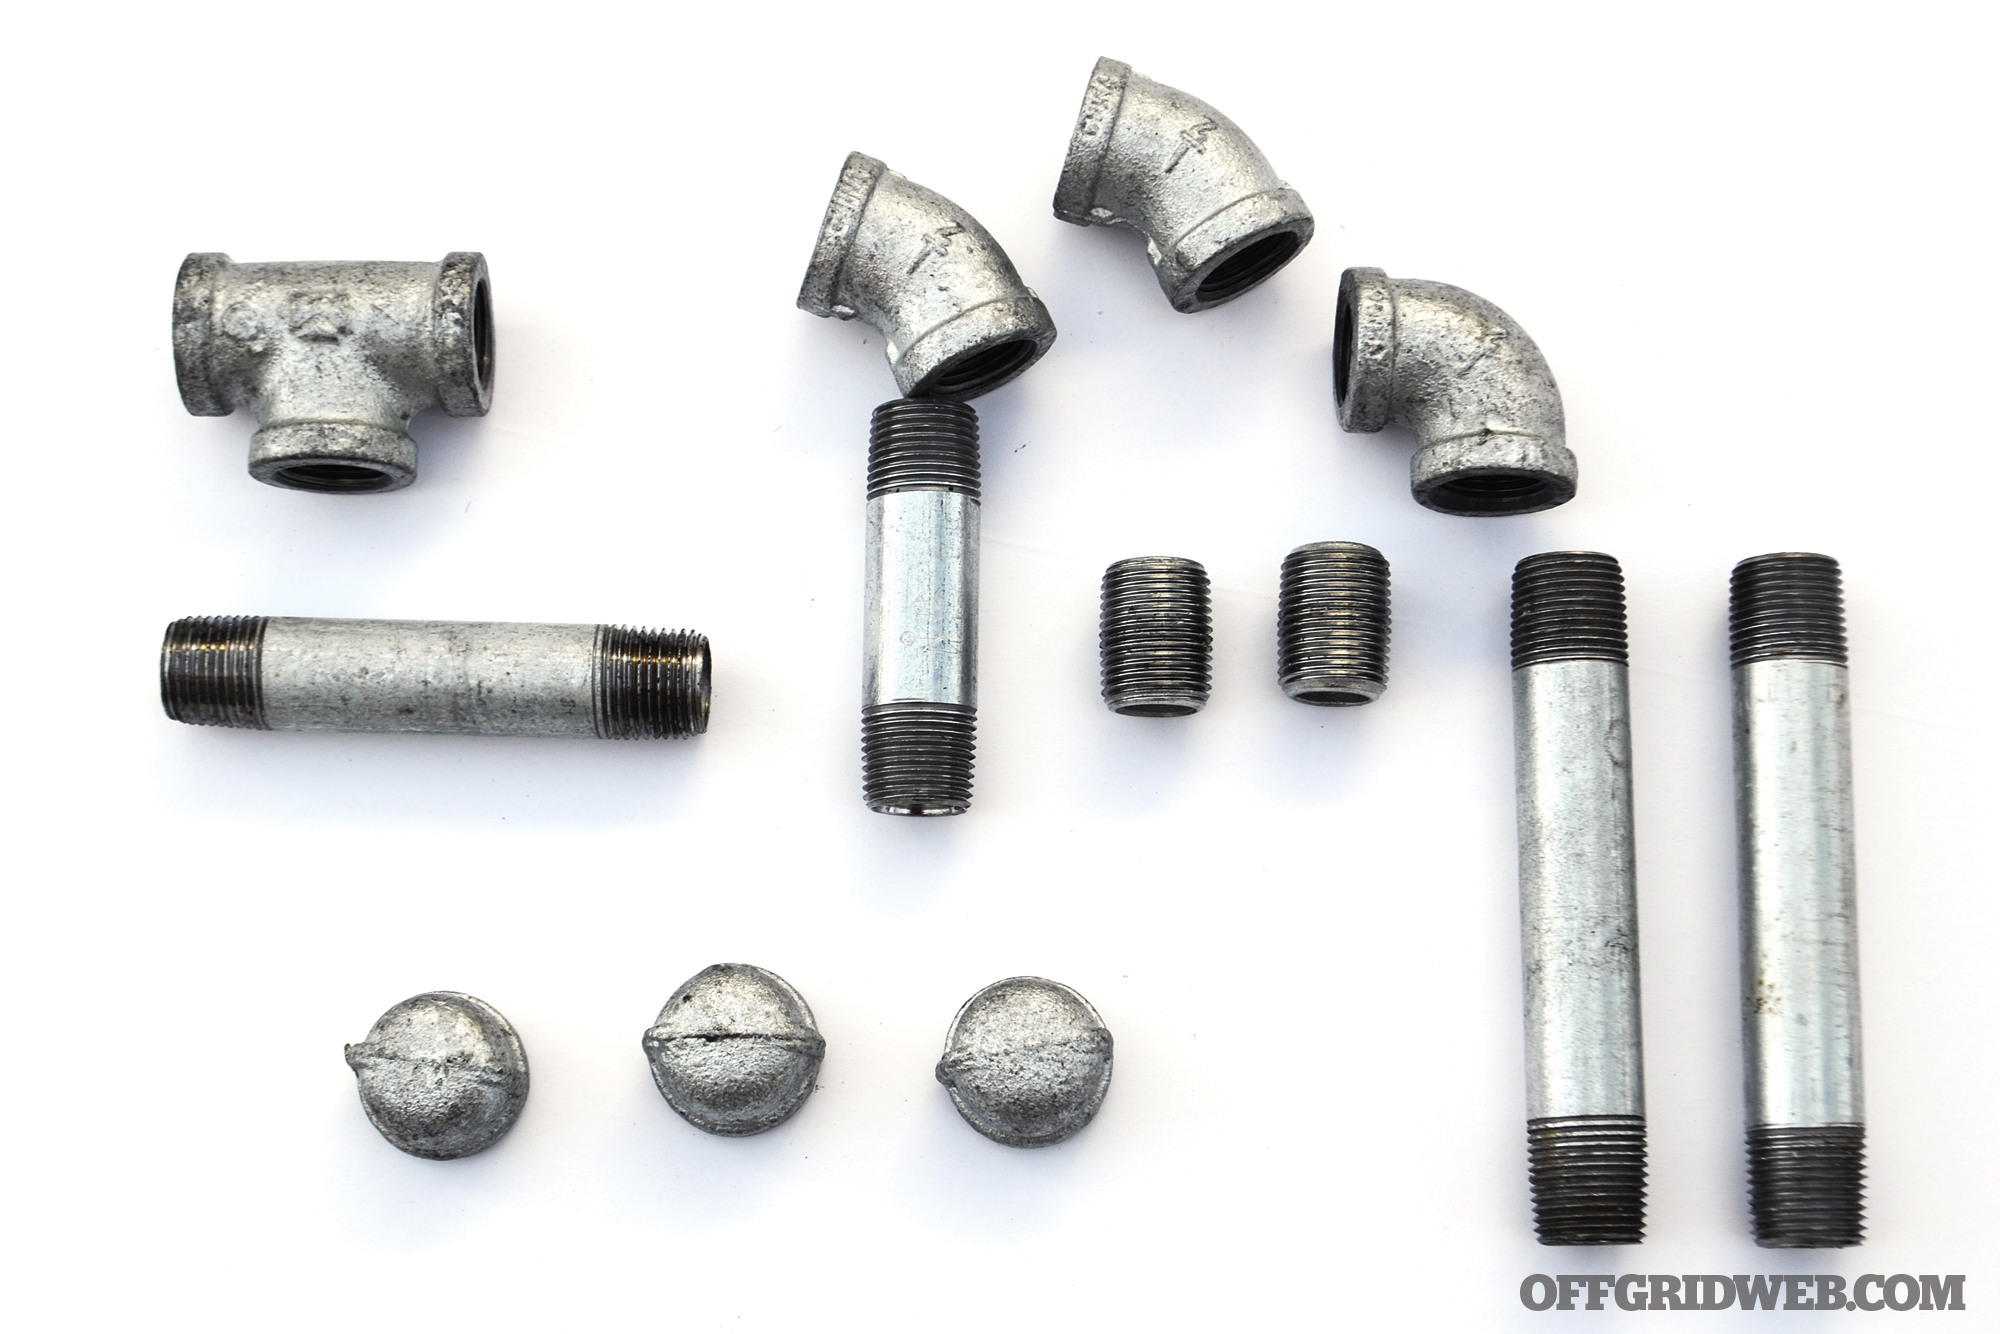
Completion of the kit requires the following ½-inch pipe parts:

  • one ½-inch tee
  • three ½-inch caps
  • two 4-inch nipples
  • one 3-inch nipple
  • two 45-degree elbows
  • one 90-degree elbow
  • two jam nipples
  • one 5-inch nipple

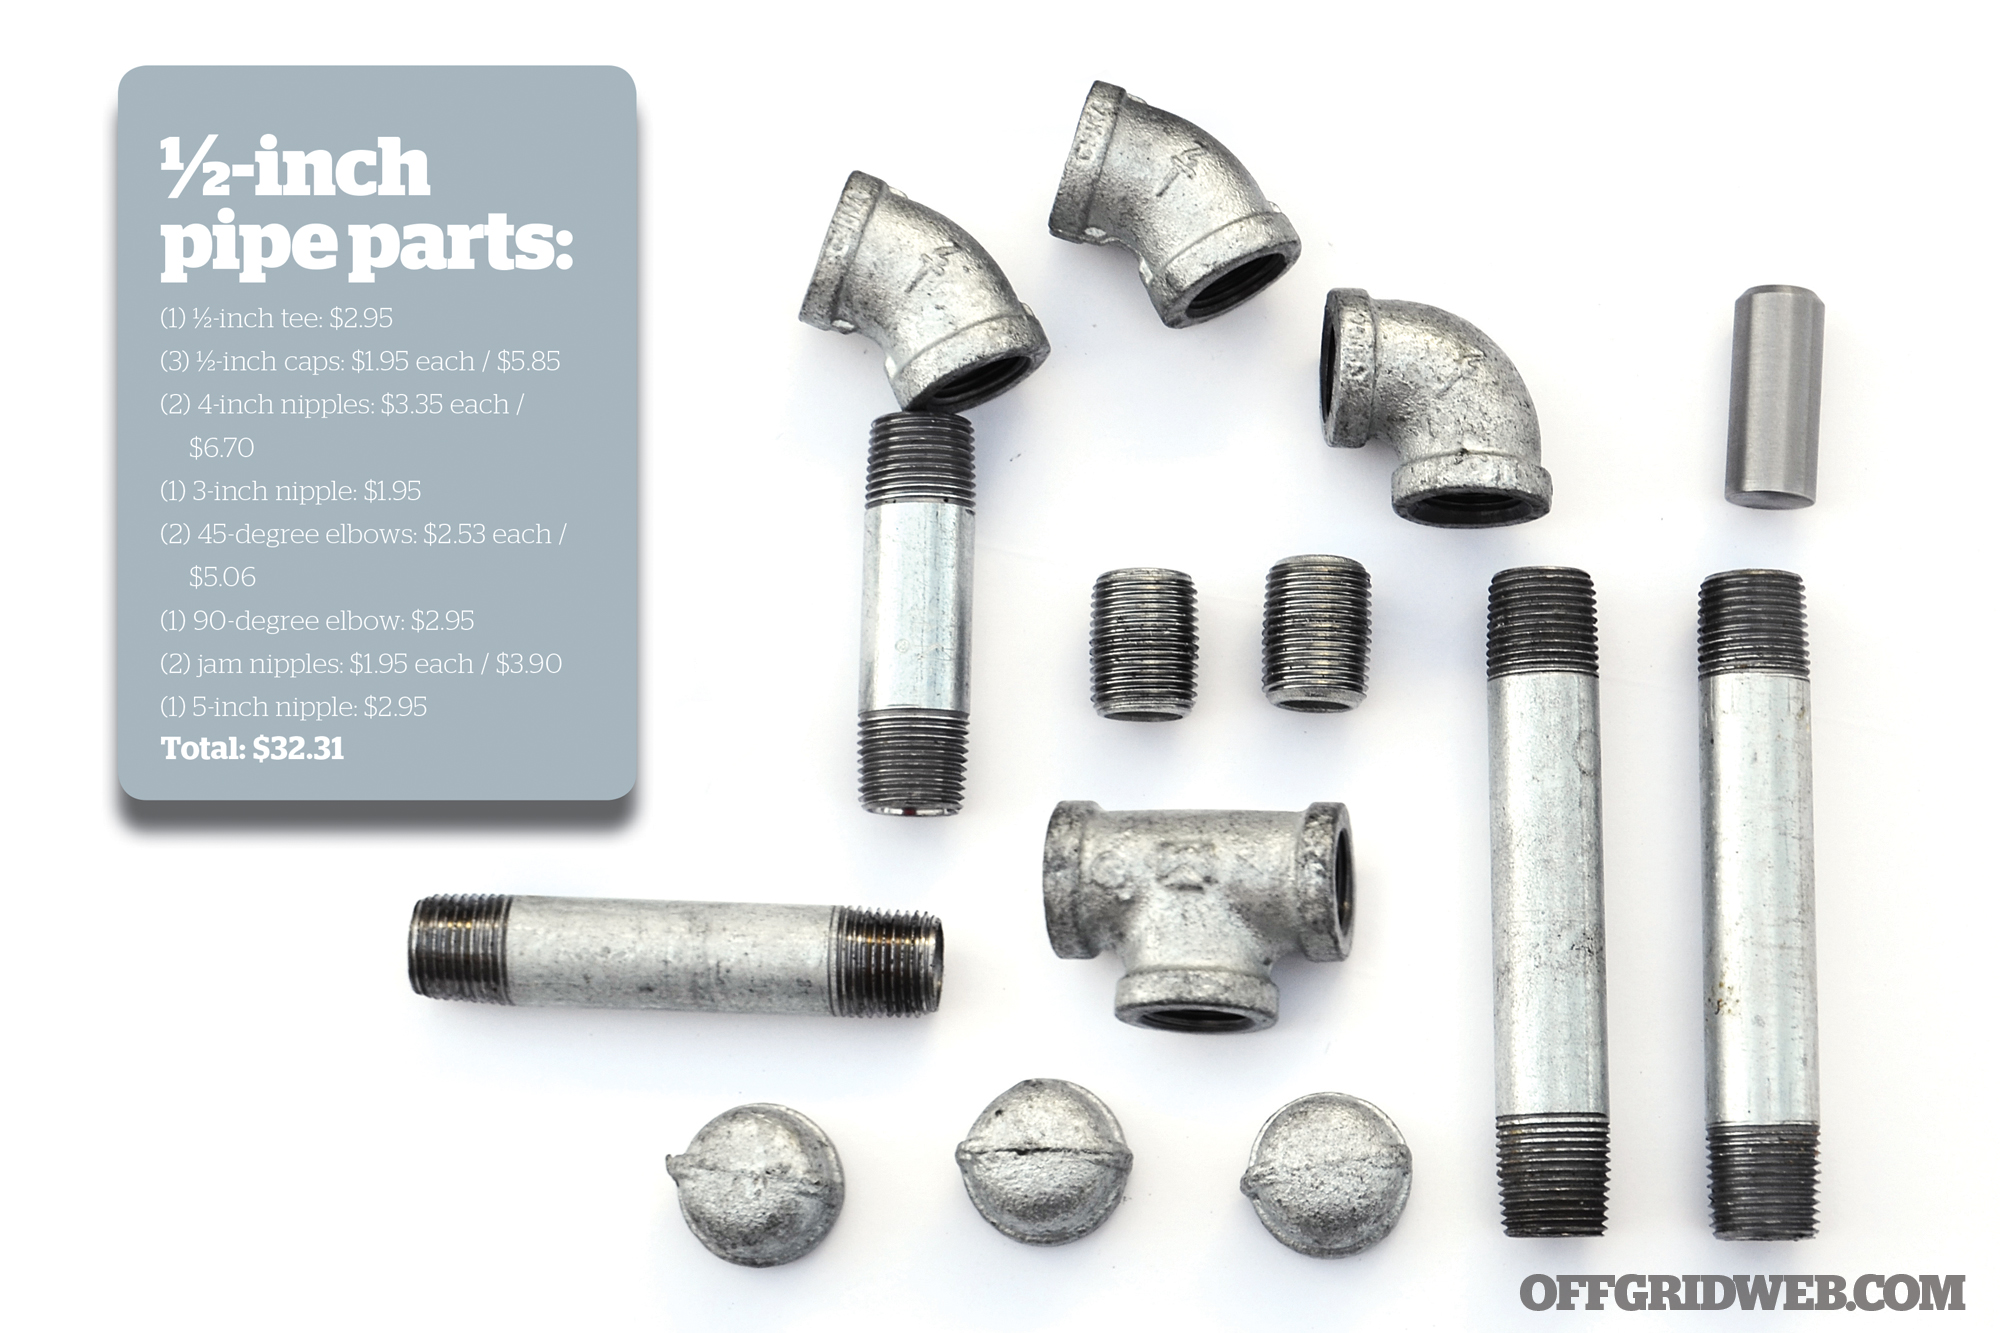
The only parts that were somewhat difficult to find were the so-called jam nipples. These are short nipples that are completely threaded. I found them under a variety of names such as zero nipples and flush nipples. Perhaps jam nipples are a colloquialism in certain parts of the country or an older plumbing term, but I couldn’t find them under that name in stores near me.
After a quick trip to Home Depot and $32 later, I had everything I needed to put the Pop-A 410 together.

Assembly took about 15 minutes, if that long. One of the trickier things to get right was ensuring that the angled pipe connectors aligned properly. They might line up perfectly while only grasping two or three threads, but then would be totally out of alignment when tightened all the way down. Lucas Oil Gun Grease and a small pipe wrench in conjunction with a vise got everything properly into position. I threaded as far as I could, backed off, and repeated in order to grasp more threads to make it sturdy and straight.

Once you have an idea on how everything lines up, you can make it semi-permanent by using plumbers’ tape, Loctite, or another adhesive. Some builders have used JB Weld for a more permanent fix, but that might be excessive.

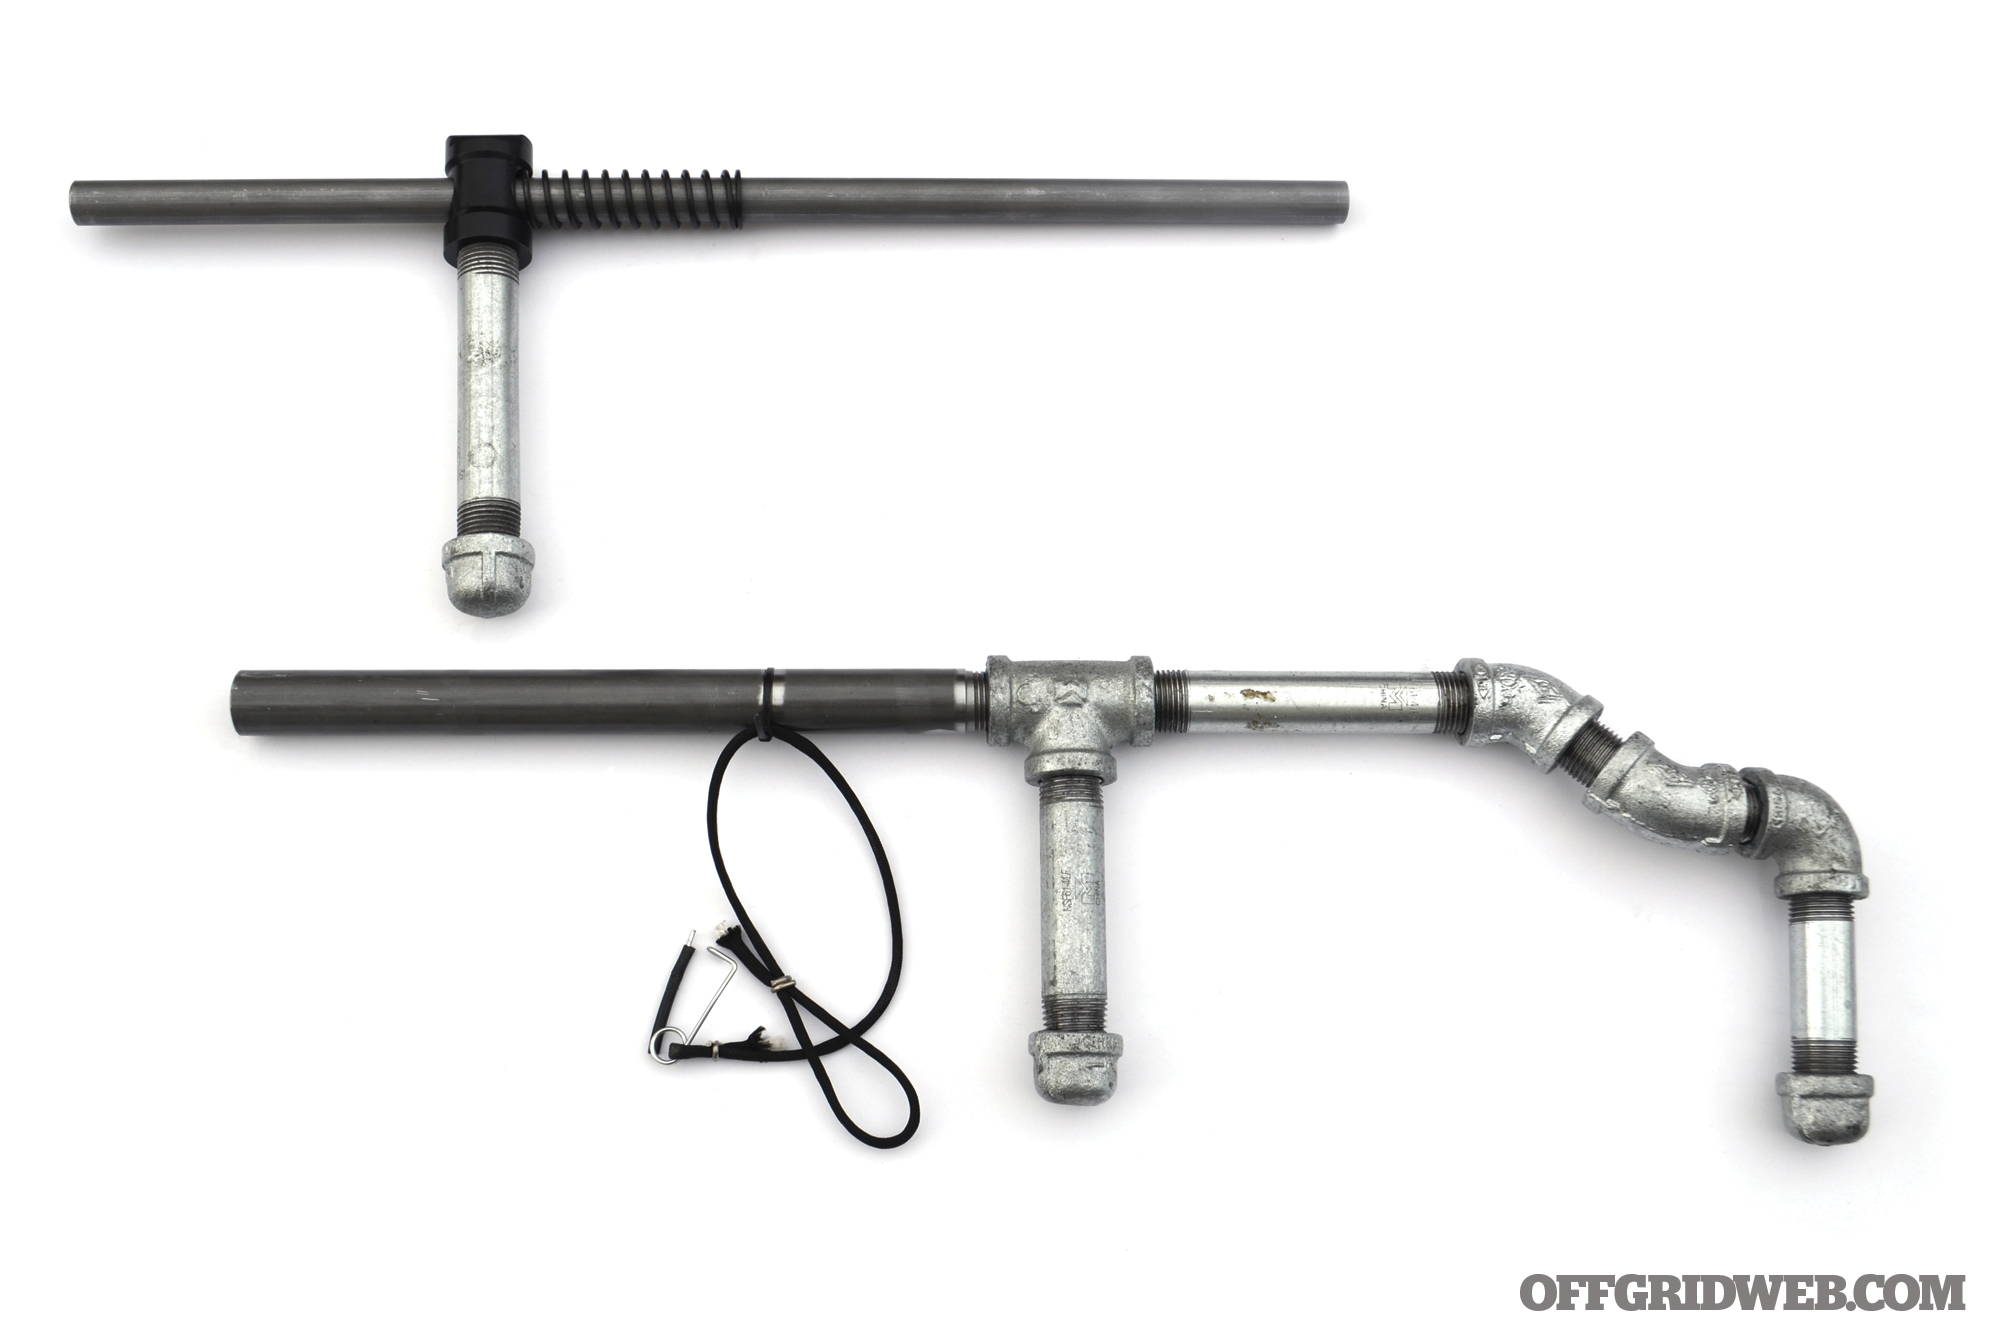
A crucial piece of this assembly is the ½-inch tee piece. This acts as your receiver, for lack of a better term, and the firing pin should be able to pass completely through it.

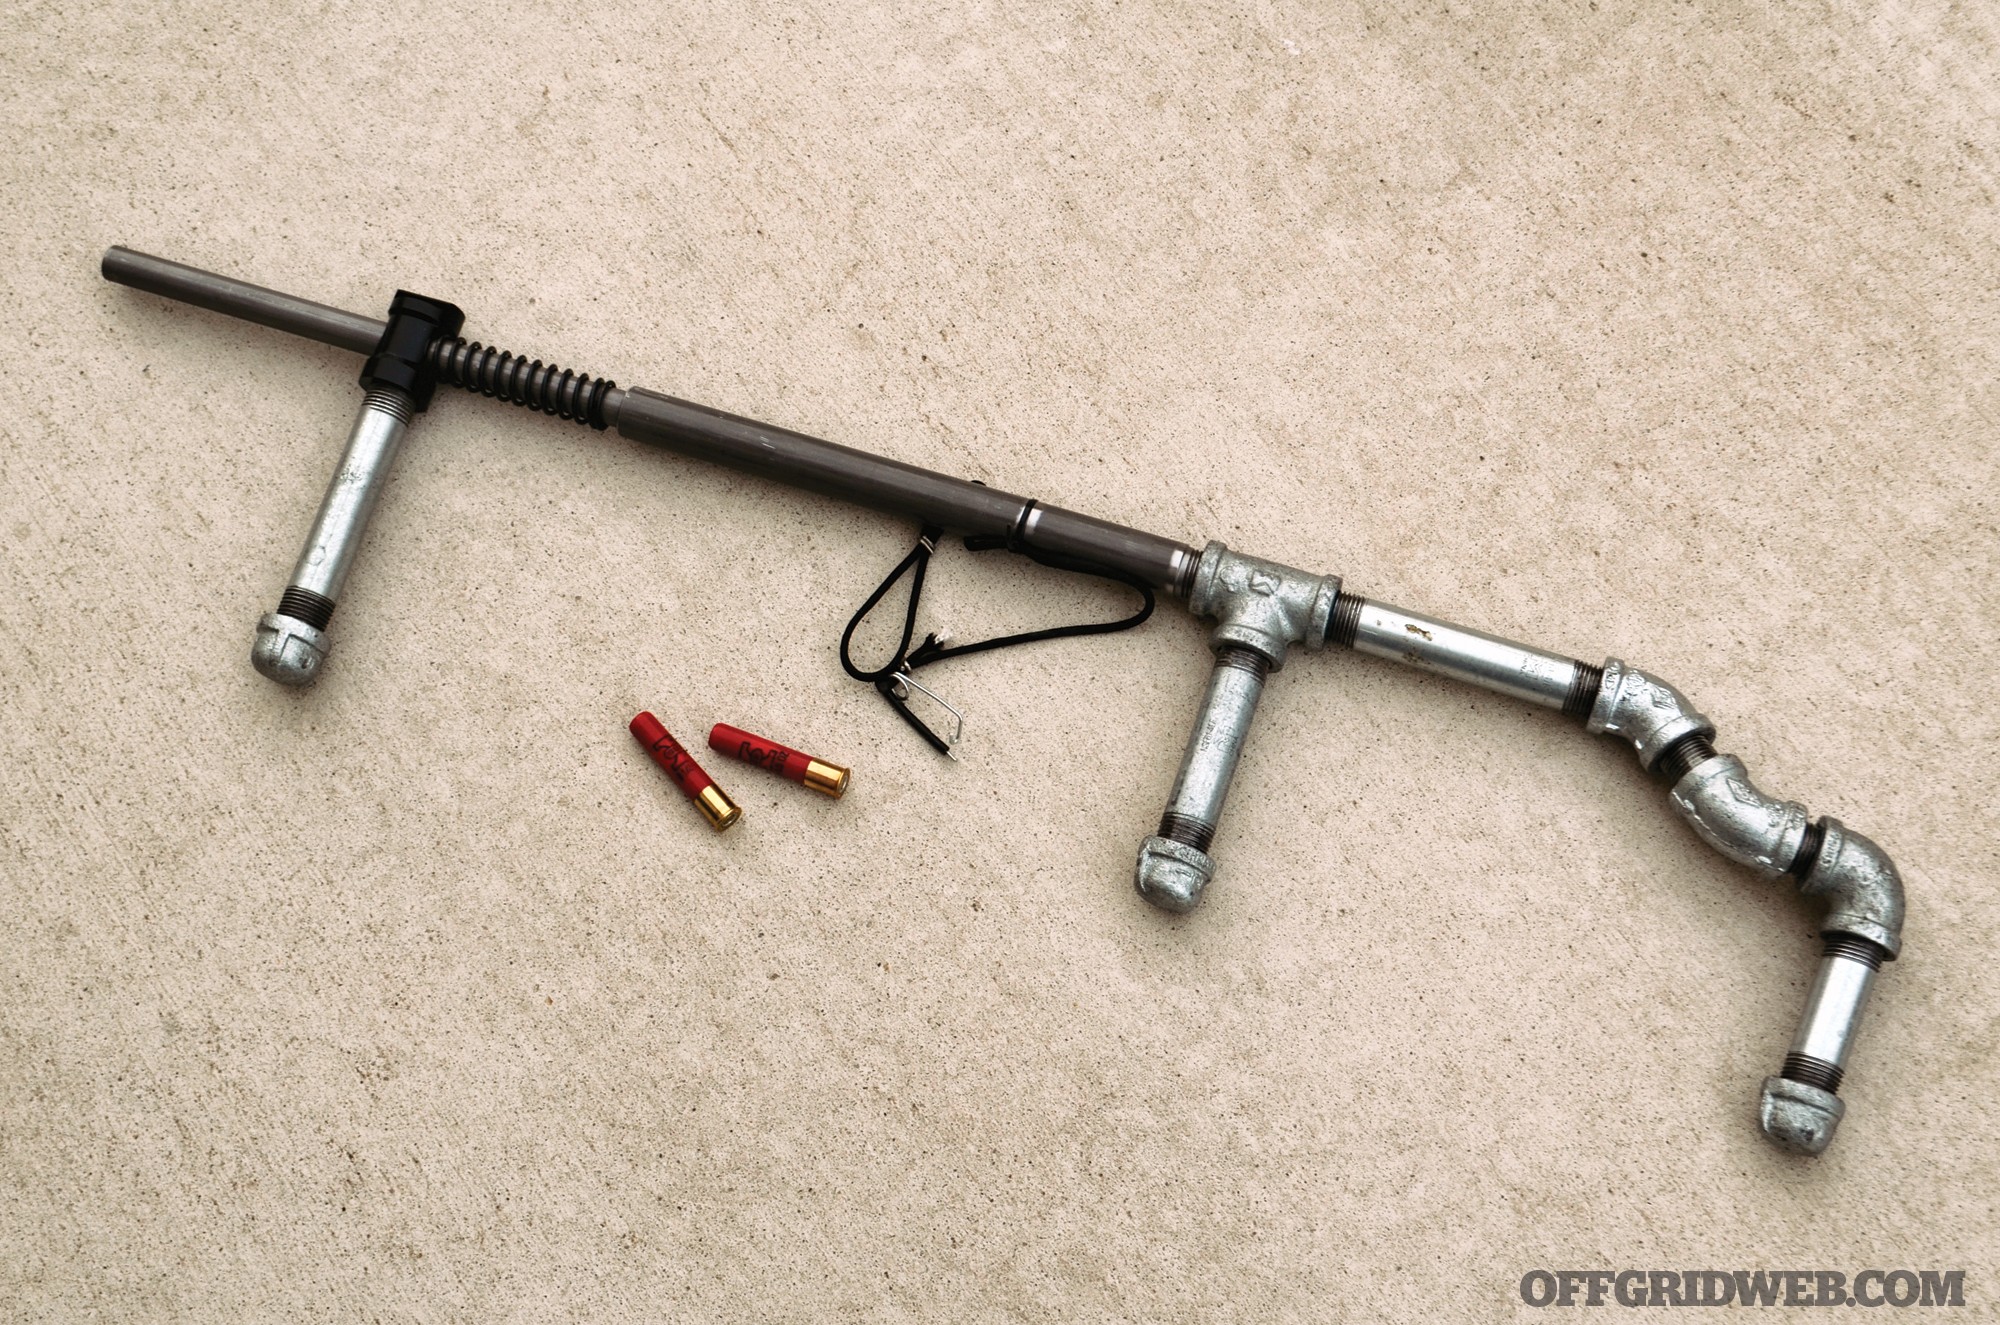
Above: For less than $35 in pipe fittings, you can complete the Pop-A 410 kit and have a single-shot shotgun.

When finished, you have basically a two-piece pipe shotgun composed of a chambered, spring-loaded barrel, a homemade receiver containing a fixed firing pin, a homemade stock, and pistol grips. A “safety” is included in the form of a clip that inserts between the firing pin and primer, attached to a short piece of cord so you don’t lose it. There’s no sighting system, but the forward pistol grip has a Weaver-style base so you can mount a red dot or visible laser. A short sheet metal screw with a rounded head could make for an improvised bead sight.

You can leave the Pop-A 410 unfinished, “in the white,” or you can break out some Krylon, Duracoat, or even Cerakote if you feel fancy and coat it in a protective finish.

Runway Sub-Cal Pop-A 410 Specifications

Caliber(s)
.410 gauge

Barrel Length(s)
18 inches

OAL
28 inches

Weight (Unloaded)
3.9 pounds

Capacity
1

MSRP
$130

URL
www.budk.com

Firing the Pop-A 410 Pipe Shotgun

To fire the Pop-A 410 you load the chamber, shoulder the pipe shotgun, take hold of the forward grip, aim, and slam the barrel rearward. The impact of the firing pin against the primer of the shell causes ignition and fires the projectile.

The first round was a bit of a doozy. The thought that kept going through my mind from the moment I loaded the chamber until I actually fired it was, “Will that galvanized pipe fitting and that two-piece barrel assembly that I bought be enough to handle 12,500 to 15,000 psi?”

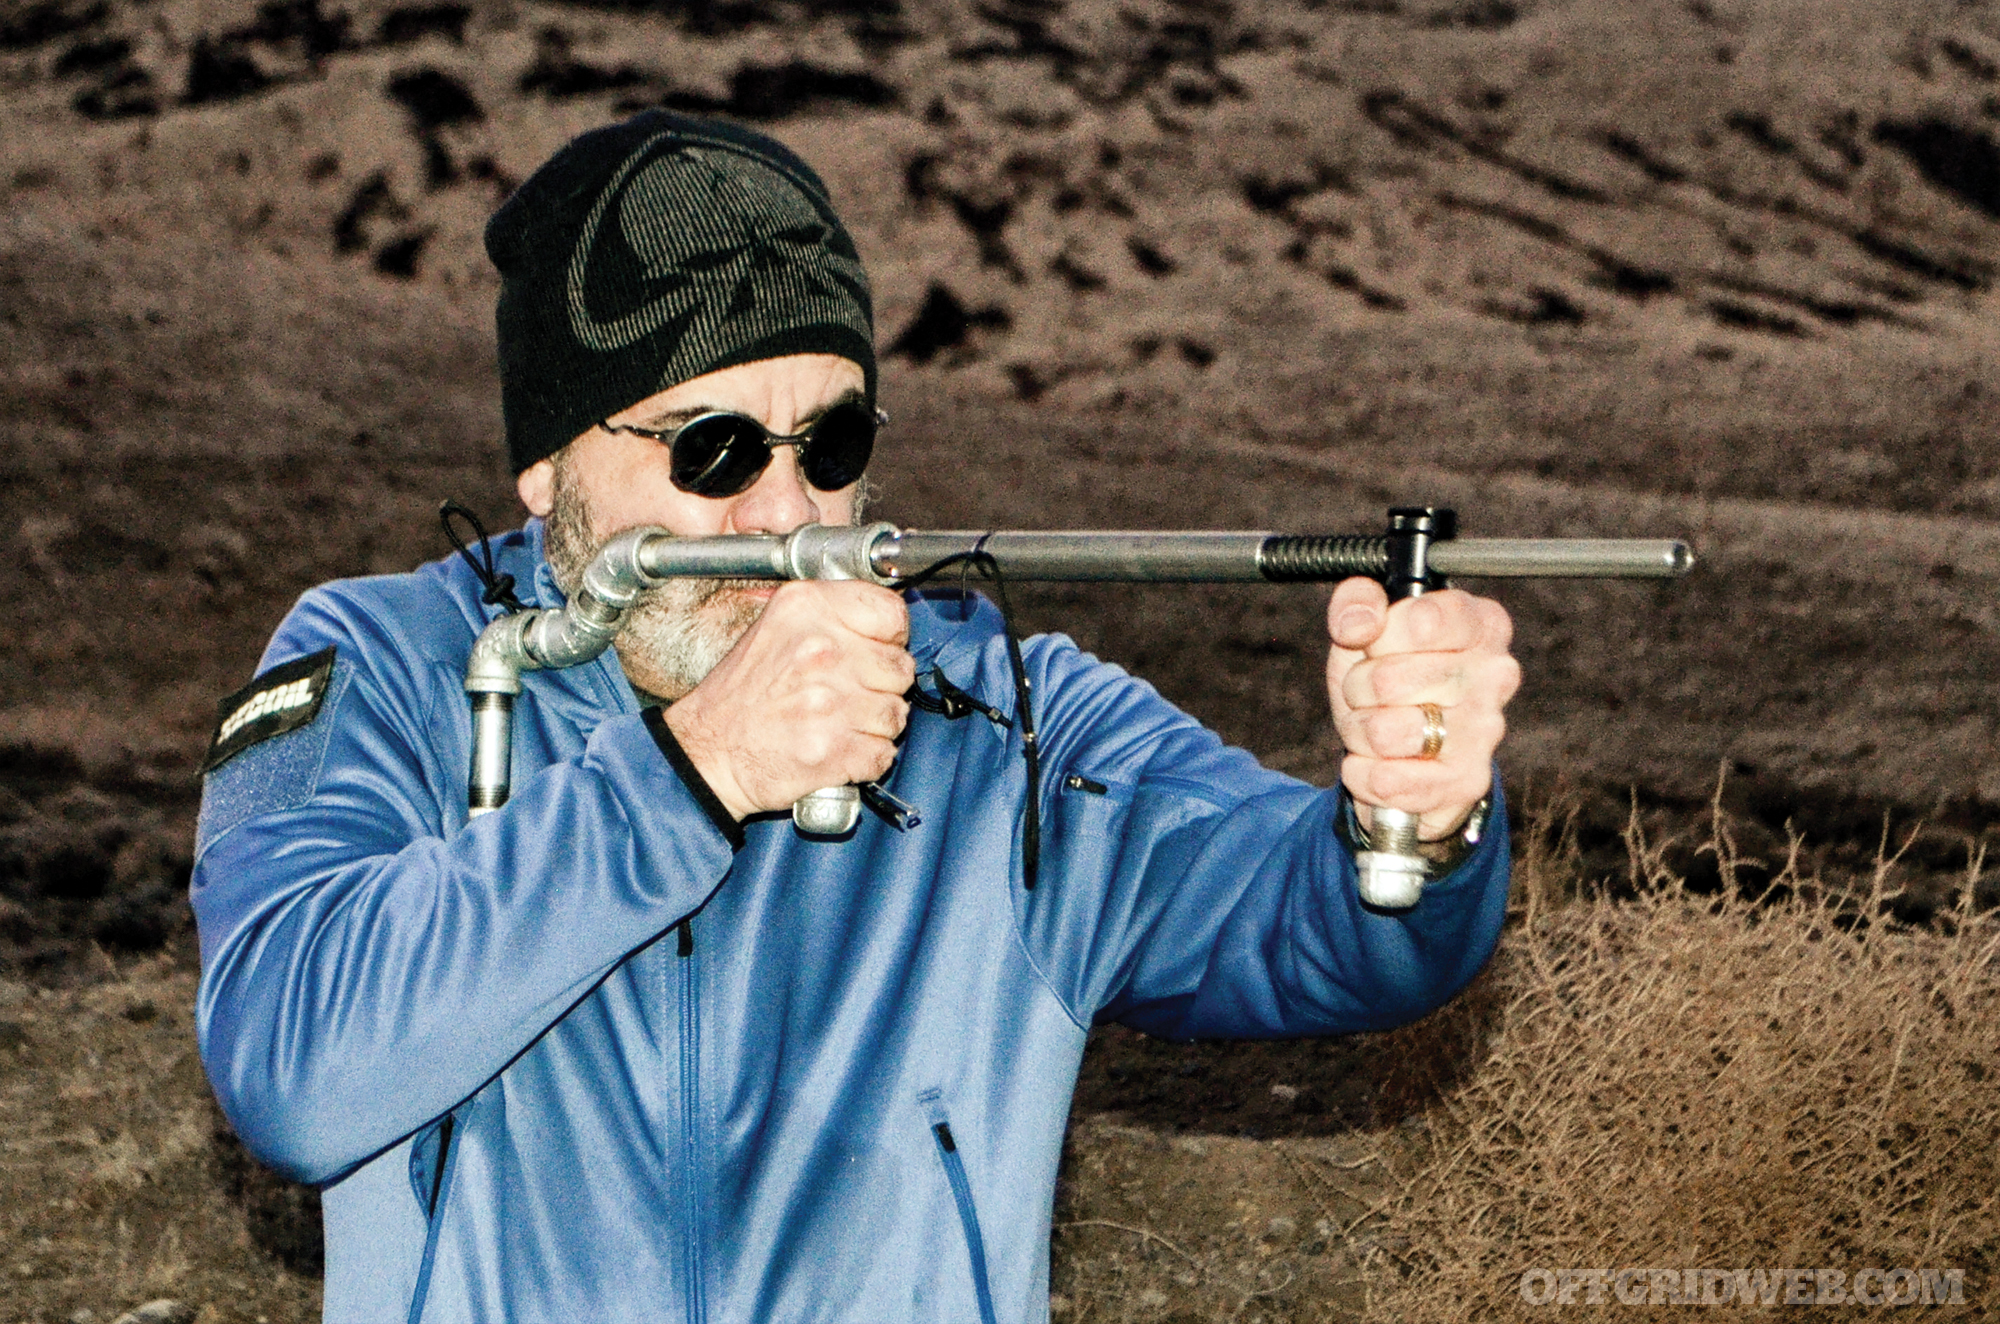
Above: Shooting the Pop-A 410 pipe shotgun is a bit tricky due to the lack of a trigger, but not difficult. Shoulder it, take aim, and slam the shell rearward into the firing pin.

It turned out that it was. The burst rating on this type of pipe is 21,000 to 26,000 psi, while pressurized. The short impulse of firing a single round of ammunition plays a role, too. Still, no one will get “millions of rounds out of this” weapon. I fired close to 150 rounds of assorted birdshot, buckshot, and buck and ball shot, without incident.

Beyond the fun factor, this is a firearm of last resort. For instance, if you had to build something out of scrap to forage for birds and squirrels in a survival situation. Or, in a darker scenario, if you needed to make something in order to take out the opposition and scavenge his weapon.

Alternative Weapons

While this was a fun project, it’s a bit expensive for what you get. It’s basically a slam-fire .410. You can walk away with the satisfaction that you built a firearm on your own. Plus, putting it together may provide a better sense of how firearms work, along with the pride we all get whenever we build something with our own two hands.

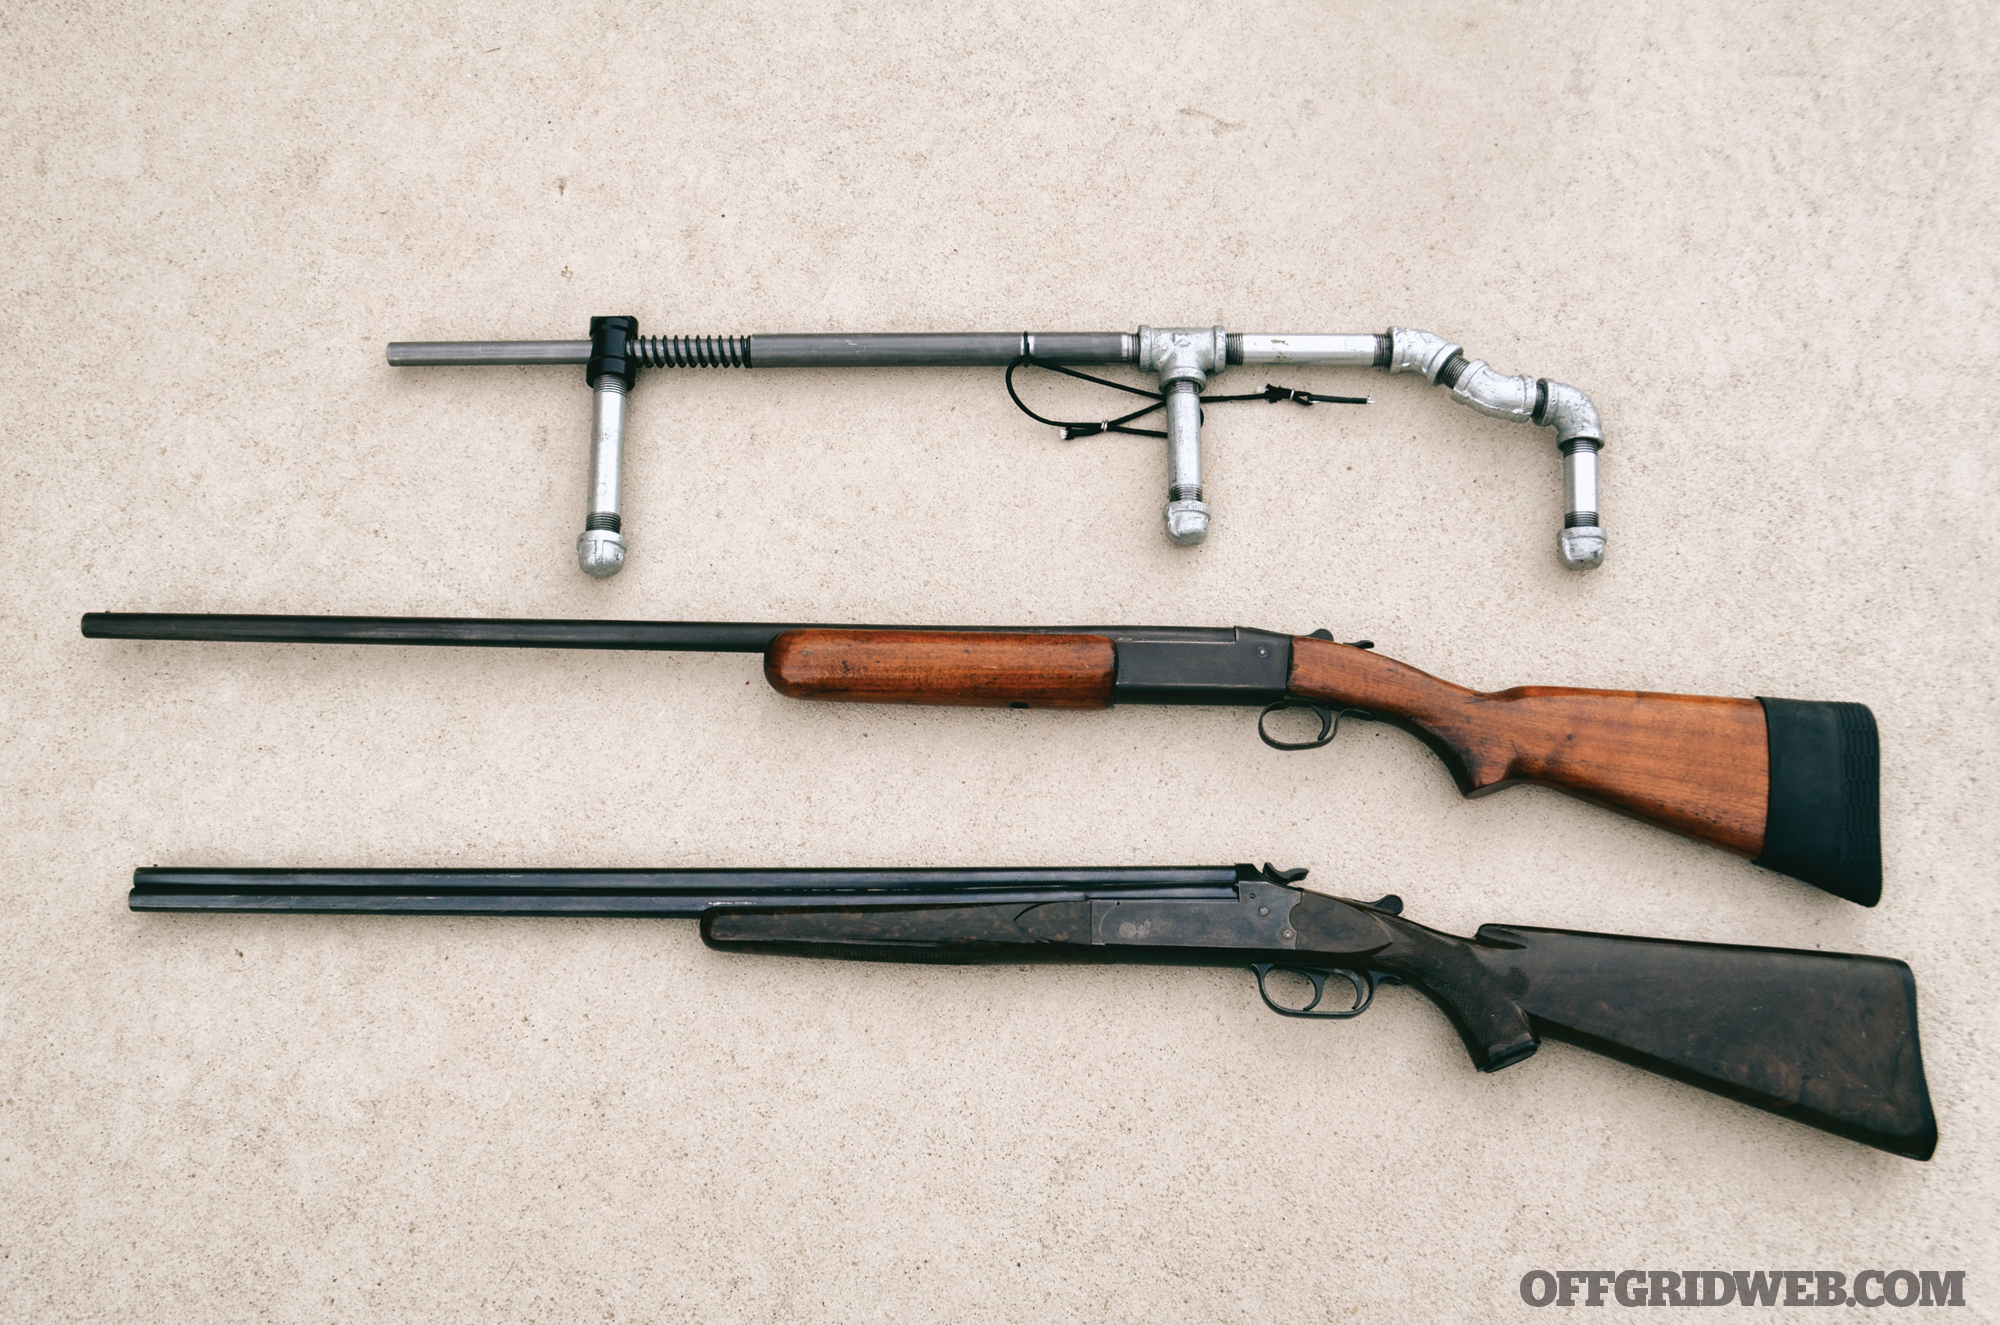
Above: For the cost of a completed Pop-A 410, a shooter can pick up a purpose-built shotgun in the same caliber, many made before 1968 also lack a serial number such as this single-shot Winchester Model 37 and an over/under Stevens Model 420.

If you’re mainly intrigued by the fact that you can build a firearm without a serial number and wondering why you'd invest the time and money in one of these, there are other alternatives.

For example, there are untold numbers of firearms, mostly shotguns and rimfire rifles, built before 1968 that have no serial numbers and can be purchased for much less than what was invested in this project. These aren’t just rusty single-shot cracked-stock scatterguns, either.

Over the years I’ve acquired single-shot shotguns made by Hopkins & Allen, New England Firearms, Harrington & Richardson, Iver Johnson, Savage/Stevens, and Winchester for less than $90 each — and in the case of the Hopkins & Allen and Stevens models, less than $40. An over/under Stevens 420 in .410 made 75 years ago set me back $110, and a bolt-action Sears 12-gauge cost me $60. None of these firearms have serial numbers; neither do a handful of 22 bolt-action and single-shot rifles I’ve acquired over the years.

Closing Thoughts

Above: It may not be a collector-grade, heirloom-quality firearm, but the Pop-A 410 survival shotgun represents a learning tool and a lightweight firearm that may be enough to keep you alive.

Any prepared individual should have low-cost firearms on hand, because they’re cheap, easy to learn how to use, and can be loaned, bartered, or otherwise utilized in the event of a large-scale long-term disaster.

The Pop-A 410 survival shotgun can fill this role, but it’s more significant along the lines of a first-time gun-builder understanding how a firearm can be built, along with the inspiration for ideas on how to build your own, should you find yourself in a situation where making a firearm from scratch may be your only option.

Examine your ammunition types on hand and see how they fit in various pipes or tubes. Find pipes or tubes in a suitable grade of metal to contain the chamber pressure of the firing sequence and experiment. You can build something like the Pop-A 410 to gain an understanding of how the parts fit together properly and take those concepts to forge ahead on your own.

The key to preparing for a disaster and surviving is the knowledge we obtain and how we successfully apply it. A simple project like this can act as food for your mind.

FAQ

  • Q: What is the simplest shotgun design?
    A: A break action is the simplest shotgun design. The “break” part simply means that the barrel (or barrels) hinge open from the receiver and stock.
  • Q: Can you make your own sawed off shotgun?
    A: The act of reducing the length of the barrel of a shotgun to less than 457 mm (18 inches) by sawing, cutting, or “otherwise”, by anyone other than a recognized gun manufacturer, is prohibited.
  • Q: What size pipe fits a 12-gauge shotgun shell?
    A: For 12-gauge slam fire shotgun, you'll need ¾- and 1-inch diameter pipes, plus a 1-inch cap to thread on the end of the 1-inch pipe that'll act as your receiver.
  • Q: What is a homemade shotgun called?
    A: Improvised firearms (sometimes called zip guns, pipe guns, or slam guns) are firearms manufactured other than by a firearms manufacturer or a gunsmith, and are typically constructed by adapting existing materials to the purpose.
  • Q: Is a slam fire shotgun legal?
    A: They must meet the 18” barrel length and 26” overall length to be non NFA. They must resemble a gun not being disguised as a cane for instance. That also would be NFA. If you can legally own a firearm you can build and own a slam fire shotgun in the USA.

Read More Like This

Don't forget to subscribe to Recoil Offgrid's free newsletter for more content like this.


Swiss Army Knife Uses: Ultimate Guide To A Classic Tool

In this age of titanium folding knives, state-of-the-art bushcraft blades, and $500 tactical tomahawks, it's easy to overlook one of the best survival tools that most us already own: the little red knife with the corkscrew.

A Victorinox Swiss Army knife is a small toolbox in your pocket. Have you ever cringed watching someone break the tip off his tactical knife while trying to turn a screw or pry a lid? Perhaps you've seen someone work up a sweat damaging or dulling his big blade while chopping or batoning a sapling, when a small saw blade would have sufficed? Tasks are often easier when you use the right tool. Swiss Army knives are available in many models, giving you lots of tool combinations to choose from without having to carry an entire toolbox. And no, not all of them feature corkscrews, and not all of them are red.

We've used this multitool in the woods and around the house, to prepare tinder, fashion snare triggers, tighten screws, strip wires, file corroded wires, open cans, repair toys, make an alcohol stove from a tuna can, and clear shooting lanes while. Once, on a high-profile detail as a police officer, this author even used the scissors on a Swiss Army knife to self-administer an emergency haircut when a grouchy superior officer went on a rant about “non-regulation” hair.

When it comes to matters of survival, a Swiss Army knife can be a lifesaver, too. Here we highlight five of the most unexpected uses for everyone's favorite little red multitool. For more useful survival hacks and tips, check out our book OFFGRID Presents: DIY Survival, on sale now.

Photo of a swiss army knife with all of its tools and blades on display.

Swiss Army Knife Basic Features

  • Main Blade: A sharp, stainless steel blade that folds into the handle.
  • Smaller Secondary Blade: Often included for more delicate cutting tasks.
  • Can Opener: Paired with a small screwdriver tip that works on flat-head screws.
  • Bottle Opener: This is usually combined with a larger screwdriver tip and also sometimes includes a wire stripper notch.
  • Scissors: Useful for cutting paper, trimming cloth, or other fine work.
  • Saw: A serrated blade that can saw through wood and other materials.
  • Awl or Reamer: A pointed tool for punching holes in leather or wood.
  • Corkscrew: For opening wine bottles.
  • Tweezers: Slotted into the casing, handy for picking up small objects or removing splinters.
  • Toothpick: A small plastic pick that can be used for cleaning.
  • Key Ring: Allows the knife to be attached to keys or gear.
  • Phillips Screwdriver: Some models include a Phillips head screwdriver.

Studio photo of a Victorinox Swiss Army Knife with a USB thumb drive included as one of the tools.

Additional features can include various other tools like a nail file, magnifying glass, pliers, fish scaler, hook disgorger, pen, digital clock, altimeter, USB stick, and even an LED light in some of the more modern or specialized versions. The specific tools included can vary widely from one Swiss Army knife to another, depending on the model and intended use.

Caring for a Swiss Army Knife

Taking care of a Swiss Army knife ensures it remains functional and lasts for many years. Here are some of the best care and maintenance tips:

  • Cleaning: After use, especially if it has come into contact with acidic substances or dirt, clean the blades and tools with warm water and a mild detergent. Make sure to open and clean each tool individually.
  • Drying: Thoroughly dry the knife after washing. Moisture can lead to rust and degradation of the metal components. Leave the tools out in a dry area or use a dry cloth to remove any moisture.
  • Oiling: Apply a drop of oil to the pivot points of the blades and tools to keep the action smooth. Use a lubricant that's safe for multi-tools and pocketknives.
  • Sharpening: Keep the blades sharp with a sharpening stone, honing rod, or a knife sharpener suitable for small blades. A sharp knife is safer and more efficient.
  • Tightening: The screws on the knife can become loose over time. Tighten them gently with a suitable screwdriver to ensure that the tools do not wobble.
  • Avoid Rust: Prevent rust by storing the knife in a dry place and avoiding prolonged exposure to wet environments. If rust does form, remove it with a rust remover appropriate for cutlery.
  • Regular Inspection: Periodically check the knife for any signs of wear or damage. Inspect the tools for sharpness, the handle for stability, and the overall function of the knife.
  • Proper Usage: Use the knife for its intended purposes only. Avoid using the knife as a pry bar, screwdriver as a chisel, or the blade as a hammer, as misuse can lead to damage.
  • Carrying Case: If you carry the knife daily, consider using a protective pouch or case to prevent dirt build-up and to protect it from the elements.
  • Avoiding Improper Storage: Do not store the knife in its sheath for long periods, especially if the sheath is leather, as leather can attract moisture and cause rust.
  • Avoid Dishwashers: The high heat and harsh detergents can damage the knife. Always opt for hand washing.
  • Polishing: For aesthetic maintenance, polish the knife with a metal polish appropriate for stainless steel, but ensure it's suitable for cutlery to avoid contamination of food.

5 Surprising Uses For a Swiss Army Knife

Survival Use #1: Start a Fire5-surprising-uses-for-the-swiss-army-knife-fire-starter001In a survival situation, you need to be able to make fire. You might carry a lighter and a ferrocerium rod with you, but those aren't the only sources of ignition. Our backup fire-starting kit uses a small piece of steel wool, the battery from a tactical flashlight, and, yes, our Swiss Army knife. The knife holds the battery in place and also forms most of the electrical circuit.


Step 1: Store a piece of steel wool inside your Swiss Army knife. Here's an easy way to do this. First, open the bottle opener and can opener on each end of your knife. Take a piece of steel wool and twist it in your fingers until you have a strong, twine-like piece just shorter than your knife is long. Push this inside the knife using the tweezers or toothpick, then close the can and bottle openers on top of it.

Step 2: When you're ready to start a fire, open the can opener all the way, but open the bottle opener just halfway, so that it's perpendicular to the rest of the knife. Remove your steel wool from inside and untwist some of it. You won't need much.

5-surprising-uses-for-the-swiss-army-knife-fire-starter002

Step 3: Place several strands of steel wool into a tinder bundle about the size of your thumbnail. A cotton ball with some shredded paper mixed in works well.

5-surprising-uses-for-the-swiss-army-knife-fire-starter003

Step 4: Remove a CR123A or similar battery from your tactical flashlight. Place the flat, negative end of the battery against the upright bottle opener. Lift the front of the battery slightly, and slowly close the can opener until it rests against the top of the battery, leaving a slight gap between the can opener and the positive nub of the battery. The battery should now be held in place by those two Swiss Army tools.

5-surprising-uses-for-the-swiss-army-knife-fire-starter004

Step 5: Holding the knife upright in one hand and the tinder/steel wool in the other, position the strands of steel wool so that it touches the positive terminal of the battery and the can opener. This completes the electrical circuit. The current will run from the battery through the knife to the steel wool and back to the battery. The steel wool is so fine that it'll heat up rapidly and begin to glow, until it catches the tinder on fire.

Note: Like many survival techniques, this requires practice, both to get the steel wool glowing hot and then to fan or blow the right amount of air onto a resulting ember in the tinder until it bursts into flame. This caught the author by surprise the first time he tried it, burning a thumb. Make sure you have other tinder and kindling ready nearby to keep your fire going.

Survival Use #2: Build a Stove

5-surprising-uses-for-the-swiss-army-knife-stove-building-001

There are many ways to make various types of alcohol stoves. Our favorite — and one of the easiest — uses a small potted meat can with two rows of holes punched around the top rim. The cook pot sits right on top, and the flames jet out of the holes. But what if your Swiss Army knife is your only tool? No problem. Here are two simple stoves you can make, one with a tuna can and the other with the bottoms of two soda cans.

Tuna Can Stove:

-5-surprising-uses-for-the-swiss-army-knife-tuna-can-stove-001

-5-surprising-uses-for-the-swiss-army-knife-tuna-can-stove-002

Step 1: Using the can opener on your Swiss Army knife, open the can of tuna, but don't completely remove the lid.

Step 2: Eat the tuna. It's good for you.

Step 3: Fold the lid back into the can.

Step 4: Fill the can with methyl alcohol — either denatured alcohol from a hardware store (used as paint thinner) or Heet brand gas-line antifreeze (the one in the yellow bottle). You can find Heet in most convenience stores.

The A-frame of the travois laid out and ready to be lashed together.

The A-frame of the travois laid out and ready to be lashed together.

Step 5: Place a couple of small stones (flat tops preferred) on either side of your stove to serve as your pot support.

Step 6: Light the stove. The flames will shoot through the gaps you cut between the can rim and the lid.

Step 7: Place your cook pot across the stones. Ideally, there should be an inch or less of space between the stove and your pot.

Soda Can Stove:

-5-surprising-uses-for-the-swiss-army-knife-soda-can-stove-001

Step 1: Begin with two empty soda cans with concave bottoms. Using the reamer tool of your Swiss Army knife, bore 6 to 10 holes in the bottom of one can, being careful not to let the reamer blade close on your fingers. The metal on soda cans is thin, so boring holes isn't difficult.

-5-surprising-uses-for-the-swiss-army-knife-soda-can-stove-002

Step 2: Cut the bottom inch off both cans. Use the reamer blade again so that you can keep your other knife blades sharp for other survival tasks.

-5-surprising-uses-for-the-swiss-army-knife-soda-can-stove-003

Step 3: Fit the two bottoms together — the one with holes in it goes inside the other one. You'll need to bend the edges slightly to get it started, then you'll be able to push them together. The fit will be snug.

-5-surprising-uses-for-the-swiss-army-knife-soda-can-stove-004

-5-surprising-uses-for-the-swiss-army-knife-soda-can-stove-005

Step 4: Your stove is done. Fill it with methyl alcohol through the holes you made. Light the stove. Use stones as a pot support as you did with the tuna can.

Notes: Burn time of these stoves is usually 15 minutes. They'll boil two cups of water in 8 to 12 minutes. If yours doesn't, try adding holes to the stove, placing the cook pot closer to the stove, or configuring a windscreen around the stove. Build time for each stove is about five minutes. For the tuna can stove, that time also included eating the tuna.

Survival Use #3: Craft a You-Haul

5-surprising-uses-for-the-swiss-army-knife-hauler-building-001

A travois is an A-frame of wooden poles used to haul heavy loads. Historically, they were pulled by horses. But you can construct smaller ones where you provide the horsepower. They can be handy if you need to move camp, haul out downed game, or get an injured companion out alive. You'll need the saw blade on your Swiss Army knife to construct it.

The author uses a Victorinox Hiker to saw downed saplings to make a travois.

The author uses a Victorinox Hiker to saw downed saplings to make a travois.

Step 1: Cut two branches about an inch in diameter to a length of 6 to 7 feet. These will be used for the outside of your A-frame. Lash them together to form two sides of a triangle.

The A-frame of the travois laid out and ready to be lashed together.

The A-frame of the travois laid out and ready to be lashed together.

Step 2: Cut one crossbar about 1 and 1/2-feet long to lash near the top of your A-frame. This will be your pushbar.

Paracord works fine for lashing wood, and the Swiss Army knife cuts the 'cord to just the right lengths.

Paracord works fine for lashing wood, and the Swiss Army knife cuts the ‘cord to just the right lengths.

Step 3: Cut two or more longer crossbars and lash these at intervals across the base. You now have a travois.

The author tests his finished travois with a pack attached to simulate the load. A travois can be a lifesaver when used to transport an injured companion.

The author tests his finished travois with a pack attached to simulate the load. A travois can be a lifesaver when used...

Step 4: Strap your load to the crossbars near the base.

Step 5: Step inside the A-frame and pick it up so that the push bar is along your waist. Hold on to the frame and start walking.

Note: You can lash the pieces together with paracord if you have it. If not, get out the Swiss Army knife again. Whittle the ends of the crossbars into a triangular shape to fit dovetail notches that you cut into the side pieces as outlined in the next item. It's time consuming, but it works.

Survival Use #4: Saw a Dovetail Notch

How do you join two pieces of wood together without cordage? Use the Dovetail Notch. Basically you cut a triangular notch into one piece of wood, whittle the end of the other into a triangular shape, and fit the two together. You can use this to make a frame to hang a kettle from a campfire or to fit poles together when building a shelter — anything you need to improvise in the field when cordage is in short supply.

5-surprising-uses-for-the-swiss-army-knife-dovetail-notch-sawing-001

Step 1: Using your Swiss Army knife's saw blade, make three cuts about halfway into a piece of wood where you want to make the notch. The first cut should be straight down. The other two, one on each side of the first, angle away.

5-surprising-uses-for-the-swiss-army-knife-dovetail-notch-sawing-002

Step 2: Use the saw and knife blades to remove the wood between your cuts, leaving a triangular notch that's narrow at the top and wider toward the center of the wood.

5-surprising-uses-for-the-swiss-army-knife-dovetail-notch-sawing-003

Step 3: Take the other piece of wood and carve the end into the shape of a triangle. Cut a little at a time and keep checking the fit to the notched piece until you have a tight connection.

You can attach two pieces of wood using a dovetail notch, made using the saw blade of a Swiss Army Knife. This dovetail technique can be used when cordage isn't available. For example, the author used sticks dovetailed together to form a pot stand.

You can attach two pieces of wood using a dovetail notch, made using the saw blade of a Swiss Army Knife. This dovetail...

Note: You can further secure the pieces by melting pine sap into the connections.

Survival Use #5: Clean Your Gun

A firearm is only good if you keep it in reliable working condition. You might be faced with doing a little field maintenance if you're far from civilization, whether on a camping trip, or a hunting trip, or while bugging out from a crisis.

Task 1: Use the small knife blade or scissors of your Swiss Army knife to cut cleaning patches from a cotton shirt.

Task 2: Use the toothpick and tweezers to reach into tight places to remove debris.

The author uses the tiny screwdriver from his Swiss Army knife as a pin punch to take down this Glock 20SF.

The author uses the tiny screwdriver from his Swiss Army knife as a pin punch to take down this Glock 20SF.

Task 3: Use the small screwdriver to punch pins.

Attaching a length of paracord to the parcel hook of a Swiss Army knife makes a handy improvised pull-through bore cleaner. Patches can be cut from a cotton shirt and attached with a small paper clip.

Attaching a length of paracord to the parcel hook of a Swiss Army knife makes a handy improvised pull-through bore...

Task 4: Use the parcel hook with a length of paracord to make a pull-through bore cleaner.

Task 5: Use the screwdrivers to adjust the sights or remove grip panels.

The Army Advantage

Whether in the open spaces of Mother Nature or the confines of an overcrowded city, a Swiss Army knife can help you solve most problems. These days there are plenty of models available that'll suit your needs and preferences.

Whether in the open spaces of Mother Nature or the confines of an overcrowded city, a Swiss Army knife can help you...

A Swiss Army knife makes an excellent everyday-carry tool. It can often be carried when it's not practical or legal to carry a larger knife. They're more socially acceptable too, as they're not apt to be seen as a threat when in civilized company.

So, tap into your inner MacGyver, no matter if your travels take you to wild forests, tall peaks, or urban jungles. With a Swiss Army knife and a little imagination, you have one of the best problem-solving gadgets ever created.

And yes, in case you're wondering, we've saved the day many a time by actually using the corkscrew to open a bottle of wine.

40 Additional Uses For A Swiss Army Knife

A Swiss Army knife is an incredibly versatile tool, known for its multipurpose application in various scenarios. Here’s a list of 40 practical uses that can come in handy in everyday situations or unexpected challenges:

  • Cutting Rope or Twine: The blade can quickly cut through materials for building shelters or tying down equipment.
  • Opening Cans: The can opener tool makes it easy to access food when you're away from a kitchen.
  • Sawing Through Wood: Handy for cutting small branches for a fire or shelter.
  • Screwdriving: Tighten or loosen screws with the flathead or Phillips head screwdriver.
  • Stripping Wire: Use the knife edge to strip insulation from electrical wires.
  • Drilling Holes: The awl can puncture leather, wood, or other materials.
  • Filing Nails: Keep your nails trim with the nail file.
  • Cutting Paper: The scissors are perfect for snipping paper or trimming maps.
  • Opening Bottles: The bottle opener is useful for hydration or celebrating a successful day outdoors.
  • Peeling Fruit: The smaller blade is ideal for peeling or slicing fruit.
  • Whittling Wood: Pass time or create tools by carving wood.
  • Picking Teeth: The toothpick can help maintain dental hygiene.
  • Tweezing Splinters: Use the tweezers to remove splinters or debris from skin.
  • Opening Letters: Slice through envelopes easily.
  • Scaling Fish: Clean and prepare a fresh catch with the scaler.
  • Measuring: Some models include a ruler for quick measurements.
  • Cleaning Under Nails: The knife tip or file can clean dirt from under fingernails.
  • Tightening Eyeglasses: The precision screwdriver can tighten small screws on glasses.
  • Punching a New Belt Hole: Modify a belt with the awl.
  • Cutting Cheese: A snack is easier with a blade at hand.
  • Opening Packaging: Slice through plastic or tape on packages.
  • Carving Messages or Signs: Leave messages on wood or soft stone.
  • Gutting Hooks: The knife can be used to remove fish hooks.
  • Emergency Haircut: Scissors can trim hair if needed.
  • Cutting Fishing Line: Quickly trim or cut lines when angling.
  • Tightening Gear: Use the screwdrivers for on-the-fly equipment repairs.
  • Scraping Surfaces: Remove stickers or clean surfaces.
  • Opening Wine: With a corkscrew, enjoy a bottle of wine outdoors.
  • Sealing Envelopes: Apply glue with the blade tip.
  • Emergency Sewing: The needle on the awl can help repair torn gear.
  • Cleaning Game: Process small game or fowl with various tools.
  • Marking Paths: Carve notches or symbols in trees to mark a trail.
  • Lifting Hot Cookware: The flat tool can serve as an impromptu pot lifter.
  • Breaking Down Boxes: Cut cardboard for recycling or storage.
  • Starting a Fire: The spark from striking steel against a rock can ignite tinder.
  • Cutting Bandages: The scissors can cut cloth for first aid.
  • Uncorking Champagne: Pop a celebratory bottle with the corkscrew.
  • Sharpening Sticks: Create points on sticks for cooking or defense.
  • Loosening Knots: The blade can pry apart tight knots.
  • Signal for Help: Reflect sunlight with the polished blade as a signal mirror.

Photo of a digital Victorinox Swiss Army Knife.

Swiss Army Knife Trivia

Which Knife? The company that would become Victorinox provided its first Soldier's Knife to the Swiss Army in 1891. But the familiar red knife with the corkscrew that we normally think of as a Swiss Army knife was actually the Officer's Knife, introduced in 1897, and it was never adopted by the Swiss Army. It wasn't until after World War II, when G.I.'s began bringing them home, that the little knife became a must-have gadget around the world.

Unlock the Puzzle: Want to test the knowledge of your “knife expert” friends? Open the locking blade of a Victorinox Rangergrip knife and see how long it takes before they can figure out how to close the blade. The Victorinox insignia on the handle is a spring-loaded button that unlocks the mechanism.

Space Age: NASA issued a Victorinox Master Craftsman model to the crews of its space shuttles. It was a German astronaut, Ulf Merbold, who used a Swiss Army knife on a shuttle mission in 1983 to rewire some electrical connections, saving some expensive scientific experiments.

Lots of Tools: The Swiss Champ, the flagship of the company's gadget knives, has 33 functions. It's made from 64 different parts and takes 450 different operations to manufacture.

Screwy idea: When a customer suggested the addition of a tiny screwdriver, the Victorinox designers didn't want to do away with the toothpick to find room for one. That's when they created the screwdriver that fits inside the corkscrew.

What's in a Name? Founder Karl Elsener began using his deceased mother's name, Victoria, as a trademark in 1909, the same year the company was given permission to put the Swiss emblem on its knives to differentiate them from imitations. In 1923, the company switched to using stainless steel and used the name Victoria Inoxyd, with inoxyd being a shortened form of the French word for stainless steel, inoxydable. By 1931, the company combined the names, and the company has been called Victorinox ever since.

The Competition: The company that eventually became known as Wenger was awarded part of the contract to provide knives to the Swiss Army in 1893. Victorinox marketed its products to the public as “the original Swiss Army knife,” while Wenger promoted its products as “the genuine Swiss Army Knife.” Victorinox acquired Wenger in 2005, and since 2013, all the knives now wear the Victorinox label.

Counterfeit Alert: Make sure you don't get stuck with an imitation. All new genuine Swiss Army knives have “Victorinox” stamped at the base of the large blade.

Real-Life Application

As the name tells us, the Swiss Army knife started out in life as a tool for Swiss soldiers. So it was meant to survive combat, training, and harsh conditions. But it's also been used as a wide variety of impromptu tools. Here's a few of the most amazing adaptations of the little red multitool:

The North Pole Shoemaker
When Tyler Fish and John Huston made an unsupported expedition to the North Pole, Swiss Army knives were a crucial part of their gear. Their success and often their survival depended on them. Fish's overboot kept popping out of the ski binding, so he used the blade, scissors, and chisel of his knife to reshape the sole of the boot to match the ski binding.
They also used the knives to keep their stoves running, guide sewing needles when they had lost feeling in their fingertips, cut bandages for blisters, screw traction skins to their skis, patch boot liners, untie frozen knots, repair ski poles, splint a busted ski tip, and fix a cracked ski binding.

The Space Station Breacher
When Canadian astronaut Chris Hadfield was docking his space shuttle to the Russian Mir space station, he found the Russians had been overzealous in sealing the hatch. Hadfield used his Swiss Army Knife “to break into the Russian space station” by cutting away the strapping and tape. The Swiss Army knife: Don't leave Earth without it.

The Other Impromptu Uses
In his excellent book, Swiss Army Knives: A Collector's Companion, author Derek Jackson recounts more truly remarkable ways Swiss Army knife owners have put these tools to work:

Faster than a Speeding Train: In Germany, a railroad worker raced to lower a stuck barrier so car traffic wouldn't cross the tracks into the path of an oncoming train. He inserted the small blade of his Swiss Army knife into the barrier's mechanism and managed to lower the barrier just in time.

Coconuts for Dinner Again? An officer in the British Army reported that during an expedition in the South Seas with his soldiers, coconuts were a regular part of their diet. They used the Swiss Army knife's reamer tool to drill out the coconut eyes.

“Bee” Careful: In South Australia, a bee flew into a bus and stung a girl who was allergic to bee stings. Another passenger used the magnifier on his Swiss Army knife to confirm that the bee's poison sac hadn't been emptied and then used the tweezers to remove the stinger.

Roadside Surgery: In Ireland in 1990, a boy on a bicycle was struck by a car and suffered serious internal injuries. Doctors in a passing car stopped and used a Swiss Army knife to insert a drain in the boy's chest while they waited for paramedics.

Grim Emergency Surgery: After his surgical saw was stolen, a Canadian doctor working in rural Uganda used the saw blade on his Swiss Army knife to perform at least six amputations.

Clothes Remover: During an expedition to the North Pole in the winter of '76-'77, British explorers routinely used Swiss Army knives to remove ice from sleds and to open cans of food. The temperature was about -34 degrees F when a member of the expedition fell through a sheet of ice. They used the Swiss multitool to cut him free of his instantly frozen clothes and were able to get him dried out before he froze to death.

A Real MacGyver: A Swiss Army knife comes in handy for urban survival situations too. In 1992, Douglas MacIver of Portland, Oregon, was stuck alone in an elevator just above the first floor of an old building. There was a fire above him in the elevator shaft and the elevator began filling with smoke. As rescuers worked to free him, he took action himself. He used his Swiss Champ knife to loosen nuts to get the elevator doors open. He then had to remove the hinges from a window on the sealed-off mezzanine level where he was finally rescued. Although he spelled his name differently, he was compared to the television character, MacGyver, who often used a Swiss Army knife to get out of tough situations.

Sources

Swiss Army Knives: A Collector's Companion
Compendium Publishing Ltd.
www.amazon.com

Victorinox Swiss Army
www.swissarmy.com

More From Issue 21

Don’t miss essential survival insights—sign up for Recoil Offgrid's free newsletter today!

Read articles from the next issue of Recoil Offgrid: Issue 22

Read articles from the previous issue of Recoil Offgrid: Issue 20

Check out our other publications on the web: Recoil | Gun Digest | Blade | RecoilTV | RECOILtv (YouTube)

Editor's Note: This article has been modified from its original version for the web.


ARCH Gen 3 Ballistic Helmet

Should you get a non-armored (bump) helmet or an armored (ballistic) helmet? This is a constant source of debate in the firearms community, and there are arguments to be made for each side. Ballistic helmets can protect your head from incoming bullets, shrapnel from explosives, and flying fragments of debris from the surrounding environment; this is essential in a battlefield setting, because even a minor head injury can take a combatant out of the fight and lead to a lifetime of medical complications.

Naturally, this protection comes with some compromises — most importantly, ballistic helmets are heavier than bump helmets and generally much more expensive. The weight aspect is unavoidable, since layered Kevlar is heavier than thin polymer, but a new product from Night Vision Network (NVN) has shown that the cost gap may not be as substantial as you think.

Studio photo of the ARCH Gen 3 Ballistic Helmet

The ARCH Gen 3

Night Vision Network offers a ballistic helmet called the PGD ARCH Gen 3 at a reasonable price point of $549. For context, that’s only $187 more than the Team Wendy bump helmet mentioned earlier in this article, but with the added benefit of ballistic protection. And at just under 3 pounds complete, it’s only 6 ounces heavier than a comparable Team Wendy ballistic helmet (which costs more than $1,300).

Unlike many of its affordably priced competitors, the ARCH Gen 3 is not sourced from or manufactured in China. This high-cut helmet uses genuine DuPont Kevlar Aramid material that’s pressed into shape in Bulgaria and assembled in Denmark (both allies of the United States). NVN imports these helmets from the manufacturer, Protection Group Denmark (PGD), to the U.S. These helmets are tested to NIJ standards in an internationally recognized facility that’s certified by the U.S. Department of Defense.

The specifics of armor performance and testing are a very deep rabbit hole, so we’ll give you the high-level details. The ARCH Gen 3 is approved for NIJ 0106.01 Level IIIA standards and is rated to stop rounds up to .44 Magnum. Additionally, it has been tested for and shown to withstand 17-grain fragments of shrapnel traveling at 700 meters per second, according to the STANAG2920 test procedure (NATO’s standard for testing ballistic protection). Deformation depth has also been carefully studied; average deformation against a 9mm bullet impact was 11.2mm.

The ARCH Gen 3 is currently available in two sizes (M/L and L/XL) as well as three colors (black, FDE, and OD green). Each includes a front shroud that’s compatible with the Wilcox G24 night vision mount, as well as side rails that accept all the common aftermarket components — Peltor and Ops-Core AMP ear pro mounts, Picatinny rail sections, lights, and so on.

Other Features

No helmet would be complete without pads and a chin strap, so NVN includes a package of super cushy memory foam pads and a finely adjustable BOA suspension system. Both of those components are common aftermarket upgrades for other helmets on the market, so it’s great to see they’re included here. Stick-on Velcro sections are included to allow attachment of infrared strobes, helmet cameras, and other accessories.

We originally got our hands on the ARCH helmet during RECOIL’s CANCON Arizona range event. Night Vision Network set up a special after-dark shoot for VIP ticket holders and outfitted each attendee with an ARCH helmet equipped with night vision to try out on the range. Under guidance from instructors, attendees strapped on their helmets, flipped down their NVN night vision tubes, and stepped up to the firing line.

They practiced active aiming with infrared lasers, as well as passive aiming through a variety of weapon optics. This was an impactful and fun experience since many of them had never worn a ballistic helmet or used night vision before. More than a few walked away grinning and saying, “I’ve got to get a setup like that!”

Final Thoughts

If you need ballistic protection and are looking for a quality helmet that won’t break the bank (or your scale), the ARCH Gen 3 is worth checking out. And as a leading supplier of night vision systems, NVN can also get you set up with NODs, mounts, ear pro, and other helmet accessories.

Source

Night Vision Network

URL: nightvisionnetwork.com

Read More


Night Vision: Armasight’s PVS-14 “Starter Kit”

We’ve talked before about the vast capabilities afforded by having some type of night observation device (NOD) as part of your preparedness plan. Once you’re past the basics of food, water, safety, and power, we’d rank having a night vision device such as NODs as a Top 3 consideration beyond those — more so than body armor or huge stockpiles of ammunition. Before you balk at that statement, remember that our world is dark 50 percent of the time, and decades of crime statistics support the notion that people prefer to do bad things under the cover of darkness.

Photo of a view through night vision optics.

Above: The view through our white phosphor Armasight PVS-14 was clear and crisp with no noticeable blemishes.

When you couple this with the fact that more people will be more inclined to do bad things when resources are scarce, or they feel threatened or afraid, the ability to see clearly at night becomes immensely important. Can you do the job with flashlights and fire? Absolutely, but NODs offer the distinctly unique advantage of being able to see without being seen.

Night Vision Benefits & Drawbacks

While most Hollywood depictions of survival situations include dramatic gunfights or street brawls with baseball bats wrapped in barbed wire, the reality is spotting and avoiding a fight is always safer than trying to out-violence the other party. Especially if your preparedness plan includes looking out for loved ones or children. Even within preparedness and self-sufficiency circles, night vision is most commonly discussed in context of shooting. But there are a myriad of other applications for these devices that aren’t gun-related at all.

Photo of a man wearing night vision mounted to a helmet in the down position.

Above: The Armasight helmet kit has everything you need to get started with night vision: helmet, mount, PVS-14, and even a padded carrying case.

The most obvious is passive observation. Whether the power goes out on your street, or you are hunkered down at a campsite or rural “bugout” property, NODs give you a clear sweeping view of your surrounding area that puts even the best flashlights to shame. Likewise, driving at night is greatly enhanced with night vision. Granted, we don’t recommend turning your headlights off on your evening commute home to drive with night-vision — in that setting, being seen by other motorists is actually beneficial.

But in blackout conditions where you may be alone on the roads, or where broadcasting your position could attract unwanted attention, it’s an effective in extremis option to have if needed. The flexibility to use this option is, again, greatly increased if traversing backroad trails on a dirt bike or ATV. The same benefits apply if moving overland on foot. Even sitting in your living room, peeking out the window to check for trouble when the dog starts going nuts in the middle of the night is a potential use case for these devices. And all of this is possible to do completely hands-free, another advantage over portable light sources like lanterns and flashlights.

Photo of the view through night vision optics.

Above: Threats obscured by darkness become as clear as day.

The biggest barrier-to-entry for consumers to get set up with night vision is cost. Despite the fact that image intensification technology has been used by the military since the 1950s, pricing remains prohibitively high for most. This is partly due to the specialized materials and equipment needed to produce them, and partly because — even with their recent proliferation into the consumer market — these devices are produced in incredibly small quantities compared to other consumer electronics. The other factor that drives cost is that, to be utilized to their full capabilities, NODs must be considered as a system rather than an individual item.

Photo of a man wearing night vision optics mounted to a helmet in the up position.

Above: The Wilcox G24 mount allows the PVS-14 monocular to flip out of the way with the press of a button when it’s not in use.

Building a Night Vision Kit

While you certainly can go out and buy a night vision monocular by itself, and nothing else, that relegates you to handheld use only, which undercuts one of the primary advantages of NODs in the first place. But overcoming this requires several other components:

  • A way to securely wear the NODS on your head (e.g., a helmet)
  • A mounting bracket to attach the NODs to the headgear
  • An adapter arm to plug the NODs themselves into the mounting bracket

When you consider that the industry standard mount (i.e., a flip-down, adjustable adapter arm) for most night vision devices, the G24 by Wilcox Industries, sells for over $500 by itself, the financial investment required for a proper night vision system becomes painfully apparent.

Studio photo of a Team Wendy Exfil LTP bump helmet in Armasight’s signature gray color.

Above: Each kit comes with a Team Wendy Exfil LTP bump helmet in Armasight’s signature gray color. The helmet features a built-in shroud for attaching an NV mount, as well as Exfil LTP 3.0 accessory rails.

Furthermore, if you don’t know exactly what you’re shopping for, it’s very easy to get duped with counterfeit components — even when you shop directly from night vision manufacturers. (This specific issue happened to us when RECOIL OFFGRID staff received a set of test NODs directly from a company that produces night vision. That sample, shipped from the factory, included a surprisingly convincing counterfeit G24 as part of the test kit.)

Armasight’s NV Starter Kit

Seeing the need to ensure customers can utilize their NODs to full capacity without worrying about buying incorrect or counterfeit parts, Armasight has brought to market a complete and comprehensive night vision “starter kit.” It includes everything you need to open the box and put your NODs directly to work at an MSRP of $6,399. Our test kit included the following:

  • A single-tube PVS-14 style night vision device with Armasight’s Pinnacle tube
  • A gray Team Wendy bump helmet (not ballistic rated) with Wilcox shroud (i.e., the plate the mount attaches to)
  • A (genuine) Wilson G24 mounting arm, co-branded with Wilcox and Armasight logos
  • A gray Otte Gear OG Helmet Bag

RECOIL OFFGRID staff has reviewed Team Wendy’s helmets in several previous articles and continues to rely on those helmets regularly for classes and training. In situations where ballistic protection isn’t needed, the TW bump helmet is an excellent, lightweight, and affordable choice from a company with an established reputation for high-quality cranial protection equipment. Their suspension system is one of the most comfortable ones we’ve come across, and our test helmet included accessory rails over the ears for mounting communications gear, over-the-ear hearing protection, or small flashlights for administrative tasks.

Photo of a Gen 3 Ghost Pinnacle PVS-14

Above: This Gen 3 Ghost Pinnacle PVS-14 from Armasight is rated at a minimum FOM of 2000. For $1,000 more, you can select a Pinnacle Elite tube with a minimum FOM of 2376.

The Otte Gear helmet bag is also an item that our staff was already using before we received the one in our Armasight kit. This bag is an incredibly lightweight, well-thought-out bag meant to carry your helmet, NODs, and some accessories. There’s enough room inside for the helmet, and even includes hook-and-loop straps to secure your helmet so it doesn’t move around during transport.

There are also moveable dividers and a small rectangular zip-pouch inside specifically sized to hold single- or dual-tube NODs. We were able to fit the PVS-14 and its G24 mounting arm inside this pouch with no issue. The dividers allow you to section off space in the bag for comms cables, lights, batteries, counterweights, or other small sundries often associated with nighttime operations. The bag comes in all of the standard tactical colors, and several MultiCam patterns. Our sample bag was gray and matched the included Team Wendy helmet almost perfectly — a very nice touch on the part of Armasight to color-coordinate the accessories.

The Wilcox G24, as stated, is the industry standard for night vision mounting arms. It provides adjustments for height and linear distance (how close the NODs sit to your eye) and has a rock-solid lockup, whether the NODs are raised or lowered. It’s a premium product at a premium price, so we’re glad to see it here rather than a low-cost alternative. Also included are two “J-arms” — the pieces that actually attached to the night vision unit itself.

Studio photo of night vision optic mounts accessories from left to right: J-arm for standard-issue USGI Rhino mount, J arm for Wilcox dovetail mount, Wilcox L4 G24 night vision mount.

Above: Included accessories from left to right: J-arm for standard-issue USGI Rhino mount, J arm for Wilcox dovetail mount, Wilcox L4 G24 night vision mount.

With dual-tube units, the housing itself comes with an integrated dovetail to hook onto the G24. But the PVS-14 style housings have a screw hole, which requires a J-arm to bridge from the unit to the G24. Our Armasight kit included two J-arms: one with the Wilcox-compatible dovetail, and a second with a snap-in pinch clip. The latter is left over from legacy military mounting systems. Prior to the days of having helmets with shrouds on the front, soldiers used a plastic-and-nylon apparatus nicknamed the “skull crusher” by those who wore them.

Looking like dental headgear made from straps and ABS plastic, the skull crusher was widely used by military forces needing to wear night vision for many years. Interestingly enough, our test kit also came with a skull crusher for those who don’t want to use the Team Wendy helmet, and also enjoy having headaches in the dark. For those who want something more comfortable than a skull crusher without the bulk of a helmet, we also experimented with a Crye Precision NightCap, a mesh nylon watch-cap style garment with padding and a modern shroud up front. Hook-and-loop patches on the cap allow the attachment of signal strobes or counterweights.

The single-tube NV device houses Armasight’s Pinnacle tube, which, according to the manufacturer, is rated for minimum of 2000 FOM. Armasight also offers an optional Pinnacle Elite tube rated at a minimum of 2376 FOM; MSRP for that kit is $7,399. The Figure of Merit (FOM) is a rating that measures the overall image clarity and effectiveness of the tube. Generally speaking, a minimum FOM of 2300 or higher falls into top-of-the-line category. Of course, higher FOM typically translates directly into higher price.

Studio photo of a Mil-spec “skullcrusher”

Above: This Mil-spec “skullcrusher” headgear was included in the kit as a helmet alternative. It’s nice to have as a backup, but it’s about as comfortable as the name implies.

So, there’s a trade-off to be considered in terms of budget. There’s a strong culture in the night vision community of “get the best or don’t get anything at all,” which is echoed in lots of social media posts and forum discussions, usually along with the snarky quip of “don’t be poor.” But the reality is that a top-of-the-line system with a five-figure price tag is just not attainable for many of us, regardless of how long we save up or how hard we shop for the best deals.

General Patton once said, “a good plan executed now is better than a perfect plan next week.” In the same vein, we think there’s a legitimate counterargument to be made that having the capability of night vision is better than not having it. If a top-tier unit isn’t reasonably in your price range, the Armasight Pinnacle tubes provide good image clarity and are wholly appropriate for most civilian applications. While this logic is bound to offend NV aficionados — and we understand why, to a degree — the bottom line is having access to effective night vision now might be better than waiting months or years until you can afford something a few percentage points better.

There’s obviously a point of diminished returns when bargain shopping for this kind of equipment. You can find dubious “night vision” systems on Amazon for a couple hundred bucks, but we strongly advise not going that route as it’ll absolutely be money wasted when you need to use it at a critical time. Our experience with Armasight’s unit is the closest we’ve come to finding mid-market NODs that are up to the task while offering reasonable compromise for cost.

Studio photo of a helmet covered in a Crye Precision Nightcap

Above: The Crye Precision Nightcap is a much more comfortable way to wear a PVS-14 in situations where you don’t want or need a helmet. (Not included in the Armasight kit.)

What About Dual Tubes?

There’s no denying the sex appeal of dual-tube units, but we also think a single-tube PVS-14 style device is the most versatile option for general use. Sometimes referred to as “the AK-47 of night vision,” the PVS-14 monocular gives you full night vision capability without the additional cost, weight, or complexity of dual-tubes.

Additionally, the single-tube setup excels in mixed lighting environments like urban or suburban environments where you’re not dealing with total blackout conditions. It keeps one eye free to make use of the increased ambient light, and we’ve found this to be a big advantage for spatial awareness in mixed-light settings. For those who strongly prefer dual-tube units, Armasight does offer a corresponding kit with all of the same accessories that includes dual-tube NODs, albeit at a higher price point.

Studio photo of a gray Armasight-branded carrying case from Otte Gear .

Above: A gray Armasight-branded carrying case from Otte Gear ensures all the components stay secure, protected, and clean when they’re not in use. Night vision gear isn’t cheap, so protecting it is crucial.

Closing Thoughts

To date, this is the only kit we’ve seen that provides a civilian-oriented, “turnkey” solution with all of the required pieces of equipment to take full advantage of having NODs in your inventory. Even though it’s possible to purchase all of these items separately, perhaps with a small amount of savings if you shop hard, the convenience afforded by Armasight’s bundle approach is immediately apparent.

For entry-level consumers who don’t have the budget or man-hours to dive down the technical rabbit hole of piecing together a night vision setup, this kit is a solid place to start from. If you don’t already have any of the required components in your preparedness loadout and are looking to add nighttime working capability, we encourage you to consider this bundle.

Source

Armasight

URL: armasight.com

Read More

Don't forget to subscribe to Recoil Offgrid's free newsletter for more content like this.


Carleigh Fairchild Discusses Her Time on the TV Show Alone

There’s something primal that stirs within us at the thought of being isolated in a remote place. As social creatures, many of us instinctively shy away from situations that separate us from our fellow humans. Others are drawn to solitude, so that they may more clearly hear their inner voice — a voice that’s often drowned out by the modern-day electronic hum that permeates our lives. The latter individuals typically remain secluded only for a short period of time, before having to return to the social tasks their lives demand. However, there are an elite few who have grappled with not only the physical dangers of the remote wilderness, but also with their own inner demons for months at a time without another human soul to lean on for support. Carleigh Fairchild is one such person.

Since the age of 13, her life has been immersed in wilderness survival and survival skills training. After turning 18, she moved to Washington state to learn primitive skills, and tested herself by successfully solo backpacking 500 miles on the Pacific Crest Trail. Having traveled the country honing her skills, she took on one of popular culture’s most difficult survival challenges by becoming a contestant on History Channel’s Alone — not once, but twice.

Carleigh Fairchild working on a pioneering project.

First, she went to the foothills of the Andes mountains in Patagonia, Argentina, on Season 3. She returned to the show on Season 5, which took place in Mongolia. Today, Carleigh uses her vast experience by teaching others how to reconnect with their surroundings and themselves, much like our not-so-distant ancestors did on a daily basis. We were able to attend a wild edibles class she was teaching at the Georgia Bushcraft Campground near Watkinsville, Georgia, and had the opportunity to sit down with her to learn more about her survival experience and what it was like to survive for 86 days in Patagonia, alone.

Carleigh Fairchild Interview

RECOIL OFFGRID: You started learning wilderness survival skills as a child, what do you feel drew you to that endeavor?

Carleigh Fairchild: My mom started me on the path of learning survival skills when she went to the Tracker School run by Tom Brown Jr. in New Jersey. They have a wide variety of classes. They start with their Standard Course which covers pretty much all of the basics of survival skills, and then there’s more advanced survival skills and tracking classes.

She came home from that and showed me the bow drill kit she had made. It was my first look at making a fire without matches or a lighter. I was fascinated that you could truly rub two sticks together and make a coal. I wanted to learn more. Luckily, I was able to attend a teen summer camp the next year when I was 13 to learn earth skills. I loved the connection the skills brought to me — connection with the earth, connection with my own abilities, and connection with others also passionate about those skills.

Carleigh in a debris shelter.

Above: As a young teenager, Carleigh spent time in the woods building shelters and practicing wilderness skills.

ROG: Earth skills is a term you don’t hear too often. What do you mean by that?

CF: Earth skills are basically anything that involves working with the earth. Things like drill fires, finding water, building shelters. Sometimes I still use the term survival skills, but I am trying to intentionally use “earth skills” more often, because they are skills that can be used in daily life, not only when trying to survive.

All too often the survival mindset is one of scarcity and constant challenge. I want to live a life of abundance and ease, at least some of the time. So why am I just surviving when I want to live and thrive? That was my focus when I was on Alone — I am not here surviving, I am here to live.

ROG: What were some of the most challenging skills you developed, and why were they so difficult?

CF: Flint knapping and trapping. It has been harder for me to connect with those skills and see and know how they work. I think this was because I was less drawn to them, partly because of interest and partly because I sometimes have a difficult time understanding things like the structure of rocks or trapping dynamics. I can make a stone tool, but I don’t really knap pieces into blades or arrow heads. At the moment, I have a serviceable level of skill in these areas, but I don’t really spend a lot of time on them. I feel everybody is drawn to certain things in life, and for me, I’m drawn to other skills.

Photo of Carleigh Solo hiking a 500-mile section of the Pacific Crest Trail.

Above: Solo hiking a 500-mile section of the Pacific Crest Trail.

ROG: How was survival different in Patagonia versus Alaska or the continental United States?

CF: There were so many species of plants, trees, birds, and animals I was unfamiliar with in Patagonia, but that made it exciting to learn about. Before I arrived there, I had a short amount of time — maybe two to three weeks — where I tried to research as much as I could about the region. But the region was so huge, it was challenging to learn everything about it. Even the moon looked different because I was in the southern hemisphere and most of the constellations were different. It’s a little like the eastern United States, where you have everything from swamps in Florida to the hardwood forests in Maine, and everything in between. There are a lot of distinct species, so it was a bit of a shot in the dark researching before I went.

Once we were on the ground there, we had a little bit of time to learn. We were staying on a style of ranch, and there really wasn’t anyone to help us get acquainted with the area. We had a brief orientation, but once we were out there competing, there wasn’t anyone we could ask questions to. I think I learned maybe three new plants that were helpful that I found in my area. All the other ones that I harvested for food were ones that I knew from the United States.

The forest in Patagonia was primarily evergreen broadleaf trees, but the leaves were very tiny. When it came to shelter building, I was challenged by the leaves being so small. I couldn’t gather great big armloads, only small handfuls. So I had to make a bag out of the cowhide I found to gather them. 

ROG: One of the most difficult challenges for Alone contestants are the feelings that accompany isolation. What was the most effective method of coping with loneliness that you used to outlast your competitors?

CF: My coping strategy began when I first landed on the pebble beach where I started. Even though there was a pressing need to get a shelter made, get a fire going, and explore the area, the first thing I did was actually sit down and take a few deep breaths and observe where I was before just rushing off. During this process, I introduced myself to the land, and said out loud what my intentions were for being there. Something along the lines of, “Hey, I’m Carleigh. I’m here to build a home and live here for as long as I can as a caretaker of the land, and hopefully be here long enough to win.” In this way, even though I was alone the whole time I was not lonely very often.

I built personal connections with the nature around me — the birds, plants, trees, mountains, and the lake. Connecting with nature was my most effective method of coping with loneliness. Being emotionally honest and recognizing when I felt that isolation turning into loneliness was helpful as well. When I found myself thinking about my loved ones, I acknowledged my feelings, then did my best to redirect back to the present moment and what I needed to do.

Fairchild Hiking and enjoying the natural beauty of Alaska.

Above: Hiking and enjoying the natural beauty of Alaska.

As my time in the Patagonia wilderness progressed, I continued building connections with the land by exploring the land daily and creating a mental map of where everything was. Certain areas would stand out in my mind — like certain trees, game trails, berry patches, places for firewood — and I would place them on my mental map as if I was looking down on it from above. Taking my role as a caretaker of the land seriously, if I had to harvest a sapling for my shelter, or food, or firewood, I did so in a way that the ones left behind would hopefully grow stronger and healthier. This deepened my connection with the land and was a respectful and reciprocating relationship.

ROG: Out of all the survival skills you’ve learned over the course of your life, what are your top three you would recommend everyone should learn?

CF: I would split skills into two categories, soft skills and hard skills, so I’ll give you three of each. For soft skills, the three most important I think would be the power of observation, being able to improvise/adapt, and trusting yourself. The three most important hard skills I think would be natural shelter making, fire making, and basket making. I know the talk of which skills are the most important can be a contentious subject, but contention can be helpful sometimes.

Now when I say the power of observation, that encompasses a lot, and is not just what you see with your eyes. It’s more of a developed awareness. What we are (or aren’t) aware of limits us and what we believe is possible. So, it’s about being able to observe what’s going on around us externally, what’s happening with our bodies internally, and how those processes drive us in a circumstantial and contextual way. It’s really a full spectrum sense of physical awareness coupled with mindfulness, intuition, and even spirituality.

Your power of observation ties in directly to improvisation and adaptation, because when your awareness is developed, you can start asking yourself questions like, “what do I need?” or “what do I have that can make something I need?” Then you can start looking for a potential resource to address that concern. If we don’t know what we need, then how do we even begin to look for a solution? If we can identify what is around us and know what resources are available, then we can begin the process of adapting and improvising.

Trusting ourselves is not very predominant in our society these days, but it is a vital skill. There are so many things in marketing or advertising that are saying things like, you’re not good enough, or you need this item to feel good. I think we are actually born with the ability to know a lot of things, and because of how many people grow up, we don’t keep that trust in ourselves. It gets overshadowed by the external things that get projected on us. I think it’s something that we all need to work on more and rediscover about ourselves.

Shelter making is a skill that is super critical in every environment, because we are humans, and we need protection from extreme heat, cold, precipitation, etc. So, if you don’t have a building to shelter in, knowing how to build your own is critical. Plus, I think it’s just a fun skill to learn.

Carleigh Fairchild After a successful turkey hunt.

Above: After a successful turkey hunt.

Fire-making is crucial because it will cook food, purify water, keep you dry, and can be a weapon if you’re concerned about some crazy animals or people. It can even be a comfort item. Learning how to make a fire is another fun skill that is easy to practice in your backyard or with friends. You can also challenge yourself by seeing if you can gather enough items to start a fire in five minutes or less.

Basket-making makes it to my top three hard skills because for any long-term survival situation or even weekend survival camping, we need containers to hold things. We need containers to hold the food that we forage, storage of fire-making supplies, and if a container is sealed properly, transport larger volumes of water. It’s a very utilitarian item that makes life so much easier.

There are so many other skills that are wrapped up into those three, like knife or ax skills and plant identification. If you know how to build a shelter, start a fire, or make a basket, you’ll have several other vital skills already in your toolbox.

ROG: How did the locals in South America and Mongolia react to your goals as an Alone contestant?

CF: We had very limited time in South America to interact with locals — almost none. They brought us to a local farm for a mini cultural experience in Patagonia, but there wasn’t a lot of one-on-one conversation going on. Mongolia was more or less the same. During the limited interaction I had with locals, they seemed to be excited for us but also very curious as to why we were trying to survive there. They wished us well.

ROG: How did your experience in Patagonia affect the items you decided to pack and bring with you to Mongolia?

CF: My experience in Patagonia affected my choice of items to pack when I went to Mongolia, because I had a better understanding of just how important it was to be able to get food. So, I wanted to increase my tools that would help me obtain more food resources. In Mongolia, instead of an ax, I brought a bow and arrows in hopes that I would be able to harvest a larger animal.

One of my biggest shifts in mindset going between the two locations was that I needed to spend more time focusing on nutrition. Several times in the first three weeks at Patagonia, finding food was almost an afterthought, and I focused primarily on making my shelter. I thought I could just fast or eat a tiny bit and be fine. It didn’t take long to realize that making that choice over and over again isn’t helpful. So, starting on day one in Mongolia, I made a conscious effort to spend several hours a day finding food, whether that was hunting, foraging, or fishing.

Photo of Carleigh Starting a fire with the bow drill method.

Above: Starting a fire with the bow drill method.

ROG: You’re teaching your own course now, Human Nature Connection: Survival Secrets That Can Save & Grow Your Life, Bond Your Family & Unite Your Team. How is your course unique compared to other survival courses?

CF: I got the idea for Human Nature Connection from my time surviving out in the wild of Patagonia for 86 days. While completely alone, I realized how critical survival skills are not just for the show I was a participant on, but in our daily lives. The skills go much deeper than making and finding shelter, water, fire, and food. I learned to truly connect with nature and myself out there, and it helped me come back and be much stronger in my relationship with myself, my significant other, and with teams at work. I believe more people could use these skills to enhance their lives and relationships at home and work.

This is not just a course, but a system designed to help executives, business owners, and entrepreneurs gain survival skills necessary in these uncertain times, while also allowing them to reconnect back to themselves, bond more with their family, and unite their teams.

The incidence rate of natural disasters, manmade disasters, recreational mishaps, and effects from the silent epidemic of disconnection are growing daily. To survive and thrive in this new world, you need to develop survival skills to deal with shifts in nature, situations, and your moment-to-moment reality by having the basic survival skills of shelter, water, fire, food, so you can save your life or those you love. These skills are also the hidden tools for deepening internal and relational connections that help us be resilient in the face of the silent epidemic of disconnection. 

What makes Human Nature Connection unique is how the 4 Pillars of Survival Living and the 4 Elements of Survival Living become a bridge to overcome the challenges that modern life throws at us every day. And you don’t have to experience it alone. I offer the course as a hybrid with online content, coaching calls, and an in-person immersion experience. You can take it with your significant other, family, or team.

It’s powerful to see how revitalized people are after taking the course. People who were dealing with a lot of anxiety and fear in their life when they started the course are not held back any longer by the fears and anxiety after completing the program. Entrepreneurs have started new businesses to help their communities in an impactful way. It’s really profound to see what people can become when they work on developing these internal and relational survival living skills. You can read more about the course at humannatureconnection.com.

Carleigh lived off the land in Patagonia and filmed herself for 86 days on History Channel’s Alone Season 3.

Above: Carleigh lived off the land in Patagonia and filmed herself for 86 days on History Channel’s Alone Season 3.

ROG: When you’re at a speaking engagement, what are some of the most common questions your audience seems interested in, and what are your answers?

CF: “How was the transition home?”

I was full of gratitude for the people in my life and getting to be with them again in person. I loved eating fresh food out of my garden and eggs from my chickens and ducks.

“Was there anything difficult about going home?”

Eating again was amazing. And it was also challenging. I found that I got full very quickly but wanted to keep eating. Because my stomach and abdominal muscles had shrunk, it was painful to be overfull. I also had some body image issues as I returned to my regular weight, by the time my mind would get used to the way I looked, I would have gotten heavier again.

“What was the hardest part about being out there?”

Two things. One was actually while fishing. The cycle of hope and disappointment that happened every time I cast out and didn’t catch a fish. Second, so many things being unknown was hard, especially as time went on. I could get lost for a while worrying about how long I might be there and how many other people were left.

“Do you have a scar from the fishhook [that got embedded in your hand in Mongolia]? Has your hand recovered?”

Yes, I have a small scar and my hand has recovered from the fishhook being in it.

ROG: What would you like Alone viewers to understand when they’re watching the show?

CF: That there are literally hundreds of hours sometimes of things happening that don’t get seen on the show. For all you viewers out there, if you question why someone is doing something, remember there might be a whole lot more going on than what you see. Don’t judge. Be a witness to the journey of the people on Alone.

ROG: For all those aspiring survivalists out there, what advice would you give them before they attempt something similar to what you did on Alone?

CF: Know the basics. Know how to make shelter, how to make fires in all different types of weather. Learn many different ways to get food, like knowing edible plants or ways to hunt, trap, or fish. If you’re not eating, you’re not going to make it for long. Boil your water. If you want to test your skills, you can take it one step at a time. For example, take all your gear except a shelter and go practice building a natural shelter. Or leave your modern fire-starter at home and go practice a fire by friction method. Remember to let someone know where you are going and about how long you plan to be out, even if you go with someone else. If you want to go on a show like Alone, my recommendation would be to get proficient at the fundamentals of shelter, water, fire, and food skills so you can apply them anywhere you go.

Photo of Fairchild fishing in Alaska.

Above: Fishing in Alaska.

ROG: What do you do to maintain your survival skill set?

CF: Sometimes I use a bow drill to start my backyard fires. I’ll make baskets, tan hides, and teach classes. The skill set I practice daily is mindset, awareness, connection, and curiosity. Those in combination with a foundation of survival skills are what will help you survive any natural disaster or survival situation. They will also help you live with less stress and more joy on a daily basis!

ROG: What are some common mistakes you see when people are trying to learn and develop their survival skills?

CF: It is all too common for people to judge themselves when learning a new skill and give themselves a hard time for not getting it right away. I also see others — and I am guilty of it myself — thinking that you have to be way out there in the middle of nowhere to practice skills. Well, we don’t have to, often skills can be practiced in our backyards or a local green space. You can even use materials from a local hardware store if you don’t have the natural resources available. Another great technique is to build things, miniaturized. For example, if you can’t build a full-blown shelter to sleep in due to space limitations or available resources, just build a smaller version. You may not be able to sleep in it, but you’ll understand the mechanics of it better when it comes time to make the real thing.

ROG: Is there any skill you want to learn that you have not gotten around to yet?

CF: Working with animal hide. I’ve tanned a few hides over the years, but I’ve never taken that skill to the next level and made something out of it. Naturally tanned hides work a little differently than hides that have been commercially tanned. You have to be more careful when you cut and sew, otherwise the fibers in the leather will tear. My goal is to eventually make a shirt and a hoodie out of animal hides I have tanned.

ROG: You have a book in development. Is there anything you can share regarding what it is about, and when we can expect to see it come up for sale?

CF: My book is a memoir on my time living 86 days in Patagonia. It is written from a day-to-day perspective, and the reader follows along with the struggles and joys I experienced. Interwoven are stories from other parts of my life that I reflected on while I was there, and the bits of wisdom that I learned along the way. Depending on the editing and publishing process, you can expect it to be up for sale in 2023 or early 2024. The best way to learn about the progress of the publication is to sign up for the newsletter on my website carleighfairchild.com and you’ll be one of the first to know about it.

Carleigh Fairchild Info

Photo of carleigh fairchild on top of a hill.

Hometown

I grew up in Columbus, Ohio. I currently live in Asheville, North Carolina.

Education

  • AA in Early Childhood Special Education
  • Completed the 7-year Niasziih Healing program at wildernessFusion.

Childhood Idols

  • Karana from Island of the Blue Dolphins
  • My aunt and uncle who had a farm to raise and grow their own food.

Survival Training/Experience

  • Alone Season 3 in Patagonia, 86 days (medically evacuated)
  • Alone Season 5 in Mongolia, 5 days (medically evacuated)
  • Coyote Tracks Programs – NJ
  • 28-day Survival Quest program – NJ
  • Solo Survival Trip – OH
  • Trackerschool: Standard, Advanced Standard, Advanced Tracking, Philosophy 1-4 – NJ
  • Earthwalk Northwest: Ancestral Living Skills Apprenticeship, Plant and Ethnobotany Apprenticeship, and the Path of the Hunter program – WA
  • Group Survival Trip – WA
  • 500 miles solo hike on PCT – WA
  • Wilderness First Responder trained- NC
  • Intern for Panoramic Journeys in Mongolia

Recommended Reading List

Favorite Drinks

  • Fresh spring water — not bottled — straight from the source
  • Mojito or whiskey old-fashioned

Favorite Quote

“Twenty years from now you will be more disappointed by the things you didn’t do than by the ones you did do. So throw off the bowlines. Sail away from the safe harbor. Catch the trade winds in your sails. Explore. Dream. Discover.” – Mark Twain

URL/Social Media:

EDC Gear

  • Pocket knife (currently a Woodsmonkey Banana Peel folder)
  • Chapstick (homemade all-purpose healing salve)
  • Wazoo Cache Belt and/or a Spark Necklace

Carleigh Fairchild Teaching students about wild edibles

Above: Teaching students about wild edibles.

Final Thoughts

From the safety of our living rooms, it’s easy to watch a show like Alone and critique contestants from our sofas. What we see are the characters the show wants us to see for the sake of entertainment. But what we miss are the years of training and preparation, the hundreds of hours in between 10-second clips, and the true inner turmoil each contestant is going through. Until we test ourselves in a similar way, we have no true understanding of what it’s like to survive on our own in austerity for weeks at a time. So, when someone like Carleigh Fairchild decides to teach us something, or share that experience, we would all benefit by paying close attention.

FAQ

  • Q: Where is Carleigh Fairchild now?
    A: Carleigh is currently a nanny, practitioner of NIASZIIH healing, earth skills instructor, public speaker, and an ambassador for LT Wright Handcrafted Knives.
  • Q: Why was Carleigh Fairchild evacuated?
    A: Carleigh Fairchild, was pulled out from Season 3 because, at 101 lbs/45.8 kg, she had lost nearly 30% of her starting body weight and had a BMI of 16.8. Participants are automatically “pulled” at a BMI of 17 or less. She was evacuated from Season 5 due to a serious injury.
  • Q:How many times was Carleigh on Alone?
    A: She was on Season 3 and Season 5.

Read More

Don't forget to subscribe to Recoil Offgrid's free newsletter for more content like this.


Foot Care in Off-The-Grid Situations: When Your Dogs are Howling

“A 1,000-mile journey begins with the first step.” It’s a sure bet that, off the grid, you won’t be spending a lot of time in your rocking chair. You’ll be up and about, sometimes traveling miles to perform the daily activities necessary to survive. You may need to carry heavy gear over rough terrain, scramble over obstacles, or sprint to escape danger. Foot care isn’t just a good idea — keeping your dogs from howling is absolutely necessary if you’re going to survive.

DISCLAIMER

This is a general overview and not a comprehensive guide to treating foot injuries. Seek professional medical advice if you experience foot injuries that worsen over time.

Foot Care 101

The first lesson in Foot Care 101 is pretty much common sense: make sure your footwear fits. Many foot problems originate from poorly fitting shoes. There are lots of different brands of boots out there, and there’s no time limit for trying them on. Your shoes are arguably the most important article of clothing you’ll own in an off-grid scenario, so find the ones that fit best.

Heavier boots, like steel-toed, are great if you’re chopping wood (you get to keep all 10 of your toes) but are cumbersome for serious treks. Remember that an extra pound of weight in your boot is often compared to five extra pounds of weight on your back. Soft, flexible uppers will help.

Photo of a five pairs of boots lined up in a row in the grass.

Above: Boots must not only fit, but also be broken in. If you find a pair that works well for you, consider buying an identical backup set.

Hiking boots should be sturdy. Soles should be Vibram or other durable, high-traction material. In wet climates, waterproof layers like Gore-Tex are your friends. In warm climates, breathable boots can keep your feet cooler and drier. High-cut boots will help prevent ankle sprains by giving more support (and may even protect against the occasional snake bite).

Some people find the right boot but don’t “break it in.” Breaking in should be a slow, steady process, not a 15-mile hike the day after you bought them. Start by wearing them inside the house. Then, walk around the block a few times. Finally, put on a light pack and walk a short trail, slowly building up mileage and weight.

Another factor in keeping your feet healthy is your socks. Most people hike in the same pair of socks all day, even in the heat of summer. This can be extremely damaging to your feet. Sweaty feet are unhappy feet; wetness increases friction and gives you blisters. Change your socks often and have replacement pairs as a standard item in your backpack. Cotton socks retain moisture, but wool socks wick moisture away from the skin and even have antimicrobial properties to reduce odor. If you’re prone to blisters, consider the use of a lighter second pair of socks (sock liners) under the thicker hiking socks. Use foot powders, like Gold Bond, or even corn starch to keep your feet dry.

Structure of the Nail. Human anatomy.

Above: A quick look at nail anatomy.

Are My Feet Getting Bigger?

You’ve been a size 9.5 for as long as you can remember. Those 9.5s fit perfectly until one day … they don’t. What’s going on?

Believe it or not, it’s not abnormal for your foot size to change over time. As you walk, your body absorbs two to three times its weight due to gravity. The ligaments and tendons that support the arch in your foot become worn with use. As a result, the arch drops. The flattening that occurs causes your foot to become a little wider and longer. Extra weight as you get older has a similar effect.

Other age-related changes that affect foot care include the thinning of the fat pads that cushion the bottom of your feet. You might also develop bony changes like bunions, hammertoes, or other conditions that require more space.

Pregnancy also makes a difference. During pregnancy, there’s a big increase in a hormone called “relaxin.” This relaxes the pelvic bones and even makes it easier for the cervix to dilate during labor. It does the same to the ligaments in the foot, however, leading to changes in length and width that are often permanent.

Photo of someone reaching for their boot as the rest their foot on a fallen tree limb.

Above: Failure to break in your boots may lead to big trouble. If you can’t walk, you won’t be able to do most other survival tasks.

Common Foot Problems

Blisters: Blisters caused by excessive friction are, perhaps, the most common foot ailment off the grid. A foot blister is a small, often painful, fluid-filled pocket that forms on the uppermost layer of the skin. Blisters are filled with clear-to-yellowish liquid and can lead to infection.

Many rugged survivalists consider blisters to be no big deal, but they adversely affect work efficiency and need time to heal. An infected blister is a major issue and will become more swollen, painful, and red over the course of time. You might even develop a collection of pus called an “abscess.”

Usually, blisters occur as a result of choosing poorly fitting shoes, not having enough dry socks, or allowing your feet to become sweaty and wet.

Treating a blister first requires you to get off your feet. Wash your hands and clean the area thoroughly with an antiseptic like Betadine. The cleaner you start off, the less likelihood of infection.

A close up shot of a water filled blister on foot due to long walks. A blister is a pocket of fluid between the upper layers of skin.

Above: A large blister may require drainage.

Should you lance the blister? If it’s small, the answer is no, as an open blister is more likely to become infected. If the blister’s big, likely to break on its own, or very painful, however, some prefer to drain it. If so, follow these steps:

  • Wash the area with soap and water and apply petroleum jelly.
  • Using a cotton swab, disinfect a needle with rubbing alcohol or heat it until it glows red.
  • Take the needle and make a small puncture in the edge of the blister.
  • Allow fluid to drain. Don’t remove the “roof” of the blister, as this will protect the raw skin underneath as it heals.
  • Apply antibacterial ointment or petroleum jelly to the blister site.
  • Use padding in high pressure areas. Cut the padding into a donut shape with a hole in the middle and place it around the blister.
  • Cover the blister and padding with a bandage or gauze.

Athlete’s foot: Athlete’s foot (also known as “tinea pedis”) is an infection of the skin caused by a type of fungus known as Trychophyton. This condition may be a chronic issue, lasting for years if not treated. Although usually seen between the toes, you might see it also on other parts of the feet or even on the hands (often on the nails or between fingers). Athlete’s foot is contagious; it can be passed by sharing shoes or socks and even from wet surfaces such as shower floors. Those affected by athlete’s foot may also find themselves with other fungal problems, like “ringworm” or “jock itch” (Tinea cruris).

Any fungal infection is made worse by moist conditions. People who are prone to Athlete’s foot commonly have the same risk factors you might find in those who are thrown off the grid due to a disaster:

  • Spend long hours in closed shoes
  • Keep their feet wet for prolonged periods
  • Have a tendency to get cuts on feet and hands
  • Perspire a lot

Athlete’s foot isn’t hard to diagnose. Look for flaky skin between the toes or fingers. The skin may appear red and the nails turn yellow. The patient will complain of itching and burning in the affected areas, sometimes severe. If the skin has been traumatized by scratching, you might see some fluid drainage. Often, the damage caused by the scratching is worse than the infection itself.

detail view of the human foot that infected by athlete's foot fungus

Above: Athlete’s foot (tinea pedis) is easy to diagnose but takes patience to treat.

If the condition is mild, keeping your feet clean and dry may be enough to allow slow improvement of the condition. Oftentimes, however, topical antifungal ointments or powders such as miconazole or clotrimazole are required for elimination of the condition. Don’t use anti-itching creams very often, however, as they keep the area moist and may delay healing. In the worst cases, oral prescription antifungals such as fluconazole (Diflucan) are needed.

Patience is a virtue when it comes to monitoring the healing process; it may take more than a month for a significant case of Athlete’s foot to resolve.

A favorite home remedy for Athlete’s foot involves putting tea tree oil liberally in a foot bath and soaking for 20 minutes or so. Dry the feet well and then apply a few drops onto the affected area. Repeat this process twice daily. Try to keep the area as dry as possible otherwise. For prevention of future outbreaks of athlete’s foot, apply tea tree oil once a week before putting on socks and shoes.

A quick mention of the old home remedy of urinating on your feet — if your urine has the usual concentration of a compound called “urea” in it, it probably won’t work. Dermatologists use stronger urea treatment with some success, however.

Corns: Corns are thick, hard patches of skin caused by friction that are found on the tops of toes. Some are barely noticeable but others may cause pain, especially when wearing ill-fitting shoes. Removing the source of friction may eliminate the problem. Other options include:

  • Protecting skin by wearing thick socks
  • Using corn pads to protect and relieve pressure
  • Applying salicylic acid to help dissolve corns. This method isn’t used on the feet of diabetics due to the risk of causing injury.
  • Wearing foot orthotics
  • Having a medical professional shave off the offending corn

An ounce of prevention is worth a pound of cure. Corns may be prevented by wearing shoes that fit properly and using gel pad inserts to decrease pressure on vulnerable areas.

Hallux valgus, bunion in foot on grass background

Above: Bunions and other conditions can cause a poor shoe fit (and pain).

Ingrown toenails: In the typical apocalypse movie, you’ll see gunshot wounds and broken bones, but in the real world, minor conditions can be a major problem. One of these is the ingrown toenail, also known as onychocryptosis.

While considered by some to be no worse than a blister or Athlete’s foot, ingrown nails can be severe enough to cause skin ulcers, blood infections (also called “septicemia”), or even total loss of circulation (“gangrene”).

Your fingernails and toenails are made up of a protein called keratin. It’s the substance that covers the claws, horns, and hooves of many animals. When we refer to issues involving nails, we refer to it as “ungual” from “unguis,” the Latin word for claw.

Nails consist of several parts. They include:

  • The nail plate: This is the hard covering of the top end of a finger or toe; what we consider to be the nail.
  • The nail bed: The skin directly under the nail plate. Made up of dermis and epidermis just like the rest of your skin, the superficial epidermis moves along with the nail plate as it grows. Vertical grooves attach the superficial epidermis to the deep dermis. In older people, the nail plate thins out and you can see the grooves if you look closely. Blood vessels and nerves run through the nail bed.
  • The nail (or “germinal”) matrix: The portion or root at the base of the nail under the cuticle that produces new cells for the nail plate. You can see a portion of the matrix in the light half-moon (the “lunula”) visible at the base of the nail plate.

A toenail becomes ingrown when the edge of the nail grows into the skin of the toe. It can occur for a number of reasons, but poorly fitting shoes and poorly trimmed toenails are the most common causes. The big toe is usually affected, but any toenail can be affected.

Ingrown toenail onychocryptosis on caucasian big toe Hallux, caused by fungal infection tinea unguium. Macro angled view isolated on white background.

Above: Ingrown toenails can become a serious problem due to how much pain they can cause.

The skin along the edge of a toenail that’s ingrown may appear red, swollen, painful, and even warm to the touch. These are signs not only of pressure on the skin, but also herald the beginning of an infection. If not treated, the condition worsens, possibly even leading to the drainage of pus.

Shoes that are either too tight or too loose can cause ingrown toenails. If too loose, it causes continual pounding of your big toe against the inside due to movement within the shoe as you walk. With shoes that are too small for your foot (or even high heels), extra pressure is placed on your toes that prevents normal nail growth.

Nails that aren’t trimmed properly can also cause ingrown toenails. This happens when your toenails are trimmed too short, or you cut your toenails in a rounded fashion instead of straight across. Rounded cuts are appropriate for fingernails, but not toenails. The edges of the nails will tend to curl downward and grow into the skin.

Photo of a blood blister on a left foot.

Above: Corns are caused by repeated friction or pressure.

Some people are born with nails that are curved and naturally tend to curve inward. Injuries to the nail bed can also cause ingrown toenails, especially if it affects the germinal matrix, the living part of the nail that produces new cells. People with diabetes or other illnesses that cause poor circulation are also at higher risk for these problems. A diabetic, for example, may experience nerve damage and not realize that excessive pressure is being applied to the toes by ill-fitting shoes. They may not even notice that the nail is growing into the skin.

In some cases, an ingrown toenail can be treated by:

  • Soaking the foot in warm water with Epsom salts three to four times a day. In between soaks, keep the toe dry.
  • Using an antiseptic to decrease the bacterial count in the area.
  • Placing a small piece of moist cotton, waxed dental floss, or other material under the nail to help it grow away from the skin.
  • Considering wearing sandals until improved.

At some point, however, you may have no choice but to intervene more aggressively. In these circumstances, remove the offending segment of nail. Remove the side trapped under the skin by using a scalpel or clippers, about 1/5 of the nail width or less. You may have to cut all the way down to the base and use a clamp for removal. Expect some bleeding.

calluses on the toes close-up. foot of a man on a white background

Above: Blisters are a common result of ill-fitting shoes.

As you might expect, this procedure is more easily done after injecting local anesthetic (plain lidocaine) into the area. Be aware that if a portion of the nail is removed, it may take months for it to regrow.

If the toe is infected, antibiotics might be appropriate. Triple antibiotic ointment may be helpful here, but oral antibiotics, such as cephalexin, clindamycin, or amoxicillin may be necessary.

If a portion of the nail is cut off, patience is required as it’ll take months for the nail to regrow. If you have a genetic tendency toward ingrown toenails, be prepared to deal with recurrences.

Close up photo of a pair of deform feet with a very high arch, tight tendons and bent hammertoes for an anatomy textbook

Above: Hammertoes are age-related changes that require more space in shoes and boots.

Nail Bed Injuries

There are various types of toenail injuries. Amputations and fractures may occur due to trauma, but more commonly you’ll see:

Nail bed lacerations: In a nail bed laceration, the nail and underlying tissue is cut. This may occur as a result of a knife or a crush injury. These wounds will bleed and leave bruising that may take a long time to heal.

Nail bed avulsions: An avulsion occurs when your nail and nail bed is pulled off the toe. This can occur when a toe is jammed into a tight space but may be caused by various other traumatic events. This injury is very painful; it has even been used as a form of torture.

Subungual Hematomas: When bleeding occurs under the nail plate, it’s often trapped and accumulates, forming what is called a “hematoma.” It’s the classic result of hitting your finger with a hammer. You can expect throbbing pain and some bruising. When a significant amount of blood accumulates, it may lift the nail plate.

Damage to the nail on leg. Big toe injury, nail torn off, blood flowing

Above: Some nail lacerations may require closure with stitches.

Treating Nail Bed Avulsions and Lacerations

In normal settings, an X-ray is often performed to rule out a fracture of the digit. You won’t have such modern medical technology available off the grid. Some procedures may be performed with a good medical kit and supplies. In the case of an avulsion or laceration:

  • Clean the nail bed thoroughly and flush out any debris. Paint with 2 percent povidone-Iodine solution or other antiseptic solution.
  • Cover the exposed (and very sensitive) nail bed with a non-stick dressing and petroleum jelly. Change frequently. Avoid ordinary gauze, as it sticks tenaciously to raw areas and would be painful to remove.
  • If the nail plate is hanging on by a thread, remove it by separating it from the skin folds by using a hemostat. You can consider placing the avulsed nail plate on the nail bed as a protective covering.
  • In nail bed lacerations, suture (if clean) with a thin absorbable suture available (6-0 Vicryl works). Be sure to remove any nail plate tissue over the laceration so the suture repair will be complete.
  • Place a fingertip dressing. Some will stabilize the digit with a finger splint to protect from further damage.
  • Add antibiotics and a tetanus shot for an obviously dirty wound.

Removal of the ingrown portion of the toenail may be necessary.

Treating Subungual Hematomas

If a crush injury causes a bruise (also called an “ecchymosis”), it’ll be painful but usually just for a short time. In this case, some ibuprofen or other pain med should help. A hematoma will continue to be painful, however, even several hours after the event. A bruise is likely to appear brownish or blue, but a hematoma may appear a deep blue-black.

If very painful or significant blood has accumulated under the toenail, a further procedure called “trephination” may be performed. In this instance, a very fine drill (or a red-hot 18-gauge IV needle or paper clip) is used to make a hole in the nail plate large enough to drain the blood and relieve the pressure under the nail. This is an important consideration to avoid damage to the nail bed. In the worst cases, the nail plate is removed instead.

Photo shows a woman's big toe with a severe subungual hematoma on the nail.

Above: A subungual hematoma appears bluish-black and painful.

The toe must be kept clean, dry, splinted, and bandaged for a minimum of 48 hours afterward. Most inexperienced medics should avoid this procedure except in the most severe cases, as the pain will usually decrease over time even if you do nothing.

It’s important to know that damage to the base of the nail (the “germinal matrix”) may be difficult to completely repair, and that the fully healed nail may look irregular in some way. A completely torn-off nail will take four to six months to grow back.

Trephination can eliminate painful hematomas under the nail.

Above: Trephination can eliminate painful hematomas under the nail.

Footwear Selection Tips

Online shopping is the norm for many these days, but not the best strategy when it comes to purchasing shoes. There are some simple ways to make sure you’re buying shoes that will fit and serve you well for years:

  • Pick the right time. Go to the store after a day of walking, when your feet are a little larger than other times. This will help you avoid buying shoes that are too small.
  • Wear familiar socks. Try on new shoes with the socks you’re most likely to wear with them. You might wear thicker socks or add liners if you’re buying hiking boots.
  • Make sure boots fit both feet. Most of us have one foot that’s a little larger than the other. If you wear orthotics or arch supports, bring them along.
  • Don’t buy shoes that are too tight and expect them to stretch. They might, but you’ll go through a lot of discomfort to get them there. Spend some time walking around the store in your potential pair, at least 15 minutes, before buying.

Close up of human heel with a chafe or blister and dry skin. Injury caused by new hiking shoes.

Above: Removing the roof of a drained blister exposes the sensitive flesh beneath. For added protection, it might be best to leave the outer layer of skin in place.

If you’ve found the right boot, consider getting a second pair (and breaking them in also).

Confirming the Fit

Each part of your foot should be happy in your new boots:

  • The ball of your foot should fit the widest part of the shoe without pressure.
  • There should be about 1/2 inch or so from the end of your toes to the end of your shoe.
  • The upper part of the shoe should be flexible enough to not cause discomfort on your instep.
  • Your heel should not slip up and down when you walk.
  • If you’ve laced the boots and there’s still space above the top of your foot, the volume is off.

Hiking boot. Legs on mountain trail during trekking in forest. Leather ankle shoes

Above: When trying on boots, use the socks you’d wear with them.

About the Author

Joe Alton, MD, is a physician, medical preparedness advocate, and New York Times/Amazon-bestselling author of The Survival Medicine Handbook: The Essential Guide For When Help Is NOT On The Way, Alton’s Antibiotics and Infectious Disease, Alton’s Pandemic Preparedness Guide, and other books. He designs survival medical kits at store.doomandbloom.net.

Read More

Don't forget to subscribe to Recoil Offgrid's free newsletter for more content like this.


Book Review: Design Any Disaster

Disasters are complex crises that reveal the type of person we truly are and serve as proving grounds to learn who we wish to become. In Design Any Disaster, author Patrick Hardy takes what we commonly think we know about disaster preparedness and formulates a plan that reinvents the principle of how we respond to emergencies on all scales.

Through his C3 method (Command, Communicate, Carry Out), Hardy looks to change how we view ourselves to ensure we aren’t helpless bystanders who allow ourselves to become victims to the disaster, but capable leaders who are willing to protect ourselves and families. The entire premise of the book is that disasters don’t have to be calamitous events that disrupt our lives, but that we are the determinant of whether an unexpected event becomes a disaster in the first place.

The 411

Design Any Disaster prompts us to look at our role in disasters differently as both the trained and untrained. While the book hits home for the average citizen, it offers a different take on preparedness for the seasoned veteran. The notion that Hardy presents, “Never experience a disaster again … ever,” is a surefire way for curious readers to pull the trigger on purchasing his book. If not for Hardy’s background in emergency management, one might think that he’d be out of touch from reality.

That, however, is Hardy’s point. He has taken the status quo and made it relatable to the average reader, empowering them to take action and turn any disaster to their will. Hardy utilizes his C3 method to ensure each disaster is approached the same way, giving his readers foresight into mentally preparing for, and responding to, any crisis. Instructing his readers how to React, Respond, and Recover for each scenario is the foundation of his theory, and even includes a method to Reverse disaster by gaining valuable insight into how to become a more complete person after the disaster is over.

The issue with Design Any Disaster is that it’s difficult to interpret who the book is written for. If written for those who are inexperienced with disaster preparation, readers would be in for a treat as they feel they’re privy to revolutionary teaching. For those who are experienced in emergency management, the book seems to be a repackaging of information that already exists. This isn’t to say anything Hardy writes is wrong; his approach is spot-on and should be a refresher for those who have worked in the field for some time.

Any long-term government worker would agree with Hardy that 99 percent of disaster plans fail because they’re convoluted messes that are rarely followed through, and that our reliance on disaster equipment actually leaves us less prepared. But ask any self-reliant prepper out there and they would’ve told you the same information three decades ago, so the information that’s presented isn’t really new.

It’s very much appreciated that Hardy calls out these mistakes, but again, the tactics presented are a rejuvenated reminder that our best asset in a disaster lies between our ears. Hardy does a wonderful job at spicing up the essentials of how disaster preparedness should look, formulating a solid plan for those new to the field to start their journey. It’s just not for the seasoned prepper.

The Verdict

Design Any Disaster, while exploring the common-sense side of disaster preparedness, is a different take on how we think about our levels of readiness and reaction during a crisis. Hardy’s point is that if we’re going to act, then prepare to act. We should never allow our circumstances to turn us into bystanders while someone else determines our survival. We do this through his approach called the C3 method. None of this, however, is revolutionary, and this is where Hardy’s work could lose the interest of more seasoned veterans in disaster survival.

If you’re new to disaster preparedness, I’d highly recommend this book. It’s a valuable tool to help in any disaster-related scenario and should find its place amongst a library of other material for those looking to protect themselves and families. If you’ve been in the field for a while and feel that you’ve been gaining ground in your disaster prepping efforts, then Design Any Disaster might be a fresh set of eyes to revitalize your passion for all things preparedness.

If you’ve been around the block a few times, however, and have a year-long supply of food in your four-bedroom underground disaster bunker, this may not be the book for you. At the end of the day, Hardy is developing a larger audience, and this could be an attempt to reach the more seasoned reader, challenging us to not be bystanders, but to share our own wisdom to a new generation of preppers in a world quickly going mad. Maybe we all are a bit stagnant and could use a strong refresher at what it means to be prepared, but the information within the book is far from “revolutionary” and feels more like a new coat of paint to spice up old information.

About the Book

Front cover of the book Design Any Disaster.

Book & Author

Design Any Disaster: The Revolutionary Blueprint to Master Your Next Crisis or Emergency

By Patrick Hardy

Publisher

Benbella Books

MSRP

$30

URL

amazon.com

Pages

288

Rating

Thrive

>Survive

Die

Read More

Don't forget to subscribe to Recoil Offgrid's free newsletter for more content like this.


Going It Alone: Exclusive Interviews with History Channel’s Alone Contestants

We often wonder what would happen if we were forced to confront a life-or-death survival situation alone. Questions like how would I react, what first steps would I take, and how long could I make it run through our minds. It’s an interesting and sometimes frustrating thought exercise, with no way to fully test our survival theories without diving headfirst into dangerous circumstances. However, there’s an alternative way to explore these ideas from the safety and comfort of our homes.

History Channel’s popular TV series Alone mitigates the risk and gives the audience valuable insights by pitting some of the world’s top survival experts against the elements for as long as they’re able. The title of the show is fitting, since each contestant must try to stay alive for as long as they can completely by themselves — a true worst-case scenario.

It’s easy for viewers to relax with all of life’s modern amenities and armchair quarterback what’s happening on the screen, but there’s a lot going on behind the scenes that isn’t shown or discussed. We wanted to discover deeper insights into what the contestants are up against, and interviewed four former Alone contestants who were willing to share the wisdom of their experiences.

Britt Ahart: Alone Season 3, 5 and The Skills Challenge

Portrait photo of Alone Contestant Britt Ahart.

If you had to start your survival learning journey over from square one, what are the top five skills you’d focus on, and in what order?

The order I would learn would likely be fire, foraging, traps, shelter, and water. That’s basically how it started for me.

Let’s say you’re tasked with surviving for one month in the woods using only the gear you can carry on your body/back. You have an unlimited budget. Starting with the type and size of pack, what’s your loadout for the perfect long-term wilderness survival ruck?

One month in the woods with an unlimited budget? Man … I’d go with a 65L backpack, big enough for the gear that I need. I’m just going to start listing items: knife, multi-tool, paracord, fishing gear (line, lures, flies, hooks, Tenkara rod), trapping line, compound bow/arrows, panda pot, single-walled canteen, ferro rod, Silky saw, Leatherman multi-tool, small tent, wool blanket, .22 rifle and ammo, flashlight, water purification tools/tablets, book on wild edibles, pad/pencil, compass, med/toiletry/sewing kit. That’s all I came up with. I think that would be more than enough — I thought I’d proven that I can do it with way less. [Laughs]

Britt Ahart teaching youth about nature.

Above: Ahart enjoys teaching survival skills to kids and passing on his love for the great outdoors.

Weather, plant and animal life, natural resources, and other factors vary widely from one region to the next. How do you prepare for an extended stay in an environment you’ve never experienced before?

When I was preparing to go on Alone, I did extensive research on both Argentina and Mongolia. Such foreign lands — I had to learn a lot about the flora, the fauna, proximity to water sources, the topography, the weather, and even the altitude. It’s important to know these things so you can be prepared for as many situations as possible. Know how you’ll acquire water and increase your likelihood of getting the nutrients that you’ll need. And knowing the trees helped in constructing an idea of what types of shelter I could build.

What’s the most impactful nugget of survival wisdom you’ve ever received?

The brain is the biggest survival tool. All of the bushcrafting and survival knowledge won’t help you if you can’t keep a level and focused mind. That also allows me to think out-of-the-box and be resourceful when the situation deems it necessary.

Britt Ahart holding up a live snake.

Above: “I’ve never been afraid of snakes. I think they are incredibly amazing creatures.” Ahart snapped a photo with this colorful corn snake before returning it to the wild.

What do you wish the viewers of Alone would understand as they’re watching the show?

I wish the viewers would understand that this show is more than a camping competition. This is a psychological experiment that really tests one’s mind and resilience, as well as skills. For me, there were a lot of internal struggles I faced and skeletons I released from closets.

Do you have any advice for those aspiring survivalists contemplating how they’d fare in the wild?

Be prepared to really get to know yourself. I’ve found that the longer that I spend in nature by myself, the more I reset to who I really am. No one around to wear a mask for, so you become who you really are.

Alone contestant Britt Ahart blowing an ember to flame within a tinder bundle.

Do you have any projects, classes, or other news you’d like to share with us?

I’ll be featured in an article in Vulture magazine. My collaboration with Valor Talent Group is continuing to grow. We are reaching a lot of kids, teaching them outdoor survival and getting them interested in exploring nature. And there are a few other future projects that I can’t talk about yet.

Where can we find you online?

Matt Corradino: Alone Season 8

Portrait photo of Alone Contestant Matt Corradino.

If you had to start your survival learning journey over from square one, what are the top five skills you’d focus on, and in what order?

If doing the show again, I would work on the same skills — shelter, water, fire, and food. For me, food gathering skills include hunting with bow and arrow, foraging, and fishing. I suppose if I did it all again, I might work more on trapping.

Let’s say you’re tasked with surviving for one month in the woods using only the gear you can carry on your body/back. You have an unlimited budget. Starting with the type and size of pack, what’s your loadout for the perfect long-term wilderness survival ruck?

For one month of survival, I’m taking a full-size pack for transporting things I might find while in the bush. In that pack would be a hunting knife, a folding saw (Silky of course), a small hatchet, a small-handled hacksaw and four or five extra blades, fishing line and an assortment of hooks, a takedown wood bow and six arrows (mostly broadheads and a few small game arrows), a cooking pot, a water bottle, and most importantly a first aid kit.

Matt Corradino with leading a survival course.

Weather, plant and animal life, natural resources, and other factors vary widely from one region to the next. How do you prepare for an extended stay in an environment you’ve never experienced before?

I constantly train primitive survival with the principles of each skill in mind, so that I can adjust each skill set to the materials at hand. The only real challenge is knowing the plant life in each region. To help with this, I spend a lot of time studying the plant families in the temperate zones and the poisonous plants worldwide. There are less plants in the world that will kill you than those that won’t. If I know it won’t kill me, I have room to experiment.

What’s the most impactful nugget of survival wisdom you’ve ever received?

There are too many nuggets to choose from for a wiseass like myself, but I’ll choose this one: You have to spend the calories until you have more than enough. If you don’t burn the calories to get more, you’ll burn them all lying in bed.

Alone contestant Matt Corradino with a group of students around a camp fire.

Above: On a recent group outing on his home island of St. Croix, Corradino found a dead deer on the beach that was likely killed by wild dogs. “I’ve never been so well fed on a survival trip,” he recalled.

What do you wish the viewers of Alone would understand as they’re watching the show?

There are two main things people should know when watching Alone. First, the contestants are dealing with a completely debilitating set of hunting and fishing restrictions. Due to the legalities of a show like this, there are far fewer things you can catch than things you can’t catch, which makes true survival almost completely impossible for most seasons. The second thing is that the show is highly edited. It is very likely that the narrative you are watching is a fantasy created by the editors. The amount of time spent in the bush is always at the very least a hundred times longer (not an exaggeration) than the amount of airtime given to any contestant. The editors often tell the story of their own choosing due to time constraints and the lack of freedom inherent in working with a major TV network.

Do you have any advice for those aspiring survivalists contemplating how they’d fare in the wild?

It’s way harder than you think. But because of that, and because you’re better at it than your immediate results might show, it is one of the most rewarding things you can spend your time on in life.

Matt Corradino preparing food over a camp fire.

Do you have any projects, classes, or other news you’d like to share with us?

We offer survival trips, skills classes, and spear fishing classes throughout the year.

Where can we find you online?

Caribbeanearthskills.com or my YouTube channel,
Caribbean Earth Skills. I’m also on Instagram and Facebook under Matt Corradino.

Jessie Krebs: Alone Season 9

Alone contestant Jessie Krebs.

If you had to start your survival learning journey over from square one, what are the top five skills you’d focus on, and in what order?

Navigation, knots/hitches/lashings, shelter principles, firecraft, and medical.

Let’s say you’re tasked with surviving for one month in the woods using only the gear you can carry on your body/back. You have an unlimited budget. Starting with the type and size of pack, what’s your loadout for the perfect long-term wilderness survival ruck?

I’d prefer an external frame pack; 60-liter capacity should be large enough. I’d take a sleeping bag plus a full- or queen-size fitted flannel bedsheet (sleeping bag liner); a non-inflatable, flat, roll-up sleeping pad cut down to fit me; an 8×10 heavy-duty tarp, about 100 feet of paracord, a few toiletries (soap, toothpaste and brush, couple hair bands, and some lotion/salve), a large garbage bag (pack liner), a small med kit, water disinfectant (iodine tabs), a metal canteen cup, two bandanas, a map and compass, some food in a bag (5 pounds of carbs, 2 pounds or so of dried veggies, 2 pounds or so of dried fruit, and 3 pounds or so of dried meat or pemmican), some spices, two 1-liter canteens, three knives (high carbon fixed blade, multi-tool with saw, and small whittling knife), a lighter, a ferro rod, a small piece of pitchwood (tinder), a rain jacket and wool top, two extra pairs of socks, a sew kit, a pen and notebook, a sun hat, a warm hat and neck gaiter, fingerless gloves, a headlamp and extra batteries. I’d wear socks, boots, cargo pants, a sports bra, and a button-down long sleeve shirt. Depending on the time of year, I might also include a dromedary water bag, and about 3 square yards of ripstop nylon. And depending on the steepness of the terrain, perhaps 100 feet of 9mm climbing rope, 30 feet of mule tape, and a couple carabiners. I’m assuming getting out is not the priority, so I haven’t included any dedicated signaling gear. And this is more of a vacation pack than a “survival” one.

Jessie Krebs teaching a class.

Above: Krebs is a former U.S. Air Force SERE specialist and the founder of O.W.L.S. Skills (short for Outdoorsy Women Learning Survival). She's passionate about helping women feel empowered by teaching them skills that are traditionally considered masculine.

Weather, plant and animal life, natural resources, and other factors vary widely from one region to the next. How do you prepare for an extended stay in an environment you’ve never experienced before?

I’d learn as much about it as I can before I go. What are the seasonal average temperature and precipitation patterns? What is the elevation and terrain like? Are there particular animals, reptiles, insects, and viruses/illnesses to be wary of? What’s the social and political climate? Feelings toward Americans? I plan to be as self-contained as possible, with everything I need, and all that I take should be easily adapted to whatever environment I find myself in. I go through the five basic needs and make sure I have what I would need for every environment: signaling (if rescue may be necessary); personal protection (clothing and equipment, shelter, fire); navigation, health, sustenance (water and food needs).

What’s the most impactful nugget of survival wisdom you’ve ever received?

Be aware. Pay attention, look for patterns — what’s going on with you, with the water, the wind, the weather, the animals, the plants, everything? Open your senses to your surroundings. Awareness is living and engaging. Awareness is a relationship, connection, and community.

Jessie Krebs teaching a student some rope techniques.

What do you wish the viewers of Alone would understand as they’re watching the show?

Viewers only get to see a small snippet of what is going on for each participant. So much is not filmed and so much is not shared on the show.

Do you have any advice for those aspiring survivalists contemplating how they’d fare in the wild?

This situation doesn’t put you in crisis mode, so if you’re good in a crisis, that doesn’t mean you’ll last on the show. Are you good at entertaining yourself? How do you deal with boredom and long-term discomfort?

Do you have any projects, classes, or other news you’d like to share with us?

My school is primarily for women, and I collaboratively run a lot of women-only courses; however, I do occasionally run courses for all demographics, and also offer custom courses for special occasions on whatever topics and wherever and with whoever you like.

Where can we find you online?

Larry Roberts: Alone Season 2 and 5

Alone contestant Larry Roberts sitting on a log with a saw.

If you had to start your survival learning journey over from square one, what are the top five skills you’d focus on, and in what order?

This is always a common question, and the answers can vary on your environment and what activities you do in the outdoors. Procuring water might not be as hard snowmobiling as say hiking in the desert. Having said that, my priorities are: fire, water procurement, shelter, thermoregulation, and problem solving. It is hard for me to put one skill before the others as they can change even by season. Freezing weather in January will have different problems or challenges than an 80-degree day in July. Once you have the basic skills down, I’d say problem solving is one of, if not the, most important skill you can learn. 

Larry Roberts holding up a successfully hunted mouse.

Above: Above: Alone fans will recall Roberts' continuous battle with the mice that scurried through his shelter.

Let’s say you’re tasked with surviving for one month in the woods using only the gear you can carry on your body/back. You have an unlimited budget. Starting with the type and size of pack, what’s your loadout for the perfect long-term wilderness survival ruck?

One of my favorite packs is called the ILBE (Improved Load Bearing Equipment), which is a military surplus pack. I’m not super into packs, so I really don’t focus on them too much. If the pack has sufficient room to carry my gear and is comfortable, I’m fine with it. I’ve used expedition packs, military surplus, and generic brands.

I would for sure take a sleep system and a tarp or tent. Most times I would prefer a tent, however sometimes a tarp can have more flexibility. I have had good luck with oilskin tarps for longevity, but they are heavy. Currently my favorite tent is a two-man tent from REI called a Half Dome 2+. My sleep system usually includes a sleeping mat (also from REI) called an Exped 9 and a sleeping bag. Depending on conditions, I will take a generic bag or if it gets real cold, I will take my Wiggy’s or Feathered Friends sleeping bag.

Another piece of kit I would bring is a cooking system and a water bottle. My cooking set can be as simplistic as a military-style canteen cup or it could include a small pot and frying pan. I prefer stainless steel for my cooking kit and especially for my water bottle.

I would also, of course, take a knife. I love my Gen 6 from LT Wright Knives, and I feel this knife is the perfect “survival” knife. Depending on the location or environment I might also include a saw, hatchet, or ax. Most times I prefer a saw over an ax or hatchet. I really like my Boreal 21 folding saw.

I love a nice fire, so I would include a 1/2×6-inch ferro rod and a lighter or two.

There are always lots of uses for cordage or rope, so I would include a bit of that as well. Usually, I take around 25 feet of paracord, and the same amount of tarred bank line. Both have their pros and cons.

Personally, I would take lots and lots of food. Starving is quite unpleasant. [Laughs]

Lastly, I would include a headlamp with extra batteries. I’m not a fan of doing a lot of night movement or traveling but having an artificial light in camp can be a huge morale boost and make a lot of camp chores safer and easier to accomplish.

There are some other small items I would like, such as Chapstick and a small medical kit, but the above list is a good starting point. Of course, individual medications (if needed) should be included as well as communication equipment or safety gear.

Alone contestant Larry Roberts showing off his back tattoo commemorating his time on the show.

Above: Roberts' back tattoo memorializes various events from his appearances on the show.

Weather, plant and animal life, natural resources, and other factors vary widely from one region to the next. How do you prepare for an extended stay in an environment you’ve never experienced before?

I try to learn skills that are viable in most environments. Starting a fire in the jungle or the desert uses the same principles. It may be easier in one location, but the theory is the same.

Shelter is also the same in different environments. The resources may be different, but the process is similar. When I am in an unfamiliar area I look for “properties.” I can look at a plant and see if it has the same properties as a different plant that I know. I’m not talking about medicinal or edible plants (special care should be taken with those), but rather plants that can be used for fire, shelter building, or cordage.

This is where problem solving comes into play. You need to look at your environment, look for properties you recognize, and figure out your highest priority. Surviving on Vancouver Island is similar to Mongolia even though the area is vastly different. I still needed water, shelter, and food. Both places offered these resources; they just differed in availability and variety. VCI had mountain lions, wolves, and bears; Mongolia had poison snakes, very aggressive bears, boars, and wolves.

What’s the most impactful nugget of survival wisdom you’ve ever received?

Test your gear. Gear is great, and I love it, but you have to test it just like you test yourself. Don’t depend on untested gear — always try it out and test it.

Larry Roberts starting a fire.

What do you wish the viewers of Alone would understand as they’re watching the show?

It’s harder than it looks. Filming yourself is an incredible energy drain, especially on limited calories. We are really alone, and it is an amazing experience to be truly alone and testing your skills. Also, they don’t show everything we do out there, they simply don’t have the time in a one-hour TV show.

Do you have any advice for those aspiring survivalists contemplating how they’d fare in the wild?

Practice, practice, and practice. Be safe, practice in a controlled environment, and then slowly start to push yourself. “Own” your skills. Practice them until they become second nature.

Do you have any projects, classes, or other news you’d like to share with us?

I am a full-time electrician, so I don’t have regularly scheduled classes. I usually take some time and hold a winter class every year, but mostly the classes I teach are to folks who reach out and request a class.

Where can we find you online?

Read More

Don't forget to subscribe to Recoil Offgrid's free newsletter for more content like this.


Marlin Dark Series Review and 2024 Update

Today, we live in a world of rapid innovation and obsolescence. Tools and technology that are common now are likely to be forgotten in a decade, if not much sooner. You’re probably not using a typewriter or telegraph to communicate in this era of laptops and smartphones. But there are exceptions to this rule — instances where the old ways may still have their merits. The surge in popularity of so-called tactical lever guns, such as this Marlin 336 Dark Series, illustrates this point.

Dark Series Lever Action Rifles (Re-Released)

Back in 2019, we reviewed the original Marlin Dark Series lever-action rifle, which was manufactured while Marlin was owned by Remington. Shortly after that review was published, Remington went bankrupt and ceased production of all Marlin rifles. Until recently, the Dark Series was out of production, and some enthusiasts wondered if it would ever return — that question has now been answered.

In 2023 and 2024, Marlin Firearms (now owned by Ruger) is re-releasing an updated version of the Dark Series Lever-Action Rifles, which blend the classic Marlin rifle design with modern features. The 2023 versions of these Dark Series rifles now come with a nylon-reinforced polymer stock, equipped with M-LOK attachment slots for mounting various accessories, enhancing their versatility. They also feature an anodized aluminum handguard with M-LOK slots, a threaded barrel with a factory-installed radial muzzle break, and a Picatinny rail for mounting optics. For improved visibility in low-light conditions, they are fitted with a fiber optic front sight with a tritium ring as well as a ghost ring rear sight.

Studio photo of the a Marlin Dark Series Lever Action rifle.

Among the new models, the Dark Series 1895 stands out. It's chambered in 45-70 Govt, with a 5+1 capacity, and a barrel length of 16.17 inches. The rifle is constructed with alloy steel and features a satin black finish. It weighs approximately 7 lbs and has an overall length of 35.5 inches. The bolt and lever are treated with a nitride finish for wear resistance, and the other major components are enhanced with a Graphite Black Cerakote finish for durability. Check out a review of the 1895 here:

The 1895 model is currently shipping with limited availability (2023) with an MSRP of $1,379. The other models in the series, including the Dark Series 336 and 1894, are expected to be available in early 2024.

Studio photo of the Marlin Dark Series Lever Action stock.

Above: Close up photo of the new Dark Series stock.

Studio photo of the Marlin Dark Series cheek riser.

Above: Close up of the new Dark Series cheek riser.

Studio photo of the Marlin Dark Series rail.

Above: Close up of the new Dark Series rail.

Studio photo of the new Marlin Dark Series handguard.

Above: Close up of the new Dark Series handguard.

Old, But Not Obsolete

The Marlin 336 was introduced in 1948, but the core of its design dates all the way back to the Model 1893, a rifle named after the year it began production. Prior to the turn of the 20th century, lever-action repeating rifles from Winchester, Henry, and Marlin quickly became popular among American frontiersmen, cowboys, and outlaws of the Old West. Today, those lever guns are seen as an iconic representation of an entire era of weapons, much like the Thompson of the prohibition period or the AR-15 of today. So, how can they still be relevant in 2020 and beyond?

marlin 336 dark series cover

Firstly, there’s an unfortunate but important legal reason: Lever-action guns are generally legal in all 50 states. If you live in one of the states that heavily restricts semi-automatic rifles, a lever gun can be a good way to avoid the headaches of “featureless” builds and fixed magazines. Even if you don’t live in one of those places, these rifles can come with you if you travel through them. I recently visited family in California, and although I couldn’t legally bring my suppressed SBR or even a basic AR-15, I could bring this Marlin 336 Dark Series.

In addition, the COVID-19 situation has served as a reminder that finding ammo won’t always be easy. When popular calibers such as .223 and 7.62×39 were impossible to find at local stores, I had no trouble picking up boxes of .30-30. This round packs a wallop, to say nothing of the mammoth .45-70 that’s another popular choice in this realm. Lever guns are also lightweight, reliable, and as we’ll show later in this article, surprisingly well-supported with aftermarket upgrades. Above all, they’re a ton of fun to shoot.

marlin 336 dark series left

Hello Darkness, My New Friend

During the last few years, we’ve noticed an increasing interest in lever-action rifles within the firearms community. A younger demographic appears to be realizing their merits, and these buyers are molding lever guns to their existing tastes — think black finishes and accessory rails instead of wood grain and stainless steel. Marlin embraced this movement with the release of the Model 336 Dark Series.

The Dark Series features several modern upgrades from the factory. The traditional 20-inch barrel is absent, replaced by a shorter 16.25-inch barrel atop the five-round tubular magazine. The muzzle has 5/8×24 threads that make it easy to add a brake or suppressor. An XS Lever Rail with integrated ghost ring sight is preinstalled, enabling the addition of your favorite red-dot sight or magnified optic. The gun also comes with a paracord-wrapped big loop lever and paracord sling, which can be unraveled for spare cordage in dire circumstances. Metal exterior parts have a matte black Parkerized finish, and the stock and forend have a black spatter finish (they’re painted wood, not polymer as some assume). Although the Model 336 Dark Series is only available in .30-30, Marlin offers a Model 1895 Dark Series chambered in .45-70.

marlin 336 dark series reciever

In unmodified form, we thoroughly enjoyed the Model 336. At under eight pounds, this rifle is easy to carry and maneuver. The lever and hammer cycled smoothly, and the trigger was crisp with minimal slack. We weren’t particularly fond of the big-loop lever — its large opening would be useful for someone wearing thick gloves, but in any other case, it slaps against the knuckles during the initial forward motion. This uncomfortable feeling is compounded by the rough paracord wrap. Reloading quickly takes some practice, but should feel familiar to anyone who has loaded a shotgun.

The ghost ring rear sight and thin front blade work fine, but aren’t exactly precise, especially during rapid follow-up shots. Thankfully, the XS rail allowed us to install a Trijicon RMR for a much clearer sight picture. The included low Picatinny rail mount is just right for a comfortable cheek weld.

Marlin’s Dark Series package makes the tried-and-true Model 336 into a great choice for the modern lever gun enthusiast. However, we still felt there was room to take this theme even further. Much like a gearhead adding disc brakes and fuel injection to an old Model A Ford, we decided to hot-rod the Marlin 336 with some aftermarket parts.

marlin 336 dark series accessories

Accessories

Optic: Trijicon RMR Type 2 Adjustable with Low Mount. Available at Europtic here.

Handguard: Midwest Industries M-LOK $162 on GRITRsports.

Scales: RailScales XOS (two) and XOS-H, Honeycomb pattern,
4-Slot
$216 railscales.us

Handstop: RailScales Karve-P railscales.us

Spare Ammo Carriers: HopticUSA Quivers (two right-handed
on protoype 2×4 Mount, one left-handed)
 hopticusa.com

Light: Inforce WMLx Gen 2 on 5-slot M-LOK Rail
(included with handguard)
on Brownell's.

Sling: Blue Force Gear Vickers Padded Sling, Magpul QD Swivel
and Mount, DIY Rear Sling Strap
on Brownell's.

Muzzle Device: 2A Armament X3 Compensator $65 2a-arms.com

Trigger: Ranger Point Precision 3.5-Pound $110 rangerpointstore.com

Lever: Ranger Point Precision Super Lightweight Medium
Loop Lever and Lever Shims (two sets)
$174 rangerpointstore.com

Additional Upgrades: Ranger Point Precision Hammer Spur
Extension, Quick Takedown Screw, Loading Gate Spring,
and Aluminum Magazine Follower
$127 rangerpointstore.com

The Build: Marlin 336 Dark Series

Our first stop was Midwest Industries for their aluminum M-LOK handguard. This immediately gives the rifle a more contemporary look, and serves as a foundation for other accessories. Model 336 variants with a barrel band forend will require an extra adapter, but this handguard bolts onto the Dark Series without an adapter.

A front sling stud is included on the handguard, but we removed it. Instead of using the standard fixed sling to carry the rifle over a shoulder, we wanted to set it up to be worn across the chest with an adjustable two-point sling, like any other modern carbine. A Blue Force Gear Vickers padded sling is attached to the side of the handguard with a QD mount, and was rigged to the stock using a scrap of nylon webbing and some buckles from a parts bin. This setup is secure and accomplishes its purpose, but we plan to drill and tap the stock for a cleaner-looking, recessed QD socket in the future.

Inforce WML

Above: After experimenting with a few different light setups, we decided the Inforce WMLx was a good fit for this build. The button is easy to reach, and the bezel sits behind the ports on the 2A Armament X3 Compensator.

Next, we picked out some additional components for the M-LOK rails. RailScales supplied grippy G10 panels and a Karve handstop; these items make the rifle much easier to control with the support hand while cycling the lever quickly. The Marlin 336 Dark Series’ 5+1 capacity is one of its most substantial drawbacks, so this has been supplemented with six rounds of spare ammo on HopticUSA Quiver carriers — one on the left side, and two on the right. The right-side Quivers are mounted on a prototype of the company’s new 2×4 bracket, which angles the front two rounds outward for easier access. The extra ammo can be pulled out and fed directly into the magazine, much like a sidesaddle carrier on a competition shotgun. To make the rifle usable in low-light environments and nighttime home-defense situations, we installed an Inforce WMLx 800-lumen light at the 10-o’clock position.

hornady ammo

Lastly, we selected a few mechanical upgrades. Recoil from the .30-30 cartridge isn’t as severe as you might expect in standard form, but we chose a 2A Armament compensator to make it even more manageable. The less-than-ideal big loop lever was swapped out for a lightweight medium-loop lever from Ranger Point Precision, a Texas-based company that specializes in lever gun parts. Thin shims were used to ensure the lever has no side-to-side play in the receiver (they’re sold in packs of two, and our gun needed three, so buy some extras). RPP also supplied an improved trigger, takedown thumb screw, smoother Flyweight loading gate, durable aluminum magazine follower, and an extended hammer spur. These items combine to make the gun much smoother to shoot, cycle, and reload, resulting in a higher-quality feel.

Since we didn’t have experience working on lever guns and knew that gun designs of this era often require some finesse, we took the Marlin 336 Dark Series and its parts to Wright Armory in Mesa, Arizona. Their gunsmiths installed the internal upgrades, handguard, and compensator, and ensured everything was working smoothly and safely.

Brothers in Arms: 30-30 and 7.62 x 39

30-30 7.62 caliber comparison

In addition to the unique pros and cons of lever guns against more modern alternatives, we also took a look at the ballistic potential of the .30-30 cartridge itself, with an eye toward performance against light barriers in an urban environment (think car bodies and Sheetrock) as well as soft targets — whether two- or four-legged. As it turns out, the “vintage” .30-30 Winchester displays a striking resemblance to the Soviet-era 7.62x39mm. Despite being septuagenarian itself, the 7.62x39mm carries global notoriety for being barrier blind and brutally efficient inside of 200 yards, and it continues to shape the balance of world power well into the 21st century.

Both cartridges use a .30-inch bullet diameter, although 7.62x39mm slugs are generally lighter — typically 122-150 grain versus 150-170 grain for .30-30. Meeting in the middle, we compared the performance of a 150-grain soft-point in both calibers using the ballistic calculator on GunData.org. At 100 yards, the .30-30 bullet has nearly identical velocity, energy, and trajectory to 7.62×39. At 200 yards, velocity differs by about 7 percent and impact point differs by only a third of an inch. Stretching out to 300 yards, the .30-30’s velocity is 14 percent lower and its trajectory drops 2.3 inches below the 7.62×39 round.

If you decide to integrate a .30-30 lever gun into your preparedness plan, feel confident that it will hold its own as a mid-weight, midrange round for game-getting and gun-fighting alike, even keeping ballistic parity with arguably the most battle-tested cartridge of the last 75  years.

Rounds Downrange with the Marlin 336 Dark Series

Before heading to the range, we picked up a few boxes from Hornady’s selection of .30-30 ammo options, including 150-grain American Whitetail, 160-grain LeveRevolution, and 170-grain Subsonic. We were most impressed with the LeveRevolution cartridges, which feature FTX hollow point bullets with a pointed polymer FlexTip that improves velocity (and therefore expansion) compared to a typical flat-tip bullet. We noticed that this ammo also fed more smoothly, while flat-tip bullets would occasionally nose-dive and jam if we cycled the lever with the muzzle angled downward. The Subsonic ammo ran fine as well, but we primarily got it to complement our eventual plan to add a suppressor to this gun (stay tuned for more in a future article).

At the range, the modern two-point sling was an immediate improvement. Fixed slings make it difficult to unshoulder a rifle and get a sight picture quickly, and they’re certainly not suited to modern run-and-gun tactics. The RailScales and handstop also go a long way to make the Marlin 336 Dark Series easier to control while cycling the lever. Speaking of which, the Ranger Point Precision lever eliminated the issues we experienced with the big loop and gave the action a smoother feel.

marlin 336 dark series shooting

The original trigger was good, but RPP’s replacement is even lighter and more direct. It also eliminates the “flop” that’s present in the stock trigger when the hammer is cocked. Paired with the compensator and red-dot sight, it became easy to get multiple rounds on target in quick succession. Reloading is easy, too, thanks to the rounds staged in Quivers immediately in front of the lower-resistance RPP loading gate.

Naysayers might claim that lever guns belong in a museum, but this build reinforces the fact that, with a little work, these old-school rifles still have their place in the world of modern weapons. While they can’t match the sustained rate of fire of semi-autos with detachable 30-round magazines, lever guns can be an excellent option for those who live in places where those guns aren’t readily available. And no matter where you’re from, they’re sure to put a grin on your face as you run through a course of fire like a cowboy-turned-high-speed-operator. Those 1890s frontiersmen might be confused at the sight of this futuristic concoction, but we’re sure it’d win them over if given the chance.

FAQ

  • Q: Is the Marlin 336 Dark Series still in production?
    A: Under its new Ruger ownership, Marlin is reintroducing the Model 336 Dark Series with expected availability in early 2024.
  • Q: Who makes the Marlin 336 Dark?
    A: The Marlin 336 dark is made by the Marlin Firearms company, now under the umbrella of Sturm, Ruger & Co.
  • Q: What is a Marlin Dark?
    A: The Marlin Dark Series is a tactical lever action rifle with a matte black finish, MLOK handguard, and other modern upgrades.
  • Q: Does the Marlin 336 Dark have a threaded barrel?
    A: The muzzle has been threaded 5/8×24.
  • Q: What calibers does the Marlin Dark come in?
    A: Three variants are currently offered — the Model 336 Dark Series in . 30-30 Winchester, Model 1895 Dark Series in .45-70, and Model 1894 Dark Series in .44 Rem Mag / .44 Special.

Read More

Don't forget to subscribe to Recoil Offgrid's free newsletter for more content like this.


Foraging Satchel: A Compact Bag For Identifying And Collecting Wild Edibles

Right now, no matter where you are, chances are you’re surrounded by useful natural resources. From the deepest wilderness to the inner city, nature provides a treasure trove of flavors and nutrients, waiting to be discovered by the adventurous forager. Whether you’re a seasoned wild food enthusiast or a curious beginner, having the right gear is essential for a successful foraging expedition. What you pack is highly dependent on what your personal situation is. This foraging satchel is focused on roots and other items low to the ground like flowers, berries, and mushrooms. Remember, foraging is not just about taking; it’s about understanding and respecting what nature can provide. Always forage responsibly and try to start out with an experienced guide who can help you on your journey.

Studio photo of everything included in the foraging satchel.

The Bag: Tuff Possum’s Shackleton

When it comes to foraging, you need a bag that’s rugged and versatile. The Shackleton EDC Satchel, inspired by the legendary Antarctic explorer Ernest Shackleton, is a practical companion for gathering wild resources. Its adjustable ITW Cobra buckle closure ensures quick and easy access, even with one hand. The slip pockets on either end hold essential tools like flashlights or folding saws — or in this case, the Wild Harvest Foraging Tool by LT Wright Knives — making them readily available. Inside, the PALS pattern loop panel offers modular organization for various tools and containers. The secondary weather flaps with ITW side release buckles offer protection against the elements, ensuring the contents remain dry and secure.

The satchel’s compact size, 12 by 9 by 4 inches, and weight of just 1.2 pounds make it a convenient choice for carrying small tools or collected resources. When you need to carry more gear, it can be buckled onto to hiking backpacks via four 1-inch mounting loops.

Studio photo of the Shackleton Bag by tough possum, being used as a foraging satchel.

Satchel Contents

Foraging Tools: Foraging isn’t just about picking; it’s about harvesting with care and precision. Les Stroud’s Wild Harvest Foraging Tool is a specialized knife designed for the task. With its unique blade shape and ergonomic handle, it allows you to cut, dig, and pry. Designed from the traditional Hori-Hori, and crafted with 5/32-inch A2 tool steel, it’s saber-ground with a false clip, allowing it to plunge effortlessly into the earth. The steel choice also offers corrosion resistance and ease of field sharpening.

An additional CJRB knife for work requiring a little more finesse is secured to the opening of the satchel. The CJRB Hyperlite is a 4-inch fixed blade that only weighs 3.5 ounces. Made from Artisan Cutlery’s proprietary AR-RPM9 steel, it’s durable and easy to keep sharp. It’s also a blade that won’t break the bank if it needs to be replaced.

Foraging Pouches: Collecting wild edibles requires containers that are both sturdy and accessible. PNW Bushcraft’s Waxed Canvas Foraging Pouch is great for this. Its waxed canvas material is resistant to the elements, and its hip-bag design ensures your finds are always within reach. Equipped with two sturdy snaps, the pouch easily clips onto belts up to 2 inches wide, leaving your hands free to collect. It also makes it easy to affix to the shoulder strap of the Shackleton. It’s the perfect size to hold a variety of items, from fire-starting materials to wild edibles and more. Hand sewn into the bottom is a durable mesh panel that’s great for allowing mushroom spores to scatter and provides a soft resting place for eggs or berries. When not in use, it simply folds up and snaps closed, becoming virtually unnoticeable.

The Wazoo Gear Foraging Bandana is another asset. It measures 22 inches across and is covered in detailed illustrations of the 12 most common wild plants and fungi of North America. These illustrations also indicate the field uses of all 12 plants and fungi, and each bandana includes 5 Steps of Identifying Edible Plants by Samuel Thayer and Rules and Ethics of Foraging by Mark Vorderbruggen. These insights have been carefully curated in cooperation with renowned experts like Dr. Nicole Apelian, ensuring that the information is both accurate and useful.

First Aid Kit: Safety first. A compact first aid kit is essential for treating minor injuries or allergic reactions in the field. This kit has an Uncharted Supply Co. first aid kit (includes a space blanket, aspirin, bandages, blister gel, Steri-Strips, and petroleum jelly) secured to a Woods Monkey Monkey Board for efficient organization and ease of access. On the back, a Viper Kydex tourniquet holster keeps a life-saving tourniquet easily accessible. Whether it’s used for fun or as a source of emergency sustenance, a Grim Workshop fishing kit is secured to the board. The kit also includes an Outdoor Element Fire Flute in case starting a fire or signaling for help might be needed. To round it out, there’s about 20 feet of Survivor Cord, which is similar to paracord, but has strands of snare wire, fishing line, and fire-starting cord along with the normal paracord “guts.”

Studio photo of the emergency kit that is packed in the foraging satchel.

Headlamp: Foraging doesn’t have to stop when the sun goes down. A quality headlamp will illuminate your path on your way back home or light up dark recesses for hands-free access. Coast makes some very affordable headlamps, and the one I have in the foraging satchels has a few settings that are great for a wild edible hunt, such as: a red light option and an emergency strobe.

Wild Edible Field Guides: One of the first things you learn as a beginner forager, is that many edible species have poisonous doppelgangers. Carrying field guides can help mitigate the risk of accidentally picking the wrong plant.

Note-Taking Supplies: Easy-to-use phone cameras have changed many dynamics about foraging but documenting your finds with a waterproof notebook and pen — especially where a plant was found and its growing conditions — can help when researching whether or not it’s safe to consume. It’s a great way to track your progress and share your knowledge with others in places where cell signals may be lacking.

Studio photo of the reference guide and notebook used in the field.

Gloves: Protect your hands from thorns and rough terrain with a pair of durable gloves. Wiley X Durtac gloves keep hands safe from knuckle busting rocks, deadfall, or other debris.

Extra Bags: You never know how bountiful your harvest might be. Carry extra bags to ensure you have enough space for all your finds.

UV Light: Some of the most sought-after foraged goods have a unique tell that gives them away. Morels and other foraging items can fluoresce under UV light. Carry a UV flashlight to uncover these hidden gems.

Foraging Satchel Make and Model

Shackleton EDC Satchel

URL: tuffpossumgear.com

Read More

Don't forget to subscribe to our free newsletter for more content like this.