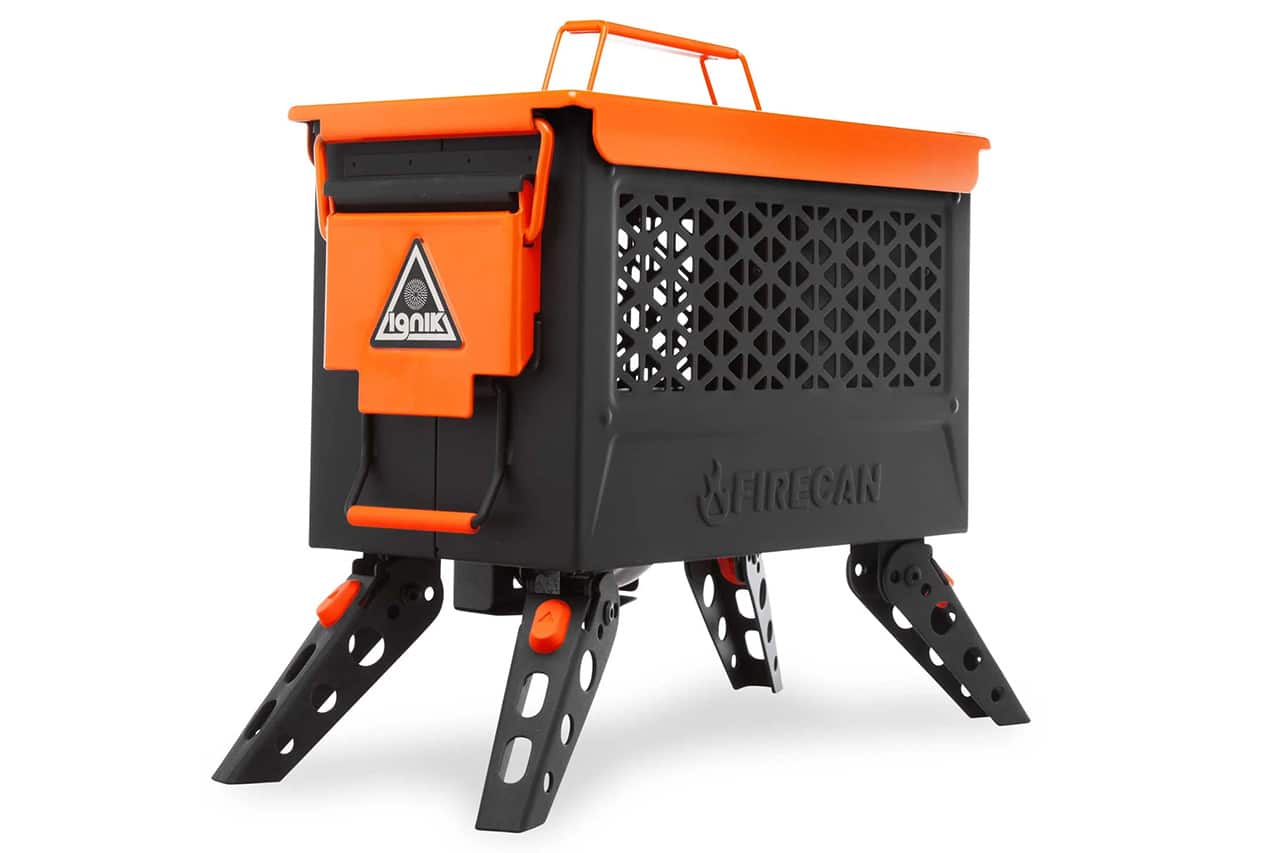
Ammo cans are surprisingly versatile containers. Most of us own several of them, whether they're filled with loose ammo, loaded magazines, a vehicle tool kit, or even a radio base station. But we recently found a product that uses the venerable ammo can design in a way we had never considered: as a propane-fueled fire pit. The Ignik FireCan is a collapsible, packable unit that allows you to bring 38,000 BTU of heat output wherever you need it, without the prep time or increased wildfire risk of an open campfire.
The Ignik FireCan features mesh sides, folding legs, and a removable lid that stays cool so you can carry the unit safely once the fire goes out. Fire rocks can be placed inside the can for added heat retention.
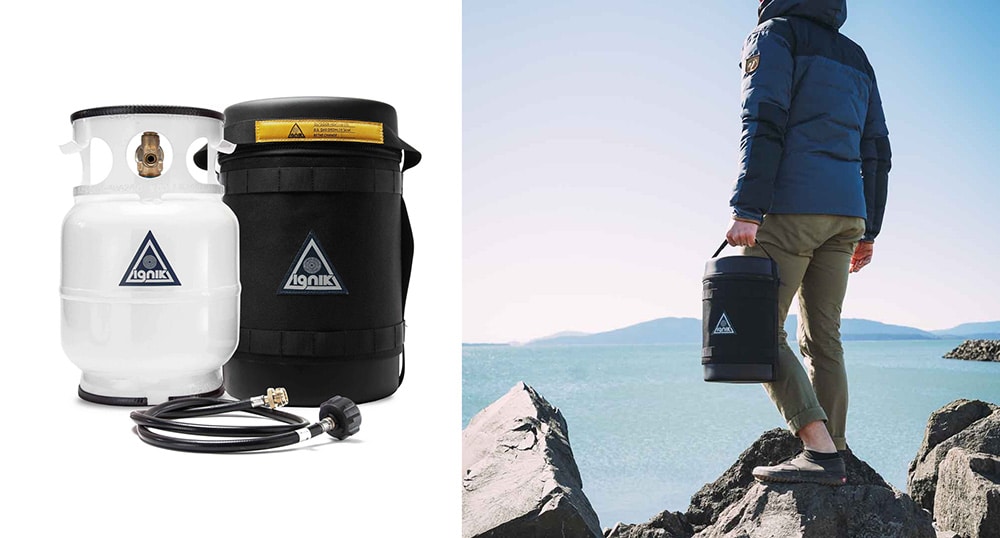
Each FireCan includes a 5-foot quick-release propane hose with an adjustable regulator, so you don't have to worry about threading on a connector that might leak. Although you can use any propane source, it's optimized for use with another Ignik product, the Gas Growler:
The company says one fill of the refillable Gas Growler costs about as much as a single-use green propane bottle, but it lasts five times as long. It includes a protective case with hose and wrench storage and exterior PALS webbing for attachment of MOLLE-compatible accessories or tie-down straps.
The FireCan and Gas Growler combo looks like a great way to bring heat and light to various outdoor events, from tailgating to camping trips. We also hear that a new variant of the FireCan, the FireCan Deluxe, will be displayed at SHOT Show next month. It includes additions such as dual burners and a removable cooking grate. We're hoping to get our hands on one for a review in the future, so keep an eye out for that.
In the meantime, you can learn more about the FireCan and Gas Growler at Ignik.com.
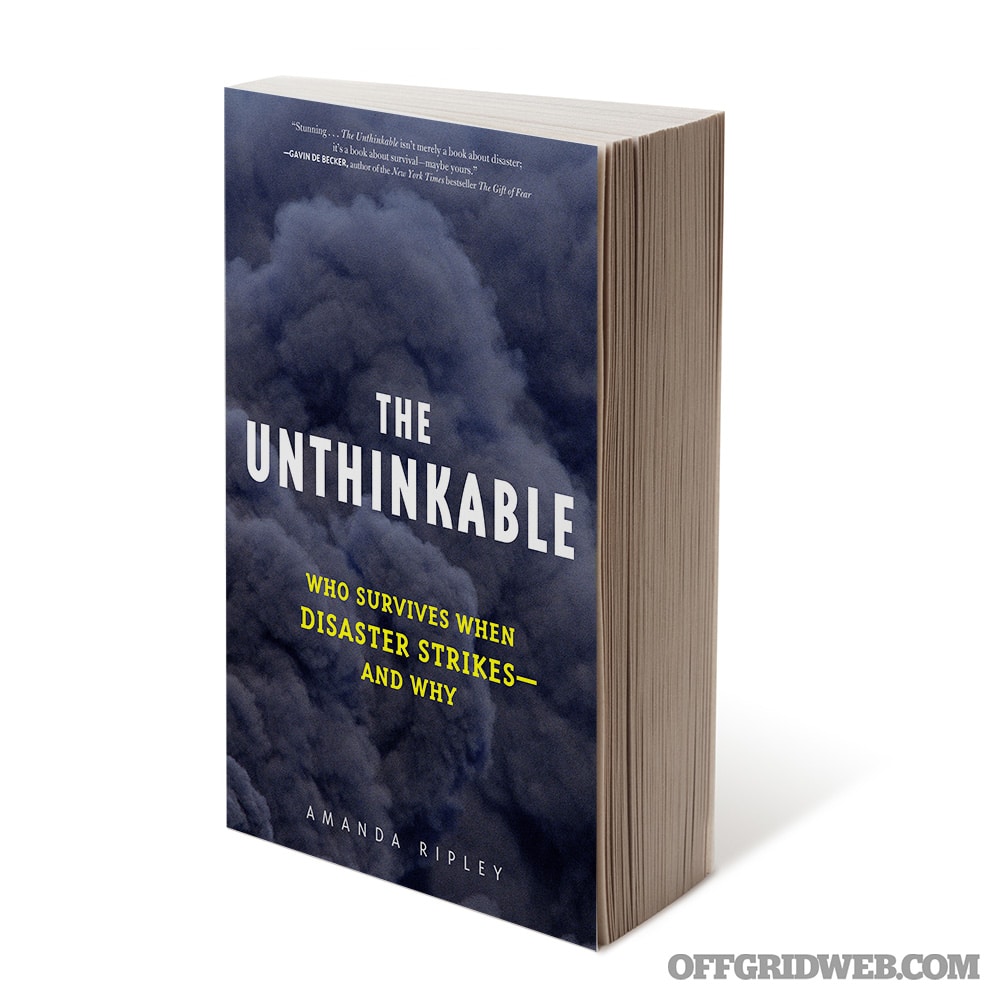
The Premise: How are you most likely to die? In The Unthinkable, Amanda Ripley asks this question and begins a journey to explore the mindset of humanity to understand what sets apart one’s survival instinct from another’s. If we’ve ever asked the question, “What would I do in a disaster,” then Ripley’s book is at the forefront of answering that question for her readers. Ripley examines the various levels of human behavior through multiple case studies and eyewitness accounts, leading readers to draw conclusions about themselves. The Unthinkable asks us the hard question: “Will my decision in a disaster lead to survival or death?” More importantly, Ripley asks why we exhibit certain behaviors, and if we can change them to make us more resilient during a disaster.
Our Review of “The Unthinkable” by Amanda Ripley
Ripley investigates a range of disasters, both natural and manmade, asking us if we’re endeared with the mental traits of a survivor. Within the over-arching question rises the most poignant thought of who has the highest potential of dying during a disaster: Why?
The Unthinkable introduces the “survival arc” of actions and reactions when experiencing disaster. Ripley identifies three phases within the survival arc: denial that anything is wrong, deliberation on options considered, and decisions on what we should or should not act upon.
Each chapter of the book focuses on a specific disaster that envelops a particular emotion and action during calamity, and explores how the two are interconnected. There’s a lot of talk about our instinctual reactions in the face of danger. Why do we perform acts of heroism? How do crowds of people suddenly turn deadly? What physical reactions do our bodies go through when faced with unimaginable fear? How do we keep from freezing and move past denial? The Unthinkable definitely focuses on mental survival during disasters, but there’s a fair share of practical advice intertwined through the reading to bring it home for Ripley’s readers, including a knowledge base on specific disasters readers could personally face, and mentally rehearse for what they would do.
The Verdict
The Unthinkable, while exploring the dark side of disasters, is intertwined with a sense of hope. The tragic stories of disaster survivors are sobering, yet heroic as they reflect the human spirt to save oneself as well as the lives of others. Stories range from the World Trade Center attacks to the Virginia Tech shooting. Ripley weaves empirical evidence throughout her writing to display why some of us are more prone to die in a disaster. These tragic stories, however, contain a silver lining, which is that humanity rises to the occasion of doing good more than we think, even during times of disaster.
In an overwhelming library of disaster novels and how-to books, Ripley should be commended for her work. The Unthinkable is a well-researched and optimistic reflection about disasters and how people navigate them. We often dissociate our environment with our emotion, believing that disaster may not happen to us. It’s this premise, however, that Ripley excels at smashing, telling us not only why we’re prone to such thinking, but how to break it as well. She mixes her research with the right balance of judgment and personal commentary, making the reading relatable to all her readers, not just those involved in disaster preparedness. She expertly reaches her audience with the use of individual stories, rather than the sole use of aggregated data, making her work understandable and easily acted upon when advice is given.
This book should be on everyone’s personal bookshelf. It’s filled with fascinating tales of how people react during disasters and gives us practical advice on how to prepare ourselves mentally before being involved in one. By understanding the most common reasons people die in disasters, we equip ourselves with practical information that could save us during such times. If we’re ever in the moment that we think we’d be oblivious to the calamity around us, Ripley is there to warn us that we all are susceptible to human response. At its core, The Unthinkable is a book that believes in humanity and the resilience of people, especially as they come to grips with their mental survivability during a disaster. It offers hope in times of despair, especially as it teaches us that we can overcome the biggest obstacle to surviving disaster: ourselves.
About the Book
Blank Book
Book & Author The Unthinkable: Who Survives When Disaster Strikes—and Why By Amanda Ripley
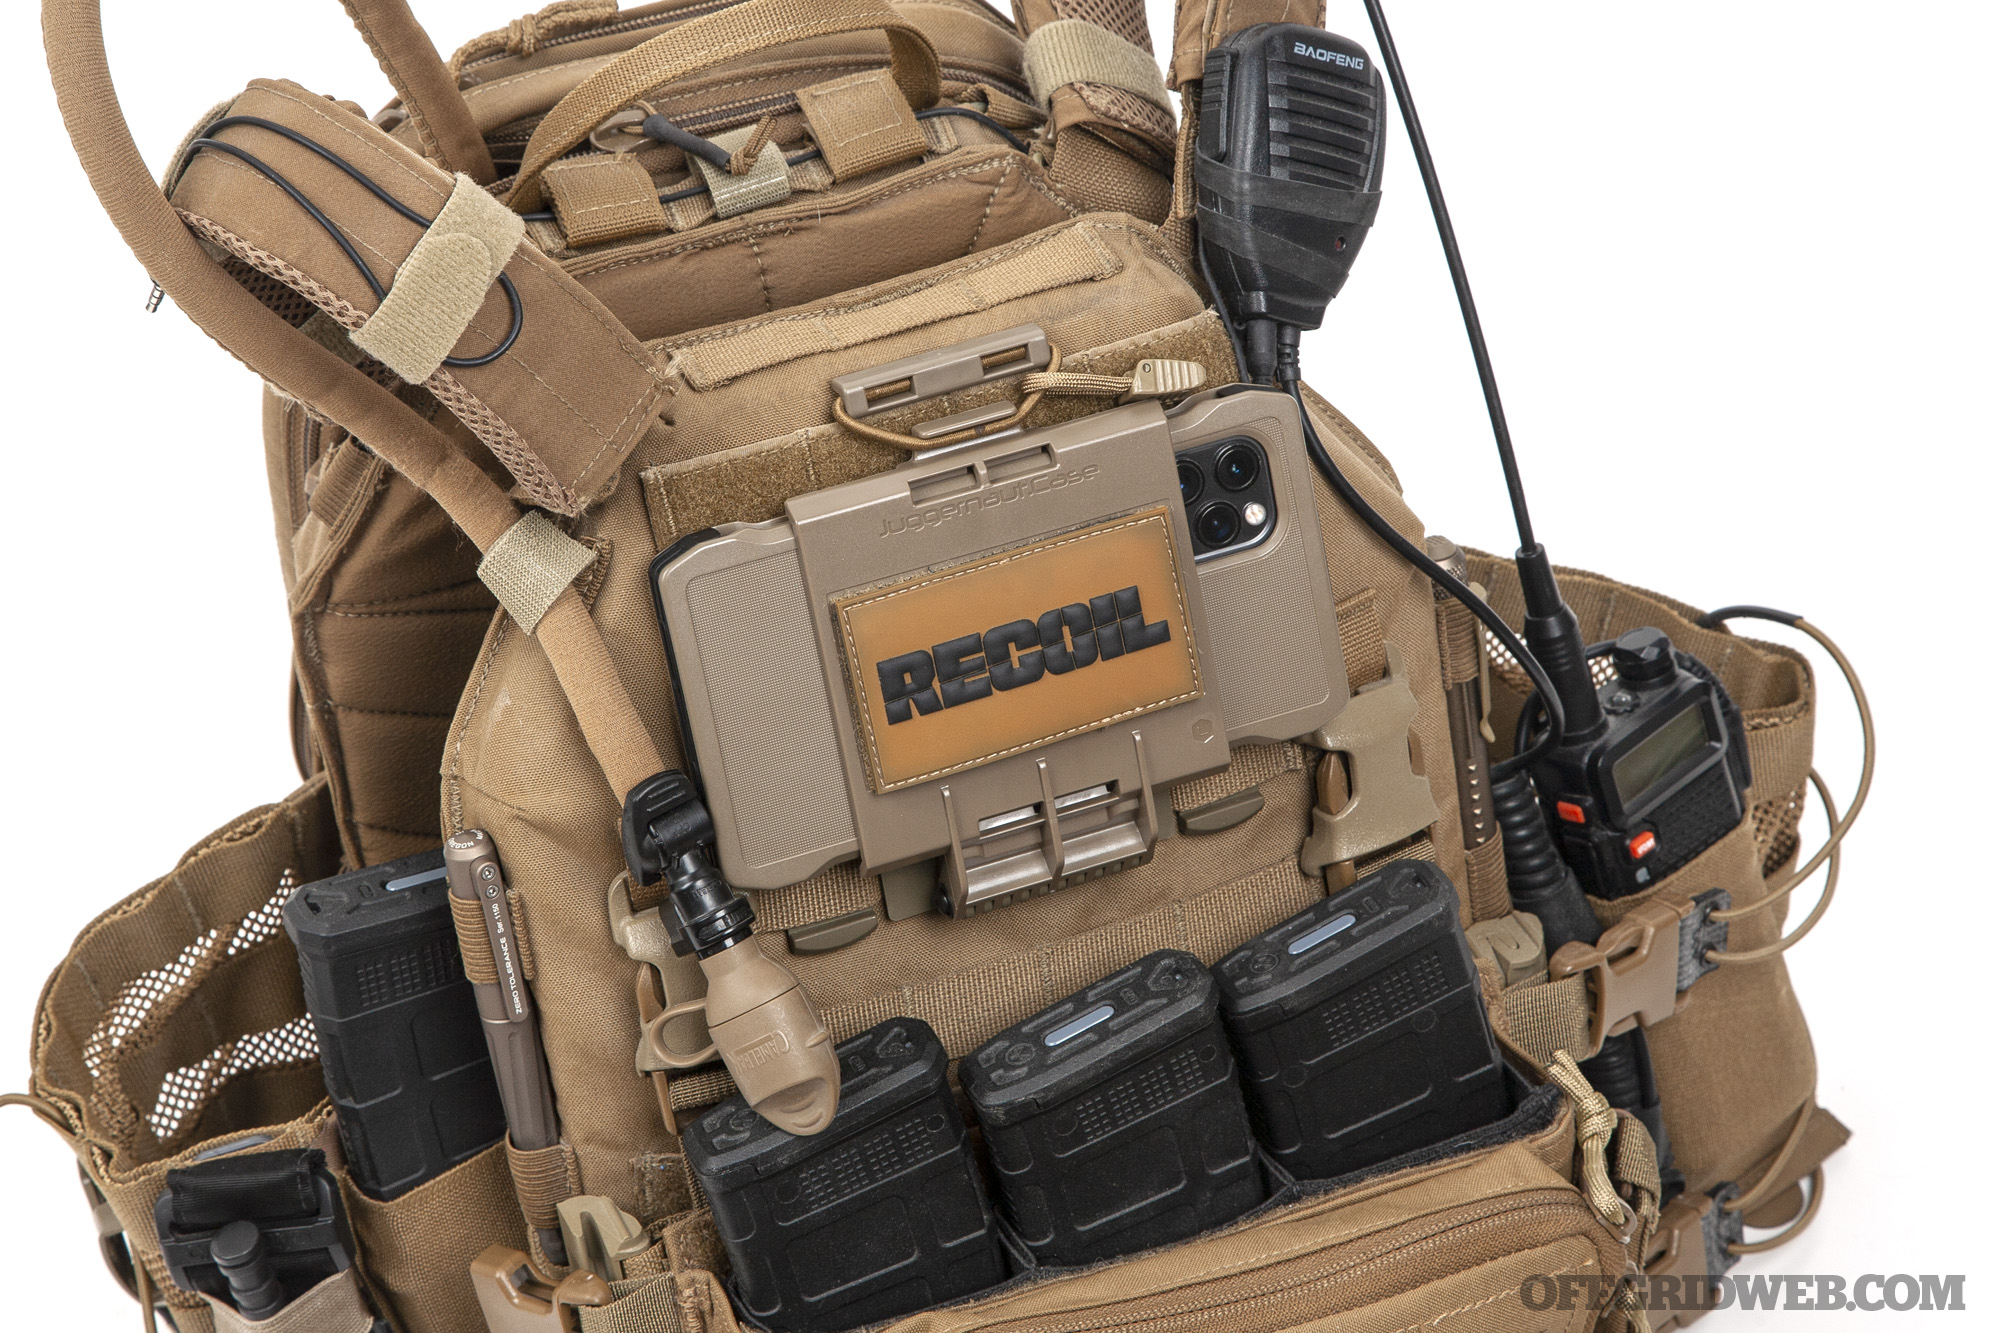
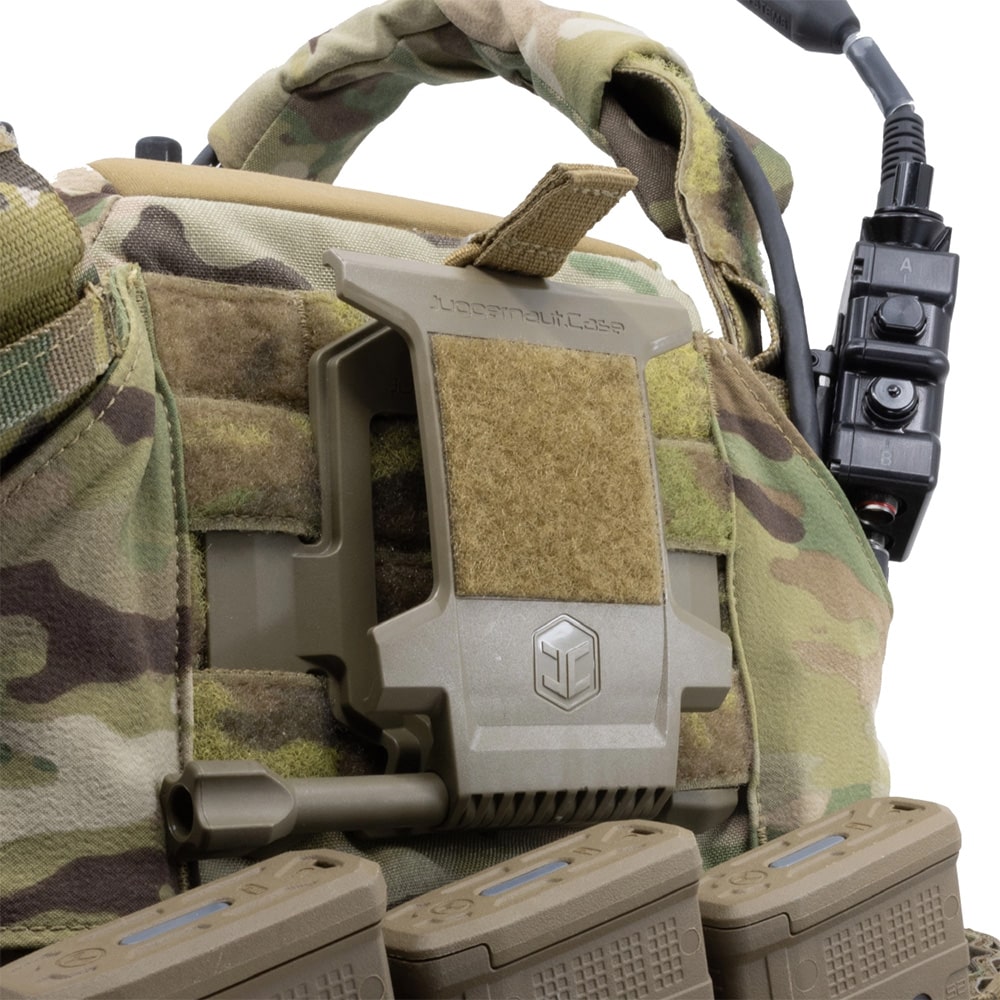
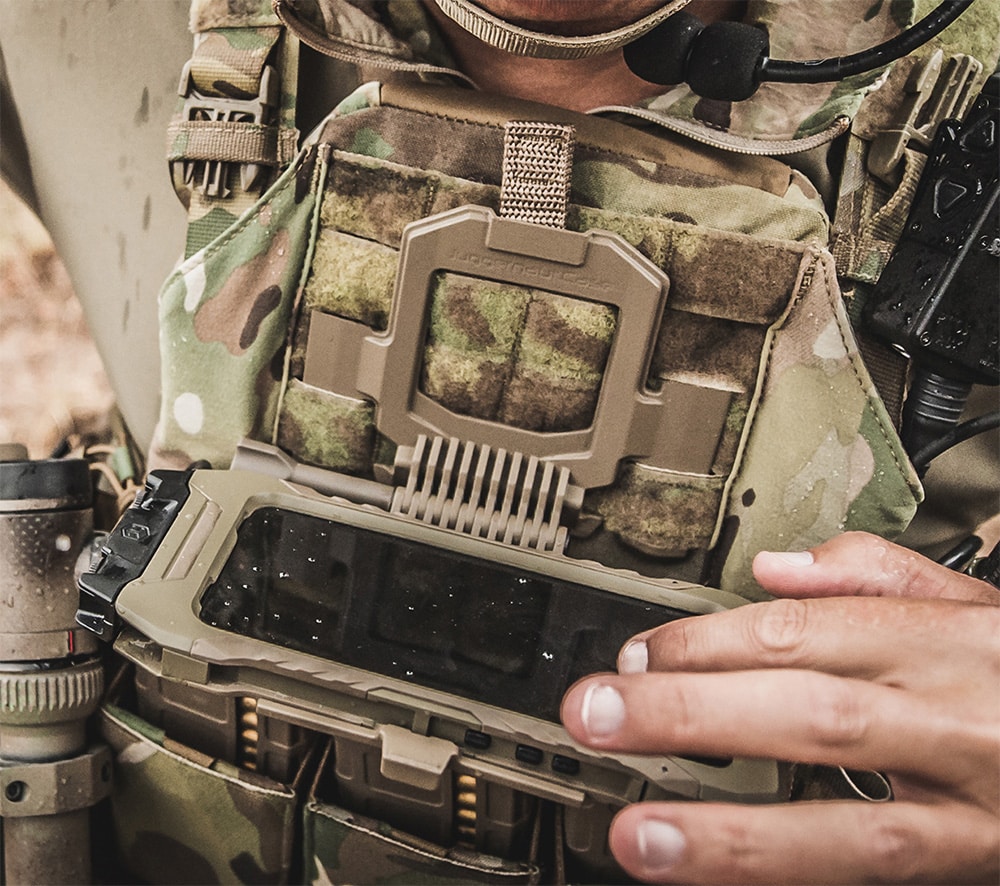
Love them or hate them, our cell phones have become an important part of our daily lives. This is also true for members of the military, law enforcement, and search and rescue teams who use smartphones in the line of duty for navigation and team collaboration through purpose-built apps like ATAK. These individuals often wear plate carriers, chest rigs, and other load-bearing gear, so it's beneficial to integrate their mobile devices into that gear for quick access. For many years, Juggernaut Case has offered a PALS Mount that attaches a smartphone to MOLLE-compatible webbing, but this week, the company unveiled Version 2.0 of the Juggernaut Case plate carrier phone mount with some cool new features.
We've spent some time wearing and using the previous version of the Juggernaut PALS Mount, pictured above. It worked well, but we still felt there was a little room for improvement. Thankfully, Juggernaut Case has apparently addressed all of our concerns with the 2023 version of the PALS Mount (available now).
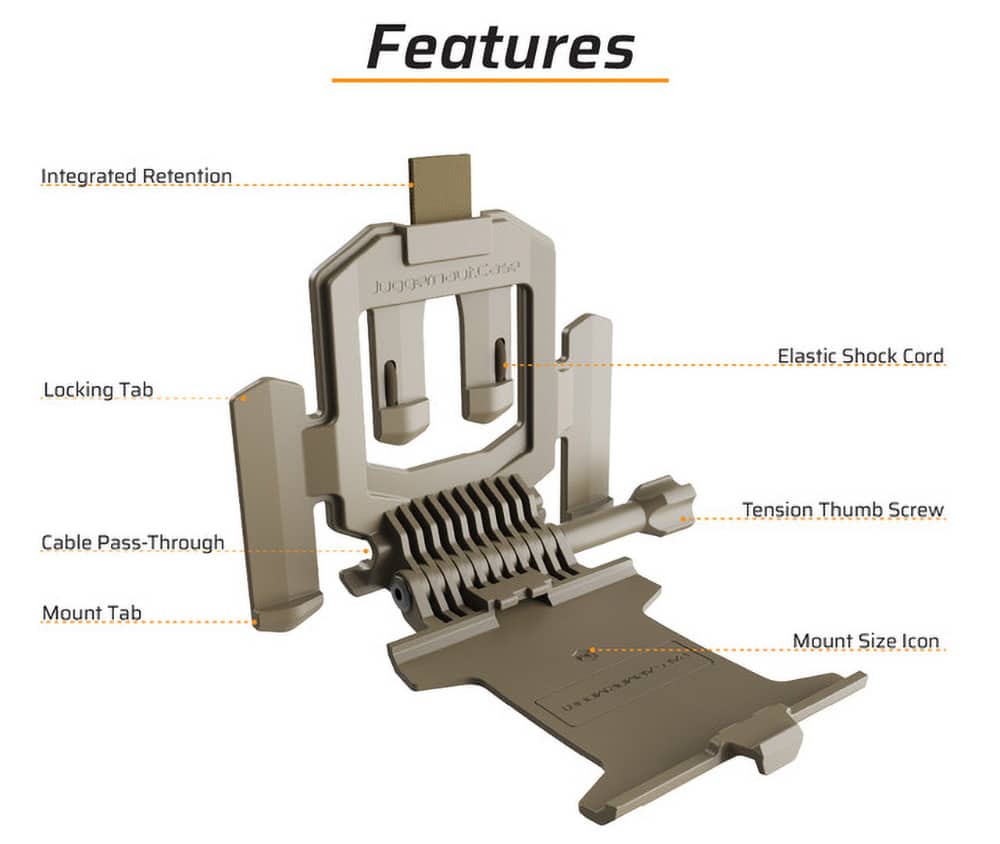
The most obvious change is the front panel, which now has Juggernaut's signature “dog bone” shape and a slightly more prominent logo. The pivot point at the bottom of the mount now has a new hinge friction adjustment knob, which allows the user to fine-tune how easily the phone folds down.
At the top of the new Juggernaut Case plate carrier mount, the elastic retention band has been integrated into the mount, as opposed to the separate retention band on the older version. This offers more consistent tension on the shock cord, so the mount doesn't flip open inadvertently.
Finally, the mount's base has been completely redesigned, with four staggered mounting tabs and two locking tabs that make it easier to install on PALS webbing. It also has a built-in cable pass-through to keep charger or headphone cables neatly organized and secure.
The new Juggernaut Case PALS Mount 2.0 is American-made and Berry compliant for use in DOD contracts. Like previous versions of the mount, it's available in four device sizes (S, M, L, and XL) as well as three colors (Black, FDE, and OD Green). MSRP is $100, and it requires a matching Juggernaut Case for your phone. The company offers a wide range of cases for Android and Apple smartphones, from the sleek ENDVR to the rugged IMPCT and ADVNTR to the professional-grade OPRTR. The new PALS Mount is backward-compatible with older Juggernaut phone cases, so you won't need to buy a new one if you already have one.
For more information on the Juggernaut Case plate carrier phone mount, go to JuggernautCase.com.
Drone shopping can be a bit like car shopping today. Not everyone needs a sports car — some families need a van for soccer practice and others need a truck for work. Just as the original Ford Model T quickly transformed into a wide range of two-door, four-door, and convertible variants, drones have come a long way from being a one-size-fits-all solution. Early commercial drones were instrumental for filmmakers and videographers. The best ones were usually made with composite/carbon-fiber material that would make your heart sink if you crashed it. Your average hobbyist didn’t have a spare $20K to $30K laying around to invest in a toy of this caliber. But today, inexpensive consumer drones can be used for recording high-definition aerial video, light shows, obstacle course racing, and even drone drop deliveries of small items.
Disclaimer: This article is intended to be a brief overview of dropping items from aerial drones, and not a comprehensive guide to drone use. Check your local laws before flying a drone or attempting to carry objects with your drone. Always fly safely and responsibly.
The Evolution of Consumer Drones
Above: Here’s my existing DJI Mavic Air2S drone setup.
As the years passed, Chinese manufacturers stepped up to pump out smaller drones made from affordable plastic components. These weren’t easy to fly, and replacement parts weren’t easy to find. But the popularity of drones continued to grow, and in 2013, DJI released the Phantom drone to appeal to the U.S. and UK markets. As of 2020, DJI has provided over 77 percent of the U.S. market share for consumer drones.
Thanks to reductions in cost and improvements to ease of use, hobby drones have become very popular. These devices are now being recognized for their capability to do more than capture amazing aerial video footage. Much like hot-rodders learned to push the limits of their vehicles by adding headers and high-flow carburetors, the drone market is experiencing a renaissance of tuning and third-party mods. Swarms of drones can put on a “firework style” lightshow. Drones can fly through obstacle courses with precision navigation and incredible speed. The days of aerial photography for fun have quickly evolved to users putting their drones to the test.
Special Delivery
Given their versatility, low cost, and ease of use, it should come as no surprise that consumer drones have begun showing up in wars and conflicts around the world. Military and paramilitary groups have been weaponizing these devices for many years — they’re used for stealthy reconnaissance from high above the battlefield and have even been equipped with improvised explosive devices to directly attack enemy positions. Drones can also be used to deliver important resources, such as medicine or a radio, to allies in heavily contested areas. Powerful motors and extended battery life have made the DJI Mavic Air2S a popular choice for applications such as these. Even if you’re not currently involved in asymmetric warfare, knowing how to deliver payloads with your drone can be a valuable skill. Read on as we explain the basics of drone drops.
Above: My drone kit and accessories fit easily into a small Haley Strategic Flatpack Plus. Clockwise from top left, this photo shows the DJI drone and controller, LoRa communicator, Hanatora drone drop kit, two Midland walkie-talkies, goTenna Mesh, and TinyTx ThrowTx in a custom housing.
How to Set Up Your Drone Drop
The DJI Mavic Air2S has a remote function button that’ll trigger a “landing light.” There are no internal modifications or special auxiliary motors to hardwire into the drone’s system — it’s essentially pre-wired for a remote “trigger.” Sourcing a relatively cheap “light sensor” switch motor will cost under $60 and will latch onto your drone with the included mounting bracket.
Once installed, the switch will open and close, unlatching whatever string/attachment you connect to the switch. Once you’ve tested the light function with your remote before flight, you’ll be ready to drop anything your drone can carry.
Above: I purchased a Hanatora Payload Airdrop kit for $37 on Amazon. The kit clamps onto the body of the drone. Foot extensions for each arm are included and can help with clearance for takeoff and landing.
Above: Here's a photo of the underside of the drone with the drop kit installed. Items can be attached to the retractable metal rod via a loop of cord or a key ring.
Above: To activate the drop function, simply press the FN button on the controller to activate the drone's built-in “Landing Light.” This will trigger a light sensor in the drop kit that opens and closes the attachment rod.
Above: This TinyTx ThrowTx device runs on a single CR2032 battery, and can provide approximately 30 hours of continuous audio surveillance to any UHF receiver (e.g. a handheld ham radio) within a 500-meter radius.
Above: Originally, the ThrowTx was designed with a spherical housing that can be thrown or rolled into position, but this didn’t provide any way to attach it to a drone. I used a 3D printer to create a new housing with a keyring attachment point. The entire setup weighs less than an ounce.
Even if your drone doesn’t have a plug-and-play accessory switch, there are still low-tech options. In an OFFGRIDweb-exclusive article on weaponized drones, we showed how militants in Central African Republic used a drone to carry a hand grenade inside a cut-open water jug. When the drone tilted forward, the grenade rolled out of the jug, and a string attached to the drone pulled the pin. Although this makeshift setup would be incredibly dangerous to everyone in the vicinity, it’s a reminder that improvised drop methods can be cobbled together for almost any drone.
What Can a Drone Carry?
Various weight tests have been performed on many drones. Typically, a DJI Mavic Air 2S can carry roughly 16 ounces at most. Factor wind and battery life into the equation before you take off to deliver that package. I like to stay under 8 ounces for payload weight, since that still allows safe maneuverability and flight distance. Remember that your drone needs enough battery life to make it back from its destination — the last thing you want is an emergency landing in an area you can’t easily access.
Above: This drone can carry about 16 ounces of payload, but 8 ounces is a safer limit to maximize stability and range. That’s more than enough for a goTenna Mesh network device, a solid-state drive full of terabytes of data, or a Baofeng handheld radio.
For reference, here’s a quick list of some possible payloads we weighed:
ThrowTx audio surveillance device with custom 3D-printed drop housing: 0.7 ounce
GoTenna Mesh network device: 1.7 ounces
SanDisk solid-state drive with USB cable: 2.1 ounces
Midland X-Talker FRS walkie-talkie: 3.7 ounces
Raspberry Pi Zero with 800mAh battery, USB cable, and zippered case: 3.9 ounces
Raspberry Pi with PiSugar 1200mAh battery and 3D-printed housing: 6.7 ounces
Baofeng UV-5RA dual-band ham radio: 7.2 ounces
Raspberry Pi with battery, housing, RTL-SDR dongle, and antenna: 8.1 ounces
Raspberry Pi Zero with USB cable, Mophie 6000mAh battery pack, and zippered case: 8.5 ounces
Above: Here’s what the ThrowTX housing looks like attached to the drop kit. The foot extensions allow the drone to take off and land more easily.
Above: After a test flight, we saw almost no impact to drone maneuverability and stability with our drop kit and payload. Lightweight items shouldn’t affect range much, either.
Deciding what you want to carry and what can withstand the impact from the drop will be an evolving goal. 3D printed enclosures partnered with soft foam work well and are scalable and light; I’d strongly recommend foam enclosures for anything that’s fragile or needs to be dropped from more than two stories of elevation. Kite strings and creative knots can secure anything that doesn’t need protection from the drop.
Real-World Drone Drop Applications
Thinking of what to drop? The possibilities are endless. If your mind races immediately to Molotov cocktails or kilos of white powdery substances, you’ll likely need a much larger drone to fly in a country where that sort of lifestyle is accepted. Maybe you want to play extreme fetch with Fido, or have an over-the-top gender reveal party. But this is RECOIL OFFGRID — we want to focus on staying prepared and alive.
Above: For less than $40, the Hanatora Payload Airdrop kit includes a mounting bracket with sensor and drop motor, as well as foot extensions.
Search-and-rescue drones can find a missing hiker, but imagine having the ability to drop a radio so you can communicate, not just hover over the individual. Keeping them intact and working can involve trial and error. A small affordable walkie-talkie weighs a lot less than a clunky CB/ham radio. If you have good cell service in the area, a cell phone would work great. If not, consider a GPS beacon or satellite phone. Find ways to strip items down to bare essentials and protect them with lightweight soft padding.
Surveillance and countersurveillance is another area where drones excel. Dropping listening or jamming devices isn’t something I will explain in great detail, but specialists such as TinyTransmitters offer some surprisingly affordable and capable options. It’s also possible to wirelessly collect information by attaching a radio receiver to the top of the drone using Velcro, and dangling an antenna underneath it. In the event that you need to make a hasty getaway, your drone drop system can be used to ditch the antenna at the press of a button. Similarly, your drone can act as a radio repeater to aid in broadcasting a stronger signal.
Above: In situations where there’s no internet access or networks are heavily surveilled, your drone can serve as a modern-day carrier pigeon. Simply load files onto a portable SSD and deliver it to the recipient. Encryption can be added as a safeguard against interception.
Dropping glow sticks or other markers can help an individual or team navigate into or out of a specific area. Technology can enable us to mimic what we see in military exercises, with marker colors representing different objectives or statuses. Maps and other navigational aids could also be delivered via drone.
Whether you believe Alberto Santos-Dumont or the Wright Brothers were first to fly, we’ve had a lot of pioneers in the field, with every contribution advancing the sky to become our futuristic superhighway. How you navigate the sky and what cargo you choose to carry is up to you.
About the Author
This article was written by SoCal Offgrid, an individual not to be confused with the name of this magazine. He is a full-time electrical contractor who previously shared his urban communications kit Bag Drop in Issue 45. He can be found on Instagram at @socal_offgrid.
When we think of weapons of war, most of us think of tanks and fighter jets and artillery. For those who experienced war in the Middle East over the last few decades, improvised explosive devices (IEDs) and chemical weapons may also come to mind. But weapons don't have to be devices that can cause immediate death and destruction. Some weapons are far more insidious. The latest video from Forgotten Weapons shows an example of a highly effective secret weapon created by imperial Japan during WWII to subvert and demoralize their enemies: opium cigarettes. These weaponized cigarettes were secretly laced with opium and distributed throughout China in an effort to cause widespread addiction, leading to a steady source of income for Japan and also reducing Chinese resistance to Japan's invasion.
Opium Cigarettes: Using Addiction as a Weapon
Ian McCollum of Forgotten Weapons discussed the history of these opium cigarettes with Patrick Phillips, the author of Tobacco of the Emperor. Phillips explains that the head of Japanese intelligence in Manchuria, General Kenji Doihara, spearheaded the opium-laced cigarette program by distributing them to warlords throughout China. Those warlords would then place the cigarettes in bars, brothels, and gambling houses, where unsuspecting Chinese citizens would purchase and smoke them.
Since Golden Bat was already an inexpensive and well-known brand of cigarettes in China before this program, and there was no visible indication of the addition of trace amounts of opium, smokers would not suspect a thing. The narcotic created a pleasant relaxing effect that kept the smokers coming back for more, and soon they were addicted. It's very likely that this concept was inspired by the British involvement in opium smuggling into China in the 1700s and 1800s.
We assumed this might be a mostly unsuccessful experiment, much like Japan's use of high-altitude incendiary balloons against the continental United States. However, Phillips says that wasn't the case for the opium cigarettes. “It was wide-scale, and it worked. It worked really well for the Japanese, actually.” Authorities later testified that the program generated as much as $300 million per year for the Japanese government.
The leader of the weaponized cigarette program, General Doihara, was convicted of numerous war crimes and hanged after WWII. According to former SOE operative Ronald Sydney Seth, “[Doihara's] activity played a key role in shattering China's ability to confront Japan's expansion by generating chaotic conditions, which prevented any mass reaction in the invaded country.”
Check out the full video from Forgotten Weapons below for more details, or pick up a copy of Patrick Phillips' book here.
Modern-Day Implications
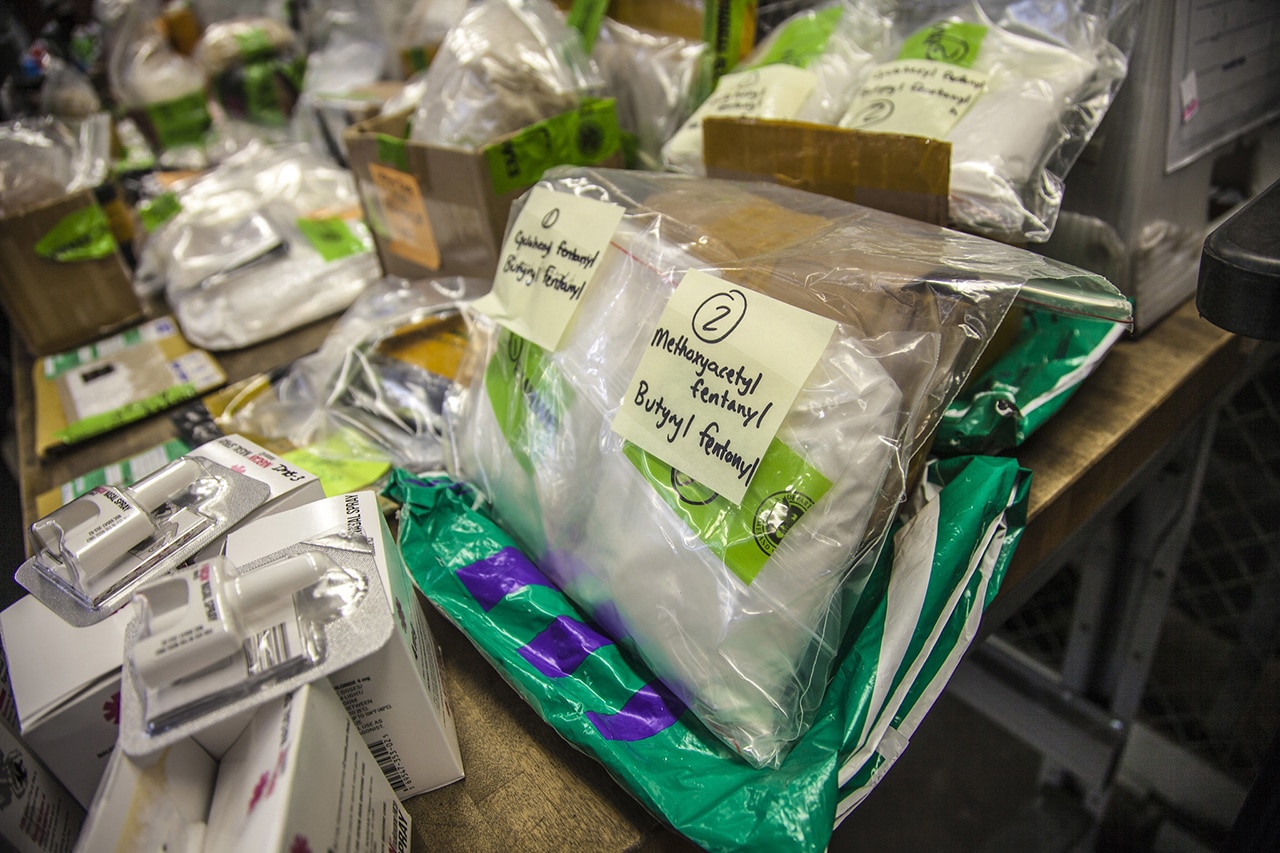
Above: A table full of fentanyl and other drugs seized by Border Patrol. (U.S. Customs and Border Protection photo by Kris Grogan)
History repeats itself, so we can't help but wonder about the existence of modern programs inspired by the success of this opium cigarette program, much like imperial Japan was inspired by 18th century British opium distribution.
Consider the fact that China is the primary exporter of fentanyl, an opioid drug which generates record-breaking overdose and addiction rates year after year in the United States. China has also expressed a strong interest in the use of unconventional and “Unrestricted Warfare” programs such as economic warfare, political warfare, and cultural subversion against technologically superior opponents (namely the United States). CCP military officials stated that these programs can “have the same and even greater destructive force than military warfare.” While it's certainly possible (even likely) that China's fentanyl exports are being used intentionally to demoralize and destabilize the CCP's enemies, there's no way to conclusively prove it.
For another example of narcotics exports being used as a source of military funding, we recommend reading about opium production in Afghanistan and its links to the Taliban.
Note: This editor's letter is from our latest publication, Recoil Offgrid Issue 53. If you'd like to purchase a copy of our magazine or subscribe, go to offgridweb.com/subscription.
In our last issue, we focused on how to survive without the aid of technology. But if we’ve learned anything over the last three years, it’s that most of the legacy survival concepts this community embraced for decades have been disproven. Contrary to the imagined templates of bugging out and living off the land to avoid complete collapse and total anarchy, Western society has instead been served an all-you-can-eat buffet of long-duration, low-intensity crises. The incidents most likely to trigger our emergency plans work on a sliding scale, instead of a light switch. While the collective effect of this continuous bombardment of slowly smoldering catastrophe has taken its toll on our psyche, it has also provided some distinct advantages over the cataclysmic upheavals portrayed by Hollywood.
More often than not, we’ll still have access to electricity, cellular networks, and the internet during simmering unrest or lingering supply line disruptions. Even when rolling blackouts or natural disasters leave neighborhoods and municipalities without power, large-scale regional communications are at least partially intact. Economically focused disasters like the ripple effect of draconian COVID-19 lockdowns don’t affect existing infrastructure at all, and severely challenge the notion that we’ll grab our go-bags, fire up our overlanding rigs, toss our electronics out the window, and head to the hills at the first sign of trouble.
It’s always a good idea to know how to start a friction fire, build a primitive shelter, and live off the land. However, you’d be foolish to hunt exclusively with a flint-knapped spear when modern firearms and ammunition are readily available. In the same vein, if the situation we’re presented allows access to modern survival tools like electronic communication and powered preparedness equipment, those who overlook or reject these tools will be at a substantial disadvantage. That’s why, for our final issue of a year that has continued to demonstrate ongoing global chaos, we’re focusing on how to survive with the aid of technology, instead of abandoning it wholesale. Whether you need to communicate securely with loved ones and an ad hoc neighborhood watch team or use a drone to ferry supplies to those out of reach, there are a vast (and still-growing) number of ways to leverage technology to facilitate your survival during a variety of really bad days.
By the time you read this, Christmas will be right around the corner. We urge you to consider using a couple of those stocking-stuffer gift cards to invest in gear and training to get you through when times are tough and every advantage counts. A little bit of advance planning and the right knowledge will let you use every ounce of processing power in your brain and in the computerized conveniences we often take for granted. From Dean Freeman’s roundup of secure messaging apps to SoCal Offgrid’s rundown on how to create your own drone delivery system, this issue pushed us to find more ways we can use ordinary consumer devices to beat the odds. Think critically, spend accordingly, and stay safe.
Happy Holidays from the RECOIL OFFGRID team. We look forward to expanding your preparedness horizons and helping you through the year ahead — whatever it has in store for you.
In Part 1 of this article, we covered the advantages and disadvantages of a low-power variable optic, discussed important factors for buying an LPVO, and talked about how to choose an appropriate LPVO mount. Now that we've addressed these “hardware” considerations, it's time to address the “software” you'll need to get the best performance from your LPVO-equipped rifle. Like any complex tool, you can't expect to use it properly if you're not trained. The two-day TruKinetics Intro to the LPVO class we attended provided many helpful lessons to keep in mind.
How to Mount an LPVO
Before firing a single round out of our guns, task number one was to confirm our optics were mounted correctly. That might sound like a no-brainer, but it's easy to mount an LPVO incorrectly, and if you do, you'll be left wondering why you're constantly struggling to find the eye box or hit targets. Knowing your optic is mounted securely and zeroed will leave you with a sense of confidence, and that's especially important for a magnified optic that may be used at 500 yards or more.
LPVO mounting involves three factors:
Placement – Is your optic an appropriate distance from your eye? If not, you'll struggle to acquire a clear sight picture quickly.
Leveling – Is your reticle level? If not, you'll be constantly chasing a proper zero. Even a few degrees of tilt in the reticle can cause rounds to completely miss a target at 500 yards.
Torque – Is every nut and bolt tightened to the correct specification? If not, your optic level, placement, and zero may shift unexpectedly (usually at the worst possible time). Estimating “gutentight” is not acceptable!
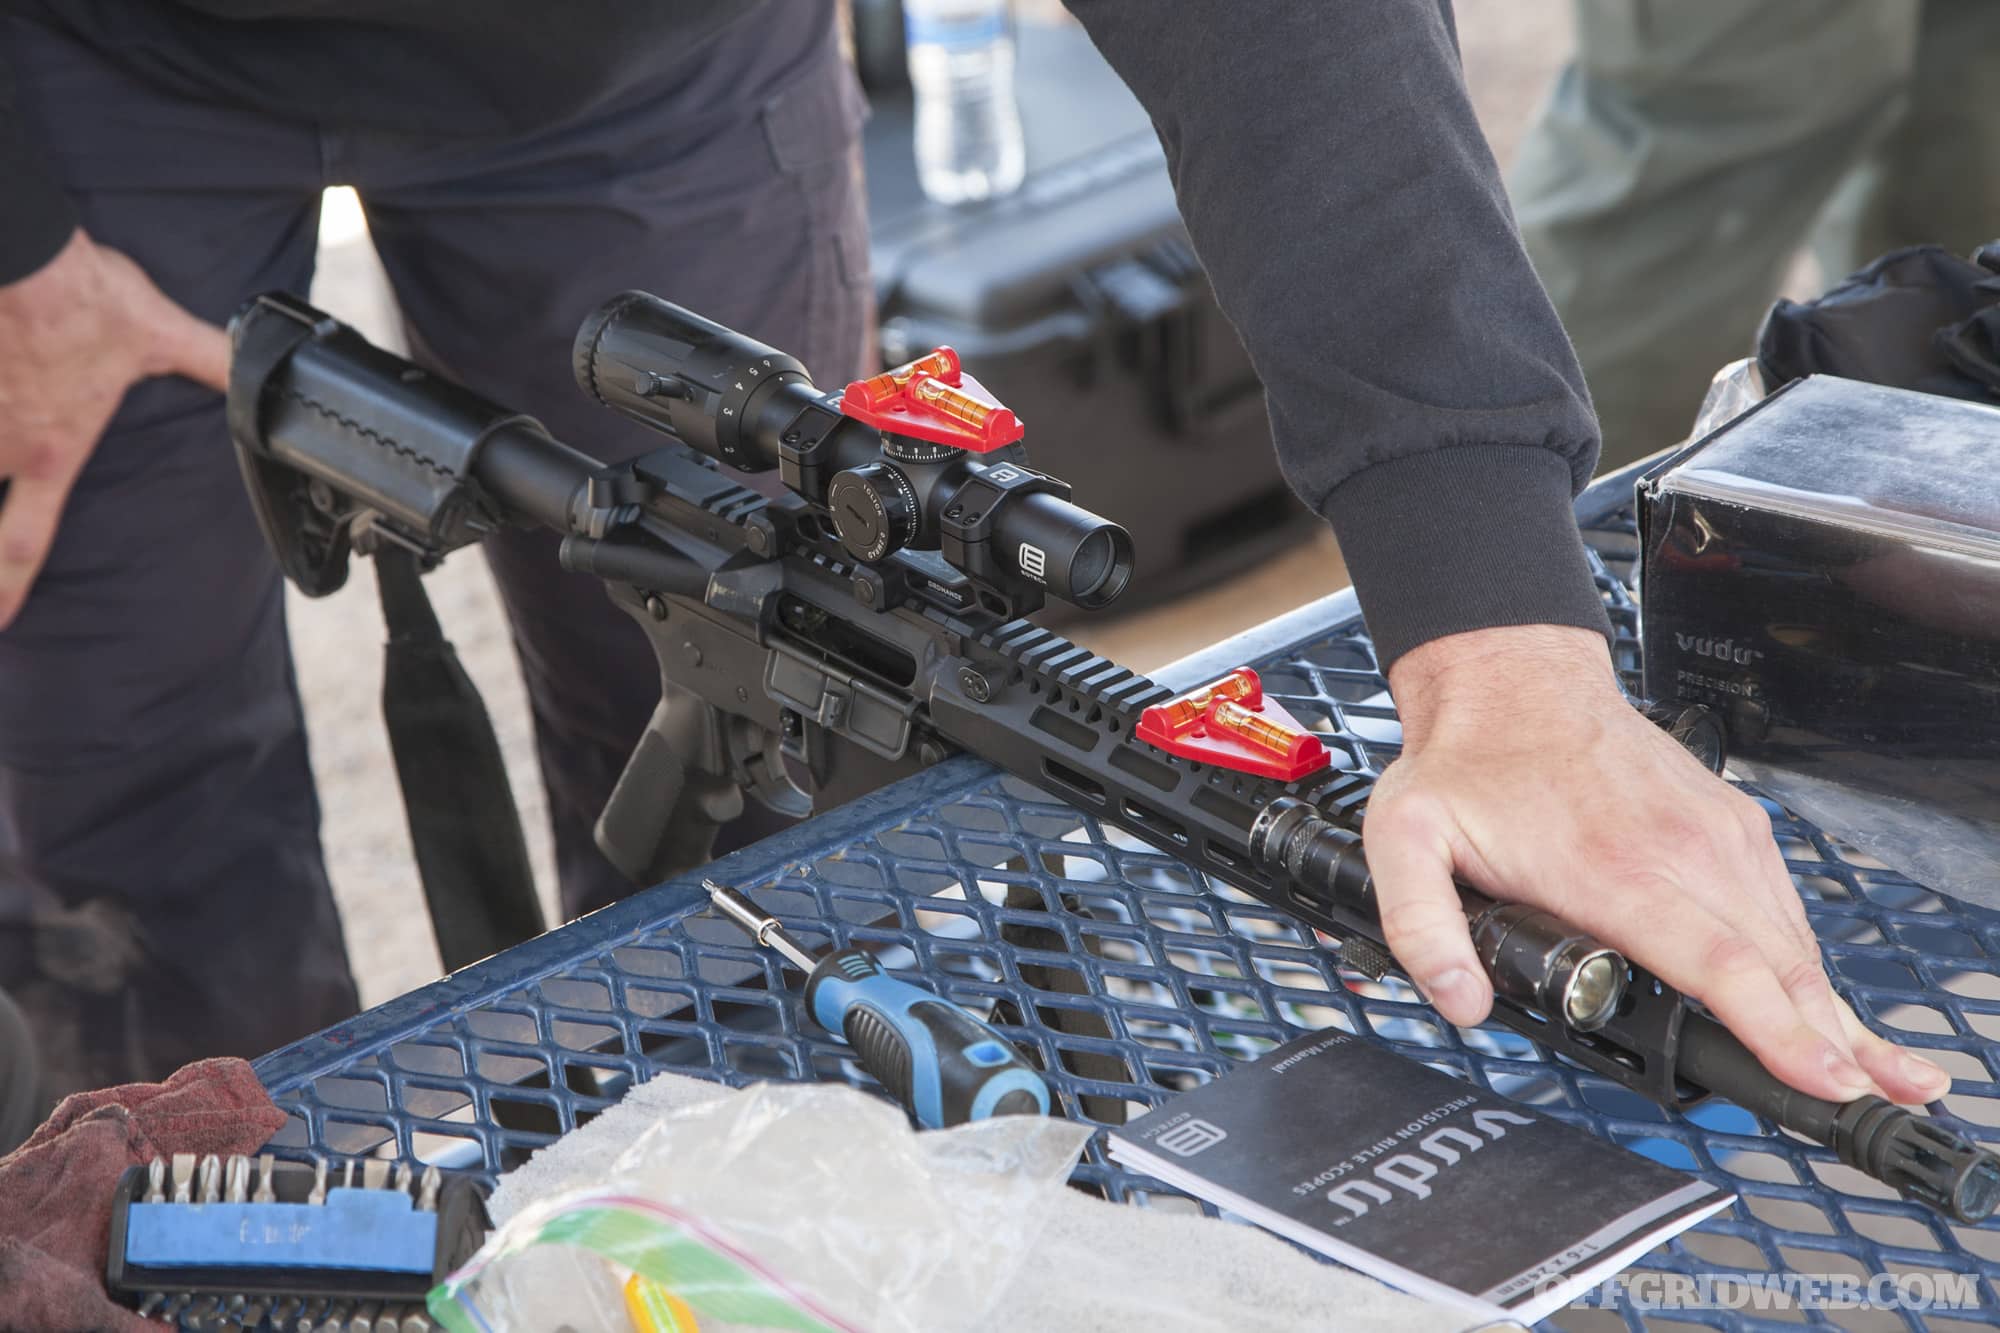
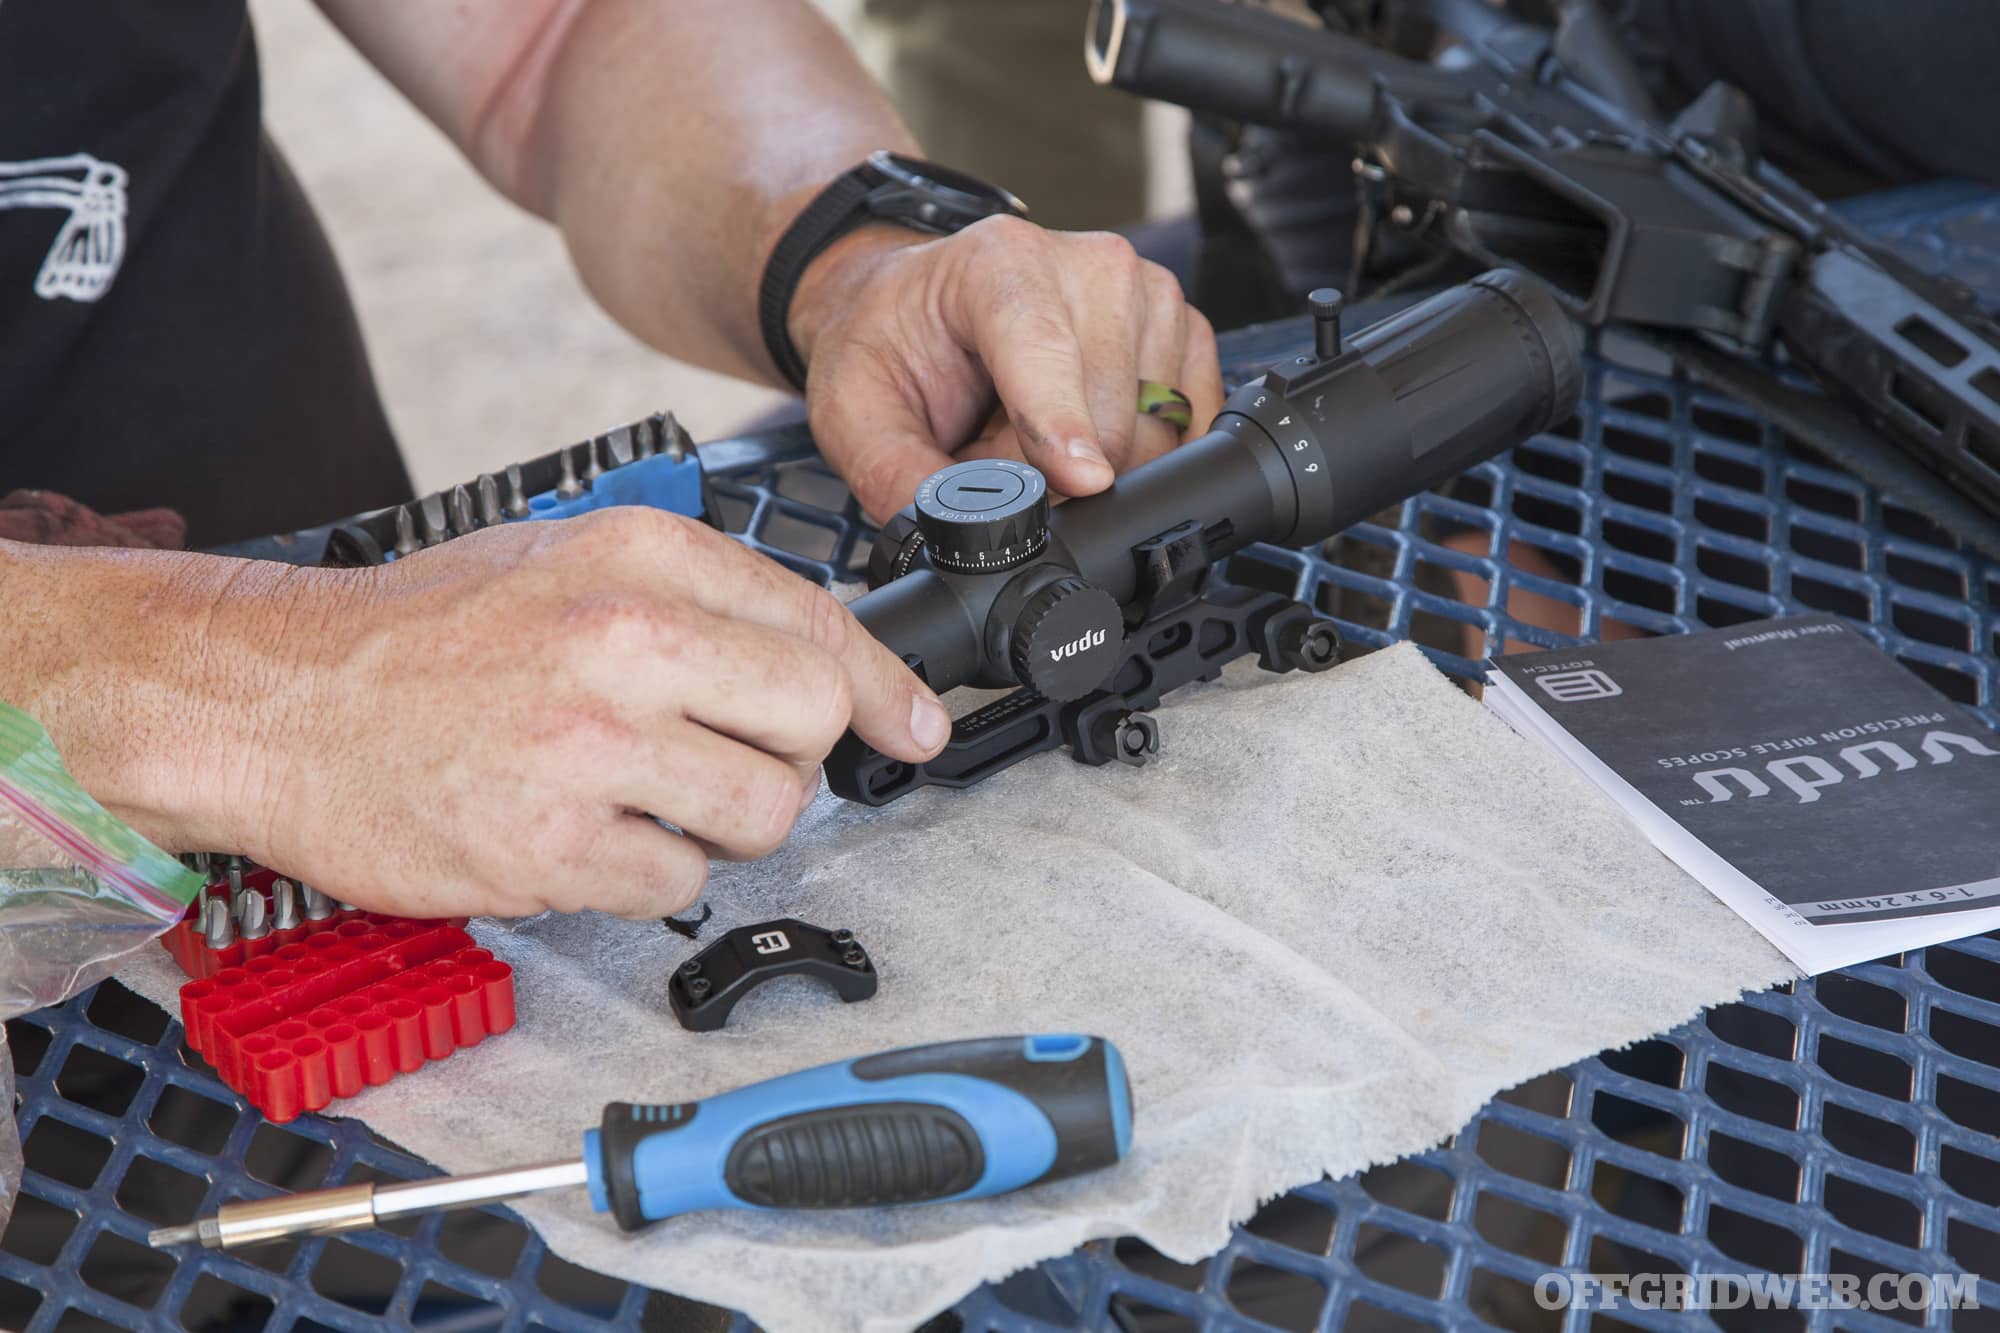
Step 1: Apply a small drop of oil to your fingertip, and rub a very light film of oil onto the inside of the mounting rings. This allows your optic to move freely in precise increments until it's fully torqued.
Step 2: Set the LPVO into the mount and insert the hardware, turning each screw a few times with your fingers to confirm it's threaded in properly.
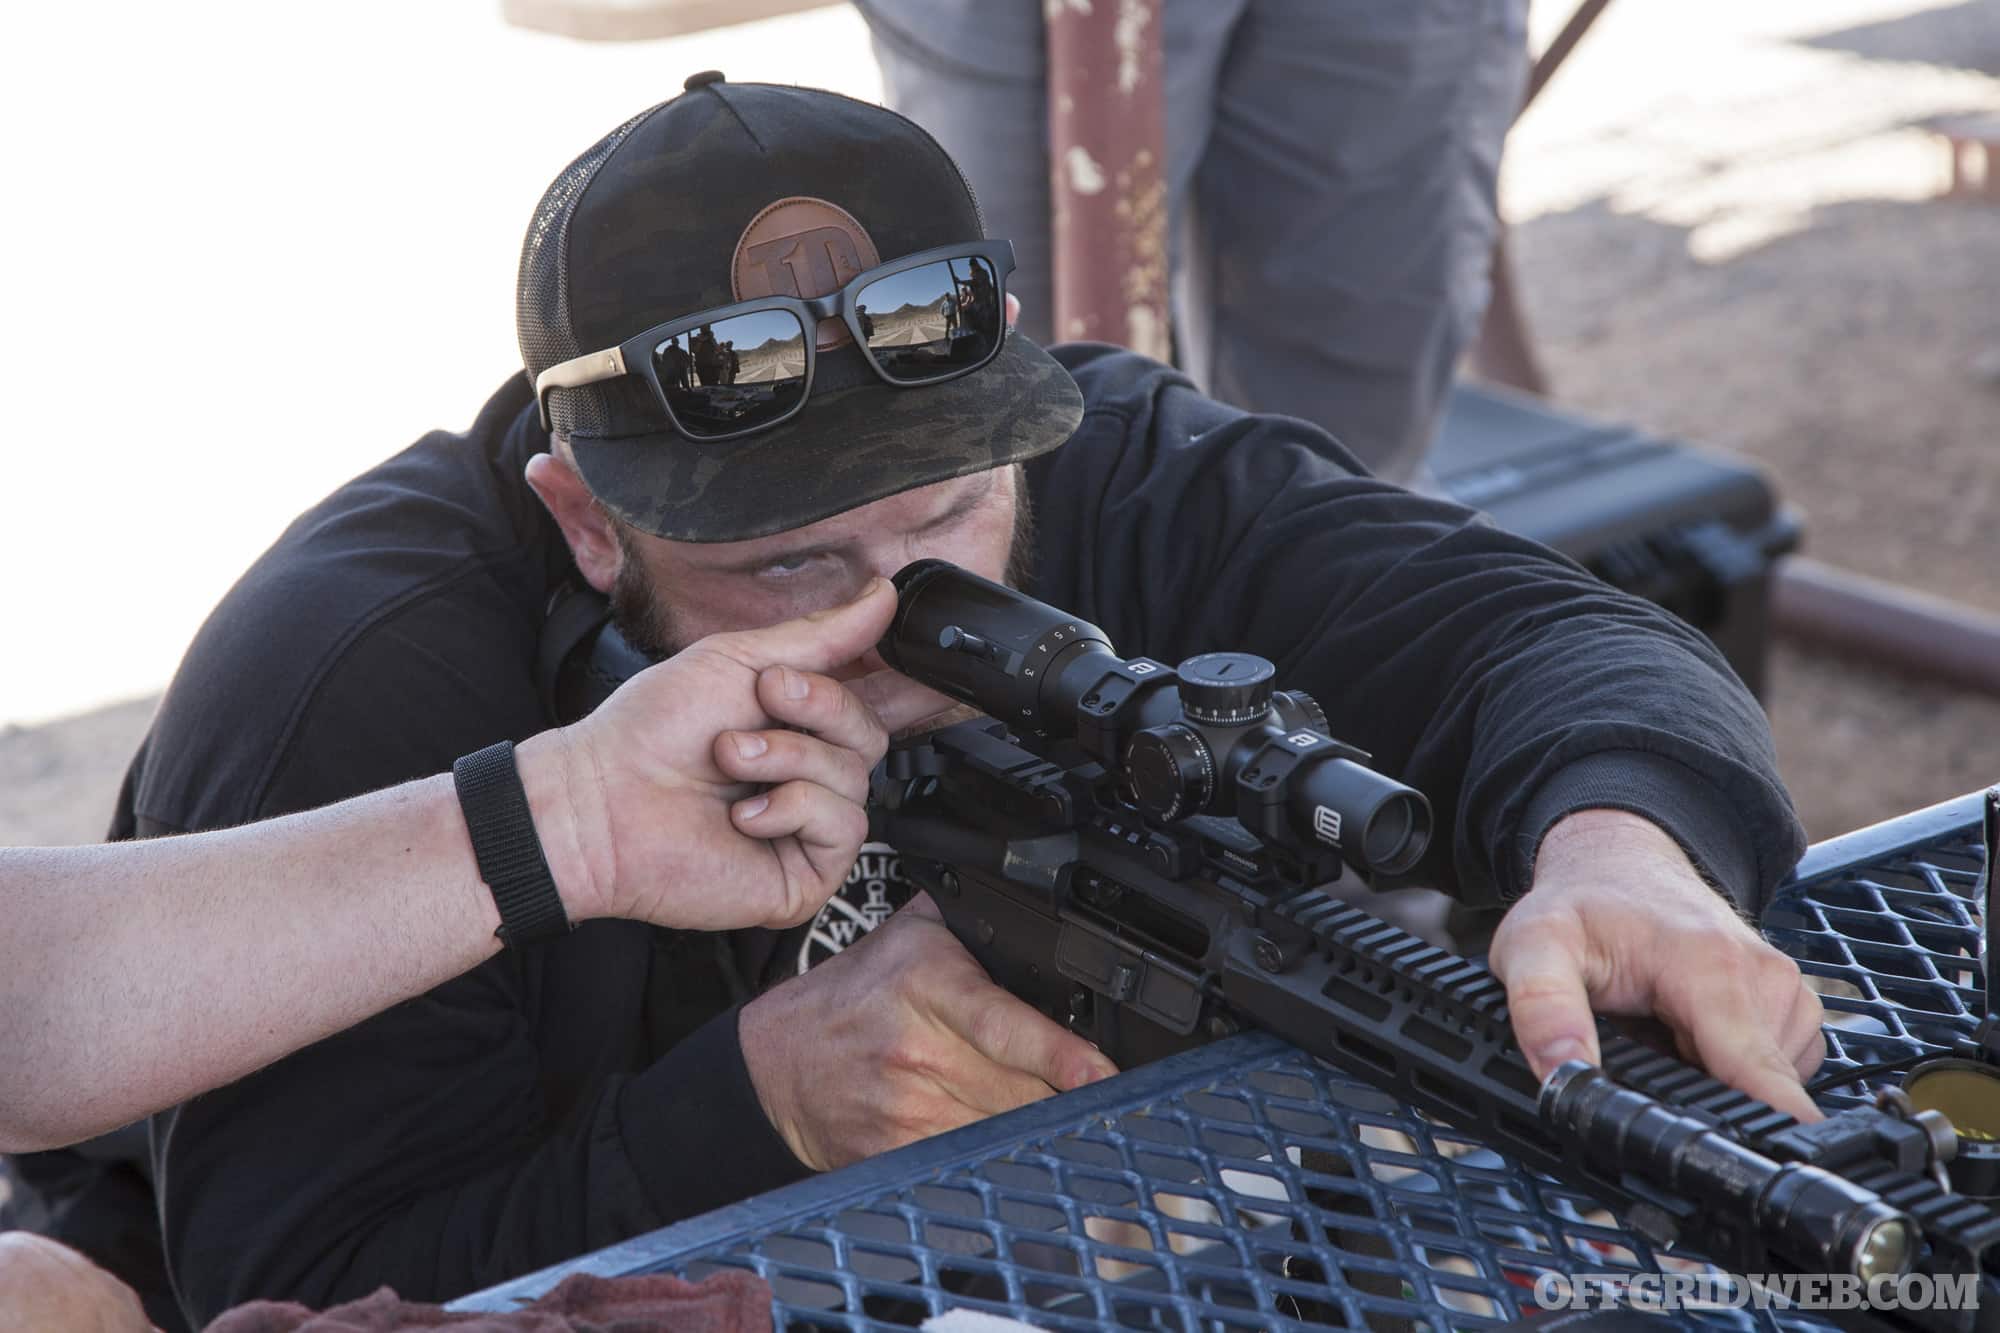
Step 3: Determine the appropriate placement of your optic on the gun at full magnification power. Make sure your rifle's stock is set to your preferred setting, and move the optic back and forth until you get a full sight picture without shadow at the edges of the lens. Large adjustments can be made by shifting the mount forward on the upper receiver Picatinny rail (never attach or “bridge” it onto to the handguard). Finer adjustments can be made by sliding the optic tube inside the mount.
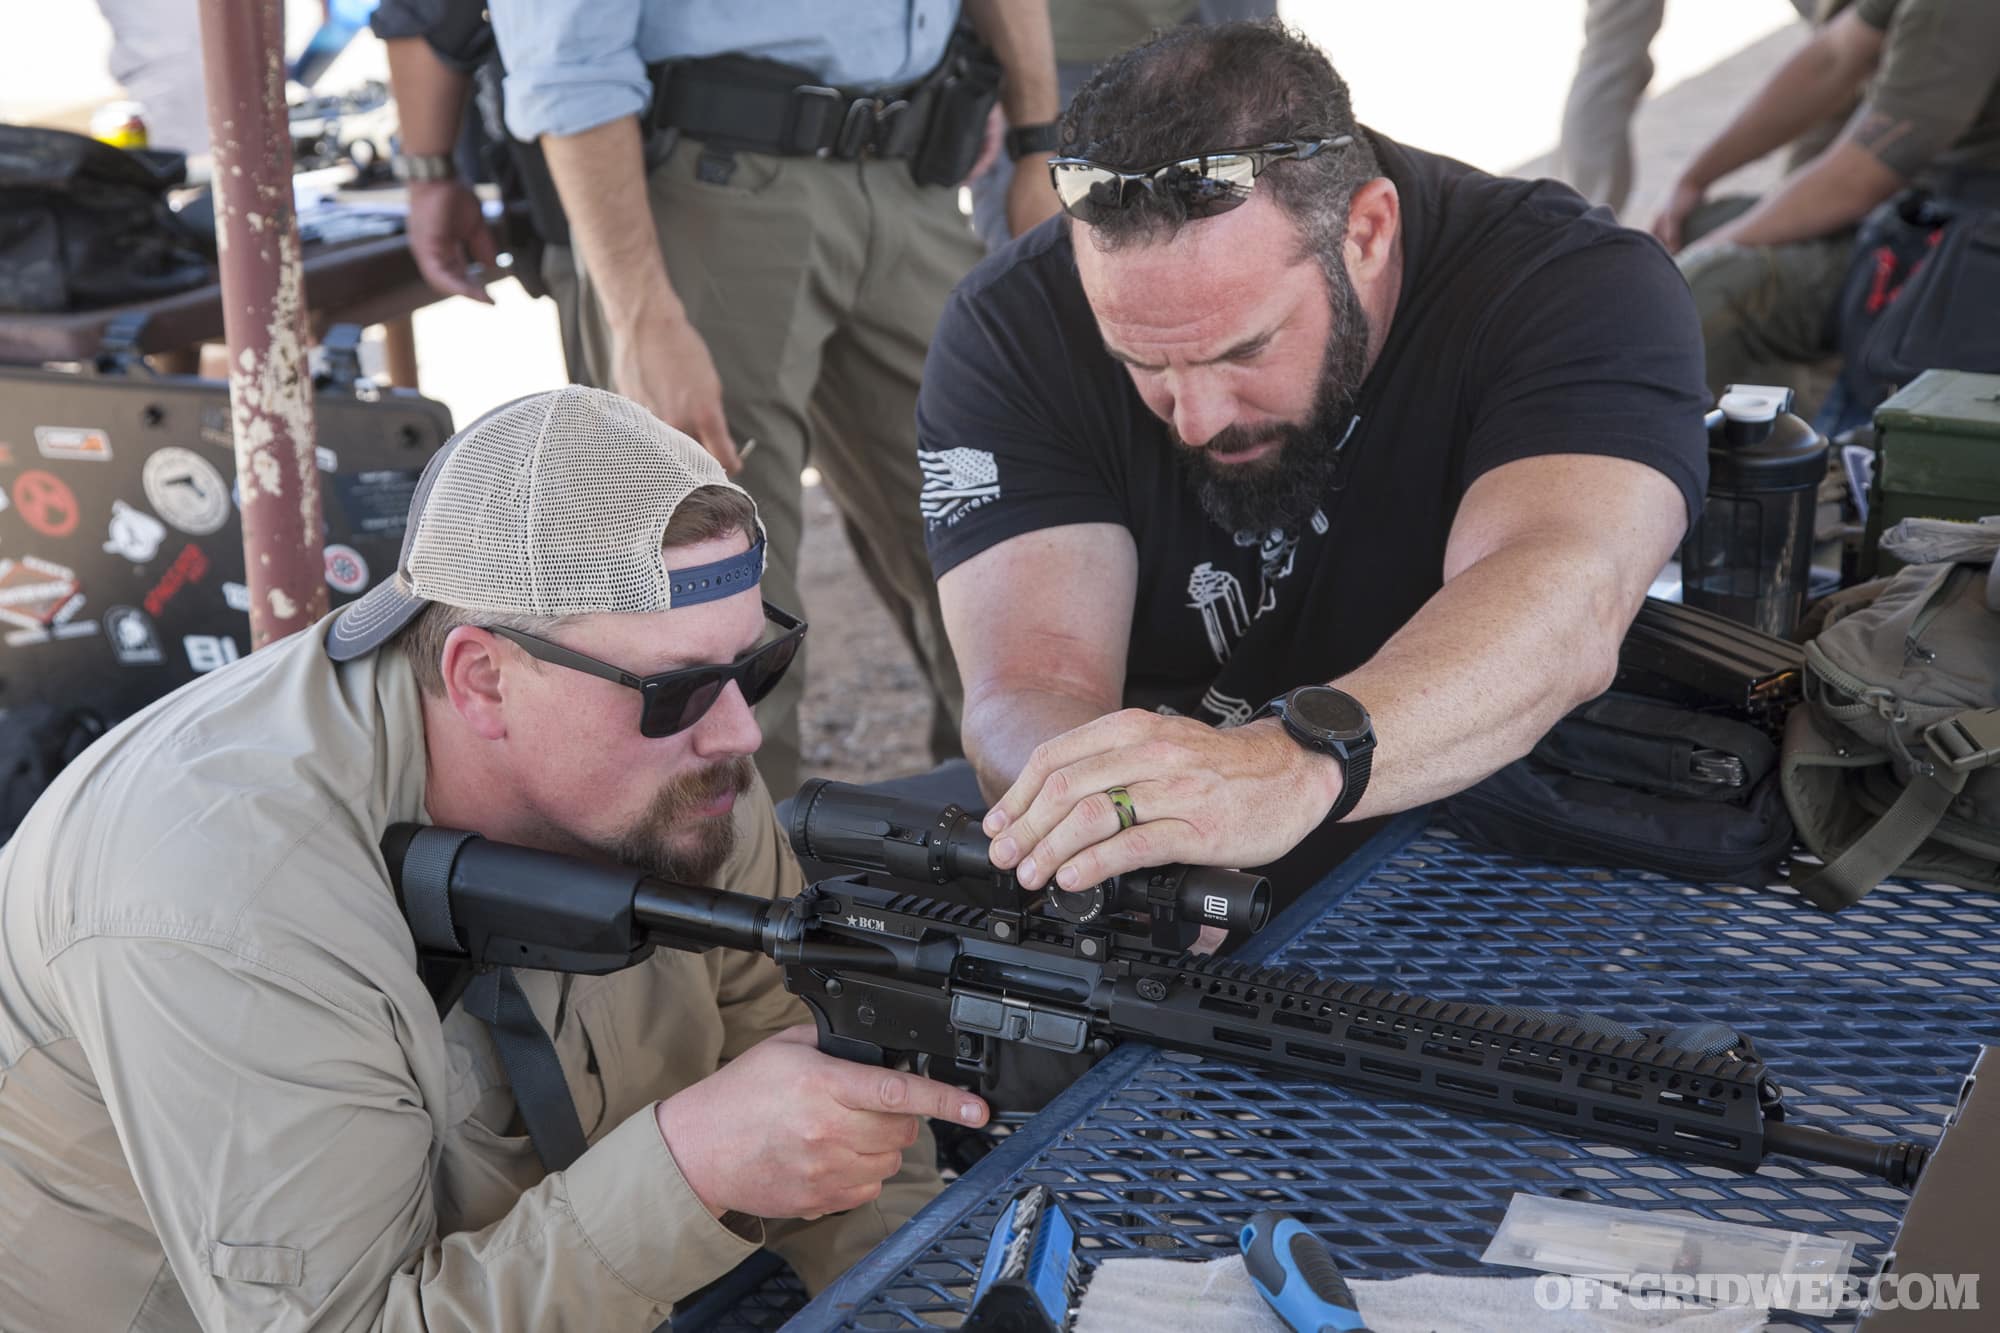
Above: Instructor Todd helped this student position his LPVO for a clear sight picture before tightening the hardware.
Step 4: Once the placement is correct, lightly snug the ring hardware in an alternating X pattern, maintaining equal gap between the ring halves on either side of the mount. The LPVO should still be able to move a little, but shouldn't be sliding around loosely.
Step 5: Hold the mount on the Picatinny rail and press it forward to eliminate any wiggle room within the rail slot. Then, with your inch-pound torque wrench, torque the rail mount hardware to the manufacturer's recommended specification (for example, 30 in-lbs).
Above: The Arisaka Defense leveling wedge is an easy and inexpensive way to quickly level an optic. However, it may not work for setups with tight clearance between the mount and optic housing. Bubble levels are a tried-and-true method, even if they require some patience and finesse.
Step 6: Level your optic. There are many tools for this job, but TruKinetics recommends the Arisaka Defense Optic Leveler ($28 MSRP), which is a wedge system that physically levels the flat bottom of an optic against the mount. Bubble levels should be used to confirm that the mount and optic are completely level relative to the gun.
Step 7: Using the inch-pound torque wrench, torque all the hardware on the rings in an X pattern to the manufacturer's recommended specification (for example, 15 in-lbs). Watch the level carefully to confirm it doesn't move during this process. It's generally not recommended to use any kind of Loctite or thread-locker compound on this hardware, since it lubricates the threads and can lead to unwanted variances in torque.
Step 8: Add witness marks on the torqued hardware using a paint pen or silver sharpie. This will give you a visual clue if anything comes loose in the future.
Step 9: Set the diopter on your optic. Aim at a plain white surface such as a wall and begin slowly turning the diopter ring (obviously do this in a safe direction while following all firearm safety rules). At the correct diopter setting, you should see a clear, in-focus reticle without any fisheye distortion or unwanted magnification. You may need to look away or close your eyes occasionally to reset your vision and confirm the diopter setting.
Above: Diopter setting is specific to the user's eye, so if your rifle is used by multiple people, you may want to add color-coded witness marks for each shooter's setting.
LPVO Training Tips
Read on for a few of the lessons we learned from the drills during our two-day TruKinetics class.
Start With a Good Zero This probably sounds like another no-brainer, but if a trusted zero is important on a red dot sight, it's doubly important on a magnified optic that may be used at 500 yards or more. TruKinetics instructors recommend the classic 50/200-yard zero — rounds impact on your point of aim at both 50 and 200 yards, and will impact high by a negligible amount at 100 yards. Beyond 200, you'll need to hold over using the markings on your reticle and the data you've recorded while testing your gun (data on prior engagements, a.k.a. DOPE).
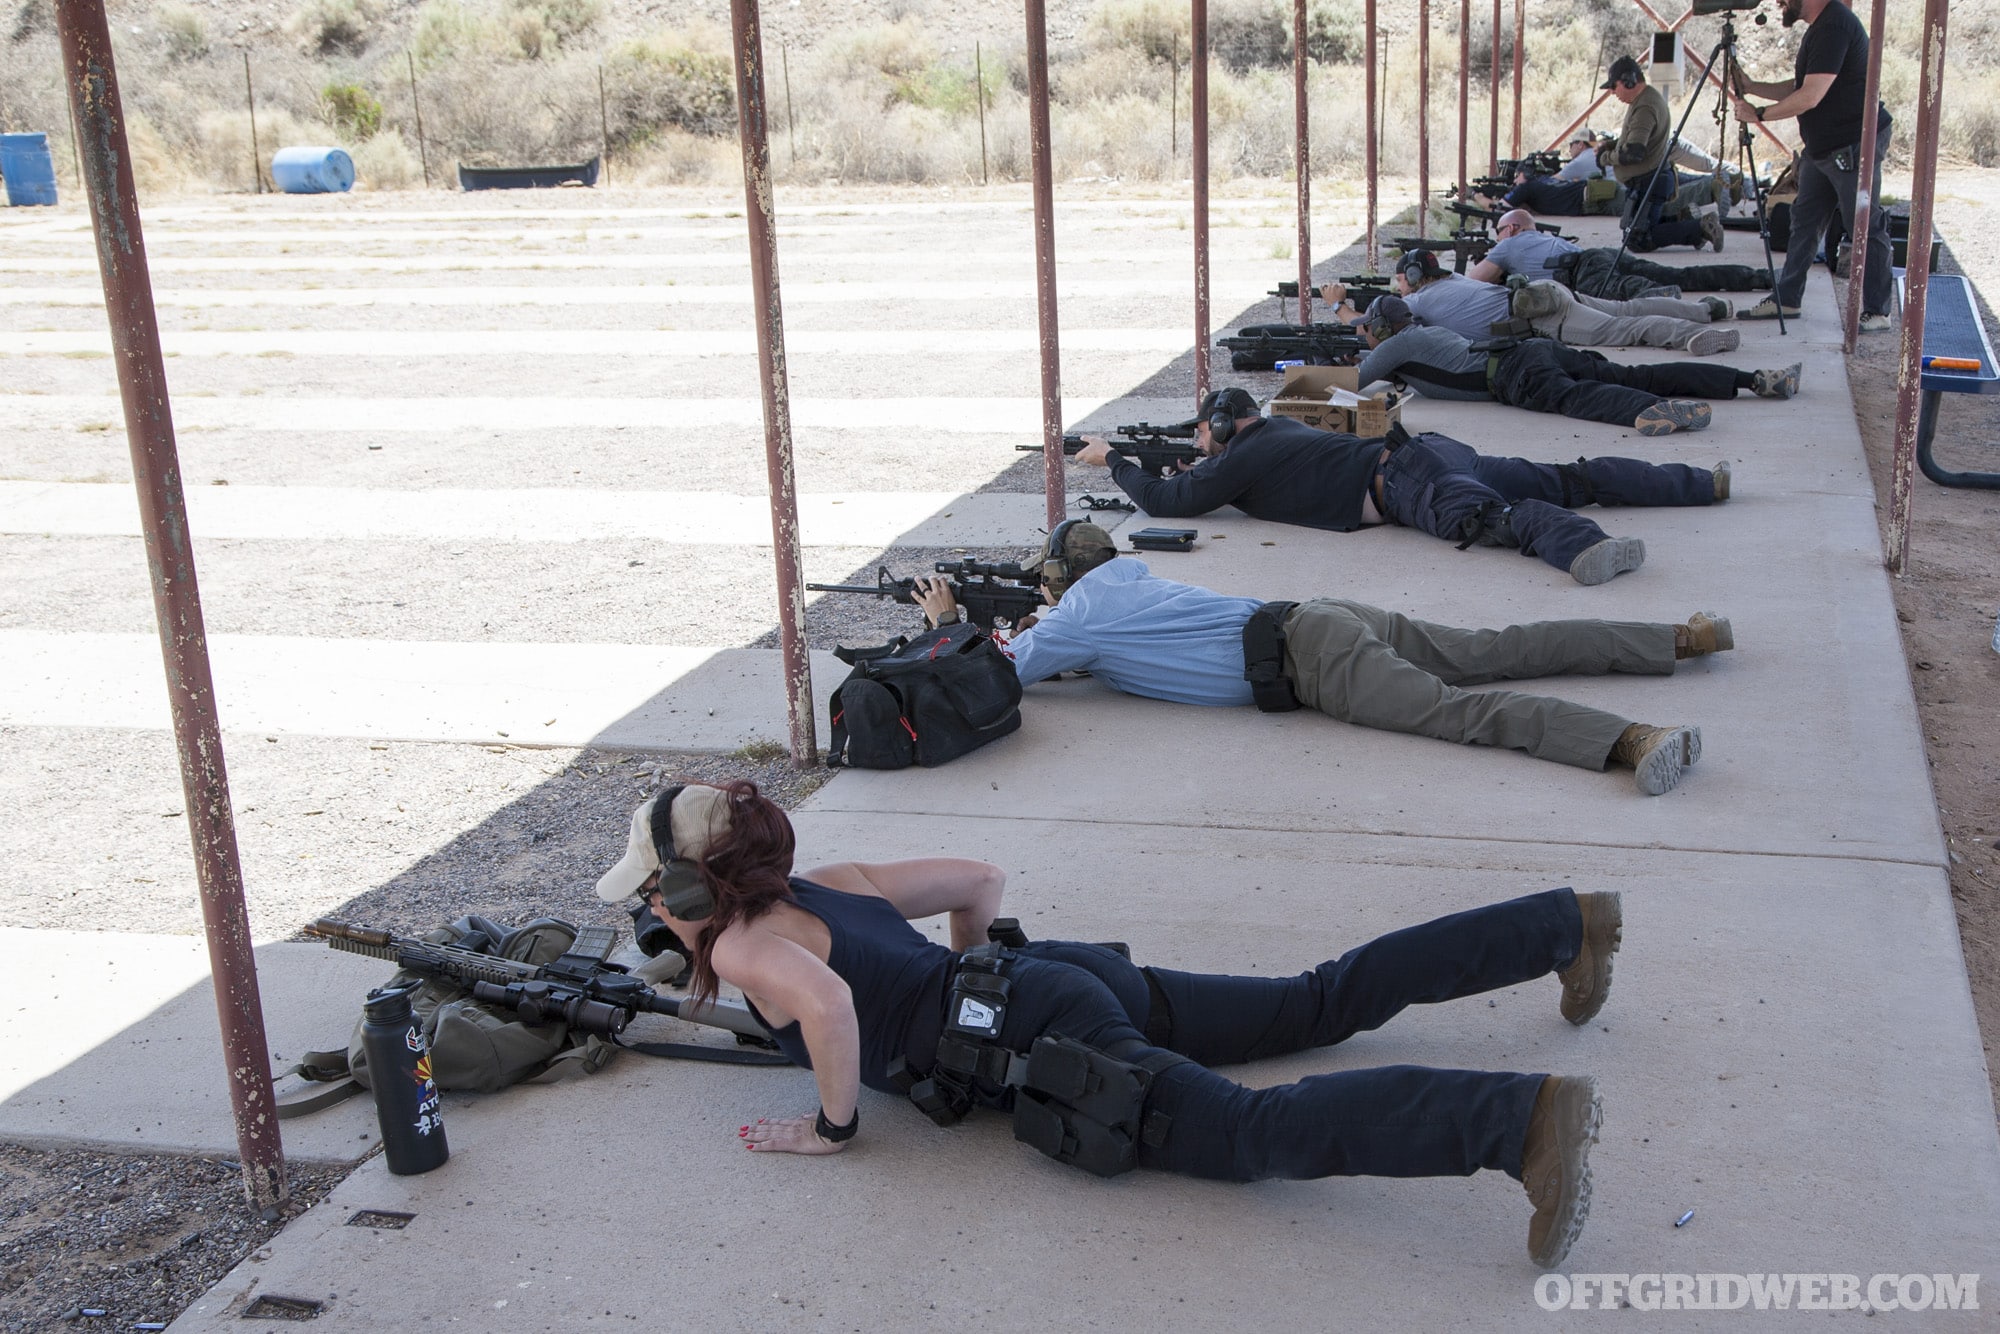
We zeroed our rifles at 50 yards from supported prone positions, using a bipod, backpack, and/or sand bags. Our LPVOs were set to full power, and we shot 5-round groups before making adjustments to elevation and windage turrets. Once we were absolutely confident about the settings, we loosened and reset our optic turrets back to the 0 mark. If it's necessary to dial in elevation or windage adjustments in the future, this will allow us to quickly return to our rifle's zero, rather than some arbitrary number on the dial.
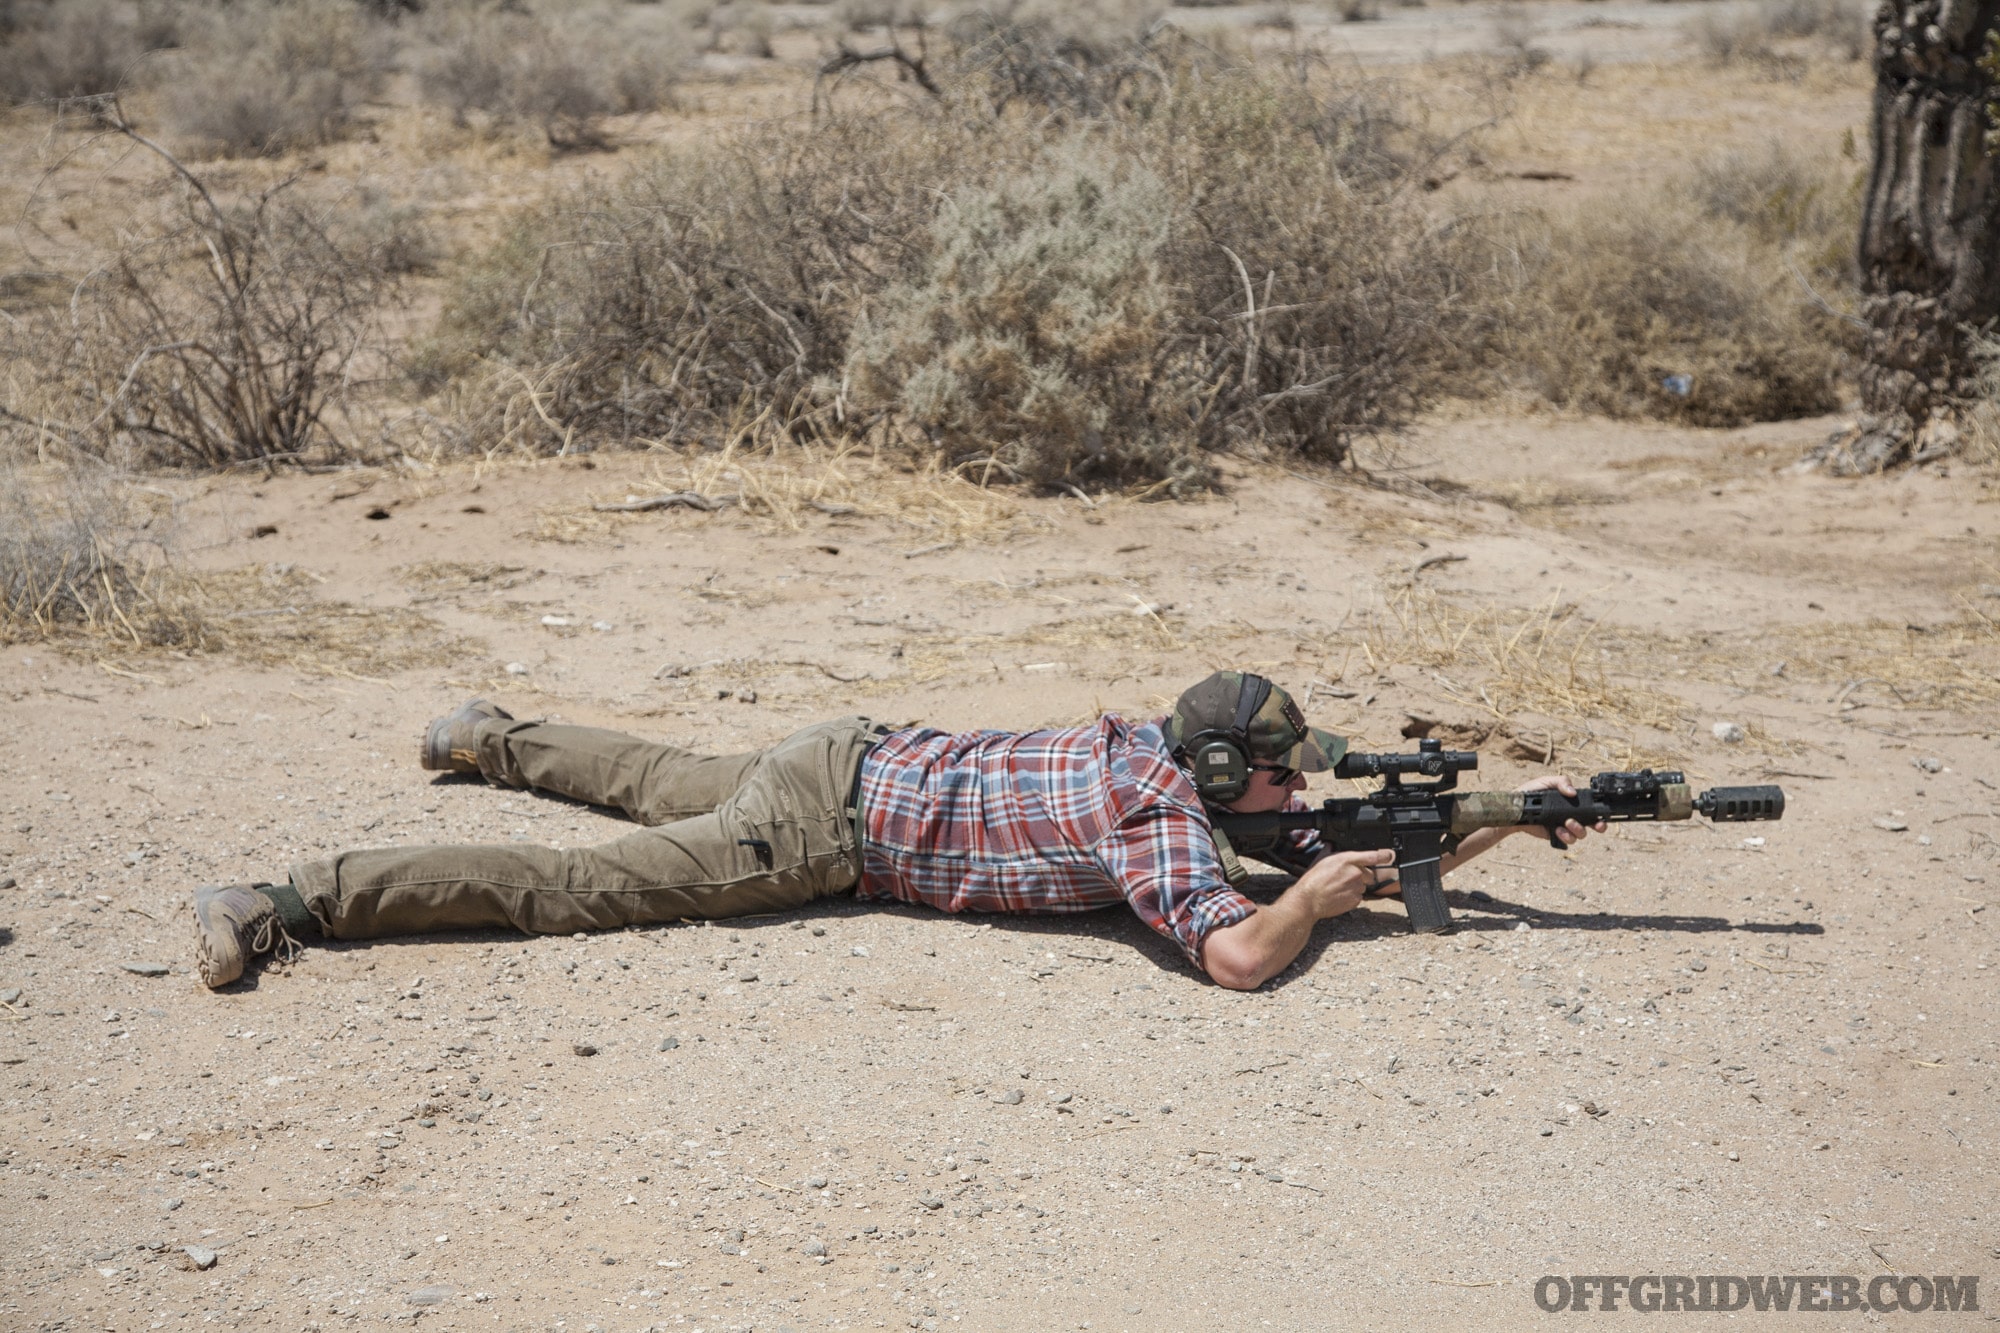
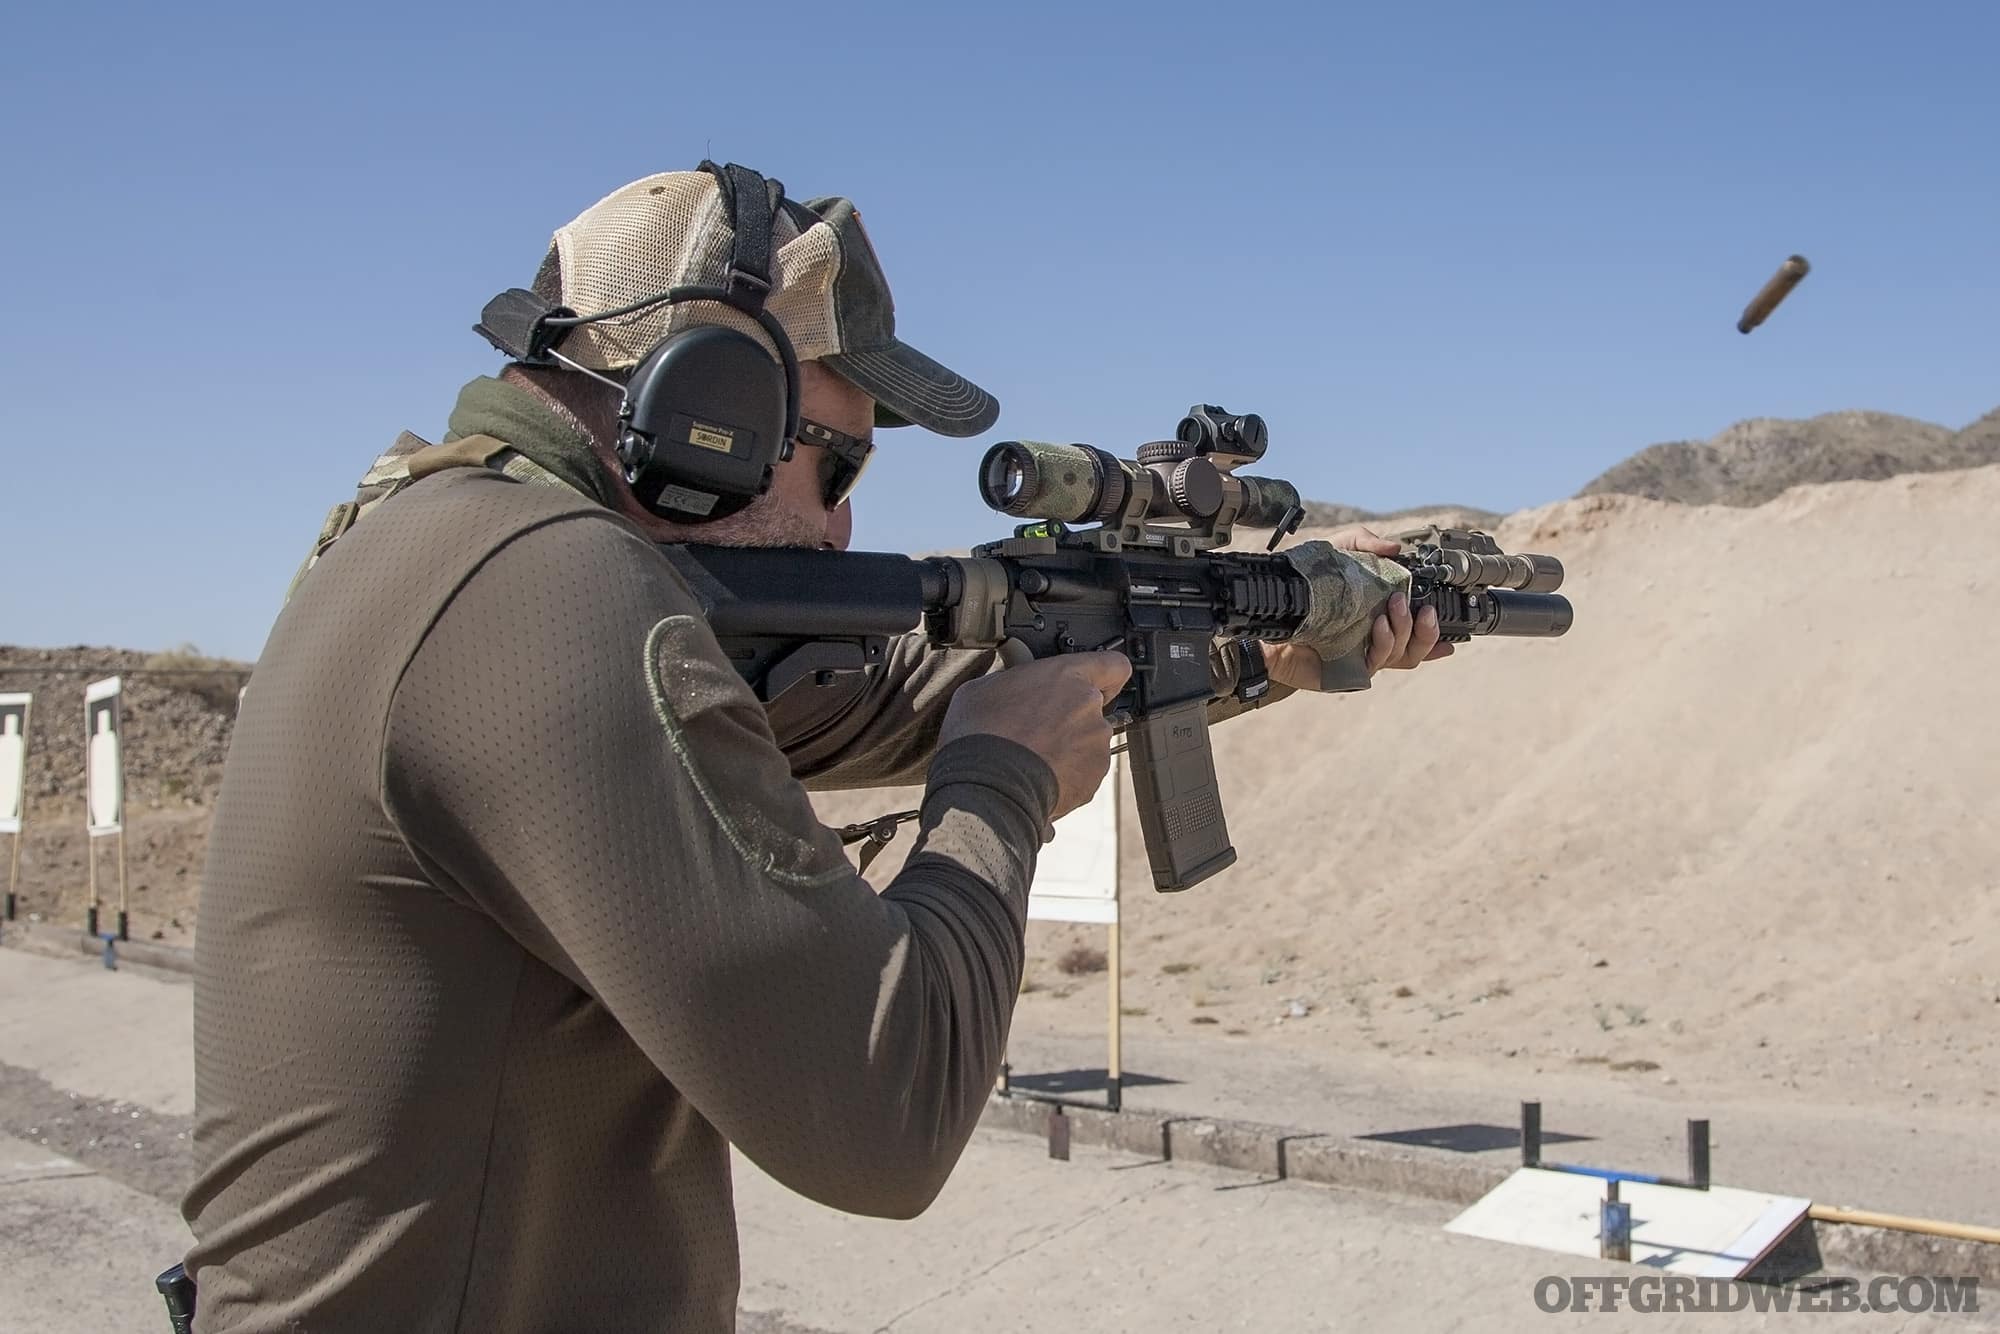
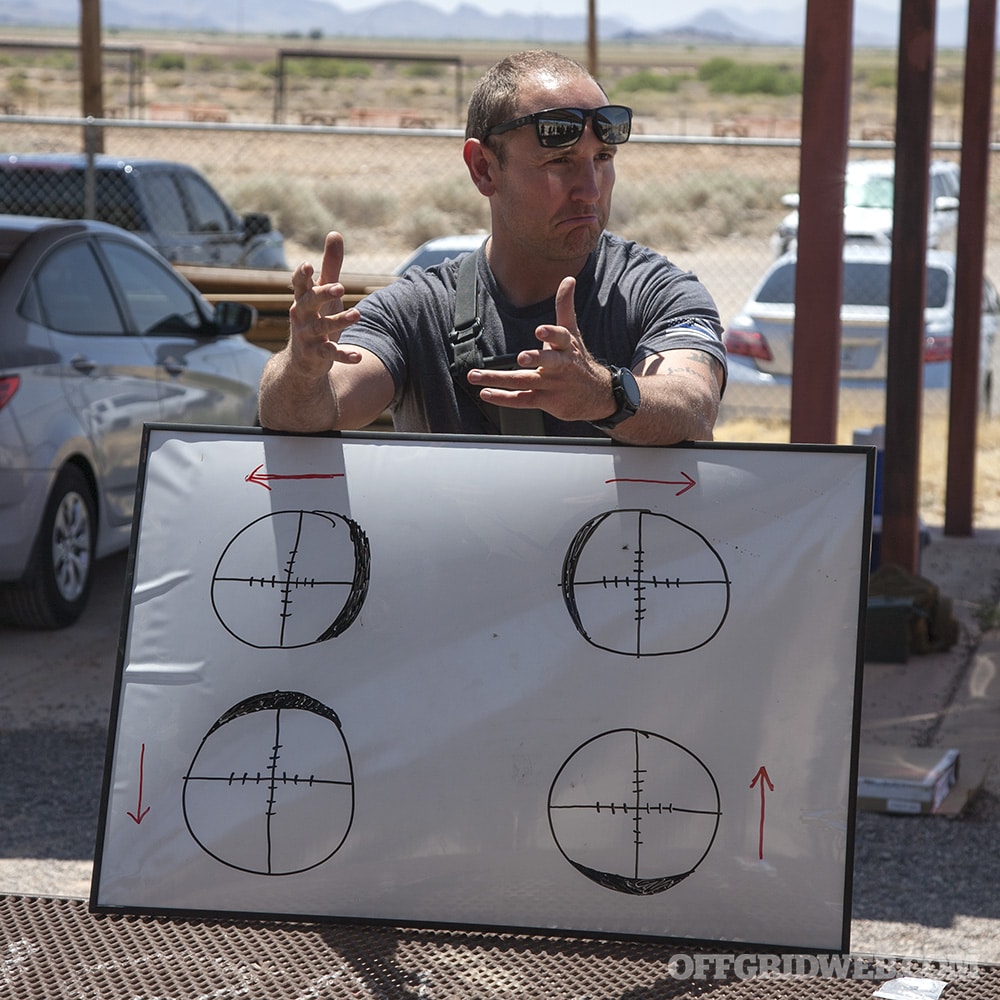
Don't Be Afraid of the Shadows There's an important difference between a perfect sight picture and an acceptable sight picture. With an LPVO, especially on higher magnification settings, achieving a perfect sight picture without any scope shadow at the edges takes time. In any life-and-death shooting situation — whether it's civilian self-defense, law enforcement, or military — time is one thing you won't have much of. Therefore, it's critical to know how to take quick shots from an acceptable sight picture (i.e. one where there's visible scope shadow). This is the single biggest training hurdle associated with moving from a red dot sight to an LPVO.
Above: Shooting quickly with an LPVO requires learning to accept an imperfect sight picture. Scope shadow can feel distracting at first, but with some practice, it's easy to tune out the shadow and still get good hits.
Thankfully, scope shadow is both manageable and predictable. As we mentioned earlier, shadow on one side of the scope “pushes” point of impact towards the other side. In other words, if you notice shadow at the top of your optic, expect rounds to impact lower than your point of aim. How much lower? That's something you'll need to test for yourself, since every gun and optic is a little different. We did several drills during the TruKinetics course to check this principle, and most students noticed that even with substantial scope shadow, there was barely any deviation in point of impact.
Of course, if you're shooting at longer distances or smaller targets, eliminating scope shadow becomes increasingly important, so you should take more time to refine your sight picture. But at 10 or 20 yards, there's no reason to let a little scope shadow slow you down.
Focus On What Matters Many of us who have spent time using red dot sights have learned the importance of being target-focused. Instead of focusing our vision on dot itself, we focus on what we're shooting at and simply remain aware of the dot's placement. This lowers the risk of fixating on small movements of the dot, which can cause us to slow down too much or miss the target entirely.
On the other hand, those who have spent time shooting precision rifles will know that the opposite is true — it's generally considered better to bias your visual focus towards the reticle, not the target. This allows us to determine a precise point of aim on the reticle, including elevation and windage measurements, and hold that point on the target while pressing the trigger.
Since an LPVO can be used for both short-range and long-range shooting, you'll need to let the situation dictate what you're focusing on. For a quick shot at 1x within 50 yards, focus on the target just as you would with a red dot. A daylight-bright illuminated reticle will help you use your LPVO in this manner. If you're at 6x magnification trying to hit a small plate at 300 yards, take more time to focus on the reticle and use it to measure the appropriate hold-over.
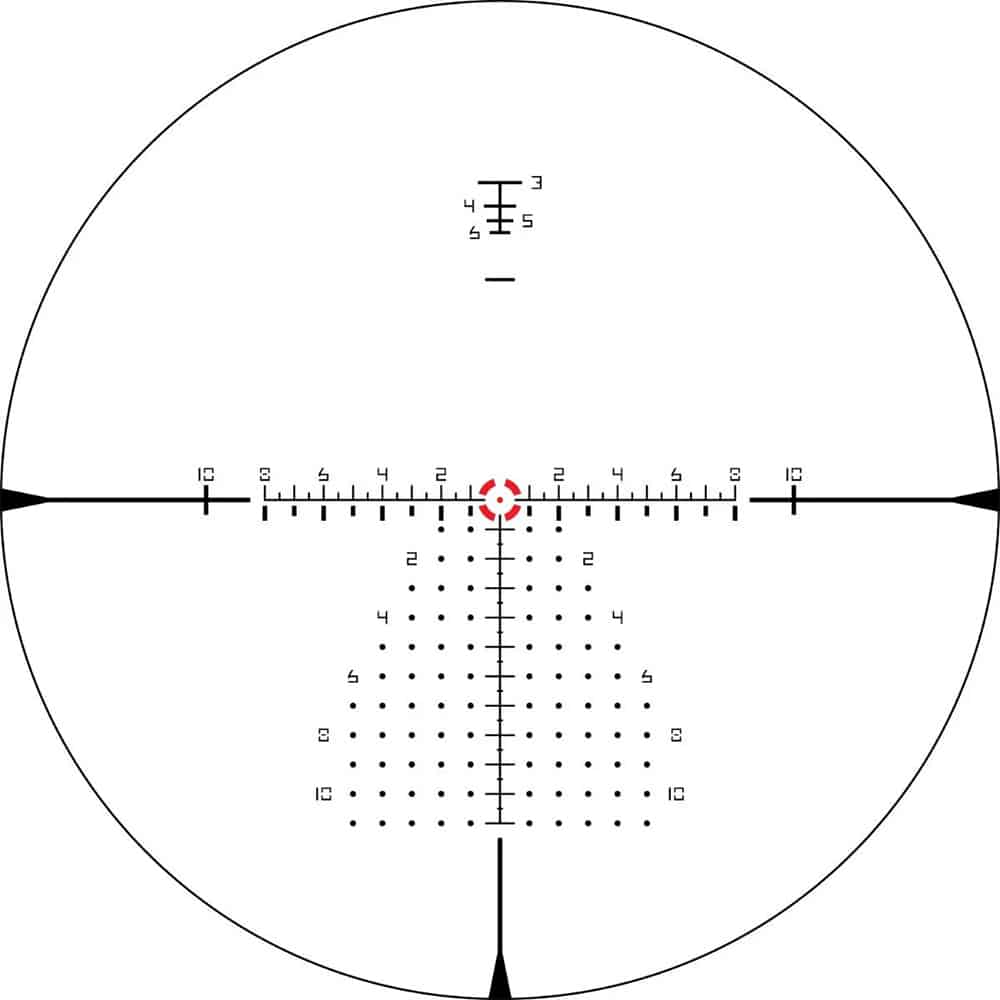
Above: It's essential to understand your LVPO's reticle and take mental notes on hold-overs at various distances. Even if you're not pausing to use a DOPE chart and laser rangefinder before taking a shot, your reticle will help you quickly estimate a target's distance and the appropriate point of aim.
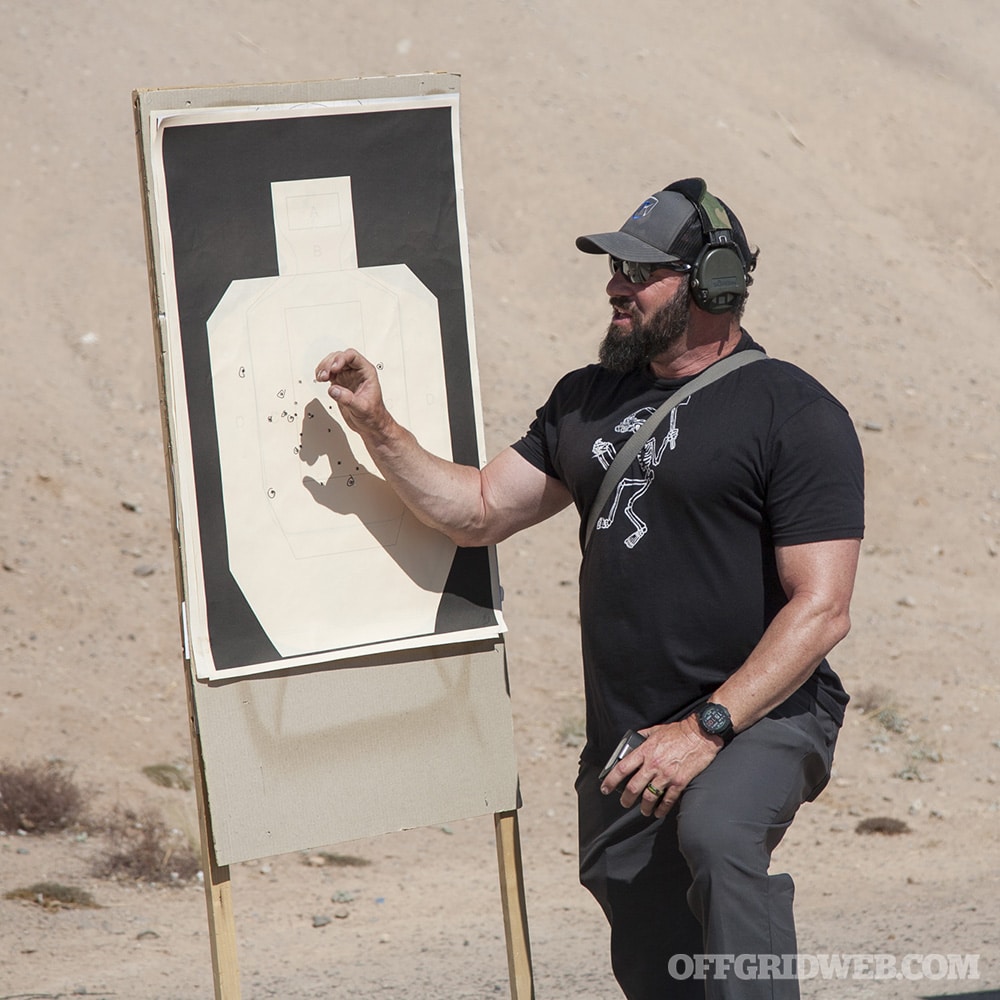
Measure Your Misses As we mentioned before, one of the LPVO's greatest strengths is its use as an observational tool. That observation shouldn't end after you fire your first shot. If you hit the target, great — keep watching to determine if you need to fire again. If you missed, the reticle's “ruler” should give you all the information you need to correct your error. With a red dot, you may not be able to see where your round impacted, and if you can, you're forced to use a generalized correction (e.g. hold right edge of target). An LPVO offers better visibility and much more precise corrections (e.g. hold right 0.6 MIL).
Above: Misses happen. With a red dot, you'll need to estimate wind and elevation holds, but an LPVO's detailed reticle offers precise information to help you make a quick follow-up shot. (This is the same reason why TruKinetics doesn't recommend oversimplified duplex reticles.)
Don't Overmagnify Magnification is a double-edged sword, so use it with caution. Just because your optic can go up to 6x or 8x or 10x doesn't mean you always have to use all that power. Doing so may give you a great view of the target, but it also gives you tunnel vision.
Excessive magnification can slow down your ability to scan the environment for a target, or it can cause you to mistakenly shoot the wrong target. Dialing back to an intermediate magnification setting gives better spatial awareness — the last thing you want is for an innocent bystander to run into your field of view just as you break a shot.
Above: Magnification should be high enough to identify the target and determine whether it's a threat, but low enough to maintain spatial awareness around the target. To demonstrate this balance, some paper targets depicted individuals with weapons that weren't easily visible until magnification was dialed up.
Hold Before Dialing In the precision shooting world, it's advisable to take time to measure the environmentals, enter them into a ballistic calculator, and dial corrections into the scope before firing. With an LPVO-equipped carbine, you may be moving around or shooting at multiple targets at various ranges, so dialing becomes less practical. It's smarter to simply use the reticle markings to hold corrections and take the shot. This is where a “Christmas tree” reticle with a grid of windage and elevation dots becomes especially helpful — it offers quick reference points that help you shoot precisely and quickly.
As one of the instructors explained, LPVOs offer enhanced precision capability, but that doesn't mean every LPVO user needs to become a sniper. All we really need is “a knuckledragger understanding of how to get good hits.”
Closing Thoughts
The TruKinetics LPVO class culminated with drills that tested every student's LPVO proficiency, incorporating speed, precision, target transitions, movement, and positional shooting.
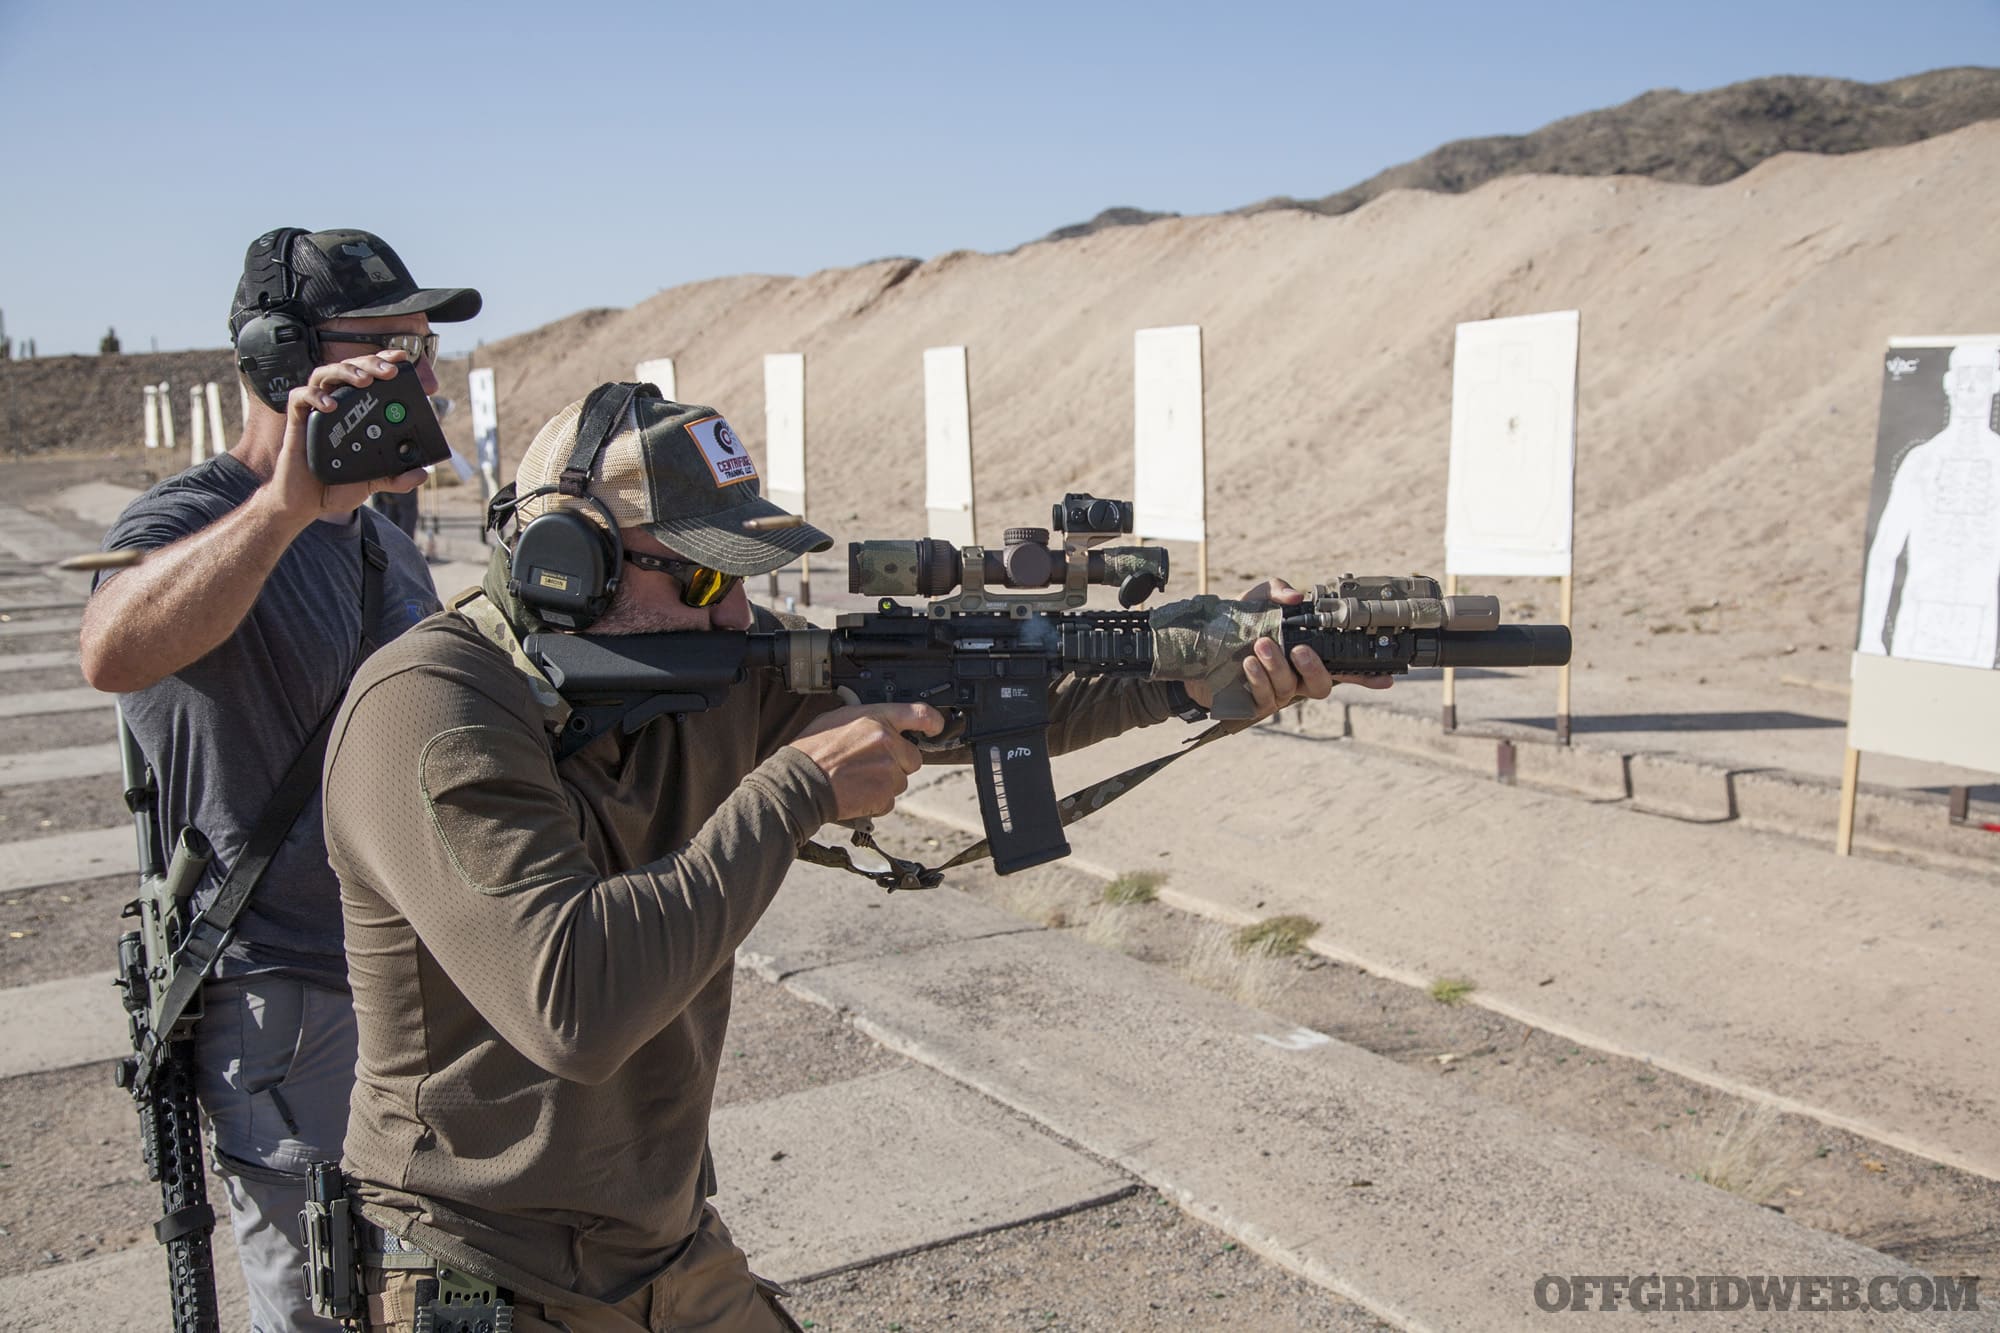
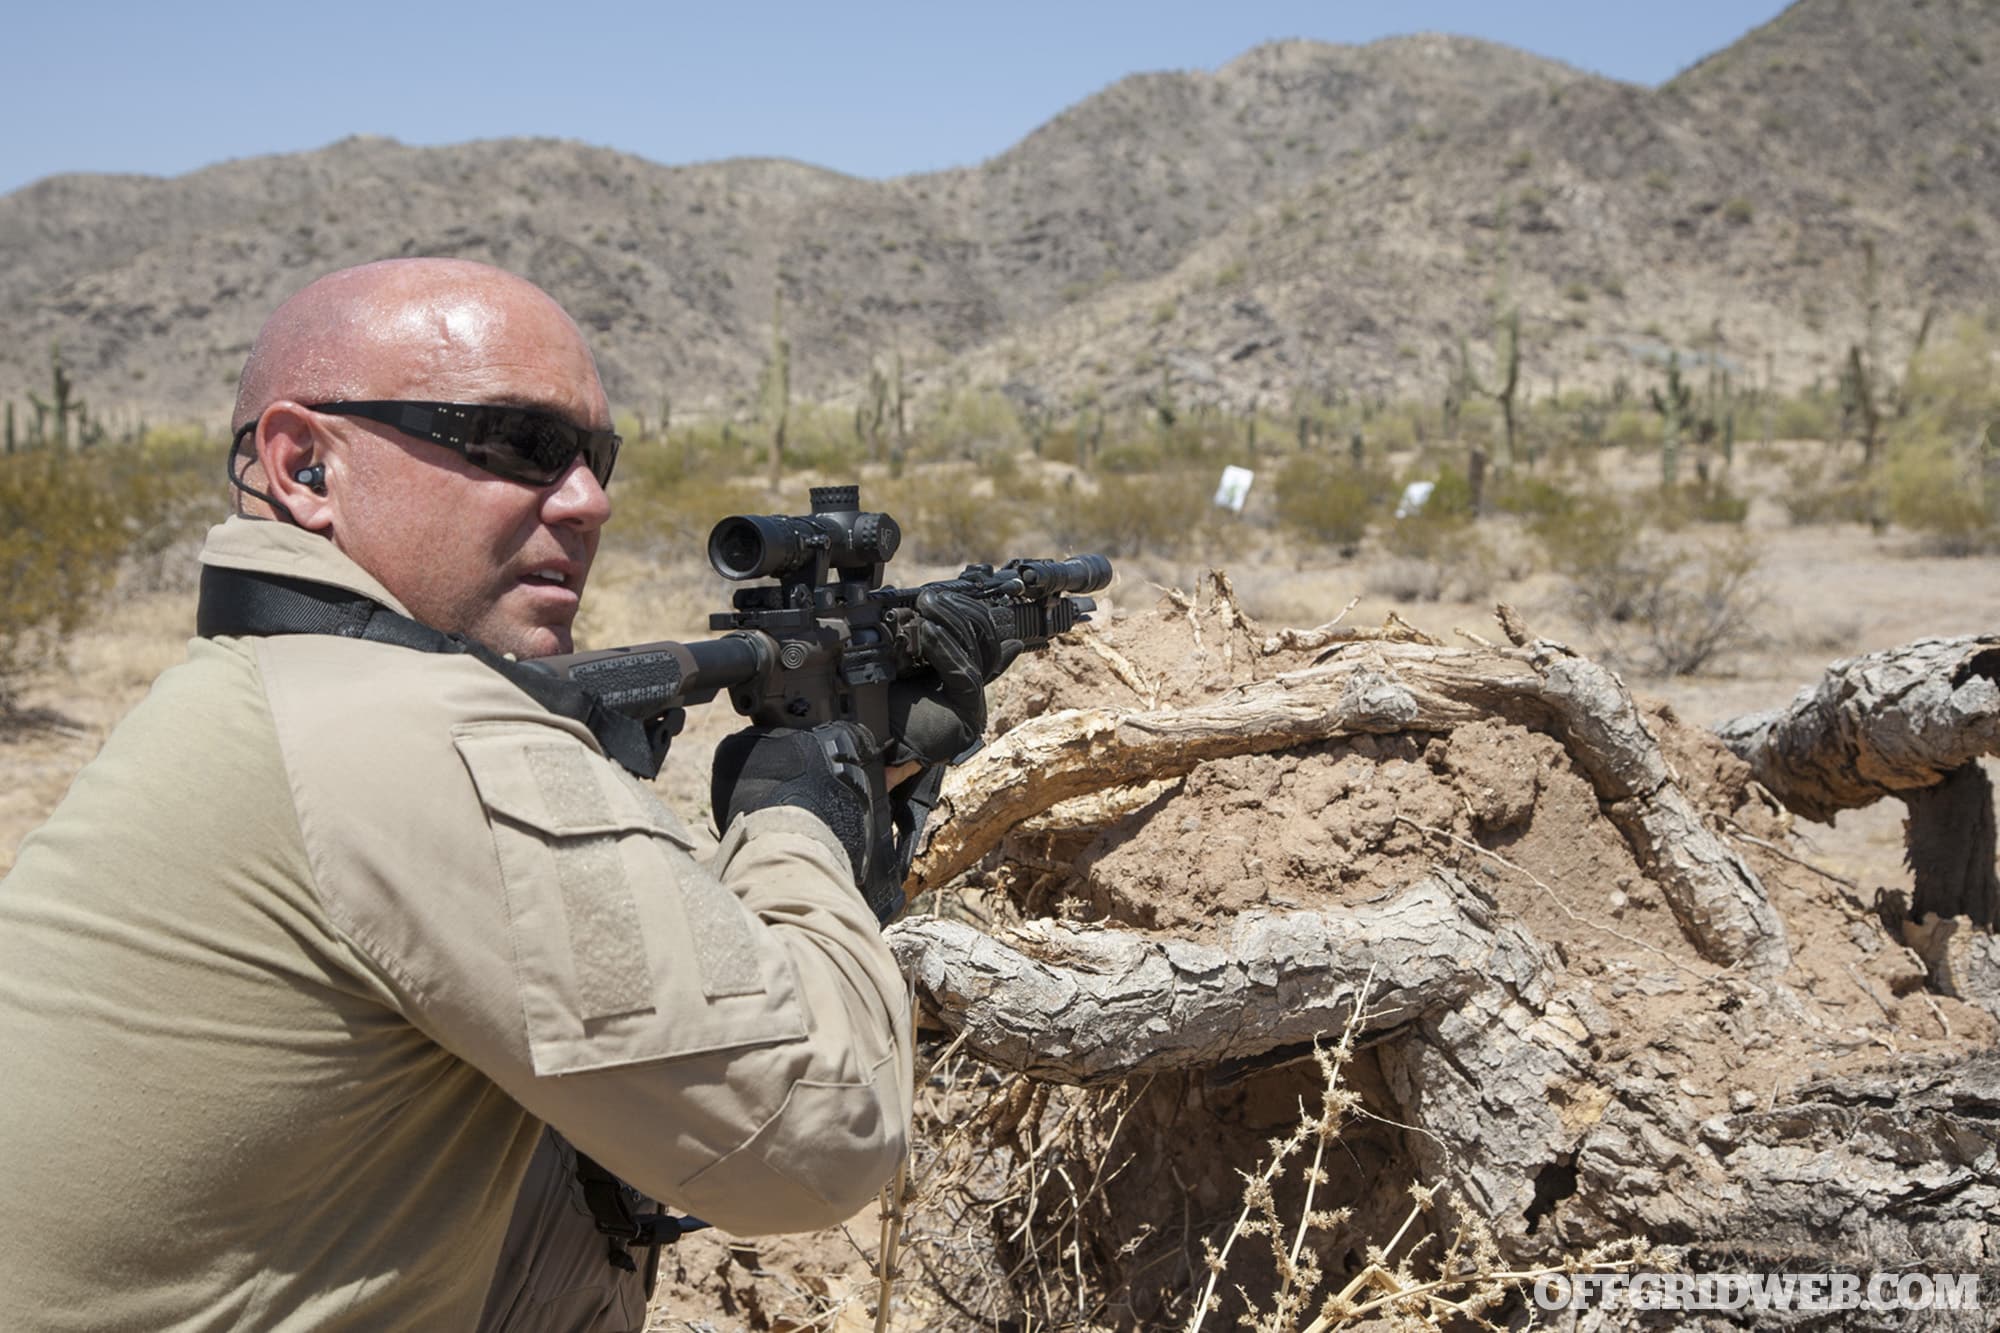
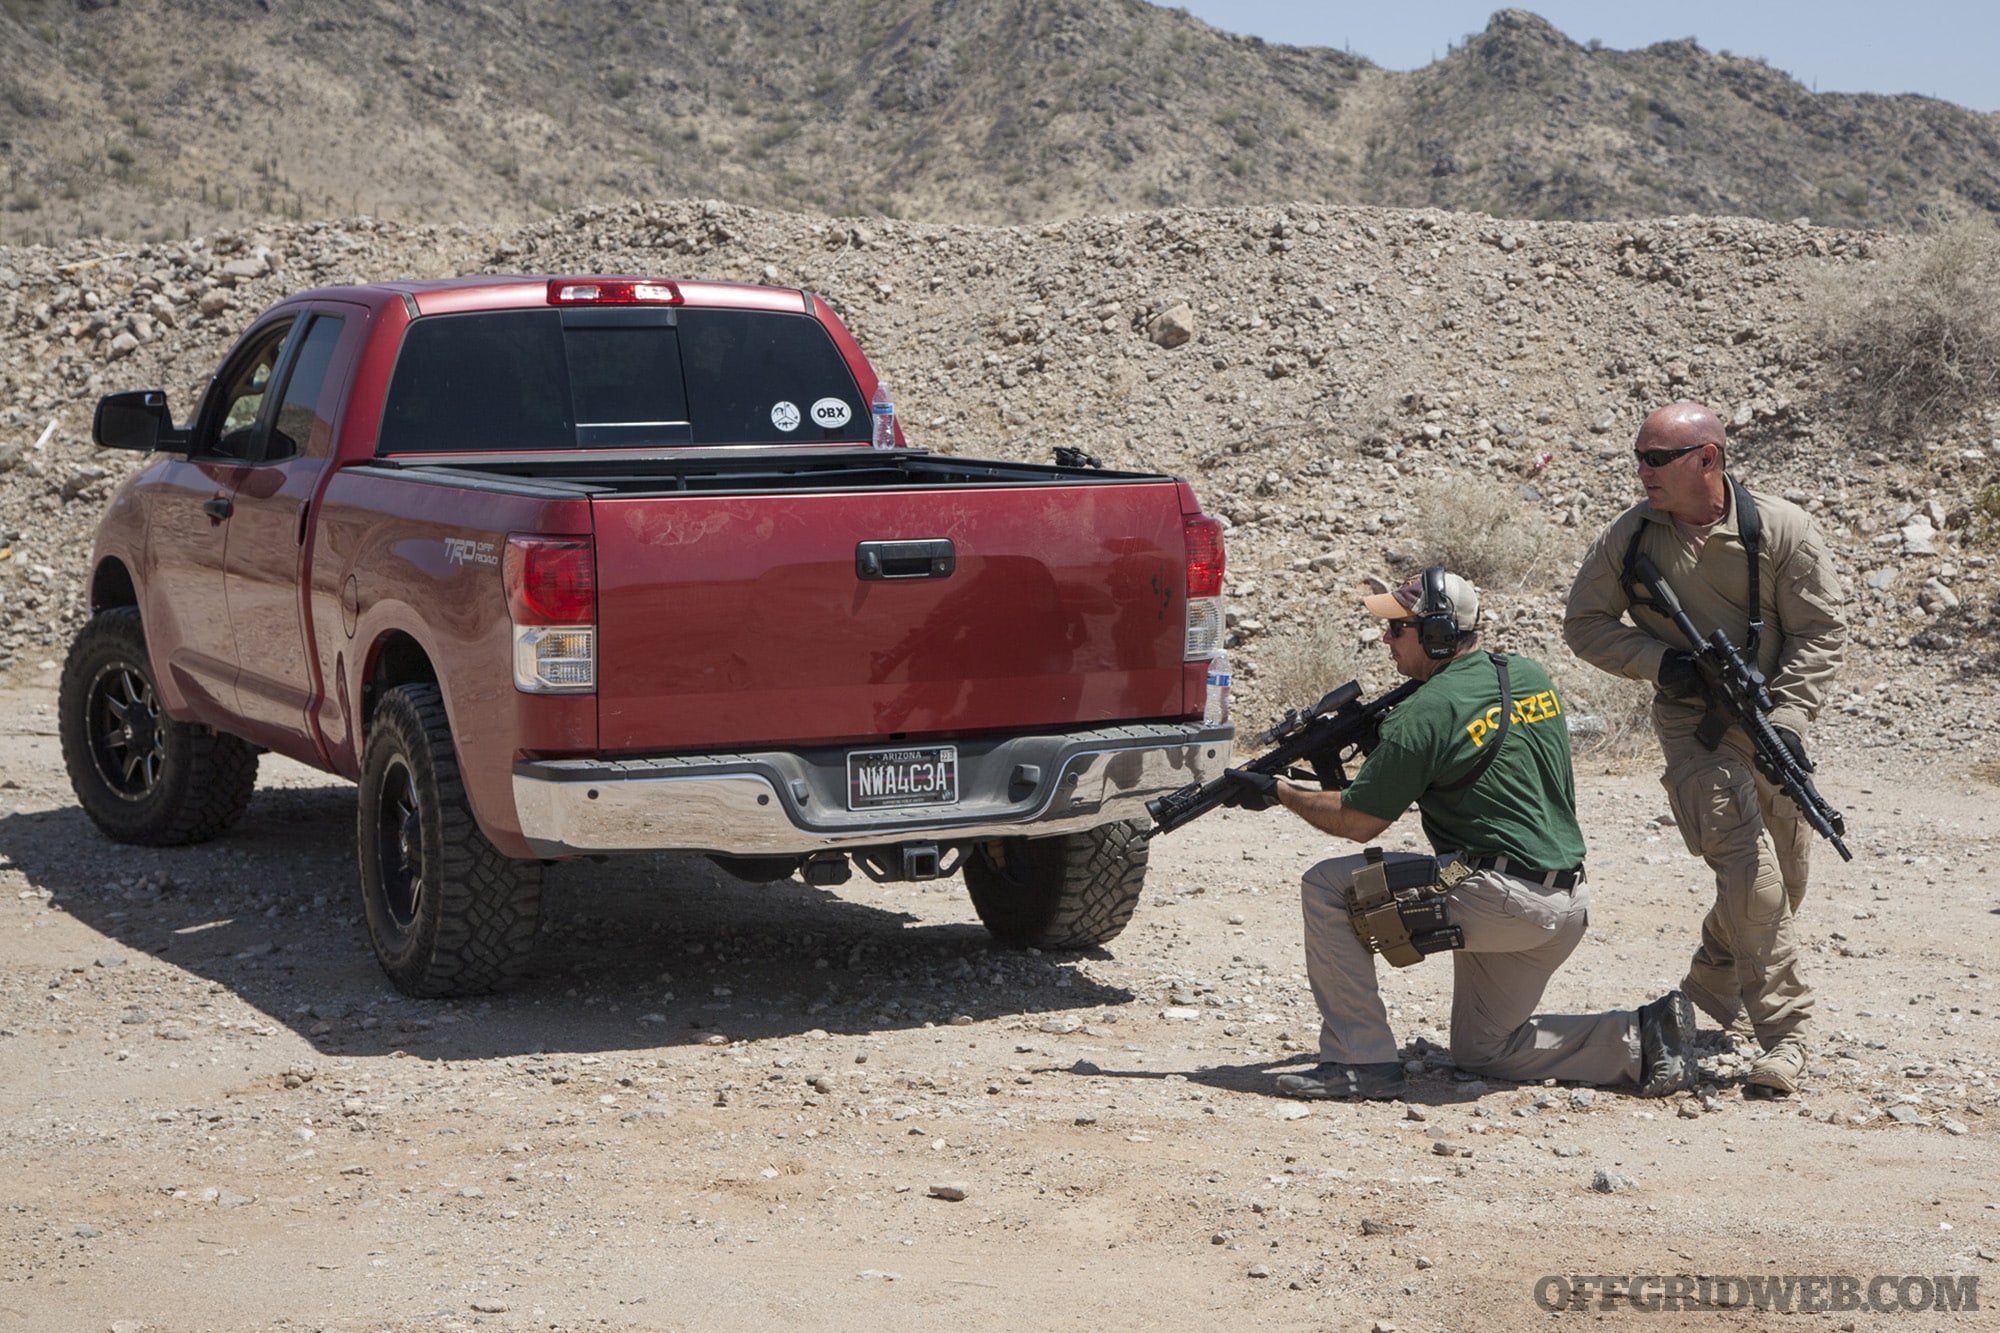
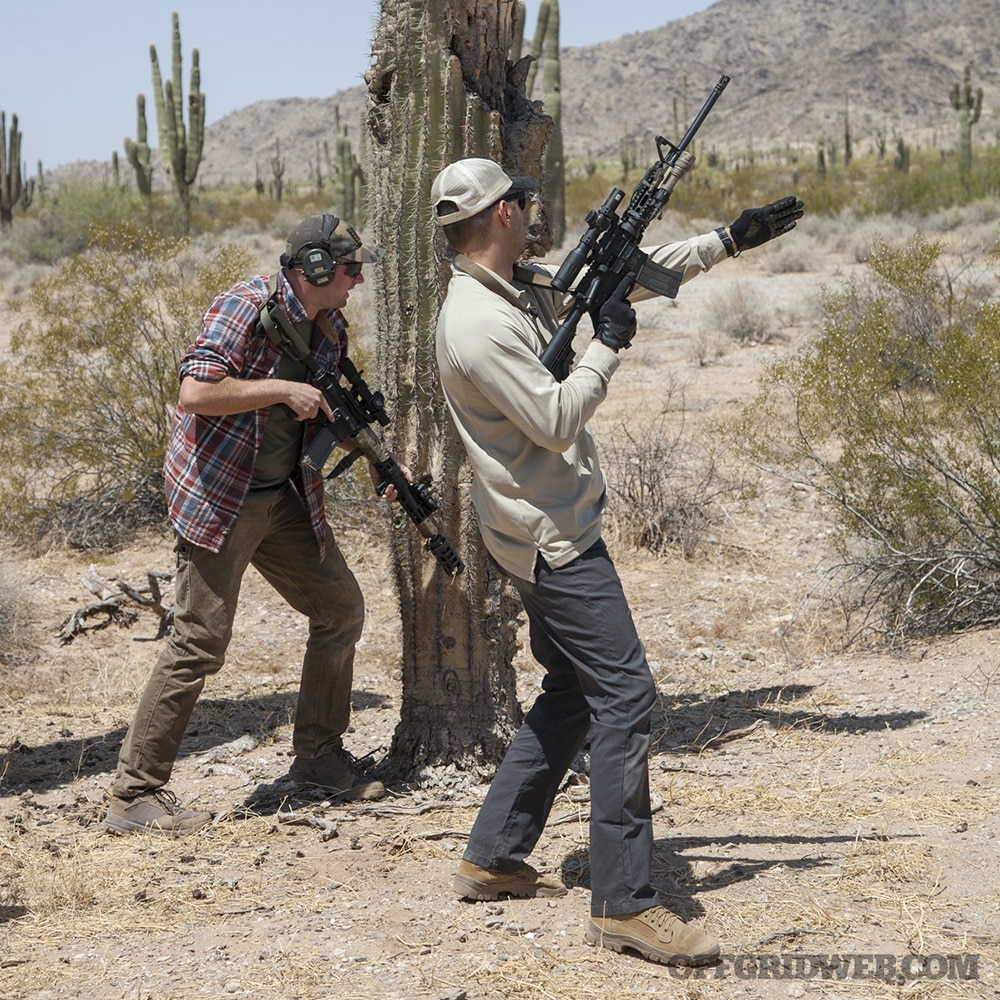
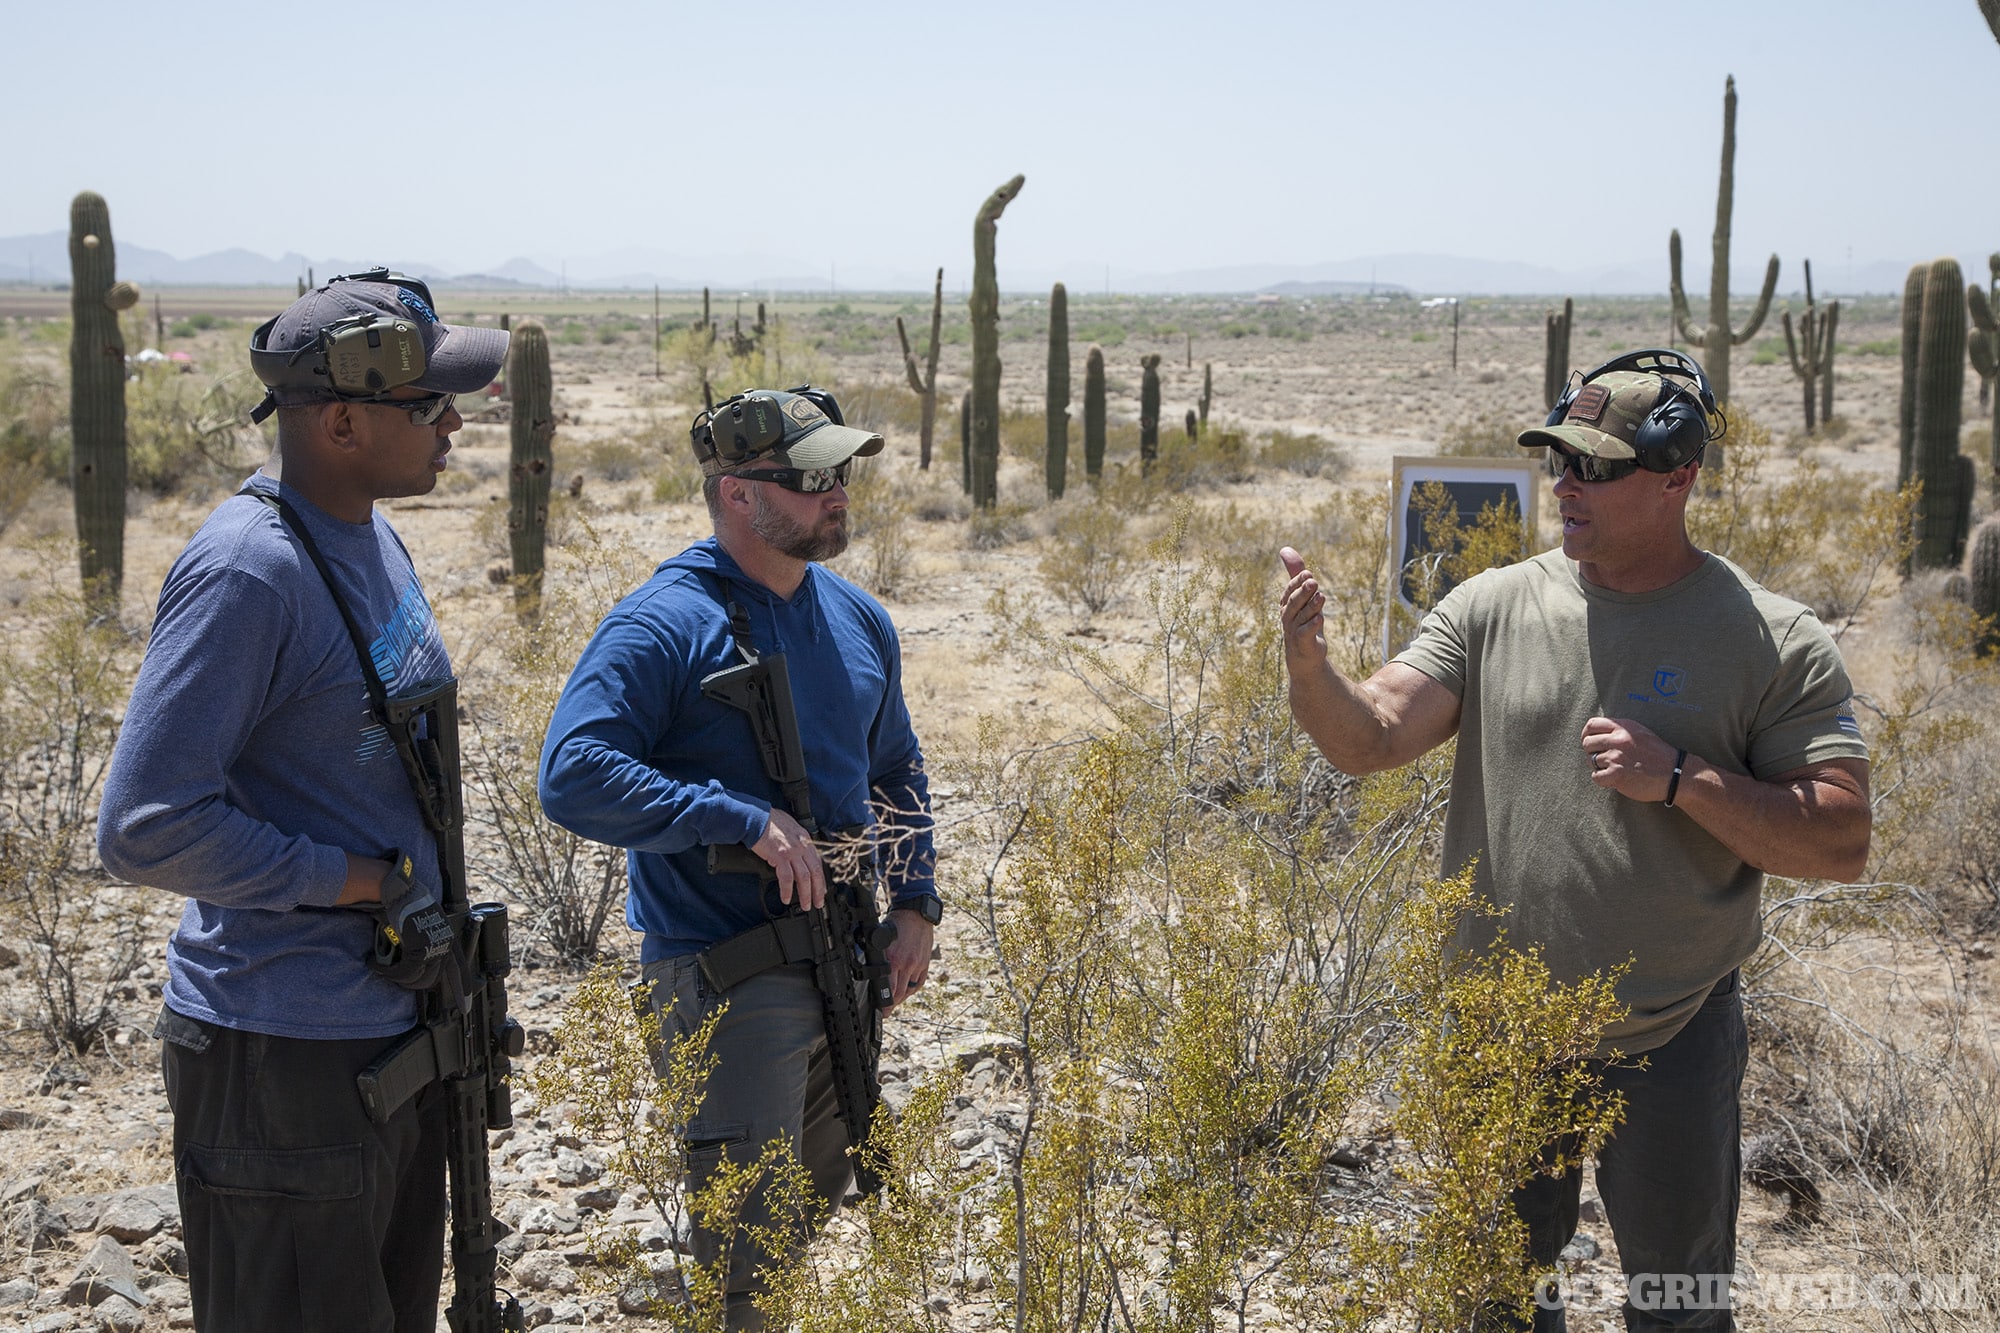
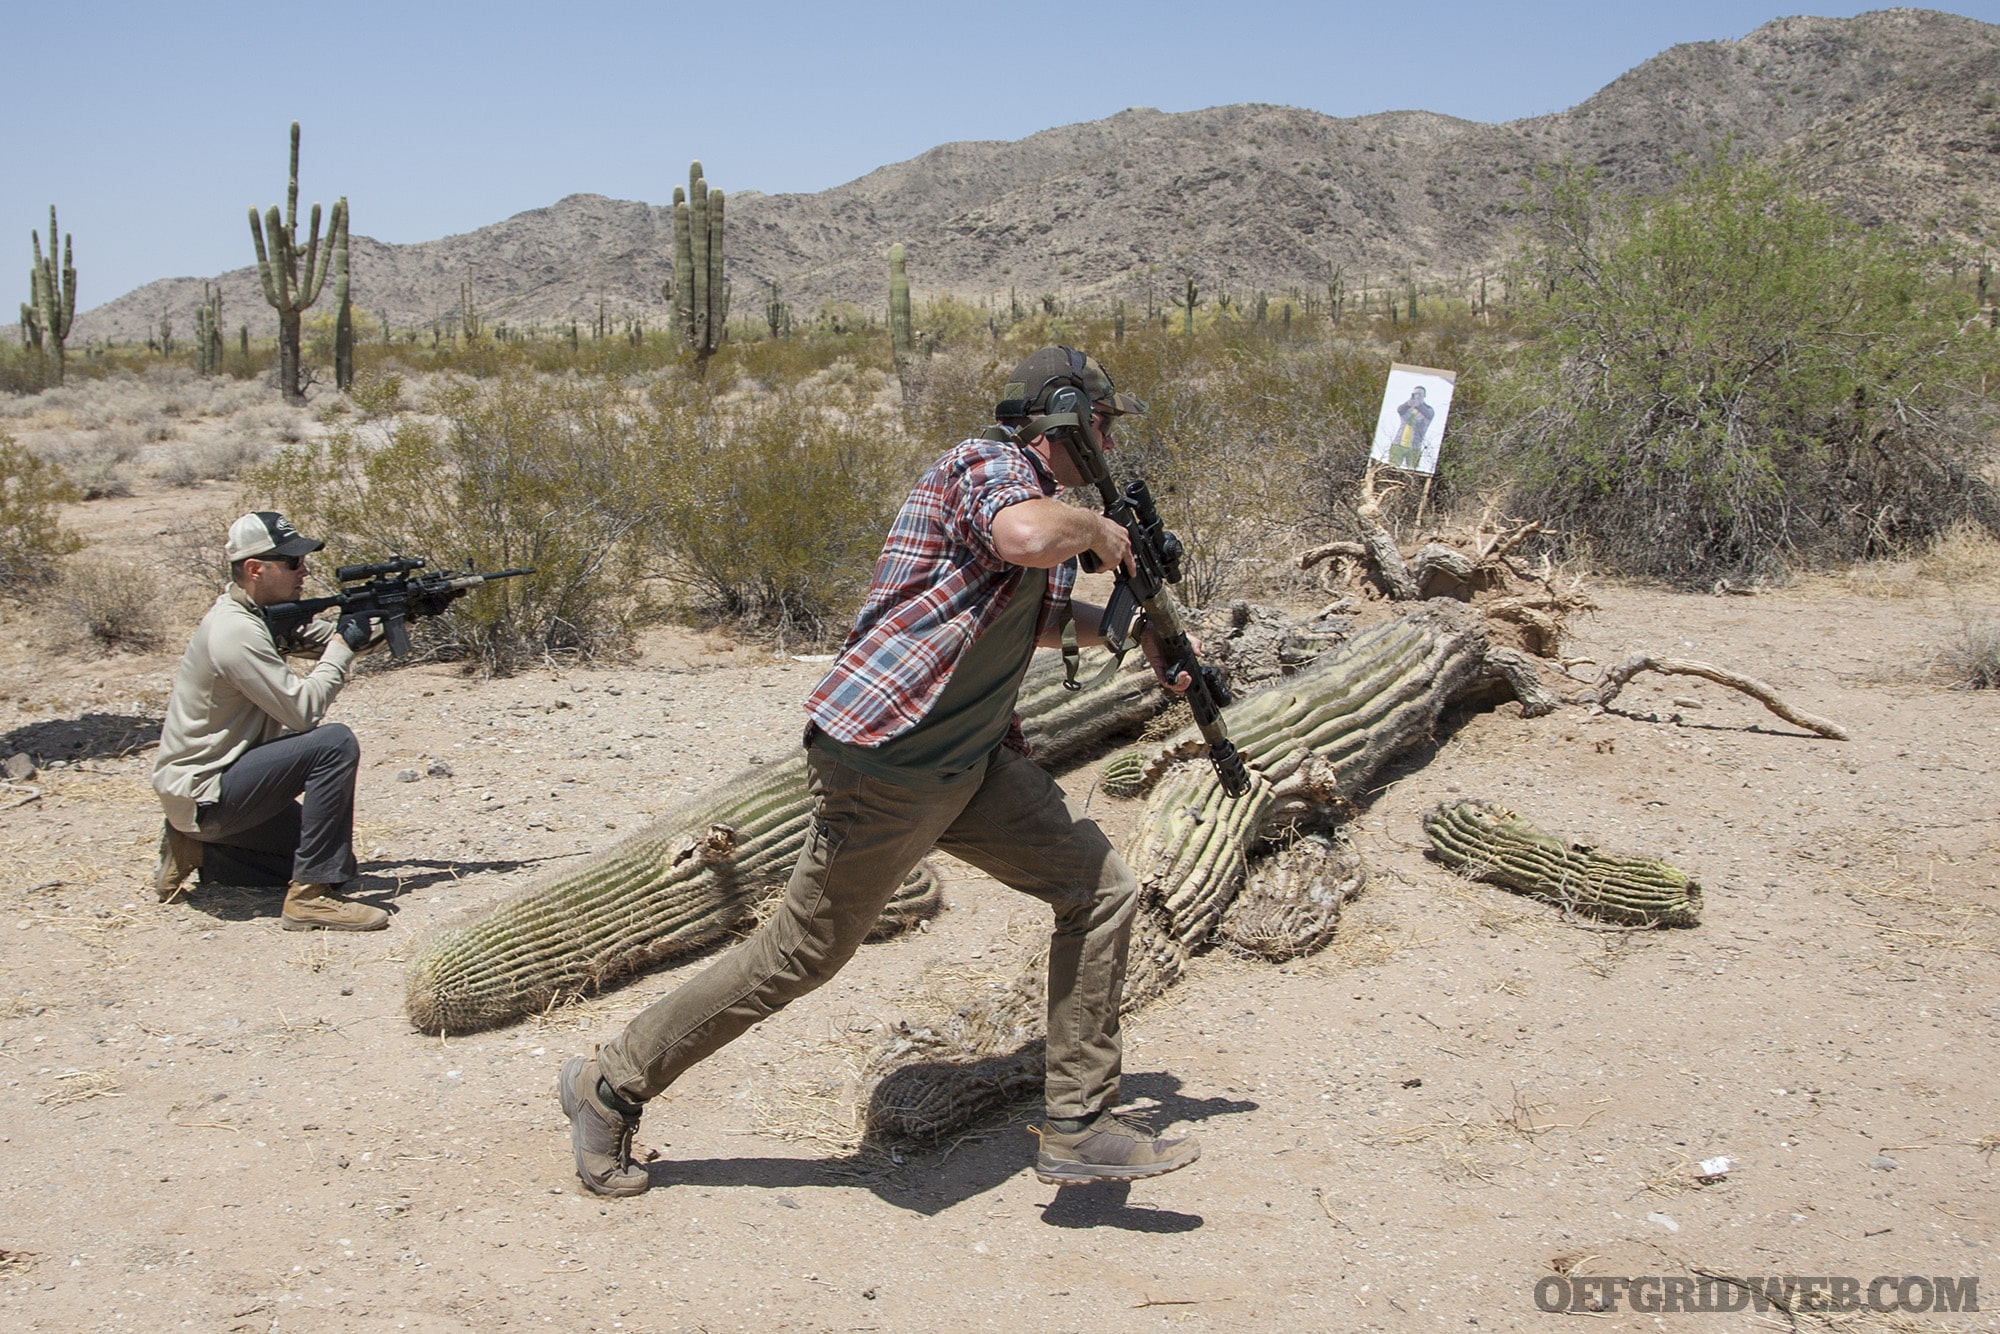
In one drill, we started near a parked truck in hilly desert terrain, and moved in a two-man team to assess 10 paper targets scattered through the environment. Each student communicated by shouting “set,” “moving,” and “move” to his partner, and we covered each other as we wove through cactus and scrub brush. Some targets depicted simple armed threats; others were holding hostages, surrendering, or carrying harmless objects that might be misinterpreted as weapons. We used our LPVOs for positive identification of each target, and made quick decisions to shoot or keep moving.
Above: Practical drills forced students to maintain the fundamentals of shooting, moving, and communication while also using LPVOs to positively identify targets at various distances.
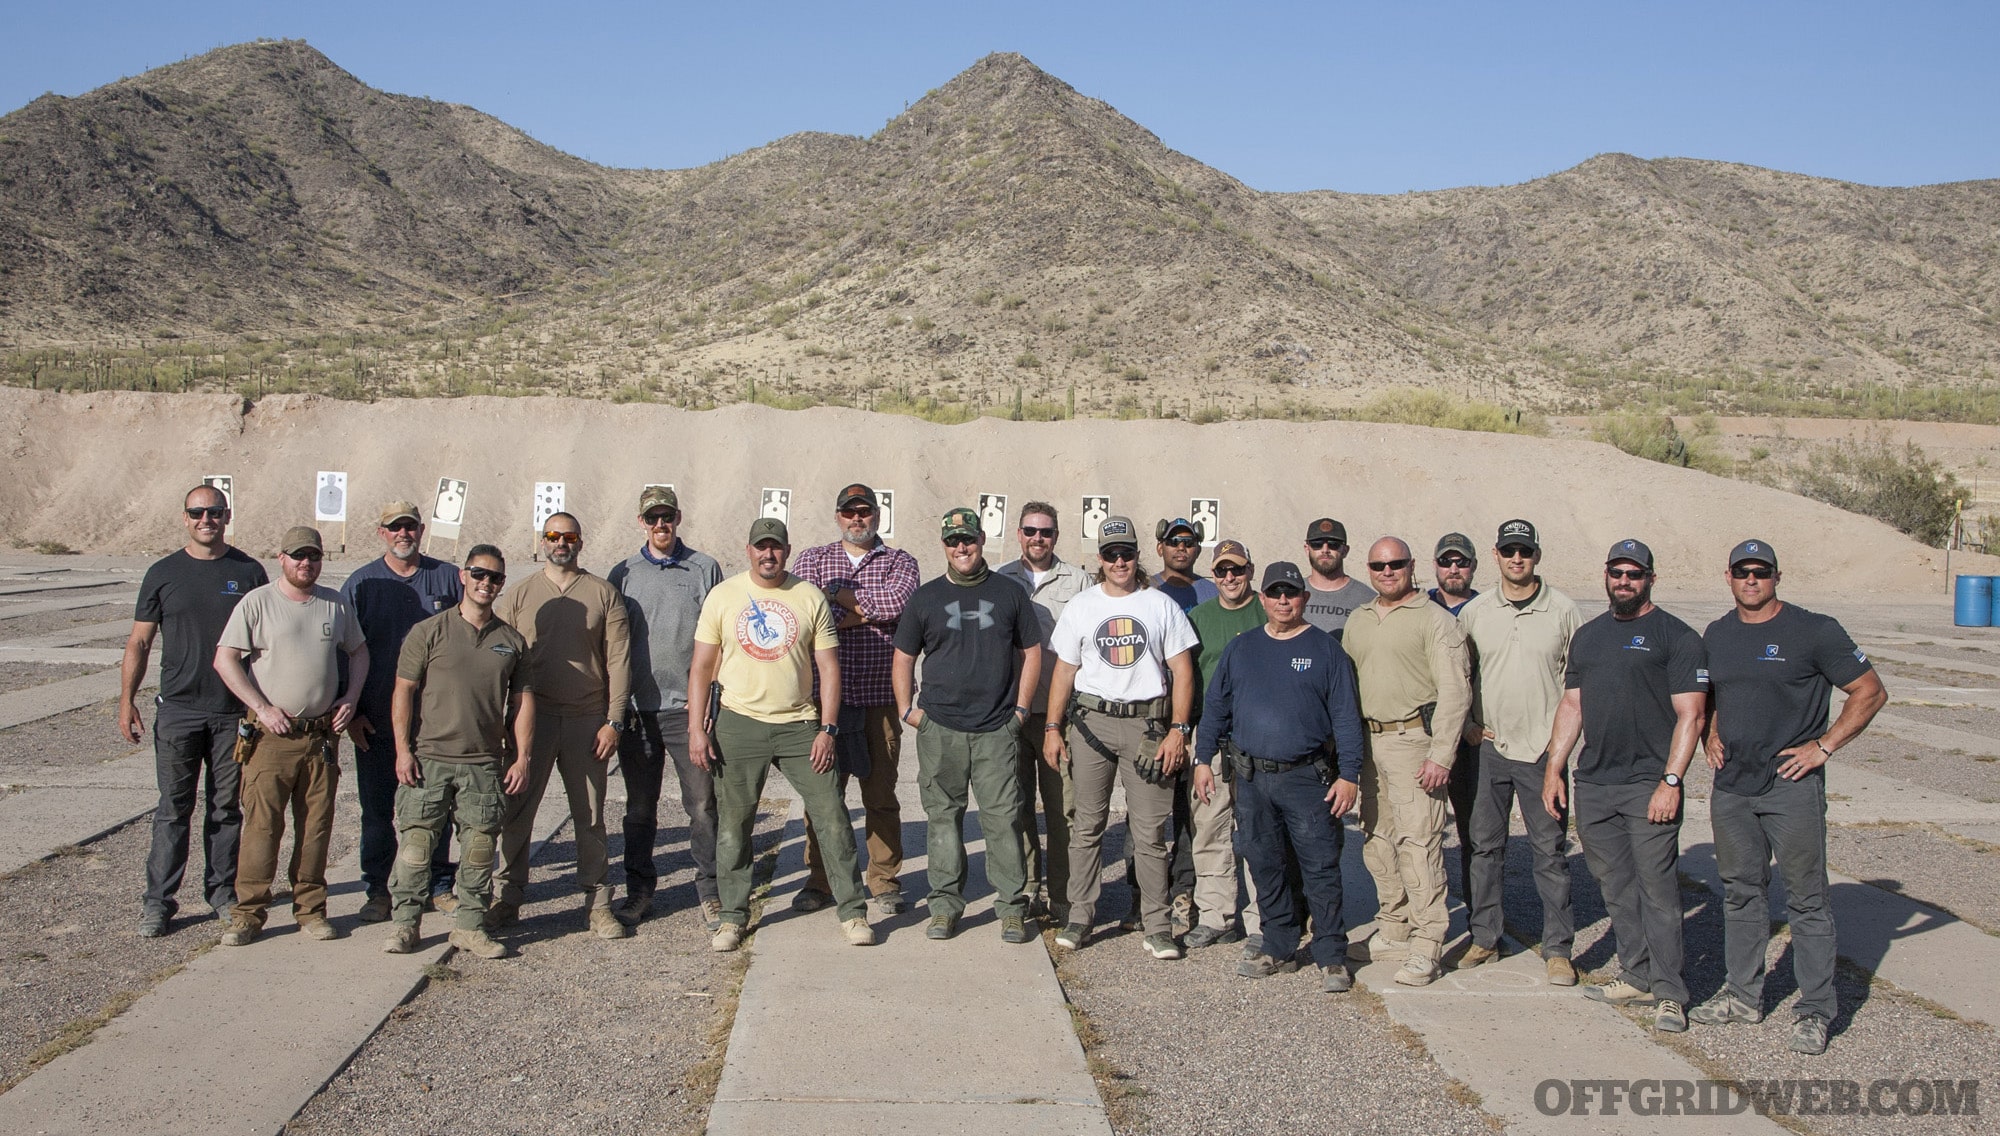
Another drill involved a timed competition-style stage, with paper targets as close as 10 yards and steel plates as far as 200. This also involved bracing off barricades and sprinting between shooting positions. We were scored based on one hit in the A zone (head box) or two hits in the C zone (body) on paper, with time penalties incurred for failure to eliminate or engage targets. This was a fun challenge that generated some friendly competition between students, and the top shooter received a prize at the end of the class.
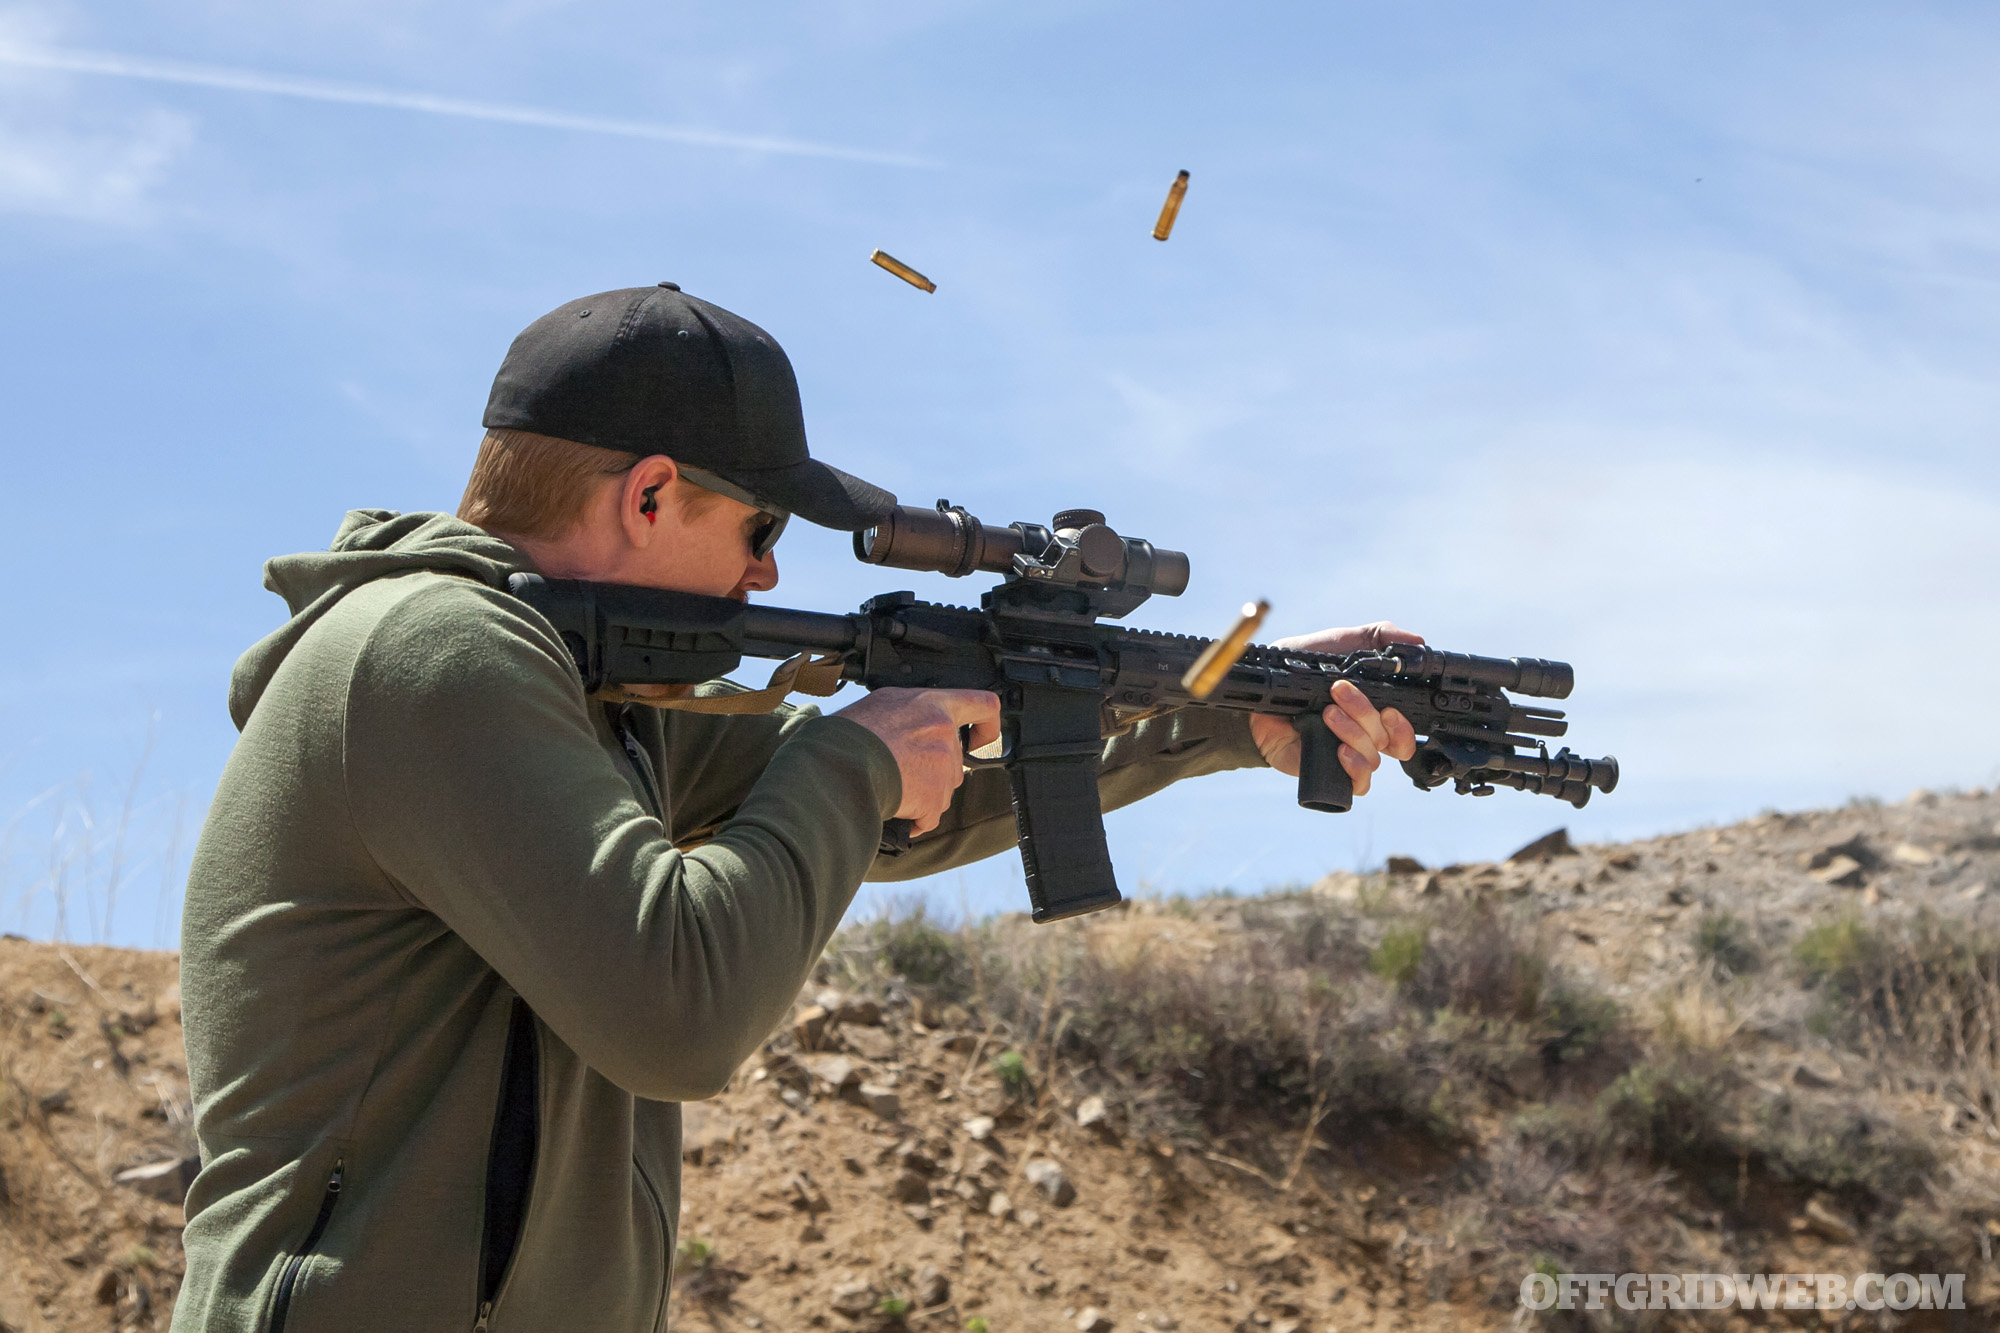
After two full days and 600 rounds of ammo expended, I walked away from the TruKinetics class feeling confident in my LPVO-equipped rifle as well as my ability to use it to the fullest. Although there's certainly a learning curve involved with any LPVO, overcoming it will make you a better, more well-rounded shooter. I know that my AR-15 can get reliable hits at 500 yards and beyond. More importantly, I know I have enough magnification to positively identify those targets before taking a shot, and I have reticle markings to quickly correct any misses after the first shot. That's a massive advantage over a red dot sight, even one with a magnifier.
For more information on TruKinetics civilian and law enforcement training courses, go to trukinetics.com or follow @trukinetics on Instagram.
Red dot or LPVO? Spend five minutes in any gun store, forum, or social media group, and you'll probably hear someone asking this common question about optic choice. Red dot sights are often considered the default — unless you're still rocking iron sights, you probably already own an RDS, if not several. They offer a quick-to-acquire point of aim and wide field of view with zero magnification. On the other hand, the low-power variable optic (LPVO) is a powerful tool that can help you maximize the capabilities of your rifle through adjustable magnification ranging from 1-4x, 1-6x, 1-8x, or more. However, if you want to get the most out of it, you'll need to do your homework.
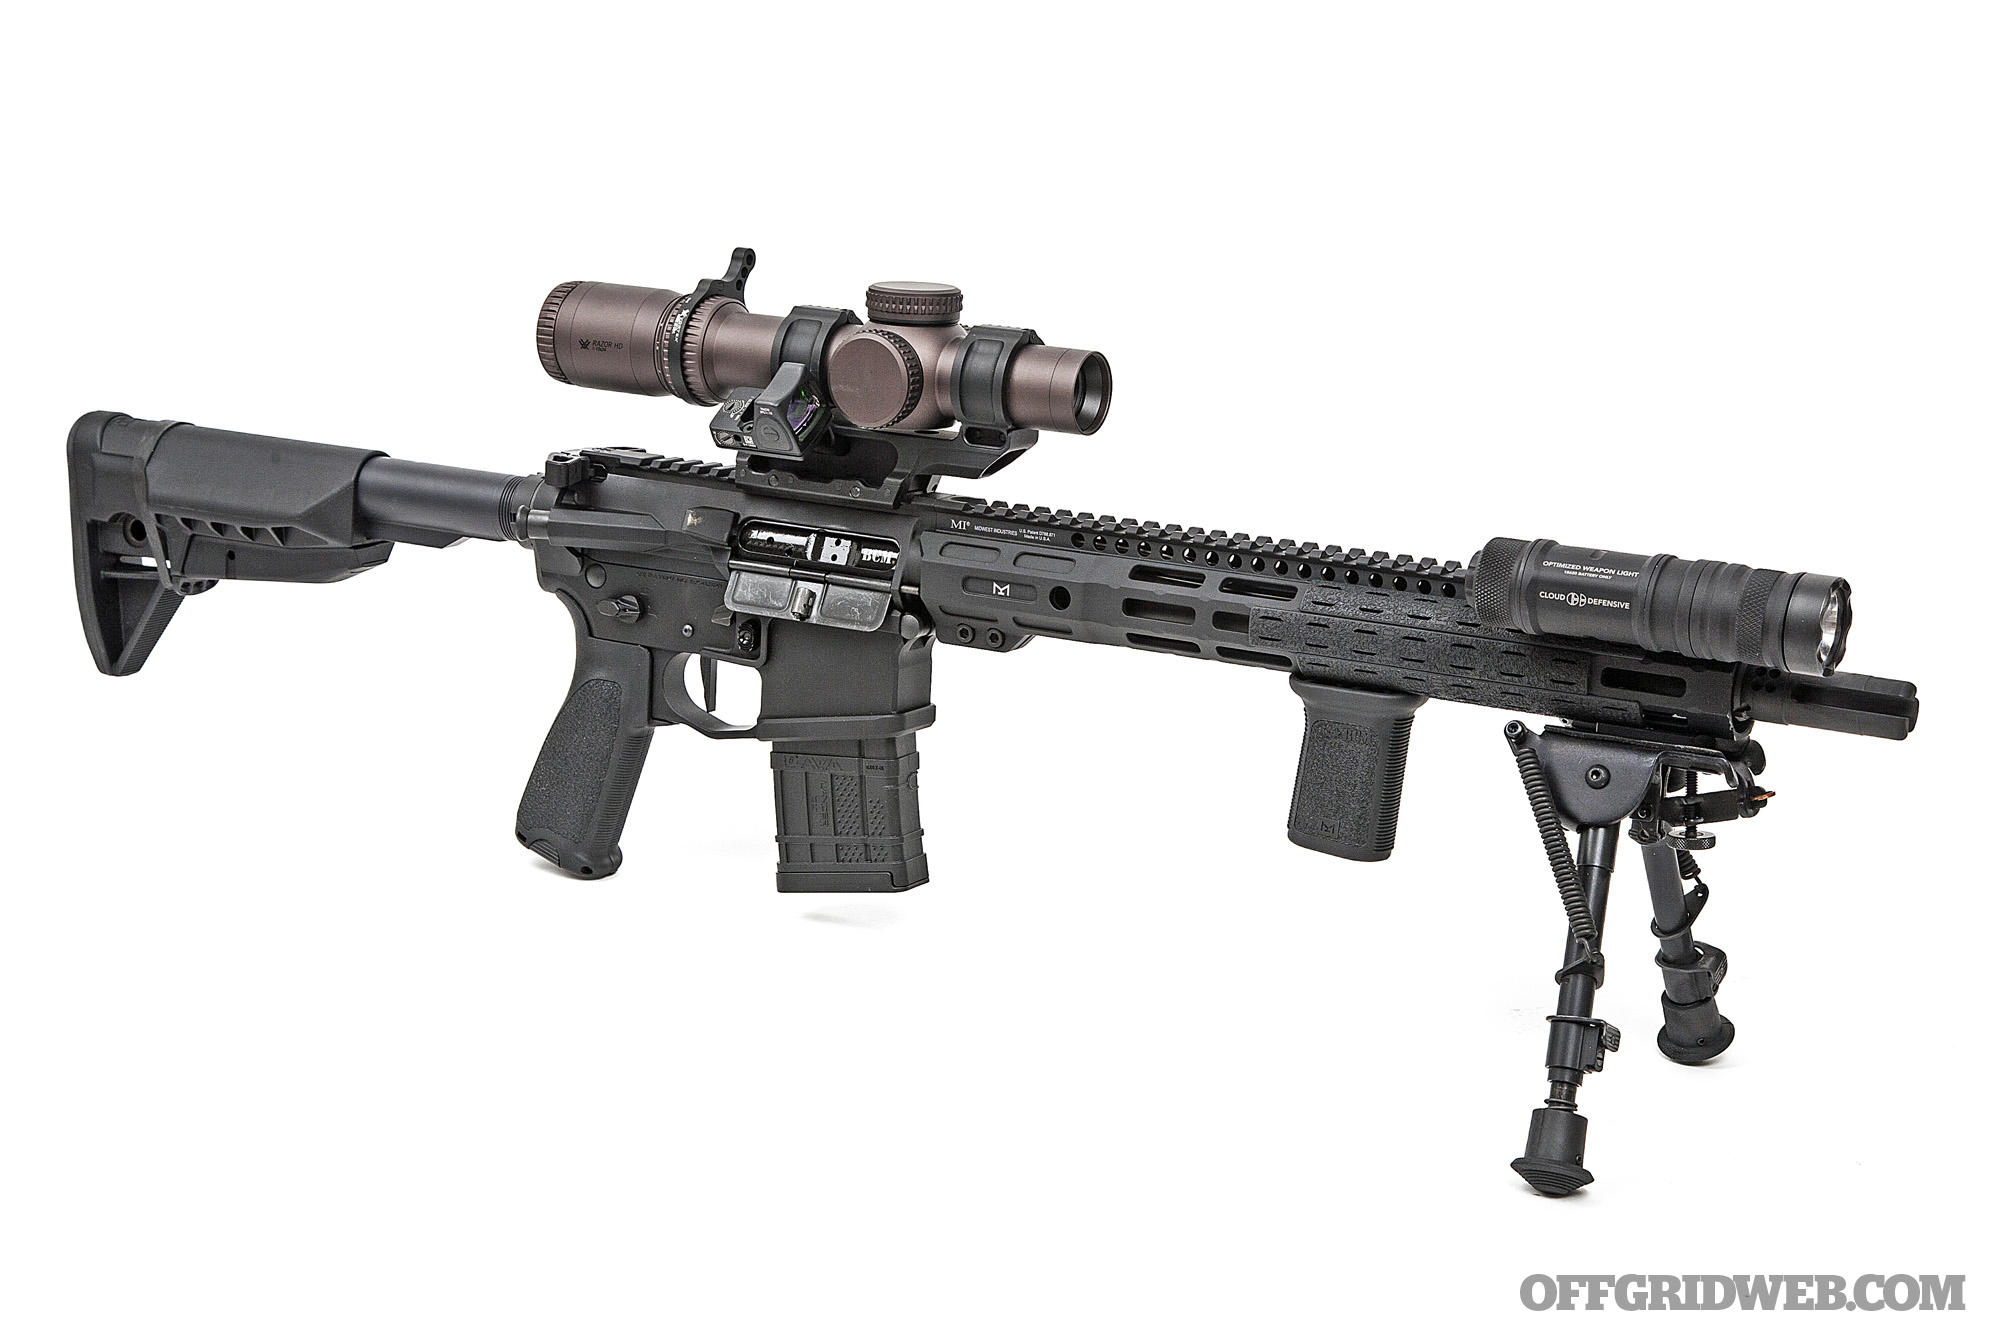
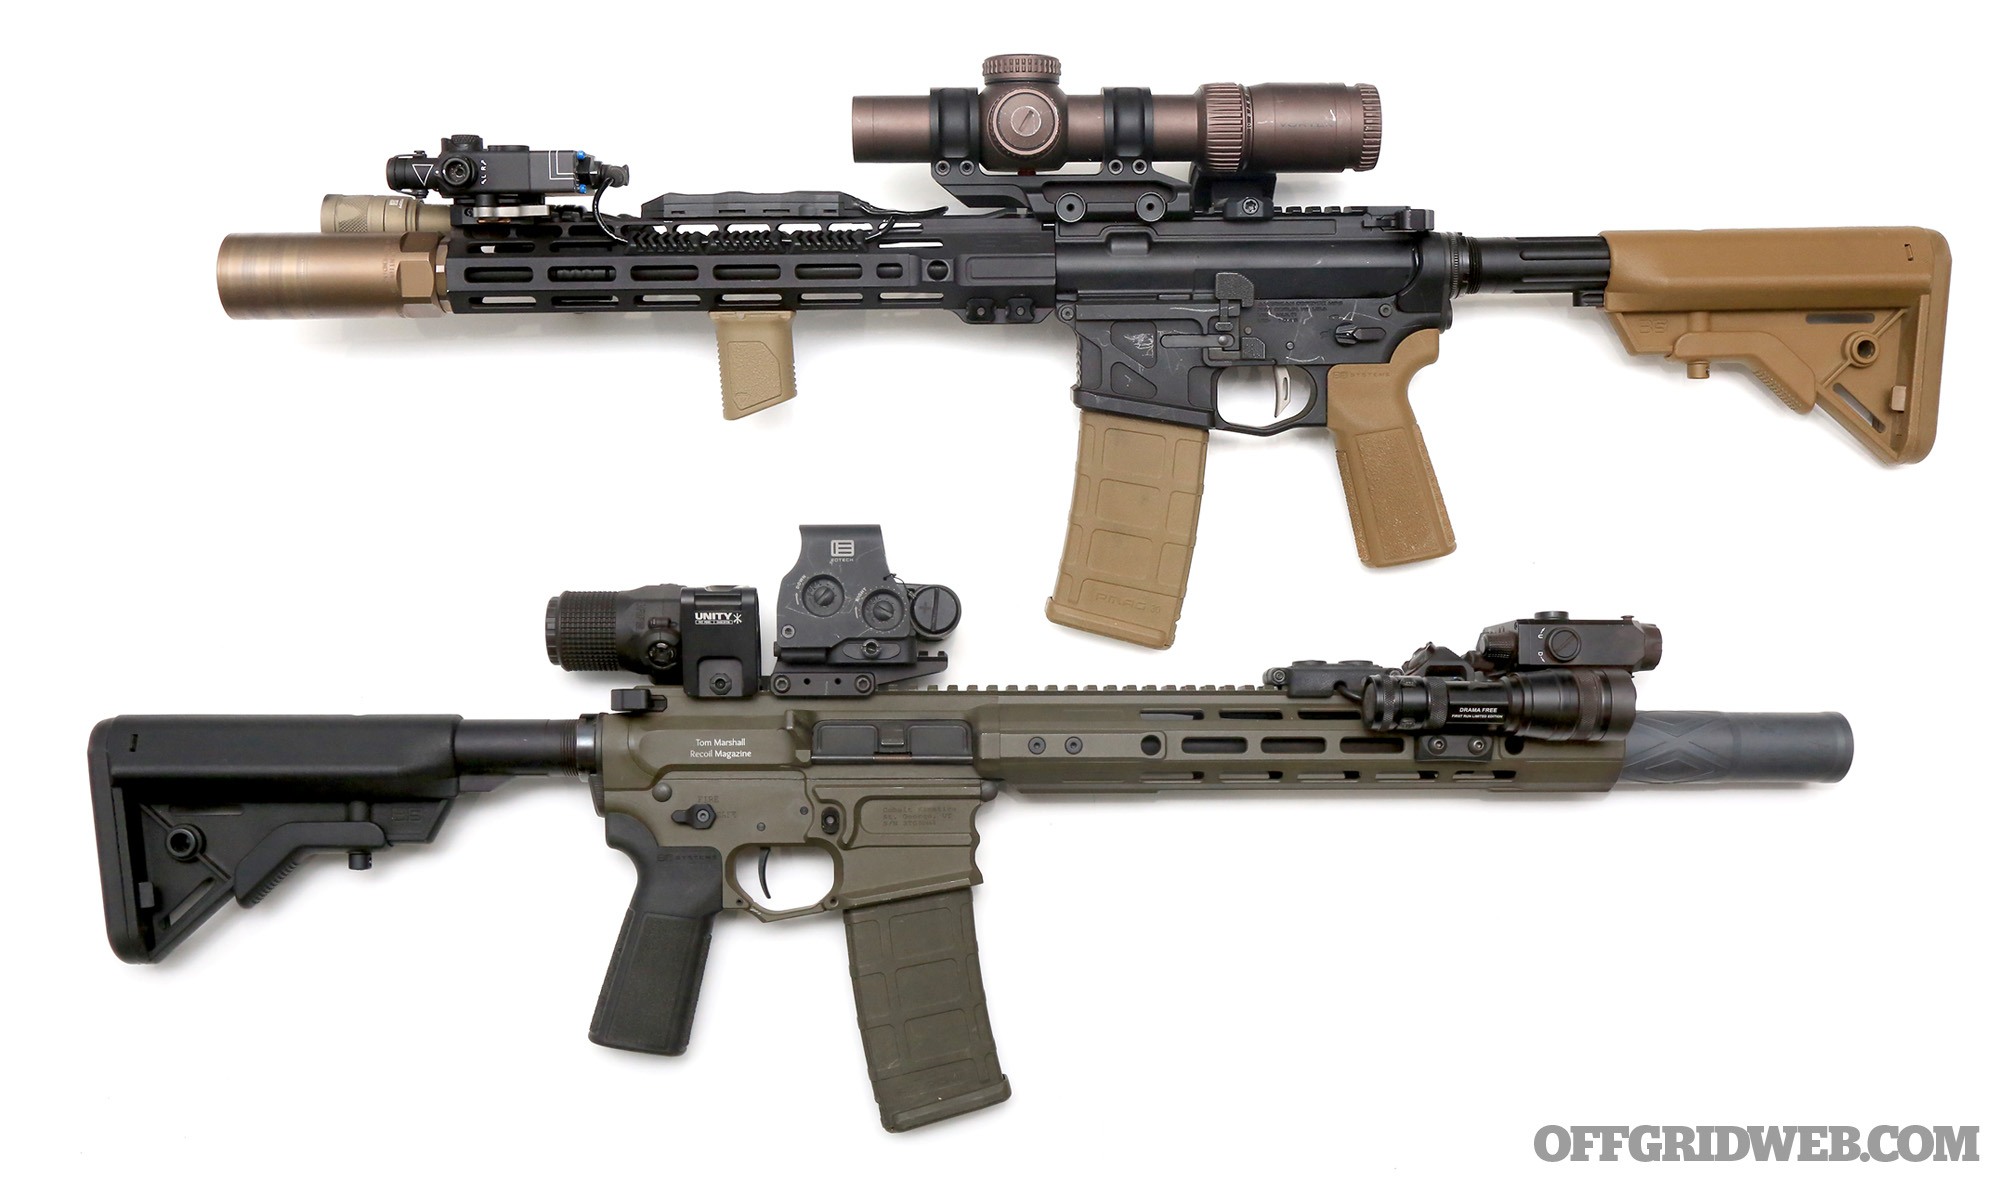
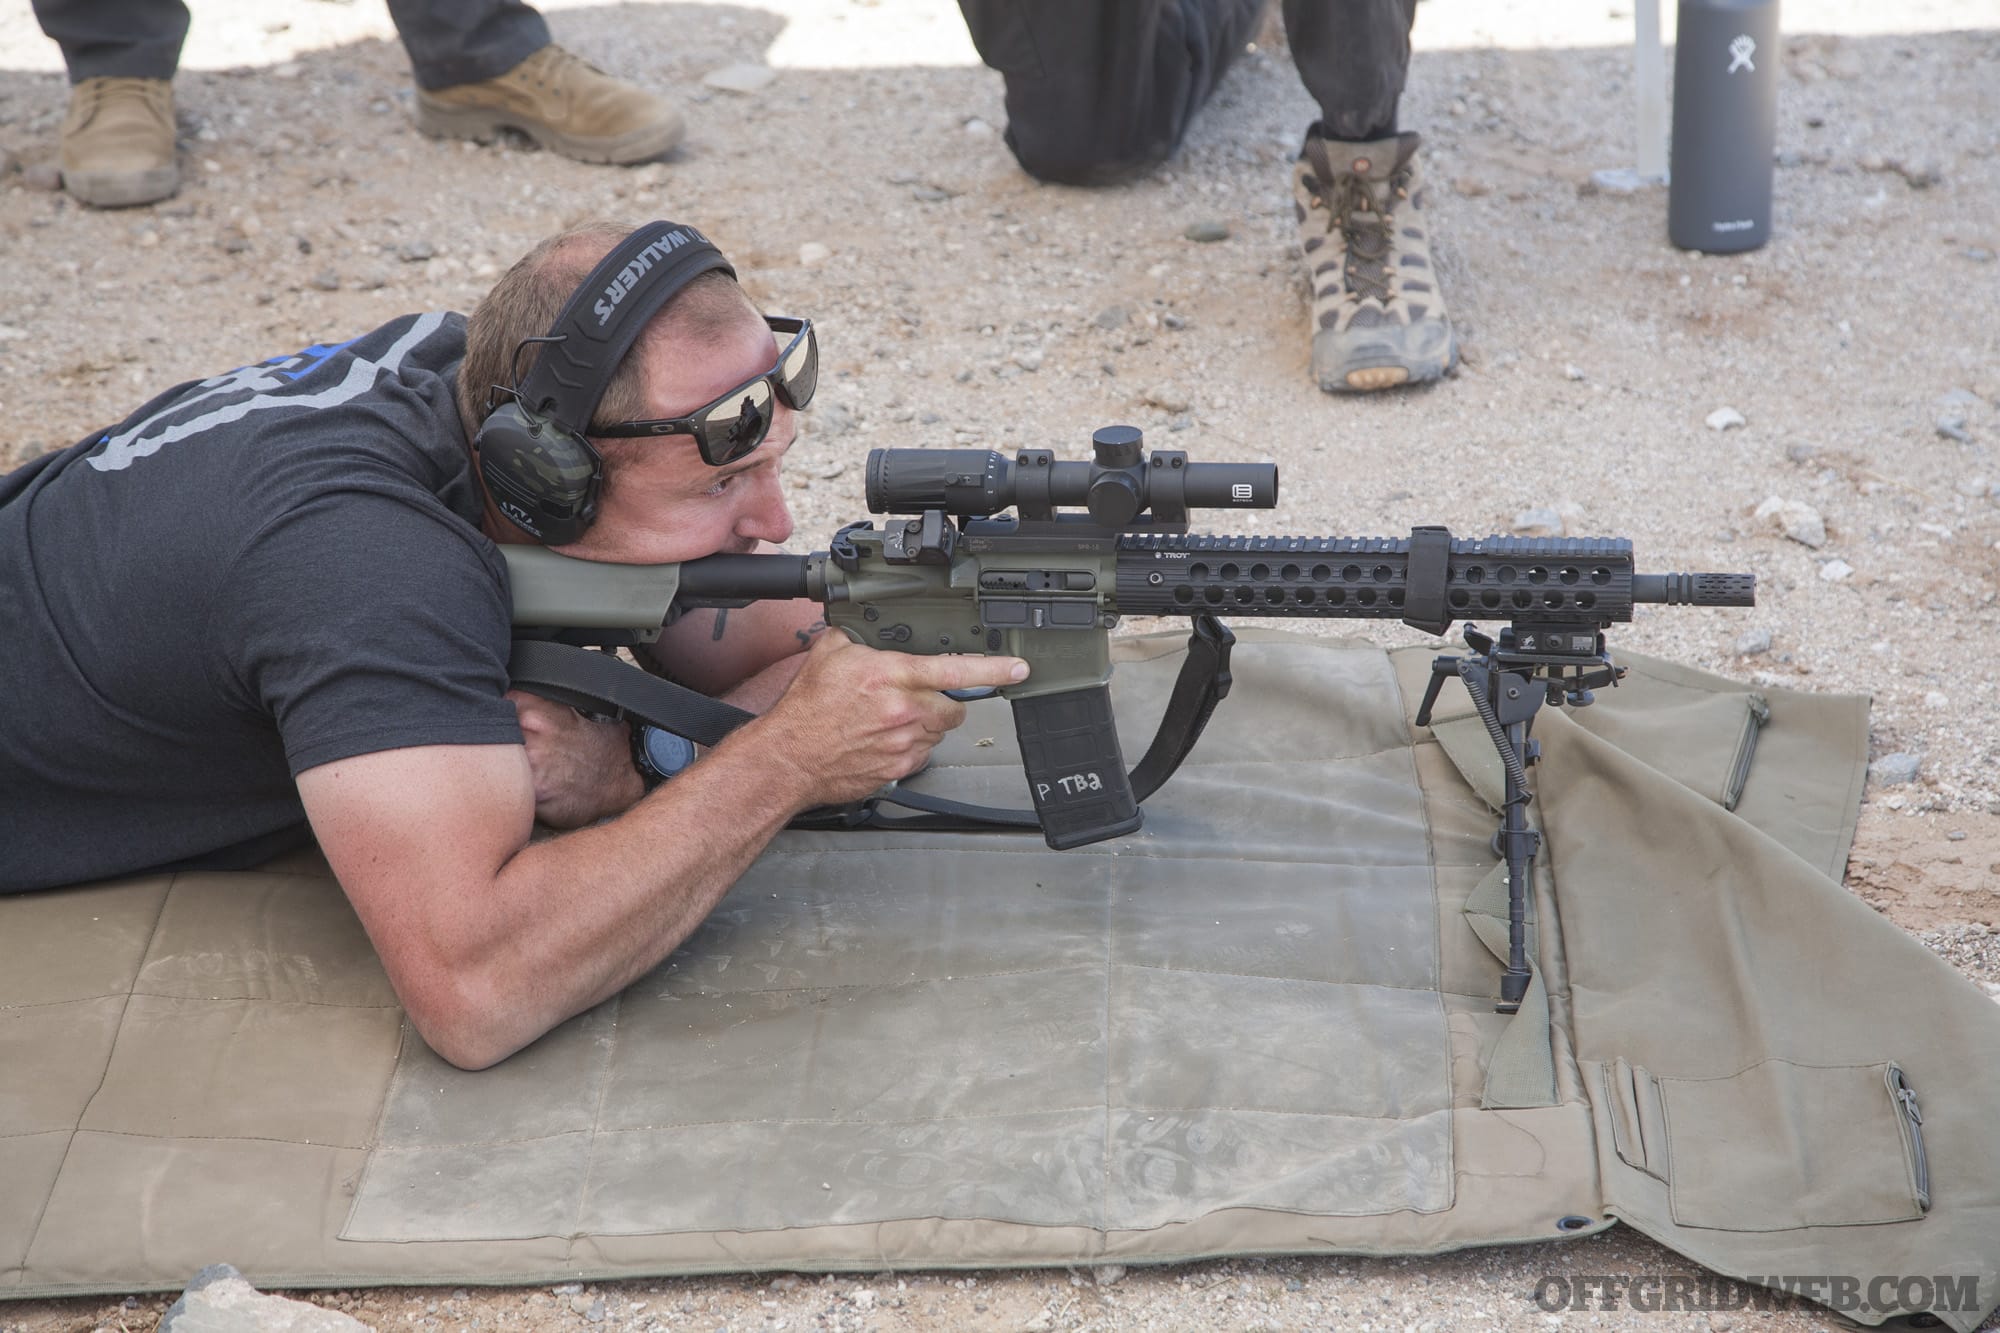
Above: An LPVO, such as the Vortex Razor HD 1-10×24 seen on the 13.9-inch AR I used during the TruKinetics course, can be supplemented by an offset red dot sight (such as this Trijicon RMR in a Scalarworks KICK mount). But as you'll see later in this article, that addition is far from mandatory.
TruKinetics Intro to the LPVO Course
Above: Norman offers advice to a pair of students after moving through a practical course of fire in the Arizona desert.
In an effort to address the pros and cons of the LPVO and learn how to use one effectively on an AR-platform rifle, I signed up for a two-day Intro to the LPVO class from TruKinetics. Founded in 2020 by 23-year law enforcement veteran David Norman, TruKinetics started strong with a focused selection of course offerings and a cadre of instructors with highly-relevant skill sets. For a class focused on LPVO use at distances from 5 to 500 yards, you'd be hard pressed to find a group of three instructors with more real-world experience behind these optics:
David Norman – 23+ years working law enforcement in Phoenix, AZ, including 13 years of full-time SWAT experience with Special Assignments Unit (SAU); Department of Defense contractor
Brian Langoliers – retired USMC Scout Sniper, U.S. State Department security contractor, and Phoenix Police SAU sniper
Todd Besaki – retired Army Ranger, federal agent for the U.S. Department of Energy training teams that escort nuclear materials
Read on for some lessons learned from this course, and how our experiences on the range reshaped our perspective on the value of the LPVO.
Red Dot (+ Magnifier) vs. LPVO
In essence, the LPVO bridges the gap between a red dot sight and a medium-power rifle scope. A quality LPVO offers true 1x magnification (or extremely close to it) and a bright illuminated reticle for close-range targets, as well as the capability to adjust quickly to a higher magnification setting for targets that are further away.
LPVO Advantages Most importantly, TruKinetics emphasized that an LPVO's magnification offers enhanced ability to positively identify (PID) a target before choosing to shoot. At extended range with a red dot, you might not be able to determine if the individual you're looking at is carrying a gun or some other object. That's critical information, no matter if you're a member of the military, a law enforcement officer, or a civilian. The LPVO is a potent tool for gathering information, even if you don't have to pull the trigger. And it allows you to obtain this information from further away — that distance enhances your safety and buys you time to react to any potential threat.
Of course, there are a variety of magnifiers for red dot and holographic sights, as seen on Tom Marshall's OD green rifle above. These magnifiers can improve extended-range PID capabilities with a red dot, but they're not without drawbacks of their own. According to the TruKinetics instructors, red dot magnifiers are typically…
Less versatile than LPVOs — they offer fixed-power magnification with an on-off switch, rather than a range of magnification settings
Dependent on the battery in a powered red dot, rather than an always-present etched reticle
Open to dirt, smudges, and other obstructions on four lenses, rather than two on an LPVO
More complicated to zero, since the magnifier and red dot each have elevation and windage adjustments
More prone to shifting parallax, since toggling the magnifier adds/subtracts layers of glass
Less effective under low-light environments or tinted windows, due to poorer light-gathering
As a quick example, if a 1x red dot has acceptable PID capability on a given target out to 100 yards, a dot plus magnifier might offer the same level of PID out to roughly 300 yards. Under the same circumstances, a 1-6x LPVO could offer solid PID out to 400 yards. A 1-10x optic can easily PID targets at 600 yards and beyond. If your rifle and ammunition are capable of remaining effective at that range, why wouldn't you want an optic that can match their performance?
LPVO Disadvantages Even though each of the three instructors swears by the LPVO based on decades of professional experience, they weren't afraid to point out some of the drawbacks of these low-power optics. Here are some of the cons of LPVOs versus red dots, with or without added magnifiers:
Weight — LPVOs are generally rather heavy, although this has been getting better in recent years. It's up to you to decide if the extra capabilities are worth a few ounces of added weight.
Eye Relief — Any magnified optic (including red dot magnifiers) will be more sensitive to the shooter's eye position than a 1x red dot. This can be overcome by setting up your optic properly and understanding the impact of scope shadow.
Night Vision Capability — If you need to passively aim while wearing NVGs, it's not easy with an LPVO. Adding an offset or top-mounted backup red dot sight is a simple solution for NVG users.
Cost? — At first glance, an LPVO might seem expensive. However, the price of a comparable-quality red dot, magnifier, and two mounts adds up fast, and this often ends up as a wash.
Training — There's a bit of a learning curve for newer shooters to feel quick and confident behind an LPVO. More on this later.
So, you've decided to buy an LPVO — which one should you get? There are many good choices, but before you spend any money, you should learn what you need. During our class, TruKinetics instructors offered a list of important considerations for buying an LPVO, in order of importance:
Focal Plane – SFP vs. FFP Second Focal Plane (SFP) and First Focal Plane (FFP) optics both have their place. This discussion could be its own article, so to keep things simple, we'll summarize:
SFP optics have reticles that stay the same size regardless of magnification. They're less expensive, and usually have simpler reticle designs that lend themselves to close-quarters use at 1x. However, SFP reticle markings (subtensions) are only correct at a specific magnification value, so you'll need to memorize that and avoid intermediate magnification settings if you plan on doing any long-range work.
FFP optics have reticles that increase in size as magnification increases. They're more expensive, but no matter what magnification setting you use, the reticle markings will be correct. FFP reticles tend to offer more precise “Christmas tree” markings for long-range use, but can appear more cluttered at 1x. These optics are ideal for users who may need to quickly engage multiple targets at varying distances, especially longer ranges.
Reticle Your optic's reticle is extremely important. Consider it carefully before buying! There are four main options:
Duplex a.k.a. plain crosshairs — These reticles give the user no additional information or measurements, and are not recommended.
Bullet Drop Compensator (BDC) — This gives a “quick and dirty” point of aim for various distances, but only if you're using the barrel length and ammo the reticle is designed for. For military- and law-enforcement-issued duty guns with consistent ammo, it makes sense. For civilians who mix and match various brands and weights of ammo, it's not a good choice.
Minute of Angle (MOA) — One of the two primary measuring systems, which equates to 1/60th of a degree (or 1 inch at 100 yards).
Milliradian (MIL a.k.a. MRAD) — The other measuring system, which equates to 1/1000th of a radian (or 1 meter at 1000 meters).
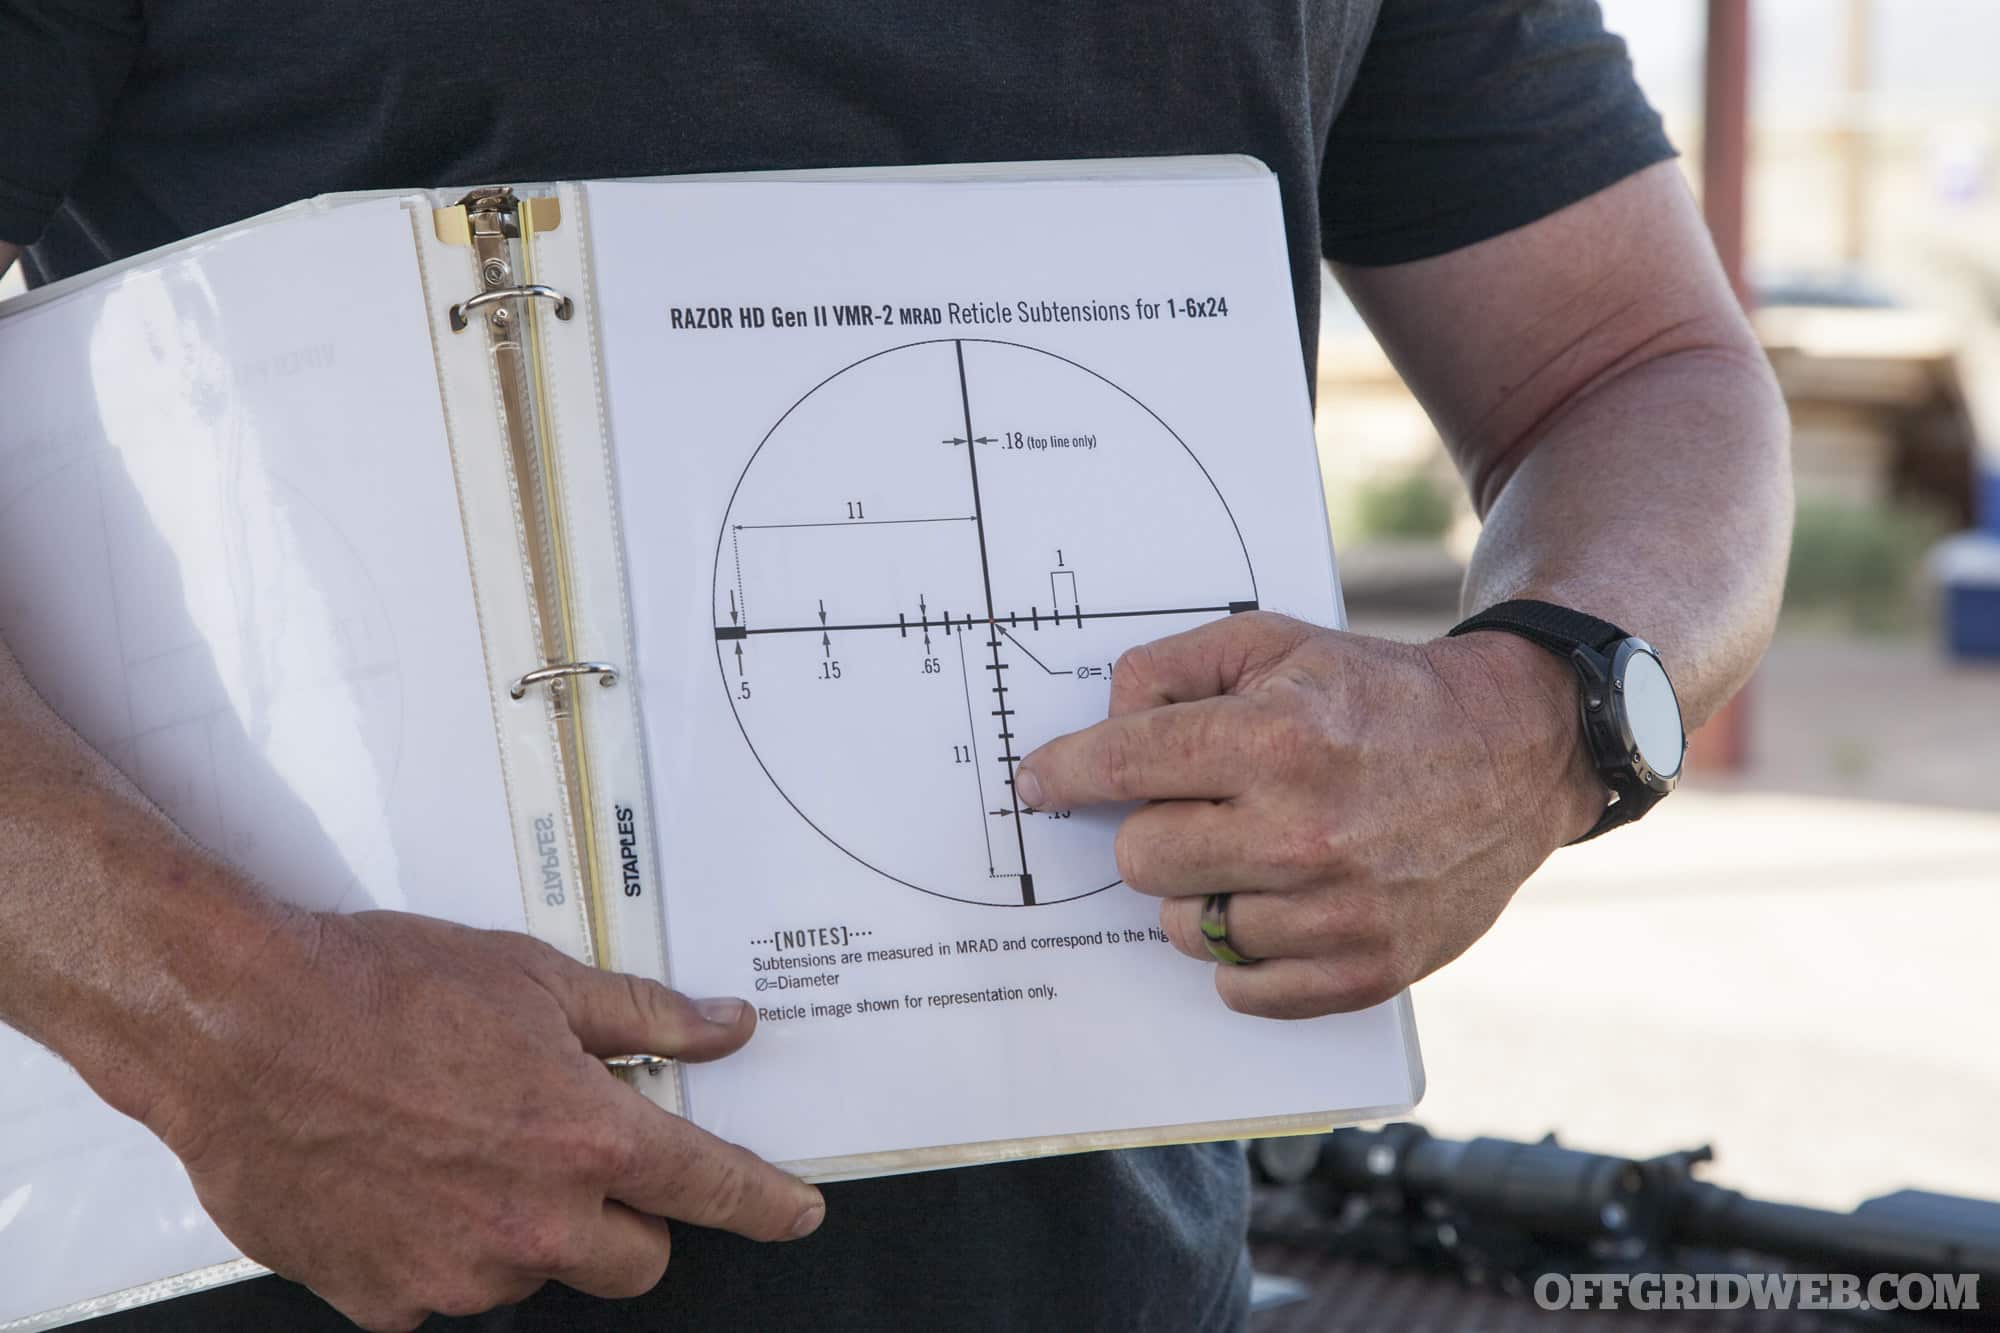
Above: I chose this EBR-9 MRAD reticle for my Vortex Razor HD Gen III LVPO. At full magnification (as pictured) its dotted “Christmas tree” offers clear measurements to hold for wind and elevation at longer ranges.
If you're trying to decide between MOA and MIL, we'll refer you to this article from our sister publication Recoil. Basically, both are viable — even the TruKinetics instructors had varying preferences, with two preferring MILs and one MOA. Whatever you do, don't get an optic that uses both (i.e. an MOA reticle with MIL adjustments) because this gets extremely confusing. One instructor put it bluntly, “sell that sh*t if you have it.”
Lastly, consider your mission before picking an LPVO reticle. Some reticles are great for long-range precision but will appear cluttered at 1x; others are nice and clean at 1x but don't offer much useful info for long-range use.
Eye Relief / Eye Box Eye relief is the distance your eye needs to be from the eyepiece to achieve a full image; eye box is the 3D space where your eye can move while maintaining that full image. As mentioned earlier, LPVOs are sensitive to eye/head position, and can produce scope shadow as the eye moves towards the edges of the eye box. TruKinetics recommends LPVOs with “generous” eye box and eye relief of 3 inches or more. This makes it easier to get a consistent sight picture quickly.
Above: Brian of TruKinetics explained scope shadow with this diagram. The arrows indicate point of impact shift — if you see shadow on one side of the optic, the impact of your shots will be “pushed” slightly in the opposite direction.
Trueness of 1x Ideally, your LPVO should offer a true 1x magnification, or extremely close to it. If the minimum setting is noticeably greater or less than 1x, you may not be able to shoot well with both eyes open, and your brain's processing of visual information may be slowed.
Illumination If you intend to use your LPVO in bright environments, look for “daylight bright” reticle illumination. This will help your optic feel more like a red dot sight at 1x. If you intend to shoot in low light environments, your full reticle should be illuminated, not just the center point.
Turret Security In order to prevent your LPVO's elevation and windage turrets from turning inadvertently, choose an optic that has locking and/or capped turrets. This will help you trust that your rifle is zeroed every time you need it.
Above: The Razor HD Gen III has capped elevation and windage turrets, plus a locking illumination dial. It's mounted in a Scalarworks LEAP 1.93-inch mount.
Durability & Track Record If you need to trust your life to a weapon, choose an LPVO make and model that has a track record of proven durability, preferably in the hands of military or law enforcement users. Research this carefully and do your best to exclude single-user anecdotes.
Magnification Ring Put simply, the magnification ring should move when you need it to, and stay put otherwise. Many users prefer a throw lever for fast adjustments, but be careful that it doesn't snag on gear and unexpectedly change the magnification setting.
Above: Another configuration of my rifle included this Leupold Mark 8 LVPO, which features locking turrets rather than removable caps. Also, the magnification ring has a raised tab rather than a large throw lever.
Glass Clarity It's not necessary to get too far into the weeds here, but poor-quality glass can lead to “fisheye” distortion near the edges of the image — this can cause parallax shift problems if your eye isn't centered inside the eye box while shooting. Japanese and German glass tends to be clearer, but Chinese glass has also come a long way in recent years.
Diopter Design “This is one of the most important and most misunderstood pieces of an LPVO,” said one instructor. The diopter ring on an LPVO must be adjusted to match your eye, and failure to do so can cause a true 1x optic to feel anything but. An improper diopter setting can even cause eye fatigue and headaches. Like the magnification ring, your LPVO's diopter ring should move only when you want it to.
Weight and Size How will you use your rifle? If it's mostly a bench rest gun, a little extra weight is no big deal. If it's something you'll carry on a sling for hours or days at a time, every ounce matters.
Above: If you need to run with your rifle or hike long distances, weight is a major consideration, but it should also be balanced with the optic's features and durability.
…and Finally, Price The old adage still applies: you get what you pay for. However, be realistic and don't assume you need the most expensive optic money can buy. As one of the TruKinetics instructors put it, “Buy what you really need, not what someone on Instagram says is awesome.”
For a trustworthy entry-level LPVO, TruKinetics instructors recommended the Vortex Viper PST 1-6×24, which retails for about $600. If you're looking for something professional-grade, they recommend stepping up to an optic in the $1,000 to $1,500 range, such as an EOTech Vudu, Vortex Razor HD Gen II, or Trijicon Accupoint.
How to Choose a Mount
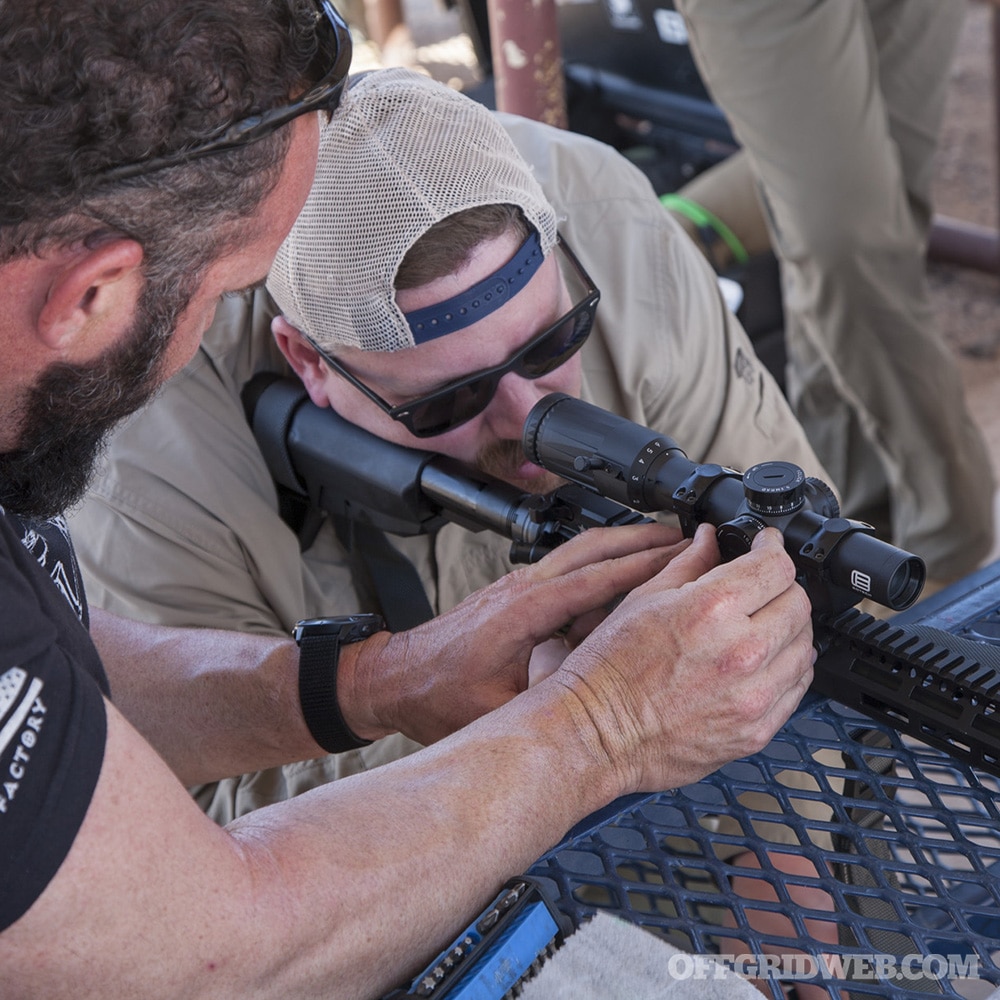
Above: In this photo, Todd from TruKinetics is installing an EOTech Vudu 1-6×24 LPVO in a Bader Ordnance Condition 1 mount. Note the cantilevered design that places the rail mount near the midsection of the optic.
Much like you'd be foolish to buy a $150,000 Porsche and install the cheapest set of tires you can find, you shouldn't try to cut costs with your optic mount — it's where the rubber meets the road. TruKinetics recommends one-piece scope mounts for LPVOs, specifically cantilevered mounts that allow the optic to be mounted further forward on the gun. This ensures the optic can be positioned appropriately while remaining securely attached to the upper receiver (not “bridged” onto the handguard). Make sure you choose a mount that matches your optic's tube diameter (e.g. 30mm or 34mm).
There are many excellent LPVO mount manufacturers to consider, including LaRue Tactical, American Defense Mfg. (ADM), Warne, Midwest Industries, Geissele, Badger Ordnance, and Scalarworks.
Above: Instructor Brian's rifle is equipped with an EOTech Vudu LPVO in a Larue Tactical SPR quick-detach mount. Its 1.5-inch height offers plenty of cheek weld stability for prone shooting. Brian's setup also includes a backup Trijicon RMR in a separate 45-degree mount.
Is QD Really Necessary? Quick-detach functionality is optional, but certainly not mandatory. After all, it's best practice to avoid removing your optic once it's zeroed. The likelihood of any quality LPVO failing so catastrophically that it must be removed during a firefight is very low, and if that's a concern, you should consider installing an offset sight system (45-degree irons or a backup red dot).
Poor-quality QD mounts can come loose unexpectedly, throwing off your zero or even allowing the optic to fall off the gun; high-quality mounts should be just as secure as a bolt-on mount, but you'll generally pay more for this feature.
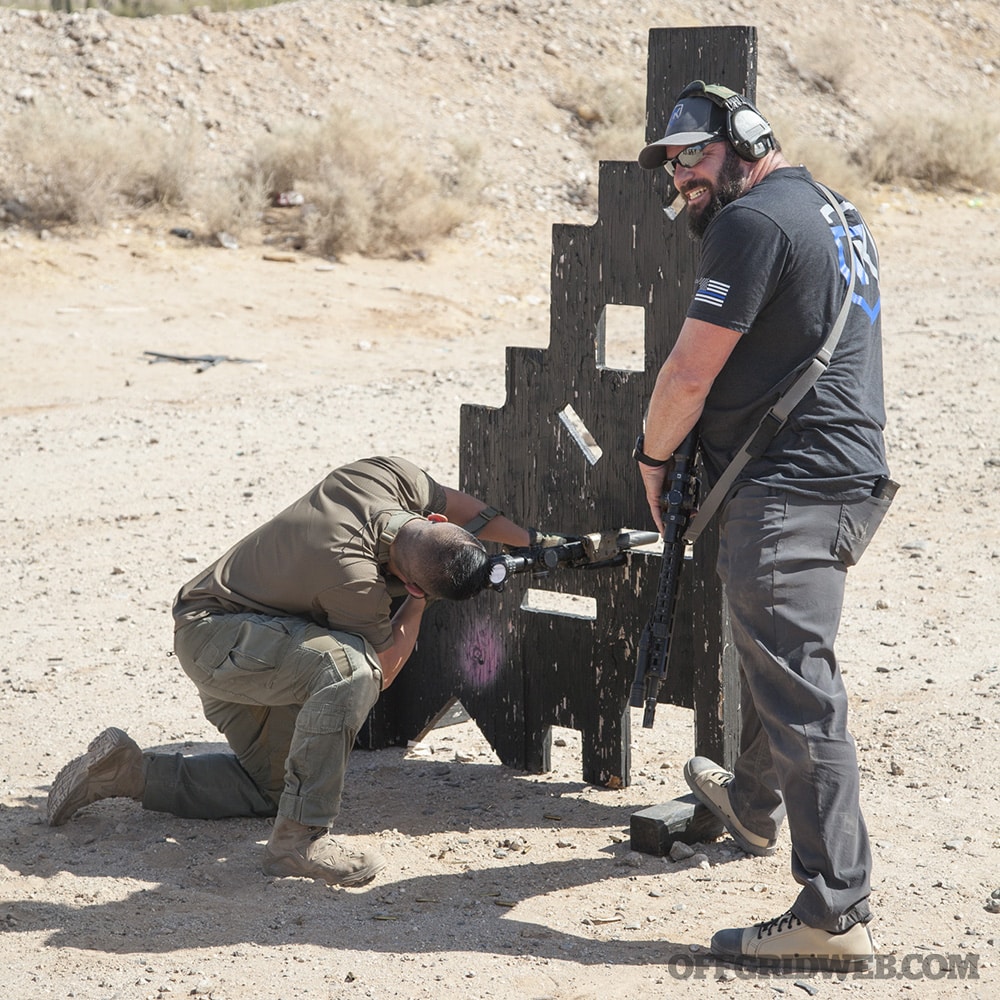
Above: While low optic mounts offer a comfortable cheek weld for prone shooting, high mounts make it easier to achieve a clear sight picture in more challenging positions. Each student experienced this firsthand after shooting through the various openings in a plywood VTAC barricade.
How High? Mount height has a substantial impact on shooting comfort, so you should consider it carefully before you buy. Base your decision on the height measurement in inches, rather than vague terms like “standard height” or “lower 1/3 cowitness.” Here's a quick breakdown of some common choices:
1.2 inches — These mounts are usually designed for traditional hunting rifles, and are too low for most AR-platform applications.
1.5 inches — This is the most common height for traditional LPVO mounts. It works fine for many shooters, and offers a very stable cheek weld against the stock, but it can be a little tougher to acquire a sight picture in compromised shooting positions.
1.7 inches — Another popular choice, and a nice middle ground for most shooters.
1.9 inches — These taller mounts offer a “heads-up” shooting position, which some shooters find faster and more comfortable. However, there's a trade-off: it may lead to neck strain while shooting from the prone. Muzzle awareness is also important with tall mounts, since it becomes easier to inadvertently shoot the edge of a barricade.
2.0+ inches — These are often referred to as night-vision-height mounts, and they're more common for red dots than for magnified optics. They have some substantial drawbacks for LPVOs, including difficulty establishing a solid cheek weld against the stock (especially in the prone) and hold-over issues at close range.
In the next part of this series, we'll cover how to properly install your LPVO on your rifle, as well as some TruKinetics training tips for close-range and long-range shooting with an LPVO. Click here to read Part 2.
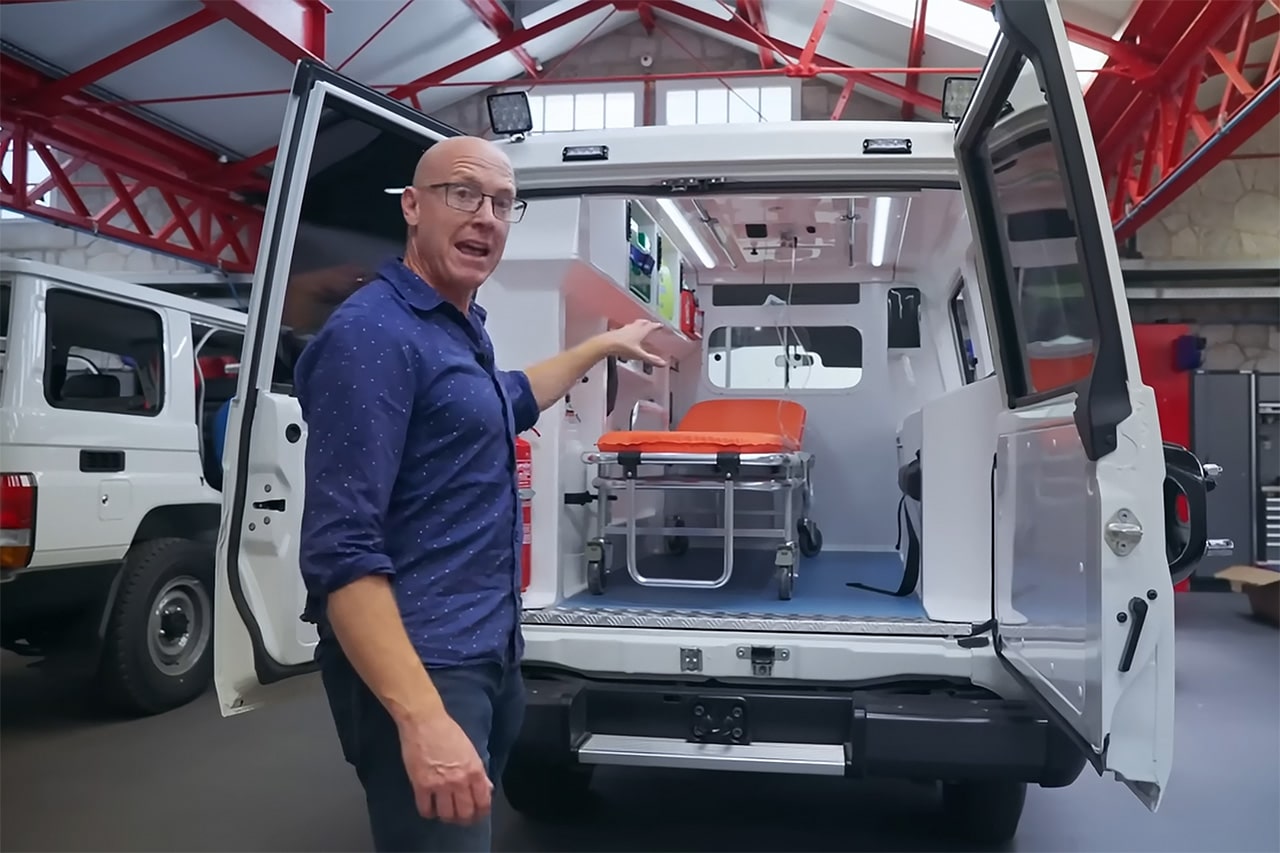
Toyota 4×4 trucks such as the Hilux and Land Cruiser have become renowned around the world for their ruggedness and durability. In nearly every modern armed conflict, you'll see combatants on both sides using these trucks, often with the bodies clad in camouflage spraypaint and a machine gun mounted in the bed (these are often referred to as technicals). However, they're also popular outside the military among humanitarian aid groups and other non-government organizations (NGOs). The United Nations uses thousands of Toyota trucks in third-world nations every year, often with specific upgrades such as heavy-duty bumpers, snorkels, winches, and radios. A little-known company called Toyota Gibraltar Stockholdings (TGS) stepped up to meet this need, shipping approximately 650 white Toyotas per month to war-torn and disaster-affected regions around the globe.
A recent video segment from the BBC show Top Gear gave us a sneak peek at the Toyota Gibraltar facility, which resides in the tiny 2.6-square-mile British territory at the southern edge of Spain. This is an optimal location for distributing the white Toyotas, since half of the world's seaborne traffic passes through the Strait of Gibraltar between the Atlantic Ocean and the Mediterranean Sea.
Much like the scene from Raiders of the Lost Ark where the camera zooms out to show a nearly-endless sea of wood crates, this BBC video shows multiple parking garages crammed with a mind-boggling number of identical white Toyotas. At the time of filming, there were more than 1,000 of these vehicles on-site.
The most common vehicle at Toyota Gibraltar is the venerable 70-Series Land Cruiser. The base vehicles are spartan, with cloth interiors and manual locks. Most of them are fitted with all-terrain tires, upgraded bumpers, roof racks, snorkels, spare tire carriers, jerry cans, dual batteries, and other off-road-oriented upgrades. This custom work is done by in-house mechanics at TGS, using items from storerooms stacked floor-to-ceiling with parts.
Depending on the needs of the customer, TGS can build fully-outfitted ambulances or search-and-rescue vehicles. The video also shows some more specialized vehicles, such as a green Land Cruiser built for anti-poaching operations in Africa and a white Corolla built with shatter-proof film on the windows (likely for transporting aid workers through dangerous cities).
This leads to a question. Given the obvious demand for these trucks in armed conflicts, there's a lot of money to be made by selling to less peaceful clientele. So, does Toyota Gibraltar also build vehicles for militaries and warlords? The Top Gear host explains, “They do not do armor plating here. This is not the sort of place you can go for a military-specification vehicle. Toyota and the UN do not want to be involved in that sort of business.” We'll let you draw your own conclusions from this statement, but it's hard to deny that Toyota has hinted at military applications of its trucks in the past.
If you've ever shopped for a discreet-looking every-day carry backpack, you've probably heard someone mention the Vertx Gamut. This series of packs has been around for several years, both in its original Gen 1 version and in the Gen 2 version that came out in 2019. These backpacks have also appeared in many of our Bag Drop gear loadout articles, such as Alexander Crown's Office Escape Bag and Joe Dawson's Personal Security Detachment Pack. So, we're glad to hear that the company has continued to refine this series with the release of the new Vertx Gamut Gen 3. This announcement also mentions 3.0 versions of other EDC bags, such as the smaller Commuter.
The new Vertx Gamut Gen 3 is currently available in four colors: black, olive drab, grey, and dark earth.
It's slightly bigger than the Gamut 2.0, increasing in capacity from 25 liters to 28 liters, but it retains the same core features — a padded laptop/ballistic panel sleeve, a 180-degree-opening main compartment, and a quick-access front flap that conceals a field of MOLLE-compatible webbing. The latter feature is where you'll find one of the biggest changes. The traditional-style nylon webbing has been replaced with a much larger area of Velcro laser-cut webbing. As always, the slick front flap can be stowed behind the MOLLE panel if you prefer to add external pouches or show off your favorite morale patches.
On the opposite side of the pack, the redesigned Rapid Access pull-tab can be relocated or interchanged with other zipper pull styles, depending on which compartment you need to open quickly. The CCW compartment is also half an inch deeper for easier access, and the side pocket water bottle retention has been improved. We're pleased to see that the slit-style sunglass pocket at the top of the Gamut 2.0 has been replaced with a medium-sized, full-zip pocket that should be great for storing snacks and other loose items.
While the Gamut 2.0 had permanently-stitched pen/knife/flashlight pockets inside the top of its main compartment flap, these have been replaced with plain Velcro material and a detachable Tactigami Double Admin Panel. This makes it easier to re-configure the storage for various sizes of items, such as pistol mags or a med kit.
The back of the Vertx Gamut Gen 3 has a new air channel material for improved breathability and airflow to the wearer's back. It also has the rolling luggage handle pass-through and stowable waist belt from the previous version.
Check out this video for a full walkthrough of the new features:
MSRP for the Gamut 3.0 is $265, and it's currently available on Vertx's web site. We hope to get our hands on this new Gamut in the near future, so stay tuned for more of our thoughts once we've worn and tested it.