Tailor-Made ARs: 11.5″ Suppressed SBR Build

When it comes to survival tools, there’s an old saying that “two is one and one is none.” The intent of this saying is to reinforce the importance of redundancy — if item A breaks or is lost, you still have item B. However, this logic also applies to diversifying the capabilities of your gear. To illustrate the point, let’s look at one of the most critical tools of all: a knife. You’ve probably already incorporated two knives into your survival kit, but it’s unlikely that they’re two identical knives. One may be a midsized fixed blade, highly durable and capable of heavy-duty chopping. Perhaps it’s a machete or an ax. The other is likely a smaller blade with a more precise edge that’s ideal for shaving tinder or skinning game; it could be a folding knife or a small fixed blade worn on a neck lanyard. Although there’s substantial overlap between the capabilities of these two tools, there are also tasks that each excels at. In addition to providing redundancy, they complement each other.

By this point, you should realize the same philosophy applies to other survival tools, including firearms. So, when the subject of building an ideal survival rifle came up, it led me to the realization that it’s possible the ideal tool isn’t one rifle. I’d argue that it’s two.

Photo by Tom Marshall

Editor’s Note: Welcome to the third and final part of our Tailor-Made ARs series, a conceptual approach to building task-focused, performance-driven rifles for emergency preparedness. Several RECOIL OFFGRID writers will each take a unique path to designing an idealized AR for survival and crisis response. We’ll examine how each weapon is tailored to the user, and how it can be creatively adapted to a multitude of dicey situations. We hope these builds reinforce the importance of choosing every component wisely with versatility in mind.

Interchangeable Uppers vs. Complete Rifles

In the beginning, I decided to start with my tried-and-true 11.5-inch short-barreled rifle (SBR) and simply build a second upper receiver for it. After giving this some thought, I wrote down the following pros and cons related to this one-and-a-half-rifle plan.

Pros:

  • It’s much less expensive than building two complete guns.
  • A spare upper is lighter and easier to carry than a second rifle.
  • Since I’m starting with a registered SBR, I can run sub-16-inch barrels, a stock, and a vertical foregrip.

Cons:

  • No true redundancy. If something goes wrong with my only lower receiver, both uppers are rendered useless. Also, in a group survival setting, I wouldn’t have a second functional rifle to hand to a friend or family member.
  • Less specialization. With only one lower, I’ll need to pick a configuration that’s suitable for both uppers. This means I won’t be able to fine-tune the buffer system, trigger, grip style, and stock shape for each setup.
  • Inconvenience. A separate upper is harder to keep clean and lubricated, since the underside of the bolt carrier is exposed to dust and lint. It also takes a few seconds to retrieve an upper, pop the pins, and switch receivers. In time-sensitive situations, that may be a problem.
  • Compatibility. If you’re running Mil-spec receivers, you shouldn’t have this concern unless one is out of spec. But, in my case, my SBR was built with a matched billet receiver set from Ascend Armory. When I attempted to install an Aero Precision M4E1 stripped upper, I noticed it was impossible to install it due to the lower’s large ambidextrous bolt catch. Some will see this as a reason to only run Mil-spec parts, but there are two sides to that argument, as I’ll explain later.
  • It’s a registered SBR, so I have to file an ATF 5320.20 Application to Transport NFA Firearms form any time I travel with it outside my home state.

As a result of these considerations, the plan to use one lower and two uppers was scrapped, and I decided to build two complete AR-15s.

Similarities and Differences

At this point, I had to decide how much overlap I wanted between the two weapons. On one side of the spectrum, I could have gone for maximum differentiation — for example, a precision bolt-action rifle and a personal defense weapon (e.g. short AR pistol or MP5K). This would allow both to be carried by one person comfortably but would also almost eliminate the overlap and redundancy in capabilities, as I mentioned earlier. Instead, I chose to build two rifles that share many characteristics but aren’t identical.

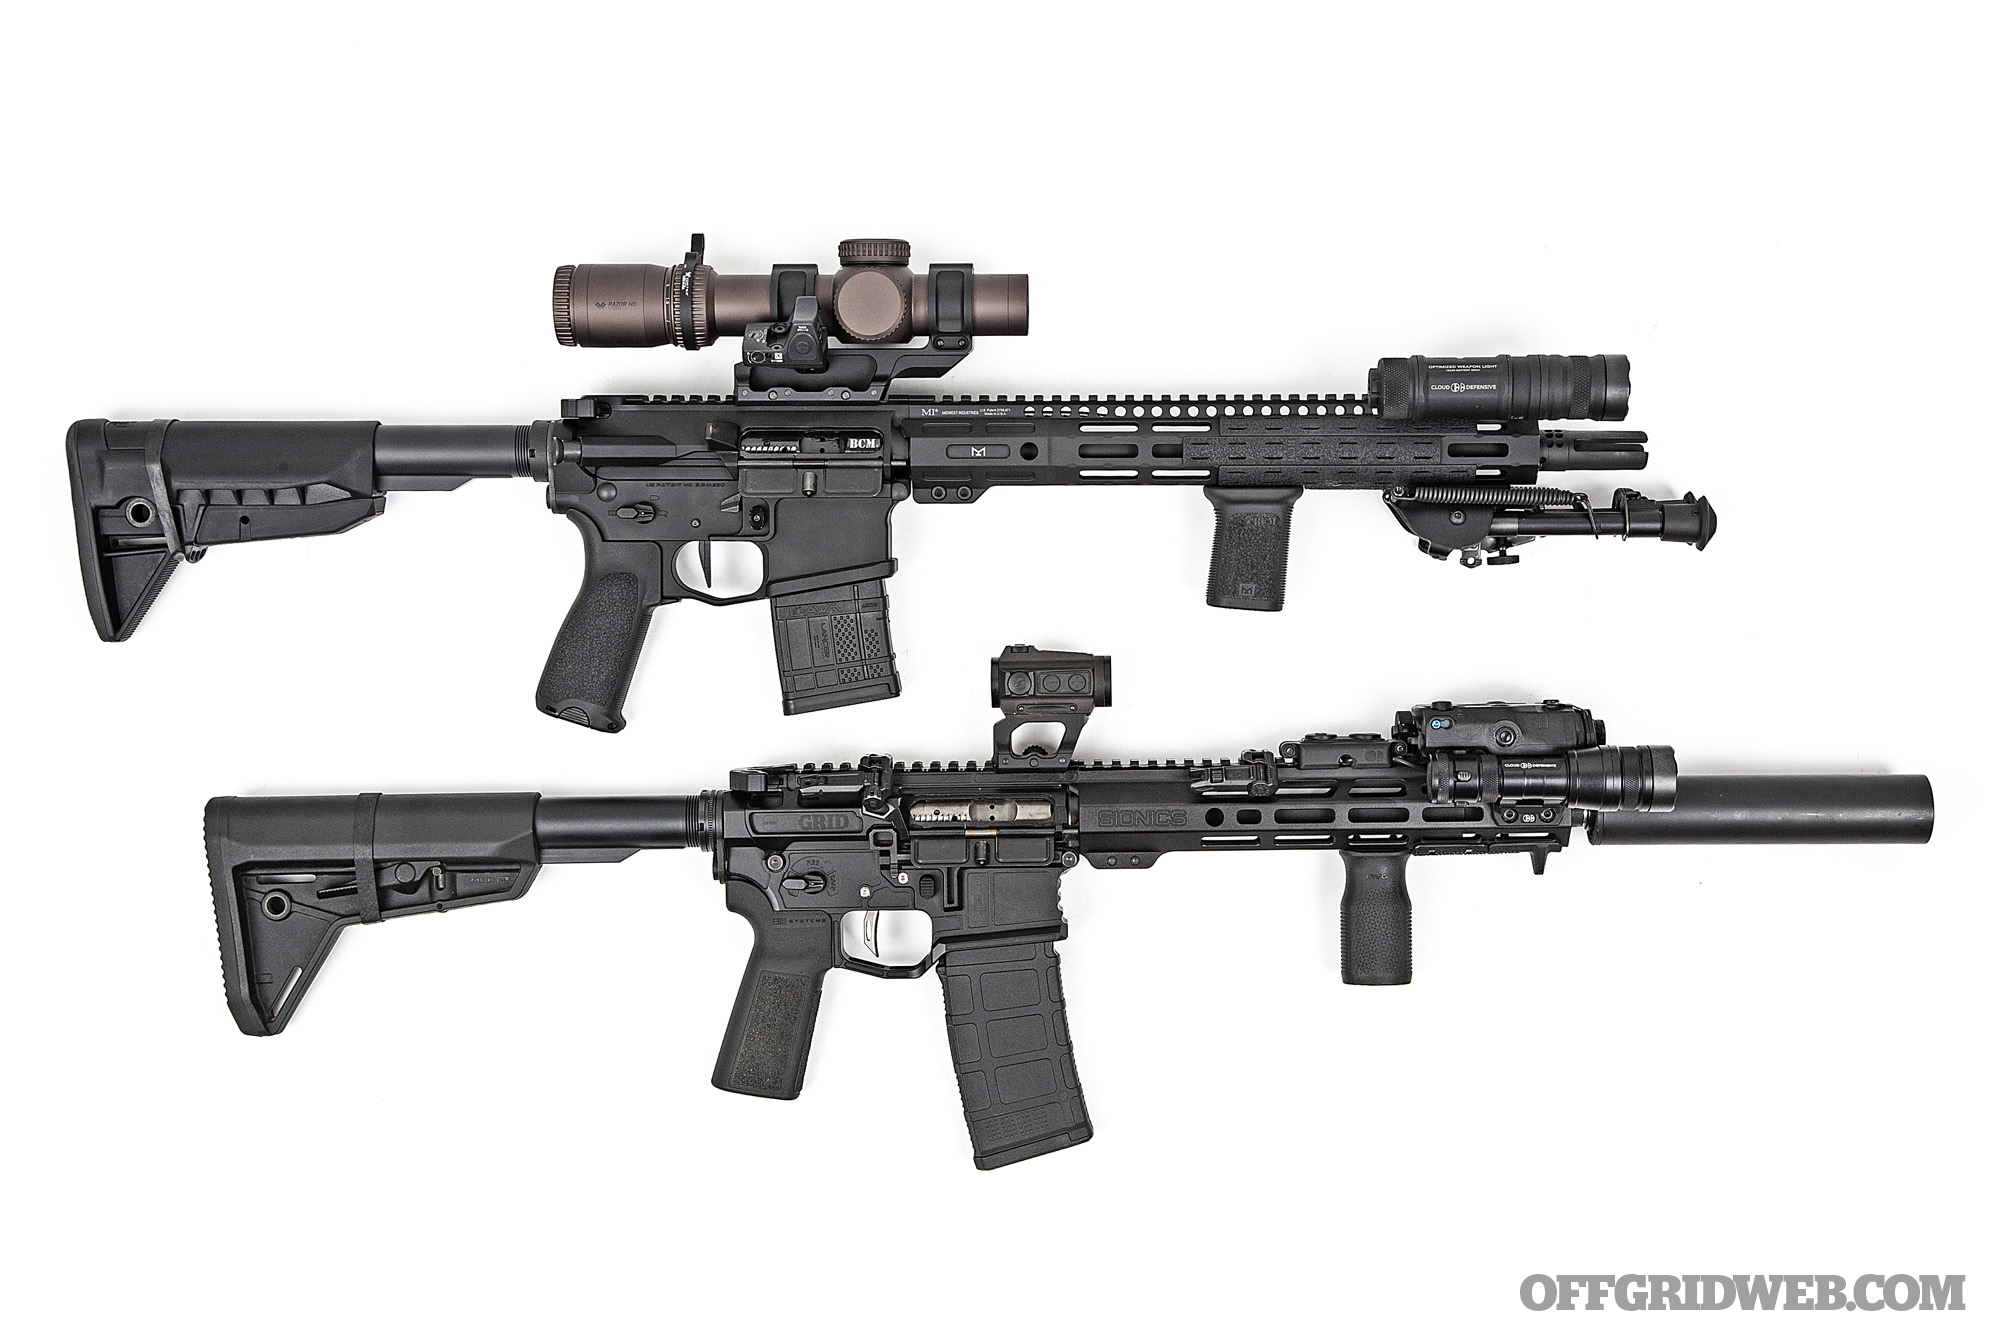
As far as similarities, both are AR-15s chambered in .223/5.56 NATO. This means I can share ammo, magazines, and critical moving parts (e.g. bolt carrier groups) between the two. I have a stockpile of .223/5.56 ammo already, and I know many of my friends and neighbors have their own supplies to share in the event that we need to pool resources. The manual of arms is virtually identical for both rifles, so anyone who has used an AR before should know how to operate them, maintain them, and clear malfunctions in the field. In a “take this and watch my back” group survival situation, that’s immensely valuable.

Differences are relatively limited and will be discussed in greater detail during the individual build sections. The CliffsNotes version is that the 11.5-inch rifle is optimized for close-quarters and night vision use, while the 13.9-inch rifle is optimized for medium-range precision and reconnaissance.

Read on as we look at the specs and components of each build.

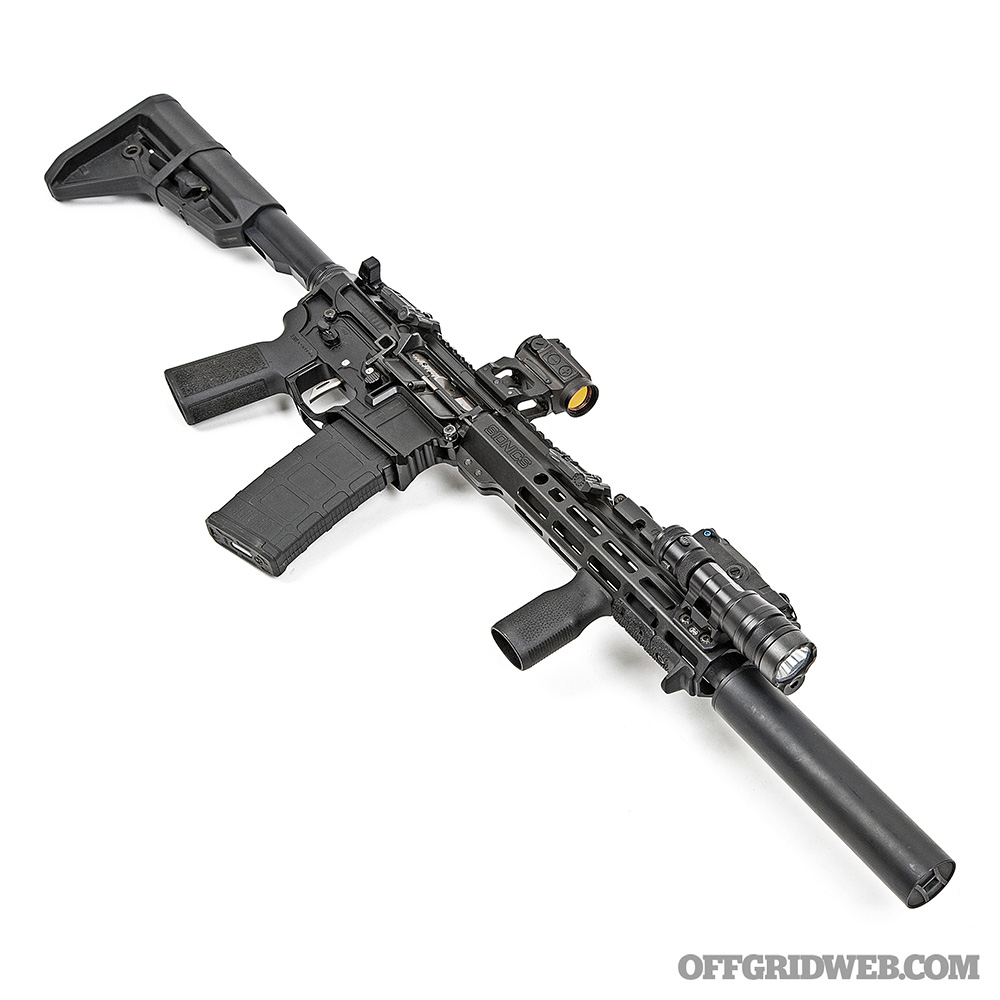
11.5-inch Suppressed SBR

Above: This Scalarworks 1.57 mount is lightweight, tall enough to clear my infrared laser, and can be installed and removed without tools. It fits a variety of optics that use the Aimpoint Micro footprint.

The earliest version of this suppressed SBR build was featured two years ago in Issue 48 of our sister publication RECOIL. Back then, it featured a few different parts and accessories, but the core components have remained mostly unchanged. It’s based on an Ascend Armory lightweight billet receiver set; it features ambidextrous bolt catch/release levers that are easy to find in the dark, a flared magwell to facilitate smooth reloads, and an enlarged trigger guard that won’t interfere with gloved hands. I filed an ATF Form 1 to designate this as an SBR before adding an 11.5-inch standard-gas-port carbine barrel, 10.5-inch M-LOK handguard, and easy-to-clean NP3-coated bolt carrier group, all from SIONICS Weapon Systems.

Since this weapon is intended for use in low light and enclosed spaces, the substantial flash and concussion from its short barrel had to be tamed. I addressed this with a Gemtech Quickmount flash hider and Shield titanium quick-detach suppressor. Gemtech says this suppressor has passed the U.S. military’s SOCOM standards, which involve more than 1,400 rounds fired in semi-auto and full-auto over a short period of time, so I have no concerns about its durability. The quick-detach system also means I can remove it in seconds to fit the rifle into a smaller bag.

Above: Billet receiver sets often diverge from Mil-spec standards to improve ergonomics or add features. This Ascend Armory set has enlarged bolt catch/release levers on both sides.

The lower receiver was previously set up with a LAW Tactical folding stock adapter, but I found I rarely needed it given the short length of the gun, so I removed it to shave some weight. I’m still using the VLTOR A5 buffer system, which allows the SBR to cycle smoothly and reliably, suppressed or unsuppressed, with a variety of ammo types (a key consideration for any scenario where ammo may be hard to find). The lower also contains a RISE Armament RA-535 trigger, which offers a crisp 3.5-pound break and near-immediate reset, and a Radian Talon 45-degree ambidextrous safety selector. This combination allows me to send the first round downrange the instant my sights are on target and maintain a fast and consistent cadence of follow-up shots. The charging handle is a Radian Raptor-SD, which is designed to make shooting a suppressed AR more comfortable. It features ports and angled relief cuts that divert gases inside the upper receiver, so they don’t end up seeping out and causing my nose to sting and eyes to water.

Lights & Lasers

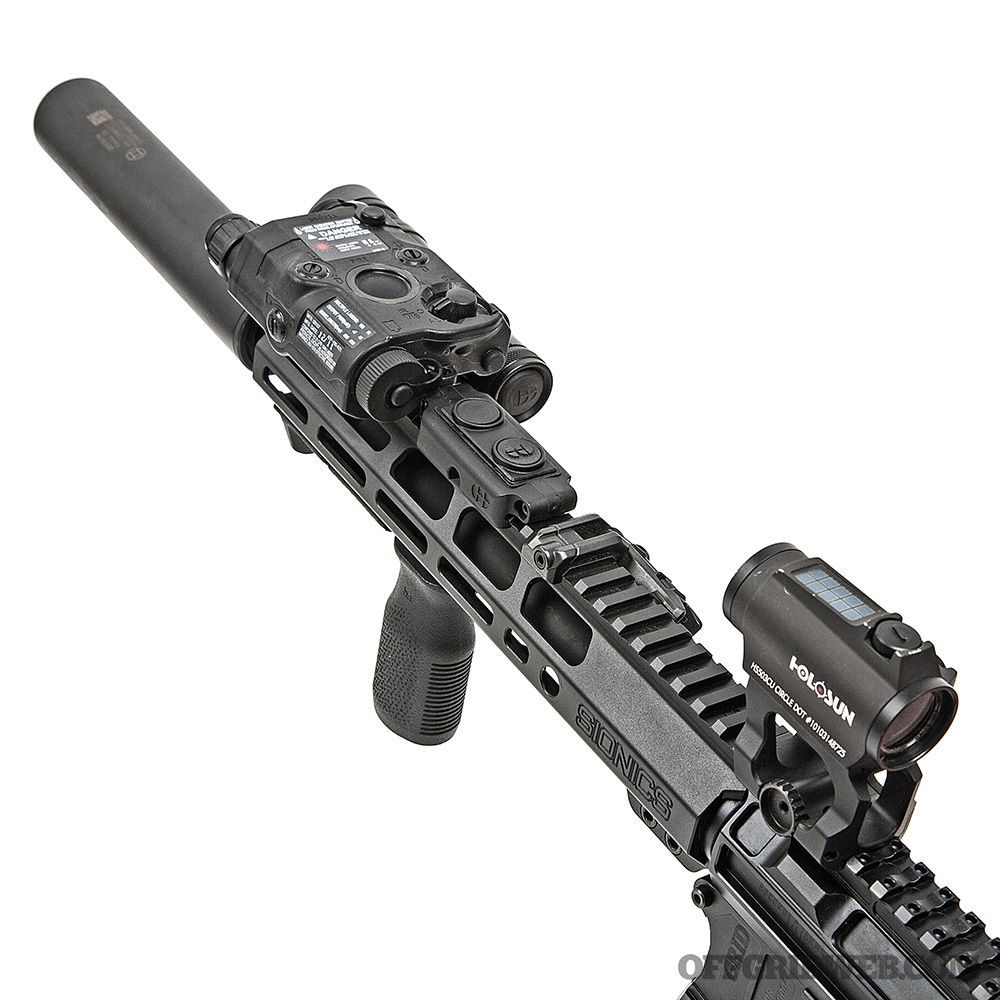
Above: I mounted the REIN light at 2 o’clock on the handguard using Cloud’s Torrent Offset M-LOK mount; clearance is extremely tight against the ATPIAL housing. The REIN remote switch is also so close to the back of the ATPIAL that I had to file it down to clear the battery cap. A tight squeeze, but it works well.

I believe every serious defensive weapon — rifle, shotgun, or pistol — needs a visible light source to help the user positively identify targets. Nature shows us that predators avoid settings where prey can see them clearly, so you’re more likely to face a threat in twilight or total darkness than broad daylight. For this SBR, I picked a Cloud Defensive REIN Micro. It produces 1,300 lumens and 55,000 candela; in layman’s terms, that’s a whole lot of light focused into a beam that’s capable of reaching a long distance. I mounted the included remote switch to the top rail on the handguard and used its built-in cable routing channel to keep excess slack tucked out of the way. In case of switch damage, the light’s tailcap button functions as a redundant activation method.

Since this gun is intended for use with night vision, it also needed an infrared (IR) illuminator and an IR laser for active aiming (firing from a head-up position without looking through weapon-mounted sights). I fulfilled both these needs with an L3Harris ATPIAL, also known by its military designation AN/PEQ-15. The ATPIAL features a red laser for daytime zeroing, an IR laser, and a laser-based IR illuminator with adjustable focus. Although a remote switch is included, I found that I prefer using the button on top of the unit, since it’s easy to reach with my thumb.

Optic & Iron Sights

Anyone who has attempted to shoot while wearing night vision goggles (NVGs), a helmet, and electronic earmuffs knows that it’s often challenging to align your eye with a weapon’s optic (referred to as passive aiming). Switching to a taller optic mount can alleviate this, but there are some drawbacks — increased height over bore can cause rounds to impact lower than expected at close range and may lead inexperienced users to inadvertently shoot the edge of a barricade after forgetting that the muzzle is several inches below the sight.

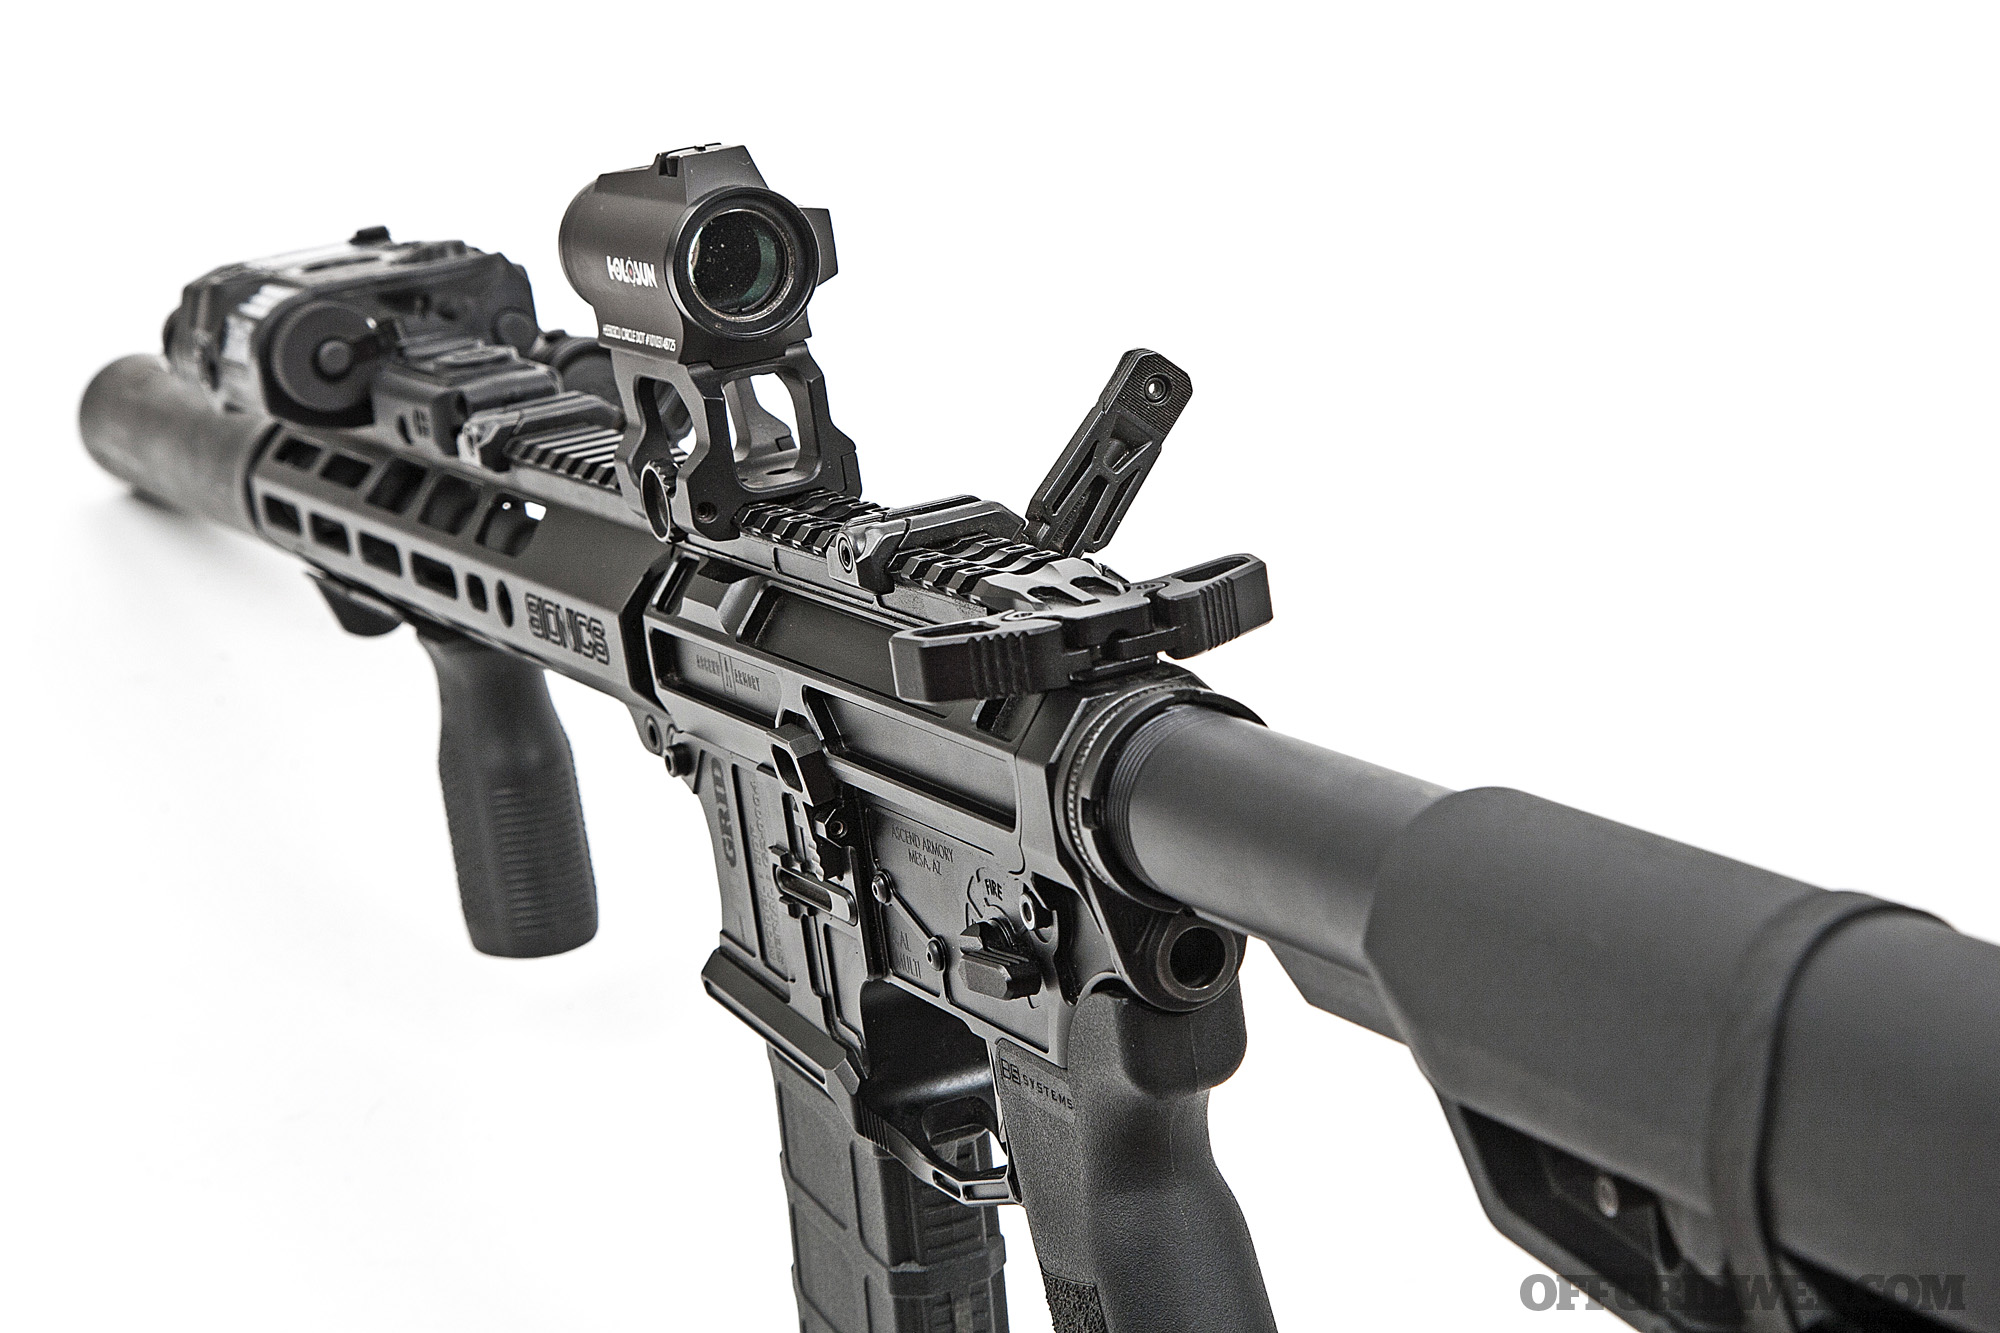
Above: The Holosun red dot has proven itself to be dependable, but a set of Magpul offset iron sights provide a secondary means of aiming just in case. The ATPIAL’s red laser could also be used in a pinch.

In search of a happy medium, I chose a Scalarworks LEAP/01 1.57-inch-height mount. With the Aimpoint Micro optic it was designed for, this would produce a lower-1/3 cowitness with iron sights. However, the Holosun 503CU optic I’m using is about 0.25-inch taller than an Aimpoint. As a result, the centerline of the optic is 1.82 inches above the rail. Based on these measurements, Scalarworks’ taller 1.93-inch mount would result in a centerline height of 2.18 inches, which was more height than I wanted. Technical details aside, this setup offers a comfortable and easy-to-acquire aiming point, whether I’m working in broad daylight, low light, or under NVGs.

As a backup to my red-dot optic, I installed a set of Magpul MBUS Pro Offset 45-degree flip-up iron sights.

Furniture

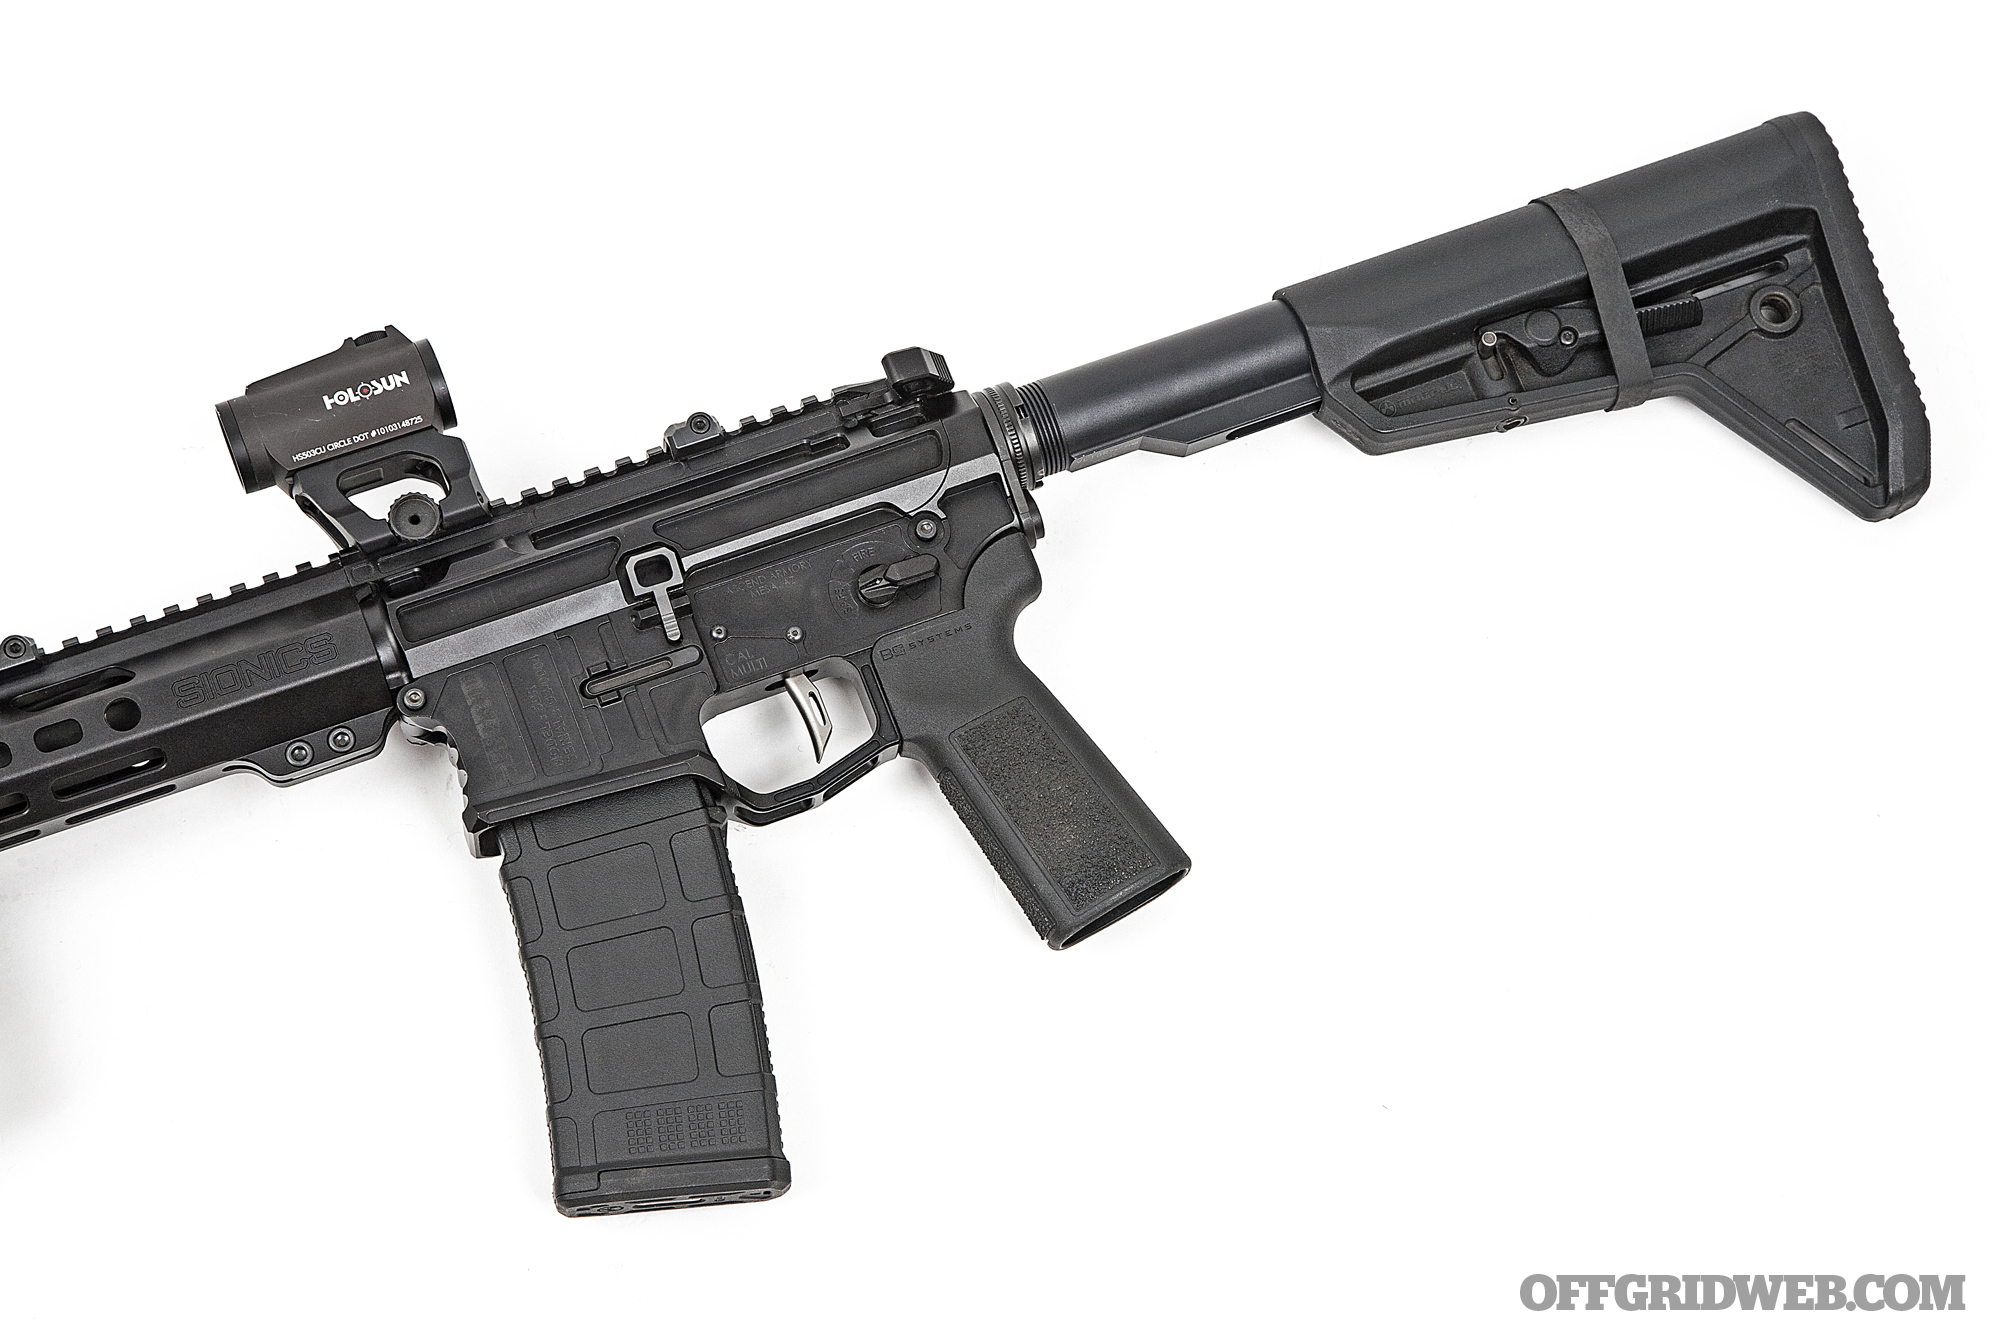
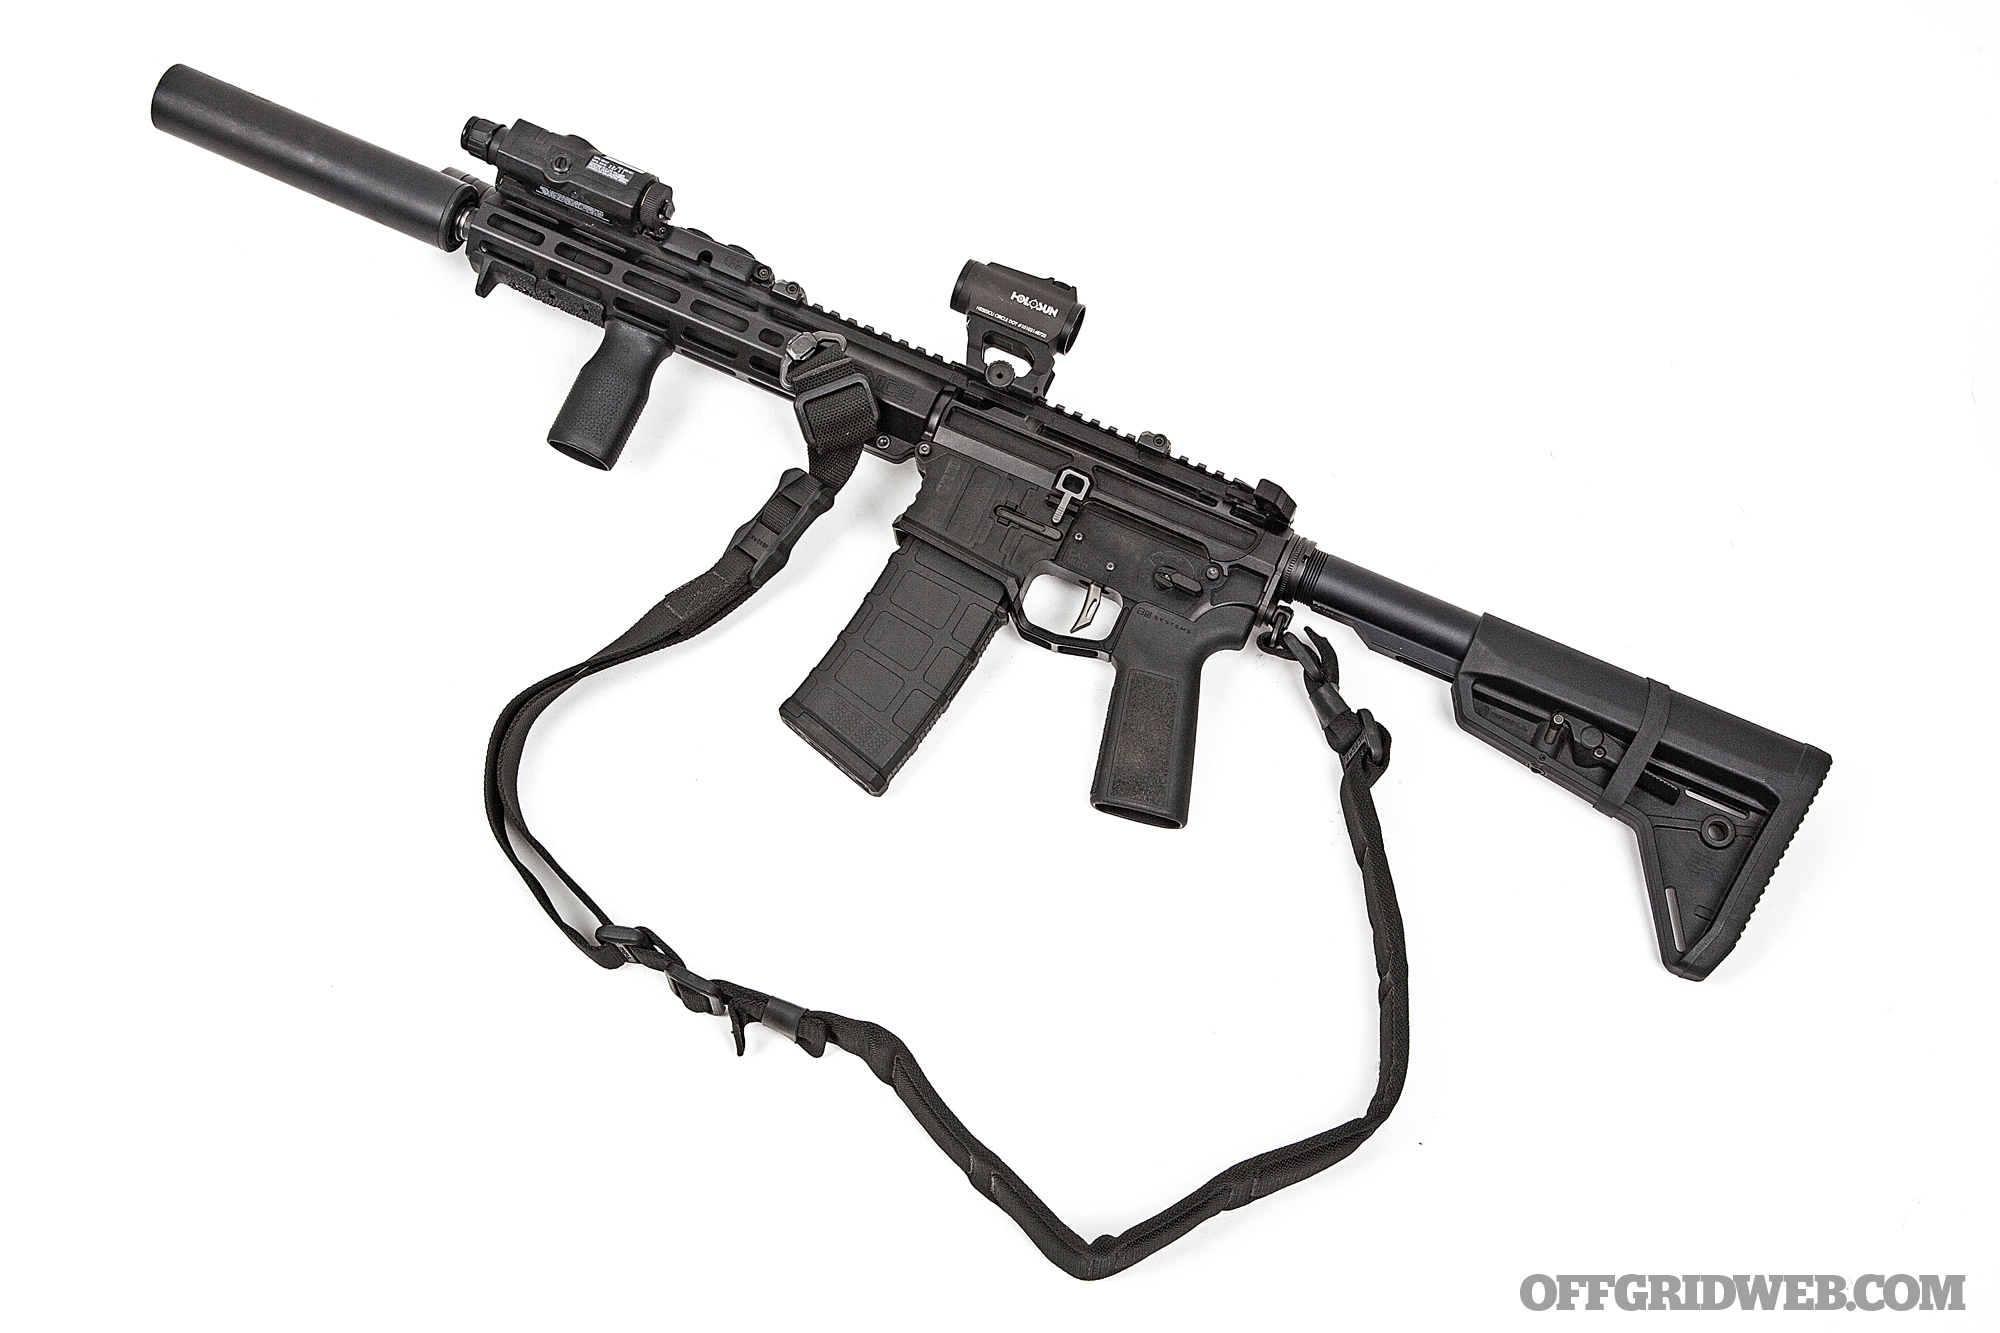
Above: A slender MOE-SL stock prevents the rifle from interfering with helmet-mounted ear protection. It also stays out of the way of my plate carrier.

As I mentioned above, achieving the proper head position for passive aiming under NVGs is tricky, so I chose the slim Magpul MOE-SL stock to minimize interference with my helmet and ear pro. A B5 Systems pistol grip offers aggressive texture and a steeper, more comfortable angle for my wrist. On the handguard, I combined two-thirds of a Magpul M-LOK Hand Stop kit with a Magpul MVG vertical grip; the result is a textured surface with front and rear stop points for my support hand. Tactile index points are especially important for a night vision application, since I need to be able to manipulate the rifle and find its light/laser controls immediately, all while wearing gloves and being unable to clearly see my hands.

The last piece of this rifle is a Magpul MS1 padded sling, which is connected to QD sockets on the rear of the handguard and the Primary Weapons Ratchet Lock receiver endplate. The sling’s hard polymer adjustment slider is easy to find by feel in the dark. When it’s not in use, I stow it against the stock via a band of bicycle innertube (aka Ranger band).

Editor's Note: Stay tuned for the second half of this article tomorrow, featuring all the details on our 13.9-inch pin and weld rifle.


New: Prometheus Design Werx SPD X MKII Paradive Watch

Although modern smart watches are convenient, we'll always have a soft spot for classic analog watches. They have one job, and they do it well. More importantly, they're durable and reliable in a way that even the best smart watches can't achieve. The new SPD X MKII Paradive watch is part of Prometheus Design Werx‘s Special Projects Division (SPD) line, and it features an origin story steeped in military history. The company calls it a “modernized version” of the US MIL-W-50717 dive watch, an item that was reportedly issued without military markings to members of US Special Forces and CIA maritime units from the 1960s through the early '80s.

The original MIL-W-50717 dive watch was not available commercially, so the only way for civilians to get one was secondhand. This SPD X MKII Paradive stays true to the original look, but offers updated materials and is available to the general public. It's based on an SII NE15 automatic movement in a 316L stainless steel case, finished with a double-domed sapphire crystal with anti-reflective coating. It also has an elapsed time bezel for tracking time spent underwater, and is waterproof to 20 ATM (660 feet).

Unique touches on the SPD edition of this MKII watch include an SPD Kraken Trident insignia, orange-tipped second hand, and PDW logo and serial number engraved on the case back.

Additionally, each SPD X MKII Paradive watch includes a fitted case with black and OD green PDW Ti-NATO straps and an Expedition Watch Band Compass Kit. MSRP for the first 50 watches will be $955.

If you've got deeper pockets, there will also be an exclusive Full Set as seen above, limited to 5 units. This Full Set includes a custom Loveless-style Chute knife by Wesley Liversage, and will be available for $1,575.

The SPD X MKII Paradive watch and Full Set will be released at 1200 PDT on July 4th. For more information, go to prometheusdesignwerx.com.


Gear Up: New Survival Gear for June 2022

ACLIM8 Combar Foldaxe

NOTES
It’s a bird, it’s a plane, it’s a nearly indestructible three-in-one folding ax, and potentially the Superman of multi-tools. Born from a fusion of the need for adventure and the creators’ experience while serving in the Israeli Special Forces, the Combar combines strength, toughness, and versatility. The Foldaxe features a highly durable design, with the handle’s body composed of glass-reinforced polymer and an over-molded head for a strong, safe head and shaft connection. Understanding that most outdoorsmen typically don’t need a full-sized ax, the Foldaxe instead features a hatchet-size blade to tackle the most common tasks around the campsite. And as if an indestructible hatchet hammer wasn’t enough, the Combar can store a knife, a folding saw, and small storage container, eliminating the need to carry a stack of extra tools.

MODELS
Titanium, Foldaxe Pro, Pro Titanium

MSRP
$199

URL
aclim8.com

Garmont T4 Groove G-Dry Boots

FUNCTIONALITY
Hiking Multi-Terrain

MSRP
$140

URL
garmont.com

NOTES
Bridging the gap between a comfortable, everyday shoe and a serious all-terrain hiker, Garmont proves there doesn’t have to be an aesthetic sacrifice between the two. With a 1.6mm suede leather upper, the FrameFlex footbed boasts a lightweight construction that combines excellent midfoot stability with effortless front flexion for enhanced comfort when walking. Garmont’s G-Dry technology features a membrane that’s both waterproof and windproof, keeping your toe beans dry even on the wettest of days. With a balance of breathability, lightness, protection, and stylish looks, this is a great pair of footwear that walks the urban-rural line with ease.

Meopta MeoPro HD 8×56 Binoculars

MODELS
MeoPro Air, MeoSport, MeoStar, Optika LR, Optika HD

MSRP
$699

URL
meoptasportsoptics.com

NOTES
Not all binos are created equal, and that’ll be glaringly apparent the first time you look through the MeoPro HD. High-definition, extra-low dispersion, fluoride objective lens elements eliminate chromatic aberration or color fringing in challenging lighting conditions and deliver pinpoint resolution, increased contrast, and vivid color fidelity. The 56mm HD objective lens makes it a powerful optic in both bright and low-light conditions. Meopta’s proprietary ion-assisted lens multi-coating is applied to all air-to-glass optical surfaces, which eliminates distorting glare and reflections, and delivers an industry leading 99.8-percent light transmission per lens surface. One hundred-percent guaranteed to be submersible and protected against the elements. Once the focus is dialed in, it’s more akin to a high-resolution telescope than your run-of-the-mill binos.

Wiley X Waterfall Women's Jacket

STYLE
Softshell

MSRP
$129

URL
wileyx.com

NOTES
Technical clothing is easy to overthink, but Wiley X has created a jacket that’s beautiful in both simplicity and design. The women’s Waterfall Jacket is perfect for those cooler days above freezing when you want a little extra warmth without overheating. It features a two-toned gray design, full-zipper with quilted front and back panels, water-resistant film insert, and 100-percent polyester microfleece lining to keep you both dry and cozy. This trend-right performance jacket is a hard-to-beat combo of light insulation on the torso and stretch knit fabric on the sleeves for better mobility. The Waterfall jacket is also great for layering in cooler weather. Adjustable-fit locking draw cords at the hem ensure optimal ventilation and temperature control, and the bindings at the cuffs provide extra warmth.

DICEROX Lagertha Knife

MODELS
Fenrir, Kalina

MSRP
$413

URL
dicerox.com

NOTES
This blade is named after the Viking Shield-Maiden who once ruled what’s now Norway; a woman warrior so fierce, she had Ragnar fighting bears just to win her over. Lagertha, in the Viking tradition, is inspired by the saxe design, and is a versatile bushcraft knife made from premium components. Unlike many stamped-steel blades, Dicerox puts all the love and care you’d expect from small-batch, custom-made knives. The blade itself is Uddeholm Vanax steel, which is renowned for its strength and resistance to corrosion. Oak handle slabs are sourced locally from Swedish forests and processed with care by an ex-furniture-maker turned bladesmith. Swedish hide, vegetable-tanned sheaths are handmade by Dicerox and constructed from the remnants of a local saddle maker, ensuring no two sheaths will be the same. This is an heirloom-quality blade, made to outlast the one who holds it.

Fenix LR80R Rechargeable Searchlight

LUMENS
18,000

MSRP
$472

URL
varusteleka.com

NOTES
If there were a king of the flashlight mountain, the LR80R would be a promising candidate. Built to withstand punishing conditions, this light can produce 18,000 lumens, creating a beam that reaches as far as 1,130 meters (nearly three quarters of a mile). Its USB-C rechargeable 7.2V/12000mAh Li-ion battery pack fully charges in approximately four hours and eliminates the need to carry extra batteries. Its 3.6-pound weight can be easily supported with the included shoulder strap, which can also be swapped out with a hanging ring in case you need it to illuminate a single area. Two output modes — low (300 to 1,000 lumens) and high (3,000 to 18,000 lumens) — ensure only the required amount of energy is being used. The light will run for approximately 300 hours in Eco mode, and the USB-C ports can be used to charge devices from the light’s battery.

5COL Survival Supply Mini Survival Kit – ESEE Knives

DIMENSIONS
3.75 by 2.25 by 0.75 inches

MSRP
$35

URL
5col.com

NOTES
Take your mint-tin survival kit to the next level with 5COL’s Mini Survival Kit. Everything included in the kit was designed to fit perfectly within the confines of a container the size of a deck of cards. This makes it ideal to stow in a hiking pack, roadside emergency kit, or in any number of EDC loadouts. It includes the foundational tools for survival basics like a ferro rod with striker and waxed tinder, button compass, and signal mirror. After the fire is started, catch some food with the provided fishing tackle, complete with several sizes of barbed hooks, fishing line, sinkers, and a weighted jig. To top it all off, there's about 10 feet of nylon cord, about 10 feet of snare wire, a sheathed razor, and a button light with a mini carabiner.

Survivor Filter Ultra Lite Active All Terrain Bottle

CAPACITY
1 liter

MSRP
$45

URL
survivorfilter.com

NOTES
Survivor Filter is releasing a lightweight performance bottle that’ll keep you and your loved ones safely hydrated during your next outdoor excursion. After many years of feedback from customers regarding the previous version of this filtration bottle, Survivor Filter has created an improved bottle and an improved carrying case. This model features a Nalgene bottle and a water-resistant carrying case. As many of you know, Nalgene is BPA free, leaves no aftertaste, and is virtually indestructible. This system is also a win for the environment, as all the packaging is made with 100-percent recycled materials, printed with soy-based inks, and naturally biodegradable. The Active All Terrain Bottle has a filter capable of safely processing up to 25 gallons of untreated water, and it can remove any residual contaminants from up to 100 gallons of municipal tap water.

Brunton TruArc 20 Compass

MODELS
TruArc 3, TruArc 5, TruArc 7, TruArc10, TruArc 15

MSRP
$80

URL
brunton.com

NOTES
Being able to keep your bearing straight is a life-saving skill, and Brunton makes it possible with its most advanced baseplate compass. Its sighting mirror, quick-reference lid, and protective rubber foot that stores an array of map scales are just the tip of the iceberg. There are a ton of extra features that give this model more bang for your buck. The TruArc 20 has a Global Needle that tilts up to 20 degrees for balanced use across the globe, and a tool-free declination adjustment to quickly orient magnetic north to true north. Brunton’s EverNorth Magnet also resists demagnetization over time. A dual azimuth ring provides reverse azimuths, eliminating intersection and resection calculations. This particular model can also come with luminous readouts, making night navigation a breeze. Made in the USA, Brunton will keep you heading in the right direction, no matter where you are.

SunJack 25-Watt Foldable ETFE Monocrystalline Solar Panel Charger

OUTPUT
2 x 5V/2A USB ports

MSRP
$80

URL
sunjack.com

NOTES
Living off the grid doesn’t have to mean giving up electronic devices that can make life infinitely easier. Weighing in at just under 2 pounds, the SunJack Solar Panel Charger will keep lights, radios, phones, and any other USB chargeable device ready to go, even if the grid goes down. A weatherproof exterior layer improves performance and durability, making the Solar Panel Charger waterproof, shockproof, and dustproof. The panels fold easily and an integrated magnetic closure system keeps the panels closed during storage while eliminating the need for bulky straps. Its powerful 2 amps per USB port provides charging speeds that can approach those of a wall outlet and boasts a 95-percent UV permeability. Onboard technology intelligently identifies your device and maximizes charging speed to prevent overcharging. It’s an awesome accessory for outdoor adventures, a bad-weather prep kit, or for disaster and emergency situations.

Adventure Medical Kits MOLLE Bag Trauma Kit 1.0

WEIGHT
0.9 pound

MSRP
$55

URL
adventuremedicalkits.com

NOTES
Having a first-aid kit handy is a basic life-saving step, and Adventure Medical Kits makes it easy to be ready for most basic medical emergencies. Whether you’re in the field, at the office, or in the car, the MOLLE Bag Trauma Kit has a ton of supplies that can easily treat one person for several days. The 2-foot QuikClot dressing included in the kit helps stop life-threatening bleeding fast. Bandages, dressings, and medications enable you to address other wounds, bleeding, and fractures or sprains, all while keeping the patient comfortable as you make your way back to camp or await rescue. Included in the kit is a wide array of medications to treat pain, inflammation, and common allergies. The kit also comes with a Wilderness & Travel Medicine Guide, which includes over 50 improvised techniques and 100 illustrations for treating outdoor injuries and illnesses. Lightweight and with integrated MOLLE straps, the Trauma Kit 1.0 makes it easy to be prepared.

Gatorz Eyewear ANSI Z87.1 Milspec Ballistic Magnum

FRAMES
Boxter, Delta, Skyhook, Specter, Stark, Wraptor

MSRP
$300

URL
gatorz.com

NOTES
Sick of carrying around multiple pairs of ballistic eyewear, or a multitude of lenses to adjust to changes in light? Gatorz Eyewear saves the day by providing clear eye protection that automatically darkens when exposed to UV rays from the sun. This makes for a great glasses option when transitioning from indoor to outdoor, or vice versa, and allows the wearer to maintain eye protection when transitioning from day to night. The lenses are impact tested to withstand two hits from a .15-caliber projectile between 700 and 725 fps without cracking, shattering, or dislodging. An antifog coating keeps vision clear despite abrupt changes in humidity or precipitation. The lenses are oil and grease repellent and provide UV 400 protection. This may be the only pair of protective eyewear you’ll need.


DIY Disinfectants: How to Fight Diseases with Limited Resources

Maintaining the health of an off-grid community involves suppressing infections and keeping wounds clean. For these, you’ll need antibiotics to destroy bacteria within the body and antiseptics for use on the skin. More, however, is needed to assure you’ll avoid contamination that could lead to epidemic disease among your people: you’ll need disinfectants. A disinfectant is a substance used to eliminate disease-causing organisms (called “pathogens”) on inert surfaces such as countertops and medical instruments. If these surfaces aren’t disinfected, they can be teeming with germs. Contaminated instruments and sick room surfaces can get the entire group infected. The off-grid medic needs to have disinfectants on hand that can assure the health and safety of the people in their group.

Some disinfectants do double duty as antiseptics, but many are too harsh to apply to living skin, and, certainly, too strong for internal use. They work just fine, however, on work surfaces and other inanimate objects.

Disclaimer: This article is meant to be a brief overview and not a detailed guide on creating disinfectants. Seek professional medical help before attempting any of the steps outlined in this article.

Sterile vs. Clean

Above: Boiling water eliminates enough microbes to allow it to be used in wound care.

A significant factor in the quality of medical care given off the grid is the level of cleanliness of the equipment used. You may have heard the terms “sterile” and “clean.” What’s the difference?

When it comes to medical protection, “sterility” means the complete absence of microbes. Sterile technique involves hand washing with special solutions and the use of sterile instruments, gloves, towels, and dressings. The “sterile field” is isolated to limit contact with anything that could allow micro-organisms to invade it.

Above: Work surfaces must be regularly disinfected.

It’s very difficult to achieve a “sterile field” if you’re in a remote environment. In this case, we may only be able to keep things “clean.” Clean techniques concentrate on reducing, as much as possible, the number of microorganisms that could be transferred from one person or object to another. Work surfaces must, at least, be clean or they will increase the risk of infection. Organism-containing dirt or droplets from coughing or sneezing regularly contaminate these areas.

Once visible dirt is cleaned off a surface, disinfectant solutions may be applied for what is called the “contact time.” The contact time is the time that the disinfectant must remain visibly wet on a surface to ensure full effectiveness. This time period is based on the results of Environmental Protection Agency (EPA) testing. Instructions regarding contact times are usually printed on the product label. The maximum contact time for a Food and Drug Administration (FDA)-approved disinfectant cannot be more than 10 minutes.

Widely Available Disinfectants

Many commercial disinfectants will be scarce in a long-term disaster. There are some widely available options, however, that can be stockpiled or improvised. Be aware that each type may vary in its effectiveness against specific organisms.

ALCOHOL
From the medic’s standpoint, the two alcohol compounds useful for disinfection are ethyl alcohol and isopropyl alcohol. These alcohols kill bacteria rapidly, although they may not be enough to destroy “spores.” A spore is a resistant form adopted by some bacteria in adverse conditions.

Above: 80-proof liquor is only 40-percent alcohol, not enough for disinfectant purposes.

Alcohol has the benefit of also being effective against viruses, fungi, and variant types of bacteria such as tuberculosis. As a disinfectant, however, alcohol’s action drops sharply when diluted under 50 percent. The optimum bactericidal concentration is 60 to 90 percent in water. The amount found in liquid hand sanitizers is usually 60 to 70 percent. A bottle of rubbing alcohol usually contains 70 percent. The amount found in 80-proof whiskey is only 40 percent, thus failing the criteria for a potent disinfectant. When spirits must be used as disinfectants, most choose 100 proof (50 percent) vodka kept wet on a surface for at least 30 minutes.

Above: Hand sanitizers should contain at least 60- to 70-percent alcohol.

The risks of using alcohol compounds to sterilize instruments include eventual damage to rubber, plastic, and other parts. Another issue is the flammability: They must be stored in a cool, well-ventilated area. Alcohols also evaporate rapidly, so you must have enough to fully immerse an instrument you want to disinfect.

CHLORINE SOLUTIONS
Chlorine solutions made from sodium and calcium hypochlorites can be powerful disinfectants. Sodium hypochlorite is available in liquid form as household bleach; calcium hypochlorite is available in various solid pool-cleaning products. Both quickly eliminate a broad array of microbes, don’t leave toxic residues, and are relatively inexpensive. Extended-release chlorine dioxide is another option which has a more prolonged effect.

Above: One part household bleach in nine parts water yields a strong disinfectant solution.

Hypochlorites are widely used for disinfecting. A 1:10 dilution of standard household bleach has been recommended for decontaminating blood spills. Full-strength bleach has been recommended for self-disinfection of needles and syringes used in needle-exchange drug programs.

In addition to skin and eye irritation, chlorine solutions can produce corrosion in plastic and metal instruments over time. When mixed with ammonia, it can produce a toxic gas.
Another issue with chlorine solutions is their longevity. If stored in an opaque container, they can last several months to a year. Left out in the open, however, they lose potency very quickly.

To make a chlorine solution with the pool cleaning agent calcium hypochlorite:

  • Add 1 heaping teaspoon of calcium hypochlorite granules to 2 gallons of water and stir. This makes a “bleach” solution.
  • Then, add one part of “bleach” solution to nine parts water to make a disinfecting solution for surfaces and instruments.

FORMALDEHYDE
Formaldehyde is sold as a water-based solution called formalin, which is 37-percent formaldehyde by weight. The solution kills bacteria, fungi, viruses, and spores.

Varying concentrations of aqueous formaldehyde solutions are needed to destroy different microorganisms. For example, almost all viruses are inactivated rapidly with a 2-percent formalin solution. Higher concentrations and longer exposures are needed for certain bacterial spores, like anthrax.

Formaldehyde is highly toxic to living tissues. Ingestion can be fatal. Long-term exposure to low levels in the air or on the skin can cause asthma-like symptoms and skin irritation. One advantage of formalin is a relatively long shelf life of at least two years.

HYDROGEN PEROXIDE
Hydrogen peroxide has good germicidal activity against bacteria, viruses, spores, and fungi. The drug store version is 3-percent concentration, but stronger versions of food-grade hydrogen peroxide are available.

Above: Hydrogen peroxide mixed 1:1 with water can be effective.

The time required for inactivating common-cold viruses using a 3-percent hydrogen peroxide solution is about six to eight minutes. For disinfectant purposes, a 7-percent concentration works more rapidly. Toxicity is not usually an issue unless ingested. In fact, a 1:1 dilution of household hydrogen peroxide and water has been used as a mouth rinse.

Under normal conditions, hydrogen peroxide is extremely stable when stored in dark or opaque containers, lasting three years or more if unopened (six months if opened).

IODINE SOLUTIONS
Iodine solutions have been used by health professionals primarily as antiseptics on skin or tissue. Iodophors, on the other hand, have been used both as antiseptics and disinfectants. An iodophor is a combination of iodine and a “carrier”; the resulting complex provides a sustained-release reservoir of iodine and releases small amounts of free iodine in water. The best-known and most widely used iodophor is povidone-iodine, a compound of polyvinylpyrrolidone with iodine.

Above: Betadine, a combination of iodine and povidone, has been used as a disinfectant and antiseptic.

Betadine is the most well-known iodophor brand. It’s used most commonly as a 10-percent solution which contains only 0.001-percent free iodine. This product retains the germicidal activity of iodine, but is relatively free of toxicity if not ingested.

“Free” iodine is the main contributor to the bactericidal activity of iodophors. Surprisingly, a dilute iodophor demonstrates more rapid bactericidal action than does a full-strength one! The reason is not entirely clear, but dilute solutions seem to cause more free iodine to emerge.

Povidone-iodine solution has a published shelf life of two to three years. Unopened bottles may last longer.

Other Disinfectants to Consider

Above: Various common household products can serve as disinfectants.

While not as powerful in antimicrobial action as commercial disinfectants, certain natural products have beneficial action against germs:

  • White Vinegar: Thanks to its acidity, white vinegar removes molds and mildew and has some antibacterial activity. Vinegar works for those who want a non-toxic cleaning option.
  • Lemon: The citric acid in lemons works to eliminate debris like soap scum from surfaces. Lemon juice reduces bacteria on hard surfaces, but is less effective than both vinegar and commercial cleaners.

Above: Vinegar has been used as a disinfectant, but isn’t as strong as some others.

  • Essential Oils: Essential oils have a wide range of medicinal properties; some can be used as a disinfectant and can enhance the cleaning properties of soap. Tea tree oil, in particular, has been used as an antibacterial agent in fish ponds; citronella, germanium, and lemon grass are other options.
  • Steam: Combining water and heat produces an economical, chemical-free disinfectant. Steam from boiling water can eliminate debris and disinfect surfaces and instruments. Hospitals use machines called “autoclaves” for this purpose.

Pressure Cookers –  An Autoclave Alternative

Above: Instruments can be disinfected using a pressure canner.

You won’t have an autoclave, but having a pressure cooker/canner as part of your supplies will allow instruments to achieve the level of sterility required for minor surgical procedures. You’ll need to achieve 15-20 psi (250 degrees Fahrenheit) for at least 20 minutes. Here's a step-by-step guide to using a pressure cooker to sterilize instruments:

  1. Wash and scrub instruments to remove any visible debris.
  2. Allow instruments to dry.
  3. Wrap instruments in aluminum foil (keeps clamps and scissors in an open position).
  4. Place a wire stand or steamer basket on the bottom of the pot to prevent water from touching foil-wrapped instruments. Another option is to use an uncovered mason jar to hold them.
  5. Add 1 to 2 inches of plain water to the pot.
  6. Run the pressure cooker at 15-20 psi for at least 20 minutes.
  7. Allow everything to cool gradually.
  8. Safely lift the lid to allow the steam to escape.
  9. Lower the lid to let instruments dry and cool inside the cooker.
  10. Once cool and dry, place foil-wrapped instruments inside plastic bags for storage purposes.

Pressure cookers, if used incorrectly, can cause severe burn and scalding injuries. Be sure to have a working knowledge and experience using them (read your manual).

Ultraviolet Radiation
A significant development in the quest to sterilize medical instruments off the grid comes from a recent study commissioned by the military. The study, published in the journal “Wilderness and Environmental Medicine,” explored the use of UVC light as a survival medical tool.

Above: Using UVC light as a disinfectant starts with scrubbing an instrument with chlorhexidine (Hibiclens).

In this study, instruments laden with MRSA and other bacteria were first scrubbed with Chlorhexidine (Hibiclens) antiseptic for 30 seconds and dried with a sterile gauze 4×4-inch pad. Then, a battery-powered ultraviolet C (UVC) wand was passed within 4 inches all over the instruments for 45 seconds.

Evaluation afterwards revealed a 100-percent reduction of bacteria and achieved levels of sterilization acceptable for use in the field. If the instruments were not used right away, rapid vacuum sealing extended the life of sterility.

Above: After cleaning with chlorhexidine, pass a UVC wand completely around the instrument for 45 seconds.

Strict attention to hygiene and disinfection will save many lives in the aftermath of a disaster. It takes someone willing to stockpile and improvise ways to keep their people healthy in such a scenario. If that person succeeds, a major catastrophe can be just a bump on the road, not the end of the road, for their family or group.

About the Author

Joe Alton, MD is a physician, medical preparedness advocate, and Fellow of both the American Colleges of Surgeons and OB/GYN. He is the author of the Book Excellence Award winner in medicine, The Survival Medicine Handbook: The Essential Guide For When Help Is NOT On The Way and other books. He is also the designer of an entire line of quality medical kits at store.doomandbloom.net and altonfirstaid.com.


Preparedness Lessons from the Uvalde Mass Shooting

Uvalde — growing up in the Hill Country of Texas, I spent many summers there. I’d describe it as an “Any Town USA.” Quiet, neighborly, everyone waved. Those are my memories as a young boy in this peaceful South Texas town. Move forward forty-plus years to that Tuesday morning in May. As information began to surge on the networks, my mood instantly changed when I saw the headline announcing the Uvalde mass shooting. My home state. My neck of the woods. Suddenly, the distant images of playgrounds, gymnasiums, churches, restaurants, and houses of old friends became flashbacks. Like over a hundred cities in America since Columbine, Uvalde had now lost a layer of tranquility. Just 24 hours prior, Uvalde had been like most every other city in America, not yet listed as a statistic. A disturbed 18-year old kid changed that forever. Innocence lost.

Of all the active shooter events I’ve covered as an on-air security analyst for a network affiliate over the past six years, this one stung the most. In this mass shooting incident, I was able to insert images of people and places I had known. The helplessness I now felt from halfway across the country quickly turned into a personal call for action.

What Can We Learn from the Uvalde Mass Shooting?

Over the next few weeks following the Uvalde mass shooting, several of my colleagues who are involved in public safety training began placing a huge emphasis on enhanced educational programs for first responders (police, fire, EMS) and educational programs for teachers and employees in regard to active shooter events. Rightly so! Uvalde made us all ask, “After what we just witnessed, have we seen any results from all the effort that has gone into teaching new doctrine after what we learned at Columbine in ’99?”

As I began to see a massive focus on training for first responders and employees, I wondered, “what type of training is being directed toward the Frontline Responders?” This term refers to armed public safety professionals who are already on scene the moment an incident occurs, such as School Resource Officers (SROs), armed private security officers, or any number of professional protectors that report to duty at facilities, venues, and soft targets every day across America.

Above: A student at Karl's training organization, KDI, prepares for a drill incorporating a ballistic shield.

Within 24 hours I developed a two-day training program titled “Active Shooter Response for the Frontline Responder”. I immediately submitted my final outline for review to both Arizona Peace Officer Standards and Training Board (AZ POST) and to the South Carolina Criminal Justice Academy (SCCJA) — two states on opposite sides of the country. Within two days, I received each agency’s blessing to make this course available for continuing education credits to law enforcement officers in their respective states. I’m happy to report that our national roll-out of this training program began less than 30 days from its inception.

As I wrote this course, it became evident to me how much of the material I was putting together could have a direct impact on everyone who has an interest in protecting themselves in a critical situation. Today, I’m here to share an overview of that information with you.

Pre-Hospital Trauma Medicine

Above: The importance of medical training cannot be overstated, and it's not only valuable for professional first responders — everyone should learn the basics.

It sounds like a mouthful, but it makes sense at every level. Pre-Hospital Trauma Medicine is known by several names, but it comes down to investing in your own personal knowledge, skills, and abilities to be able to perform tasks like “stopping the bleed” (hemorrhage control), applying a tourniquet, performing CPR, using an Automated External Defibrillator (AED), preventing choking, and rendering basic first aid.

This training is not just for those who may face gunfire. It works for everyone! Being prepared for a medical emergency in the home or office is a preventive measure that we should all take seriously. To what level you take your training is completely a personal decision. At best, you can provide aid for your family. During a crisis, you can become a force multiplier for responding medical personnel. When a serious incident occurs, one thing we have all learned is that there are rarely enough emergency personnel on-scene to provide adequate emergency medical care to everyone.

Like most skills, the skills you learn in the tactical arena are considered “perishable,” and as such, should be practiced on a regular basis. Luckily, there are many resources within our community to help keep your skills up to par. To name a few, programs are offered through the American Red Cross and the American Heart Association. Your city or county may offer free classes on the topic of Community Emergency Response Training (CERT), or you can find similar classes through providers in Tactical Emergency Casualty Care (TECC). Numerous local hospitals also host community-based medical education and training throughout the year. If you make the effort, you can become and remain proficient in a variety of pre-hospital trauma skills.

Above: Students in a medical trauma course practice wound-packing with gauze. Oil is used to simulate the slippery conditions of treating a hemorrhage.

Do you carry a first aid kit in your car, at your home, or in your office? If so, are its contents in good condition or outdated? Have you invested in purchasing an AED? Or do you depend on an ambulance coming to help you? Ask any medical professional and they will tell you how critical those first few minutes of a medical emergency are to the individual(s) in distress.

At a minimum, in your Individual First Aid Kit (IFAK), you should carry two CoTCCC-recommended tourniquets, four chest seals, hemostatic gauze, a compression bandage, and a pair of shears. Your IFAK can grow based upon your training and experience, but you need to start somewhere. And keep it with you! You don’t want to be that individual that happens upon a medical emergency and wishes you had your IFAK at that critical moment in time.

Situational Awareness

Above: Two KDI students prepare to make entry into a room using inert training weapons.

Know your surroundings and your environment. It’s absolutely vital, whether in your office or at a public venue, that you make yourself consciously aware of a few things:

  1. Know the location of your nearest exits, emergency exits and stairwells
  2. Know the location of a fire extinguisher, first aid kit, and AED
  3. Know the location of your nearest security office (as in your local mall)

Your rapid response to identify these locations and acquire these items can truly be the difference between life and death. And know a location you can quickly move to where you will be safe during an active shooter event.

It takes a conscious effort to be aware of your surroundings. But every one of us is, at one time or another, is responsible for the safety and security of others. Take this responsibility seriously the next time you’re in a group space. Begin planning now.

If You’re There at the “Moment of Bang”

Let’s address three areas of concern: the mall, your office, and a school. While in the mall, you can rapidly move into the nearest store. Every major mall has a protocol for mitigating active shooter events. Stores will actively lock down their entry gates and most stores have an exit into the rear of the mall for evacuation. Do not get caught in a stampede at any location. There are frequent stories of people getting trampled when caught in the rush of a crowd. If you cannot keep up with the flow of a running crowd, position yourself behind a hard barrier such as a pillar or stationary sign. Inside a mall, because of how they are built, you cannot always tell what direction the sound of gunfire is coming from, so know your environment and exit the main thoroughfare quickly.

In your office, consider establishing a “safe room” — a location where you can shelter in place that is hardened against gun fire. Has your office considered controlling access to the main entrance through the use of cameras, entry control, or voice devices? Does your office have a practiced emergency evacuation plan? Is your reception area customer service friendly, yet still secure enough to keep out unwanted visitors? These and other questions can be easily reviewed by seeking out a trained professional to conduct a physical security survey of your office. (Editor's Note: For more information on how the pros test security and what we can learn from their assessments, refer to our article on “red teaming” from Issue 35.) One of the best ideas I’ve heard is keeping a small fire extinguisher by the reception desk (even by your desk). It has been shown that, in the absence of purpose-built defensive tools, fire extinguishers can work well in deterring a combative individual and buying you time to exit the area. Besides, no one ever questions why you have a fire extinguisher in your office.

Above: Every classroom should be equipped with a well-stocked trauma kit and some type of mechanical breaching tool to create secondary escape routes. Body-worn armor and ballistic shields are also valuable resources for defense in active shooter situations, and should always be available to on-site Frontline Responders.

In classrooms, ensure that you have practiced your active shooter plan. The classroom doors must be reinforced to lock out any unwanted persons. You must have a way to blackout your classroom (no lights) and a way to shelter the students in place behind desks or other hardened objects. If you have to fight the aggressor, remember you are fighting for your life and the lives of others.

Every classroom should be equipped with a fire extinguisher, a first aid kit that contains tourniquets and chest seals, a mechanical breaching tool to be able to exit through windows or even through the adjacent wall, and color-coded signs (red and green construction paper) to inform the first law enforcement officers who reach you about whether there are injured people inside your classroom without having to open the door. And please, do not open your door to an unknown voice that is telling you they are the police. Confirm before you open. Those individuals planning an active shooter event watch school training videos as well, and they often collect pertinent information to assist in their attack.

Closing Thoughts

Every topic we’ve discussed in relation to the Uvalde mass shooting boils down to this one point – preparedness. There is no substitute for a good plan that’s been practiced until it becomes second nature. The criminals we are seeing engage in active shooter incidents are typically not trained, experienced, hardcore terrorists. These are individuals who are disturbed and often fear the pain of being caught or being shot themselves. You have a significant advantage in a critical situation if you have a plan in place, are familiar with that plan, and you have practiced it with others.

The regret of not being prepared truly outweighs the inconvenience of taking time to train.

About the Author

Originally from San Antonio, Texas, Karl L. de la Guerra has been active in the protective services industry for the past 43 years with an emphasis on counter-terrorism and dignitary protection. He is Founder & CEO of South Carolina based Karl de la Guerra, Inc. (teamKDI.com), an international security consulting and protective services training agency. His agency operates KDI Protective Services of South Carolina, KDI Protective Services, LLC in Texas, and KDI Protective Services, LLC in Arizona. Karl has been instructing law enforcement officers since 1981. He is also Chairman of the International Bodyguard & Security Services Association (IBSSA.org) headquartered in Budapest, Hungary.


Book Review: “The Disaster Diaries” by Sam Sheridan

The Premise: From time to time, we find a survival book that is refreshingly different from the multitude of similar manuals that currently exist in the market. The Disaster Diaries: How I Learned to Stop Worrying and Love the Apocalypse utilizes theoretical disasters as a backdrop to demonstrate real survival knowledge from experts throughout our nation. The author of The Disaster Diaries, Sam Sheridan, accomplishes this goal through storytelling that’s both thoughtful and playful.

Our Review of The Disaster Diaries

From basic skills (such as how to make fire and hunt) to learning how to maneuver a vehicle through a zombie-infested city, Sheridan plays to our sense of adventure to showcase practical skills. Sheridan learns from the nation’s most unlikely practitioners of skillsets that bring a broad base of knowledge of overlooked techniques. Want to learn how to train your body during the apocalypse from an Olympic weight lifter? Do you need to learn how to steal a car from an ex-gang banger who showcases his street knowledge? Sheridan brings his readers with him to explore the spectrum of survival one skill at a time.

The 411: If calamity decimated the world through a massive earthquake, would you have enough food and water to last a week? Could you hot-wire a car to outmaneuver the shock wave of a thermonuclear blast? Similar questions, and many more, have occurred to Sheridan through his sleepless nights as a young father. This has prompted Sheridan to put his family’s safety at the forefront of his quest to be a more well-rounded disaster expert, and is his foundational purpose for writing The Disaster Diaries. Sheridan, an amateur boxer and mixed martial arts fighter, has developed a survivor’s mentality from his years as an EMT, wilderness firefighter, sailor, and a Montana ranch cowboy.

Each chapter is focused on Sheridan learning a new and practical survival skill from experts around the world, and is predicated by some outlandish yet entertaining disaster scenarios that range from super earthquakes to the zombie apocalypse. While his research is dead serious, Sheridan’s tone is quirky and comedic, always appealing to his readers through a relatable and down-to-earth delivery of his journey.

The Verdict: The Disaster Diaries stands apart as a refreshing addition to the extensive amount of reading that currently saturates the preparedness market. Although it serves as a teaching tool, it proves itself as an enjoyable narrative in which you’re invited to follow the author on his personal journey, making it the reader’s journey as well. Each chapter stands alone, much like a manual, but carries the story arc of Sheridan’s transition into a knowledgeable survivalist. Throughout the book, Sheridan keeps his reader motivated as he reminds himself of why he instigated this journey in the first place, which was to protect his family from the worst this world has to throw at them. For the prepper who has enveloped themselves in the “sport” of disaster survival, Sheridan does an excellent job in veering his readers away from narcissistic motives and instead paints the picture that preparing for disasters should be founded on selfless acts for those you love.

It’s here where Sheridan begins to shine as he uses his journalistic instincts to paint a picture that showcases our lack of readiness, which overlooks skillsets that are practical in a cataclysmic world. The end result is a call to action that’s both sobering and humorous, mentoring us to think outside of the box and embrace the fact that our survival is not dependent upon others to save us, but on our capable shoulders alone. Sheridan hopes to provoke us to take our own measures to prepare for catastrophe and successfully reaches across the “prepper’s table” to bring in a wider audience.

The Disaster Diaries is irresistible in its charm as it weaves its readers through an adventure of learning and imagination, especially for those who want to learn to survive cataclysm from someone who is in the midst of struggling to learn the same skills. It’s an upbeat and entertaining survival guide for the end of the world as well as mundane disasters. It appeals to a wide range of ages, backgrounds, and mentalities. What Sheridan has done with The Disaster Diaries is make his journey real to his readers, drawing in new crowds to the world of disaster preparedness who otherwise might not want to read a traditional survival manual.

About the Book

Book & Author
The Disaster Diaries: How I Learned to Stop Worrying and Love the Apocalypse
By Sam Sheridan

Publisher
Penguin Books 2014

MSRP
$17 (Amazon paperback version)

URL
www.amazon.com

Pages
336

Rating

>Thrive
Survive
Die

Offgrid Library of Recommended Reading

Tactics and Firearms

Skillsets and DIY

Novels and Literature

Scenarios and Survival


Bag Drop: Viktos Upscale 2 Urban EDC Sling Bag

We have dedicated a lot of time in our Bag Drop column covering bags that get packed and then stashed away for emergency situations. This time, we want to talk about a bag that is worn literally every day. It belongs to one of our female freelance photographers, who wears it throughout the day instead of carrying a traditional purse. This Viktos Upscale 2 sling bag and its contents are meant to maximize on minimalism without sacrificing essential equipment for emergency response.

The Viktos Upscale 2 Sling Bag

Make/Model: Viktos Upscale 2

MSRP: $75

URL: viktos.com

The bag itself is a Viktos Upscale 2 – a compact sling bag with a low-key, utilitarian aesthetic on the outside and well-thought-out storage management on the inside. Measuring a demure 15 x 7 x 4 inches all around, the Upscale 2 is slightly larger than a traditional fanny pack but smaller (and sleeker) than many tactical or survival-oriented sling bags currently on the market. There are four pockets, including a dual-zip flat pocket on the body side of the bag, which comes with a universal Velcro holster for CCW.

The front of the bag has a half-moon pocket up top with extra internal padding meant for glasses or sunglasses. The rectangular compartment below it comes with staggered elastic loops of varying sizes to retain your various sundries. That pocket has a small zip-pocket on its face that’s ideally sized for small items like wallets, keys, folded cash, credit cards, etc.

The shoulder strap features an ambidextrous design with a single attachment point at the top, and one on either side at the bottom. The top end of the strap is attached by small side-release buckle, the bottom by a carabiner that can be swapped to the left or right corner depending on wearer preference.

The body-side of the bag does have PALS loops sewn onto it, should you want to run this pack attached to a plate carrier, but is mostly out-of-sight while the bag is worn. Said webbing could be used to attach a couple of small pouches to the outside of the bag if needed, though we felt like this would defeat the purpose of the bag’s minimalist design. Its small size and generally shoebox-y shape makes it easy to stow as a grab-and-go bag in all sorts of places. If loaded and left for emergency use, the Viktos Upscale 2 fits easy underneath the front seat of your car, in between the two front seats, hanging in a locker or by the door, or even in a pantry or cupboard.

Above: The front pocket contains a trauma kit, SureFire flashlight, and a large wallet.

It’s also worth mentioning that Premier Body Armor makes a Level III+ flexible armor insert specifically sized for this bag. While we suppose some armor protection is better than none, the 12.6-x-7-inch dimensions really rely on the enemy’s marksmanship to stop incoming rounds effectively. Slung across the front of the body, it would be slightly larger than the old-school steel “heart plates” used to augment older generations of soft body armor.

Our sample bag is MultiCam Black which is, depending on who you talk to, either the apex or ass-end of tactical fashion. If you don’t care to make such a fashion statement, there are several solid colors available as well.

Bag Contents

Above: No, the tampons are not for gunshot wounds — they're carried for their intended function. A proper trauma kit is stashed in the pack for treating serious injuries.

This is an everyday bag worn in lieu of a proper purse. As such, it contains both some basic preps as well as some typical purse supplies. The CCW pouch holds a single-stack Staccato C pistol with Trijicon RMRcc optic, in an LAS Concealment holster. Originally meant as an AIWB holster, the belt clip and wing were removed and the holster body wrapped in hook tape, to hold it in place inside the bag.

Above: An LAS Concealment holster, retrofitted with Velcro hook material, contains this Staccato C single-stack 9mm pistol.

The sunglasses pouch on the top front of the bag contains some granola bars and tampons. No, the tampons are not for gunshot wounds. That’s what the TCCC supplies in the larger front pocket are for. The elastic loops inside this main compartment are perfectly-sized for retaining a 4-inch Emergency Trauma Dressing from North American Rescue, a pair of compact chest seals, a packet of Combat Gauze LE, a CAT tourniquet and nitrile gloves. The last remaining loop holds a Surefire E1B-MV flashlight. This palm sized backup light produced 400 lumens off a single CR123 and utilizes Surefire’s MaxVision beam – a flood-like reflector which produces a wide, uniform wall-of-light. These features make it ideal for up-close administrative tasks and small area searches.

Above: The effectiveness of the Kopis Designs L-Via knife carried in this pack was tested on a pig carcass in Ed Calderon's Weaponology class.

The front zipper section hides a Kopis Designs L-Via fixed blade. This knife, a collaboration between Kopis and OFFGRID contributor Ed Calderon, is a lightweight, handy defensive fixed blade. The unique sheath features a tooth-like hook that can snag the edge of a pouch or pocket to pop off instantly as the blade is drawn. Finally, an elastic-top mesh pocket on the inside of the front flap holds a large wallet perfectly.

Conclusion

There’s not much to this Bag Drop loadout — some med gear, some defensive tools, some snacks, and some personal goods. If more is needed, there are other larger bags strategically placed throughout the owner’s daily locales (car, home, office). But this Viktos Upscale 2 is truly a daily-driver. It's a general out-and-about bag that’s equally prepared for a drive-through coffee break or active shooter.


A-TACS AU Camo Has Been Re-Released

Whether you're active-duty military in a combat environment, law enforcement on a stakeout, or a hunter attempting to avoid alerting prey, camouflage is an important consideration. Both humans and animals are extremely attuned to slight changes in color and texture, and these factors can vary greatly from one environment to the next. That's why it's great to have lots of camo patterns to choose from. We're glad to see A-TACS has expanded its line of camo offerings with the re-release of the original A-TACS AU.

The A-TACS AU (Arid Urban) pattern originally hit the market back in 2009 but was eventually discontinued and replaced by its successor, A-TACS AU-X (Arid Urban Xtreme). In the image below, you can see the original AU side-by-side with AU-X; the latter “Xtreme” pattern appears to have a wider range of variance between light and dark elements.

Owner and pattern designer Phil Duke explained that this AU re-release was a byproduct of a growing number of requests from end users who wanted gear in the original pattern. From our perspective, we suspect A-TACS AU performs well in environments with softer light and more muted color tones, while AU-X seems better suited for terrain with darker and more defined shadows. There certainly seems to be room in the market for both options.

For those who live in less dry environments, the company tells us it's also planning to bring back the original A-TACS FG (Foliage Green) pattern, so keep an eye out for that official announcement in the future. For more information about the return of A-TACS AU, go to A-TACS.com/our-patterns.


Shoot & Scoot: Global Military Products Scorpion Mobile Mortar System

In warfare, a stationary target is a vulnerable target. Firing any weapon from a static position for an extended period of time can allow an enemy to pinpoint your location. Conversely, repositioning frequently makes it harder for an enemy to launch an effective counterattack. The Scorpion mobile mortar system from Global Military Products is designed to address this need, achieving an effective balance between mobility and lethality.

Above: An experienced two-man team can skid to a stop and fire the first round downrange in just 45 seconds. Eleven additional rounds can be fired within the next 60 seconds.

Editor's Note: This article originally appeared in Issue 61 of our sister publication Recoil magazine.

Photos by Glen Castle

The Global Military Products Scorpion

The Scorpion system was originally developed by a family-owned business in Spain called NTGS (New Technologies Global Systems). NTGS is the manufacturer of the Scorpion; Global Military Products, a division of Global Ordnance, partnered with the company to adapt and distribute it internationally.

Once you see how the Scorpion works, it becomes clear that its name isn't just meant to sound imposing — it's a direct reference to the predatory insect's anatomy. Much like the articulation of a scorpion’s stinger, the mortar system swings out of the back of the truck in an arc until it reaches its final position with its baseplate pressed against the ground. This deployment takes roughly 30 seconds and can be initiated as soon as the truck comes to a stop. Within another 15 seconds, a skilled two-man crew can fire the first 81mm or 120mm mortar round downrange (depending on the interchangeable tube installed). In the first minute, the Scorpion is capable of firing 12 rounds; rate of fire slows to 4 rounds per minute after that. More importantly, the Scorpion can be stowed and driven away a mere 21 seconds after the last shot is fired.

Above: After firing a shot, it only takes 21 seconds before the Scorpion can drive away. In many cases, the truck can leave the area before the round impacts its target.

The system is much more than a simple deployable mortar tube. It features a weather station that unfolds as part of the deployment to improve accuracy. The high-tech Fire Control System uses double GPS units to determine the truck’s location and orientation, compares that location to assigned targets, and calculates the ballistic trajectory of multiple munition types. There’s also an electronics cabinet that houses control systems for the elevation and direction of the gun, communication systems, and an independent battery. On the opposite side of the Scorpion’s frame, a pneumatic cabinet contains the compressor, storage tanks, and solenoid valves that control the folding and unfolding operation. The Fire Control System can be operated from a computer screen and keyboard inside the truck’s cab, removing the operator from the blast radius of the mortar, or it can be controlled from similar control panels outside the truck.

Above: A large computer screen and keyboard in the cab allows the passenger to operate the Fire Control System, which automatically factors in GPS, ballistics, and weather data to electronically aim the mortar.

The baseplate of the Scorpion system rests against the ground, distributing recoil so it doesn’t place strain on the truck’s chassis and suspension. Once the system is deployed, the tube still has a 120-degree arc of movement, so it can be aimed precisely without requiring the driver to park at a precise angle. Onboard ammunition cabinets can carry up to 72 rounds of 81mm or 40 rounds of 120mm ammo. Maximum range for each of these munitions is 6,500 meters and 8,000 meters, respectively, with sub-2-mil accuracy.

Above: Ammo tubes on each side of the truck offer protected storage for 81mm or 120mm mortar ammunition.

As for the truck that carries the Scorpion mortar system, Global Military Products says it can be adapted to any wheeled or tracked vehicle over 1.5 tons with no structural reinforcement required. Early prototypes were based on the Land Rover Defender and URO VAMTAC, a Spanish military vehicle comparable to the American Humvee. The truck pictured here is a 2021 Toyota Land Cruiser VDJ79 with a turbodiesel V-8 and five-speed manual transmission. It has no modifications aside from removal of the bed to make room for the Scorpion. With a combined weight of 7,165 pounds (not including ammunition), it’s light enough to be carried by helicopters and other aircraft.

Above: Rather than digging into the ground, the Scorpion’s baseplate presses firmly against it. This distributes recoil without impeding the truck’s ability to pack up and leave quickly.

Global Military Products believes that the Scorpion offers a huge advantage over the legacy mortar systems that are currently in use by the U.S. Army and Marines, which it says have been “essentially unchanged since WWII.” Although it remains to be determined whether our military will adopt this system, it’s easy to see how its ability to park, fire several mortar rounds, and move to a new location in under two minutes could be valuable on the battlefield.

Global Military Products Scorpion Specifications

Vehicle Type: Mobile Mortar System

Base Vehicle: 2021 Toyota Land Cruiser (can be adapted to any vehicle greater than 1.5 tons)

Drivetrain: 4.5L turbodiesel V-8, 5-speed manual transmission

Mortar Type: 81mm or 120mm (interchangeable)

Ammunition Capacity: 72 rounds of 81mm / 40 rounds of 120mm

Set Up / Pack Up Time: 30 seconds

Rate of Fire: 12 rounds for first minute, 4 rounds per minute afterward

URL: globalmilitaryproducts.com


Guerrilla Mentor Class Review: Hostile Encounters on the Road

How realistic is your training? This is a question you should be asking yourself frequently, since unrealistic training can be detrimental to your ability to deal with a survival situation. When it comes to firearms, we often train on a flat range, standing in a booth and shooting slowly at static targets. In a real fight, it’s important to use cover and concealment to your advantage, move while shooting, and communicate with other members of your “squad” (teammates, family, friends, etc.). who may be present at the time. I recently attended a two-day class that focused on each of these skills, centered around a common context: driving a vehicle. The Guerrilla Mentor Hostile Encounters class was based on head instructor Timothy Lacy’s experience working as a private security contractor in war zones overseas.

Guerrilla Mentor Hostile Encounters

Timothy Lacy Guerrilla Mentor riding in a humvee 2008

Above: After spending years in the Army, law enforcement, and as a security contractor, Timothy Lacy used his experience driving through hostile areas to teach students how to stay safe in worst-case scenarios on the road.

Lacy often had to escort VIPs through hostile areas, and if necessary, return fire and extract the VIPs. You may be thinking that this isn’t relevant to armed civilians, but I’d beg to differ. Whether you find yourself in the path of a road-raging psycho who’s angrily approaching with a gun, you get caught up in the middle of a mass shooting or gang violence on the street, or you’re rolling up to a dangerous situation as a professional first responder, many violent incidents take place in (or near) a vehicle. And although you probably won’t be leading a fire team or escorting government personnel, you might be working alongside an armed spouse and corralling your own scared children.

Above: At the beginning of the class, Lacy demonstrated how to shoot from a vehicle without shattering the windshield or leaving the driver’s seat. This is useful if you need to escape to a safer location immediately after returning fire.

At the beginning of the class, we discussed using a vehicle as cover or concealment — it’s almost always the latter. Most bullets will pass right through both sides of a car or truck and remain lethal. The engine block and wheels/axles provide some protection, but less than you’d think. Cars are also big targets that draw fire like a magnet. If driving away immediately is possible, that’s the obvious choice. Otherwise, it’s best to quickly move back from that bullet magnet, use it to obscure yourself from view, and loop around to a position where you can shoot back or find real cover.

Above: Although unarmored civilian vehicles provide visual concealment, they don't provide much protective cover from incoming fire (especially rifle rounds). The engine block and axles/brakes/wheels can offer some last-resort cover if there's nowhere else to run.

For a practical exercise, we loaded groups of students into pickup trucks and simulated rolling up to a scenario. As soon as the threat was identified, the “tactical commander” (TC, a term from Lacy’s days working private security details) in the shotgun seat yelled “Contact front!” The TC then provided clear instructions to the group — “drive” if we could leave the area, or “vehicle down” if we were immobilized. In the latter case, he followed with “evac [direction],” leading everyone to reply “moving” and bail out of the truck on that side. Once each student was clear of the truck, we took up firing positions and yelled “set” to indicate this. If anyone needed to move, they announced “moving” and waited for the “move” confirmation from the nearest team member before taking up a new position. We moved deliberately, being careful not to cross lines of friendly fire, and bounded (i.e. leapfrogged) back to a secondary vehicle while other members provided covering fire. When we were all set around that vehicle, the TC shouted “recover.” We jumped in, each yelling “up” once we were seated; TC gave the “drive” command once everyone was inside, and the driver peeled out.

Above: By the end of the class, Lacy covered more advanced techniques, such as safely extracting a scared VIP from a damaged truck. In civilian context, this “VIP” might be a friend or family member.

After several dry runs, we ran live drills. As we got more comfortable, radios were incorporated to communicate with our secondary evac vehicle. We even ran scenarios where an unarmed, cowering VIP had to be forcibly removed from a disabled car. Your ability to manage that particular complication will be valuable if anyone in your vehicle (e.g. kids) hasn’t been thoroughly trained how to react if a violent incident occurs.

As a civilian, it’s unlikely that I’ll be riding with four kitted-out friends when a road rager decides to pick a fight. However, the principles learned in this Hostile Encounters class translate well to personal and family self-defense. I feel more comfortable moving and shooting around a vehicle, and I know that if I’m with my wife or someone else who is armed, I’ll be able to coordinate with them to escape or fight back. For more information on future classes with Guerrilla Mentor, go to Facebook.com/guerillamentor or follow the Instagram page at @guerrilla.mentor.

More Training Recaps