New: Phantom Hill CTF-2 IR Laser/Illuminator Details Revealed

If you're looking to get into the world of night vision gear, brace yourself, because it can get expensive fast. However, we're glad to see that the costly nature of NV gear has been gradually diminishing thanks to new products from smaller companies such as Phantom Hill. The Phantom Hill CTF-1, which we previously reviewed, includes an infrared laser, IR illuminator, and white light in a single housing for $800 — that's relatively inexpensive compared to existing options like the DBAL or ATPIAL-C. At the end of that review, we mentioned that the company would be releasing a second model with added features and more modularity soon. This week, we confirmed some of the final specs of the new Phantom Hill CTF-2 weapon-mounted light/IR laser/IR illuminator.

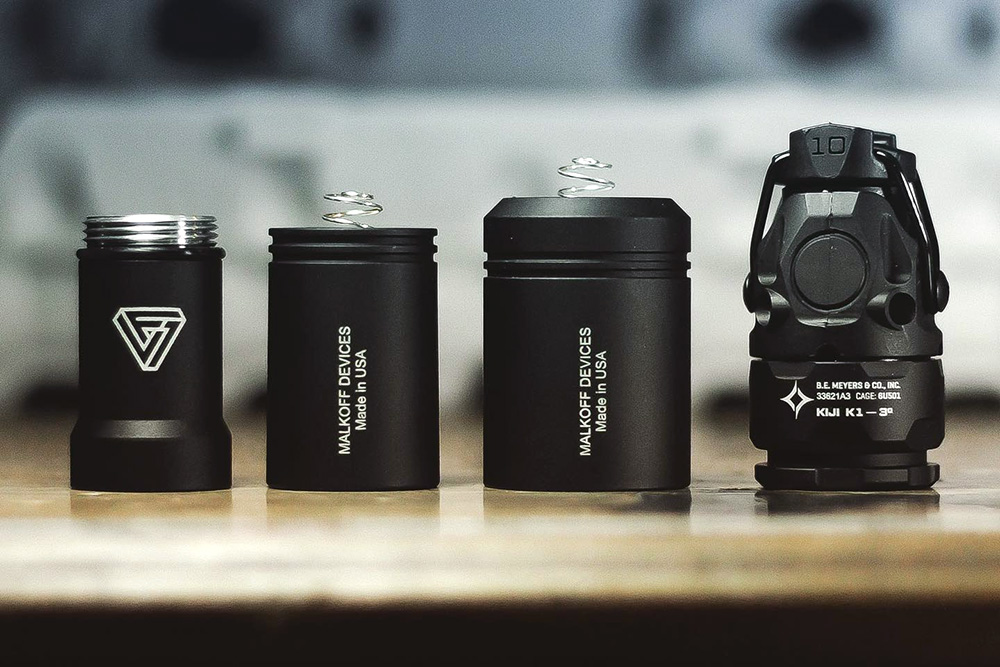
The Phantom Hill CTF-2's biggest change is its transition to a modular head architecture. As opposed to the CTF-1's proprietary, integrated light and illuminator, the CTF-2 will accept light heads that work on common CR123-powered SureFire Scout 300 (3V) or 600 (6V) flashlight bodies. Some configurations may require a battery tube extender — such as the VF1 Systems extender pictured below — to add an additional CR123 battery.

According to Phantom Hill, the CTF-2 will start at a price point of $699 — the laser is built-in, but you'll need to add your own white and IR illuminator heads. If you don't have those already, it'll be offered in packages with various combinations of accessories. Pictured above from left to right, there's the aforementioned VF1 Systems battery extender, Malkoff Devices E1HT white light, Malkoff Devices EX IR 250 illuminator, and B.E. Meyers KIJI K1 3-degree IR illuminator. These packages range from the base $699 to a maximum of $1,399.

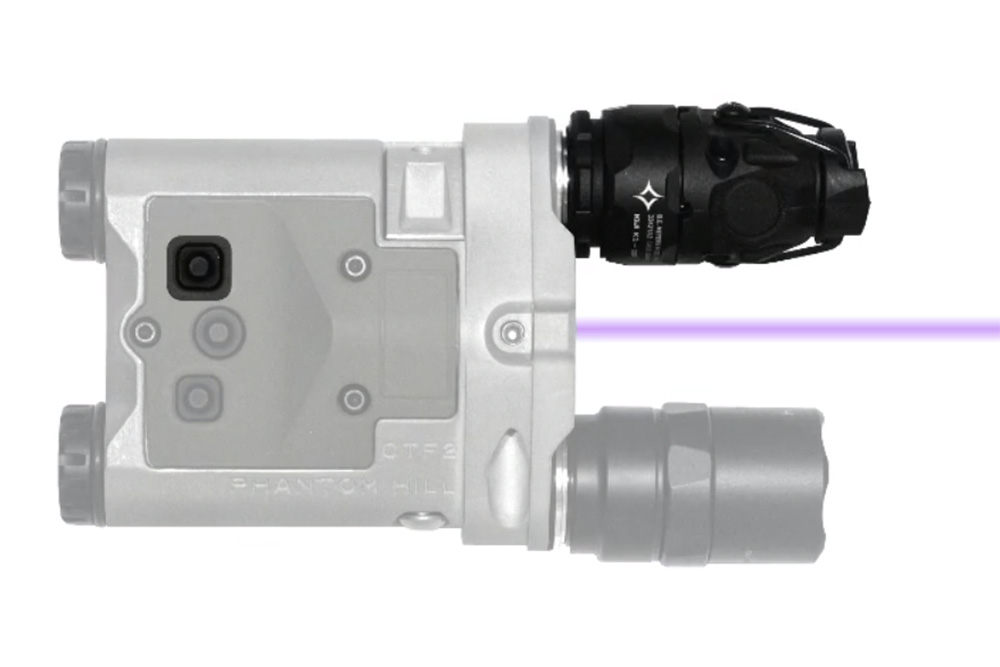
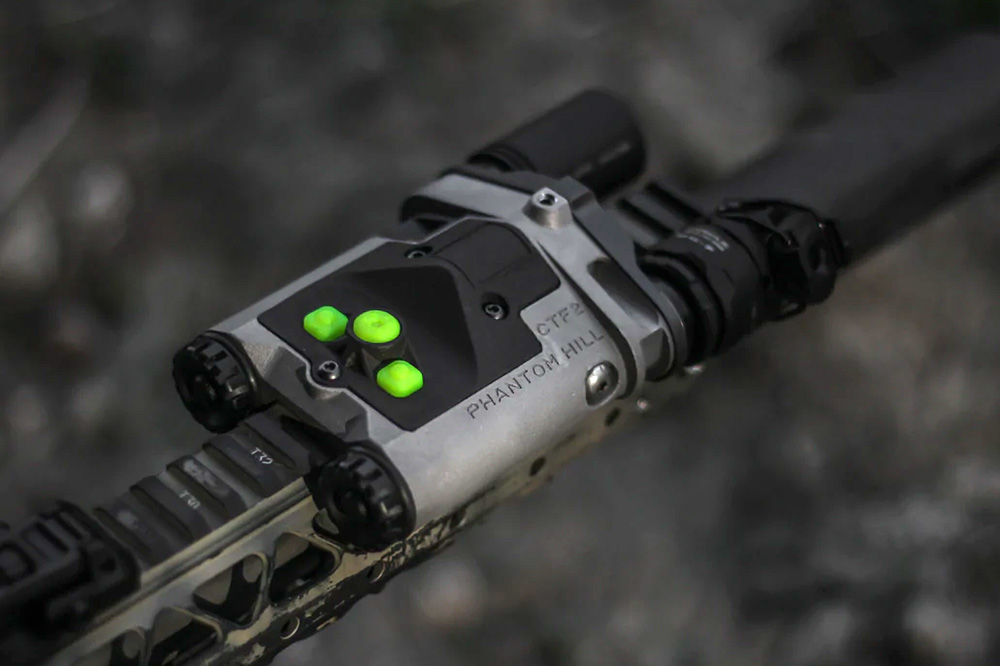
Operation of the CTF-2 will also be different from the CTF-1. It now has three buttons, with the raised center button always controlling the laser (press for momentary, double-tap for constant-on). The two side buttons control their respective light heads, so you can place the IR illuminator and white light on either side of the housing. Both side buttons are momentary only.

Above: This image of a CTF-2 prototype shows how the left square button activates the left head, in this case a B.E. Meyers KIJI illuminator. The IR laser (shown in purple for illustration purposes) is activated independently via the round center button.

Like the CTF-1, the Phantom Hill CTF-2 is designed and assembled in the United States with a 3D-printed DMLS aluminum housing. It weighs 7 ounces with two CR123 batteries installed, and comes with a 5-year warranty. Since infrared lasers fall under ITAR rules, the CTF-2 cannot be shipped outside the United States, but Phantom Hill said on Instagram that it's working on a model for the Canadian market.

The Phantom Hill CTF-2 is expected to be available in June 2022. For more information, go to PhantomHill.design.


PSA AK Updates: VLTOR Handguard & JMac Customs Folding Stock

The topic of a mass-produced, American-made AK is one that never fails to upset the hornet's nest of die-hard AK enthusiasts on the internet. Admittedly, their reaction isn't entirely unjustified. Some of the earlier attempts by American companies to produce domestic AKs were riddled with various metallurgy, design, and quality control issues. When it was possible to buy a brand-new WASR for less than $600, that was often the default choice. However, this state of affairs may be changing. The prices of imported Russian and Eastern-Bloc rifles — not to mention the imported ammo for them — have been increasing over the past decade, and the war in Ukraine has only accelerated that trend. At the same time, Palmetto State Armory has worked hard to address known issues and solidify the reputation of their American-made AKs. No matter how you look at it, the PSA AK is steadily becoming a more viable choice for those who are currently in the market for a new AK.

A Traditional Start for Our PSA AK

Those of you who follow our magazine and/or web site consistently may recall our “blue collar” AK project from a few months ago. That project was based on a PSA GF3 AK with a triangle side-folding stock, “cheese grater” handguard. MSRP for this setup, as seen above, is currently $949. We modified that rifle while maintaining a relatively traditional aesthetic, including custom Kalashnicarver wood furniture, a cantilevered flashlight mount, and the original triangle stock.

After taking this setup through a 3-day Haley Strategic D5 Kalashnikov class (writeup coming soon) I found that I liked some aspects a lot, and wasn't as fond of others. During the class, I was able to shoot respectable groups out to 200 yards. The gun ran reliably through 1,000 rounds of steel-case ammo without a single malfunction, aside from those we deliberately induced for training purposes. Functionally, the PSA AK was off to a solid start.

However, it wasn't exactly comfortable for me. I'm well over six feet tall with long arms; on an AR-15, I typically run the buttstock almost fully-extended and place a foregrip close to the front of the handguard. On the AK, the short length of pull of the triangle stock and the placement of the wood handguard left me feeling like I was shooting a rifle made for someone half my size. I needed more length of pull and more handguard real estate, so I decided to take the PSA AK in a new direction.

The Updates

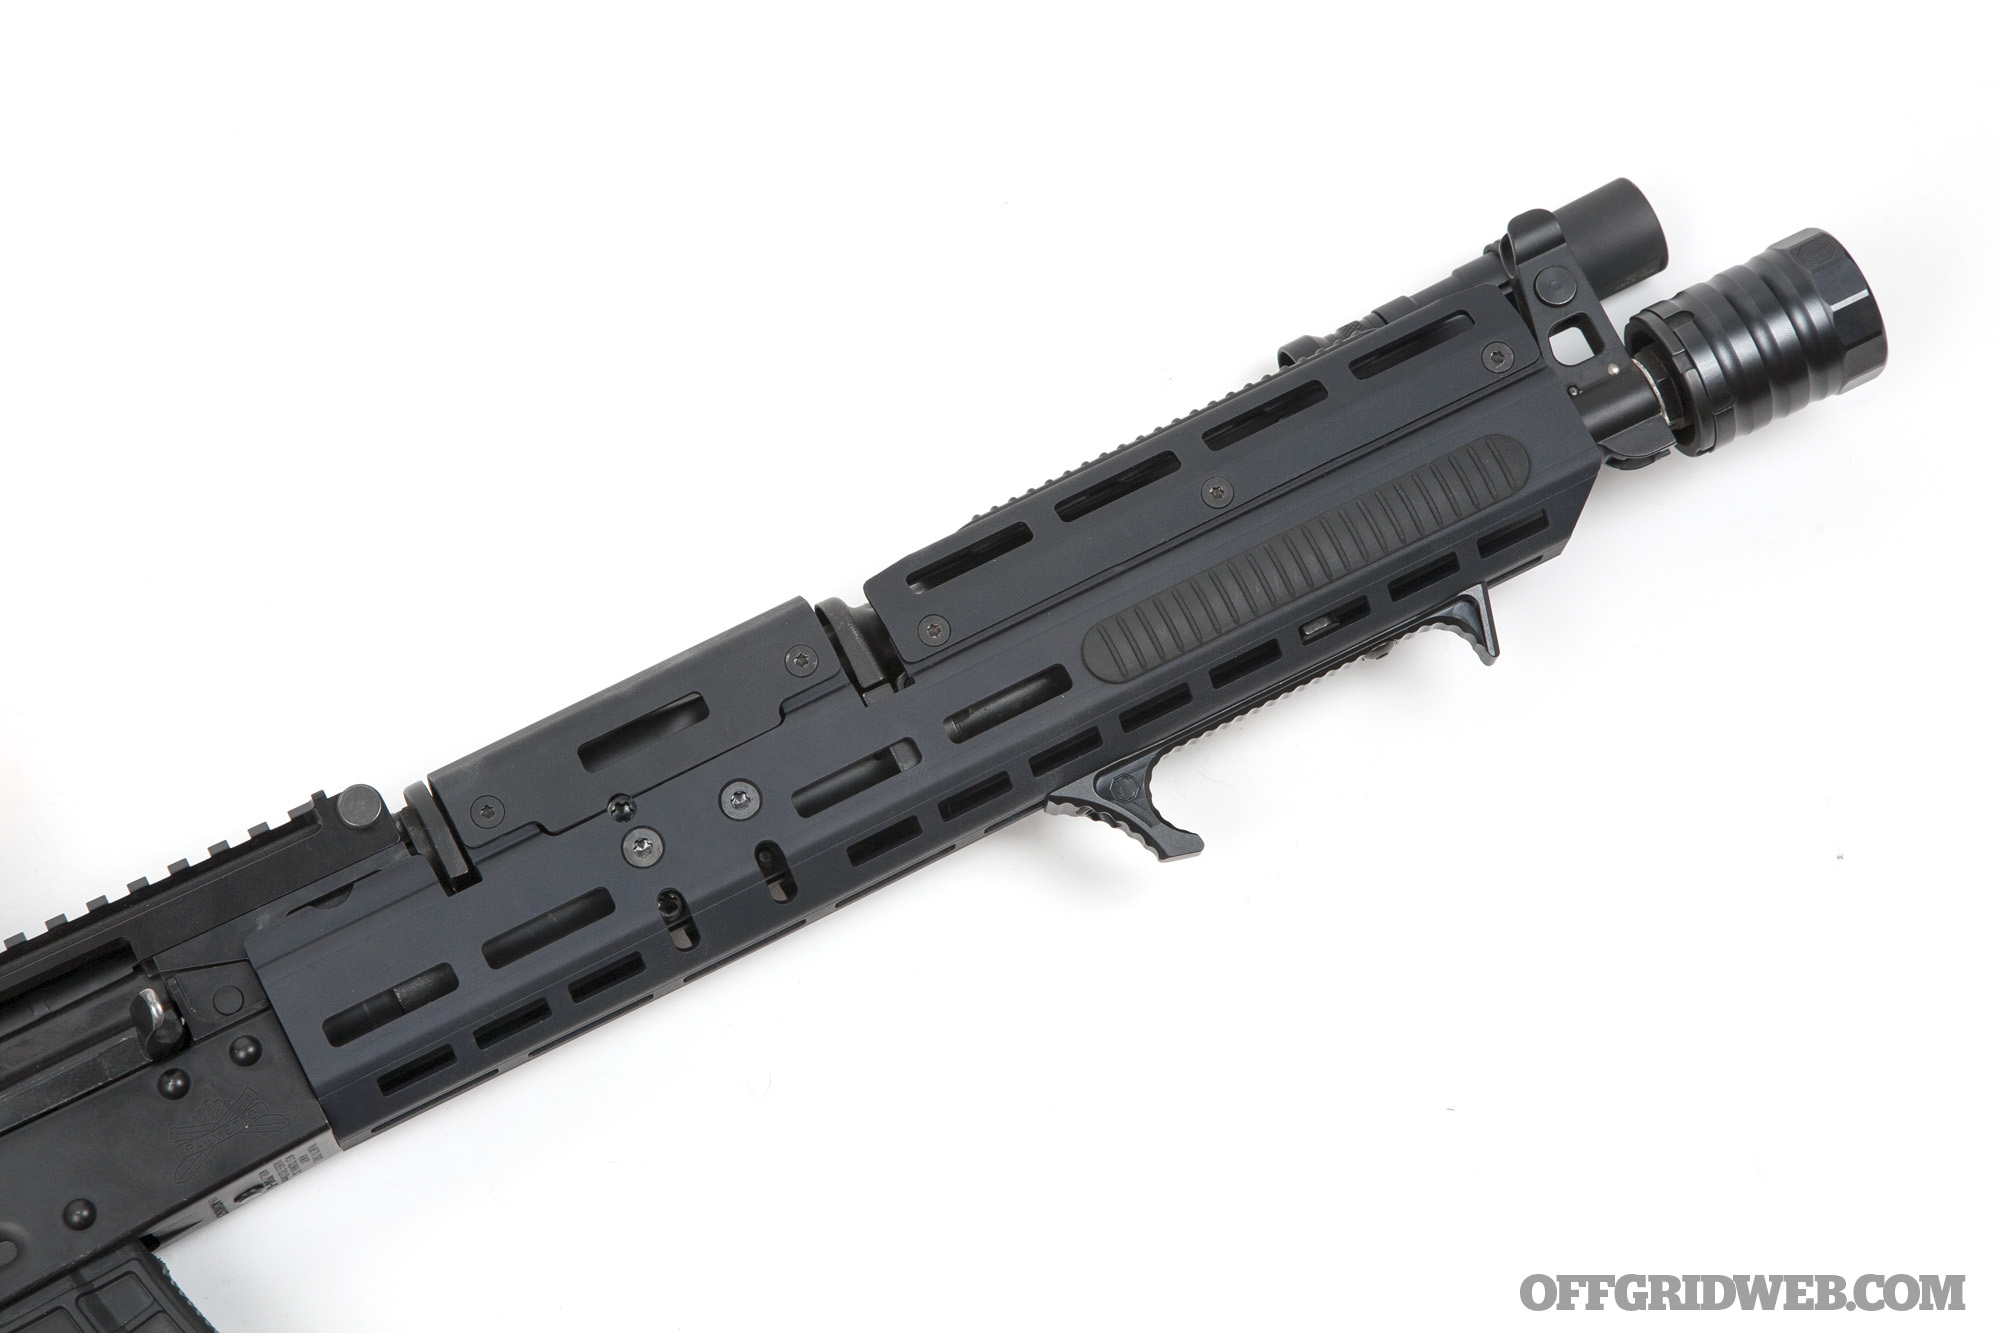
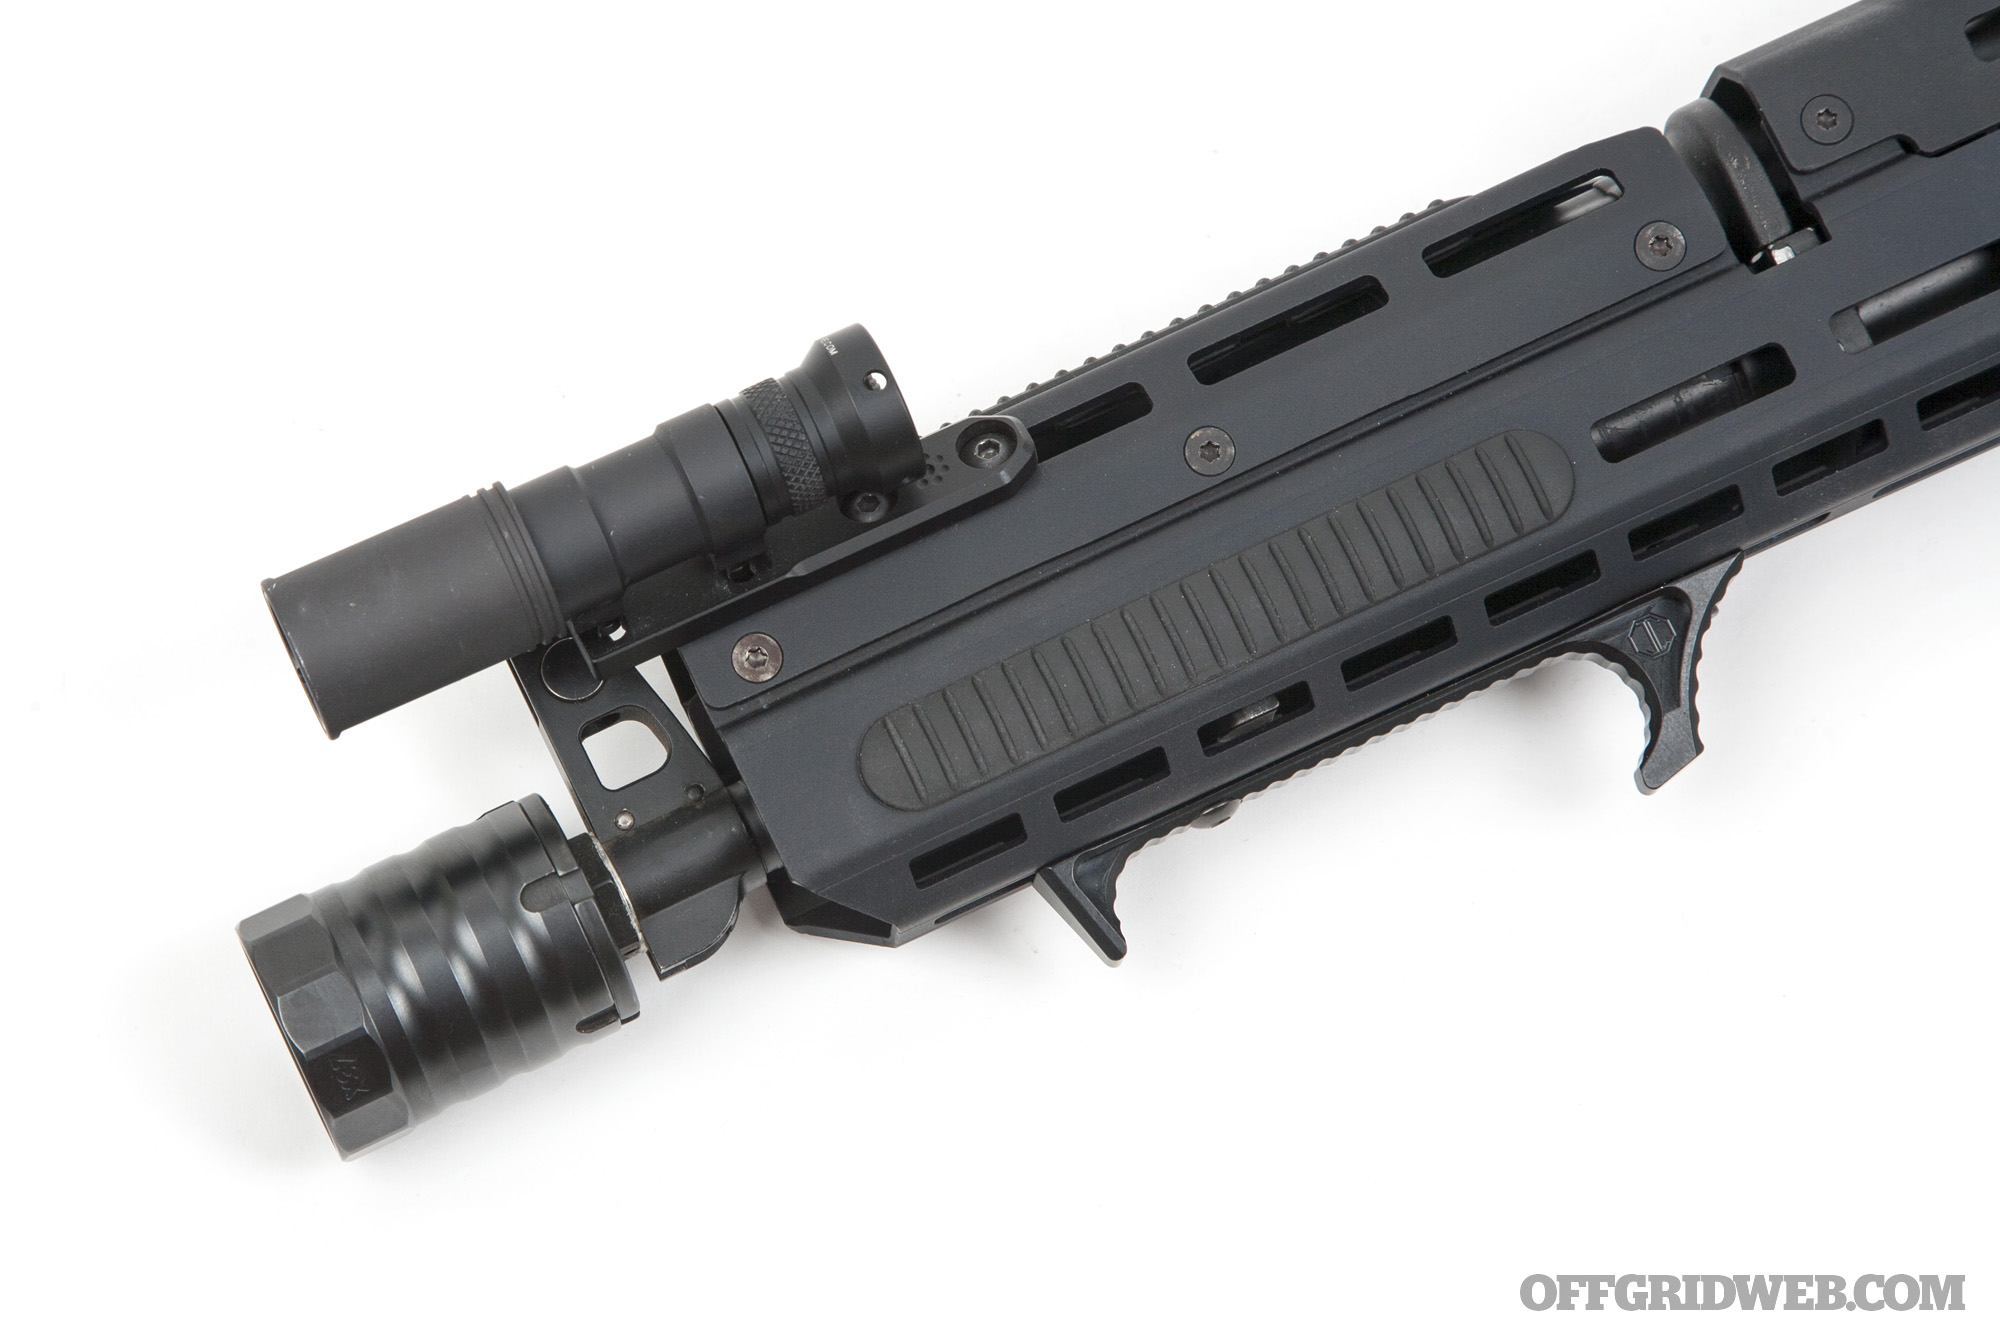
Starting with the most glaring source of discomfort, I began looking for a full-length handguard that would allow me to move my support hand forward. At SHOT Show 2022, I learned that VLTOR had released an M-LOK version of its CMRD (a.k.a. “Comrade”) AK handguard. The VLTOR CMRD is made from three pieces of 6061-T4 aluminum with a hard-coat black anodized finish, and it spans the entire length from the front of the receiver to the back of the front sight post.

Surprisingly, this significantly larger handguard only weighed 4 ounces more than the 10-ounce wood handguard and “cheese grater” that had been on the PSA AK before. Installation was relatively easy — aside from using a Dremel to cut off the sling loop from the original lower handguard retainer, it simply bolted together.

The VLTOR CMRD features a variety of M-LOK slots on the top, bottom, and sides, as well as some 45-degree slots on the front portion of the upper handguard. I used these to install a JMac Customs HRD Extended handstop and Arisaka Defense 300 Series flashlight. There was no need for a cantilever mount this time, so it's attached on an Arisaka inline mount.

I also added three rubber B5 Systems M-LOK rail covers to improve grip and insulate my hand from the heat of the barrel and gas tube. The muzzle device — a JMac Customs RRD-2C 14F X37 brake with a BDS-37 blast shield — remains unchanged from the last phase of the build.

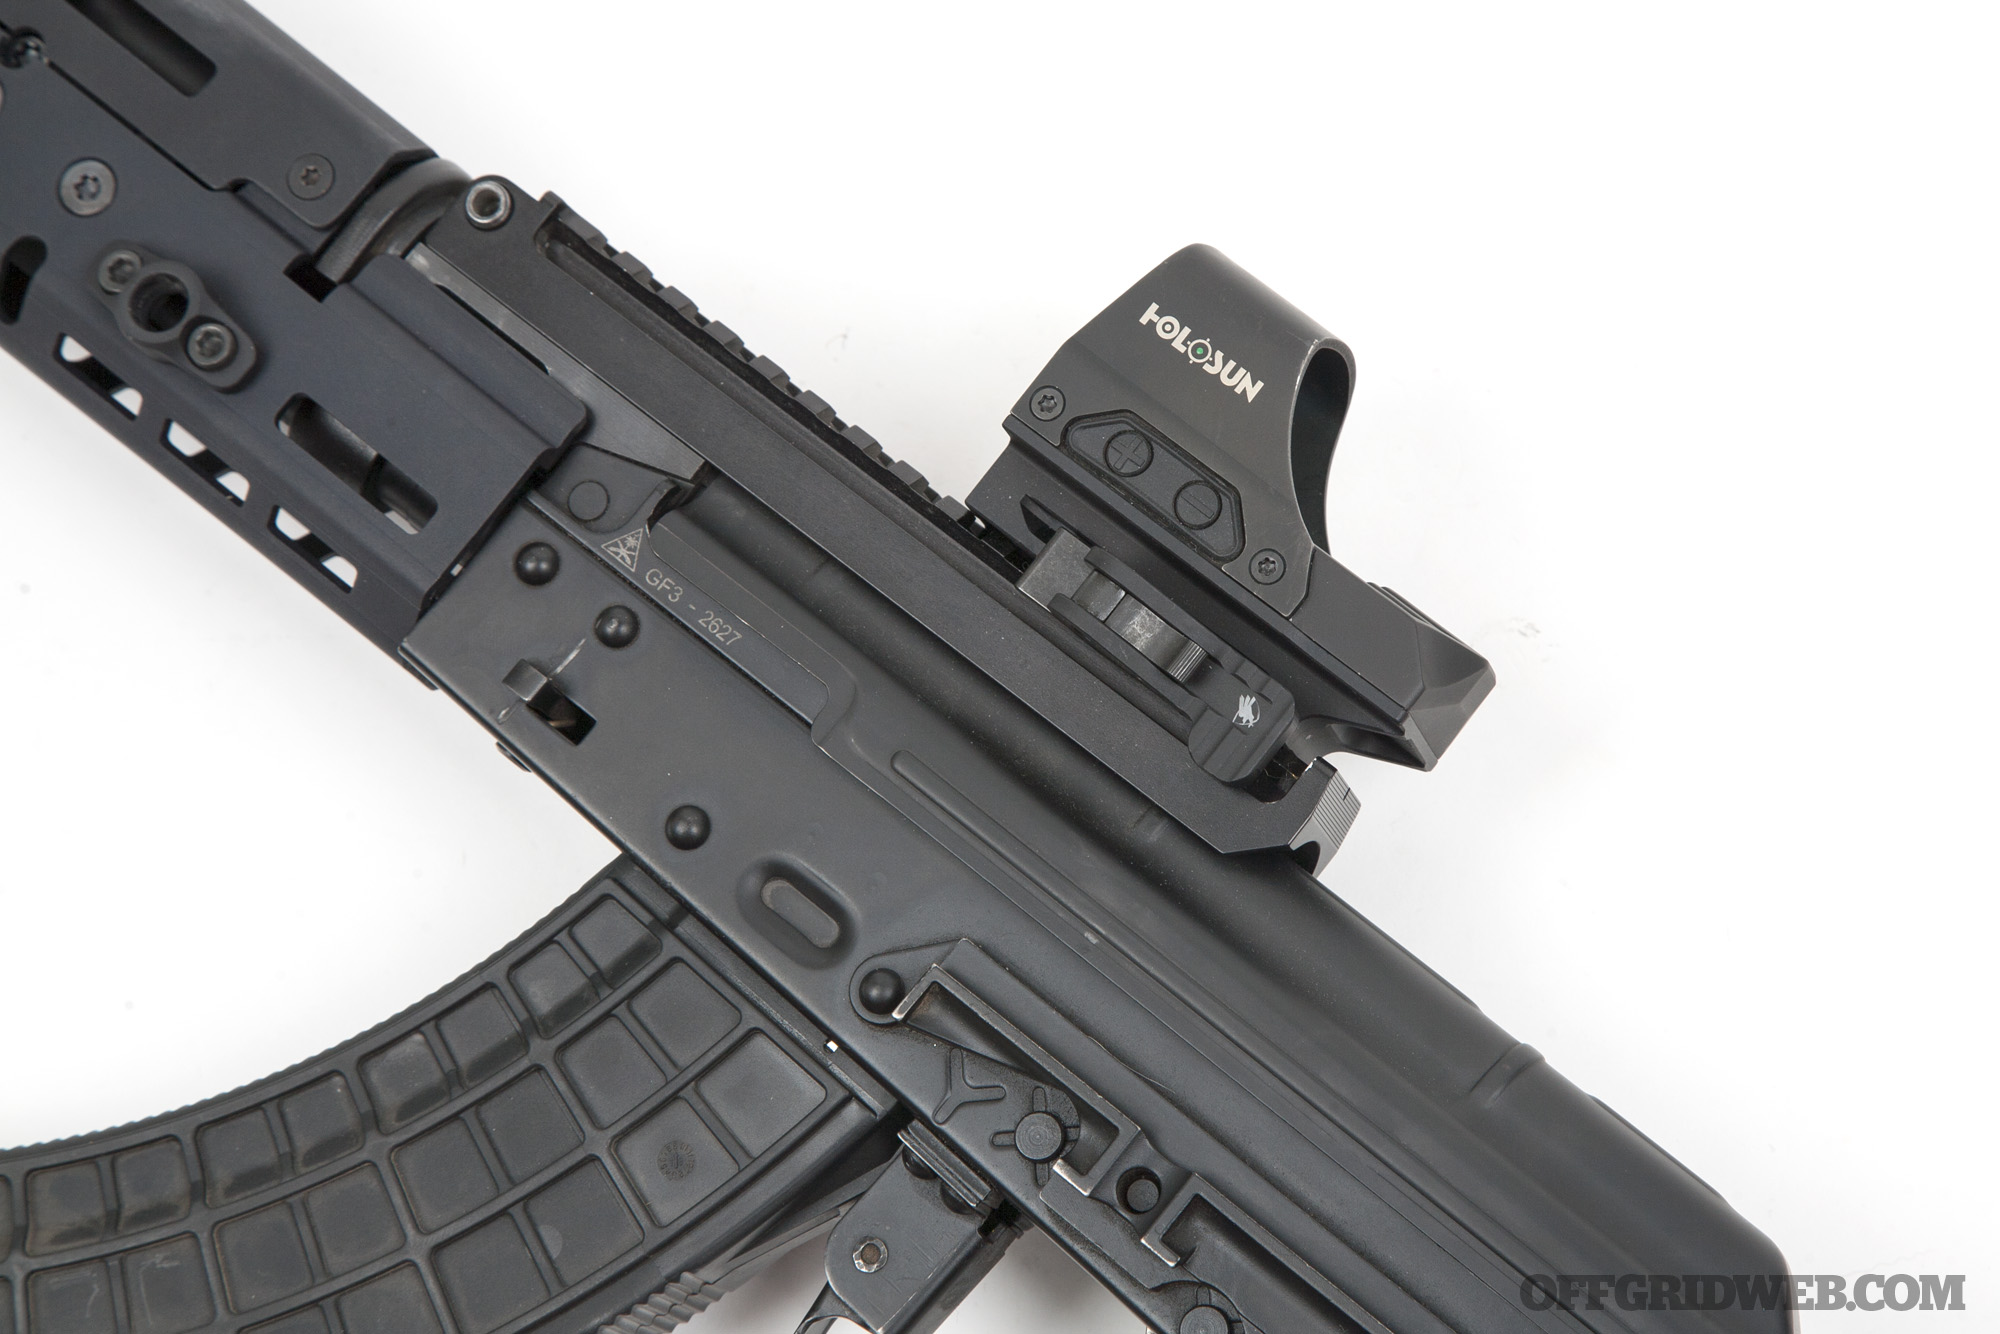
Moving to the midsection of the rifle, I decided to try a different optic setup. American Defense Mfg. recently released a new lower-third QD mount for the Holosun 510C, so I used it to attach a green-dot Holosun optic to the Sabrewerks KOP system that was already on the rifle. I like the heads-up position of the optic and the wide, unobstructed field of view it provides. The shake-awake feature and solar backup also ensure the battery will last a long time, and if it does, the QD lever will allow me to remove the optic and use the backup iron sight notch built into the KOP rail.

Since the wood handguard was gone, the wood pistol grip was swapped out for a Magpul MOE AK+ rubberized grip.

Finally, in search of extra length of pull and a more comfortable stock, I swapped the standard triangle folder for a JMac Customs ST-6 Folding Stock Mount (specifically, the PSA GF3 side-folder requires a 4.5mm pin version). It features a lightweight, skeletonized 6-position tube machined from 7075 aluminum, and has integrated QD sling loop sockets on both sides. Installation was as simple as using a small pin punch and mallet to knock out the pin from the original folding mechanism, dropping the adapter into place, and tapping the pin back in.

The JMac ST-6 will accept most AR-style stocks and braces, but I went with a B5 Systems Bravo stock. This offered the ability to achieve a maximum length of pull of 14.5 inches, a full inch and a half more than the 13-inch LOP with the triangle stock. It provided an instant improvement to comfort, since I no longer felt like I was shooting an undersized gun, and it had a rubber butt pad unlike the hard metal triangle stock. Better yet, the telescoping stock can be adjusted down to an 11.25-inch LOP, so it'll still be comfortable for shooters with much smaller frames.

Although I'll continue using the Bulgarian steel mags seen in the previous configuration, these XTech MAG47 polymer mags from GunMag Warehouse match the modern aesthetic a little better.

Closing Thoughts

I'm happy with these changes, since they made the AK feel much more comfortable and balanced in my hands. Weapon ergonomics, not to mention the shooting stance that accompanies them, have come a long way since the 1940s. We no longer live in an era where weapons have to be configured for “one size fits all.” The addition of an adjustable, interchangeable stock and M-LOK forend allow the weapon to be configured for a specific user.

Although I'm aware that some purists will sneer at this PSA AK because it's made in the USA, that doesn't bother me a bit. It has thus far proven itself to be reliable and (relatively) accurate, even under the stress of running three days of back-to-back drills during the aforementioned Haley Strategic class. I shot it prone on a surface of fine Arizona dust that coated every nook and cranny, including the inside of the receiver (and the inside of my lungs). I used various types of polymer and steel mags, and ran a case of Tula 7.62×39 through it without so much as a periodic wipe-down or a drop of oil. I watched other students' imported AKs malfunction on the line, and yet the PSA GF3 kept plugging away.

Obviously, this is my sample size of one, and issues could always crop up in the future, as they can for any weapon. But for now, I'm satisfied. Regardless, it still won't be the first rifle I reach for in a defensive situation — that'll always be an AR, a platform with which I'm much more familiar and proficient.


Book Review – “Sustainable Food Gardens: Myths & Solutions”

The Premise: If you camped out for a week in a bookstore and read as much literature as possible about gardening, you’d end up with a lot of ideas — a fat percentage of which have no foundation in science. It’s the equivalent to asking friends and neighbors for gardening tips. In many circumstances, an idea works once or in a specific situation, but it’s not necessarily a technique that’ll be applicable across a broad set of variables and skill levels. The author of Sustainable Food Gardens: Myths & Solutions recognizes that much folklore is prevalent in home gardening and makes an effort to examine sacred cows under the light of research.

Our Review of Sustainable Food Gardens: Myths & Solutions

The 411: Chances are you’ve picked up one or more sustainable gardening techniques over time. It could’ve been from a YouTuber or blogger, from a back-to-the-land magazine, or from a relative who always has a visually appealing vegetable plot. And it’s possible that you’ve embraced some principles as gospel. In reading this book, stay open-minded, as your foundations are about to be rattled. Author Robert Kourik explores practically every gardening concept that has been presented in popular literature over the last few decades, from no-till to raised beds to sheet mulching, and examines them against formal wisdom gleaned in the fields of agriculture and natural resources.

Beyond equipping his readers to nurture their soils, conserve water, and invite beneficial insects, Kourik takes on widely held gardening myths head-on. Some of these he dismisses, but he also tempers the conventional wisdom with research-based facts where appropriate.

Many of the principles of modern permaculture (perennial agriculture that mimics natural systems as closely as possible) are put to the test. The author questions the claims behind perennial forest gardens, hugelkultur, herb spirals, and plant guilds, among other techniques. There was a time when he himself had promulgated some widely held beliefs, such as dynamic accumulators, and in those cases he humbly breaks down areas in which he was mistaken.

Even techniques deemed to have merit are stripped down to their frames and rebuilt with a more scientific understanding. In the case of plant guilds, for instance, Kourik explores one by one the species considered major players within certain traditional fruit tree guilds and makes a case for or against each of these, often with alternatives. As an example, where resources have suggested Russian olive or Siberian pea shrub beneath fruit trees for their nitrogen-fixing capabilities, he encourages readers to forgo those two invasives and instead go with a perennial clover.

With a forest garden, the goal is to mimic the layers of a natural forest with upper canopy, mid-canopy, shrub, and ground layers, as well as vines and root-bearing crops. So, one may have nut-bearing trees as the upper layer of the “forest garden,” fruit-bearing trees and shrubs below, strawberries and herbs on the ground, passionflower vines running here and there, and so forth. While it sounds like a feasible and desirable system, Kourik argues that the ecosystems and communities behind forest gardens are more complex than some writings allow and presents alternatives.
A chapter on companion planting delves into not only which plants have been shown through research to be effective companions, but how these function to the benefit of the target plant(s). Companion plants may serve as a trap crop; they may repel or block a specific pest; they may camouflage the crop plant, or their purpose might be support of beneficial insects.

The Verdict: Sustainable Food Gardens: Myths & Solutions is akin to a textbook, rich with scientific nomenclature, graphs, and charts, but there’s no shortage of eye-catching illustrations. It isn’t light reading, nor is it a warm and fuzzy gardening tome you’d want to keep on the nightstand. But for any who are serious about producing a portion of their own food sustainably — and perhaps who are thick-skinned enough to accept that garden knowhow is dynamic — this resource should be on your shelf.

About the Book

Book & Author
Sustainable Food Gardens: Myths & Solutions
by Robert Kourik

Publisher
Metamorphic Press

MSRP
$45 (Amazon)

Pages
486

Rating
>Thrive
Survive
Die

Offgrid Library of Recommended Reading


Letter from the Editor: Adapt and Overcome

I’ve discussed in past editor’s letters that we sometimes struggle to keep up with current events due to the lag time that’s inherent to a print production cycle. For example, by the time you see this, we’ll be about two months into Russia’s invasion of neighboring Ukraine. Given that the situation is changing literally by the hour as I sit here typing, I have no clue what the geopolitical landscape of Eastern Europe will look like by the time this letter gets to you. While we try to supplement our coverage of emerging threats with real-time articles on www.offgridweb.com, we do what we can to give similar due diligence to those of you purchasing the magazine in hard copy or digital formats.

Originally, we had planned on focusing on bug-out bags: how to select them, how to fill them, and how to maintain them over extended periods. And we’re still addressing some of that content. Specifically, Patrick McCarthy rounds up a series of rifle bags designed to carry SBRs in discreet fashion. Our health column also details how to handle aging or expired medical supplies — which is something you’ll wind up with plenty of, if you keep a survival bag packed long enough. We also have our normal Bag Drop column, featuring a deep woods survival pack.

But we also wanted to include some articles that seem pertinent to the invasion of Ukraine, and how that might be causing a lot of us to re-examine our preparedness plans. David Roy runs down some of the factors to consider in terms of vulnerabilities in our national infrastructure. Energy, communications, and transportation hubs were all targeted by Russia up to and during their invasion, with a combination of cyber and physically destructive attacks being used. I also want to direct you to this issue’s Spotlight, featuring Greg Mihovich. Greg grew up in Belarus before and during the fall of the Soviet Union. He was also a child when the Chernobyl nuclear power plant suffered its catastrophic disaster. Unfortunately, both Belarus and Chernobyl are back in the public eye in light of recent events. Greg also has personal insight into the value of a preparedness culture as well as what life was like before and after Soviet rule.

Above: Our interview with Greg Mihovich is already available online — you can read it here.

We’re not sure what the long-term geopolitical or economic fallout from Russian aggression will be. But as the world gets smaller and more connected, there’s no doubt this will touch us in some way, shape, or form. We hope the direct impact on America and its citizens will be minimal. However, we will stay true to our mission of calculating the severest of outcomes and giving you as much information as we can to avoid or mitigate hardship to the greatest degree possible.

Stay ready, and stay safe.

Click here for a full list of articles from Recoil Offgrid Issue 49 that are currently available online.


The O.G. – Tom Marshall’s Do-All Survival SBR

It’s been said before that “the most dangerous weapon in the world is a Marine and his rifle.” While I wasn’t a Marine, I’d like to think that a capable rifleman and his rifle are a force to be reckoned with, Marine or otherwise. As such, a well-tuned and highly capable carbine is an absolute staple of prepared living. There are many like it, but this survival SBR is mine.

This article originally appeared in Issue 60 of Recoil magazine.

The Survival SBR Build

I started with the military’s “recce rifle” concept (essentially an accurized AR), scaled down to leverage current advancements in barrel technology. This build sports a tube from Rosco Manufacturing. Specifically, this one is their collaboration barrel, built with input from Aaron Cowan of Sage Dynamics. It’s a 12.5-inch barrel made from 416R stainless with a 1:7 twist and NATO-spec 5.56mm chamber. The barrel is finished in black nitride and features a proprietary “patrol length” gas system that is somewhere between carbine and mid-length. The idea behind this was to create a system more reliable in the short barrel than true mid-length, but without the over-gassing that occurs in carbine-length SBRs — particularly when running suppressed.

This barrel is mated to a lightweight Balios Lite upper from 2A Armament, which is slicked down and lightly skeletonized to reduce weight. The lower is an ADM UIC lower, built for hard-use and sporting a full suite of completely ambi controls. The back end is built around a Primary Weapons Systems enhanced buffer tube and ratcheting castle nut with B5 SOPMOD Bravo stock. The recoil system is a Sprinco “blue” spring with Spikes ST-T1 buffer. A Rise Armament RA-535 trigger, with 3.5-pound single-stage break and a blazing-fast reset, allows for both long-range precision and rapid-fire when needed close-in.

The handguard is an SLR Rifleworks ION Ultra Lite 11.7-inch tube. The ION Ultra Lite features seven sides of M-LOK slots as well as several more M-LOK cutouts along the 12-o-clock axis, with a small section of Picatinny rail at the muzzle end. I tried to make best use of this configuration by clamping a Holosun LS-321 IR laser/illuminator to the front rail section, which is controlled by a Unity Tactical TAPS switch attached directly to the 12-o-clock MLOK slots. The TAPS is a dual-lead switch that single-handedly operates both the laser and white light – in this case, an Arisaka 18650 light body with SureFire UE-series tailcap and Malkoff Devices E2XTL head. This head produces 500 lumens and 55,000 lux. The beam pattern is tight and well-directed with minimal spill, making it especially useful at extended ranges while still providing a large bright spot in CQB. The light is mounted via an Arson Machine inline MLOK mount that pushes the light out almost to the end of the suppressor to minimize barrel shadow. The 12-o-clock position of the TAPS, combined with fully ambi controls including Radian safety and charging handle means the manual-of-arms is perfectly mirrored regardless of which shoulder you’re shooting from.

Speaking of line-of-sight, the optics system consists of a Vortex Razor Gen III 1-10x, mounted in an ultralight Scalarworks mount, paired with a Trijicon RMR on an Arisaka offset mount, which can be configured to either 35- or 45-degree offset to accommodate scope clearance and shooter preference. It should be noted that the Razor is mounted in a 1.57-inch height mount for better cheek weld during prone or long-range shooting, while the RMR is in a 1.93-inch mount for faster acquisition in heads-up shooting, and to permit passive aiming through NVGs.

Furniture is rounded out with a B5 systems Type 23 pistol grip and Strike Industries short angled vertical grip. The Type 23 offers a more vertical grip angle and comes with stippling on both sides and the front strap. We had P4 Coatings add matching stippling to the backstrap for better grip during one-handed manipulations, particularly when running the gun muzzle-up. The Strike short angled vertical grip offers just-enough vertical grip to drive the gun and provide consistent support-hand indexing without excessive protrusion. This grip also has molded-in channels for cable management, but we found Strike’s Siegen MLOK inserts to be better suited for our setup. Support-hand grip surface is augmented with insert panels from Walker Defense Research. These polymer panels are dusted with silicon carbide grit to provide a no-fail grip surface while still being lightweight and low profile.

The build is topped off with a Blue Force Gear VCAS sling stowed with a Neomag Sentry Strap. The Sentry Strap wraps around the handguard and is held in place with Velcro, while a small tail with sewn-in rare earth magnets keeps the wrapped up while not in use. To deploy the sling, simply tug on it to break the seal between the magnets and you’re ready to go. The barrel is capped with a Rex Silentium MOD X suppressor. The MOD X is a two-part can unique in that, when you order from a Rex dealer, it can be custom-configured to any combination of baffles for both base unit and extension. The base unit can be as short as 3 baffle, and the total baffle count can go as high as 14. We chose to set ours up with a 3-baffle base unit (seen here) with a 5-baffle extension. The base unit is a compact 4.1 inches long and weighs only 8 ounces. The stubby base unit, when used alone, is far from Hollywood quiet but provides enough sound suppression to save your hearing while still being short enough to carry the complete rifle in most SBR backpacks. For more deliberate shooting sessions like classes and range days, the additional 5-baffle unit can be threaded on for better sound suppression.

The sum total of these parts is a single survival SBR that’s capable of both CQB and long-range precision (we’ve run this rifle past 800 yards with repeatable hits on steel), day and night capable using white light or night vision that can still be packed away in a duffle bag, backpack or between the seats of an SUV. It's truly a go-anywhere, do-anything rifle we expect would serve us well in any emergency.

Selected Parts List

ADM UIC-15 Lower ($350)
www.admmfg.com

Primary Weapons Systems Enhanced Buffer Tube Kit ($110)
www.primaryweapons.com

Rise Armament RA-535 trigger ($260)
www.risearmament.com

B5 Systems SOPMOD Bravo ($60)
www.b5systems.com

Rosco 12.5” Sage Dynamics K9 Barrel ($170)
www.roscomfg.com

Vortex Razor Gen III 1-10x ($3,600)
www.vortexoptics.com

Scalarworks LEAP ($399)
www.scalarworks.com

Unity Tactical TAPS ($175)
www.unitytactical.com

Arson Machine Inline Scout Mount ($48)
www.arsonmachine.com

Arisaka 18650 w/Malkoff Devices E2XTL Head ($266)
www.arisakadefense.com

Holosun LS321G ($970)
www.holosun.com

Strike Industries Short Angled Vertical Grip ($22)
www.strikeindustries.com

Strike Industries Siegen Rail Panels ($15)
www.strikeindustries.com

Walker Defense Research NILE MLOK panels ($50)
www.walkerdr.com

Rex Silentium MOD X ($1,100)
www.rexsilentium.com


Midland MXT575 GMRS Mobile Radio Review & DIY Installation

I recently picked up a new 2022 Toyota 4Runner with the intention of adding a few modifications to make it a more fun daily-driver and more capable overland vehicle. Communications were near the top of my list, since I often venture into parts of Arizona where cell signal is spotty or nonexistent. It's valuable to have a quick and reliable method of staying in touch with nearby friends and family, whether we're shooting in the desert, off-roading in the mountains, or cross-country caravanning on a road trip. The new 50-watt Midland MXT575 GMRS mobile radio fits the bill, and can easily connect to local repeaters, other mobile radios, and the half-dozen cheap Baofeng handheld radios I already own.
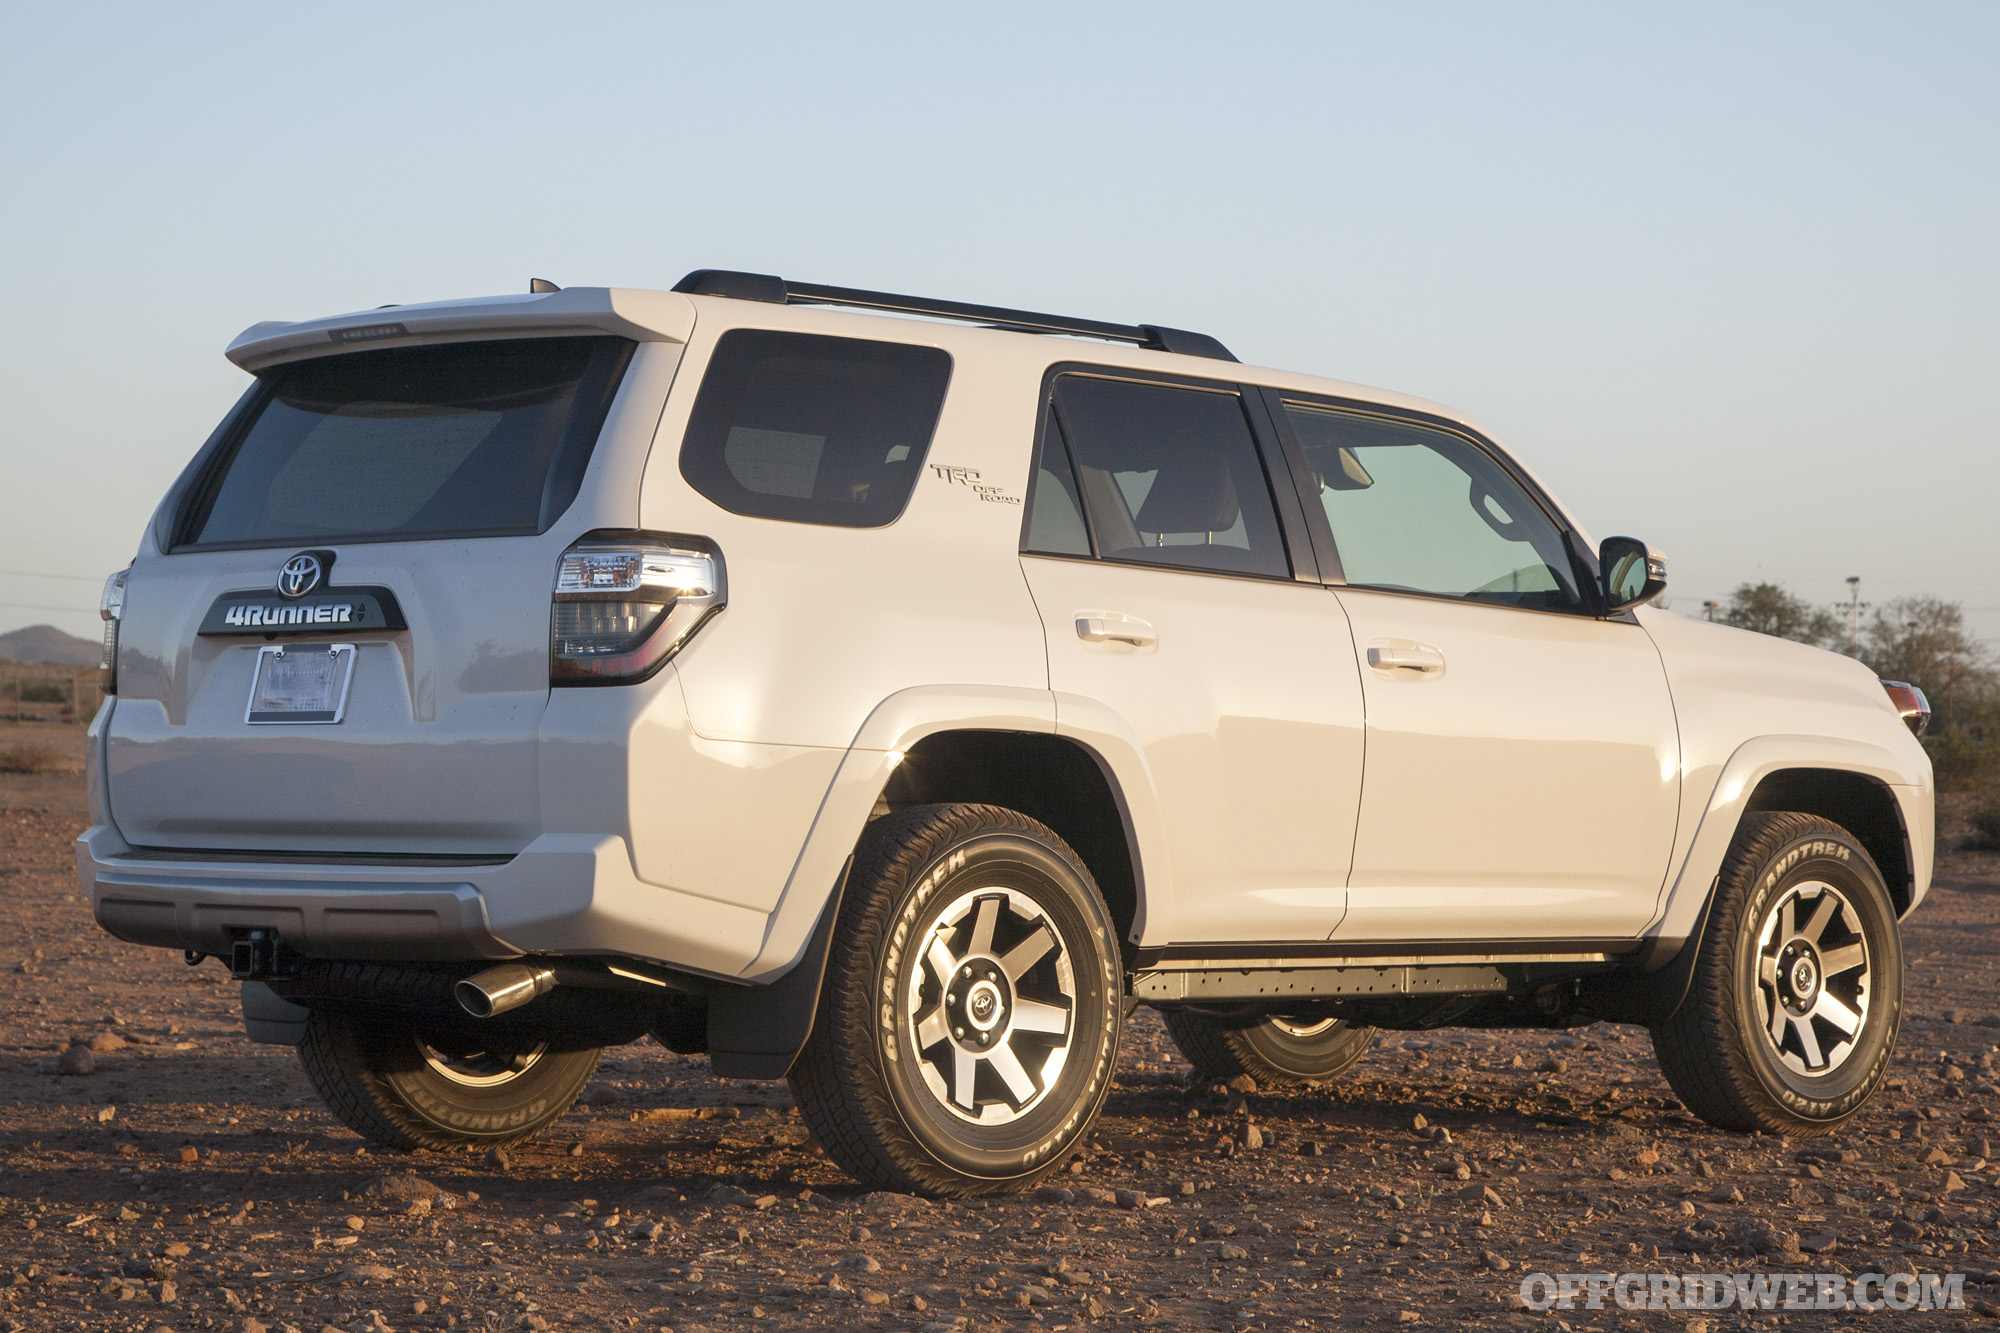
Above: With a reliable V6 engine, four-wheel-drive, and a locking rear differential, the 4Runner makes a good platform for an overland vehicle or bug-out truck.

Read on for my thoughts on the MXT575 and a step-by-step guide showing how I installed it discreetly in my 4Runner.

About the Midland MXT575
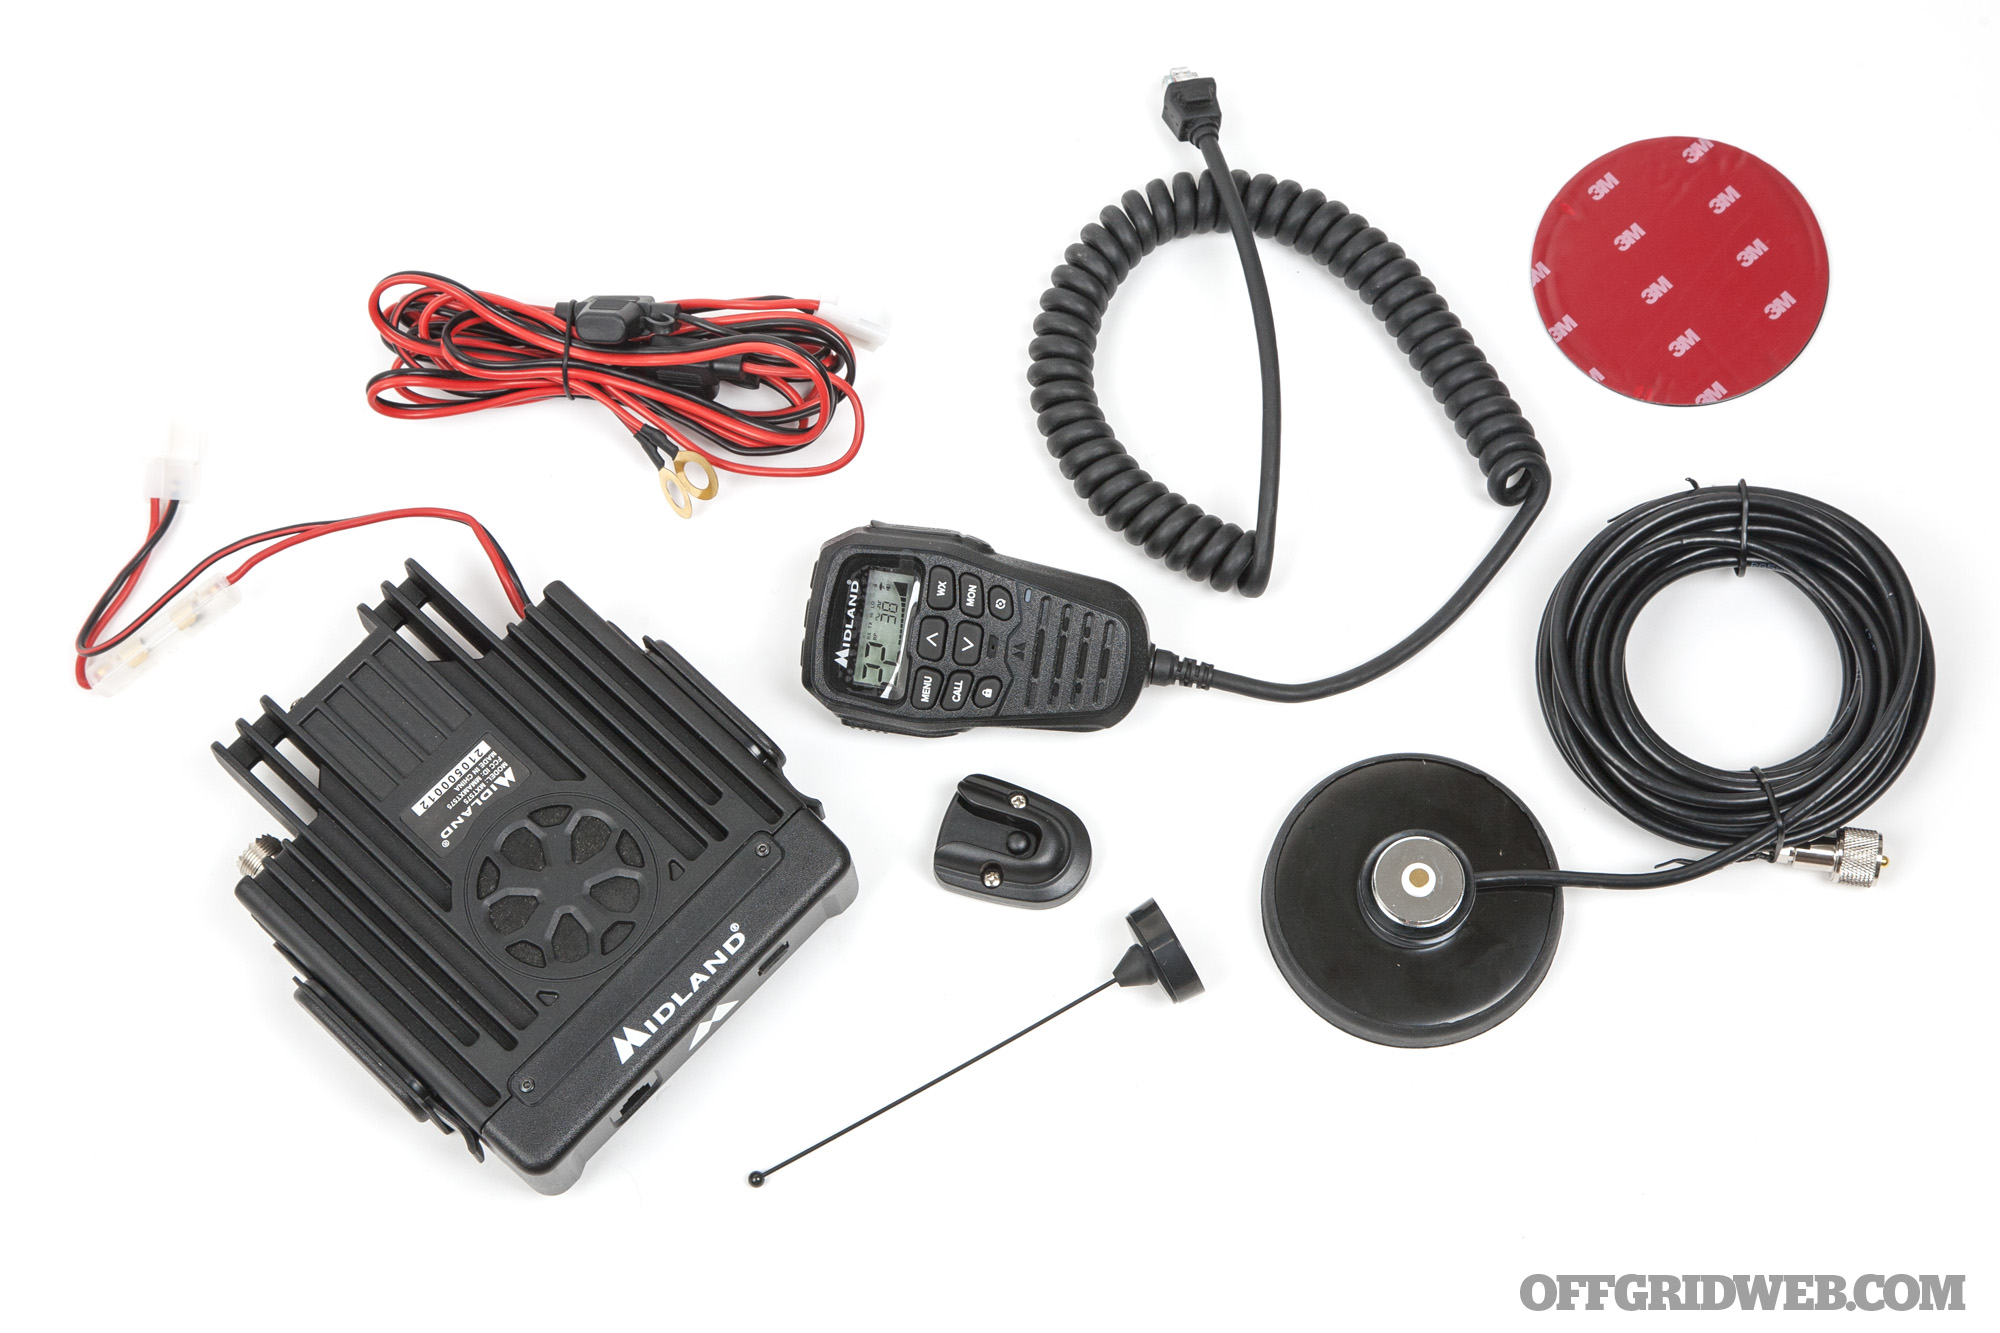
The Midland MXT575 MicroMobile radio is Midland's flagship GMRS product, boasting 50-watt broadcasting power, the maximum allowed by law in the United States. It features 15 high-power GMRS channels with 142 privacy code options, as well as the ability to scan NOAA weather channels and provide automated alerts if a storm is rolling in. It has 8 repeater channels and is split-tone repeater capable, so you can extend the radio's range by connecting to any GMRS repeaters that happen to be nearby. There's also a USB-C port on the base, which can be used for fast charging of cell phones and handheld radios.

The MXT575 kit consists of three main components:

  • Midland MXT575 base unit with quick-detach cradle mount, wiring harness, and in-line fuses
  • Control microphone/speaker with backlit LCD display
  • 2.1dB unity gain antenna with coaxial cable and magnet mount
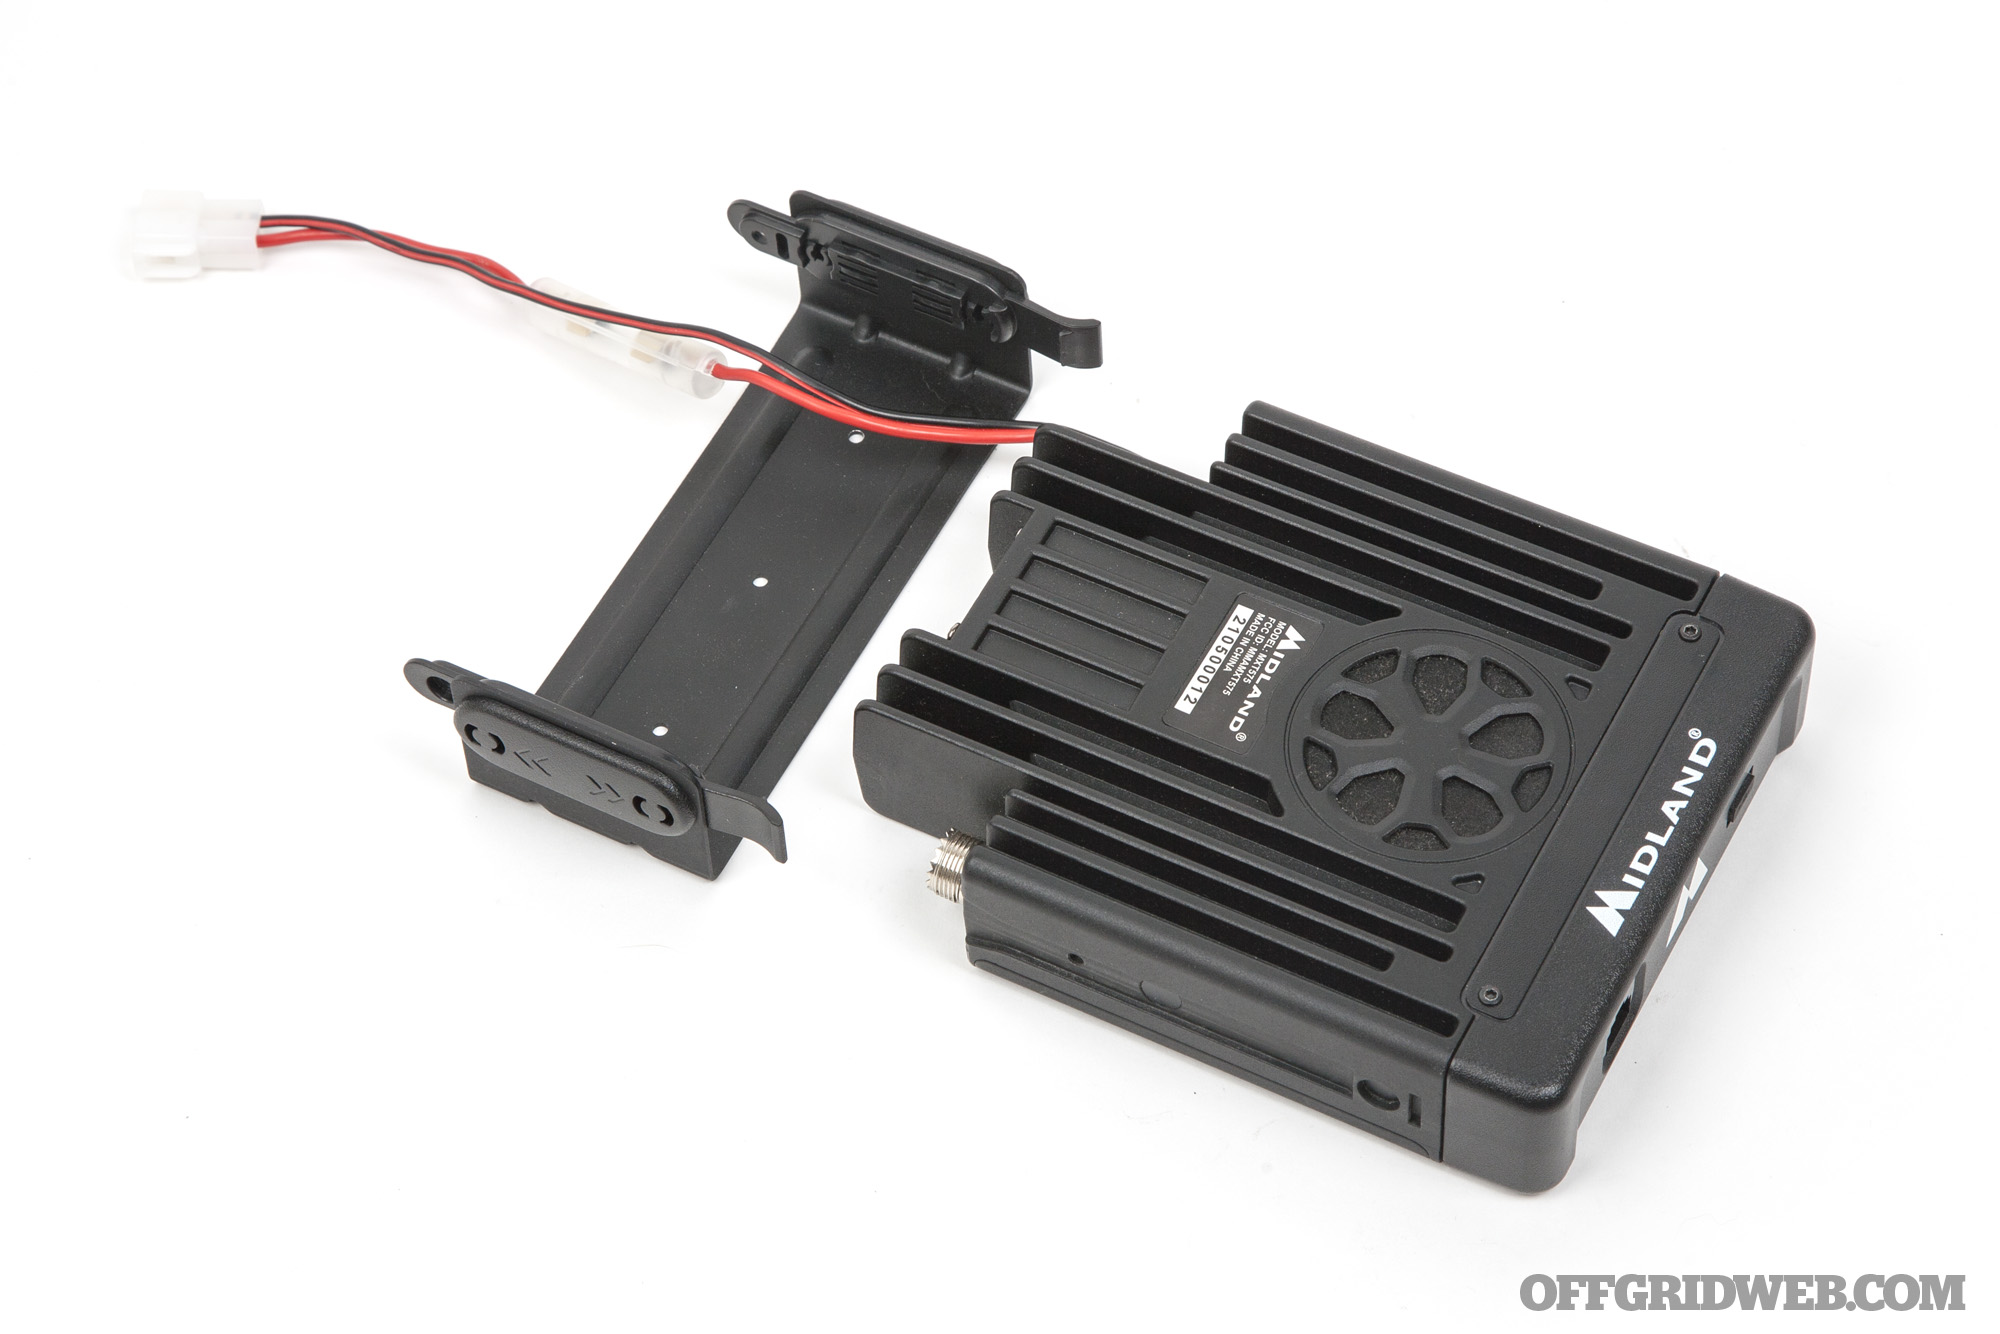
Above: The radio clips into a mounting bracket that can be attached to any hard surface. Self-tapping screws are included.

Since the controls for the MXT575 are integrated completely into the handheld mic, the base can be tucked away anywhere in the vehicle, as long as there's adequate airflow to keep it from getting too hot. This was good news for me, since I didn't want a radio taking up space on my dash and/or catching the eyes of potential thieves. I wanted it out of sight and out of mind until it's needed.

Of course, the short coiled cable attached to the mic wouldn't be long enough for many mounting locations, but that was easily extended. More on that later.

As for the antenna, the MXT575 comes with an MXTA51 magnetic antenna with 20-foot RG-58A/U coaxial cable, NMO threaded connector, and 2.1dB detachable antenna. This is easy to attach anywhere on your vehicle without cutting or drilling. For maximum performance, you should position the antenna as high as possible on top of a large ground plane (e.g. metal roof, hood, or trunk lid). A soft rubber cover is included to prevent the strong magnet from scratching your paint as you install or remove it.
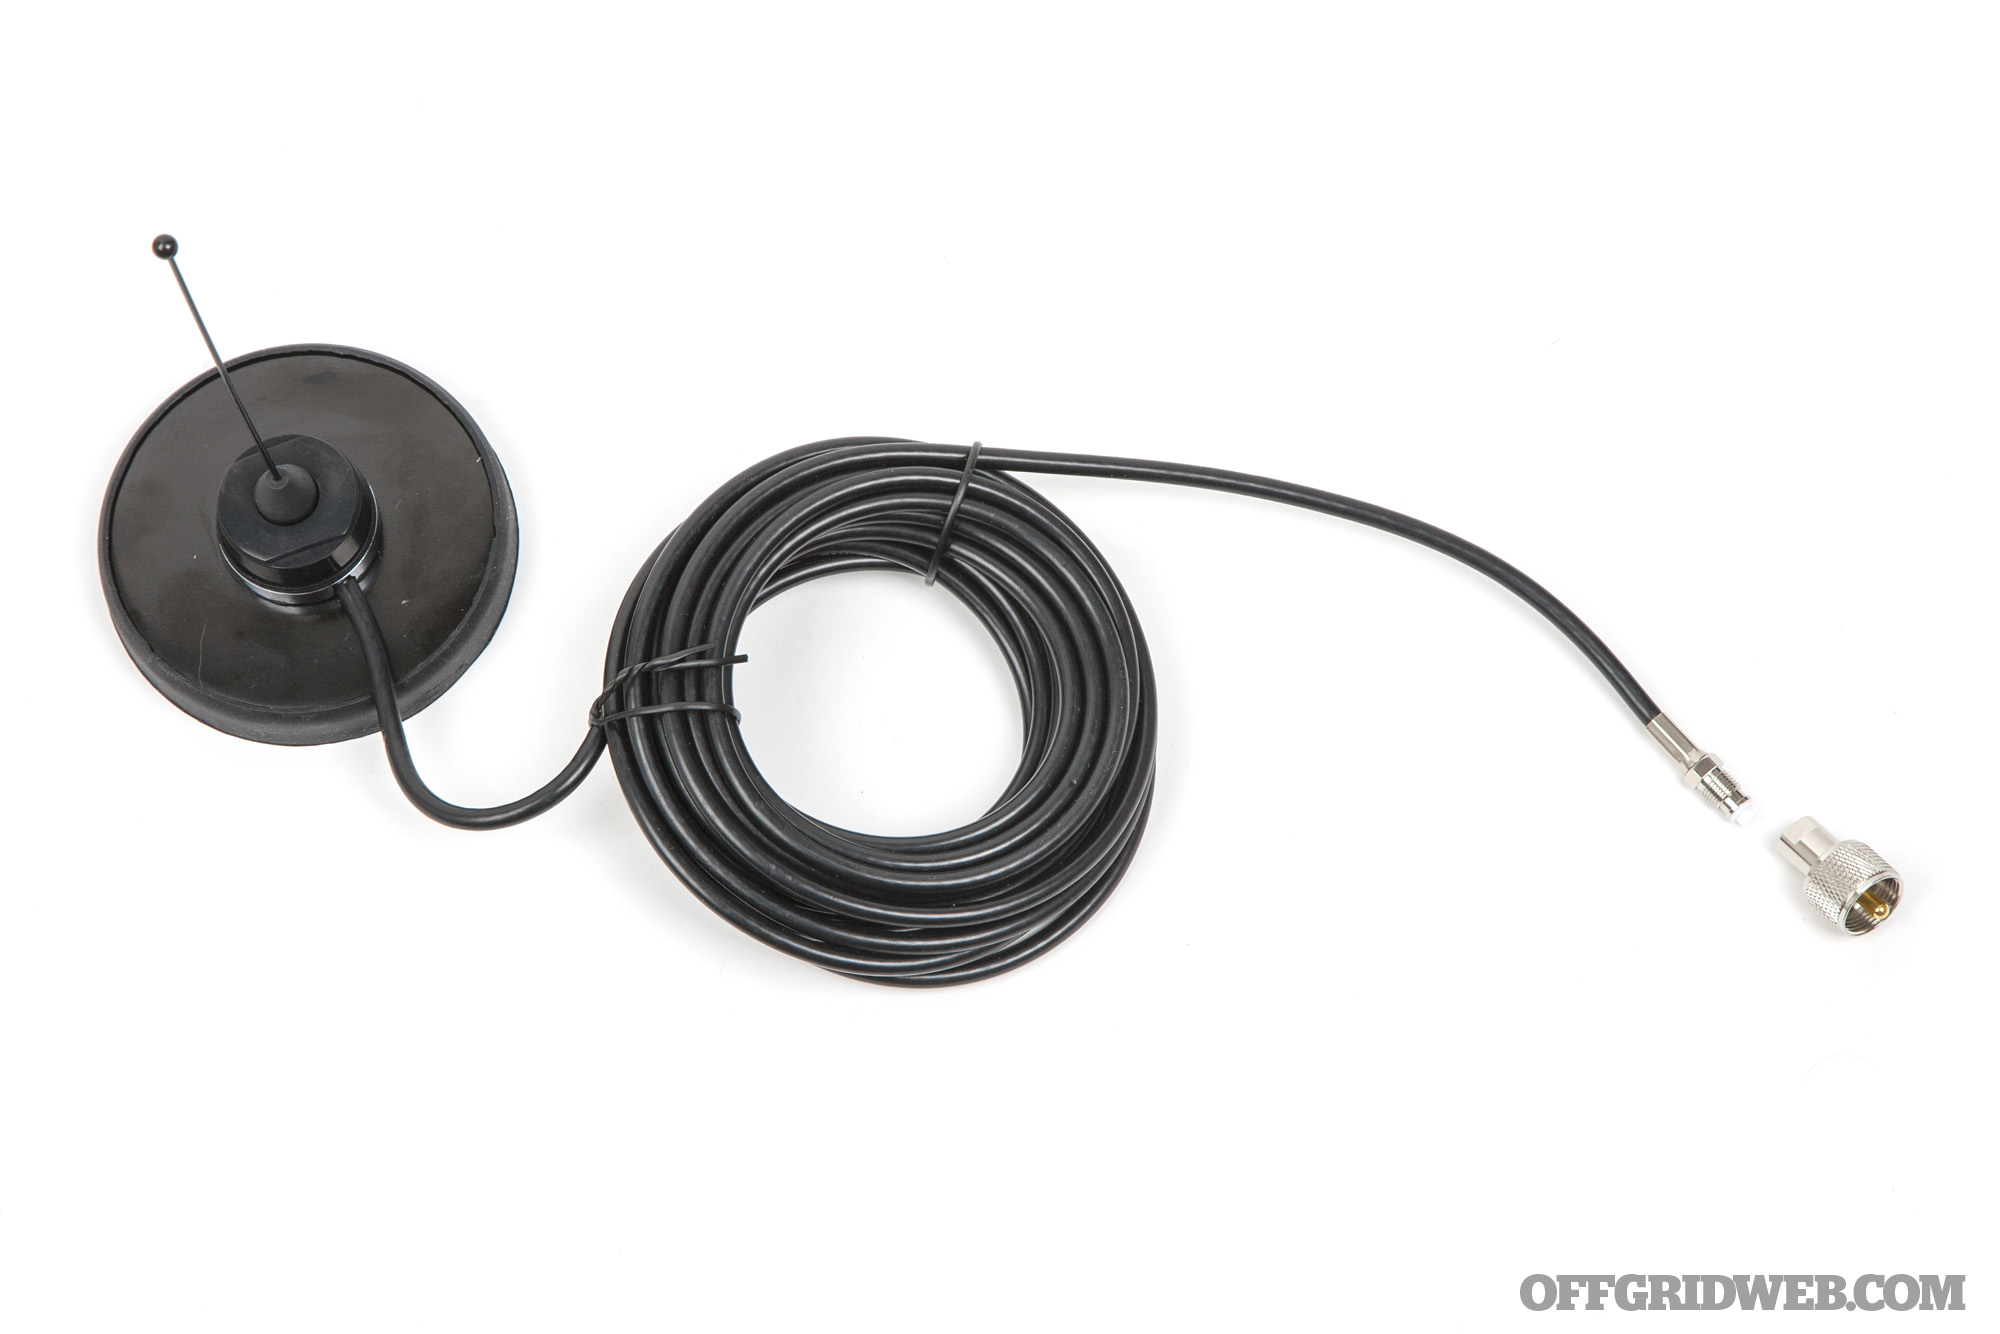
Above: The antenna cable has a removable connector, making it easier to pass through tight spaces.

One much-appreciated feature of the Midland antenna is its removable connector. This temporarily reduces the diameter of the cable end, and makes it significantly easier to feed the cable through panels or under carpet. Anyone who has tried to cram a large wire through a small hole in a cramped space knows how much of a headache that can turn into.

MSRP for the Midland MXT575 is $400. The radio seen in this article is a pre-production test model — the retail release of the MXT575 is slated for May 3rd, 2022.

An Overview of GMRS

If you're well-educated on radios, you probably know all about how GMRS works, but we'll give a quick overview of this radio category for readers who may not be well-versed yet.
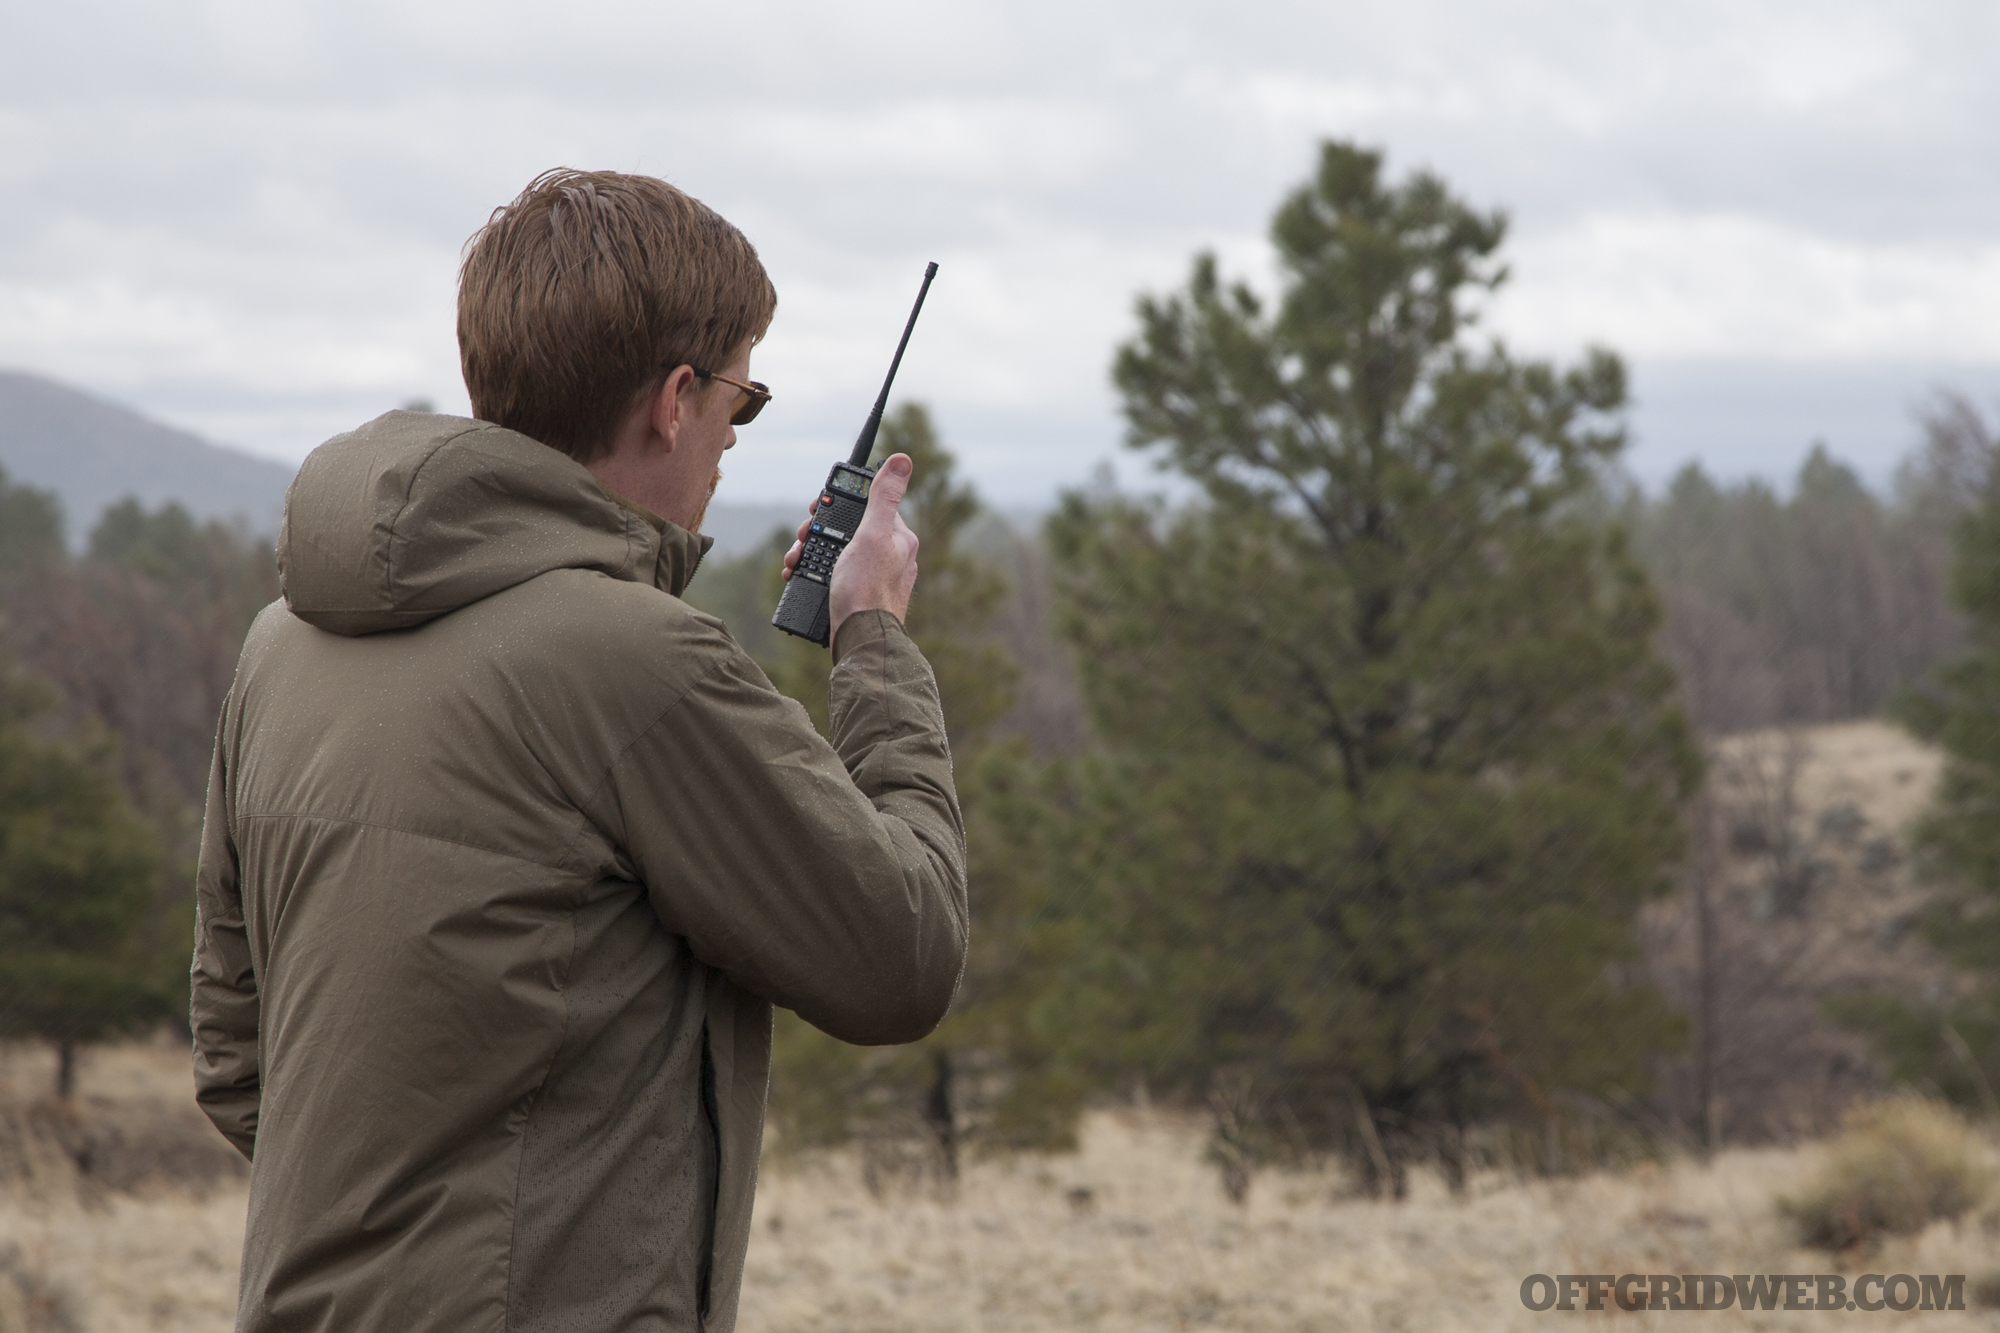
The General Mobile Radio Service (GMRS) occupies channels between 462 and 467 megahertz, and is designed for (relatively) short-range two-way communications. Unlike the Family Radio Service (FRS), which is what most cheap blister-pack walkie-talkies use, GMRS offers increased broadcasting power limits and the ability to interface with repeaters (both of which extend the radio's maximum range). Although handheld GMRS radios are limited to 5-watt output, mobile radios such as the MXT575 can push a maximum of 50 watts.

The downside to GMRS is that it requires a license — but don't write it off just yet. It's exceptionally easy to get your GMRS license, since (unlike ham radio) no test is required. Better yet, the license fee used to be $70, which wasn't too bad, but that fee recently dropped to $35 (as of 4/19/2022). One license applies to your entire immediate family and it lasts for 10 years. Once you get a license, which shouldn't take more than one or two business days, you'll be issued a call sign you can use on the air.

For more information on FRS, GMRS, and ham radios, refer to our article “Can Anyone Hear Me?” from Issue 38 of Offgrid.

DIY Installation
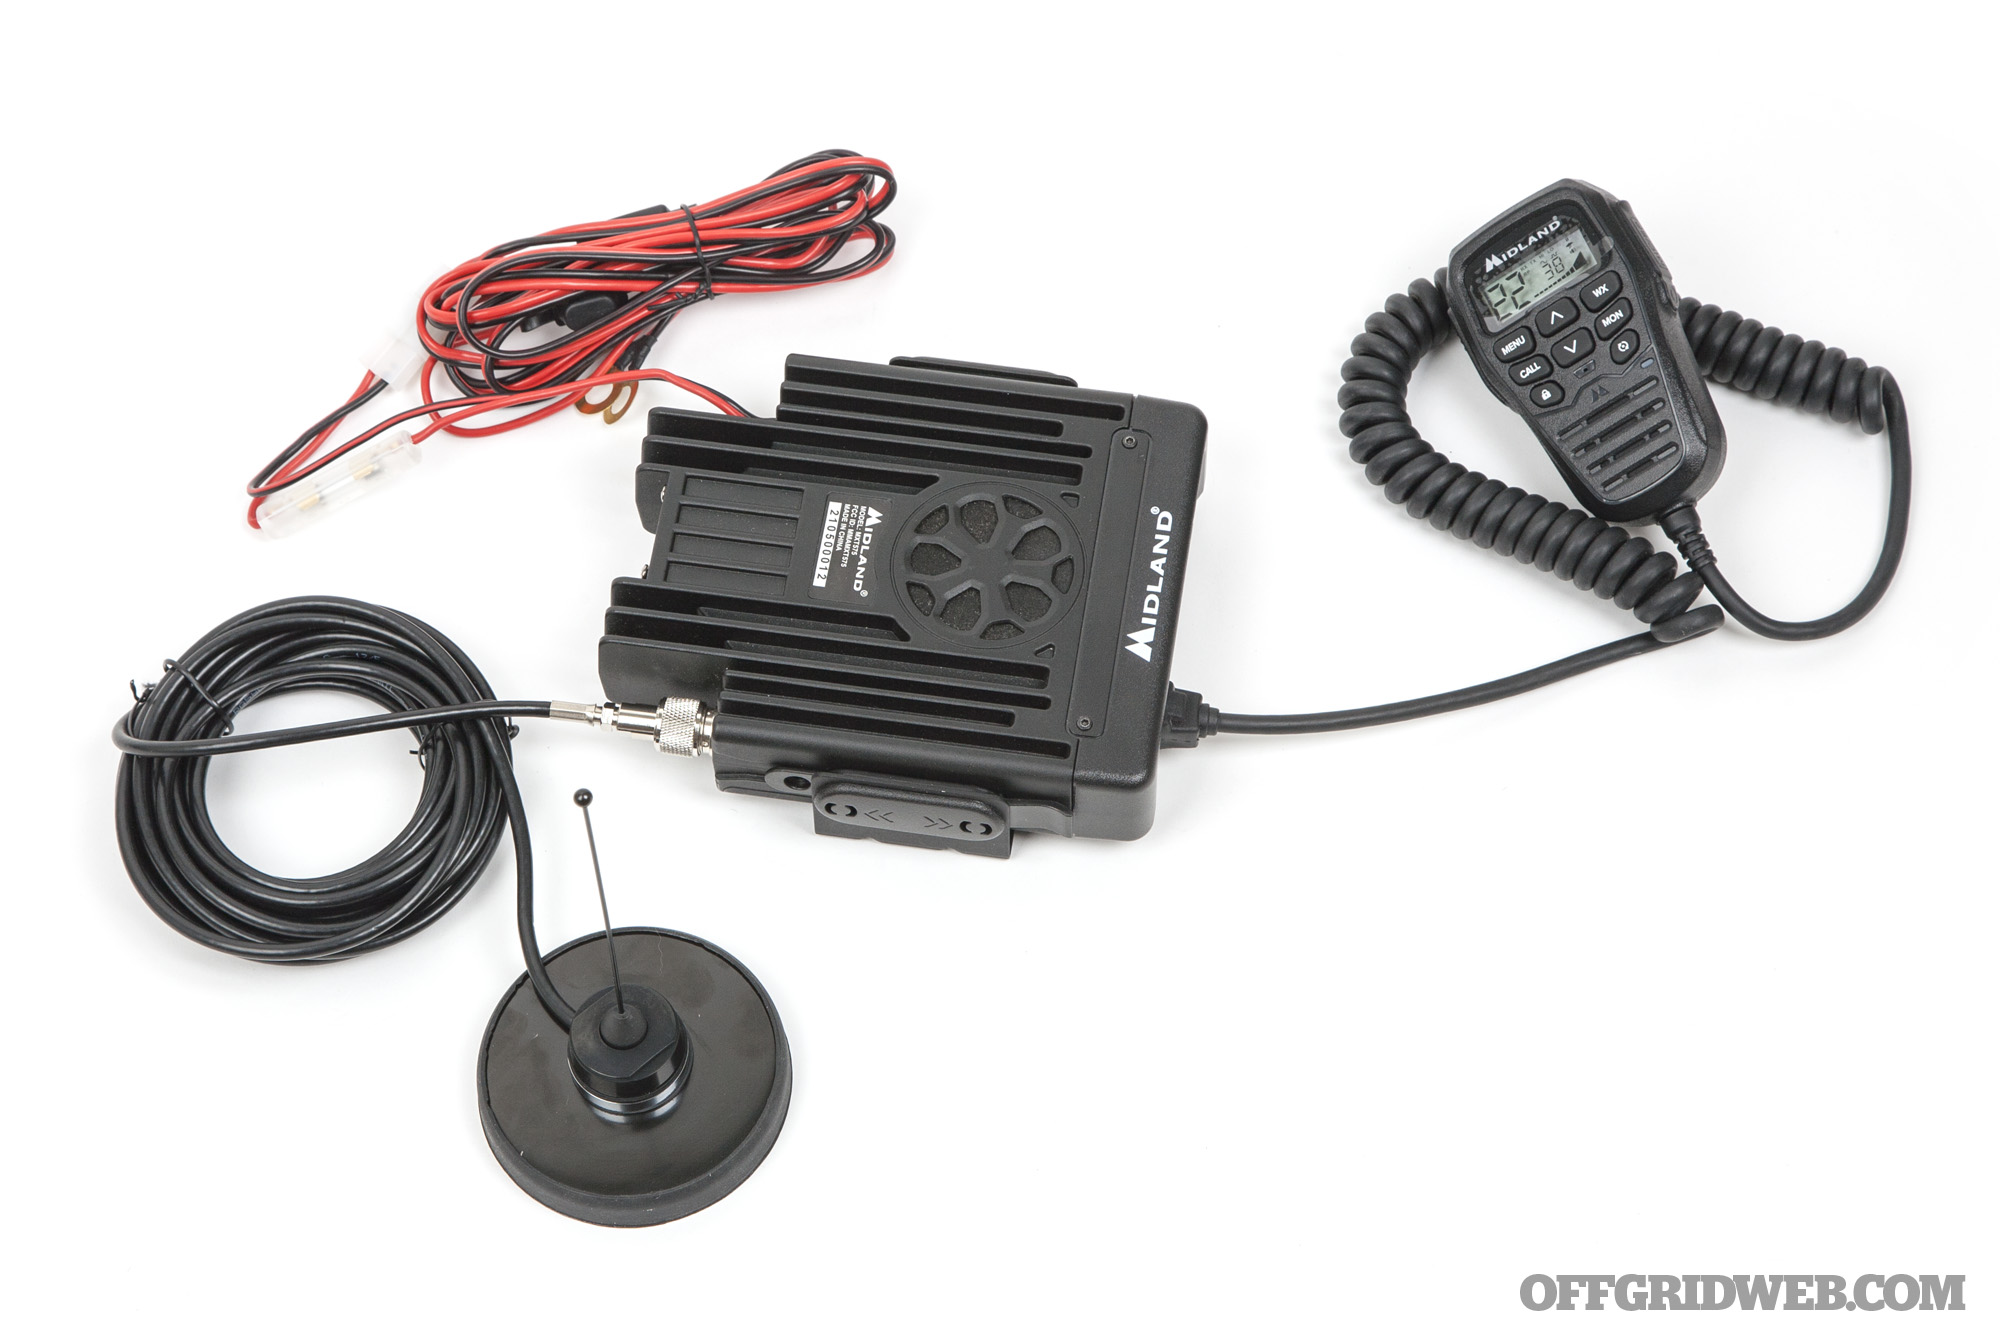
Before I started work on my 4Runner, I spent a few days reading other DIY radio installation guides online. This helped me determine where I could put the radio, how I could run the wiring, and even where to attach the mic. Credit where credit is due, several elements of my project were inspired by two DIY articles from Trail4Runner.com. However, I didn't want to put the larger, higher-output MXT575 in the glovebox, console, or inside the dash due to concerns about overheating. Instead, I decided to place it under the driver's seat.

Mounting the Radio
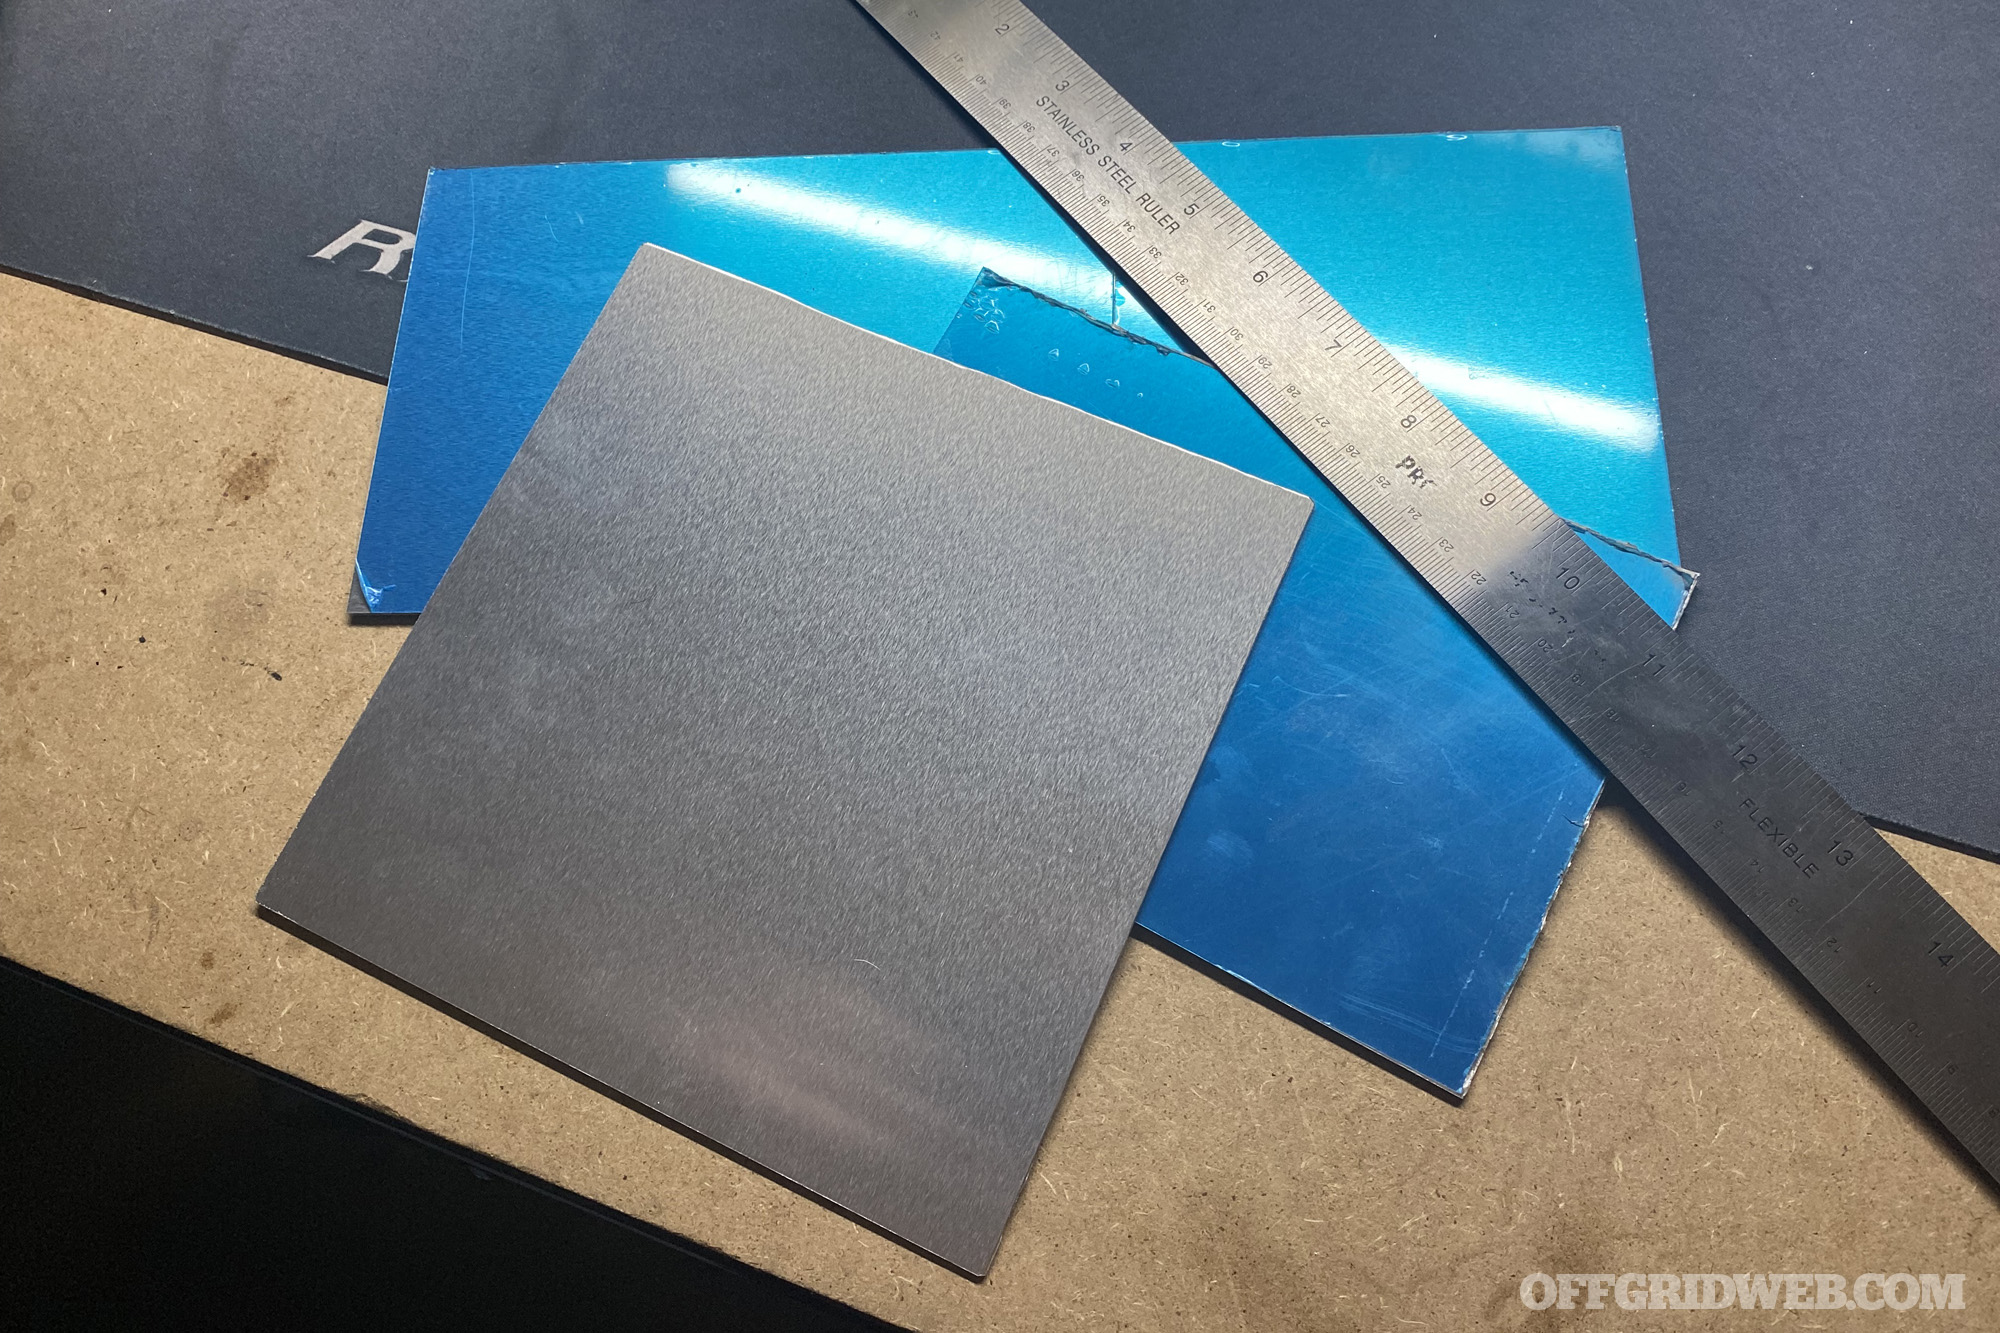
Rather than cutting carpet and drilling into the floor of my nice new truck, I created a mounting base that would attach to the carpet with strong Velcro strips. I bought an 1/8-inch-thick aluminum sheet off Amazon and used a Dremel to cut it to 7×7 inches square. This provided lots of surface area for Velcro and a sturdy platform for the radio mount. I probably could have used wood or plastic sheet, but I know aluminum will dissipate heat better — I live in the land of 120°F summers, after all.
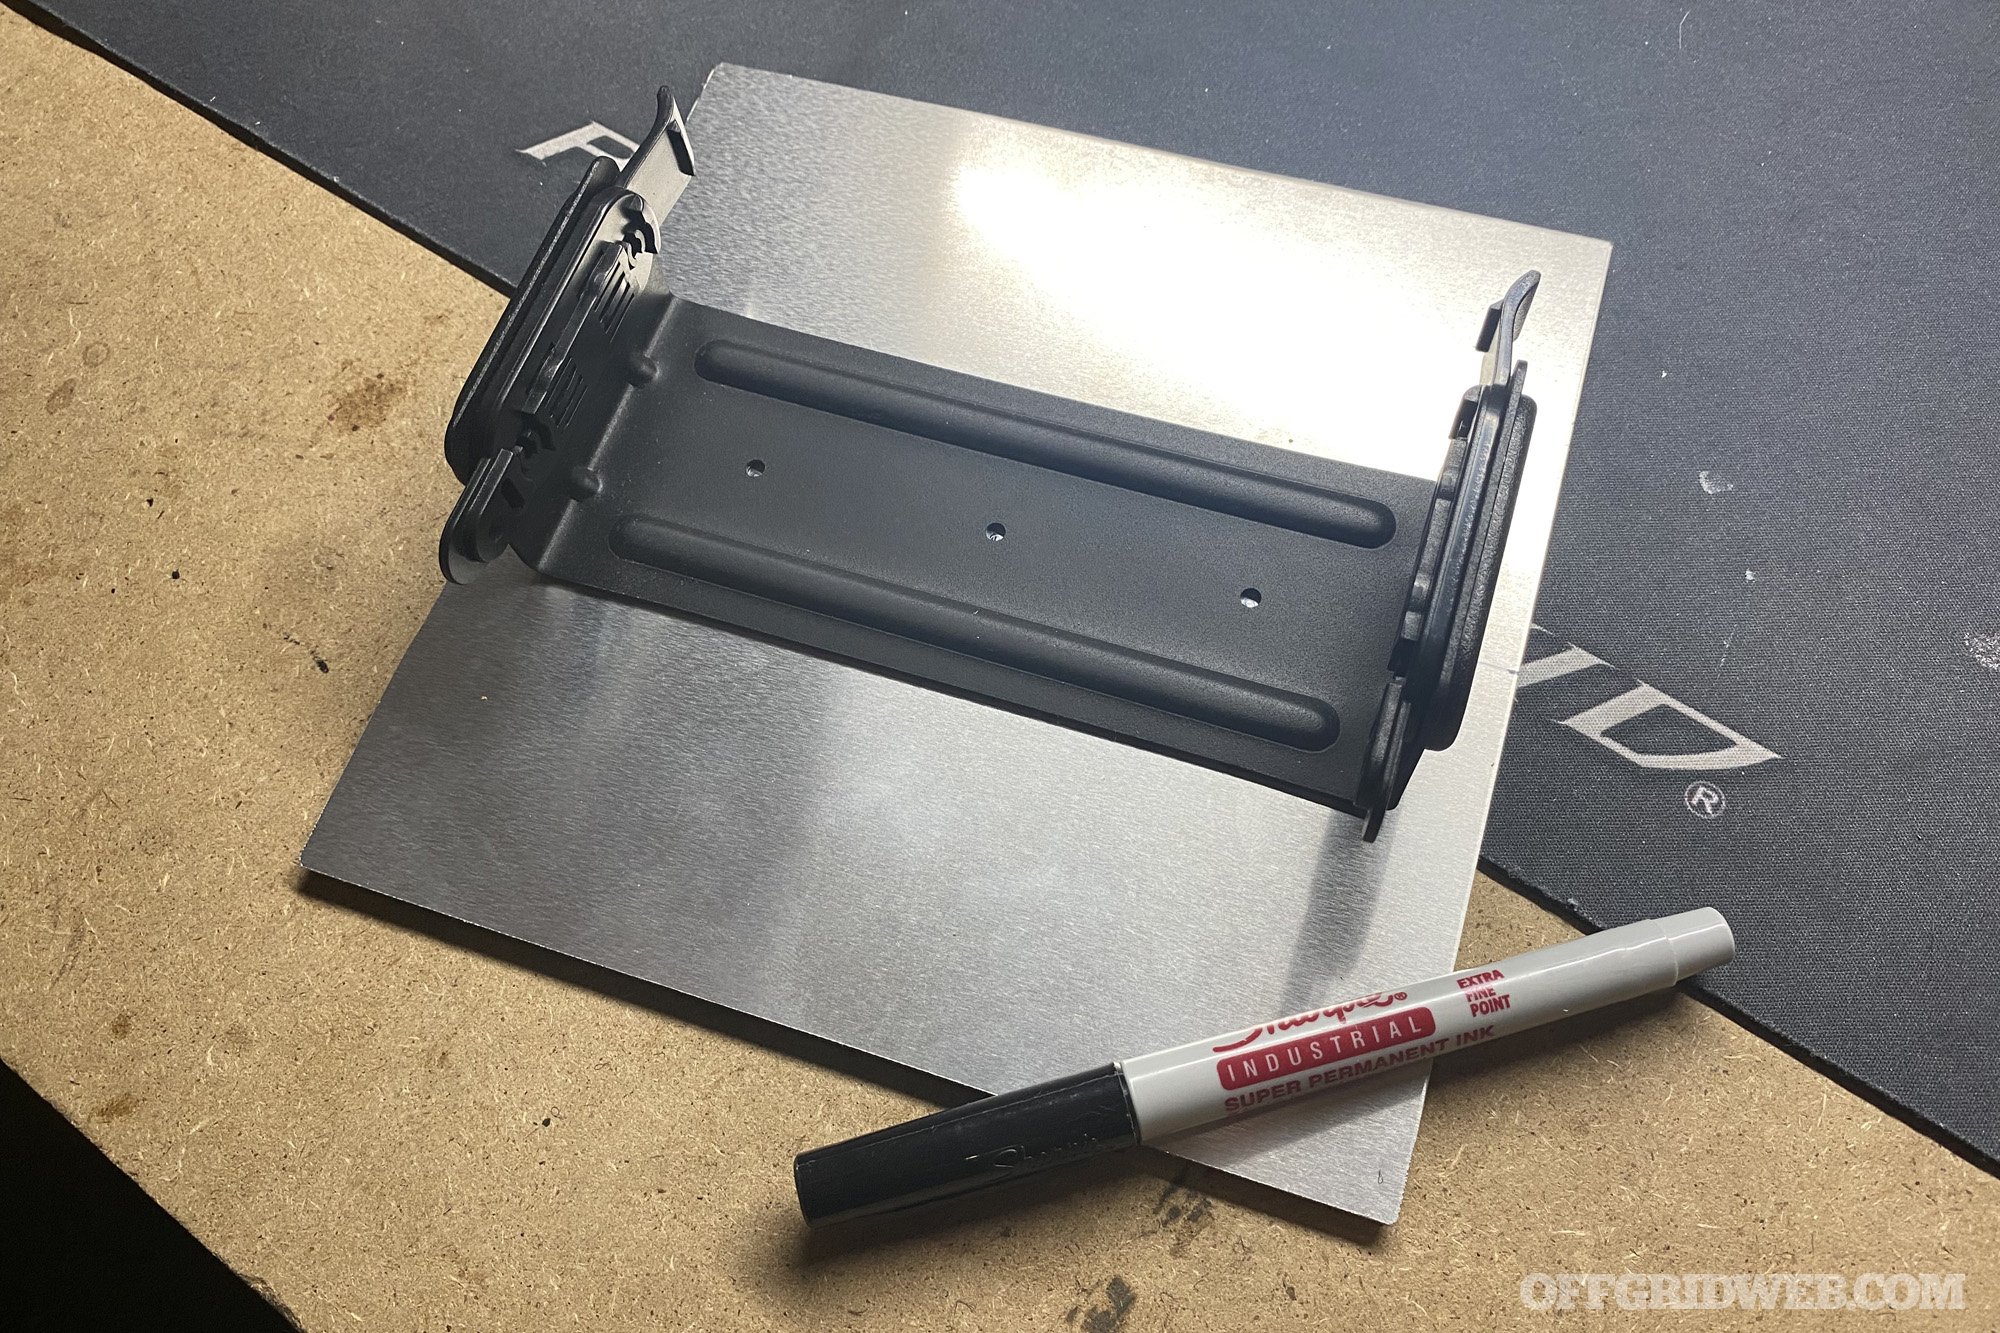
I detached the Midland MXT575 cradle mount from the radio, marked the screw holes, and drilled them out. A few short cap screws and nuts were used to attach the mount to the plate.
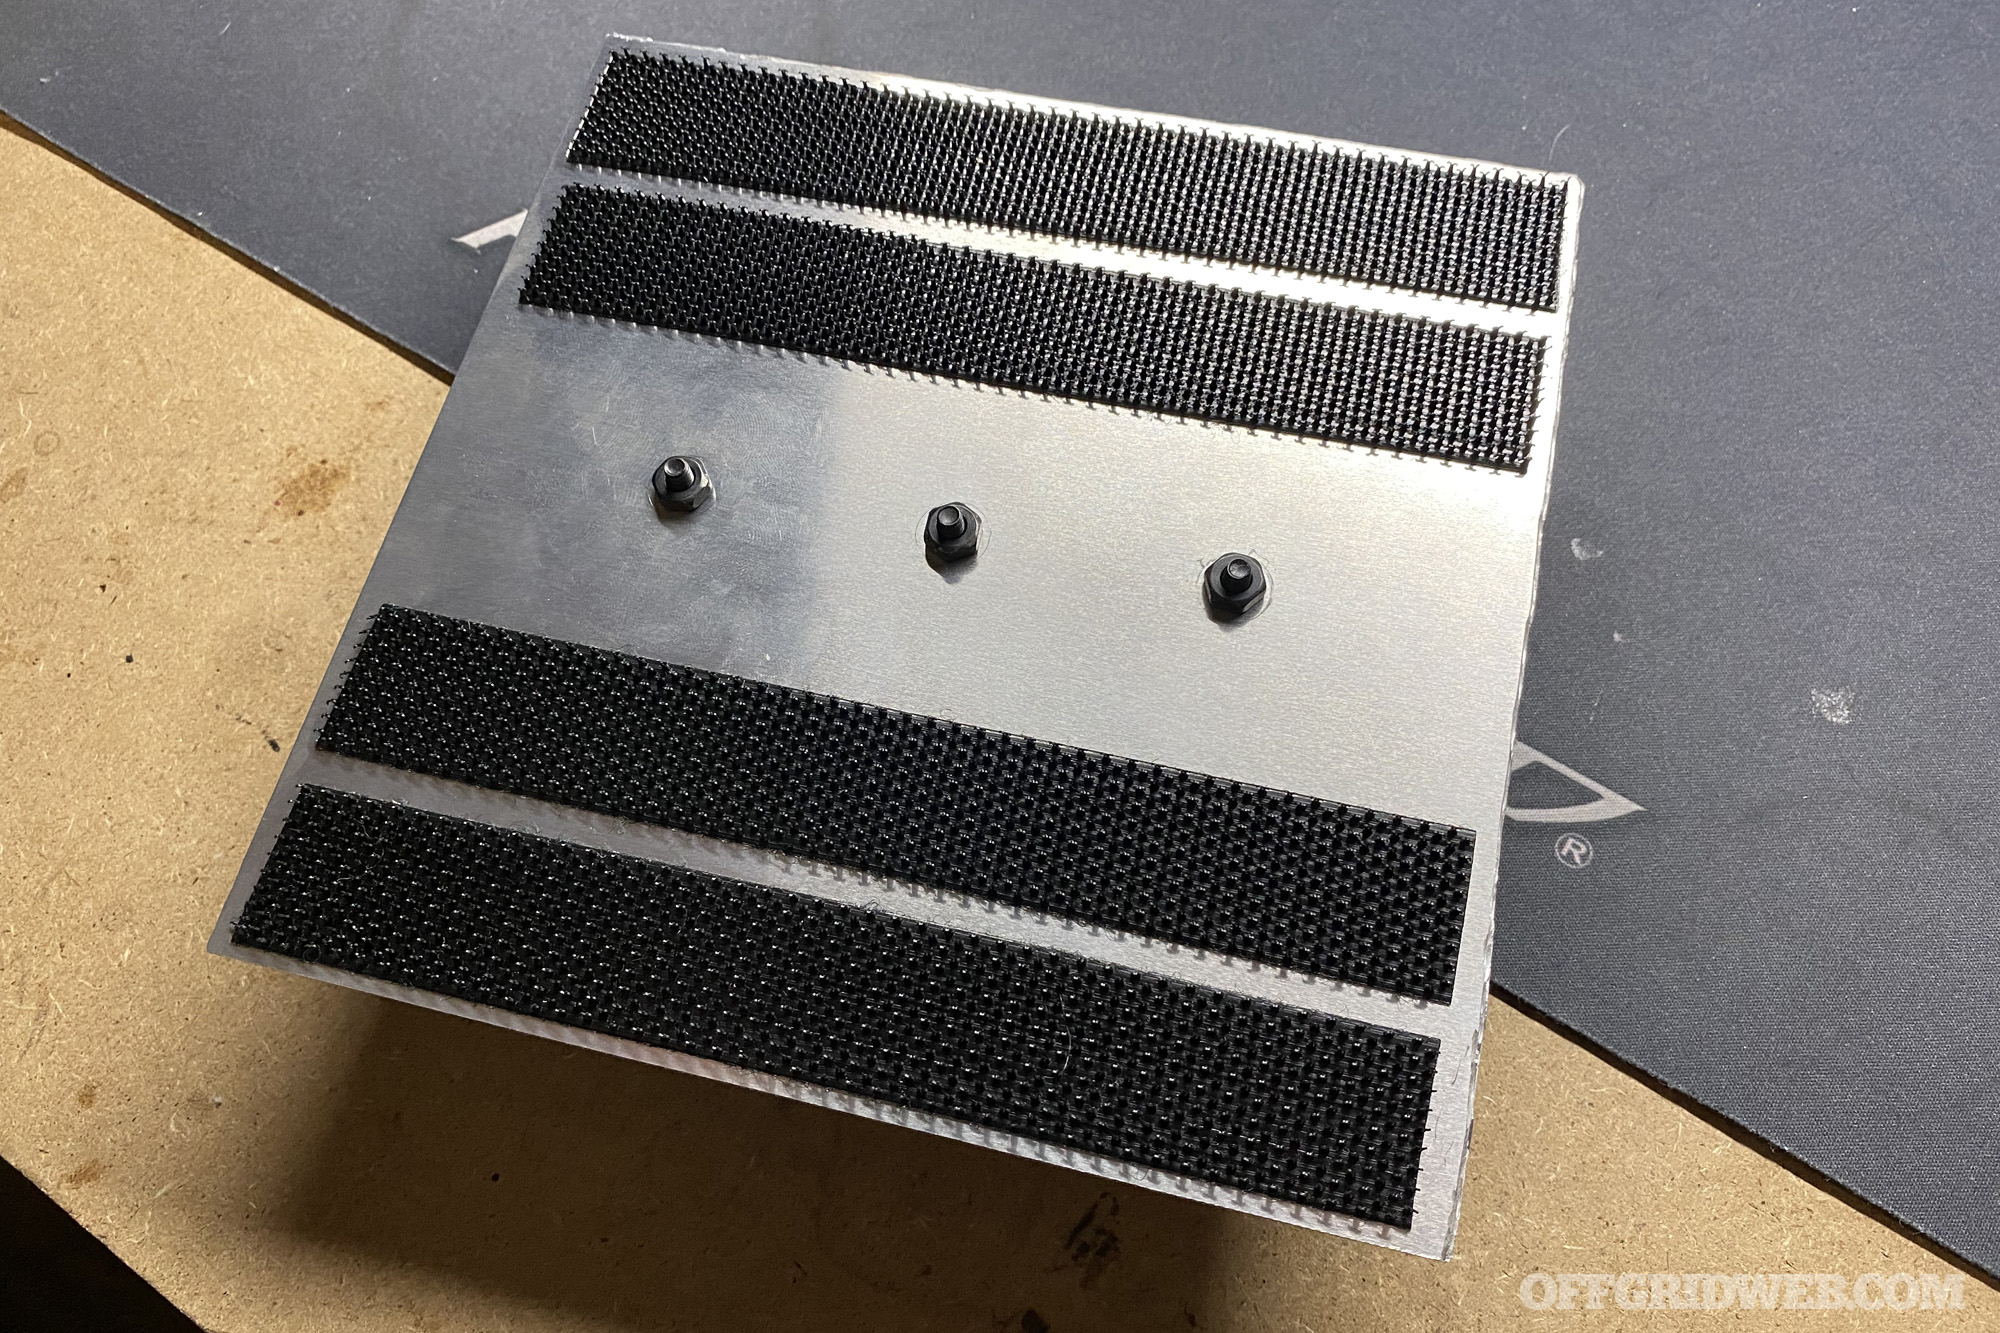
On the underside of the plate, I stuck four strips of Velcro Extreme Outdoor hook material, which grabs the truck's carpet with surprising force. It won't budge an inch, even if I'm bouncing down rocky trails and shaking my own fillings loose.

Hardwired Power

Next, I needed to figure out how to get power to the MXT575. Even though it would be possible to run the included power cable to the fuse box inside the cab, the high draw of a 50W radio could lead to problems down the line, and the harness is clearly designed with ring terminals for direct connection to the truck's battery. So, I decided to hardwire it straight to the battery. This meant finding a way to run the cable through the firewall into the engine bay.
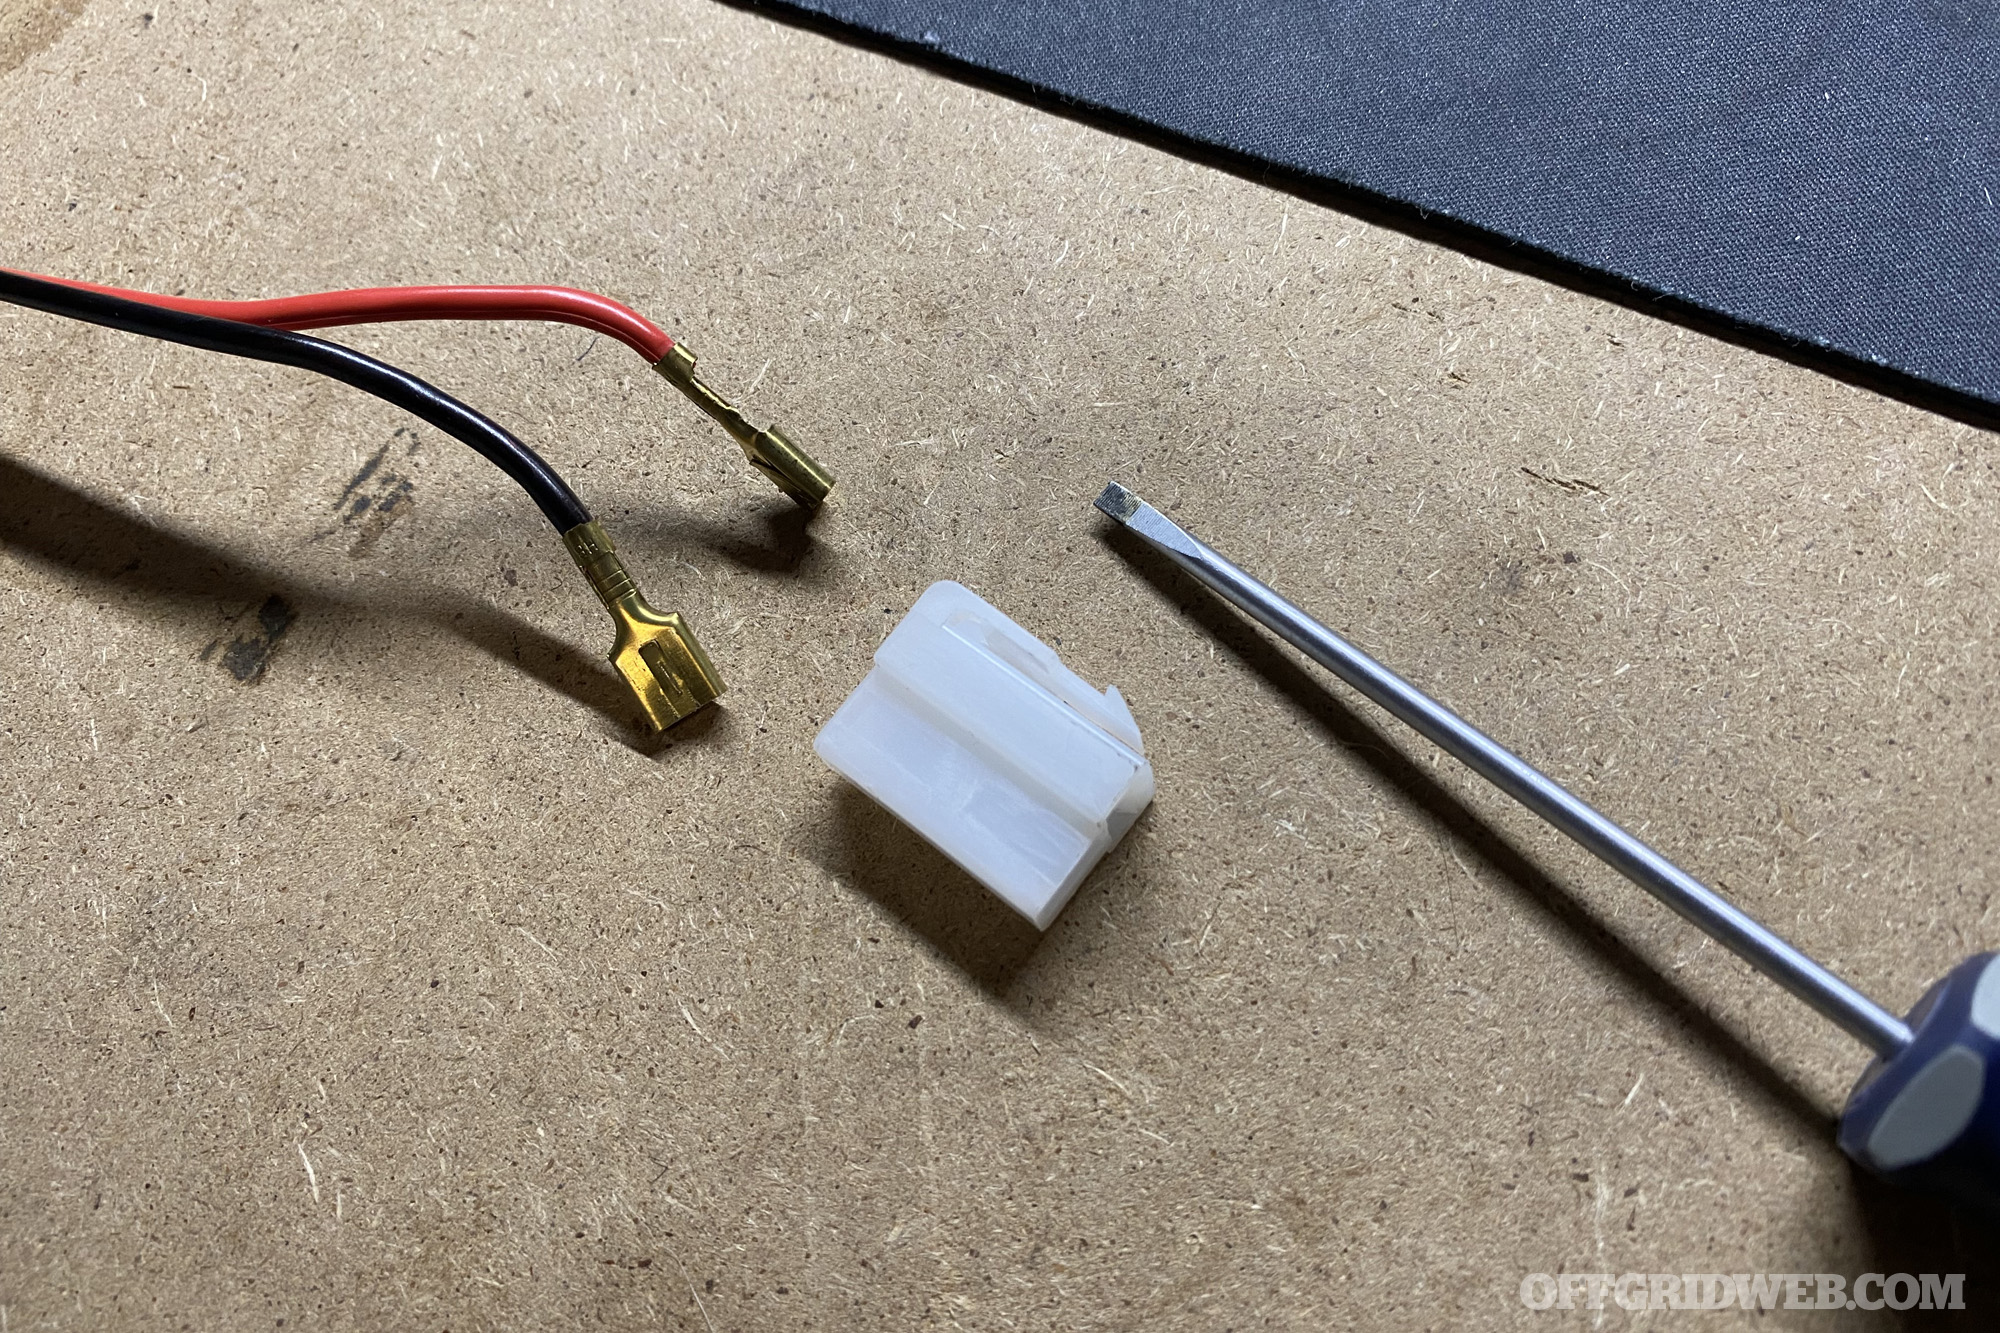
The plastic connector on the end of the power cable was far too large to fit easily through the firewall, so I carefully used a small screwdriver to pry out the terminals inside. I then found a suitable location to pass the wires through:
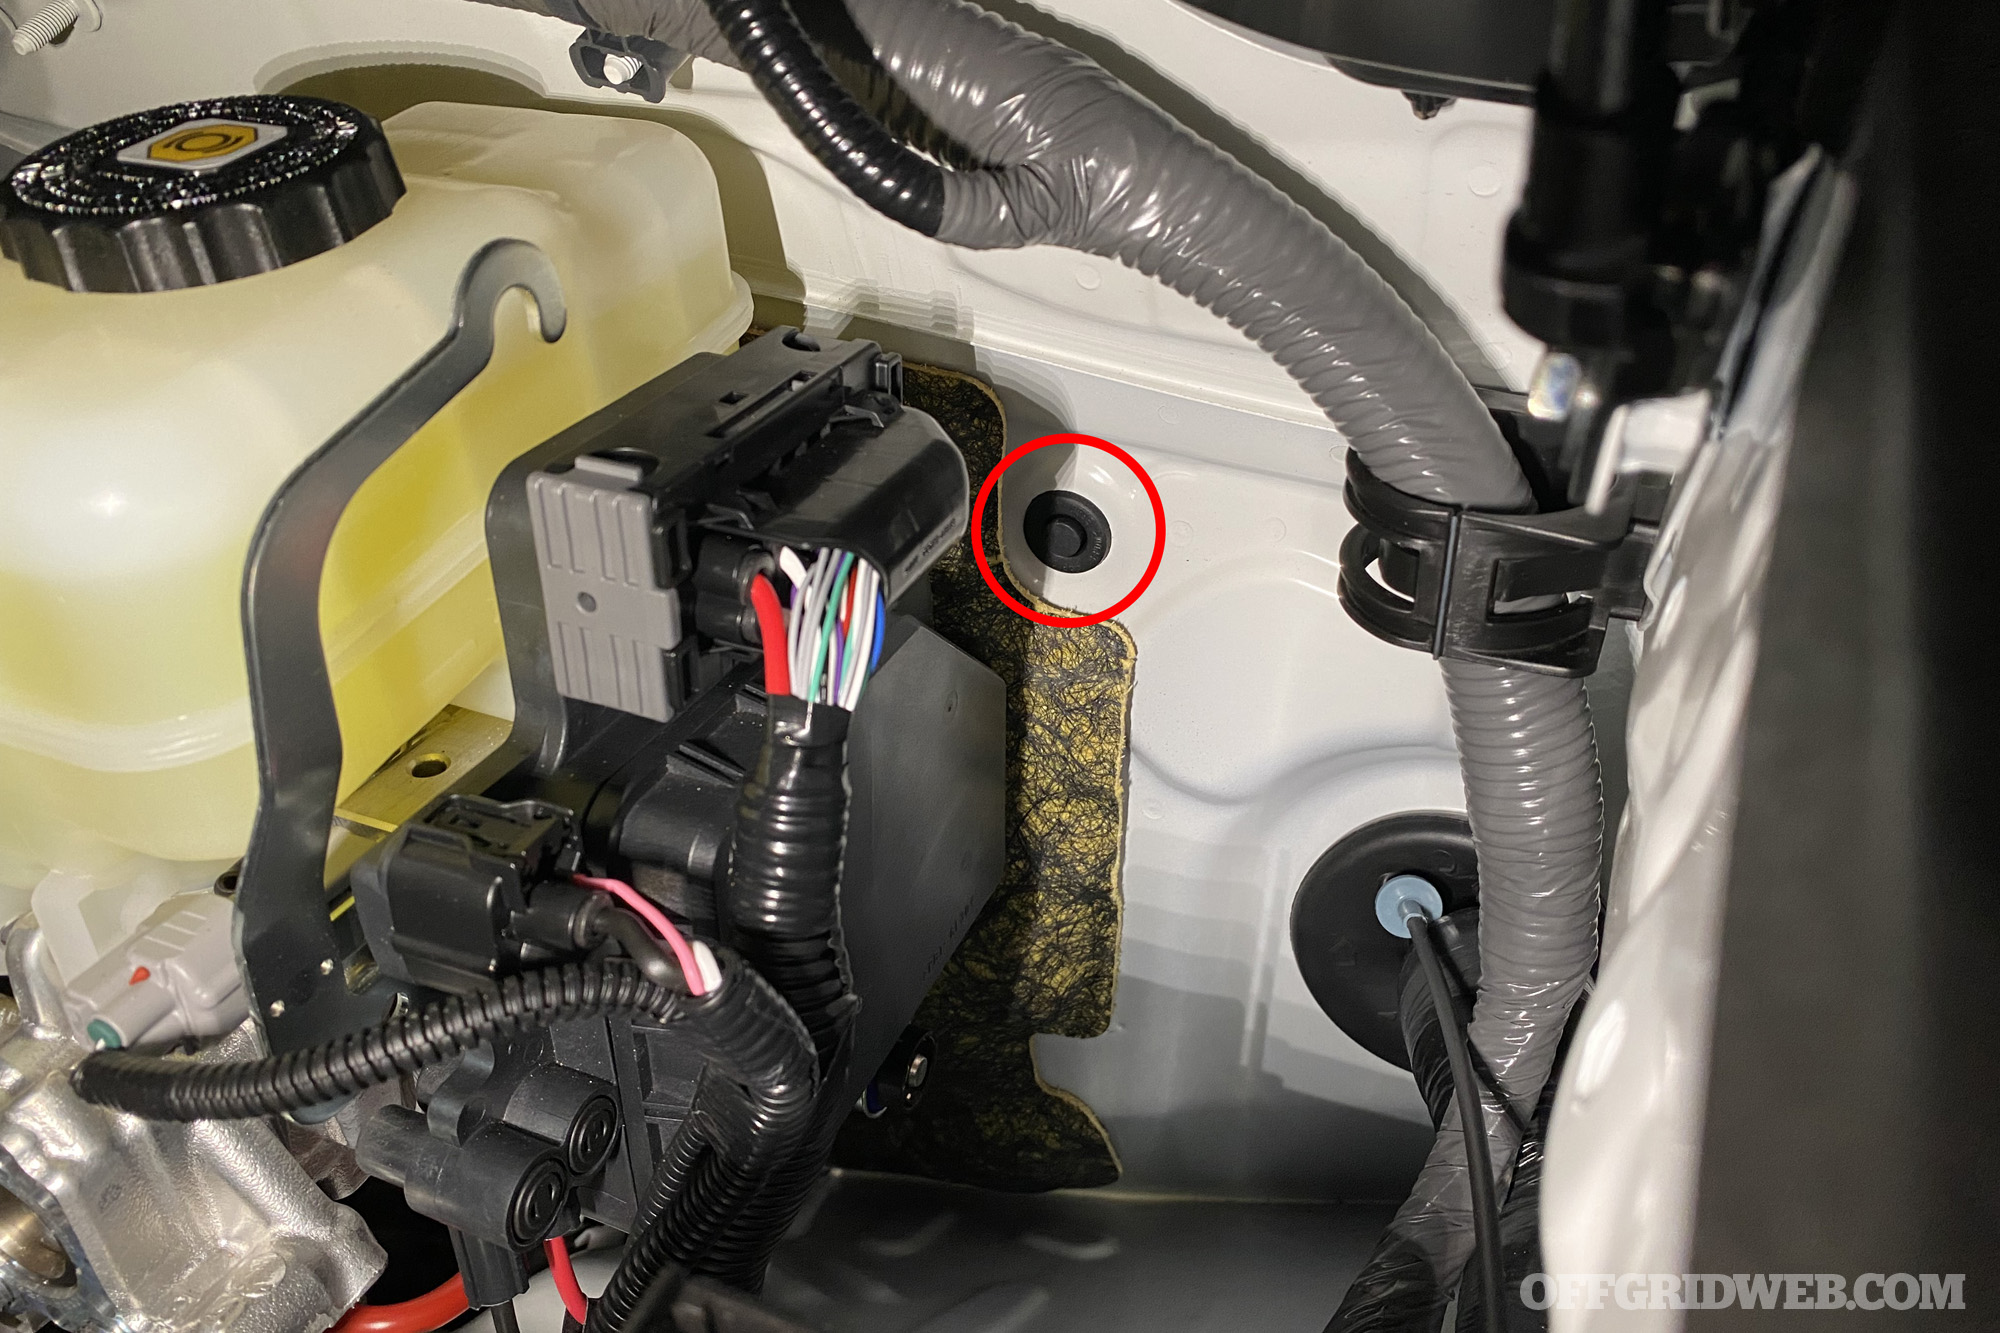
Other 4Runner owners have noted that this small rubber grommet on the driver's side can be removed to act as a pass-through for wires. So, I popped it out, cut a hole in the middle, and pulled through the terminals one at a time.
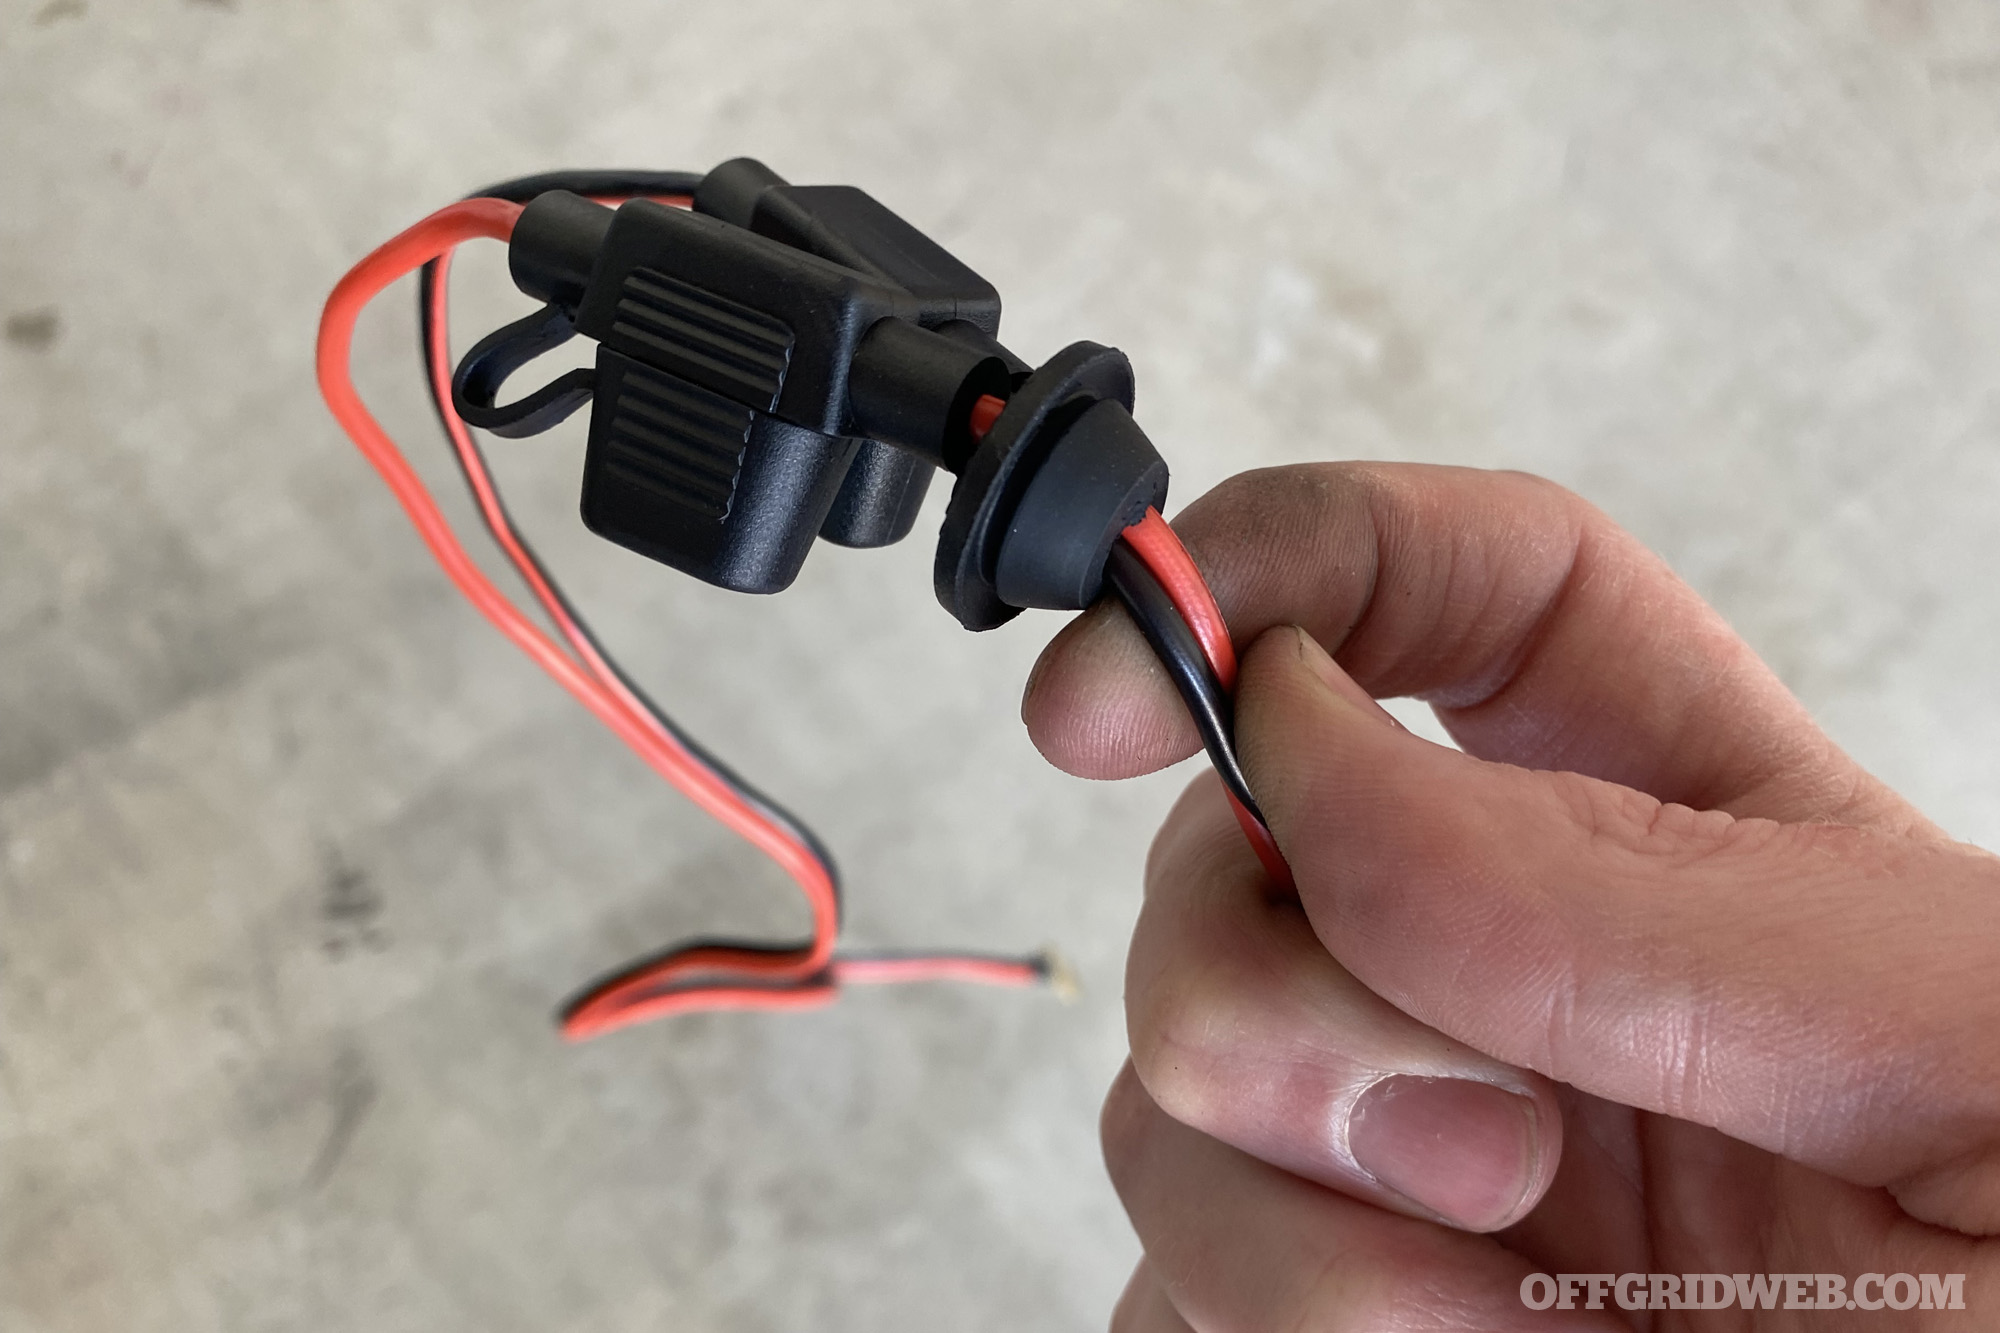
With the grommet in place on the power cable, I used a fish tape to feed the end of the wire into the cab:
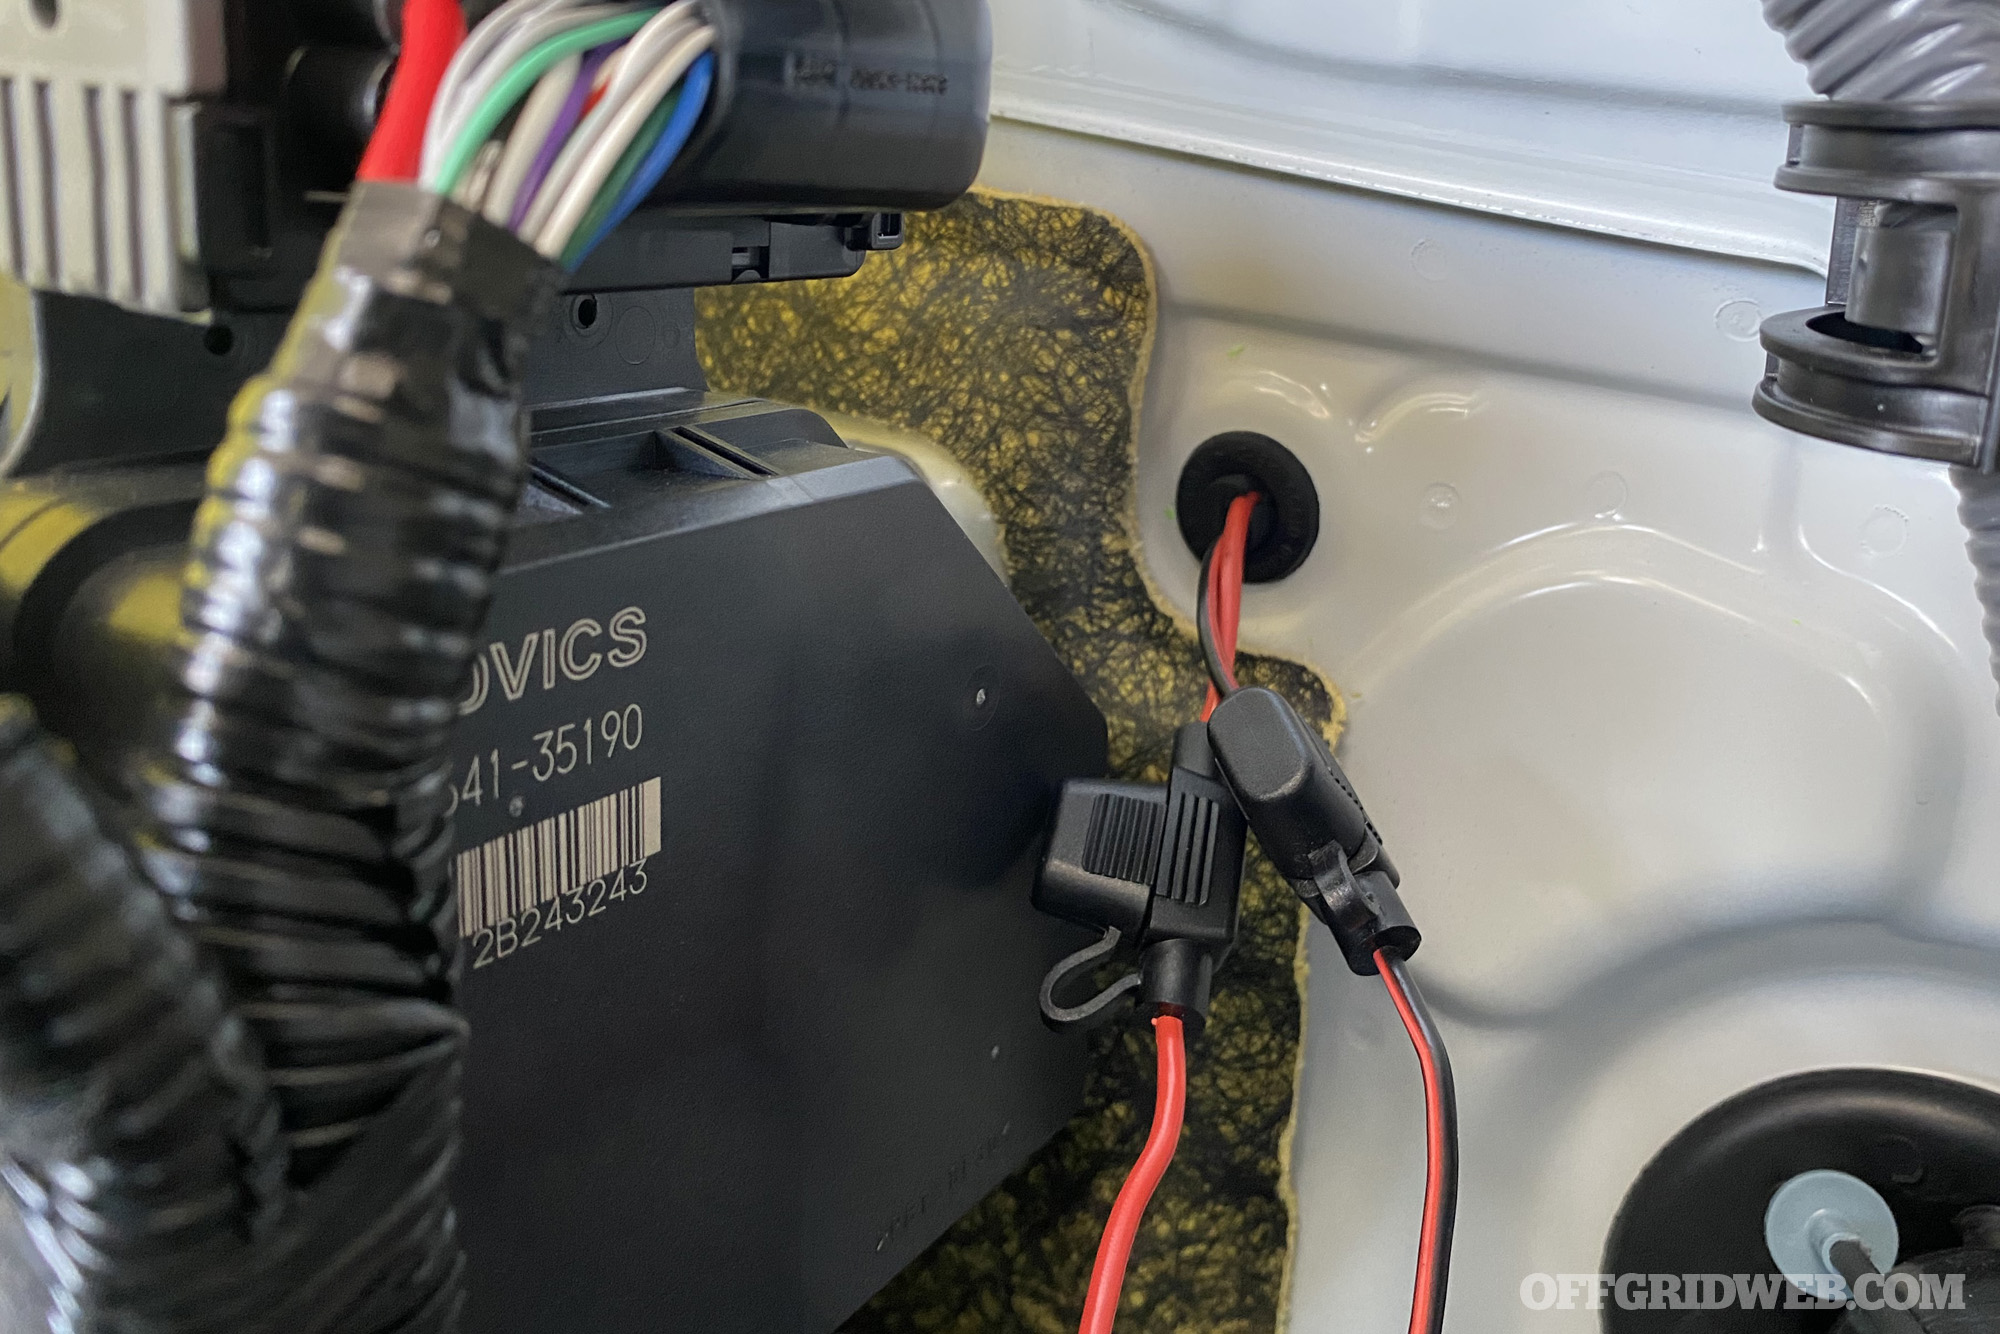
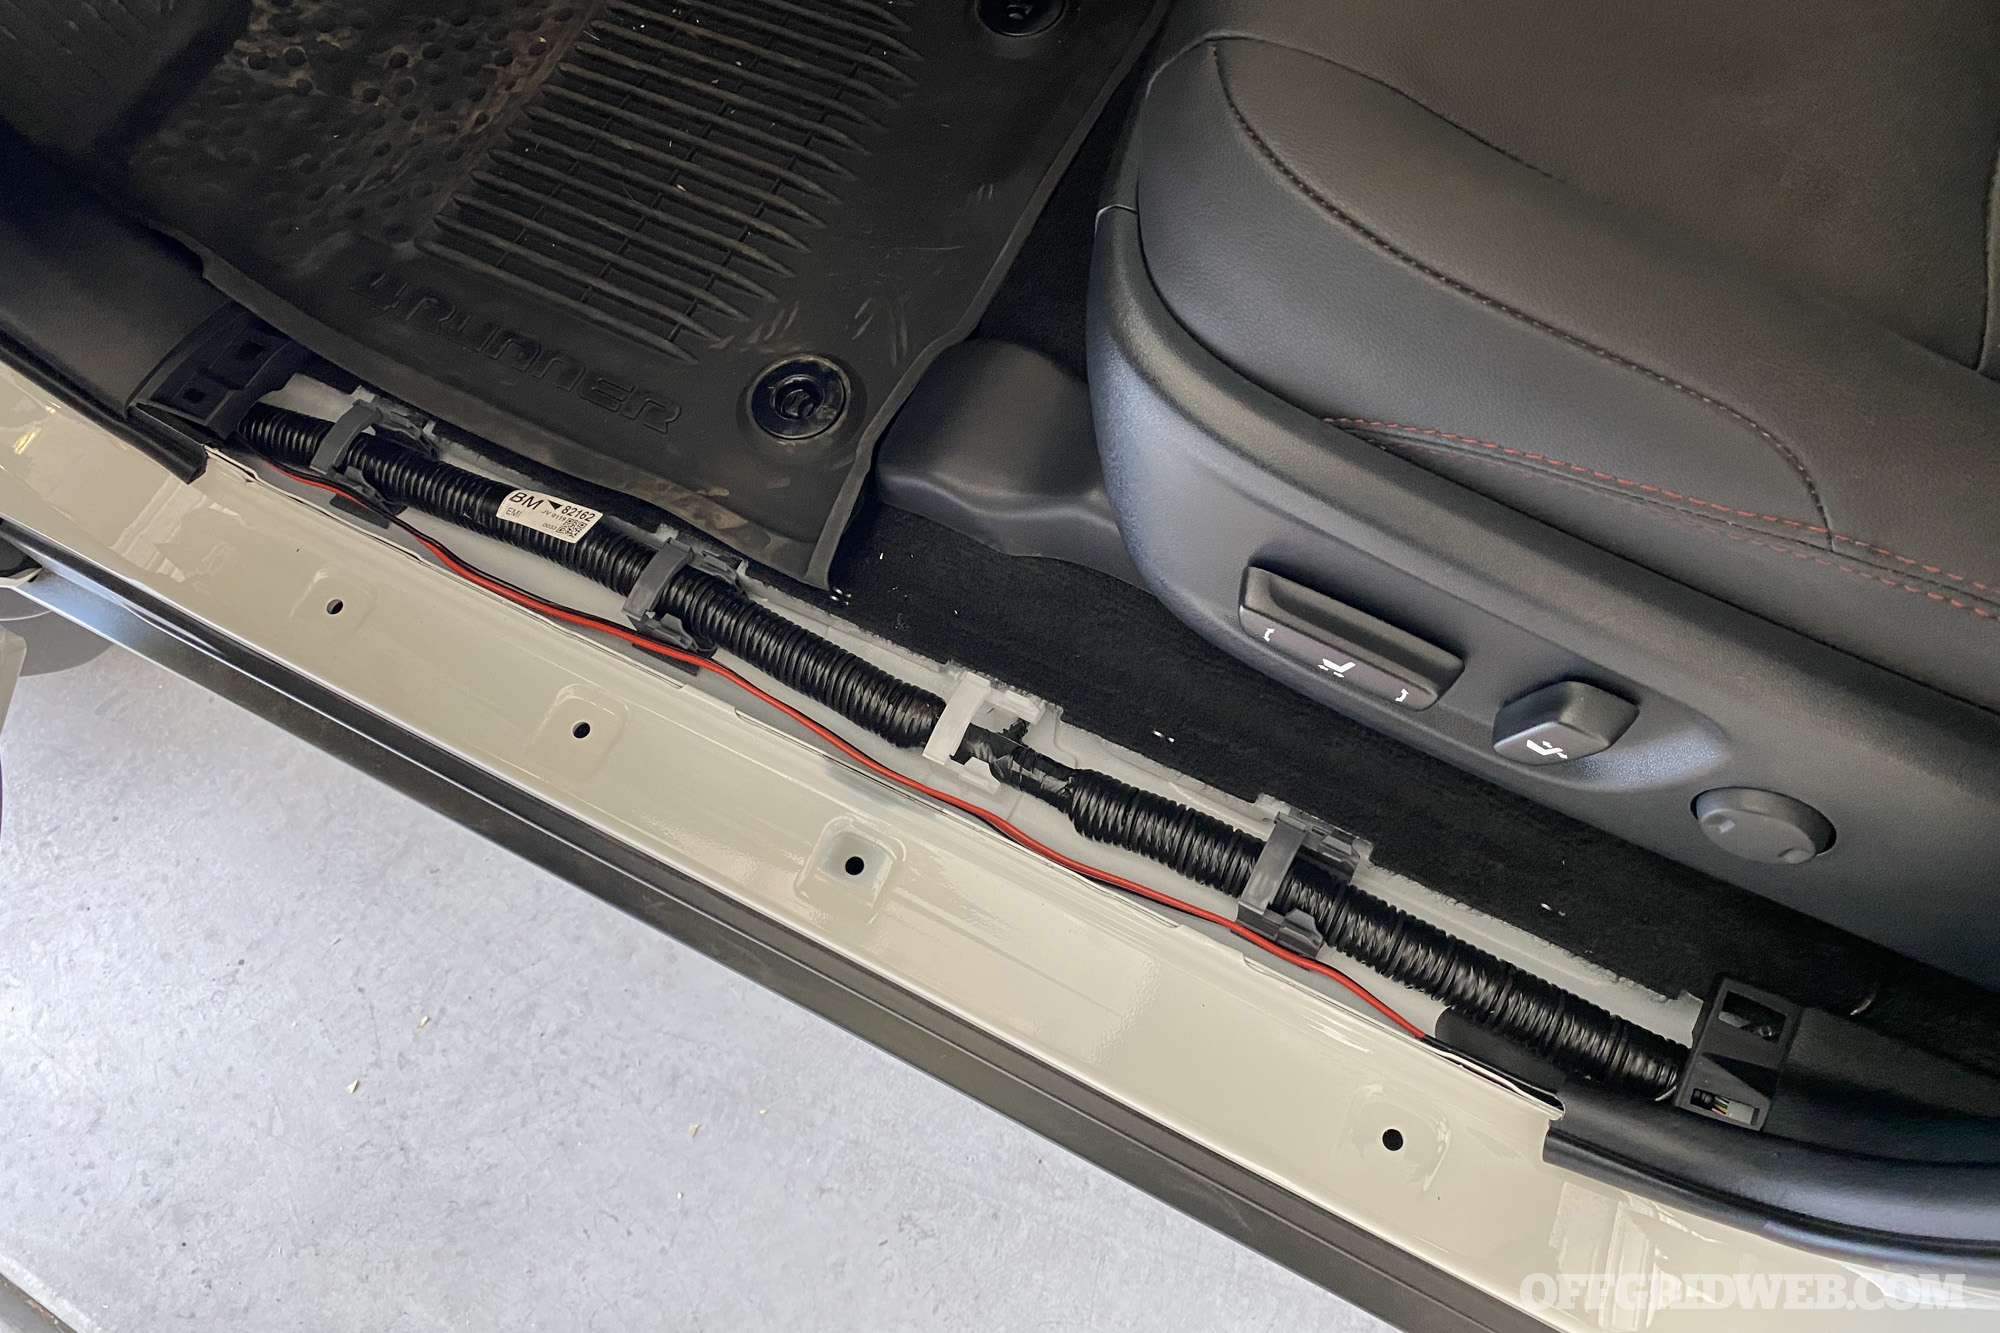
The loose end of the power cable appeared above the pedals, and was pulled through from there. Next, it was routed through the kick panel and door sill, then underneath the carpet. I used the fish tape to pull it up through an opening in the carpet next to a floor A/C vent, leaving the loose end directly under the seat.

At this point, I replaced the plastic connector, ensuring the wire terminals were snapped back into their original positions. This is important since I didn't want unprotected hot wires during the next step.
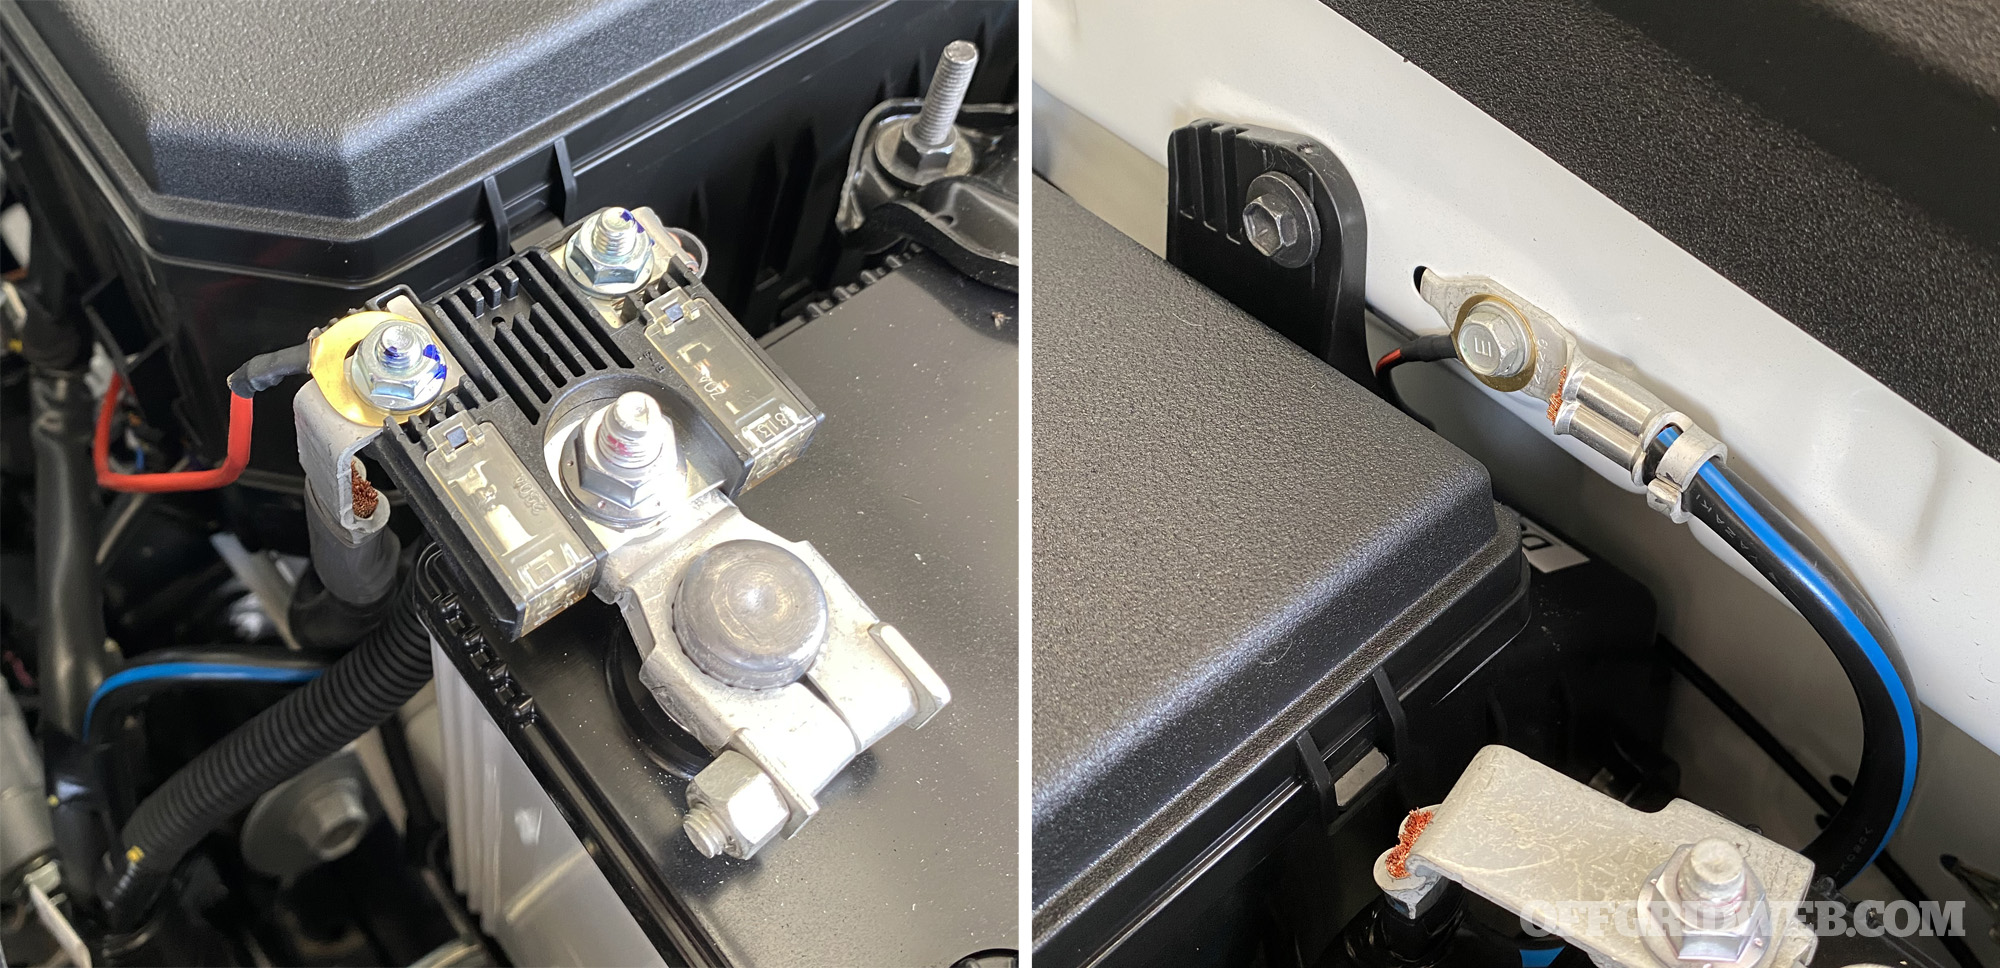
Now that I had the power wire where I wanted it, I connected the ground wire to a ground point in the 4Runner's engine bay next to the fuse box. The positive wire was connected to the battery terminal.
Adding a Mic Port

If I wanted to keep things simple, I could have connected the mic directly to the radio under the seat, but this would have meant pulling it between my legs every time I needed to use it. I decided to put in some extra work to make the radio setup appear as though it had been installed on the Toyota assembly line.
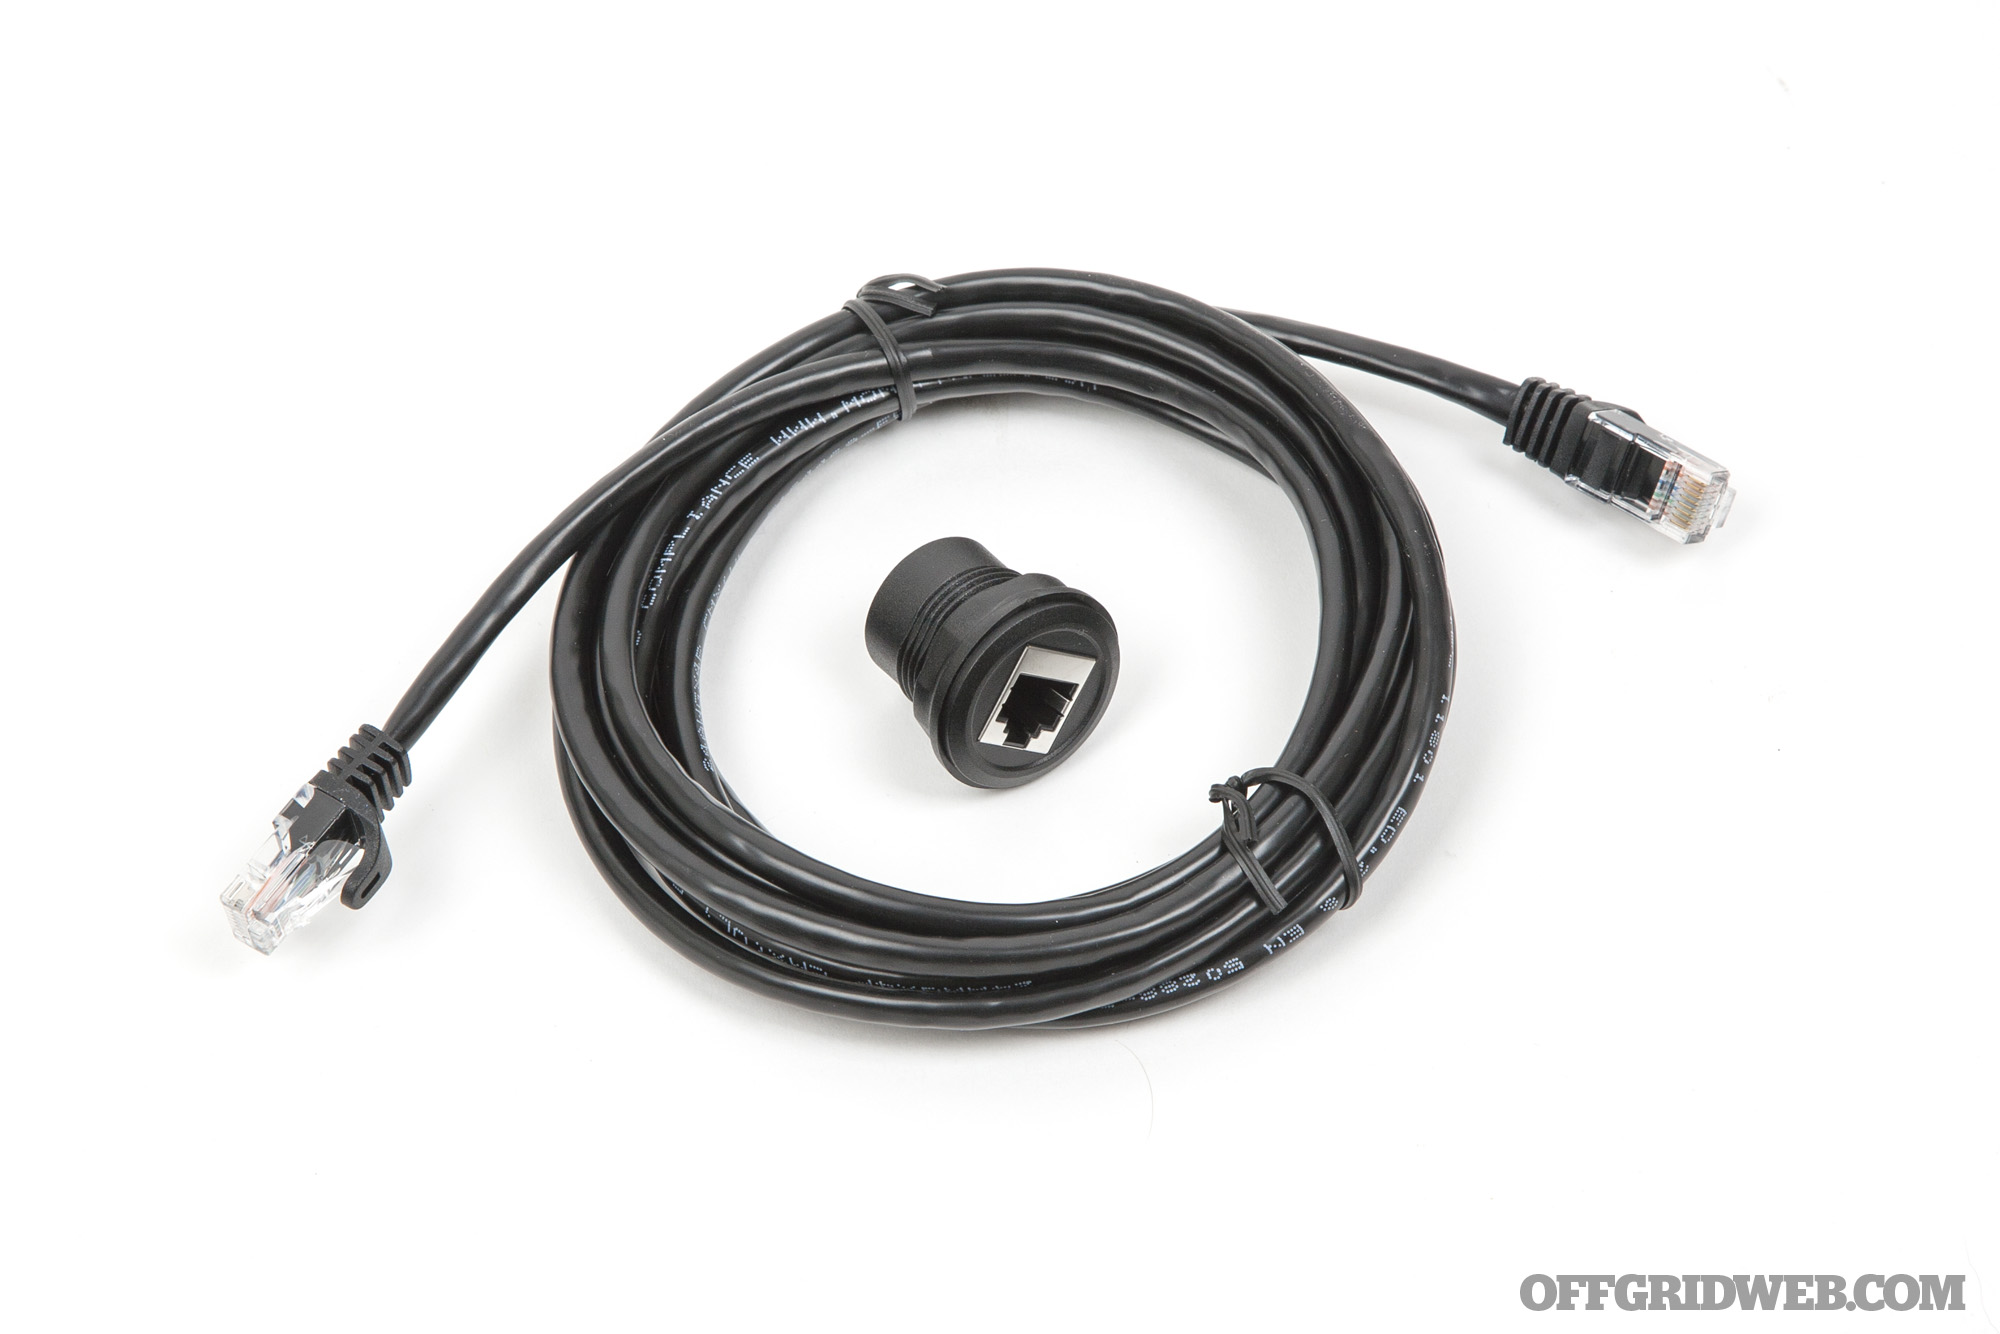
Luckily, the mic uses a standard CAT-5 ethernet cable, so it's simple to extend it. Inspired by @Dumbo_T4R's DIY article, I purchased a 10-foot CAT-5 cable and an RJ45 panel mount plug for a total of $16 on Amazon.
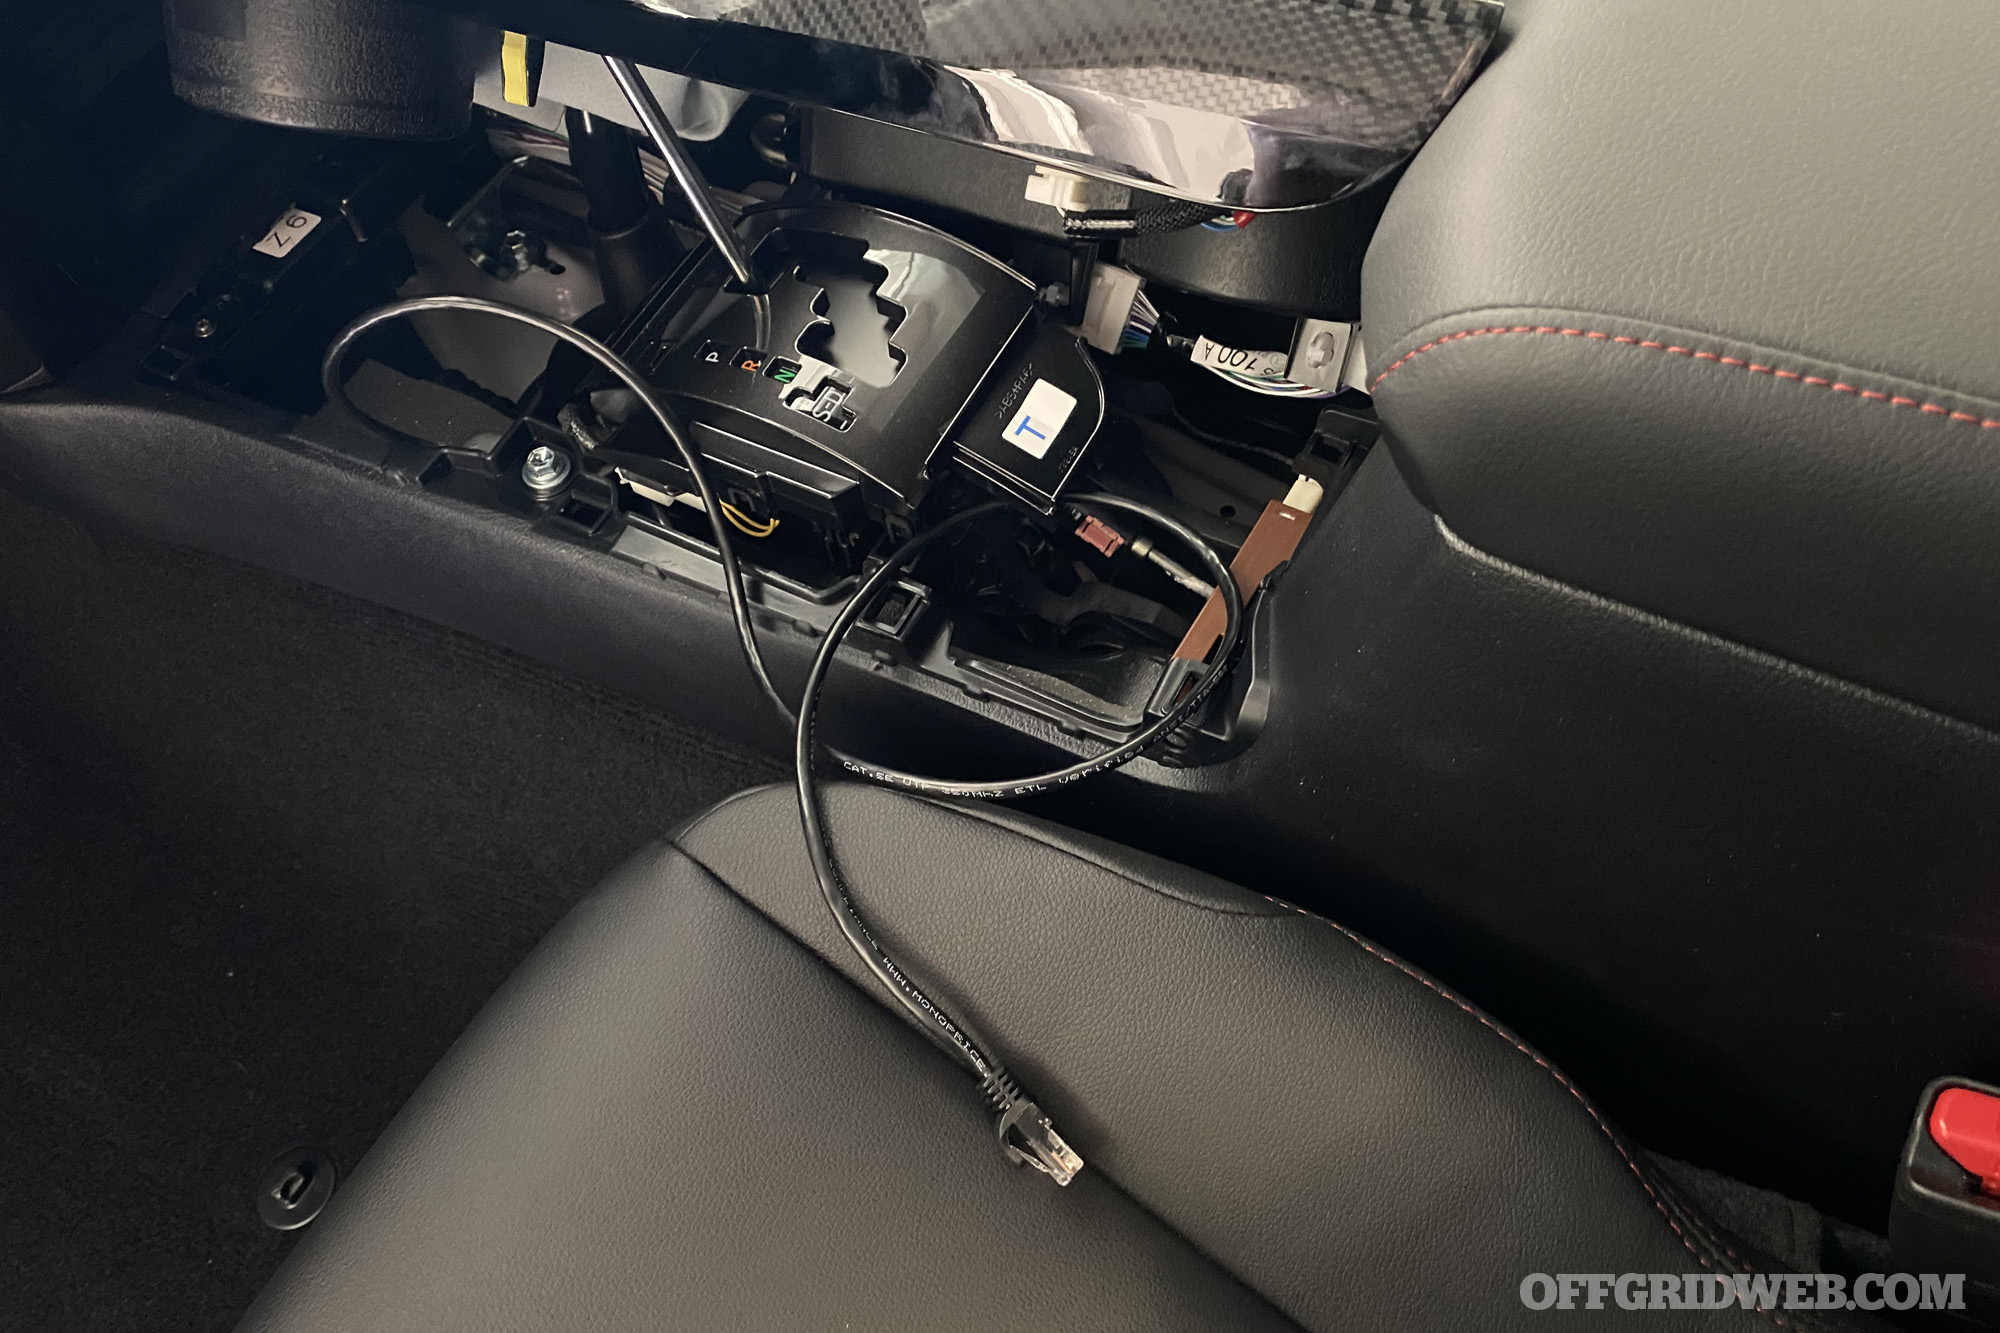
The CAT-5 cable was pulled from under the driver's seat up through the center console, around the shifter, and out under the dash on the passenger side.
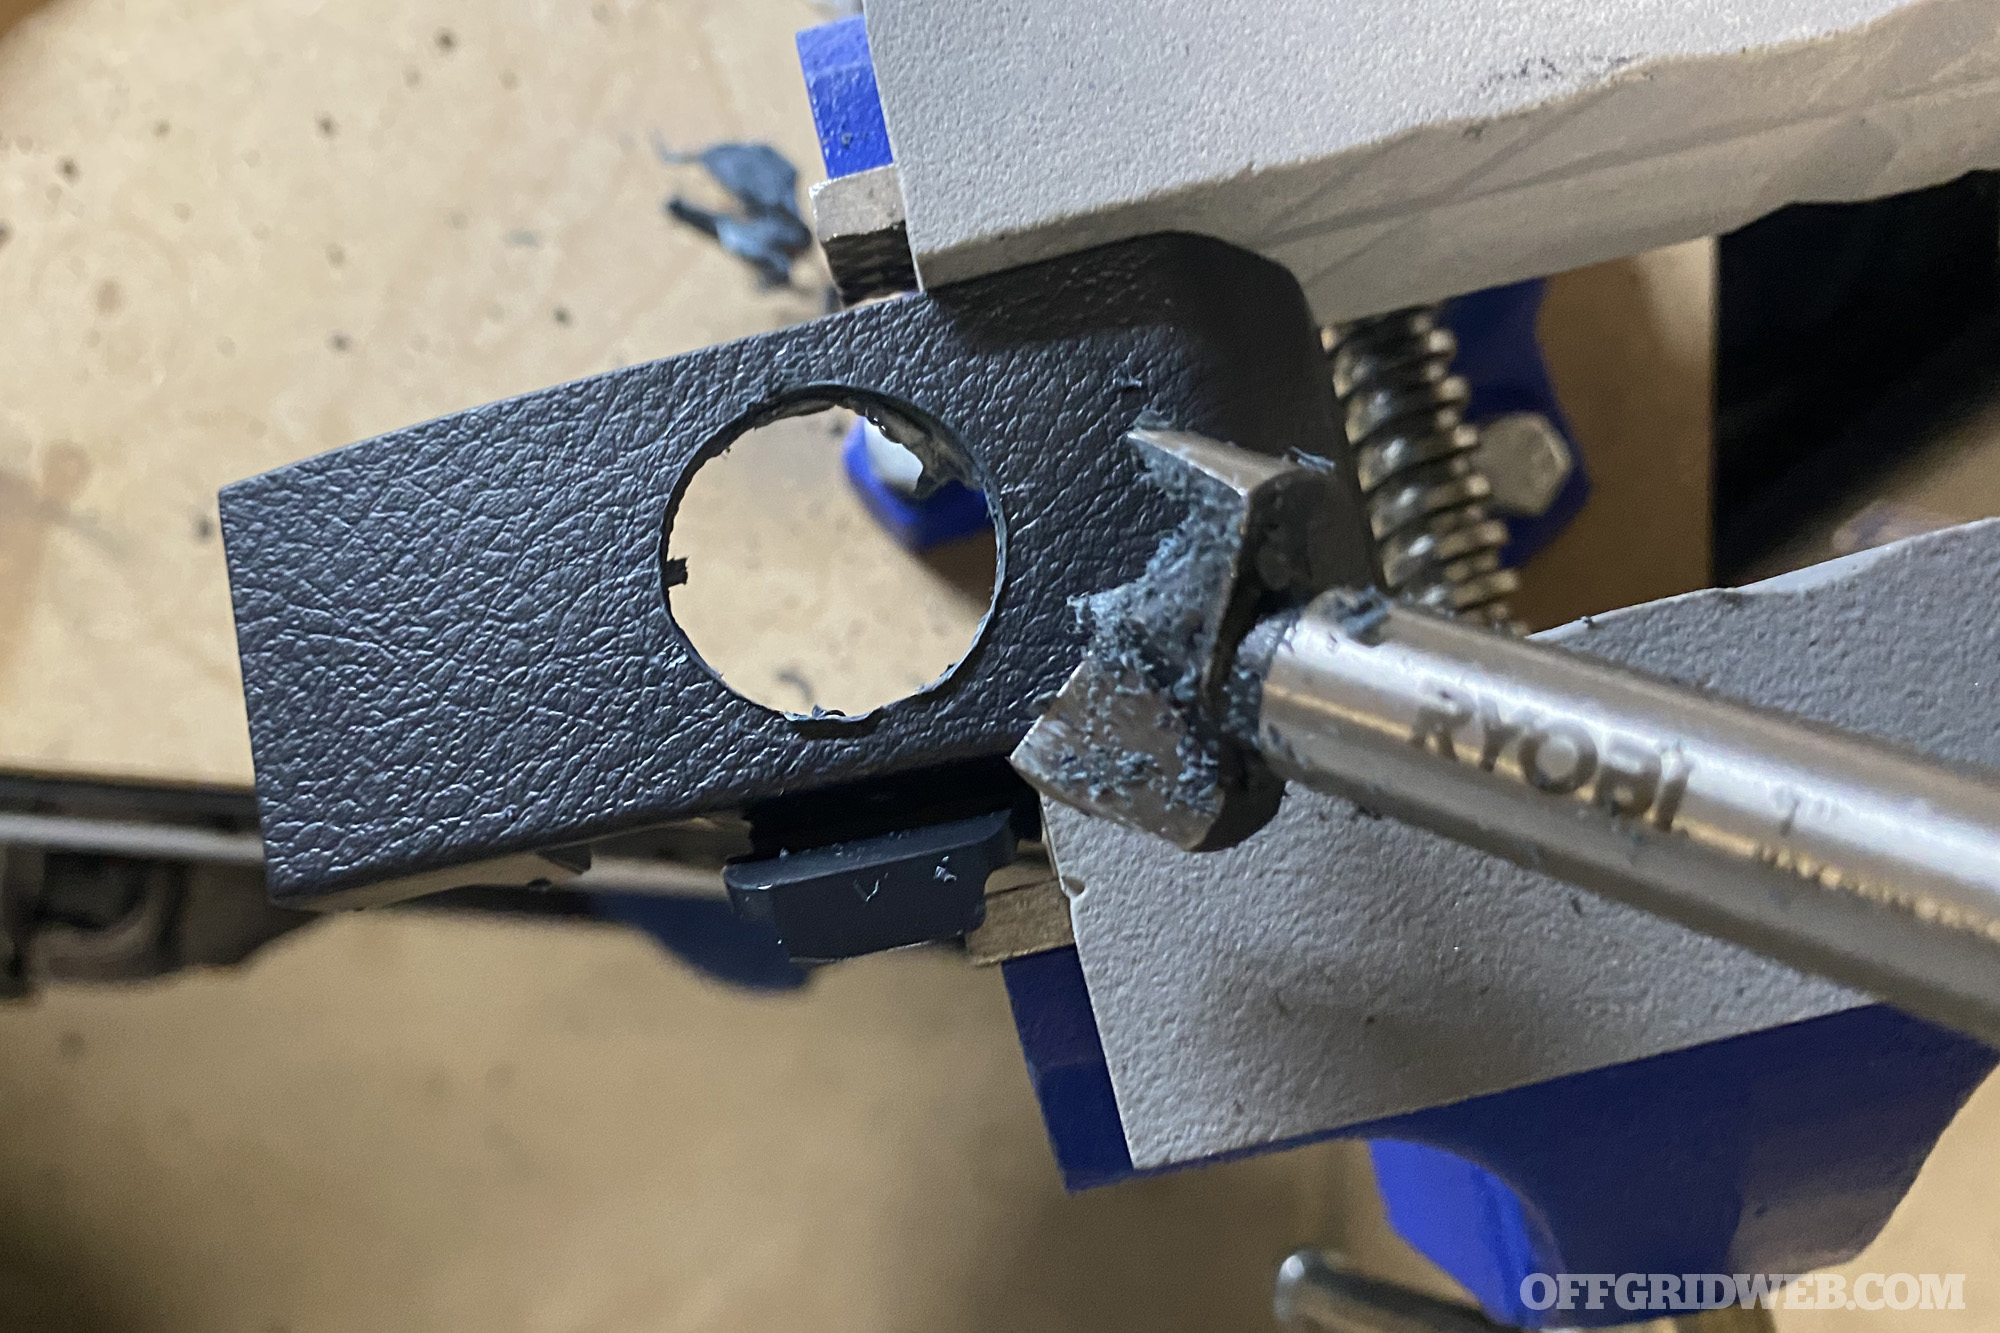
Below the glovebox where the CAT-5 cable exited, I removed this small plastic panel. After centering and tracing the panel mount plug onto its surface with a pencil, I used a Forstner drill bit to cut a 1-inch round hole into the panel. The edges were cleaned up with a razor blade, and the panel mount plug was installed into this plastic piece.
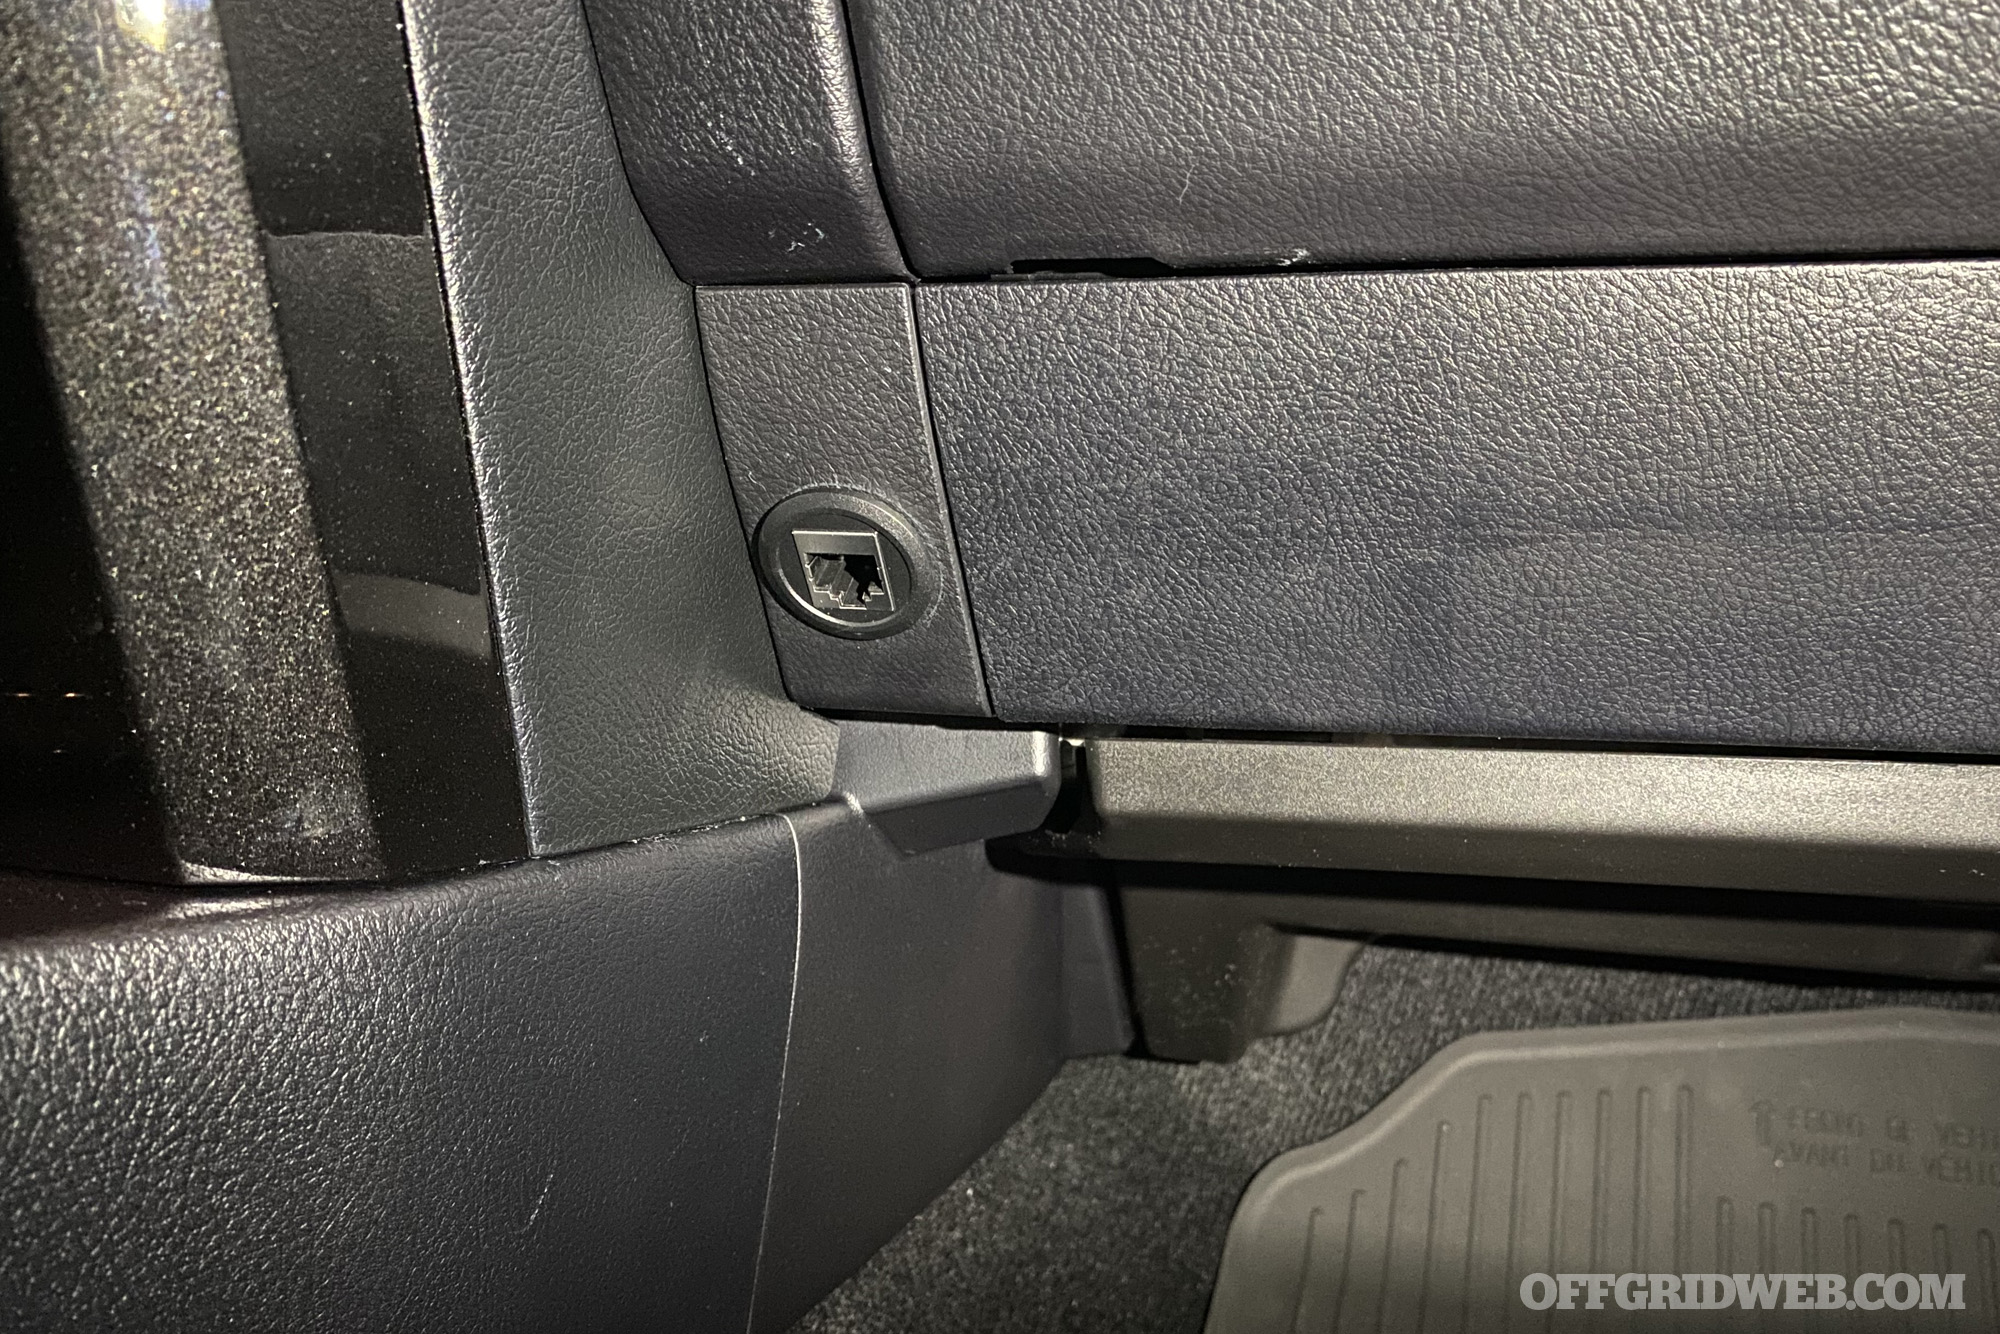
The plastic panel was reinstalled and connected to the CAT-5 cable I routed through the console. The result is a port at the bottom of the dash where I can connect the Midland MXT575 mic. If I'm not using it, I can disconnect the mic and stow it in the glove box, maintaining the factory look of my 4Runner and giving thieves no hint of what my truck contains.
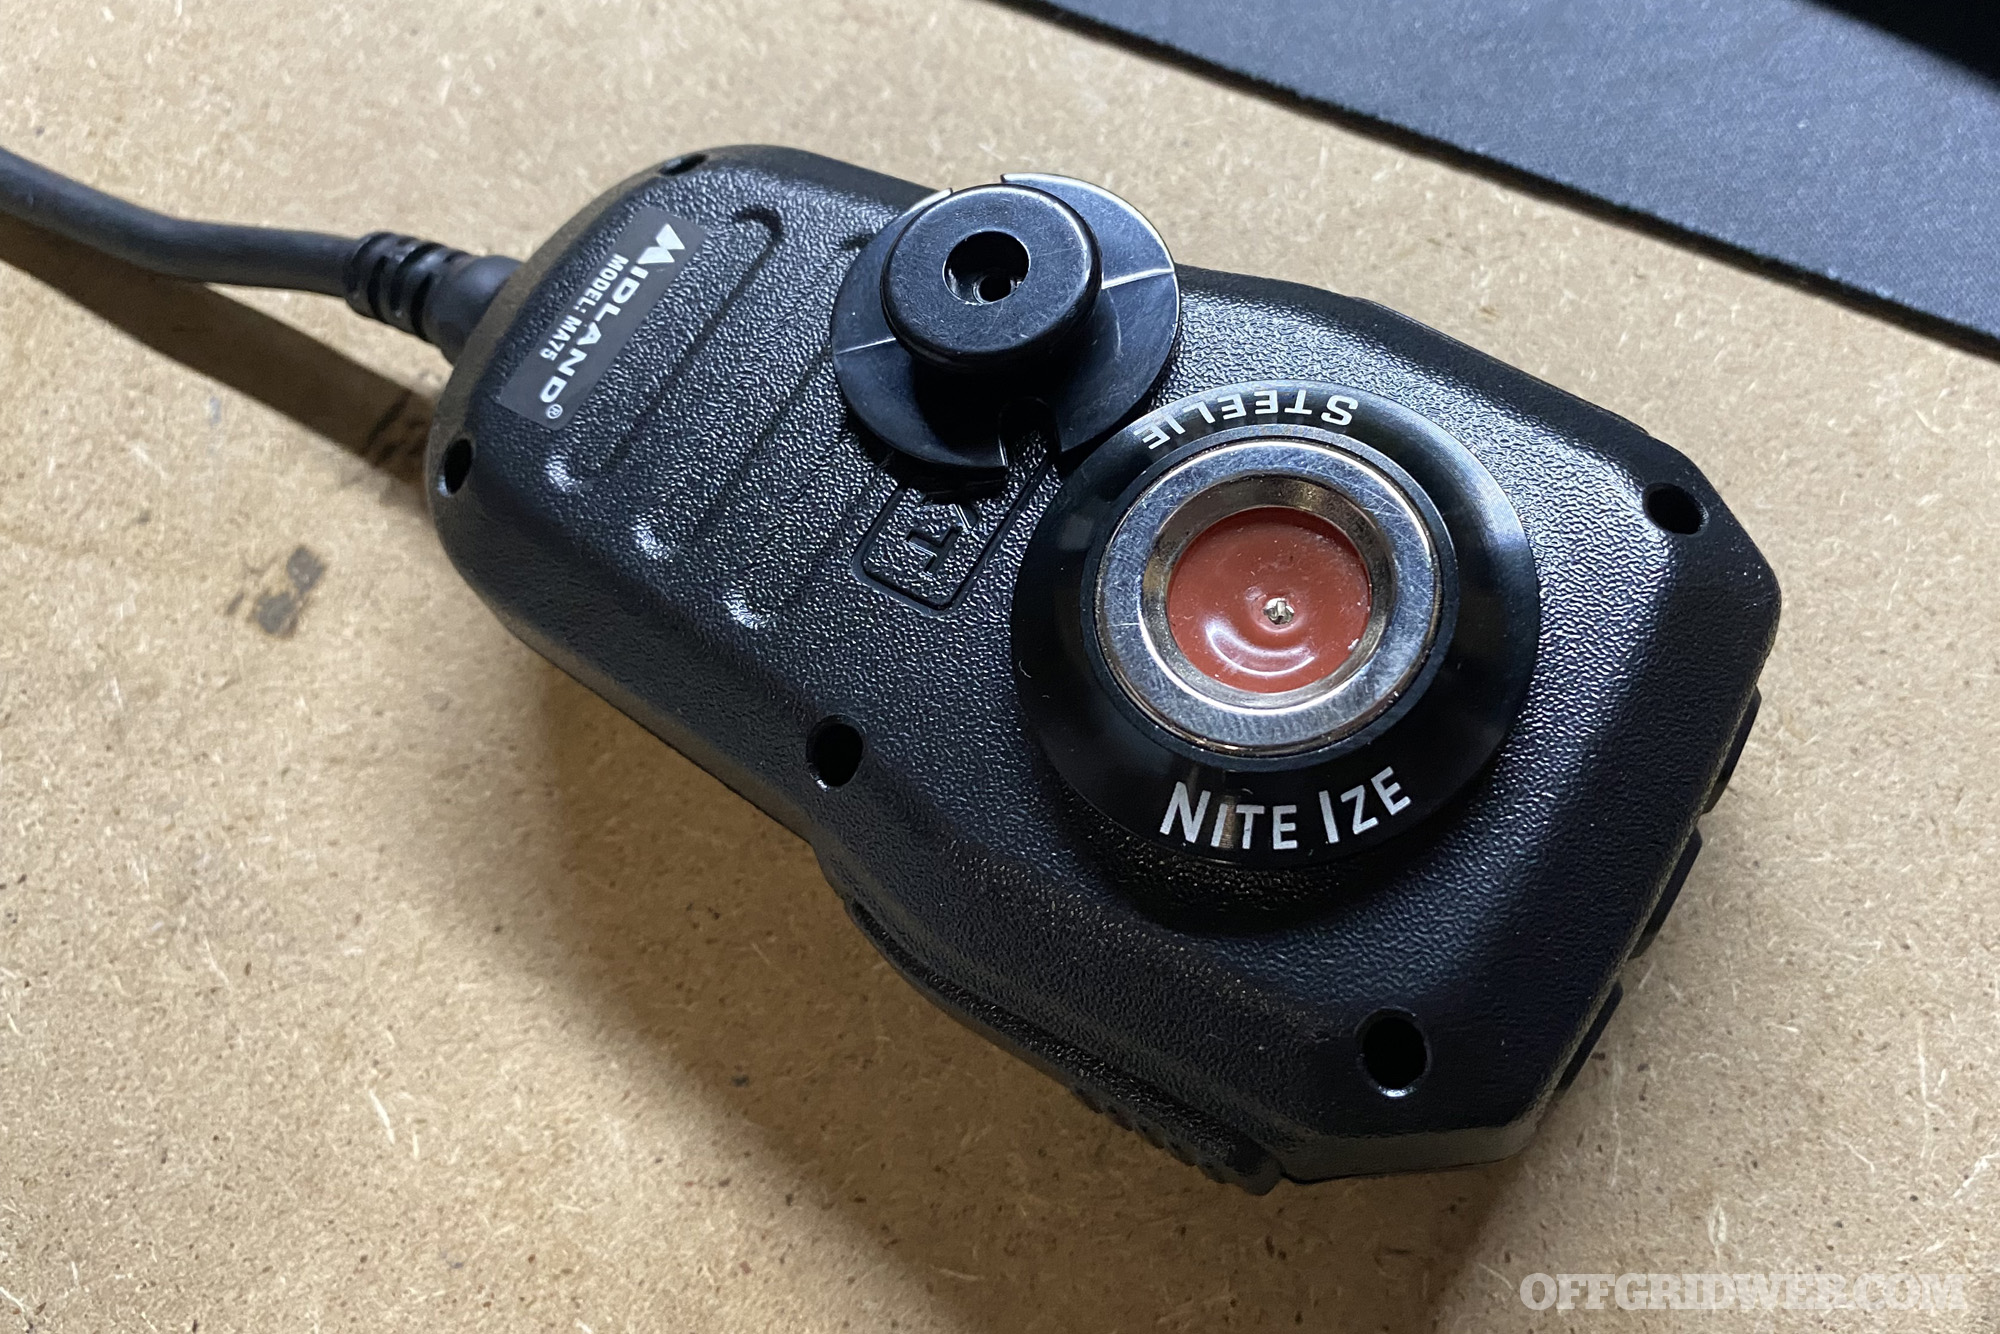
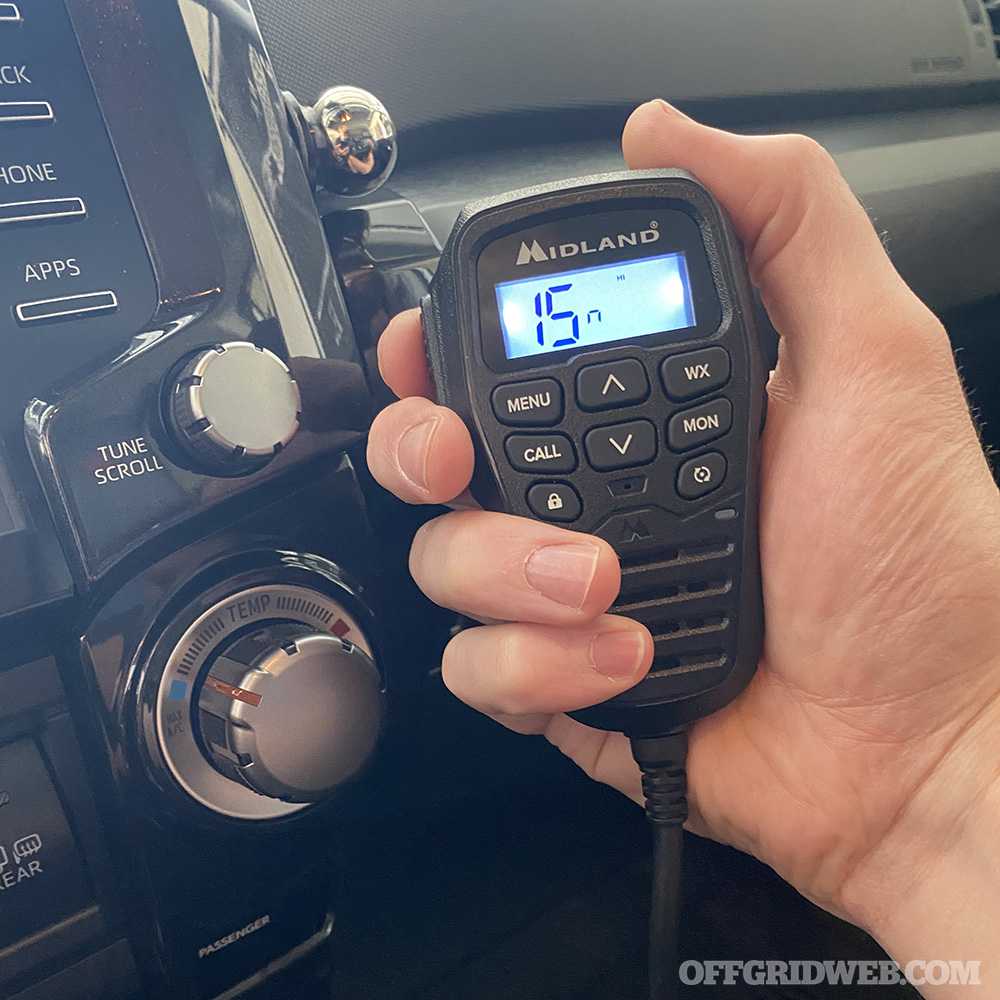
The Midland mic includes a connector and stick-on plastic dash mount, but I had a sturdier Nite Ize Steelie magnetic ball mount on hand, so I swapped it onto the mic. A small hole was drilled through the Steelie plate, and the Midland screw was used to attach it securely to the mic.
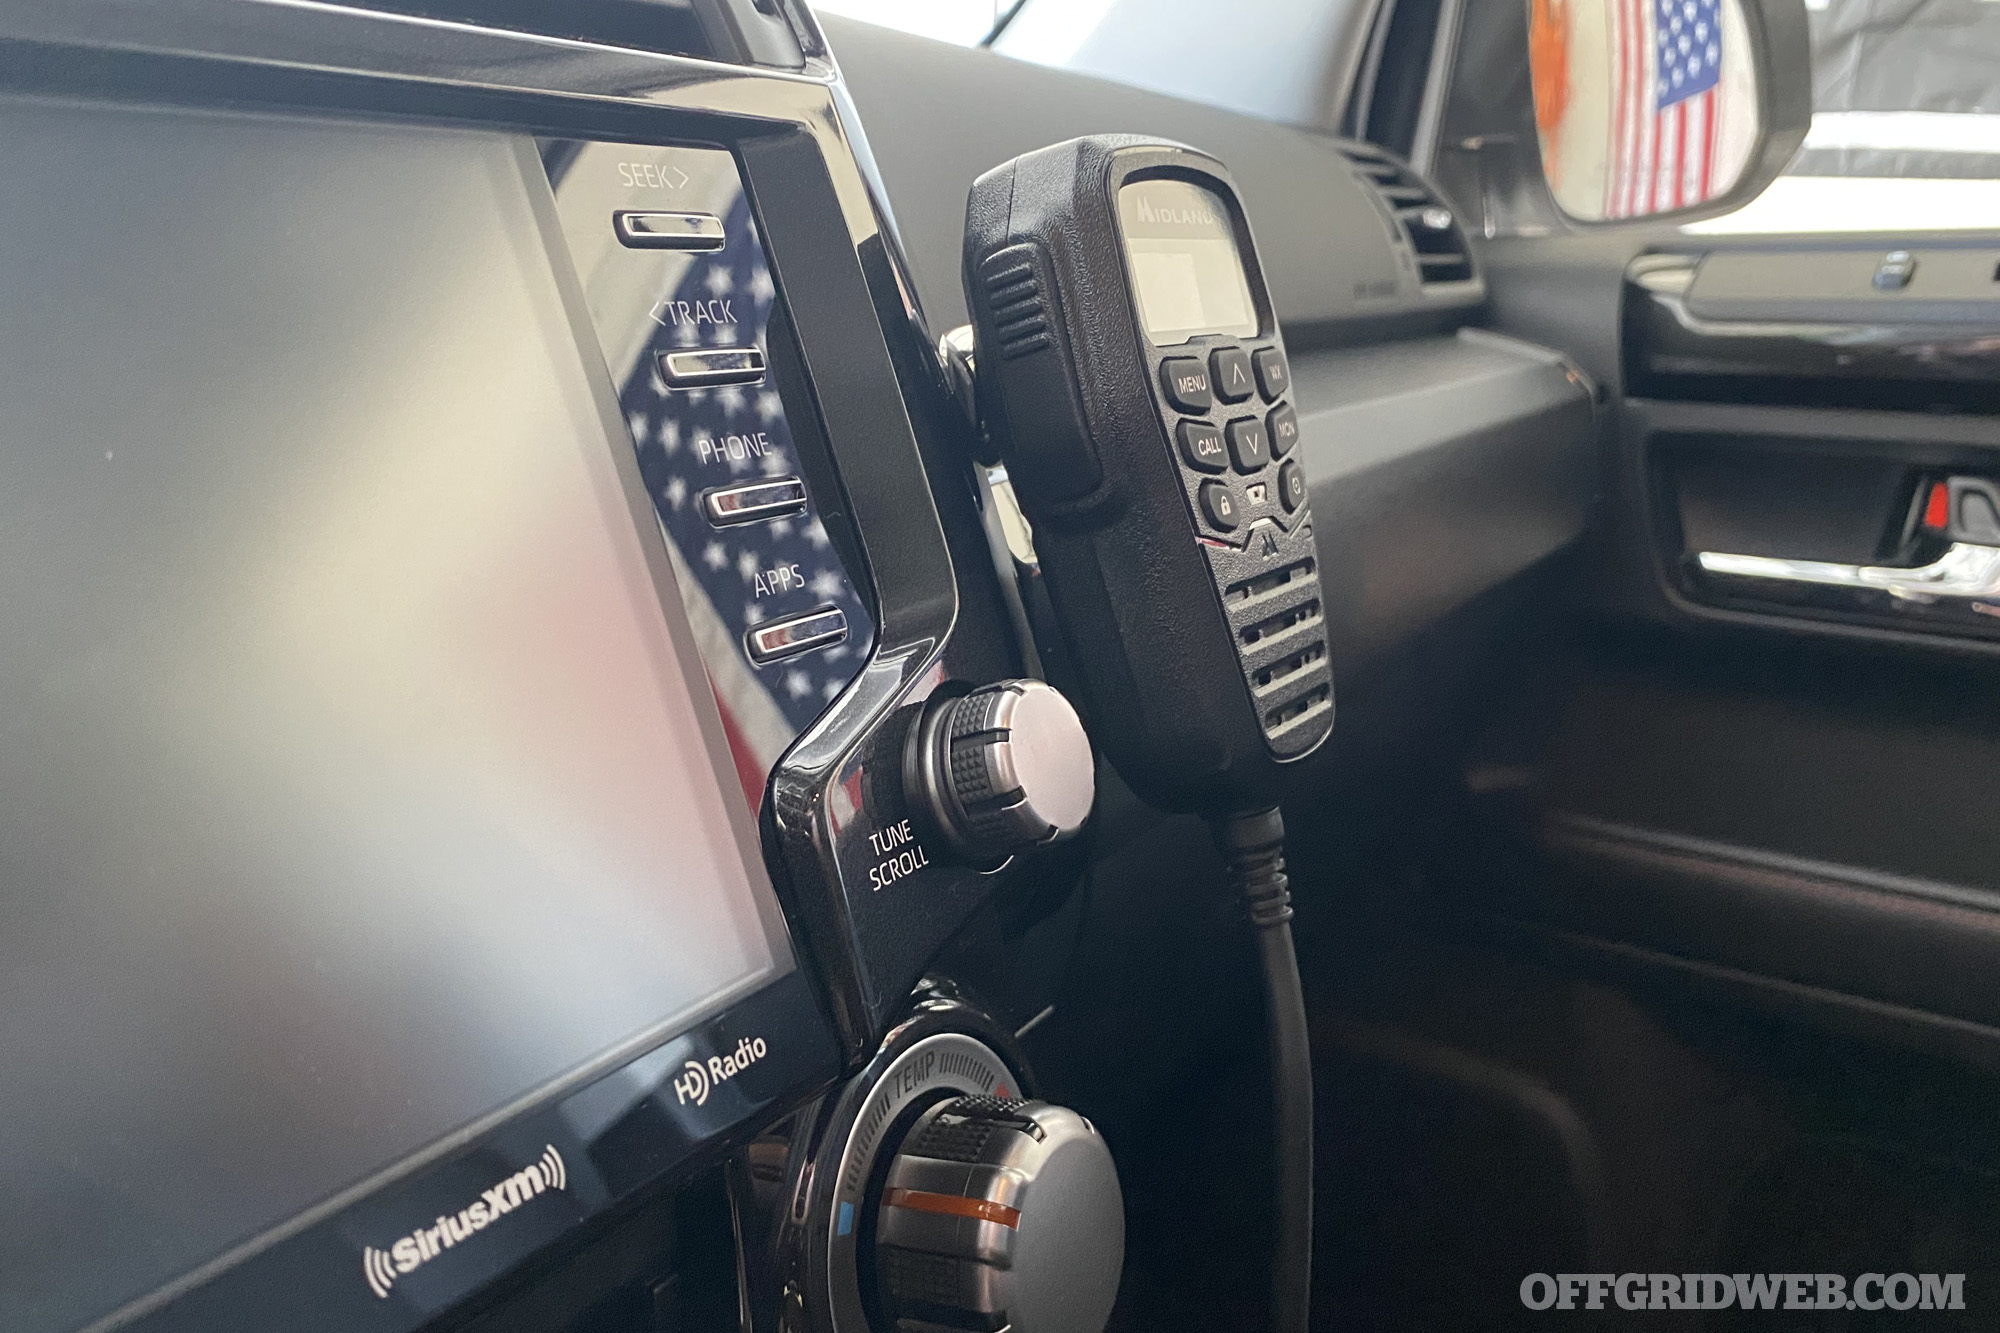
The other side of the Nite Ize magnetic mount was attached to the passenger side radio trim panel. Now the MXT575 mic is always within arm's reach of the driver or passenger, and its display is clearly visible at all times. Pretty slick, if I do say so myself.

Final Steps & Testing
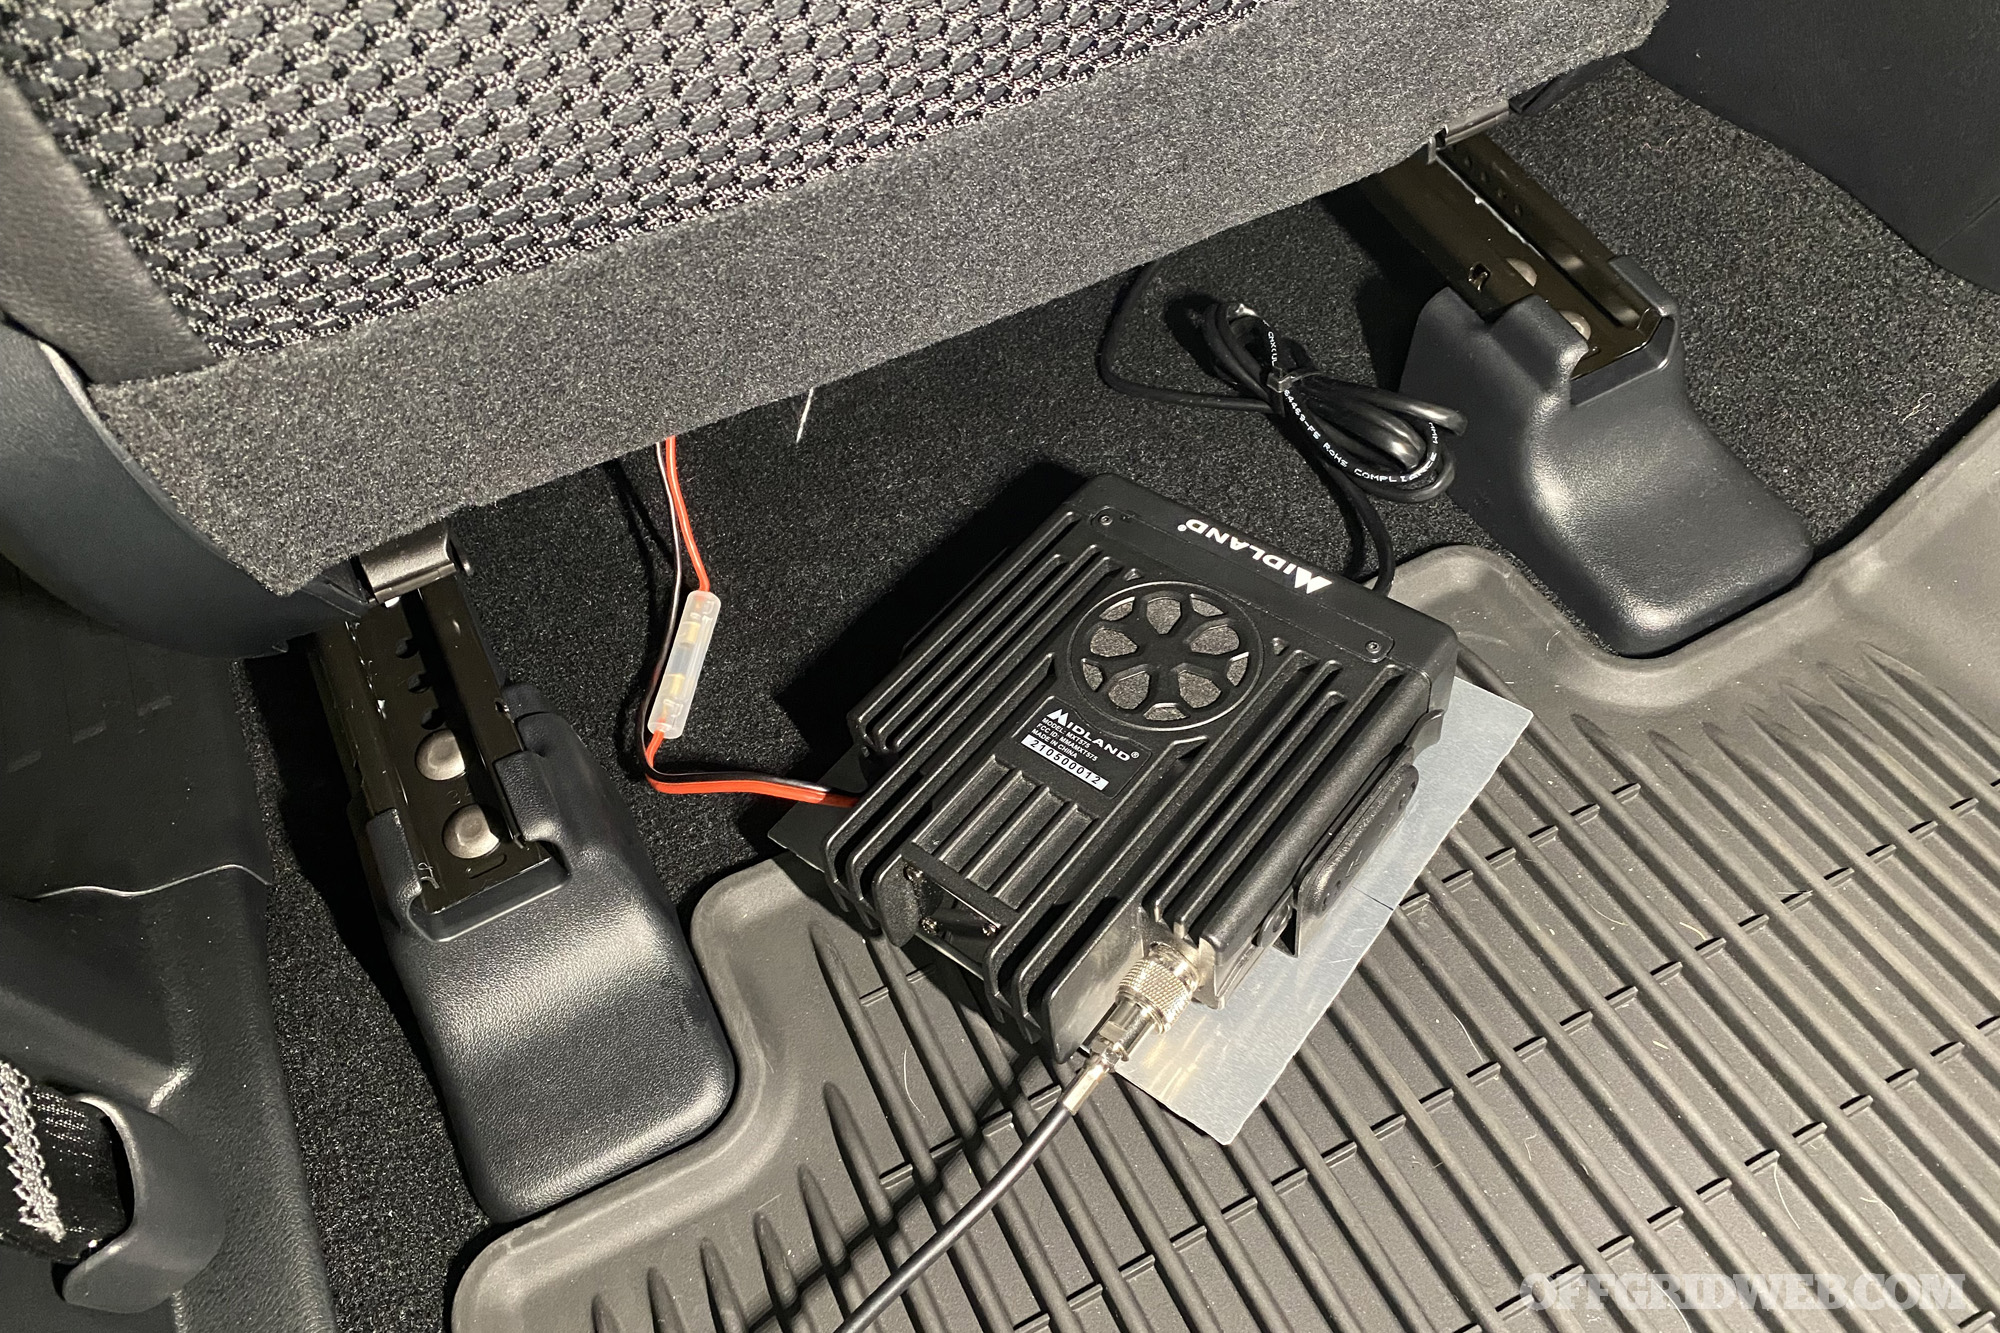
Since the mic and power cables were ready under the seat, I attached the radio to the mounting plate and connected both cables. I also screwed in the antenna cable and placed the magnetic mount on the roof of the 4Runner:
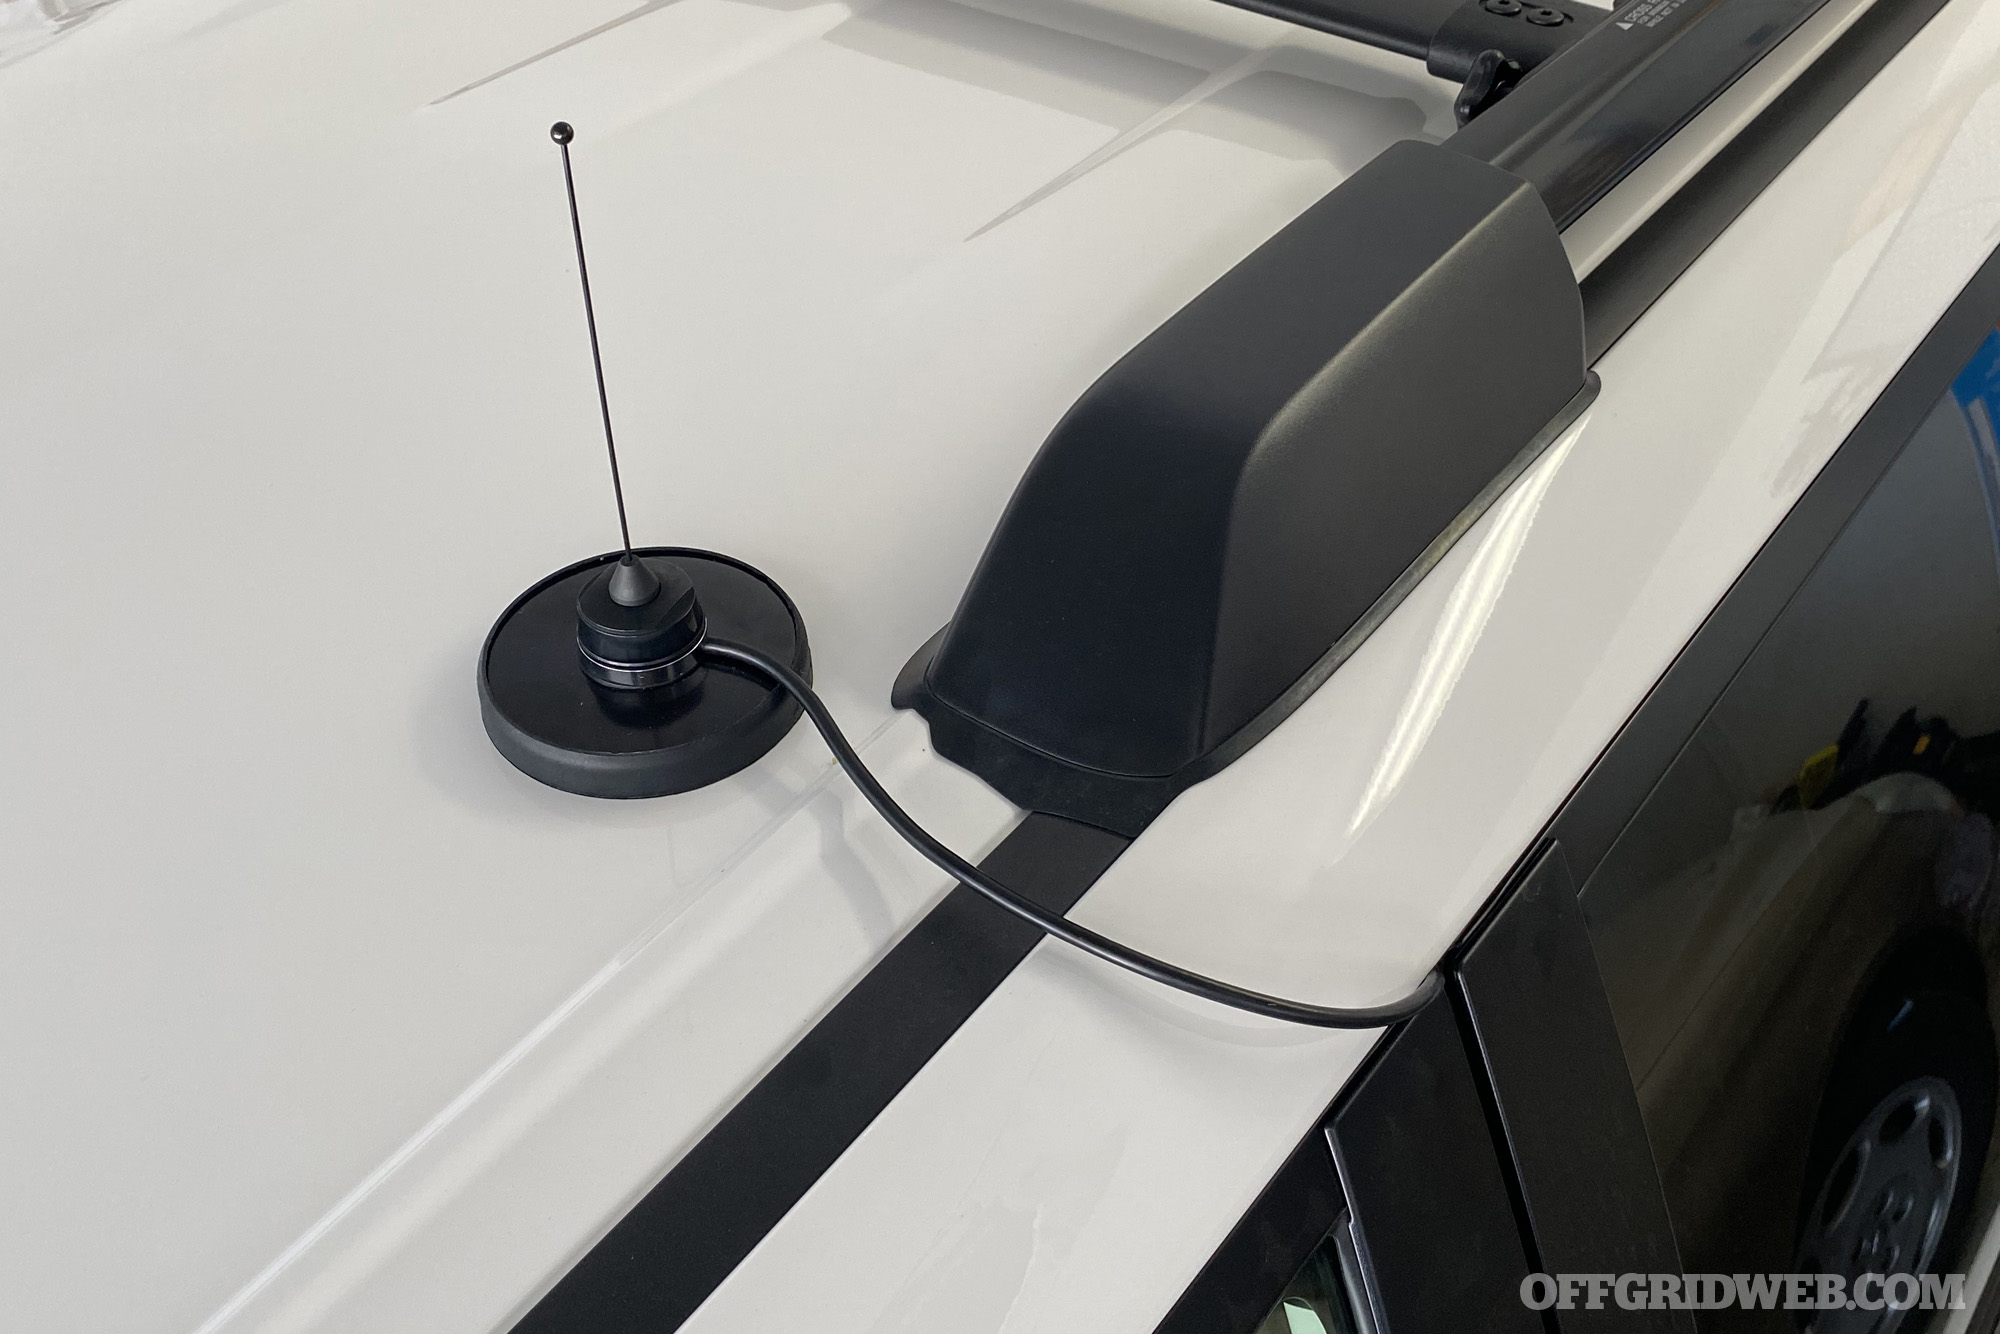
This is only a temporary antenna location, but it'll allow me to use the radio until I come up with a more permanent mounting solution.

With a press of the power button on the mic, the radio chirped and lit up. As I scrolled through the channels, I overheard some chatter from neighbors discussing supplies they needed for a new chicken coop. It works! To test the broadcasting ability, my wife headed out to walk the dog, and brought a handheld radio with her. She was able to hear me loud and clear throughout the neighborhood.
With the radio mounting plate Velcro'd to the carpet under the seat, it's protected and completely invisible to passengers:
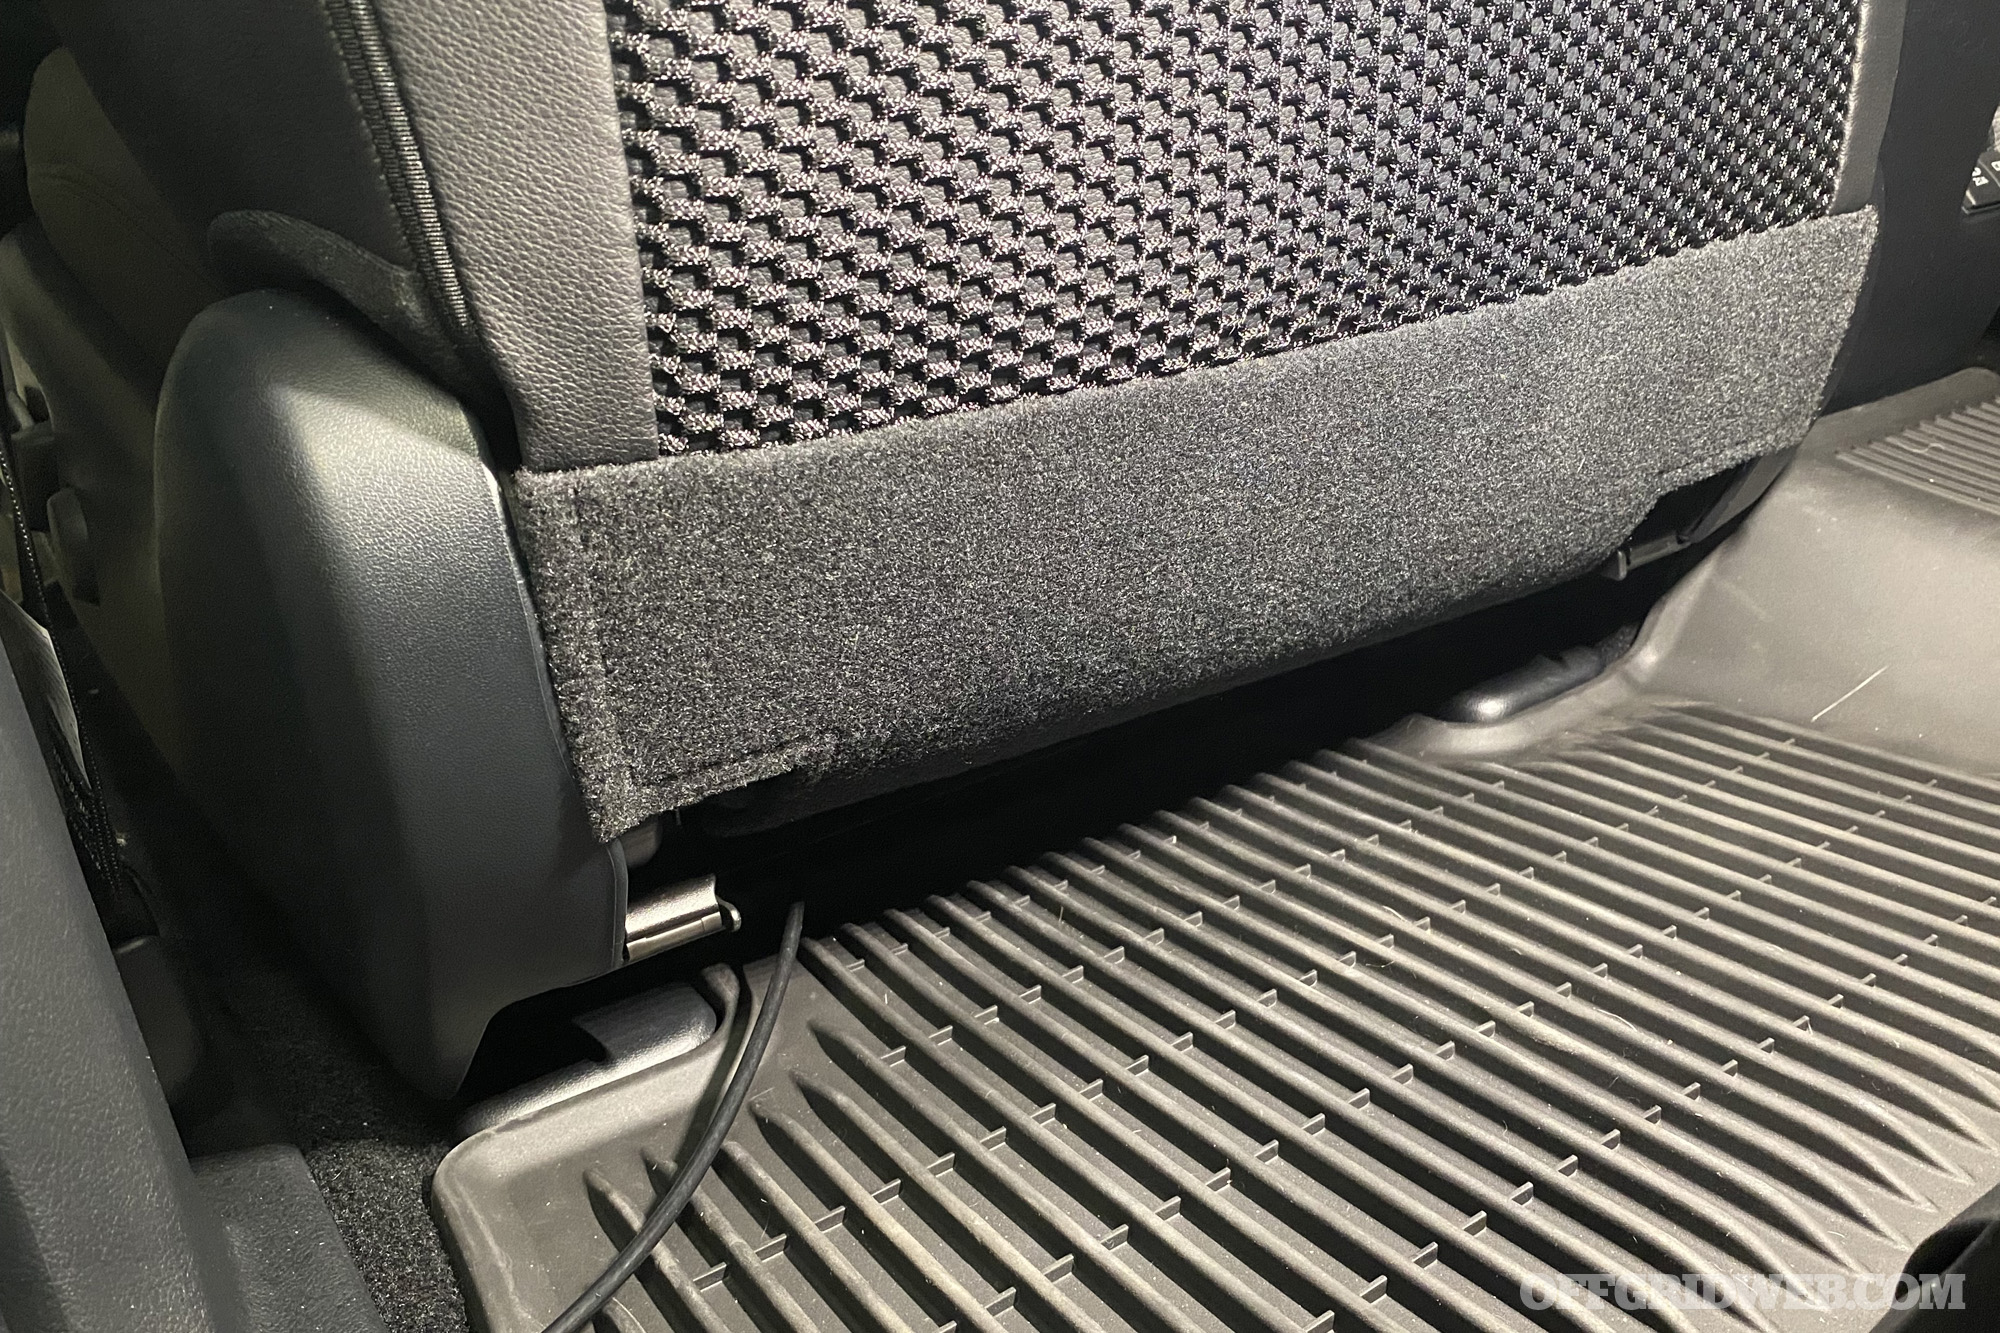
Only the antenna cable can be seen here — I plan to reroute that and hide it once I determine a final location for the antenna (preferably something more discreet).

Closing Thoughts
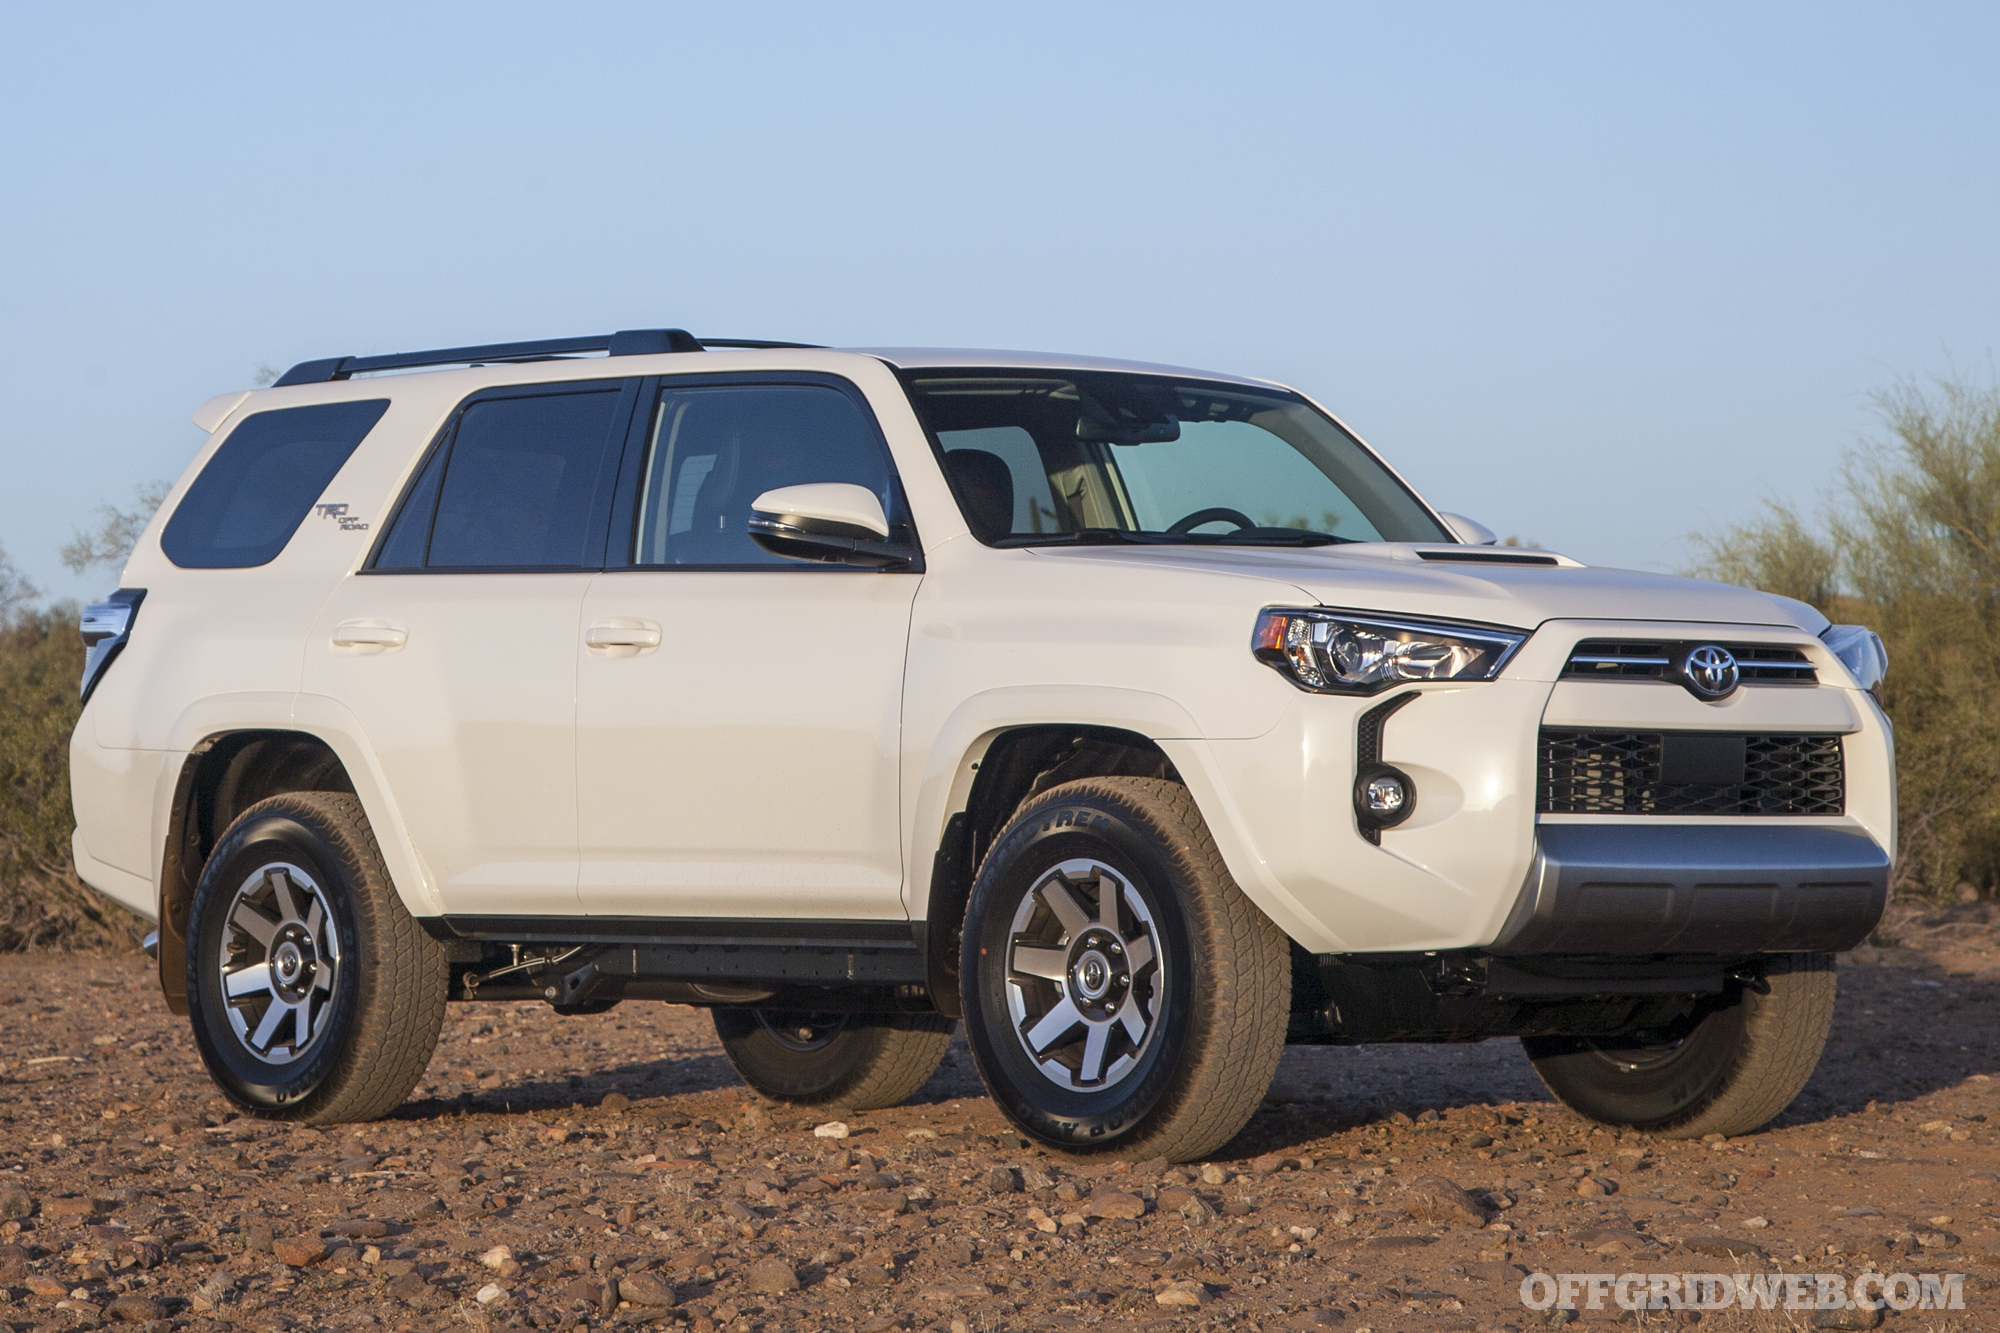
The new Midland MXT575 served as an easy way to add off-grid communication capabilities to my 4Runner. Its 50W broadcast power and high-mounted antenna on a large ground plane ensure I'll be able to squeeze every bit of range and clarity out of this GMRS setup. I'm also pleased with its hardwired power and concealment-friendly control mic — these features allowed me to integrate it seamlessly into the truck, rather than cluttering up my dash with wires and brackets.

Admittedly, even a 50W GMRS mobile radio can't reach as far as a top-of-the-line ham radio setup, and public repeaters are less common. However, GMRS doesn't require every member of my family to pay a fee, pass a test, and obtain a separate license. With one $35 family license, I can simply give my wife a spare handheld radio and let her spot my approach to challenging trail obstacles. This low barrier to entry also means that many local off-roaders and overlanders use GMRS, so if I ever need to call for help, I'm likely to reach someone nearby. Combine this with a healthy network of GMRS repeaters in the Phoenix area, and I have a reliable alternate comms tool to fill out my PACE plan (Primary, Alternate, Contingency, and Emergency).

As I mentioned earlier, the new Midland MXT575 will be released to the public on May 3rd, 2022. For more information, go to MidlandUSA.com.

Update: Adding an MXTA25 Ghost Antenna
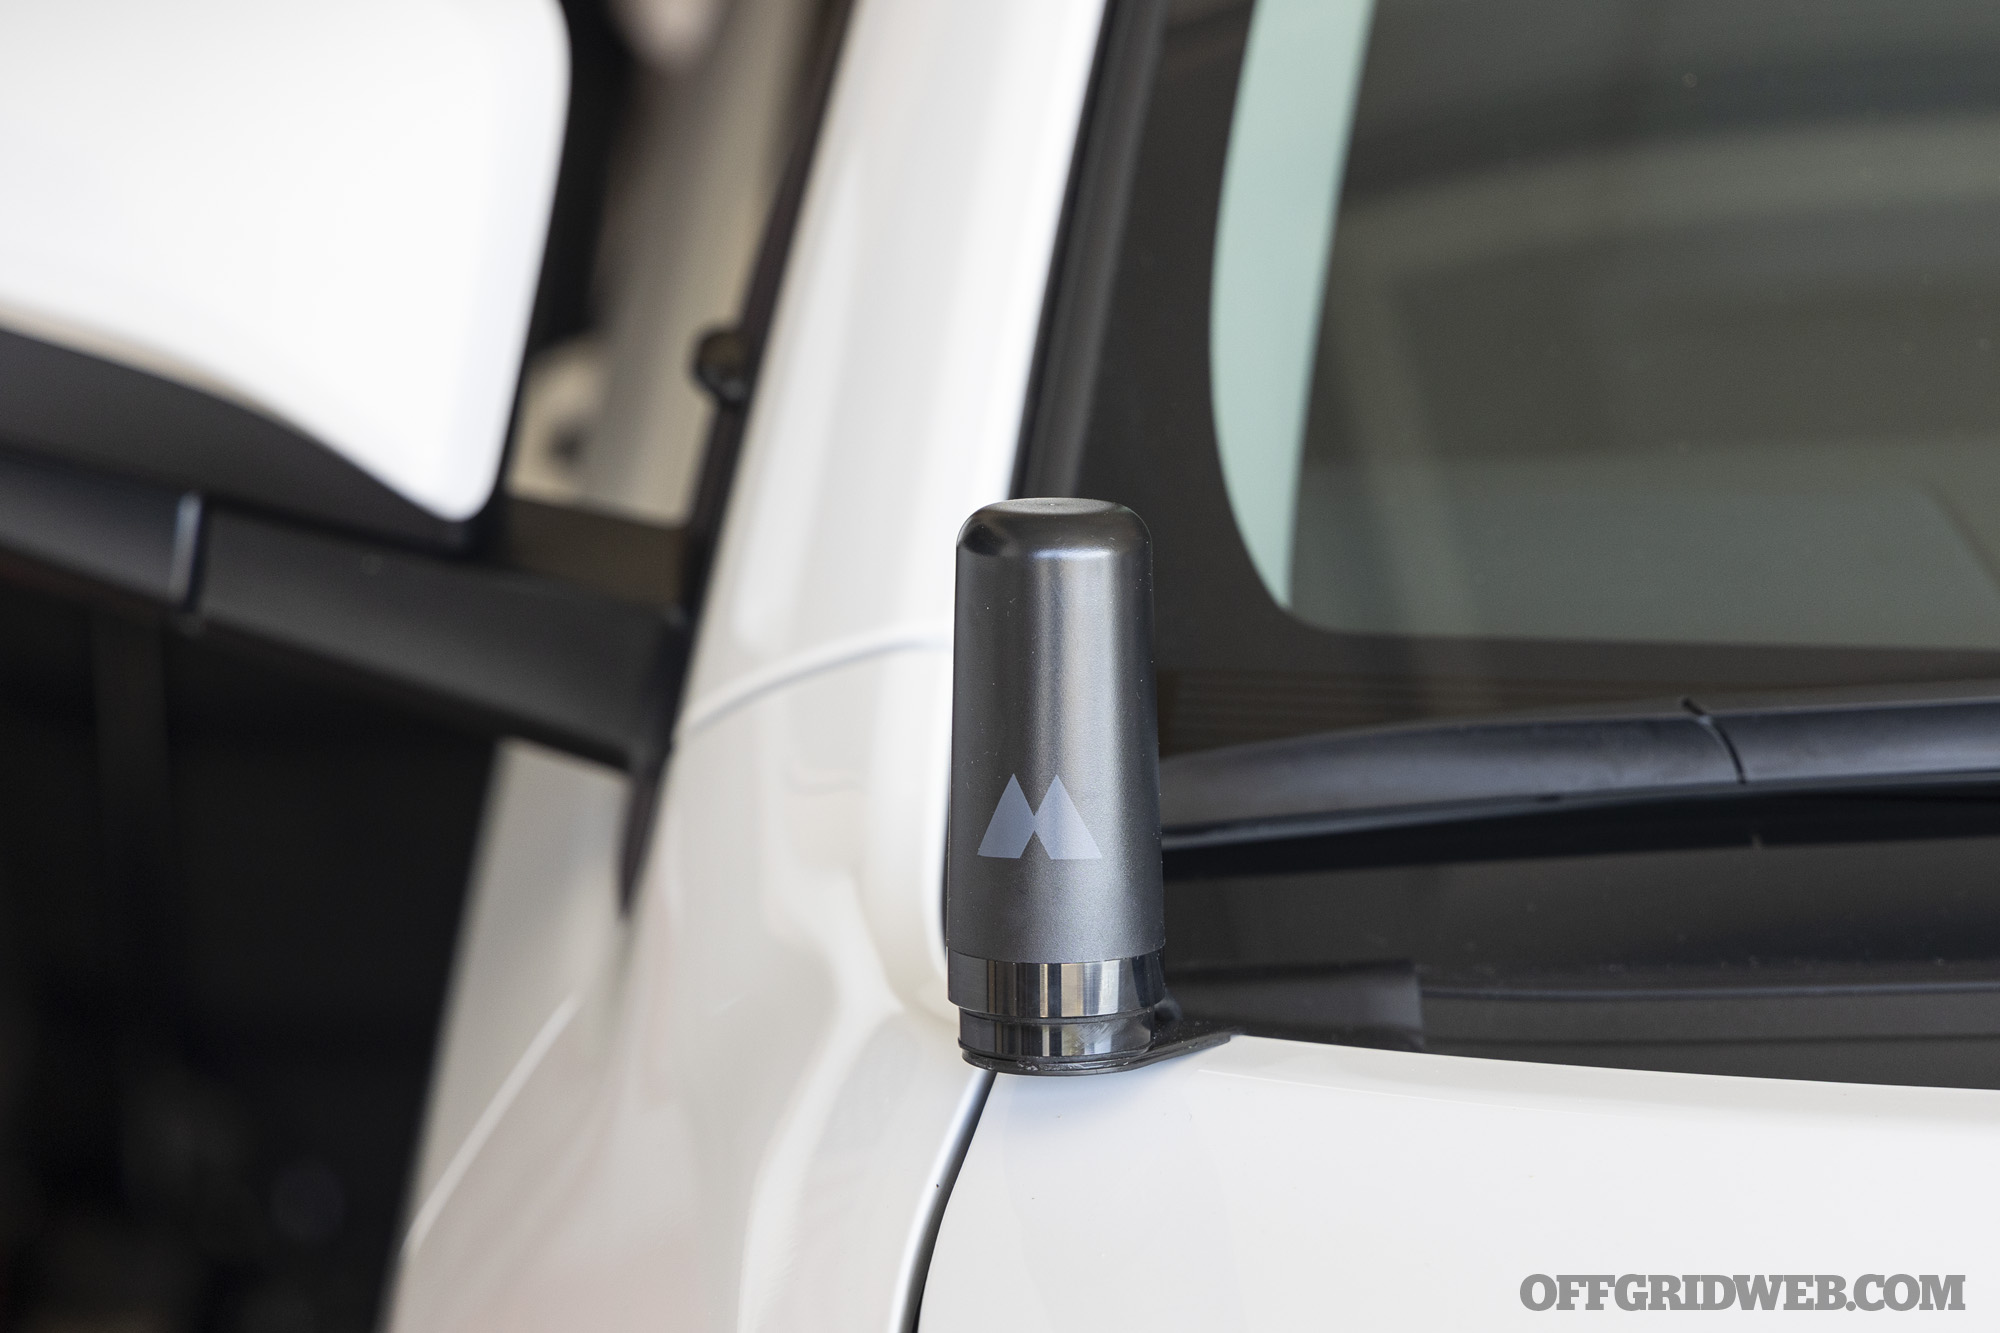
As I mentioned previously, the magnetic antenna that is included with the MXT575 worked well, but didn't match the factory-style integrated look I was aiming for. So, a few weeks after completing the radio installation, I picked up an MXTA25 3dB Gain “Ghost” Antenna and an MXTA27 Universal Lip Mount from Midland.

The MXTA27 mount — which includes a metal bracket, NMO antenna connector, and 6-meter coaxial antenna cable — was attached to the passenger side corner of the 4Runner's hood. To ensure it wouldn't loosen over time, I applied red Loctite to the two set screws on the bracket. Then I routed the cable through the engine bay, zip-tying it along an existing wiring harness, and passed it through the same firewall grommet as the radio power and ground wires. This would have been impossible if not for the fact that the end of the MXTA27 cable features a removable UHF connector, just like the magnetic antenna.

I finalized this setup with the cylindrical Ghost antenna, which features a sleeker look and higher gain than the MXT575's original antenna. It doesn't generate any wind noise in this location, and has been sturdy enough to go through an automatic car wash without any sign of movement. Performance is great since it's still right next to a large ground plane (the hood).

New: SOG Recondo FX Fixed Blade Knife

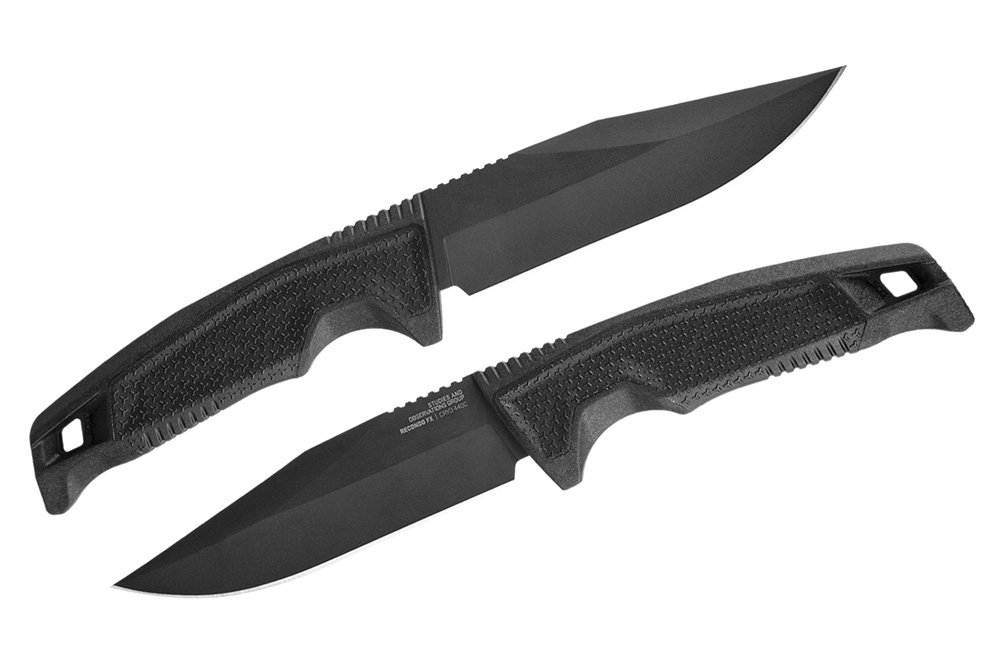
A sturdy fixed blade makes a valuable addition to any survival kit, whether it's in the trunk of your car, your EDC backpack, or your plate carrier. Folding knives are great for many everyday tasks, but a fixed blade will hold up to heavy-duty uses such as batoning wood. SOG has announced a new combat knife called the Recondo FX that's designed to withstand these uses in the hands of armed professionals and prepared citizens.

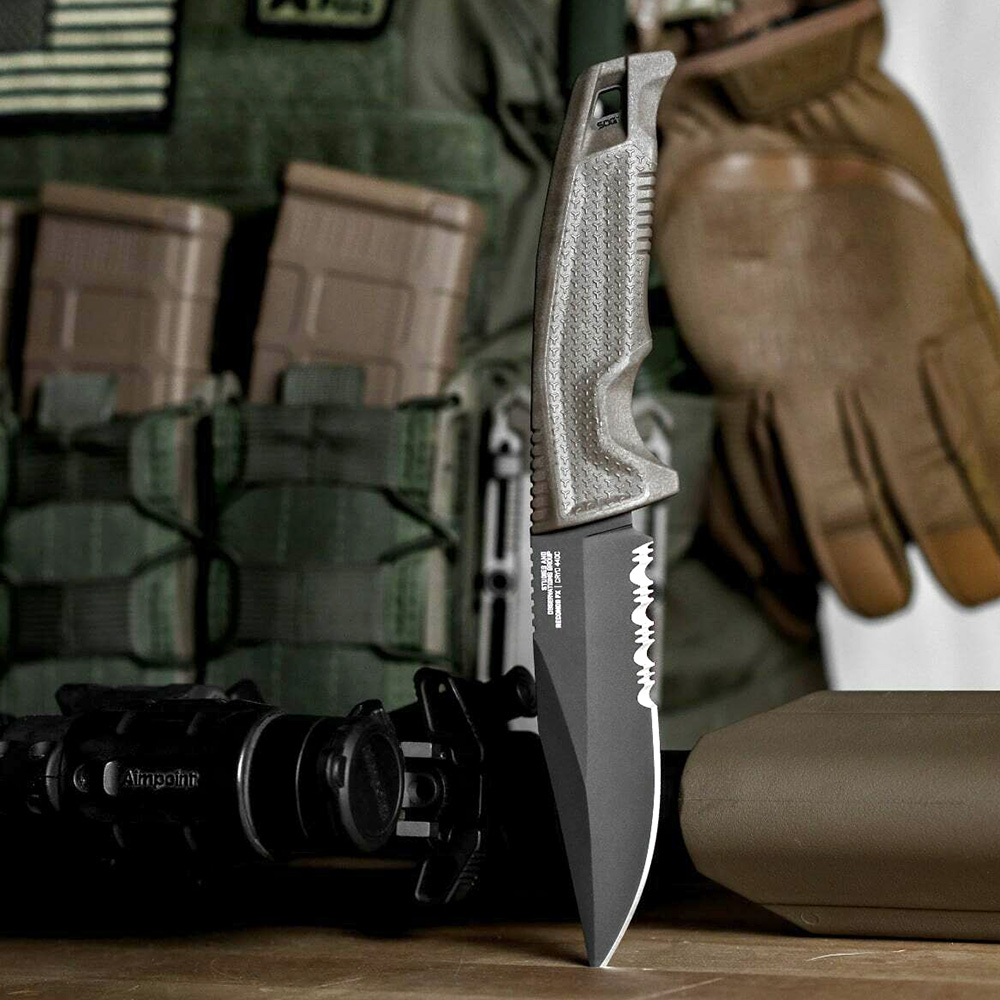
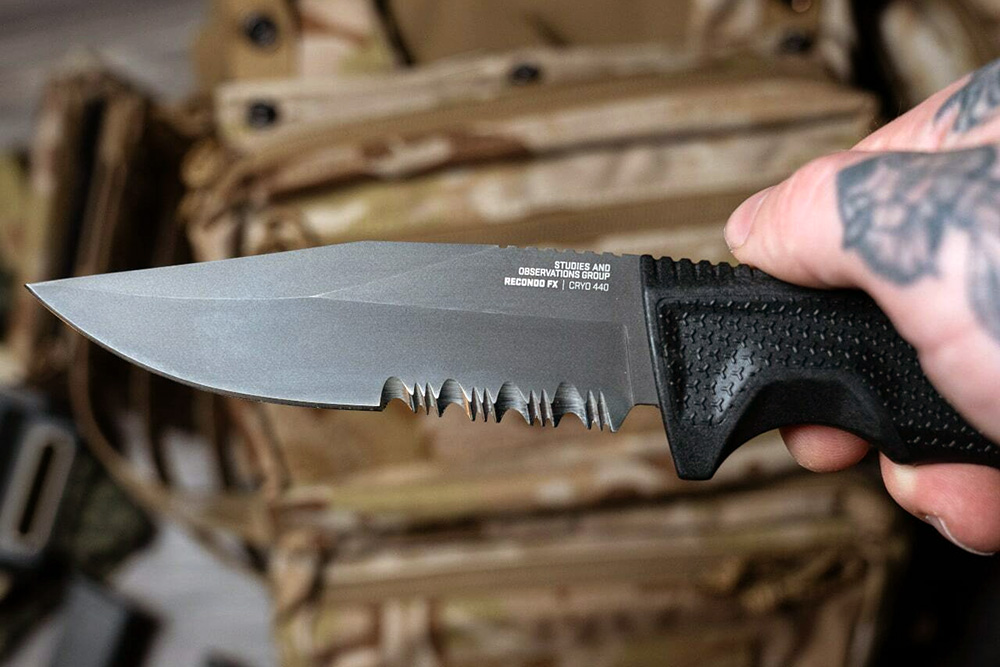
The new SOG Recondo FX features a 4.6-inch clip point blade with full-tang construction and a rubber-overmolded handle. It's built from 440C stainless steel that has been cryogenically hardened to 58-60 HRC to improve wear resistance, and it's finished in a black TiNi ceramic coating. The handle features strong contours and texture to lock in your grip, and there's a hole for a lanyard as well.

Four variants of the SOG Recondo FX will be available — black or FDE handle, and straight or serrated edge. Each knife includes a Universal Mounting System (UMS) polymer sheath that's ambidextrous and includes toolless tension adjustment to achieve your preferred balance between retention and a smooth draw. The UMS system allows for attachment to PALS webbing, belts, and Velcro loop material.

The new Recondo FX is still listed as “coming soon” on SOG's web site, but we anticipate it will be available in the next few months. MSRP for all versions is $130. For more info, go to SOGknives.com.


Child Abuse Facts and Myths Every Parent Should Know

Editor’s Note: Due to the sensitive nature of child abuse cases and the restrictions of this author’s job in law enforcement, his article has been published under a pseudonym. All incidents mentioned in this article have been left anonymous to protect the privacy of the victims. If child abuse has occurred to someone you know, call the National Sexual Abuse Hotline at 1-800-656-4673 or refer to this list of resources from Rainn.org.

First off, I’d like to warn you that this article may be hard to read; names have been changed, sentences redacted, but these are not fictional “stories.” What you are about to read comes from the investigations in one of the largest cities in the country and the lessons I’ve learned about the physical and sexual abuse of children. This piece will focus mainly on the sexual abuse of children, though I will make a point or two on the physical abuse that often comes along with it.

I recently read an article from the National Children’s Advocacy Center (NCAC) talking about common myths of child abuse — you can read it here. This was by far one of the better quick looks at the topic. One thing was missing for me: It didn’t hit on the corresponding facts that parents need to know. So, I’ve thought of some lessons every parent should know. These may not have statistics attached to them, but they’re based on firsthand experience. My ears will never be able to unhear what these kids have said, my eyes will never be able to unsee the atrocities of child sex abuse material (CSAM), and I will never look at a supposedly innocent “family friend” the same.

Common Perpetrators of Child Abuse

The first point I want to hit on is about the perpetrators of child abuse. Contrary to popular belief, it’s not the trench coat-wearing stranger at the store you need to worry about — it’s your father, your brother, or your husband and/or boyfriend. Out of my hundreds of cases investigated, a small fraction have truly unknown suspects. The usual culprits are the biological father, stepfather, or boyfriend in the home. Mothers, if you get anything out of this article let it be this: If your child — male or female — has an uneasy feeling about or is spending an unusual amount of time with your partner, dig deeper and keep an eye on them. That said, remember that women can be perpetrators too, as I’ll discuss later.

One thing I’d love to say is that biological fathers are never the ones to sexually abuse their children. Unfortunately, while they are perpetrators in only a small percentage of my cases, these are usually the most manipulative and long-lasting abuse cases (keep this in mind when I make my second point). Most of the time the stepfather or live-in boyfriend takes advantage of the trust and isolation of the victim. A case for this that comes to mind occurred between a stepfather and stepdaughter while the mother was away. After finally having groomed the stepdaughter to trust him, the stepfather got drunk and asked the stepdaughter to sexually pleasure him with a sex toy. Let’s take a break from that and go to my second point; I promise I’ll come back to it.

Above: While society has a tendency to depict males as the sole perpetrators of abuse, female perpetrators often go unreported.

Underreported Crimes

For this second point, I’ll take it from the NCAC’s article. Contrary to popular belief, most children either delay their disclosure or never disclose their abuse at all. Most of the disclosures that I’ve had come from three catalysts:

  1. an accidental outburst during an argument (usually with mom)
  2. the partner finding evidence or walking in on the child and parent engaging in sexual intercourse
  3. a purposeful disclosure

Every single child I’ve spoken to who had a delayed disclosure said they didn’t come forward sooner because of not being believed. Every single child I’ve spoken to who had a purposeful disclosure said they didn’t think anyone would believe them.

Another portion of underreported or completely unreported crimes by victims is male-on-male sexual violence. One case in particular comes to mind, as I recently was informed of the perpetrator taking a plea deal. In short, a female victim came forward to report being sexually abused by a male family member. The female victim’s brother was brought in for a precautionary interview. During my interview with the mother, she stated during the entire ordeal of police involvement, the brother was adamant nothing occurred between him and the male suspect. Sadly, during my interview the male victim said he was scared and ashamed of what occurred, which is why he waited until his interview to disclose the fact that he was also abused by the suspect. Most of my male victim interviews had a common theme: shame. This stigma causes a high percentage of male-on-male crimes to not be reported.

The Power of Manipulation by Predators

Now, let’s tie the previous two points together with one of my cases. I spoke to a distraught mother who told me her 16-year-old daughter disclosed being sexually abused by her father. Just another case, I thought, but something felt off. I had the mom bring in her two other daughters for interviews. The interviews are called forensic interviews; in short, they allow the interviewee to provide a narrative instead of just short answers. It’s common for interviews to go an hour or so. The 16-year-old’s interview lasted two-and-a-half hours. She didn’t come forward for eight years and her disclosure was purposeful.

So, you may ask why she waited so long. Wouldn’t she want this to end? Trust me when I say this was the bravest 16-year-old I’ve met. She waited in hope that it would protect her younger siblings. The biological father told her if she endured his abuse, her sisters would be spared. She believed she was sacrificing herself for them, and only spoke to authorities after she found out that her father’s promise had been a lie. While writing this I received an update on the case; the father pled guilty to multiple charges as a plea deal and received multiple years in the Department of Corrections for his actions.

Above: Manipulation can take the form of threats or bribery.

This case hits both points above: The biological father was constantly alone with the daughters, as he was the only one with internet access for the children who were doing online school, and he manipulated the victim to believe if she did whatever he asked, her younger sisters would be spared. Due to the new information on the plea deal, I’d like to transition to a topic a bit earlier than planned — sexual abuse suspects.

Overcoming Societal Norms

You just read of a case where a male perpetrated multiple acts against female children; many wonder if females are ever suspects in these cases. The answer is a simple yes, but the reason statistics show a low number may surprise you. Let us examine two separate cases — I can’t disclose the full details of either, but what I can disclose still paints a grim picture. The first case is quite tragic. A stepmother sexually groomed and abused her juvenile stepson, got impregnated with his child (a girl), and the juvenile male left the household prior to the child’s birth. When was this reported? Multiple years later when the mother was arrested for placing her own daughter into the sex trade at only 8 years old; at the time of arrest, the daughter was 14. This case does not fit a societal norm — incest, whether perpetrated on a male or female, is still not harshly prosecuted in many courts.

Let’s now look at how societal norms may have failed another child. A 16-year-old male had a full sexual relationship with a 32-year-old female. This relationship included “sleepovers,” dates, and sexual intercourse. The pair were caught in the act and the female arrested. That is normally what I would call an “open-and-close case.” However, what did the courts do? They dismissed the case on the basis of “no likelihood of conviction.” That is legal jargon which implies the prosecution doesn’t feel they’d win the case if it went to trial.

Above: Spending an excessive amount of time together isn’t always innocent.

These cases draw attention to the societal norms of relationships. When you hear of a younger male dating or engaging in promiscuous acts with an older female, the general consensus is to “high-five” and congratulate the male for some sort of accomplishment. However, when the roles are reversed it’s usually described with words like “disgusting” and “manipulative.” Ask yourself, especially the male readers, what your initial thoughts were. Whether you like to admit it or not, I would assume many blindly fell into those societal norms of a large-age-gap female-to-male relationship being generally accepted.

The Big Question

Up to this point, I’ve laid out the pathway for real-life examples of child sexual abuse, but how do you know if your child is a victim? This is a question no parent ever wants to hear an affirmative answer to. I have been the one to give the news to multiple parents, and it’s truly heartbreaking. So, how do you know if your child has suffered any type of abuse? Ask them. It’s a simple answer for an extremely difficult task, one which must also be carefully and methodically asked. In the case that your child does say they have been abused, I caution parents who may assume the child is lying. Sadly, plenty of parents do.

Three “Case Killers” to Avoid

Below, I will expand upon my top three “case killers” — factors that destroy a victim’s trust and willingness to report a crime — in different investigations.

Case Killer 1: Confronting the Accused

The most notoriously obvious thing a parent does when they suspect a child to be lying is take the child to the accused and utter the following words, “Go ahead, tell him/her what you told me.” The child, now in a worse position than before, will recant their story and be labeled a liar by the perpetrator. This occurs quite frequently after the perpetrator tells the victim “no one will believe you.” Of my cases where this occurred, the child always recanted, was victimized again, then a second disclosure came out accidentally or they told a mandated reporter (nurse, teacher, firefighter, cop, etc.). At this point it takes skill, compassion, and time to build trust for the interviewer to get a full disclosure from the victim.

Case Killer 2: Blaming the Victim

While similar to the first, this case killer comes at the cost of the trust between the victim and who they disclose the crime to. I’d like to say I’m a level-headed investigator; I do my best to remove my emotions and focus on facts and elements of the case. However, I know of one time when I couldn’t believe the words I heard from the wife of a suspect. She didn’t believe the victim, she believed her husband. She tried every excuse in the book to blame the victim for what occurred and why everything was a misunderstanding.

The comment that pushed me to disclose more of the case than I wanted to — I had evidence I hadn’t revealed to the suspect yet — was regarding the victim and her social media/outfit habits. The wife told me to look at how the victim dressed, acted on social media, and “flirted with everyone.” Could all of that which she brought up be labeled as attention-seeking behavior? Sure. However, I like to think of that as behavior similar to a defense attorney; I know their case is weak when I get personally attacked during trial. It’s at that point in the trial that I know the case against their client is a solid one. Attacking my work ethic, appearance, and integrity (something that’s always brought up) takes away from the lack of defensible evidence they have. In the end of that case, the suspect admitted to the acts. I’d go as far as to say the wife knew and was trying to protect him.

Case Killer 3: Forcing the Disclosure

Above: Allowing the victim to go at his or her own pace is critical when talking about abuse. Forcing a disclosure may cause even more trauma.

During interviews with victims, I ask some form of question about how the disclosure occurred. I wanted to know what prompted the conversation and why they decided to disclose the crime now — what was different about now? That question sometimes slowed the interview, as the victim would break down emotionally and explain how they were forced and emotionally pressured to the point of disclosing.

Some may think the parent did a good job, doing whatever was necessary to get the disclosure. Sure, the case may go forward, but psychologically the victim will have another traumatic experience added to the abuse they already suffered. My suggestion is don’t force the victim to talk. So much will be going on in their minds that being “forced” to talk with a cop is the last thing the victim wants to do (usually). What’s my suggestion if the victim isn’t ready to talk? Make the police report immediately — take the child to a safe place first if needed — and have the investigation started. Most departments have adopted the practice of having a victim advocacy center built into their child-related crime bureaus. If a victim advocacy center isn’t attached to the building or accessible, ask for the nearest one or one the department commonly works with. The victim advocates are a wealth of knowledge and resources, and they can assist the victim without further traumatizing or pressuring them.

The Internet & Social Media – Your Kids Know More Than You Think

Above: Although “stranger danger” is still something to be wary of, most suspects are well-known by the child and/or family.

I’ve gone over how children are victimized, and what to do if your child is a victim, but what about preventing these crimes before they happen? Aside from investigations, I try to stay up to date on technology, especially cellular technology. This has helped my investigations not only in finding key elements of crimes, but also helping inform parents of what their kids are doing when using their cellphones. If you have a child with access to a cellphone and an internet connection, I can almost guarantee they have some form of social media (often not under their real name), an application to message friends (Snapchat, Instagram, TikTok), and an application/folder that’s used to hide pictures or videos they don’t want you to see.

It would be impossible to list all the applications that provide these functions; however, a quick search of their downloaded applications (viewed from the downloads of the iPhone App Store or Google Play Store) will show you the app and the function of that application. An app that hides photographs, videos, or GPS location is what I’d call a “clue” in the situation of possible inappropriate behavior from a child. This doesn’t mean they’re a victim of something, though I would say it’s cause for you (the parent) to do some digging and see what’s going on in your child’s life.

Smartphone Apps Parents Should Know

The following graphic was created by the Sarasota County Sheriff’s Office in September 2019, and contains 21 apps that are popular among minors, along with brief summaries of their capabilities. Click here for a full-size version.

Conclusion

I hope this information hasn’t scared you but has instead made you eager to be more involved in your child’s life or helped you to be more aware of what goes on in the world. Above all, do your best to maintain open communication and trust with your child, your child’s friends, and their parents. Be involved and attentive. If signs of child abuse — or red flags indicating the potential for abuse — appear, you’ll have a much greater chance of hearing about it and being able to respond appropriately. Links for articles referenced can be found in the sidebar, as well as an infographic from the Sarasota County Sheriff’s Office for 21 phone applications which parents should be aware of.

Important Resources


iTAK Brings the Military’s Collaborative Mapping App to Civilian iPhones

If you've ever seen photos of members of the U.S. military wearing smartphones on the front of their plate carriers, you may have wondered what they're for. No, they're not just there for browsing Pinterest or playing Candy Crush — these phones are used with an application known as Android Tactical Assault Kit (ATAK). ATAK was originally developed in 2010 by the U.S. Air Force Research Laboratory using code from NASA's WorldWind mapping program. Lightly-modified versions of this application were eventually released to government agencies (ATAK-GOV) and civilians/first responders/humanitarian nonprofit groups (ATAK-CIV, also known as CivTAK). Each of these was exclusive to Android devices, but last week, a developer known as Syzygy Integration released iTAK for Apple devices.

Above: A radio operator with the Maritime Raid Force, 31st Marine Expeditionary Unit, uses an Android Tactical Assault Kit (ATAK) device in a Juggernaut case during a Visit Board Search and Seizure (VBSS) mission. (U.S. Marine Corps photo by Cpl. Brandon Salas)

What Does iTAK Do?

iTAK is described as “a collaborative geospatial application to see your teams’ locations, sensor information, videos, chat, and more in real-time.” In simpler terms, it's a mapping app that allows you and members of your group to tag locations, trace routes, discuss objectives, and track each other's positions. Think of it like the mini-map in a video game — you can glance down at it occasionally to see where your teammates are and what they're doing.

The original purpose of the military ATAK software was for assaulting objectives, hence the Tactical Assault Kit name. The civilian app name stands for Team Awareness Kit, but it's the same core concept and most of the same functionality (minus the ability to call in airstrikes). Even if you're not on the battlefield, it's useful to be able to track where your friends are, check their movements, and note important landmarks.

Here's a quick list of some of iTAK's capabilities. If you're an Android user, CivTAK has all of the same features plus a few more that haven't been implemented in iTAK yet.

• Online and offline mapping with in-app downloadable map options

• Team tracking

• Collaborative mapping, including points, drawings, locations of interest

• Location marking and sharing with photo tagging

• Chat, file sharing, photo sharing

• Live video streaming with the ability to share video links

• Spotted map to mark and share multiple locations across your map

• Navigation — walking/hiking, driving, also useful for flying and air-ground coordination

• Range, bearing measurement tools

• Team Emergency Beacons

Above: EOD technicians use an Android Tactical Assault Kit device during a patrol at the Warfighter Challenge. (U.S. Air Force photo by Samuel King Jr.)

Syzygy Integration says iTAK is “useful for law enforcement, first responders, hunting, fishing, ornithology, and wildlife site surveys.” We could also see this app being helpful for overlanding and off-road trail exploration, since routes can be mapped out and difficult obstacles can be tagged. And in an extreme scenario, it might be useful for coordinating small unit guerrilla tactics to defend a contested region, much like what we've seen overseas in Ukraine.

How to Download iTAK

Like CivTAK, iTak is free and can be downloaded through the App Store without requiring any modifications to the device or operating system. Here's a direct link to the App Store download page: https://apps.apple.com/us/app/itak/id1561656396

Android users can get the original CivTAK app on the Google Play store.

All data in iTAK is said to be “fully compatible with the TAK ecosystem,” including ATAK, TAK Server, and WinTAK (for Microsoft Windows). We're not sure yet if this means there's cross-platform compatibility — in other words, if you can use iTAK to collaborate with a friend who uses ATAK on an Android device — but we plan to experiment with it more in the future. The finer details of how to set up an ATAK/iTAK server can get pretty technical, so we'll leave you with the following resources for additional information:

We plan to write an in-depth article about how to set up and use ATAK and iTAK in the future, so stay tuned for that. In the mean time, download the app and try to familiarize yourself with its basic functions.


Roamr’s 1974 Jeep J20 “Tomahawk” Overland Truck

Jeep pickups are a common sight these days as a result of the popularity of the new JT Gladiator. Prior to that model’s release in 2020, American Expedition Vehicles offered AEV Brute pickups built from modified Wranglers; before that, there was the 1986-92 Jeep Comanche based on the XJ Cherokee. But the history of Jeep pickup trucks — and the Gladiator name — goes back even further. In 1963, Jeep introduced the first Gladiator, also known as the J-Series (which includes sub-models like the Jeep J2000 and Jeep J20). Production of this Wagoneer-based truck would continue for more than 25 years, serving as a testament to consumers’ desire for a vehicle blending the off-road prowess of a Jeep with the versatility of a pickup.

Photos by John Schwartze

Editor's Note: This article was originally published in Issue 7 of our sister publication Carnivore magazine.

The Roamr “Tomahawk” Jeep J20 Build

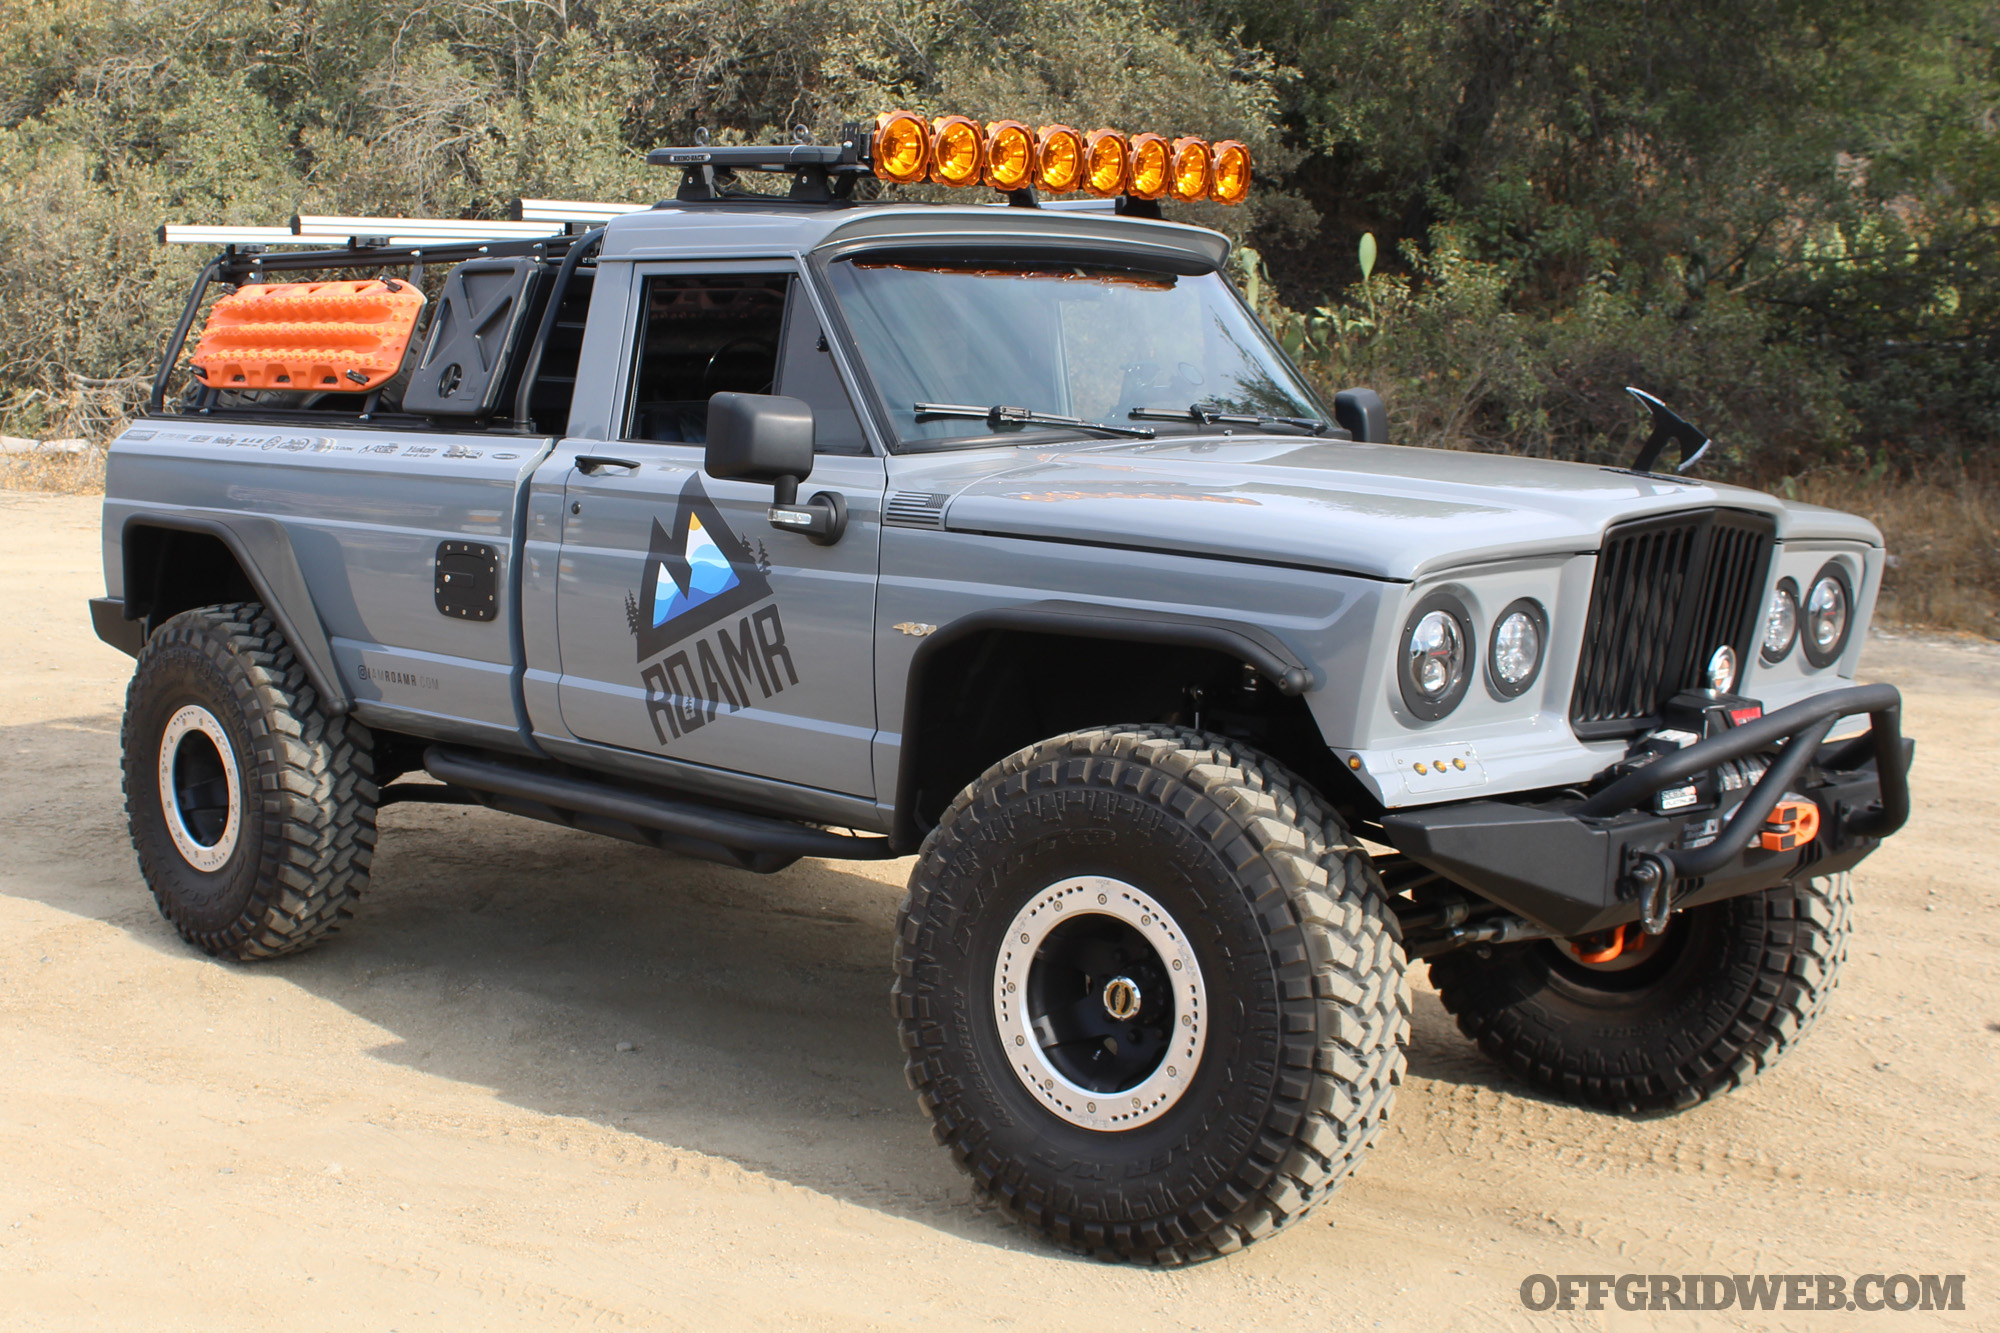
Roamr is a partnership between overland vehicle enthusiasts Troy Tertany, Tony Durbano, and Jason Miller. The trio has always been fond of J-Series trucks, so when they found a 1974 Jeep J20 for sale, they immediately decided to restore it. “It was rough,” Troy said. “The truck was running, but just barely, and there was a lot of body cancer.”

Above: Troy sent us this photo of the J-20 shortly after it was purchased. It took the Roamr team roughly a year to restore and modify it into its current form.

The cab, bed, and engine were removed, and all the rust was carefully excised. Then, Castle Fabrication shortened both ends of the frame to reduce its length by a total of 13.5 inches — this would improve the approach and departure angles on trails, and also make it more maneuverable around town.

Body Modifications

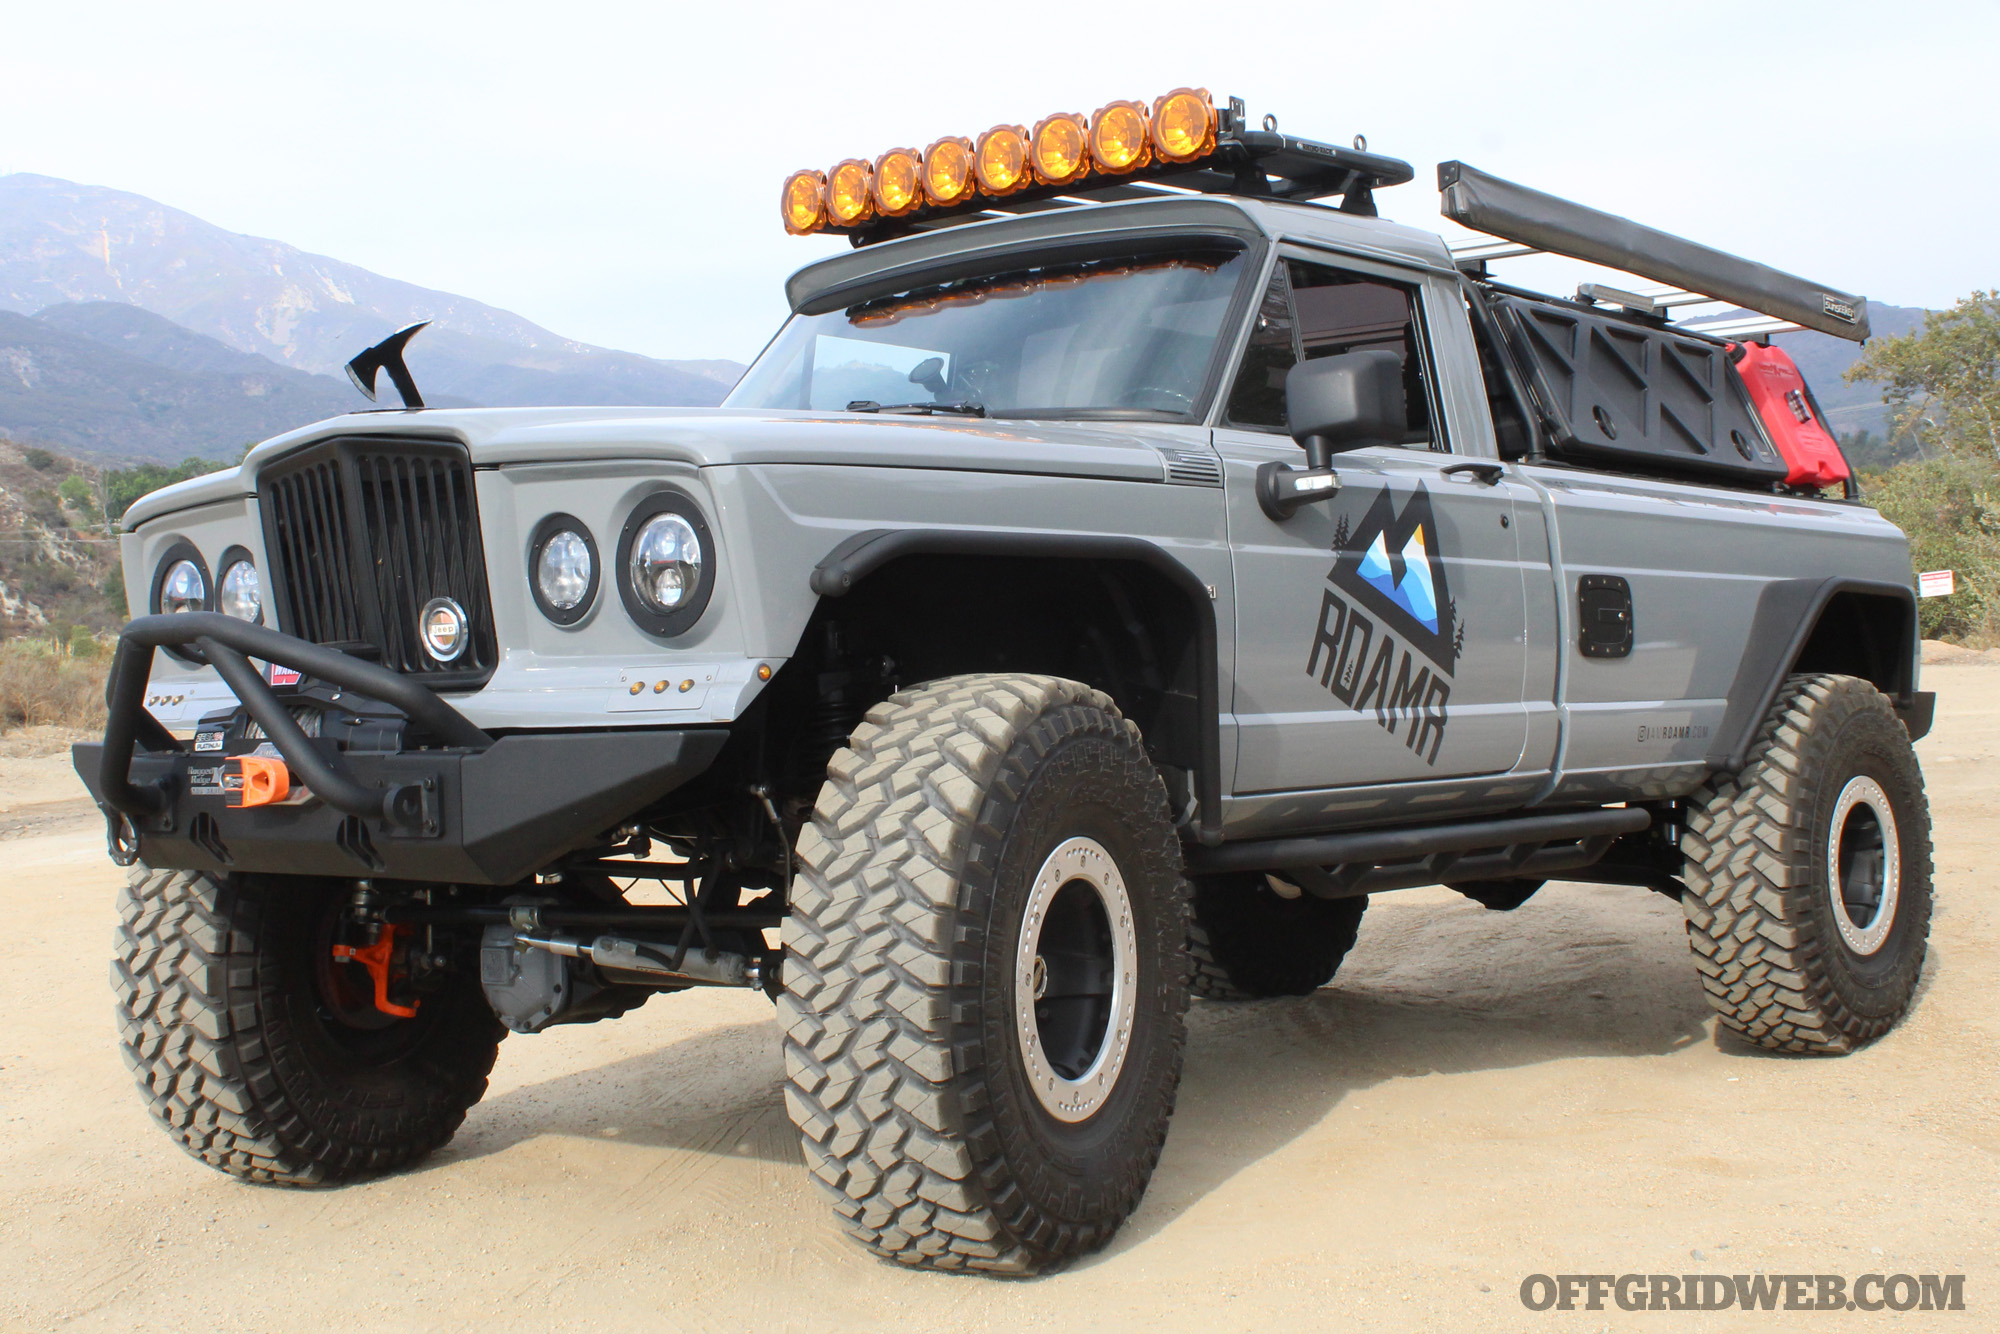
“We decided early on that this build needed 40-inch tires, should be able to go just about anywhere, and should be prepared for several-day excursions,” Troy said. This meant the J20 would need substantial modifications to the suspension and body. The factory sheetmetal panels were cut to make room for modified Metalcloak fenders; Rugged Ridge bumpers and rocker panel guards were also installed. Castle Fabrication crafted a custom suspension setup based on a Metalcloak 6-inch long-arm kit. This provided enough clearance to install 17-inch B.A.D. beadlock wheels and 40-inch Nitto tires.

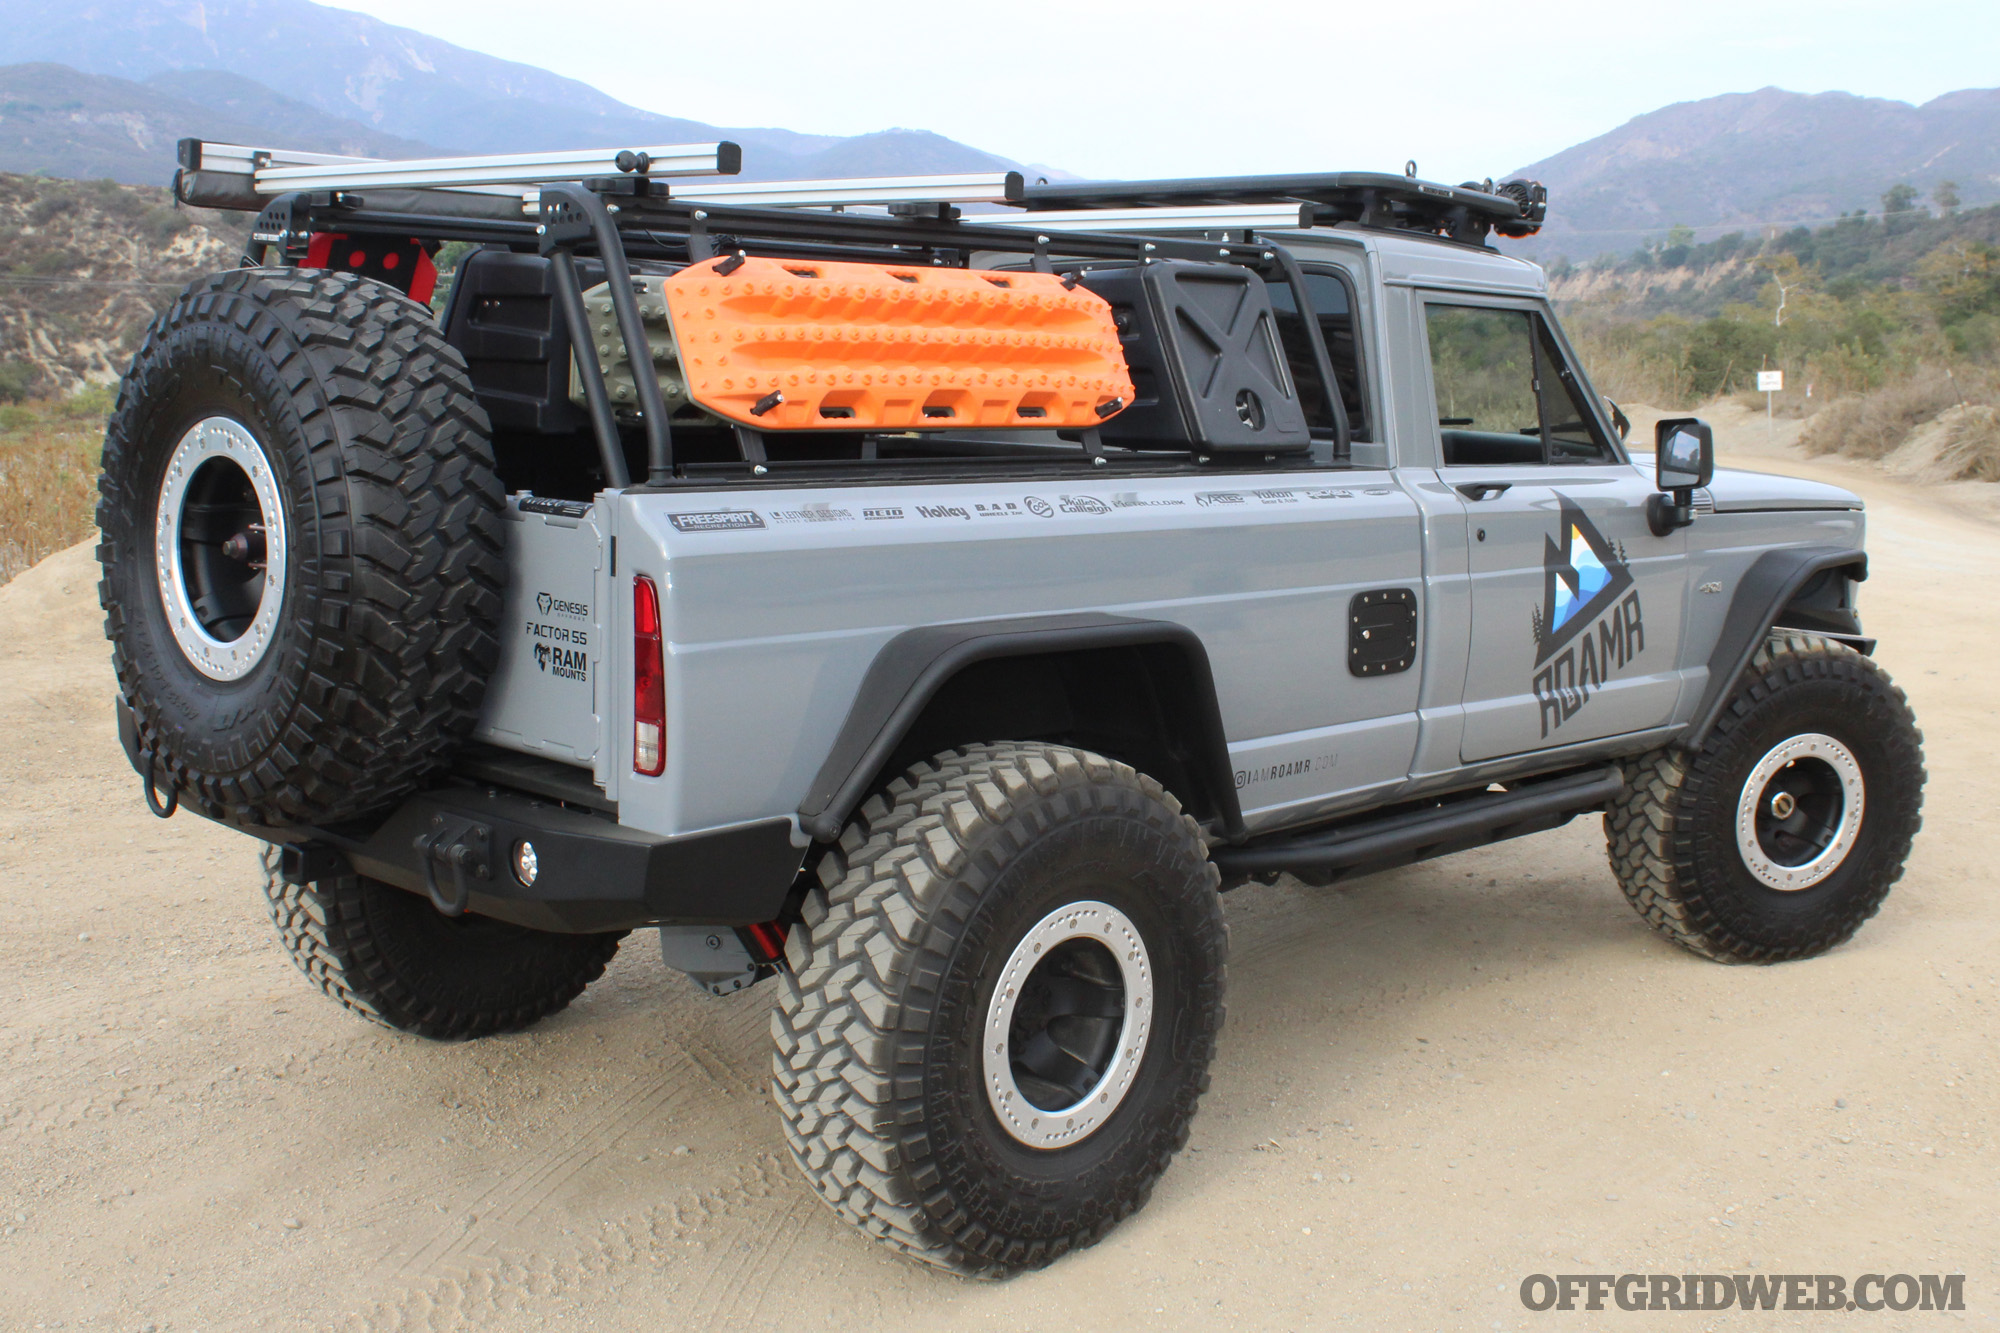
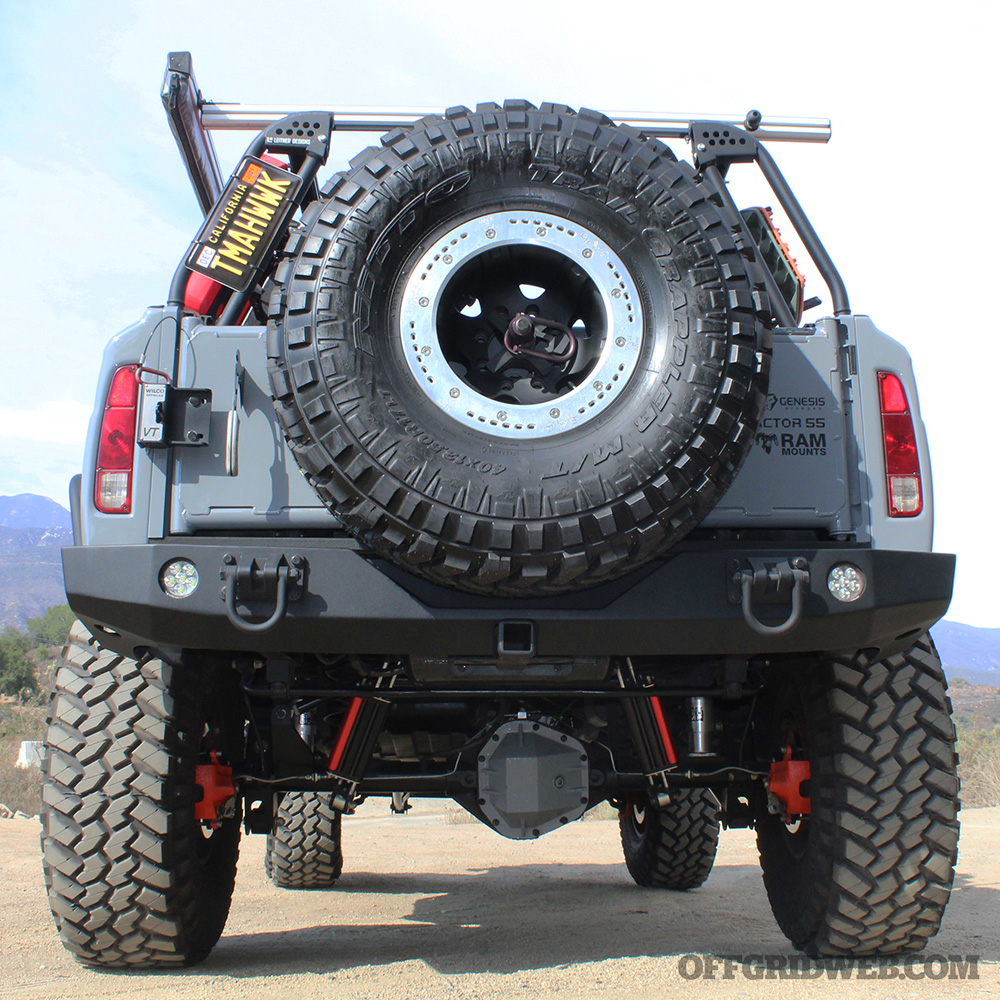
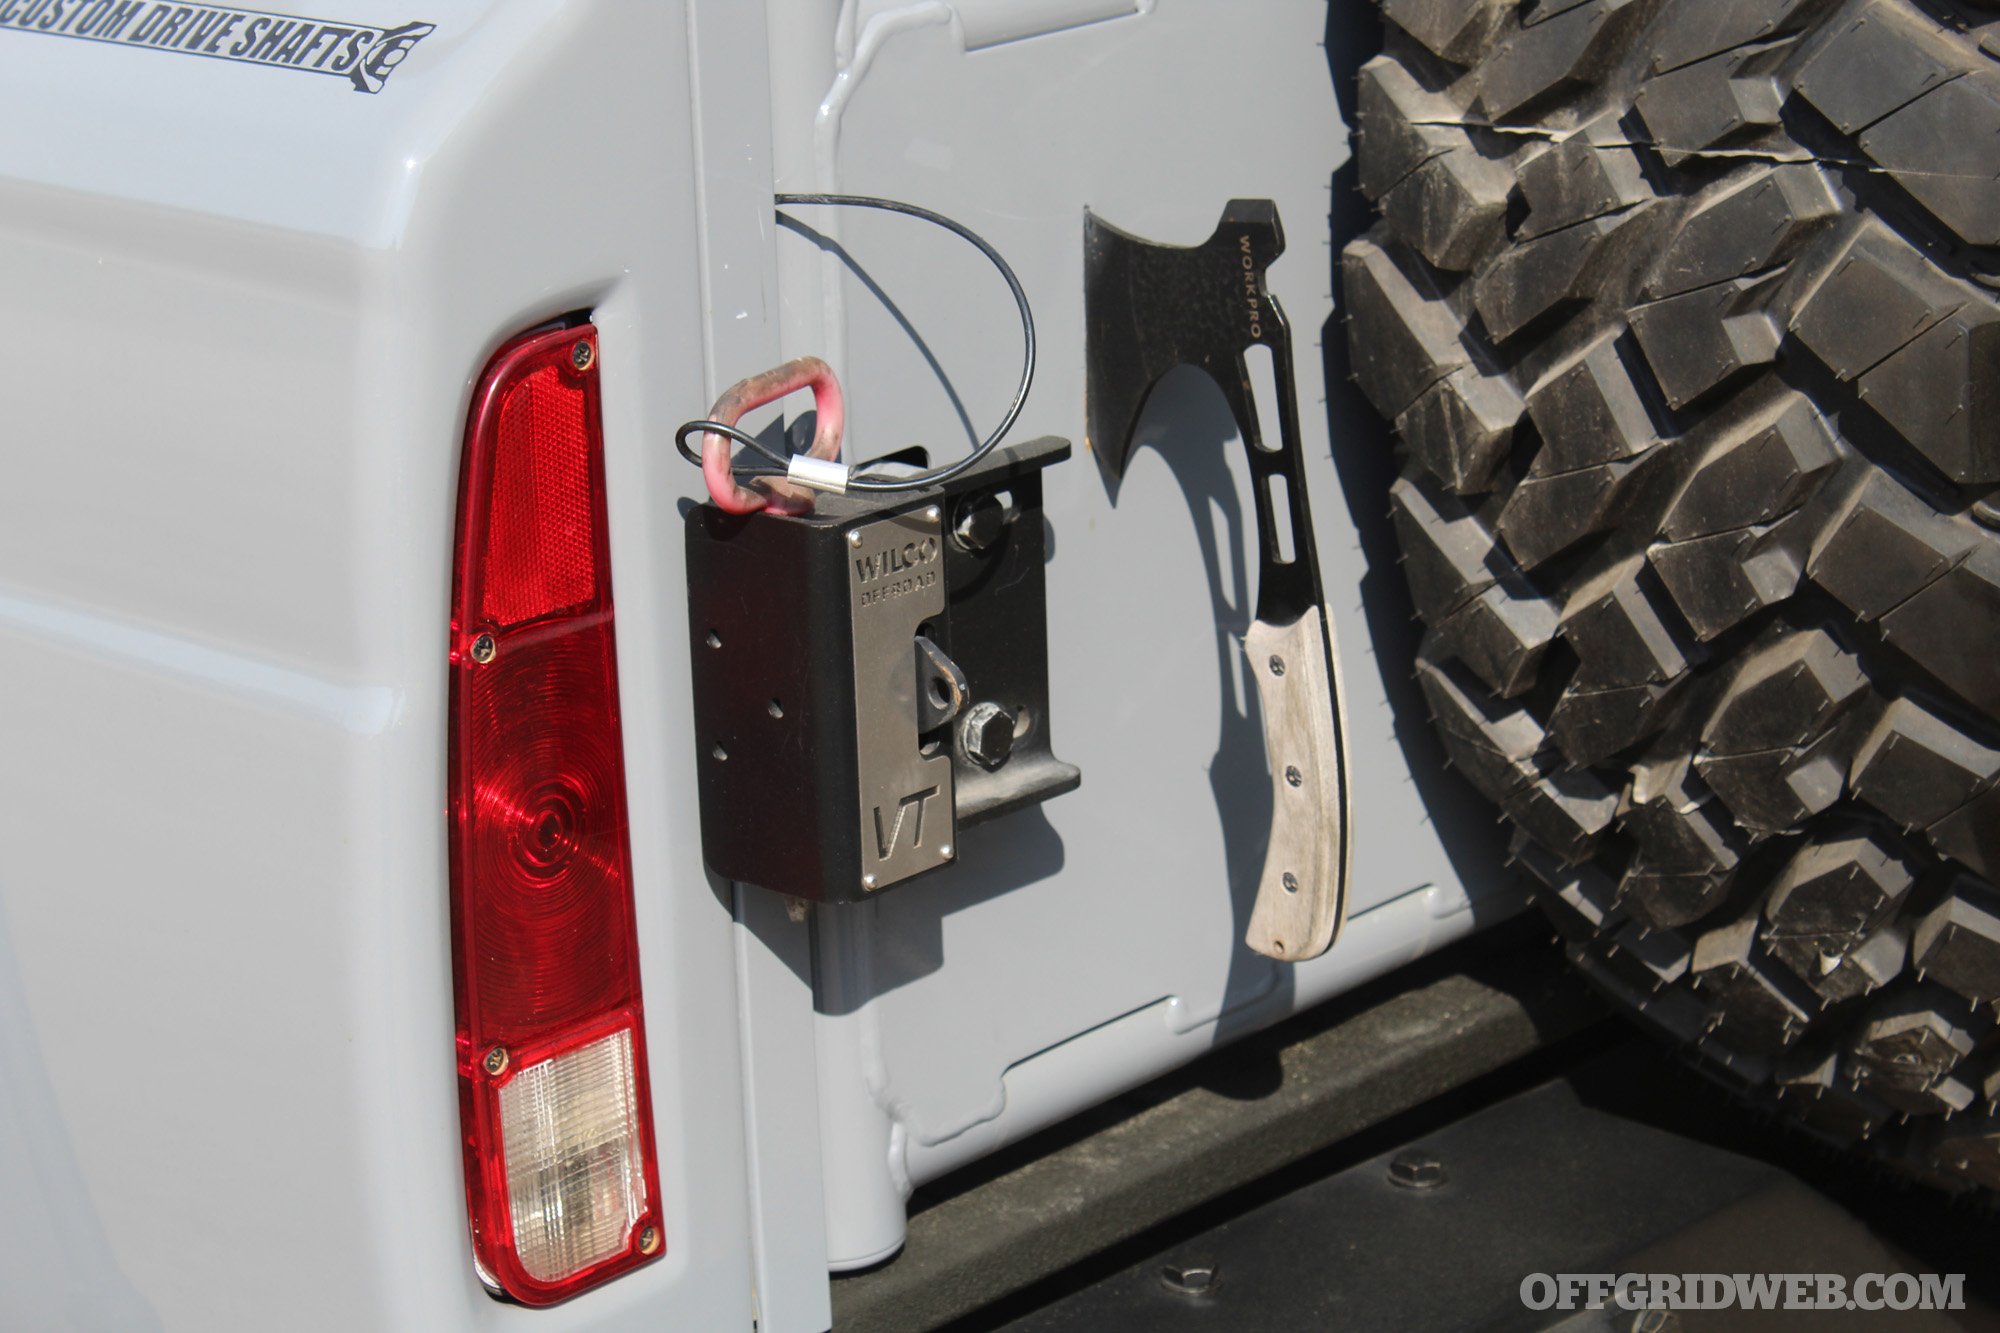
Above: In case one of the 40-inch Nitto Trail Grappler tires goes flat, a full-size spare is mounted on the Wilco tailgate for quick access.

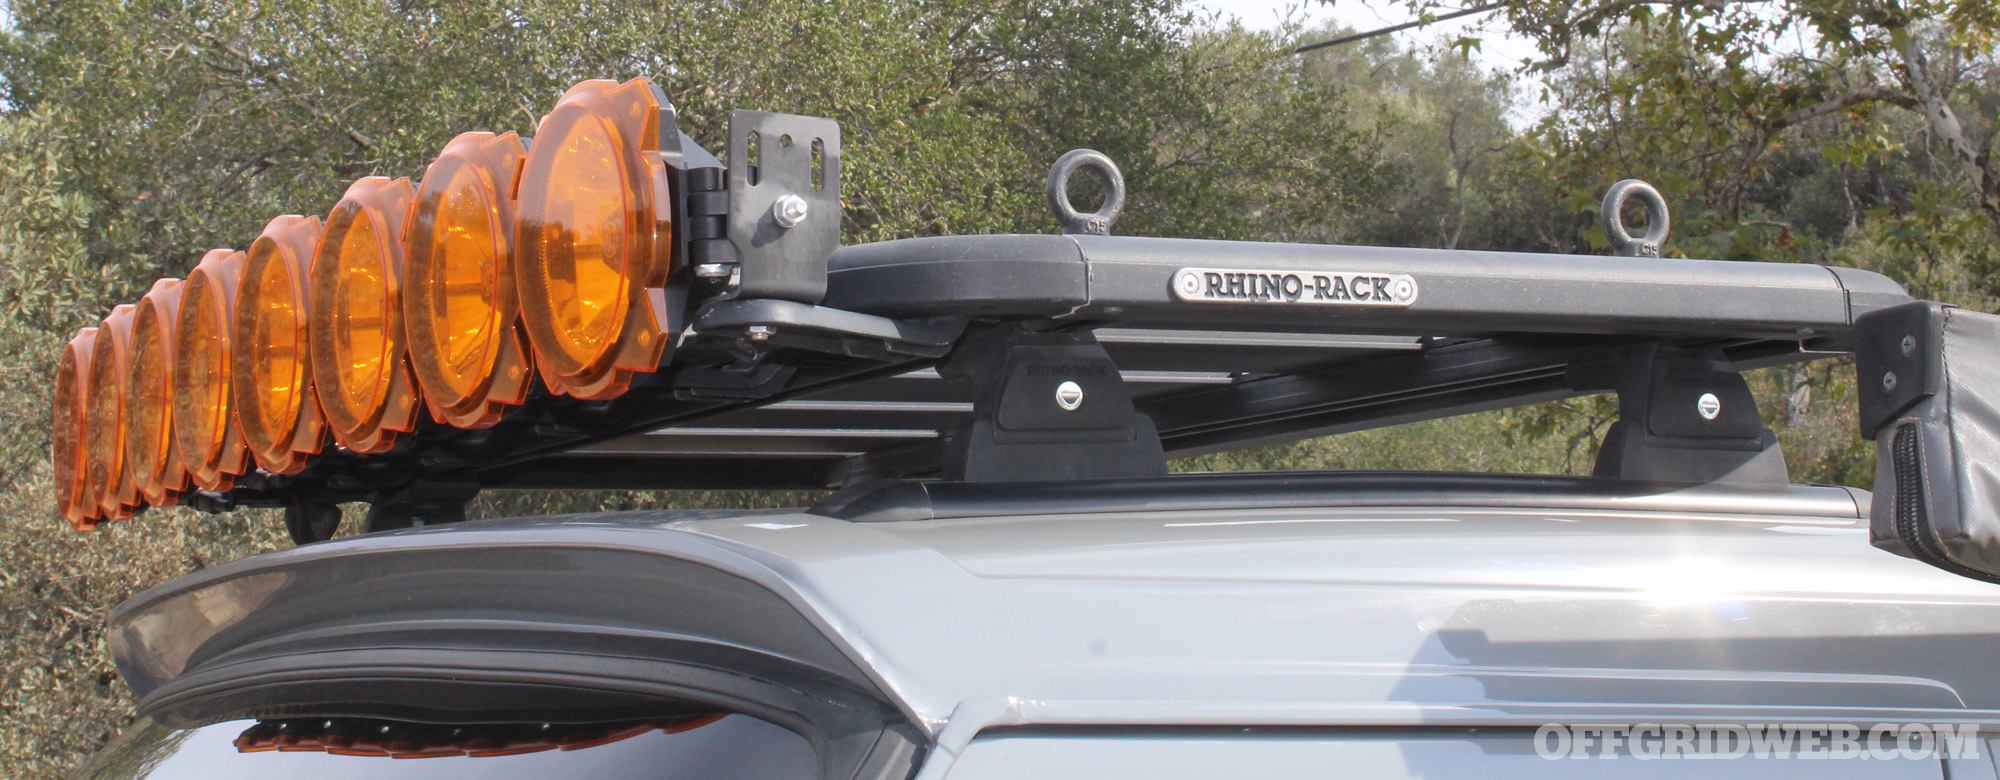
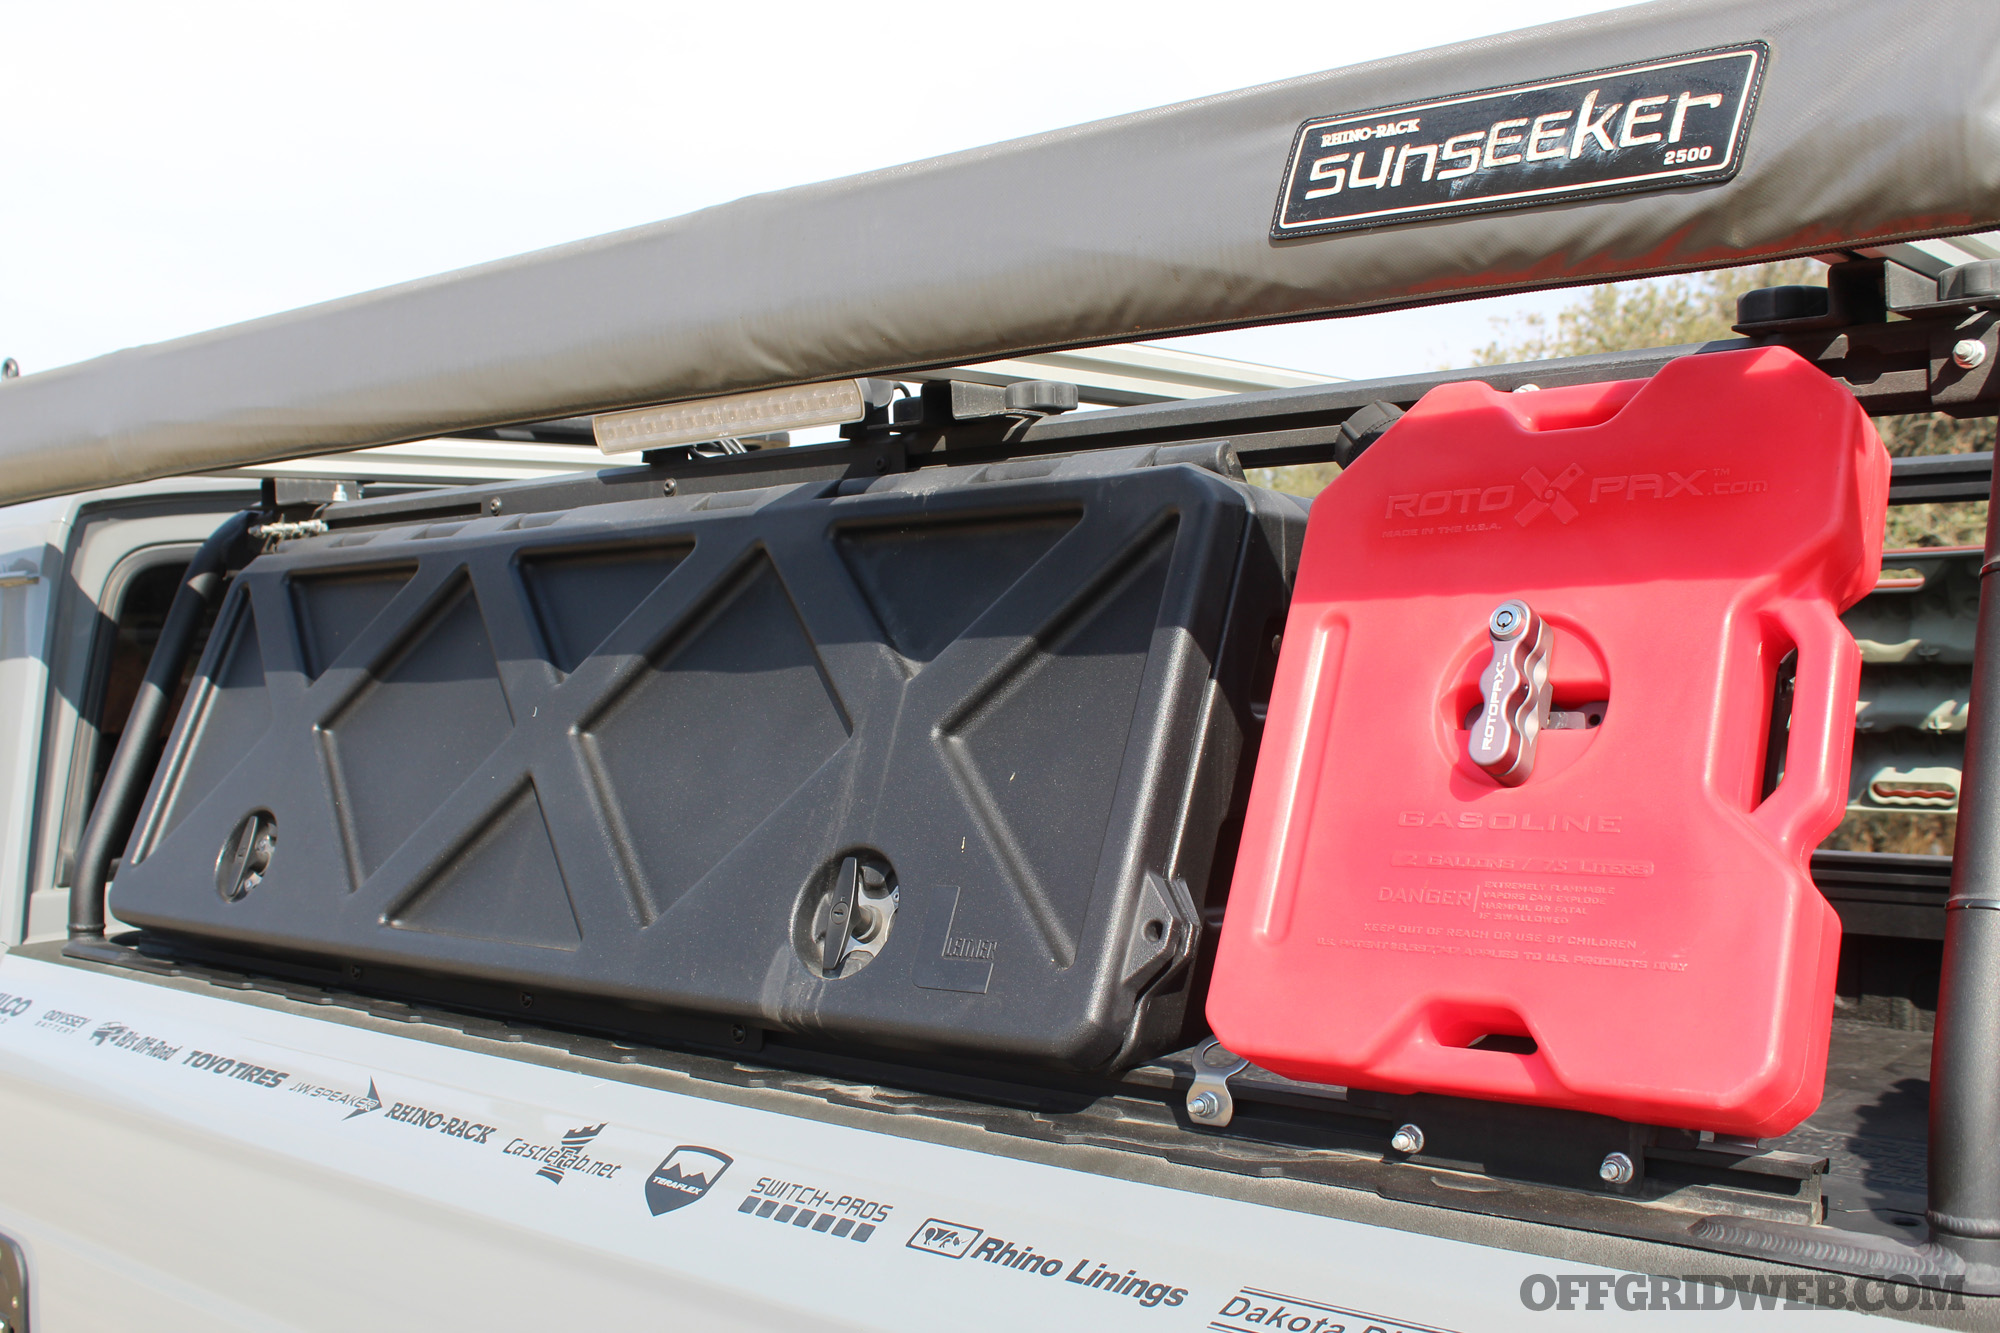
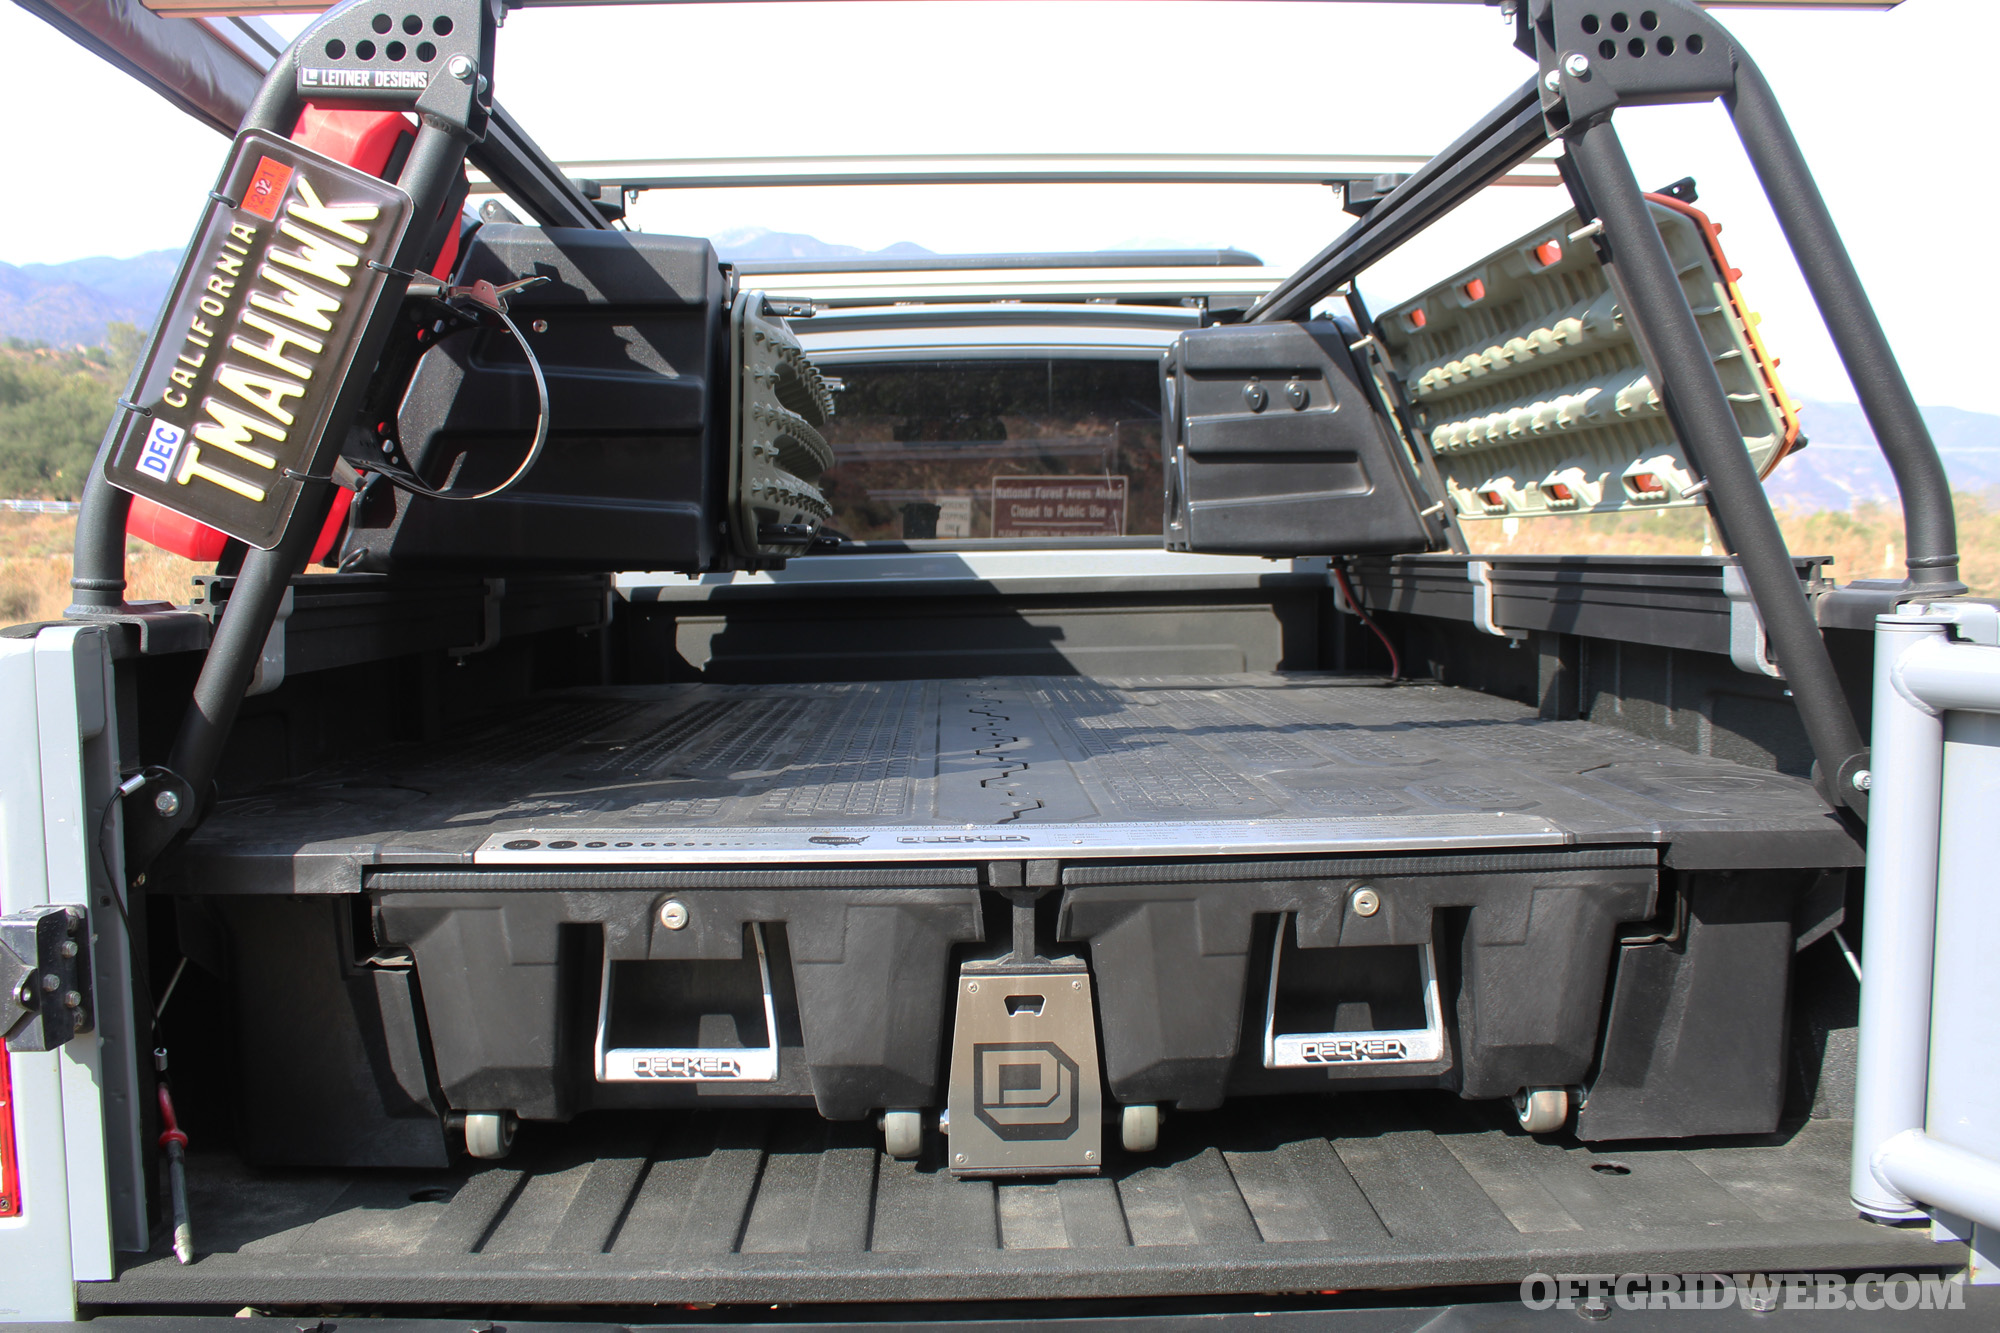
The shortened bed received a host of new overland-oriented upgrades, including a Leitner Designs rack and storage pods, Decked drawer system, and a Wilco tailgate with spare tire. A Rhino-Rack on the cab serves as a mounting point for eight KC Hilites LED lights; a Sunseeker awning was also attached to provide shade at campsites.

Above: A Rhino-Rack on the roof provides storage space for additional gear, as well as a mounting point for eight KC Hilites LED lights.

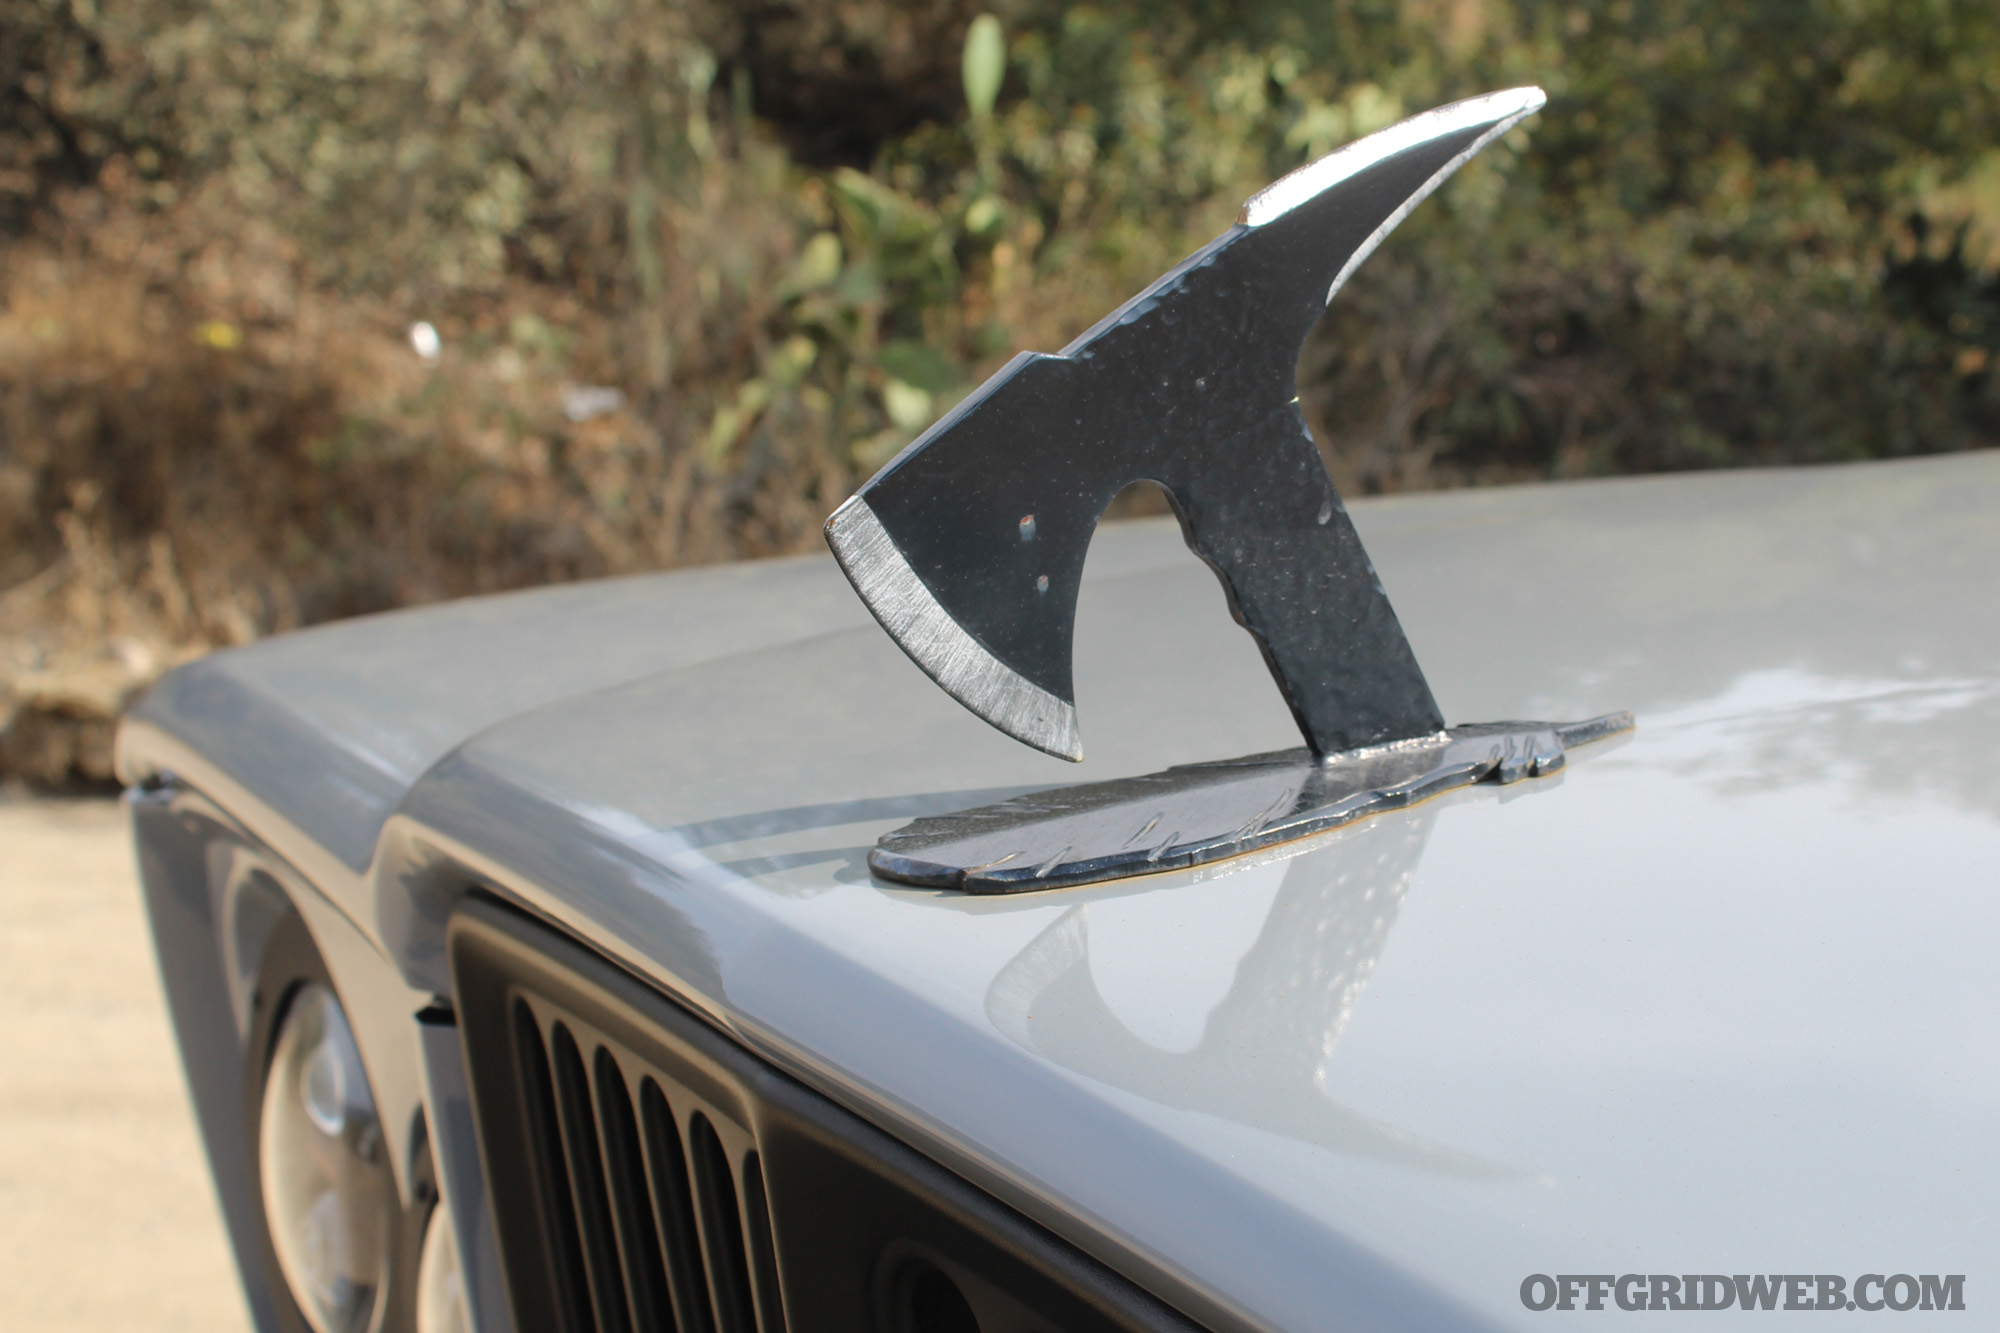
Up front, Roamr installed JW Speaker projector headlights, a black Rhino grill, and a Warn winch. The unique hood ornament is a physical representation of the truck’s “Tomahawk” name; a second ax embedded in the tailgate serves as a handle. To complete the exterior, Miller Collision sprayed a coat of glossy Nardo Grey paint onto the body, and OC Rhino coated the bumpers, fenders, rack, and other accents in durable Rhino liner.

Above: One side of the bed rack carries a large Leitner Designs storage pod, a Rotopax gas can, and a Rhino-Rack Sunseeker awning; the other side holds a small storage pod and a Maxtrax recovery device.

Engine, Transmission, and Axles

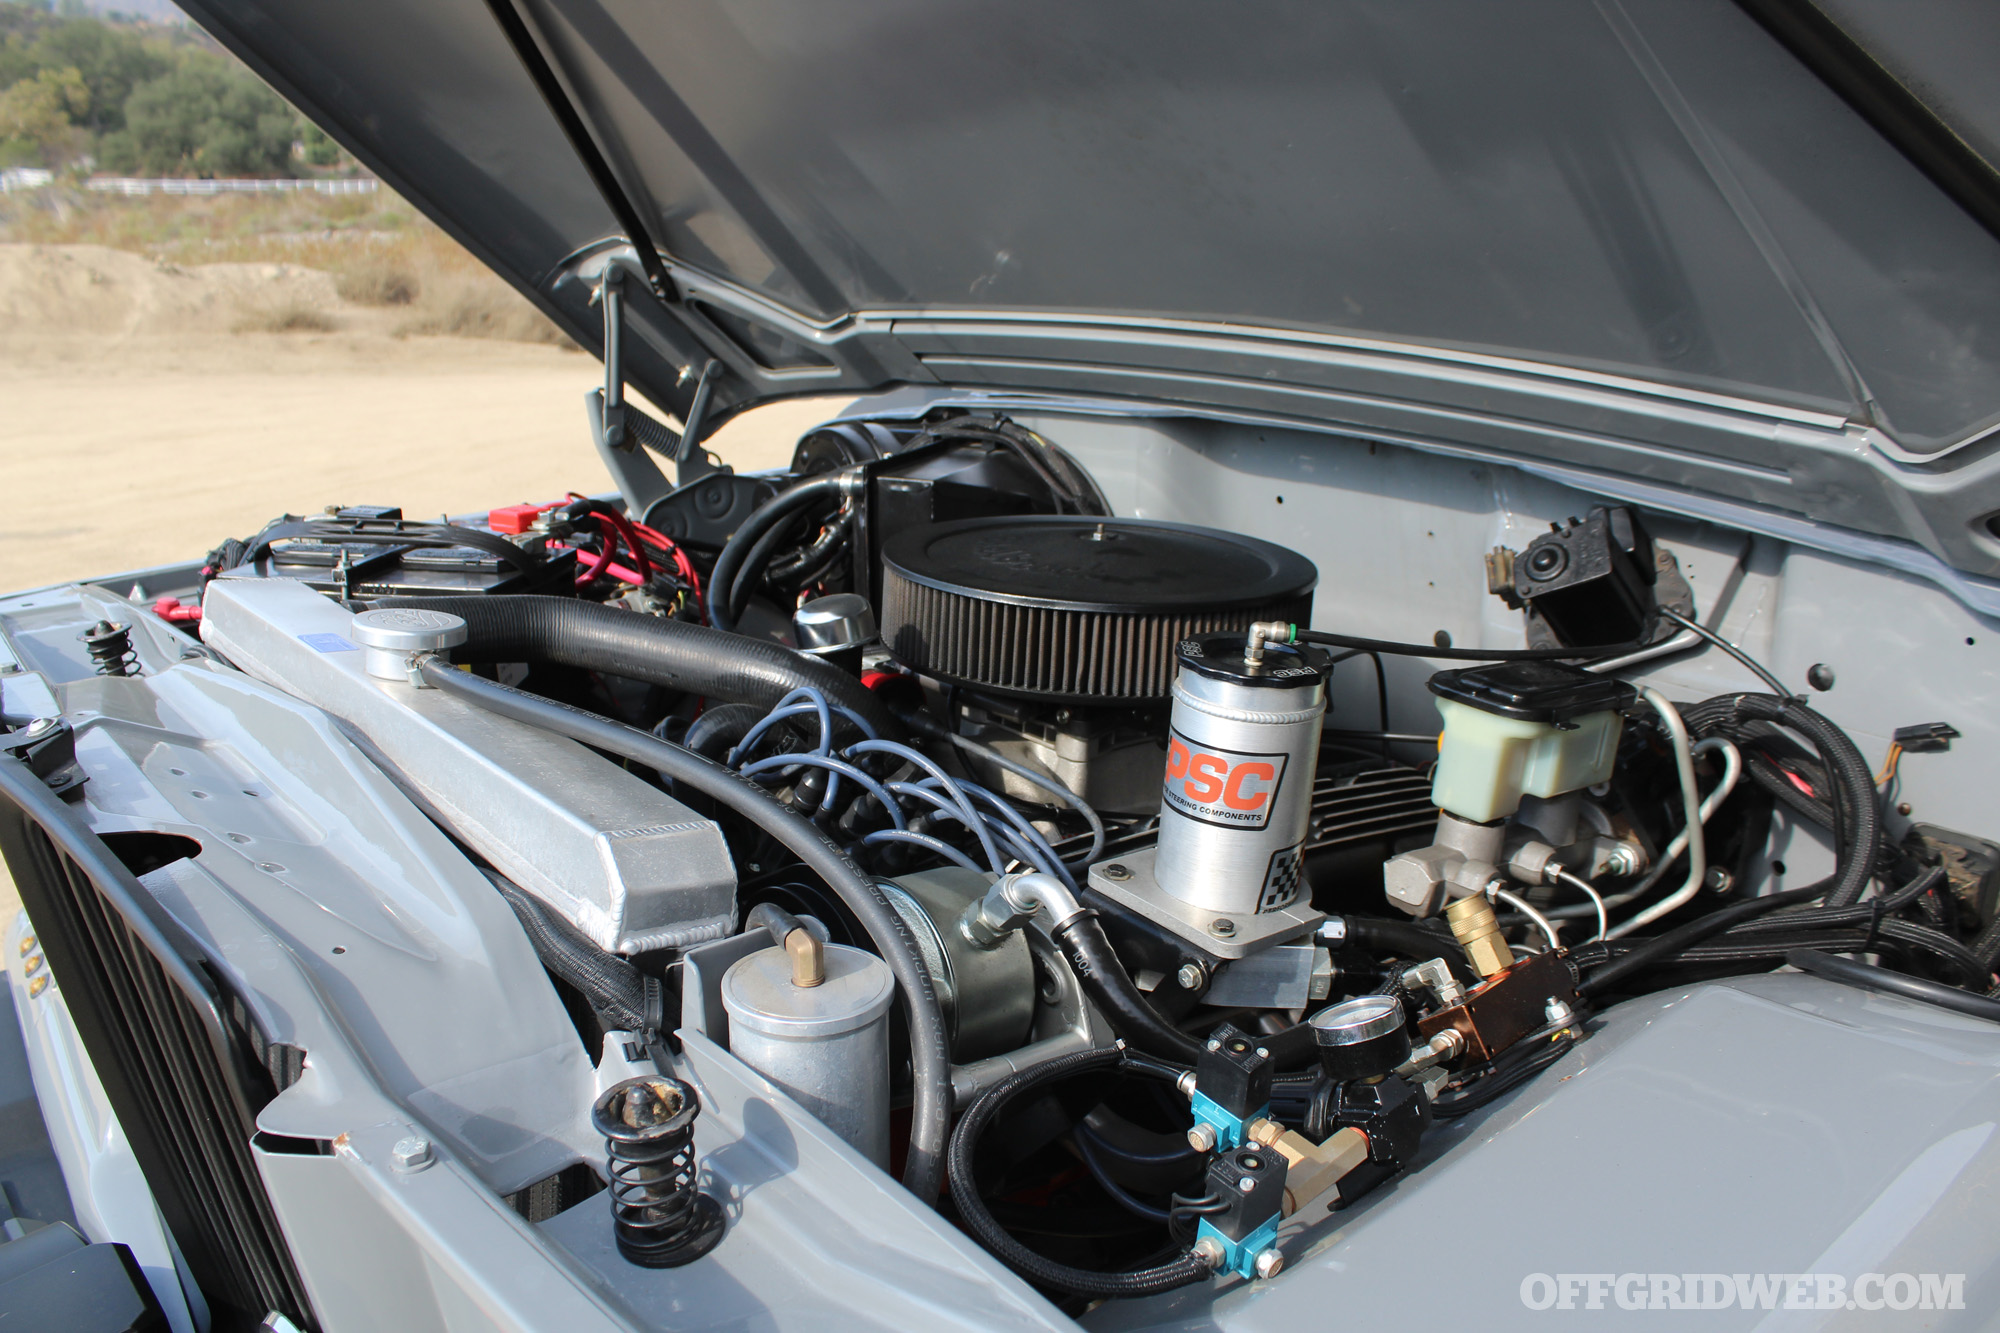
Above: Although Troy says he loves the classic 401ci V-8, he has also considered swapping it out for a turbodiesel motor. The additional torque would be helpful in spinning the big 40-inch tires.

The Jeep J20's original 401ci V-8 still resides under the hood of this Jeep, fully rebuilt and upgraded with Holley fuel injection. It sends power through a TH400 automatic transmission, BorgWarner QuadraTrac transfer case, and Tom Wood driveshafts to the Dana 44 front axle and Dana 60 rear axle. Both axles have been upgraded with Warn hubs, Yukon gears and lockers, and BJ’s Offroad disc brakes.

Interior Upgrades

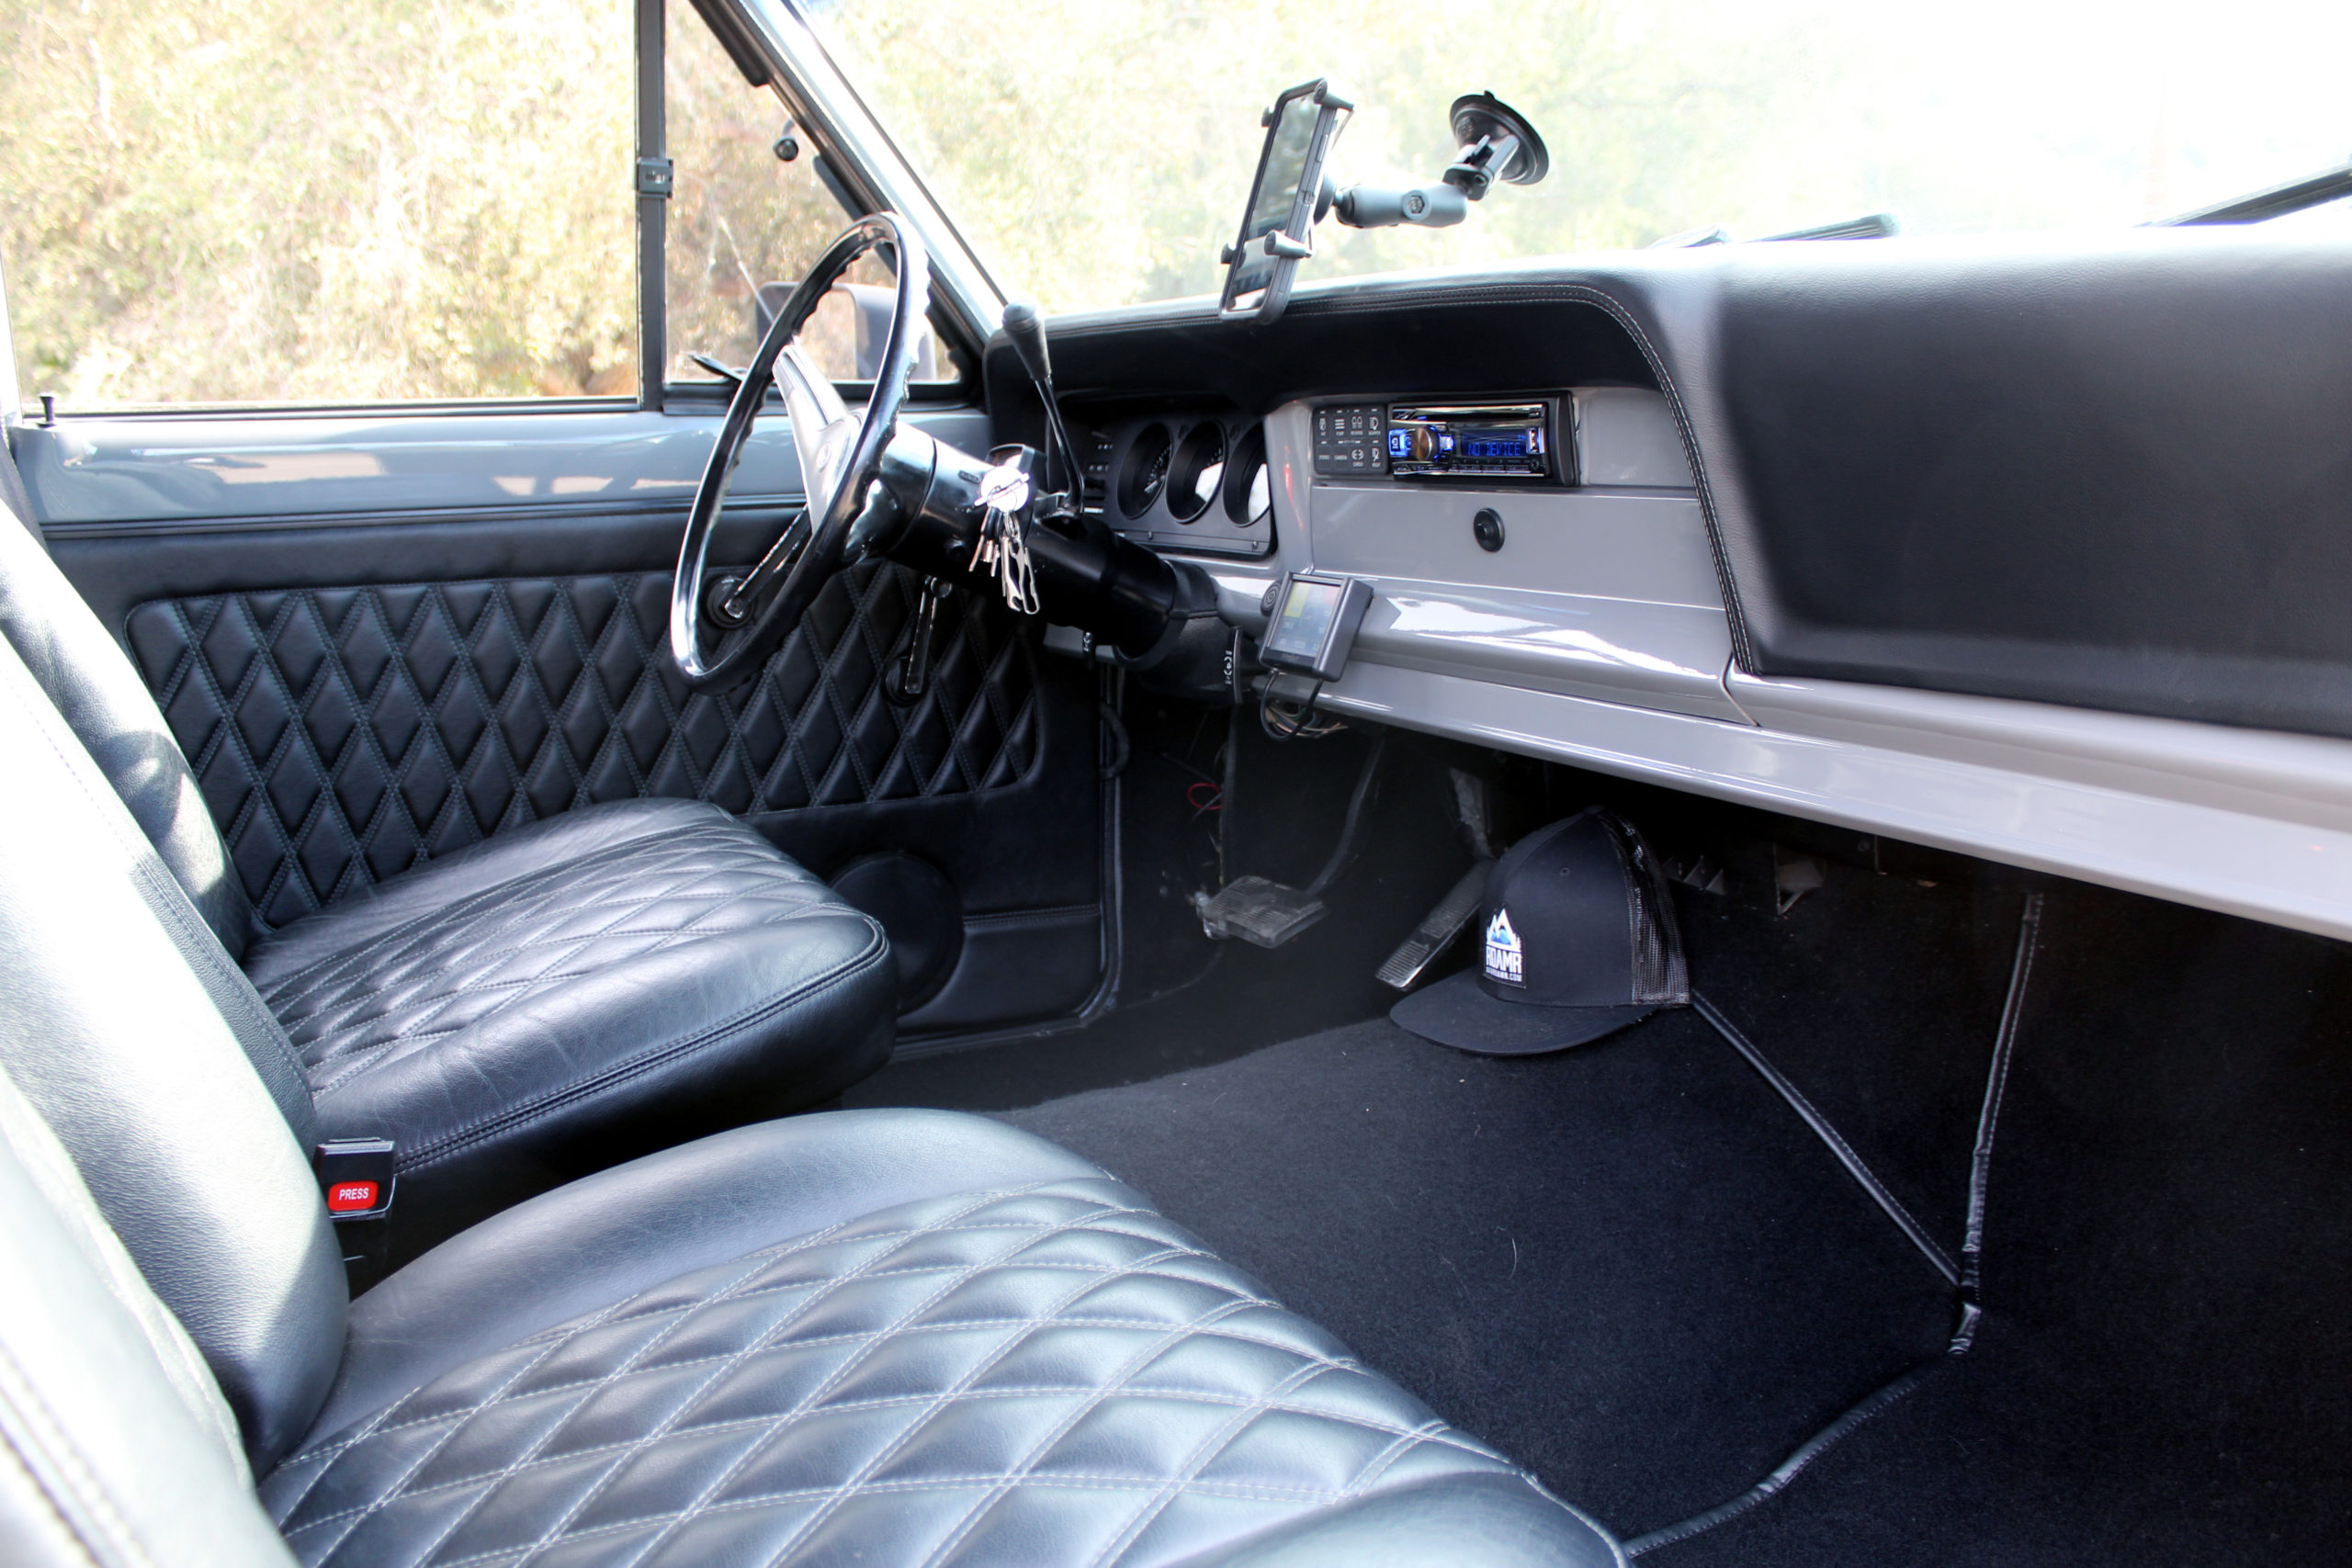
Above: The J-20’s interior has been modernized with a Dakota Digital gauge cluster, upgraded sound system, and electronic controls for the Holley EFI system, lights, and accessories.

Inside the cab, the original power seats and door panels were reupholstered in diamond-stitched leather from Relicate. New black carpet, a plaid headliner, and a leather-wrapped dash were also installed. To bring this ’70s Jeep J20 into the 21st century, the Roamr crew added a Dakota Digital gauge cluster, Bluetooth head unit, JL Audio speakers, Holley touchscreen fuel injection controller, and Switch Pros switch panel for the exterior lights and Viair air compressors.

Roaming the Roads and Trails

Although Troy says this frame-off Jeep J20 build was a huge challenge, he’s extremely proud of how it turned out. “This beast drives straight and smooth with one finger on the wheel at highway speeds,” he explained before adding, “But it’s frankly dangerous on the freeway because so many passersby veer toward it as they stare.” Although it’s driven on the road occasionally, it’s clearly made for the trail. “We have had it out to Moab twice — that’s its natural habitat.”

Above, Below: The tomahawk theme for this build is represented by its custom hood ornament as well as the grab handle embedded in the tailgate.

1974 Jeep J20 Build Specifications

Engine
Rebuilt AMC 401ci V-8 with Holley Sniper fuel injection, Be Cool radiator and fans

Transmission
TH400 3-speed automatic

Driveline
4WD with BorgWarner QuadraTrac 1339 transfer case and part-time 2WD conversion kit, Tom Wood driveshafts

Brakes
BJ’s Offroad disc brake conversion

Axles and Steering
Dana 44 front with truss and chromoly shafts, stock Dana 60 full-float rear, Reid knuckles, Artec steering, PSC hydraulic assist, Yukon gears and lockers, Warn hubs

Suspension
Custom setup by Castle Fabrication based on a heavily modified Metalcloak LJ 6-inch long arm kit, coil spring conversion, Metalcloak 6Pak shocks, Teraflex SpeedBump bump stops

Wheels and Tires
17×9 B.A.D. beadlock wheels, 40×13.5R17 Nitto Trail Grappler tires

Body Modifications
Rhino grille; heavily modified Metalcloak fenders; Rugged Ridge bumpers, mirrors, and sidesteps; Wilco tire carrier tailgate; Leitner Designs Active Cargo System bed rack; Decked bed storage; Rhino-Rack over-cab rack and awning; bodywork and Nardo Grey paint by Miller Collision

Above: The Decked storage system offers a flat cargo surface and two slide-out, lockable drawers for tools and recovery equipment.

Lighting & Electrical
Genesis Offroad dual battery kit with Odyssey batteries, JW Speaker headlights, KC Hilites light bar, Warn winch with Factor 55 FlatLink, Viair dual air compressors, Power Tank air tank

Interior
Original power seats and door cards reupholstered with Relicate leather, Dakota Digital gauge cluster, full dash restoration, plaid headliner, JL Audio speakers, Switch Pros switches

Owners
Troy Tertany & Jason Miller

Roamr
Instagram: @iamroamr
iamroamr.com