Fieldcraft Survival 72-Hour Ziploc Bag Challenge

Working for Fieldcraft Survival, I’ve learned to expect each day to be filled with the unexpected. We have a highly dynamic work environment with new projects and tasks on a regular basis. One day, we’re scouting land for upcoming courses, the next we’re flying to another state to teach a defensive handgun class, the next we’re filming online content in the mountains — you get the idea.

The Fieldcraft Survival Challenge

In June 2021, my boss Mike Glover challenged me to survive for 72 hours in the desert with nothing more than the contents of a quart-sized Ziploc bag. Since I was hired to be the lead survival subject matter expert, I wasn’t going to pass up this opportunity.

Above: The gear the author was allowed to carry needed to fit inside a closed 1-quart plastic bag.

Statistically speaking, most emergencies last no more than 72 hours. Within those 72 hours, a person can self-rescue, problem solve, and affect their situation to prevent the emergency from becoming a survival scenario. There’s no doubt anyone can be thrust into an emergency bivouac or short-term emergency in their day-to-day travels. In an unfortunate circumstance like that, the contents of one’s pockets or a small emergency kit may be the only gear available. Pocket gear will generally not take up more space than what can fit into a quart-sized Ziploc bag. Hypothetically, a person should be able to survive 72 hours in a given environment with a quart-sized kit designed to address basic survival needs. Hypotheticals are good for debate, but practical exercises are better for proof. I recently took a single Ziploc to the high desert and survived triple-digit heat and gained many teachable points to share here.

Disclaimer: This 72-hour survival challenge was performed by a professional survival instructor under close supervision by rescue personnel. Do not attempt any potentially dangerous survival challenge without prior training, and always establish contingency plans in case something goes wrong.

Planning the Ziploc Bag Kit

Above: Kevin Estela is the Director of Training for Fieldcraft Survival, with over two decades of outdoor skill teaching experience. He drew upon his edible plant knowledge to sustain himself for the 72-hour challenge. 

Mission always dictates gear. Surviving 72 hours in the high desert of Utah during the hottest month of the year meant shifting survival priorities around. Deciding whether shelter or water is priority number one is conditional on clothing and existing makeshift structures like a broken-down vehicle. Since this challenge required using the contents of the Ziploc, I carried a North American Rescue Emergency Wrap blanket to sleep under and an Adventure Medical Kits 1-Person Bivy to sleep inside of. In terms of water, I premeasured and marked 24 ounces on a collapsible bladder for easy use with Aquatabs. Aquatabs call for 1/10 gallons or 25 ounces and even if I were off by 1 ounce on my water collection, the tabs would work as expected.

Given the fire restrictions in the area, I packed some basics just for proof of concept including a Mini-BIC, Exotac nanoSTRIKER ferro rod, and some premade tinder. Cordage was carefully chosen with emphasis on smaller “disposable” cordage as a space-saver. Duct tape and superglue rounded out the kit for multipurpose use in binding and first-aid. Nutrition was a serious consideration in this challenge. Since most people carry plenty of food stores on their body in the form of fat, I knew I could go longer than 72 without food. That said, I didn’t want to compromise my health. I packed a sleep aid, multi-vitamins, and rehydration tablets. Part of the challenge was an allowance of reasonable clothing. I couldn’t pack a puffy jacket just for sleeping at night if I wouldn’t normally wear it. This meant a pair of pants, boxers, a long-sleeve T-shirt, button-up shirt, wide-brim hat, sunglasses, neckerchief/scarf, and boots. I didn’t carry a spare set of socks, and I didn’t have gloves for hand protection with me.

Another thing worth noting is the large safety net the Fieldcraft Survival team cast for this challenge. I was monitored by our medic Austin Lester and I carried a small Kifaru Escape and Evasion Pack filled with an emergency medical kit, short-wave radio, electrolyte drink, Kestrel device for taking weather readings, and battery packs to recharge my electronics used to update social media. I had an emergency trailer about a quarter mile from my location I wasn’t allowed to enter, as well as my vehicle nearby. I had to remain in the environment on 2,500 acres of private land and not use the emergency provisions unless they were absolutely necessary. This type of challenge is very rewarding to the participant, but it can be dangerous if precautions aren’t in place.

Ziploc Bag Contents

Shelter:

  • North American Rescue Rescue Wrap
  • Stay Outside Longer (SOL) Emergency Bivy Sack

Water:

  • Fieldcraft Survival Collapsible Bladder
  • Reynolds Oven Bags
  • 3-Foot Vinyl Tubing
  • 30 Aquatabs

Fire:

  • Mini BIC lighter
  • Exotac nanoSTRIKER
  • 4x Procamptek Tinder Plugs

Knives:

  • Victorinox Farmer
  • ESEE Knives S35VN Izula With Duct-Tape Edge Guard

Cordage and Utility:

  • 6-Foot Duct Tape
  • 12.6 Feet 550 Paracord
  • 25-Foot Braided Tarred Catahoula Line
  • 3-Foot Stainless Steel Wire
  • 1x Single Use Superglue
  • 2x Small Cable Ties
  • 1x Button Compass
  • 1x Quart-Size Ziploc

Fishing and “Hunting”:

  • Assorted Dry Flies
  • 6-Foot 4x Fly-Fishing Tippet
  • 25-Foot 50-Pound Test Spiderwire
  • Assorted Hooks, Split Shot, Snap Swivels
  • 2x Sheffield Floats
  • 1x Theraband Slingshot Band

Nutrition:

  • 6x Wolf21 Sleep Supplements
  • 3x Nuun Hydration Tablets
  • 3x Kifaru Revival Packets
  • 3x Ghee/Coconut Oil Packs
  • 3x Black Rifle Coffee Instant Coffee Packs
  • 1x Cholula Hot Sauce Packet

Starting the Challenge

Above: An emergency blanket was used, reflective side out, to create a shade structure for protection from the sun and 110-degree temperatures.

Starting at 7 a.m. on Tuesday, I immediately went to work creating a shade structure before the temperatures rose too high. I pinned down one long side of my emergency blanket with rocks and propped up the other side with two sticks and some tarred twine with pebbles acting as “buttons” rolled up inside the corners. With a basic sun structure set up, I moved to the river about a quarter mile away. I used my marked bladder to measure out approximately 2 gallons of water and carried it in the Reynolds Oven Bags doubled up for strength. My button-up shirt was used as a makeshift backpack with the sleeves tied up around the waist as well as the collar. I carried my water higher off the ground from thistle and spiky plants that could have torn my bag. Instead of risking popping my emergency water bladder by lifting and moving it, I used the small length of tubing to create a flexible straw to drink from. After establishing the essentials, I built up my bedding with local vegetation before taking the first of three daily siestas from 10:30 to 2:30 each day when the sun was hottest.

Above: These wild rose hips were dry but still edible. Collecting and processing them helped pass the time. 

Over the next three days, I kept a busy schedule to prevent boredom. This meant building projects like a single-funnel fish trap, Lincoln-log bird trap, chopsticks, and a slingshot (even though I didn’t plan on hunting anything due to local hunting restrictions). Some of these items served to demonstrate concepts rather than generate immediate results.

Above: The author constructed a funnel fish trap out of narrow-leaf willow on day one. Unfortunately, the trap did not yield any fish.

While my fish trap didn’t yield anything edible, my makeshift fishing rod made from a 7-foot length of narrow-leaf willow did. I caught two small trout that I later cooked with fire extinguishers and safety officers on standby to prevent any risk of wildfire. Fishing helped keep me sane, so it was part of the daily routine along with gathering water. During one trip to the creek, I spotted two beavers, making the decision to pack and use purification tabs extremely justified. As one day carried into the next, the temperature continued to climb from 99 to 104 degrees F. On the final day, I decided to jump in the creek with all my clothes on, only to find they’d dry off in under an hour in the hot and dry air.

Above: The author dunked his Tilley hat in the water to cool off.

There’s an old Spanish proverb that “the belly rules the mind.” Even though I could survive on my body’s fat stores, there’d definitely be associated hunger pains from not eating frequently. My first real meal was on day two — roughly 30 hours into the event — and it consisted of broad-leaf plantain, dandelion, clover, and a couple flexible stems of mullein spiced up with a single-serve packet of Cholula. I snacked when I could and found golden currants on the verge of ripeness with a bit of astringence to be regular trail nibbles. I carried single-serving ghee/coconut oil packets I planned on using every six hours on the final day; this nominal source of calories and energy from fat was a welcomed treat. I was used to a schedule of intermittent fasting with an eight-hour-per-day eating window already. This helped prepare me for ignoring the pain of hunger experienced on this challenge. Even though I found food to eat from the land, I definitely experienced fatigue from a lack of calories.

Above: Fishing resulted in catching two small trout.

Each night, I used the Wolf21 sleep supplement and was able to get between seven and eight hours of sleep easily. Sleep is highly underrated, and it provides the body with time to recover both mentally and physically. Temps dropped to about 60 degrees at night, and I found I climbed into my emergency bivy only when the wind picked up. Sleeping out in the open, I was exposed to some insects and occasionally felt them crawling on my face and neck. It’s an inconvenient reality of roughing it that interrupts an otherwise peaceful night’s sleep.

Above: Small fish can be eaten whole. Cook until their eyes turn white.

I wrapped up the 72-hour challenge with great energy. I made a single cup of cold coffee and smoked a celebratory cigar. Over three days, I dropped from a pre-challenge carb-loading weight of 207 to 199 with my usual weight around 202.5. I used most of the kit with the exception of the superglue, compass, and zip ties. Other than that, all the items I carried found their way into my solution to spending time in an incredibly inhospitable environment.

Post-Action Lessons Learned

After a few sleep cycles, it was easy for me to begin assessing what worked and what didn’t. As always, the devil is in the details, and it’s only by testing gear in realistic scenarios that we can learn and modify our preparedness. There really isn’t any gear I would’ve swapped out of my kit given the size constraints of the package it had to be carried in. Of course, there were many times I wished I had a more substantial knife, a larger tarp, a metal container to make hot drinks, a closed-foam sleeping pad, a mosquito head net, and a better fishing setup. That said, these items couldn’t fit in the Ziploc and were just wishful thinking.

Above: The author used the stripped willow saplings to construct a bird trap. The trap was triggered by a field mouse.

If there were any items I wished I had that did fit, they were simply more of what was already in the bag. On the third day, my slingshot band snapped. I wished I had brought a spare. I wished I doubled my electrolyte tablets. I wished I had drink mixes and small packets of salt, as I began craving it more with more of my body’s salt escaping through sweat. Even something as simple as chewing gum could’ve been useful to take the taste of bitter plants out of my mouth.

Above & Below: Hot sauce can be used to spice up locally harvested greens like clover, dandelion, and plantain. The inner pith of flexible mullein stalks can also be eaten.

As I used my knives to carve and build, I noticed the edges getting dull. I picked up some smooth stones to sharpen the blades, but a simple diamond hone would’ve worked quicker and with less effort. Looking back at the experience, even something as simple as barbed hooks instead of barbless flies could’ve been beneficial when the trout bit but weren’t landed because of this easy oversight.

In terms of clothing, everything I wore worked as planned. My scarf was wet each day and worn around my neck to cool off. My boots were breathable enough to prevent my feet from suffering the effects of poor hygiene. My pants were durable enough to endure walking through brush and slipping down hillsides as I navigated the scree. Something noteworthy is the eye protection I wore. My shooting glasses have a wraparound lens providing better protection from the light stimulus that works underneath and around standard “flat” sunglasses. That saved me literal headaches from the brightness.

While I had a medic on hand for major injuries and illnesses, I could’ve probably had a more substantial med kit with me in my bag. While I planned to pull the plug on the experience in the event of a major issue, minor issues were going to be treated with makeshift med gear, which is simply never as good as proper medical supplies. Next time, I’ll stash some triple antibiotic ointment, some finger bandages, and maybe some pills for common issues.

Above: To keep the fish fresh, the author kept them alive on a micro-cord stringer until they were ready to be eaten.

Closing Thoughts

Overall, this experience was a testament to proper prior planning and a firm understanding of survival fundamentals. It wasn’t comfortable, but it was educational and a deed that’ll hopefully help fellow readers recognize ways to improve their own preparedness. We intend to continue pushing the limits of this 72-hour challenge with different players and kit limitations. Just as the challenge continues to evolve, we hope the collective understanding of what’s needed to survive 72 hours in an emergency evolves too. For more information, please follow Fieldcraft Survival @fieldcraftsurvival and fieldcraftsurvival.com. (You can also follow Kevin's personal Instagram account @estelawilded.)


Letter from the Editor: The Things We Carry

We’ve always tried to emphasize that gear alone doesn’t make you prepared, and that survival is a game of knowledge as opposed to things. Having said that, it’s important to know what products and technologies are out there to help ease the burden of survival events. In the military, we call these things “force multipliers.” Whether it’s a durable knife, GPS unit, weatherproof tinder, or souped-up carry gun, the items themselves do not increase your odds of survival. But they can magnify skills and abilities you already possess. So, we’re taking this issue to examine some “survival tools of the trade” as well as the importance of those tools.

This issue’s What If? scenario focuses on being stranded alone with only the gear you carry on your body or in your trunk/truck bed. Nila Rhodes and Mel Ward give you their respective rundowns on vital gear and what it can do for you. Our Pocket Preps column focuses on sub-3-inch pocket knives. A sturdy blade may be one of the most fundamental survival tools, and these are sized to go anywhere you do without fuss or complication.

I penned the first installment of a multipart series on building an optimized survival AR-style rifle and how to choose some of the best AR-15 mods. Myself and two other writers will each give you a rundown on what we think constitutes the ideal emergency AR-pattern rifle and why. Longtime RECOIL OFFGRID contributor and Fieldcraft Survival SME Kevin Estela gives us his lessons learned from 72 hours spent in the Utah high desert. The catch? The only equipment he allowed himself to bring was what he could fit into his pockets and a quart-size Ziploc bag. This gives us a great insight into the relationship between survival gear and survival knowledge, as well as how critical an asset just a few pieces of smartly selected gear can really be.

Of course, nowadays, not all survival equipment is physical in nature. Richard Duarte rounds up some security-focused smartphone apps. These range from antivirus to secure web-browsing to encrypted communications. Most of us spend way more time on our phones than we do trekking through wildlands, which makes day-to-day digital survival an equally important part of total preparedness.

It could be argued that being savvy about what tools are available to you is, in itself, a survival skill. So, take this issue to geek out on gear and hopefully you find a gadget or two that fit your preparedness plan. Choose wisely.


Breaking: Ammo Inc. Offers to Donate 1 Million Rounds to Ukraine

As the war in Ukraine rages on, reports have surfaced that the United States offered to evacuate President Volodymyr Zelensky, but he immediately declined this offer. The Associated Press reported that Zelensky told a senior U.S. intelligence official, “The fight is here; I need ammunition, not a ride.” In a video response to the public, he continued, “We are here. We are not laying down any arms. We will defend our country.”

Answering the Call for Ammo

In a press release, Ammo Inc. announced a formal offer to provide what Zelensky asked for. After witnessing the invasion and hearing his plea for help, the company has offered to donate one million rounds of ammunition to the Armed Forces of Ukraine “in support of their fight for independence and freedom.”

Fred Wagenhals, CEO of Ammo Inc., had the following to say: “Ammo Inc., and we as Americans stand firmly in support of Ukraine’s sovereignty and independence, as we stand for freedom and democracy everywhere. While we fervently hope for a quick and peaceful resolution to the crisis and that diplomacy will win the day, we condemn the Russian aggression and its threat to Ukraine’s territorial integrity and freedom. We recognize that events are unfolding rapidly on the ground in Ukraine, and we are prepared to move quickly as possible to support Ukraine as it continues to defend itself and its freedom.”

For those not familiar, Ammo Inc. is an Arizona-based company founded in 2016. It designs and manufactures products for law enforcement, military, sport shooting, and self-defense. Ammo Inc.'s branded munition lines include the classic Signature series, STREAK Visual Ammunition, /stelTH/ subsonic munitions, and armor piercing rounds for military use. The company also operates GunBroker.com, the largest online marketplace serving the firearms and shooting sports industries. For more information, go to AmmoInc.com.


Preparedness Lessons Learned from the Invasion of Ukraine

The last two years have been a seemingly constant barrage of reminders of the importance of emergency preparedness. From COVID lockdowns and civil unrest to supply chain disruptions and record-setting winter storms, we're often left wondering what will be next. Last week, the world watched yet another disaster unfold as Russian forces invaded Ukraine by land, air, and sea — an incident U.S. Secretary of State Antony Blinken called “the greatest threat to security in Europe since WWII.”

As preparedness-minded individuals, there is much we can learn from this ongoing conflict in Ukraine. We'd like to be clear: this article is not intended to critique or question those who currently find themselves in the midst of this invasion. This article is intended for those in other parts of the world who have witnessed these events and wondered, “What if it happened here? What should I do to prepare myself and my family?” Our goal is to draw attention to a few significant lessons that may be relevant to future conflicts.

Any student of history can tell you this is not the first full-scale invasion of a sovereign state, and it certainly won't be the last. This leads to our first lesson.

Don't Assume It Can't Happen in Your Country

Humans have a natural tendency to assume events we have experienced in the past are a good reflection of events we will experience in the future — psychologists call this normalcy bias. Unfortunately, this leads us to believe that events we haven't experienced (yet) are unlikely to occur. It's the driving force behind all the disaster survivors who look back and say, “I never thought it would happen to me!” Don't let that be you.

In the case of the Ukraine invasion, it's easy to use the power of 20/20 hindsight to find examples of individuals who believed an invasion was unlikely until it occurred.

In late January, Ukraine's Defense Minister Oleksii Reznikov argued that an invasion was not imminent and told parliament members, “Don’t worry, sleep well. No need to have your bags packed.” Shortly afterward, President Zelensky expressed frustration at U.S. officials' analysis of a growing risk of invasion, saying the claims were an “overreaction.” In the same statement, he called the decision to withdraw staff from the U.S. embassy a “mistake.” He also reportedly drew a comparison to 2021, explaining that the security situation at the border was not much different from last year.

According to an Al Jazeera article, preparations in the city of Mariupol — a city that's now under siege — were sparse in early February. “The manager of one of the city’s bomb shelters said little is being done to prepare shelters with basic supplies or even water because few people expect there to be any need for them. Many have been unused for so long they have been turned into spas and restaurants.” In Kyiv, one woman told a BBC correspondent, “I'm not worried because we have good authorities and our president. I think they can manage it. They protect us, that's why we elected them.” Many of the men who were eventually drafted into military service during the invasion had no prior experience with firearms, something they would've likely pursued if they believed their lives might depend on it.

To be clear, we are not mentioning this to criticize the judgment of any of these individuals. Instead, we want to point out that it's human nature to expect a repeat of previous experiences — in this case, threats from Russia had been a frequent occurrence since 2014, but nothing had come of it.

So, what can you do to combat your inherent normalcy bias? Prepare for and consider a wide range of possible scenarios, ranging from mild inconveniences (e.g. twisting an ankle on a remote hiking trail) to severe disasters (e.g. war and economic collapse). From a purely statistical standpoint, some will be more likely than others, so it makes sense to spend the bulk of your time prepping for those emergencies. However, also take stock of the unlikely worst-case scenarios, and consider any gaps in your preparedness that they might reveal.

Don't Assume the Enemy is Bluffing

In the weeks leading up to the invasion of Ukraine, we lost track of how many pundits, politicians, and internet experts we saw assuring everyone Putin was just rattling his saber. Staging armored divisions and missile-launchers at the borders and parking warships in the Black Sea was just an intimidation tactic, right? Maybe a few contested regions would be attacked, but surely not the capitol and civilian population centers, right? Through hindsight, we know that wasn't the case. It was exactly what it appeared to be: an all-out invasion from multiple fronts.

Now, as Putin has ordered his nuclear forces to high alert, we're faced with the same question — is he posturing, or is he seriously preparing for another attack?

If warning signs begin to crop up prior to a potential disaster, your preparedness should ramp up proportionally. Hope for the best and plan for the worst.

Consider High-Value Targets

We've previously discussed the concept of an adversarial mindset — putting yourself in your enemy's shoes, and asking how you'd approach the situation from the other side. This is a valuable skill for threat awareness, and it can help you adjust your behavior to better counter an adversary's strategies.

In this case, the highest-value targets should have been predictable to anyone with an adversarial mindset. The moment the invasion began, airports were specifically targeted in an attempt to cripple Ukraine's airborne defenses and cut off escape routes. Additionally, Russian troops pushed across the border rapidly in an attempt to seize control of major cities — Odessa, Donetsk, Kharkiv, and most importantly, Kyiv. Perimeter defenses near the borders and coastline (such as the now-infamous Snake Island) were also hit in the first phase of the invasion. Natural resources and infrastructure, such as the Ukrainian dam that obstructed water flow to Crimea, are also key targets. Even the most fundamental understanding of tactics would make these goals obvious.

However, some high-value targets are less obvious.

Above: The highly-radioactive “elephant's foot” remains sealed in a steel and concrete sarcophagus in Chernobyl, a facility that is now under Russian occupation.

Who would've guessed that Russia would quickly take control of Chernobyl, a defunct nuclear power plant inside an irradiated no-man's land? It may not seem like a desirable asset, but some analysts have theorized it serves as a deterrent to retaliation. Destruction of what remains of the power plant could cause an ecological disaster that might affect eastern Europe for decades, if not the whole continent.

What should this mean to you? If you live in a major city that is likely to be a significant target, your threat awareness should be elevated. You should prepare escape routes with waypoints and discuss them with your family — failure to do so could leave you stuck in gridlock, as many Ukrainians were. This is especially true if your city borders directly with a hostile nation or its allies (e.g. Belarus), or lies on a coastline that is readily-accessible. If your escape plan includes air travel, keep in mind that airports are typically a top priority in warfare, and you won't want to be there when bombs start to fall.

Understand that Cyberattacks Will Be a Significant Factor

In our discussion of high-value targets, we left out one critical battlefront: cyberspace. In the 21st century, we have become heavily dependent on electronics and internet connectivity for countless daily tasks — accessing money in the banks, buying products at stores, communicating with friends and family, checking the news, contacting emergency services, and maintaining medical systems in hospitals. Cyberattacks can target any and all of these systems, dealing a crippling blow to a country's economy and ability to coordinate counterattacks.

Russia's use of cyberattacks is well-known and documented, both in regards to Ukraine and its other perceived enemies. It has already targeted the United States. For example, the 2020 SolarWinds hack snuck malicious code through the defenses of roughly 100 companies and a dozen U.S. government agencies (including the Treasury, DOJ, and Pentagon). Ransomware attacks on transportation and energy infrastructure (such as the Colonial Pipeline) have also been documented.

Within the Ukraine, the NotPetya ransomware attack — which took place the day before Ukraine's annual independence celebration in 2017 — appeared to target the Ukrainian financial sector. A statement by the White House called it “part of the Kremlin’s ongoing effort to destabilize Ukraine.” More recently, Ukrainian government web sites and banks were targeted by DDoS attacks immediately prior to the Russian invasion. A sophisticated data wiper malware also began to spread through Ukraine last week, only hours after the DDoS attacks started.

What can we learn from this? We're not suggesting you abandon technology and everyday conveniences, but you should certainly establish contingency plans in case cyberattacks affect the electrical grid, internet service providers, cell phone towers, or banking/point-of-sale systems. Consider learning how to use ham radio for emergency communications, set aside cash, buy a generator, stockpile important medications, and purchase paper maps of the surrounding area. If we're ever set back to a world without reliable technology, you'll be more prepared to cope with it.

Train with Purpose and Urgency

The Ukrainian government recently drafted all men ages 18 to 60 into military service, barring them from leaving the country. This undoubtedly led to parents being separated from their children. In this eleventh hour, there is little to no time for training before combat. Regardless of the draft, many men and women bravely volunteered to fight and defend Ukraine — in this clip, you can see a group of three young women taking up AK-47s despite admitting they barely know how to use them.

Ask yourself: how would you respond if you faced an invasion and had to join the fight, whether by mandatory draft or moral obligation? Would you be able to fall back on a solid foundation of training, not just in shooting skills but also small unit tactics, concealment, communication, navigation, medical, and sustainment skills? Would your spouse and children be prepared to contribute to the fight, or to escape to safety without you?

These are gut-wrenching questions, but there are millions of men in Ukraine who are facing them as you read this. Keep this in mind and use it to motivate your training regimen. Take physical fitness seriously. Study new skills. Enroll in classes with knowledgeable instructors. Include the family in these activities and build a spirit of self-sufficiency. If the day ever comes when you need these skills, they will be invaluable.

Learn to Use OSINT to Your Advantage

Above: A photo of an explosion, reportedly on the outskirts of Kyiv, which was posted to social media last week.

The ability to gather and analyze OSINT (Open-Source Intelligence; i.e. publicly available information on a particular subject) is one of the most valuable skills you can possess during a rapidly-unfolding conflict. In fact, open-source information-gathering has served as the backbone of our own study of the invasion of the Ukraine leading up to this article.

Through studying publicly-available OSINT sources — such as Twitter, Instagram, and Telegram groups — you can make informed decisions about the likelihood of a potential disaster on the horizon. You can also keep an eye on the latest updates related to one that's already in progress. There's no need to wait for reports to filter through mainstream media channels; you can see the action in real-time through videos, photos, or written reports from people who are on the ground. The widespread access to smartphones and internet in Ukraine has generated some astonishing footage of everything from missile attacks to tank convoys.

Above: Flight trackers such as FlightAware are another valuable source of instantly-updated information. In this screenshot, note the complete absence of civilian flights over Ukraine (KBP is Kyiv's airport) and Belarus.

For those in combat, some of this OSINT can be directly actionable, giving insight into enemy positions, equipment, and tactics. For those who aren't in combat, OSINT can indicate severity of threats and areas to avoid. This applies to natural disasters as well — it might tell you which areas are flooded in the aftermath of a storm, or indicate how widespread supply shortages are at local stores.

With regard to the Ukraine conflict, here are a few pages we have used to gather open-source photos and videos from the front lines:

There is one major caveat, however — due to the rapidly-evolving and unconfirmed nature of OSINT, it is especially difficult to verify information. This brings us to our final point.

Maintain a Healthy Degree of Skepticism

We can't discuss OSINT without discussing its most obvious flaw: misinformation.

In the last week, we've witnessed social media pages sharing combat footage that's several years old with claims that it's current, spreading baseless rumors, and even distributing overt propaganda on both sides. For countries that take information warfare seriously, it's exceptionally easy to start distributing disinformation (such as inflated casualty counts, claims of wartime atrocities, or tales of impossible heroism) to confuse and demoralize the enemy. Oblivious internet users latch onto fake news and spread it like wildfire. By the time anyone can prove it wrong, the damage is already done.

Allegations of orchestrated provocations (sometimes called false-flag incidents) are especially common in the OSINT space, and should be approached with a heightened degree of skepticism.

The image above serves as a particularly blatant example of misinformation. It was shared to Instagram by a news-oriented account based in North America, and attributed to an original creator whose profile was set to private. The top portion of the image shows what appears to be a Ukrainian solider standing over a dead Russian soldier, holding a Russian AS-VAL rifle.

The second half of the image attempts to prove the gun in the image is actually an airsoft toy rifle based on small details on its magazine. The apparent goal of these claims was to lead users to believe this was a staged false-flag incident — in other words, its creator was claiming that Ukrainians had used a toy gun to fake a combat victory for propaganda purposes.

Above: If information you see seems outlandish or provocative, do a quick search online for more information. This photo of a real AS-VAL rifle shows a magazine design that matches the photo in question. (Source: Vitaly V. Kuzmin, CC BY-SA 4.0)

Ask yourself: does this sound plausible, and is there any more information I can gather to prove or disprove these claims? In the example above, a quick visit to Wikipedia will show that a real AS-VAL rifle magazine (pictured above) has the exact same dimples and baseplate design as the magazine in these photos. On top of this, the user who first posted the image could be found in the comments section espousing pro-Russian sentiment.

A cursory knowledge of military equipment, uniforms, and insignias can help you distinguish fake news from real reports. Services like Google Lens can also be used to translate text within images or video stills; this often provides important background information.

In summary, be extremely cautious with OSINT. Take nothing at face value. If you begin seeing multiple independent sources confirming the same facts, that's a good sign you're onto something. If you see outlandish claims or signs of inaccurate details, you need to dig deeper. Even if intel is factually accurate, it can be curated and editorialized to skew your perceptions, as is the case for all forms of news media.

Conclusion

The invasion of Ukraine has been a showcase of the horrors of war, and the devastating effects it has on all those involved. However, it should be more than that. It should also be a powerful source of motivation to enhance your own preparedness for future catastrophes.

Without a doubt, many of the innocent bystanders who find themselves caught up in this war wish they had been better prepared. Despite this, the Ukrainian people have shown incredible bravery by fighting tooth and nail to defend their homeland.

You have the opportunity to prepare right now — don't waste it. Accept the reality that you may face similar circumstances one day, study your country's vulnerabilities (both physical and cyber), formulate a disaster plan for your family, train continuously, and keep a watchful, discerning eye on information about potential threats.

If you someday face a full-scale attack by a formidable adversary, you'll be glad you took the time to heighten your preparedness.


Review: Crane TEC Knives

Preparedness is a highly individualized pursuit, with very few provisions being universally agreed on. But one principle that remains essentially beyond question is the utility (and value) of a good knife. Whether dressing out game, shaving down sticks for kindling or clipped to your pocket for everyday jobs, there is a knife for every situation – many of which are purpose-built to the task. The Tempest by Crane TEC (Tactical Everyday Carry) is a perfect example of an edged tool that arose directly from a specific need to fill a capability gap.

Crane TEC’s founder, Hugh Crane, is a martial artist, self-defense instructor and former corrections officer. He has spent years refining an edged weapons defense system that is simple, easy to learn and integrates into existing hand-to-hand and defensive tactics systems. But the more Crane refined his system, the more he realized that existing self-defense fixed-blades all fell short of what he wanted. So in 2017, after years of toying with design sketches and rough ideas, he set out to produce his own knife. In addition to aesthetic preferences, there were several key performance factors this knife needed to have. Specifically, it needed to be comfortable to wear all day, easy to conceal, and able to be deployed with either hand from either side of the body. A double-edged blade was chosen to keep the knife fully functional regardless of carry side, draw side, or tip up/down deployment.

Photos by Niccole Elizabeth

About the Crane TEC Tempest

The Tempest is made from a newer boutique knife steel known as Nitro-V. We’re not exactly metallurgy nerds ourselves, but some of you may be. So we did a little digging and found out that Nitro-V is based on AEB-L, with the addition of nitrogen and vanadium. This elemental tinkering gives Nitro-V higher corrosion resistance and increased hardness over similar metals. Crane TEC says the Tempest comes in at 62rc hardness. The blade is 2.75 inches long, with the knife coming in at an OAL of 7.25 inches and a total weight of just over 4 ounces. Natural and Cerakote finishes are available, with custom colors and options available upon request.

The very first pre-production Tempest we ever saw had 3D printed scales. But the production models come with G10 scales, which can be enhanced with their “rock pattern” texture. Or you can upgrade to Kirinite scales, as seen on our samples here. Kirinite is a sheet-based acryllic that can be produced in a diverse range of unique colors and patterns, such as the faux-marbled Desert Camo pattern seen here.

We mentioned that the Tempest is a double-edged knife, but there are two blade styles available. Their flagship is a double tanto with four individual cutting edges. The double tanto is a complex grind that isn’t easy to pull off and speaks to the artisan nature of Crane TEC’s manufacturing approach. Its also aesthetically pleasing, for those who like a more unconventional visual, while still being intensely functional for its intended purpose (fast slashing/hacking/cutting in tight quarters). There is also a dagger point blade available for those with more traditional tastes, or whose ascribed self-defense methods rely more on stabbing and puncturing. Both blades are flat saber ground.

Features and Application

In addition to the technical specs, there are some interesting design features built into the Tempest that fit directly into its intended purpose, and the designer’s specific edged-weapon curriculum. That’s not to say you must follow Crane’s specific self-defense methodologies to be able to use the Tempest, but only to highlight the knife’s ground-up layout as a practical self-defense tool.

At the pointy end, the blade is cut to angle away from the handle, so that even when the knife is drawn in close to the forearm, the risk of cutting yourself on the reverse edge of the blade is little-to-none.

While bending the wrist is a move to be avoided in self-defense encounters (regardless of weapon being used) it may be unavoidable, or even required, in certain situations where stand-off distance is non-existent. This rakish angle also helps for ergonomics when carrying the knife. The included Kydex sheath is designed for horizontal outside-the-belt carry, just off centerline. This angle sets the handle at such an angle that the knife moves with you and remains accessible when seated, squatting, or kneeling.

The handle falls naturally into the pelvic crease created by your thigh and torso in these positions, giving you space to grip and draw while keeping the knife close to your body. The DCC clip is also reversible to accommodate right- or left-handed carry without losing this benefit.


Using the sheath as intended also allows the Tempest to integrate seamlessly with an appendix-carried firearm, as demonstrated here by Hugh Crane himself, with a SIG P365 blue gun in a Tier 1 Concealed holster riding on a Kore belt.

Flipping to the pommel end, the Tempest features an index finger ring – a somewhat controversial feature in some edged weapons circles. There are essentially two schools of thought we have encountered about ring handle knives: one which prefers the enhanced retention of using a ring, the other which sees the ring as a hazard that could result in a broken or degloved index finger if you wind up in a wrestling match for the knife or your opponent attempts a disarm. The bulk of the author’s knife training falls into the latter category, so we took this chance to have a frank discussion with Hugh Crane about this feature. His response gave us further insight into both the Tempest’s design and his philosophy on edged weapons use.

The Tempest’s ring is not meant to have the entire finger closed through the ring. Instead, he teaches to only insert the index finger only to the first knuckle, and close your grip at that joint. This positions the knife in an ice pick grip more advantageous for close-quarters defense but, in a worst-case scenario, allows the knife to be separated from your grip without taking the finger with it.

Above: These images show the Tempest held in a closed fist with the index finger locked into the ring. Crane does not recommend this grip style, as it could lead to injuries to the user's hand if the knife is twisted or pulled away.

If finger rings aren’t your style there is enough room on the handle, for all but the biggest hands, to grip the knife without using the ring at all. So, in our opinion, having it there shouldn’t detract from your ability to use the Tempest effectively, regardless of your preferred grip style.

As a final testament to this knife’s intent as a real-world self-defense tool, Crane TEC offers every Tempest with a matching stainless steel trainer for only $50 more, with a drop-down menu option for it on the Tempest product page.

The trainer will come in the same “blade” style as your live blade, with orange grip scales, as well as a matching orange Kydex sheath.

Conclusion

There is something to be said for fit, finish and presentation. Every Crane TEC Tempest comes in a locking, waterproof Seahorse case with custom-cut foam for your knife and trainer, if applicable, plus the sheath(s) and an authenticity card. Every Tempest is made to order and the full kit with knife, trainer, two holsters and case retails for $525 – add a little more if you want a logo or text custom engraved.

For what you get, from a designer with actual defensive training and experience who put true thought and effort into his design, we’re hardly going to balk at the price. Tools you intend to stake your life and safety on are not the place to pinch pennies in your household budget, and we think the Crane TEC Tempest is well worth the spend for an edged weapon that will be there for you if and when you ever need it.

For more information on Crane TEC knives, go to cranetecknives.com.


Book Review: “The Book of Two Guns” by Tiger McKee

The Premise: Violence is a universal constant in human history, whether it’s carried out with bare hands, clubs, edged weapons, or firearms. As author Tiger McKee puts it, “The firearm is simply a tool … ultimately, we fight with our minds.” This underlying martial arts philosophy serves as the foundation for an informal yet thorough manual for firearm-based combatives. By McKee’s own admission, this book was never intended to be published — it was a personal journal written in the early 2000s that documented lessons learned while training with his carbine and sidearm of choice. The entire book was handwritten by the author and is interspersed with sketches and diagrams. In line with this style, tone is conversational, and there are frequent spelling and grammar errors (we noticed half a dozen on the first page alone). The majority of this book’s content is focused on fighting with a 1911 pistol and AR-15.

Our Review of The Book of Two Guns

The 411: The Book of Two Guns has no table of contents or chapters; it flows from one concept to the next. It begins with commentary on mindset and the fighting spirit, immediately reinforced by case studies such as the 1986 FBI Miami shootout and 1993 “Black Hawk Down” incident. Situational awareness is discussed in detail, with references to the OODA Loop and Jeff Cooper’s color code system. Readers are encouraged to act rather than react and to visualize realistic what-if scenarios frequently. Several pages are spent on threat identification, anatomy, and incapacitation factors.

Above: The Book of Two Guns advises readers to carry a 1911 pistol with minimal modifications. Even the double-adjustable rear iron sight seen on this BRN-1911 is deemed unnecessary; the author prefers a simpler contoured rear sight.

About 40 pages in, the firearm-specific content begins. Pistol modifications and holster configuration are discussed in relation to the 1911 — McKee recommends a 4.5-pound trigger, basic iron sights, de-horned hammer, and a strong-side holster with reinforced opening. When it comes to an AR, McKee’s advice feels positively archaic — he recommends a fixed A1-stock, 16-inch carbine (he calls it “the ideal length”) with a simple over-the-shoulder sling (not an around-the-torso “tactical” sling). He writes, “iron sights are best … anything with batteries isn’t good.” It’s noted that AR magazines should be loaded to “10-percent less than capacity” to avoid insertion problems.

Above: McKee's ideal carbine, as described in the book, features an A1 fixed stock and iron sights, much like this BRN-16A1 M16A1 clone from Brownell's. However, McKee prefers a shorter 16-inch barrel and 30-round magazines (down-loaded to 27 rounds).

The fighting stance depicted in this book is modified Weaver, with dominant arm almost straight, hands applying push-pull tension against each other, bent waist, and dominant foot pointed outward. Carbine stance is similar, with dominant elbow held up and body bladed sideways. During a section on reloads, readers are urged to never release a handgun’s slide with the slide lock lever, and encouraged to carry a spare mag between the fingers of the support hand for quick reloads in “target rich” environments. One-handed shooting and malfunction clearance is also discussed for each weapon.

Above: This 1987 photo of a Marine firing an M16A1 serves as a rough approximation of the bladed, elbow-up stance recommended by McKee. (Source: U.S. National Archives)

More than 30 pages are dedicated to tactical movement and use of various body positions. This includes moving while shooting, changing positions, peeking around cover, and clearing rooms. A dozen pages are focused on low-light shooting and tactics. The book concludes with McKee’s opinions on subjects ranging from dry-fire to the importance of spirituality — “the man without any religious belief is closer to defeat,” he writes. There’s even a strange half-page on “internal energy” that should be projected through your body as you shoot, “forcing the bullet toward the target.”

The Verdict: This book was published in 2004, and it serves as a stark reminder of just how much guns, gear, and shooting technique have changed over the last 20 years. Much of its content was written in the earliest days of the Global War on Terror, and before the start of the Iraq War — a time a growing segment of our readership might be too young to remember (this realization makes us feel old). Given that context, we have to cut it some slack. It was relevant at the time it was written, but we simply can’t recommend it in 2022.

Several elements of this book have stood the test of time, especially those relating to situational awareness, tactics, and movement. Others, however, are obsolete in our modern world of precision short-barreled rifles, striker-fired double-stack pistols, isosceles stance, advanced slings, reliable optics, and LED lights. Experienced readers can separate the wheat from the chaff, but a new shooter might be confused. If you pick up a copy of The Book of Two Guns, do so with the understanding that it’s a product of a different era.

About The Book of Two Guns

Book & Author
The Book of Two Guns: The Martial Art of the 1911 Pistol and AR Carbine
By Tiger McKee

Publisher
Shootrite LLC

MSRP
$25

URL
www.shootrite.org

Pages
172

Rating
Thrive
Survive
>Die

OFFGRID LIBRARY OF RECOMMENDED READING


Faraday Bags: Testing Commercial and DIY Wireless Signal Blockers

English scientist Michael Faraday’s instrumental work with electricity in the early 1800s led to discoveries in creating the first electrical generator, rubber balloons, and of course the Faraday cage. Early in his research career, he worked for Sir Humphry Davy, the chemist responsible for using electrolysis to isolate many elements for the first time. These were the pioneers of research into metals, chemistry, and electricity. Albert Einstein was even said to have kept a portrait of Faraday on the wall of his study — such was his importance within his field.

Out of necessity, since scientists were known for injuring and killing themselves during experiments in this era, the first Faraday cage was constructed in 1836 to keep Michael safe. In this “test lab,” he proved there was no electrical charge present when voltage was discharged to strike the outside of the cage.

Today, Faraday’s experiment has shaped how we keep ourselves protected from harmful microwaves while reheating our favorite frozen meal or cup of noodles. Can your microwave act as a Faraday cage or protect items from an EMP attack? No, not really. Microwaves are designed to keep non-ionizing radio waves that heat your food inside and prevent that radiation from leaking out. However, Faraday bags and cages are designed to provide more complete, leak-proof shielding.

The Basics of Faraday Bags

Faraday cages can block various types of signals from communicating with electronic devices, including RFID, FM radio, GPS, cellular, Bluetooth, and Wi-Fi — each has its own vulnerabilities, and the protection from threats can range from hacking to EMP attacks. Faraday bags offer the same benefits of rigid cages, but in a slimmer and more flexible format.

For many people, the threat of losing the ability to communicate with others immediately following any type of attack will warrant various forms of preparation. Pulling your cell phone out of the faraday bag immediately after any type of attack doesn’t guarantee you will have a device that’s capable of communicating with anyone. The cell and power grid could potentially have their own issues following an attack. There’s a very strong assumption that cell towers could be overloaded with traffic as well. Boston Marathon attendees experienced this failure immediately following the bombing in 2013, as did most of New York City on 9/11.

Keeping your phone or laptop data safe from cyber criminals would also be an effective use case for Faraday bags. Blocking all wireless connectivity surely keeps hackers at bay — until, of course, you want to actually use your device. Removing it from its secure storage to make or receive a call or send a text/email immediately opens the vulnerability pipeline, and leaves you open to attacks and unwanted visibility.

Above: From tin-foil wrap to snack bags to purpose-built bags, there are a number of ways to protect your devices from wireless signals.

For law enforcement, a faraday bag can prevent someone from remotely wiping a phone once it’s in custody. For criminals, a Faraday bag can block your ability to track/wipe your device if lost or stolen. The best protection is to avoid keeping any sensitive data on a portable device that would be easy to lose.

In a true disaster scenario, it would be effective to keep a radio (HAM or FRS) in a faraday bag and limit your communication window to a predetermined time of day. Don’t forget about the potential for a secondary EMP attack/blast.

Uses for Faraday Bags

Here are some of the many ways you can use purpose-built or DIY faraday bags to protect your sensitive electronics and data:

  • Prevent devices from being tracked by GPS or third-party apps
  • Block hackers from wirelessly accessing your devices
  • Insulate devices from signal interference or EMPs
  • Go off-grid by instantly disabling all incoming calls and texts to your cell phone
  • Shield your car key fob to temporarily shut off keyless entry/ignition
  • Protect RFID cards from replication attacks (credit/debit cards, hotel keys, door access keys)

EDEC OffGrid Series Faraday Bags

Above: The EDEC OffGrid bags come in various sizes to shield an array of different devices.

With all this in mind, we did some testing on the OffGrid Series of Faraday bags produced by EDEC (not affiliated with OFFGRID magazine, the shared name is a coincidence). Most other faraday bag companies put two sheets of faraday material in their bags and call it “multi-layered.” Faraday fabric is expensive but skimping on material can lead to reduced effectiveness and lower durability. The EDEC OffGrid bags are lined with four layers of faraday material to provide ultimate shielding. The innermost layer is “diamond-grade” faraday fabric, which is extra-durable to prevent scratches when inserting or removing devices from the bag. This ensures the longevity of the product.

Specifications

OffGrid Faraday Bag by EDEC Digital Forensics

Sizes
Key Fob (4” x 6.9”) / Mobile (8” x 9.4”) / Tablet (8.6” x 14”) / Laptop (13.4” x 20.8”)

Colors
Black, Gray

MSRP
$25 to $130

URL
offgrid.co

The bag is constructed of lightweight ripstop fabric that’s sleek and water-resistant. It also gives the material a sporty, fashionable look, if that’s a shopping point for you. Said ripstop is held together with thermo-welded seams, because traditional stitching can risk a signal leak. The closure mechanism is a combination of magnets and Velcro designed to keep the opening securely folded shut. This reduces the risk of gaps in the faraday material that could lead to “leaks.”

In order to gauge the capabilities of the EDEC bag, we compared it to our own improvised faraday bags, made of hand-wrapped aluminum foil and potato chip bags. Both have been shown in movies and on TV as signal blockers. They’re easy to source in any grocery store or gas station bodega but can be effective ways to quickly provide some signal blocking. These options should be considered a “last resort” if shielding is important to you.

Faraday Bag Testing Procedure & Results

We checked the EDEC bags and DIY Faraday bags with six types of frequencies to ensure proper signal-blocking: RFID, FM radio, GPS, cellular, Bluetooth, and Wi-Fi. An Apple iPhone and Google Pixel 4a were used in addition to a portable radio. A Proxmark 3 RDV4 device was also used for RFID testing on a hotel card and ATM debit Mastercard.

Above: While foil chip bags aren’t totally ineffective, they’re far from ideal.

The EDEC Faraday Bag passed our tests with flying colors, providing complete shielding against all six signal types.

As for the DIY folded foil method, we found that three layers needed to be folded around the device to provide adequate Wi-Fi signal blocking. We accomplished this by using one large sheet to wrap all the way around the device, with all overhang layers folded over onto themselves. Doing this three times is key to getting the correct seal.

A foil-lined chip bag was capable of blocking cellular and GPS signals, but Wi-Fi was able to penetrate the bag’s shielding. Two folds and a chip clip worked well to block out the cellular and GPS Signals. Multiple bags would likely work as well as multiple layers of regular foil, but unless you eat a lot of potato chips in various bag sizes, that’s probably not a practical solution.

Closing Thoughts

Finding new ways to use old technology will always captivate our attention. Our goal is to explore various scenarios and find the most effective way to use the technology available to us. Faraday bags aren’t a new concept by any means, but their relevance has only increased in this era of 24/7 wireless connectivity. When you need to ensure you’re off the grid, it’s helpful to use a DIY or off-the-shelf faraday bag to shield your devices.

About the Author

This article was written by SoCal Offgrid, an individual not to be confused with the EDEC OffGrid product line or the name of this magazine. He is a full-time electrical contractor who previously shared his urban communications kit Bag Drop in Issue 45. He can be found on Instagram at @socal_offgrid.

More Technology & Security Articles


New: Midwest Industries Marlin 1895 Handguard & Extended Sight System

So-called “tactical lever guns” have seen a surge in popularity over the past few years, and it's easy to see why. They're a modern twist on a classic operating mechanism, available in a wide variety of caliber choices, 50-state legal, and great hosts for suppressors. If there's one company that has fueled the growth of this trend more than any other, it's Midwest Industries — their M-LOK handguard is one of the core components of many builds, including our own Marlin 336 Dark Series project. The company has just released a new version of their handguard for Marlin 1895 variants, known as the Marlin 1895 Extended Sight System.

Above: In addition to the Extended Sight System, the pictured Marlin 1895 is equipped with a billet aluminum stock from Chisel Machining and a Longbow ammo carrier from Hoptic USA. It was built by Mad Pig Customs for Midwest Industries.

Unlike the standalone M-LOK handguard, the Extended Sight System features an integrated full-length Picatinny rail for lights, lasers, remote switches, and other accessories. This also makes it possible to shoot your lever gun with a thumb-over-bore/C-clamp grip without burning your hand on a hot barrel. The Marlin 1895 Extended Sight System includes a heavy-duty ghost ring rear sight and a front post, both of which are shielded and offer a wide range of elevation and windage adjustments.

The handguard design appears similar to the standalone component, except for the addition of a notch and four bolts that support the front of the rail. As before, it's constructed from 6061 aluminum with a hard coat anodized finish. A 5-slot Pic rail section is included to make it easier to attach lights and other accessories to any of the 7 M-LOK surfaces.

A forward-mounted sling swivel is also attached, but can be removed for those who prefer a slick handguard and plan to use a modern QD-style sling (as we did on our Marlin 336 project).

The Midwest Industries Extended Sight System is designed for Marlin 1895 variants with forward handguard caps (not barrel bands). It does not fit the 1895CB or 336Y. We're told that a Marlin 1894 variant will be coming soon. MSRP for this system is $325. For more information, go to MidwestIndustries.com.


TAV 2018 Tundra Overland Build + Can-Am X3 Turbo

Traditionally, the term “toy-hauler” refers to a fifth-wheel trailer with a loading ramp and enough interior space for motorcycles, ATVs, or UTVs. It’s a convenient way to travel to the lake, sand dunes, or mountains — when you arrive at your destination, the family piles out of the truck, the toys are backed out of the portable garage, and the trailer is converted into sleeping arrangements. It’s a tried-and-true formula … but what if there were a better way? Walt Wagner, founder of Tactical Application Vehicles, believes he has found one. He and his team at the TAV workshop in Albuquerque created this 2018 Toyota Tundra overland build into his concept of the ultimate toy-hauler/adventure vehicle. It blends the go-anywhere versatility of an overland camper, the practicality of a tow rig, and the high-speed performance of an off-road race truck.

Starting the Tundra Overland Build

The project began with a stock Cement gray Tundra 4×4 Double Cab. Much like TAV’s first project truck, the 2009 “Ranger Goat” Tacoma we wrote about in Issue 6 of Carnivore magazine, this Tundra is equipped with a full long-travel suspension setup. This enables the truck to fly down washboard fire roads and soak up bumps, even when it’s loaded down with passengers, cargo, and fuel. The suspension consists of a Total Chaos Fabrication long-travel kit with secondary shock hoops, King coilovers and bypass shocks, Alcan leaf springs, and King air bumpstops. For optimal ride quality and smoothness, TAV special-ordered custom shock valving and spring rates for the Tundra.

Supercharger and Drivetrain Mods

Since this truck is used for towing, Walt added a Magnuson supercharger to the 5.7L V-8 and installed higher-ratio 5.29 Nitro Gear ring and pinion sets in both differentials. This provides improved torque and low-end acceleration, helping to get the 17-inch Method Race Wheels and 37-inch Toyo mud tires up to highway speeds faster. Front and rear ARB air lockers allow the Tundra to crawl up steep inclines when it’s not on tow duty. A 46-gallon fuel tank from LRA makes gas station stops a rarity.

FiftyTen Flatbed Camper

The Tundra’s most notable feature is its FiftyTen Full-Size Camping System, which replaces the entire bed with an assemblage of angular sheet metal. This German company has been manufacturing overland campers since 2017, but only recently entered the North American market; the TAV Tundra was one of the first vehicles in the U.S. equipped with this setup.

Above: Doors on all three sides of the FiftyTen camper offer easy access to gear within. If more space is needed, the camper shell can be removed entirely, leaving a versatile flatbed.

Its lower flatbed portion includes locking storage compartments and a slide-out rear drawer; the upper camper portion opens on three sides and pops up to reveal a spacious rooftop tent. Between the camper and cab, there’s a slot for a full-size spare tire. Walt also liked that the camper shell is removable, so the Tundra overland build can be used in flatbed configuration as a work truck. But with a base price of $38,400, this system requires deep pockets.

Above: MultiCam Black vinyl on the camper and hood contrasts nicely with the Tundra’s Cement gray paint.

Image Craft printed a custom MultiCam Black vinyl wrap for the FiftyTen camper, which was installed by Revive Wraps. The Tundra’s hood was also wrapped in matching material. Other exterior mods include wide fiberglass fenders from McNeil Racing, a Prinsu roof rack with Zarges aluminum storage case, a C4 Fabrication front bumper, and an array of Baja Designs LED lights.

Can-Am Maverick X3 Turbo R

As if this truck build wasn’t impressive enough on its own, Walt paired it with a customized 2019 Can-Am Maverick X3. This 172-horsepower UTV was quick in stock form, but Walt added a Stage 1 tune, clutch weights, and a drive belt from EVP to make it even quicker.

It also received a list of suspension mods just as extensive as the Tundra overland build’s — Geiser Performance arms, TMW bulkhead gussets, ZRP billet spindles, ZRP radius rods and dog bone supports, a Shock Therapy billet steering rack, and much more. All this rides on a set of 15-inch Method Race Wheels 401 Beadlocks wrapped in 32-inch STI Chicane RX tires.

Above: With a spare tire carrier, fire extinguishers, jerry cans of fuel, two winches, and much more, this UTV is prepared for almost any emergency — day or night.

The TMW front bumper is outfitted with more Baja Designs LED ights and a winch, while the Geiser Performance rear bumper holds a full-size spare tire. The X3 also has a Geiser Performance custom cage with windshield, SDR Motorsports doors wrapped in MultiCam Black, and a Front Runner roof rack that TAV modified to fit the UTV.

Above: The cockpit is equipped with a powerful Rockford Fosgate sound system, a VHF/UHF radio with intercom headsets, and an sPOD controller for the auxiliary lights.

Inside, Walt and his copilot — usually his daughter — can settle into the TMW Triple X bucket seats, crank up the Rockford Fosgate Stage 4 stereo, and communicate at speed via intercom headsets hooked up to the Rugged Radios VHF/UHF system. Recovery equipment and other emergency gear is stashed in the TMW rear storage bag and Zarges hard case.

TAV's Tundra Overland Build Specifications

Above: The Tundra and Can-Am make a perfect pair, with one vehicle for high-speed trail fun and one to serve as an off-grid basecamp.

TAV Stage 3 2018 Toyota Tundra

Drivetrain: 5.7L V-8 with Magnuson supercharger, six-speed automatic transmission, Nitro Gear 5.29 ring and pinion, ARB front and rear air locking differentials, LRA 46-gallon fuel tank

Front Suspension: Total Chaos Fabrication 2.5-inch long-travel system with secondary shock hoops, King 2.5-inch Performance adjustable coilovers, King 3.0-inch triple-bypass secondary shocks

Rear Suspension: TAV-spec Alcan progressive-rate leaf springs, Total Chaos Fabrication rear shock relocation kit, TAV-spec King 3.0-inch internal-bypass shocks, King 2.0-inch Air Bumpstops

Wheels & Tires: 17×8.5 Method Race Wheels 704 Trail Series, 37×12.5R17 Toyo Open Country M/T

Body Modifications: C4 Fabrication Overlander Series front bumper, ComeUp Seal Gen2 12.5RS winch, RCI skid plates, McNeil Racing fiberglass fenders, Prinsu roof rack, Baja Designs LED lights

Flatbed Camper: FiftyTen Full-Size Camping System with Image Craft / Revive Wraps MultiCam Black vinyl wrap

In Tow: TAV modified 2019 Can-Am Maverick X3 X rc Turbo R

URL: tavllc.com

Conclusion

This combination of truck and UTV gives Walt the best of both worlds — a platform for comfortable long-distance travel with the whole family, and the thrills of a high-speed trail vehicle. He drives the Tundra overland build on a daily basis, using it to haul parts for the shop. On the weekends, he can lower the camper onto the bed, strap the Can-Am to the trailer, and escape civilization at a moment’s notice.


Tailor-Made ARs: Choosing the Best AR-15 Mods

“Excellence is never an accident. It is always the result of high intention, sincere effort, and intelligent execution; it represents the wise choice of many alternatives.” This ancient quote from Aristotle is applicable to many aspects of life, including the selection of gear for emergency preparedness. The idea of building a single rifle that could meet all of your survival and preparedness needs is akin to pulling Excalibur from its stone pedestal. Everyone thinks they’re the one person who can do it. But the reality is a little more … well … anticlimactic, leaving many of us to rely on a safe full of ARs for specific purposes like a golfer plucking clubs from his bag. How much can we condense the capabilities of various individual rifles into a single weapon? Is there a combination of the best AR-15 mods, accessories, and technologies that could eliminate half (or more) of our survival gun safe?

Considerations for the Best AR-15 Mods

While the other authors involved in this series will take their own approaches and make their own arguments, I started by reaching back to my routes in military reconnaissance. Two decades of near-constant warfare around the globe has given a lot of military leaders a deep reservoir of experience regarding how to build, configure, and run a rifle in spartan conditions. So, before I lay out the recipe for my ideal one-gun-solution, we need to examine an obscure but relevant slice of recent military history.

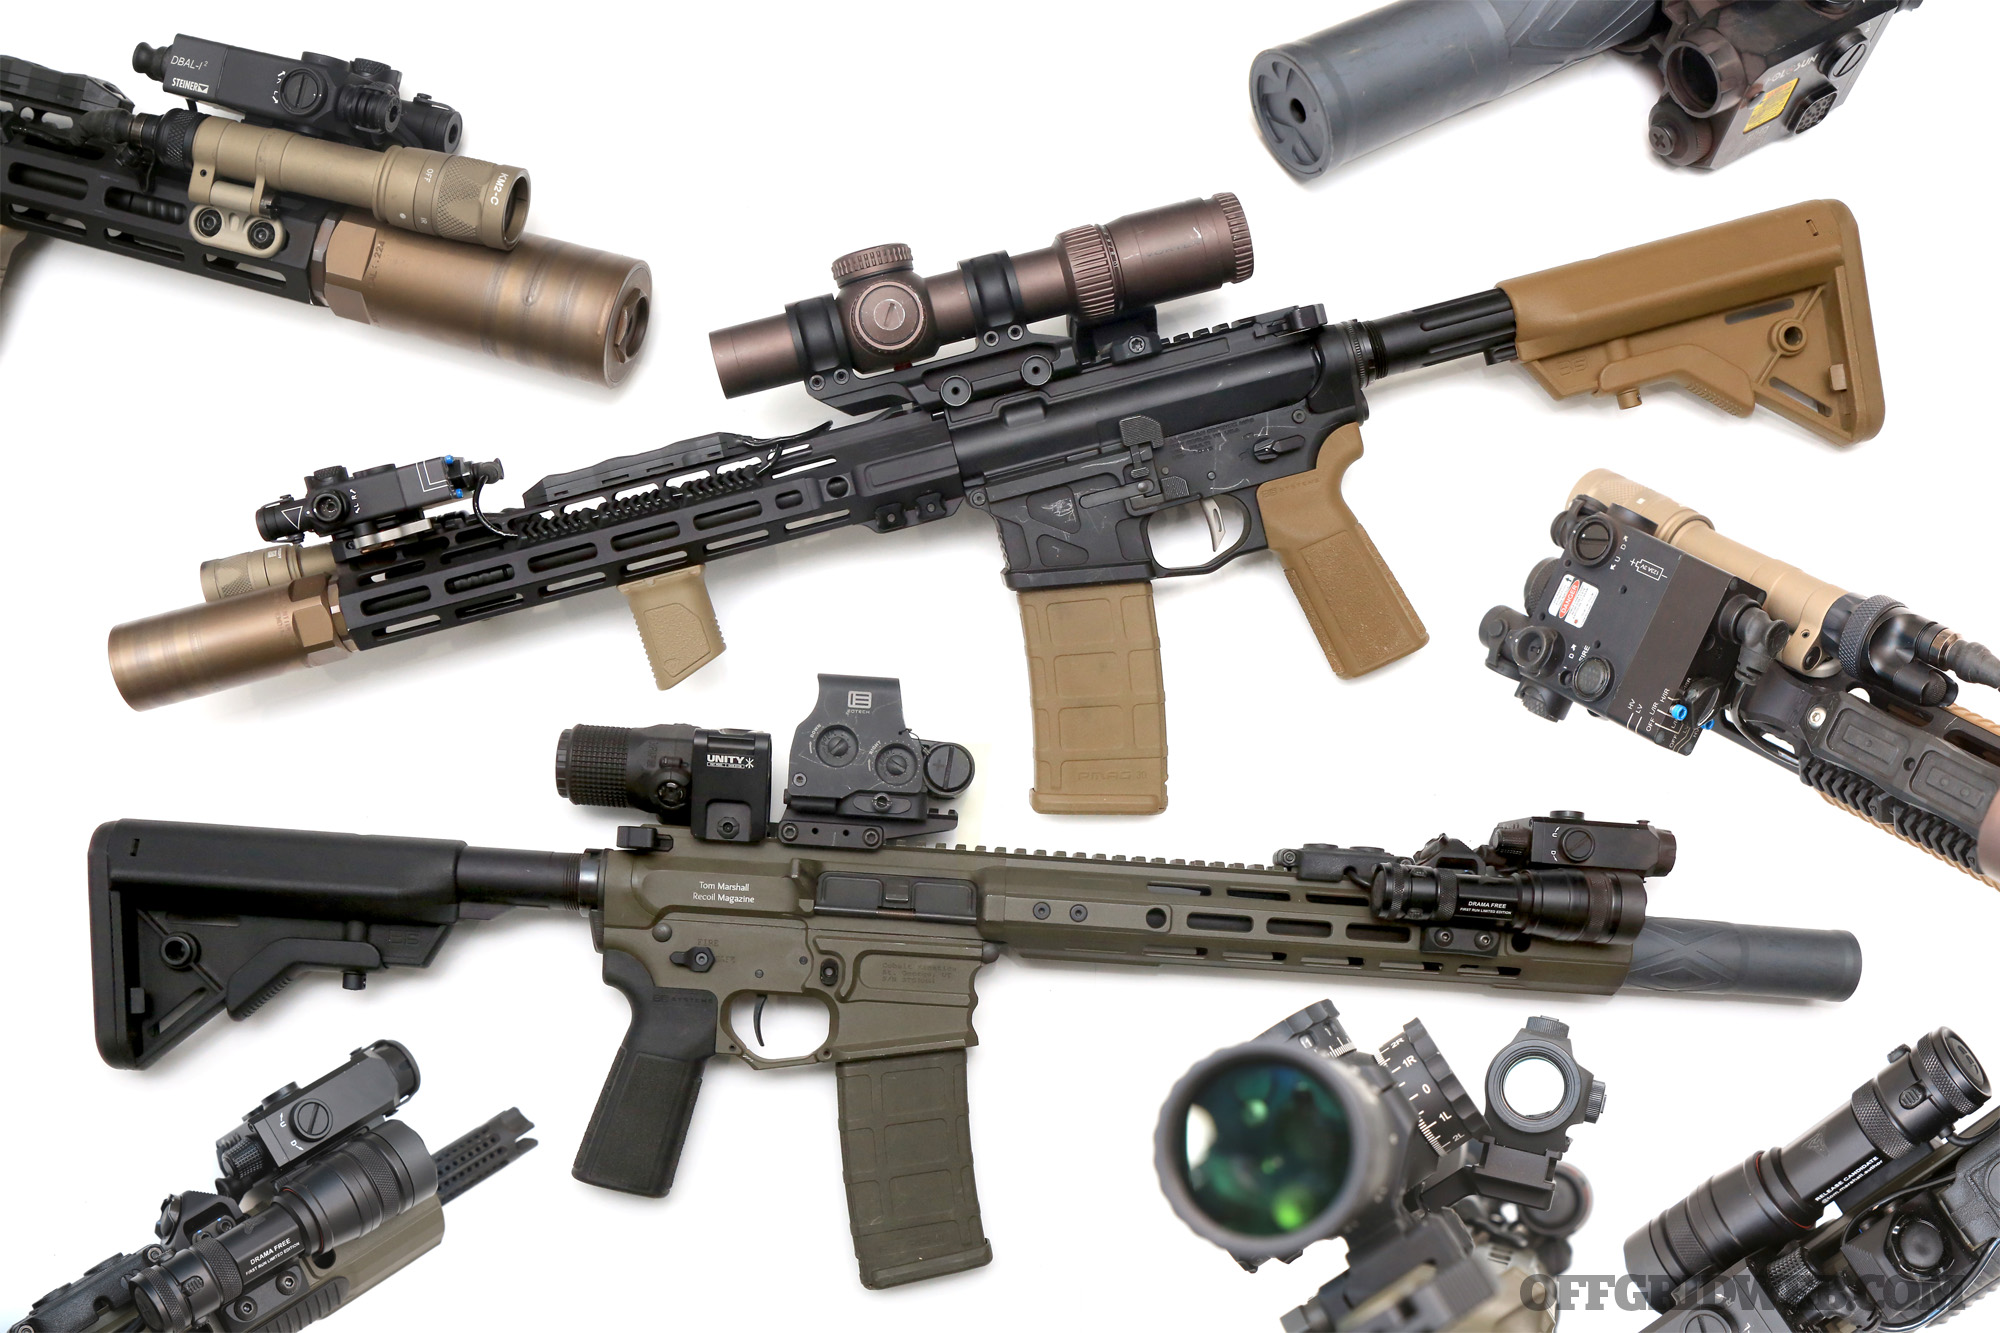
Photos By Niccole Elizabeth

The Recce Rifle Concept

Pronounced “wreck-y” — for heaven’s sake, please don’t say “reese” — the term recce is just military slang for “reconnaissance.” It’s primarily used by our Brit and Aussie brethren since, for most American grunts, “recon” is the preferred vernacular. Regardless of how you bastardize the word, reconnaissance teams rely heavily on stealth and maintaining a low profile to execute their missions. Because of this, recon teams are typically smaller in size than their assault force counterparts. And because of that, they often use specialized equipment and leverage technological and firepower advantages to offset the risk of operating in small groups behind enemy lines.

At some point in the late ’90s or early ’00s, reconnaissance elements within the SEAL community began formulating a firepower enhancement concept that would come to be known as the Recce Rifle. The premise was to have a rifle within the recce team that could see and hit farther than a standard issue M4 or M16, without having to rely on a dedicated sniper team. The recce rifle needed to have maximum commonality with the team’s issued carbine and not require any special training. The goal wasn’t to make more snipers, but to give standard riflemen on a recon team a stopgap capability between traditional infantry engagement ranges (normally 300 yards or less) and the long-range precision shooting executed by professional snipers with specialized heavy rifles (normally 600 yards or more). Furthermore, the inclusion of a quality magnified scope could aid in direct surveillance and intelligence gathering.

Without going too far into the minutiae, a template emerged from within the SEAL teams for an enhanced/accurized M4 carbine featuring a match-grade trigger, 16- or 18-inch stainless steel match barrel, and a variable-power scope. Otherwise, these rifles were mechanically identical to issued M4s — they even retained full-auto capability so that in an ambush or counter-ambush scenario, the recce rifleman could still perform traditional fire-and-maneuver with his squad. But the foundation was laid for a rifle that could excel both in close combat and at extended ranges with minimal mods, using commercially available off-the-shelf components.

Commercial Adoption & the Mini Recce

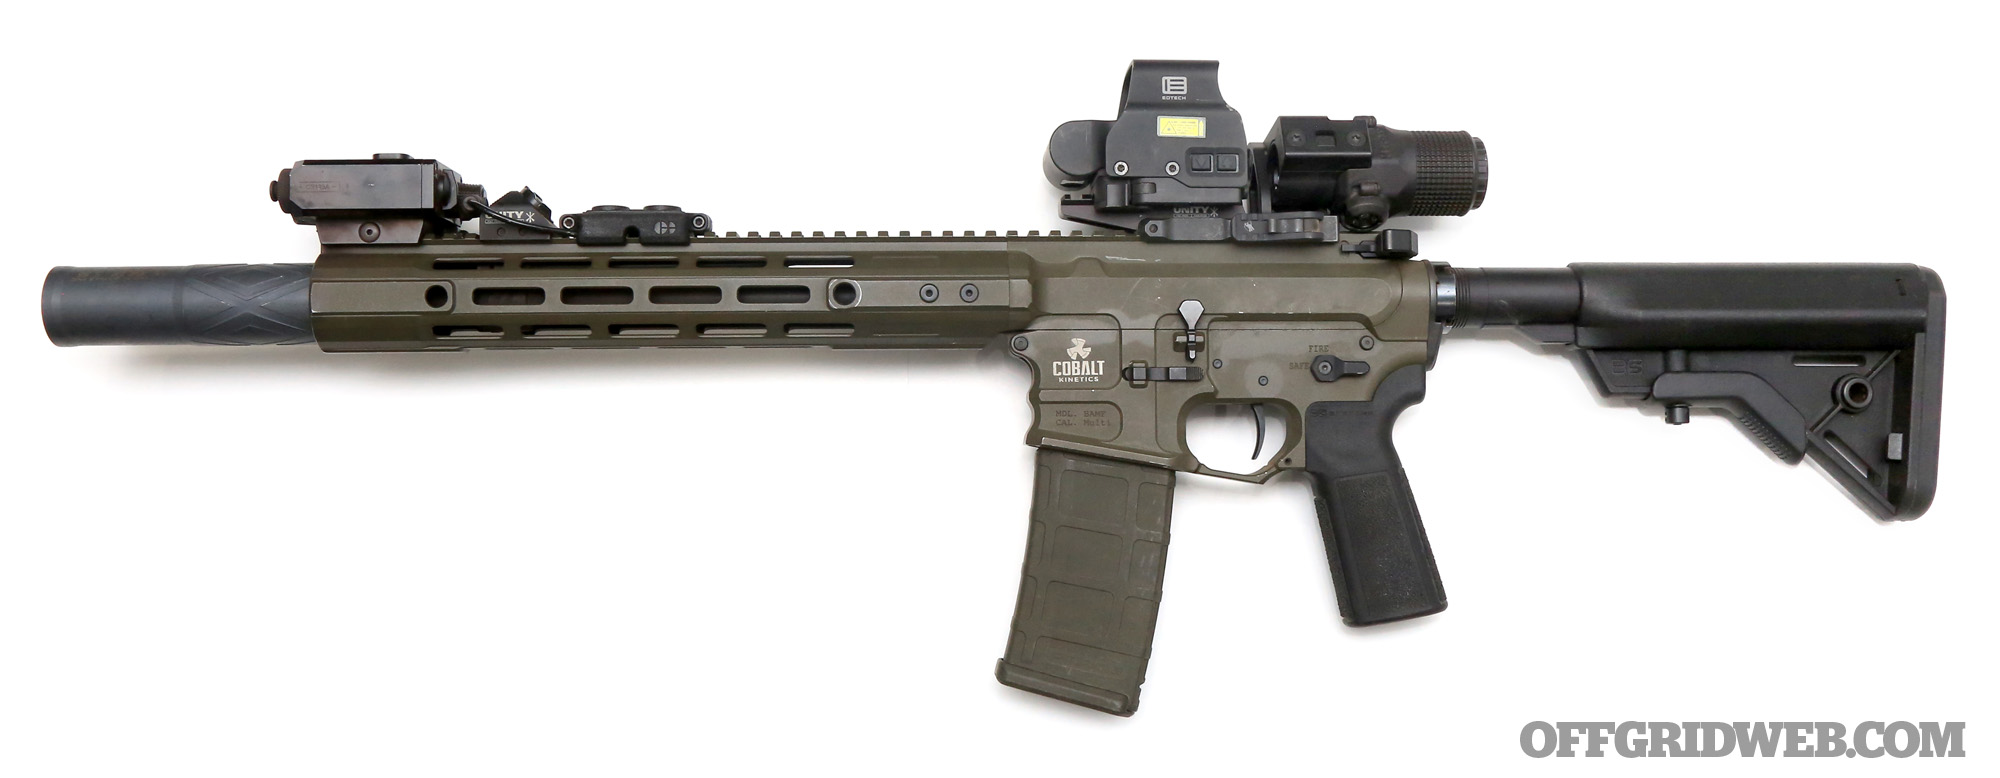
Above: The Cobalt Kinetics 12.5-inch BAMF Pro offers a pre-packaged mini recce solution constructed with premium components.

Soon after photos and anecdotes of the recce rifle made their way to the shooting public, similar-looking builds began popping up in internet forums — stainless match barrels, variable-power scopes, match triggers, and long, lightweight handguards. First, it was mostly military rifle enthusiasts trying to build clones of SEAL guns. But then the concept took on a life of its own. Elements from the special operations recce guns were being fused with similar traits found on 3-Gun competition setups, as civilian shooters began to realize they could have rifles that were both fast and accurate, and which performed equally well at 500 yards or across a hallway.

As AR-15 manufacturing continued to evolve, with engineering, metallurgy and quality control being pushed to the bleeding edge of what’s mechanically possible, the vaunted concept of the Recce Rifle evolved as well. Specifically, the growing availability of nearly aerospace-grade AR barrels has birthed the so-called mini recce rifle. The mini recce applies the same form factor we previously discussed with a shorter barrel length, making it even more optimal for the close-quarters end of the spectrum while maintaining match-grade abilities at the hundreds-of-yards line.

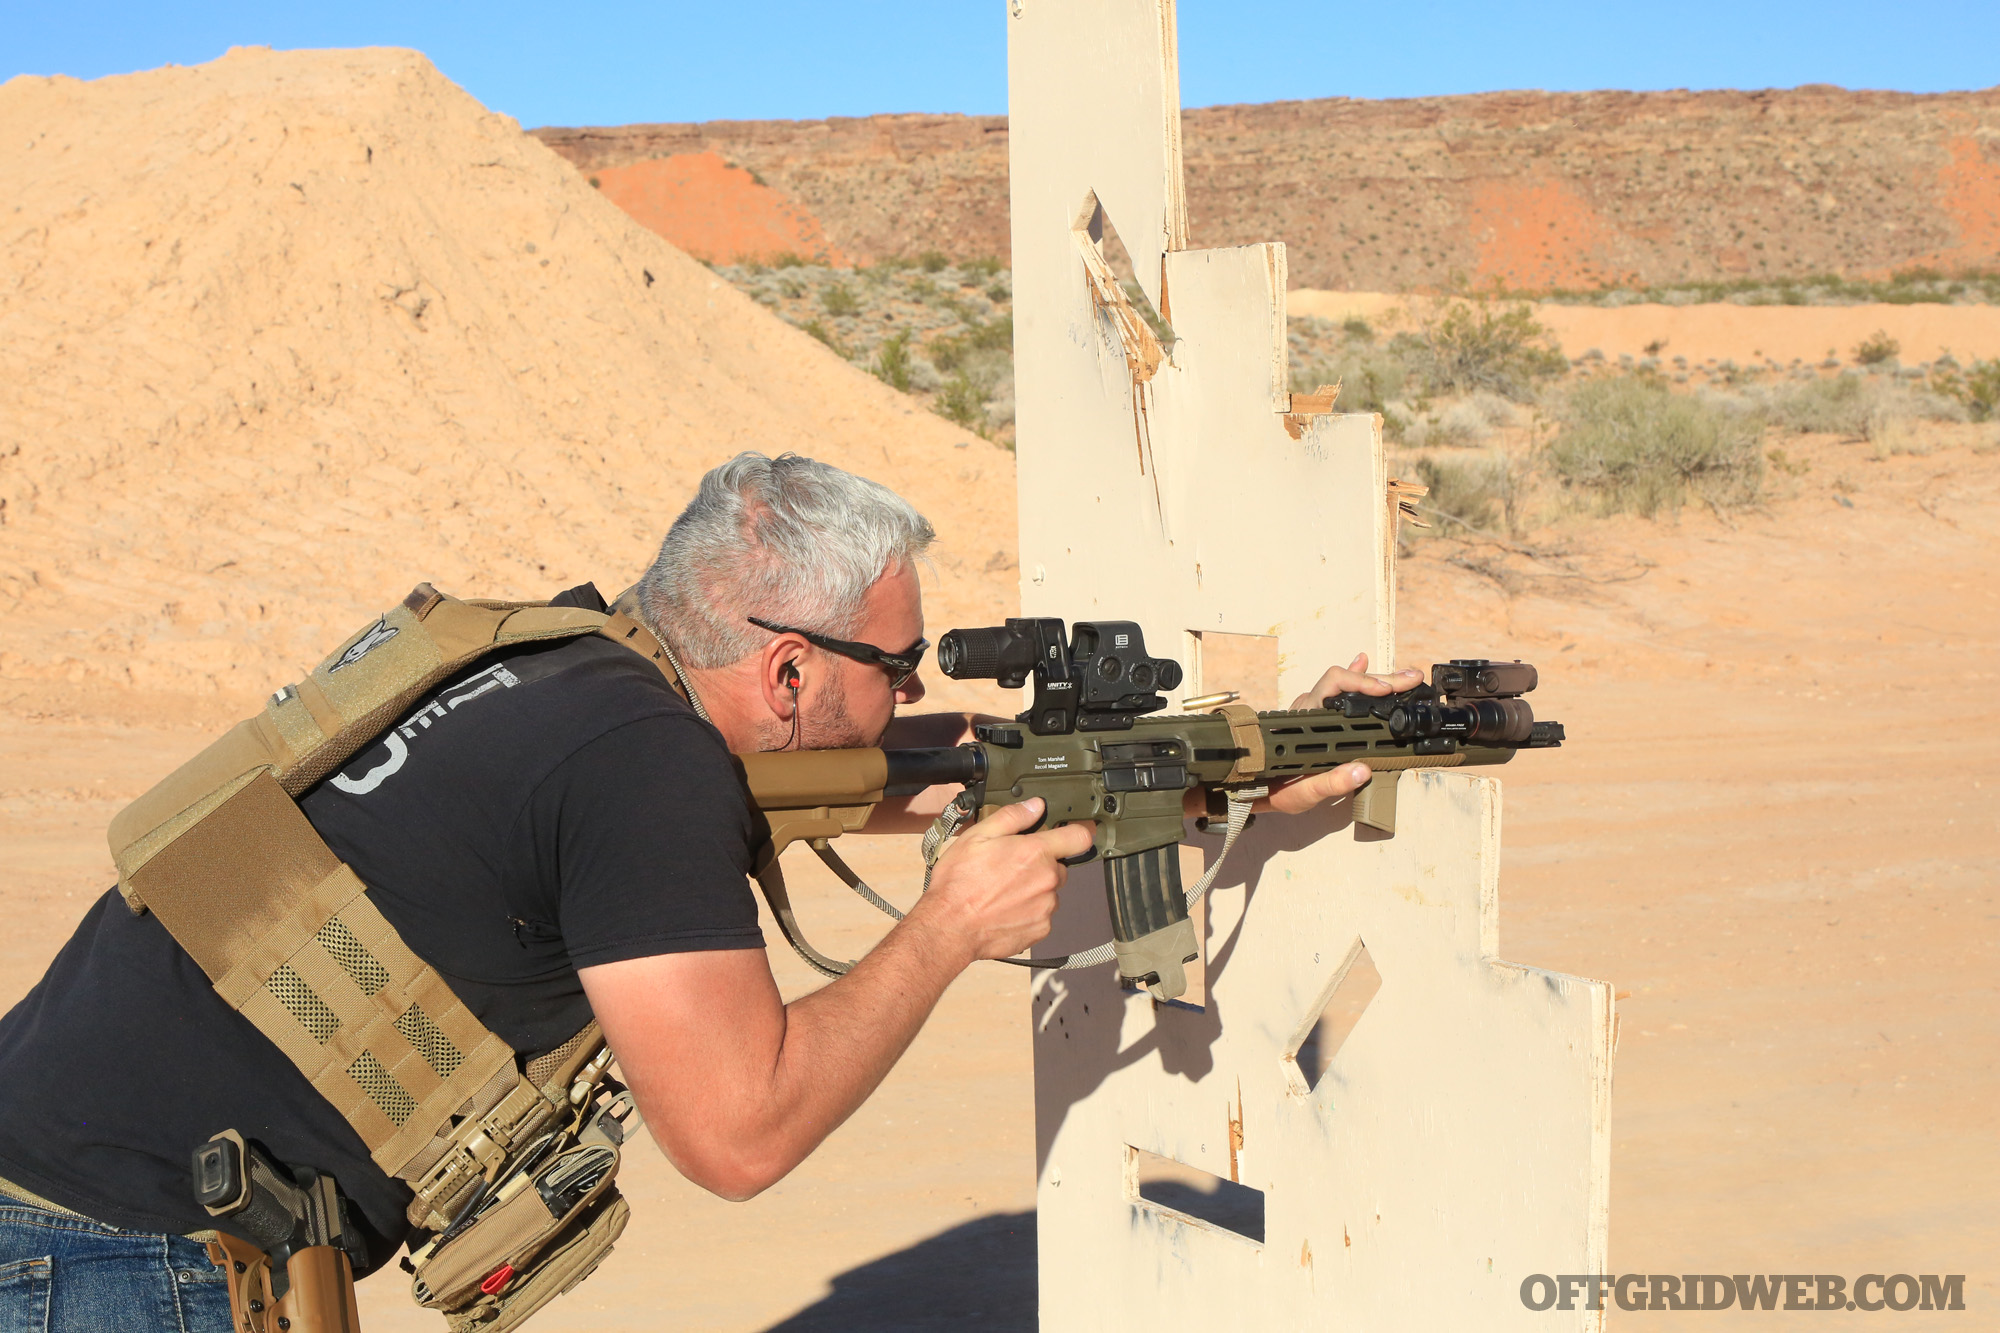
Above: We worked our Cobalt Kinetics mini recce through movement and unconventional positions at Greenline Tactical‘s Combat Carbine course in the Utah high desert. 

For reference, the first generation of recce rifles built by Naval Special Warfare armorers typically sported 16- or 18-inch barrels. For civilians, 18-inch stainless barrels were all the rage for a few years. Next, it was 16-inch barrels. Then, people started building recce-style rifles on 14.5-inch match barrels. Currently, we have a number of precision-manufactured stainless steel barrels in the 10.5- to 12.5-inch range delivering stunning accuracy for their size, fueling the mini recce trend. The recce/mini recce concept, proven by special reconnaissance operators and advanced by the aftermarket, is where I found the last rifle I may ever own and the first one I’ll grab when the world goes sideways. Read on as I explain my considerations for the best AR-15 mods for this particular application.

Receivers, Barrels, & Gas Systems

I’ll admit to copping a little bit of insider privilege in the sense that the barrel of my ideal survival gun is one I received as a prototype nearly two years before penning this story. However, by the time you read this, these barrels should be fully out in the wild and readily available.

Rosco Manufacturing, in conjunction with Aaron Cowan of Sage Dynamics, produced a 12.5-inch barrel dubbed the K9. The idea, in Cowan’s words, was to create a “performance duty barrel” that bridged the gap between the tough-as-nails machine gun barrels found in military or law enforcement rifles and the high-precision ones used by competitors and long-range aficionados. The resulting K9 barrel is made from 416R stainless steel that’s black-nitride-coated, featuring a 5.56mm NATO-spec chamber and military-standard 1:7 twist rate. The barrel sports a medium contour and a new, proprietary-length gas system they’ve dubbed “patrol length” — which sits in between carbine and mid-length. Patrol length aims to bring the smooth, efficient cycling of mid-length gas guns to shorter barrels, optimizing reliability with slightly increased dwell times. Cowan insisted the barrel would also need to run reliably with a suppressor. So, the patrol-length gas system also serves to cut down on the over-gassing and accelerated erosion that can take place when suppressing short guns with carbine gas tubes.

Above: A high-quality barrel and match trigger are high-priority components in a mini recce build, making hits at extended range possible in spite of the rifle's reduced size.

I’m not saying 12.5-inch barrels are the only choice for short ARs, but I do believe that barrels between 11.5 and 12.5 inches are the best for survival applications. Shorter 10.5-inch guns are more concealable and offer great maneuverability in tight quarters, but cycle harshly and create premature wear issues. Longer 14.5- or 16-inch guns can take advantage of the mid-length gas system and offer higher muzzle velocities but get awkward in tight spaces and typically need to be broken down into halves for discreet transport.

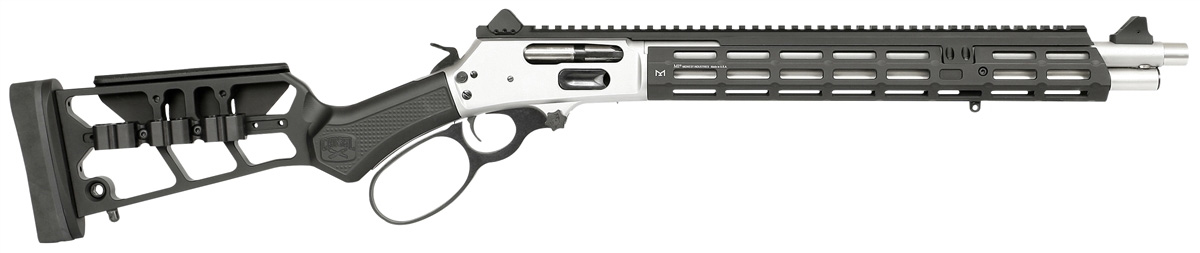
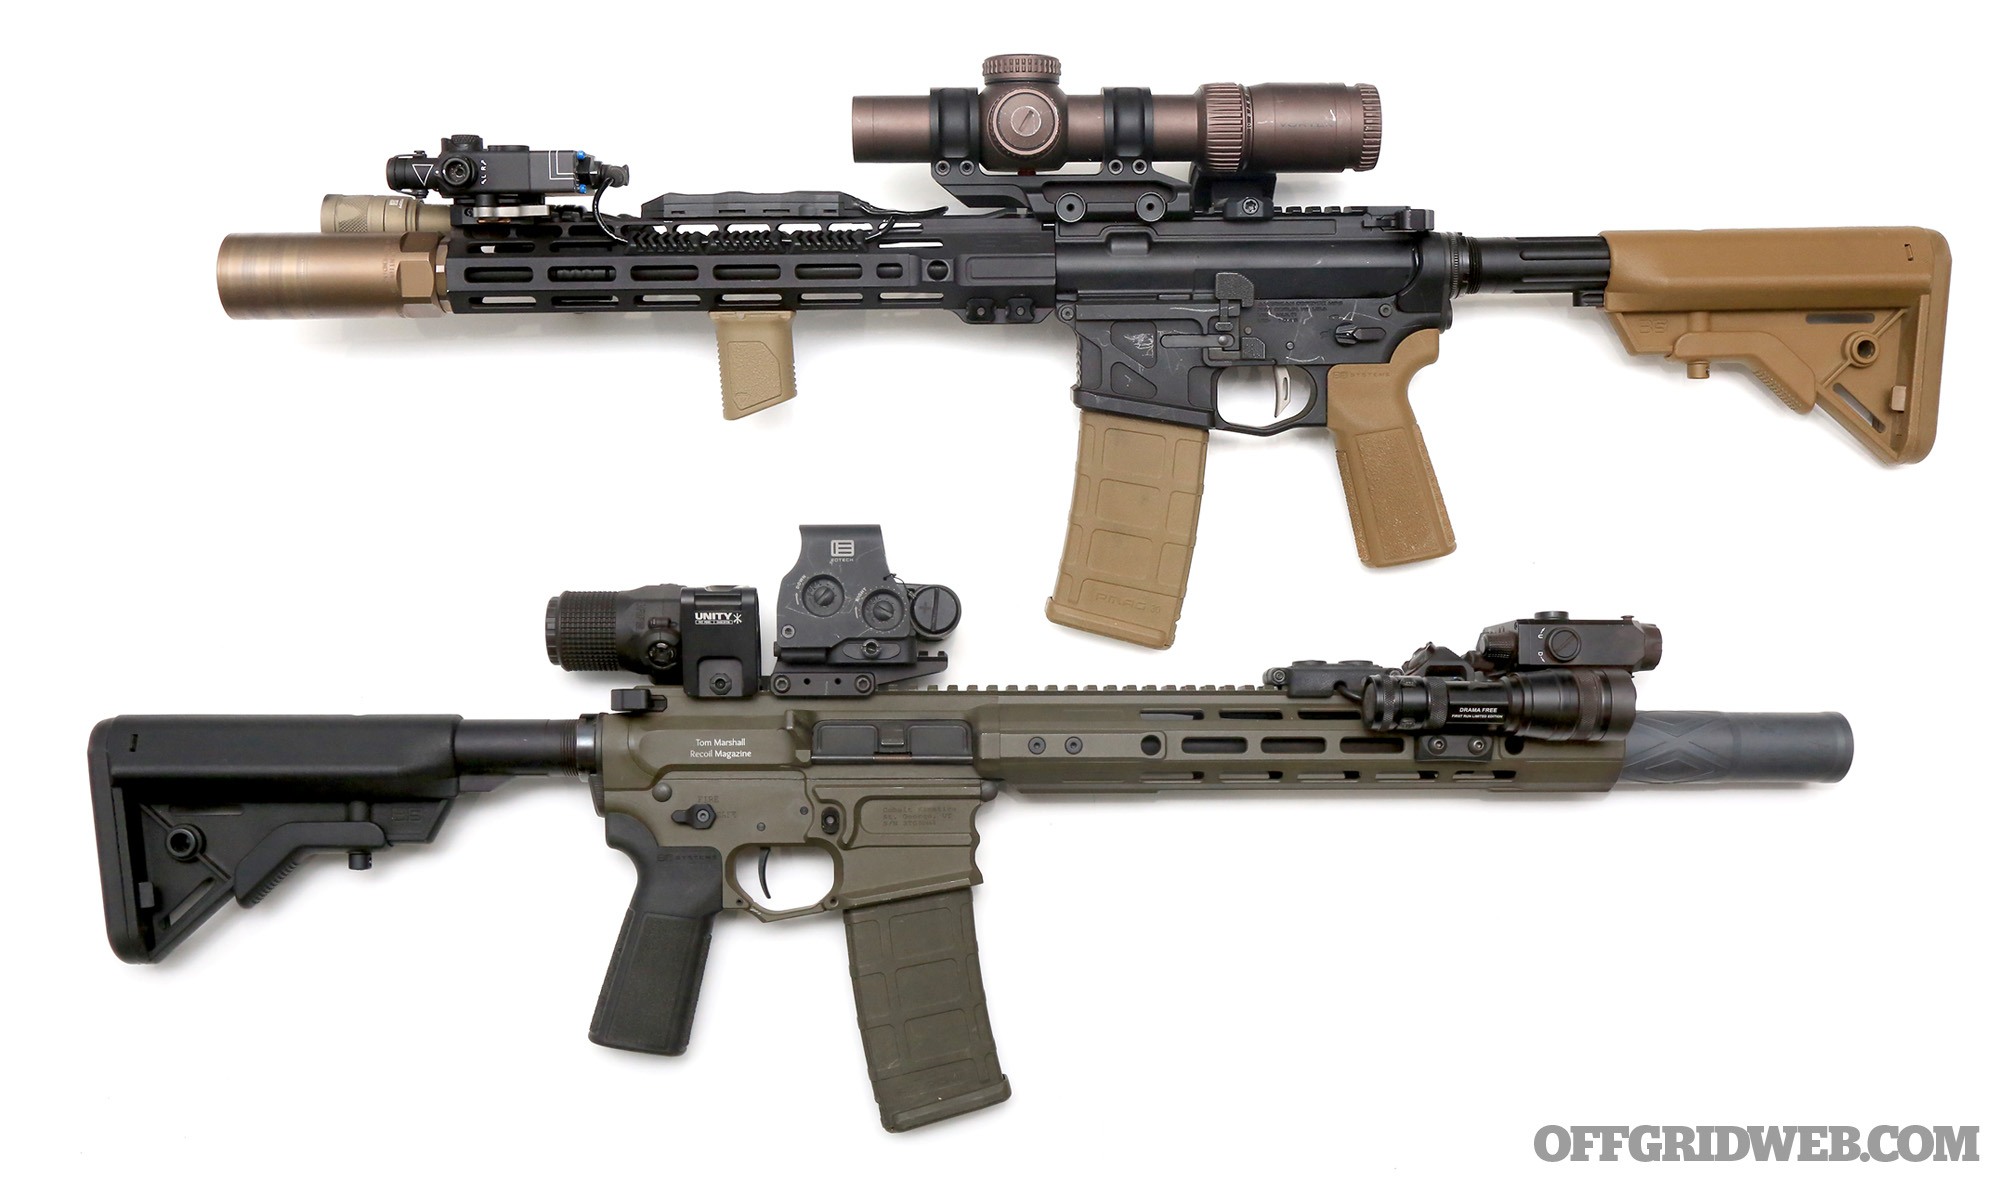
Throughout this article you’ll see two separate AR builds. Both are configured in the mini recce format. Both feature the same 12.5-inch Rosco/Sage collaboration barrel. One rifle is a franken-gun built to test the very first K9 barrel I got my hands on. But the second rifle, the Cobalt Kinetics BAMF Pro, will feature these barrels as the factory standard in their 12.5-inch model. In addition to being the default for the BAMF Pro 12.5, I’m told that Rosco will be offering barrel and gas tube kits as stand-alone items if you prefer to build it out yourself.

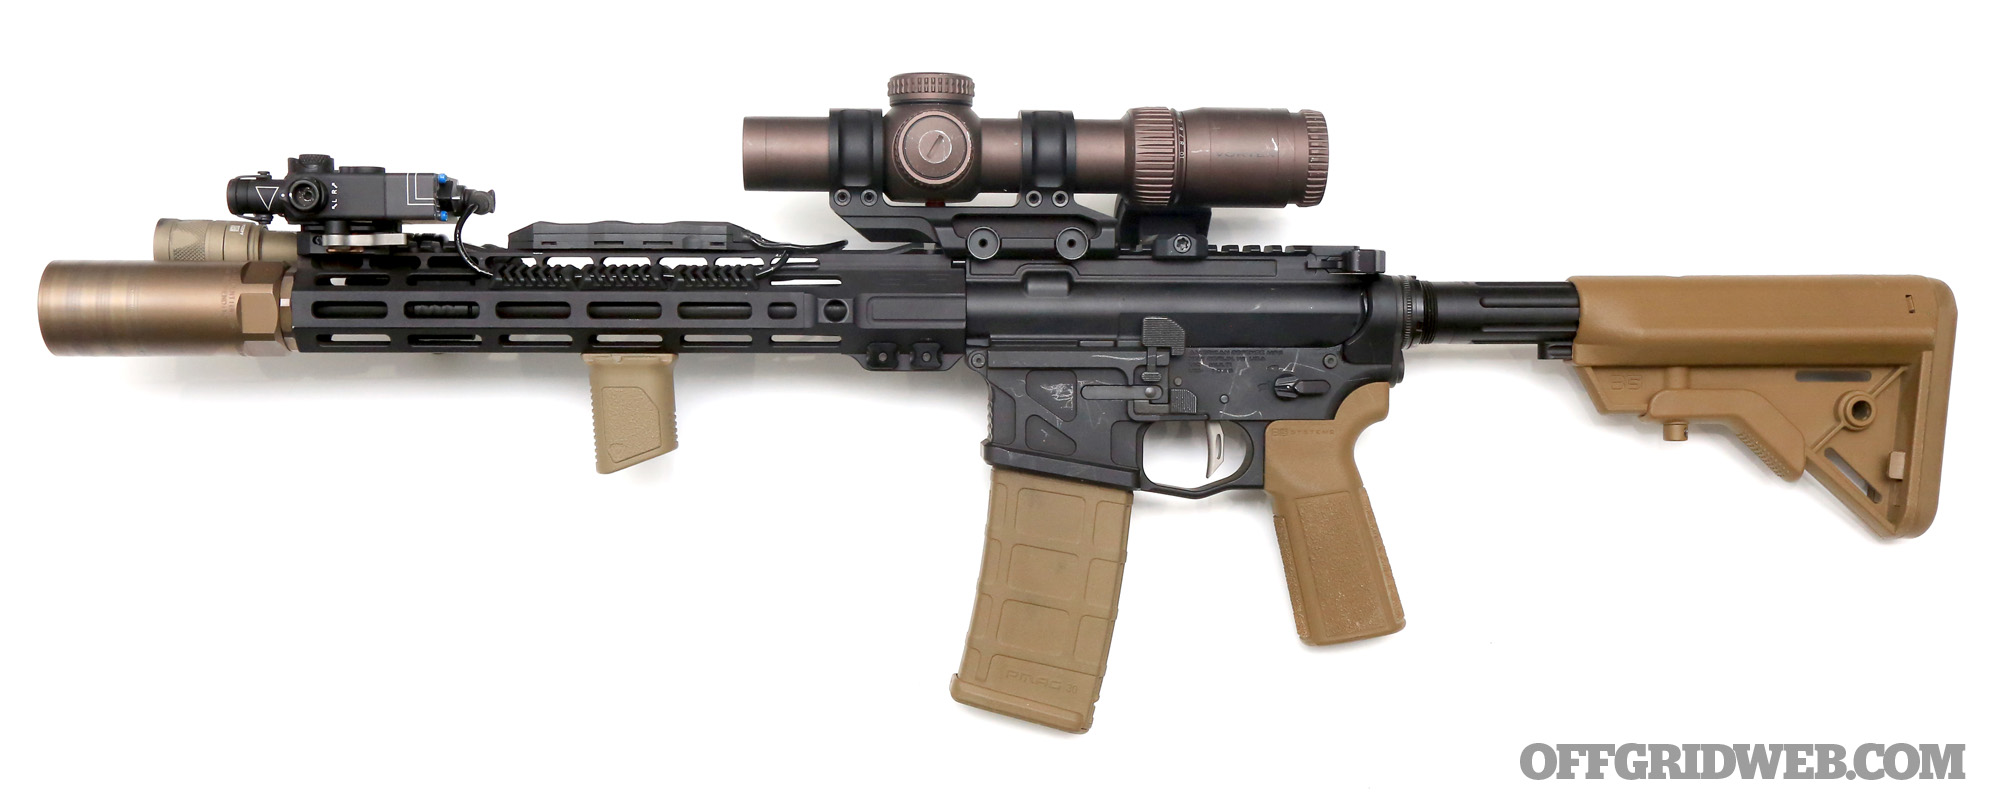
Above: Contrary to our off-the-shelf rifle from Cobalt, this one was pieced together over the course of a year from carefully selected individual components to save weight and add capability. We fit both rifles with “K-can” style suppressors. The custom-built AR is wearing a 4.1-inch Rex Silentium MOD X.

Pros
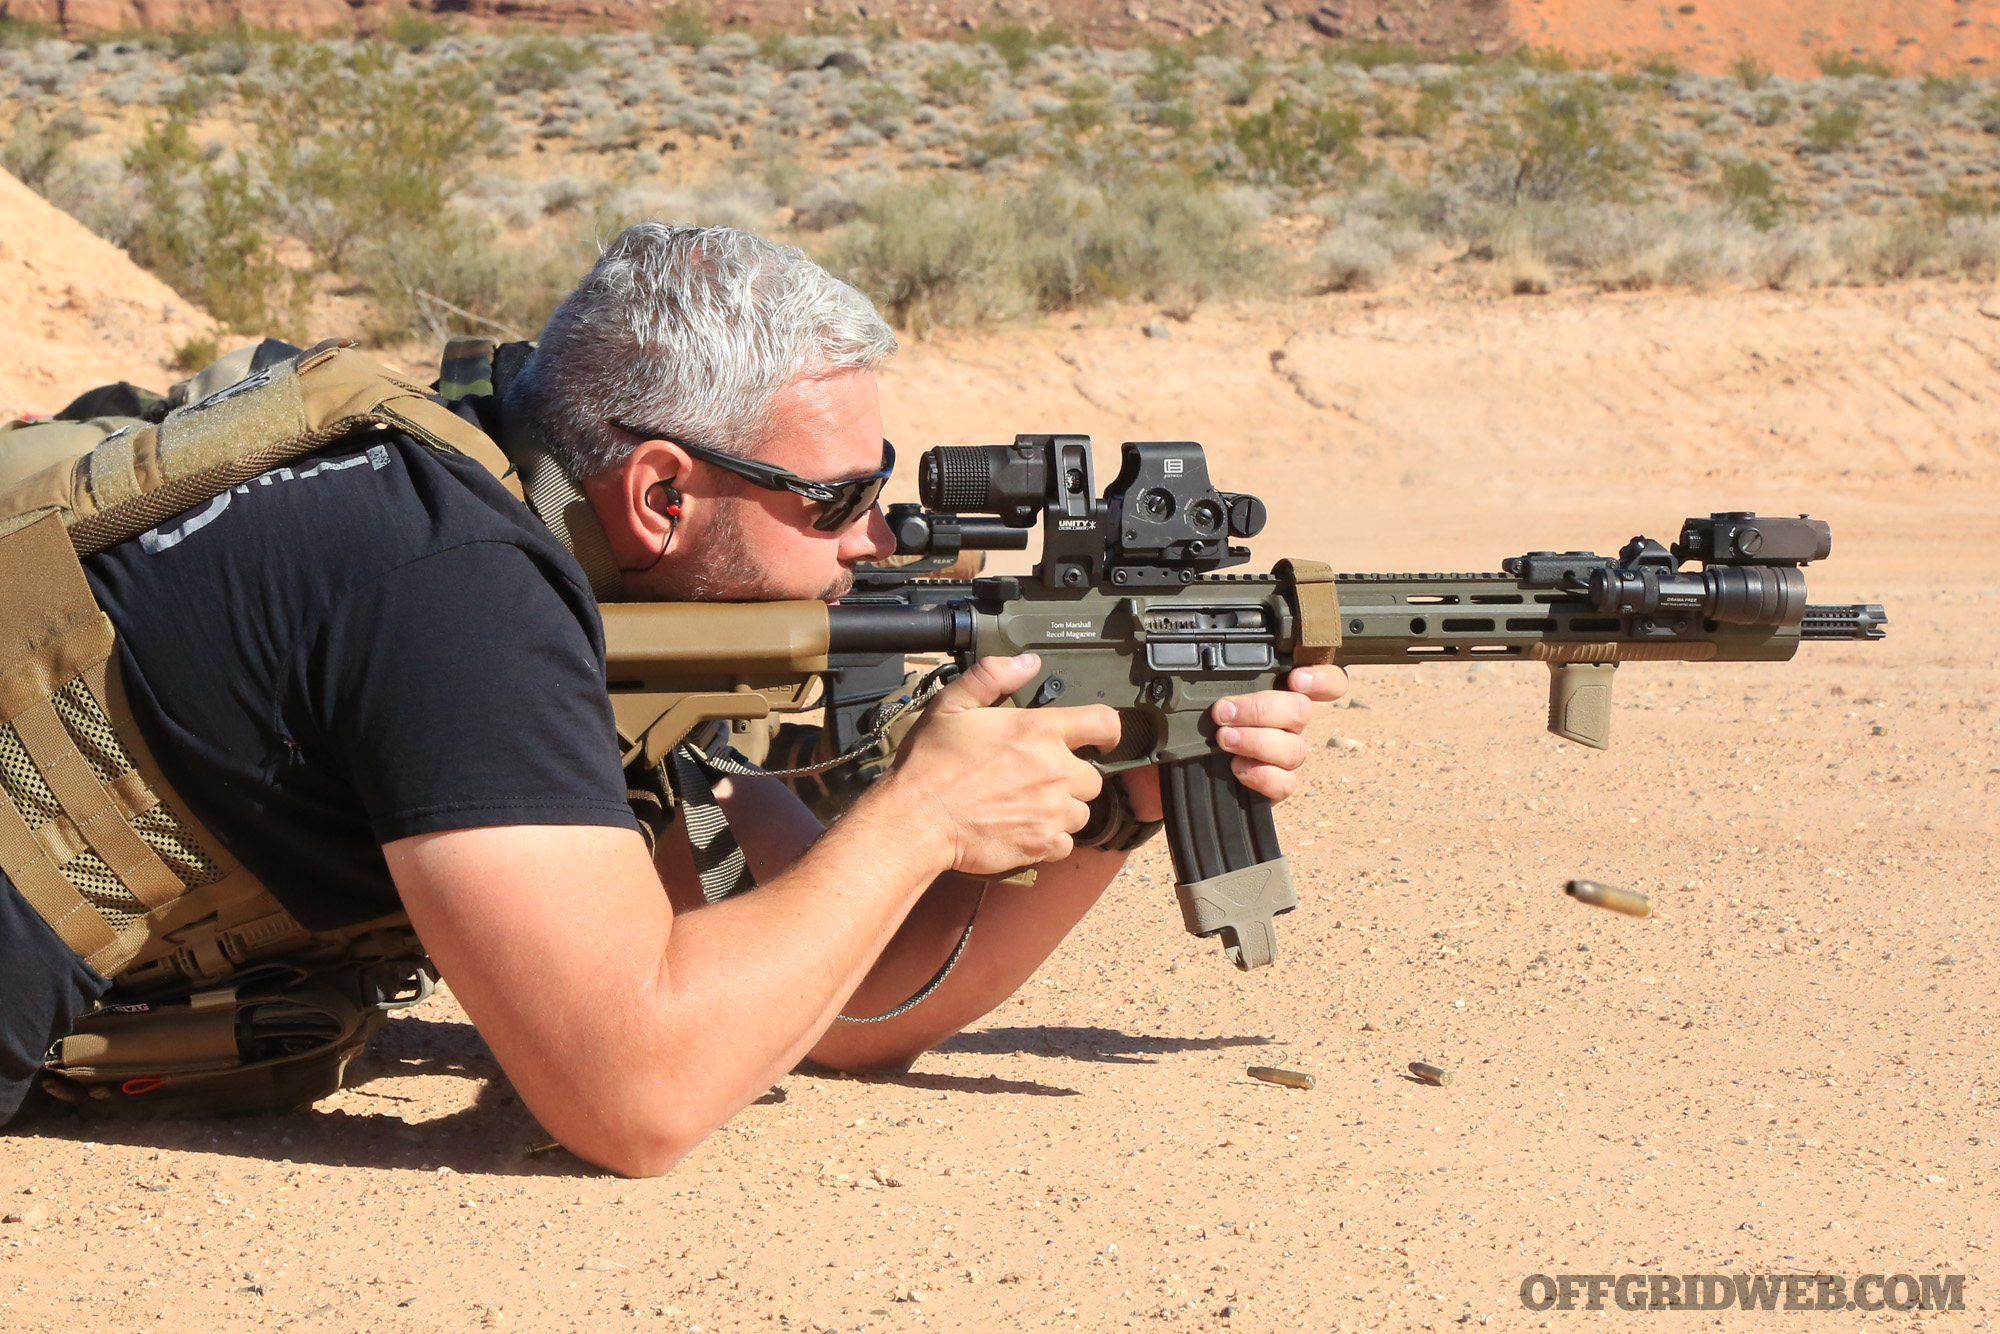
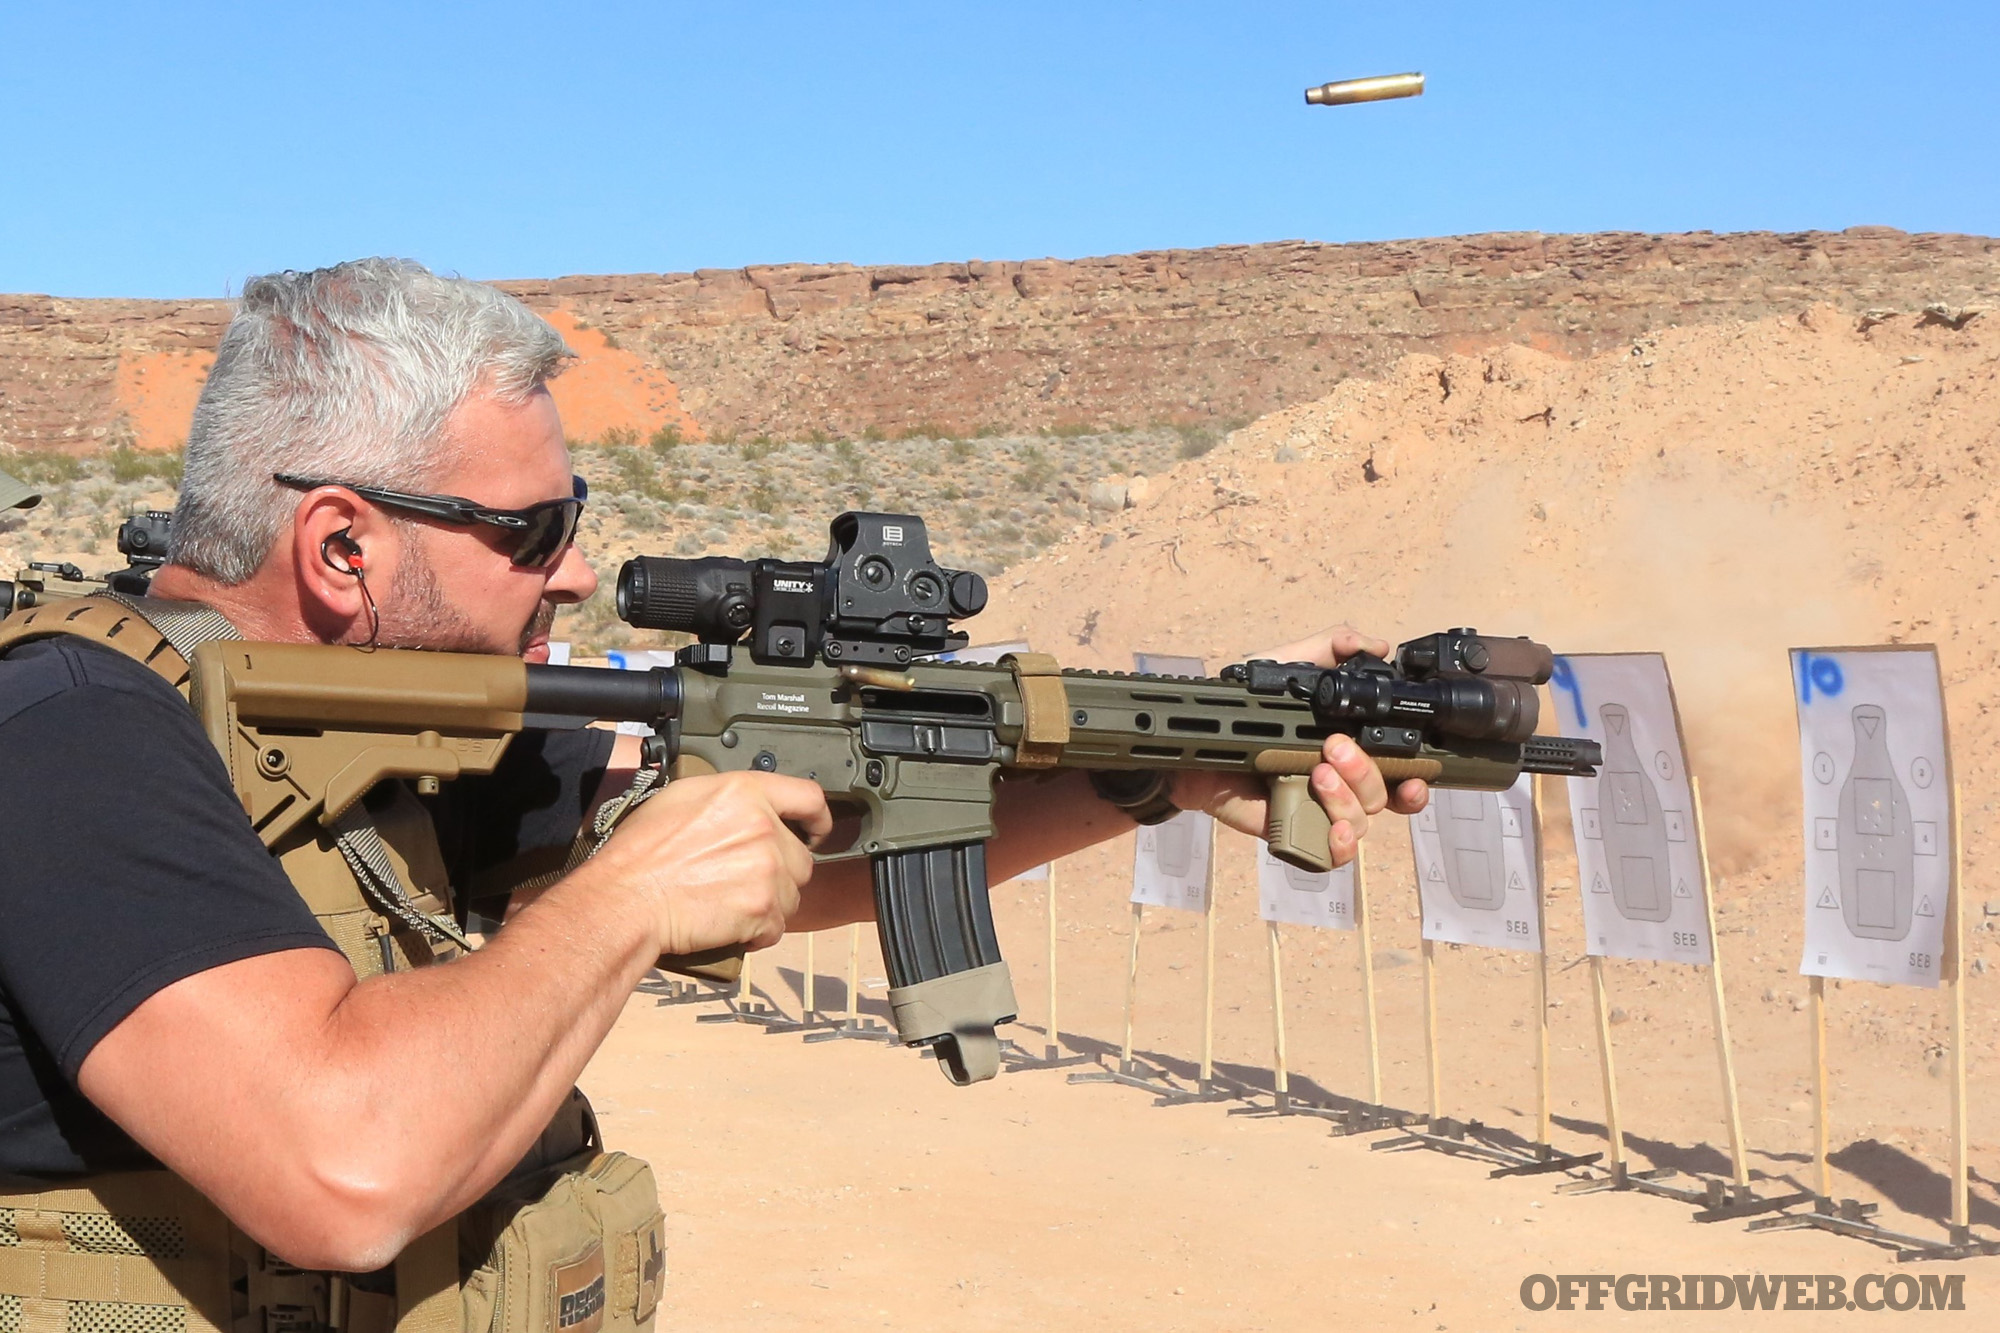
The mini recce concept’s greatest advantage is offering a single rifle that’s fast, accurate, and reliable from across-the-room distance to whatever you, your barrel, and your ammo are capable of. In this case, I was able to run the Rosco/Sage 12.5-inch K9 barrel to 880 yards. When properly outfitted with a white light and infrared laser, the result is a rifle that is 0 to 800 yards capable — day or night, white light or NVGs — and still fits inside a duffel bag or larger pack without needing to be broken down. Even the addition of a short suppressor only brought us to a total 16.1 inches of “barrel length.” This makes the mini recce packable almost anywhere and powerful enough to put down most threats of the two- or four-legged variety. It’s nimble and comfortable in a CQB environment, or working in and around vehicles, but also retains much of the long-range performance of ARs twice its size. The idea that you must have an 18-, 20-, or even 24-inch barrel on your AR for it to work past 300 yards is antiquated at best, obstructionist at worst. If you’re looking for a true “one-gun solution” for a survival/preparedness carbine, carefully choosing the best AR-15 mods to craft a mini recce-style build may be ideal for you.

Cons
For as much as I love this concept, it’s not all sunshine and roses. Asking one rifle to do (almost) everything isn’t impossible. But it does require a very discriminating selection of the best AR-15 mods and specialized accessories. If you need to push an 11- or 12-inch barrel out to 500 yards and beyond, you’ll need a barrel up to the task, and not every one of them is. Likewise, you’ll also (most likely) need heavy-for-caliber match-grade ammo that plays well with said barrel. Good-quality glass in a solid mount is a must as well. Those are, in my mind, the essentials for getting a short rifle to perform at long distance. Lights, lasers, suppressors, and switches aren’t only extra cost, but extra weight. When I was working overseas as a government contractor, my issued gun sported a 10.5-inch barrel but still weighed close to 12 pounds when fully configured. Proper management of both total weight and available “rail estate” on your handguard is critical when you’re trying to build so much capability into a single rifle. Using skeletonized, titanium, or other lightweight components will help, but will drive the price up quickly and may negatively impact reliability in some cases.


Above: This Cobalt Kinetics AR is equipped with a 5.5-inch Odin Works Baja suppressor.

Then, there’s the ATF. If you’re going to build a short rifle, you’ll need to get it registered as an NFA item. There’s wait time and cost associated with this process. Can you build something similar to what you see here as a braced pistol? Yes, you can. However, at time of writing, the legal status of pistol braces is under some intense scrutiny. If the fear-mongers get their wish, your jack-of-all-trades braced AR may become illegal overnight. Even if braces don’t get banned, there has already been some talk to the effect that using a magnified optic on a braced pistol demonstrates “intent to circumvent” and could by itself bring you some heartache under the wrong circumstances. How much that deters you, if at all, from setting up a Mini recce with exactly the rearend you want is entirely a personal call. We provide the information; you make the decision.

Both of my builds are SBR’d, and there are some pros and cons to relying on a stamped gun for SHTF scenarios, but we’re going to address those concerns later in this series. In this particular instance, it was decided the pros outweigh the cons, and Form 1’s were filed.

Grips, Stocks, & Handguards

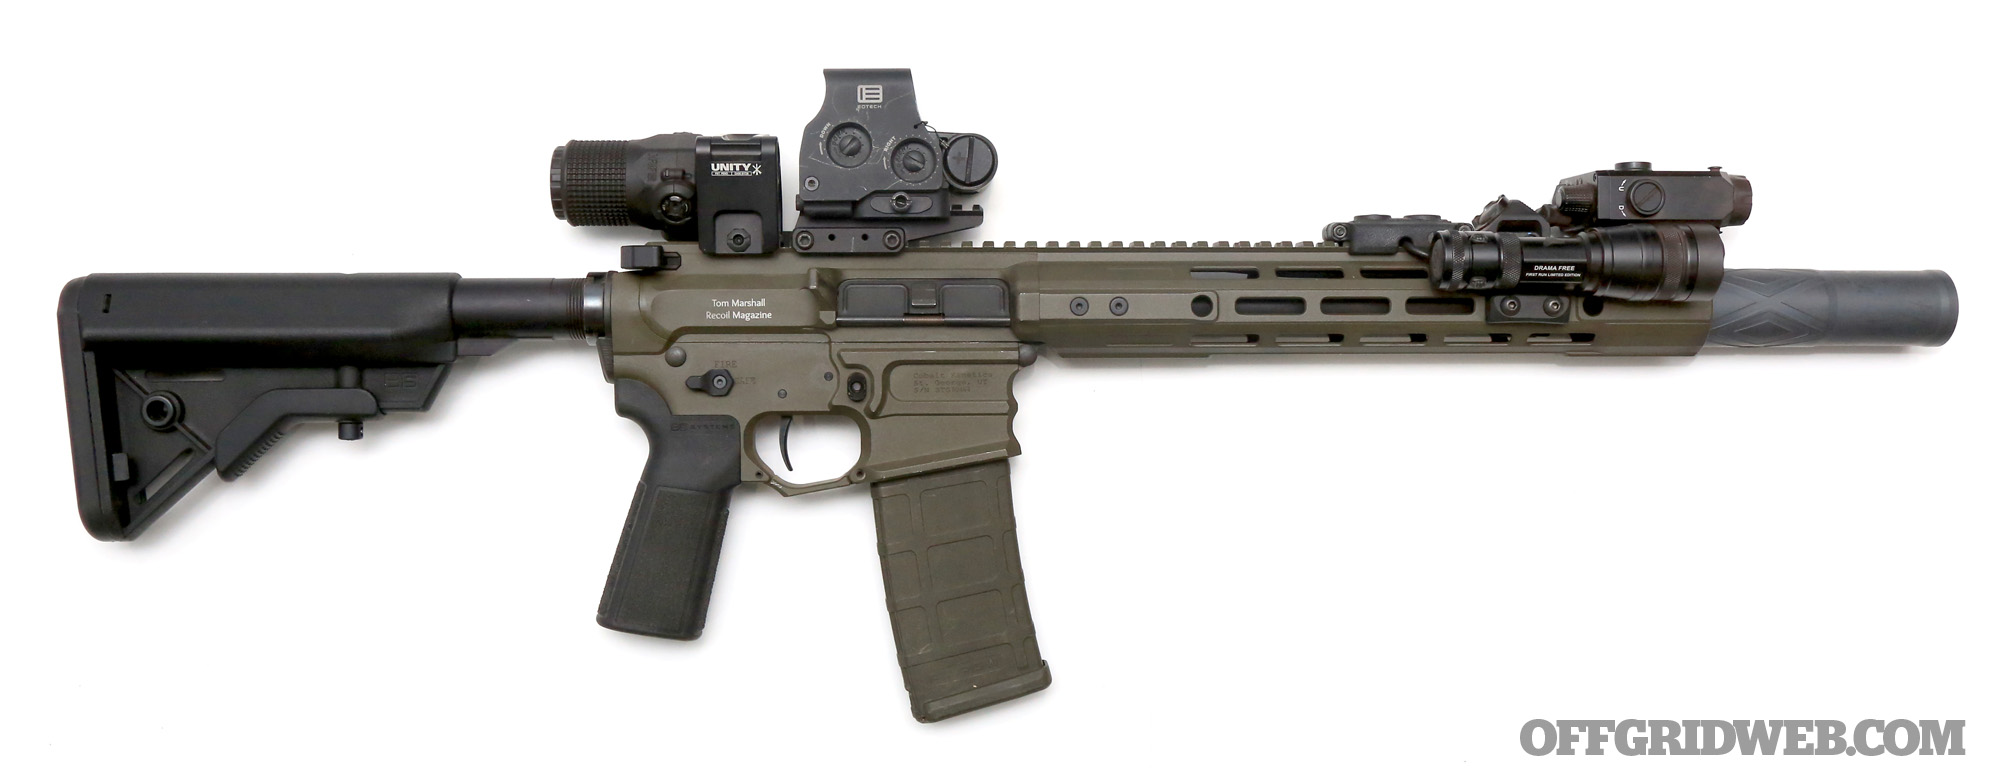
With approved tax stamps in hand, I fitted both guns with B5 Systems SOPMOD Bravo stocks. The SOPMOD Bravo is based off the larger SOPMOD stock, but deletes the battery storage compartments to shave a few ounces and create a slimmer profile. Their N23 pistol grips are also attractive to us in both size and grip angle. They come pre-textured on three sides, which is cool. But the backstrap is left slick, which isn’t. So, I had my friendly neighborhood gun-tinkerer, P4 Coatings, add a matching stipple to the backstrap.

The franken-build received a Short Angled Vertical Grip from Strike Industries (it's also seen on the Cobalt in the range photos above). A low-profile, no-nonsense vertical “stub,” this grip gives me a consistent index point for my support hand that’s long enough to pull back against when managing recoil or driving the gun through target transitions, but also short enough to be wholly unobtrusive, even when stowed or concealed in an SBR bag.

Triggers & Ambidextrous Controls

Other than those mods, the BAMF Pro appears here as you’d see it on the shelf, in terms of receivers, handguard, and controls. These are meant to be premium-grade rifles and are appointed with an ambidextrous safety and mag release, as well as the venerable KE Arms DMR trigger. The DMR is a unique design in that the pull weight is fixed at 4.5 pounds, but the reset is adjustable by a set screw inside the cassette, which allows for a softer, longer reset or an immediate hard snap back to ready after the break. It’s a feature we’ve not seen elsewhere that allows you to fine-tune the feel of your single-stage trigger without inadvertently manipulating the pull to unsafe lightness.

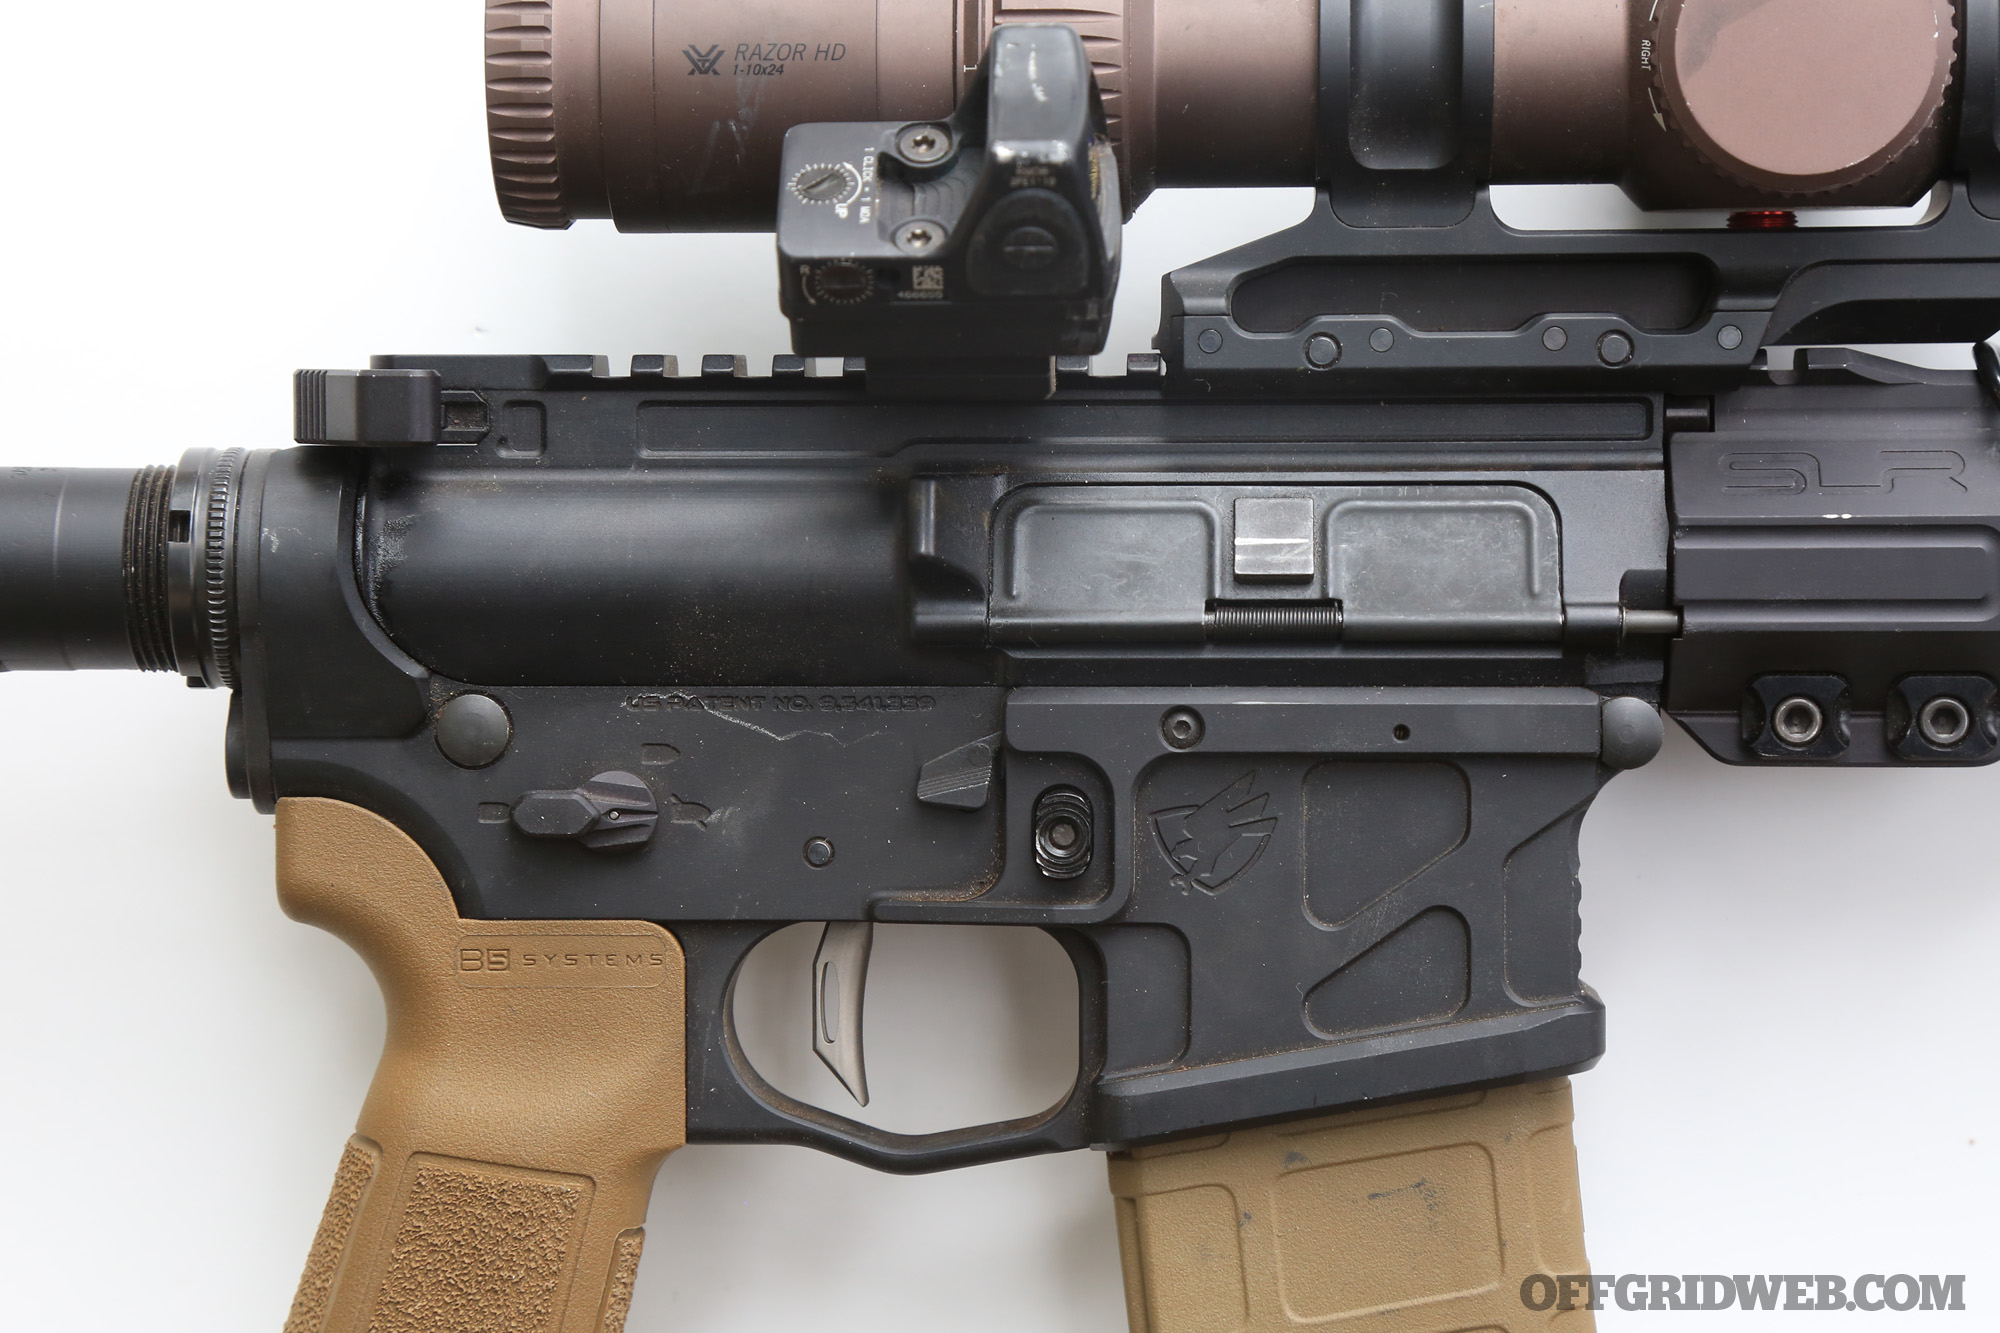
Our proto build is based on an American Defense Manufacturing UIC lower receiver, which takes ambi controls one step further by incorporating a right-side bolt catch/release tab that can be used to drop the bolt on a fresh mag or lock it back for admin purposes. It’s conveniently placed behind the mag release for use with the trigger finger. We originally had a matching UIC upper, but swapped it with the Balios Lite upper from 2A Armament. The Balios does away with forward assist (something I’d argue is essentially an appendix on modern, high-quality ARs) and weighs a meager 5.8 ounces. I mated the Balios Lite with the 11.7-inch ION Ultra Lite handguard from SLR Rifleworks. With a svelte 1.35-inch internal diameter and M-LOK slots replacing most of the 12-o-clock rail, the ION Ultra Lite lives up to its name and helps balance the front end of the rifle against all of the peripherals I added to maximize capability. The weight savings afforded by these parts help keep a heavily laden rifle manageable in the hands, but with a price tag north of $500 for just the stripped upper and handguard, cost versus capability is a real struggle in the mini recce realm. Likewise, the trigger I used is a Rise Armament RA-535. This drop-in trigger also comes in at a premium price point but offers a crisp 3.5-pound break with zero excess movement before or after the break.

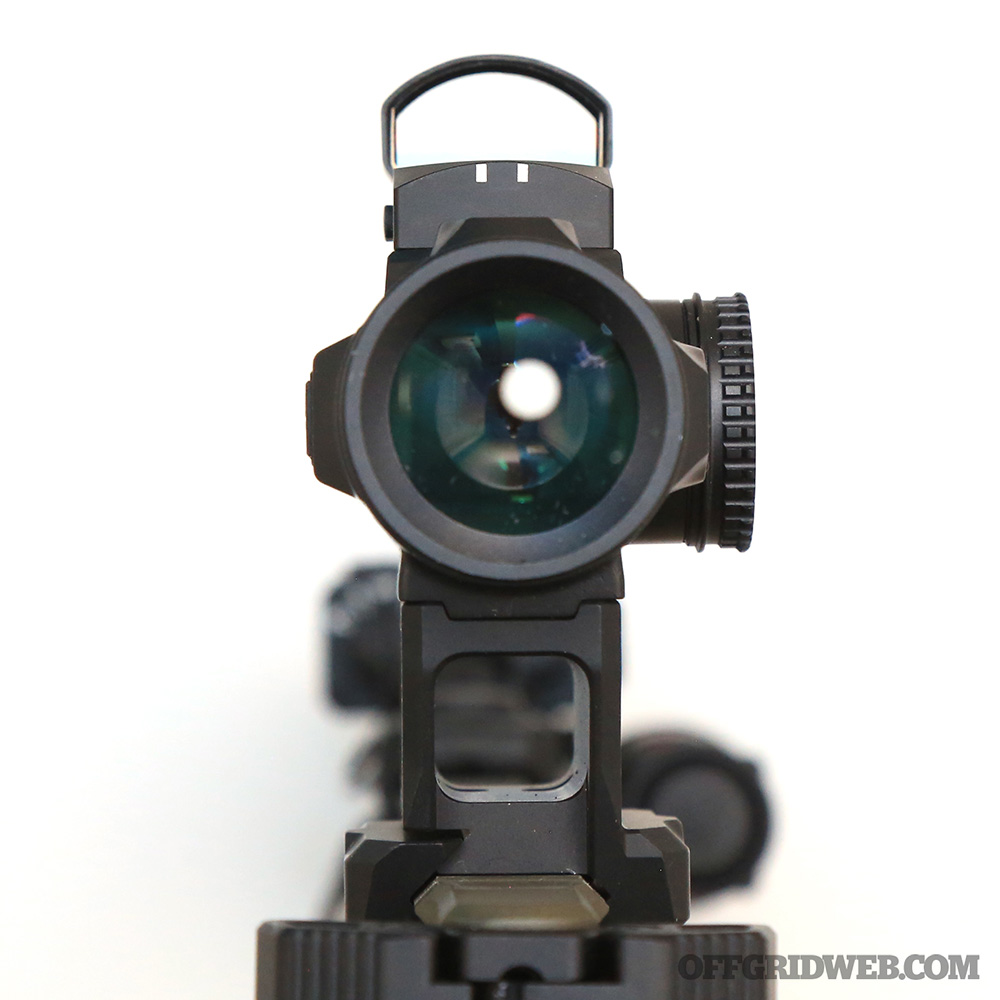
Optics: Red Dot, Prism, LPVO, & More

Quality optics are easily one of the best AR-15 mods for any rifle destined for defensive duty, especially when it comes to the mini recce blueprint. Accuracy at distance is a challenging feat for barrel lengths that don’t afford full powder burn or long engagement against the rifling. Magnification is essential for the distances involved, but within that requirement, there’s ample room for flexibility and personal preference. We’re going to look at three-and-a-half different options for how to integrate modern sighting technology into the mini recce platform. We’ll start with a bias for distance, move across the spectrum, and finish with a bias toward closer medium-range engagements …

LPVO + Red Dot, Separate
Low Powered Variable Optics (LPVOs) have become prolific on modern AR builds. First made mainstream on the 3-Gun competitive circuit, LPVOs can now be spotted in police patrol cars and in Special Operations gear lockers across the country. While it’s possible and acceptable to use the 1x setting on an LPVO for close-quarters shooting, you do lose speed and convenience over a red dot or holographic sight.

Above: Scalarworks LEAP scope mount and Arisaka Defense Offset Red Dot mount

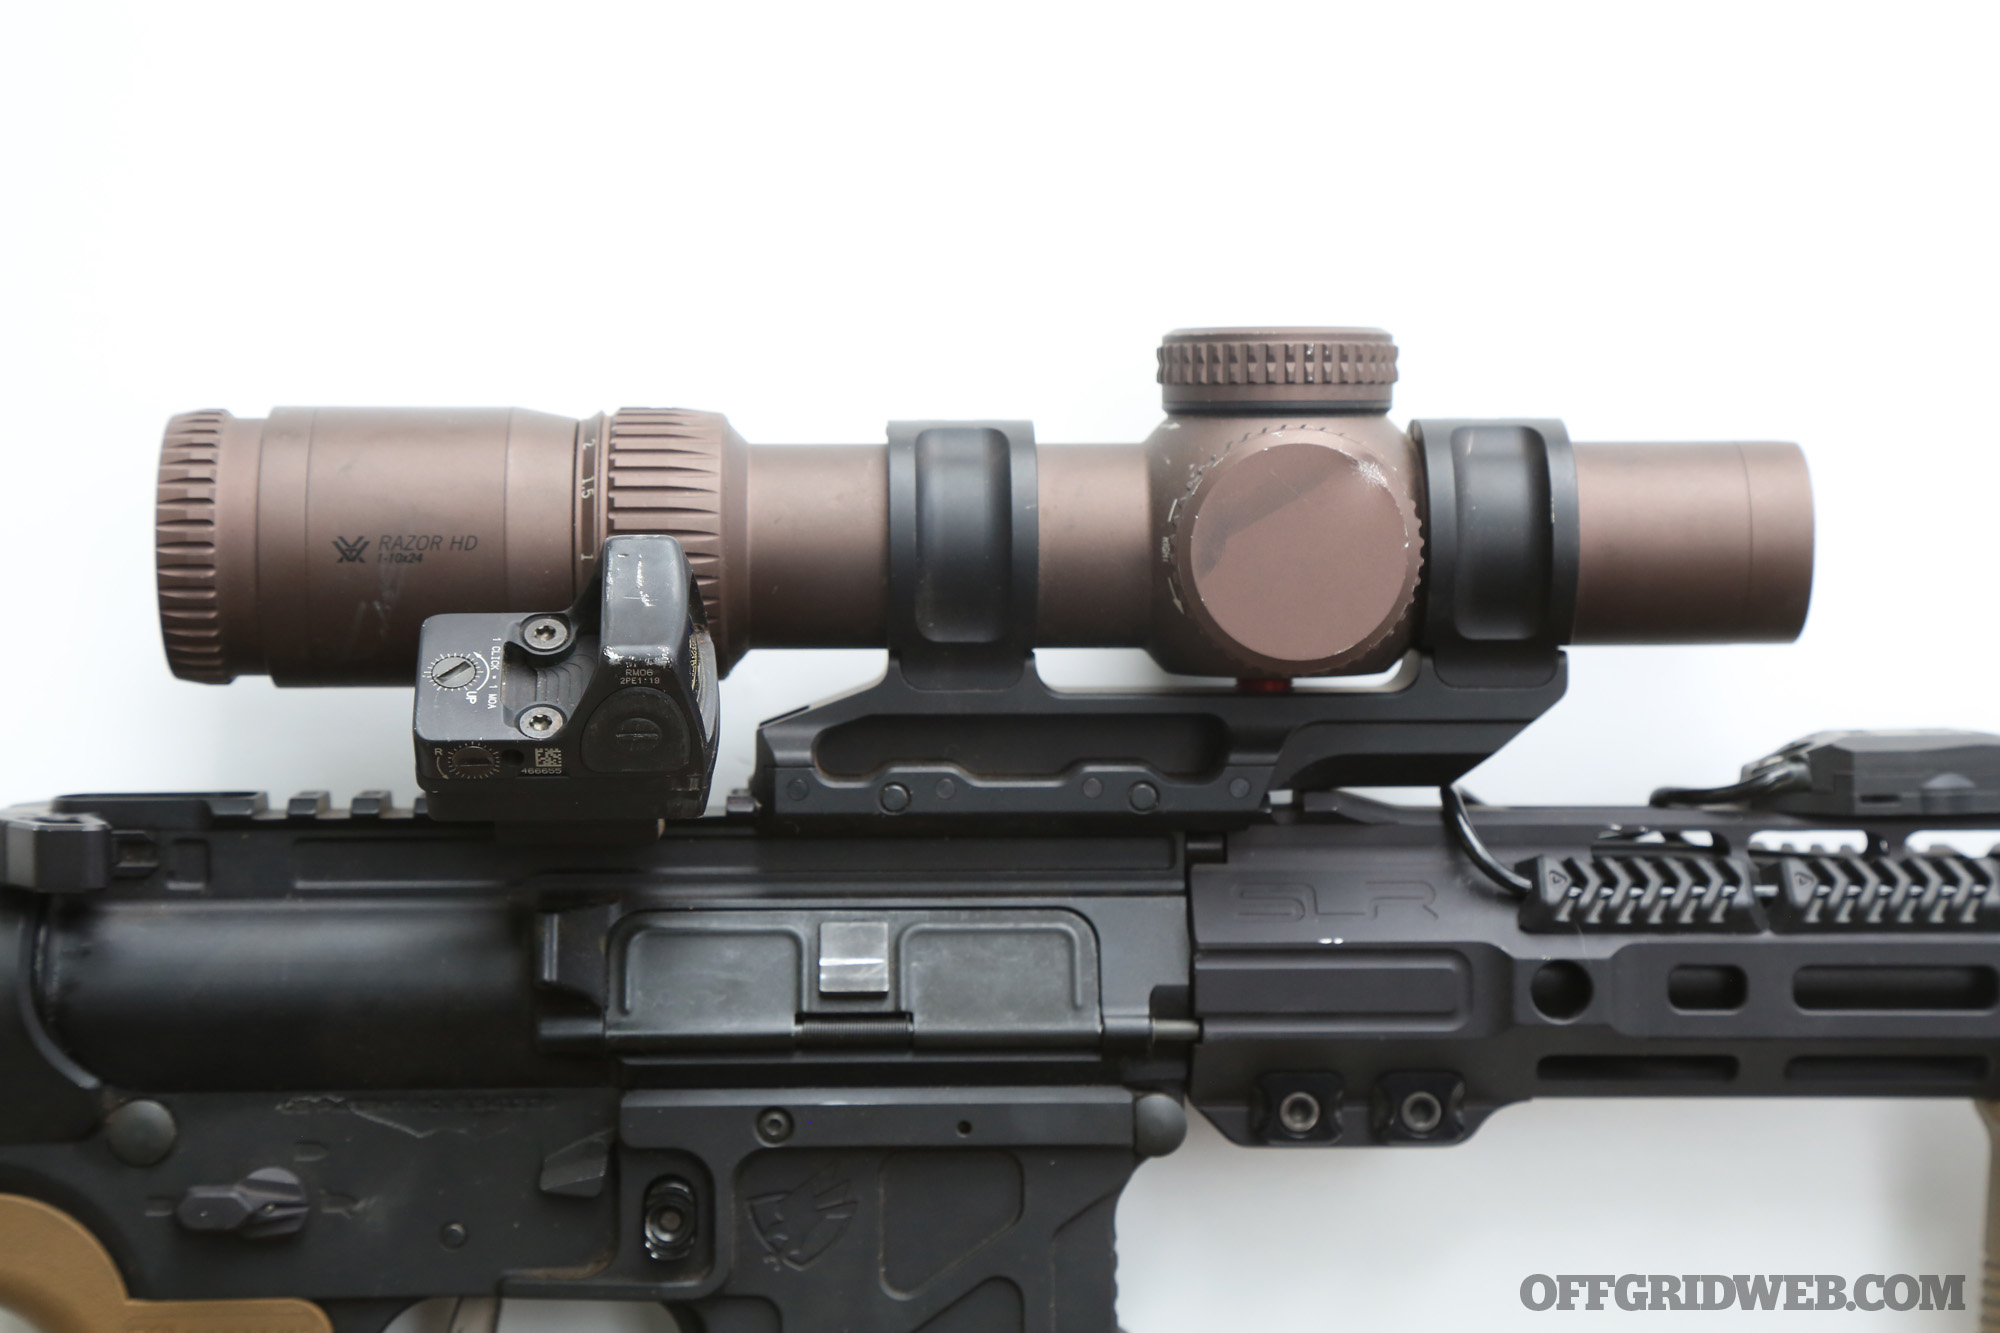
The answer for many is adding a miniature red dot sight (MRDS) in tandem with the LPVO and leaving the latter at a midrange magnification for longer shots. This best-of-both-worlds configuration spawned an entire submarket for low-profile mounts to accommodate the MRDS. On my homebuilt mini recce, I’ve been using a Vortex Razor Gen III 1-10x in a lightweight Scalarworks mount paired with a Trijicon RMR on a stand-alone offset mount from Arisaka Defense.

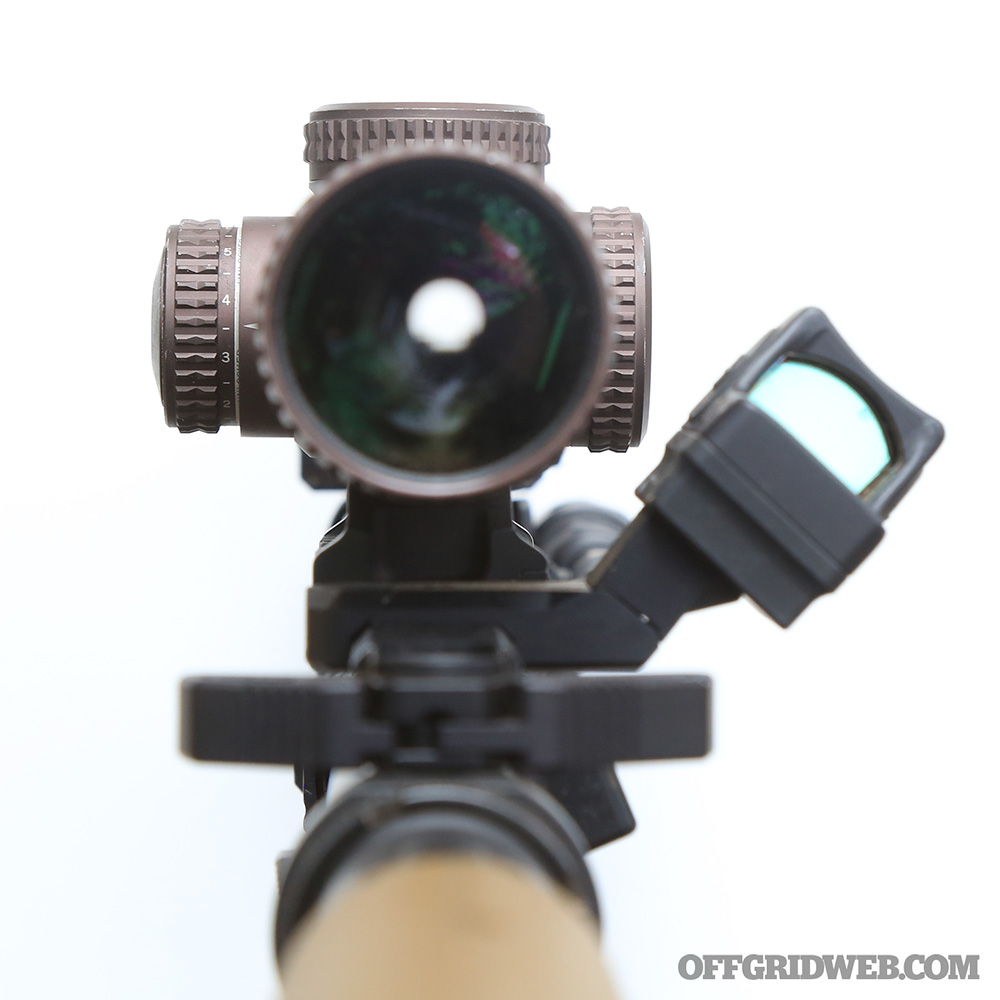
Keeping the two mounts separate offers two advantages, in my practice. One is being able to place the red dot behind the LPVO or in front of it. This is purely shooter preference. Some folks find a forward-set red dot easier to pick up when canting the gun. Others swear by the rear mount, on account of it being closer to the eye. Regardless, a separate red-dot mount allows you to experiment with both — or even change the make and model of red dot — without laying a finger on the scope mount. The other advantage I’ve found is being able to run the red dot at a different height than the scope. I prefer mounting the scope lower to afford a better cheek weld on the stock, while mounting the red dot higher for faster heads-up shooting (as well as ease of use when passive aiming through night vision goggles). I know there are some taller, night-vision-compatible LPVO scope mounts, but I’ve found floating an NVG tube behind a scope tube to be a tricky proposition, and one I haven’t used especially often. So, my Scalarworks scope mount is a “standard” 1.54 inches tall, while the Arisaka red-dot arm pokes up a little higher at 1.93 inches.

LPVO + Red Dot, Integrated
The alternative method for pairing a red dot to an LPVO is to use a single mount that accommodates both.

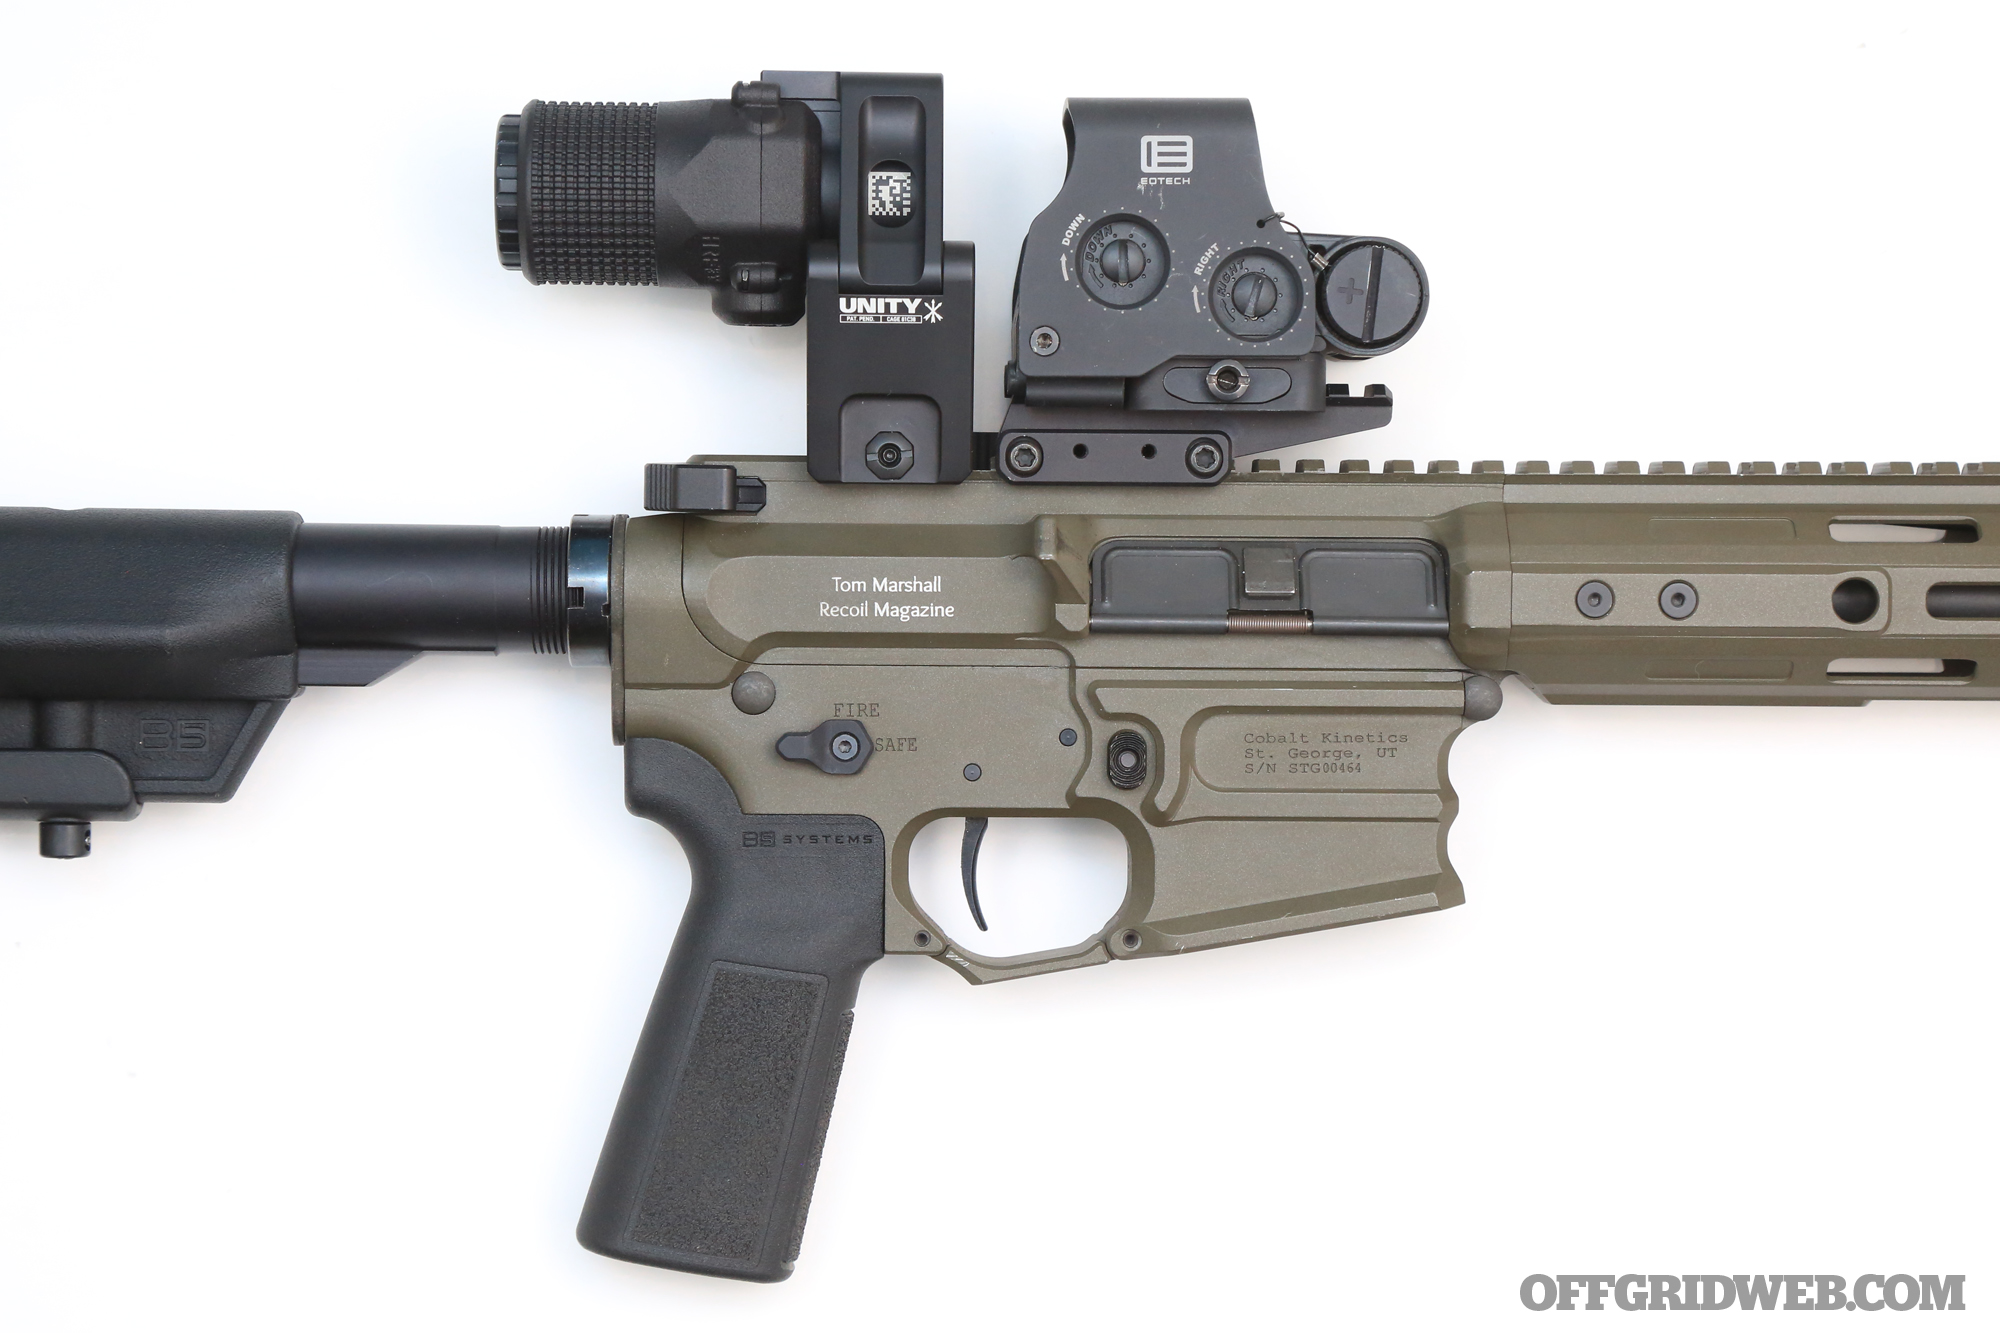
Above: Badger Ordnance Condition One mount 

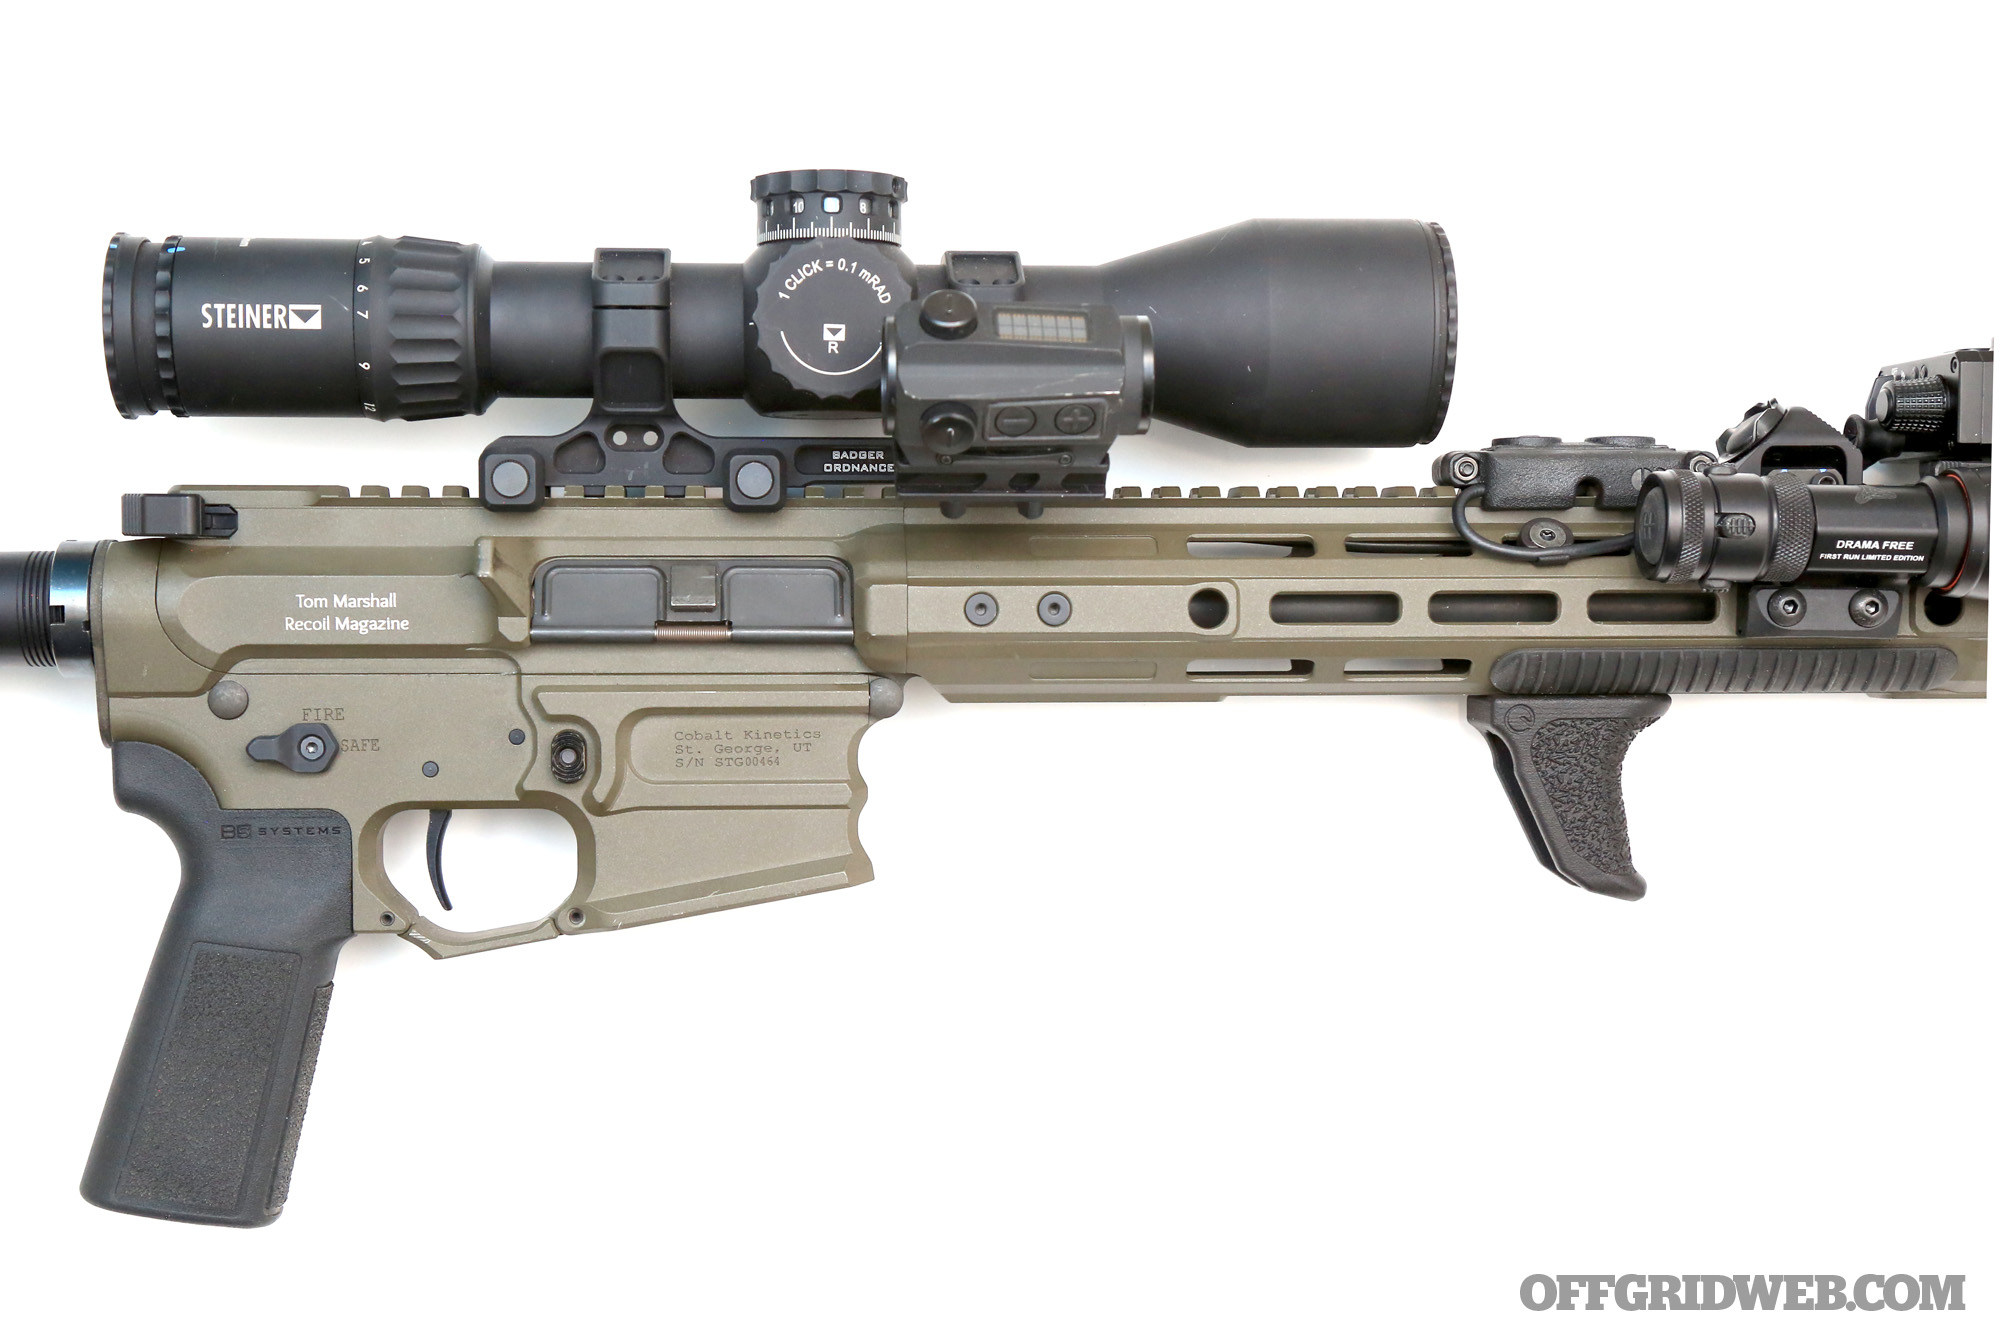
My first optics setup on the BAMF Pro consisted of a Steiner T5Xi 3-15x scope and a Holosun 403C red dot mounted together on a Badger Ordnance Condition One mount. The Condition One features a small arm that bolts directly onto the one-piece scope base so that both optics are carried cleanly on a single mount. The Condition One’s red-dot arm also features unique geometry that centers the red dot directly over the bore line, in spite of the angular offset.

If you do have to use the red dot at any significant distance, having it centered over bore reduces the need for lateral holdovers created when you roll the weapon off-center to shoot. The dual-optic setup is especially useful in cases where the magnified optic has no 1x setting. While magnification makes it easier to get consistent hits past 600 yards, it deletes the 1x provision for close-in shooting.

Fixed Prismatic + Red Dot
Speaking of optics with no 1x setting, I also wanted to touch on the niche optic configuration that won’t seem to go away — the fixed-power prismatic with piggy-backed red dot.

Above: Vortex Spitfire and Venom optics, Arisaka mount. (Note: This mount is designed to cantilever a red dot slightly forward; for this Vortex prism, it was flipped to cantilever the optic rearward, positioning it appropriately for its eye relief.)

The concept was disseminated during the early years of Operation Iraqi Freedom when the 4x ACOG was the primary issued rifle optic. However, this failed to account for the amount of close urban combat being seen in theatre. I find them to be of limited use unless your threats are consistently at a known intermediate distance. But what they do offer is medium magnification in a minimal footprint compared to LPVOs. They’re smaller, lighter, and usually come with their own built-in mount. The example here embodies all of those advantages.

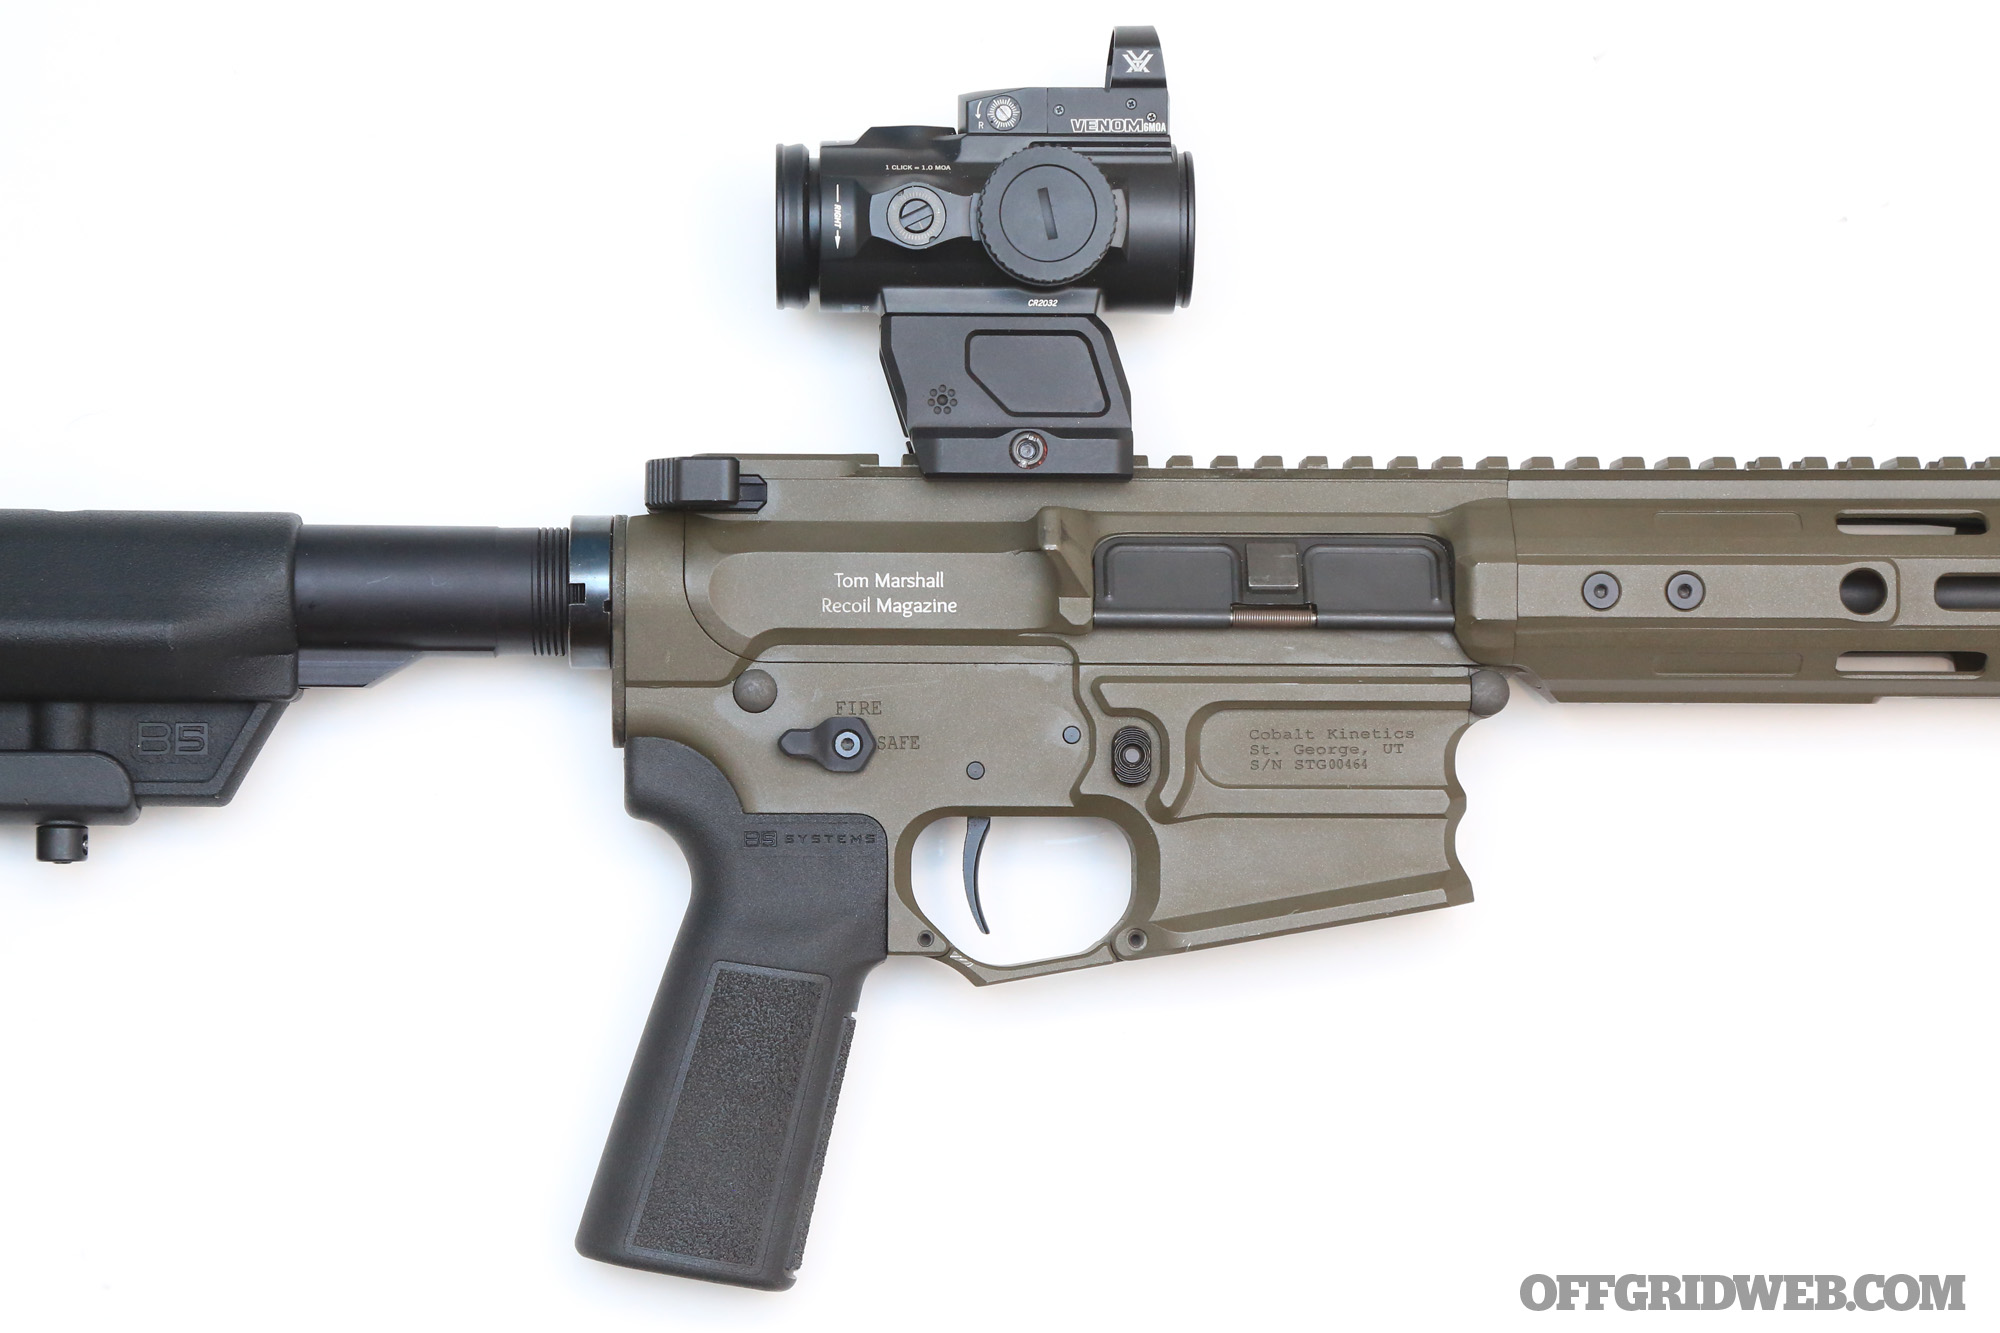
The Vortex Spitfire HD Gen II offers fixed 5x magnification and an option to piggy back a Viper or Venom red dot, weighing only 10.3 ounces with built in rail mount. If your daily environment is primarily urban or suburban where your magnification only needs to reach a block or two, this could be a leaner, lighter option to bring both magnification and close-quarters capability to a mini recce build. The top-mounted red-dot setup also positions the dot ideally for ambidextrous passive use under night vision.

Red Dot + Magnifier
Last but not least is the red dot or holographic sight augmented with a flippable magnifier.

Above: EOTech optics in Unity Tactical mounts

This combination is biased heavily toward close-in shooting, with a turn-on/turn-off option for some ancillary magnification when needed. It’s a capable, if imperfect, solution for dedicated shooting at longer ranges. But if your primary concern is close response with some added capability to reach down the block, or you just want some additional magnification to aid in threat identification or spotting, this might be the way to go. First-gen magnifiers were almost exclusively 3x, but there are now multiple options in 5- and 6-power to extend the effectiveness of this setup. Since #opticsmountsmatter, I went to Unity Tactical for their FAST riser rail and Flip-To-Center (FTC) adapter mount.

Even as magnified optics have gotten better, most flip-to-side mounts have remained largely unchanged. The ability to push the glass out of your way in a hurry is super convenient, but this leaves a big chunk of armored glass hanging off your rifle at a 90-degree angle. And since every flip-mechanism we’ve ever seen flips right, if you’re shooting lefty the flip motion is noticeably awkward. Unity’s FTC fixes these problems by reorienting the magnifier to flip straight up and down. This makes the rifle more balanced when the glass is tucked out of the way, and also significantly raises the height of both the dot and magnifier for a more heads-up orientation. It’s superior for fast shots at no-fail ranges as well as aiding shooting under night vision or with a gas mask on. We also removed the factory soft rubber cover from the EOTech G33 magnifier and replaced it with an Armored Magnifier Cover from HRF Concepts. This is a hard plastic clamshell that provides a little extra bump protection as well as more aggressive gripping surface when flipping the magnifier up and down.

Lights, Lasers, & IR Illumination

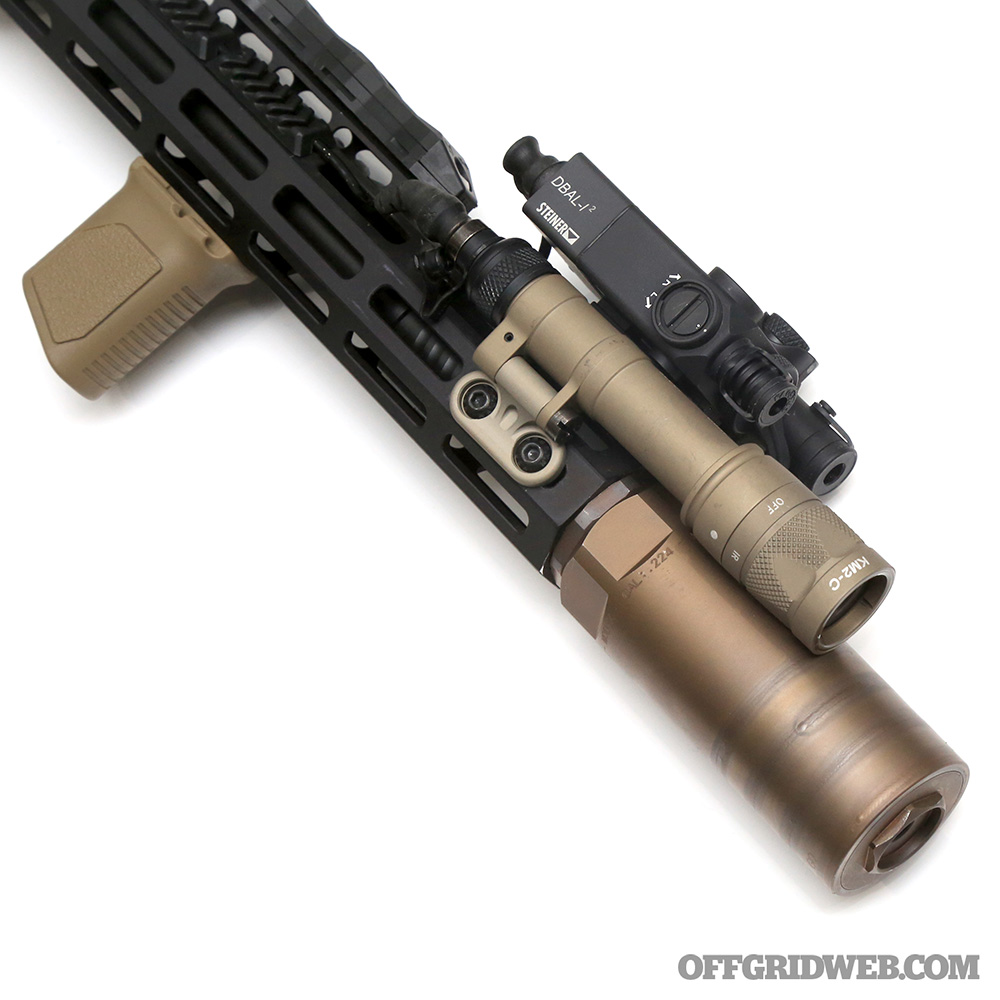
Above: The diminutive, custom Rex Silentium suppressor proved ideal for mini recce setups.

Speaking of forward controls, let’s talk about peripherals and accessories for an all-purpose preparedness rifle. I’m a strong believer that every rifle intended for serious use needs a quality weapon-mounted light. Being able to clearly identify friends and foes in low light or no-light conditions, and having enough light to effectively utilize your optics with or without the sun, are core competencies any gun must fulfill in order to qualify as real-world-emergency capable.

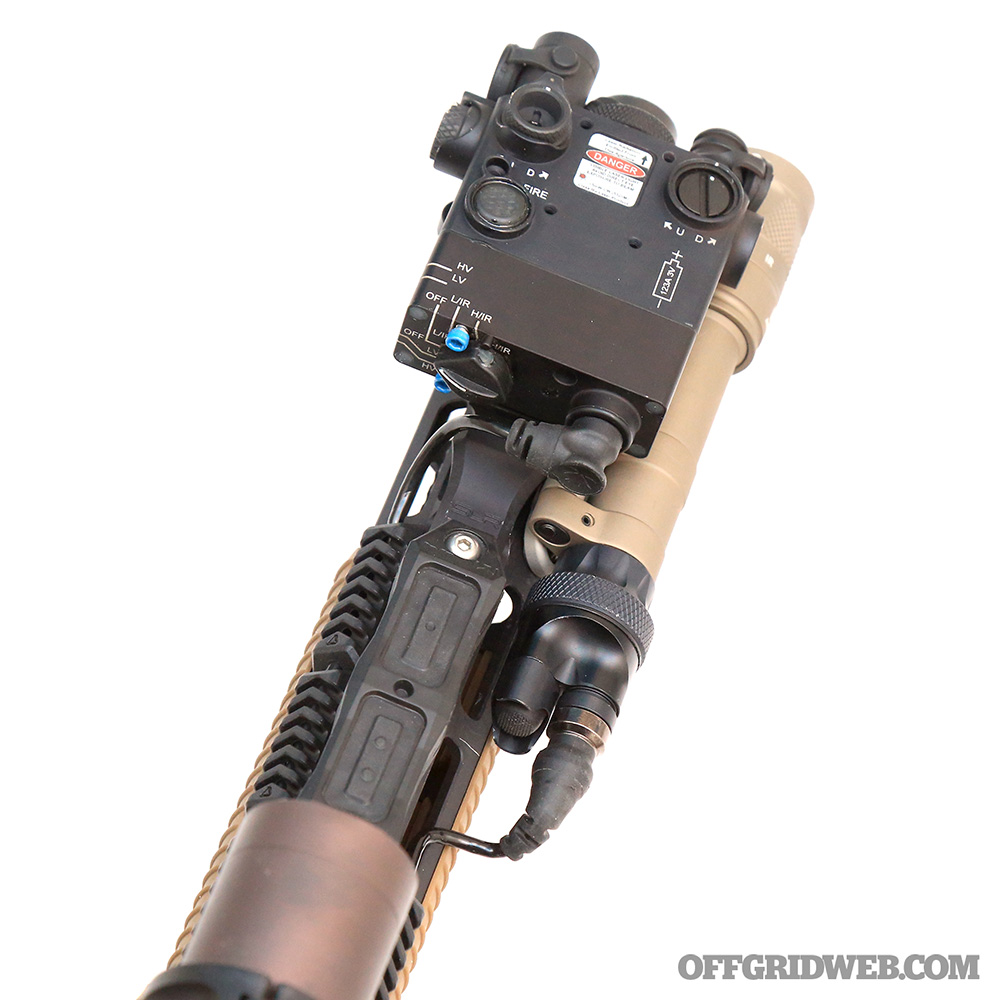
Weapon-mounted white light is the standard for using a rifle in darkness, but there are those who have taken the leap to integrate night vision into their preparedness plan. If you fall into this category (or are pinching pennies to get into this category), make sure your rifle is configured to take full advantage of the added capability. The two best ways to do this are to use optic mounts that are tall enough to work with night vision — as I mentioned in the previous section — and to include infrared (IR) lasers and/or illuminators on your rifle.

There are a number of IR lasers on the market, and none of them are inexpensive. My parts build has been sporting a Steiner DBAL-I2 for quite some time. This is one of the more compact laser options on the market, but the size and weight benefits come with the tradeoff of not having a built-in illuminator. It’s only a laser pointer (both green visible and IR). This works well enough in urban or suburban environments, where there’s consistent ambient light even after sundown, but when you start working in truly dark rural environments, the lack of illuminator becomes a noticeable hindrance to target ID and engagement. In order to compensate for the lack of illumination, my franken-build also sports a SureFire M600V Scout Pro. This light features a rotating head that can be switched to white light or IR light, and includes a built-in M-LOK mount that allows the light to pivot for optimal cant, which comes in handy when pairing it alongside a laser.

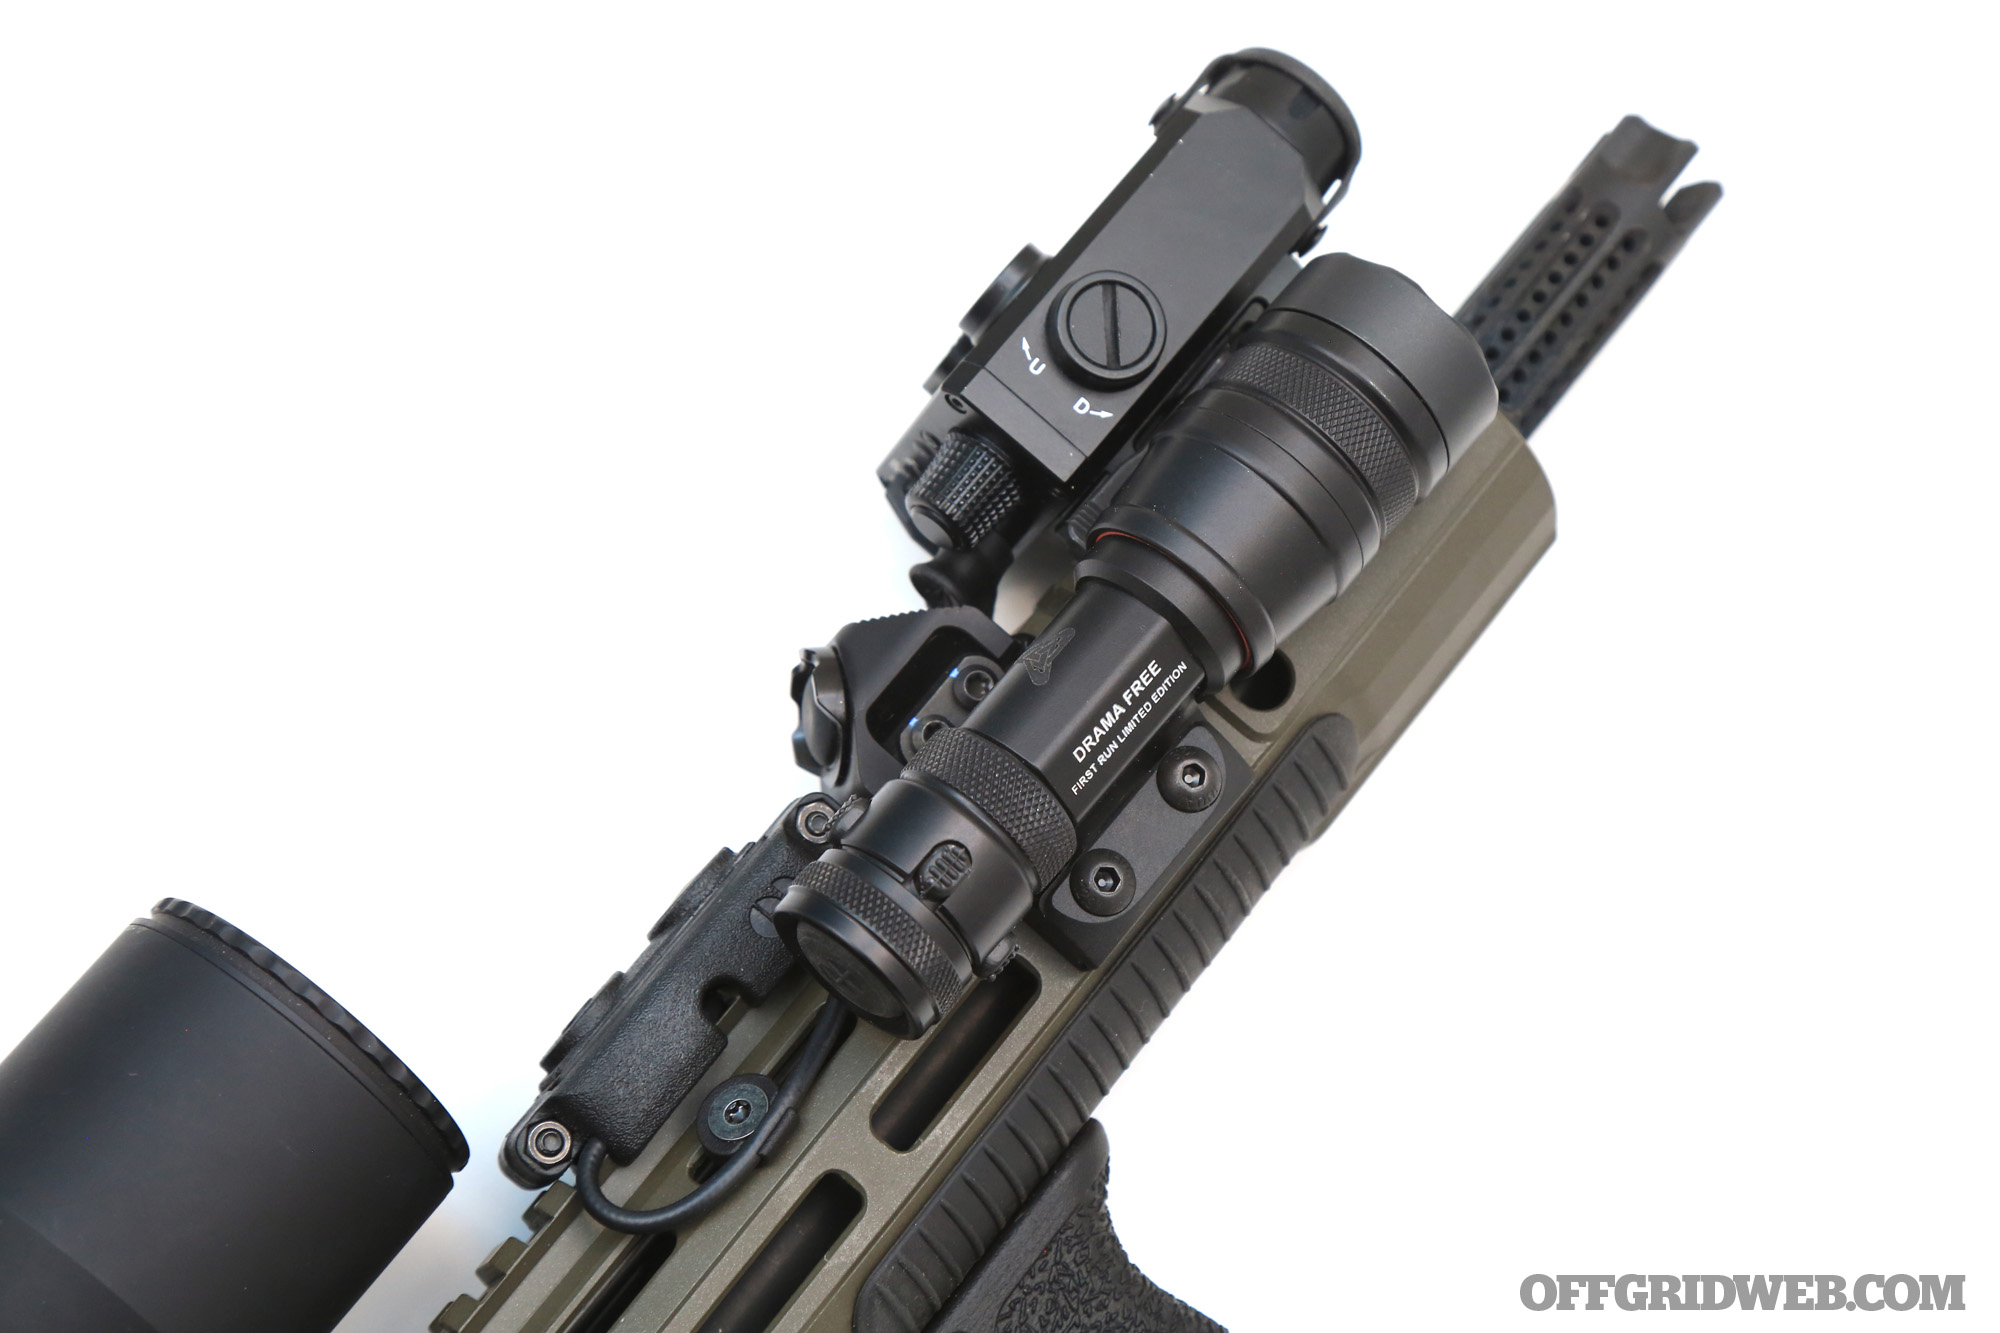
Above: Shorter handguards require thoroughly well-thought-out placement of all accessories and switches.

On the Cobalt BAMF, I mounted a Cloud Defensive REIN Micro, which was built entirely from scratch as a dedicated hard-use weapon light. Duty-focused features include a user-replaceable lens, dedicated remote with independent switching for momentary and constant-on, excess cable routing channels built into the remote body, and a redundant clicky tailcap switch wired wholly independent of the remote. The mounting studs on the side of the REIN’s body are compatible with SureFire Scout-style mounts, but the head, tail, and switching technology are all fully proprietary. With an output of 1,300 lumens and 55,000 candela, the REIN Micro measures up handily against any other light meant to serve on a rifle. I chose the Micro to minimize footprint on an already compact rifle. For testing purposes, I also swapped the factory body unit for Valhalla Tactical‘s Baldr replacement body. This uses the same 18350 battery but features an integral offset mount machined into the body which let us tuck the light in a little closer to the body without being impeded by the Cobalt handguard's flared front end. If you want more power, the full-size REIN features 1,400 lumens and 60,000 candela, running on the larger 18650 battery.

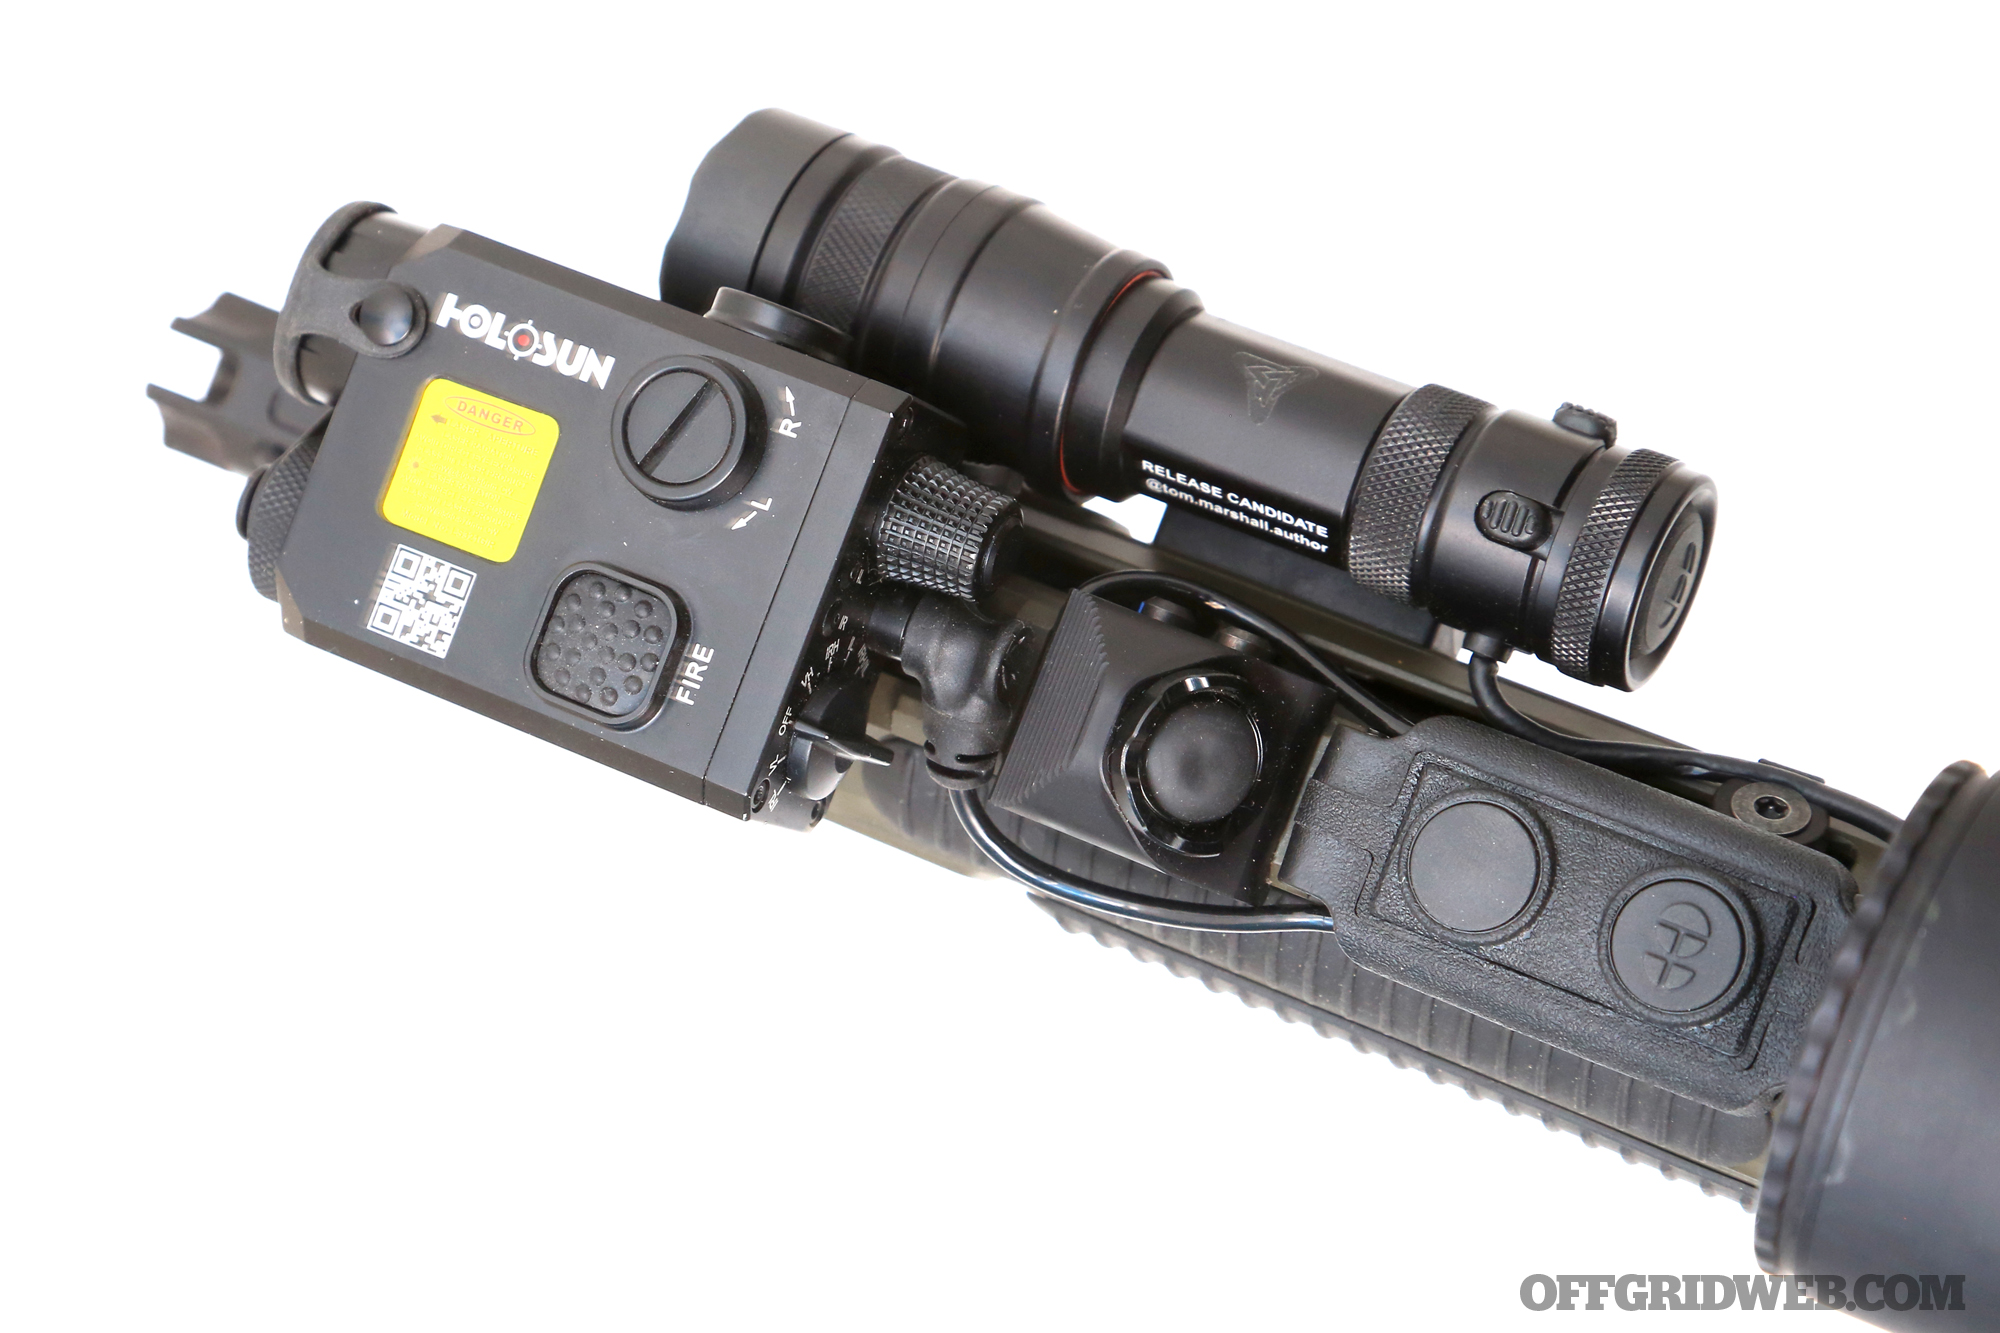
So, when it came time to outfit the BAMF Pro, I decided to try out the Holosun LS321G, which includes a visible green laser, IR laser, and IR illuminator in one unit. I had the chance to test this in a near-zero-ambient-light environment and found the LS321’s illuminator to be effective well past 100 yards. In fact, I was able to pit the LS321 against a full-power, Mil-spec AN/PEQ-15. With the PEQ-15 on “low” setting, the Holosun’s output was nearly equal to that of the military-grade unit, making it an excellent civilian-available choice for those needing an illuminator in addition to an aiming laser.

Switches & Cable Management

We’re big believers in maximizing access to all critical controls with both hands. Whether clearing an off-side corner in a building, compensating for an injury, or handing your weapon off to a southpaw, there are a number of reasons you may need to activate controls with either hand. A decade ago, I was against using remote tape switches for things like lights and lasers as the technology was somewhat fragile and unreliable. That time has since passed, and the robust electronics in next-gen weapon lights like the REIN have made the argument all but obsolete. Therefore, tape switches mounted at the 12-o’clock position on the handguard are probably the easiest way to ensure your manual-of-arms remains symmetrical, regardless of which hand is on the handguard.

Above: Placing switches along the 12-o-clock axis allows for a fully mirrored manual of arms. Note the tight cable management on both setups — this one is using spare cable routing built into the REIN's remote switch. 

In both cases, I turned to Unity Tactical for switching solutions. While the REIN Micro on the BAMF Pro comes with its own proprietary remote, the Velcro-on tape switch included with the LS321 IR Laser took up a lot of room on a handguard that’s already packed pretty tightly. My answer was the Unity Hot Button, an extremely compact stand-alone push-button remote with a Crane standard plug compatible with most U.S.-made IR lasers on the market today. The cable routing channels on the REIN’s remote were able to accommodate leftover wire from both the REIN itself and the Hot Button. To ensure I had absolutely no dangling slack from either button, I added a single Micro Cable Clip from Emissary Development. These clips sport an aggressively minimalist design with an open loop just large enough to clip a remote wire onto.

Above: Another example of neat cable management using Strike Industries Siegen M-LOK plugs to keep excess slack under control.

Since my home-build features a stand-alone laser, and relies on the white light to double as an illuminator, I used the TAPS (Tactical Augmented Pressure Switch) Sync — jointly designed by TNVC and Unity Tactical. The TAPS is a single switch with dual leads and dual buttons, meaning you can operate both your light and laser from a single remote. As a further benefit, the TAPS series of switches come out of the box able to clamp onto a Picatinny rail or direct-mount into M-LOK slots. The SLR handguard features several M-LOK slots on the top axis, so I stripped off the rail clamps and threaded the TAPS directly into the Ultra Lite tube for a slender no-bulk layout that remains fully ambidextrous. The TAPS doesn’t have on-board cable management, so I added a couple of Strike Industries Siegen M-LOK inserts. The Siegen is a soft rubber M-LOK slot plug with a channel through the center that essentially buries excess wire underneath itself. Like the Emissary Micro Clips, the Siegen plugs pull loose wires against the handguard rail and protect them from bumps, pinches, and snags. The TAPS Sync variant is programmed in a number of different variants. This one will activate the light only with one button and, for night vision use, the other button will activate both light and laser simultaneously. This gives me an aiming laser and background illumination at the push of a single button.

While I have full faith and confidence in modern remote switches like the REIN, TAPS, and Hot Button, I also advise strict cable management when you do use them. Fortunately, close to a dozen different products have popped up in recent years for this purpose alone. With so many options, there’s no excuse to have loose wires dangling off your handguard.

Suppressors

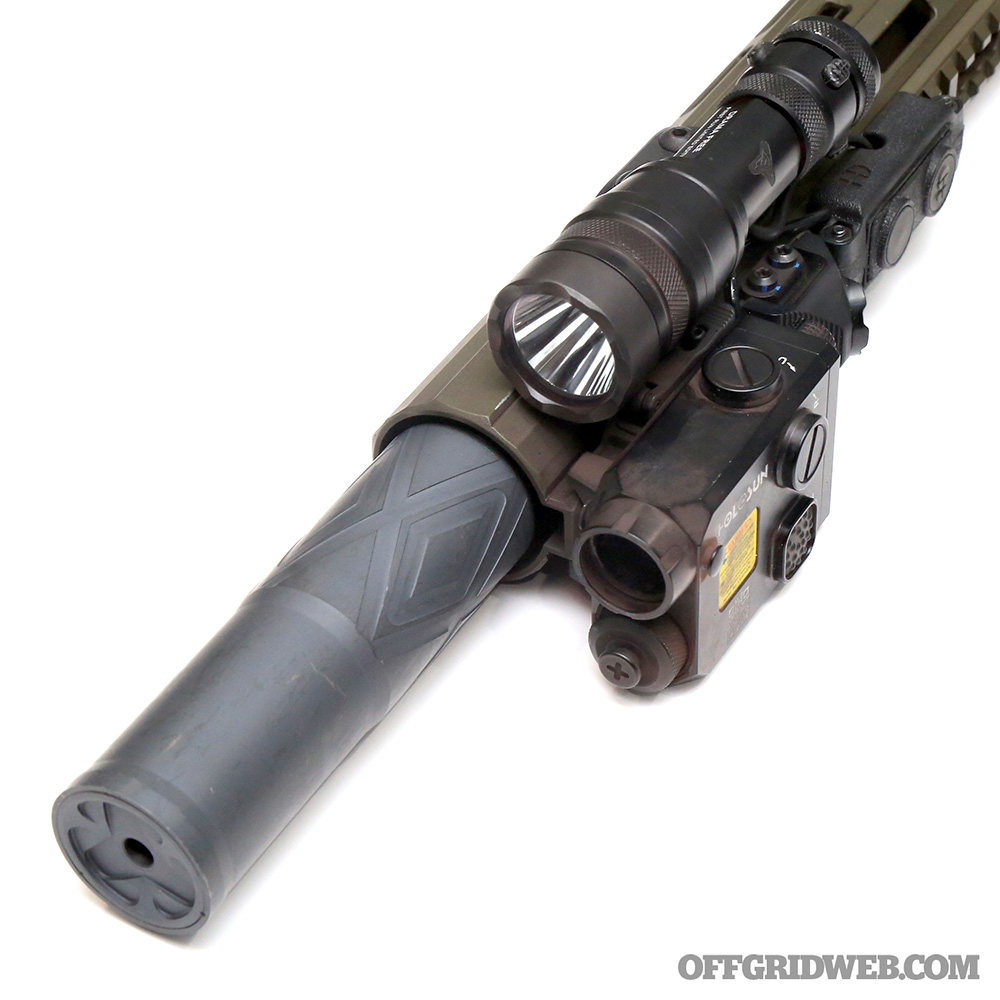
Above: Odin Works‘ Baja suppressor nested perfectly into the flared front-end of the Cobalt BAMF handguard.

Depending on your situation and perceived needs, adding a suppressor could be an attractive option. But the last thing you want is to expend the effort cramming all this capability into a small rifle that grows 6, 8, or 10 inches when you thread a can to the front. As suppressors become more advanced, so will the ability to shrink them. The trade-off for reduced length will always be reduced effectiveness, but it may be a worthwhile compromise when trying to keep your carbine to a more discreet footprint.

The copper-colored can you see in this article is a Rex Silentium MOD X. Rex Silentium offers a high degree of customization in their cans, and I chose to make use of this with a minimalist three-baffle design. It’s far from “Hollywood quiet” but measures a scant 4.1 inches overall. Direct-threading it to the muzzle leaves me with an effective barrel length just a hair over 16 inches, which is still small enough to fit inside some duffels or packs without having to be broken down. It still takes the edge off the increased concussion of a shorter 5.56mm AR-15. If you have to grab this rifle and fend off a threat without putting on ear protection first, it’ll save your hearing and help you maintain auditory awareness of your environment.

Conclusion

Building a single do-all mini recce rifle that’s ready to react to an array of threats is no small undertaking. It requires a holistic “system-based” approach where each individual component, down to cable clips and optics mounts, must work in harmony to wring every ounce of ability out of a rifle that’s small enough to tuck between car seats or zip up in a gym bag. But, if you can afford the time and money to choose the best AR-15 mods for your needs and make it work right, the result of your efforts could be the “one gun to rule them all” that’ll serve you faithfully regardless of what the world throws at you.

Glossary of Sources for Our AR-15 Mods

Here's an alphabetized list of the companies whose parts were featured in this article:

More Survival AR-15 Articles

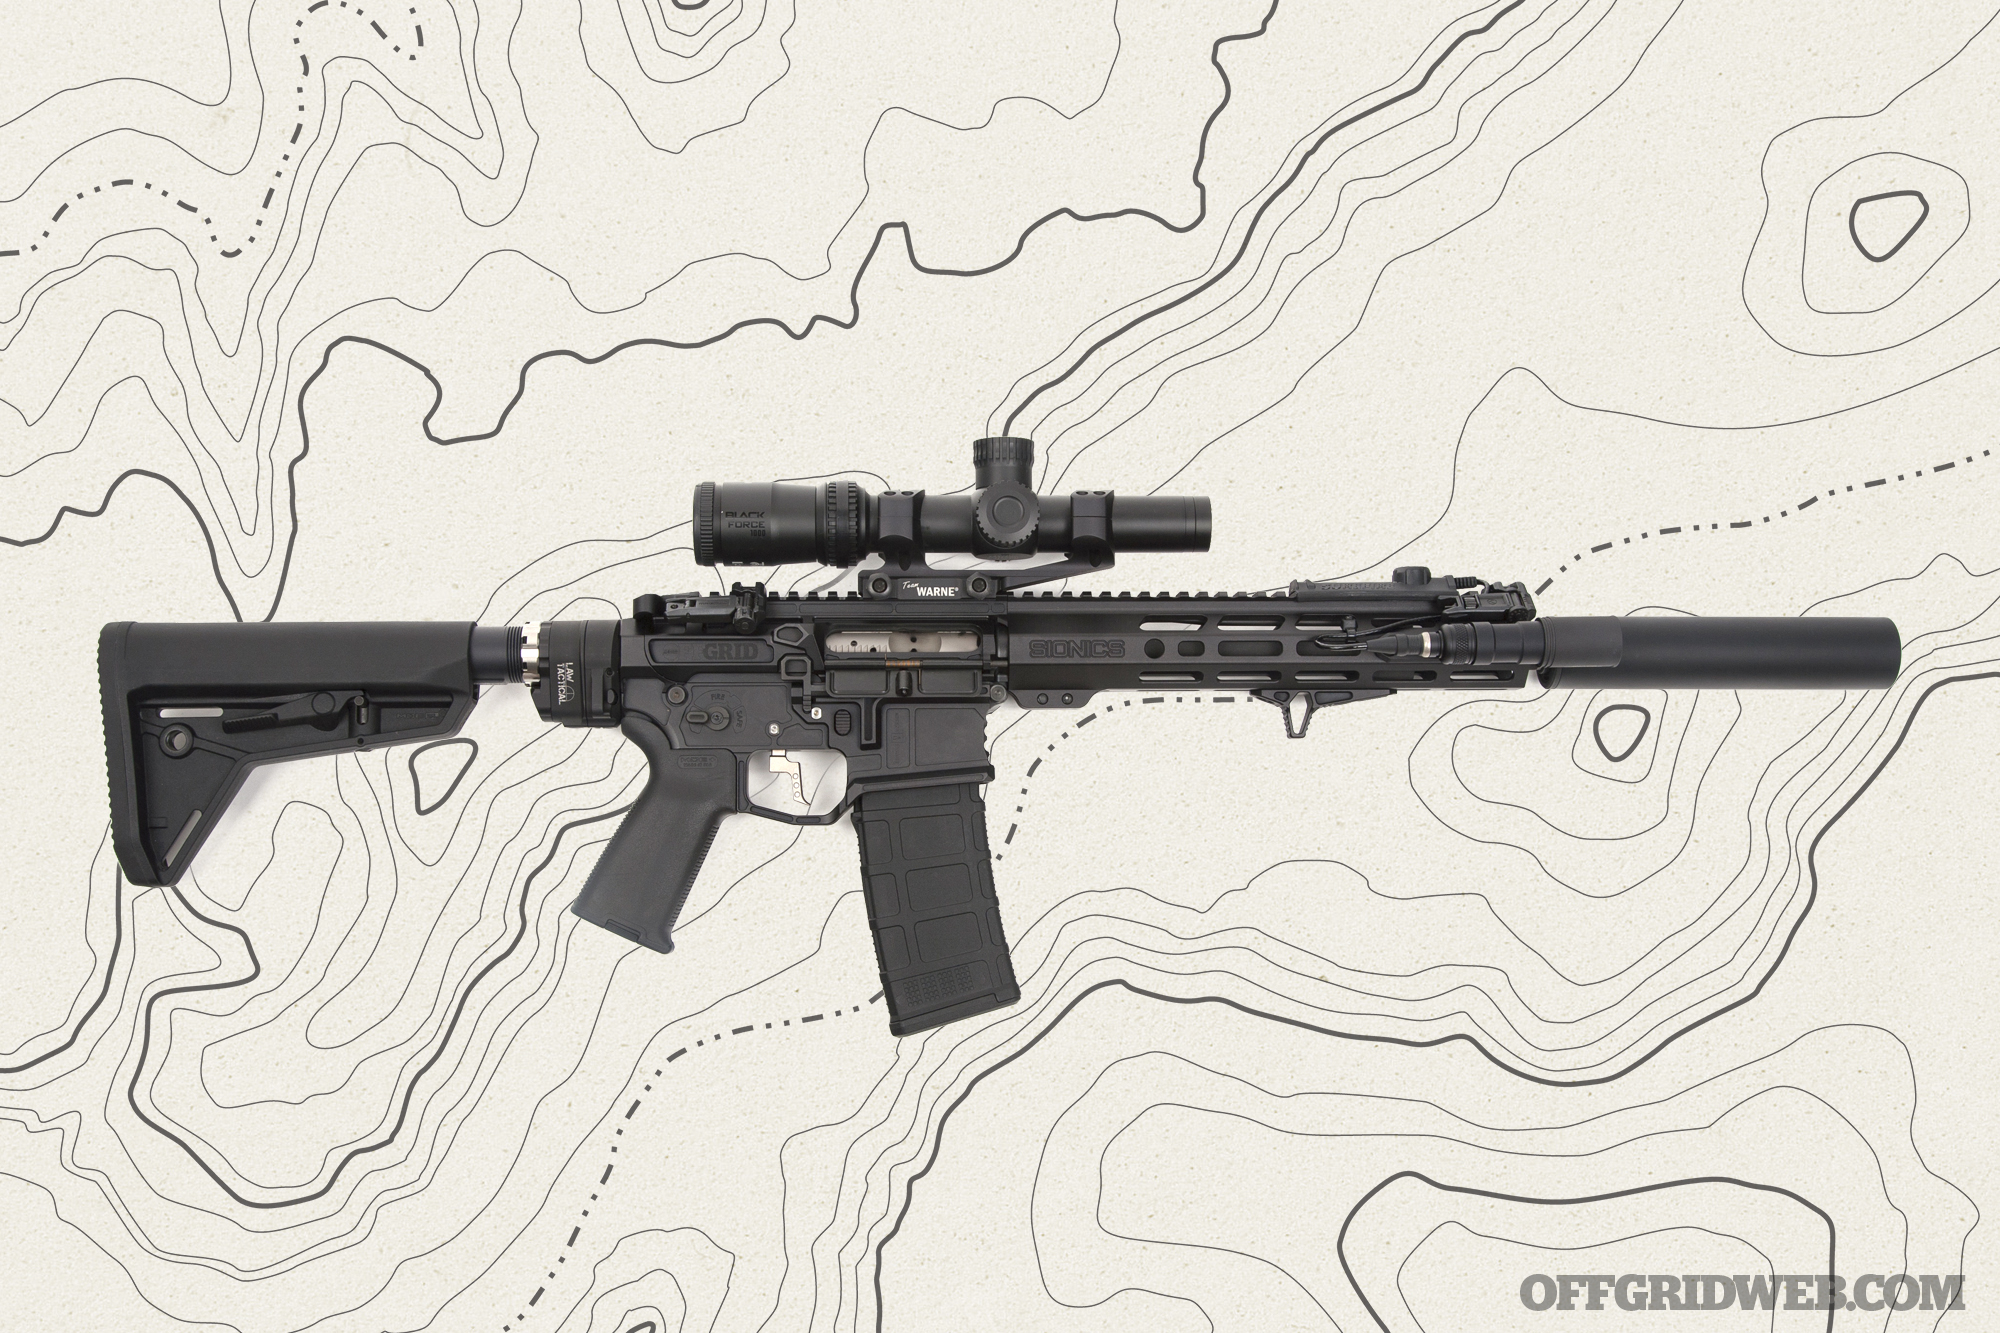
Above: Our OFFGRID-themed 11.5-inch custom AR-15 is equipped with an Ascend Armory receiver set, LAW Tactical folding stock adapter, Sionics barrel and handguard, Gemtech suppressor, and more.

Are you interested in reading more about AR-15 mods and custom builds? If so, check out some of our previous articles: