Traumatic injuries occur in the tens of millions every year in the United States. According to the Centers for Disease Control and Prevention (CDC), close to 2-million victims of trauma require hospitalization annually. In normal times, trauma victims have the benefit of an infrastructure that allows rapid stabilization and transport to a modern medical facility. The off-grid medic, however, has no such access, but is even more likely to be confronted by traumatic injuries.
In survival scenarios, mishaps related to activities of daily survival are bound to occur. Those unaccustomed to, say, chopping wood for fuel could easily end up requiring intervention by someone with medical skills in the event of an accident.
Disclaimer:
This article is for informational purposes only and applies specifically to long-term off-grid scenarios. Improper wound closure can cause more problems than it solves. Seek care by certified professionals wherever a functioning medical system exists.
One of those skills is wound closure. The well-rounded medic should be familiar with the various methods and materials used in closing a laceration. More important still is the proper judgement as to when an open wound should be closed and when it should not. Having the necessary knowledge, training, and equipment is imperative to be an effective caregiver.
The Open Wound
An open wound is any injury that breaches the skin. Skin is your natural armor. It prevents the invasion of microbes into the body that could otherwise be life-threatening. Typical open wounds include:
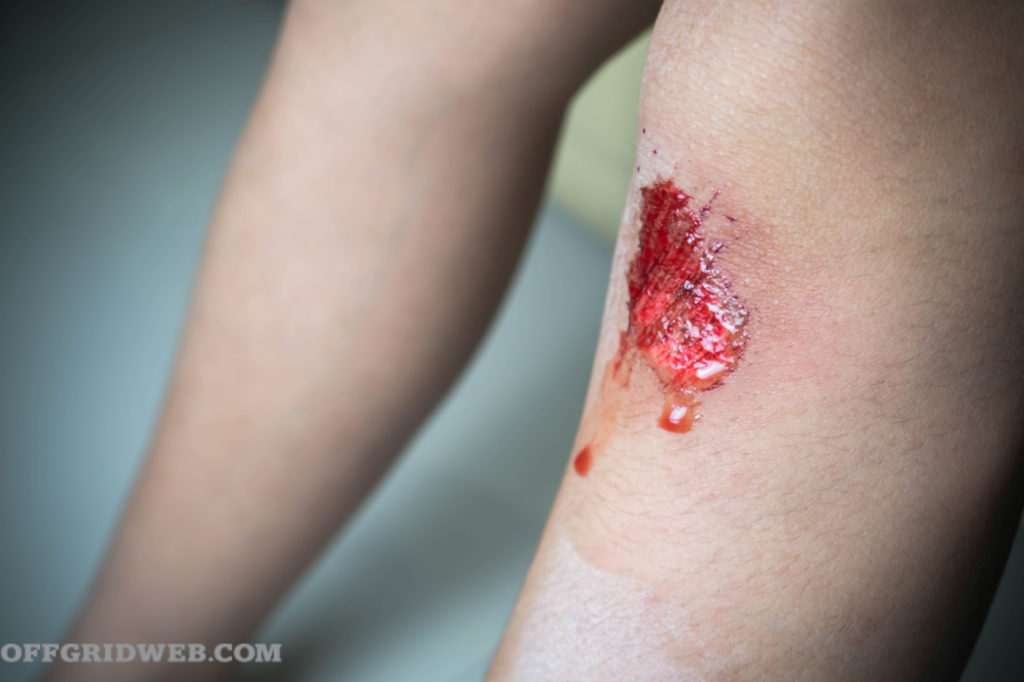
Above: Skinned knees are a common form of abrasion. Typically, no closure is necessary; clean and dress the wound to reduce the risk of infection.
Abrasions: An abrasion occurs when your skin rubs or scrapes against a rough or hard surface. A motorcyclist’s “road rash” is one example, but most people have “skinned” their knee as children. Bleeding is minimal, but the wound needs to be scrubbed and cleaned to avoid infection. No closure is necessary.
Punctures: A puncture wound is a hole created by a projectile, nail, needle, or certain animal bites. Some punctures may not visibly bleed, but can be deep enough to damage internal organs and increase the risk of infection if closed.
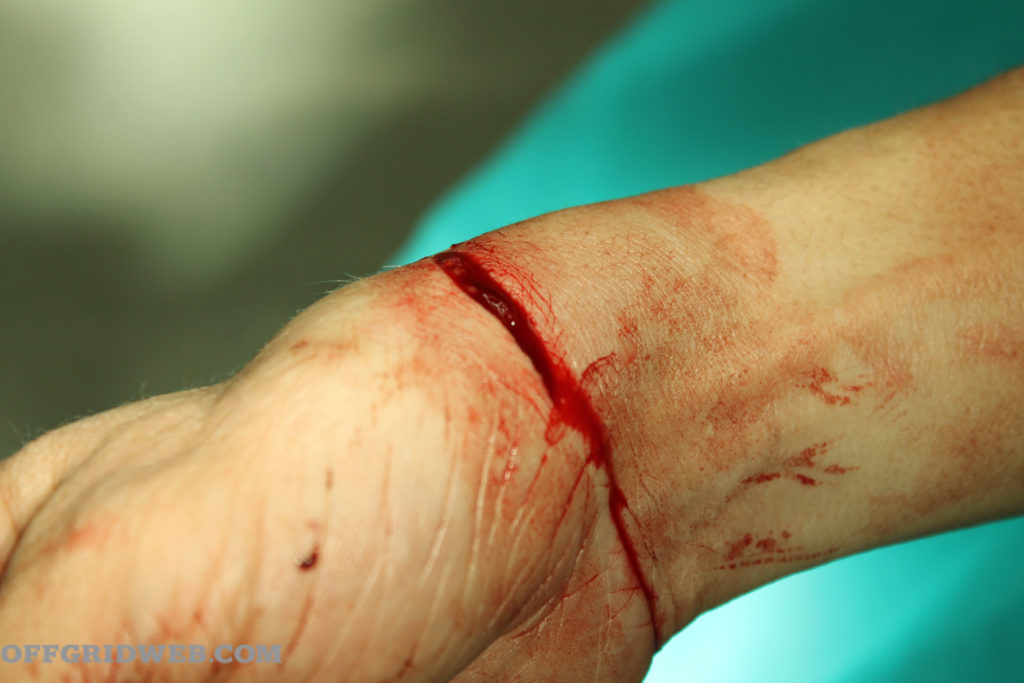
Above: An example of a typical laceration.
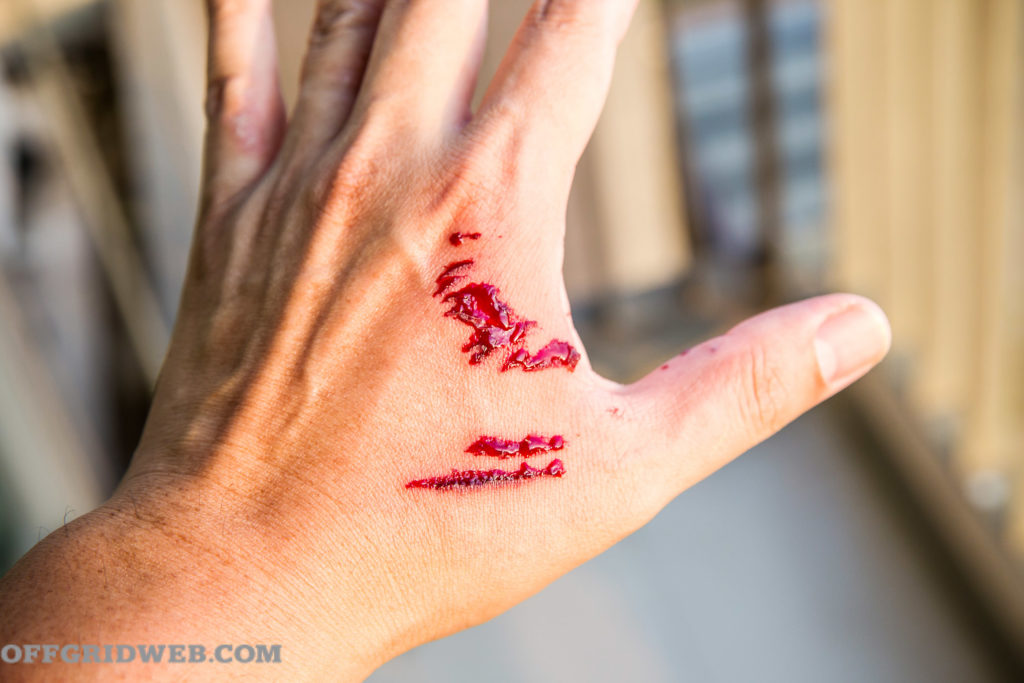
Lacerations: For the purposes of this article, we’ll define a laceration as a cut that goes through both the upper layer (epidermis) and the lower layer (dermis) of the skin. Skin lacerations expose the structures underneath to the risk of contamination. Accidents with knives, tools, and machinery may cause lacerations that slice through major blood vessels or even cut deeply into internal organs, like the liver. Bleeding can be extensive. Most lacerations these days are closed by a medical professional.
Avulsions: An avulsion is a tearing away of skin and the soft tissue beneath. Avulsions usually occur during violent accidents, such as crush injuries or shrapnel wounds. Degloving is another gruesome form of avulsion (don’t Google that unless you have a strong stomach). In many cases, these wounds bleed heavily and rapidly. After assuring that bleeding has stopped, closure may be attempted at some point dependent on the amount of tissue lost.
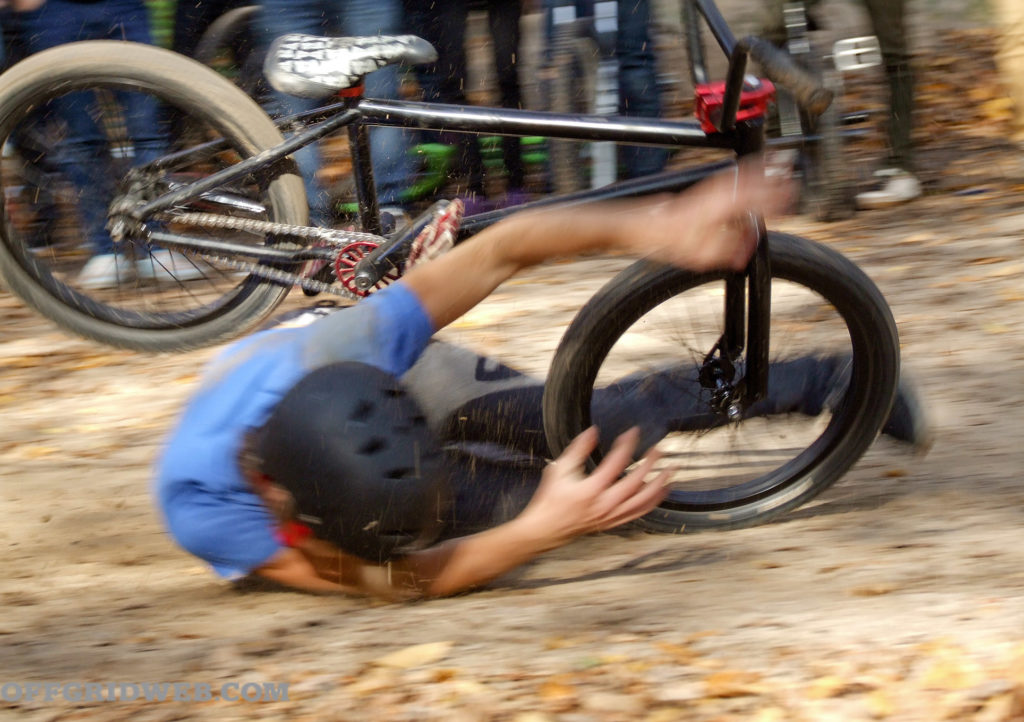
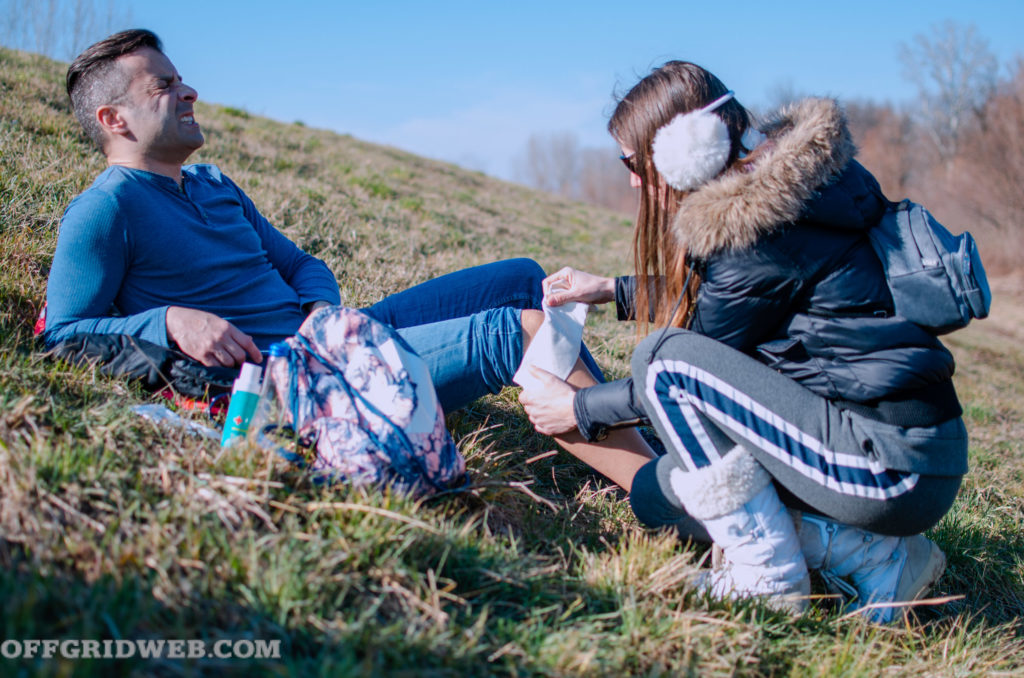
Above: Mountain biking is one activity that can lead to “road rash” abrasions in the backcountry.
Decisions: Primary, Secondary, or Tertiary Intention
When faced with an open wound, you can choose to:
- Close it right away (“primary intention”)
- Keep it open and let heal on its own (“secondary intention”)
- Keep it open for a time and then close (“tertiary intention”)
Your choice will depend on the situation. Most wounds that you close (primary) heal just fine as long as the wound is flushed with clean drinkable water or a diluted antiseptic solution. This is known as “irrigation” and serves to clear out debris and germs.

Primary Intention: Closure by primary intention usually leads to edges that fit together neatly and, if done properly, drops the risk of infection significantly. It’s important to know that, although skin heals very rapidly, deeper tissues like muscle and tendon take longer to heal and recover full strength.
For wounds that are jagged in nature, a portion of skin may require trimming, also known as “debridement.” This makes the wound more symmetrical and assures the removal of dead tissue that would impede the healing process.
Secondary Intention: Healing by secondary intention leaves the wound open. It’s preferred when wound edges cannot be brought together easily. An example might be a shrapnel wound, where large areas of tissue may be torn off. This may also be used for wounds with a significant amount of dead tissue (like bedsores), which requires debridement.
The process of a wound closing on its own is called “granulation” due to the granular look of newly forming tissue. The larger the wound, the longer it’ll take to fill in. Other factors like the age and general health of the victim play a part in the speed of healing, as does the presence of infection.
These wounds are usually packed with moist (not soaked) sterile dressings, which should be changed at least daily and irrigated with clean water or a diluted antiseptic solution.
Tertiary Intention: Healing by tertiary intention is also known as a “delayed wound closure.” In this strategy, the wound isn’t closed immediately because of suspected contamination. It’s treated like healing by secondary intention for a period of time so that the tissue can be closely observed for signs of infection. If no signs of infection are present after two or three days, the wound may be closed at that time.
Waiting to close is the more prudent approach in many cases where infection is a common complication, like bite wounds. Leaving the wound open for a time allows pus and inflammatory fluid to drain and not accumulate below the skin.
A partial closure is sometimes performed with the placement of a drain. Drains consist of thin lengths of latex, nitrile, or even gauze placed into the wound to allow drainage. “Penrose” drains are a reasonably priced item that are still used in some operating rooms. Don’t be surprised if a drain leaks fluid; be sure to cover any exposed areas.
Many open wounds should be treated with antibiotics to prevent infection whether you close them or not. Natural substances with antibiotic properties, such as raw, unprocessed honey may be useful in survival scenarios.
To Close or Not to Close?
That is the question, as Hamlet would say. It seems like common sense that we would want to close a laceration to speed healing and prevent infection. The decision to close a wound, however, involves developing sound judgment, something that takes some training and experience.
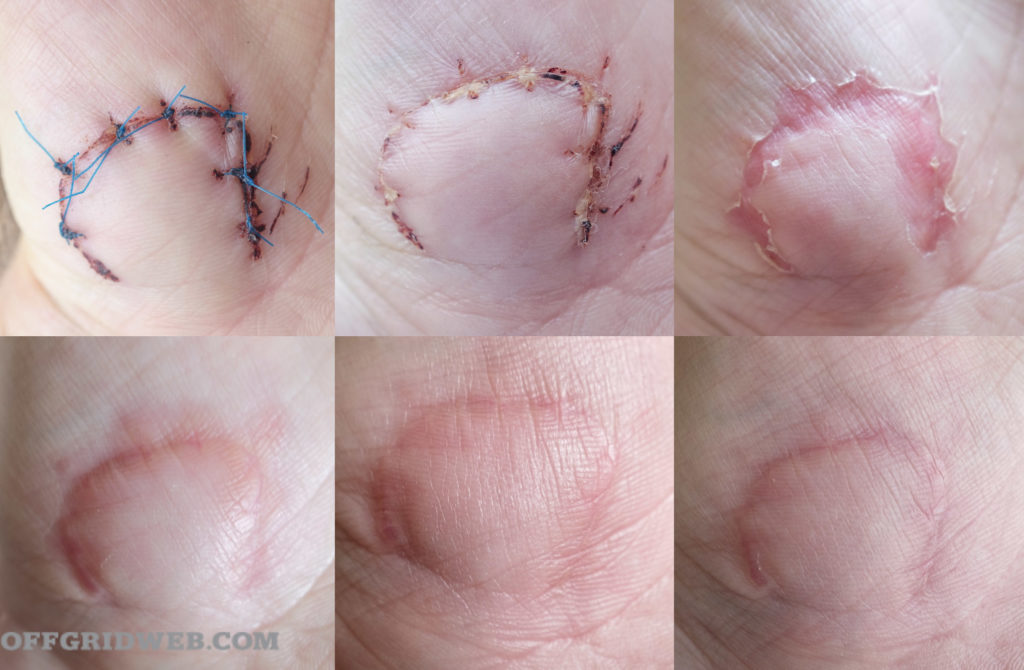
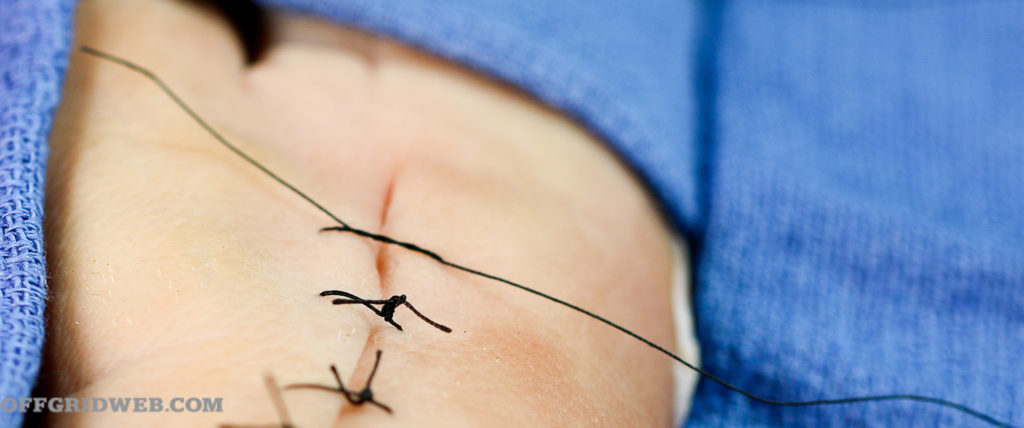
Progress of suture closure over time.
What are you trying to accomplish by closing a wound? Your goals are simple. You close wounds to repair the defect in the body’s armor, to eliminate “dead space” (pockets of air/fluid under the skin which could lead to infection), and to promote healing. Although more an issue in normal times, a neatly closed wound is more cosmetically pleasing.
Closure options include sutures, staples, tapes, or medical glues such as Dermabond. Even industrial superglue has been used (they’re both in the cyanoacrylate family), although the prescription product tolerates getting wet better.
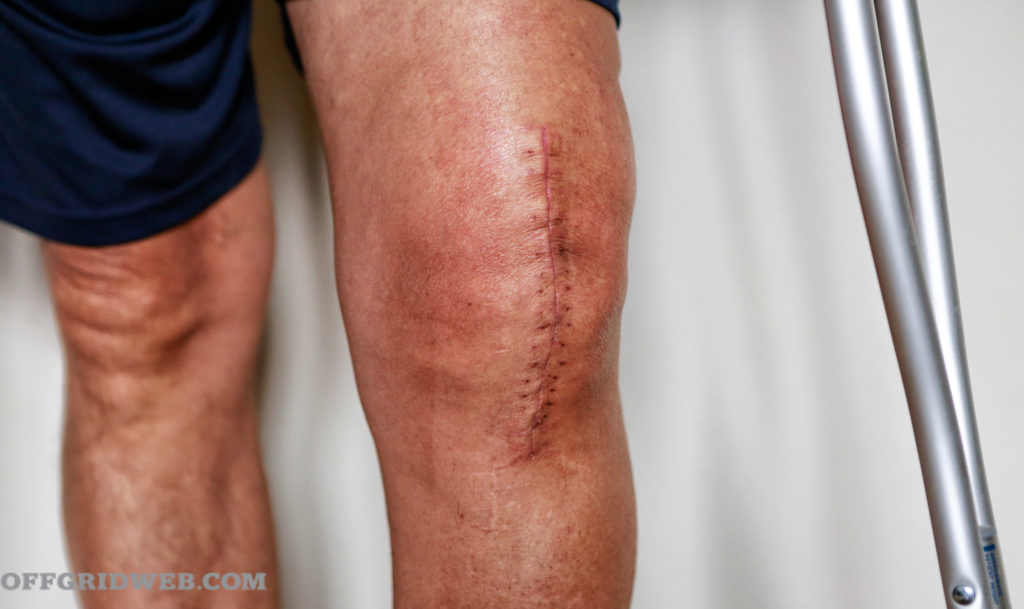
Always use the least invasive method possible to close a wound. Steri-Strips and glues don’t put additional holes in a person, but sutures and staples do. In certain areas, however, it may be necessary to use them. Joints like the knee and elbow are so frequently flexed and extended that tapes and glue are unlikely to hold a laceration together. These wounds should be closed if possible. For that, sutures or staples are required.
You’d think that all wounds should be closed. Unfortunately, closing a contaminated wound can do a lot more harm than good, and could possibly put your patient’s life at risk. Take the case of a young woman injured some years ago in a fall from a zipline — she was taken to the local emergency room, where 22 staples were needed to close a large laceration in her leg. Unfortunately, the wound had dangerous flesh-eating bacteria in it, causing a serious infection which spread throughout her body. She eventually required multiple amputations (including her hands).
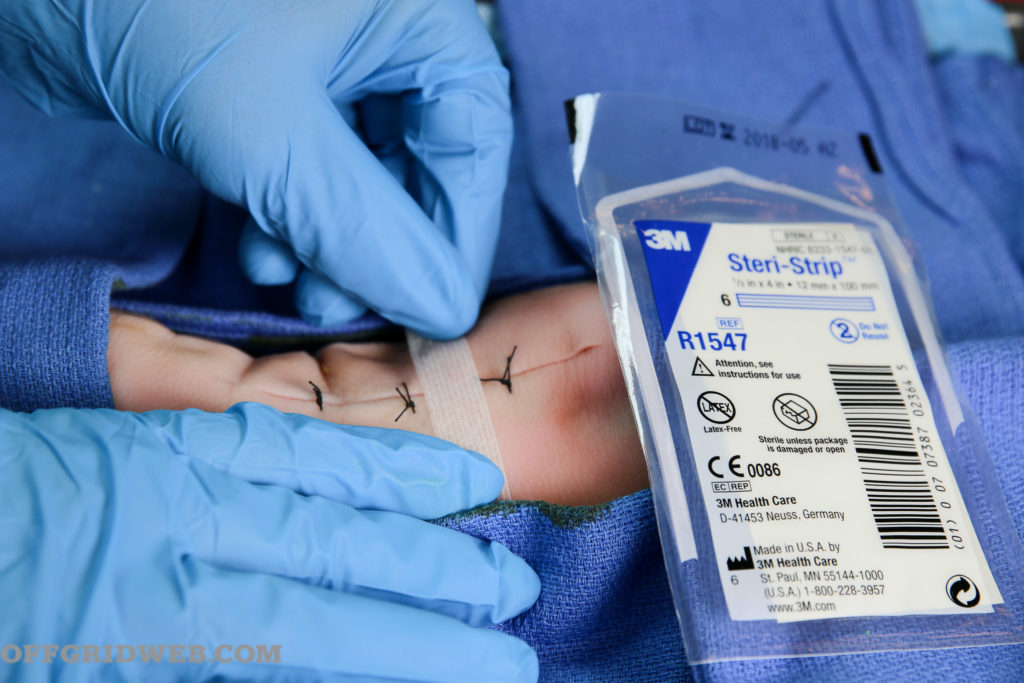
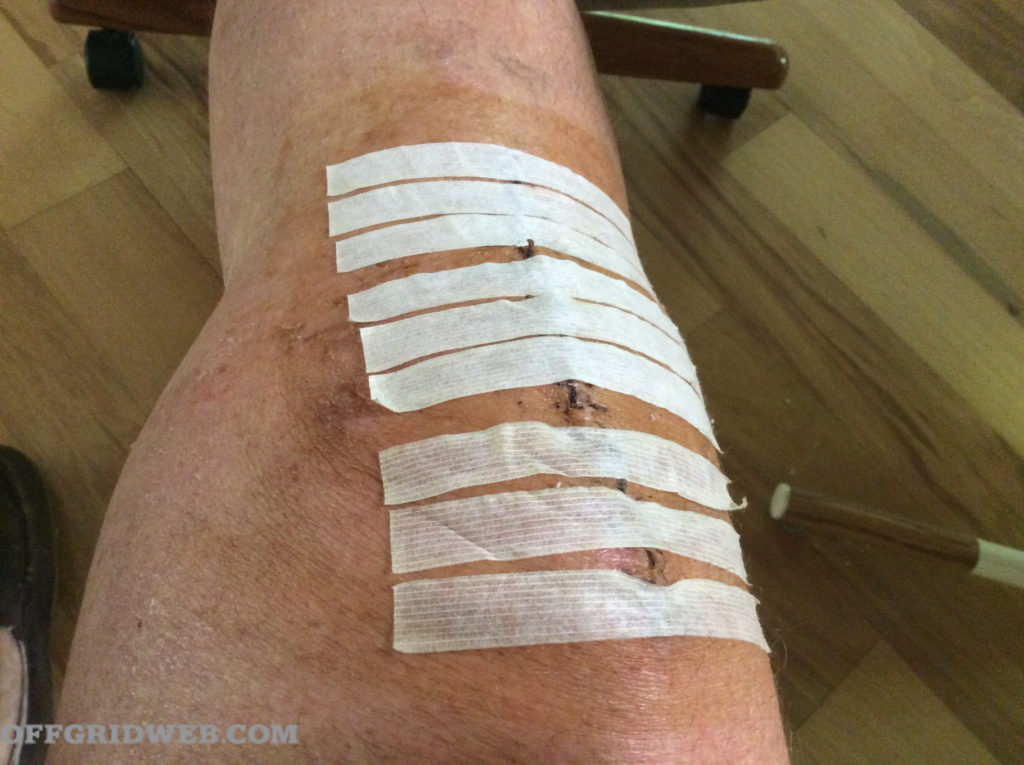
Above: Steri-Strips can be placed between sutures or staples to conserve materials.
Despite this tragic case, some wounds are good candidates for closure after a good cleaning. Lacerations that are less than eight hours old are an example. Beyond that, it’s likely that bacteria have already colonized the injury. Even the air has bacteria that can cause infections.
Another case that might call for wound closure is if a laceration is long and deep, cutting through layers of subcutaneous fat, muscle, or other internal structures. A muscle that has been ruptured or torn may not regain its function unless cut edges are approximated. You may also decide to close a wound that gapes open loosely enough to suggest that it can be closed without undue pressure on the skin. The exception might be a puncture wound from an animal bite. These bites are loaded with bacteria and are often kept open.
Is the wound a simple laceration (straight thin cut on the skin) or an avulsion (areas of skin torn out or hanging flaps)? If the edges of the skin are so far apart that they can’t be stitched together without creating undue pressure, the wound should be left open.
Wound Infections
Most wounds you’ll encounter in an off-grid setting will be dirty. If you close a dirty wound, such as a gunshot, you have sequestered bacteria, bits of clothing, and dirt into your patient’s body. Within a short period of time, the wound may show signs of infection.
Above: Animal bites have a higher risk of infection.
An infected wound closure appears red, swollen, and is warm to the touch. In extreme cases, an accumulation of pus called an “abscess” may form. In these cases, stitches would have to be removed and the inflammatory fluid drained. If not recognized quickly, infection may spread to the bloodstream (a condition known as “septicemia”) and become life-threatening.
The Suture Kit
Commercially produced suture kits, also known as “laceration trays” should contain the following items:
- Needle holder
- Toothed forceps
- Hemostat
- Small scissors
- Gauze pads
- Drapes
- Antiseptic (such as Povidone-Iodine solution or Chlorhexidine; usually separate)
- Sutures, absorbable and nonabsorbable
The above materials in the tray itself are usually labeled as sterile. Veterinary sutures are acceptable in a pinch as long as they’re also sterile. If uncertain, the needle point may be exposed to heat until red hot, then allowed to cool. An alternative approved for nylon sutures by the National Institute of Health calls for 10 minutes of complete immersion in povidone iodine 10-percent solution. Rinse in sterile water or saline afterward.
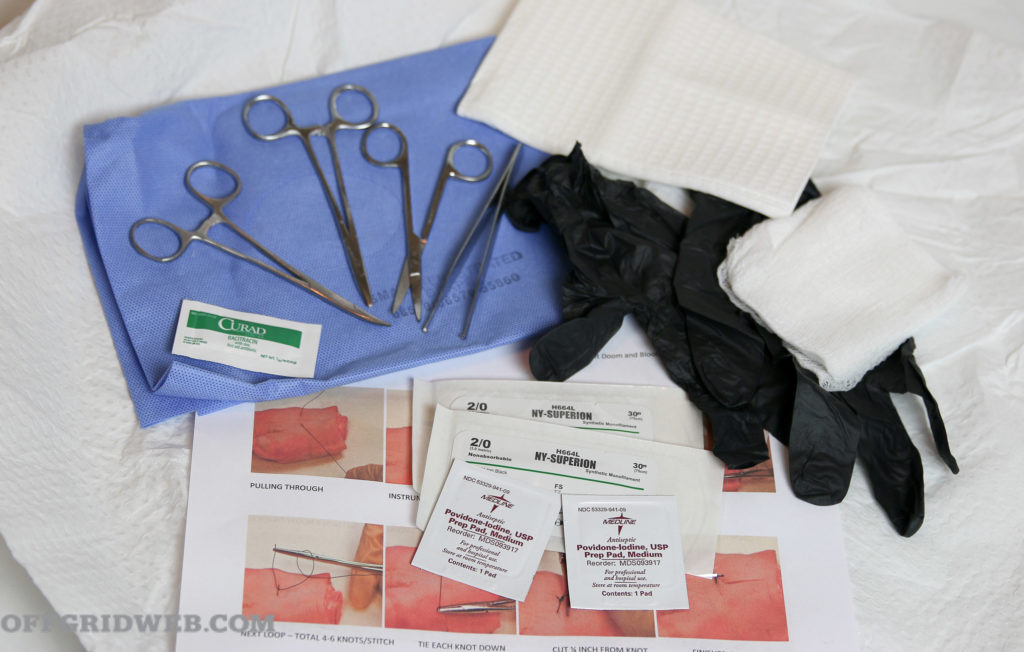
Above: Suture kit supplies should include antiseptics and gloves.
One item missing from the list is local anesthetic. Agents like lidocaine with or without epinephrine are prescription drugs. Besides their anesthetic effect on soft tissue, they’re also used for certain cardiac issues. An accidental injection of lidocaine into a blood vessel by an inexperienced medic can lead to life-threatening arrhythmias. Off the grid, anesthetic options may be limited to ice packs or topical ointments. Your experience with this may vary.
As for suture type, it’s best to practice using an inexpensive non-absorbable suture like silk, which is, in my opinion, easier to practice with than some other materials.
Choosing A Closure Method
Let’s say you’ve chosen to close the wound. When choosing a closure method, you should always use the least invasive method possible to close a wound. Surgical tapes and glues approximate wound edges well, but have little tensile strength. Sutures and staples are more invasive.
It’s important to realize that you’ll only have a limited supply of staples and sutures. If you’re down to your last couple of sutures or the last stapler, feel free to mix different closure methods like alternating sutures and surgical tapes, or even adding duct tape improvised into butterfly closures when you’ve run out of medical supplies. You’d be surprised to see what qualifies as medical supplies when the chips are down.
There are several reasons why surgical tapes (Steri-Strips) and glues are used:
- They’re less painful for the patient.
- Unlike sutures or staples, they don’t require additional punctures of the skin. As such, there’s less risk for infection.
- Materials are less expensive and more easily stockpiled.
- In a grid-down disaster setting, advanced closure materials like sutures and staples may no longer be manufactured or distributed. Conservation of these limited supplies is imperative.
Surgical Sutures: In certain areas, such as knee and elbow joints, it may be necessary to use sutures or staples. Sutures are needles and thread used to a sew a wound closed. Unlike staples, they can be used just about anywhere in the body. Some are absorbable; that is, they’re meant to dissolve over time. For the off-grid medic, nonabsorbable sutures like nylon or silk will mostly be utilized for skin lacerations. There are, however, a wide variety of suture types available for just about
any purpose.
Surgical Staples: Much like the staples used to hold paper together, they’re almost as easy to place on the skin with a little training. Staple closures are strong enough to hold a wound closed over joints. A special removing tool is used for removal.
Sutures vs. Staples: Here are some considerations to help you choose between sutures and staples:
Sutures
- Can be used on skin or deep layers
- Best for jagged lacerations
- More skill required to perform well
- Can be performed alone
- Many materials from which to choose
- More time-consuming
- Any scissors can be used to remove, or no removal at all if absorbable sutures are used.
Staples
- Standard versions should be used for skin closure only
- Best for straight-line cuts
- Less skill required to perform well
- Best performed with an assistant
- Fewer choices (essentially, standard or large)
- Can be accomplished very quickly
- Requires special instruments to place and remove properly
Surgical Glue: Medical glues are cyanoacrylates meant for use in lacerations that don’t need a tremendous amount of tensile strength. A good example would be a small laceration on the forearm. Prescription medical glues like Dermabond hold up better to getting wet and are less irritating than regular superglue (which is also a cyanoacrylate). If you must use the industrial version, gels are easier to handle.
To use topical skin adhesive glue:
- Approximate the wound edges carefully (best done with an assistant). If glue gets in the wound, it won’t close.
- Gently brush the glue over the laceration, taking care not to push any below the level of the skin.
- Apply about three layers of the adhesive over the wound, preferably widening the area of glue each time after drying to increase strength of closure.
Although you’d use antibiotic ointment on most wound closures, avoid it in closures with skin glues; it breaks down the compound. The glue itself, however, helps protect the wound from infection.
Surgical Tapes: Surgical tapes are strips of sterile adhesive material used for simple laceration closure. A popular brand is called “Steri-Strips.” Like medical glues, they work best on small lacerations upon which there is little stress. Placed with a sticky liquid called “tincture of benzoin,” they adhere to both sides of the wound and pull it closed. Steri-Strips last for a few days and often fall off on their own. They can be used in between stitches or staples to provide more support or on top of glue closures.
How to Suture Skin
The process of learning how to suture should be hands-on. We teach it and found that there are few substitutes for having a physician show you how to stitch in person. Certification is rarely available, however, for those who aren’t nurse practitioners, physician’s assistants, or other medical professionals.
It’s also important to realize that, off the grid, it’ll be nearly impossible to duplicate the sterile conditions of an operating room. The best you can hope for is a clean environment that eliminates the majority of microbes.
You’ll need something on which to practice. The best material I have found for teaching is a pig’s foot. The skin of a pig’s foot is probably the closest thing you’ll find to human skin.
Wash your hands and put on sterile gloves. Place the pig’s foot on a level surface and make a “laceration” by cutting straight through the skin with a knife or scalpel. You’ll then perform a “skin prep.” Paint the area to be sutured with a pad dipped in Betadine, Hibiclens, or other antiseptic. Alcohol may be used if nothing else is available. Start at the laceration edges and paint around them in an ever-widening oval. If you have enough materials, repeat three times.
Next, you’ll isolate the “prepped” area by placing sterile drapes. The drape will usually be “fenestrated,” which means it has an opening in the middle to expose the area to be sutured. If not, cut a hole big enough to see the entire wound. Taken together, we refer to this as the “sterile field.” Local anesthesia would be given at this point if available.
Open your laceration tray and the suture packet cover. If you have sterile gloves, put them on now. Take the tip of your needle holder and grasp the curved needle in either the center of the arc (for skin) or one-third of the way from the string end to the needle point for deeper structures. Remove the needle and the attached string from the packet. Adjust the curved needle on the needle holder so that it’s perpendicular (to skin) or slightly outward to the line of the instrument.
The needle holder is held in the dominant hand. If you’re holding the needle holder in your right hand, the sharp end of the needle should point to your left and vice versa. For most purposes, the needle tip should point to the ceiling.
Now take your toothed forceps in your non-dominant hand and grasp the edge of the laceration where you wish to place the first stitch. Right-handers start on the right, left-handers on the left. Insert the suture needle at a 90-degree angle to the skin and drive it through that side of the laceration with a smooth twist of the wrist that follows the needle’s curve. It should enter the skin no closer than a quarter inch from the edge of the laceration.
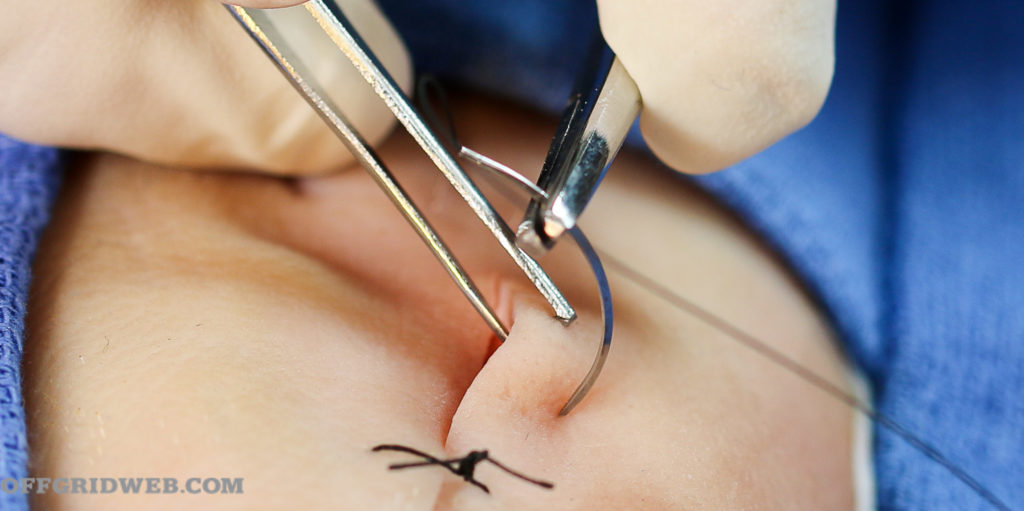
1. The needle enters the skin at a 90-degree angle.
Release the needle but continue to hold the skin next to it with your forceps so that it stays in place. Re-clamp it, and pull through. Reload the needle on the holder and, going from the inside of the wound, drive the needle with a twist of the wrist through the skin on the other side of the laceration. If the edges are close together, this may be performed in one motion instead of two. If they’re that close together, however, maybe you should have considered surgical tapes instead of sutures?
2. Holding with the forceps, pass the needle through one side.
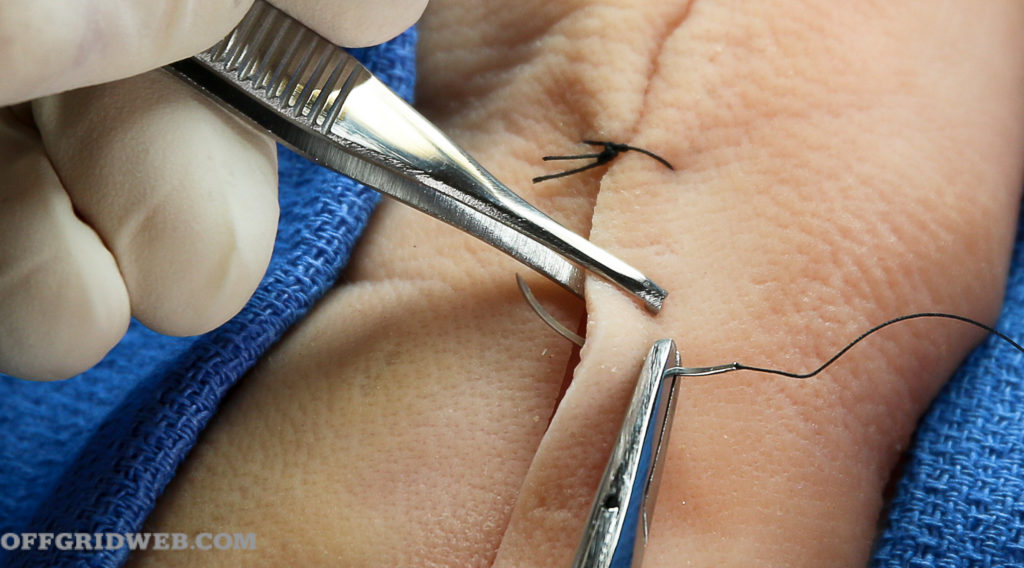
Pull the string through, leaving a small length on one side. This should leave you with a long side (the side with the needle) and a short side.

3. The needle goes through the other side.
4. Leave the end without the needle very short.
There are various ways to tie your suture, each with its own advantages and disadvantages. In our opinion, the ideal method for the survival medic:
- Has stitches that are independent of each other so that one faulty stitch by an amateur doesn’t unravel the whole closure
- Conserves precious suture material
- Is easy to learn for the non-medically trained
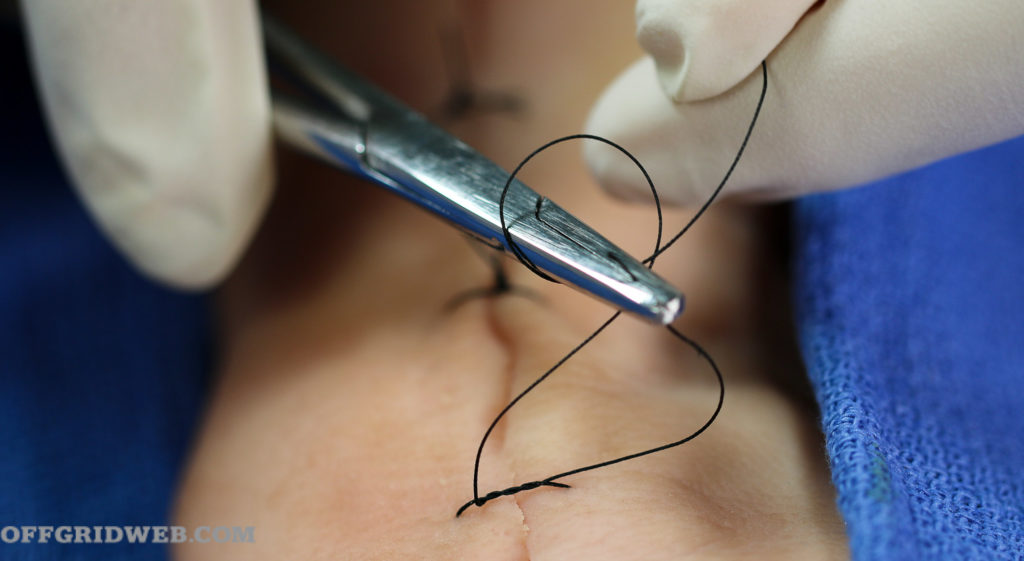
This method is known as the “interrupted instrument tie.”
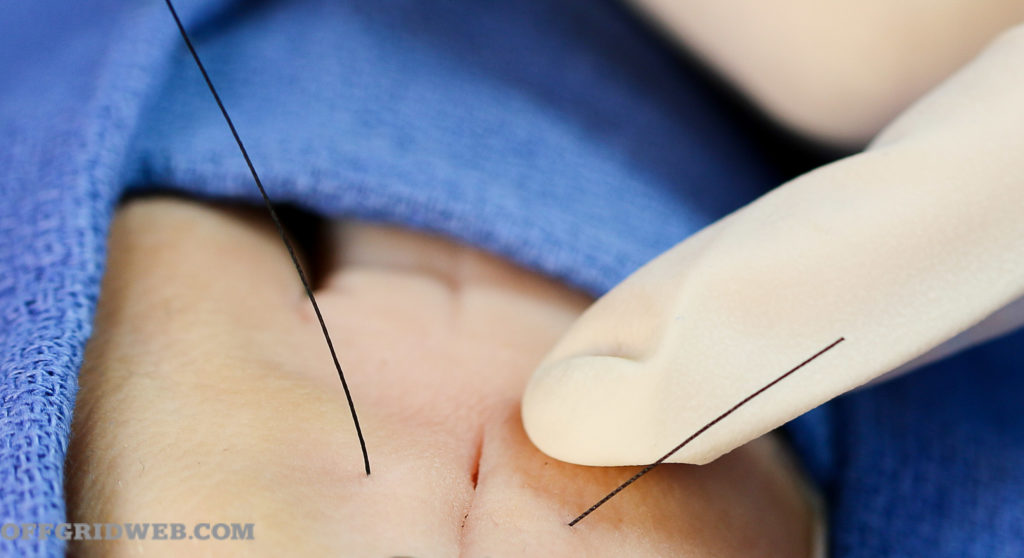
Holding the needle holder loosely in the center over the wound, wrap the long end of the string twice over and around the end of the instrument. Then, open the needle holder end slightly and grab the very end of the short end of the suture. Pull it through the loop tightly to the other side. You’ll form a square knot, also called a “Surgeon’s Knot.” Repeat the instrument loop several more times. Only one loop around the needle holder is required for every knot after the first. Four or five knots on top of each other should do.
5. Loop the long end twice around the needle holder head.
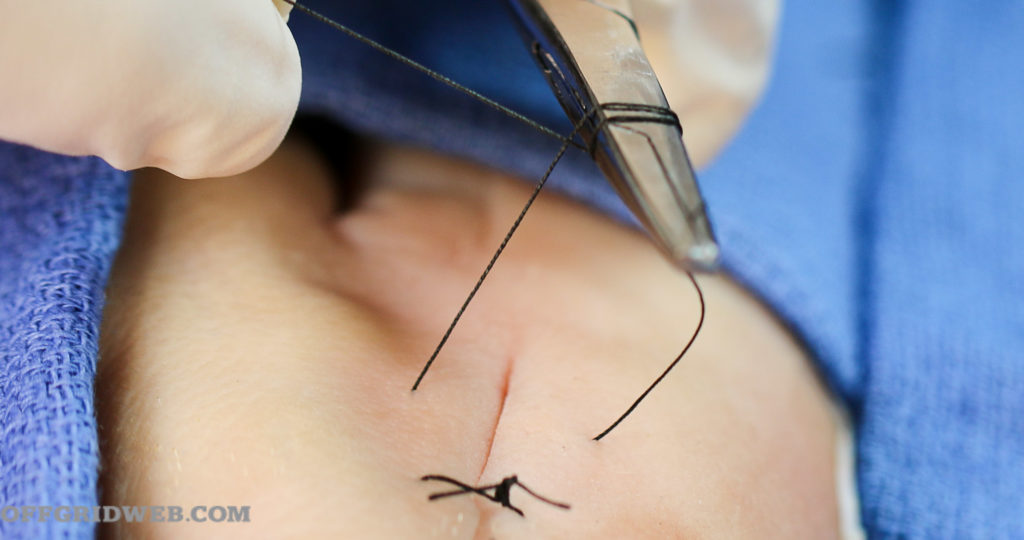
6. Surgeon’s knot in place
Finally, grasp the two ends of the string and cut the remaining suture material ¼ inch from the topmost knot with your suture scissors. If you have a good supply of suture material, place each subsequent suture about ½-inch apart from the previous one, especially if over a joint (see below). In situations where suture availability is limited, you may choose to fill in areas between sutures with surgical tapes if the laceration isn’t over a joint.
7. Each successive knot uses only one loop.
It’s important to tighten your knots only enough to close the wound. Approximate, don’t strangulate. Excessive pressure from a knot that’s too tight will prevent healing in the area of the suture. You can easily identify sutures that are too tight — they cause an indentation in the skin where the string is. To complete your suture procedure, apply some antibiotic cream or raw, unprocessed honey. Then cover with a light dressing.
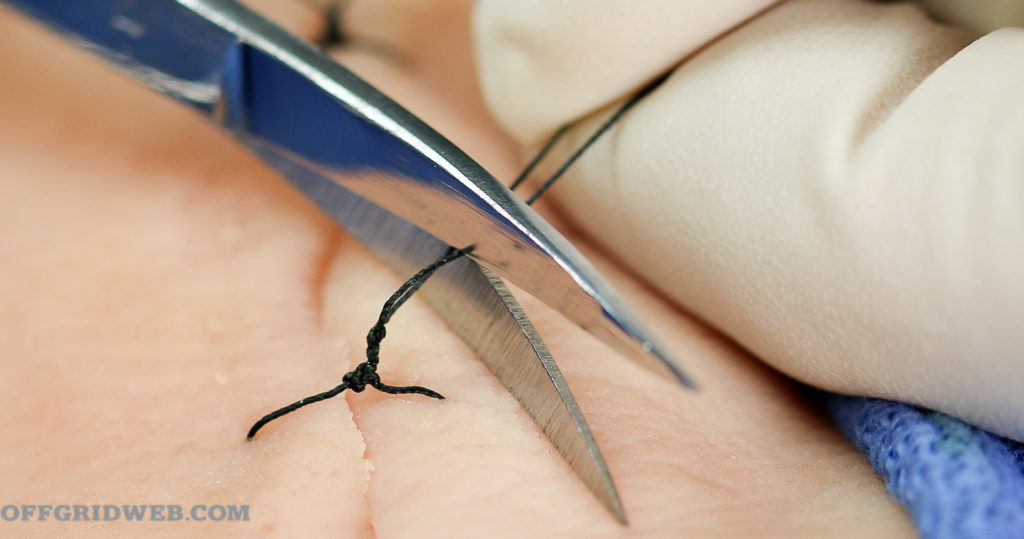
8. Perform several knots per stitch. Grasp both ends and cut at about ¼ inch from the knots.
Once the closure is done, keep the wound dry and covered for 48 hours, checking it several times a day. Sutures or staples on the skin should typically be removed in seven days; if on the face, remove after five days; if over a joint, remove after no less than 14 days.
Suture After Care
Most wounds closed with sutures should be covered with an antibiotic ointment and a nonadhesive dressing for the first 48 hours or so. Antibiotic ointments like Bacitracin or Triple Antibiotic reduce the rate of infection from 18 to 5-6 percent. These products, however, degrade surgical glue closures and shouldn’t be used in those instances.
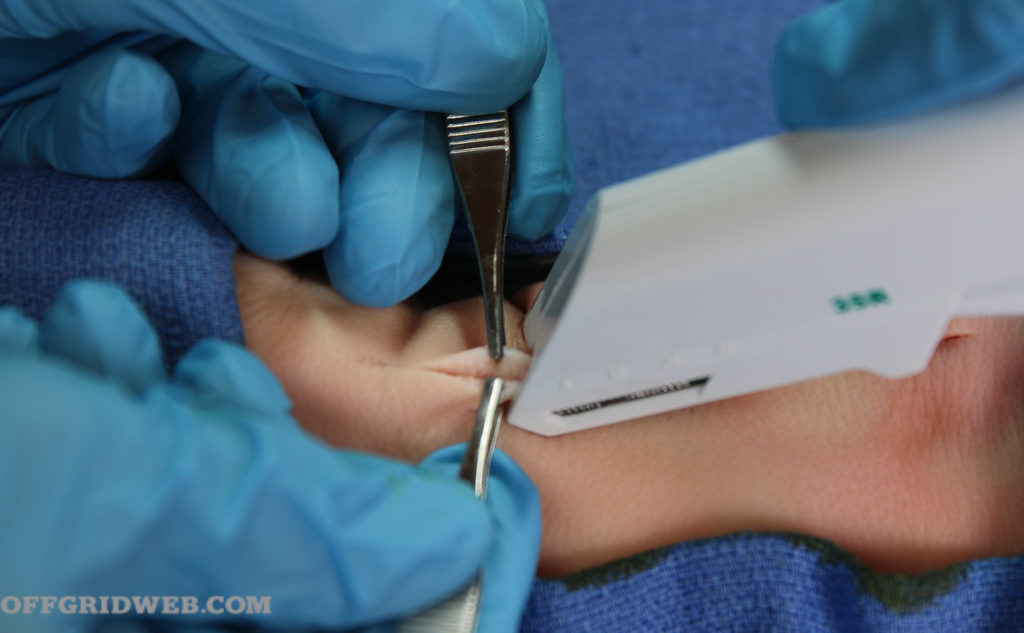
How to Staple Skin
After thoroughly cleaning a wound and applying antiseptic to “prep” the surgical field, you’re ready to use your skin stapler. Your assistant will need two Adson’s forceps to hold the skin for you. Position yourselves on either side of the patient. Both you and the assistant should wear sterile gloves.
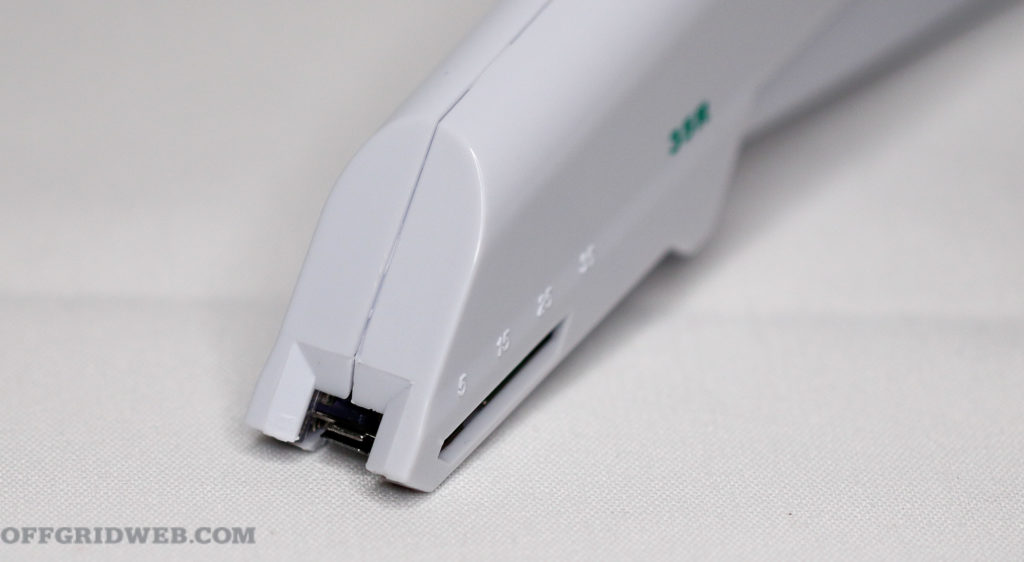
Above: The middle of the stapler is clearly delineated.
Most staplers are held in the dominant hand the same way you would hold, say, a garden hose nozzle. Stand in a position so that you have an overhead view of the laceration to be closed.
Your assistant then grabs the edges of the skin with the two forceps. They’ll then evert the edges (turn them inside out) slightly and gently press them together.
Above: Adson’s forceps are used to approximate the skin; the staple is then placed.
Hold your stapler at a 60-degree angle to the approximated edges and press firmly downward on the raised edges of the skin. The line of the laceration should be right in the middle of the line of the stapler.
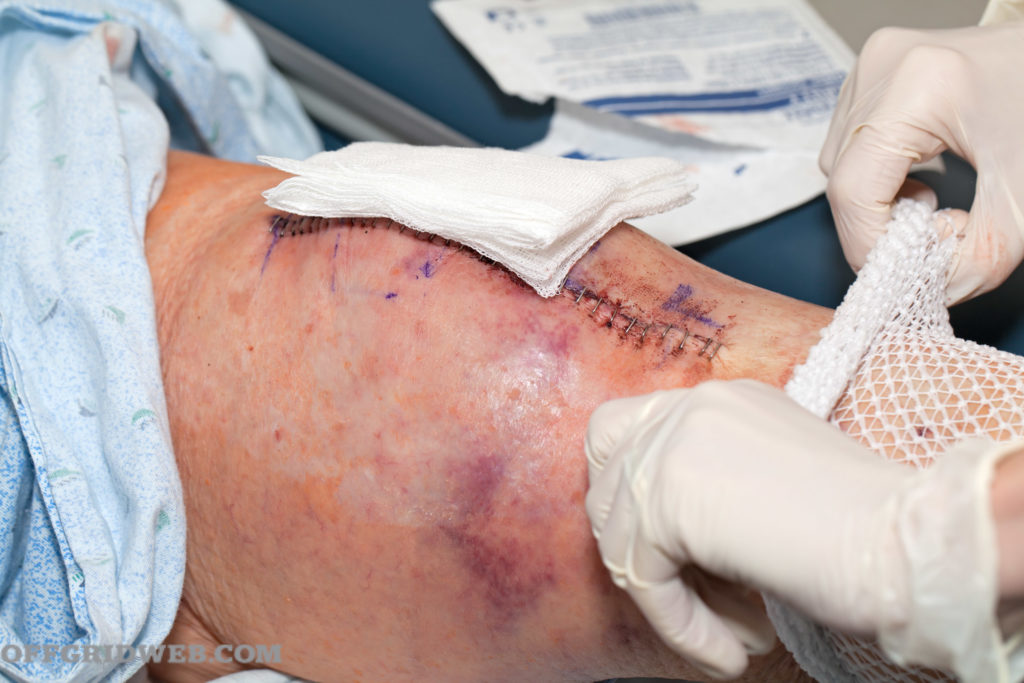
Press the “trigger” of your stapler to embed the staple; then, release and retract. Check the staple placement and remove any that aren’t appropriately executed. The skin should appear slightly “tented up” if the staple was placed correctly. Place subsequent staples ½-inch apart, especially in areas over a joint. If not over a joint, they can be spaced more widely apart, with surgical tapes placed between in-between.
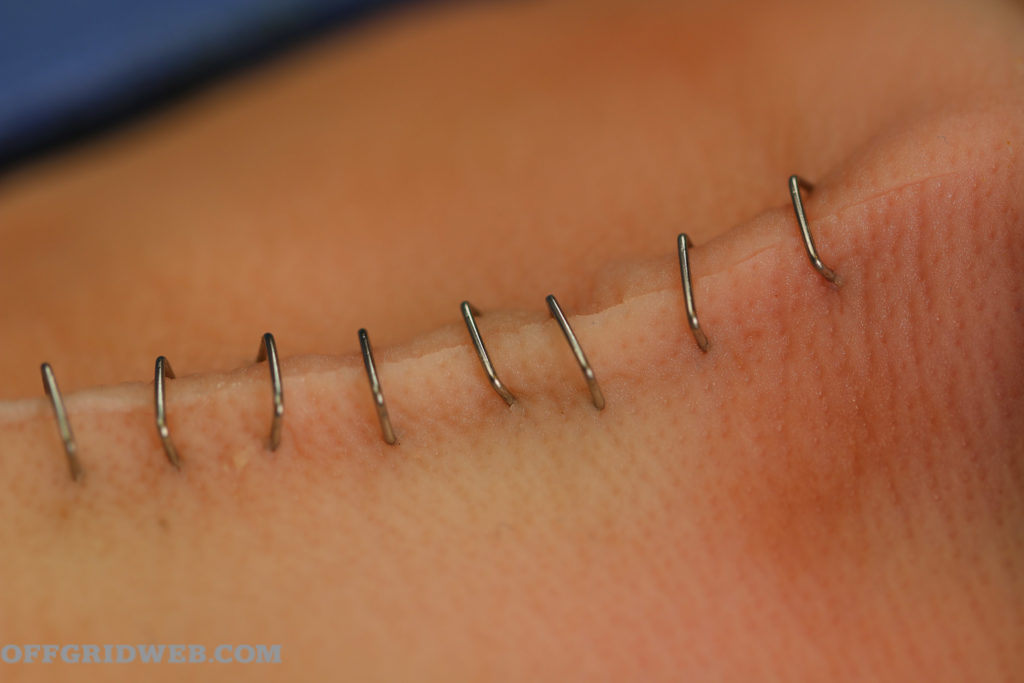
Above: Staple intervals are dependent on the location.
To remove staples, you’ll need an instrument that’s (unsurprisingly) known as a staple remover. This instrument is similar to office staple removers of bygone days. Place the “mandible” of the staple remover between the healed skin and the staple. Some brands contain two prongs on the lower blade and one on the upper. When the two prongs are under the staple, press the handles together; the top prong will press on the staple in such a fashion that the staple is easily lifted and removed. Repeat until all staples are removed.
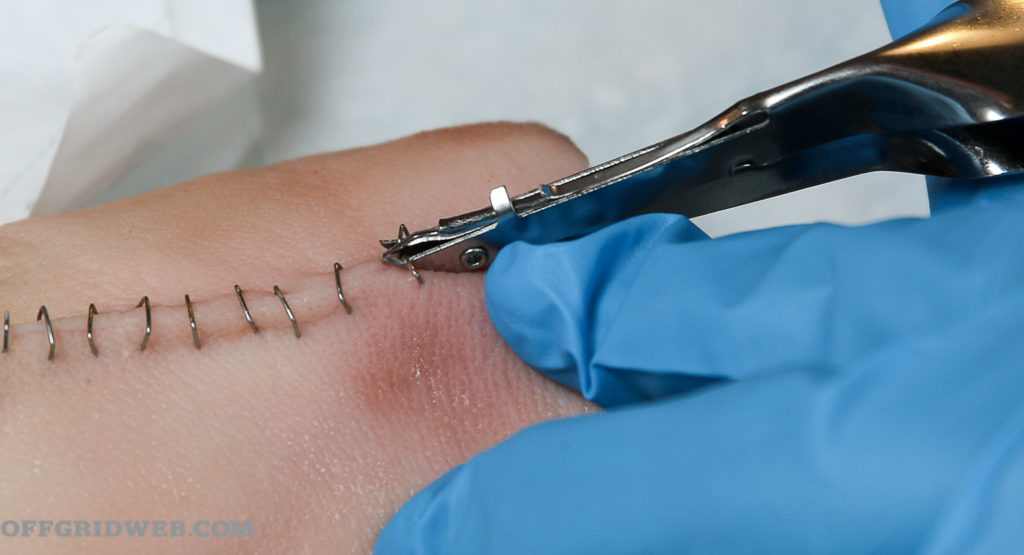
Above: A staple remover is needed to easily take out staples.
When to Remove Sutures or Staples
The longer sutures are in place, the higher the chance they may become embedded in the skin and cause scarring. On fine skin on the face, five days is often enough. On regular skin, like your forearm, a week to 10 days should do. Consider two weeks or more if the closure involves a joint, like the knee. If you’re not sure about the strength of healing, take one or two alternating stitches out in the middle and observe for skin edge separation.
Common Suturing Mistakes
Too Tight: Over-tightening causes skin to invert and prevents laceration edges from touching (and thus healing). It may also delay formation of new blood vessels in the area of the suture closure.
Too Loose: Skin edges should be touching and not gape open.
Not eliminating “dead space:” Dead spaces are pockets of air or fluid that accumulate under a skin closure. If you can’t approximate the entire wound with one series of sutures, consider placing deeper layers of (absorbable) suture first.
Misaligned sutures: Sutures not directly across on each side leave leftover skin at the end. Be certain to align perpendicular to the wound edge. Avoid making sutures that appear diagonal to the wound.
Uneven thicknesses: Taking a deep “bite” on one side and then going superficial on the other leaves one skin edge higher than the other. Make sure to take bites on each side that are as identical as possible.
Not beginning with a Surgeon’s Knot: Double looping on the first instrument tie will prevent slippage that causes excessive loosening.
Not using fine-enough sutures: Delicate areas like the face should be sutured with as small a suture as you can competently handle. Scars from needle holes are more noticeable with bigger needles and thicker string.
Using too fine a suture: Over joints, too thin or small a suture may not be able to handle the stress of movement.
Leaving sutures in place in obvious infections: Follow the wound healing process closely. If pus is noted, remove all sutures and consider allowing to heal by secondary intention.
Sutures placed too close to the wound edge: Take enough skin on each side to give strength to the closure. One-fourth of an inch is about right for most closures. It’s better to have a suture a little too wide than too narrow.
Conclusion
It’s important to realize that every surgeon may have their preferred way of closing a wound that differs from the above. Ask five surgeons, get five answers. Medicine is as much an art as it is a science.
There’s a lot more that goes into proper education and training in wound closure than is found here, but with some commitment and determination, the off-grid medic can learn this important aspect of medical care.
More Emergency and First Aid
 Unobtainium Gear has appeared on OFFGRID before, when we covered their


 Above: Many times, users of marijuana turn to the drug to escape stress. During times of massive disaster, many may use cannabis to deal with the anguish of a societal meltdown. Photos by Lars Smith.
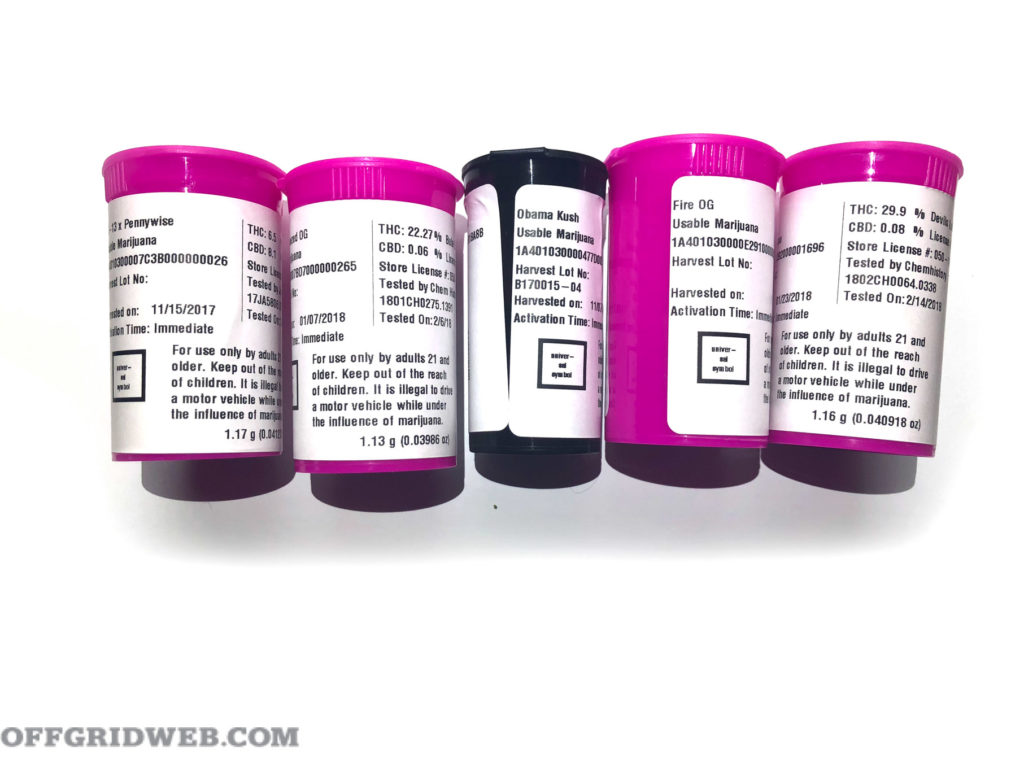
 Above: Marijuana remains the most widely used drug in the world, both for its proposed medical abilities as well as the stereotypical “high” that marijuana is infamous for. Photo by Henry Glover.
 Above: Currently, a handful of American states have legalized the growth and sale of cannabis for both medicinal and recreational purposes. Businesses in these states have the advantage of securing a product that may be highly sought-after during times of national distress.
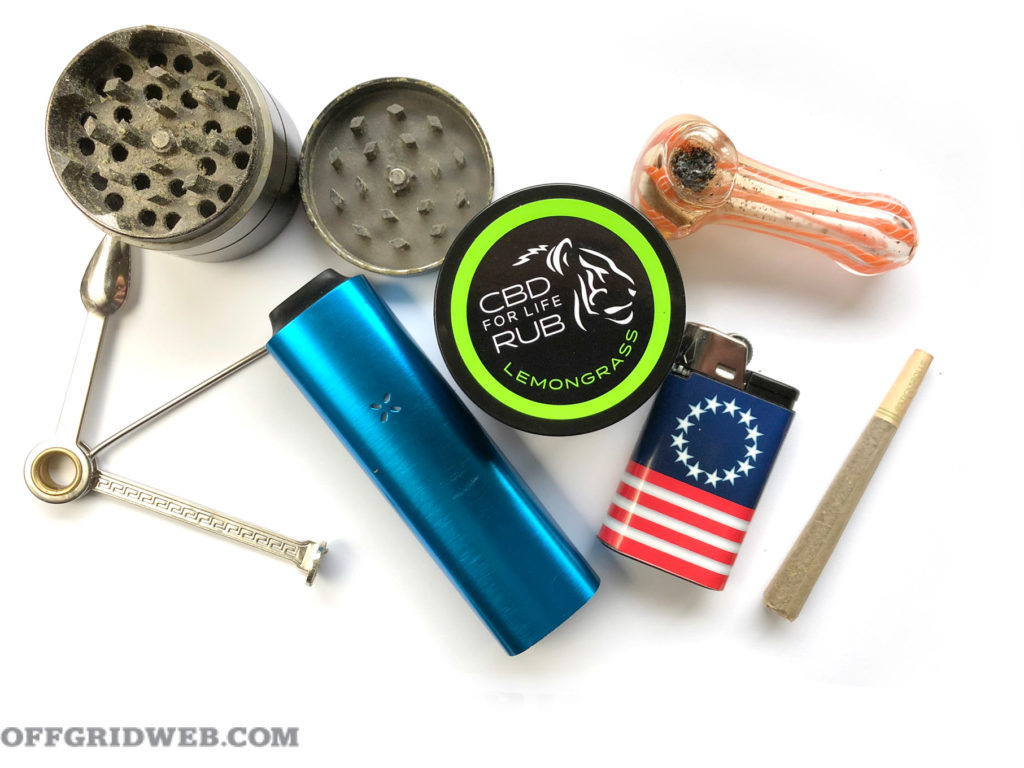 Above: In a society where the infrastructure has fallen, marijuana may become a bartering token. However, its value as a resource may lead to crime, such as killing or stealing from those who have it. Photo by Lars Smith.
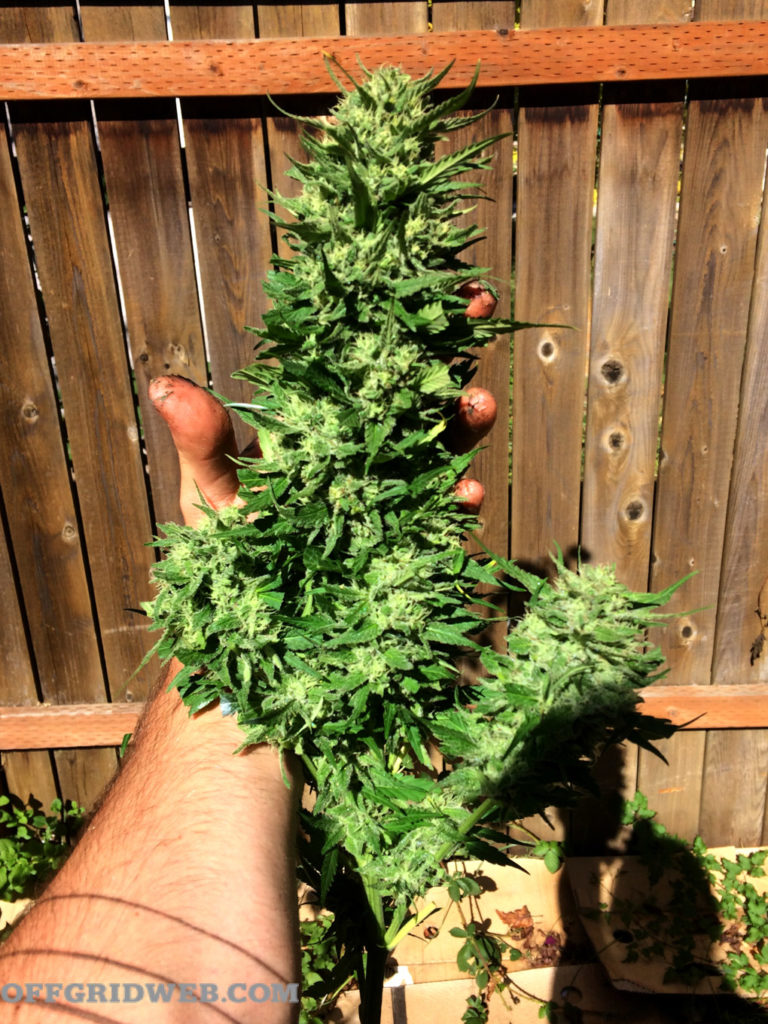
 Above: In many cases, the cost to become a government-sanctioned marijuana grower is so exorbitant that farmers continue to maintain an unregulated operation. Photo by Henry Glover.

 Above: While professional landscaping is more expensive than DIY, it can often add value to your home or business.
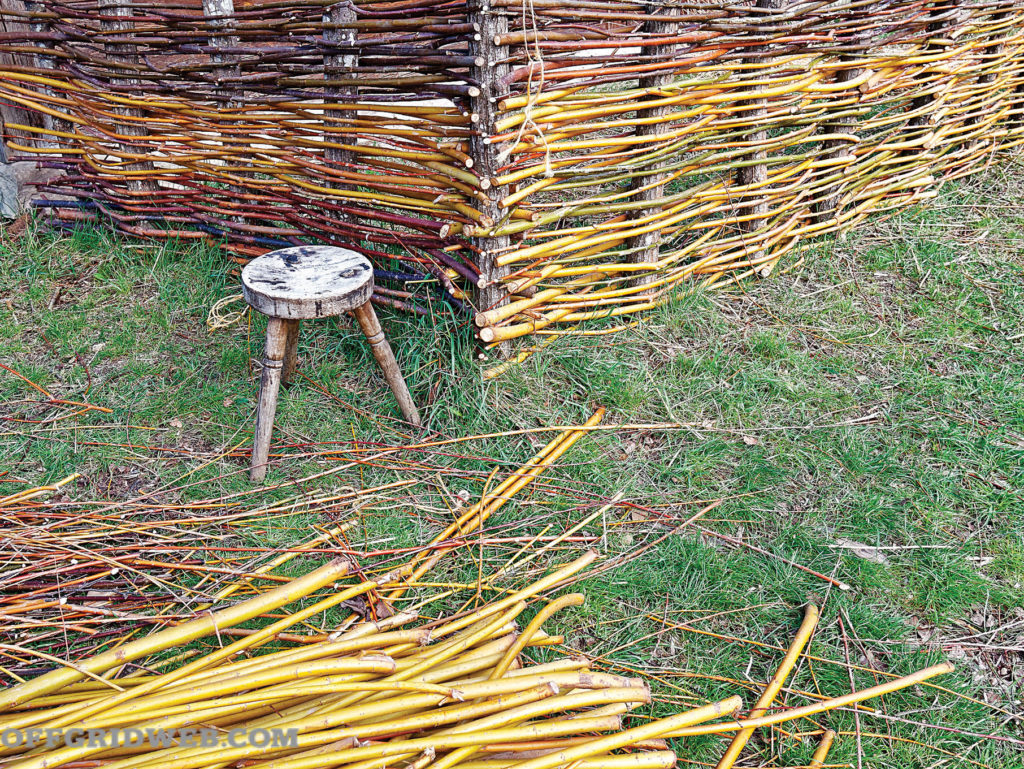 Above: “Whips” harvested from willow trees can be used for attractive fencing.
 Above: Grapes don’t necessarily need a formal vineyard setting and can be trained on a trellis or against a wall in a landscape.
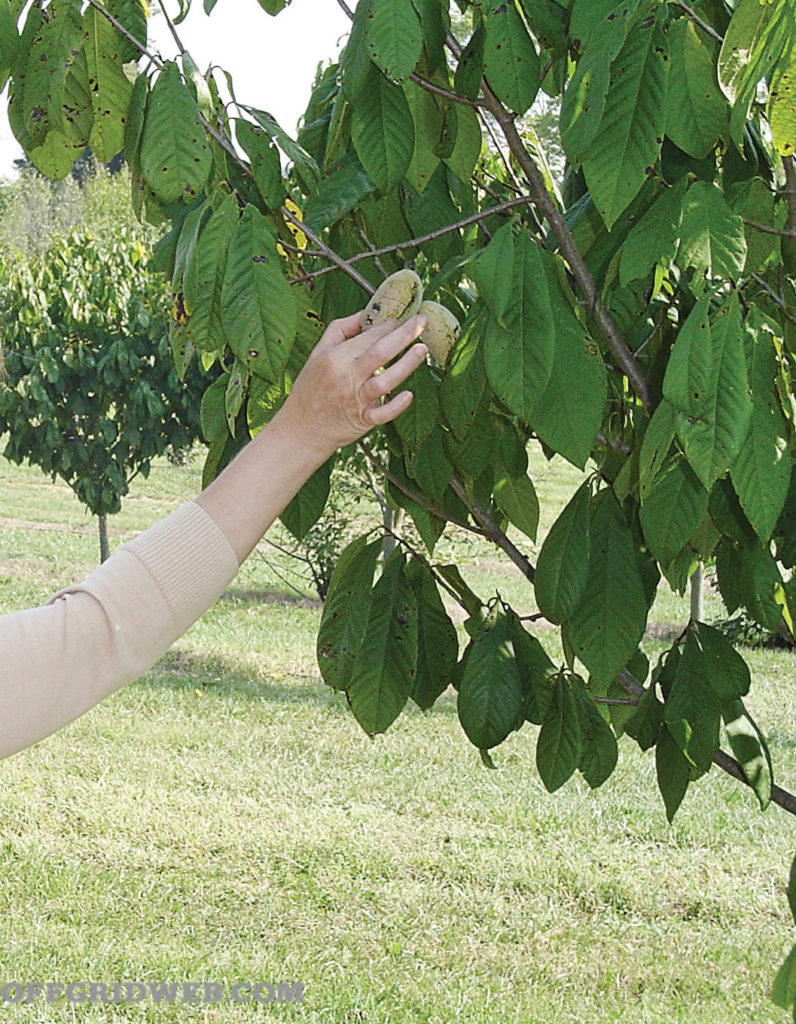 Above: Pawpaw is a small native tree with a fruit that can substitute for bananas in many recipes.
 Above: An unused corner near a porch can bear pounds of tomatoes.
 Above: Ginseng can thrive in shady areas of the landscape.
 Above: Black cohosh is another medicinal plant that does well beneath the canopies of mature trees.
 Above: Elderberry is a species with medicinal qualities that does well near streams or ditch lines.
 Above:
 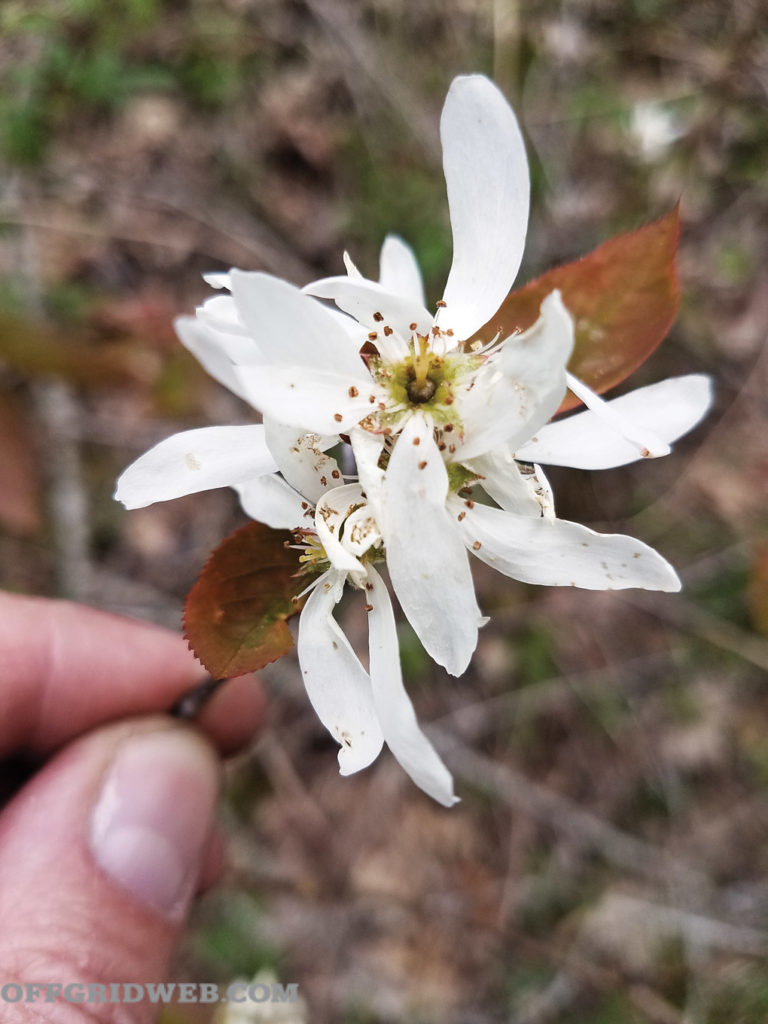 Above: Serviceberry is a small, early-blooming tree that can bear heavy crops of blueberry-sized fruits.