Just a few decades ago, being “prepared” meant something quite different from what it means today. Back then, if you focused on the survival essentials like food, water, security/self-defense, first-aid, sanitation/hygiene, and knowing when to stay put and when to get out, you’d probably be in pretty good shape if a natural disaster, or some other crisis, came your way. As long as the physical world was safe and secure, everything else would follow.
Today, however, many experts believe that virtual threats are quickly becoming just as dangerous as physical threats. In other words, what happens online can have a direct impact on all the things you need to survive, including essential public services, vital utilities, the supply chain, and even access to your own currency. If you want to protect yourself, and your family, you need to take your preparations to a whole other level, and you need to start thinking about protecting your cyberspace.

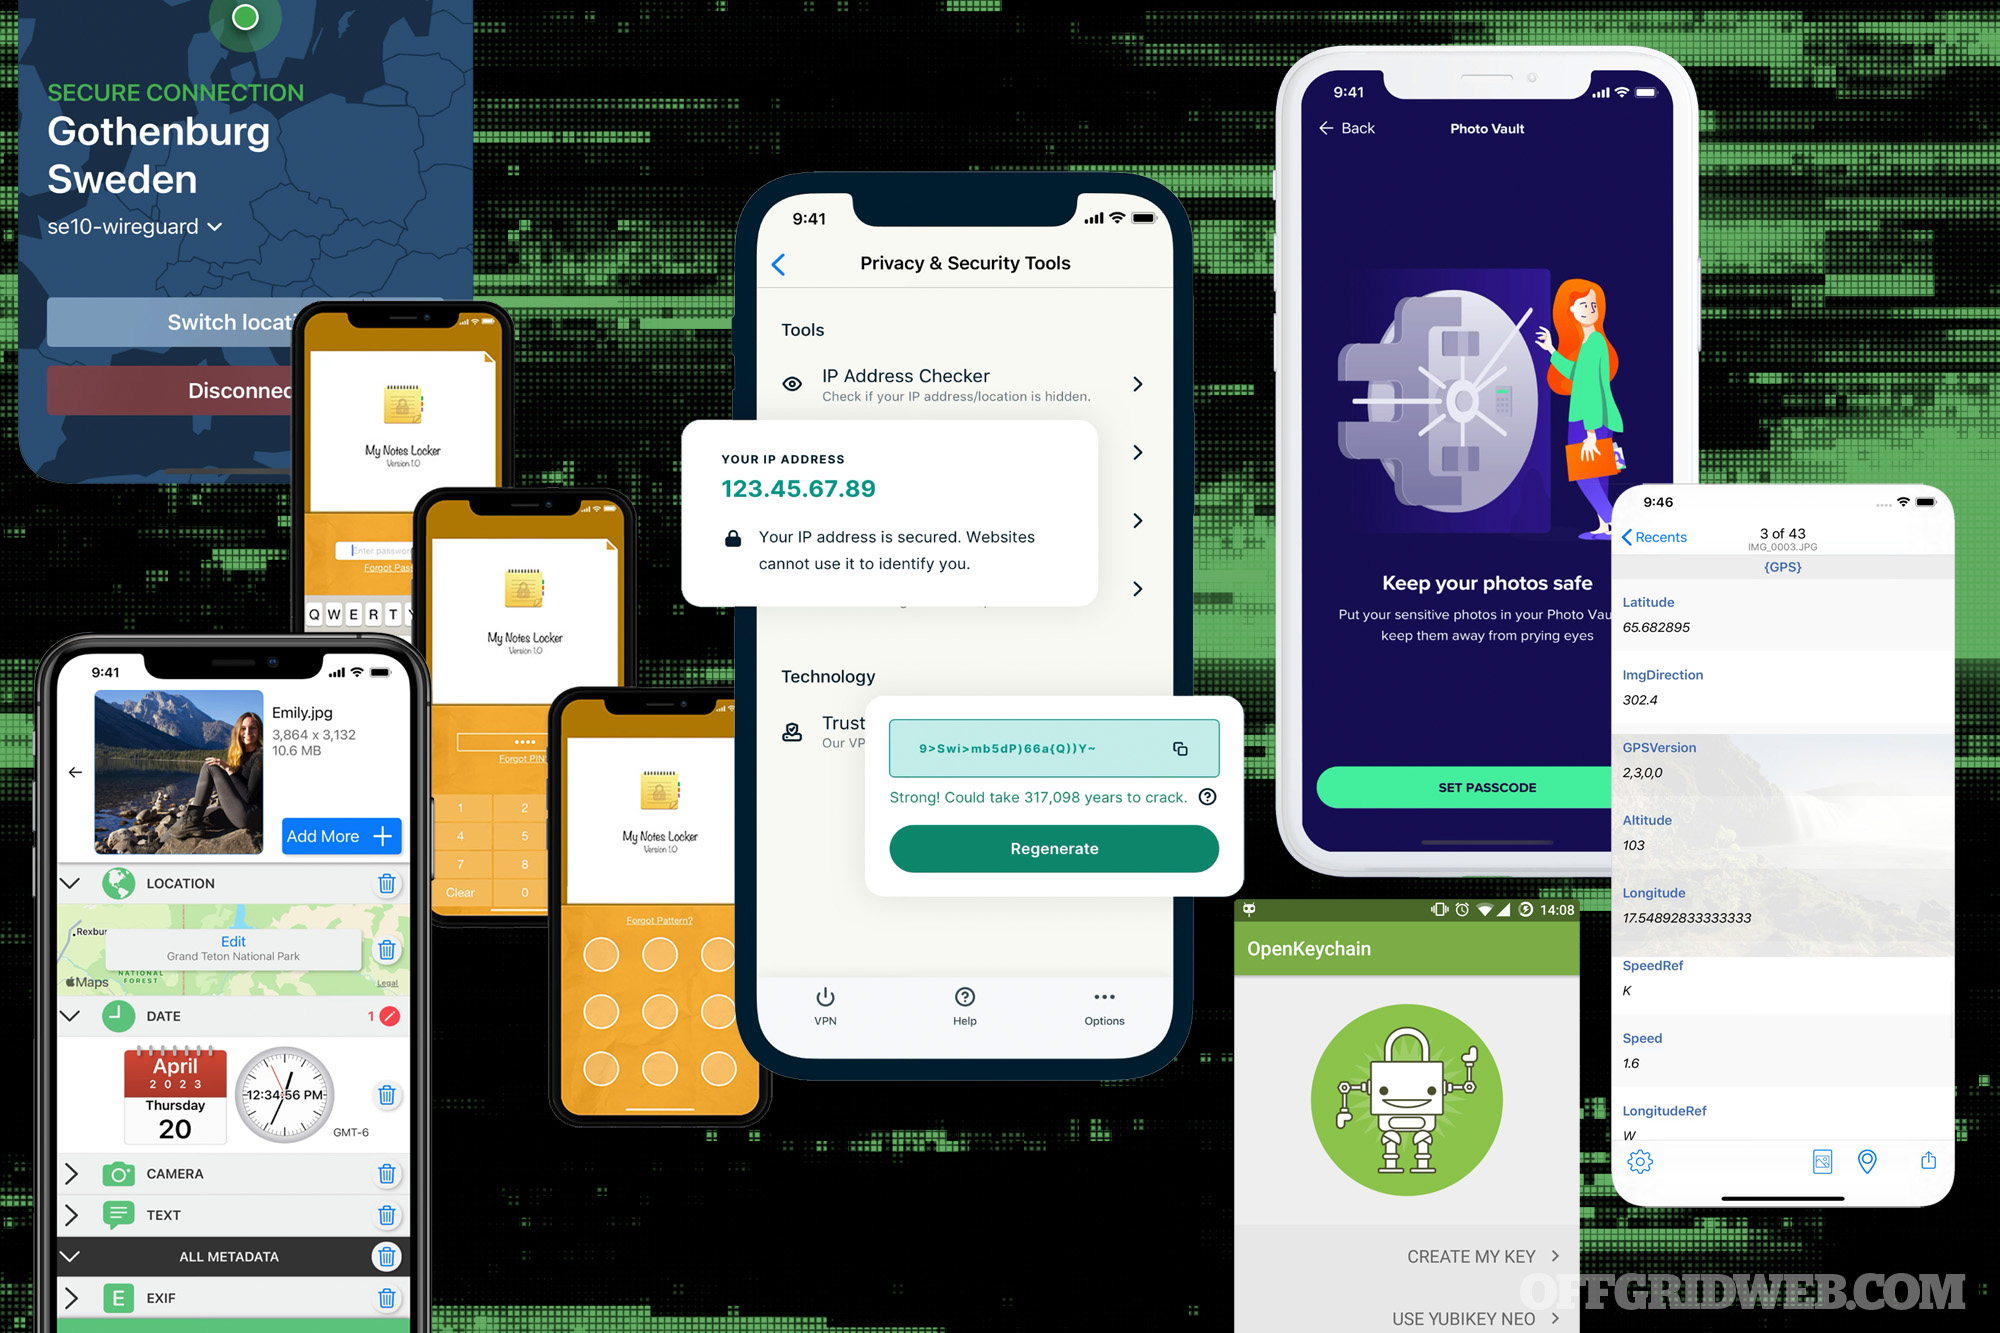
In this article, we review a few security applications that can help you protect yourself, your data, and your hard-earned currency in an environment where cybercriminals can lurk in the shadows, just waiting for an opportunity to take advantage of the unwary.
The Future of Smartphone Security
Life in the 21st century is changing at a pace few of us would ever have anticipated. In contrast to the mostly stationary internet of just 20 years ago, Americans are now increasingly connected to the internet via mobile devices, such as smartphones and tablets. Because of their versatility, and ever-increasing functionality, mobile devices have become the “multi-tool” of our era. The recent acceleration in the development of mobile apps that run these devices has only fueled this expansion. Transactions that were once firmly rooted in the physical world, are now conducted digitally, with no paper trail, and in many instances, on a mobile device. From buying a car, paying a bill, to making a deposit at your bank, it can all be done digitally from a mobile device.
Yet, right below the surface of all this convenience, the same technology that allows you to easily access services and information from just about anywhere in the world also makes you vulnerable to hackers, cyber criminals, and an assortment of bad actors, both foreign and domestic. Considering that many people now connect to the internet using a mobile device, and that a large portion of the everyday world resides in cyberspace, you ignore these threats at your own peril.

Mobile Devices are a Top Priority for Hackers
Recent trends suggest that cybercriminals may be shifting their attention from computers and workstations, to mobile devices, especially smartphones. The reason for this is clear — many of these devices contain an abundance of valuable information, including the most intimate details about your personal life. Malicious attack methods previously used against PCs are now being adapted, modified, and employed to hack mobile devices; chief among these criminal tools is malware. Malware, short for “malicious software,” refers to any software used by hackers to steal data, or to damage or destroy computer systems. Common examples of malware include viruses, spyware, adware, ransomware, etc. One of the most common methods used by hackers to spread malware is through apps, downloads, email attachments, infected links, and even text messages.
Hackers are constantly working to steal data from mobile devices. They know that mobile devices may not be as secure as workstations and servers. Security features like antivirus software are usually lacking in mobile devices. As such, hackers will often target mobile devices, and users may be less cautious of threats on this platform.
Given the opportunity, cyber criminals will exploit every possible vulnerability; it’s up to you to take reasonable measures and precautions to protect your privacy and personal information.
Security Apps – What to Look For
The apps we reviewed for this article all provide internet security tools intended to protect against cyberattacks, and to help protect personal information and privacy. Our aim was to provide a broad spectrum of possible options for comparison. But, since each person’s needs, budget and circumstances are different, you’ll need to consider what sort of protection/security is most relevant to you, and what level of service you prefer.
We looked for apps that were easy to download, install, and navigate. Ease of use, reliability and speed were also at the top of our list. While most people want the most effective security features on their mobile devices, they don’t want apps that’ll slow down their devices, or cause any interruptions in the way they navigate the internet.
Finally, we looked for apps that are free, or low-cost, and provided in-app purchase options for people who may want to access to additional features, or enhanced functionality. If the app falls short in any of these areas, users would likely not bother using it. Overall, the best apps are useful, fast, convenient, reliable, and provide a level of security and protection that you wouldn’t otherwise have without them.
Many of the apps discussed in this article offer basic level security protection for free, and “free” is usually a good thing. But, those “free” apps can sometimes come with limited features and annoying ads. If you want the premium services/features, or you don’t want to deal with ads, you can always consider an upgrade at an additional cost. On the other hand, if the app itself works for you and provides the protection and security you’re looking for, you may not mind the ads, or maybe even paying for a premium level of service offering more advanced features.
We looked at a few popular apps and put them to the test. For practical reasons we had to limit the number of apps we reviewed, but there were certainly many more that we could’ve included. While finding the “best” protection for your mobile device can be a time- consuming and confusing task, our goal was to provide you with a point of comparison to help you look at the relevant options, so you could decide what works for you. Here’s how they stacked up.
Express VPN
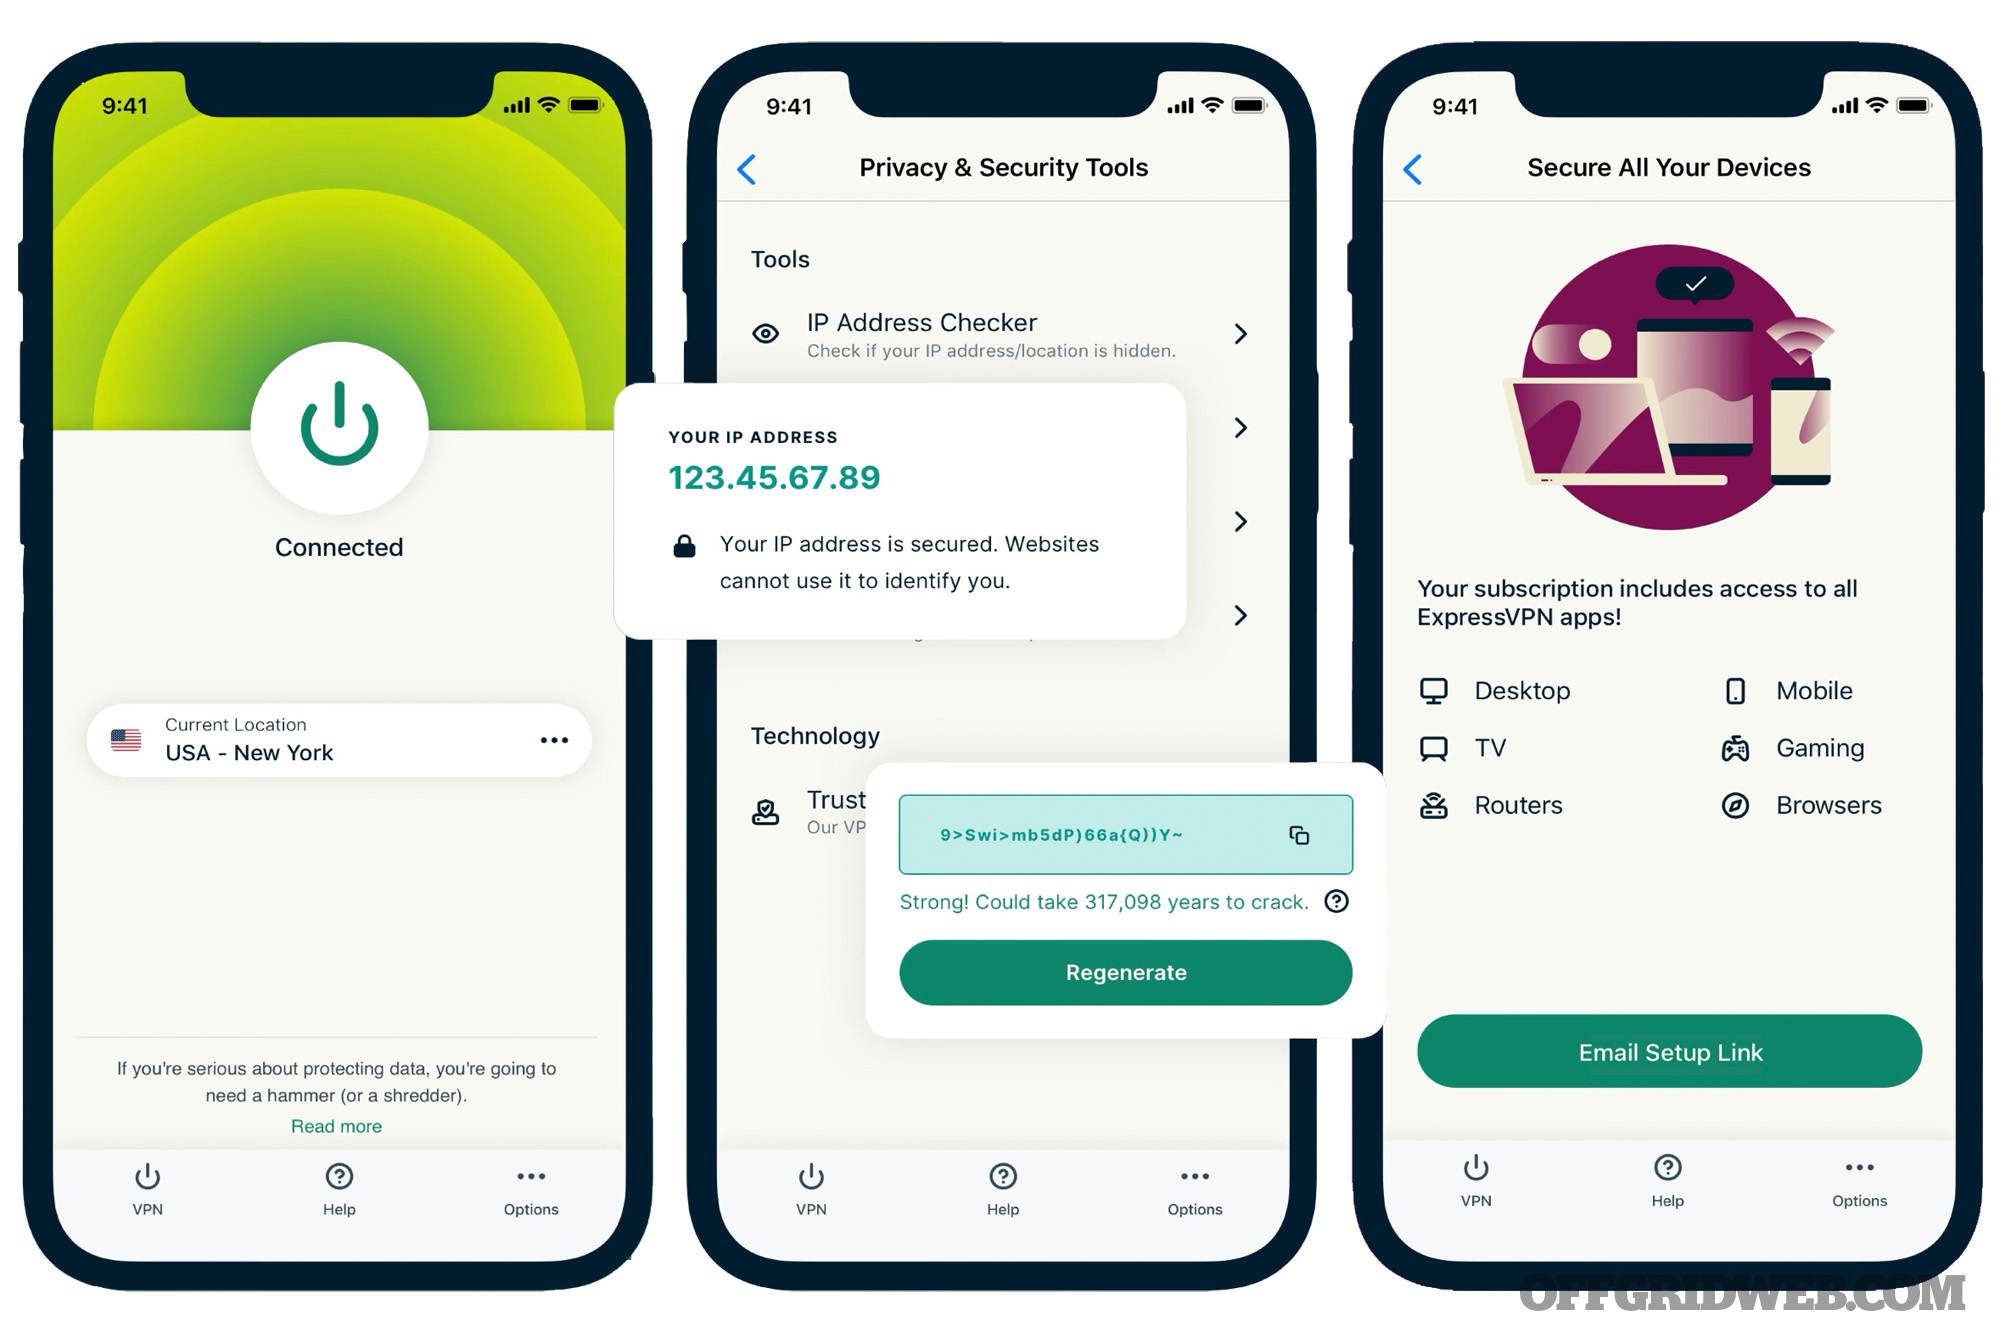
A VPN (virtual private network) is an easy and effective way for people to protect their online traffic and personal data. This app allows you to use the internet while keeping your IP address and location private. When a user connects to a secure VPN server, that internet traffic goes through what’s called an encryption tunnel that shields their identity and prevents anyone from seeing their traffic or personal data. A VPN can be especially useful while traveling abroad, while using public Wi-Fi, or for just about any situation where you want to keep your data and identity private, which for most people is always. Express VPN claims to have the fastest, most reliable, and lowest latency VPN service available, using exclusive access to what they call “Lightway” a VPN protocol that offers faster speeds, security, and reliability. Express VPN claims that users can safely connect to over 3,000 VPN servers in 160 locations, across 94 countries, for powerful speeds and unlimited bandwidth.
Pros
- Unlimited bandwidth (no caps) allows you to watch streaming video and to video chat.
- Use your account for up to five supported devices — smartphone, tablet, router, laptop, desktop, etc.
- 24/7 live chat support
- Thirty-day money-back guarantee
- Available for Apple and Android mobile devices
- No activity logs or connection logs
Cons
- A bit pricey, with a monthly subscription price of $12.95
- Some users have reported difficulties canceling the service, connectivity issues, and unexpected interruptions in service.
Seller/Developer: ExprsVPN LLC
Size: 53.3 MB for iOS/32 MB for Android
Compatibility: iOS 12.0 or later. Compatible with iPhone, iPad, and iPod touch; and Android 5.0+
Languages: English, Spanish, Danish, Dutch, Finnish, French, German, Italian, Japanese, Korean, Norwegian, Bokmal, Polish, Portuguese, Russian, Swedish, Thai, Turkish
Price: Monthly subscription plans start at $12.99, discounts for longer terms
Privacy Policy: www.expressvpn.com/privacy-policy
Mullvad VPN
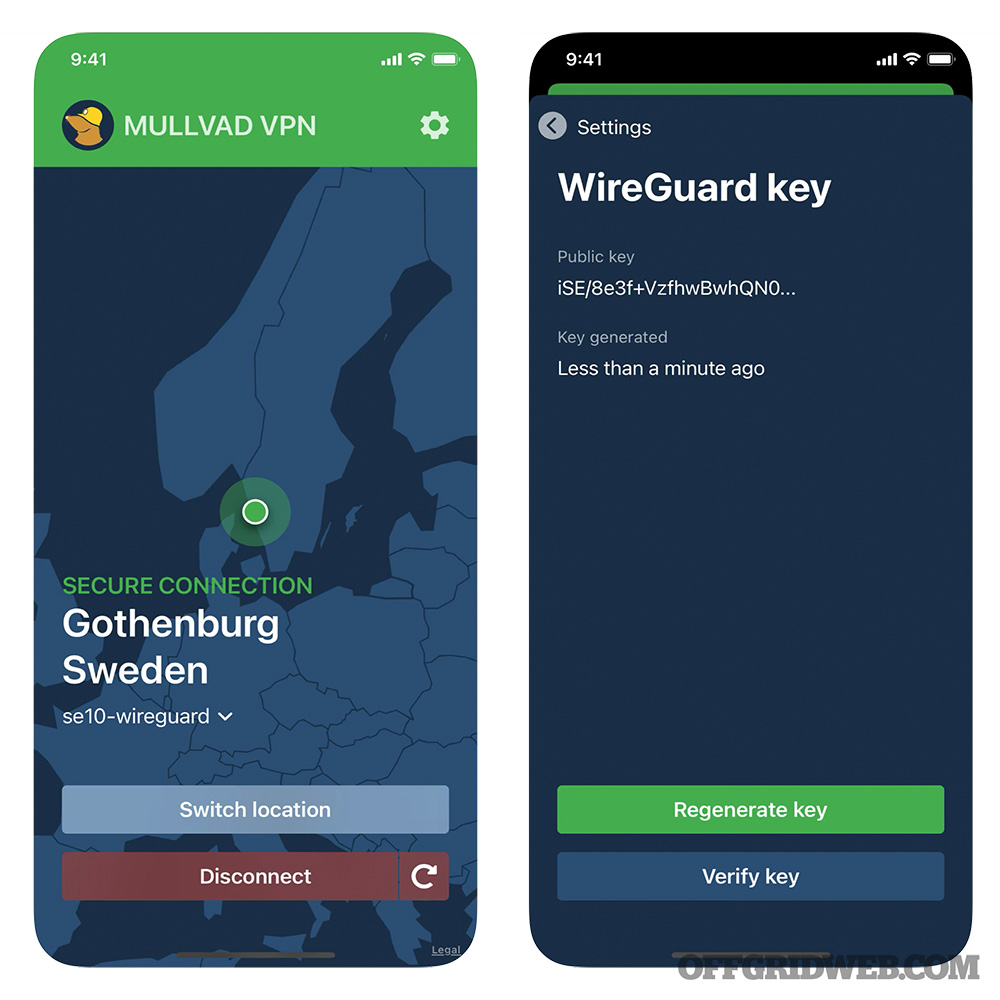
Mullvad is another VPN, but with an additional level of privacy — it’s one of the only apps where you don’t have to provide any personal information to use it, and allows you to use a number of payment options, including cash and cryptocurrencies. Your data travels through an encrypted tunnel to one of Mullvad’s VPN servers, and then to the website you’re visiting. Your IP address is replaced by one of theirs, ensuring that your device’s activity and location are never linked to you. Mullvad VPN offers strong encryption, DNS Leak Protection, and an Automatic Kill Switch to keep all your unprotected data secure in the event your connection to the VPN drops out. Mullvad VPN will allow up to five simultaneous connections, and its OpenVPN config files will work on most modern devices.
Pros
- Strong encryption to keep your data private while using public Wi-Fi connections
- Mullvad keeps no activity logs
- Anonymous payment options via cash or cryptocurrencies available
- No personal information is needed — no email, no phone number, no name, no personal information at all.
- Easy to use, just download and install app. No complicated setup or multi-step registration process.
- Use your account on up to five devices.
- Flat rate of $5.50 per month
- Thirty-day money-back guarantee
- Available for Apple and Android mobile devices
Cons
- Only available in English
- Some users have reported connectivity issues and screen freeze.
Seller/Developer: Mullvad VPN AB
Size: 18.1 MB for iOS/21 M for Android
Compatibility: iOS 12.0 or later. Compatible with iPhone, iPad, and iPod touch, and Android 7.0+
Languages: English
Price: $5.50 per month
Privacy Policy: mullvad.net/en/help/privacy-policy/
Avast Mobile Security
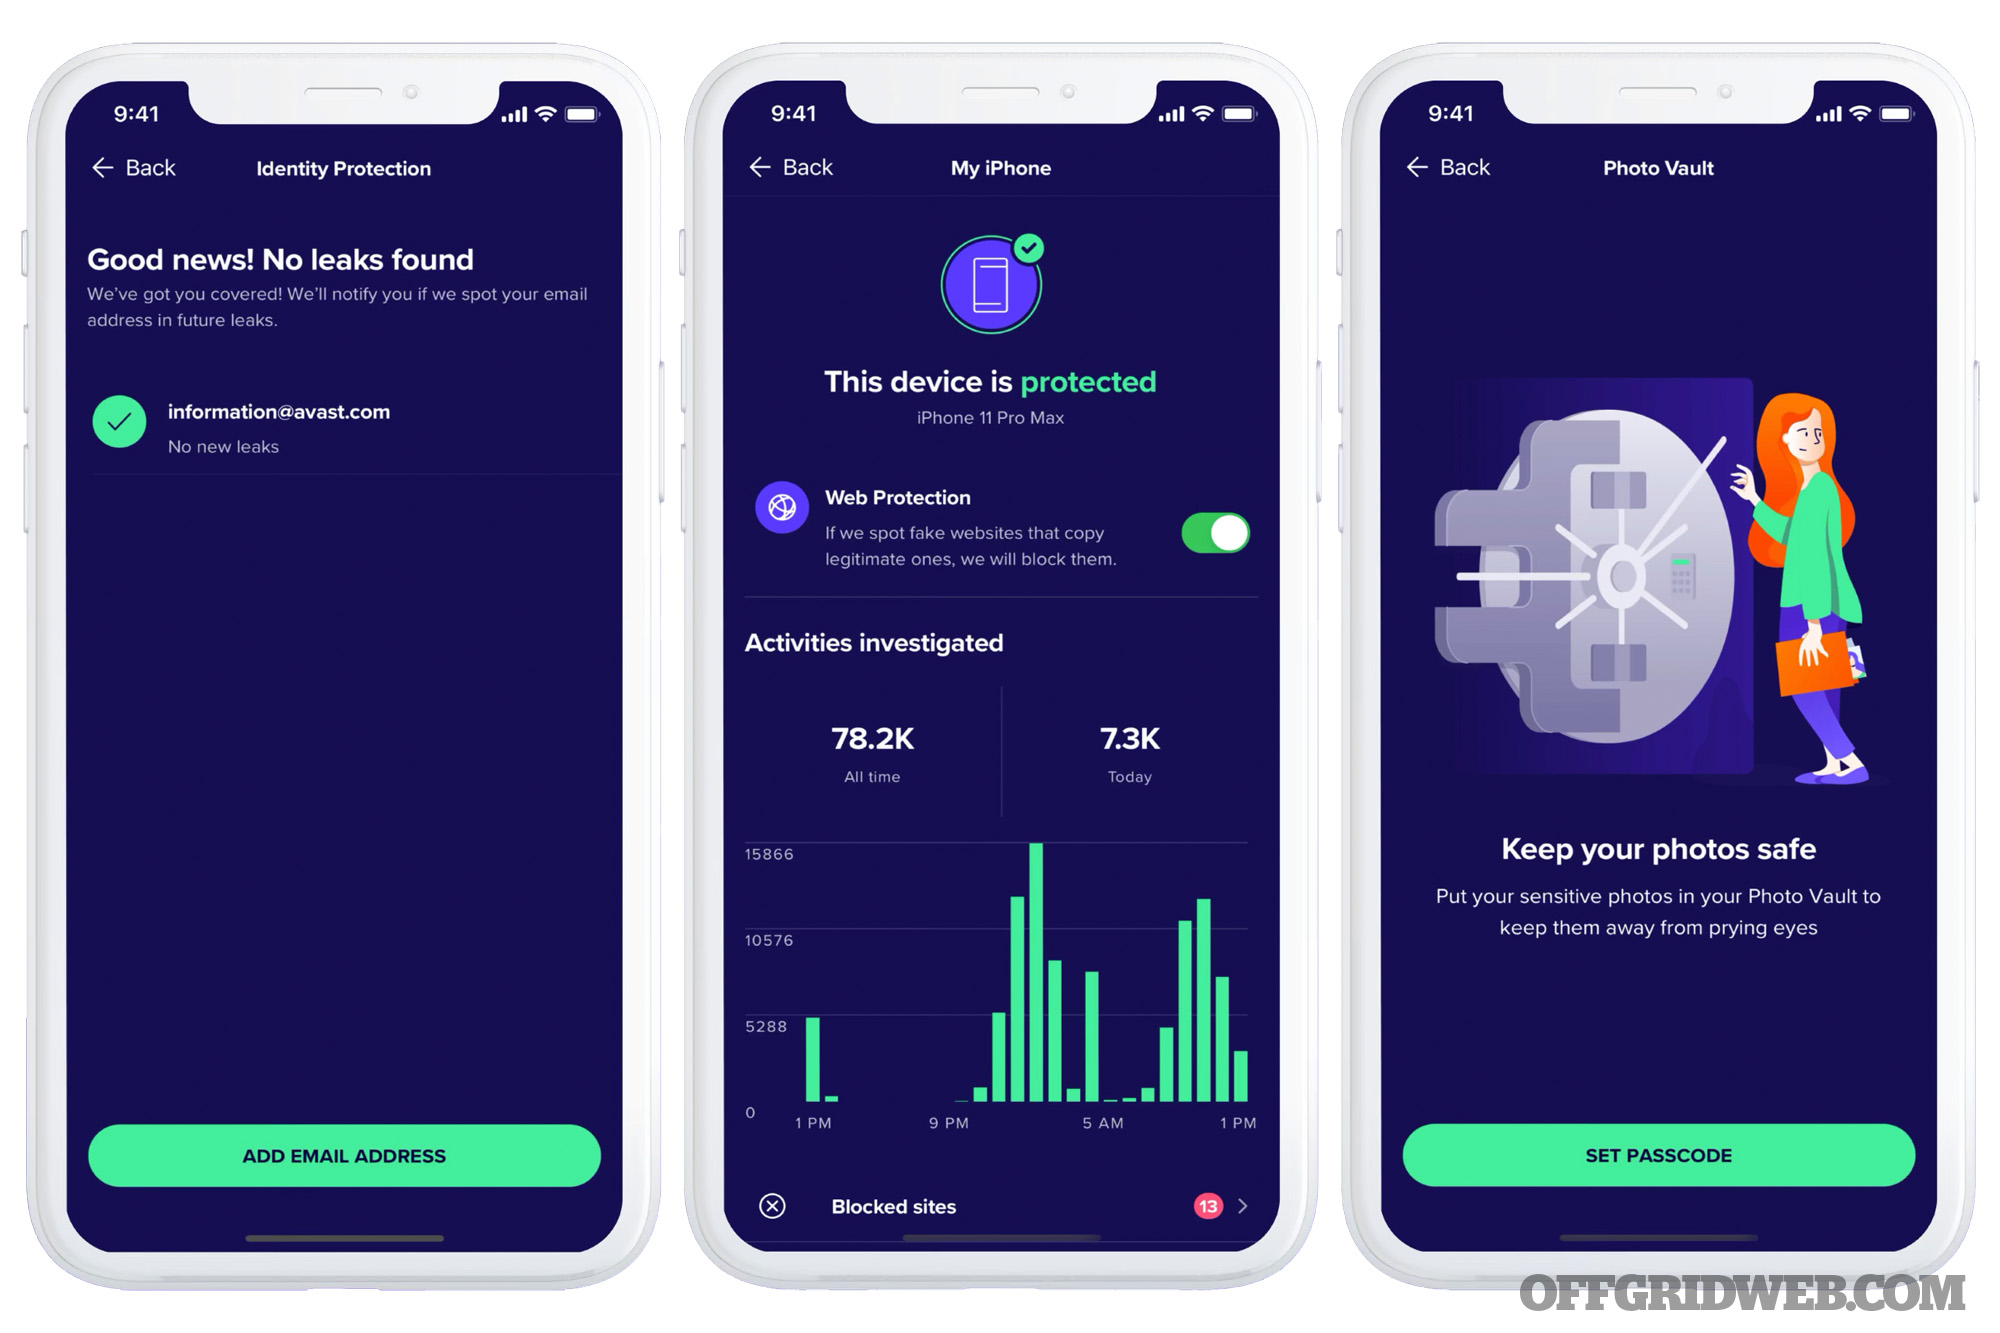
Avast Antivirus provides well-rounded mobile protection by automatically scanning for viruses, malware, spyware, Trojans, and infected links. Avast Mobile Security & Antivirus also offers a comprehensive array of free, and premium features to provide advanced protection and privacy to help you manage and secure your devices.
Pros
- Antivirus engine automatically scans for viruses, malware, spyware, Trojans, and warns you of malicious or infected apps
- Cleans out unnecessary files, data, installation and residual files, system caches, and gallery thumbnails to free up more space
- Encrypt and secure photos/images with a PIN code pattern or a fingerprint password
- Web browser protection against malicious URLs, scan and block malware-infected links for safer web browsing
- Verify the security of Wi-Fi networks
- Premium features provide advanced protection and security; ultimate users also have access to a VPN (Virtual Private Network) to keep your online activities private
Cons
- While basic app is free, premium services require in-app purchases.
- Avast direct customer support, which allows the user to contact customer support directly from the app, is a premium feature. Some users have reported difficulties accessing customer support while using the basic (free) app.
- Some users have complained about the frequency of advertising, which for some users interferes with the user’s ability to use the app.
Seller/Developer: AVAST Software s.r.o.
Size: 52.4 MB
Compatibility: iOS 12.0 or later. Compatible with iPhone, iPad, and iPod touch; Android 4.0.3 and up
Languages: English, Czech, Dutch, French, German, Hindi, Japanese, Italian, Korean, Polish, Portuguese, Russian, Thai, Simplified & Traditional Chinese, Turkish, Spanish, Vietnamese
Price: Free (extra fees to remove advertising and for premium features)
Privacy Policy: www.avast.com
Prey Anti-Theft
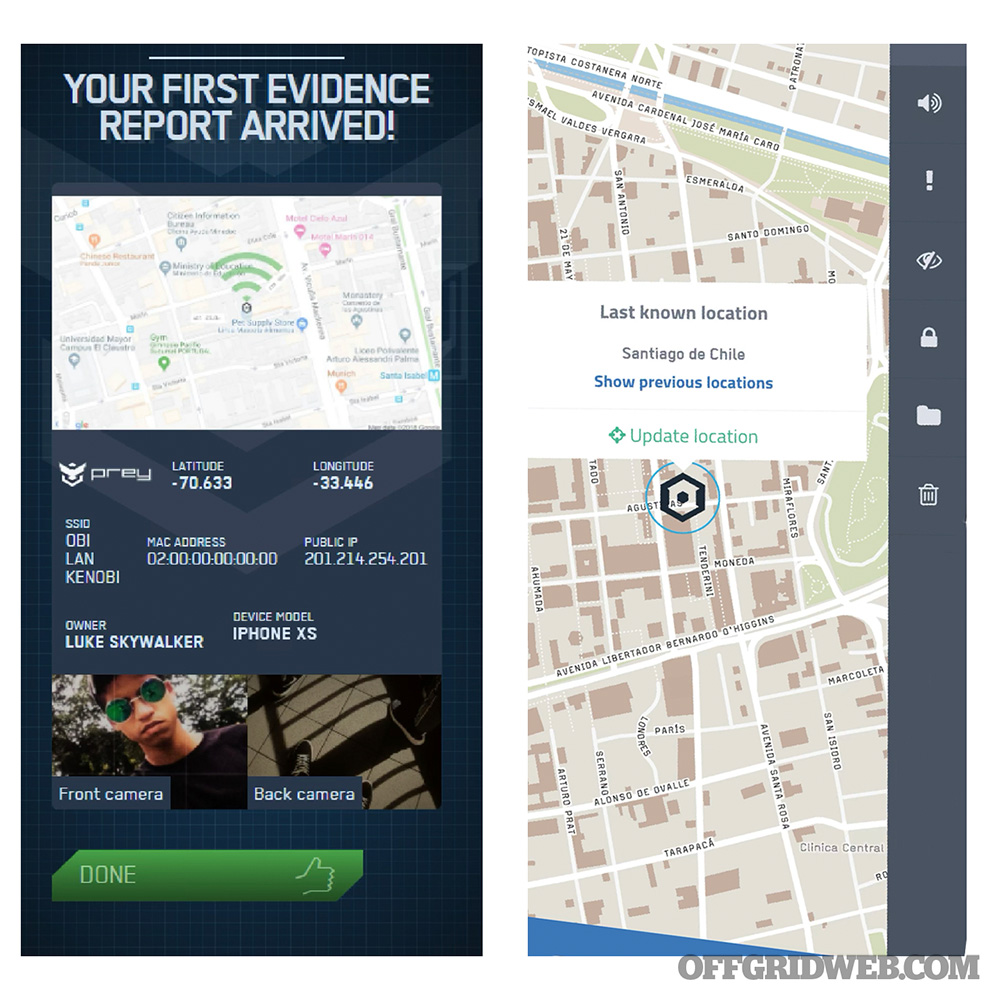
Prey is an anti-theft phone tracker and data security app that allows you to know the real-time location of a stolen or lost device. Using geolocation tracking, you can track mobile devices anywhere in the world. This app also protects data, and allows you to remotely wipe the information, or lock the device.
Pros
- Track, find, lock, and secure all your devices with just one app (Basic plan allows you to track up to three devices)
- Once a device is reported missing, Prey will track and send you detailed evidence reports, including remote pictures, locations, and nearby networks to help retrieve your device.
- Remotely lock your device, retrieve and wipe data, ring an alarm to locate a tablet
- Use Control Zones to monitor device movement, and location history to detect unusual activity
- Educational and nonprofit discounts available
- No long-term contracts
- Available for Apple and Android mobile devices
Cons
- Basic Plan is free but includes limited features.
- No data protection, and no reactive security on Basic Plan. Advanced features (Premium Plan) are available, for a monthly fee.
- Some users have complained about the customer support.
- Language options limited to English and Spanish
- Some users have reported compatibility issues with iOS, and issues navigating menus.
Seller/Developer: Prey, Inc.
Size: 69.2 MB
Compatibility: iOS 8.0 or later. Compatible with iPhone, iPad, and iPod touch; Android 5.0 and up
Languages: English, Spanish
Price: Free (extra fees for premium features)
Privacy Policy: www.preyproject.com/terms
KYMS
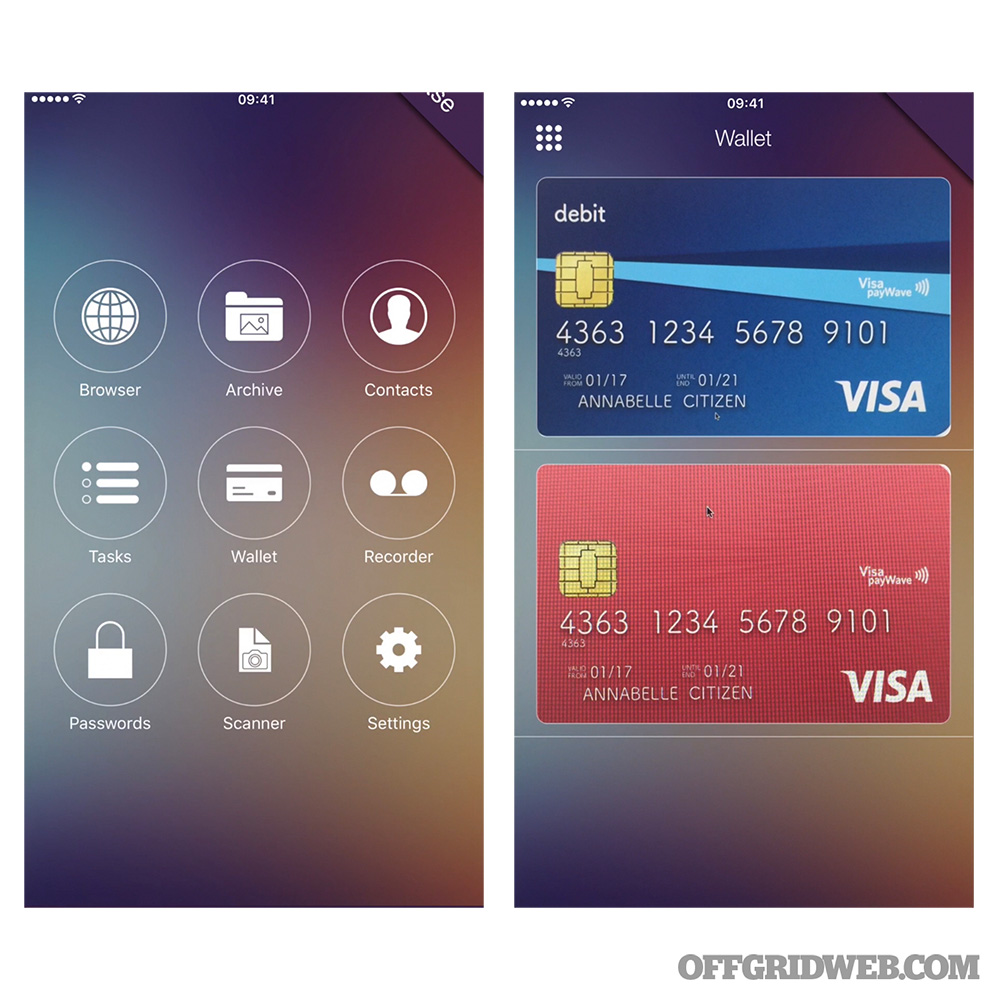
KYMS is intended to be an protective digital vault that allows you to hide and encrypt multimedia files, text documents, passwords, and other sensitive files with AES Encryption. The developers also claim that KYMS is the only app that decrypts files in real time, with no waiting. Tap on a video, for example, and it’ll start playing immediately while the decryption continues in the background. Media can be imported from device local files, device camera, or from a Mac or PC through Wi-Fi.
Pros
- Resources to protect your data, while still maintaining easy access
- Relatively easy to use and navigate. Log in with four-digit PIN and alphanumeric password.
- Encrypt and protect: photos, videos, documents, contacts, credit cards, audio files*
- Decrypts files in real time
- Private bookmarks and history
- Integrated, multi-tab, fast internet browser
- Available for Apple and Android mobile devices
- Basic app is free, and allows you to encrypt videos and photos.
- Premium package will also encrypt contacts, tasks, credit cards, audio files, and scanned documents.*
Cons
- Some users have difficulties retrieving files, and have had the app crash when attempting to work on a saved file.
- Some users have complained about the frequency of advertising, which for some interferes with the user’s ability to navigate the app and access data.
- Extra fees to remove ads and for premium services
Seller/Developer: IdeaSolutions S.r.I.
Size: 98.3 MB for iOS/13 M for Android
Compatibility: iOS 9.0 or later. Compatible with iPhone, iPad, and iPod touch; Android 4.0.3 and up
Languages: English, French, German, Italian, Japanese, Korean, Russian, Simplified & Traditional Chinese, Spanish
Price: Free (extra fees to remove advertising and for premium features)
Privacy Policy: www.iubenda.com/privacy-policy/40989235
*Some features require Premium service.
OpenKeyChain
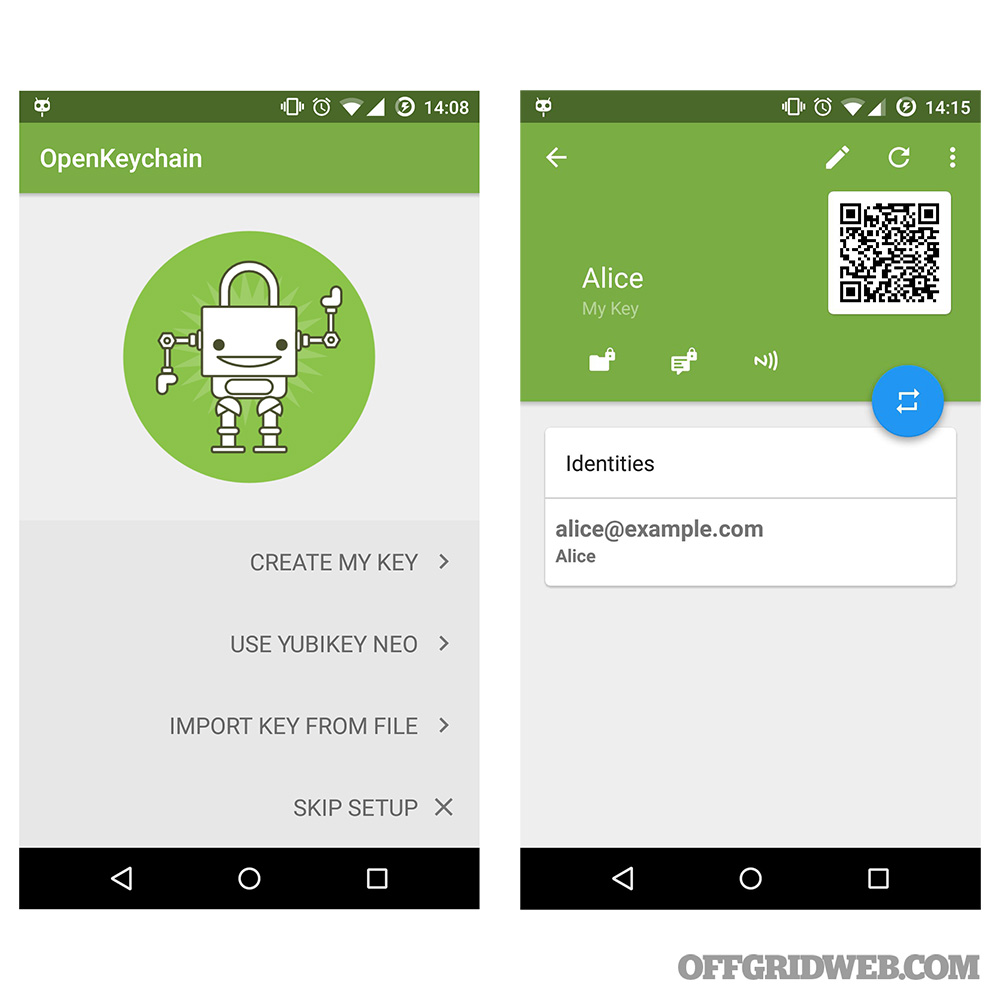
As concerns for online security and privacy continue to grow, more and more people are looking for effective ways to protect themselves and their data. According to the developer, OpenKeyChain allows you to use your device to communicate more privately and securely, by using encryption to ensure your messages are only accessible by the intended recipient. Modern encryption is based on digital “keys,” so OpenKeyChain stores and manages your keys, and the keys of the people you communicate with, to encrypt and decrypt messages quickly and efficiently.
Pros
- Easy to use, simple step-by-step instructions
- Simply copy and paste the key to your notes
- Scan QR codes to add other people’s keys
- App is free, with upgrades available for in-app purchase.
Cons
- Using with your email app may require some settings changes
- Some users have found the interface not to be “user-friendly.”
- Some uses have reported “frequent crashes,” requiring reinstalling app.
- Only available for Android
Seller/Developer: Confidential Technologies GmbH
Size: 9.6 MB for Android
Compatibility: Android 4.0.3 and up
Languages: English, Spanish
Price: Free (extra fees to remove advertising and for premium features)
Privacy Policy: www.openkeychain.org/help/privacy-policy
Notes Lock
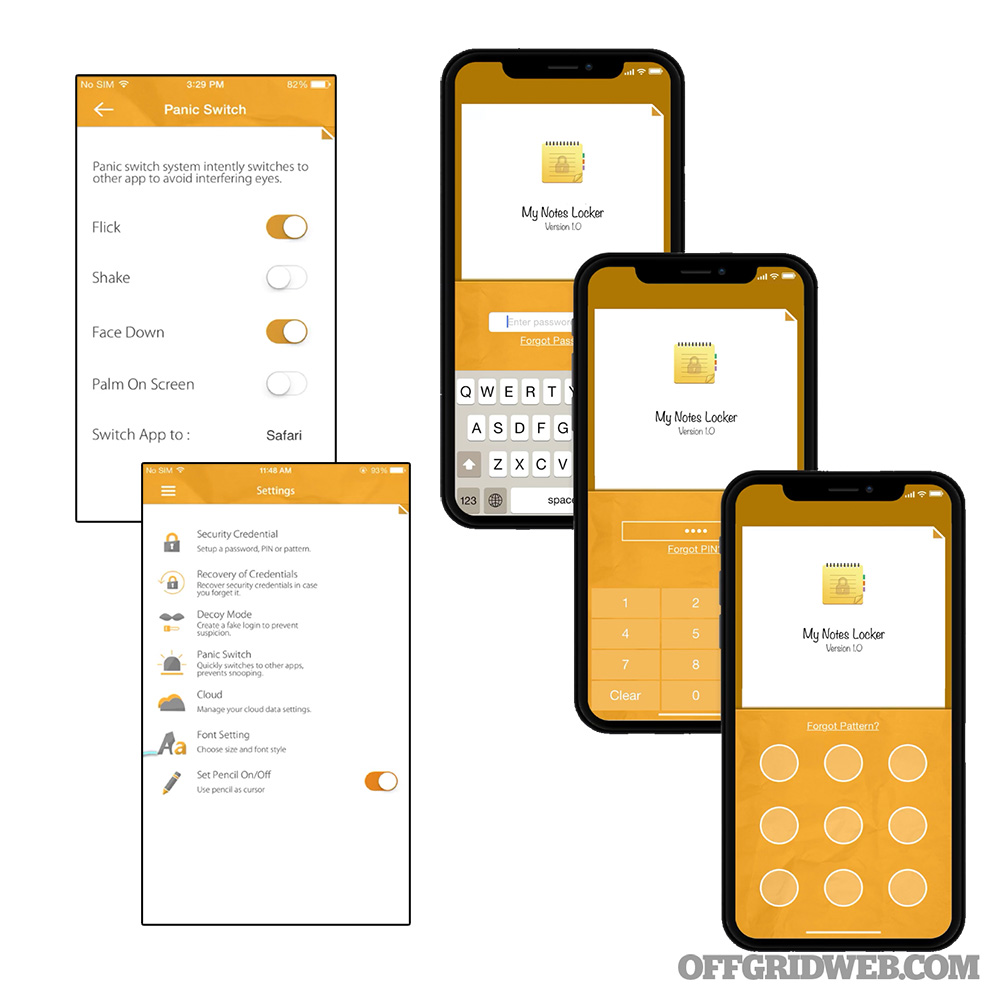
Notes Lock is a customizable, lockable, password-protected notepad that provides protection for private notes, lists, memos, photos, and audio recordings. Simple-to-use app provides multiple options, including downloadable themes, font style, and more. Notes Lock features advanced options such as decoy passwords for added security, and an increased level of protection/privacy.
Pros
- Three security credentials (password, PIN, and pattern)
- Built-in panic switch to immediately change to decoy app
- Takes images of unauthorized users
- Secure user interface
- Resources to protect your data, while still maintaining easy access
- Relatively easy to use and navigate
- Manage notes with multiple folders, attach photos, and customize using an assortment of font size and colors.
- Multiple views, including Tile and List view
- Available for Apple and Android mobile devices
Cons
- Only available in English
- Some users have complained about the frequency of advertising, which for some users interfered with their ability to navigate the app, and to input and access data.
- Some users have reported excessive pop-up ads.
Seller/Developer: NewSoftwares LLC
Size: 28.6 MB for iOS/14 M for Android
Compatibility: iOS 10.0 or later. Compatible with iPhone, iPad, iPod touch, and Mac; Android 4.0.3 and up
Languages: English
Price: Free (extra fees for premium package)
Privacy Policy: www.newsoftwares.net/legal/privacy/
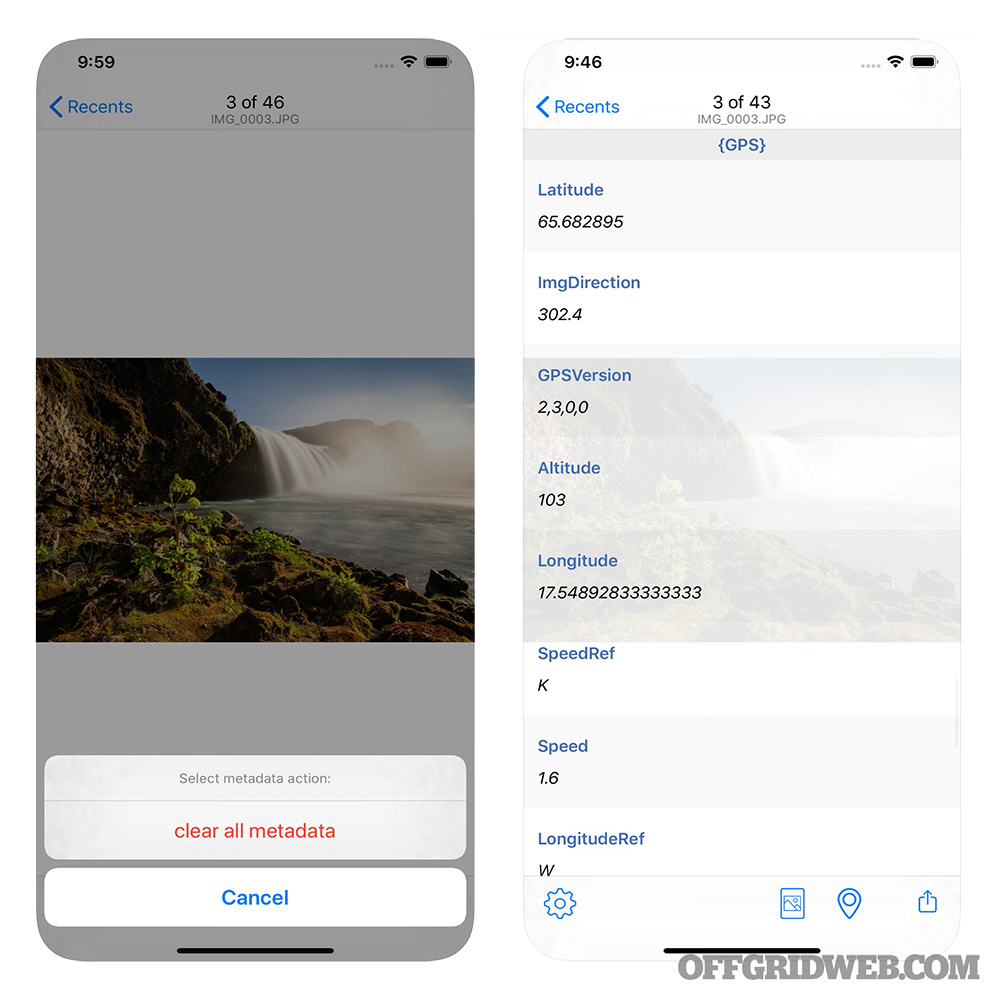
Photo Investigator
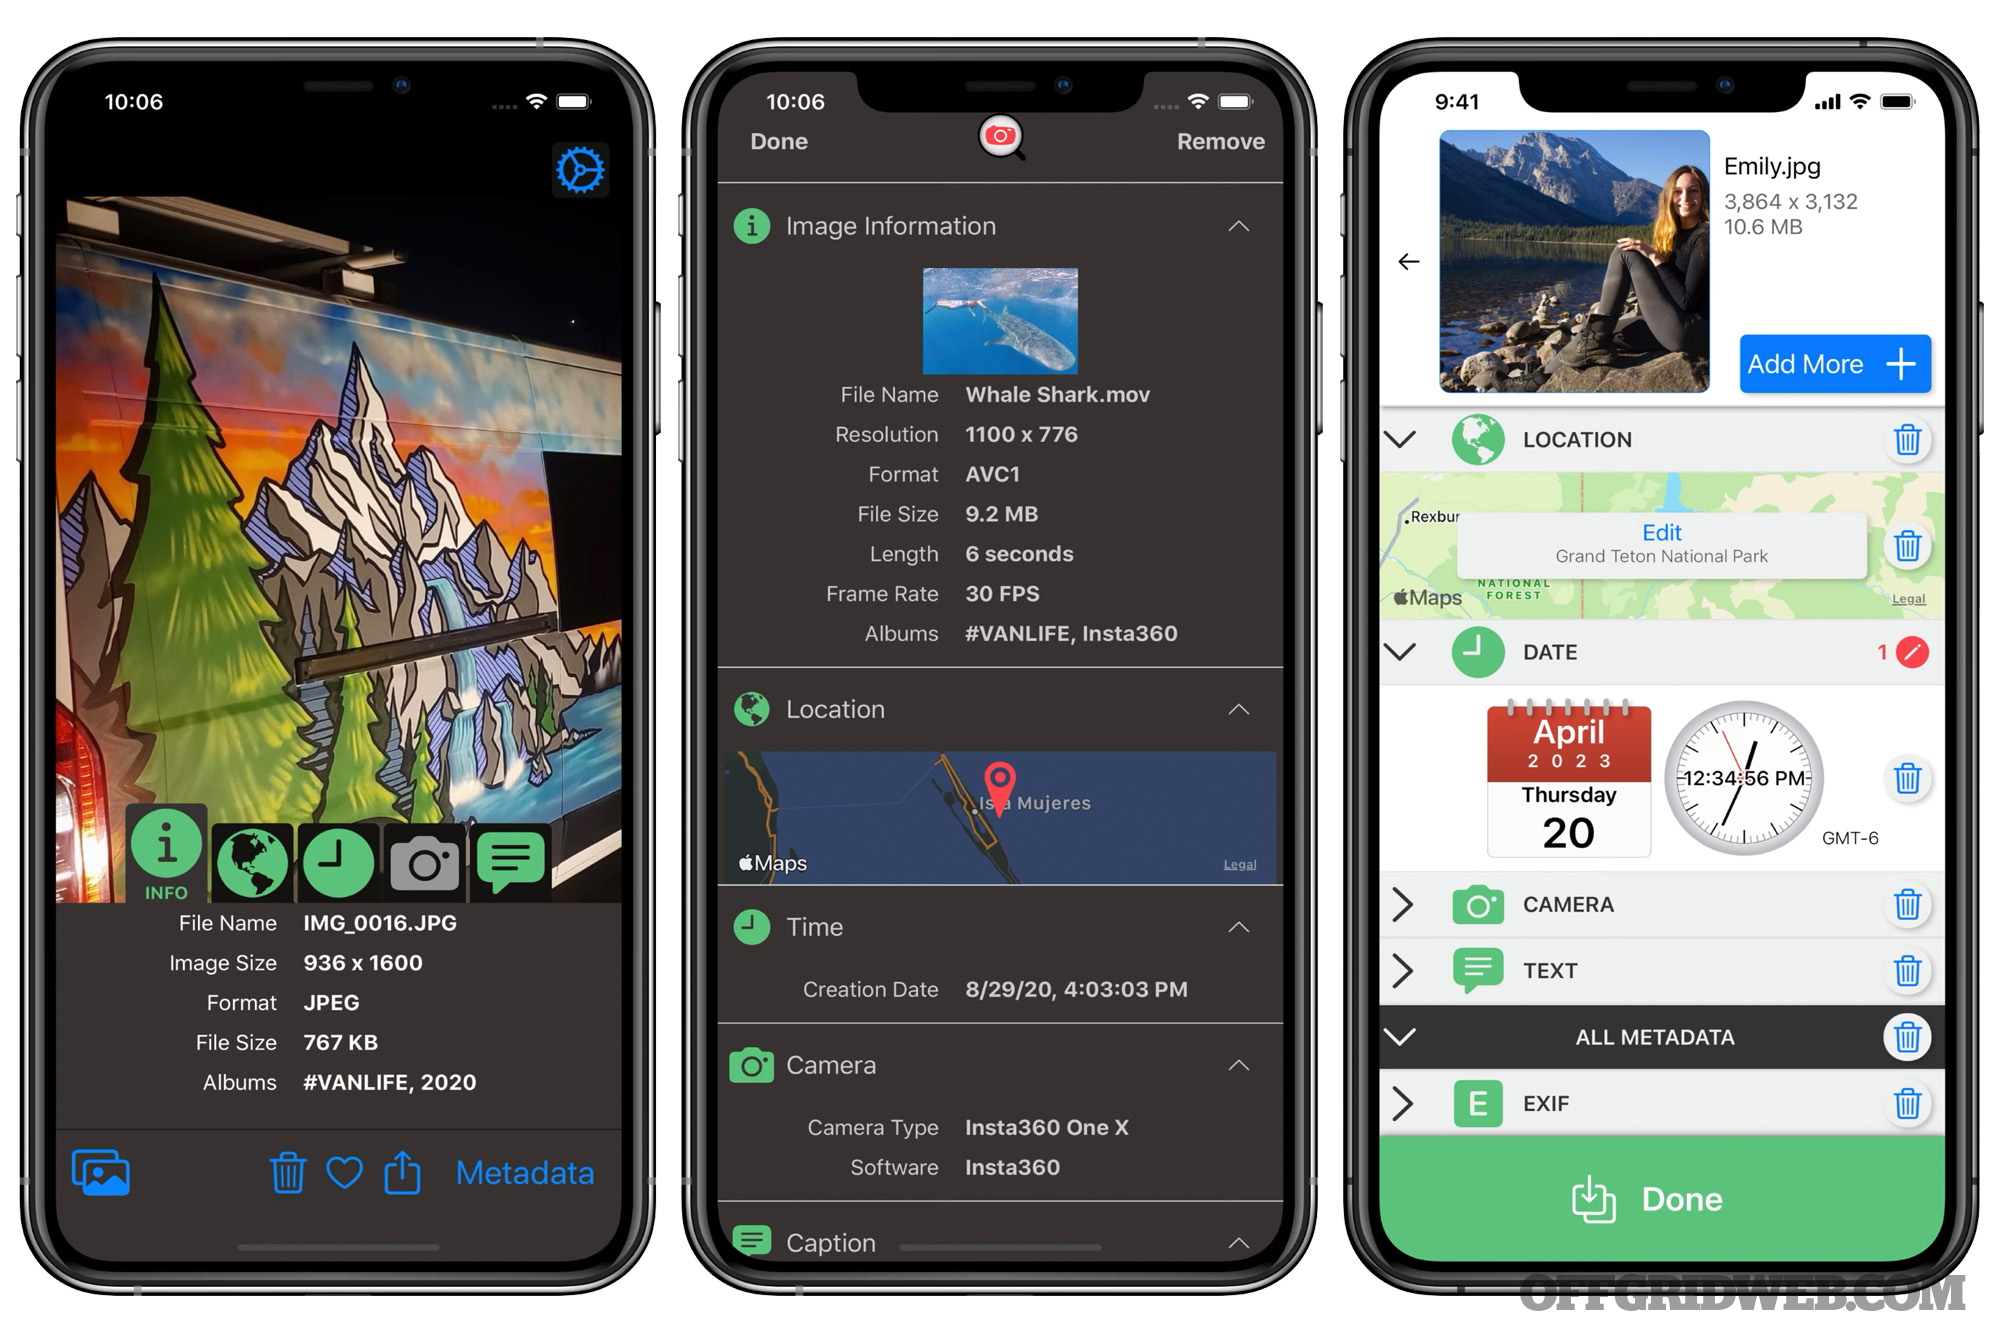
Photo Investigator is a free app that lets you quickly and easily view photo metadata. Metadata is the information embedded in the image file each time you take a photo with your cell phone or camera. Viewing this information lets you see not only where the photo was taken, but also the camera settings and the date and time the photo was taken. As such, it’s usually a good idea to remove sensitive metadata before sharing photos online or with other people.
Pros
- View, edit, and remove GPS EXIF metadata
- Easy to install and easy to use
- Photo map shows places you’ve been and the photos you’ve taken there
- Accessing photos from a particular region is as easy as tapping a bubble icon.
Cons
- Free version only lets you view metadata; to remove photo metadata requires in-app purchase.
- Some users have reported issues transitioning from the free to the premium version.
- Some users have reported issues with removing or editing metadata on the premium version.
- Only available for iOS
Seller/Developer: Daniel Anderson
Size: 28.5 MB for iOS
Compatibility: iOS 11.0 or later. Compatible with iPhone, iPad, and iPod touch, and Mac
Languages: English, Arabic, Catalan, Danish, Dutch, Finnish, French, German, Hebrew, Hindi, Indonesian, Italian, Japanese, Korean, Norwegian Bokmål, Portuguese, Russian, Simplified Chinese, Spanish, Swedish, Thai, Traditional Chinese, Turkish
Price: Free (extra fees for complete unlock – premium features)
Privacy Policy: a-r-studios.com/Media/PhotoInvestigatorPrivacyPolicy.html
Photo & Video Metadata Remover
According to Platinum City LLC, their app allows you to remove metadata from photos and video. Simple commands allow you to remove camera details and settings, precise location of where a photo was taken, and other information from images, which is embedded by the camera, device, or photo editing software.
Pros
- Remove EXIF, TIFF IPTC Data
- Can be used for photos and videos
- Ease of use and efficient
- Metadata isn’t removed from the original photo or video; a copy is made with the cleared metadata.
Cons
- Some users have complained about excessive ads.
- Only available in English and Spanish
- Extra fees to remove ads
- Only available for iOS
Seller/Developer: Platinum City LLC.
Size: 7.9 MB
Compatibility: iOS 10.0 or later. Compatible with iPhone, iPad, and iPod touch
Languages: English, Spanish
Price: Free (extra fees to remove advertising and for premium features)
Privacy Policy: platinumcityapps.com/privacy/
*Some of these features require Premium service.
Wrap-Up
The number of mobile devices across the globe, especially smartphones, is rapidly rising. But, as the use of mobile devices continues to grow, so does the need to protect your personal information and sensitive data from hackers and other cyber criminals. With mobile malware on the rise, there are plenty of reasons to be concerned. Fortunately, many application developers have stepped up, and the market now offers an abundance of choices to address mobile phone/device security issues. From VPNs to antivirus, and very sophisticated encryption technology, many of these advanced applications protect against cyberattacks, theft, and the loss of sensitive/private information while we’re online.
Whether you use your devices for business, pleasure or both, there are apps that cannot only provide very effective protection against the never-ending efforts of cybercriminals, but actually provide you with tools to be proactive about your security, while still enjoying the full functionality of your mobile device.
About the Author
Richard Duarte is a practicing attorney, urban survival consultant, writer, and firearms enthusiast. He’s the author of Surviving Doomsday: A Guide for Surviving an Urban Disaster, and The Quick Start Guide for Urban Preparedness. Follow Richard on Twitter @SurvivingDoomsd.