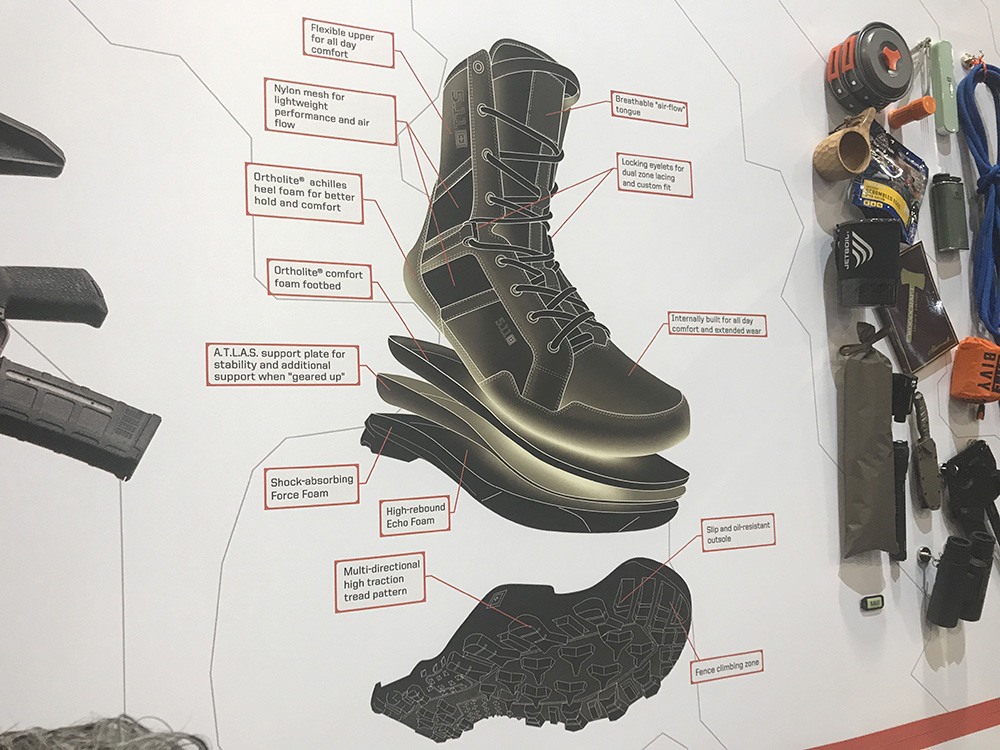
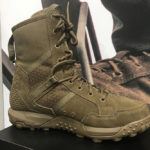
At SHOT Show 2020, we stopped by the 5.11 Tactical booth to check out some of the new products the company launched at the show. One of the most notable announcements was a major addition to the 5.11 footwear line, known as the new A.T.L.A.S. series. These shoes and boots bridge the gap between military-style duty gear and sport-oriented consumer footwear, and they place a strong emphasis on comfort while carrying heavy loads.
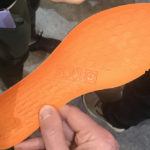
A.T.L.A.S. stands for All Terrain Load Assistance System, which speaks to this purpose. Most of us have experienced foot soreness while hiking or walking with a loaded backpack — all that weight is distributed onto the soles of your feet. 5.11 Tactical addressed this issue by combining a proprietary high-rebound foam with a stiff A.T.L.A.S. support plate. The plate is designed to spread your weight and offer stability, while the foam cushions each step.
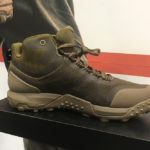
The 5.11 Tactical A.T.L.A.S. line has initially launched with three models: low-cut trainer, mid-cut boot, and 8-inch boot. The latter is available in standard and side-zip variants. Note: the trainer does not include the stiffened support plate, and is therefore better-suited to comfort with lighter packs.
These models will be offered in black and dark coyote tan. MSRP is $120 for the trainer, $140 for the mid-cut boot, and $150 for the 8-inch boot. We’ve already snagged a pair of the trainer shoes, so we’ll be trying them out soon and reporting back with our thoughts.
For more information on the 5.11 Tactical A.T.L.A.S. line, go to 511tactical.com.
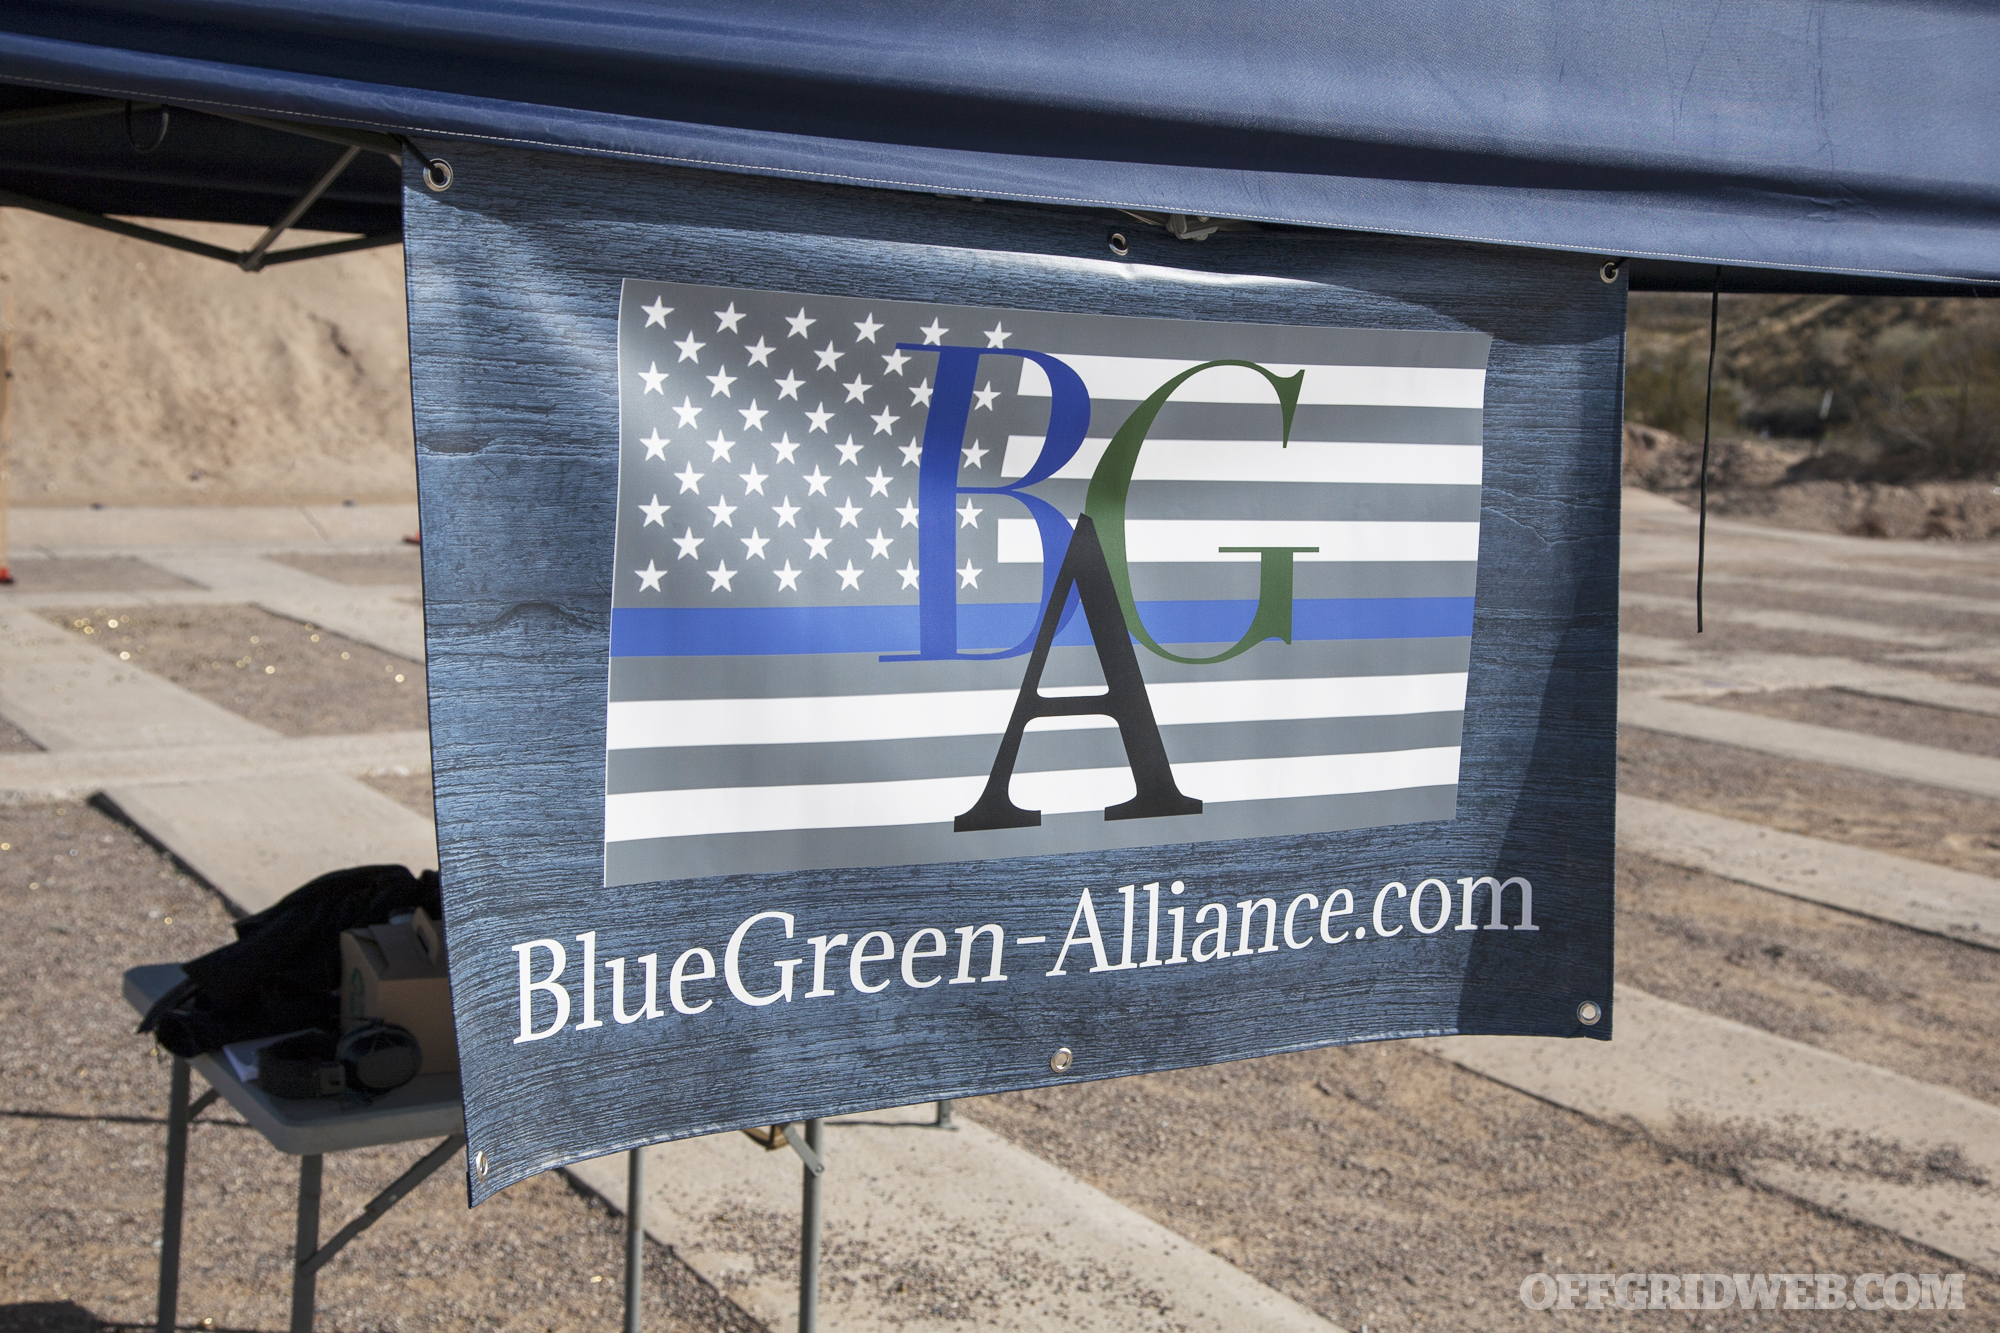
We appreciate high-end guns and gear as much as anyone, but it’s worthless to have the best tools money can buy if you aren’t capable of using them effectively when lives are on the line. Unless your ultimate goal is to show off your purchases on social media, you’d better be investing time and money into training. At the end of the day, the skills and confidence you carry within weigh nothing, will never be depleted, and are worth a thousand times more than the items in your pockets or your holster. With this in mind, we set a goal to receive more professional survival skill instruction in 2020, and started out with the Blue-Green Alliance Dynamic Marksmanship Class.
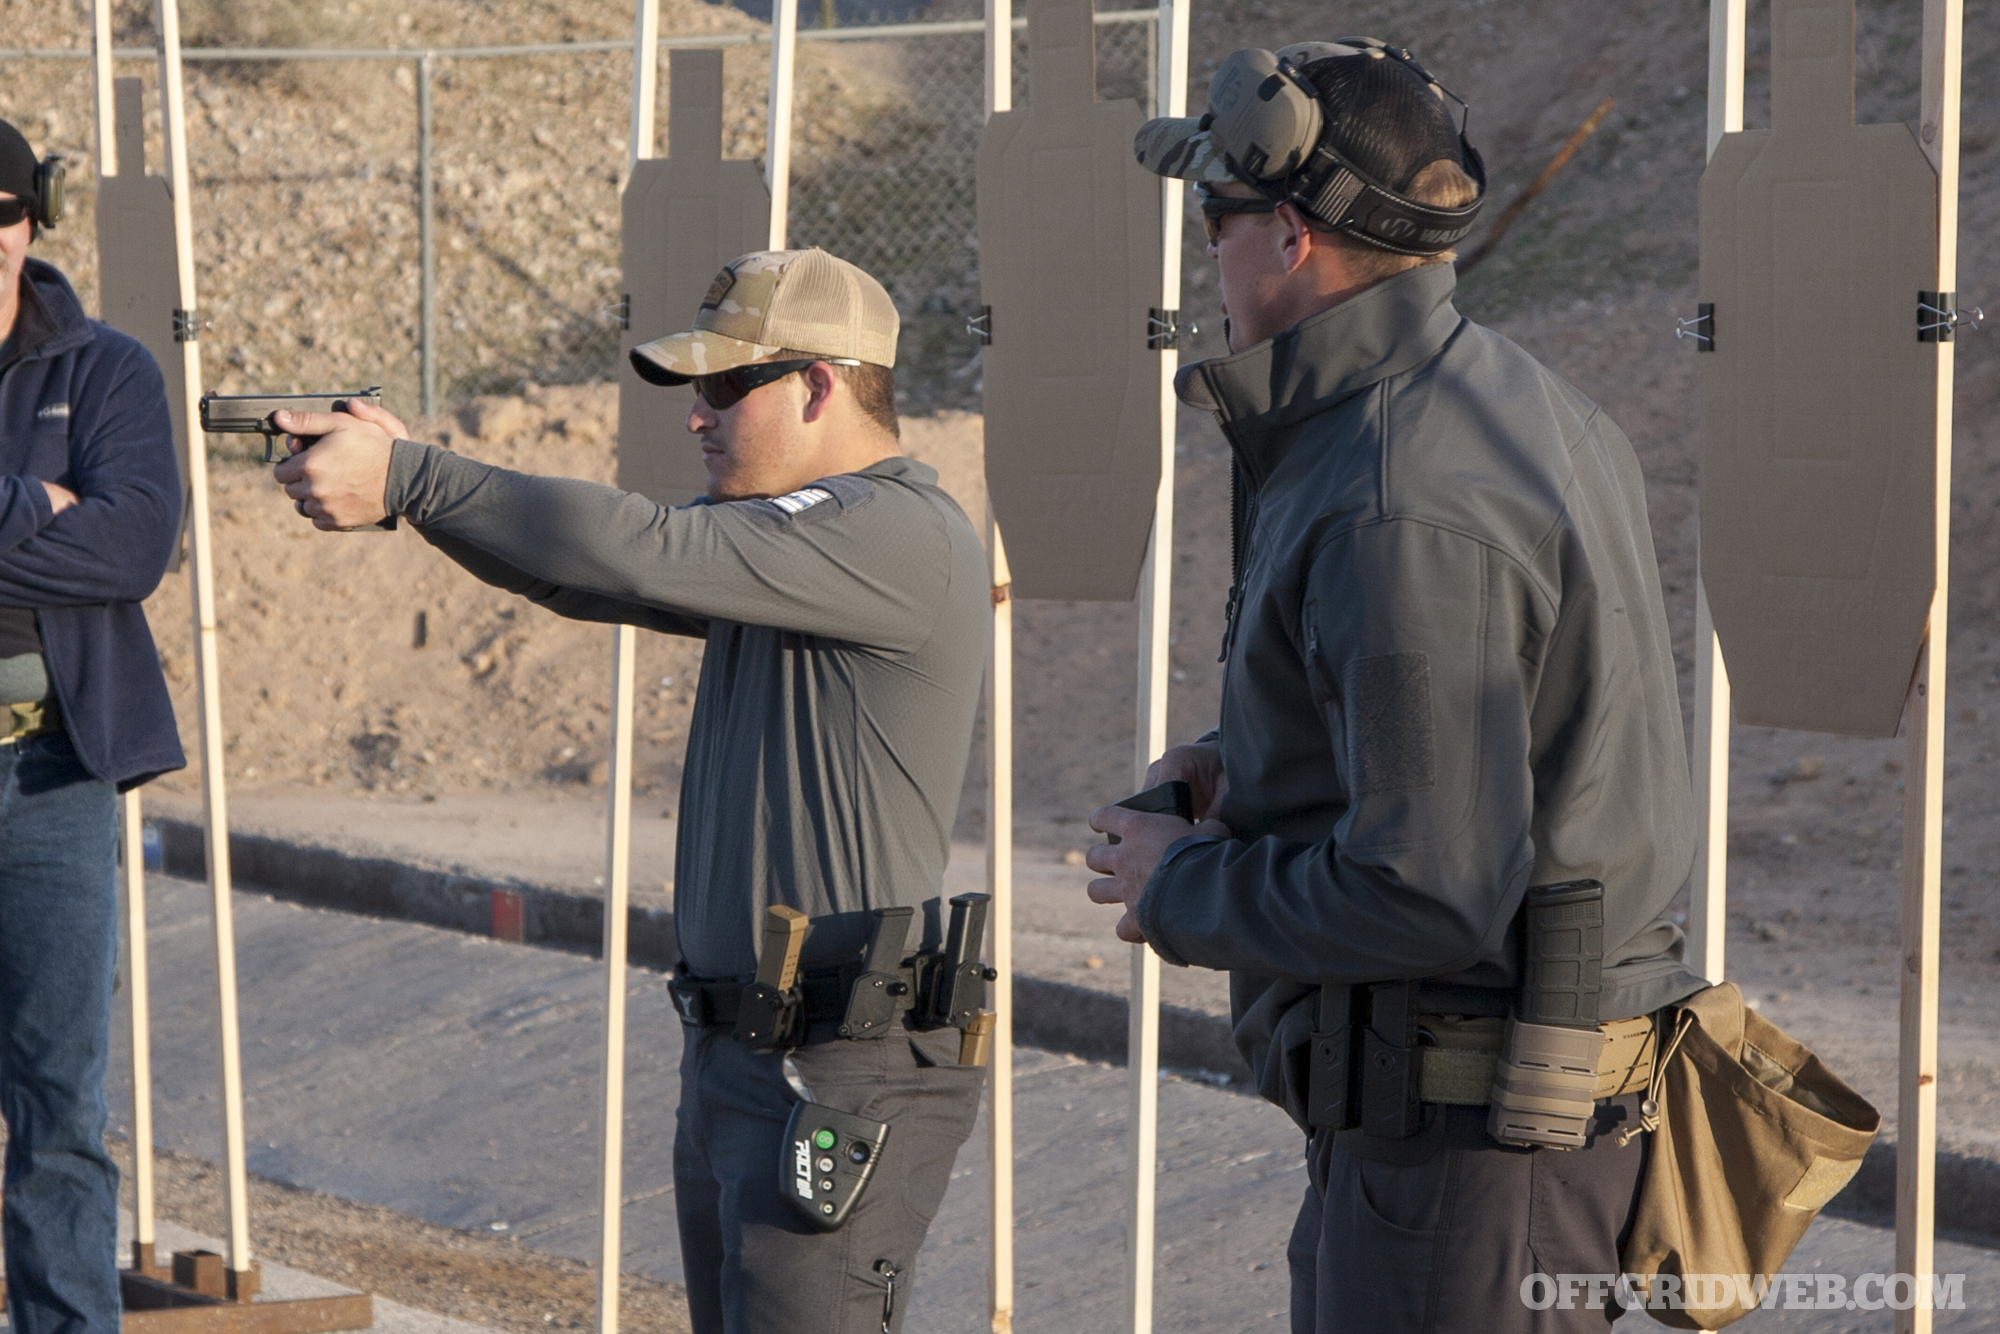
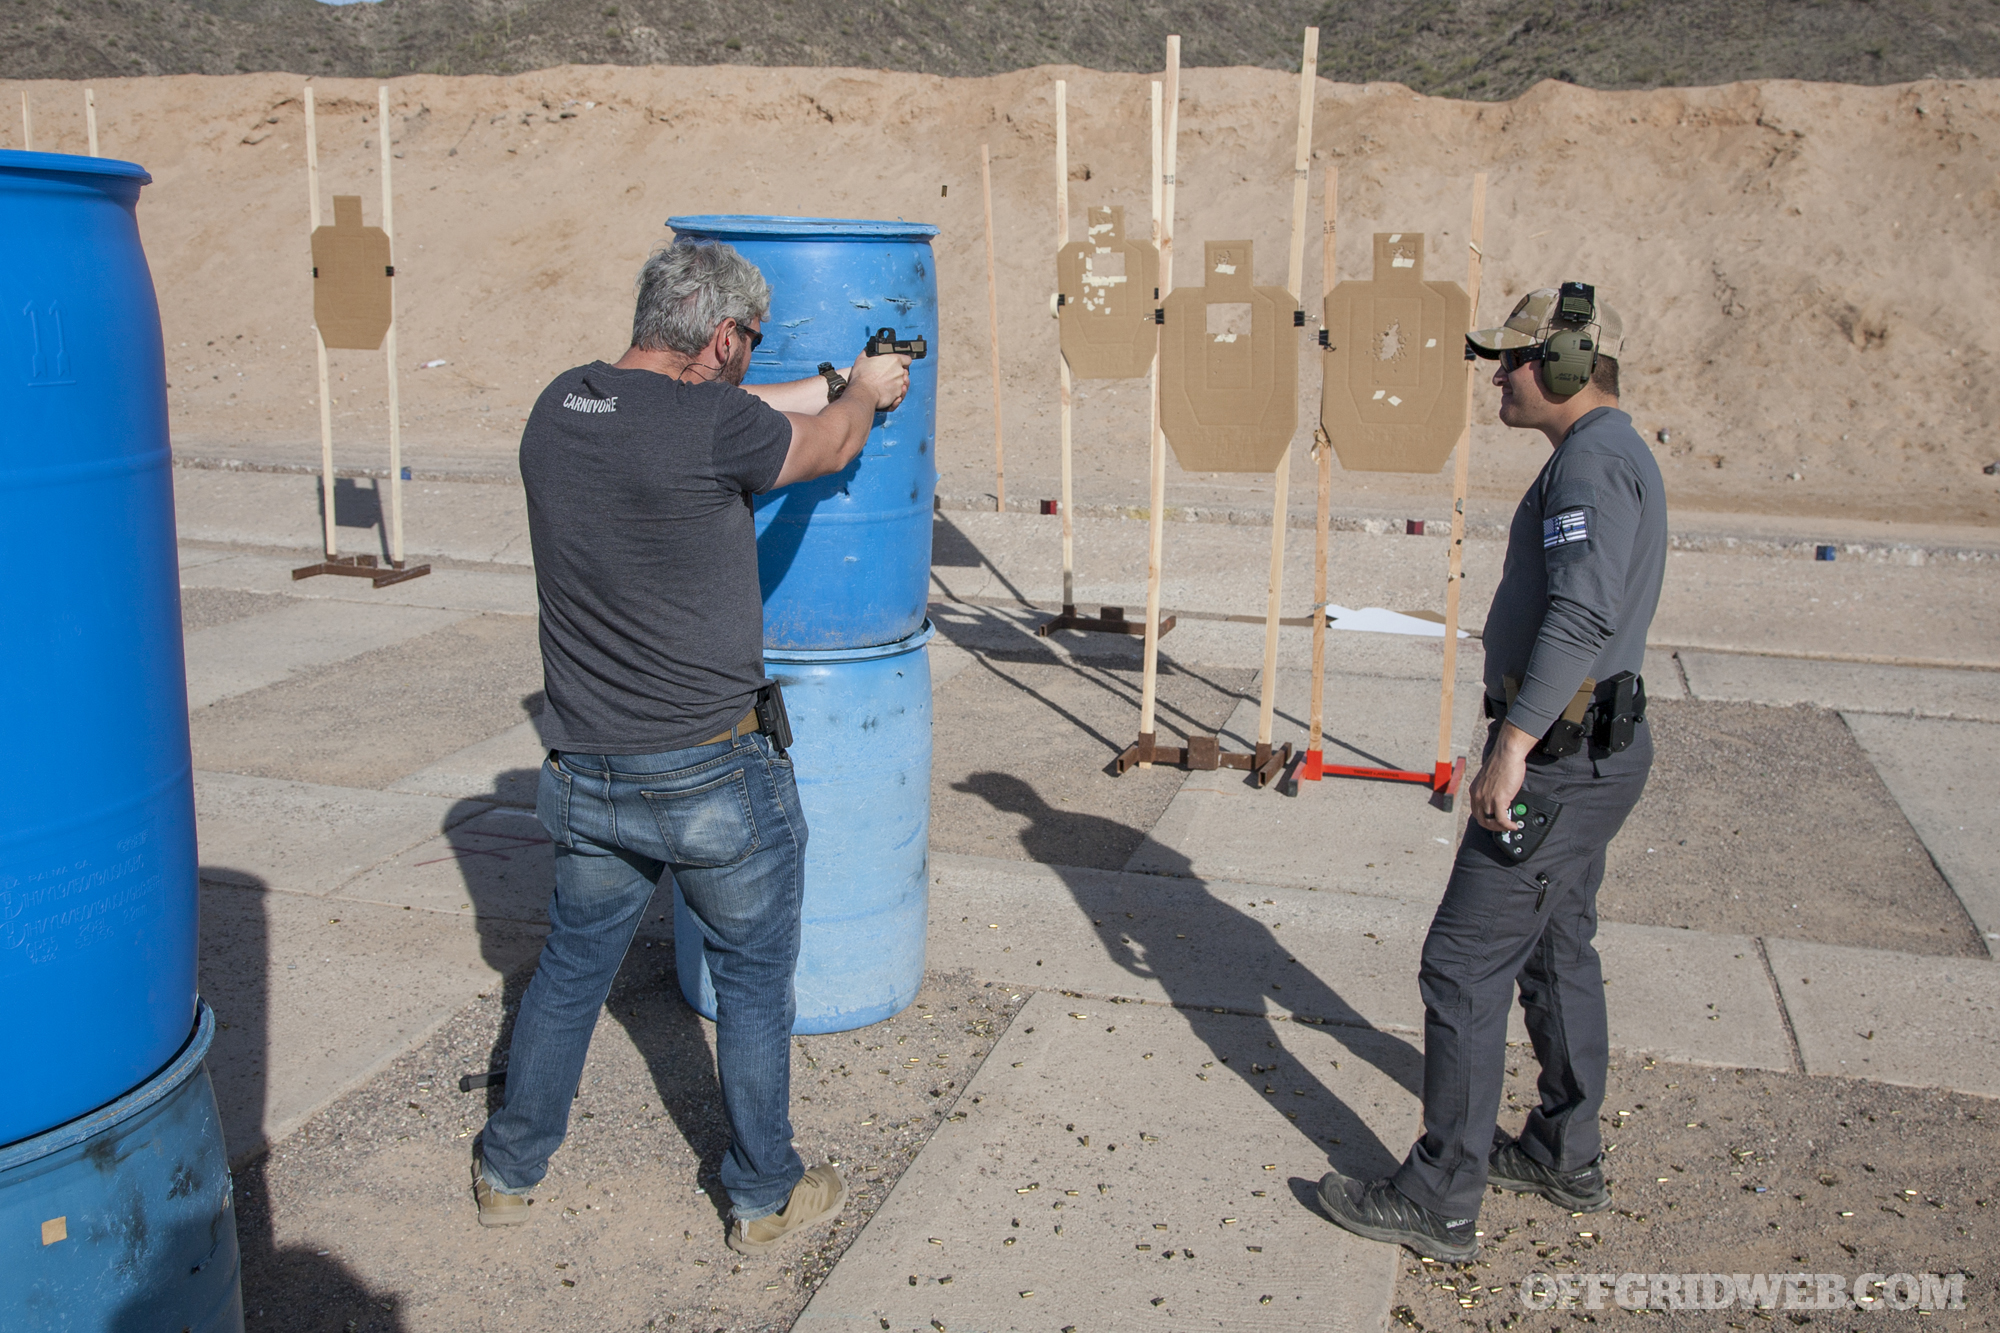
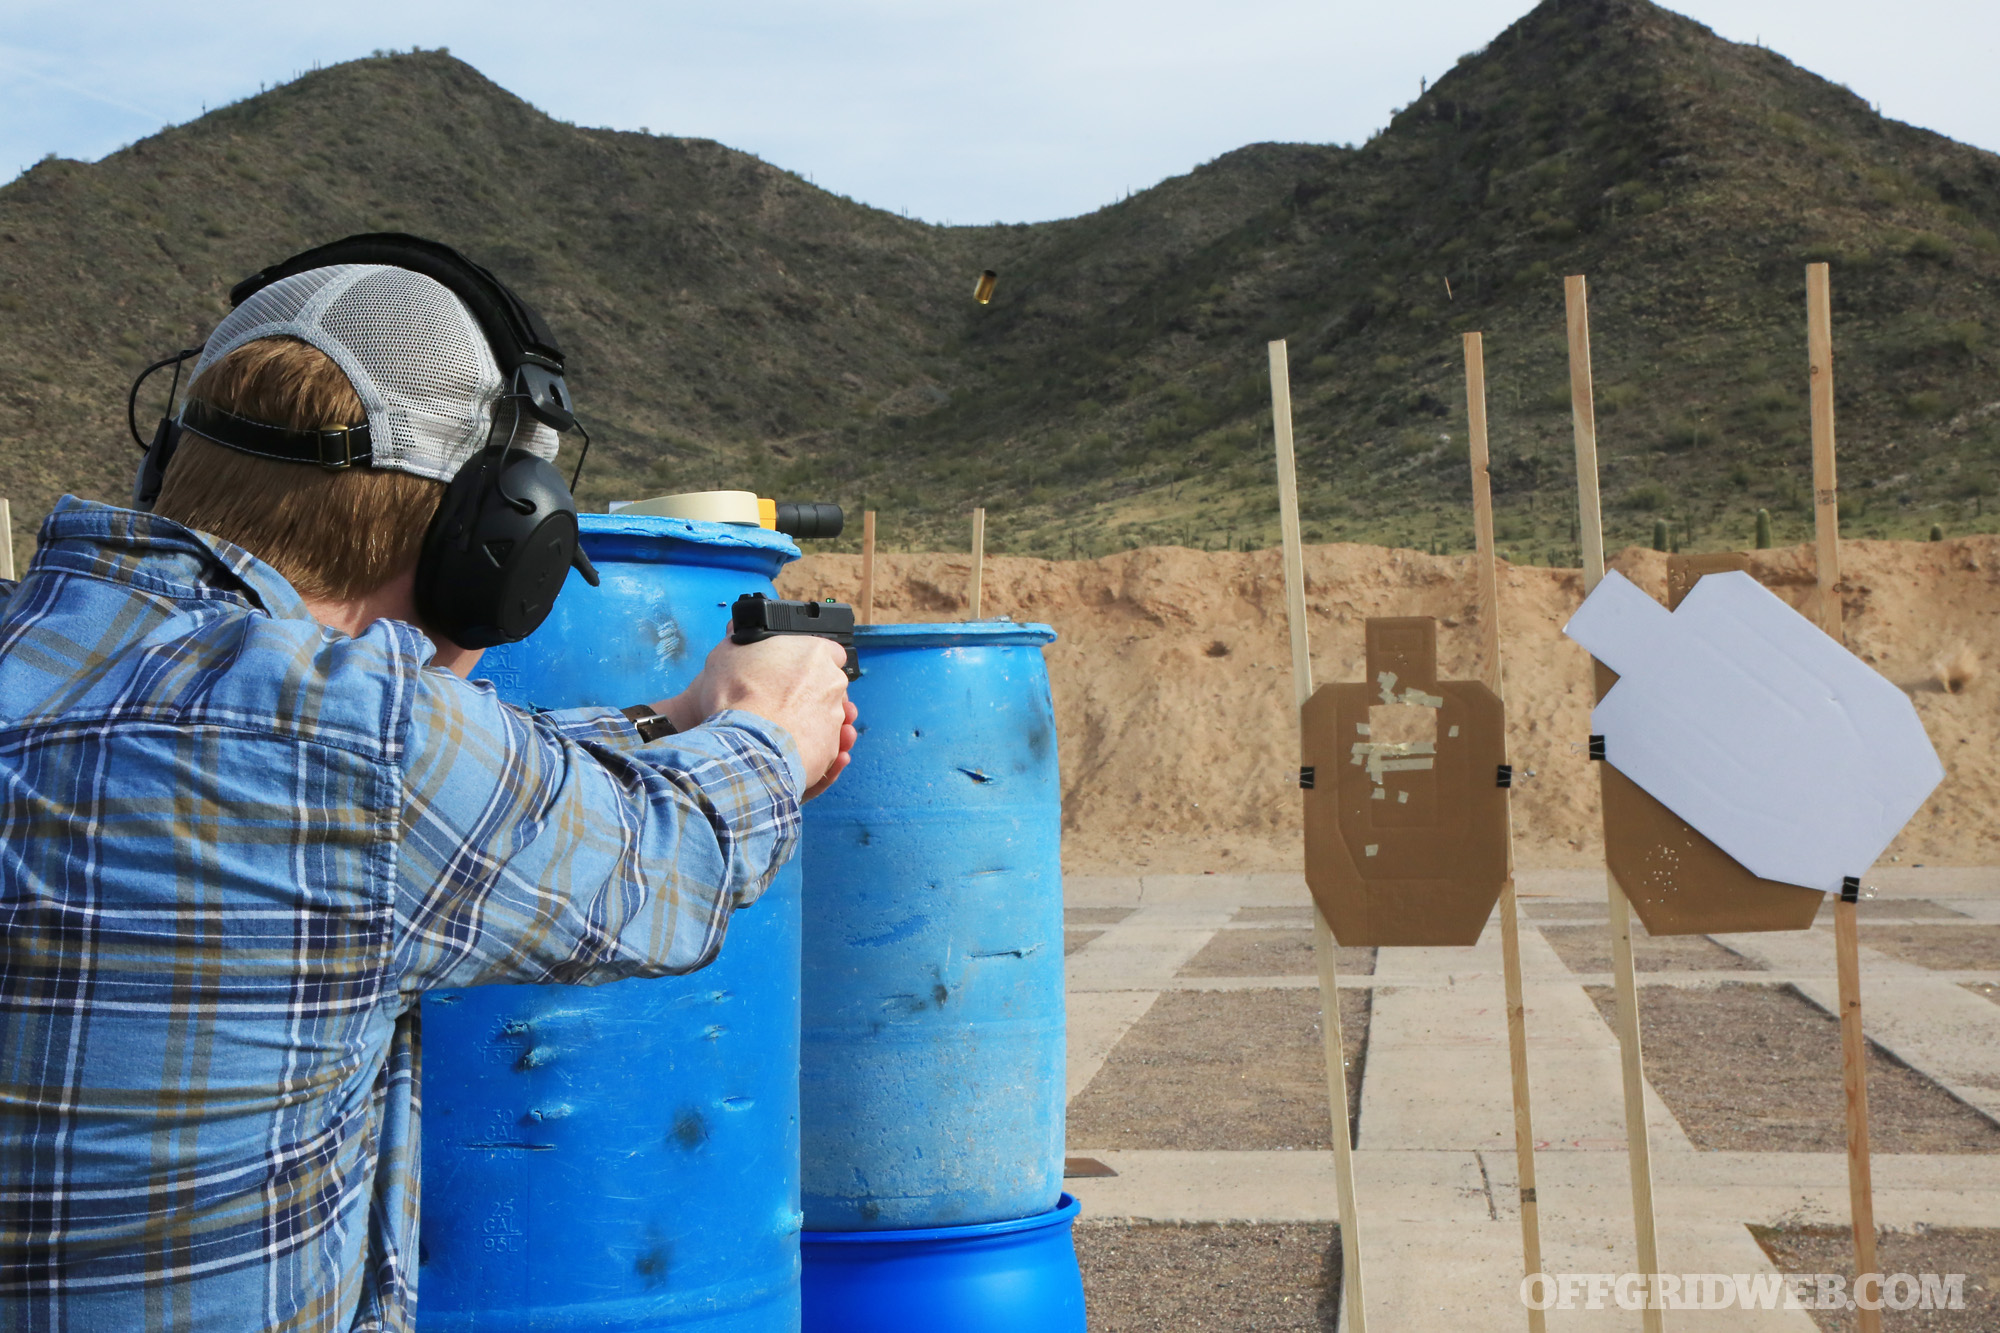
For one of our first steps in this educational journey, two members of our staff — myself and OFFGRID’s head Editor, Tom Marshall — attended a two-day Dynamic Marksmanship pistol class here in our home state of Arizona. The class was taught by Blue-Green Alliance, a firearms training company founded by two Force Recon Marines named Josh and Gabe.
The duo set out to use their military experience to help members of the law enforcement community become more proficient with their service weapons, hence the use of “green” and “blue” in the name. They also welcome civilians who wish to improve their concealed-carry preparedness and marksmanship. Their unique approach to training incorporates elements of sports psychology and biomechanics, because they believe there’s much shooters can learn from the way high-level athletes train.
Read on as Tom and I recount some of the biggest successes, biggest challenges, favorite drills, and lessons learned from this Blue-Green Alliance pistol class.
Biggest Success
Patrick McCarthy I’ll preface this by saying that I am what some of you might consider a novice shooter — essentially the opposite end of the spectrum from Tom. I’ve spent a decent amount of time plinking at ranges over the last ten years, and often practice my draw and dry fire drills at home. I felt I had established a baseline level of competence to defend myself, but I knew I had lots of room to improve, having never received any formal pistol shooting instruction. That had to change, and there was no better time than the present.
Although my performance on the course paled in comparison to other shooters in the class — most of whom had prior military and/or law enforcement experience — I felt that my biggest success at the class was the rate at which I improved. Both Gabe and Josh were patient and encouraging instructors, and offered tips on how to improve my form. More importantly, they helped me learn to self-diagnose mistakes. I soon found myself correctly identifying what I had done wrong after a run, and this has allowed me to keep improving after the class ended.
The net result is that after two days on the range and more than 800 rounds fired, I feel dramatically more confident and consistent with a handgun.
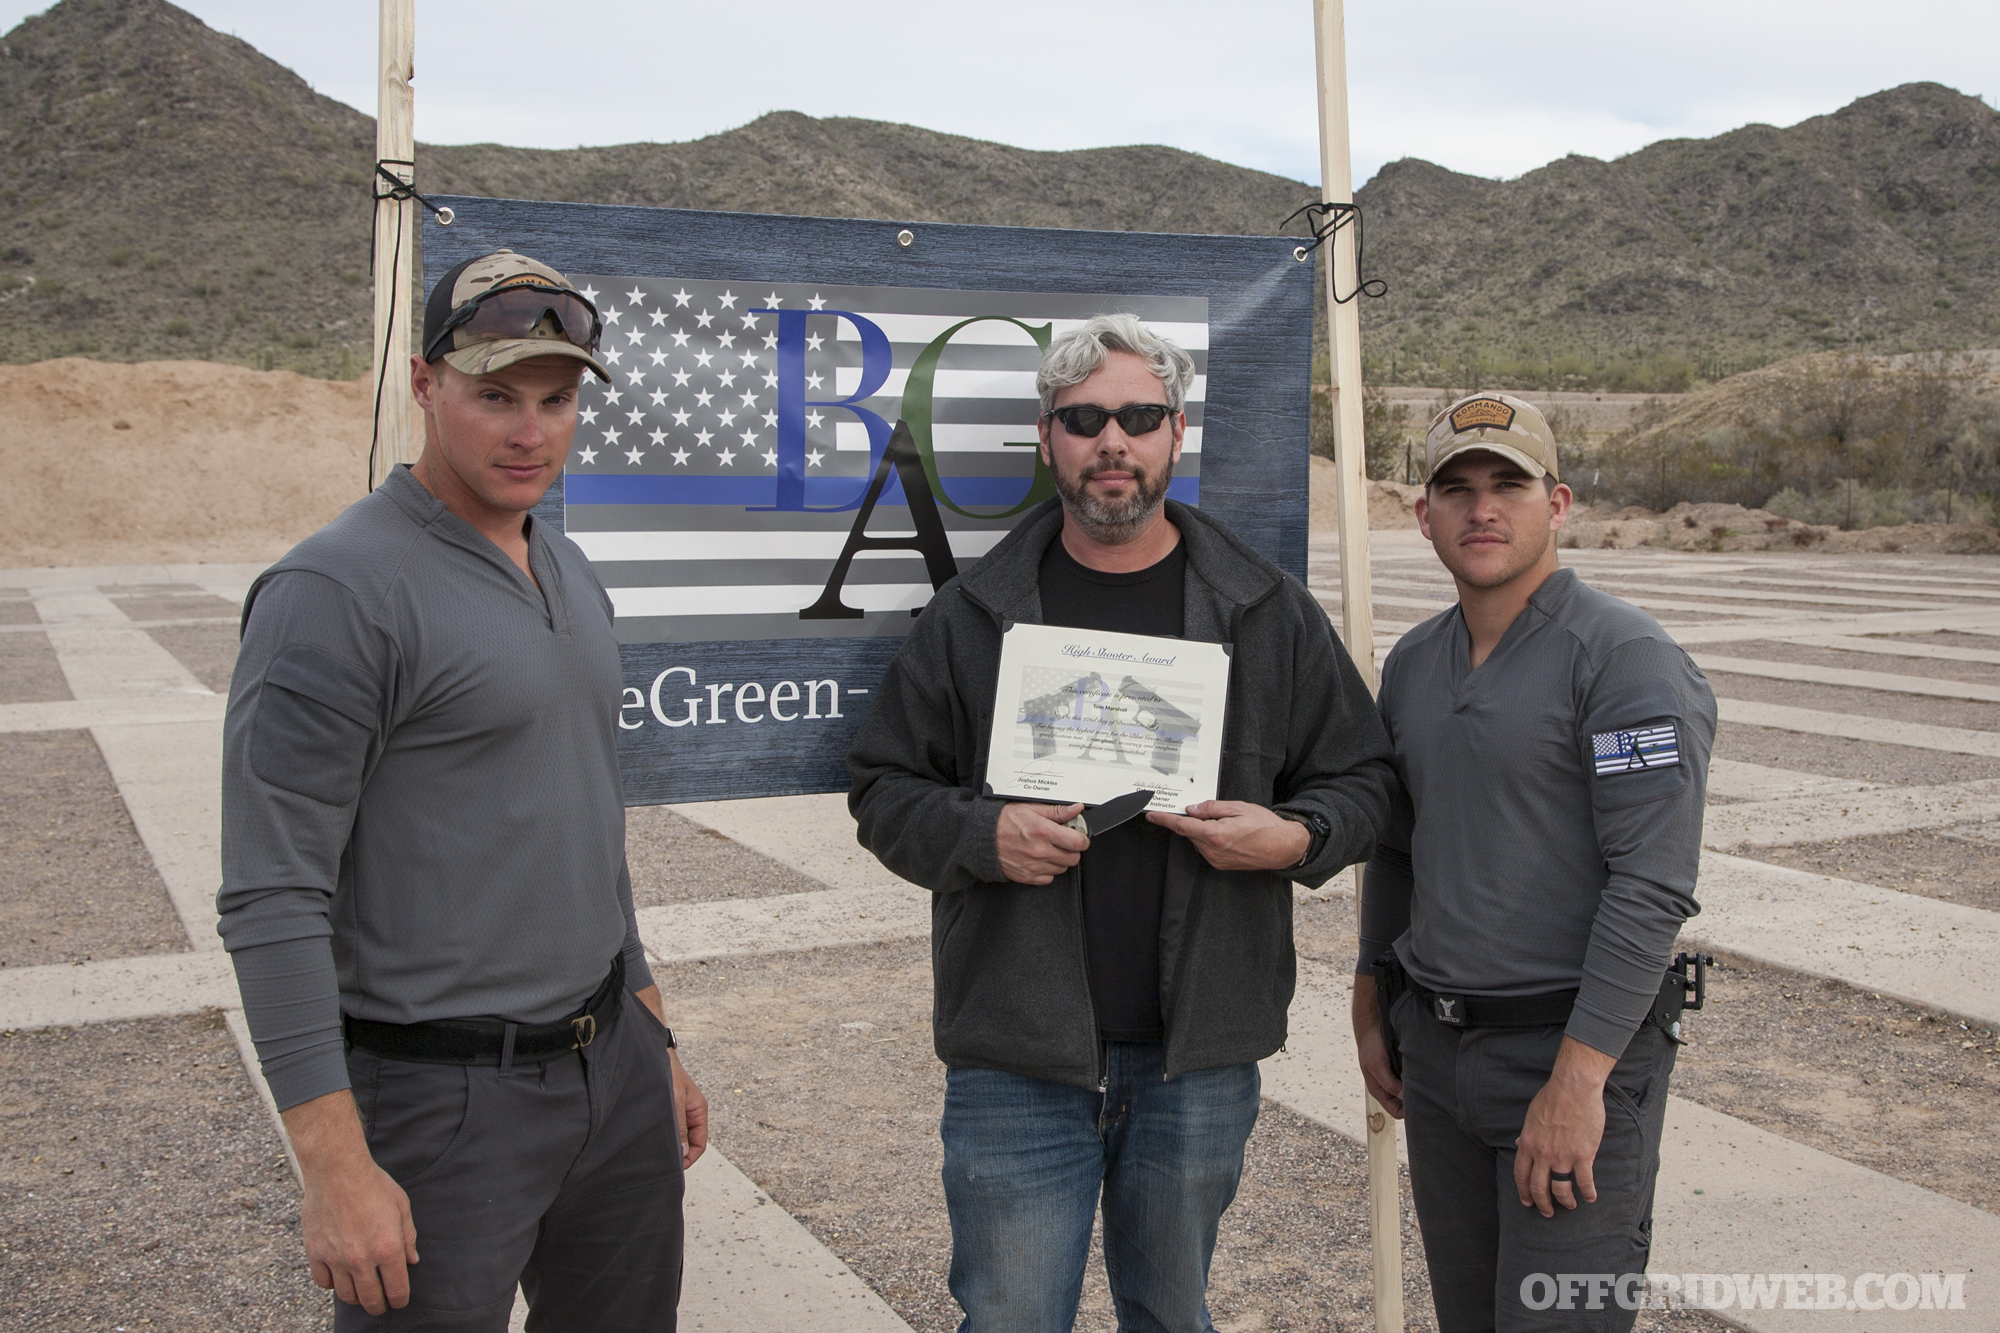
Tom Marshall On paper (no pun intended) my biggest success was winning the final shoot-off. It was truly a stroke of luck, as far as I’m concerned. All the same, it’s an honor to have made top shot at Blue-Green Alliance’s inaugural class.
Above: As top shooter at the class, Tom received a certificate and a slick new knife from Half Face Blades.
What I feel was more important was finally finding something I’ve personally been searching for most of the last decade — instructors who are teaching marksmanship with the backing of empirically-quantified performance science, as opposed to regurgitating the same anecdotal lessons and buzz phrases that have been repeated since the mid-1960s. The guys at Blue-Green Alliance, in my opinion, are really onto something with their unconventional methods. And they are tracking hard data to prove the efficacy of their system. It’s a refreshing break to see an athletic, mentally-engaging endeavor taught with science, instead of with history.
Biggest Challenge
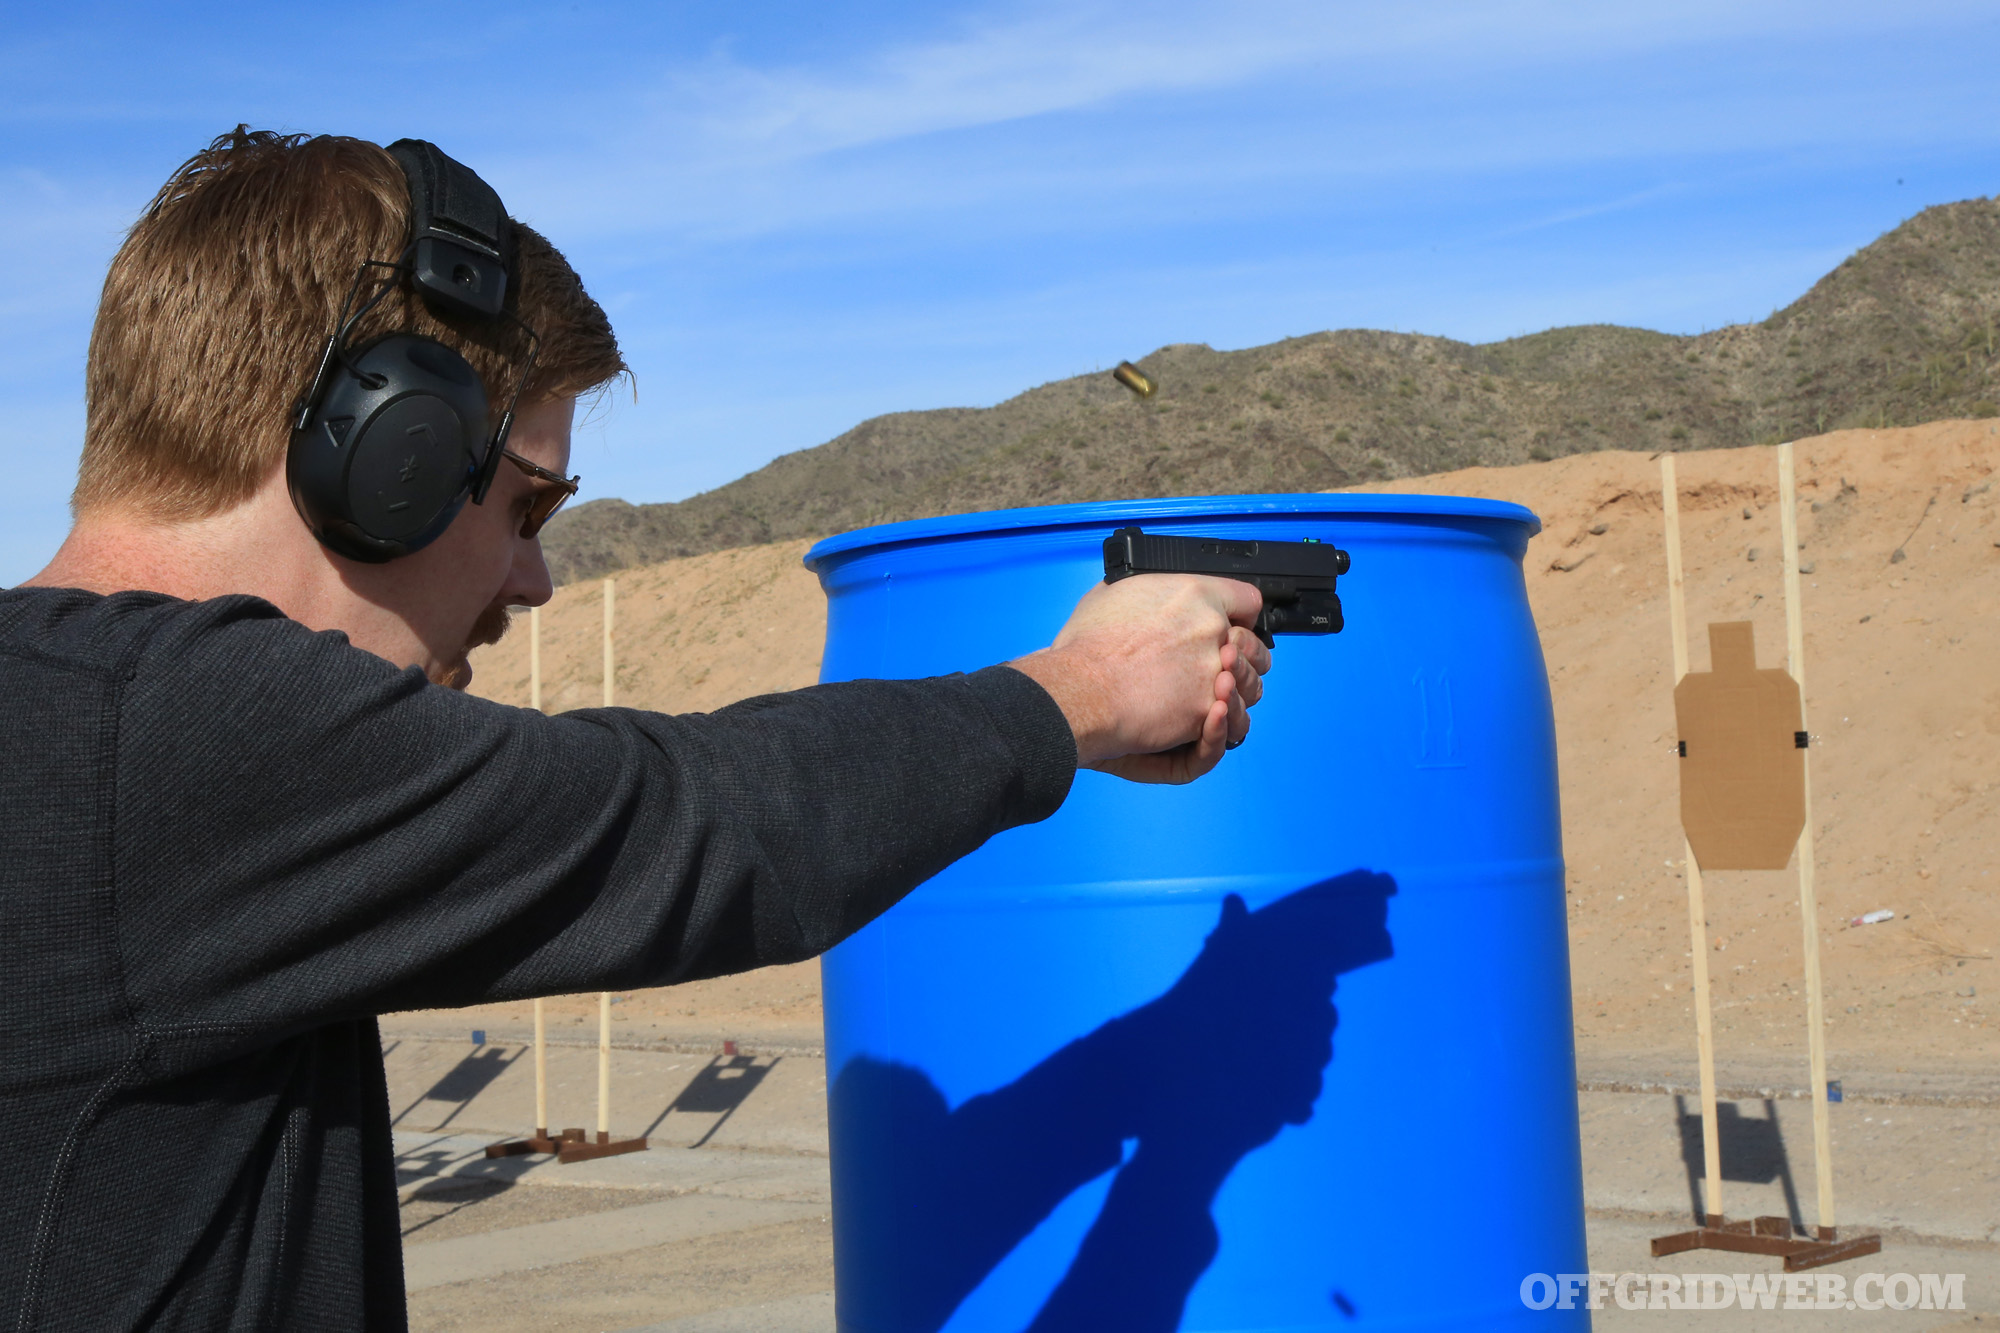
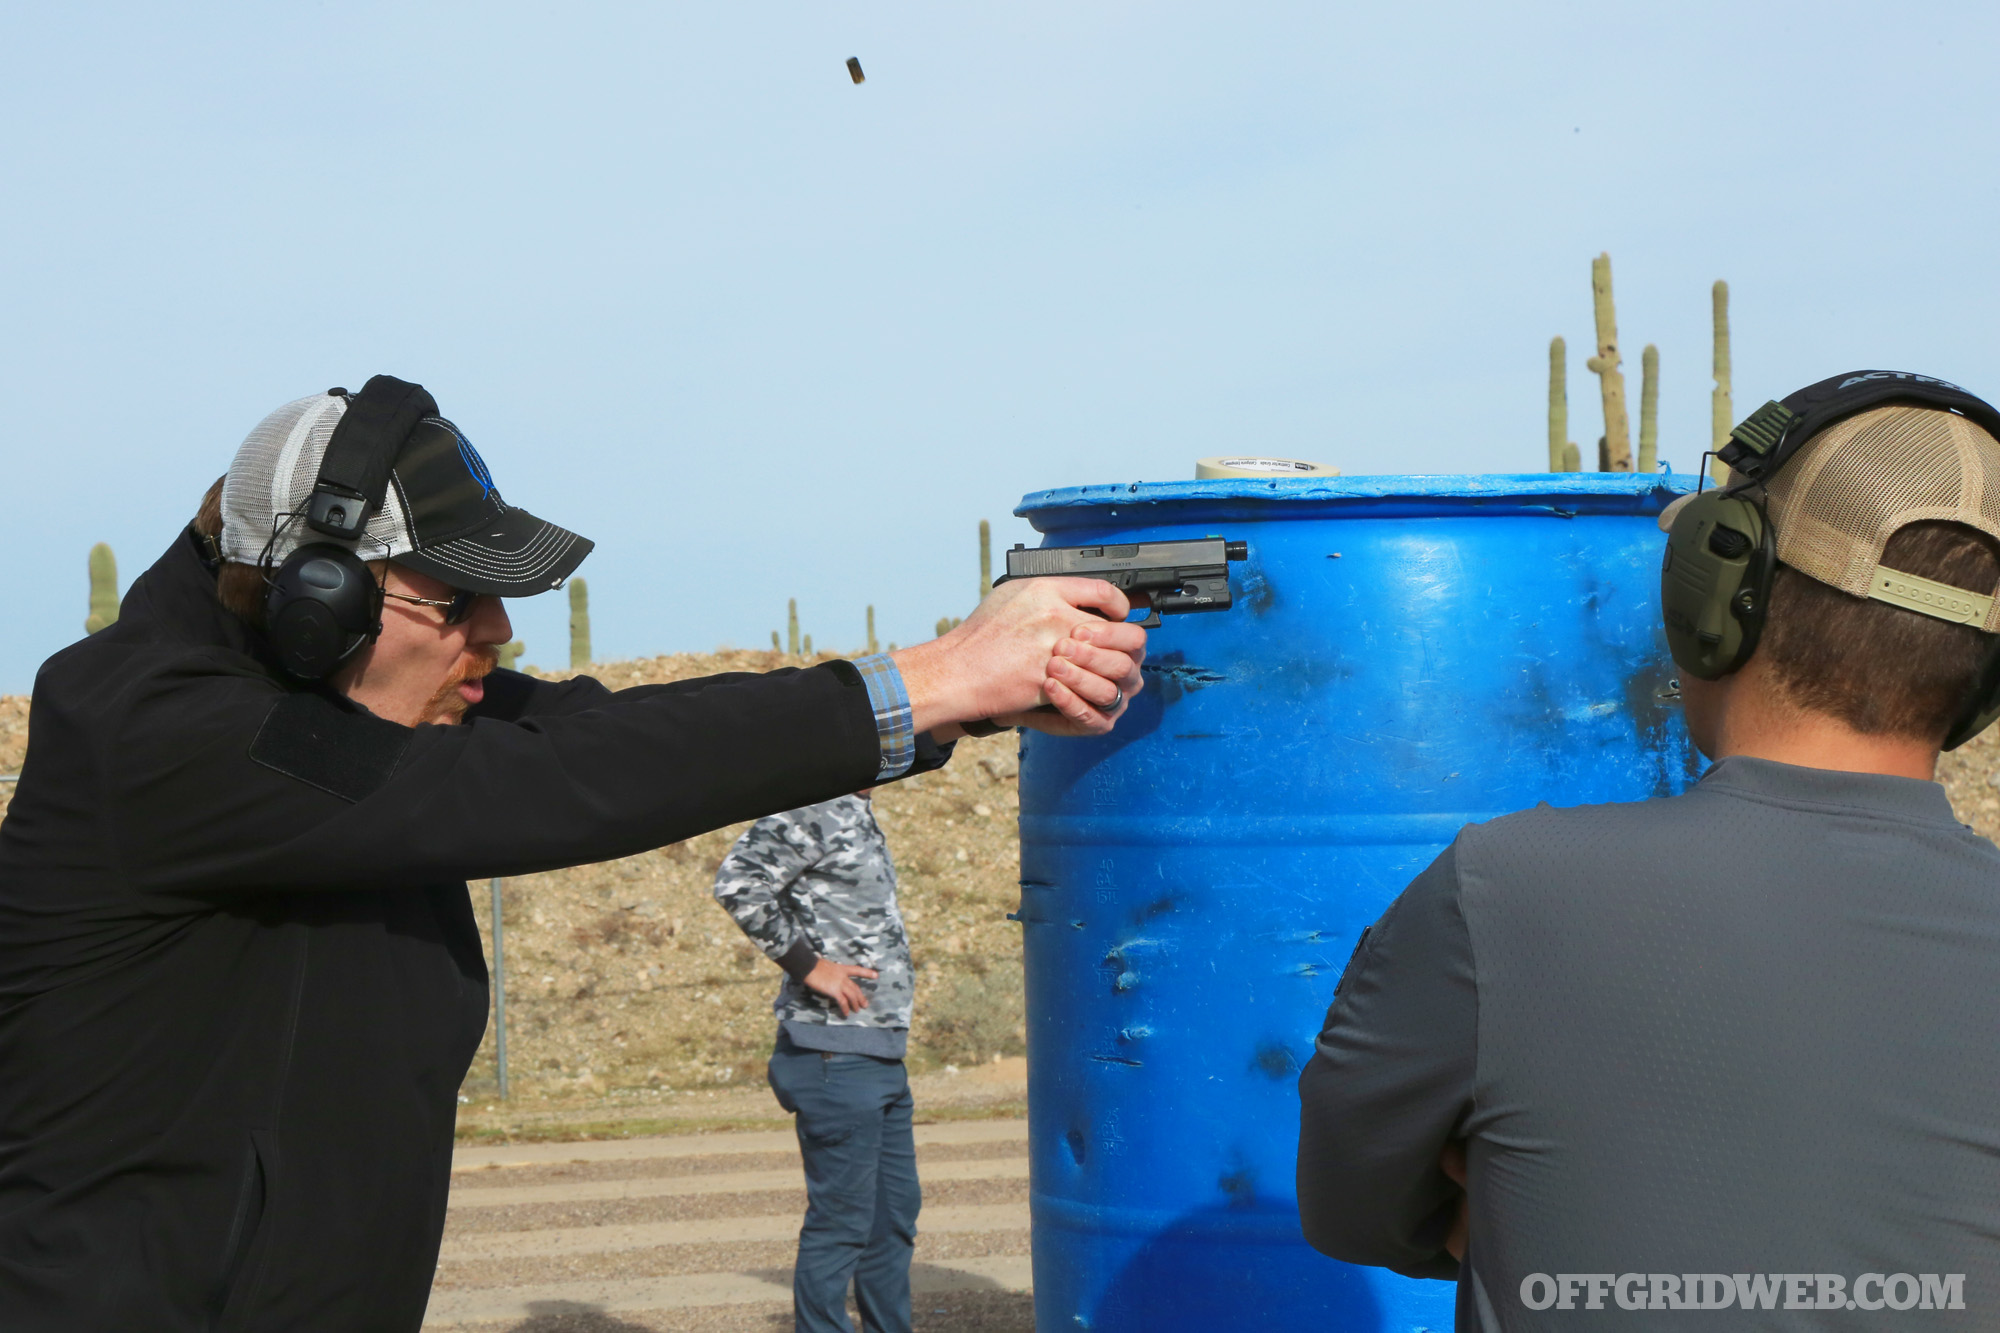
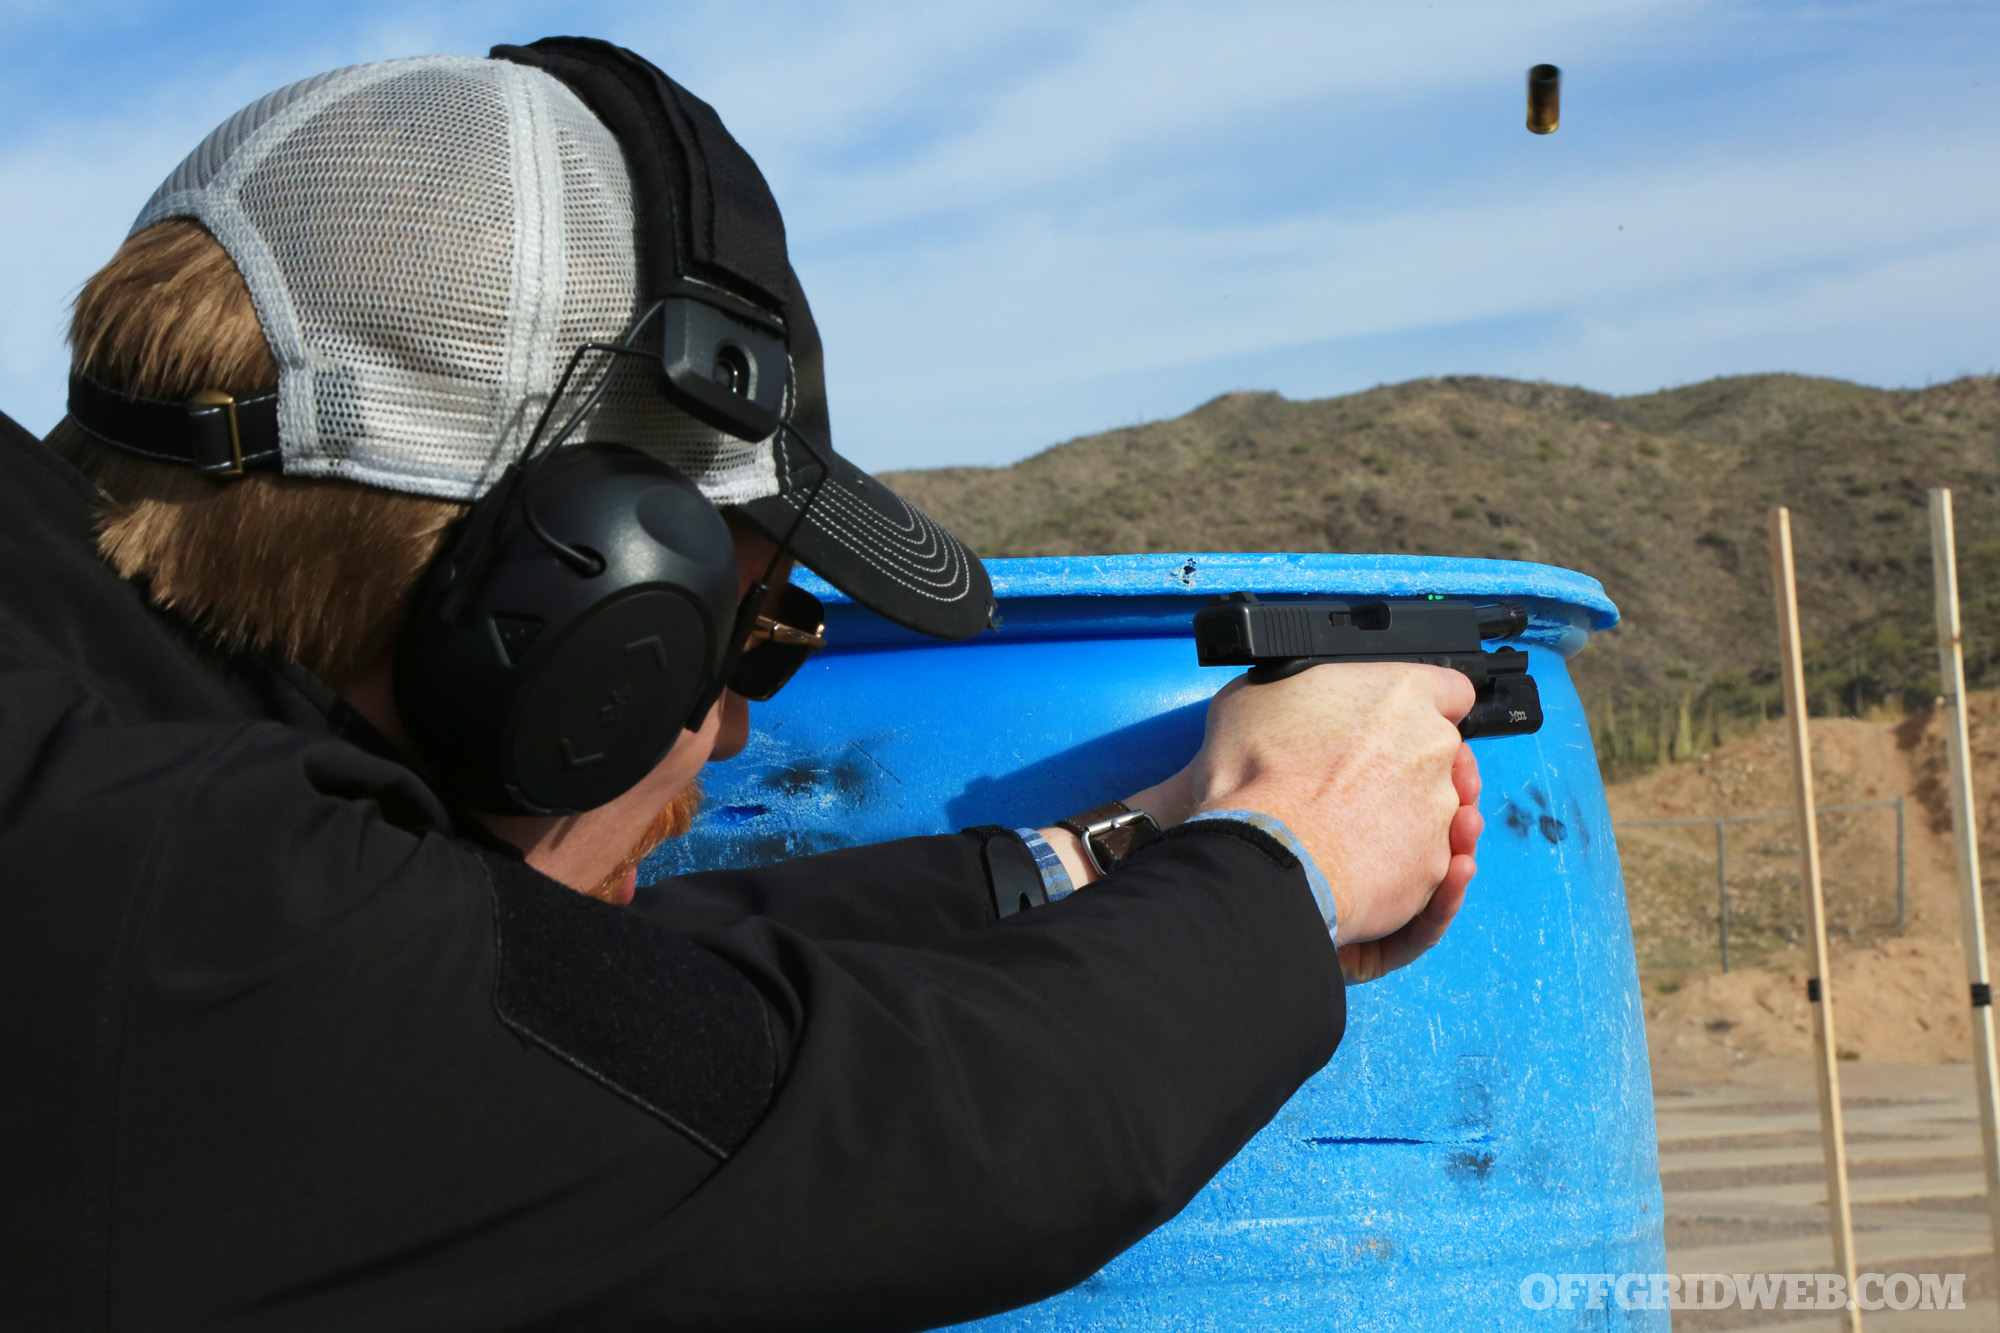
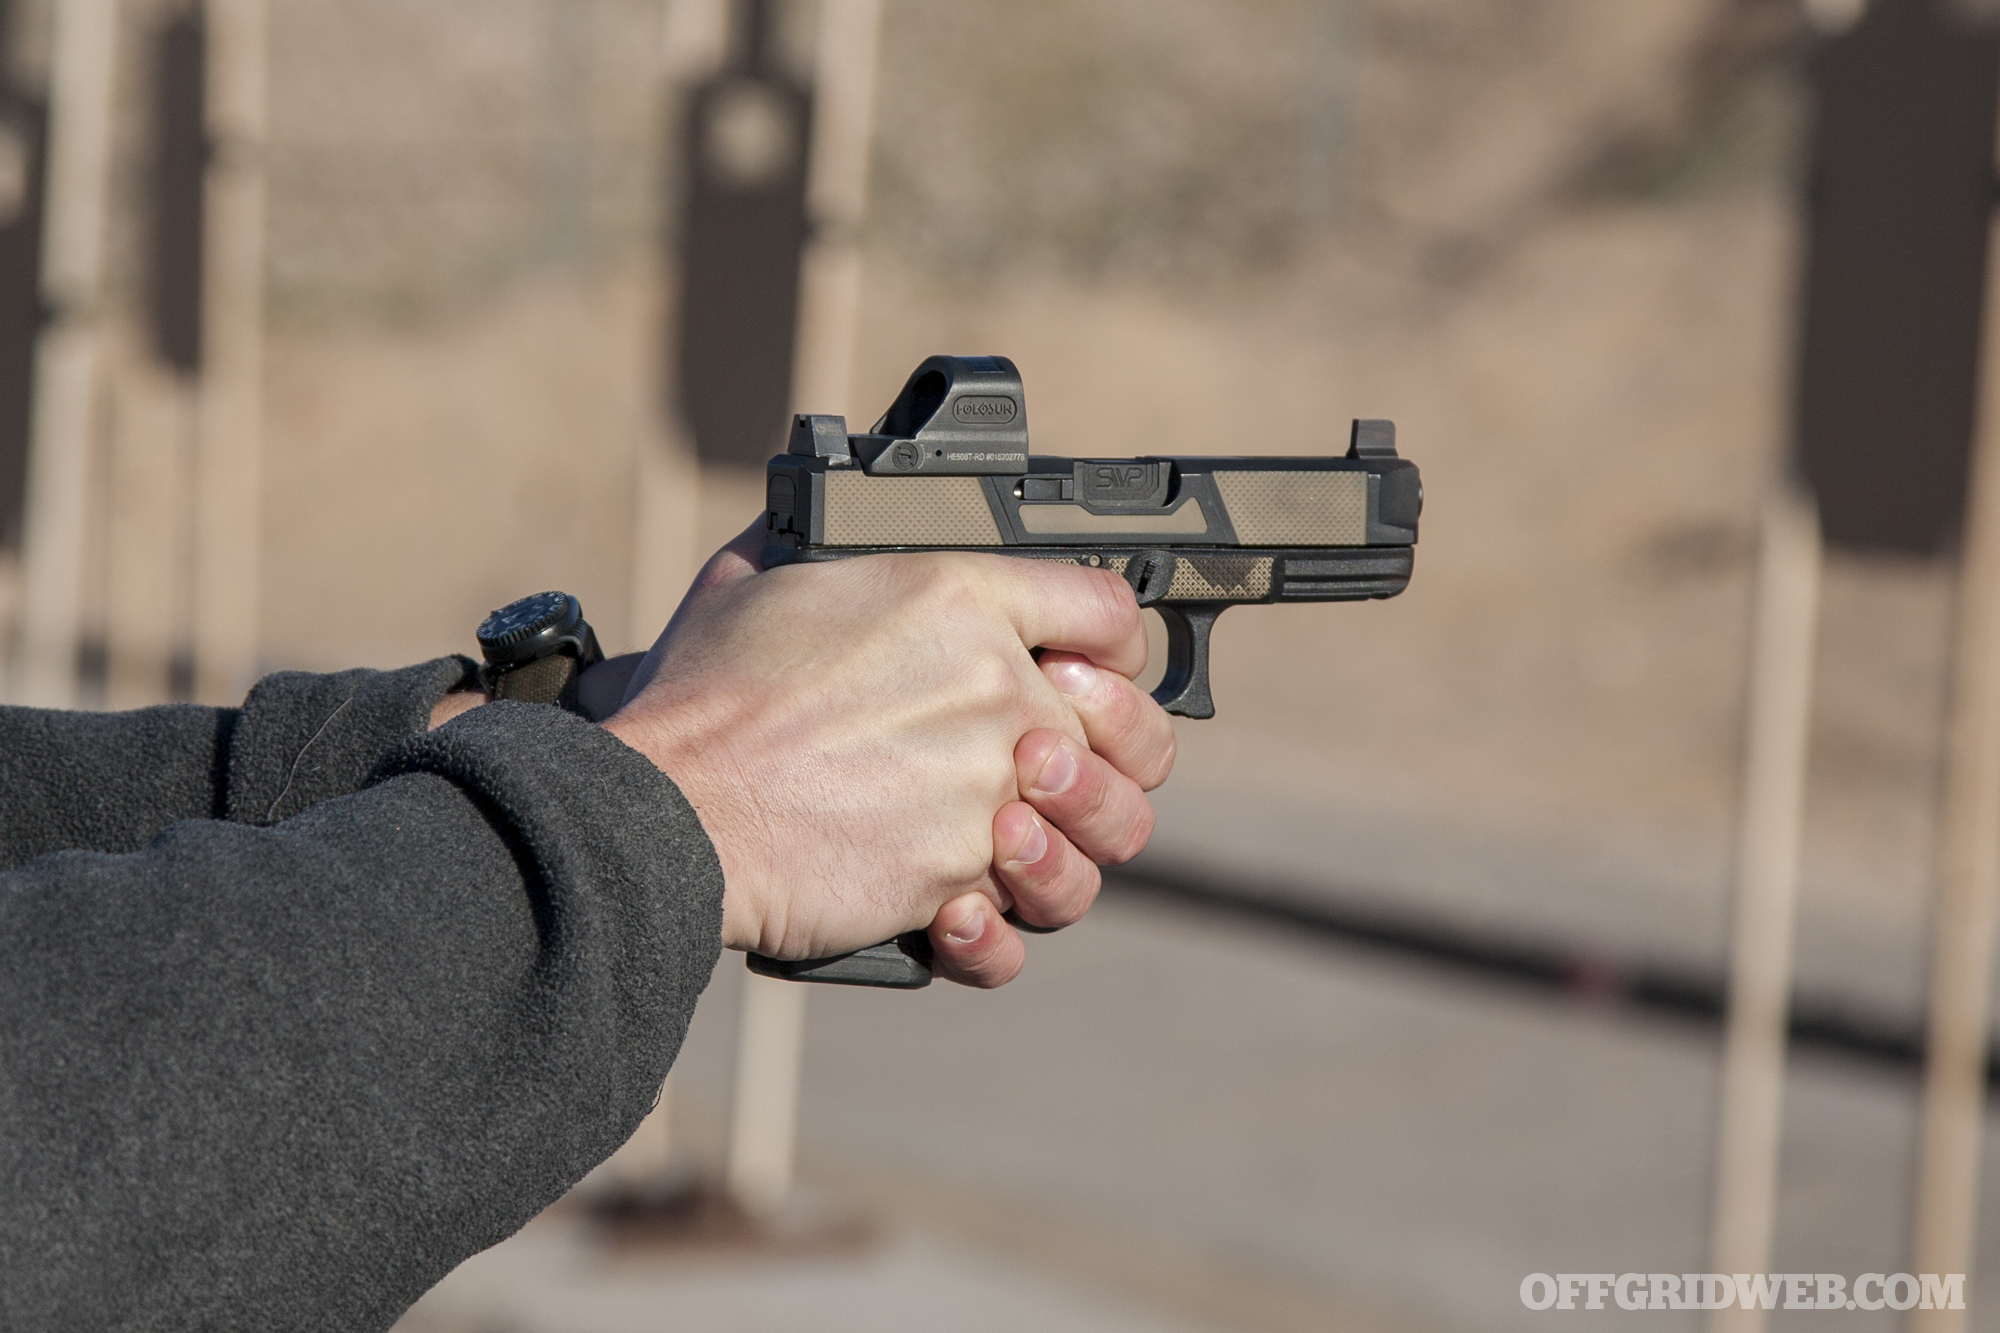
Patrick McCarthy Three words have been ingrained in my mind from this class: prep, confirm, roll. Every student had to speak these words out loud hundreds of times while performing the associated actions — draw the gun to the ready position and prep the trigger by holding it at the break point, confirm that the sights are aligned on the target, and roll more pressure onto the trigger to smoothly fire a shot. Saying these words while drawing and firing took time to get used to. Still, my biggest challenge by far was the unspoken step that comes immediately afterward: reset to recoil.
“Roll” is spoken out loud just as each shot is fired.
After the roll fires a shot, the trigger must be reset before firing a second shot. Many shooters (myself included) have formed the habit of pinning the trigger as far back as it’ll go until the gun is back on target, then releasing pressure until the audible “click” that indicates the trigger has been reset. This manifests as bang …pause… click, bang. This may be fine if you’re looking for single-shot precision, but in a dynamic real-world environment (such as a self-defense situation) you’ll probably need to fire multiple shots in fast succession. That means that your trigger should be reset and ready to go before the weapon is back on target.
Reset to recoil essentially means resetting the trigger during the gun’s recoil impulse, so that by the time it’s stable and you’ve re-acquired the sight picture, you’ll be able to accurately fire a second shot without jerking the trigger or waiting for the reset. That may sound easy on paper, but I found it monumentally difficult in practice. It’s tough to back off the trigger juuuust far enough that it’s reset — but not so far that you’re lifting off entirely — during the split-second recoil movement. My aforementioned bad habit of slowly resetting during dry fire practice and range trips compounded the issue.
Thankfully, Josh stood next to me on the range and offered one-on-one feedback when I was doing well, and when I wasn’t. This helped me recognize the issue and work to improve it.
Tom Marshall For me, the biggest challenge was de-programming scars from conventional training – not just in terms of how I shoot, but in my whole mindset going into training. For example, re-learning the draw stroke in two steps, instead of four or five, was pretty significant to me. Not having the path of draw (exactly how the gun moves from the holster to full extension) laid out for me was interesting. At first, it seemed as if their method was missing something, which was fine for me, since I already had my draw nailed down and just filled in these perceived gaps with pre-existing knowledge. But the more times I watched them demonstrate this streamlined technique, and the more time I’ve had since the class to marinate on it, I wish I’d learned it this way.
The BGA instructors explained it like this: “Why teach extra steps which you just have to buff out later?” I understand this logic, but I believe there’s even more benefit to it than that, which I’ll explain in a minute.
In terms of adjusting my mindset, I had never been to an open-enrollment class that focused so heavily on dry fire before. Having been through a dozen or so open-enrollment classes plus a decade of carrying guns professionally, stepping up onto a line of your peers just to dry fire was almost anti-climactic. If I hadn’t been so intrigued by their science-backed training methodology, I’d have been pretty frustrated – especially considering I conduct regular dry fire practice at home and, on the surface, don’t need to drive an hour from home and pay someone to watch me click away on an empty gun. But, especially first thing in the morning, the dedicated dry fire time helped “prime the pump” or “knock the rust off” or however you want to phrase it so that, by the time we went live, I didn’t need a warm-up string to reach my most capable levels of accuracy.
But beyond either of these, perhaps my biggest challenge was the old walk-and-chew-gum trick. For all of day one and part of day two, the instructors insisted we say (out loud) what we were doing as we drew, presented and fired. It sounds simple. Maybe even a little silly. But, in the words of the Blue-Green instructors: “if it’s so simple, why can’t you do it?” And they were right. Having to actually engage my conscious thinking brain in order to form words and push them out while also firing and manipulating my weapon to the acceptable accuracy standard proved to be maddeningly difficult.
Favorite Drill
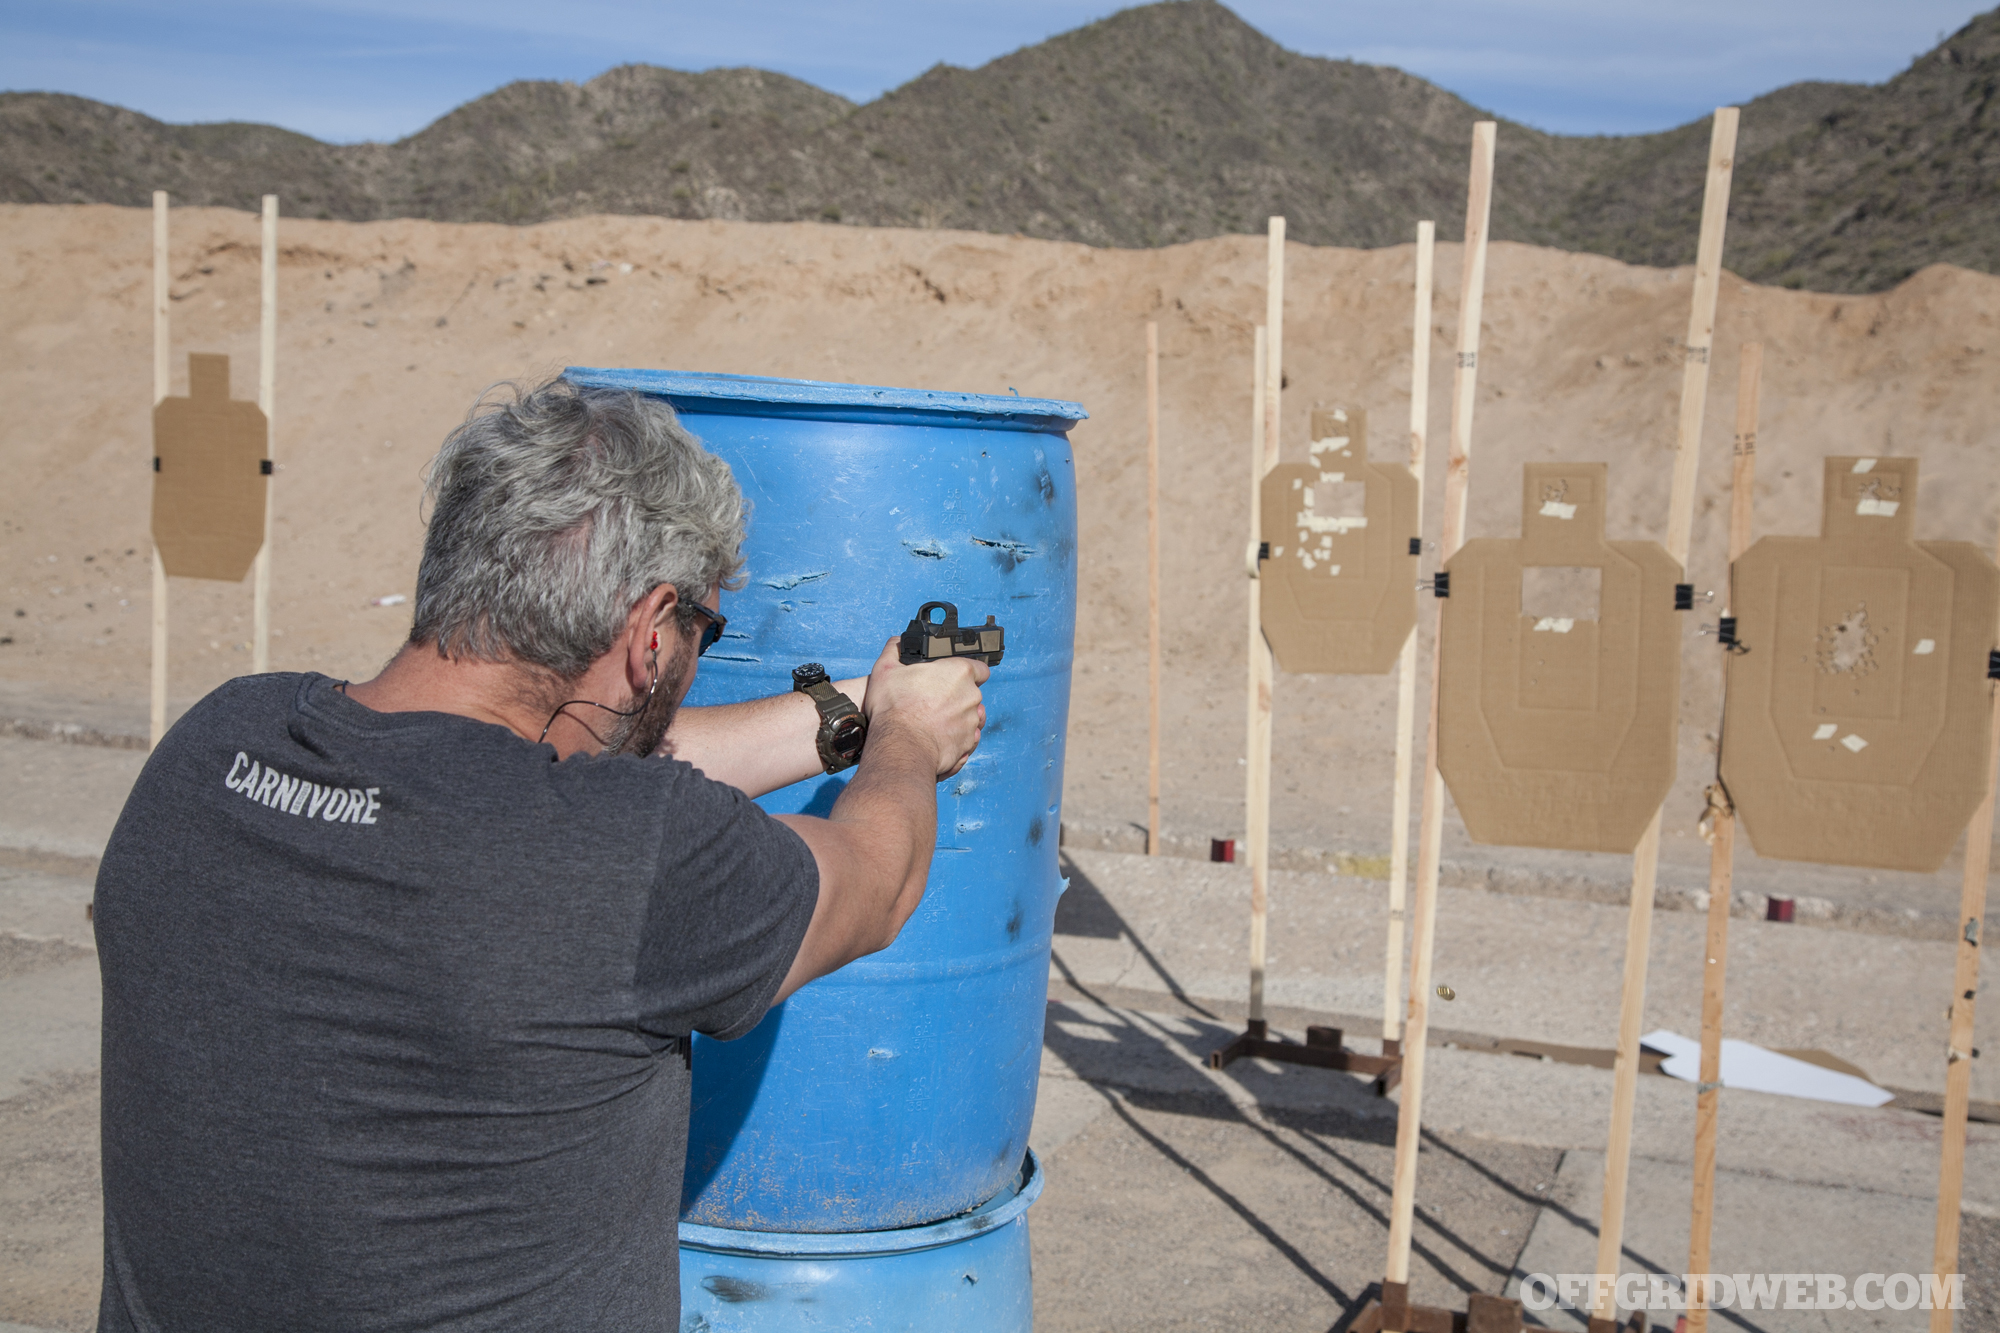
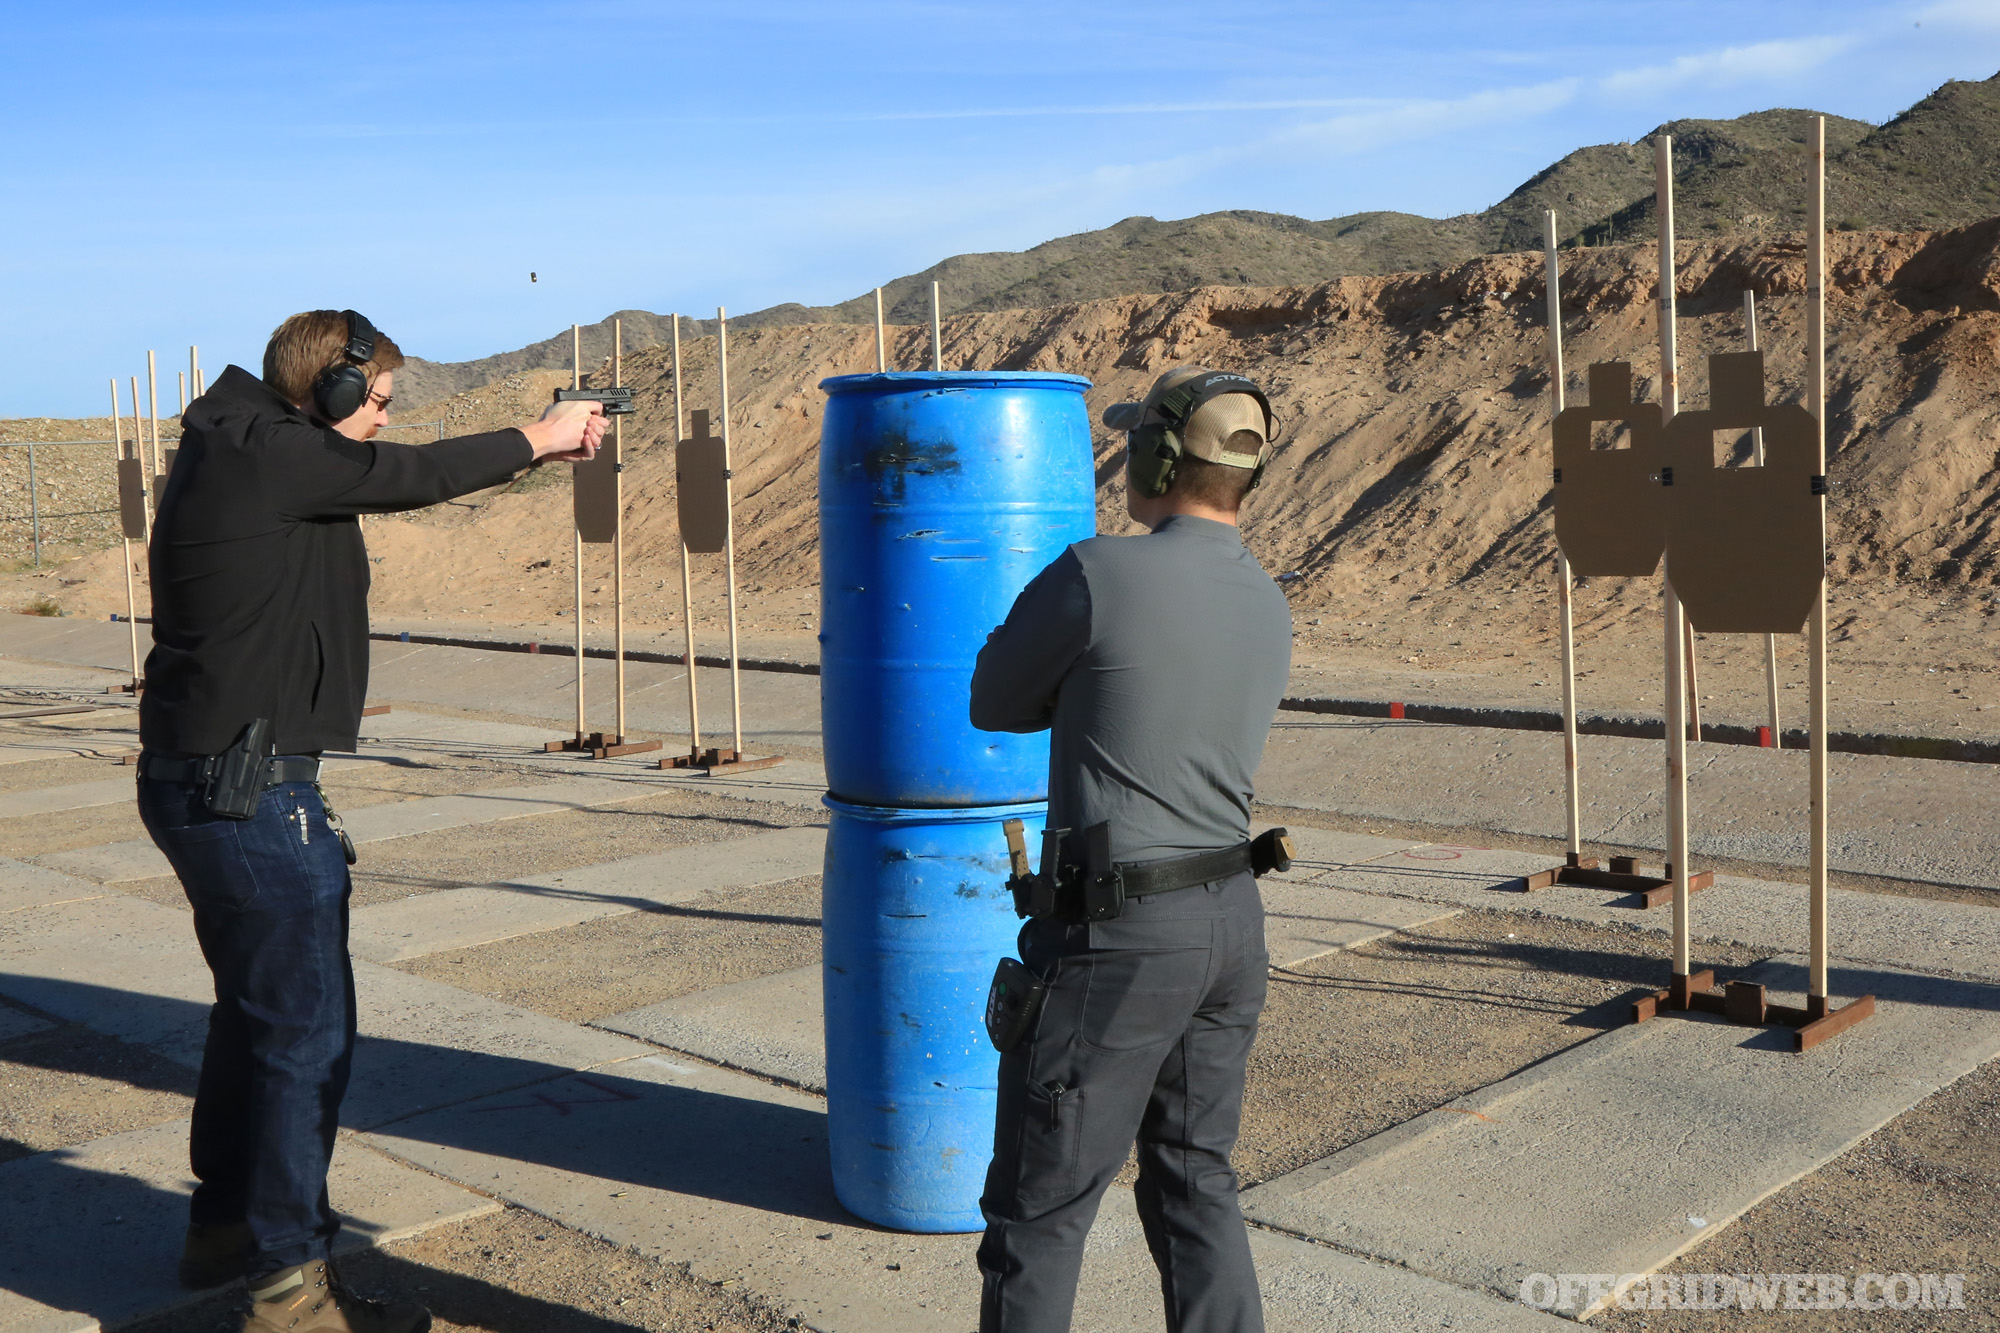
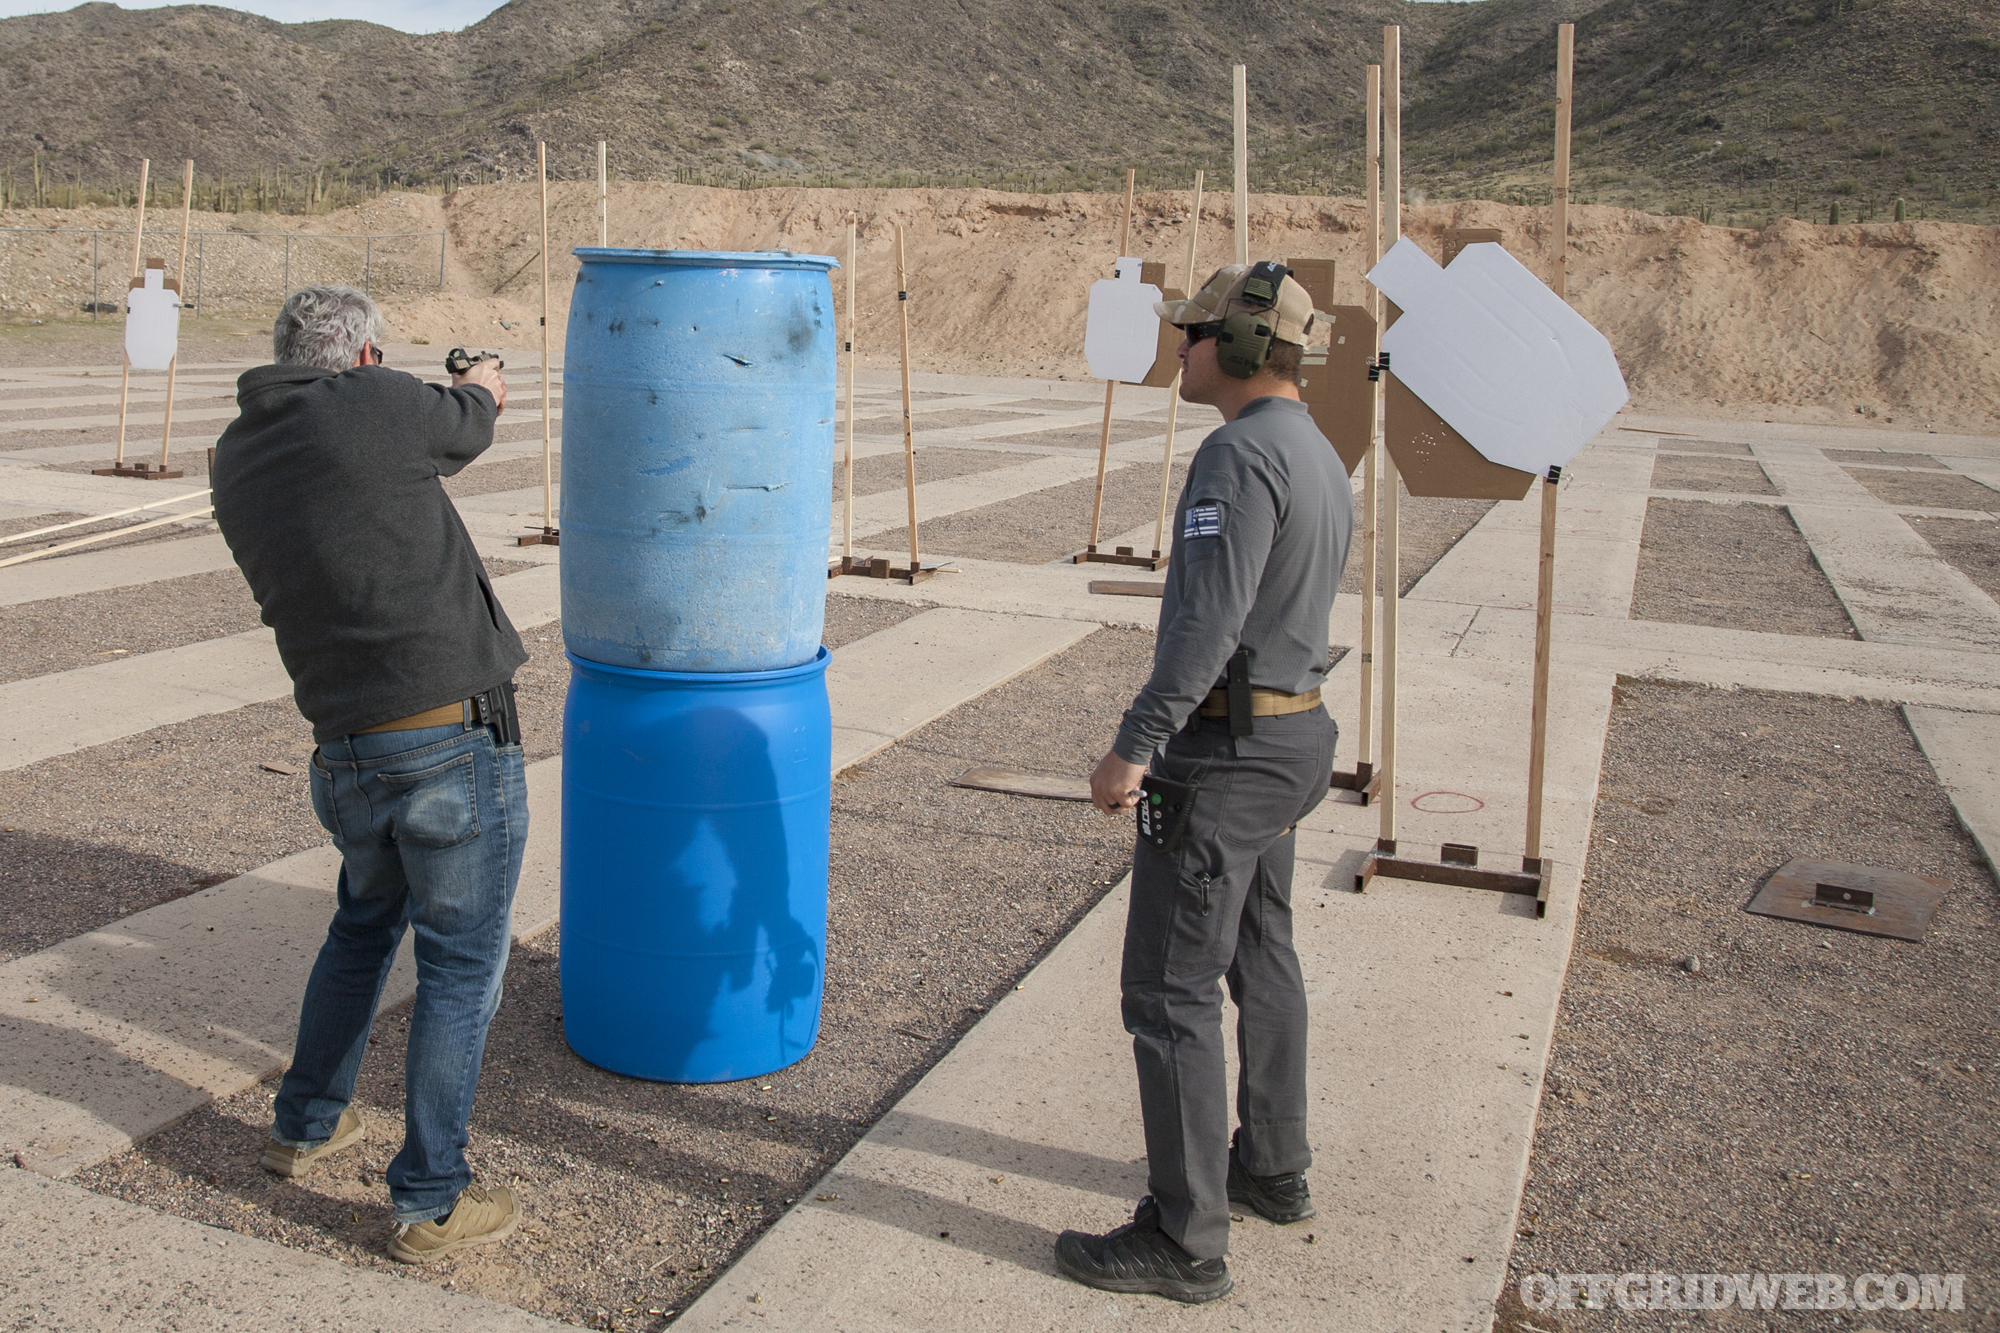
Patrick McCarthy By the end of the first day of the class, prep-confirm-roll had started to feel more natural, and we had integrated it with speed-reloads, follow-up shots, and target transitions. During the second day, the complexity ratcheted up again with the addition of moving and shooting from cover. Blue barrels were set up on the firing line, and students were tasked with shooting from behind one barrel, moving to the next, and shooting another target (all while performing the same verbal exercises). But for me, the most interesting element was the constant variation.
Once we all ran through the shoot-move-shoot segment, the instructors walked out and reconfigured the target positions at random, then told us to run the drill again. Next, more targets were added into the mix. In some cases, the cardboard “bad guy” on one target would line up with the white hostage overlaid on a second target a few yards downrange. If you shot without factoring this in, you’d end up killing a hostage in the background — a literal representation of the safety rule “know your target and what is beyond.” Students were simply told to shoot each course as efficiently as possible, leading to each student approaching it a little differently. Some crouched down to change the pass-through angle, some shot on the move between cover, and some peeked around the far side of the barrel to get a different perspective.
This drill, with its heavy emphasis on varying circumstances and on-the-fly problem-solving, was my favorite from the course. It was a substantial challenge, and I clipped more hostages than I’d like to admit. But if you’re forced to draw on an adversary in the real world, you won’t be standing calmly face-to-face, ten yards apart with a sand berm backstop. You’ll probably be facing a chaotic situation with a high risk of collateral damage, just as Blue-Green Alliance simulated in this drill.
Tom Marshall My favorite drill, if it can be called a drill, was simply being forced to describe what I was doing as I was doing it, with live rounds going down range. It’s slap-your-forehead simple and, if you’ve never tried it, sounds so trivial as to not be worth your time. But when you’re on the clock, in front of your peers, and it’s time to talk and press at the same time, you’d be surprised how quick the wheels fall off. But what this did was make me realize how much of my marksmanship and weapons handling is truly subconscious – or, how much of it should be.
Lessons Learned
Patrick McCarthy Given my lack of prior formal training, I went into this class concerned that the challenge might exceed my skill level. Thankfully, Josh and Gabe started with fundamentals and steadily cranked up the pressure. I always felt challenged, but never felt completely overwhelmed. By the end of the class, my hands were sore from hundreds of weapon manipulations, my brain was buzzing with drills, and my range bag was a whole lot lighter due to the ammo expended.
I walked away knowing that I still have a tremendous amount to learn, but also felt encouraged by my ability to improve. We started with simple dry fire practice, something I’ve done countless times. We finished with drills that involved shooting from cover, speed-reloading, running between barricades, transitioning between multiple targets, and avoiding collateral damage to hostages. Though my performance was far from smooth, the instructors at Blue-Green Alliance patiently gave me the one-on-one guidance I needed to gain confidence in an area that was previously way outside my comfort zone.
Tom Marshall The bottom line is I wish I’d had this kind of training earlier in my career.
The guys at Blue-Green Alliance have structured their curriculum in way that allows students to learn, instead of teaching them specific, broken-down skills. In a matter of 12 training hours, we went from dry fire draw-and-present to shooting on the move, shooting multiple targets, shooting multi-round strings, dealing with no-shoot targets and tactical problem solving/stage strategy. While I have been exposed to all of these skills in previous classes, I attended probably a half-dozen separate classes that allowed me to piece all of these individual skills together. The BGA philosophy synthesizes these ancillary principles into an entry-level fundamentals class that doesn’t come with a laundry list of prerequisites.
For future Blue-Green Alliance training dates and more information on its instructors, visit BlueGreen-Alliance.com.
Most people begin learning knots at an early age. Once the shoelaces are secure, though, knot fluency usually drops like a rock. There isn’t much of a push to teach rope competency at any age beyond shoe tying. In fact, it’s safe to say the majority of people subscribe to the ever-popular “if you can’t tie a knot, tie a lot” theory.
In 1999, I became a firefighter and learned a handful of knots required for the job; then a few years later I joined our Technical Rescue Team. Being a part of a squad whose primary responsibility is rope rescue required me to up my knot game. When public safety depends on one’s knot-tying abilities, more skill is required than continually wrapping and tucking the rope until it looks like something that will probably hold.
Whether you’re a card-carrying prepper, an avid outdoorsman, or one who simply recognizes the potential need to tie, hoist, drag, or secure, proficiency in tying a few easy and key knots is a critical skill that should be learned.
So, which knots are the most important?
The answer is as hotly contested among rope purists as the Glock-versus-1911 debate is in the handgun community. This article is less about settling that argument and more about identifying 10 relatively easy-to-tie knots that offer a solid foundation for your knot-tying skillset. Read on to untangle any confusion you might have about survival tethering.
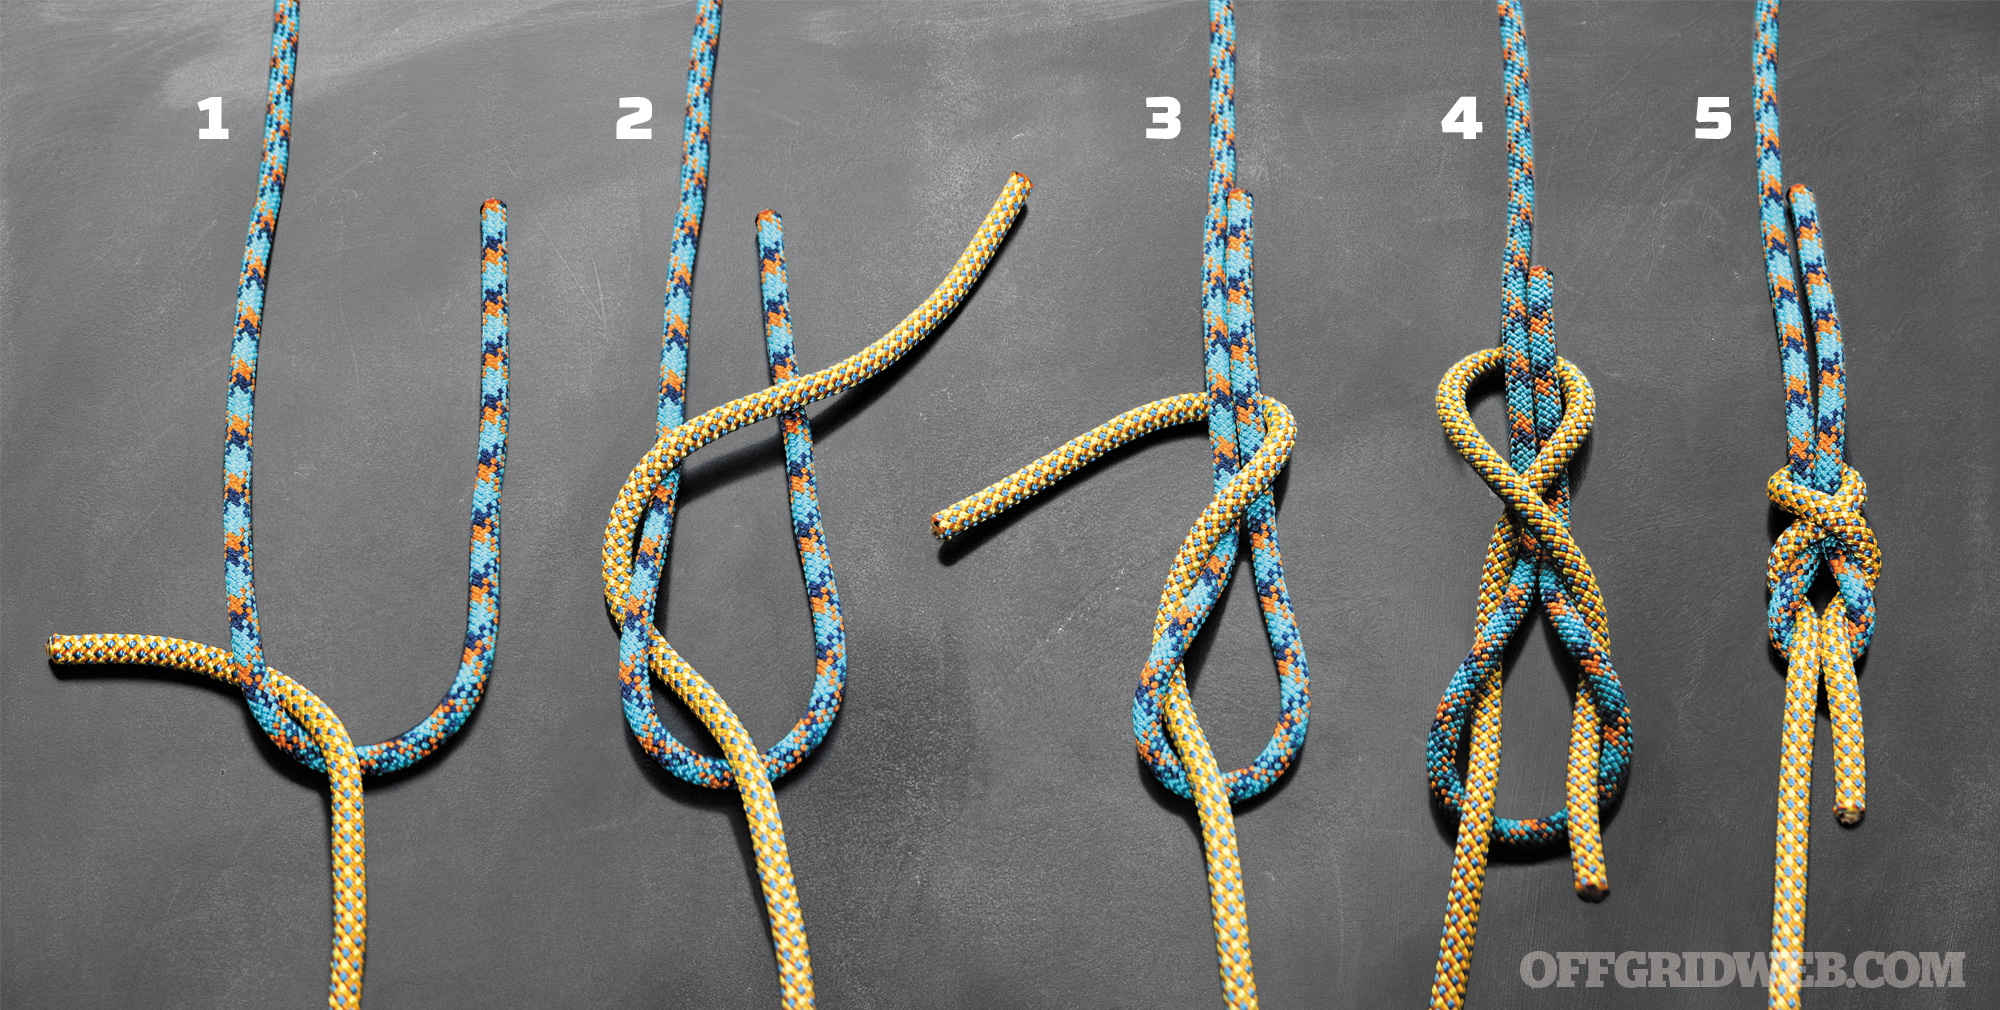
Knot Glossary
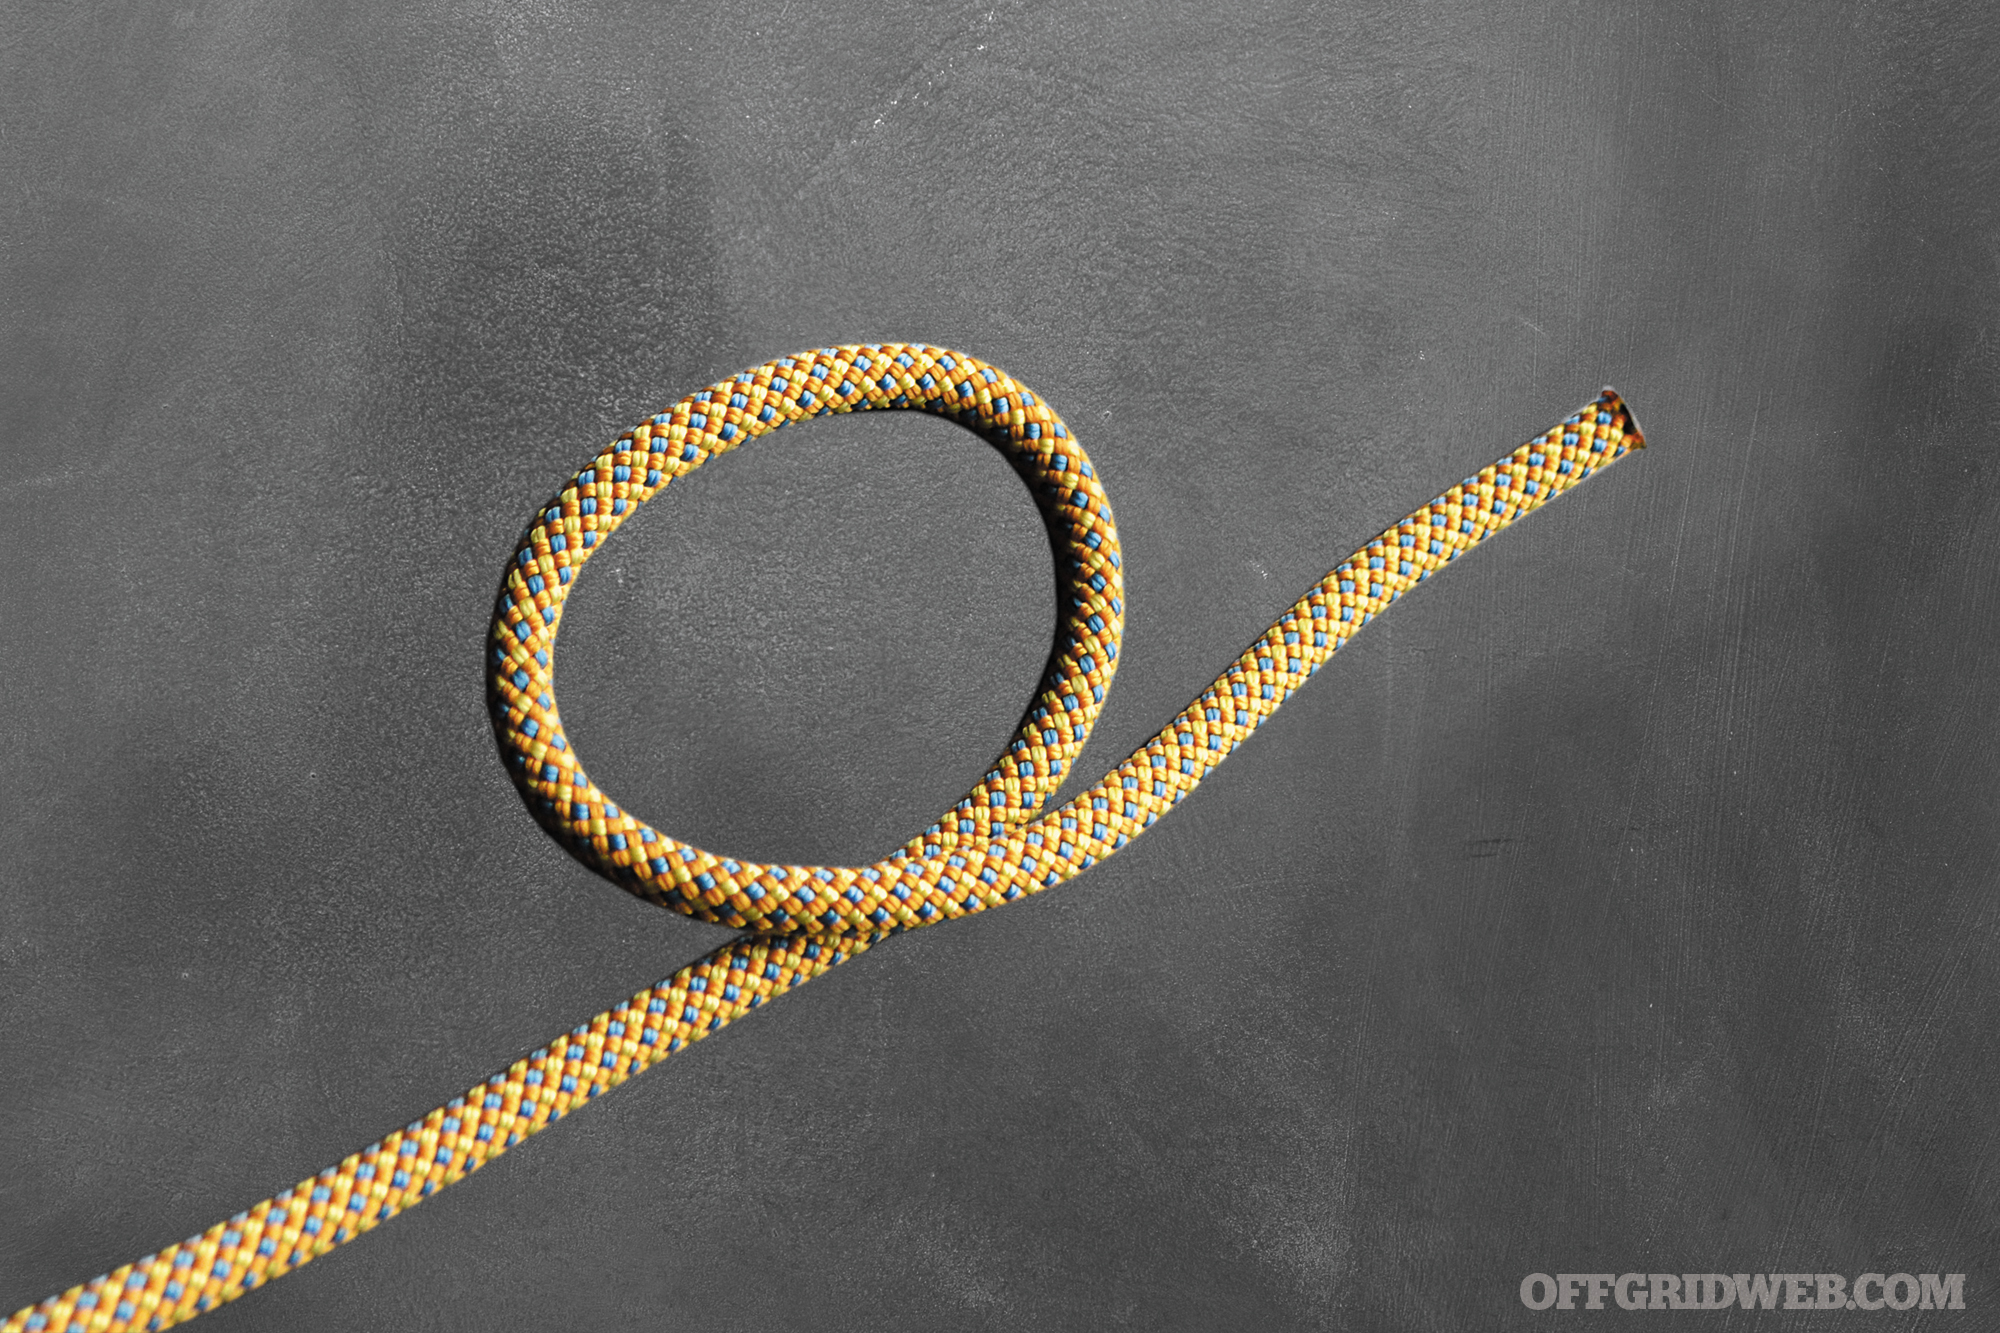
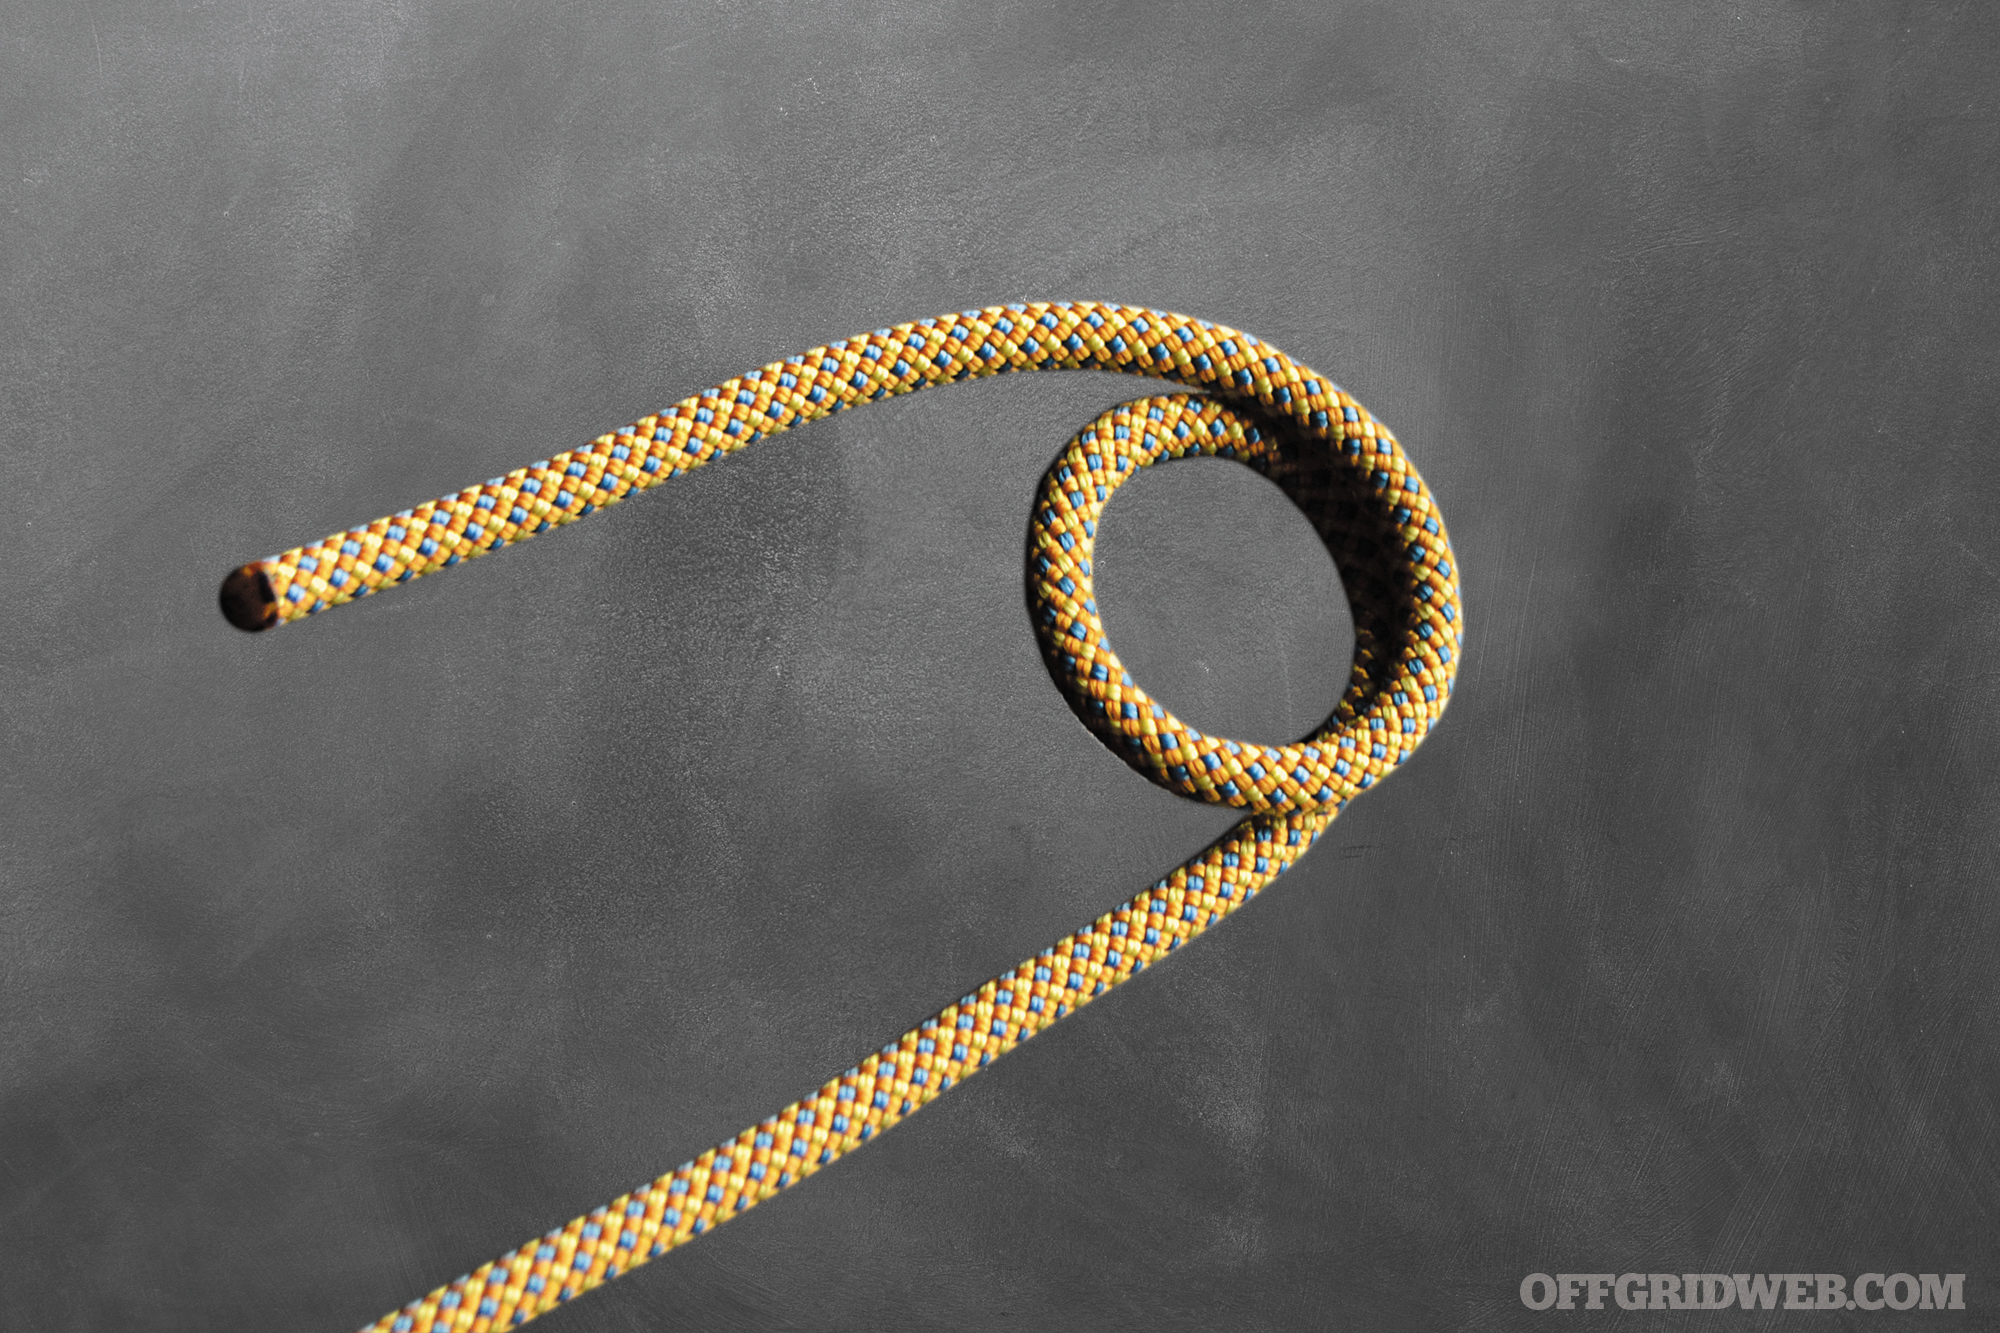
Bight: A curved section in the rope where the two sections lie alongside each other — think U-shape.
Loop: A circle placed in the rope with the ends crossing each other.
Round Turn: Two passes of the rope that make a complete circle.
Standing End: The remainder of the rope not involved in tying the knot.
Working End: The end of the rope used to tie the knot (also called the running end).
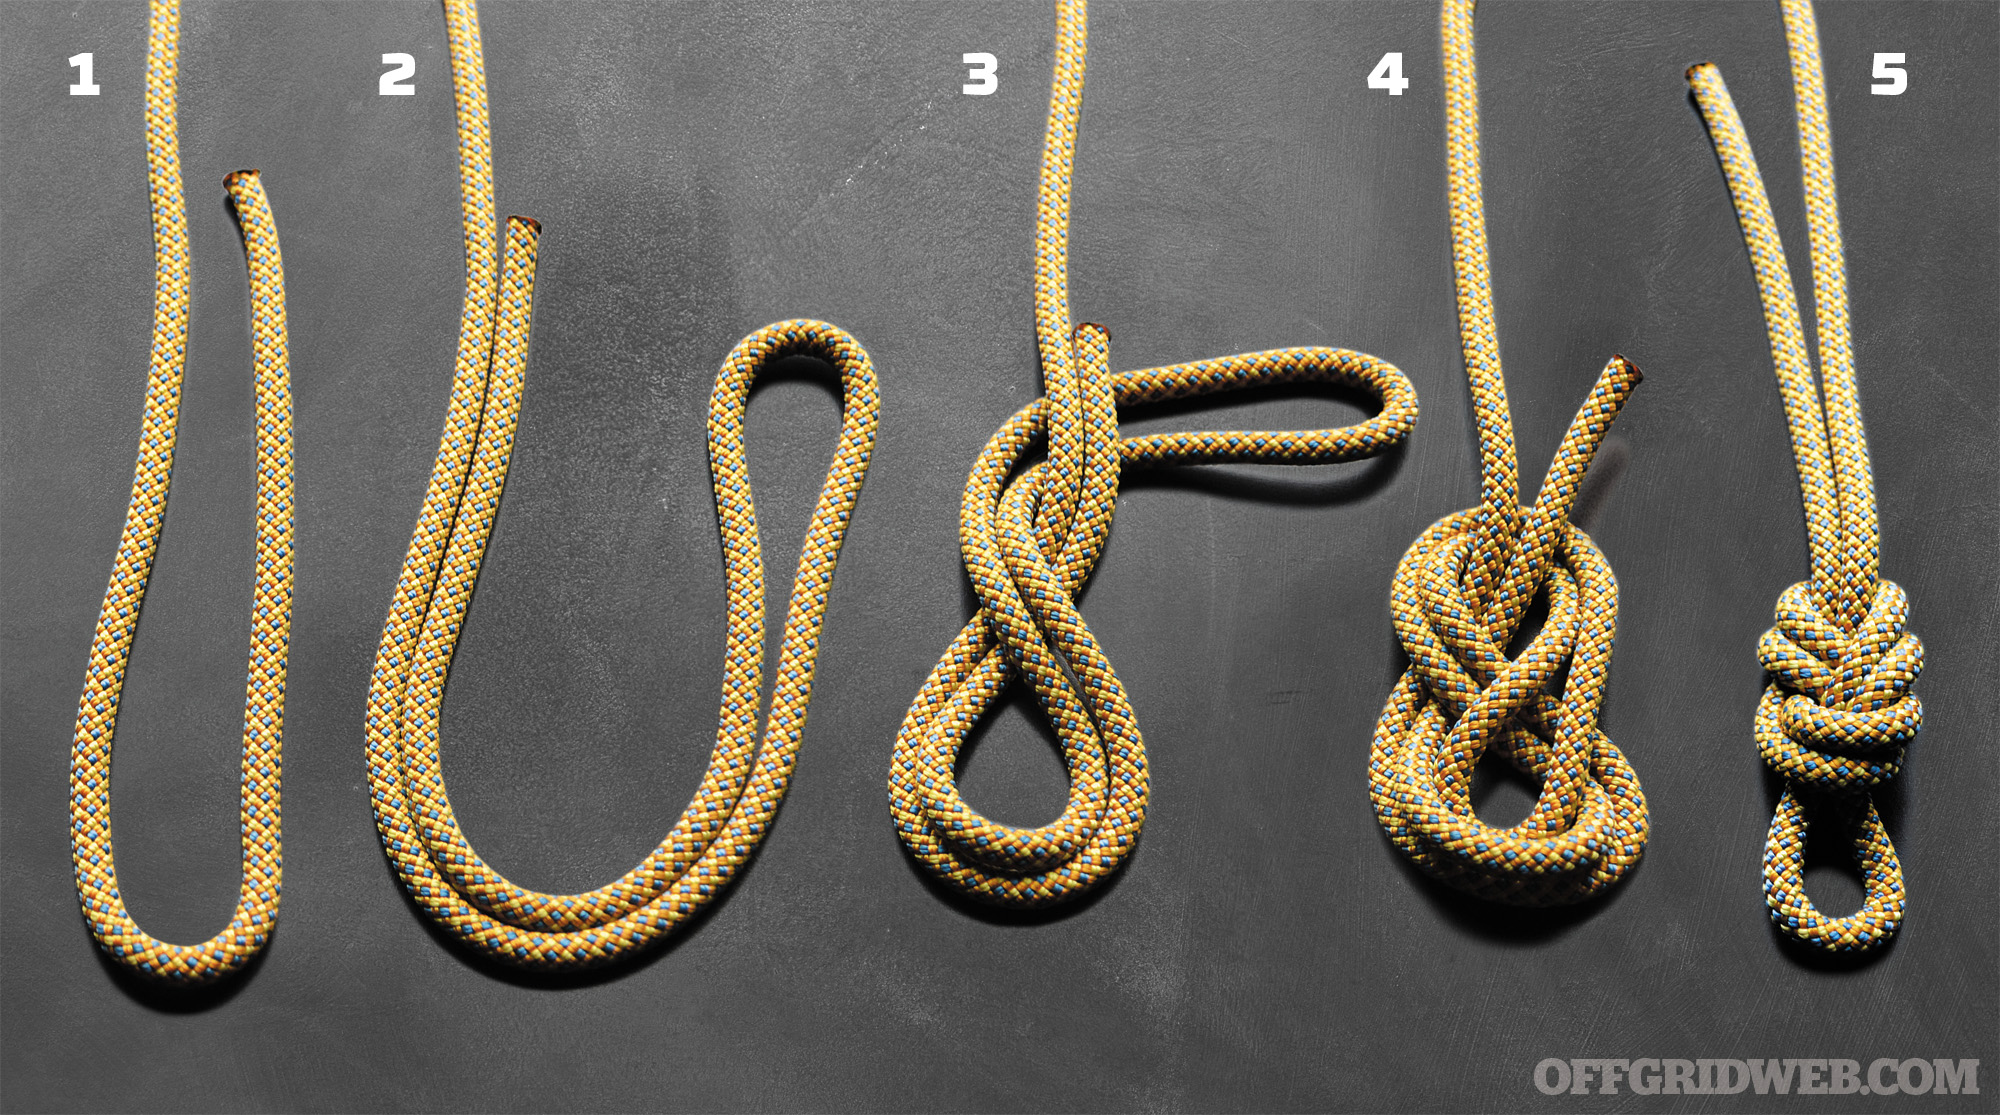
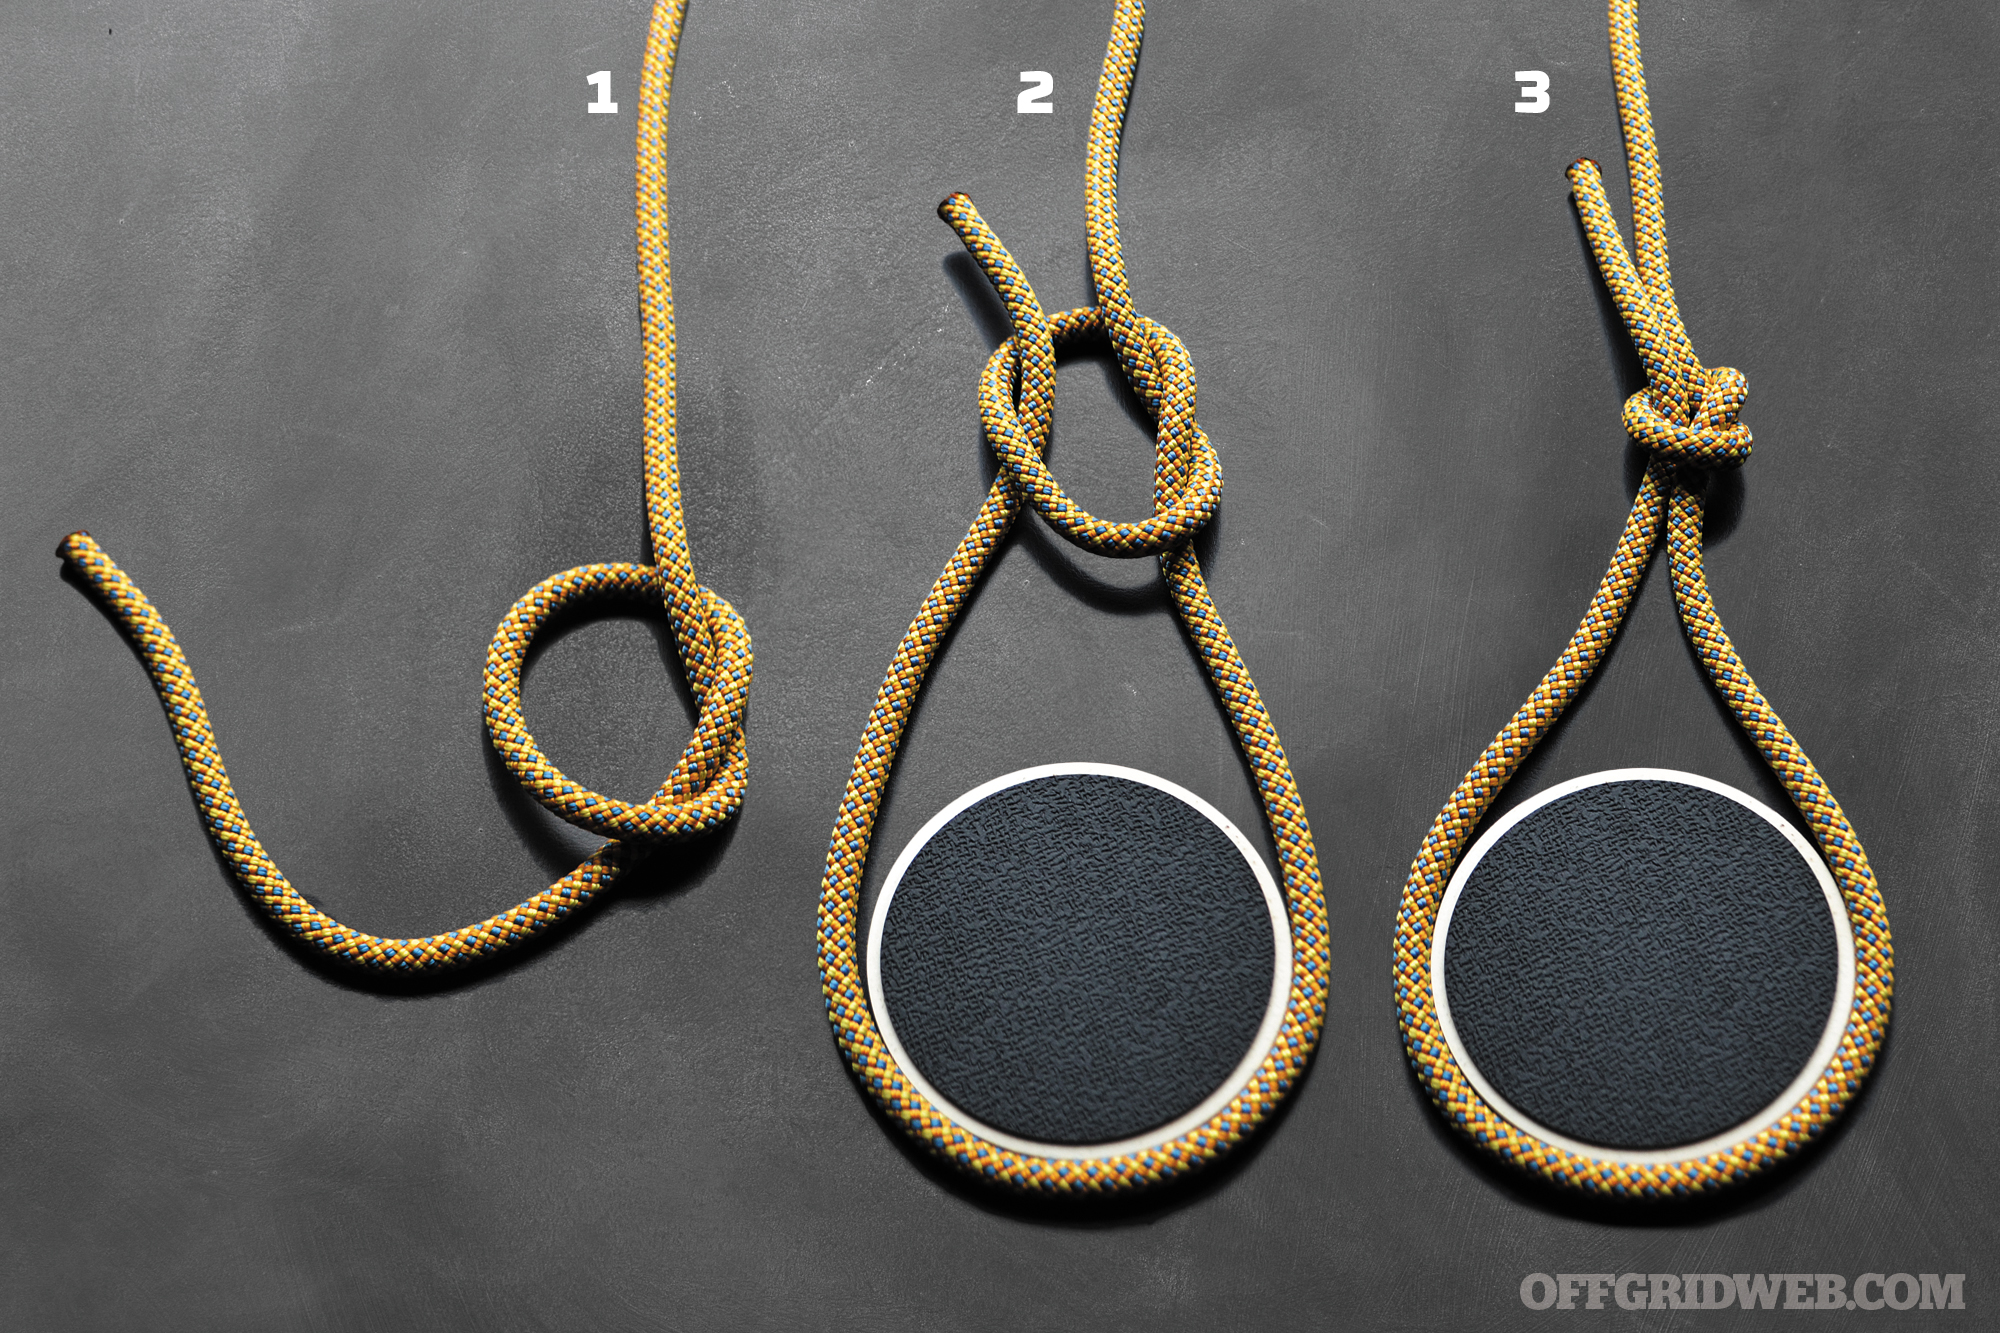
Survival Knot #1: Figure-of-Eight Loop
Difficulty: ★☆☆☆☆
Functions: This knot has virtually unlimited uses, such as hoisting gear, pulling limbs or debris, rappelling, and climbing.
Directions Step 1: Place a bight in the rope. Step 2: Fold the bight over (in essence creating another bight). Step 3: Wrap the bight one full time around both standing parts. Step 4: Tuck the bight through the top of the knot (the second bight you created in step 2). Step 5: Pull tight.
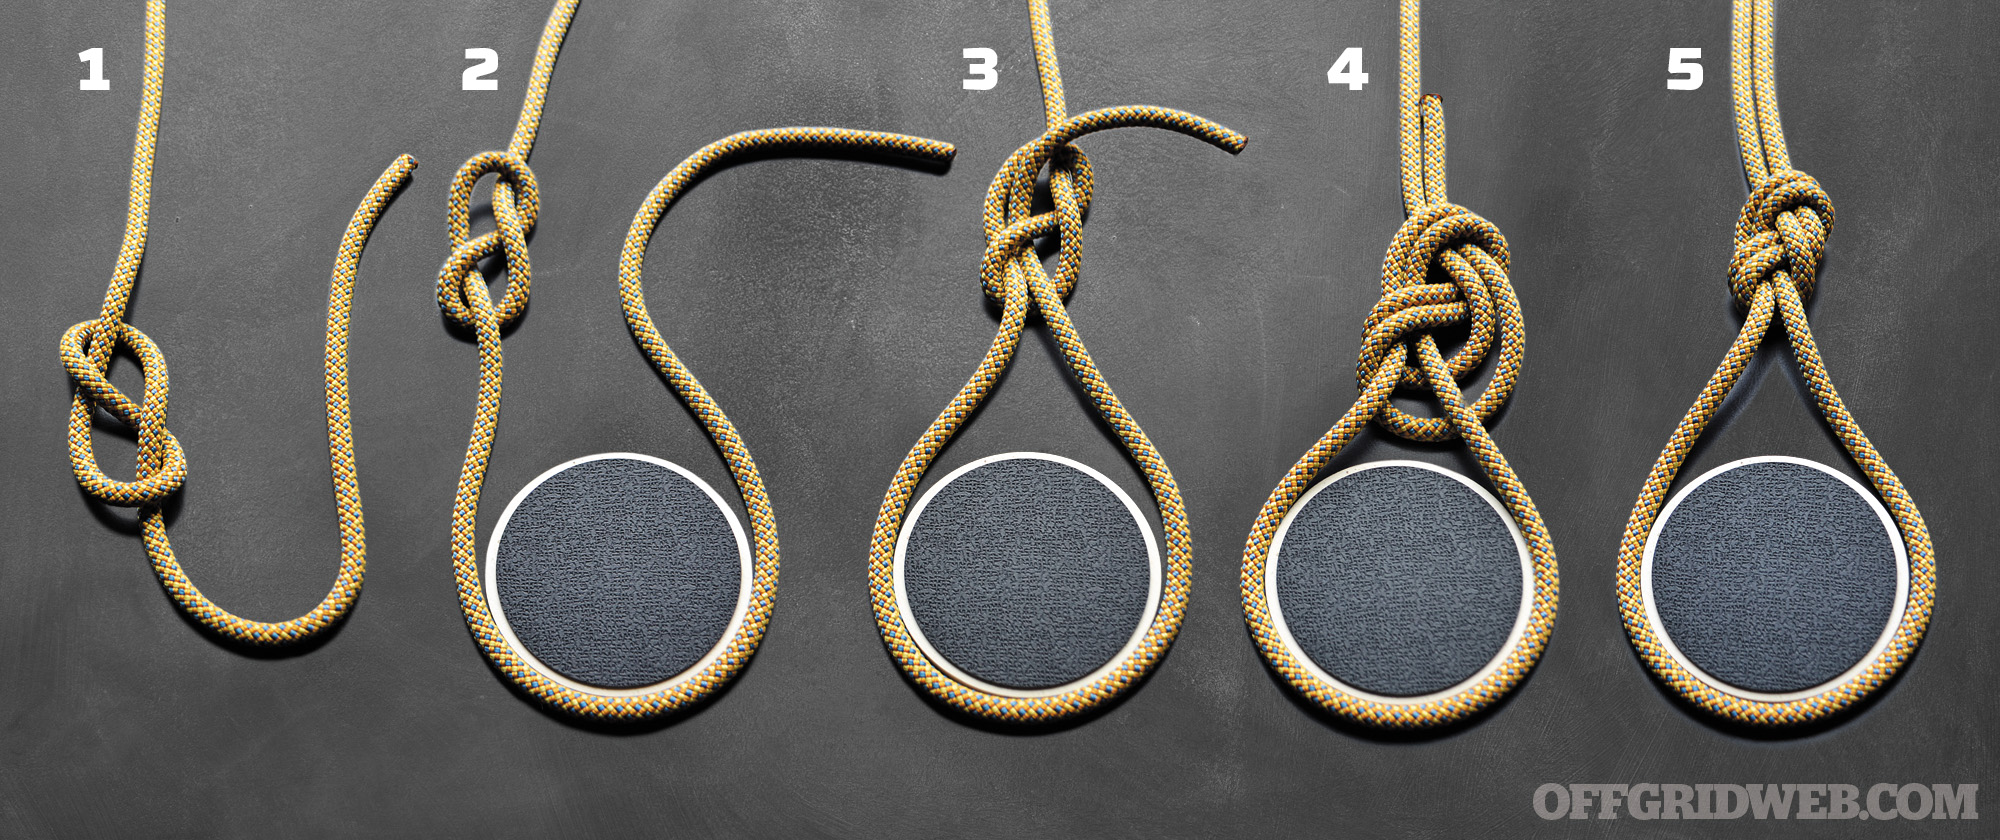
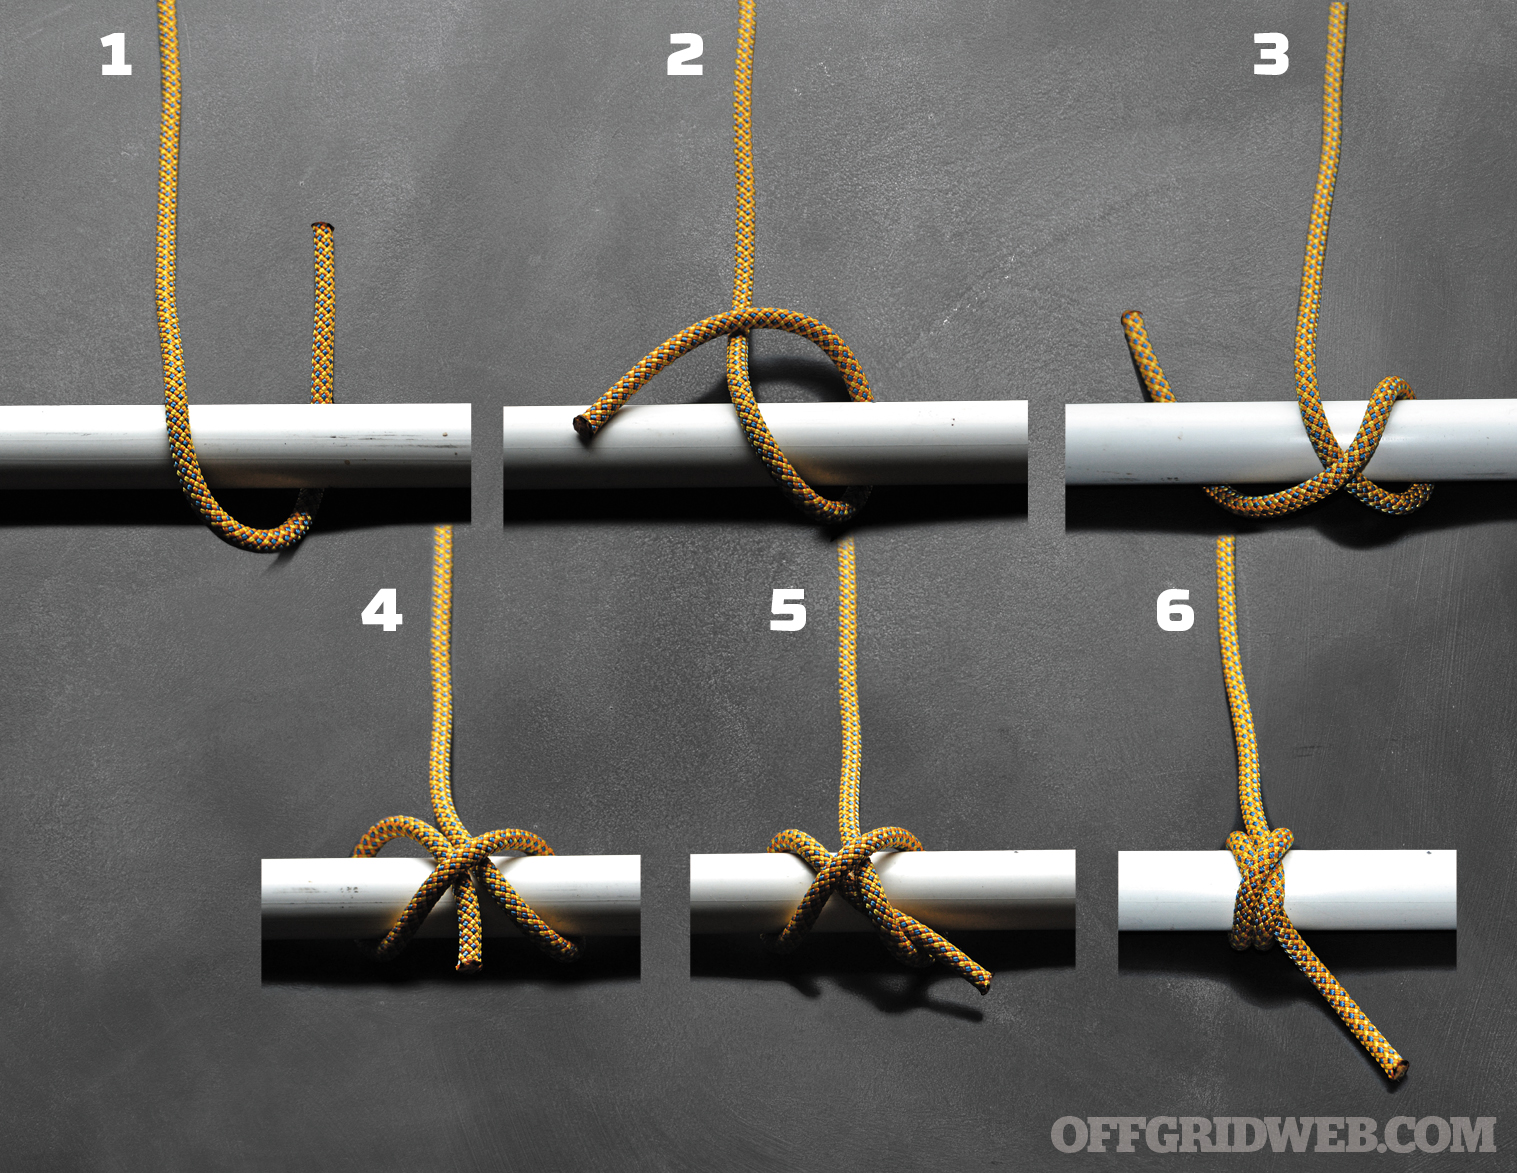
Survival Knot #2: Figure-of-Eight Follow Through
Difficulty: ★★★☆☆
Functions: As a variant of the first knot, this has the same vast variety of uses, but additionally allows you to tie the knot around an object when you don’t have access to the end of the object to loop the figure-of-eight over.
Directions Step 1: Tie a Figure-of-Eight in the rope with enough working end to wrap around your anchor and trace back through the knot. Step 2: Wrap the working end around your anchor. Step 3: Place the working end against the standing end and trace the working end through the knot. Step 4: Dress the knot so the turns don’t cross each other. Step 5: Pull tight.
Survival Knot #3: Overhand Knot with a Drawloop
Difficulty: ★★☆☆☆
Functions: The draw loop is wrapped around the load (gear, animal carcass, human victim, litter, etc.). As the knot is weighted, the loop cinches tight, securing the load. When the load is relieved, the knot can easily be released by pulling the working end of the rope.
Directions Step 1: Tie an Overhand Knot. Step 2: Wrap the working end around the anchor and back through the loop created in step 1. Step 3: Pull tight.
Survival Knot #4: Alpine Butterfly
Difficulty: ★★★☆☆
Functions: This knot offers a three-way pull. One can wrap a rope around an object and tie an Alpine Butterfly. Then, an object can be clipped or tied to the Alpine Butterfly — and it won’t compromise the rope or knot due to the three-way pull. The Alpine Butterfly can be used any time a loop is required in the middle of the rope, such as securing a shelter or elevating food away from wild animals.
Directions Step 1: Drape the rope over your open hand at an angle extending away from your thumb. Step 2: Bring the rope around and over the front of the hand, crossing the first wrap and forming an X. Step 3: Continue wrapping one more time around the hand, working closer to your thumb. Step 4: Pull slack in the center of the three wraps and lay the loose rope on your hand facing back toward your wrist. Step 5: Tuck that loop under the X toward your fingertips. Step 6: Withdraw your hand from the knot and pull the standing ends in one direction and the bight in the other. Step 7: The knot is complete when you pull the two standing ends apart from each other, popping the knot into its final position.
Note: As with many knots, there are multiple ways to tie the Alpine Butterfly. If this method doesn’t click for you, research other ways to tie this important knot.
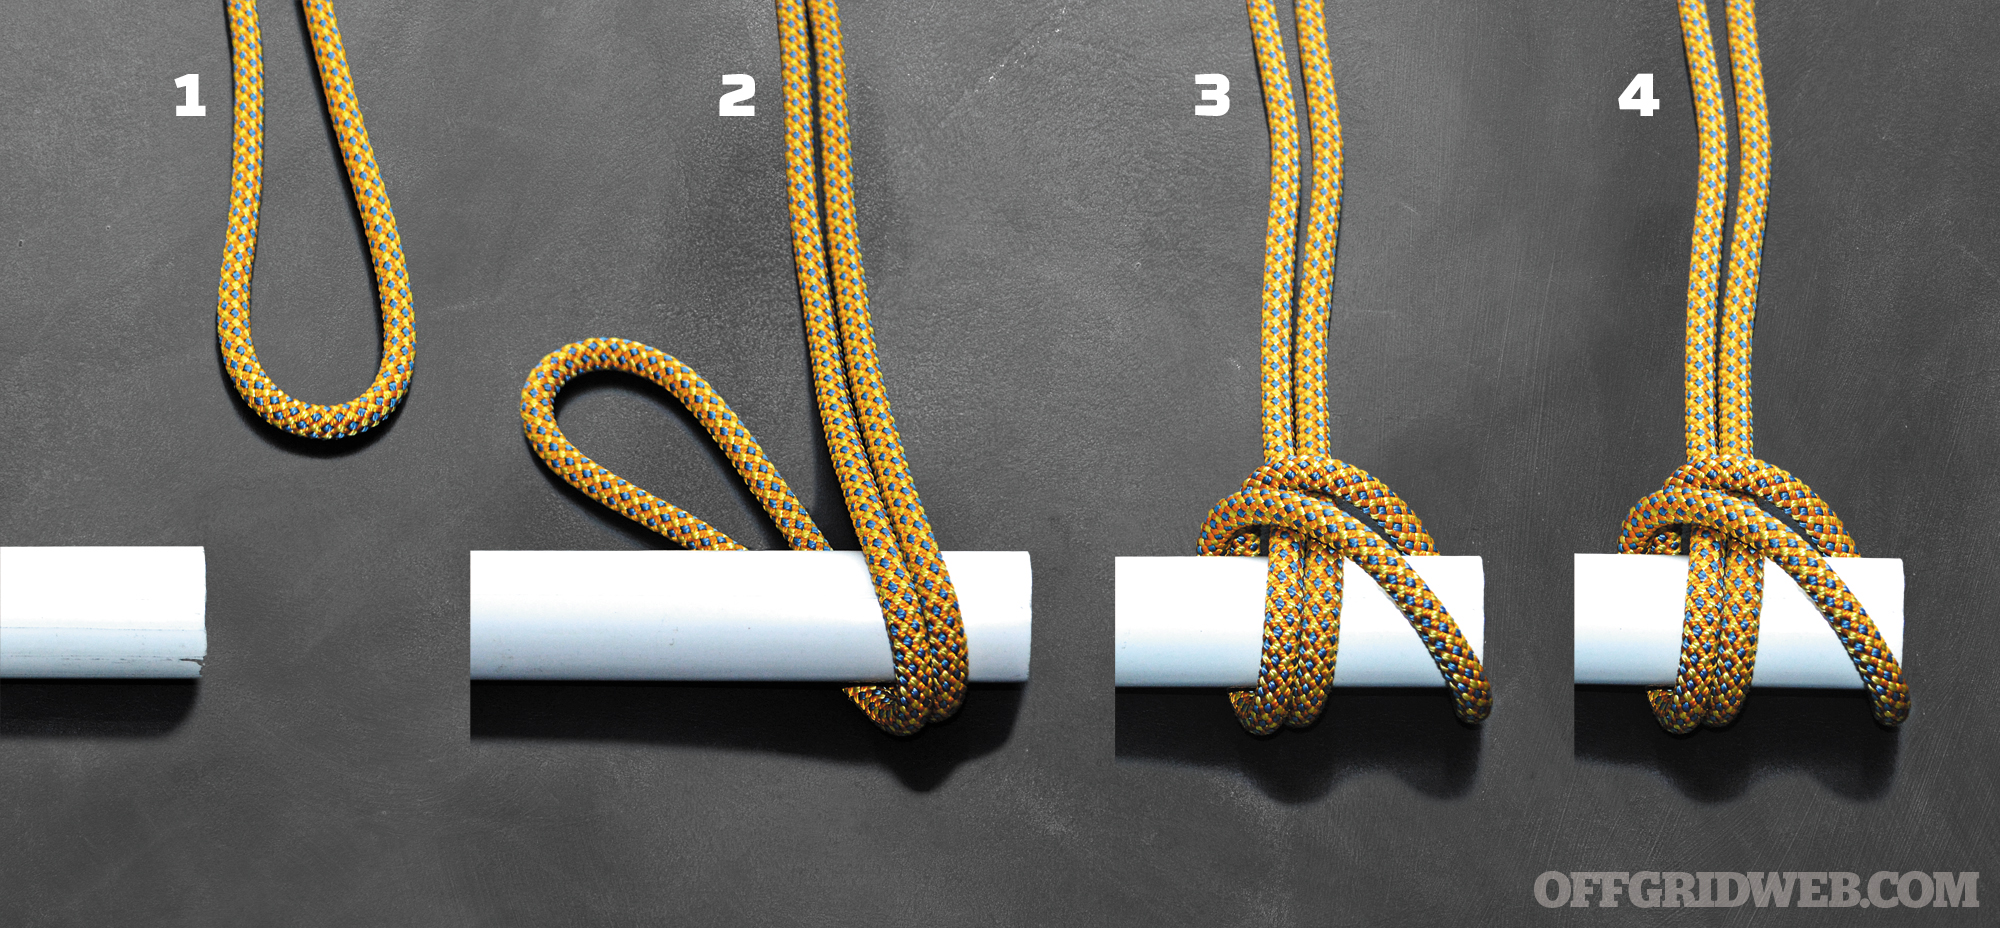
Survival Knot #5: Constrictor Knot
Difficulty: ★★★☆☆
Functions: The Constrictor can be utilized as whipping at the end of a rope, a clamp to hold things down, or to hoist, drag, or grip around a group of objects. It can also be used in any scenario when you need to secure a rope to an object or an object to a rope, and doesn’t require access to the end of the object. This is possibly the most useful and common of the binding knots.
Directions Step 1: Wrap the rope around whatever is to be tied. Step 2: Lay the working end across its own standing part. Step 3: Tuck the working end around the object again creating an X. Step 4: Lead the working end beneath the diagonal part of the X that was just created. Step 5: Tuck the working end under the first crossing turn. Step 6: Pull tight.
Survival Knot #6: Pile Hitch
Difficulty: ★☆☆☆☆
Functions: Used to quickly tie a rope to a pole, post, or tree. The Pile Hitch is often used to tie off a watercraft or to secure an animal. While it isn’t even considered a knot by some purists, this knot provides one of the easiest ways to tie a hitch.
Directions Step 1: Make a bight in the rope. Step 2: Wrap the bight around the post or object, passing the bight underneath both standing ends. Step 3: Pass the bight over the top of the post or object. Step 4: Pull tight.
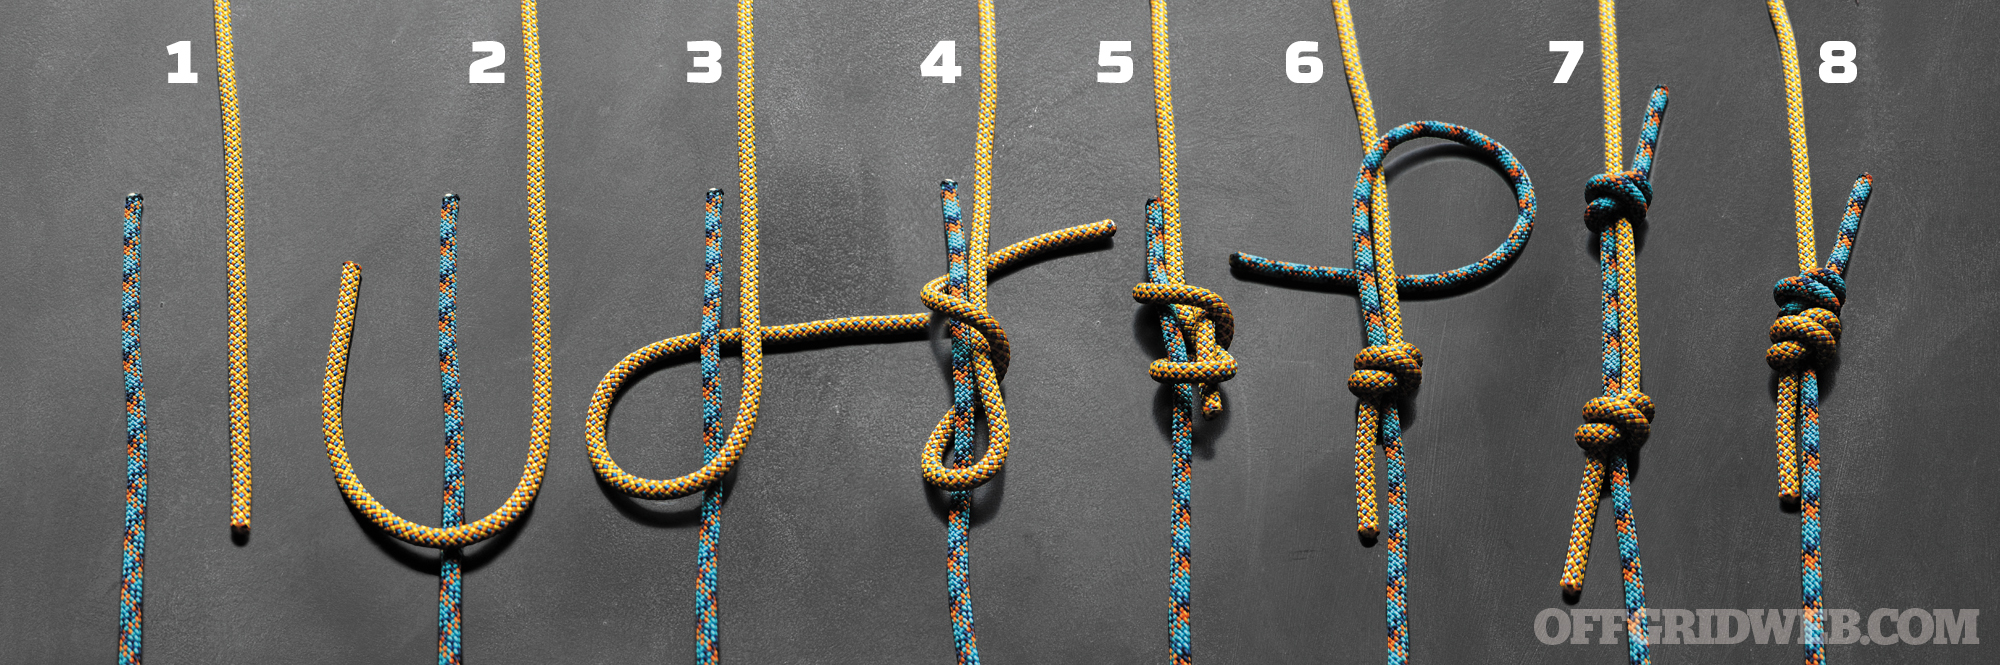
Survival Knot #7: Double Fisherman
Difficulty: ★★★★☆
Functions: A tad more difficult to tie than the rest in this bunch, this knot can be used to securely tie two lengths of rope together. Whenever a single rope is not long enough to accomplish a task, the Double Fisherman can potentially save the day.
Directions Step 1: Place the two ropes parallel to one another. Step 2: Make a bight in rope No. 1. Step 3-4: Create a figure eight working back toward its own standing end, making sure you finish it by tucking the working end under both ropes 1 and 2. Step 5: Pull both ends of rope No. 1 to secure it to rope No. 2. Step 6-7: With the working end of rope No. 2, repeat step 3, tying it around rope No. 1. Step 8: Pull the ropes apart, drawing the knots in together.
Survival Knot #8: Simple Simon Under
Difficulty: ★★★☆☆
Functions: Another knot used to tie two ropes together, the Simple Simon Under is especially useful for tying wet, synthetic rope together.
Directions Step 1: Make a bight in rope No. 1. Tuck the working end of rope No. 2 through the bight in rope No. 1. Step 2: Wrap the working end of rope No. 2 over both the working and standing ends of rope 1. Step 3: Continue wrapping over the working and standing ends of rope No. 1. Step 4: Crossing the working end under itself, tuck it back into the back of the bight in rope 1. Step 5: Pull tight.
Survival Knot #9: Handcuff Knot
Difficulty: ★★☆☆☆
Functions: This can be quickly tied and placed around a victim’s wrists or ankles to remove them from harm or around an animal to drag it.
Directions Step 1: Put two loops in the rope side by side, one clockwise and one counterclockwise. Step 2: Partially overlap the two loops with the clockwise loop on the bottom (at this point, the knot will look like a pretzel). Step 3-4: Pull the leading edge of the clockwise loop through the back of the knot and the counterclockwise loop through the front.
Survival Knot #10: Daisy Chain
Difficulty: ★★☆☆☆
Functions: Although not a knot, the Daisy Chain is an extremely useful method to store rope for rapid deployment.
Directions Step 1: Locate the center of the rope. Step 2: Create a Half Hitch. Step 3: Pull both legs of the standing end up through the loop in the Half Hitch just enough to make a bight. Step 4: While holding the newly formed bight, pull the standing end and the bight with the two rope ends. Step 5: Place the two working parts of the rope up into the bight just far enough to make another bight. Step 6: Continue tucking the two working parts of the rope up into the most recently formed bight just enough to create another bight. Do this until the entire rope is “chained.” To untie, simply pull the ends of the rope and the chain comes undone.
Conclusion
Tied Knot isolated on white background
With these 10 knots, you can now use rope as a tool to enhance your life, bolster your survival skills, and wow your friends. Remember you were only able to learn how to tie your shoes by repetition. Cut yourself a piece of rope and, as you binge watch your favorite TV show, tie these knots over and over again. Create the muscle memory to afford you the ability to tie them under the stress of a disastrous scenario. It’s far better to learn them in the comfort of your chair rather than on your back in the throes of a disaster.
About the Author
Scott Finazzo has been a firefighter for more than 20 years and a longtime member of his fire department’s Technical Rescue Team. He has authored five books, including The Prepper’s Guide to Knots and the national bestselling The Prepper’s Workbook. He also wrote Why Do All the Locals Think We’re Crazy? about his kayak trip through the Virgin Islands. www.scottfinazzo.com
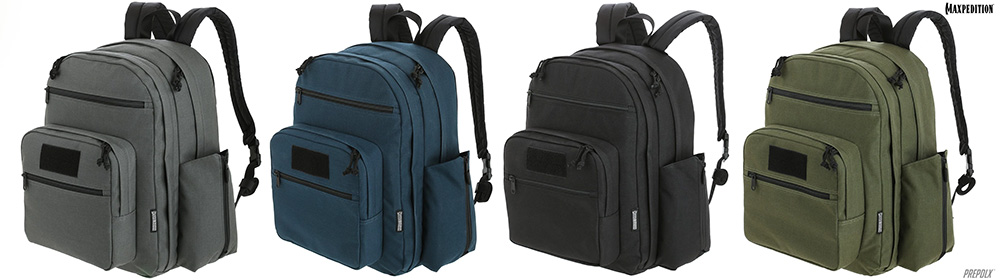
There’s a time and place for large-capacity military-style packs covered in PALS webbing, MOLLE pouches, and expansion straps. They’re great for range days, backcountry hikes, or long-term sustainment situations. However, when it comes to every-day carry around town, we prefer something more discreet and streamlined. We’re therefore pleased to see more gear companies offering lower-profile options for urban EDC. Maxpedition recently launched a new pack in this style known as the Prepared Citizen Deluxe.
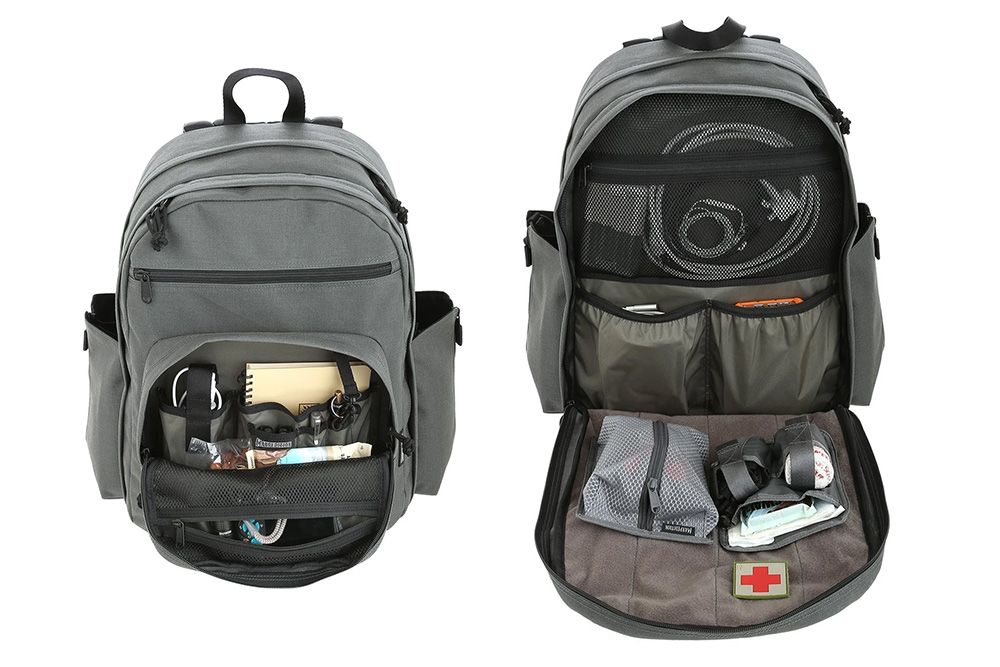
The Maxpedition Prepared Citizen Deluxe is a follow-up to the company’s popular Prepared Citizen Classic, a pack that closely resembles a ubiquitous bookbag design we’re all familiar with. This new Deluxe variant adds more capacity, compartments, and features while maintaining a relatively-innocuous appearance. Both feature sturdy 1,000D nylon fabric with double-stitching and reinforcements, YKK zippers, and Duraflex buckles. There’s also a hidden rear CCW compartment for a weapon or ballistic panel.
The Prepared Citizen Deluxe pack’s interior features loop-lined panels for addition of pouches, pockets, or a holster. Each side of the pack also now has an expandable bottle holder, a feature we’re glad to see implemented. Total capacity is 32L, plenty for a daypack or get-home bag.
This pack is available now in four colors: Wolf Grey, Dark Blue, Black, and OD Green. MSRP is $110, but at this article’s time of publication, it’s on sale for $89. There’s also a limited-time code on the product page for a free hook-backed holster for the CCW compartment. For more information on this pack, go to Maxpedition.com.
The Premise: The best-selling John Matherson series began with 2011’s One Second After, a realistic portrayal of life after an electromagnetic pulse (EMP) weapon sends the United States into a new Dark Age. In the series’ third installment, The Final Day, a messenger is sent to find John; however, his perilous journey proves too much, and he only manages to get a partial and cryptic message to Forrest’s settlement. The remaining citizens of Black Mountain, North Carolina, are finally starting to make progress rebuilding after “The Day,” but a new threat looms.
The 411: The Final Day was written by William R. Forstchen, an American historian and novelist. If you have some back issues of Boys’ Life from the late ’70s you read some of his earliest work. His writing in the John Matherson series exemplifies his expertise, with multiple references to important historical events that parallel or give further insight into the story. One Second After was even cited in Congress as a realistic depiction of the possible aftermath of an EMP attack on the continental USA.
The Verdict: Unfortunately, a lot of post-apocalyptic books tend to focus on two things: a corrupt government and EMPs. This series doesn’t deviate from this paradigm, but manages to keep itself from feeling tired or overdone thanks to believable storytelling.
The protagonists do suffer, get hurt, and don’t have all the answers. Characters are fleshed out and aren’t one-dimensional.
The people of Black Mountain and the surrounding area try to regain some of what was lost, such as power, communication, and a sustainable source of food. It’s interesting to see how the town has formed its own working militia based out of Montreat College. These battle-hardened shells of what were once kids are now the town’s first line of defense against enemies both foreign and domestic. There’s a bit too much civil-war talk, but still, it adds to the story.
Will John use their precious fuel reserves acquired from Fredericks Army of National Recovery in One Year After to see if what the messenger said was true? Is John’s old friend and former commanding officer, General Bob Scales, still alive? Or will they hunker down to prepare for something that could be far worse?
The series as a whole covers important topics that any survivalist can learn from, such as how to enforce law, priorities to focus on, the importance of hygiene, and the need for a strong community. The occasional bits of news the survivors receive about the condition of states like Florida being all but wiped out help build the tension. Real issues like the process of rebuilding are a key point.
The plot in The Final Day wasn’t as strong as the first two novels, but still kept us wanting more. After all, it’s pretty hard to compare any sequel to what some consider one of the best most accurate portrayals of life following a world-changing EMP event.
Novel & Author The Final Day by William R. Forstchen
The following article was originally published by our sister publication RECOIL. It appears here in its entirety with permission. For more articles on guns, training, and gear, go to RECOILweb.com.
If you are familiar with the original Stiletto, and a fan of the product, you will love this one. The Stiletto Pro is basically the standard Stiletto on steroids. The new version includes a number of new features and upgrades. We asked SureFire Public Relations Manager Andrew Wright about the product, and he said, “The Stiletto Pro is the big brother to the standard Stiletto. Still maintaining the awesome profile for EDC, the Pro has an aluminum body for increased durability and heat transfer. The Pro has 1,000 lumens and a new reflector, giving far greater candela and output than the standard Stiletto.” We were excited to receive a sample to walk through a side-by-side comparison.
Output
Let’s be honest, the most critical feature of a personal light is output. With output, in lumens, we are concerned about battery life and also the ability to switch between different modes. If you are using a light for work, a lower mode is applicable for map reading or tasks in front of you, while a high mode is preferred for targeting a person or object at distance. The Stiletto Pro has both, and is an upgrade in energy from the Stiletto.
Most importantly, the Pro utilizes SureFire’s proprietary MaxVision Beam reflector. As Wright describes, Maxvision is “created by a special faceted reflector that shapes the LED’s light into a smooth, seamless wall of light that’s perfect for close-range applications and maintaining situational awareness.” What you receive is a very clear light that exposes every detail for a variety of applications.
The Stiletto Pro has three modes of high, medium, low, at lumens of 1,000, 300, and 25, respectively. A 1,000 lumens is a lot of light. As a comparison, the popular SureFire Scout light for rifles has a max output of 1,500 lumens. The Pro offers an output close to the Scout, but in a much smaller form factor. Below you can see the difference between the two models in both output, and battery life.
Stiletto
High: 650 Lumens/1.75 Hours
Medium: 250 Lumens/2 Hours
Low: 5 Lumens/30 Hours
Stiletto Pro
High: 1,000 Lumens/1 Hour
Medium: 300 Lumens/1.5 Hours
Low: 25 Lumens/23.5 Hours
Form Factor
Weight and size are critical components of any light for on-duty use. If you think back to the days of a police officer carrying a foot-long Maglite on their duty belt, you’ll understand how far we’ve come. SureFire has driven home the concept of smaller, easier-to-use lights without sacrificing performance.
The Stiletto Pro weighs approximately 4.0 ounces, compared to the Stiletto’s 2.8 ounces. You will notice the slight weight difference if you are doing a side by side comparison, but with that weight comes enhanced durability. The Stiletto Pro is 4.5 inches long compared to the Stilleto with 4.45 inches.
The Stiletto Pro boasts an all-new aerospace aluminum body and mil-spec hard anodized for tremendous durability. The original Stiletto was composed of a lightweight polymer with only an anodized tip. While the Stiletto is still very durable, the Pro is next-level.
The form factor allows the user to fit the product in most pockets, and be drawn like a knife. Its Melonite-coated clip steel clip is reversible, while the standard Stiletto was not. The ability to switch the steel clip is a great option. Right-handed, I deployed the standard Stiletto and have to rotate the light to enter my natural grip. With the Stiletto Pro, I adjusted the clip so that the deployment is one motion.
The ease of deployment makes a difference when performing under duress or even movement. Both models have a similar light activation mechanism that matches the anatomy in our hand. With a natural grip, the activation buttons are extremely easy to access and manipulate. Both models also have an additional ‘tactical tail switch’ that deploys the high mode– perfect for using in short bursts to disorient an attacker or move a crowd.
Both models use a micro-USB port for easy recharging. But if you don’t like a light that requires recharging instead of replaceable batteries, a Stiletto isn’t for you. There is a difference in price between the two models. The Stiletto Pro is $229.00 MSRP and the standard Stiletto is $109.00 MSRP.
Conclusion
As a professional end-user, I would recommend the Stiletto Pro due to its durability, output options, and clip functionality. While the standard Stiletto is still a great option for recreational needs, the power and ruggedness of the Pro are exceptional. The Stiletto Pro is a great reminder of why SureFire is still viewed by many as the gold standard in terms of tactical lights.
For more information on this flashlight, visit SureFire.com.
The Myth: Let’s explore the popular belief that the average “shade tree” mechanic can modify his vehicle so it’s invulnerable to an electromagnetic pulse (EMP).
The Upsides: Picture a multi-megaton nuclear device has just detonated 200 miles over North Dakota. The resulting pulse knocks out the power grid and most electronics throughout the heartland.
So, what a game-changer it would be to drive a functional vehicle through a landscape of horse-drawn carriages, bicycles, and inline skates. Forget about running away from a pack of mounted marauders. Your spike-covered and skull-adorned EMP-hardened truck would be truly awesome. Speeds over 50 mph, serious load-carrying capacity, and plenty of passenger room — none of these come standard on some old nag you commandeered from the local petting zoo.
The Downsides: First off, you may be wasting your time trying to modify a vehicle that doesn’t need modifying. Modern cars are somewhat shielded to prevent interference between the numerous electronic systems onboard. In some alleged U.S. government EMP tests, vehicles purportedly restarted after users disconnected the battery and then hooked it back up.
Secondly, I don’t believe that the average person has the knowhow (or parts) to modify a modern vehicle enough to survive a strong EMP strike.
Sadly there are more negatives. The parts that allegedly provide shielding could be expensive. And the corner gas station won’t be open for fuel, oil, and spare parts.
But aside from the expense and the uncertainties, you might as well paint a giant bull’s-eye all over your sweet ride, because it’s one hell of a noisy attention-grabbing target.
The Reality: Which kind of EMP are you worried about? They come in two flavors. First is the Carrington Effect, which is a solar event named after English astronomer Richard Carrington. In 1859, this fellow (and people across the world) watched in surprise as their telegraphs stopped working or caught fire from the effects of the greatest recorded solar storm in history. This massive solar flare had the energy of 10 billion atomic bombs. Scary!
And then there’s the nuclear kind of EMP. More scary! Rather than a lengthy blast from the sun, a nuclear EMP is a pulse less than a nanosecond in duration.
As with most things in life, size matters. If the second type of EMP attack happens, it happened because we are at nuclear war. Who cares if your Escalade won’t start. We’re at nuclear war!
Yes, vehicles with carburetors (usually pre-1980) will be mostly unharmed by an electromagnetic pulse. Do you want hordes of desperate people to follow the only set of fresh tire tracks in the area — right up to the gate of your secret homestead? I’d say no.
How about a bicycle instead? You can take a mountain bike completely off the road (and ride it almost anywhere else). And that old horse I was joking about earlier? It doesn’t run on gasoline, so refueling can be as easy as letting the thing graze on grass. But for those who can’t let go of the internal combustion engine, there’s always the dirt bike.
These off-road machines can last a long time, subsisting on simple repairs that you can perform yourself (no MIT doctorate required). Older dirt bikes don’t have a single computer chip in them either, so they’re good to go. Just a cache with some stabilized fuel and a few common spare parts could keep this thing running for months or even years. Let’s just hope that we last that long.
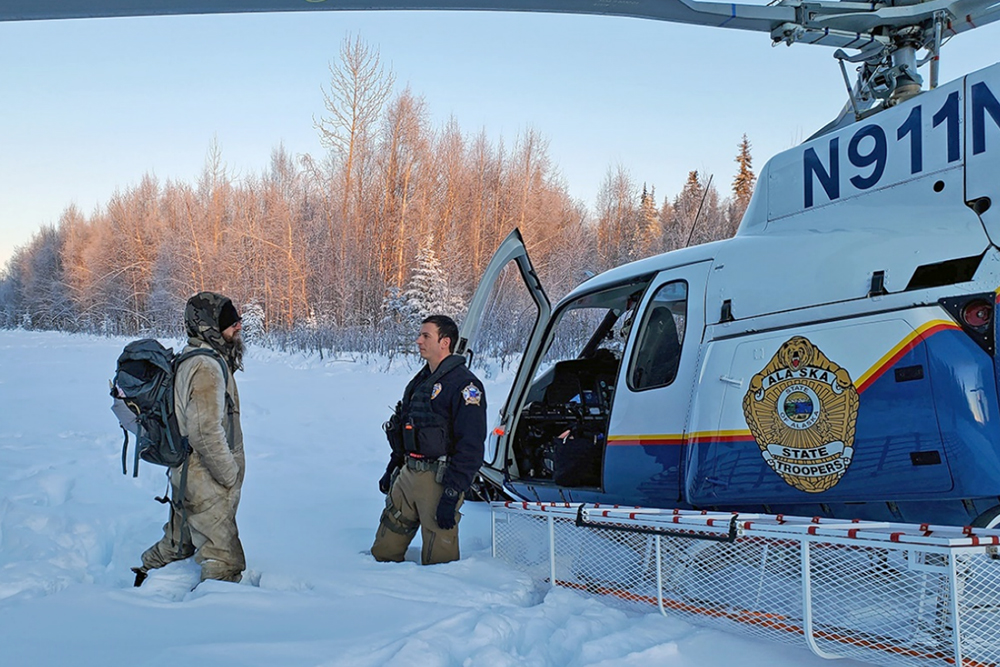
It’s one thing to be self-sufficient when things are going smoothly, and entirely another to be self-sufficient during a catastrophic situation. Life has a way of throwing curveballs at us, and being able to deal with these challenges will test your survival skills, especially when you’re all alone. The recent story of 30-year-old Tyson Steele, who was stranded in sub-zero temperatures for more than 20 days after his cabin burned down, is a reminder of this fact. Thankfully, Steele was able to stay alive until Alaska State Troopers rescued him.
Photo Credit: Alaska State Troopers
On Thursday, January 9th, an Alaska State Trooper helicopter was dispatched to conduct a welfare check on Steele at his cabin in the remote woods 20 miles from the town of Skwentna. Steele’s family became concerned after not hearing from him for several weeks, an unusually long period of time for him to go without checking in. The helicopter found Steele waving his arms outside the ruins of his cabin, with “SOS” carved into the snow nearby.
Hours after Steele was rescued, he explained what happened in detail — you can read a PDF of the entire account on the Alaska DPS web site. It all began in the middle of the night on December 17th or 18th, as Steele recalls: ” I got hasty and I put a big piece of cardboard in the stove to start the fire … it sent a spark out through the chimney, which landed on the roof.” The resulting ember slowly burned a piece of plastic tarp, which grew into a blazing inferno while he slept.
At roughly 1 AM, he awoke to find the entire roof on fire. He ran back inside to wake his 6-year-old labrador retriever, Phil, who jumped up and appeared to run outside. He then attempted to save a few critical supplies — warm clothes, a sleeping bag, and blankets he’d need to survive the -15°F winter cold. He rushed out shortly before the fire spread to engulf his stockpile of cooking oil, as well as 500 rounds of ammunition, and finally a propane cylinder that exploded.
Tragically, the dog didn’t make it outside after all. “I was hysterical… I have no words for what sorrow; it was just, just a scream,” he recalled.
He worked until sunrise, attempting to put out sections of the fire, but eventually sat down to formulate a plan. He determined that he had 60 cans of food, many of which were charred and questionably-edible. The only way in and out was through a chartered private plane — the ground was blanketed in 5 feet of soft snow, and Steele’s snowshoes had burned up in the fire. Additionally, his cell phone had recently stopped charging due to a faulty battery, so he was unable to use it to call for rescue.
Steele scavenged some lumber and tarps to build an improvised shelter around the surviving wood stove, and was able to stave off hypothermia. “I could still see my breath, but at least I wasn’t suffering.” He ate ruptured cans of half-burned food and peanut butter in melted plastic jars. After approximately 22 days, the State Trooper helicopter arrived to find him healthy but cold and ash-stained.
You can read a full account of Steele’s survival story in his own words here. By his own admission, he made some critical mistakes that exacerbated the disastrous situation, most notably a lack of emergency communications equipment. However, his commendable resourcefulness and determination allowed him to stay safe until rescuers arrived.
Lock picking is a subject that often receives mixed opinions from the general public. Sadly, many see it as a skill set that’s only applicable to members of the criminal underworld, and claim that those who learn it must have some kind of underlying nefarious intent. Others perceive it as something that’s only possible in spy movies, assuming that the average person would never be able to learn its intricacies. We’re here to tell you that these assertions are simply not true — lock picking is an extremely valuable skill with many real-world applications, and it’s a lot easier to learn than you might think.
Why Learn Lock Picking?
To address the first point, let’s look at a few use cases where knowing how to pick a lock can be valuable to the average person. The most obvious of these is a situation where you’re locked out of something you own, whether that’s a door, gate, toolbox, or even a vehicle. Maybe you lost the key, left it in an inaccessible location, or locked it inside the container — either way, if you know how to pick a lock, you can solve this problem without paying a locksmith to do it for you. Lock picking is also important for emergency entry and exit techniques, which might be necessary in a survival situation. For example, gaining entry to a locked building to take shelter during a disaster, or in the worst case, covertly escaping captivity during a kidnapping scenario.
Additionally, understanding lock picking is a critical part of hardening your own security systems against those who might employ it for malicious purposes. This plays into the adversarial mindset we’ve discussed in previous articles. If a bad guy might use lock picks to gain access to your valuables, you’d better learn the skill too so you can know enough to stay one step ahead.
As for the second point, lock picking isn’t some esoteric skill that requires years of tireless practice to learn (at least not for most common applications). In fact, it’s surprisingly easy to defeat most consumer-grade locks — the kind found in home goods and hardware stores everywhere — within a few seconds. The abundance of educational videos, articles, and training kits available online has made lock picking easier to learn than ever before.
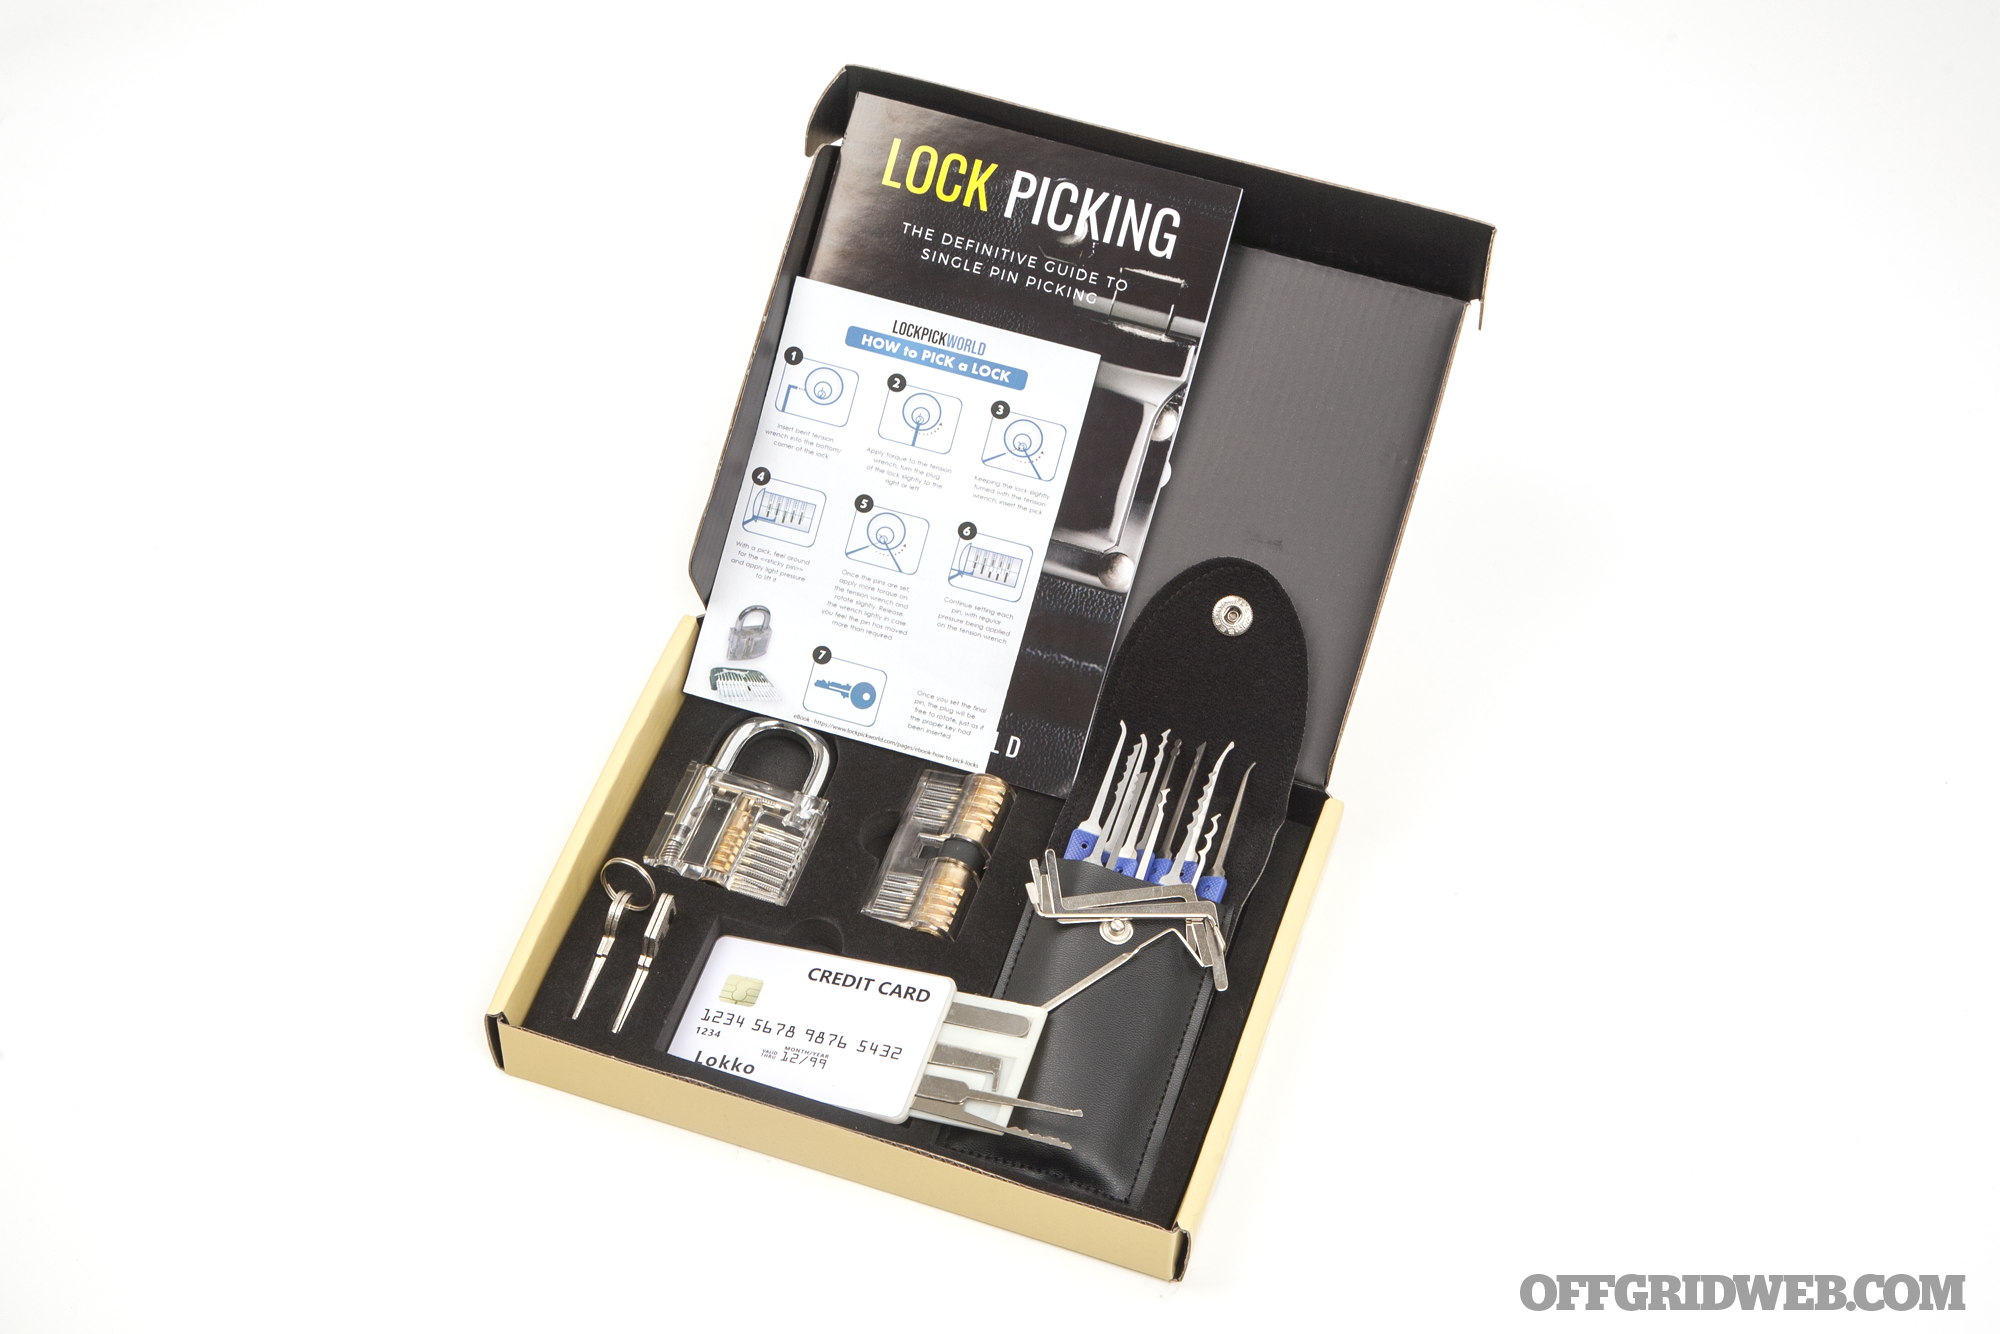
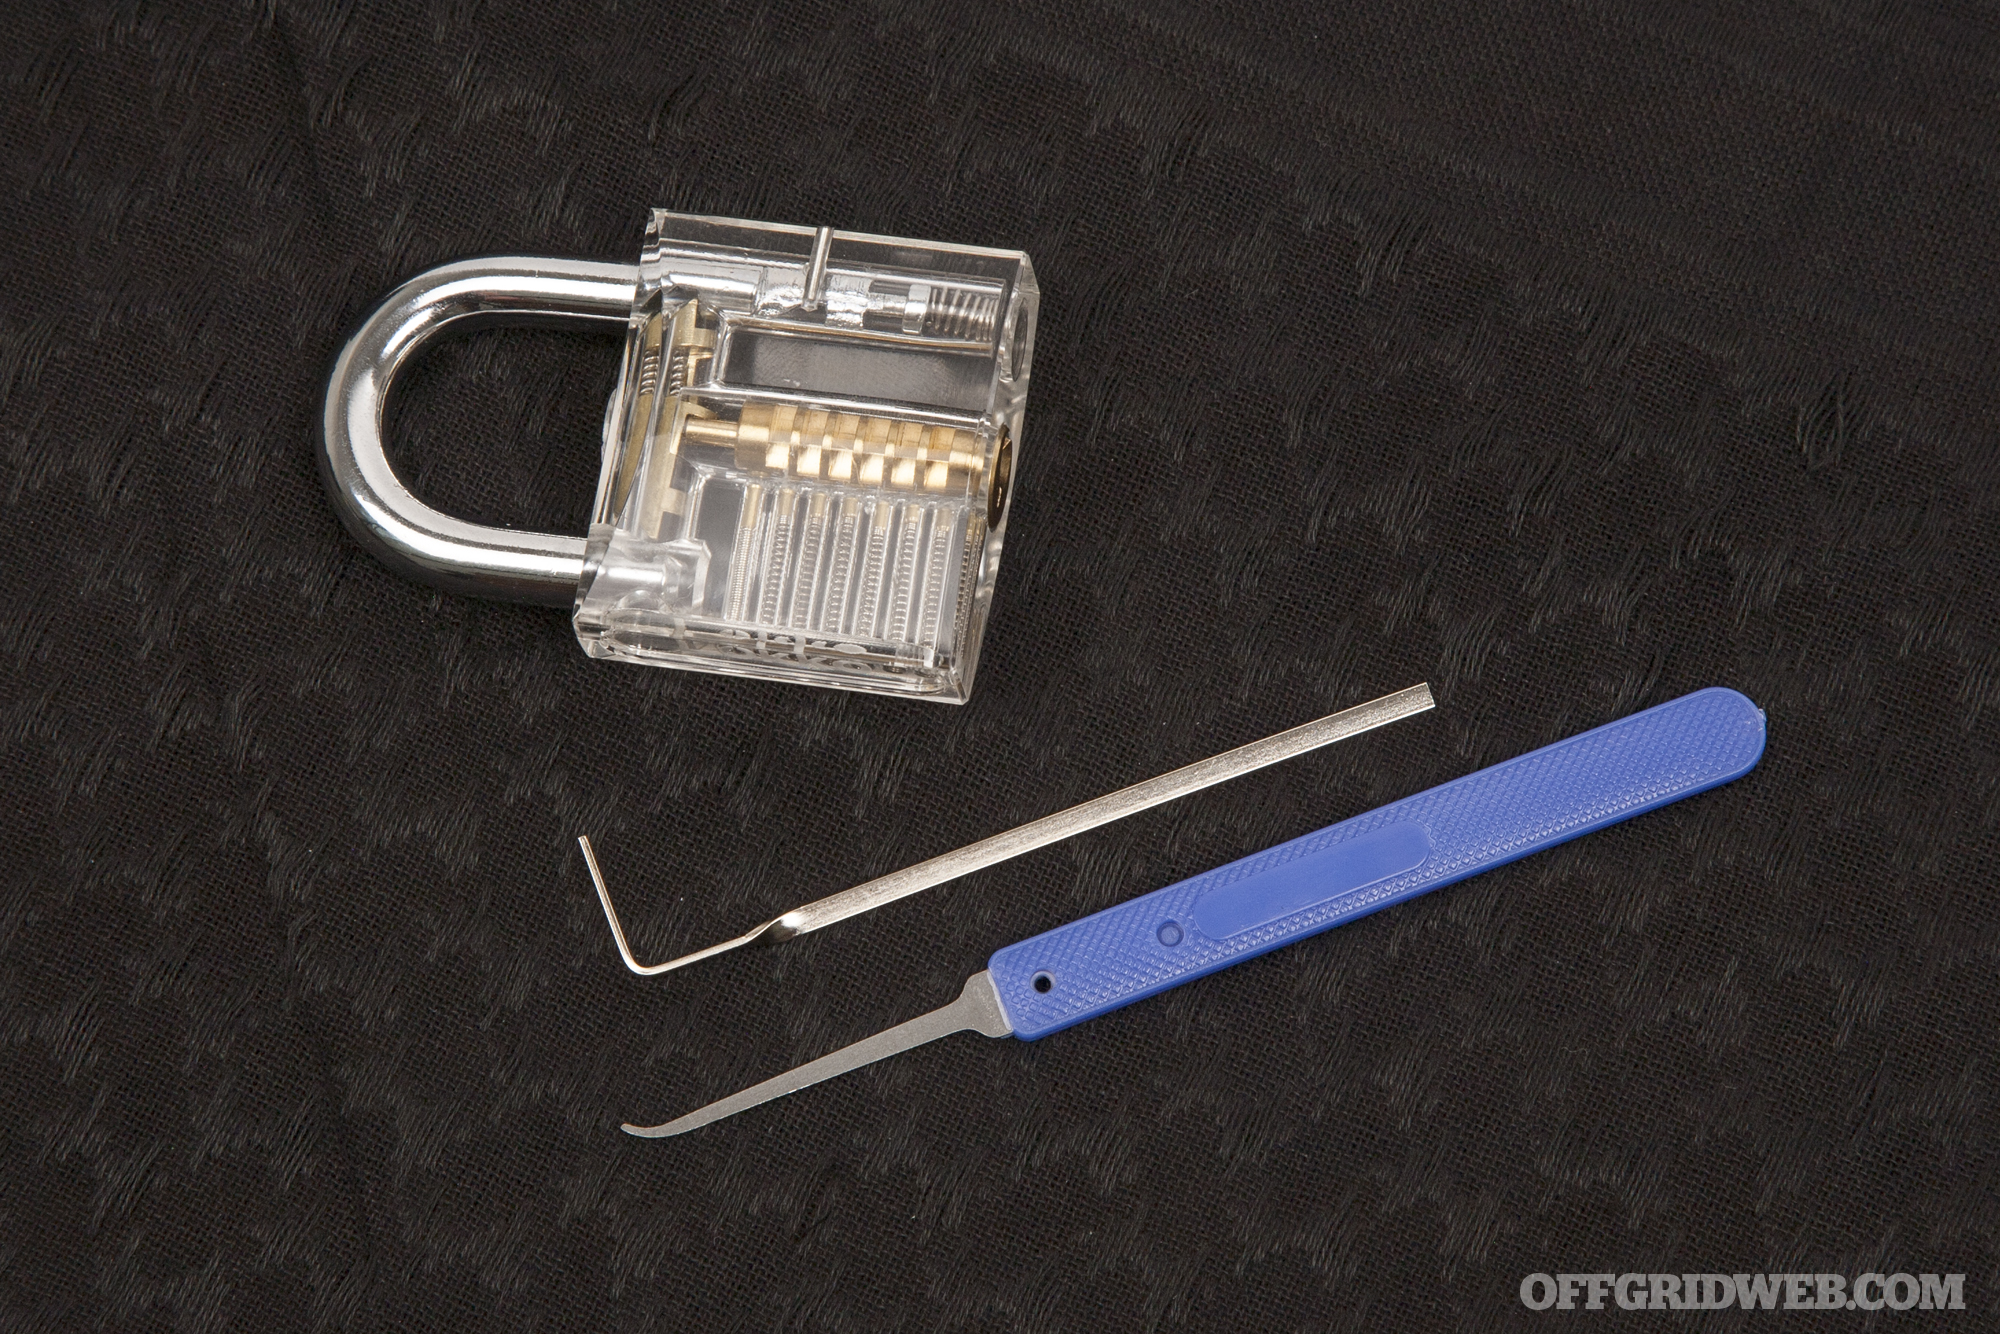
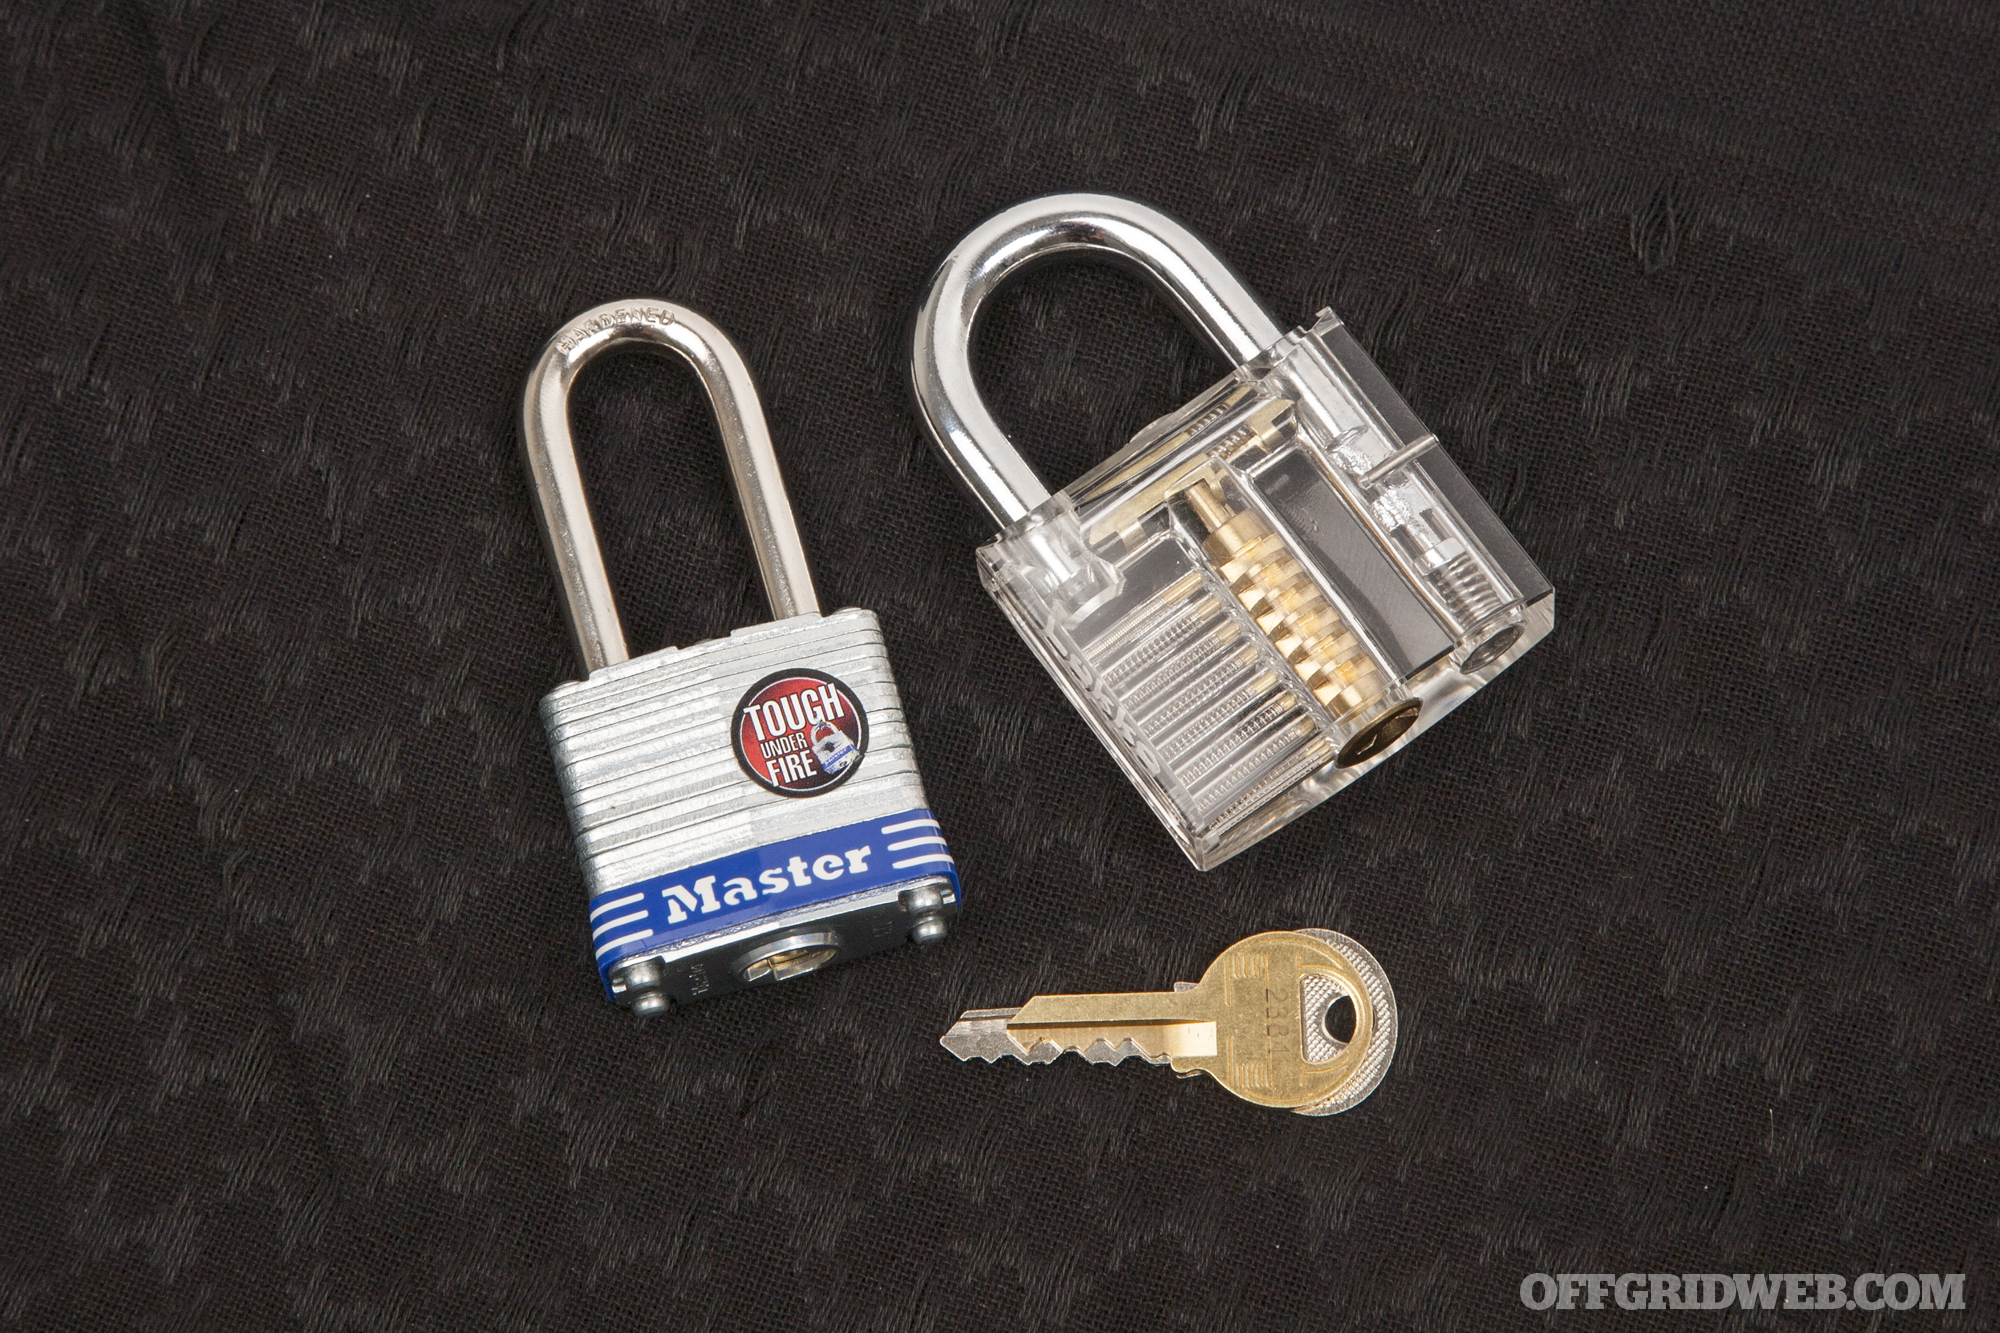
LockPickWorld Beginner Lock Pick Box Set Contents
Today, I’ll take a detailed look at one such training kit: the LockPickWorld Beginner Lock Pick Set. LockPickWorld was kind enough to send me one of these kits to evaluate, but with a retail price of $53 (plus free shipping) it certainly won’t break the bank.
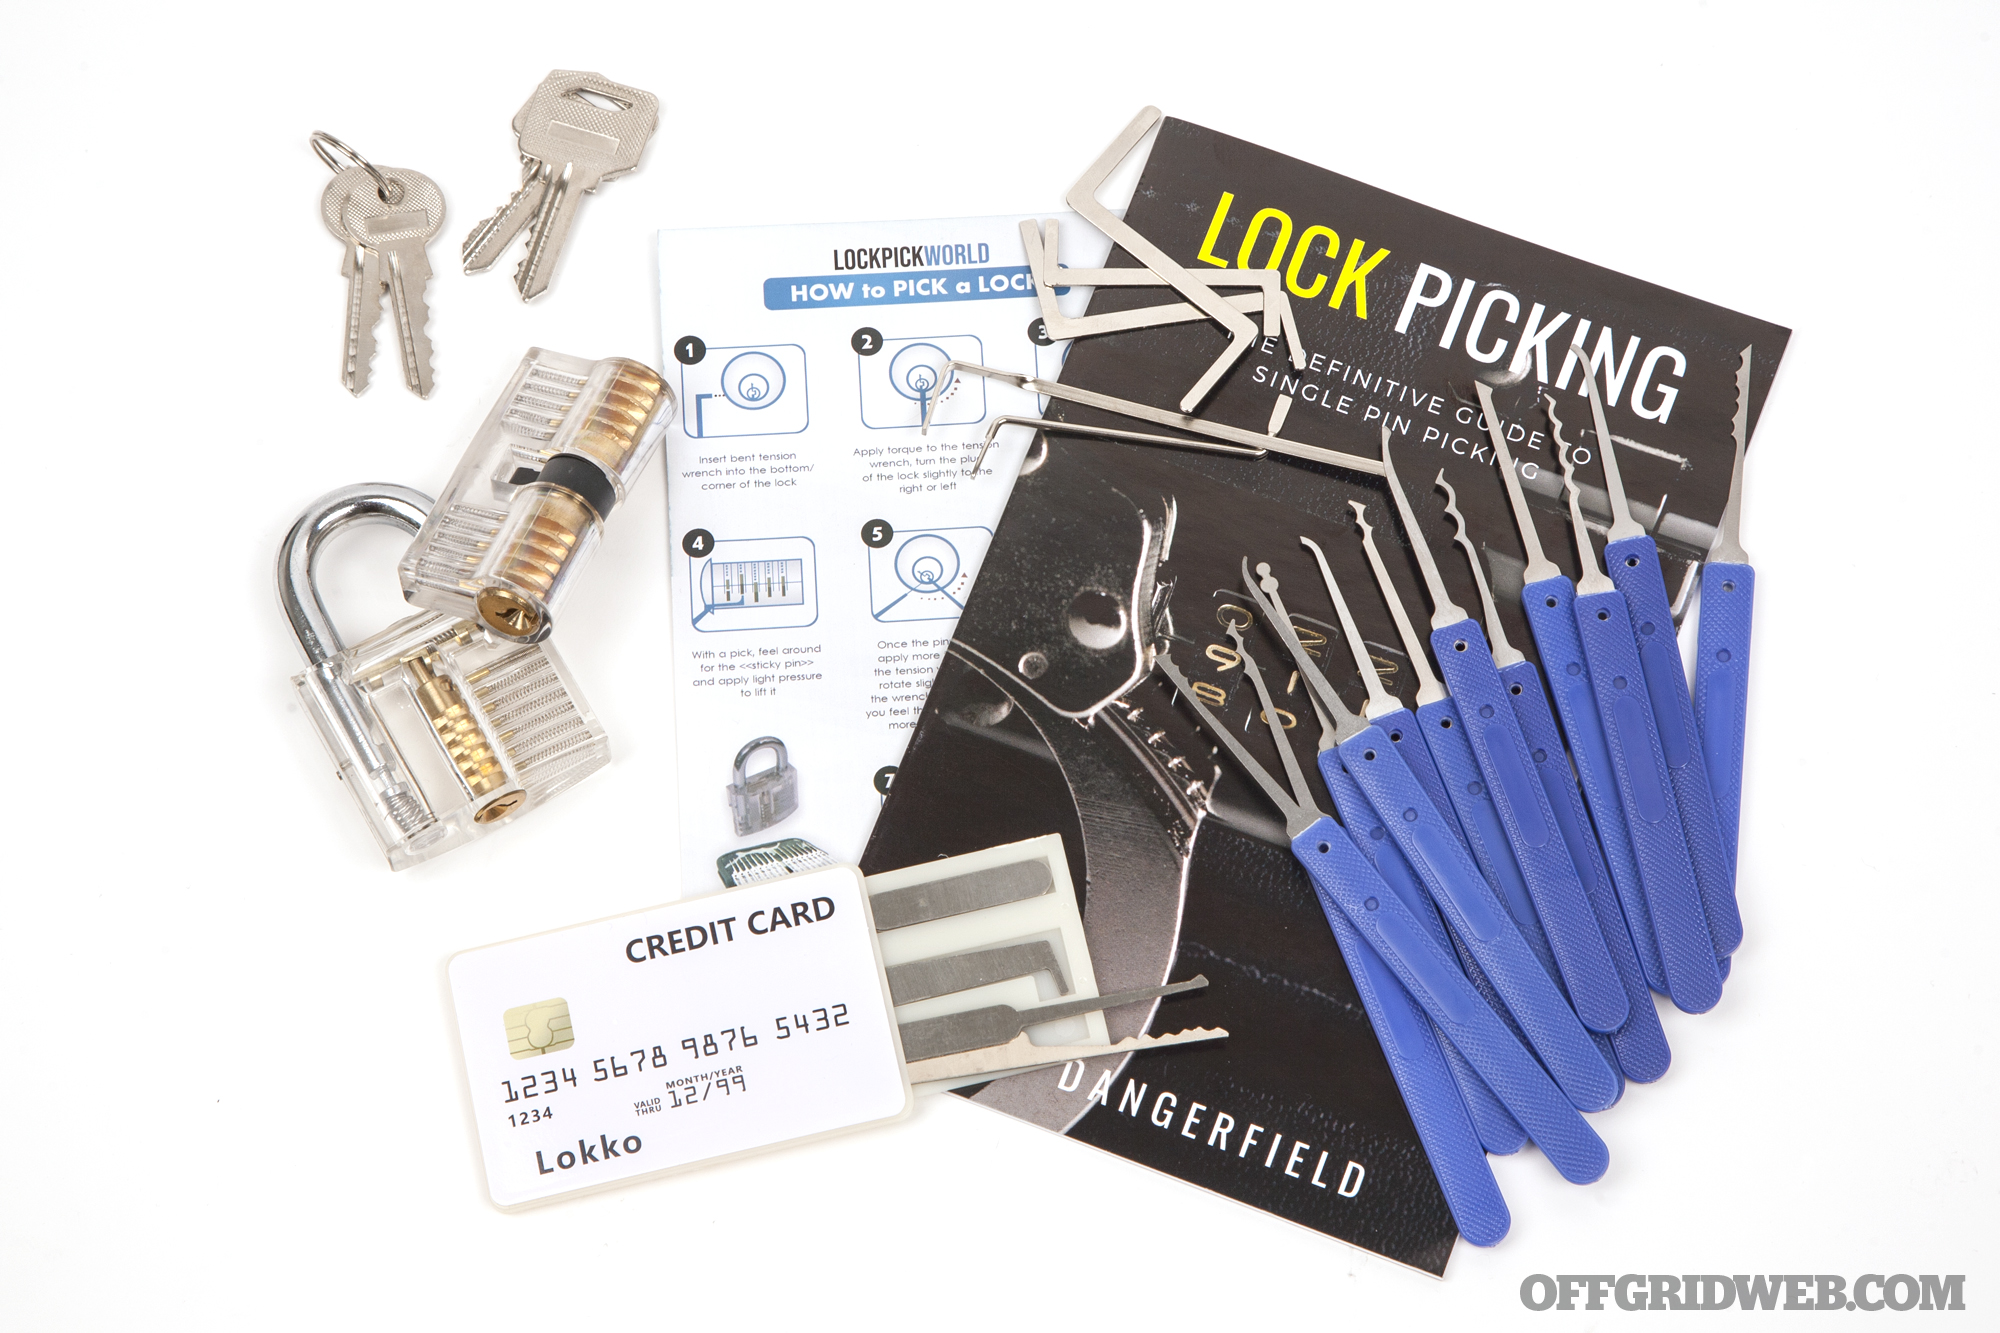
This kit is marketed as an all-in-one starter pack for newcomers to the skill — a perfect description of my own experience level going into this review. It contains the following items:
Lock pick set with a variety pack of picks, tension tools, and an extractor
“Secret Agent” credit-card-sized pick set
Clear practice padlock with keys
Clear practice cutaway training lock with keys
“How to Pick a Lock” quick-start card
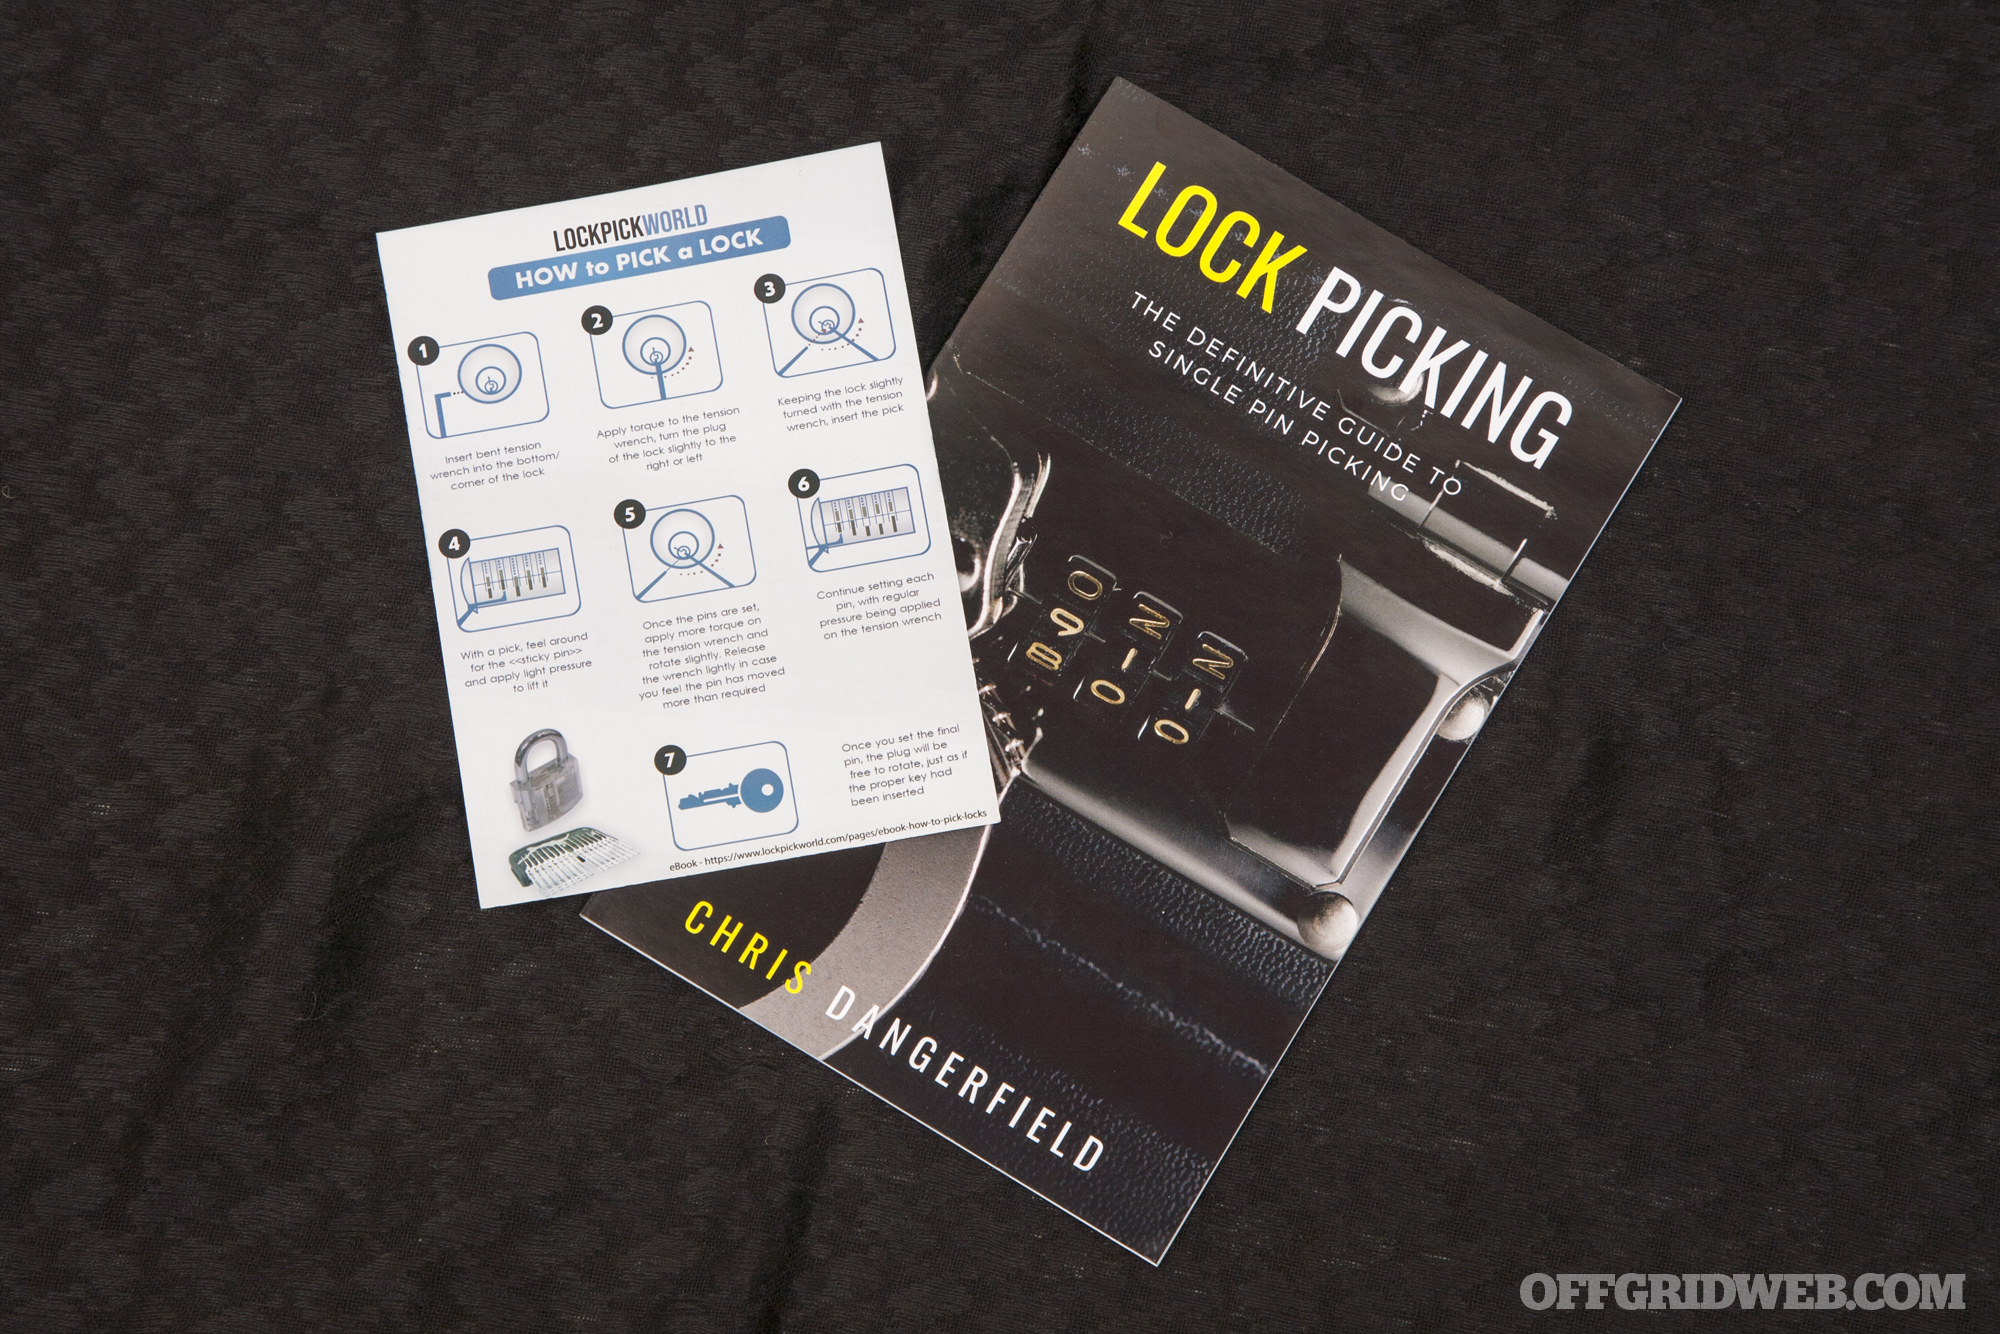
Lock Picking: The Definitive Guide to Single-Pin Picking by Chris Dangerfield & Mike Gibson
The kit comes standard with the last item in the form of a 40-page downloadable ebook for a total price of $48. However, I selected the upgraded version of the kit, which includes the guide in paperback form. This adds $5 to the price of the kit, and I’d say it’s well worth the additional money to have a physical book to study and keep on hand.
I also added an additional blue Medium Difficulty practice lock ($18, pictured above at far right) which ups the ante for practice in the future. I’ll discuss this item more later.
The Definitive Guide Book
Despite my impulsive instincts, I knew that it’d be a wise choice to study the fundamentals before I started experimenting with the picks and practice lock. So, I read the book cover-to-cover right away. With only 34 printed pages, clearly-defined sections, and many photos and colorful diagrams, it was easy to digest. The content, which was written by Mike Gibson and edited by LockPickWorld director Chris Dangerfield, was generally well-articulated and simple to understand. I spotted a few typos, but these didn’t detract from the value of the guide.
It’s bold to call any 34-page document a “definitive guide” to a subject as complex as lock picking, but I’d say this book does a pretty good job of covering the key points (forgive the pun). It’s broken into two parts, which I’ll analyze briefly below. Note that this is a quick summary — the guide offers far more detail, tips, and tricks.
Part 1: How a Cylinder Pin Lock Works
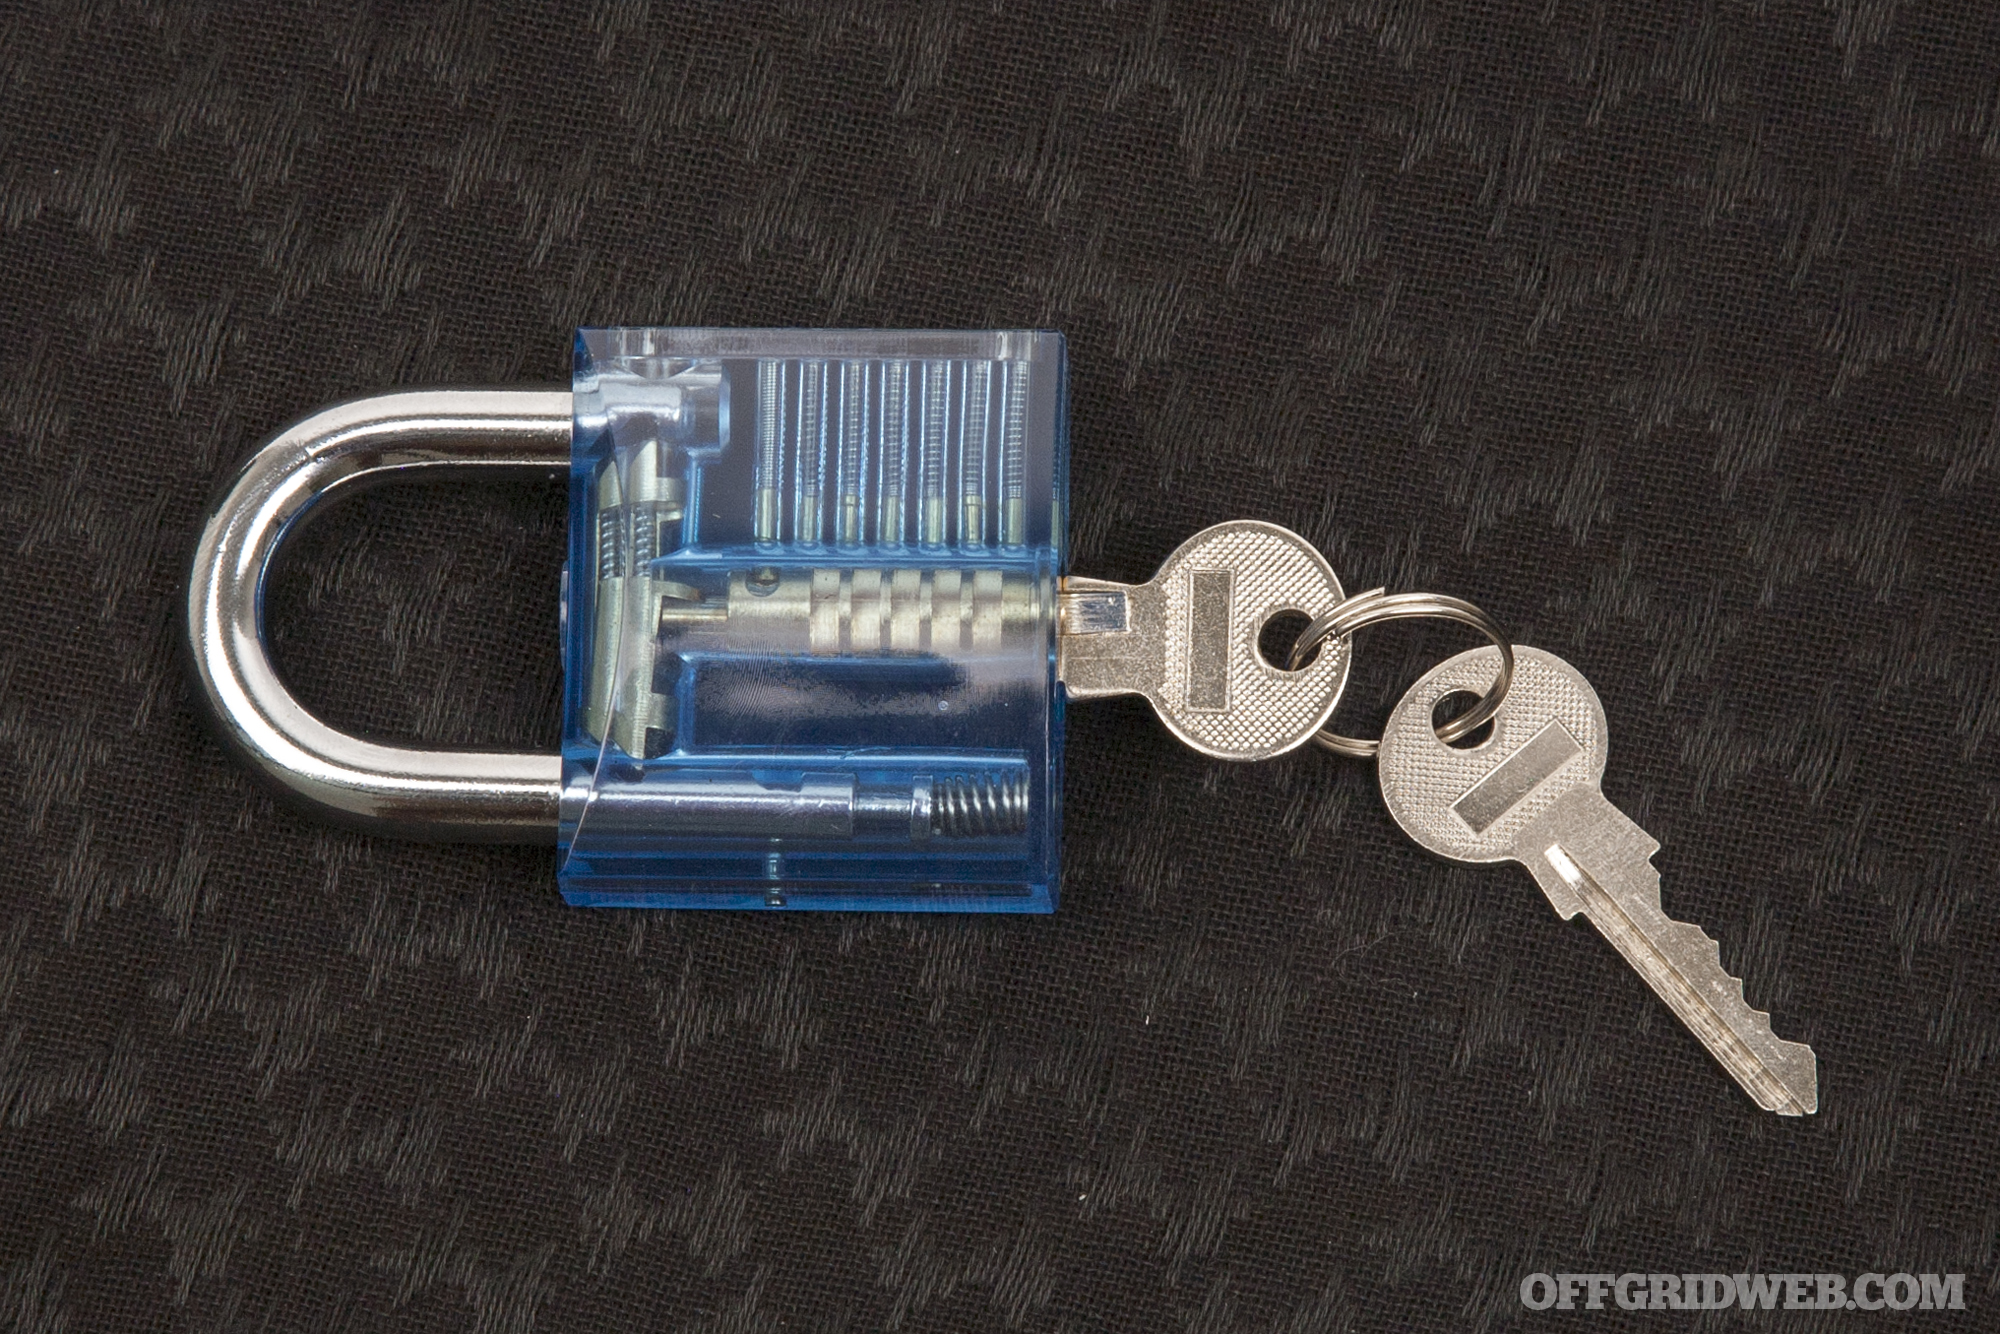
This is said to be the most important part of the book, and understandably so. If you don’t comprehend how a lock mechanism works, you won’t be able to pick anything, much less troubleshoot problems that crop up. The components are described and depicted in detail, but we’ll cover the basics below so you’ll be familiar with terms used later in this review.
Shell — the body of the lock
Plug — the rotating cylinder where the key goes
Pin chambers — shafts that are drilled through the shell and plug, containing the pins
Key pins — these occupy the lower part of the pin chambers, and are the parts that contact the key (or pick)
Driver pins — these occupy the upper part of the chambers, and block the shear line between shell and plug, keeping the cylinder from rotating unless they’re aligned correctly
Springs — add tension to the pins, preventing them from rattling within the lock
Notice how inserting the correct key into a clear lock aligns all the pins — this is your goal.
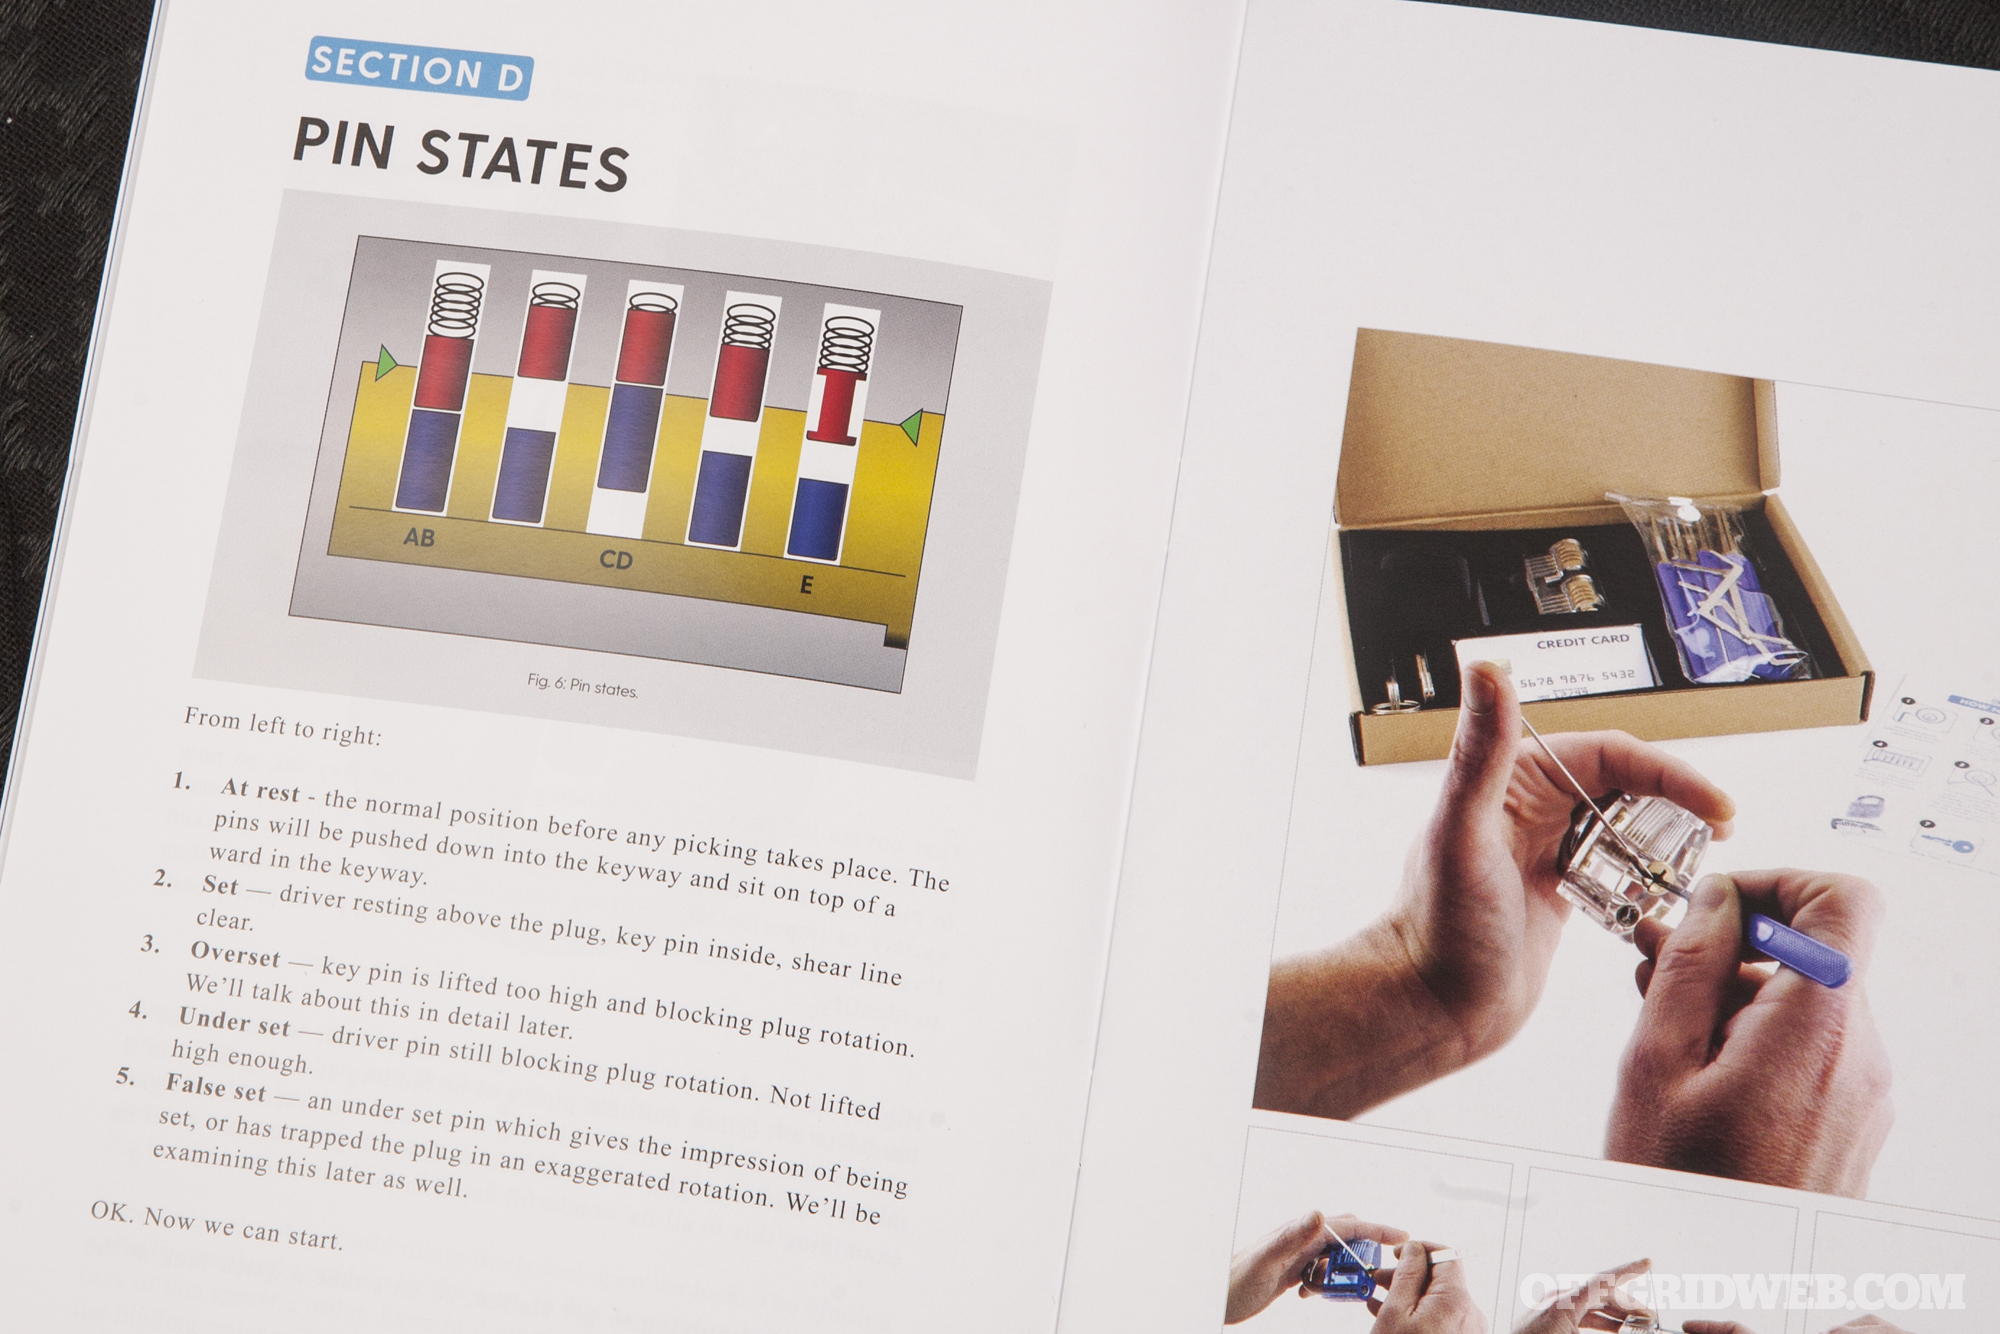
The guide then shows how the key lines up the driver pins at the shear line, allowing the cylinder to rotate and open the lock. It also discusses machining tolerances — slight variances in the pin diameters that can cause some pins to bind and get stuck in the chambers while others move freely. Pin states are also discussed, such as set (lined up at the shear line), over-set (too high, with key pins above the shear line), and under-set (too low, with driver pins below the shear line).
Diagrams clearly depict various pin states that can occur inside the lock.
Part 2: Picking Techniques
Once the theory portion was out of the way, I moved on to the meat of the guide. First, the author explains how to hold picks and tension wrenches, and includes photos demonstrating each method. Essentially, a lot of it comes down to personal preference, but the author recommends the following basic technique:
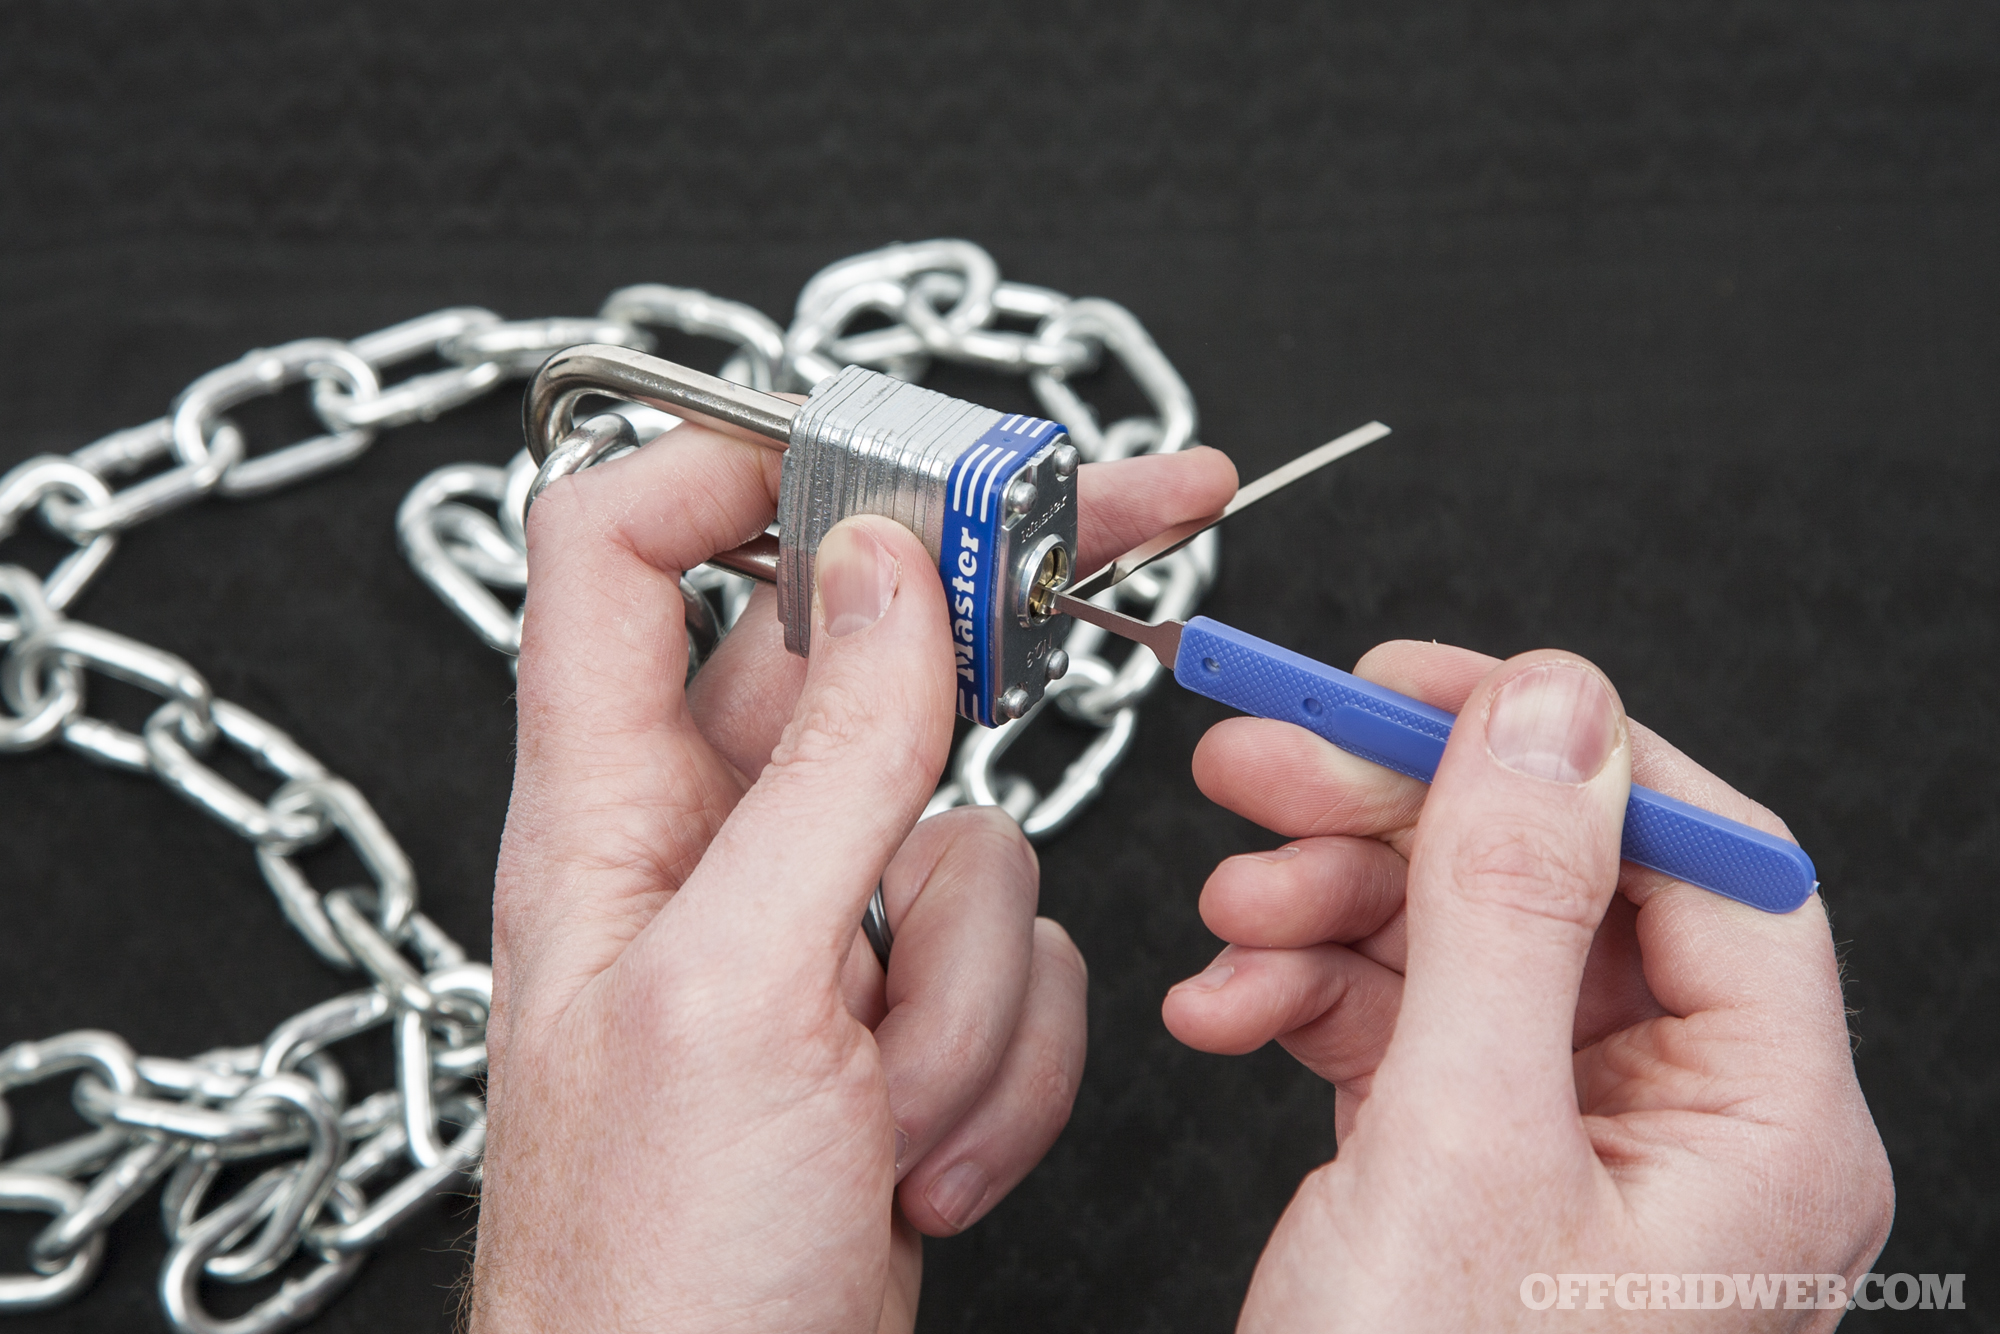
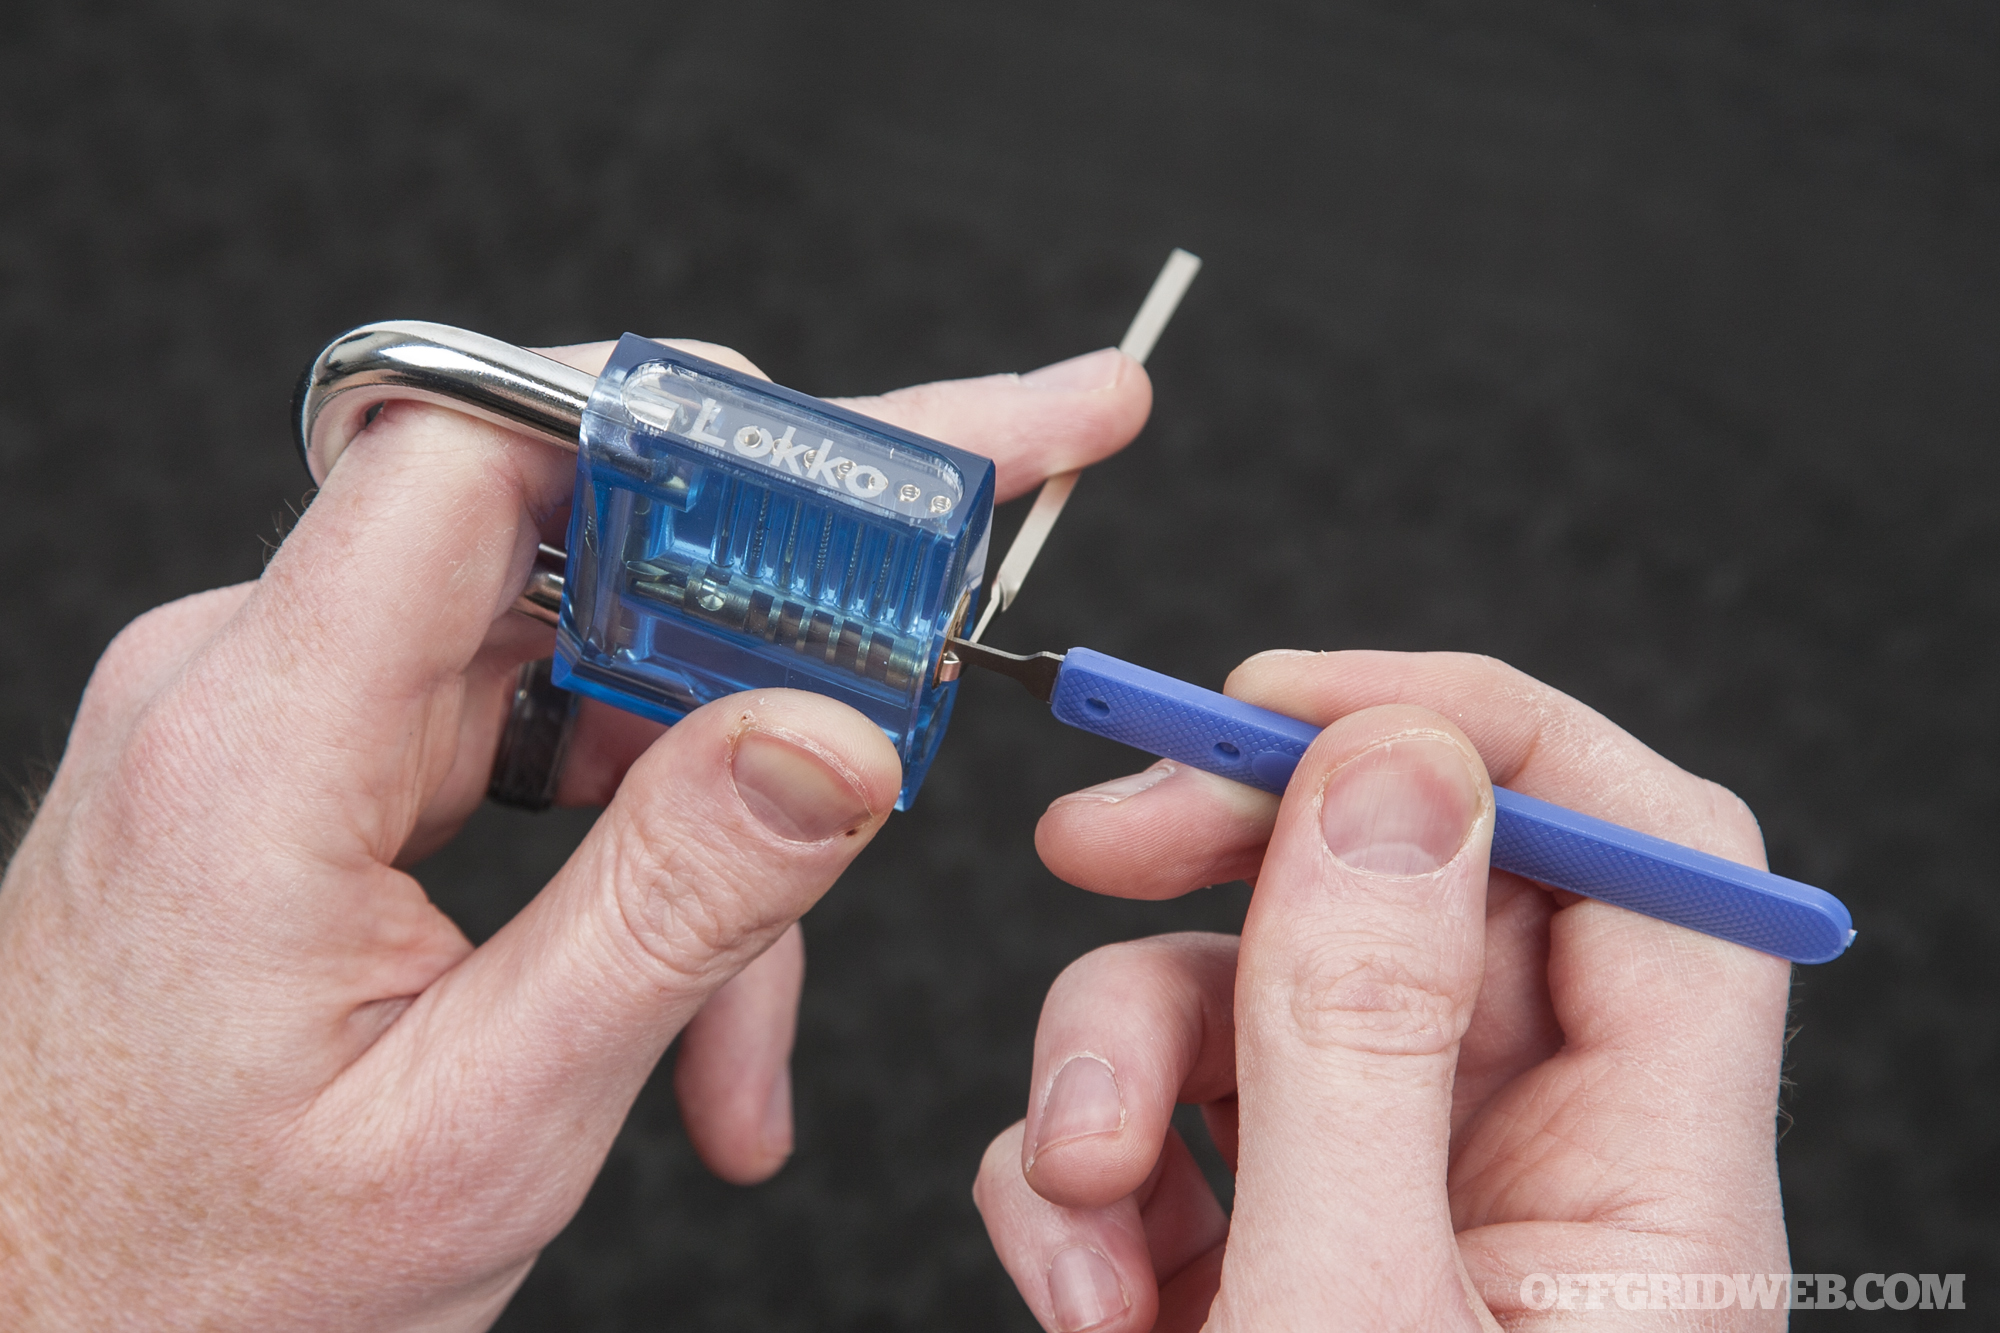
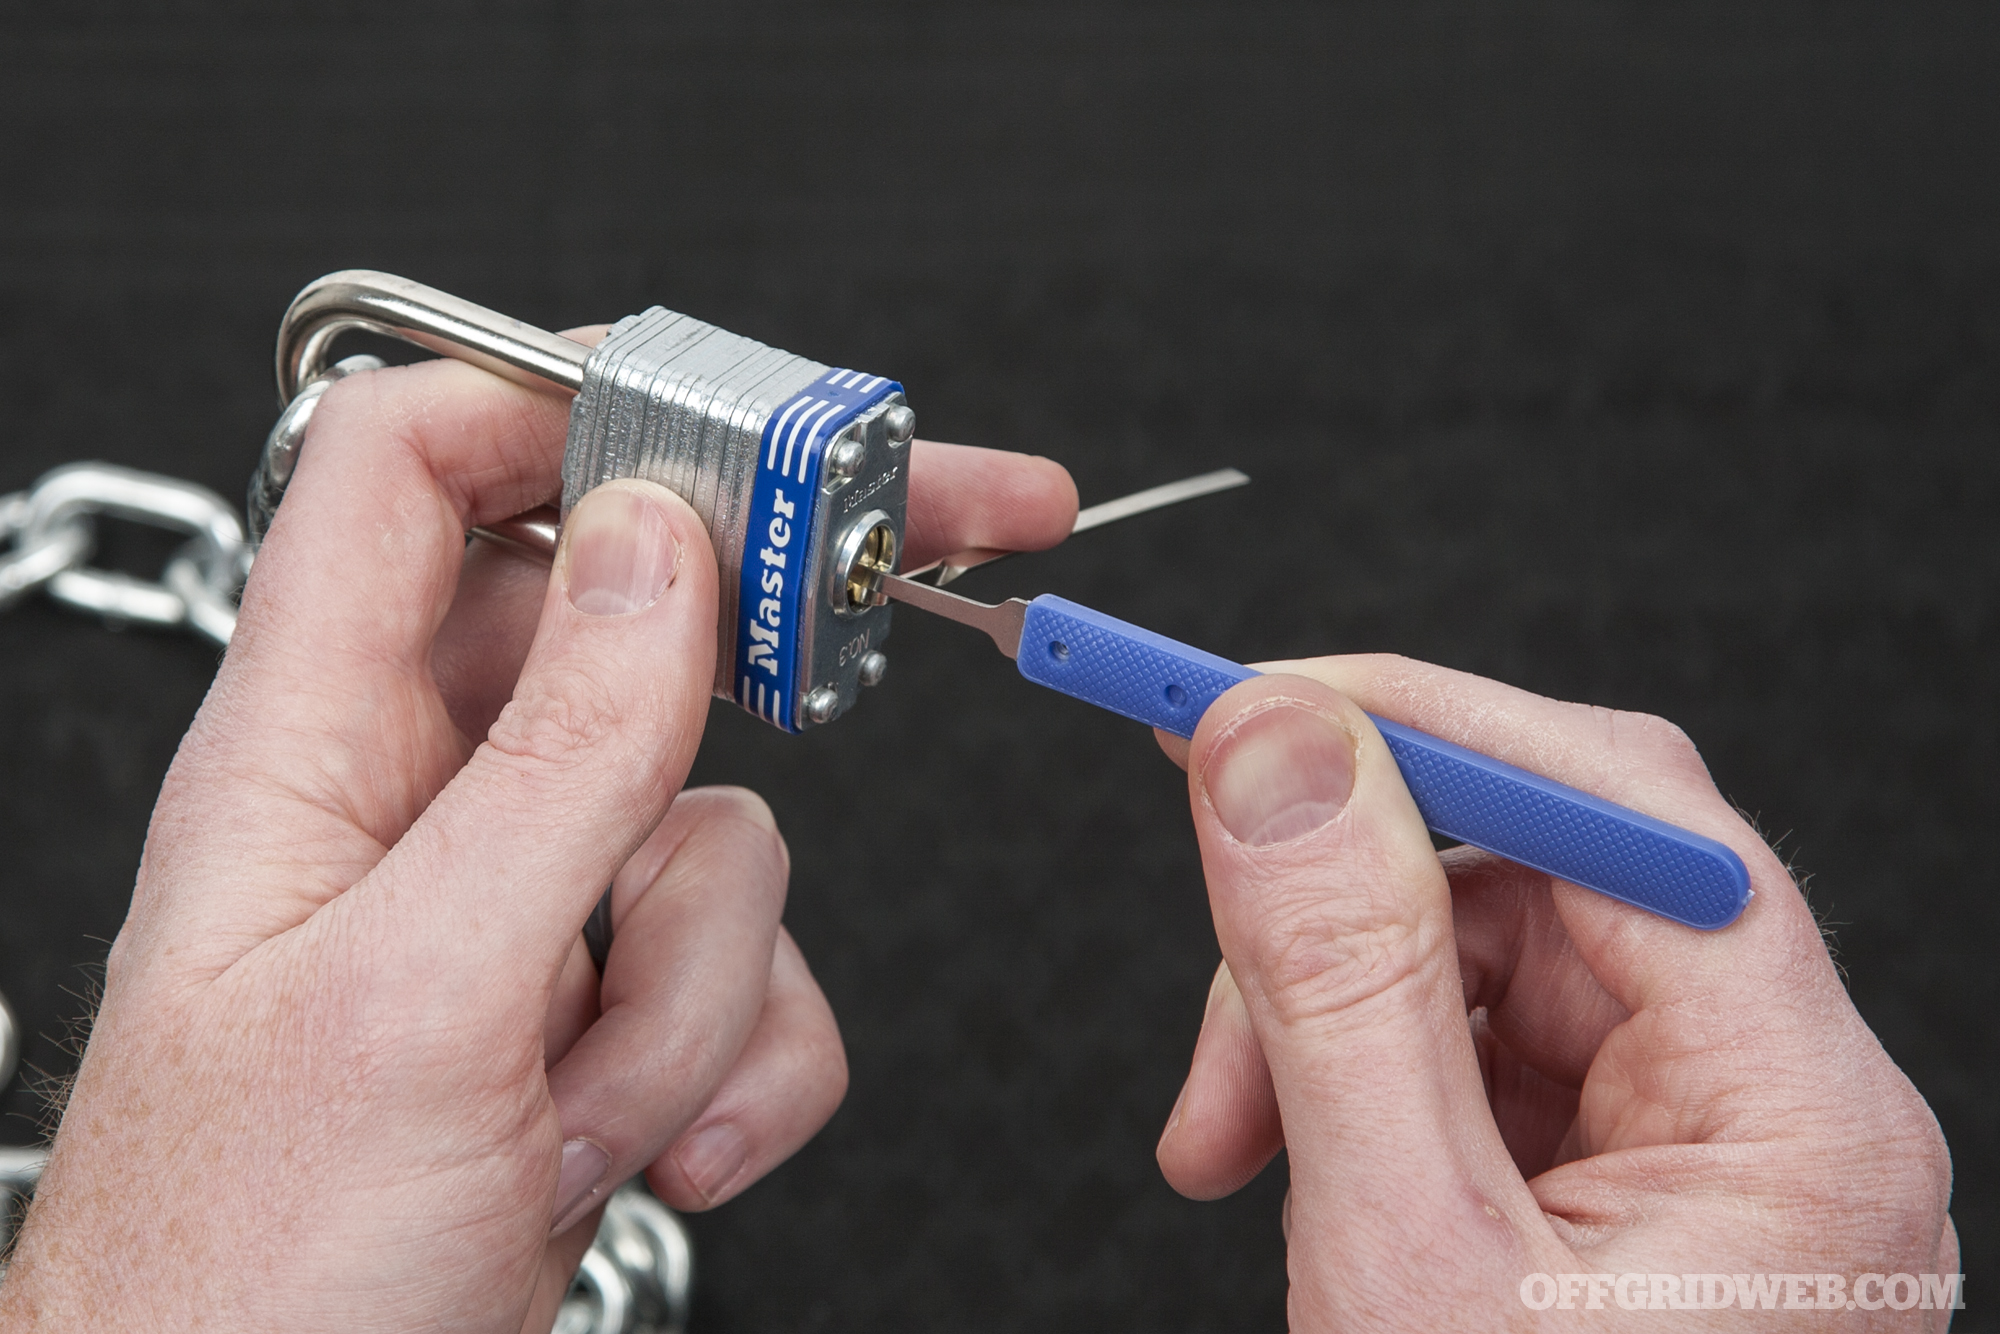
Insert a tension wrench into the bottom of the keyway, taking up as little space as possible inside the mechanism. Hold the lock in the non-dominant hand and apply “a medium amount of tension” with one finger — roughly the amount needed to press a key on a computer keyboard.
Start with a short hook pick, and insert it into the keyway at an upward angle. Slowly draw the pick back and forth across the pins to find the first binding (stuck) pin.
Apply pressure with the pick and back off tension on the plug until the binding pin moves. Once you feel the pin is set, move on to the next binding pin.
Continue the process until the final pin is set and the plug turns to open the lock.
If you’ve never picked a lock, this probably sounds extremely complicated, but the author provides reassurances that you’ll get the hang of it quickly. He then describes one of the most common problems — over-setting one or more pins by pushing it too far upward — as well as potential solutions. The guide concludes with a reminder to focus on the Three P’s: Practice, Patience, and Persistence.
The Tools
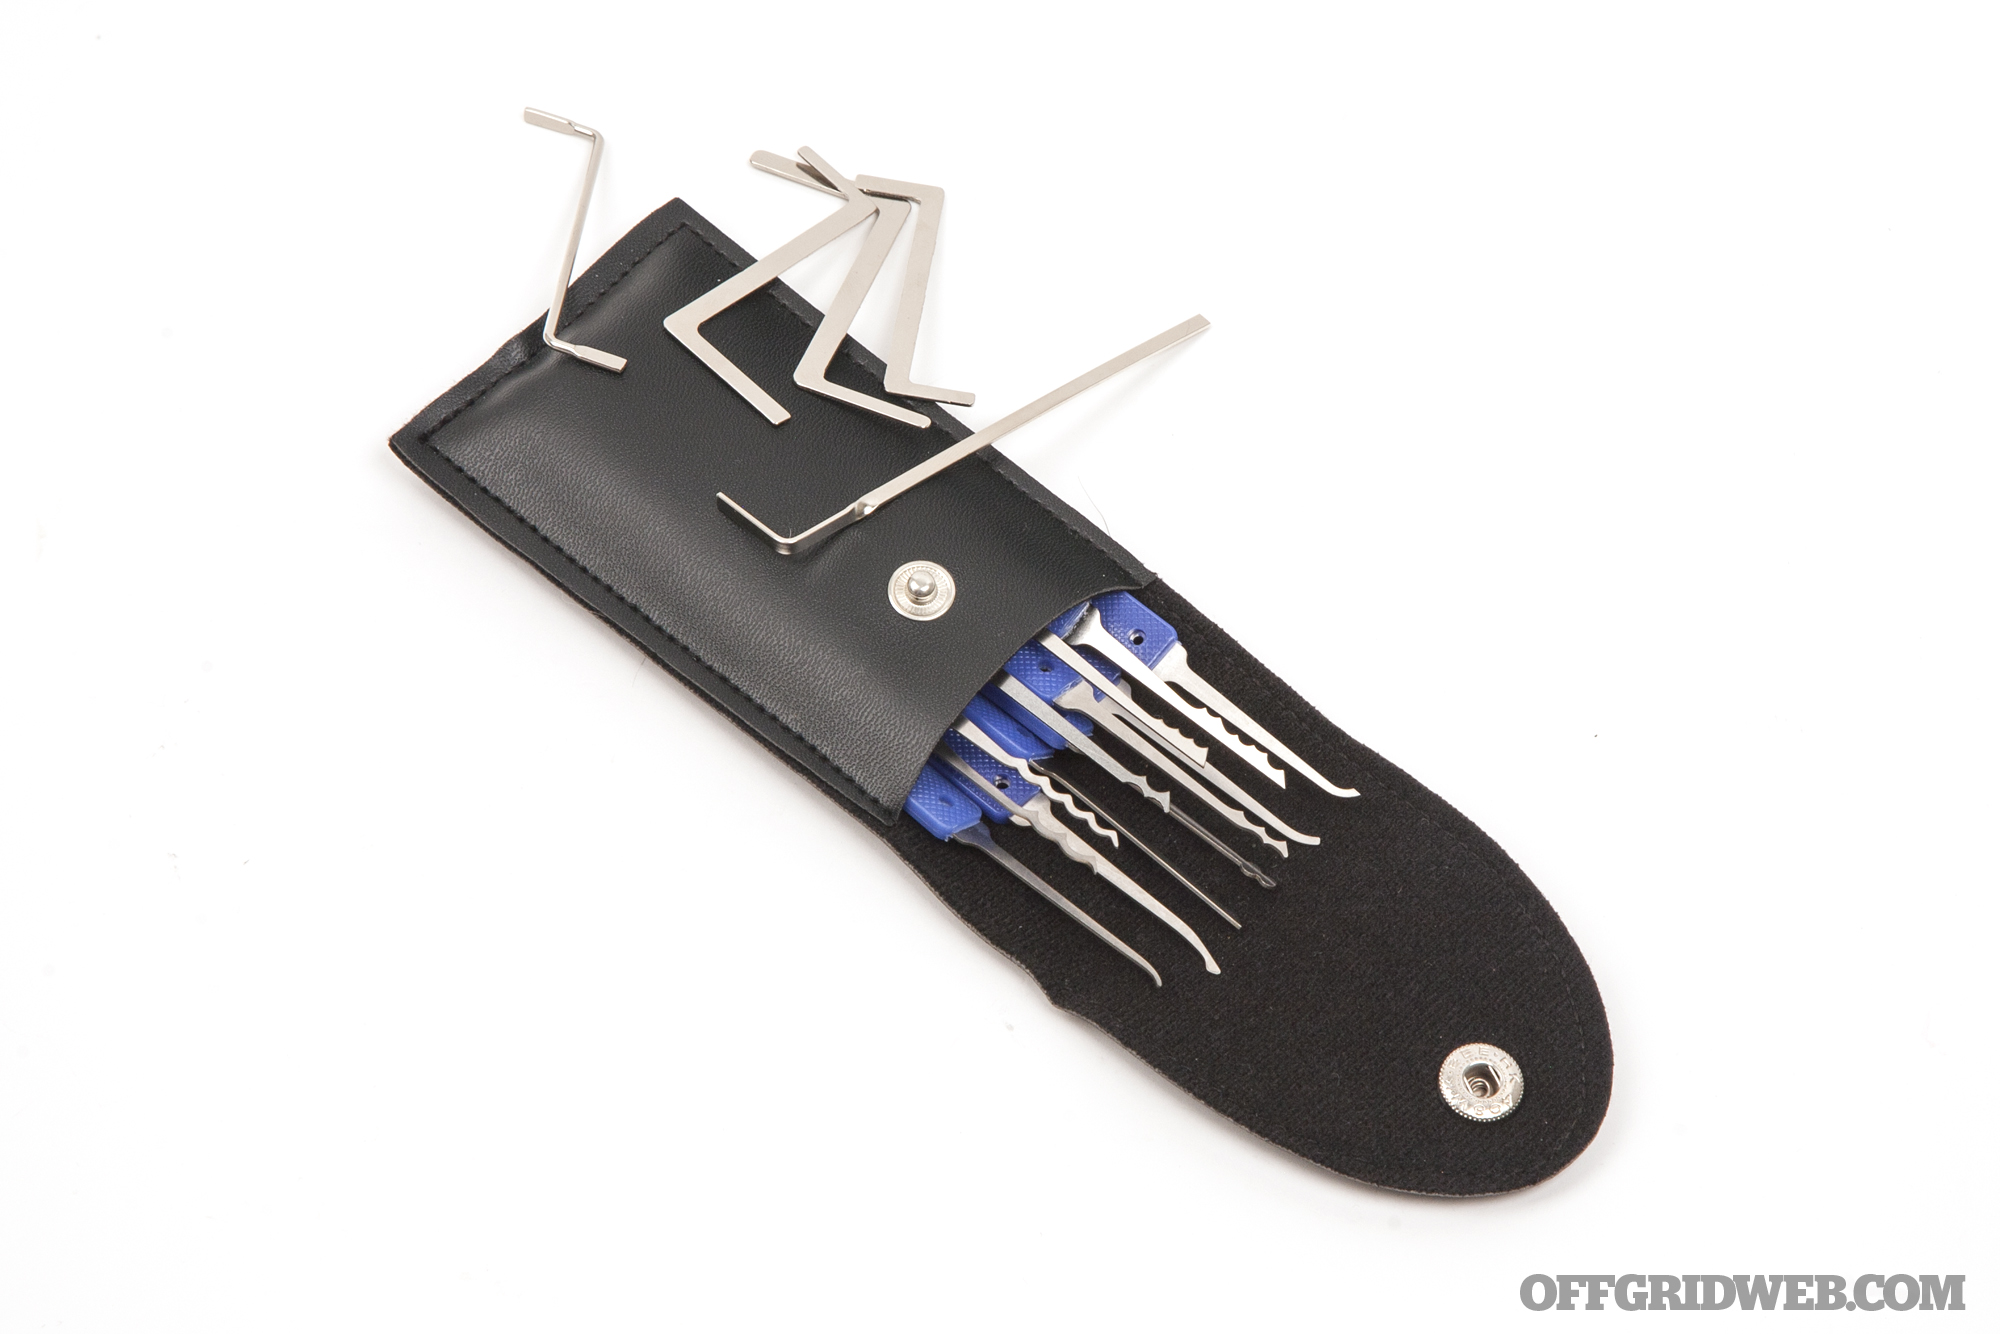
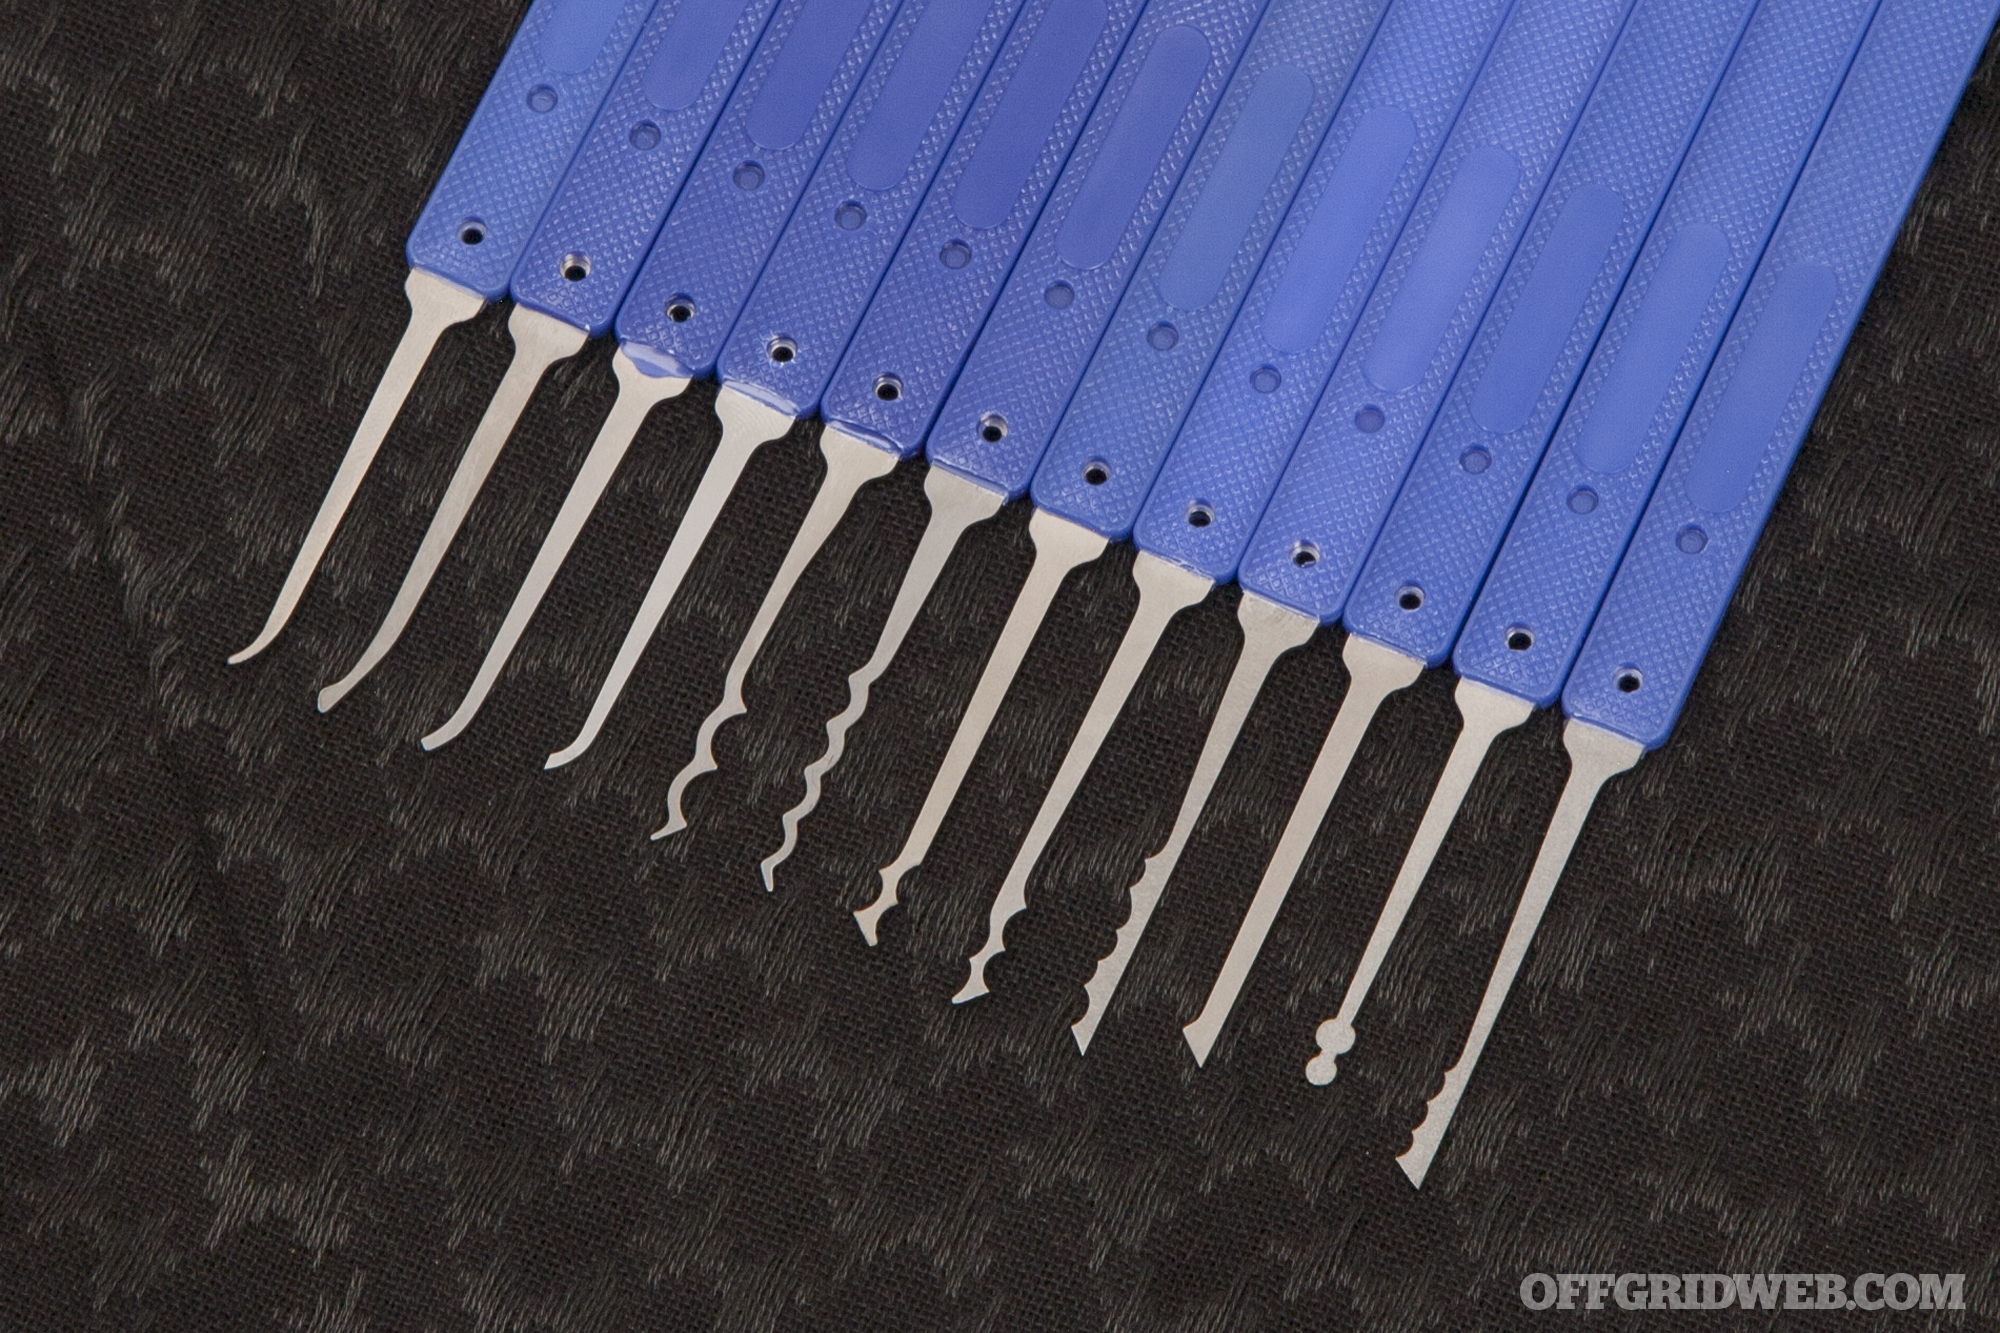
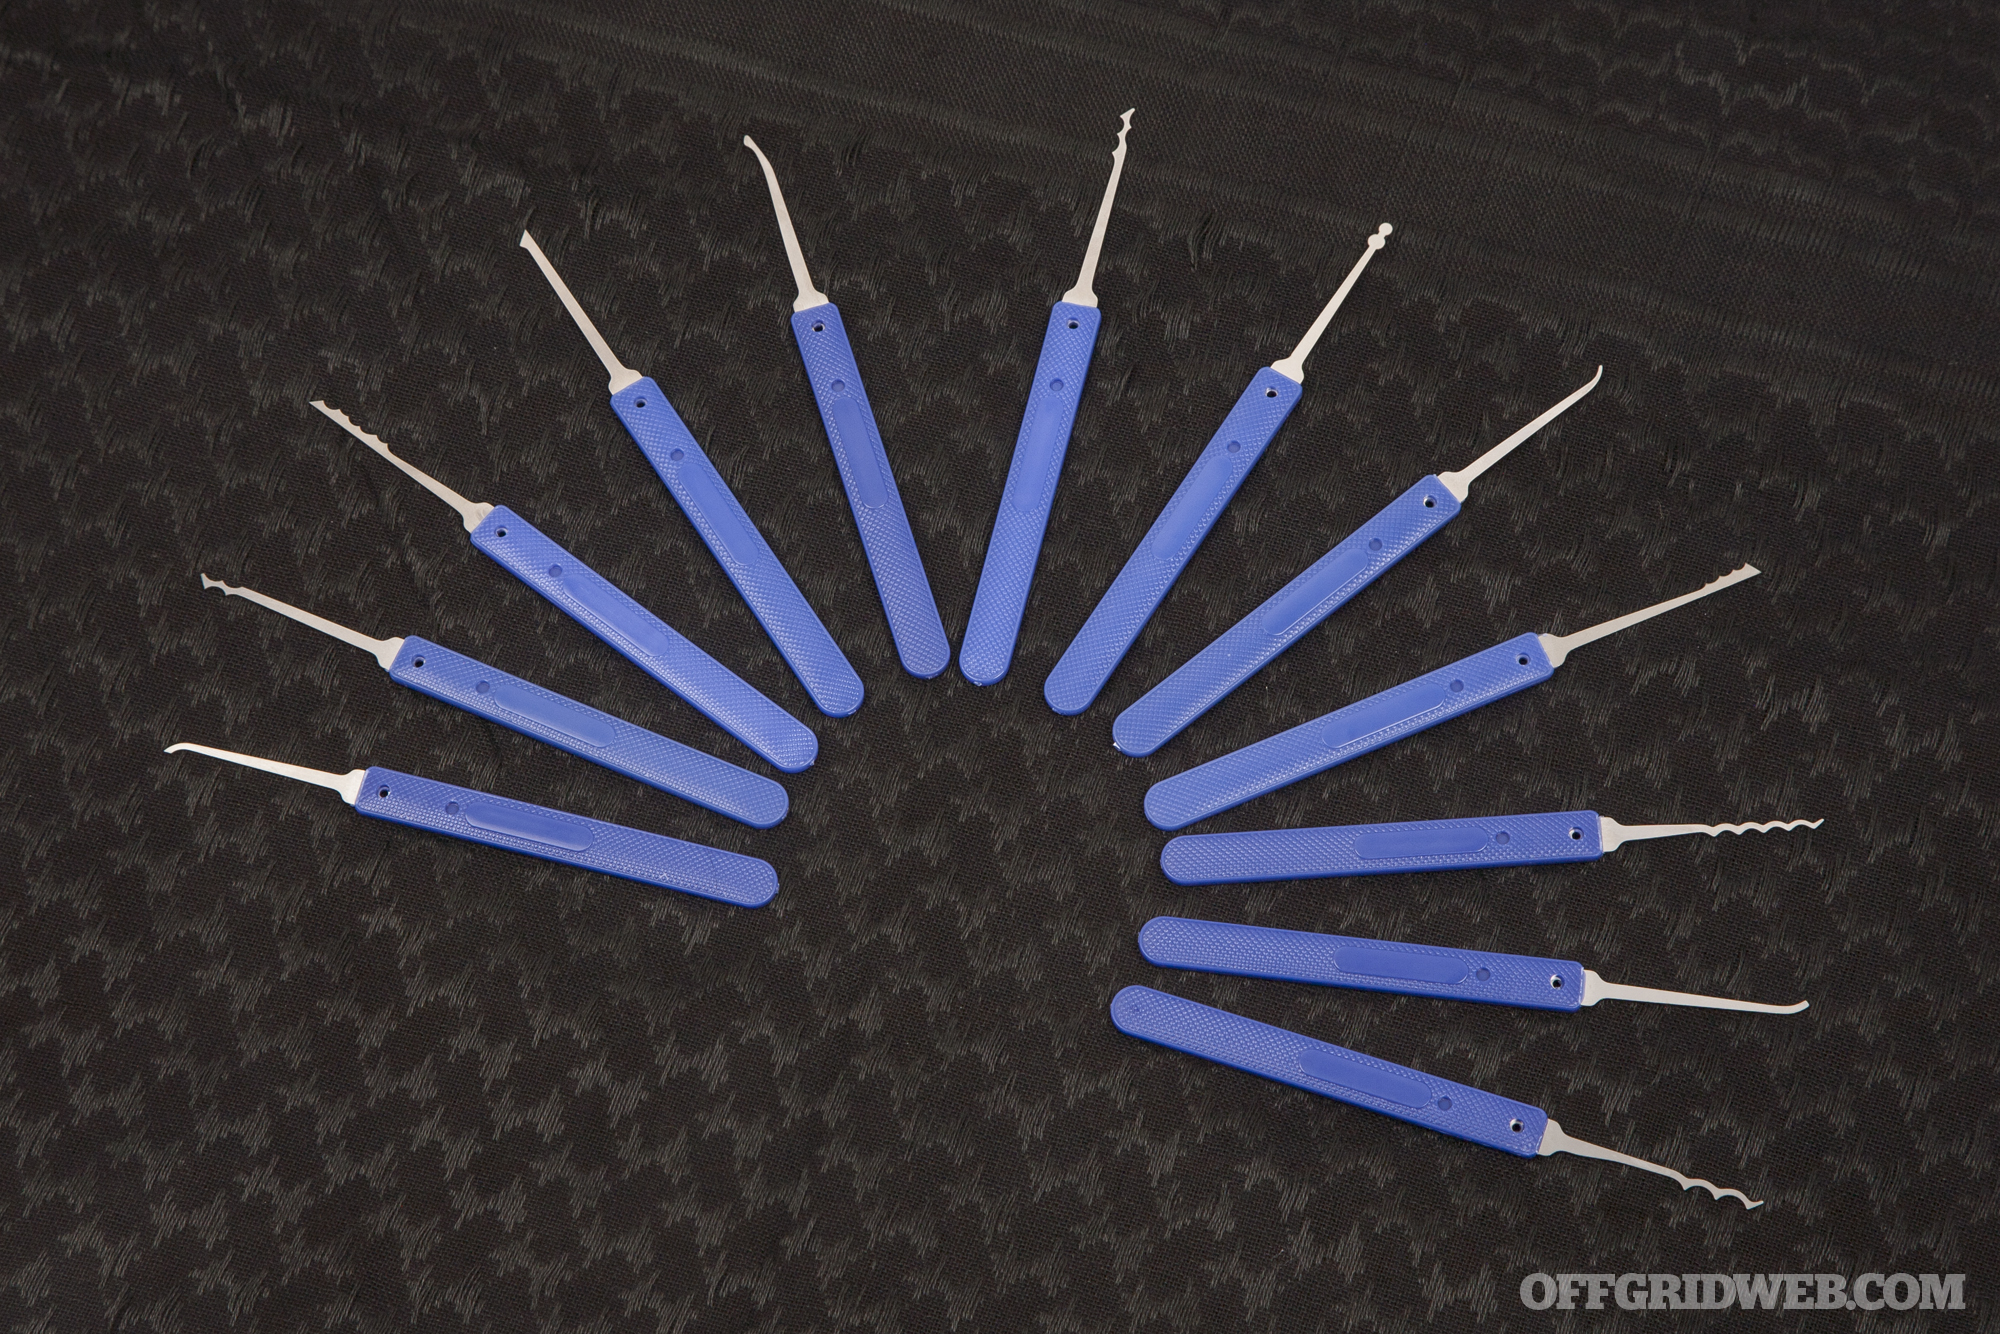
After reading the book, I set out all the tools in the LockPickWorld box. The faux leather pouch contains five L-shaped tension tools, plus eleven picks and one extractor with blue plastic overmolded handles. I recognized a few of these as the hook-style picks described in the guide book, but all of the tools are unlabeled, and the other styles are not mentioned in any of the documentation.
After reading up on lock pick types elsewhere, I determined that there appear to be four hook variants, four zigzag-shaped rake/snake picks, one single-sided long rake, one half diamond, and one double-ball “snowman” pick (all pictured from left to right above). The final tool looks like a second rake, but is actually an extractor that’s designed to remove a broken key stuck inside a lock.
Although it’s nice that the kit includes all these items, it’s frustrating that their names and purposes were not described in the guide. Based on what the guide covers, I immediately selected one long hook pick and a tension wrench, and put the other tools back in the case. As a beginner, the more-specialized tools strike me as a source of confusion rather than assistance.
To begin, you’ll need a hook pick and a tension wrench — I chose these two.
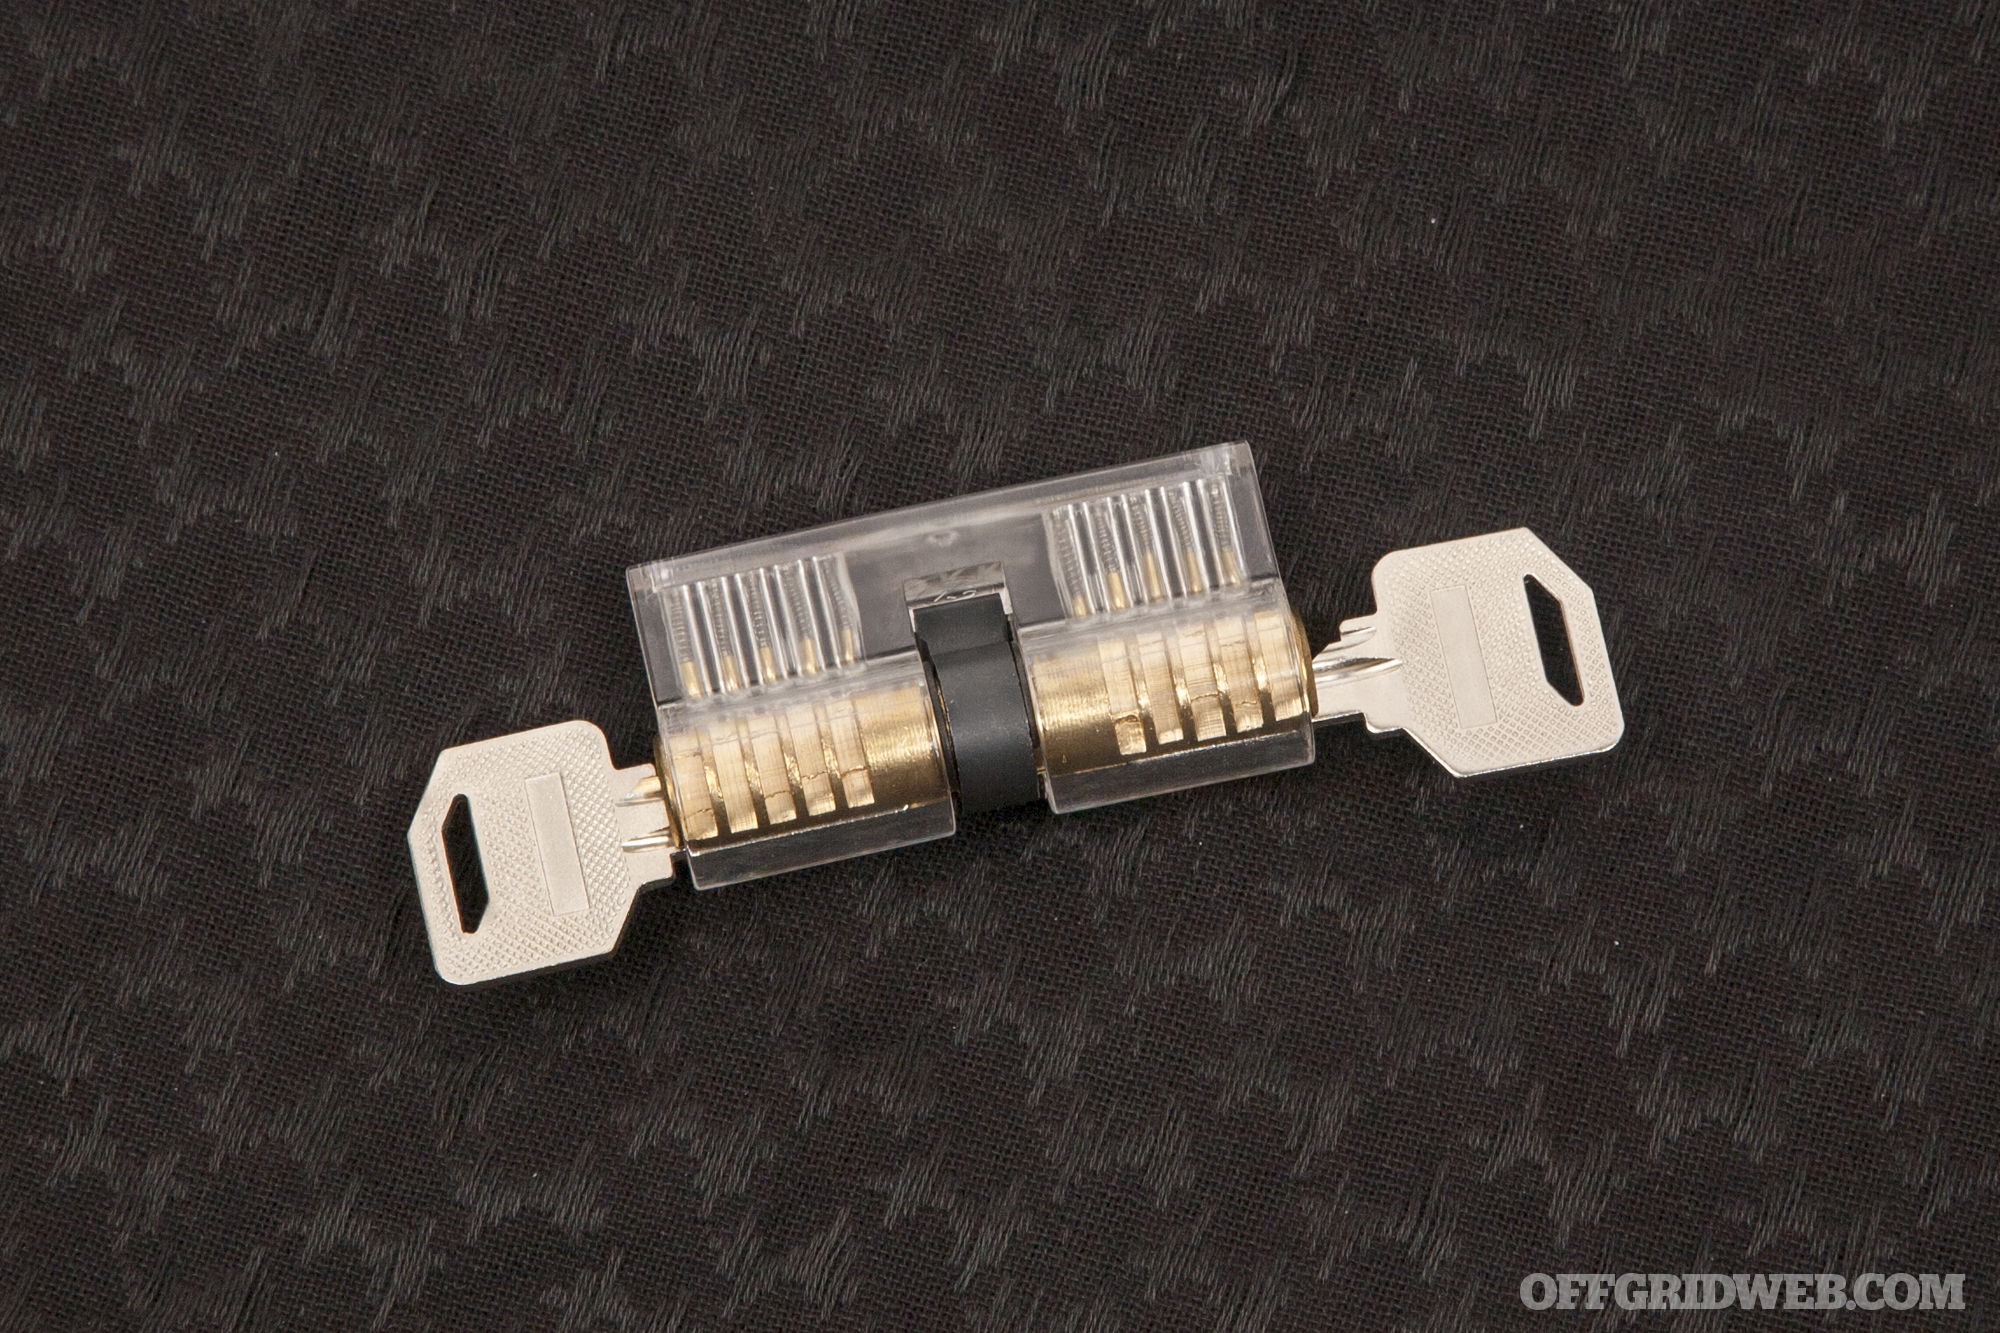
Thankfully, both of the included clear locks offer ideal conditions for practice. The transparent plastic shells on these locks make it easy to see each of the pins as it moves, and to catch mistakes such as over-setting pins, or contacting multiple pins with the pick shaft rather than a single pin with the tip. The 6-pin padlock works exactly like you’d expect, and the cutaway lock is double-sided with two different 5-pin configurations, yielding a total of three unique locks to pick.
The cutaway lock is similar to a typical door lock, but with two different pin arrangements.
Finally, there’s a slim plastic case that contains the “Secret Agent” pick set: a double-sided tension wrench and four stamped metal picks (stretched snake, long hook, half diamond, and long rake). Again, three of these four are styles that weren’t covered in the guide. The plastic case features a sticker on the front that loosely resembles a credit card, but this definitely won’t fool anyone. If I chose to carry any of these items, I’d slide the tension wrench and one or two picks into a wallet and leave the rest of the kit at home.
Optional Add-On: Medium Difficulty Practice Lock
The clear locks included with the kit were fairly easy to defeat after a little practice, so I also picked up a Stage 2 Medium Difficulty Training Padlock from LockPickWorld ($18). Its bluish clear shell contains six pins like the clear Easy Difficulty padlock. However, two of these pins are spool pins, with an I-shaped side profile that makes them more challenging to set correctly.
With a little practice and some help from this BosnianBill video, I was able to learn to work around these spool pins and open the Medium Difficulty lock somewhat consistently. However, real locks aren’t transparent, and doing it without looking at the pins is the true challenge — that will take a lot more time to master.
Conclusions
As a first-time introduction into lock picking, the LockPickWorld Beginner Lock Pick Set has some ups and downs (again, forgive the pun). The guide book is easy to read and quickly conveyed the fundamentals of lock mechanisms and picking. I also appreciated the quick-start guide, which condenses the process into seven basic steps. The clear locks were simple to use, and offered an excellent training aid comparable to standard-fare hardware store locks.
Compared to the 6-pin clear lock (silver key), opening a basic 4-pin Master Lock (gold key) was child’s play.
The pick set included the basic tools I needed, but lumped them in with an array of other tools that don’t seem very relevant to a beginner’s learning process. The lack of documentation on the pick set left me wondering what they’re called, much less why or how they might be used. The user can certainly experiment with them in the clear practice locks, but this must be done without any guidance. In this case, I would have preferred two or three high-quality picks with a few sentences explaining their uses, as opposed to a variety-pack of twelve entry-level picks that only serve to confuse a novice.
Pick variety is great, but too much at once can overwhelm a novice. I’ll take quality over quantity any day.
The “Secret Agent” pick set seems mostly like a novelty item, with an unconvincing plastic “credit card” case and thin stamped metal picks. Still, if you’re planning to use lock picks in the real world, you’ll probably want a concealable set for every-day carry (LockPickWorld offers many to choose from). Although I plan to upgrade to a higher-quality EDC set in the future, this kit at least allows me to get a feel for using smaller picks.
Above: After some practice with the clear locks, I was able to open this Master Lock No.3 in seconds. Other locks I own, such as an ABUS Titalium padlock, posed a much greater challenge as a result of security pins and tighter tolerances. Learning how to pick locks will make you more aware of these differences, and how some locks offer far more physical security than others.
Overall, the LockPickWorld Beginner Lock Pick Set is a solid starting point for beginners. While I felt that the tool kit could’ve benefited from a less-is-more approach, having too many tools is still preferable to having too few. With the addition of a Medium Difficulty padlock, it could also appeal to intermediate users who might be more familiar with the other pick types. Given the $53 price tag, this box set offers good value as well. For more information on this and other LockPickWorld tools, go to LockPickWorld.com.
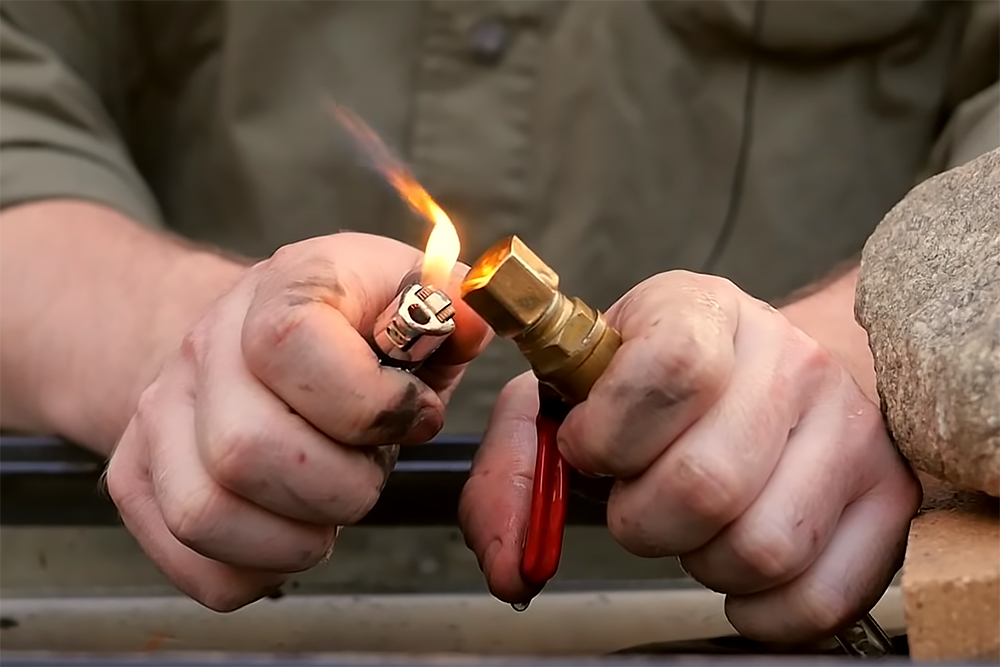
Ever since humans learned to create fire, we’ve been burning wood. It’s an effective way to stay warm, cook food, and repel predators in the wilderness. However, simply throwing some logs on the campfire is far from the most efficient method of accomplishing these tasks. This is why we’ve moved from wood to energy-dense fossil fuels such as coal, natural gas, and various oil derivatives (kerosene, gasoline, diesel, and so on). The downside to these fossil fuels is that they’re not as easy to obtain, and might become impossible to obtain in a long-term disaster scenario. Wood gas is an alternative biofuel that’s simple to produce, even in an austere environment.
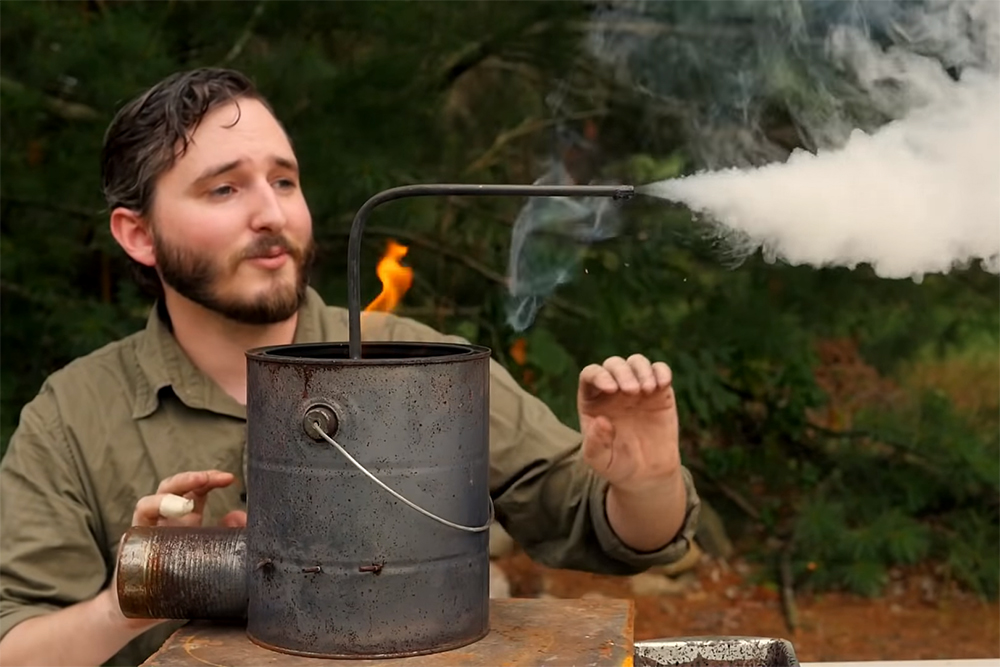
You may know about wood gas in the context of devices called gasifier stoves — the Solo Stove is one prominent example. These stoves use controlled airflow to produce wood gas, and immediately burn it to create a more powerful, cleaner-burning flame. But what if you want to save that fuel for later, and use it only as needed? YouTuber NightHawkInLight wondered this, and created a video that explains the principles of wood gas, as well as how to trap it without advanced tools.
As described in the video above, wood gas can be produced by simply burning wood in an environment with limited oxygen. The wood can’t combust, so it turns into charcoal — another extremely useful fuel. (This is the same principle used to make char cloth tinder.) At the same time, it gives off combustible gases through an exhaust tube. These gases contain water vapor, sap, and ash that forms a thick black tar which can be used as a sealant or glue. So, by generating wood gas, you’re also able to simultaneously generate useful charcoal and tar — that’s a win-win.
NightHawkInLight takes the experiment to the next level by trapping this wood gas in a way that pulls out the soot and other impurities. He does this by passing it through a tank of water and allowing the bubbles to rise into a sealed container, then waiting for the smoke to settle and the gas to turn clear. Submerging the tank then pressurizes the gas enough that it can be released through a valve as needed. It’s certainly not as simple as grabbing a pre-filled propane tank before your next camping trip, but it’s also free and nearly-unlimited, unlike commercially-refined fuels.


.JPG")