USNG App: Emergency Geo-Location Tool

Let's say you're hiking in a rural area, and you trip and break your ankle. If you can't walk out, you may have to call for help on your cell phone—but how will emergency services locate you?

If you're familiar with cell phone technology, you'd probably answer that the 9-1-1 operator can find your location automatically using the cell phone's built-in GPS chip. However, most people don't know that this location data delivery is currently extremely unreliable. Even the FCC admits that this method of emergency geo-location is “not always specific enough for rescue personnel to deliver assistance to the caller quickly.”

The Problem with Cellular Location Data

According to a recent article in USA Today, the FCC has indicated that cell phone location data can be transmitted to emergency services less than 40% of the time. In fact, the FCC has set a goal to reach 40% location data reliability in 2017, and 80% by 2021.

This means that the 9-1-1 operator will most likely not be able to locate you automatically via GPS, and you may be stranded unless you can explain your location in another way. Sadly, there have been many instances of 9-1-1 callers dying before rescue could arrive, as a result of missing GPS location data.

What About Latitude and Longitude?

USNG App google maps latitude longitude

Latitude and longitude (the light blue numbers above) can be viewed in GPS software like Google Maps.

Tech-savvy smartphone users will likely suggest an alternative method. Assuming you have cell signal, you can use GPS software such as Google Maps to pull up your location in latitude and longitude. While this is a valid method, it poses several problems:

  1. Most map software requires a cellular data connection (such as WiFi, 3G, or 4G LTE) to work properly. In rural areas, you may have enough cellular signal to call 9-1-1, but no reliable data connection to use map software.
  2. Latitude and longitude is a complex system based on degrees. It also has multiple versions, which can include decimals, plus, minus, north, south, east, and west components.
  3. Latitude and longitude requires at least 12 digits to provide location accurate to within 36 feet. It can be difficult to convey all these digits accurately to emergency services.
  4. If even one digit is misheard or transmitted wrong, or if the incorrect version of latitude and longitude is used, rescue teams can be sent tens of miles in the wrong direction.

The U.S. National Grid

USNG App US map

Fortunately, there's a better system available: the United States National Grid. Despite the name stating “United States”, this coordinate system works anywhere on earth.

This system was developed in by the U.S. Federal Geographic Data Committee, and is similar to national grid reference systems used by many other countries. It also bears resemblance to the Military Grid Reference System (MGRS) used extensively by NATO military forces, and as of October 2015, it is now the official location system used by FEMA.

So, how can regular folks like us tap into the power of this new USNG location system? It's easy, thanks to a new tool called the USNG App.

Currently, the USNG App is actually just a web site: USNGApp.org (although a proper downloadable app is in development). The site can be visited from any smartphone, tablet, or other device with internet connection* and a GPS chip. You can try visiting it on your home PC, but since it probably lacks built-in GPS, the location will only be accurate to a several-mile radius.

Why You Should Use the USNG App

USNG App screen

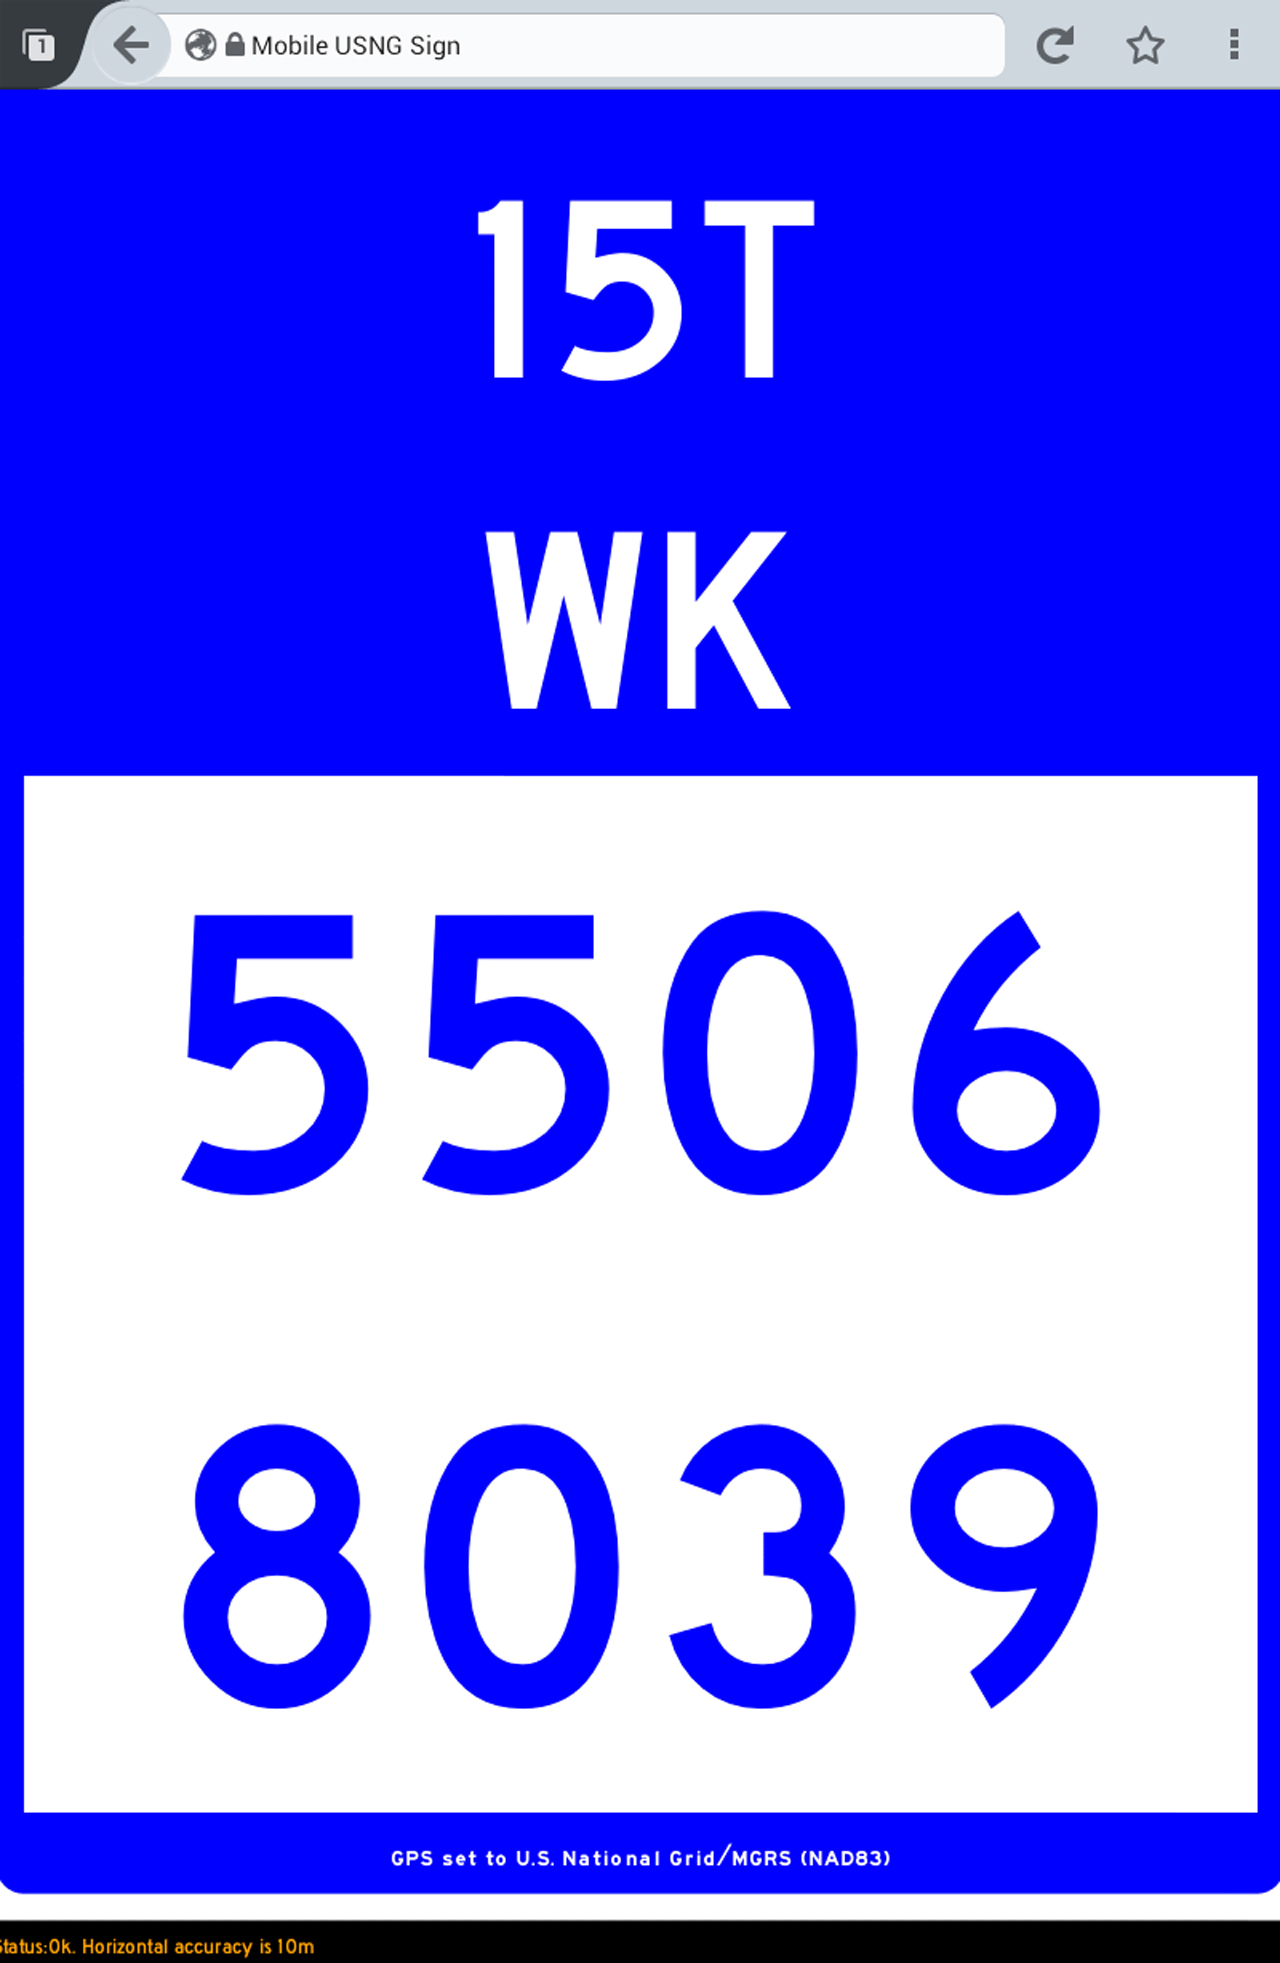
A screenshot of the USNG App web site from a smartphone.

The USNG App has many advantages over latitude and longitude:

  1. Instead of degrees and decimals, coordinates are in meters. This makes the system much easier to understand.
  2. The USNG coordinates can be easily plotted on existing USGS topographical maps and gridded maps using a simple “read right, then up” convention. This makes finding your location on a printed map much easier.
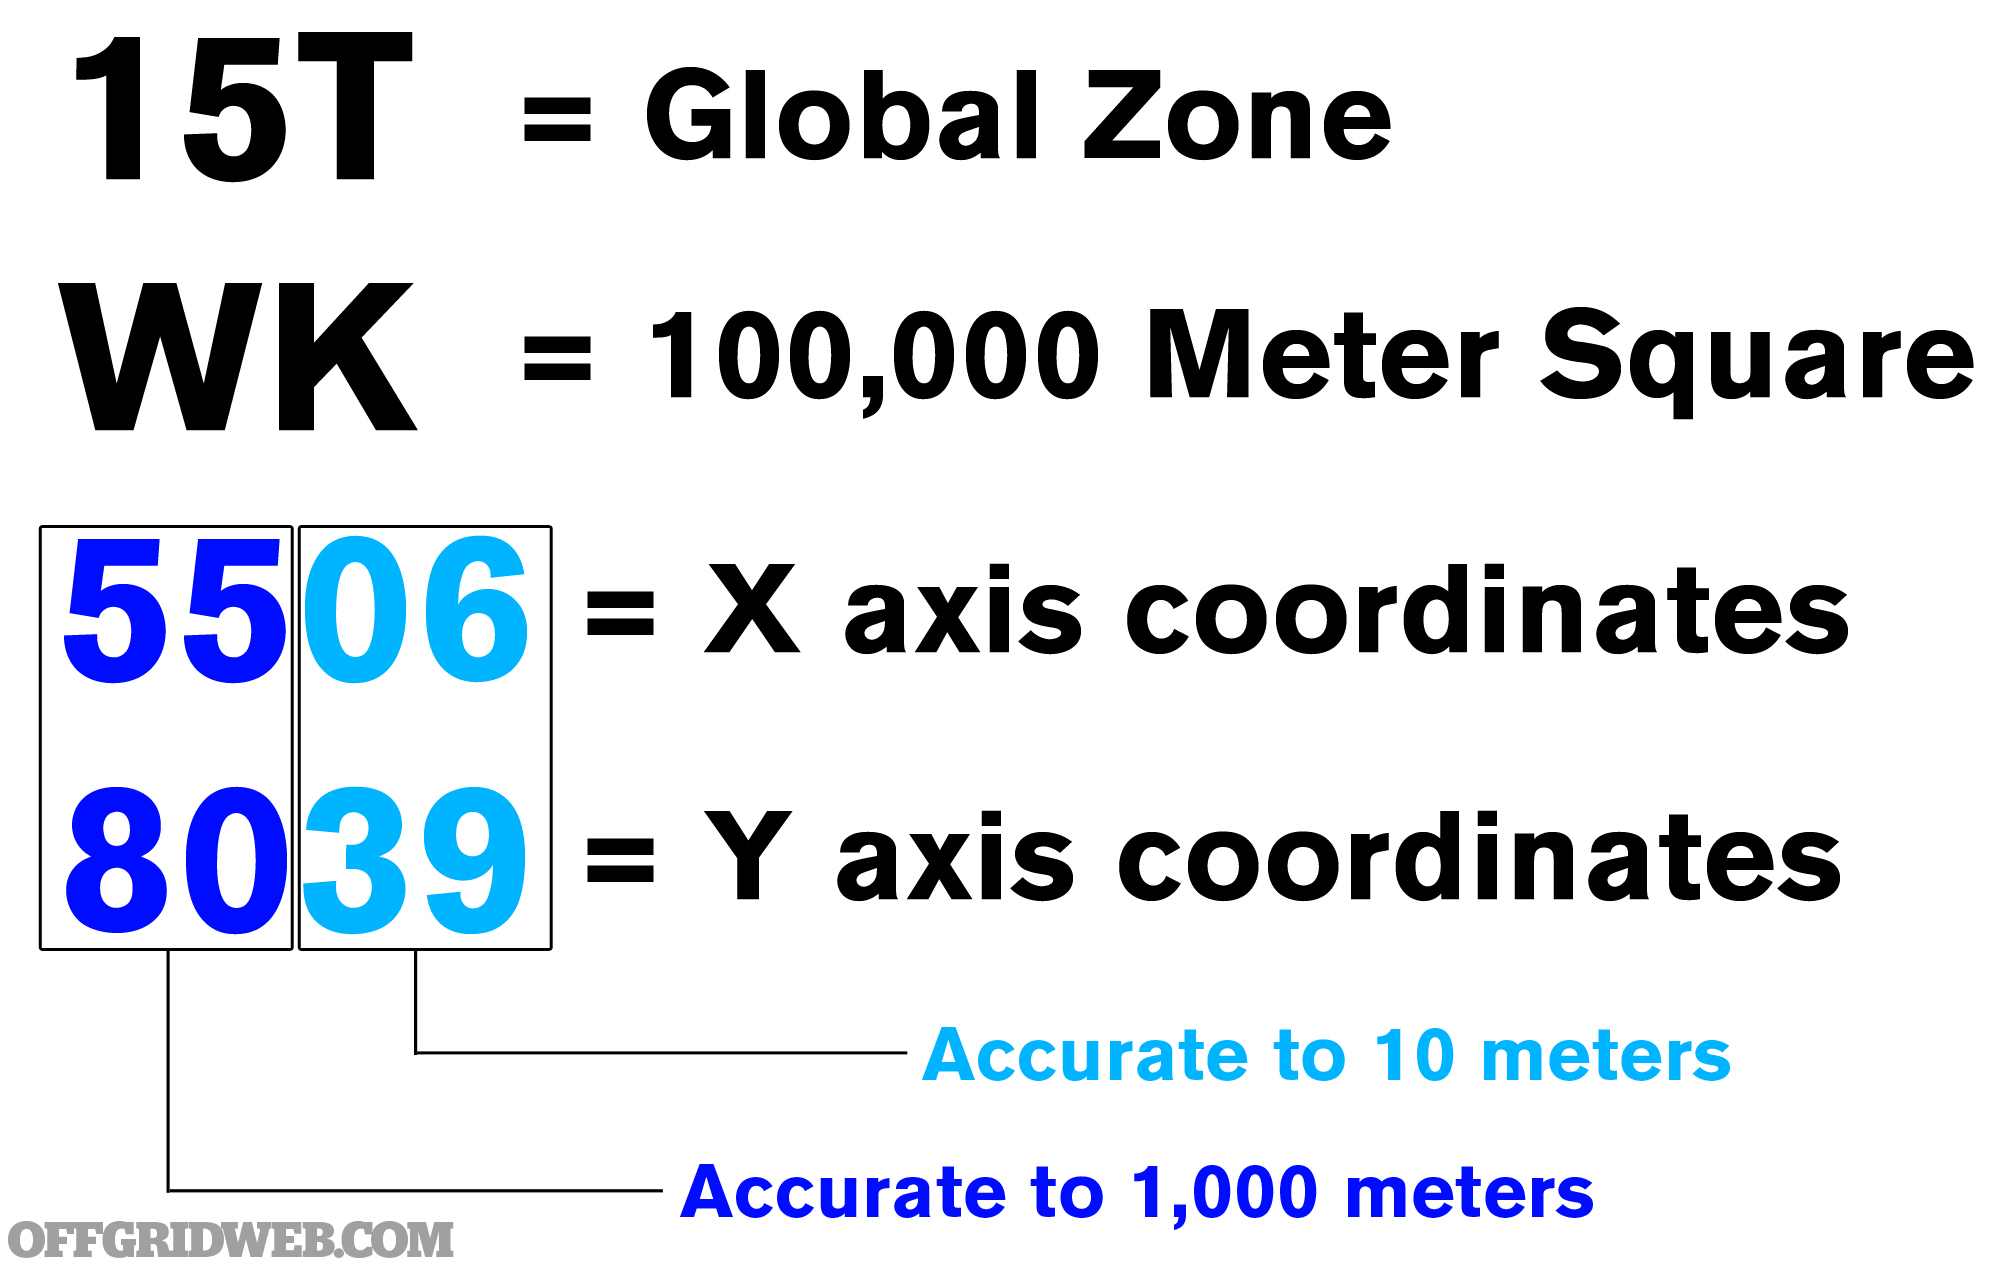
  3. Using 13 simple characters and no decimals, the USNG can provide a full location accurate within 33 feet (10 meters).
  4. For local use, such as a 9-1-1 call, you only need to know 8 characters (in the app: 2 blue numbers with 4 digits each).
  5. For use throughout the entire world, just add the 5 additional characters at the top of the screen (in the app: 2 white numbers and a letter, then 2 more letters).
  6. The USNG App is smart enough to only display valid data. So, if your GPS signal is inaccurate due to tall buildings or other interference, the app will only give your location within 330 feet or 3300 feet, and will show red lines through the inaccurate digits. (With latitude and longitude, the numbers could be wildly inaccurate, and you'd never know it.)
  7. An orange “Status” message at the bottom of the page will show the app's current accuracy and last update time in simple terms.
USNG App inaccurate data

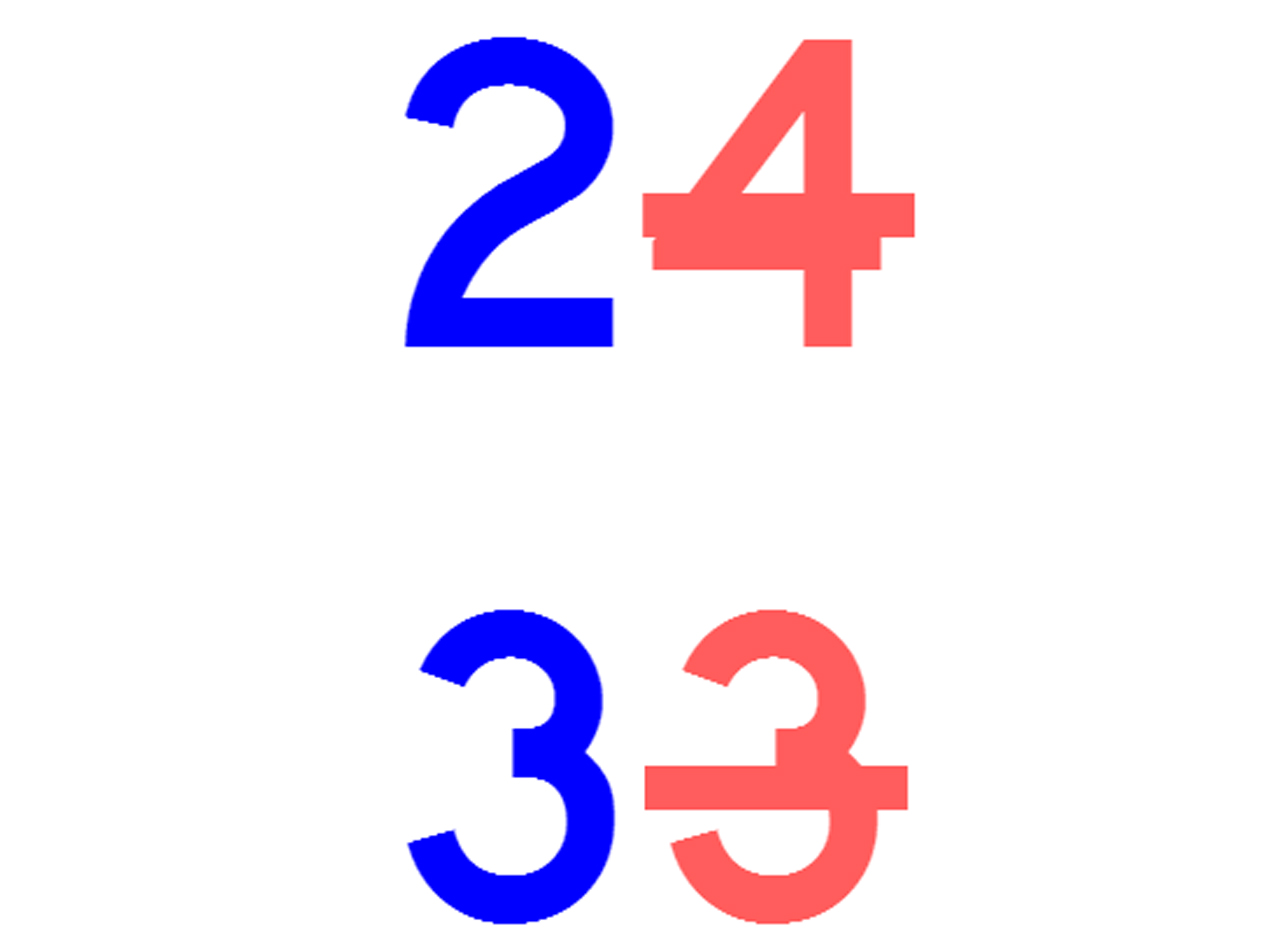
An example of inaccurate USNG data, crossed out automatically by a red line.

How to Interpret USNG Coordinates

USNG App coordinate definitions v2

We'll be looking up these example coordinates on a map below.

Here are the basic steps for interpreting USNG coordinates:
USNG App zone grid
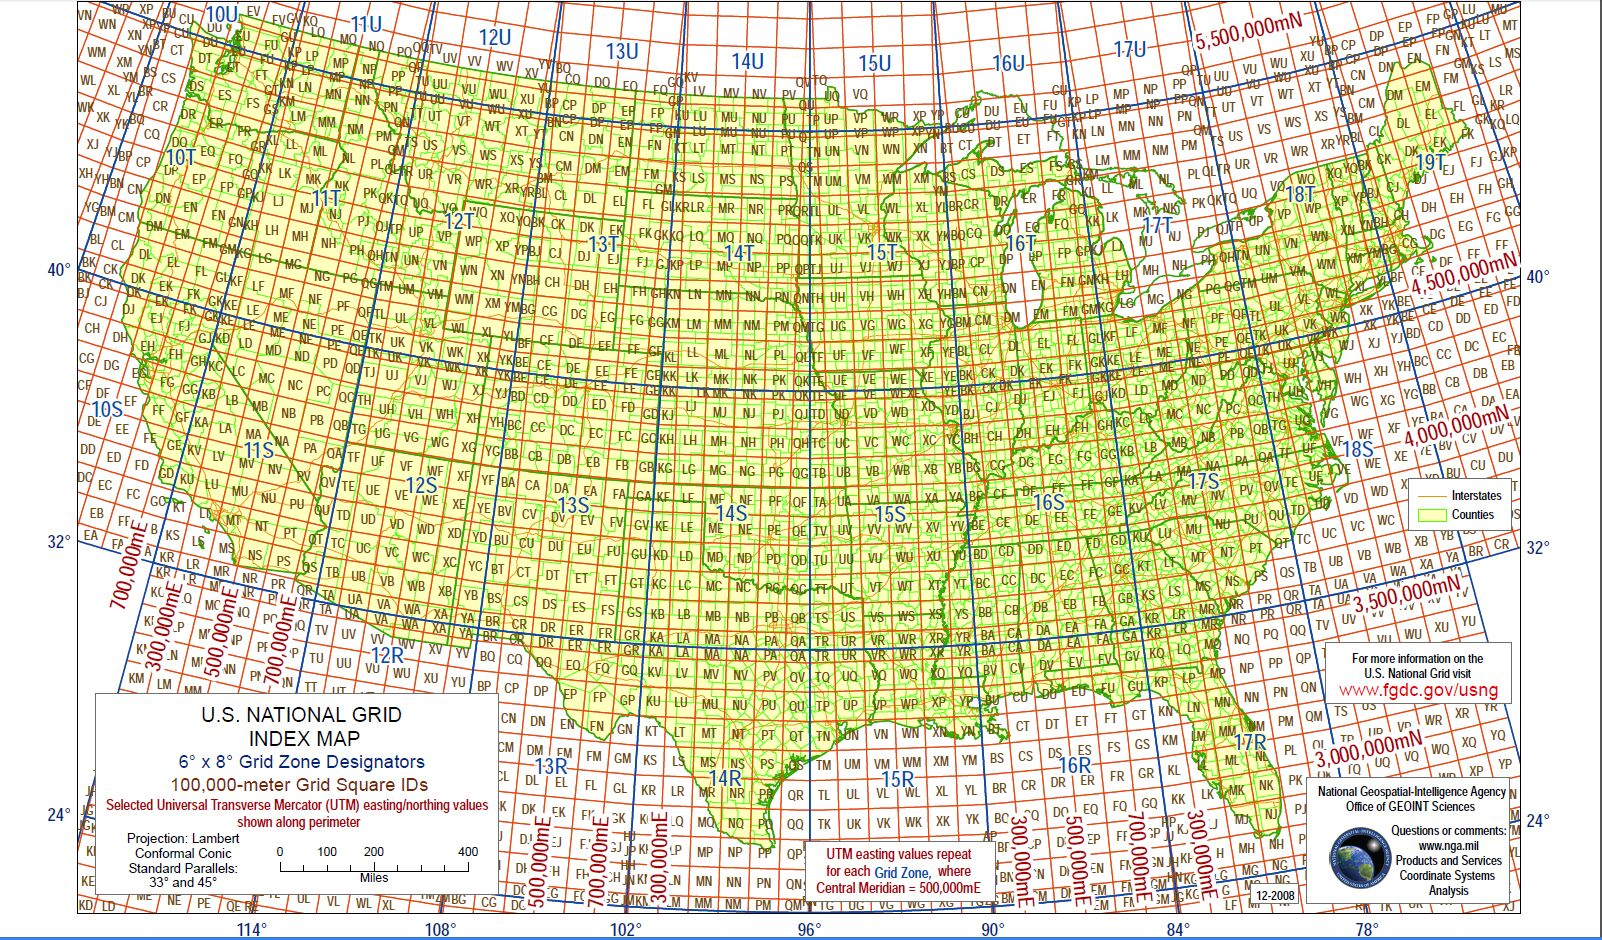
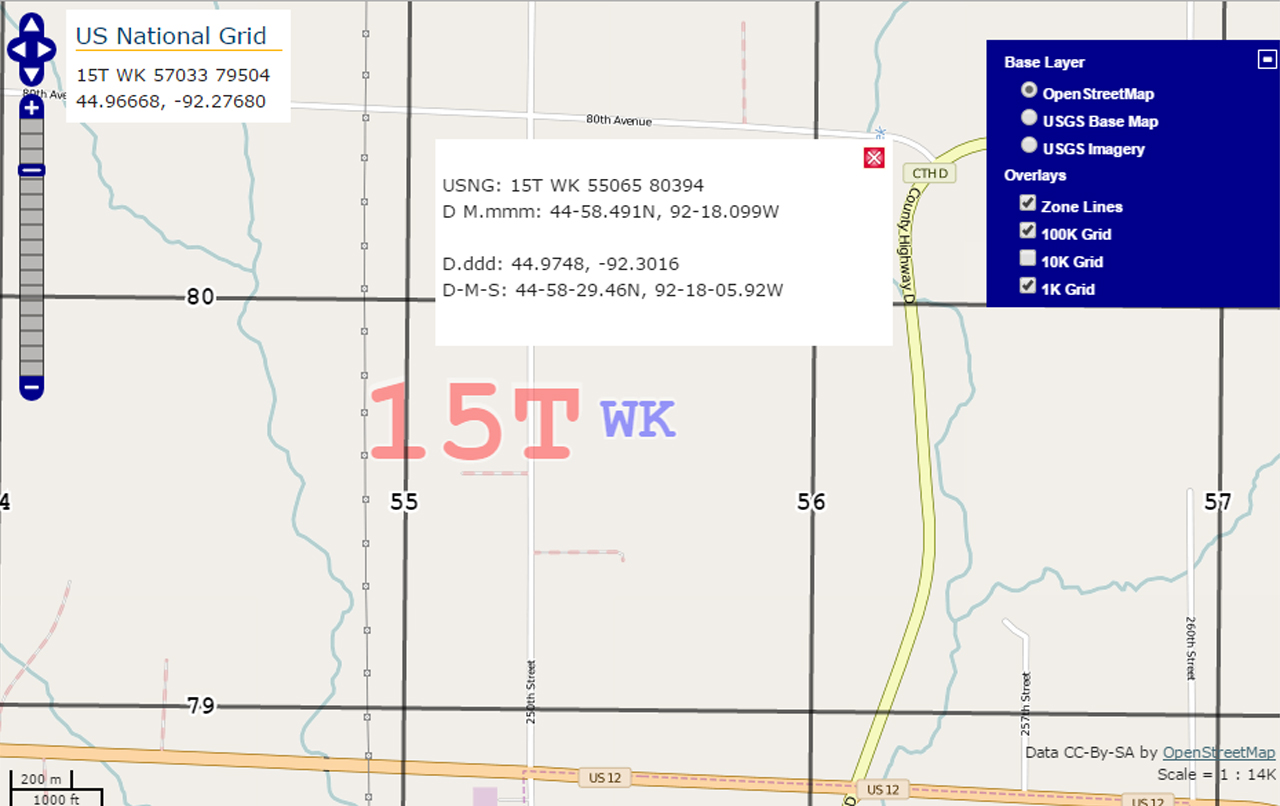
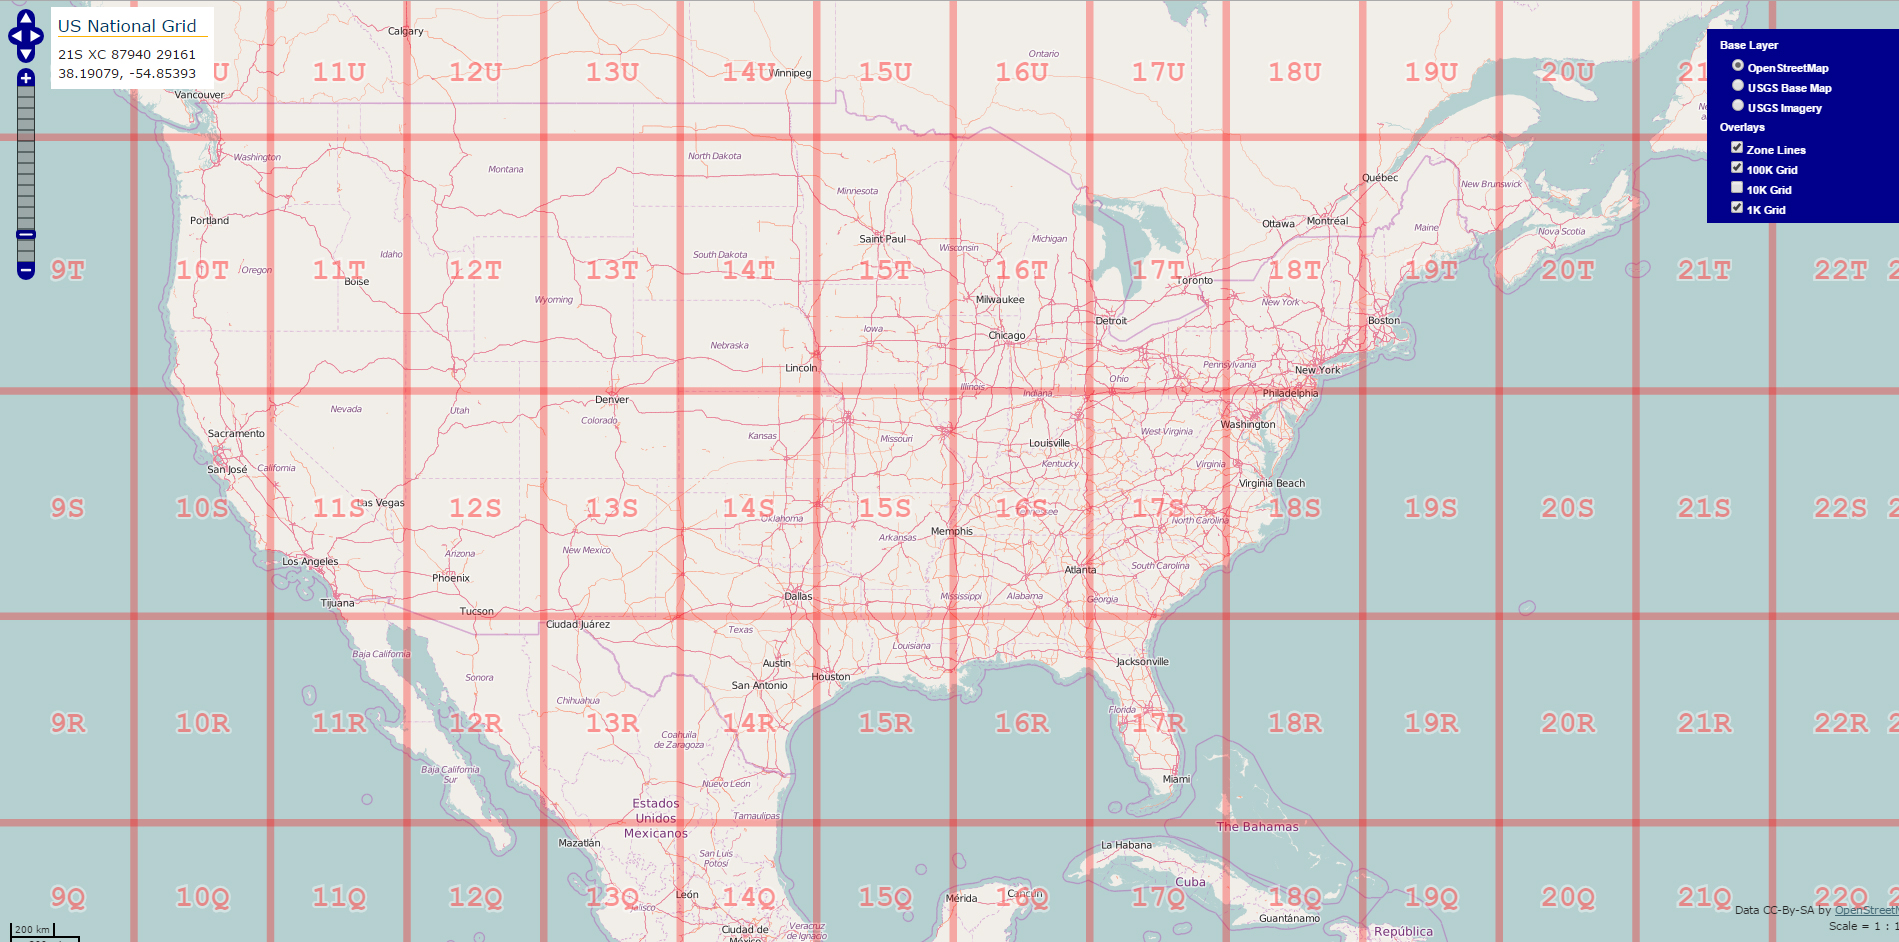
1) Use a USNG reference map, such as this one, to find the Grid Zone. These are the first 3 white characters you see at the top of the app. For example, 15T gives us the Minnesota/Wisconsin/Iowa area.

2) Zoom in further on the map, and find the second set of white characters you see in the app, the 100,000 Meter Square Identification. For example, WK gives us an area to the southeast of Saint Paul, MN.

USNG App 100k grid v23) Next, read the Grid Coordinates, which are the two blue numbers within the white square in the USNG App. Remember: “read right, then up”.

4) The first two digits will be on the X (horizontal) axis, so zoom in and look for 55 on the black 1000-meter grid.

5) Then, read up to find the next two digits, 80. At this intersection (aka 5580), you'll be within 1,000 meters of the location.

USNG App 1k grid

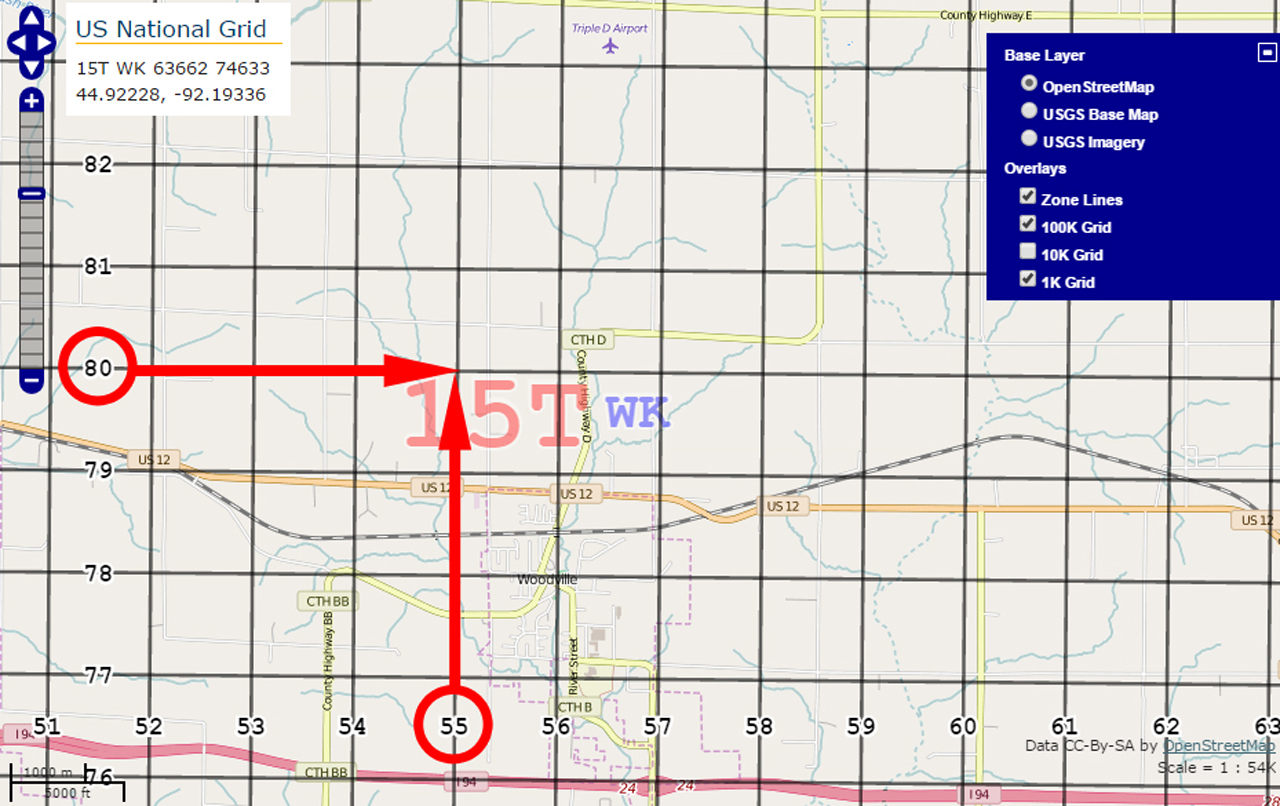
6) Zoom in more, and continue to “read right, then up” to find the second set of X,Y coordinates (aka 0639). This is accurate to 10 meters.

USNG App coordinates

For more information on interpreting USNG coordinates, visit the Federal Geographic Data Committee's web site. There's also a free tool called Gmap4, which overlays the USNG on top of Google Maps. Click here to try out Gmap4.

No Internet Connection Required?

Did you notice earlier that we put an asterisk/* next to the phrase “with internet connection”? There's a reason for that. The very best part about the USNG App is that you only need an internet connection the first time you visit the USNGApp.org web site.

After you visit the USNG App site once, the data that makes the tool work is cached (or temporarily stored) in your device's browser. Then, as long as your GPS chip is functional and you don't clear your browser cache, you can open the web page at any time and see your USNG coordinates. No internet connection or cellular data plan required, since everything required to run the tool is stored in your browser's cache.

Don't take our word for it—try it for yourself. Go to USNGApp.org on your smartphone. You may be prompted to allow access to GPS location data, so you'll need to hit “Allow” for the tool to work. Then, close the page, and turn on Airplane Mode to disable your data and WiFi connections. Re-open your browser and go back to the USNG App page. The tool should still work, even without a data connection.

Final Thoughts

Even if you get nothing else from this article, get this: visit USNGApp.org today on your smartphone, and save it as a favorite. You may never end up needing to use the app, but in case you do need it, you'll have quick access to accurate GPS coordinates for emergencies.

Special thanks to our friend and contributor Andy Schrader for telling us to check out the USNG App.


Infographic: Estimate Remaining Daylight

Here's a challenge: right now, try to estimate what time the sun will set this evening within a 15-minute window. Unless you've been paying close attention to previous sunset times, you've been studying an almanac recently, or you cheated and Googled it, you'll probably have a hard time estimating sunset time that accurately.

Well…. actually, that's not necessarily true. There is another way to estimate remaining daylight hours, and it's much more practical than any of the other methods we mentioned above.

Estimate remaining daylight 3

This extremely simple trick uses nothing more than your fingers and the horizon, and it takes mere seconds to do. It's one of those skills that everyone should know about, even if you're not a prepper or survivalist. It's just a handy life skill in general (forgive us).

Here's an illustration of how it's done, via an infographic we found through LifeHacker.

Estimate remaining daylight 2

Simply extend your arm, and align the top of your index finger with the bottom of the sun. Each finger width between the sun and the horizon should provide about 15 minutes of daylight. This lets you figure out how long you have to make camp or gather firewood before sunset.

Of course, like the infographic above mentions, there are a few drawbacks:

  • It's not 100% accurate, hence our use of the word “estimate”. If you have short and stubby T-rex arms, your readings may be thrown off a bit.
  • The accuracy diminishes the closer you get to the north or south pole, since the sun's movement will appear to slow as it nears the horizon. Then again, some polar regions have sunlight for almost 24 hours each day, so you may not have to worry about sunset at all.
  • The accuracy also diminishes the closer you get to the tropics, but in the opposite direction. Near the equator, the sun will set faster than you might estimate using this method.
  • Obstructions near the horizon, such as low-lying clouds, can cause daylight to disappear faster than you might expect.
  • Some residual light will persist as the sun begins to sink behind the horizon.

To improve the accuracy of this method, get out there and try to estimate the remaining daylight where you live. After using this trick a few times, and paying attention to a wristwatch, you'll be able to figure out more accurately how many minutes of light each finger represents in your region.


Falling Injuries & Fatality Rates

Ever stood on top of a precarious ladder, and thought about what would happen if you fell? Or, have you looked over the edge of a building, and wondered if you could survive the drop to the ground?

Falling injuries ladder

These questions (sometimes referred to as “the call of the void”) may seem morbid, but they're a natural part of your brain's inner workings. Also, knowing the answers can help us better deal with life-and-death survival scenarios when height is involved.

This way, rather than wondering about your chances of surviving a jump,  you can make an educated guess about the falling injuries you might endure if you were forced to jump to survive.

Falling injuries cliff

According to the World Health Organization, falls are the second leading cause of accidental deaths worldwide, behind road traffic injuries. Falls cause approximately 424,000 deaths each year, but most falls are not fatal.

One of the easiest ways to understand fall risk is to look at LD50, or distance at which you have a 50% chance of fatal injuries. If you fell from 48 feet (about 4 stories), statistically you have about a 50% chance of survival. At 84 feet (or 7 stories), the mortality rate is 90%, meaning you'd be very unlikely to survive a fall from this height.

Falling injuries rooftop

Despite the statistics, it's still possible to be seriously injured or killed when falling a single story (or...

From a practical standpoint, it may seem unlikely to survive a four-story fall. However, keep in mind that many other factors contribute to these averages, including: how you land, how hard the surface is, and what protective gear you're wearing (if any). There are also extreme outliers, such as one man who fell 18,000 feet from a plane without a functional parachute, and survived the landing with only a sprained leg.

So, now you know that you'll be statistically more likely to survive falls of less than 50 feet. Then again, it's far from a guarantee, and you should never try it unless every other option is more likely to kill you. Don't blame us if you jump off a roof and get hurt, because you're almost guaranteed to get hurt doing so.

Falling injuries skyscraper

What else can you do to reduce your risk if you're forced to jump or fall from a high place in a survival situation? We'll leave you with some quick pointers to remember:

  • Be extremely careful on elevated surfaces with slippery conditions (such as water or ice) or with uneven terrain.
  • Take your time and wear proper footwear, so you don't trip or stumble.
  • If you're forced to jump from a roof to the ground, hang from the ledge by your hands, then let go. This slightly reduces the distance you have to fall, improving your odds of survival.
  • While falling, try to relax your body, and protect your head and neck with your arms.
  • Try to bend your knees and roll forward or onto your side as you land. This will absorb some of the impact.
  • Avoid falling directly onto your back if possible, as this will reduce the risk of spinal injuries.

For more information about common accidents and injuries, check out our article on mountaineering accident statistics.


Ceramic Knives: Would You Carry One?

As survival-minded individuals, it's important that we never become complacent with our gear. Sure, using old-school and traditional tools for survival is a reliable option, but if you're not constantly checking out new alternative technologies, you might be stuck using outdated gear that's less effective.

Ceramic survival knives Stone River

A fixed-blade black Zirconium Oxide ceramic neck knife from Stone River.

That said, we're curious to hear what you think on the topic of ceramic knives. It goes without saying that most of us own at least one fixed-blade or folding knife, and the vast majority of those knives are made of steel. That's the way blades have been forged for centuries, and some might say there's no need to fix what's not broken.

Ceramic survival knives Boker Antigrav

This Boker Antigrav folding knife uses a ceramic blade and carbon fiber scales to tip the scales at only 2.1 oz.

However, modern ceramic knives have come a long way, thanks to prominent manufacturers like Kyocera (from Japan), Boker (from Germany), and Stone River (from the U.S.). They also provide some interesting advantages when compared to ordinary steel knives. Here's a quick list of general pros and cons to summarize ceramic knives:

Ceramic Pros:

  • Excellent edge retention. Ceramic can stay sharp 10 to 12 times longer than conventional steel.
  • Extremely light, about half the weight of a comparable steel knife.
  • More concealable, since they won't be detected by metal detectors (obviously, we strongly advise against doing anything illegal with this knowledge)
  • Non-reactive and less porous, so they will never corrode or retain tastes/odors like some steels can.
Ceramic survival knives Kyocera chef

Kyocera, a leading manufacturer of ceramic kitchen knives, uses a proprietary material called Zirconia Z206.

Ceramic Cons:

  • Potentially brittle, and will shatter instead of denting or bending like steel.
  • Generally more expensive than comparable steel knives.
  • While great for precise slicing, ceramic won't handle hard chopping or cutting against hard surfaces (like bone or glass)
  • When they eventually become dull, these knives are more time-consuming to sharpen.
  • Usually slightly less sharp than a perfectly-sharpened steel blade.

We mentioned in the last point that ceramics are usually very slightly less sharp, but when cared for correctly, they can still be as sharp as a razor. Here's a video that proves it's possible to shave with a freshly-sharpened Kyocera ceramic kitchen knife:

So, we want to hear your thoughts on this cutting-edge blade material (forgive the pun). Answer the poll, and let us know if you'd ever consider a ceramic knife. Feel free to leave a comment at the bottom of this page to explain your choice.


Superesse Straps Survival Lanyard with Neck Knife

You may recognize the name Superesse Straps from our review of their paracord survival bracelet, called the Bug-Out Bracelet Pro. That compact and lightweight bracelet unravels into a Pandora's Box full of survival gear. The Superesse BOB Pro has a compass, fish hook, ballpoint pen, can opener, surgical blade, multiple fire-starters, and even water purification tablets—as well as over 10 feet of useful 550 paracord.

superesse-straps-bug-out-bracelet-pro-contents

The Superesse Straps BOB Pro has an insane amount of densely-packed survival tools.

Since our review of the Bug-Out Bracelet, we're pleased to see Superesse Straps' veteran-owned-and-operated small business has grown considerably. Now, they've announced an all-new addition to the lineup of compact survival kits: the Superesse Straps Survival Lanyard with custom neck knife.

Superesse straps survival lanyard 3

For those who don't like the feel of wearing bracelets, or who simply want a backup survival kit within arm's reach, the new Survival Lanyard is an ideal choice. It includes many of the same paracord-wrapped tools and items found in the bug-out bracelet, but in the form of a neck lanyard with a miniature knife at the end.

Superesse straps survival lanyard 2

As with existing Superesse Straps products, there are many options to choose from. First of all, there's the color, which applies to both the paracord and the knife/sheath combo. You can choose from Black, Olive Drab, Coyote Tan, or Safety Orange. Then, you can choose from one of the following pre-set packages:

  • SERE Kit – Escape and Evasion Kit with basic survival supplies.
  • Medic Kit – Treat minor medical emergencies and aid in the sustaining of your self and equipment.
  • Offgrid Kit – Supplies to survive a SHTF bug out scenario and navigate to safety. (Superesse Straps tells us this name was a tribute to us, and that's pretty cool!)
Superesse straps survival lanyard 5

These are just a few of the items Superesse Straps can include in your survival lanyard.

If you want something truly unique, Superesse Straps can accommodate that, too. They have a custom lanyard builder tool on their web site, with an almost unbelievable amount of options. You can really trick this lanyard out if you want to, although the builder tool includes a recommended max capacity so you don't get too carried away with add-ons.

The lanyard's neck knife is forged from 440c stainless steel, and comes with a color-matched sheath and rubber over-molded handle.

Superesse straps survival lanyard 4

The founder of Superesse Straps notes, these products are handmade to order in Fort Bragg, North Carolina. He also writes, “every aspect of your kit is crafted by my wife and myself. We put great detail into each order.” This means it may take a few weeks to receive your custom lanyard, but we're sure it will be worth the wait.

Superesse straps survival lanyard

The SERE, Medic, and Offgrid lanyards can be purchased through the Superesse Straps Etsy page, and start at $145. Custom orders start at $150, and can be placed directly through SuperesseStraps.com.

As with the Bug-Out Bracelet Pro, this lanyard isn't cheap, but you definitely get what you pay for: a handcrafted, high-quality, American-made survival kit.


New Magpul CORE Ranch Glove

There's no denying that high-tech moisture-wicking materials and space-age fabrics are beneficial, but sometimes when it comes to apparel, simplicity is best. That's why it's nice to see Magpul covering all the bases with a new glove design that's decidedly old-school.

Magpul CORE ranch gloves 3

This new product is the Magpul CORE Ranch Glove, and it was inspired by the company's move to a new headquarters in Central Texas. In the surrounding area, Magpul saw cowboys and cattle ranchers wearing weather-beaten and worn leather gloves, so the company decided to expand its product lineup into this market.

With Magpul's considerable experience making tactical gloves, it was a natural step. The company calls the CORE Ranch Glove “a modern interpretation of a classic,” based on the traditional (but rather crudely made) tough leather glove designs that have existed for centuries.

Magpul CORE ranch gloves 1

However, several improvements were made to the traditional rancher's glove design. Soft and durable 100% goatskin leather gives improved tactile feedback, and can hold up to day-to-day wear. There's also an elasticized wrist and extended gauntlet, so the gloves can be put on and removed easily.

Magpul CORE ranch gloves 2

Recognizing the importance of smartphones and other touchscreen devices, Magpul also added conductive thread on the index finger of each glove. Subdued branding keeps the Magpul CORE Ranch Glove looking clean and traditional.

The new CORE Ranch Gloves are available directly through Magpul's web site for an MSRP of $39.95, and are offered in sizes ranging from S to 2XL. For more information on Magpul gear and apparel, visit Magpul.com.


Survival Scenarios: Boots or Bug-Out Bag?

Welcome to another entry of Survival Scenarios, where we ask you how you'd handle a difficult choice in a hypothetical survival situation. Previously, we asked whether you'd rather be adrift at sea or stranded in the barren desert, and also whether you'd rather survive without a knife or without a fire-starter. These are all tough questions, but today's may be the hardest yet.

How would you rather survive for 7 days: without your boots (meaning, barefoot) or without your bug-out bag?

Survival Scenarios boots or bug out bag NYC

The streets of New York would be a tough place to go barefoot.

Before you answer, we’ll provide some more information on the circumstances. As with previous Survival Scenarios, in either case, you’ll need to survive for 7 days, and you’ll be alone. You'll be located in an urban setting, on the streets of New York City in the month of May.

Weather is expected to be clear, and temperatures will range from about 65°F/18°C during the day to about 50°F/10°C at night.

Survival Scenarios boots or bug out bag NYC Brooklyn

However, it's not exactly peaceful in this scenario—major civil unrest has recently thrown the Big Apple into turmoil, and large-scale rioting has been taking place for over a week already. Over the last 7 days, you have been hunkered down in your tiny apartment in Brooklyn, listening to the chaos in the streets below, and hoping it would all blow over.

Survival Scenarios boots fire escape 2

However, you awake in the early morning hours to the deafening tone of a smoke alarm. Choking clouds of pitch-black ash fill your lungs. A fire broke out on a lower floor (possibly from a molotov cocktail or vehicle fire on the street) and it quickly spread through the aging apartment building. Emergency services have been stretched to the breaking point over the last week, so rescue is unlikely.

You begin to get dizzy from smoke inhalation, and know every second counts if you're going to evacuate and survive. As you stumble deliriously towards the door, your body aches for a breath of clean air. You can barely see as you crash through the door, and rush downstairs to the dark street.

Survival Scenarios boots or bug out bag NYC 2

In your hasty escape from the burning apartment, you make it out with only the following items:

If you choose the bug-out bag, it contains all the items and tools you might expect, such as a folding knife, hatchet, flashlight, paracord, small first-aid kit, water purifier, food ration bars, Mylar emergency blanket, and even a change of clothes.

mechanix-wear-gear-bag-top-open

Many useful items, but no footwear to be found.

However, here's the catch: the bug-out bag does not contain any footwear, not even socks. So, you'll be forced to hit the streets of New York City completely barefoot.

If you're feeling clever, you may try to craft some makeshift sandals from the supplies in your BOB, but that's easier said than done. Also, you may be facing attacks from violent crowds—if you need to run for your life at any point, good luck doing so in cobbled-together flip-flops.

Survival Scenarios boots asphalt

Unless you're used to hiking barefoot, miles of rough asphalt will quickly wear out your feet.

You might think that you can just raid a nearby shoe store, but keep in mind the week-long rioting and looting has already stripped most shops bare—it'll be hard finding any shoes at all, much less in a size that fits. As you forage, you'll also be navigating a veritable minefield of broken glass, trash, stagnant water, and even blood on the sidewalks and streets.

Survival Scenarios boots broken glass

One tiny laceration to your foot could easily make you a sitting duck.

A cut on the sole of your foot could lead to an infection, and end up crippling you. You can disinfect it with the BOB's first aid kit, but that won't make it any less painful to walk on, and it won't help if you keep getting dirt in it with every step.

On the other hand, if you choose the boots, you'll have no worries about injuring your feet or ending up with an infected cut. However, you won't have any other supplies or weapons, so you'll have to sneak out and look for them. That's a dangerous proposition with crowds of looters filling the streets.

bug-out-boots-buyers-guide-511-tactical-recon-trainer-001

Without shoes, there's nothing between your skin and the hard asphalt.

Finding food and clean water will be a problem in this case, and you'll need to find some warmer clothing and a weapon to defend yourself. You may think these items are everywhere in NYC, but remember that the violent looting has left most valuable items already stolen or destroyed.

If you walk into a department store or pharmacy for supplies, expect to meet looters. At best, they'll ignore you or realize you have nothing worth stealing. At worst, they'll already be armed and see your presence as a threat. But, with no supplies or gear, it's a chance you'll have to take.

Tools for Survival - Crowbar

Since you don't even have a pocket knife, you'll need to find something else to defend yourself with.

Without a bug-out bag to rely on, you'll have to kick your scavenging into overdrive. Venturing outside will be necessary to collect food, water, and other supplies, but this will also potentially put you in danger. So, you'd better hope you can find what you need without any confrontations, or that you can defend yourself adequately with your fists, feet, or improvised weapons.

So, make your choice of either boots or bug-out bag in the poll below, and feel free to justify your decision in the comments section.


Survival Scenarios will be a recurring feature on OFFGRIDweb.com, and will ask you to make a difficult choice between two or more hypothetical situations.

We don't just want you to read our posts silently—we want to hear what you have to say. That's why we're working hard to provide more interactive content like quizzes, polls, and giveaways. Got any suggestions? Post them in the comments below, or head over to our Facebook page.


Prison Workout Routine: Deck of Pain

Try to picture a stereotypical maximum-security prisoner. What do you see? Probably a tough-looking guy with an orange jumpsuit, shaved head, face and neck tattoos, and a chiseled, muscular body. There's a very good reason the last part is included in this stereotype—when someone is locked up all day, every day, they tend to work out a lot to kill time.

Prison workout routines 3

Free weights make excellent blunt-force weapons, and therefore usually aren't available in prisons.

So, you're probably not planning to go to prison, but there's still something you can take away from this: convicts have figured out ingenious ways to build muscle with limited resources. Those guys don't exactly have a fully-stocked fitness center—some states even disallow weightlifting in prisons—so the inmates make do with what they have. Usually, this means body weight exercises.

Prison workout routines 2

Need a workout? A deck of cards is the only tool you need.

We previously showed you 42 different body weight exercises in a convenient chart format. However, any fitness instructor can tell you that having a system helps you stay on track and push yourself harder. So, here's a method that has been used by prisoners around the world: the deck of cards workout, also called the deck of pain.


Most prisoners have access to playing cards, which makes this method a natural fit. Here's how it works:

  1. Shuffle the deck of cards.
  2. Assign a body weight exercise to each suit. For example, hearts could be sit-ups, spades could be push-ups, and so on.
  3. Draw a card off the deck, and flip it over.
  4. The number on the card indicates the number of reps, with face cards being 10 and aces being 11.
  5. Based on the number and suit, do the corresponding exercise. For example, a 7 of hearts would mean 7 sit-ups.
  6. Rest a few seconds, draw another card, and repeat the process. Continue until all 52 cards are used.

It may be difficult to tackle at first, but this method will keep you active both physically and mentally. The workout method is said to have started in prisons, but has become more mainstream now, and there's even a smartphone app if you don't have playing cards.

More info on the “deck of pain” prison workout can be found here or here.


How to Make a DIY Compass

Land navigation and orienteering are essential skills for any survivalist. Even in areas you're already familiar with, it's far too easy to get turned around and hopelessly lost, especially when you're panicked or frustrated. Obviously, a reliable compass and map are extremely helpful for getting your bearings, but like all survival tools, there are situations when you'll have to do without them.

stay-or-go-map-reading

Knowing how to use a compass and a topo map properly could save your life.

We've discussed alternative methods for finding true north in the past, such as celestial navigation and the shadow compass method. However, today we're going to discuss how you can simply make your own DIY compass, instead of trying one of these alternate techniques.

DIY Compass 2

By simply magnetizing a needle and floating it on water, you've got a compass.

The basic principle of a compass uses a needle or indicator that has been magnetically charged, and floats it on water to move smoothly. The magnetized needle will generally point in a northerly direction (although there are other complex factors like declination that can throw it off a few degrees).

This video from the guys at Black Scout Survival shows one method for magnetizing an ordinary sewing needle using a AA battery and some snare wire:

If you don't have a battery and wire, you can magnetize a needle using—get this—a magnet. Makes sense, right? However, you'll need a fairly strong magnet to do it correctly.

In a survival situation, the more methods you know to get your bearings, the better. Even if you can't make one DIY compass method work, you can fall back on another, and navigate your way to safety.


Bloodstain Pattern Analysis

You've probably seen one of those stereotypical crime drama TV shows. You know, the ones where the clever cop protagonists show up to the cordoned-off murder scene, pull out some high-tech tools, and suddenly find a miraculous clue in the blood patterns that leads them straight to the killer. It's all Hollywood nonsense, right? Well, maybe not as much as you'd think.

Bloodstain pattern analysis, also called BPA or blood spatter analysis, is a very real tool that crime scene investigators (actual CSIs, not the sunglass-wearing TV kind) use to understand violent crimes. This technique can help investigators determine crucial details about the crime, such as when it happened, what type of weapon was used, and how long the victim survived after the attack.

Bloodstain Pattern Analysis 4

Scientists often use trigonometry to determine blood spatter impact angle. You won't see that on TV.

The process of BPA has been fictionalized and romanticized by the TV show Dexter, among others, but the fact remains that it's a valid technique used by crime scene analysts.

So, as a survivalist, why does this matter? First of all, in an urban disaster scenario, rioting or other large-scale violence may take the lives of innocents who end up beaten, stabbed, or shot in the street. By remembering the basics of bloodstain pattern analysis, you can quickly ascertain important facts about scenes of violence you come across. For example:

  • Approximately how long ago was the person killed?
  • How many perpetrators may have been involved?
  • What sort of weapons were used on the victim?
  • Was there a struggle, or was the victim ambushed?
  • Which direction did the perpetrators come from, and where did they leave?

BPA can assist in answering all these questions. Even if you're not certain what transpired, making an educated guess about the facts of a crime can help you avoid violent criminals, and thereby avoid becoming the next victim.

Here's a useful infographic about bloodstain pattern analysis:

Bloodstain Pattern Analysis 1

Bloodstain Pattern Analysis 2

Bloodstain Pattern Analysis 3

Obviously, if you're looking to prove your analysis in a court of law, you'll need to study BPA for years and become a true expert. However, if you're looking to determine what likely happened at a violent crime scene, and want to prevent it happening to you in the future, a very basic understanding of bloodstain pattern analysis can be a useful survival tool.