Infographic: Scams to Avoid Around the World

Ask someone if they're gullible, and they'll almost always reply with an emphatic “no”. Nobody likes to think they'll fall for a scam while traveling, but tourists around the world are getting robbed, extorted, and ripped off in creative new ways every single day. Even if you're skeptical and self-aware, you can be caught off guard by scam artists if you're unprepared.

Scams to avoid 2

Walk the streets of any urban area for long enough, and someone will try to separate you from your money.

Most of us know to avoid the classic “shell game” scam, where you're supposed to point out a marble under one of three moving shells or cups. However, that's just the tip of the iceberg. There are hundreds of other methods that criminals will use to take your valuables—from begging and guilt-trips to pickpocketing and armed robbery.

This in-depth infographic from Just the Flight shows 40 different scams to avoid while traveling. How many of these have you experienced first-hand?

Scams to avoid 1a

Scams to avoid 1b

Scams to avoid 1c

By learning about as many of these tricks as possible, you can stay ahead of the game and avoid getting conned out of your cash. Even if you really aren't the gullible type, there are plenty of con men out there who will be more than willing to test your resolve.


Two-Wheel Road Warrior

Retaining mobility when a disaster on a grand scale strikes your town can be as, or even more important, than plans to stock up supplies and bunker down at home. When things are good, getting in, out, and around town is as easy as jumping in your transportation mode of choice — be it a car, truck, motorcycle, or even subway or bus — and simply going from point A to point B. But when roads are clogged, fuel is scarce, and the city's infrastructure is in disarray, moving about could get mighty tricky.

The most reliable mode of transportation is your feet. You can use them to traverse a multitude of terrain, and they require no additional forms of fuel other than what you already need to sustain your life. If your vehicle is rendered useless or the streets around you become impassable for some disastrous reason, you can probably still hike yourself out if need be. But relying on your feet to get you and your gear across long distances is a surefire way to turn them into hamburger meat. Because we like our feet the way there are, let's explore another human-powered alternative.

The bicycle runs on the same power as your feet, meaning that you don't need additional fuel to power it. Bicycles allow you to travel great distances more efficiently and allow you to be on the move quicker with heavier loads, while using less energy and having less impact on your body than if you were to go on foot. If there is a need to keep a low profile, which might often be the case, bicycles are a lot quieter than most motorized vehicles.

When properly equipped, the right bicycle can take you and your heavy survival gear, or possibly another passenger, over a number of types of terrain. If shit hits the fan while you are at work, a prepositioned bike could get you home faster than waiting for the roads to clear up. On the other hand, if you're bugging in and waiting it out in your prepared fortress, bicycles are a great way to scout the area rapidly and quietly while having a viable way to bring supplies back to home base. With basic tools and a couple of spares, your bike can always bring you and your gear to safety.

Although there are some really nice bicycles out there, you don't need to break the bank in order to get a two-wheeled escape plan going. There are plenty of used bikes you can pick up on the cheap from Goodwill, yard sales, Craigslist, pawn shops, and the like on which to base your silent escape rig. One of our staff members actually picked up a bike for $50 at a yard sale. He rigged his own carriers out of milk crates, scrap metal, and used backpacks to complete his get-out-of-town bike for less than $100. If you do pick up a used bike, make sure that it is inspected and serviced for safety at your local bike shop.

Like everything in life, what bike you get and how you set it up is all about what your individual needs are. Let's take a look at a couple of differently outfitted bikes and their accessories to get an idea of how you can configure a bike to best suit your needs.

The All-Terrain Scout

This setup is based on the Cogburn CB4 bike. With its oversized 3.8-inch-wide tires, the CB4 is an all-terrain fat bike capable of taking on some seriously rough roads and torn-up asphalt. Built to fulfill an all-terrain scout role, we wanted a bike that could zip around city-center all the way to the outskirts of town regardless of road conditions. It is capable of carrying back foraged food and supplies with its bags and single pannier as well as providing the rider with some defense and hunting capabilities with its mounted rifle.

It's equipped with disc brakes, wide track handle bars for confident control even with heavier loads, and pre-threaded attachment points all over the place for racks and carriers. We took advantage of those attachment points and added a few carriers and accessories that would help this bike fill a scout role.

The All-Terrain Scout

  • Blackburn Barrier Universal Pannier

    Make & Model - Blackburn Barrier Universal Pannier
    Capacity - 17 L
    MSRP - $100
    URL - http://www.blackburndesign.com
    Notes - Blackburn's Barrier Universal Pannier features a waterproof roll-top design that makes it ideal to secure items that you need to bring back to basecamp. It features clear visibility panels on its sides, waterproof zipped exterior pocket, vertical compression straps, and lashing points. Its mounting fixtures can be custom fitted, making this pannier compatible with all standard racks. Its thick, tough skin and welded-seam construction are sure to give it a long, useful life on the road. When taken off the bike, the ends of the top clip together and form a convenient carry handle.

    Blackburn's Barrier Universal Pannier features a waterproof roll-top design that makes it ideal to secure items that you need to bring back to basecamp.

  • Blackburn Mountain Bottle Cage

    Make & Model - Blackburn Mountain Bottle Cage
    Weight - 2.4 oz
    Colorway - Black (shown), silver, red, green, blue
    MSRP - $5
    URL - http://www.blackburndesign.com
    Notes - These bottle cages mount easily on any bike frame that has predrilled holes to accept them and securely hold most standard sport bottles.

    The Blackburn Mountain Bottle Cage mounts easily on any bike frame that has predrilled holes to accept them and securely hold most standard sport bottles.

  • Cogburn CB4

    Make & Model - Cogburn CB4
    Front and Rear Shifters - Shimano Deore 2 x 10 Speed
    Front Derailleur - Shimano Deore 2 x 10 Speed
    Rear Derailleur - Shimano Deore Shadow Plus 10 Speed
    Crankset and Bottom Bracket - SRAM X5 GXP100, 175mm crank with sealed bearings, 22/36t gearing
    Chain - KMC 10-speed
    Derailleur Cable and Housing - Jagwire stainless shift cables and full-length housing
    Cassette - Shimano Deore – 10-speed, 11/36t gearing
    Wheels - Formula sealed-bearing hubs front and rear, S
    URL - http://y 82mm-wide Rolling Darryl rims, DT Swiss stainless steel spokes, built and finished by hand in the USA
    Tires and Tubes - S
    URL - http://y Nate 26x3.8-inch tires, S
    URL - http://y Light Fat inner tubes
    Front and Rear Brake set - Avid BB7 cable actuated disc brakes, 160mm stainless rotors, Avid FR5 levers
    Overall Length (Large frame, as featured) - 74 inches
    Weight - (Large frame, unloaded)
    MSRP - $2,200
    URL - http://www.cogburnoutdoors.com
    Notes - To sum it up, the CB4 is a man-powered all-terrain vehicle. Its high-riding fat tire and wheel combination coupled with its wide frame give the rider a very capable and sturdy platform to traverse all types of terrain. It comes covered in RealTree Xtra camouflage and is bead-blasted so that the bike maintains a non-glare, low-profile look. The two-wheel disc brakes stop the bike quickly and confidently, while the 2 x 10-speed shifters change gears up and down smoothly. Accessory mounting points are found all over its frame, which is a huge bonus when we built up this example. It even has mounting holes for three water bottle holders — not found on most bikes. The bike is lighter than it looks due to its frame being made of high-quality heat-treated, double-butted A6N-6000AL tubing.

    The CB4 is a man-powered all-terrain vehicle, its high-riding fat tire and wheel combination coupled with its wide frame give the rider a very capable and sturdy platform to traverse all types of terrain.

  • Cogburn Gear Carrier

    Make & Model - Cogburn Gear Carrier
    Weight - 1 lb, 15 oz.
    MSRP - $130
    URL - http://www.cogburnoutdoors.com
    Notes - Although the Gear Carrier is designed to hold a rifle, bow, or fishing rod, it is capable of carrying a wide range of gear, thanks to its included positionable Quick Fist clamps. Along with the two 2-inch and one 1-inch Quick Fist clamps it comes with, the rider can easily employ rope, paracord, or bungee cables to secure other items such as firewood or other foraged materials. We found that the 2-inch Quick Fist clamps were too narrow to help attach long guns such as a shotgun or AR-15. Adding your own larger-diameter Quick Fist clamps would remedy that. The carrier itself is sturdy and covered in a matte-black powdercoat as well as mounting holes that allow for a myriad of mounting possibilities.

    Although the Gear Carrier is designed to hold a rifle, bow, or fishing rod, it is capable of carrying a wide range of gear, thanks to its included positionable Quick Fist clamps.

  • NiteRider Mako Light System

    Make & Model - NiteRider Mako Light System
    Headlight Brightness - 150 lumens
    Headlight Modes - High, low, flashing
    Headlight Runtime - High
    TailLight Runtime - 100+ hours
    Battery Type - Headlight 2 x AA
    MSRP - $60
    URL - http://www.safarilandpatrolbikes.com
    Notes - The Mako Light System is perfect for those times when you need to be seen. It comes with a bright 150-lumen headlight that can keep you from riding at night into one of those pesky sinkholes and an LED taillight that can be seen up to 1 mile away. The headlight features side "gills" that light up red to make the rider more visible. The taillight emits light to its sides as well as to the rear for greater visibility as well. Multiple mounting options including a belt clip are included.

    The Mako Light System is perfect for those times on your bike when you need to be seen.

  • Novara Novara Rack Trunk

    Make & Model - Novara Novara Rack Trunk
    Capacity - 6.6 L
    Dimensions - 12.5 in L x 6.5 in W x 5 in H
    Weight - 12 oz
    MSRP - $43
    URL - http://www.rei.com/novara
    Notes - The Rack Trunk is a fairly standard, well-made bag that mounts on rear bike racks with four stout hook and loop straps. It is made of weather-resistant coated nylon, is padded, and the insulated main compartment protects contents and maintains shape. Its internal mesh pockets help keep everything in its place.

    The Novara Rack Trunk is a fairly standard, well-made bag that mounts on rear bike racks with four stout hook and loop straps and is made with weather-resistant nylon.

  • Salsa Cycles Alternator Rack Wide

    Make & Model - Salsa Cycles Alternator Rack Wide
    Maximum Load - 33 lbs
    Weight - 1 lb, 11 oz
    MSRP - $120
    URL - http://www.salsacycles.com
    Notes - The Alternator Rack Wide is made for fat bikes such as the CB4. Its oversized tubular 6061-T6 aluminum construction fits over the extra-wide frame of fat bikes and includes longer struts for improved range of fit.

    The Alternator Rack Wide is made for fat bikes such as the CB4. Its oversized tubular 6061-T6 aluminum construction fits over the extra-wide frame of fat bikes and includes longer struts for improved range of fit.

  • Topeak Compact Handlebar Bag

    Make & Model - Topeak Compact Handlebar Bag
    Capacity - 2 L
    Maximum Load - 11 lbs
    Dimensions - 8.7 in L x 5.1 in W x 7.1 in H
    Weight - 1 lb
    MSRP - $60
    URL - http://www.topeak.com
    Notes - This handlebar bag converts to a fanny pack and is attached to the bike's handlebars with a quick-release mount. It keeps your essentials close at hand and is detachable so you can take them with you, right on your hip. The wings of the bag fold out in fanny pack form and feature hidden zippered compartments. It also includes a rain cover for those wet days on the road. Be careful not to overload handlebar bags as excessive weight on the handlebars can affect the bike's handling.

    The Topeak Compact Handlebar Bag converts to a fanny pack and is attached to the bike's handlebars with a quick-release mount. It keeps your essentials close at hand and is detachable so you can take them with you.

The Pack-Mule

This alternative setup is focused on the transportation of gear and supplies. Think of it as a pickup truck or cargo van version of a bicycle, if you will. This bike is set up with multiple racks, bags, panniers, and even a trailer that allows it to carry large loads in the event you need to get out of your place. If you do find yourself in a position where you need to move someplace else — and depending on the overall situation, you will probably want to take as many supplies and equipment as you can with you.

We based this example on a non-current model TREK FX, which is considered a hybrid bike. Hybrids are great for long rides due to their more upright seating position. Like we mentioned earlier, many used road-worthy bikes can be outfitted in much the same way at a fraction of the cost of a brand-new bicycle.

The Pack-Mule

  • B.O.B. Ibex Plus

    Make & Model - B.O.B. Ibex Plus
    Maximum Load - 70 lbs
    Cargo Area (approx.) - 25 in L x 16 in W x 18 in H
    Weight - 17 lbs
    MSRP - $439
    URL - http://www.bobgear.com
    Notes - As you can see, the Ibex Plus adds a whole lot more hauling capabilities to your bike. The trailer easily attaches to the bicycle's rear wheel using a quick-release system. B.O.B. offers multiple trailer options, but the Ibex stands out because it is equipped with a coilover shock that allows for 3 inches of adjustable suspension, greatly improving on- and off-road handling. We spoke to some bicyclists who have taken the Ibex over dirt roads and moderately rough terrain without trouble. It is constructed of 4130 chromoly steel tubing which makes it sturdy and is designed with a low center of gravity that keeps the weight off the bicycle frame for improved handling. The 70-pound hauling capacity will undoubtedly come in handy if you need to clear out of your bug out locale. The Ibex Plus model, as seen here, comes with a BOB DrySak, with PVC-coated nylon fabric that is tear-resistant and completely waterproof.

    The Ibex Plus adds a whole lot more hauling capabilities to your bike. The trailer easily attaches to the bicycle's rear wheel using a quick-release system and there are multiple trailer options.

  • CatEye HL-EL135 Front / Omni 3 Rear Bike Light Set

    Make & Model - CatEye HL-EL135 Front / Omni 3 Rear Bike Light Set
    Headlight Brightness - 150 lumens
    Headlight Modes - High, flashing
    Headlight Runtime - High
    Tail Light Modes - Constant, flashing, rapid
    Tail Light Runtime - Constant
    Battery Type - Headlight 2 x AA, Taillight 2 x AAA
    MSRP - $30
    URL - http://www.cateye.com
    Notes - We're going to bet that not all riding in a disaster-stricken situation will be of the stealthy assortment, so a set of lights on your bike will come in handy. Riding in the dark is a risky proposition, especially if other vehicles might be on the road. This CatEye light set runs on common batteries and is plenty bright enough to see where you are going — and allows you to be seen so you aren't flattened like a pancake on the highway.

    Riding in the dark is a risky proposition, especially if other vehicles might be on the road. This CatEye light set runs on common batteries and is plenty bright enough to see where you are going, and allows you to be seen.

  • Ortlieb Back-Roller Classic

    Make & Model - Ortlieb Back-Roller Classic
    Colorway - Black (shown), red, gray, orange, blue, white
    Capacity - 40 L
    Cargo Area (approx.) - 16.5 in H x 12.6 in W x 6.7 in D
    Weight - 4 lbs, 3 oz
    MSRP - $180
    URL - http://www.ortliebusa.com
    Notes - Ortlieb's pair of rear panniers are made of PVC-coated polyester fabric and close with a fold-over configuration, making them completely dustproof and protected from water splash coming from all directions. These panniers are incredibly rugged, to say the least. We like how they feature a quick-release handle at the top that allows them to be easily removed from the bike's rack. They include a shoulder strap that turn these panniers into shoulder carry bags when you need to load or unload them away from the bike. Inner pockets and large reflectors round out this great pannier option.

    Ortlieb's pair of rear panniers are made of PVC-coated polyester fabric and close with a fold-over configuration, making them completely dustproof and protected from water splash coming from all directions.

  • Ortlieb Front-Roller Classic

    Make & Model - Ortlieb Front-Roller Classic
    Colorway - Yellow (shown), black, red, gray, orange, blue, white
    Capacity - 25 L
    Cargo Area (approx.) - 11.8 in H x 9.8 in W x 5.5 in D
    Weight - 3lb, 8 oz
    MSRP - $160
    URL - http://www.ortliebusa.com
    Notes - Almost identical to Ortlieb's rear panniers, also featured here, the fronts are just smaller and capable of carrying 25 liters of gear. Adding gear on the front of your bike allows you to carry more supplies, but be careful to keep the loads on either side relatively equal in weight to maintain balanced handing characteristics.

    Almost identical to Ortlieb's rear panniers, the fronts are just smaller and capable of carrying 25 liters of gear. Adding gear on the front of your bike allows you to carry more supplies, but be careful to keep the loads on either balanced.

  • Planet Bike PB Cage

    Make & Model - Planet Bike PB Cage
    Colorway - Silver (shown), various
    Weight - 2.3 oz
    MSRP - $5
    URL - http://www.planetbike.com
    Notes - This aluminum bottle cage is available in 10 different colors and holds any standard sport bottle in place during your long trip to safety.

    This aluminum bottle cage is available in 10 different colors and holds any standard sport bottle in place during your long trip to safety.

  • Racktime Top-It

    Make & Model - Racktime Top-It
    Maximum Load - 22 lbs
    Weight - 1 lb, 3.2 oz
    MSRP - $55
    URL - http://www.ortliebusa.com
    Notes - A front rack is a must if you want to increase the load capabilities of your bike. On it, you can install front panniers as we did here. It also provides you extra space to mount yet another a bag — or, as in our case, we left it open to add whatever item we scavenge when on the road. This rack, like the others, does require threaded holes in your frame for proper installation, so do consult the manufacturer's website for installation information.

    Check out the Racktime Top-It: a front rack is a must if you want to increase the load capabilities of your bike.

  • Safariland Bike Gear Bag

    Make & Model - Safariland Bike Gear Bag
    Capacity - 6.9 L
    Cargo Area (approx.) - 10 in L x 6 in W x 7 in D
    Weight - 1 lb, 10 oz
    MSRP - $65
    URL - http://www.safarilandpatrolbikes.com
    Notes - This bag was designed with input from both bicycle-mounted police officers and bike enthusiasts. It has a deceivingly spacious interior that encompasses a durable pocket for small items and a collapsible "false floor" for items you'd like to keep out of immediate sight. It is constructed from sturdy, water-resistant nylon materials, which are specifically blended to resist environmental changes. The top cover is equipped with exterior bungee drawstrings to quickly secure loose items. The top and sides each have zippered pockets for extra storage options.

    The Safariland Bike Gear Bag has a deceivingly spacious interior that encompasses a durable pocket for small items and a collapsible "false floor" for items you'd like to keep out of immediate sight.

  • Timbuk2 Goody Bento Box Top Tube Pack

    Make & Model - Timbuk2 Goody Bento Box Top Tube Pack
    Capacity - 1 L
    Dimensions - 6.7 in L x 3.9 in W x 2.8 in H
    Weight - 5 oz
    MSRP - $35
    URL - http://www.timbuk2.com
    Notes - This bag attaches to your bike's top tube with hook and loop straps. The top external smartphone pocket is clear and retains touchscreen functionality. If not using a phone, paper maps can be tucked in it for weather-resistant reference. The generous interior can hold up a liter worth of items that you need to have access to during your ride. Sunscreen, lip balm, bike repair gear, or a knife — you won't have to choose since it will fit them all.

    The Timbuk2 Goody Bento Box Top Tube Pack has a top external smartphone pocket that is clear and retains touchscreen functionality or can be used to view paper maps too.

  • Topeak Explorer MTX Rack

    Make & Model - Topeak Explorer MTX Rack
    Maximum Load - 55 lbs
    Weight - 1 lb, 6 oz
    MSRP - $45
    URL - http://www.topeak.com
    Notes - This rear rack is sturdy, easy to install, and a basic piece of kit for your bike if you intend on making it a mule. On it, you can mount a trunk type bag as well as panniers. To keep this piece light weight Topeak elected to make it out of 6061 T-6 hollow aluminum.

    This rear rack is sturdy, easy to install, and a basic piece of kit for your bike if you intend on making it a mule.

Must-Have Accessories

Along with safety equipment such as gloves and a helmet for your noggin, we recommend taking a look at aftermarket seats if you don't find yours comfortable to sit on for hours on end. Also, to keep your bicycle on the road, and you on the move, we highly recommend a few tools and accessories to keep packed on the bike.

Must-Have Accessories

  • Avenir Big Mouth Bike Bag – medium

    Make & Model - Avenir Big Mouth Bike Bag
    MSRP - $15
    URL - http://www.avenirusa.com

    Keep all your little tools, gadgets, and maybe even a power bar or two handy in this tiny little saddle pack from Avenir.

  • Camelbak Podium Chill 21 oz

    Make & Model - Camelbak Podium Chill 21 oz
    MSRP - $12
    URL - http://shop.camelbak.com

    The Camelback Podium Chill is the perfect water bottle for you when you're on the go and holds 21 oz for when you don't want to strap on your Camelback pack for a short ride.

  • crankbrothers Multi-17 Tool

    Make & Model - crankbrothers Multi-17 Tool
    MSRP - $27
    URL - http://www.crankbrothers.com

    Once you carry around the crankbrothers multi-17 tool you'll wonder why you didn't before, it's perfect to have with you on your bike ride for when the unexpected happens.

  • Lezyne Road Drive

    Make & Model - Lezyne Road Drive
    MSRP - $45
    URL - http://www.lezyne.com
    Notes - The Road Drive is a light weight hand pump that pumps up to 160 psi of pressure. Note that it is for use on Presta valves only. It comes with a mount that attaches to the same points as bottle cages.

    The Lezyne Road Drive is a light weight hand pump - so you can carry it around with you - that pumps up to 160 psi of pressure.

  • Novara Patch Kit

    Make & Model - Novara Patch Kit
    MSRP - $3
    URL - http://www.rei.com/novara

    Keep the Novara Patch Kit on you in case you pop a tire but still need to ride home!

  • Sigma Sport BC 5.12

    Make & Model - Sigma Sport BC 5.12
    MSRP - $25
    URL - http://www.sigmasport.com/us

    Not for everyone, but if you want to know exactly how far you've traveled, or you need help with navigation, the Sigma Sport BC 5.12 is for you.

  • Specialized Standard Tube

    Make & Model - Specialized Standard Tube
    MSRP - $13
    URL - http://www.specialized.com

    The Specialized Standard Tube is what you need to have on hand in the event that the damage to your tire cannot be repaired and you need to replace it instead.

Choosing a Bicycle

Bicycles come in all different flavors, as do their riders, intended terrain, carrying load, and distance to be ridden. Picking the right bicycle can be tricky — and writing about how to pick the right bicycle can be even trickier. This topic can quickly become a 100-page dissertation, but we only have the space inside this little box, so we'll make it brief.

We are speaking in generalities here so you have a cursory idea of what to look for in a bike, but the experts at your local bicycle shop will be able to nail down the specifics of what bike will best fit your needs. Remember that fit is of upmost importance, so getting a bike that is the correct size for you along with being fitted to the proper seat height and handle bar adjustments is critical for riding comfort and efficiency.

Road Bikes

road-bike

Good on pavement, road bikes are the sports cars of bicycles. They feature nimble handling, are built lighter, and are capable of greater speeds than other bikes when ridden on relatively smooth roads.

Hybrid Bikes

hybrid-bike

Hybrid bikes work well on everything from smooth pavement to gravel roads. They are generally built for comfort, ease of use, and sturdiness. Hybrids are heavier than typical road bikes, but feature heavier-duty wheels, wider tires, and a more comfortable upright-style seating position. Like mountain bikes, many hybrids offer front suspension options. We prefer this type of bike in urban settings to base a build around.

Mountain Bikes

mountain-bike

Good on dirt and rocky roads, as well as rough roads with uneven pavement. Mountain bikes can be looked at as the Jeeps of the bike world. Many of them feature suspensions, some on the front only, and some with shocks front and back. If you are planning to ride on both soft surfaces such as dirt as well as pavement, a front suspension-only, or “hardtail” bike, is what you'll want. The idea of having a suspension in front and back might sound appealing, but the shocks on a bike make pedaling inefficient on hard surfaces — reducing speed, making the bike heavier, and sometimes even compromising the number of gear attachment points. They are great for complete off-road riding, however, providing more rear-wheel traction.

Fat Bikes

fat-bike

Fat bikes hail from the snow banks of Alaska and the deserts of New Mexico. They are essentially mountain bikes built with wider frames so they can accommodate extremely wide rims and tires. These “fat” wheels allow fat bikes to traverse a large range of terrain effortlessly and feel very stable to ride.


Fontus Self-Filling Water Bottle

Obtaining clean drinking water is one of the fundamental challenges of survival, and it's a problem faced by millions of people in third-world countries each day. Many people don't have access to clean running water, and as a result they suffer and die from bacteria, parasites, and other waterborne pathogens.

Scientists have been working hard to develop water purification technology to solve this problem, but it remains a widespread issue. However, one recent invention appears to use an ingenious way to extract and capture water from the air we breathe. It's called the Fontus self-filling water bottle, and it was invented by Kristof Retezár, an Industrial Designer from the University of Applied Arts in Vienna.

Fontus self filling water bottle 3

An initial prototype of Fontus Ryde, designed to be mounted on a bicycle.

While contemplating potential clean water sources, Retezár realized we are literally surrounded by invisible water vapor in the form of humidity. This led him to design a device called the Fontus Ryde that mounts to a bicycle and condenses humidity from the air using energy from integrated solar panels.

This invention was launched in 2014, and went on to win Retezár a James Dyson Foundation award and generate significant media attention.

Fontus self filling water bottle 2

An illustration that shows how the Fontus system works.

More recently, the Ryde design has been revised and improved, and Retezár has also begun working on a stand-alone bottle known as the Airo. The Fontus Airo includes a larger, removable solar panel sleeve that claims to allow it to generate enough energy to condense water while stationary.

Fontus self filling water bottle

The revised Fontus Ryde design, now with a sleek black exterior and larger solar panels.

Fontus's web site claims the water bottles “literally never run dry” and can harvest “up to 0.8L of water in an hour's time under the right climatic conditions”.

Speaking of climatic conditions, the system would work best in warm, humid conditions, specifically “between 86 degrees and 104 degrees Fahrenheit and between 80 and 90% humidity”. See the map below for the regions where the device is claimed to be most effective.

Fontus self filling water bottle 4

The company plans to launch a crowdfunding campaign soon, and release the product to the public later this fall. Retezár hopes to make the Fontus available for a retail price of under $100.

The Fontus self-filling water bottle certainly seems like an interesting and valuable technology if it works as expected. However, some sources have criticized the design for being “vaporware in just about every sense of the phrase”.

It remains to be seen how the Fontus will fare in the real world—hopefully we can get our hands on one, and let you know.


Review: AquaPodKit Emergency Water Storage

If you've been following our daily posts here on OFFGRIDweb, you may recognize the name AquaPodKit. We previously mentioned this clever emergency water storage system in a short post, which you can read here. Since the product seemed like a valuable resource for preparedness, we went ahead and ordered an AquaPodKit system to thoroughly test out.

About AquaPodKit

AquaPodKit emergency water storage 05

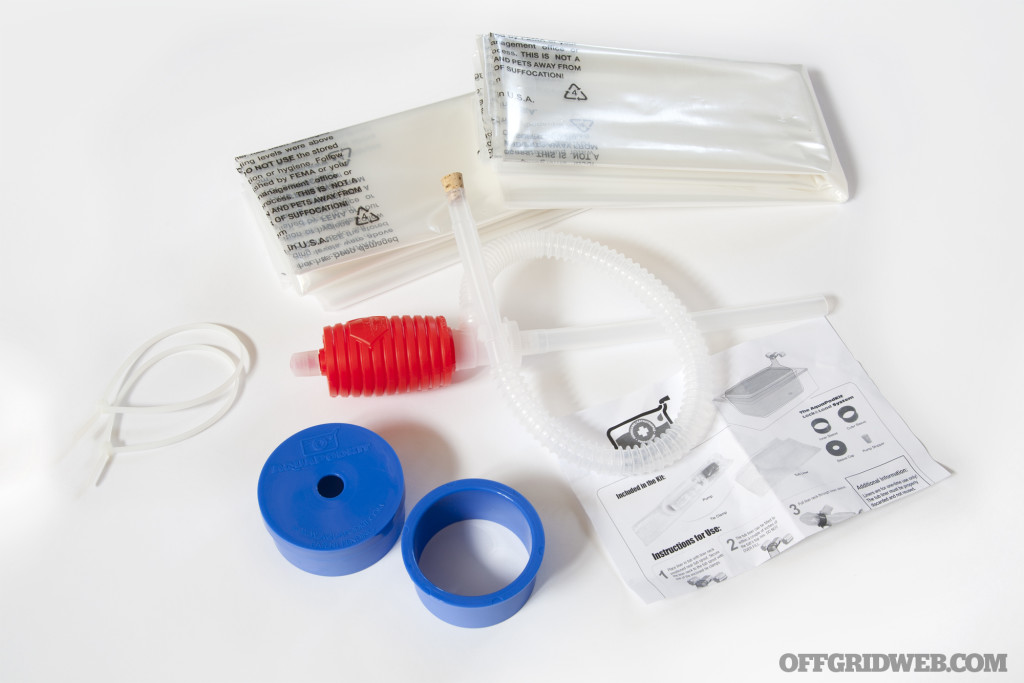
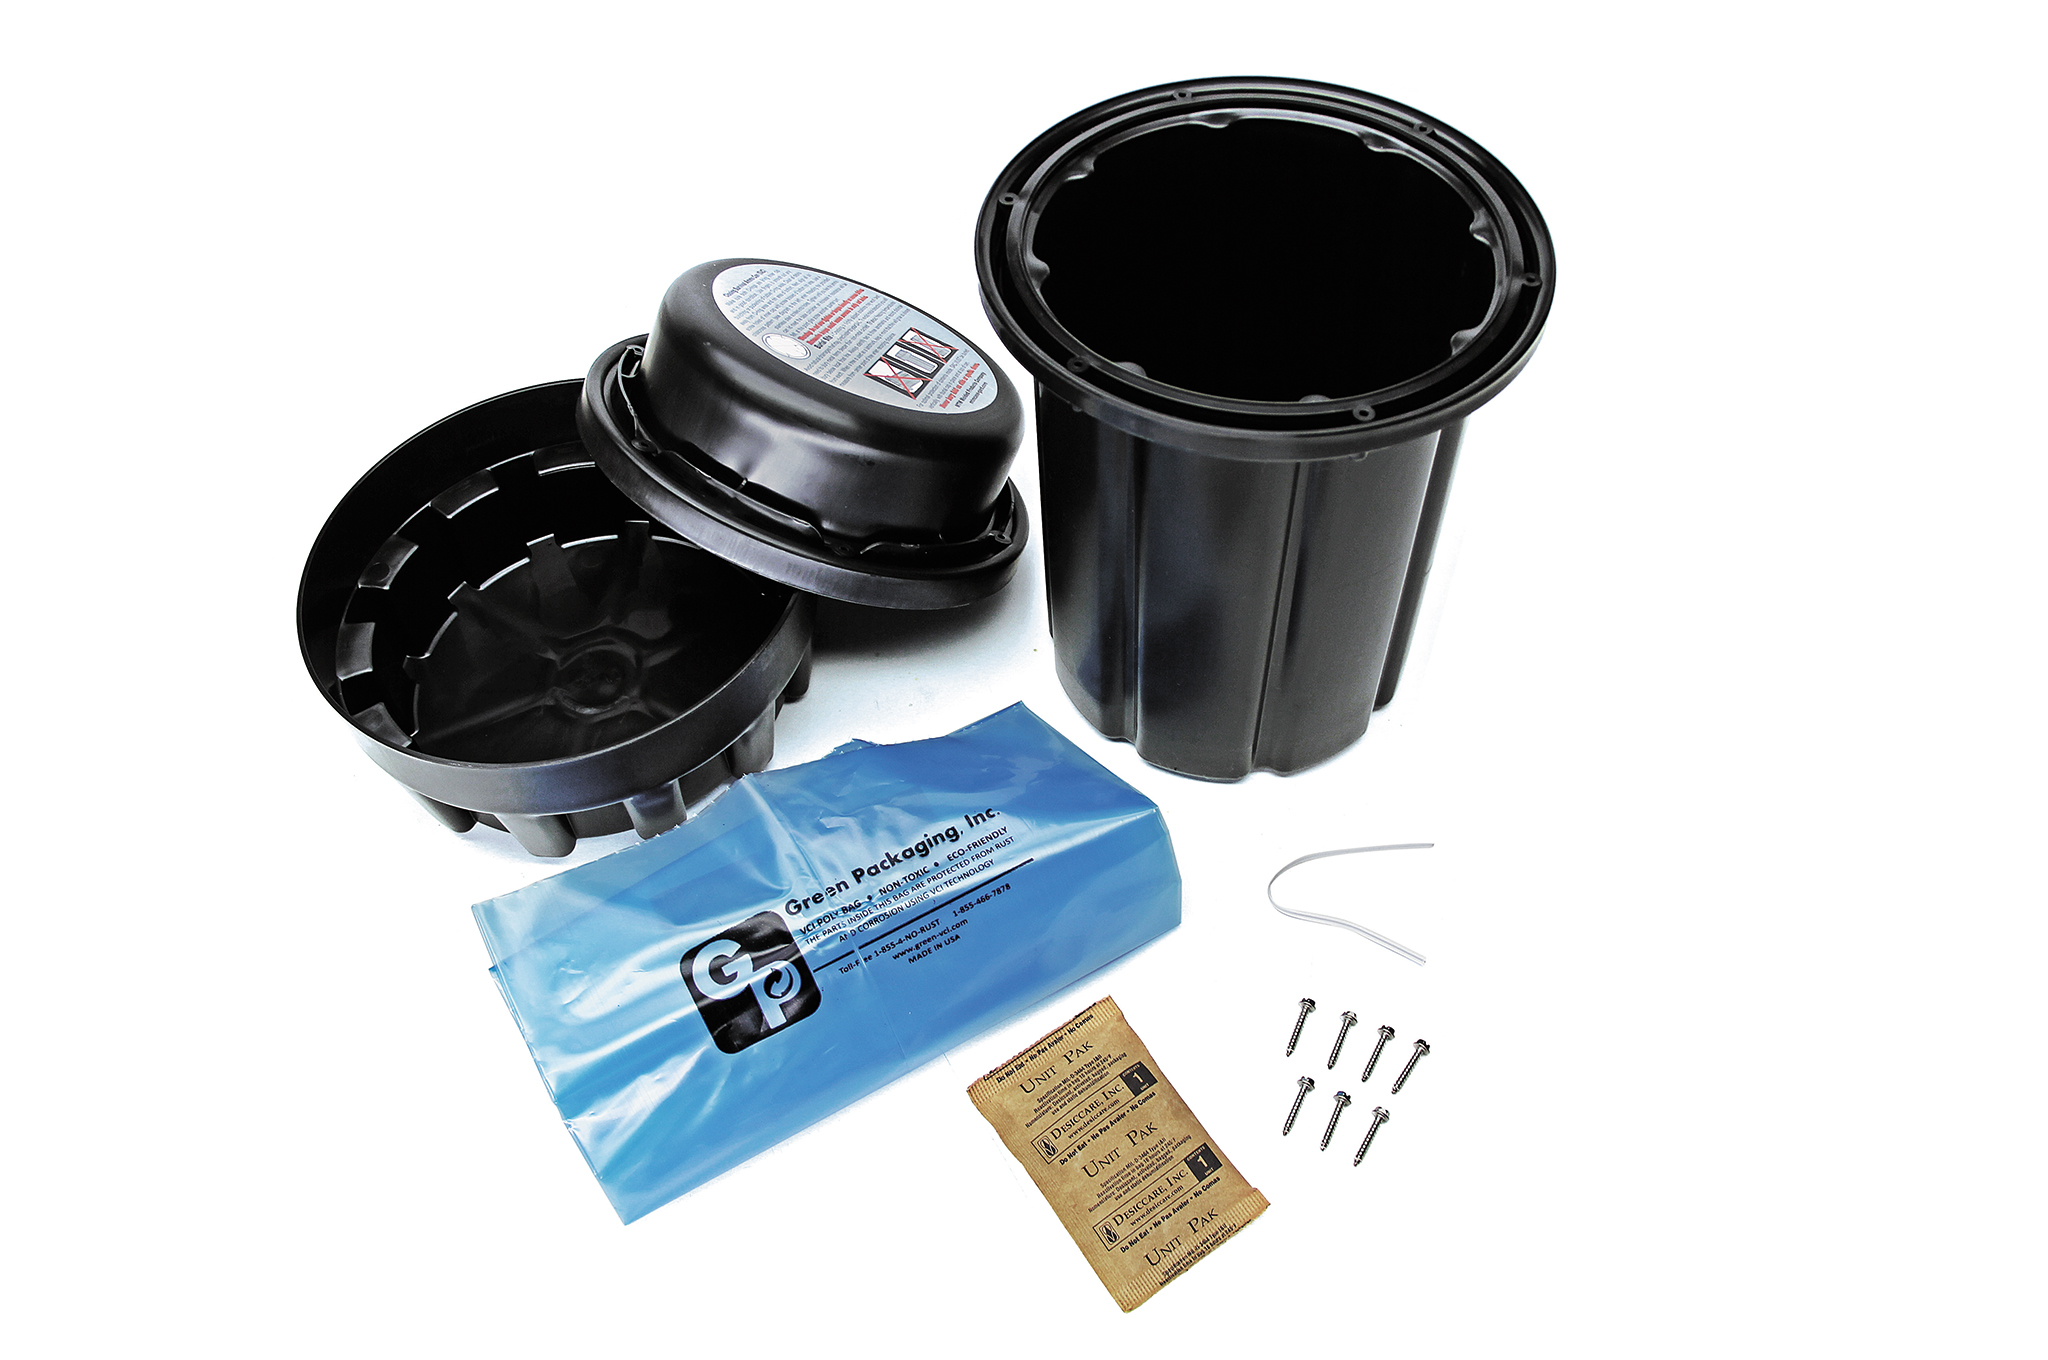
The AquaPodKit PlusOne, with 2 plastic liners, sealing sleeve, pump, zip ties, and instructions.

To recap from our previous post, the AquaPodKit is a complete liner and pump setup that includes everything you need to store clean water in your bathtub.

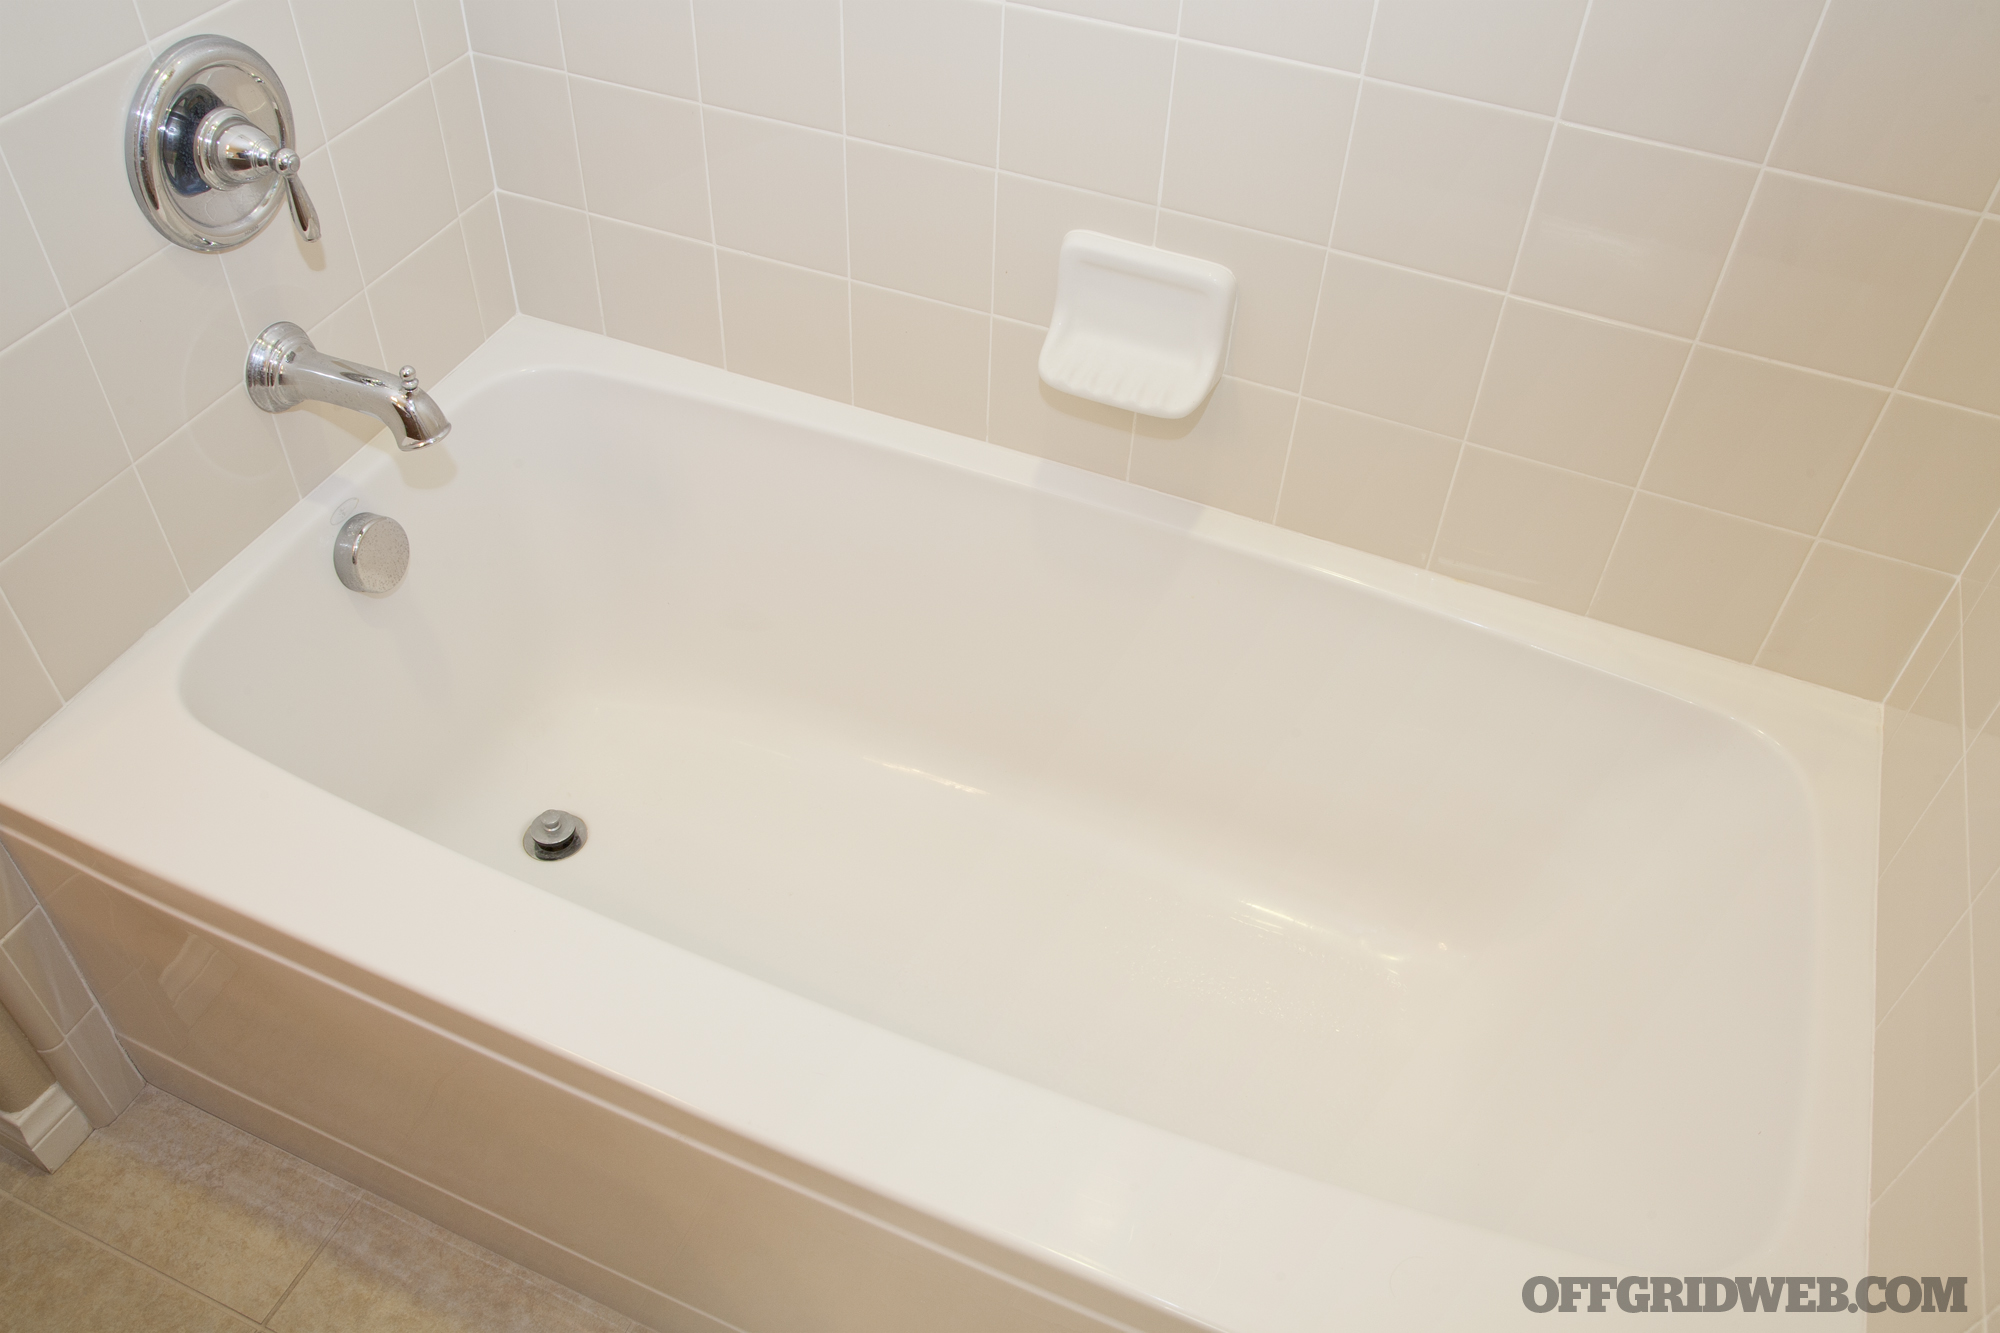
Why the bathtub? Well, it's already designed to hold large amounts of water, often 65 gallons or more. That's enough water to keep you clean and hydrated for nearly 2 months, or enough to supply a family of four for 14 days. So, it's logical to make use of this capacity in emergencies. This allows you to be prepared for a disaster that may disable or contaminate your running water supply for an extended period.

This brings us to the concept of cleanliness. Unless you obsessively scrub your bathroom on a daily basis, you probably wouldn't want to eat or drink anything that's sitting directly on the tub floor. Adding time to the mix just provides added opportunity for mold and nasty bacteria to grow in the stagnant exposed water.

AquaPodKit emergency water storage 06

Even if your bathroom looks clean, it's still host to a variety of bacteria you don't want to ingest.

The idea behind the AquaPodKit is to ensure that your drinking water stays sealed in a food-grade liner, making it safe for long-term storage. On top of this, AquaPodKit provides a convenient and easy-to-assemble pumping mechanism for dispensing water as needed.

In order to test if this system works as well in practice as it would seem to in theory, we decided to order one for ourselves.

Buying a Kit

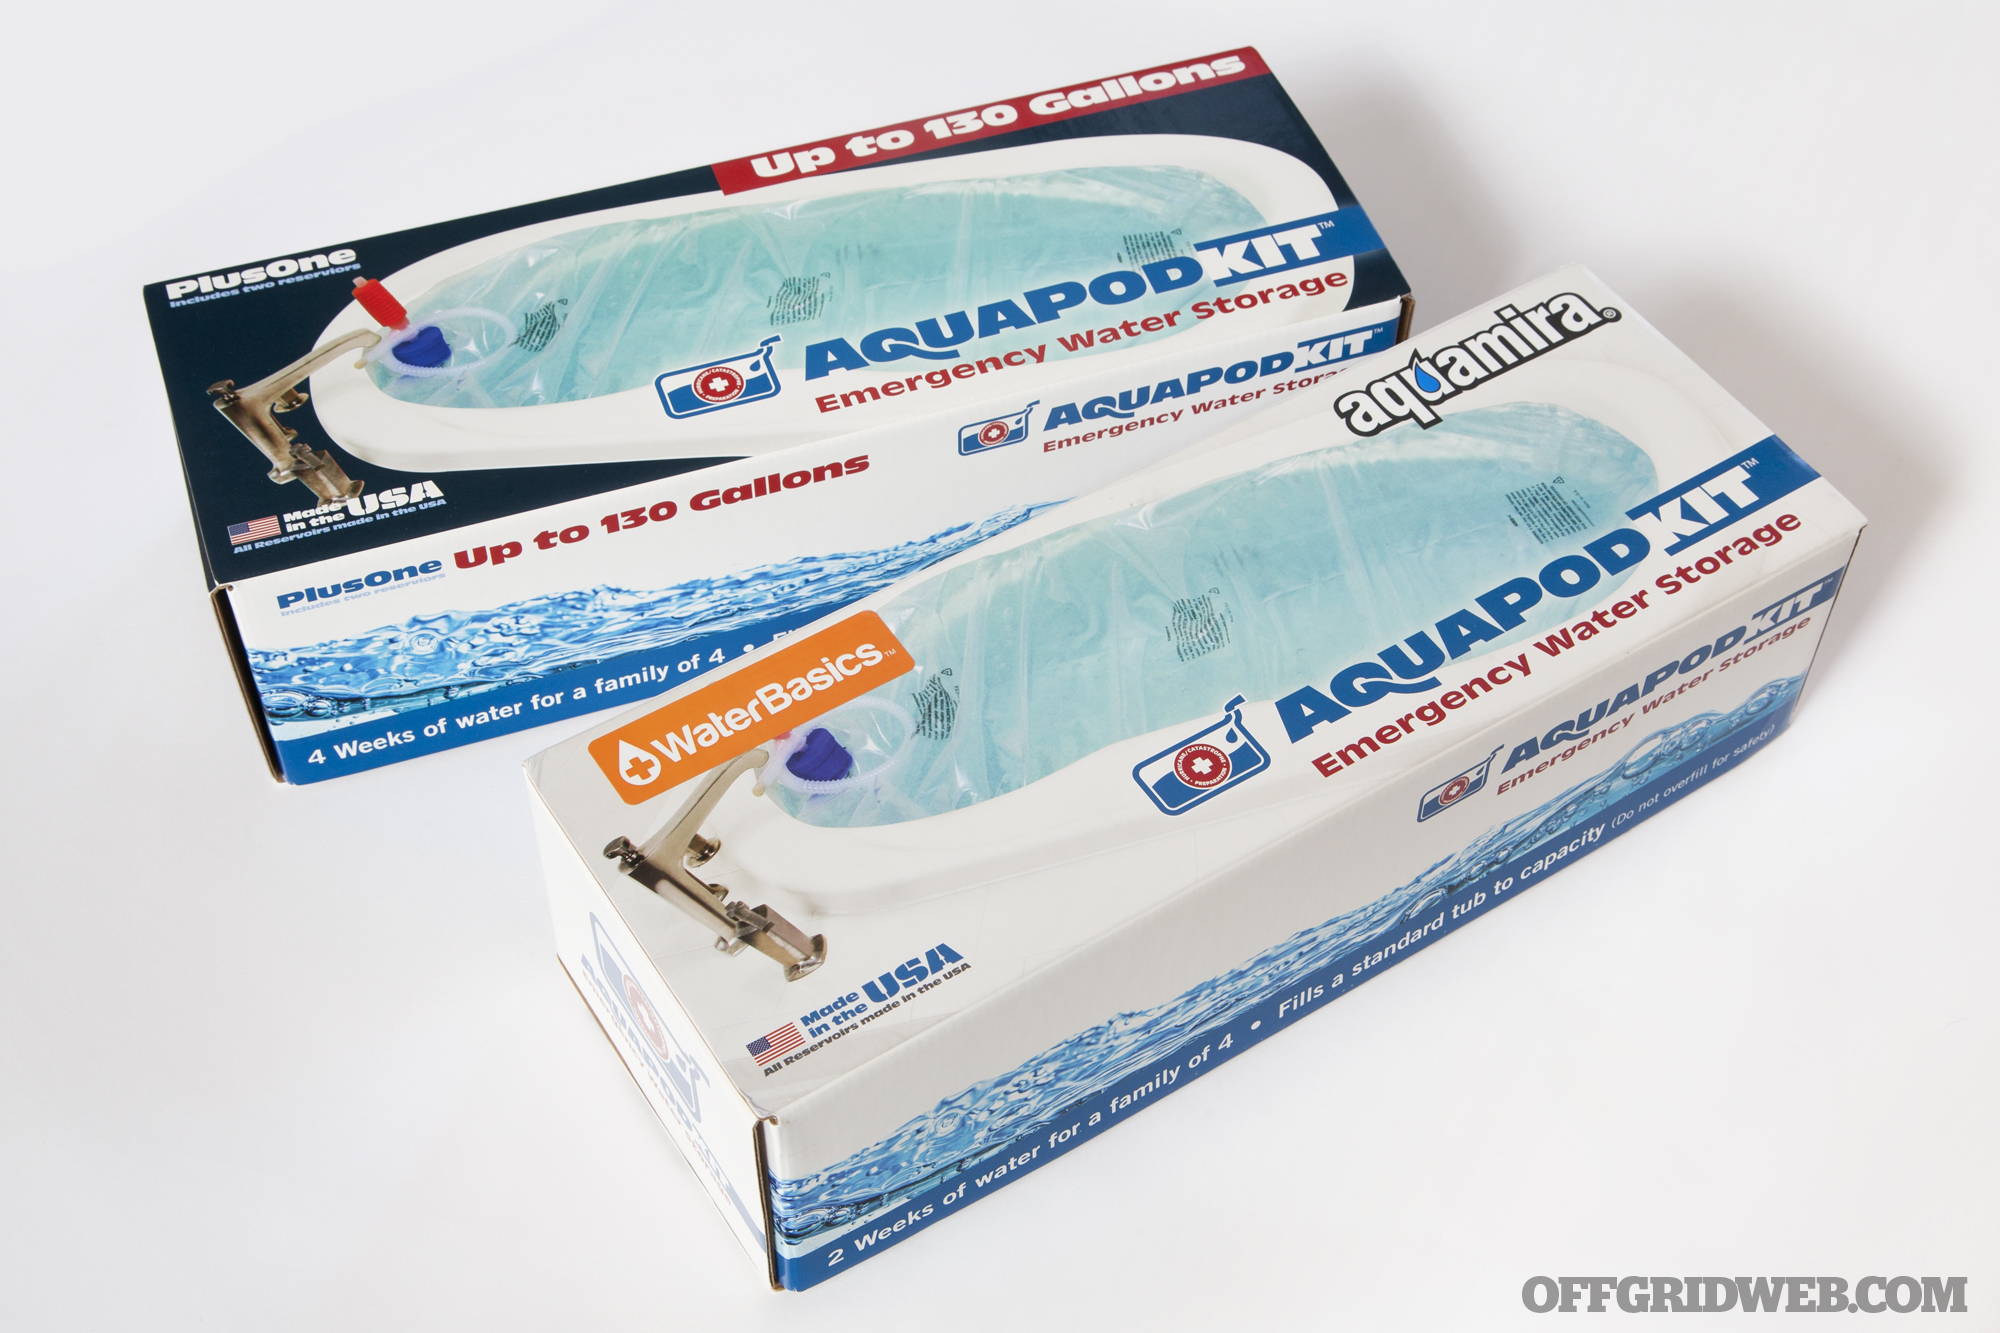
All of the AquaPodKit products are available directly from the manufacturer's web site, AquaPodKit.com. Notice we say products plural—there are actually several variations and options to consider beyond the basic kit.

AquaPodKit emergency water storage 03

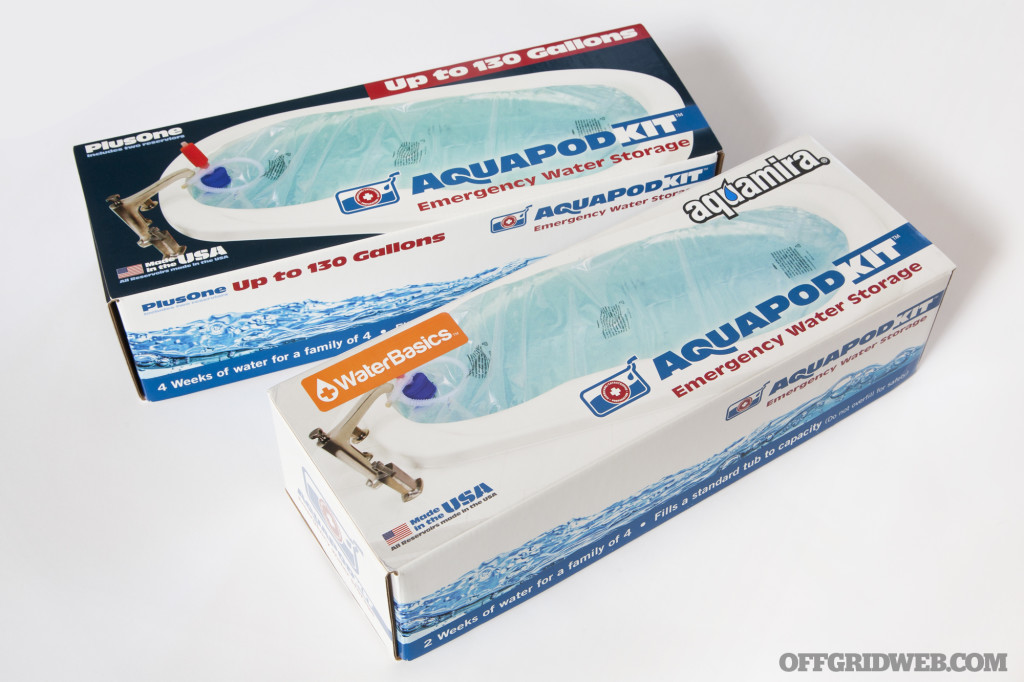
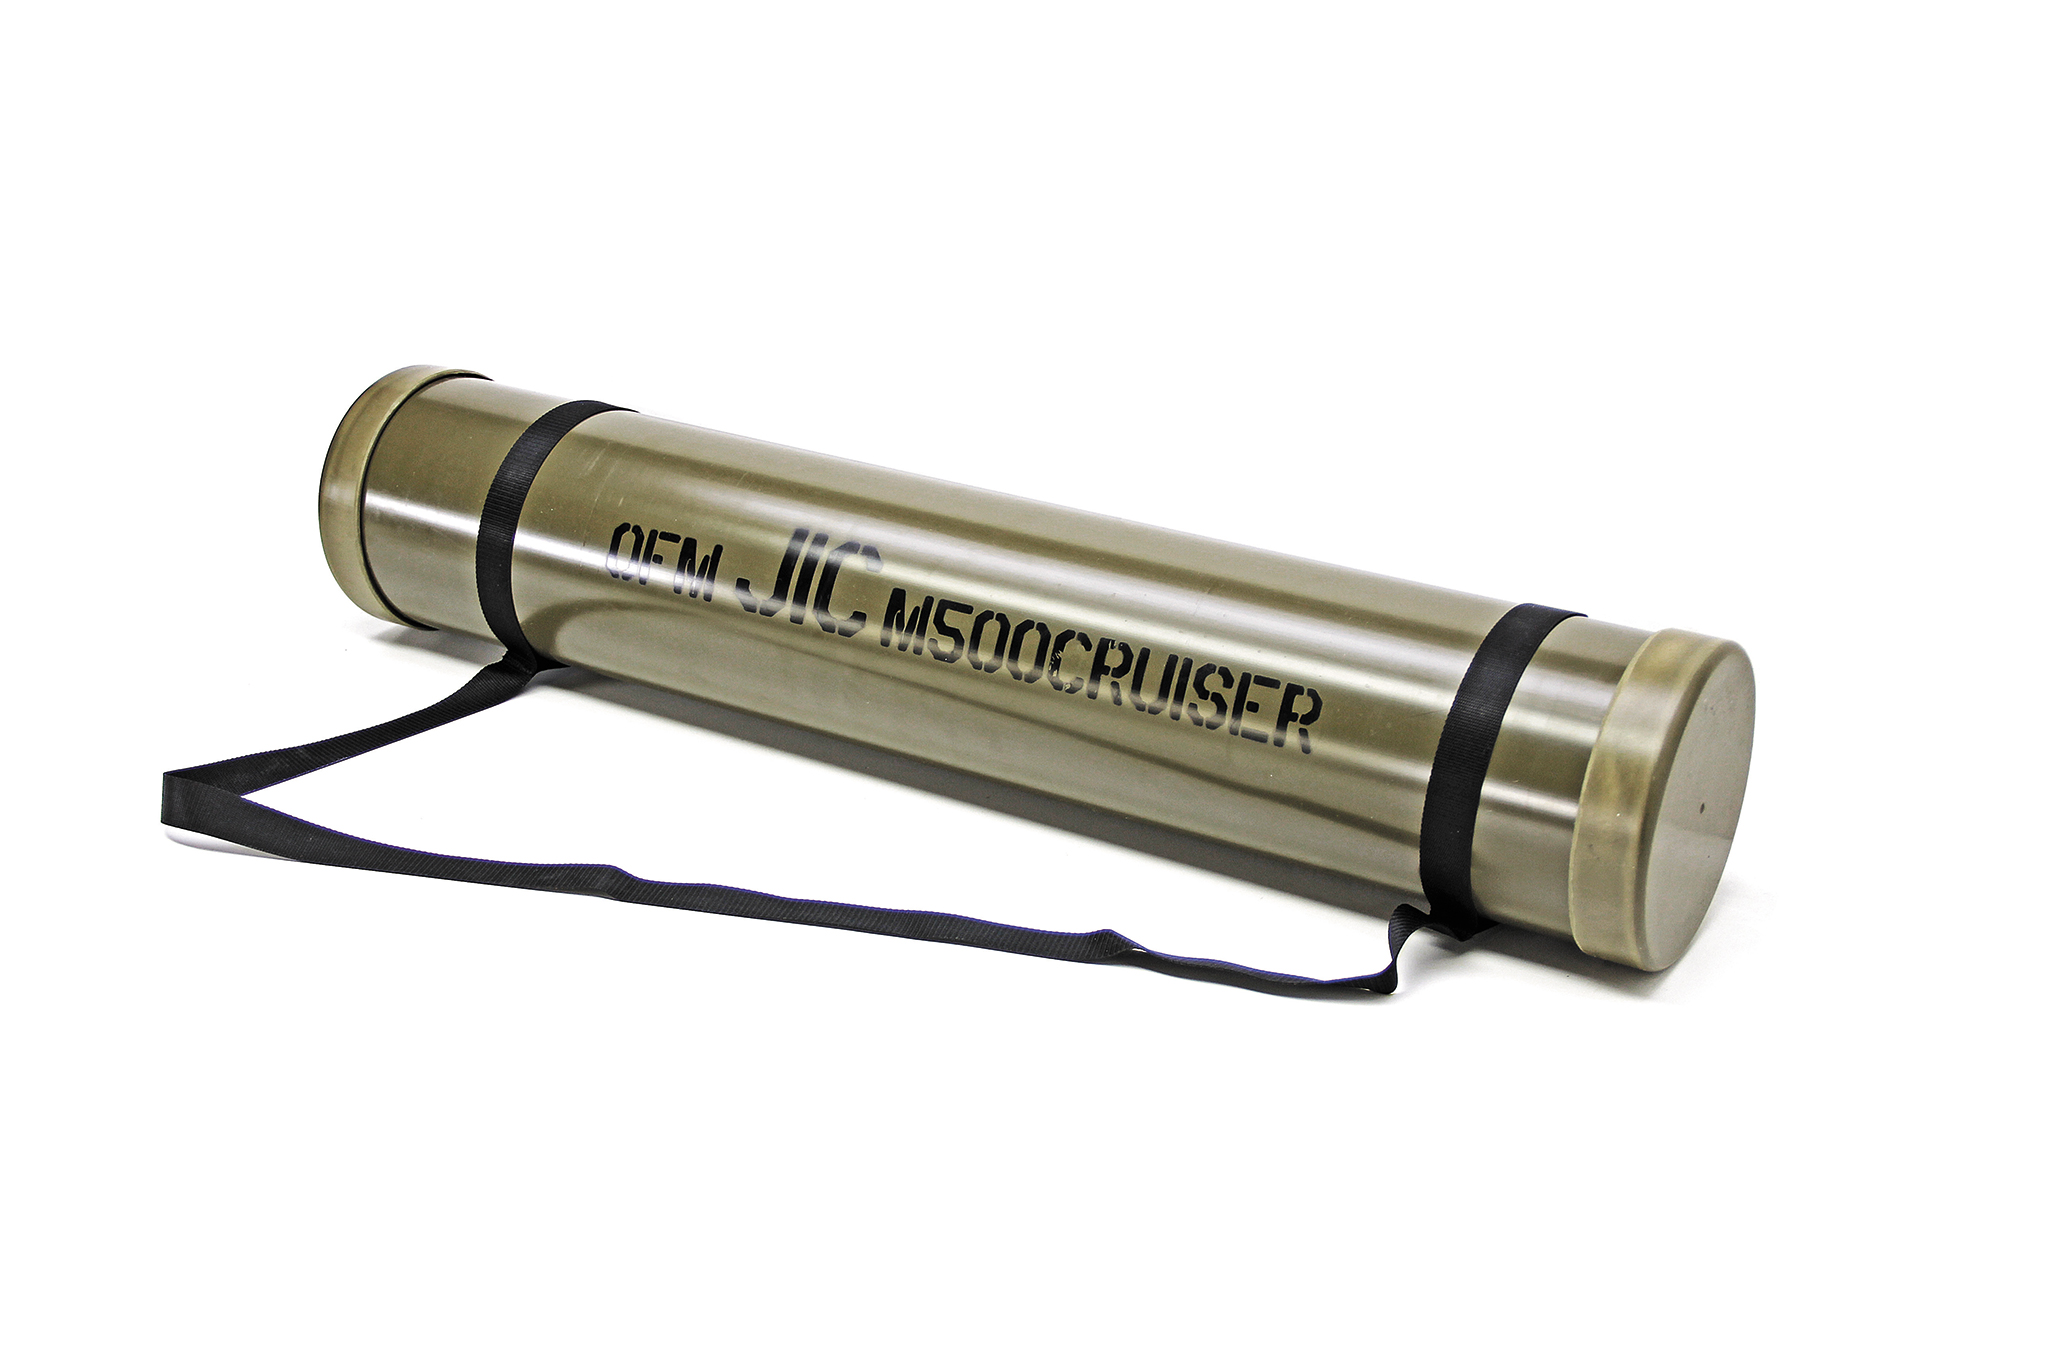
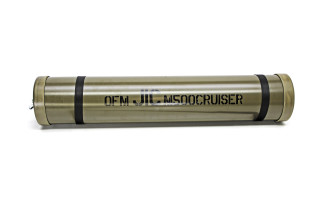
The AquaPodKit PlusOne (rear) and AquaPodKit with WaterBasics Pump and Filter (front).

The standard AquaPodKit sells for $24.99, which seems pretty reasonable to us. However, it only includes one liner, and once that has been filled and drained, it must be thrown away to prevent mold growth or other contamination. Additional liners are available for $12.99 each.

Alternatively, you can buy the PlusOne kit, which includes two liners right off the bat for $34.99. This way, you avoid the hassle of re-ordering a new liner after the first use (and you save a few bucks, too).

AquaPodKit emergency water storage 04

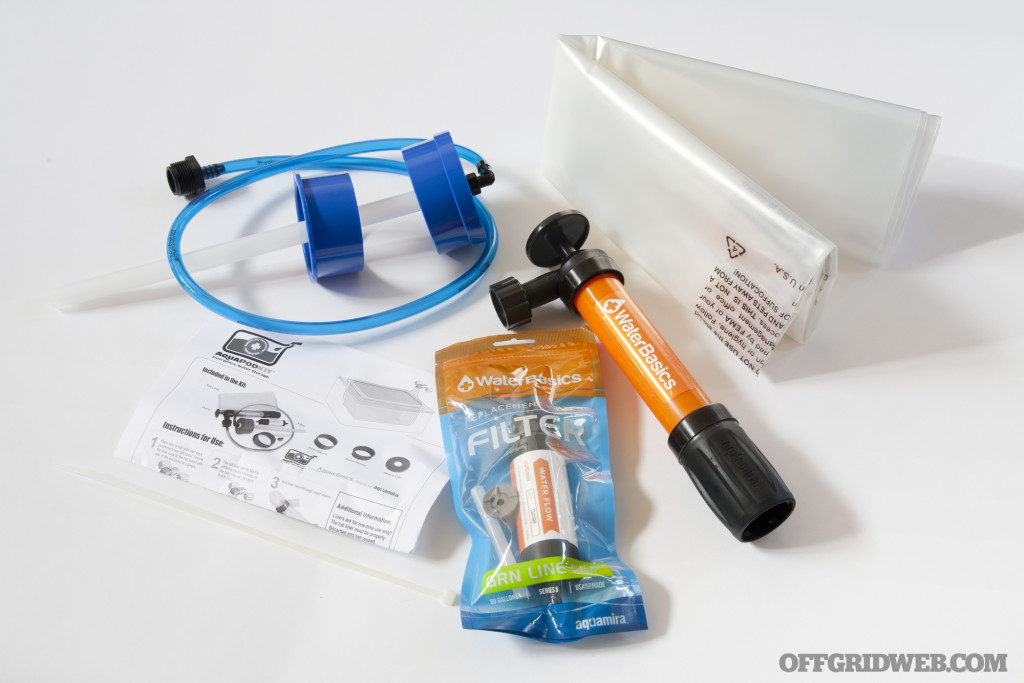
Here's everything that's included in the upgraded AquaPodKit with WaterBasics Pump and Filter.

There's one more option to consider: the AquaPodKit with WaterBasics Pump and Filter. This upgraded kit is available for $39.99, and includes a WaterBasics pump and Green Line filter from the water purification experts at Aquamira. The pump makes dispensing water easier than the standard squeeze bulb, and the filter is capable of removing over 99.9999% of bacteria from water. It even eliminates any unpleasant tastes or odors that may be present.

We went ahead and ordered the $34.99 PlusOne kit, and also the $39.99 upgraded kit with WaterBasics pump and filter. After unboxing both and flipping through the instructions, it was time to test the system out.

Setup and Filling

AquaPodKit emergency water storage 07
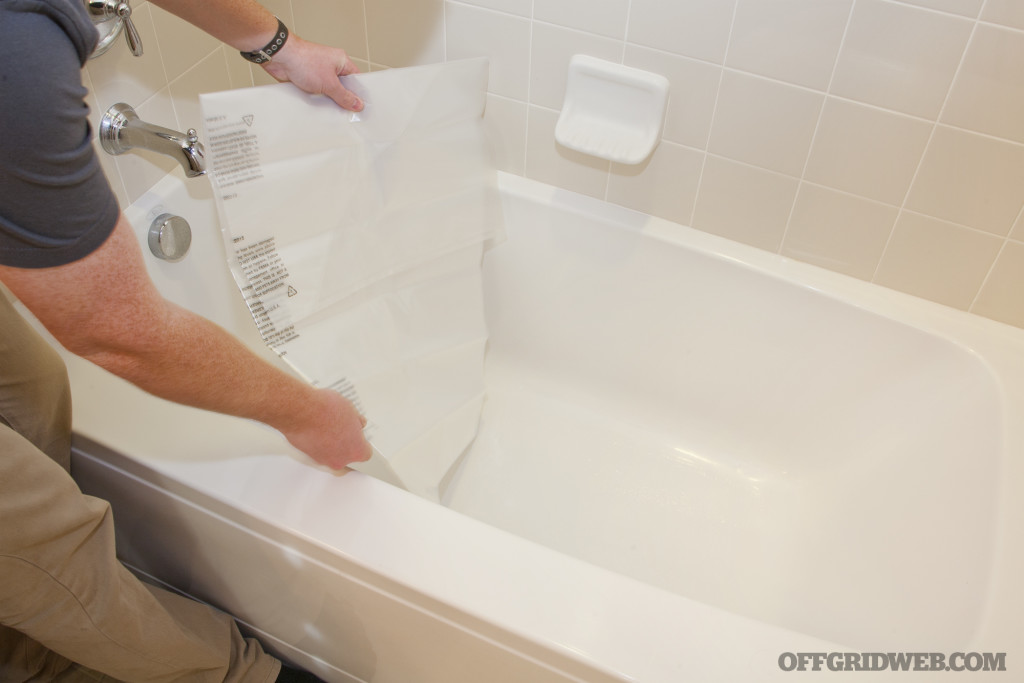
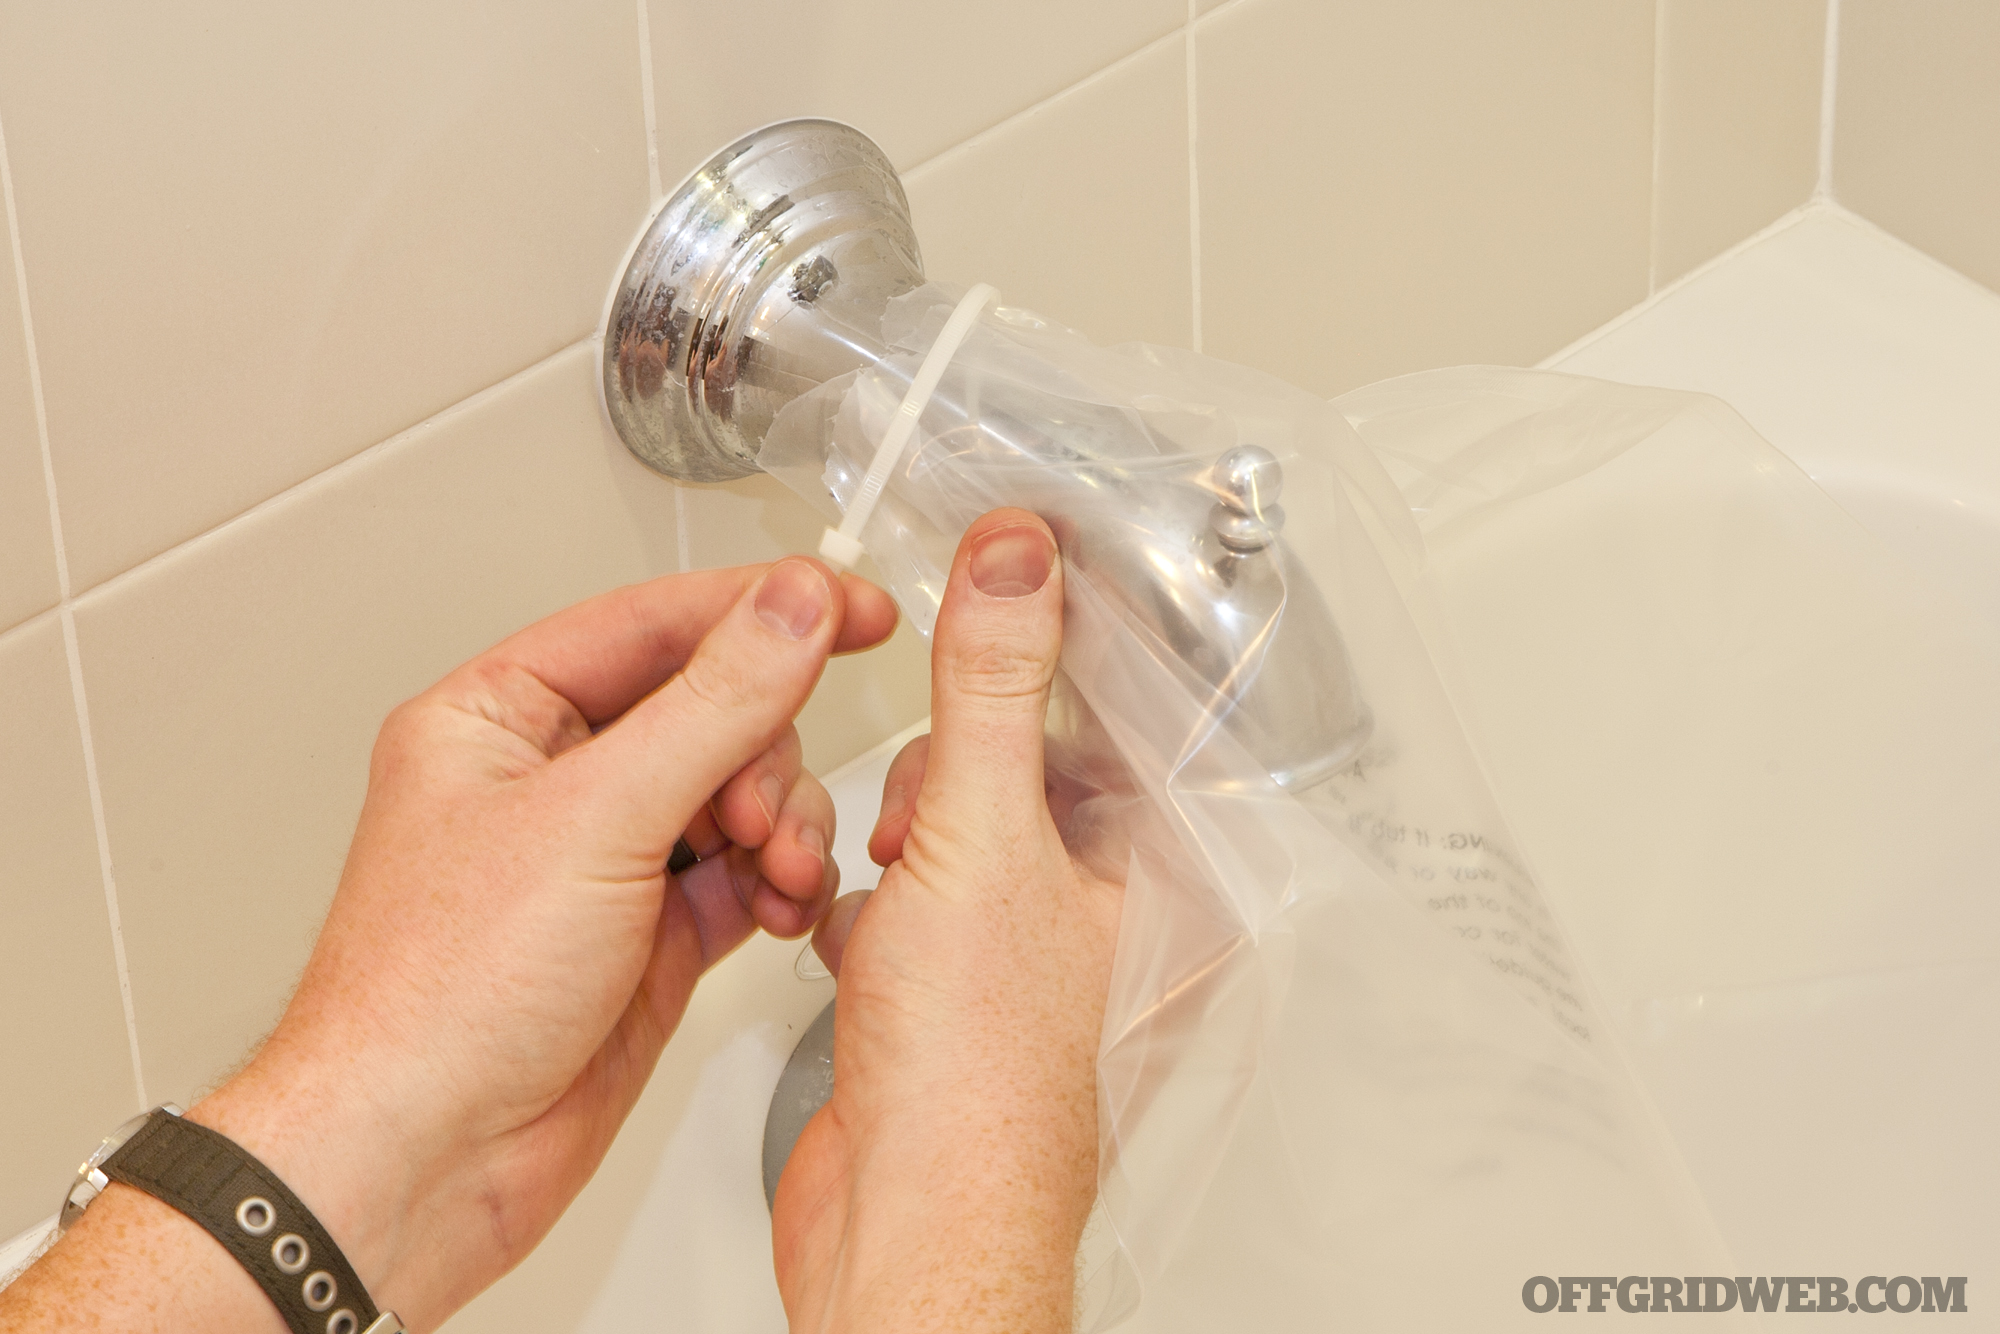
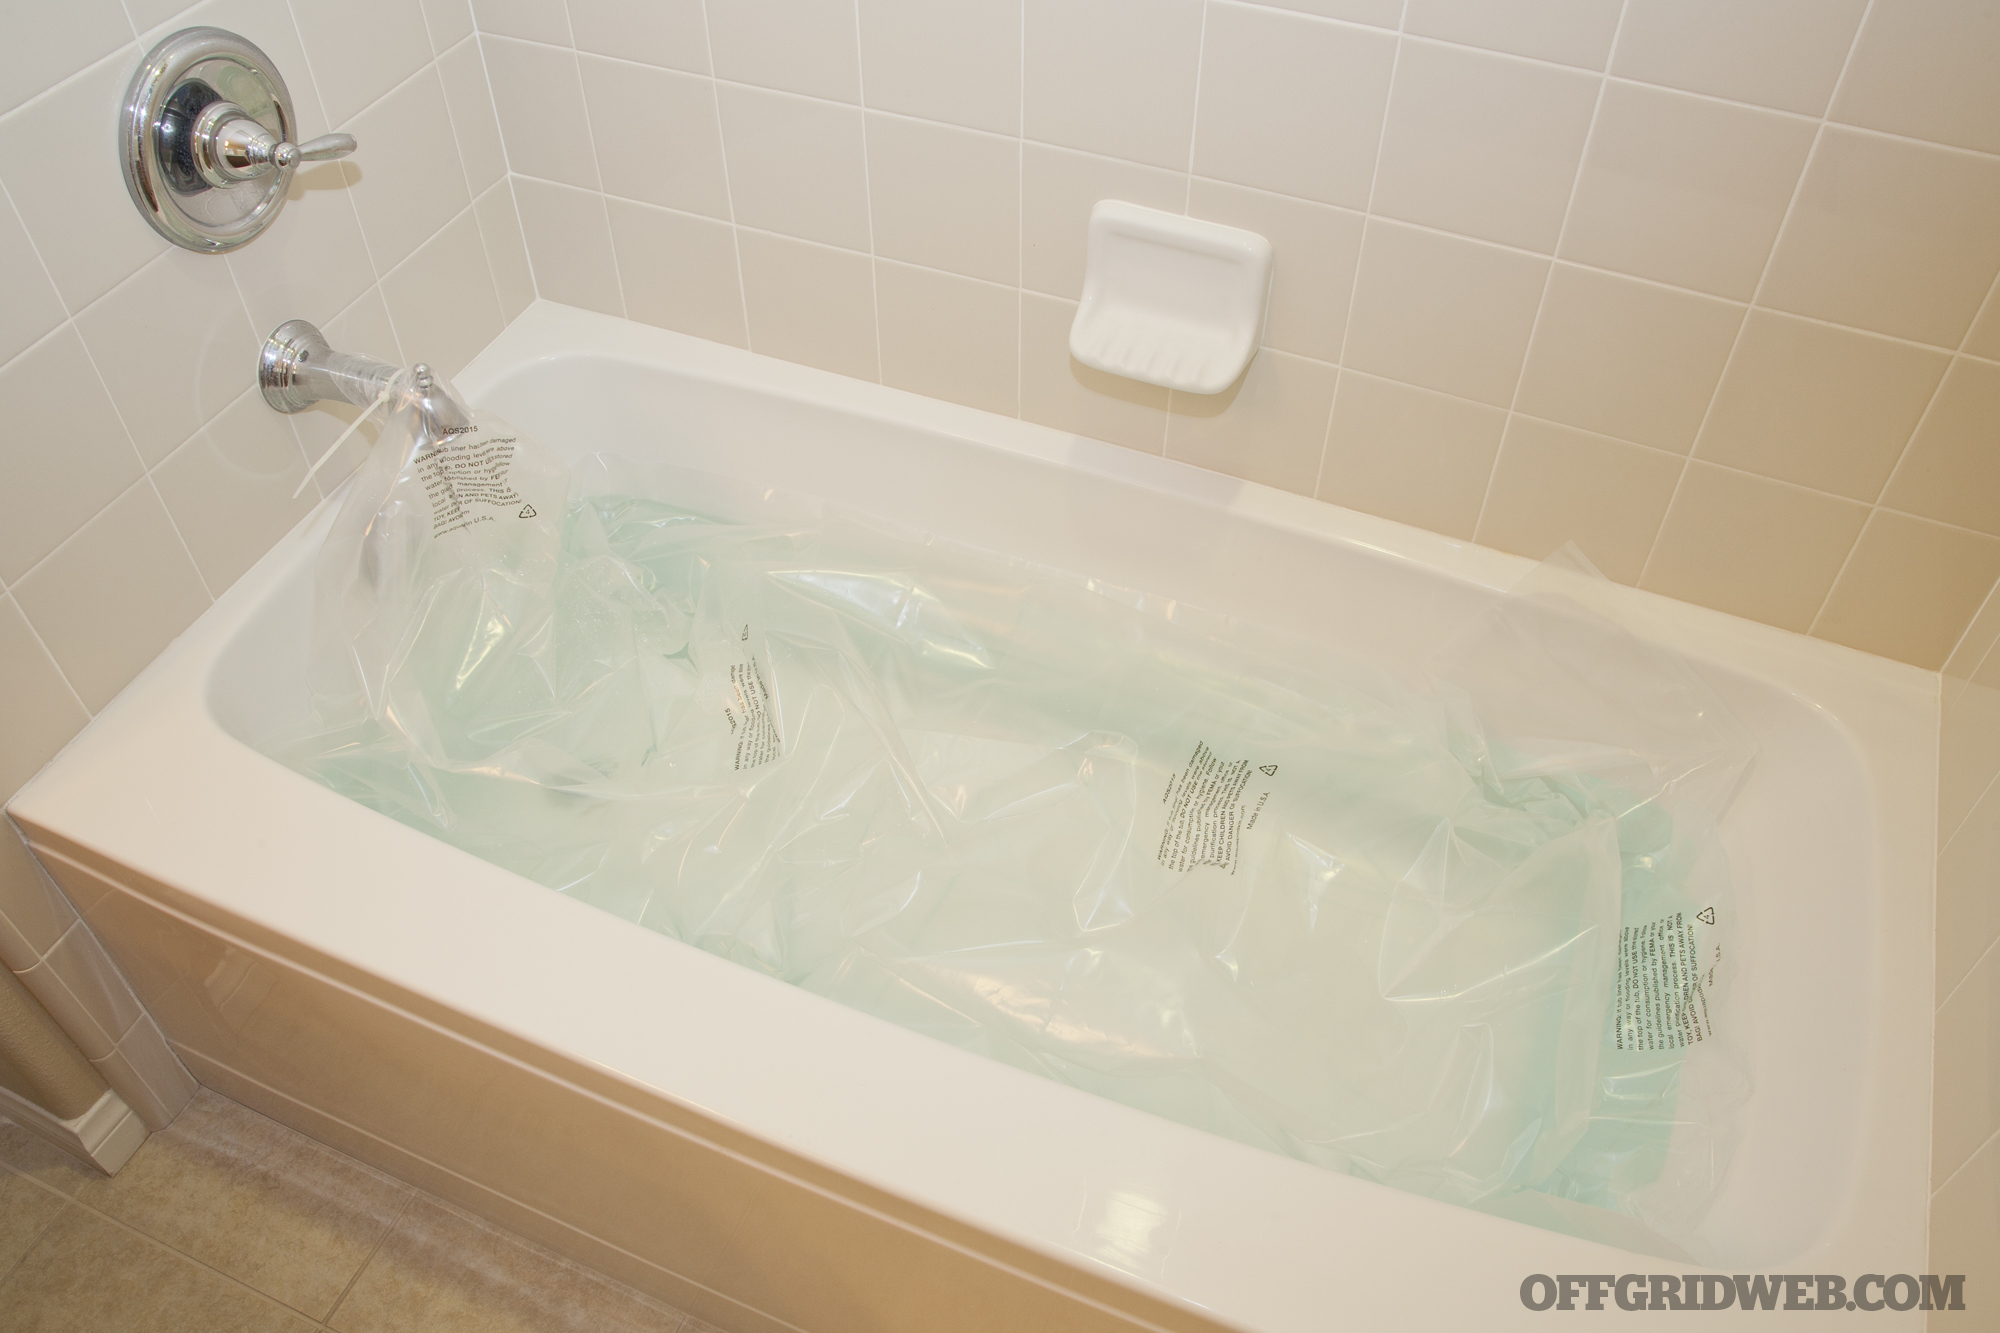
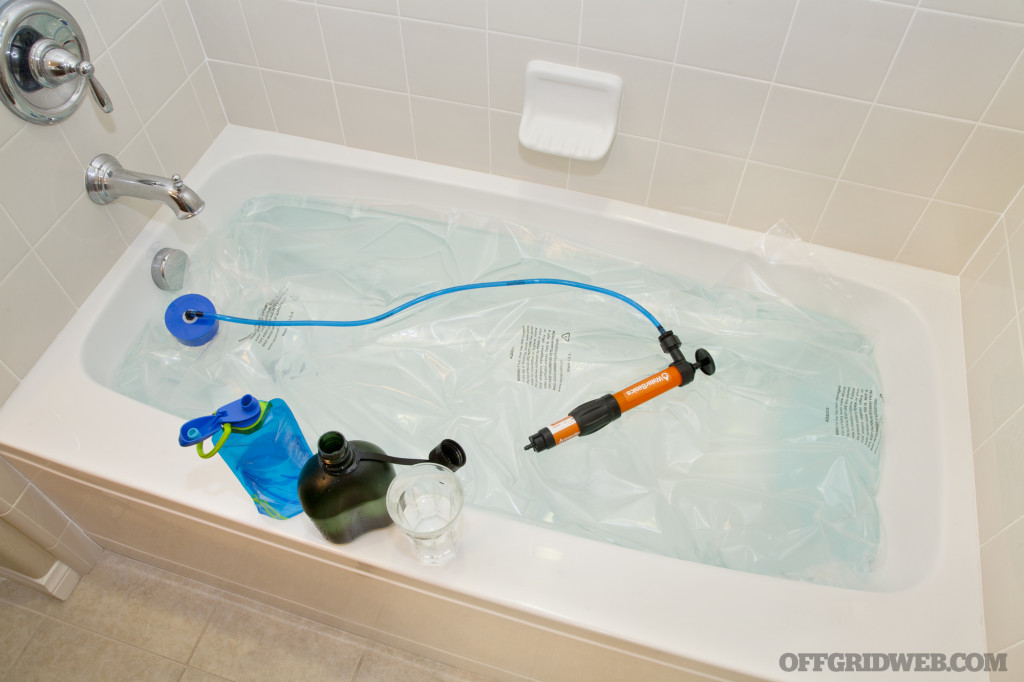
The first part is pretty obvious: lay out the heavy-duty 4-mil Linear Low Density Polyethylene (LLDPE) plastic liner in the tub. It'll need to be unfolded with the open end under the tub spout.

AquaPodKit emergency water storage 08

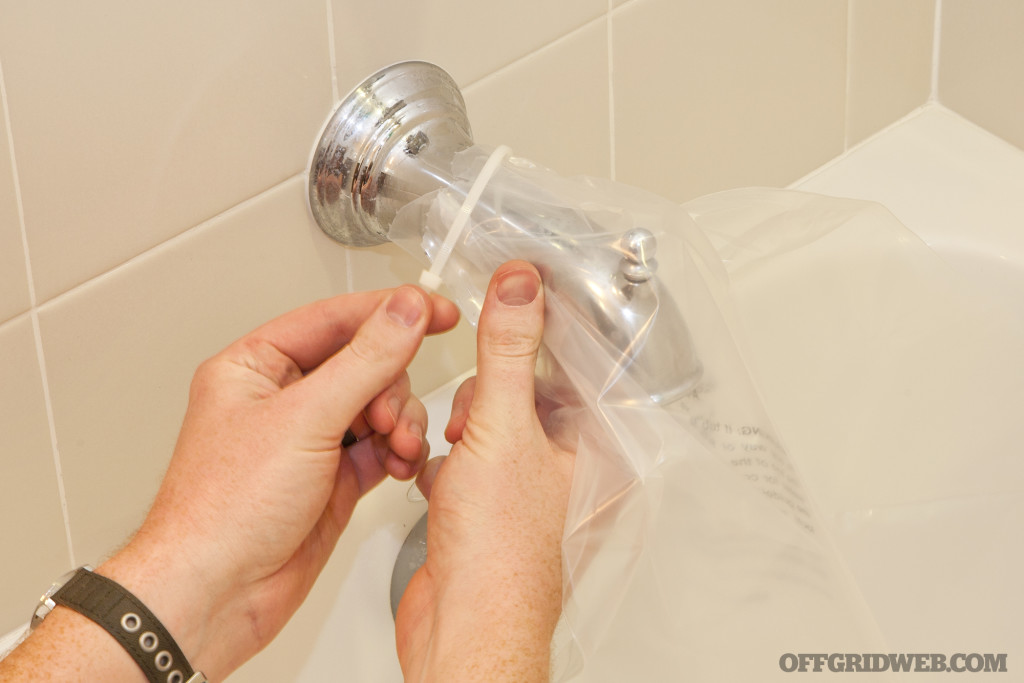
Next, pull the opening in the liner up over the spout, and secure it with the included zip tie. This makes sure the liner won't slip off while it's being filled. However, don't over-tighten this, as you'll need to cut it off later.

AquaPodKit emergency water storage 09

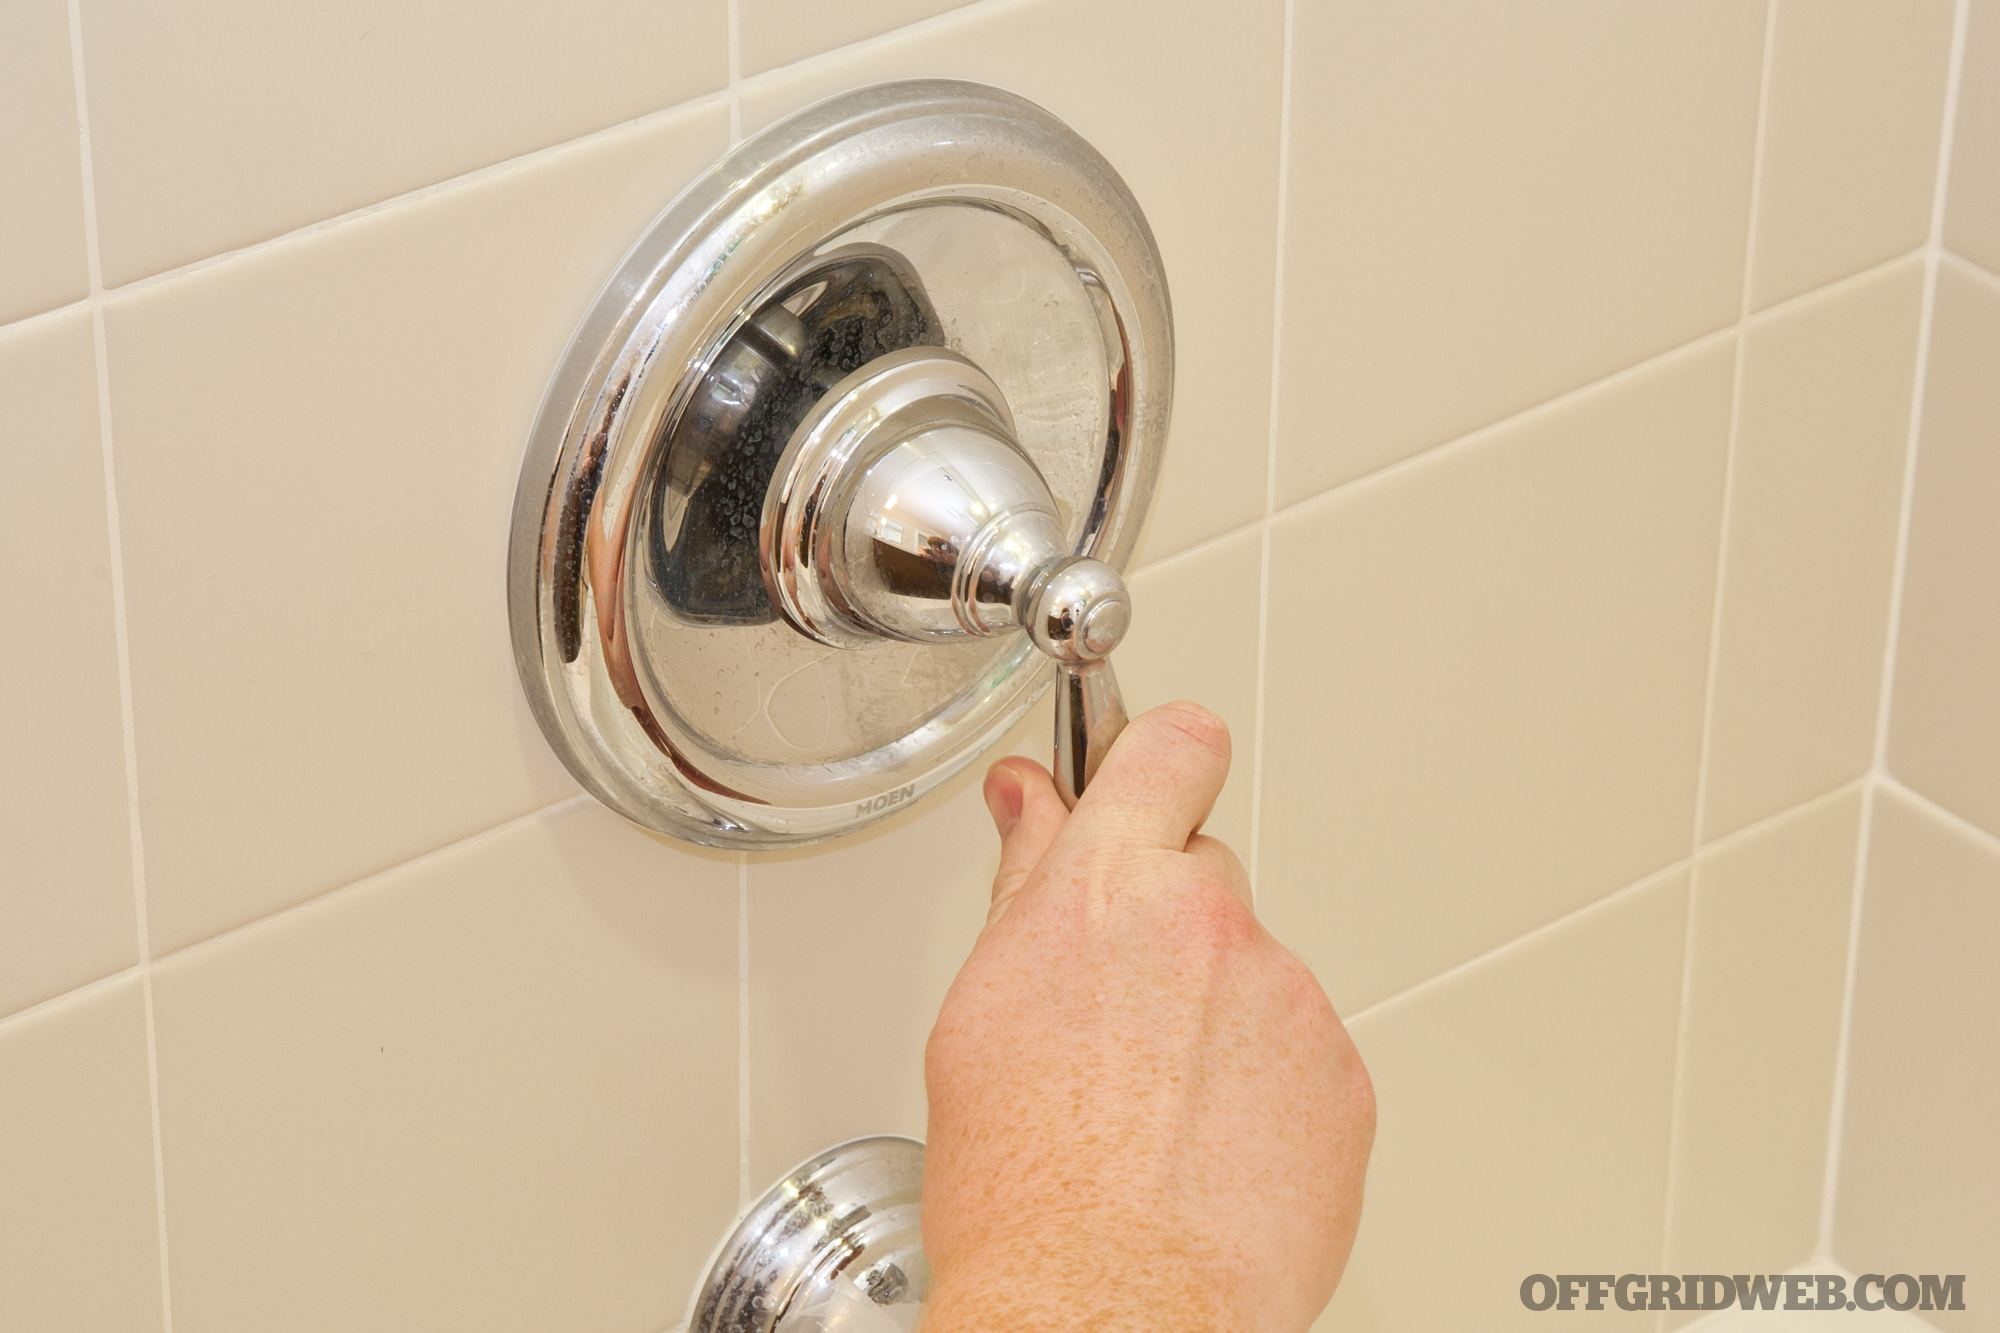
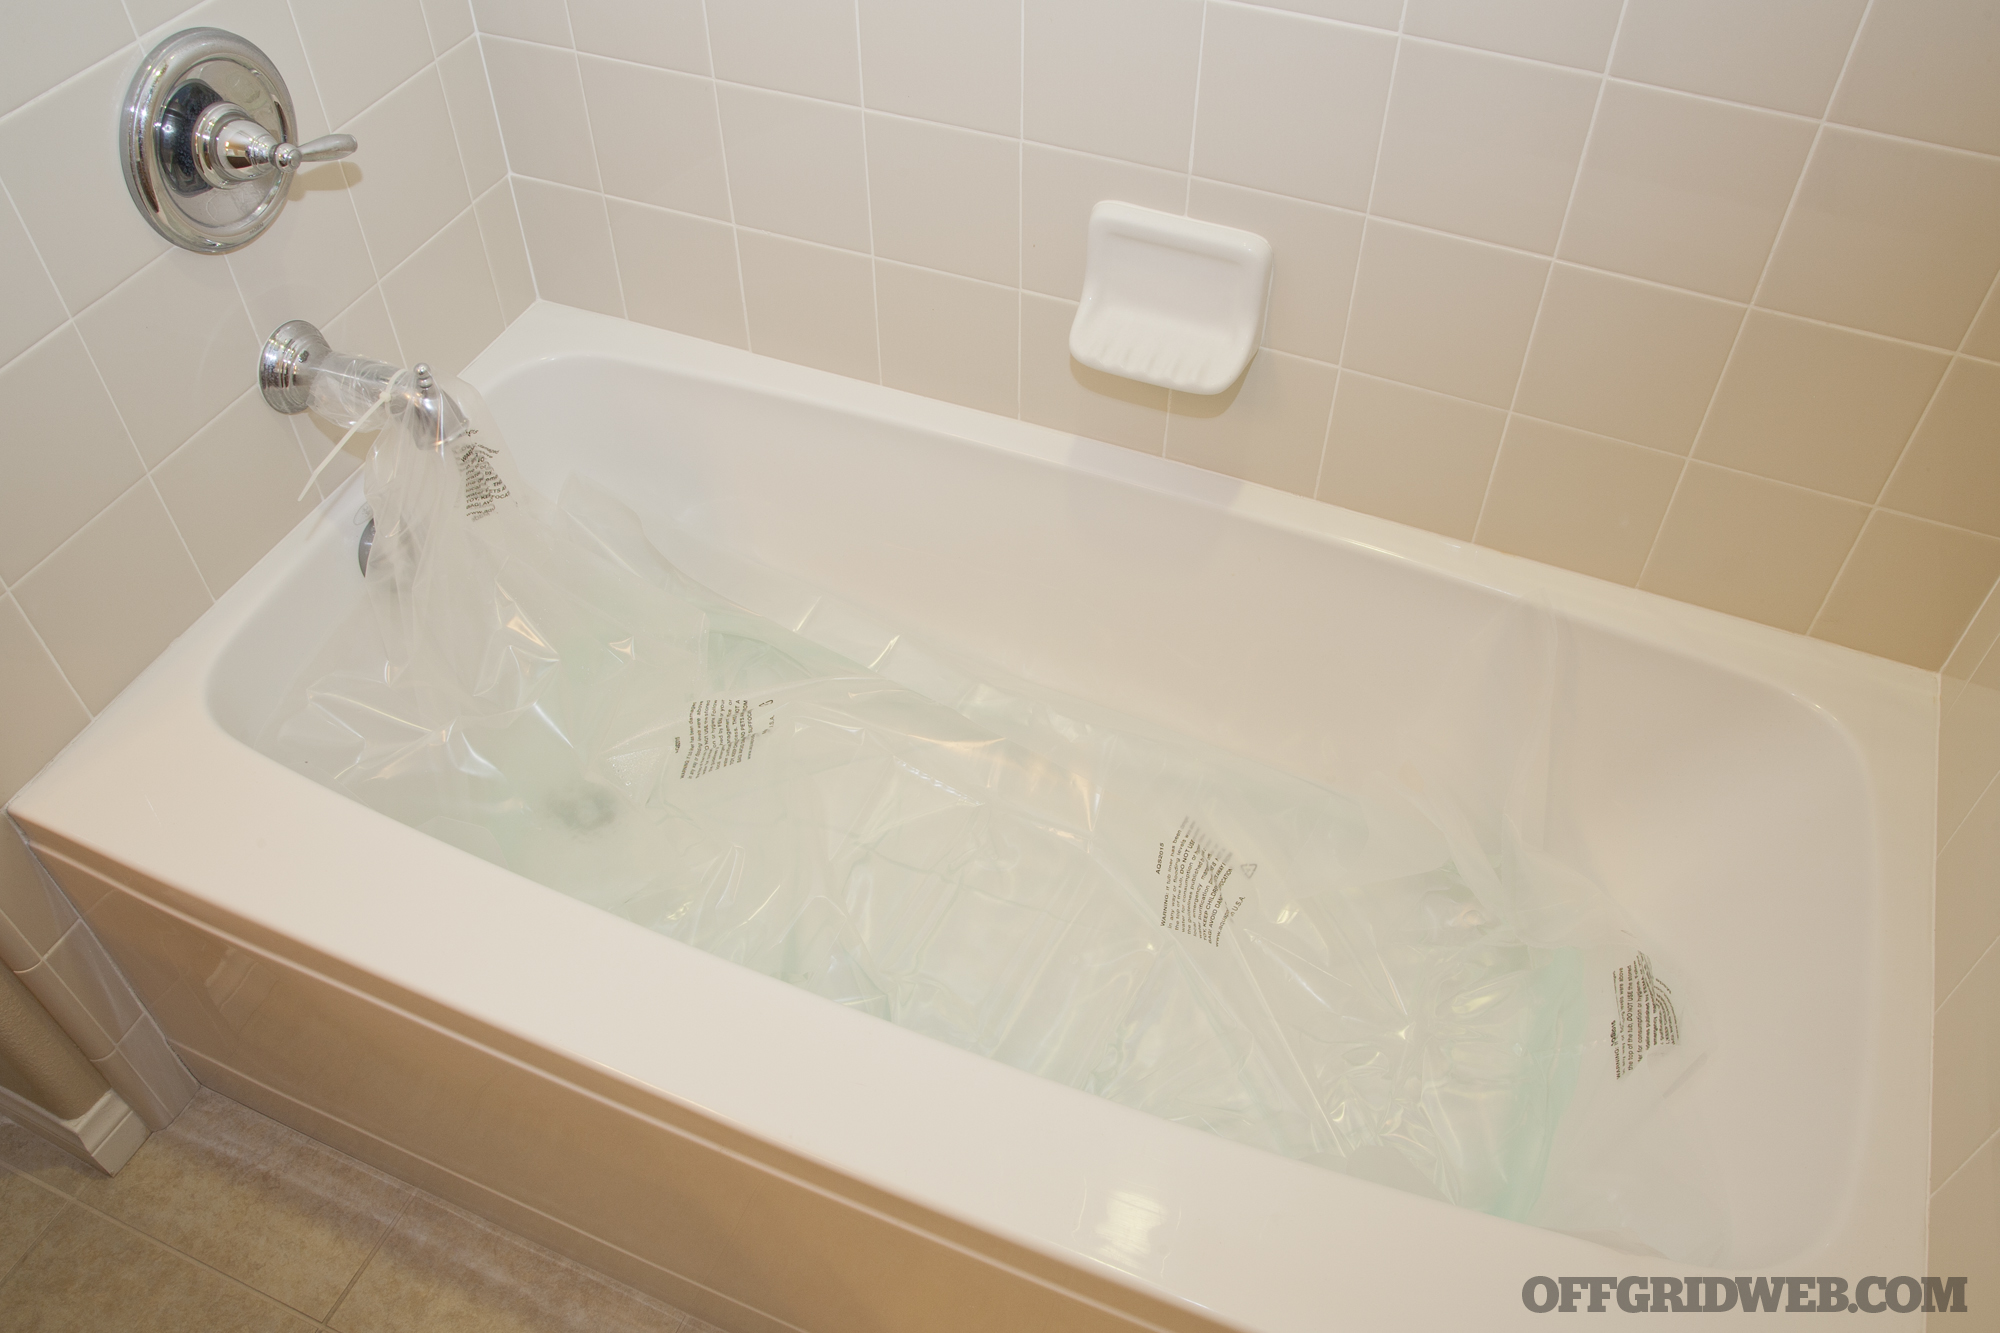
Now you're ready to turn on the water flow and start filling the liner. Although the liner will hold up to 100 gallons of water, most tubs only hold 70 gallons. AquaPodKit's instructions recommend you fill the liner to “a few inches” below the edge of your tub, which should be about 65 gallons.

After 10 to 15 minutes, the liner should be filled up. Some air pockets may have formed and inflated the bag slightly, but that's nothing to be concerned about.

AquaPodKit emergency water storage 13

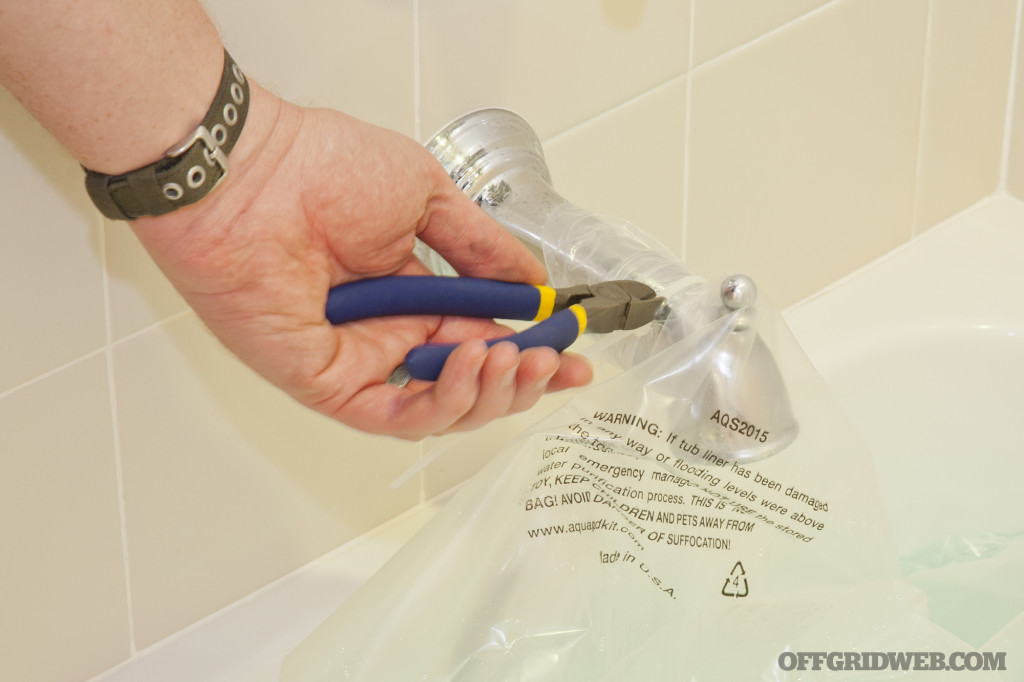
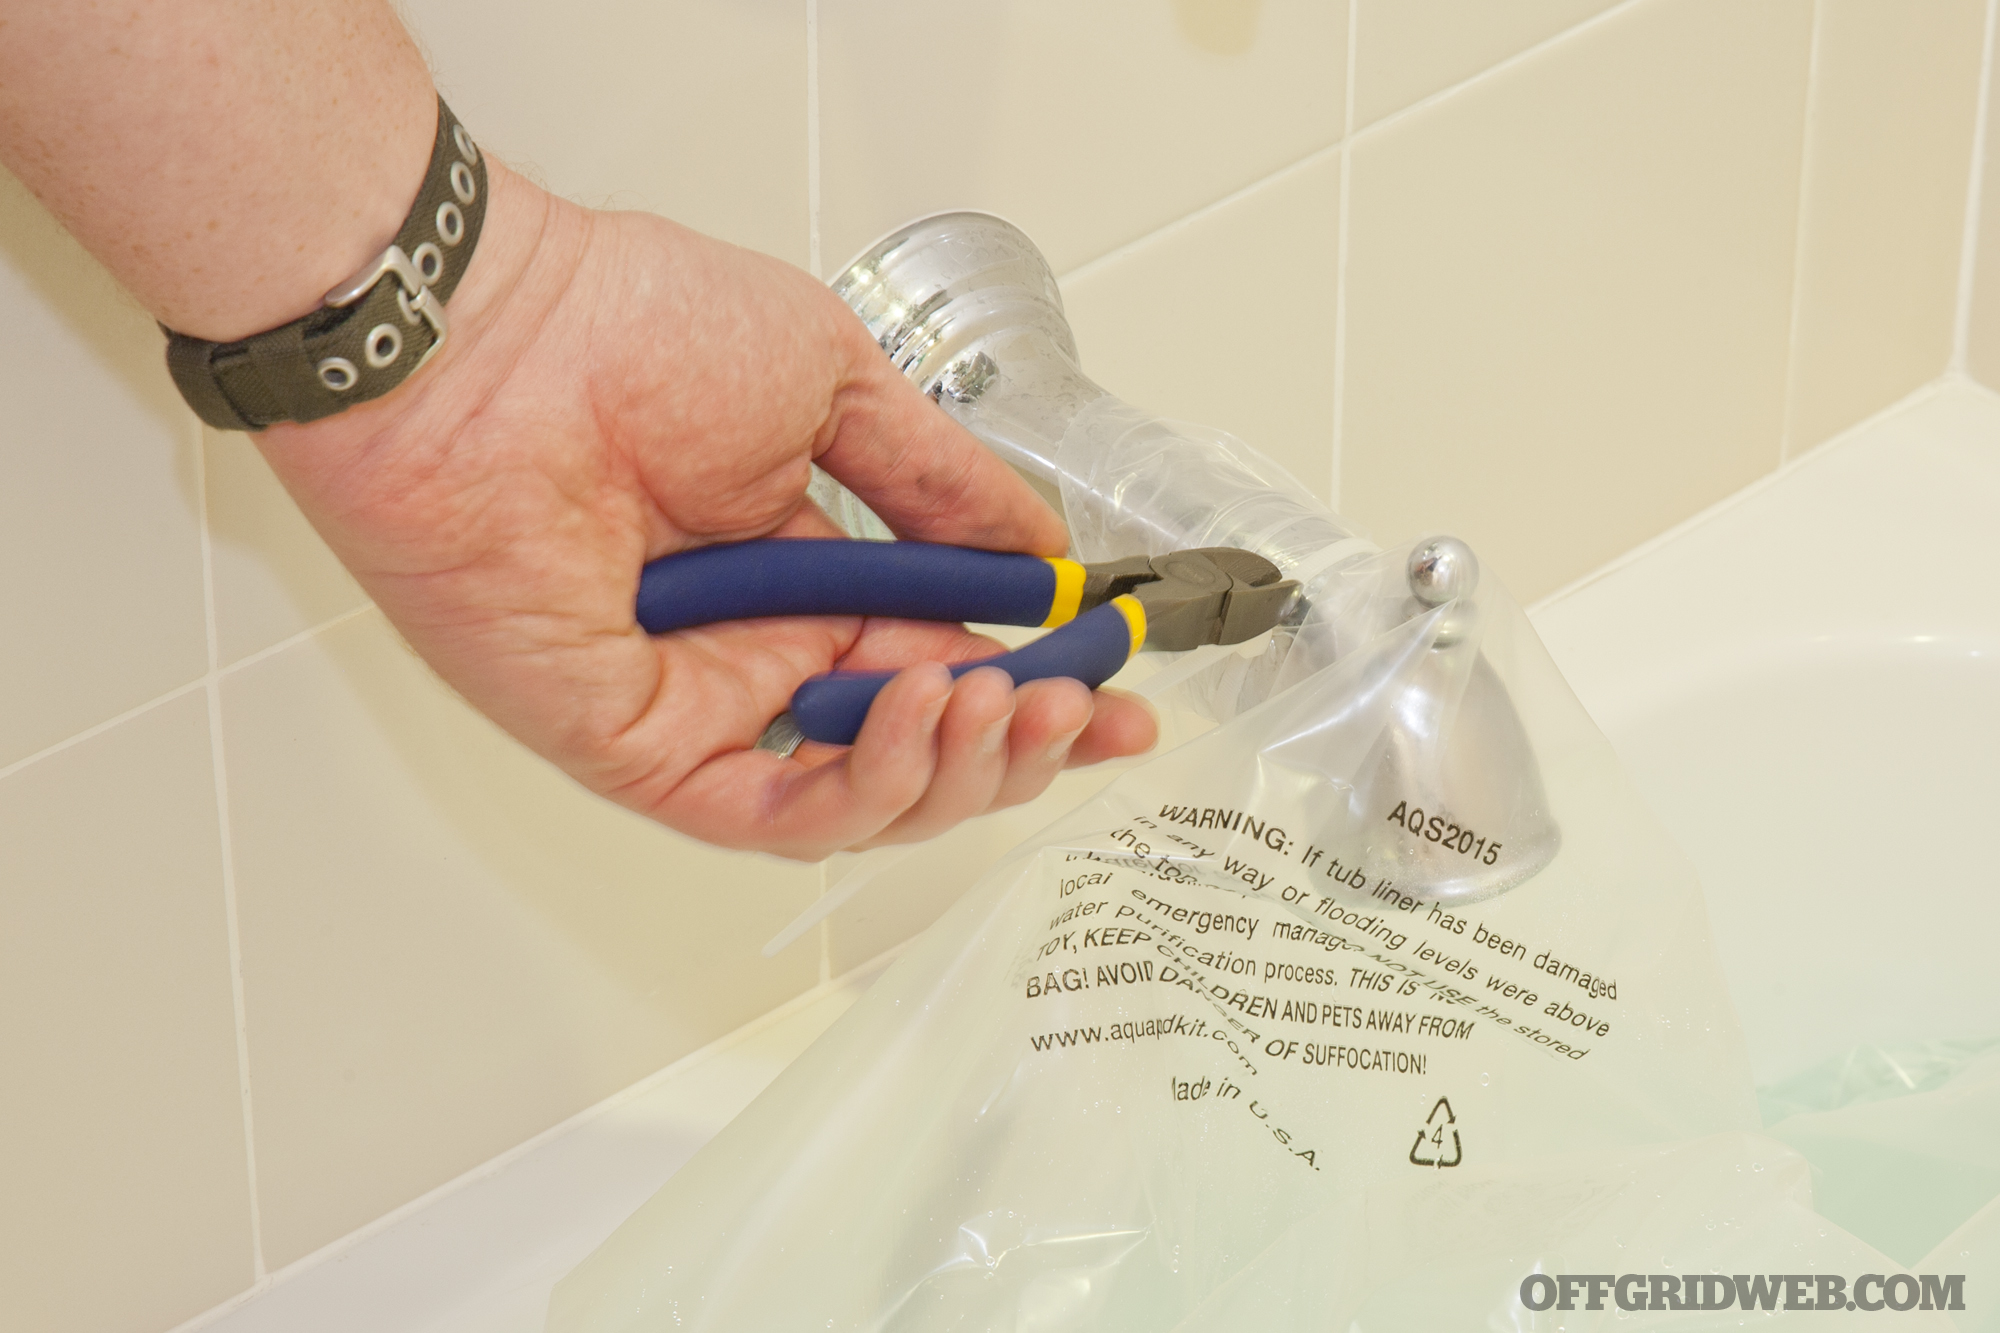
Use some scissors or wire cutters to remove the zip tie from the spout, then pull the open end of the liner off it as well.

AquaPodKit emergency water storage 14

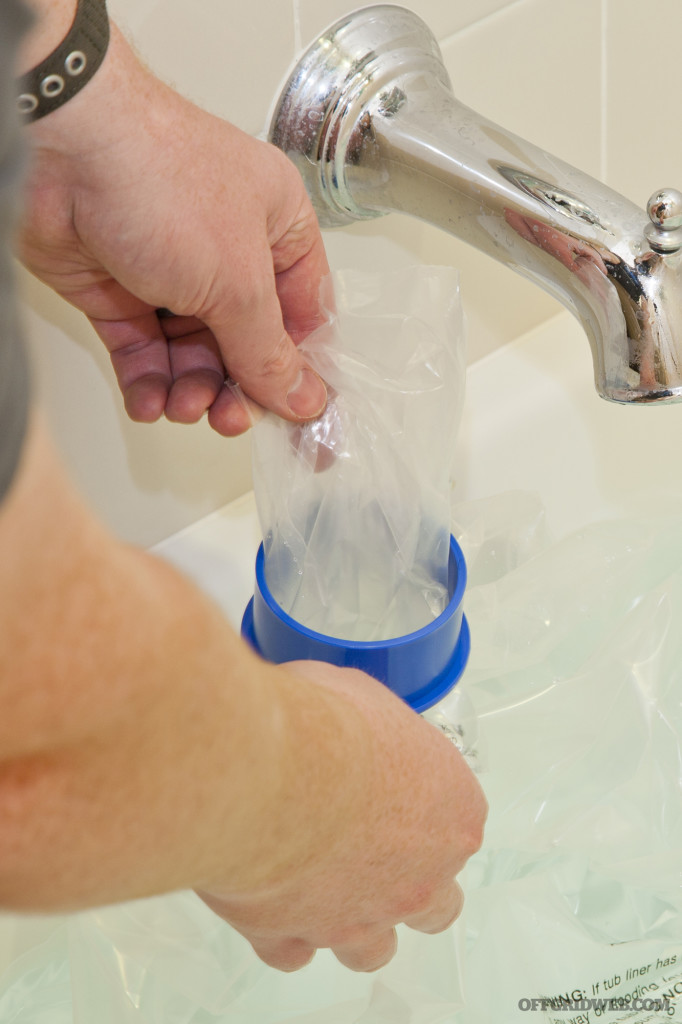
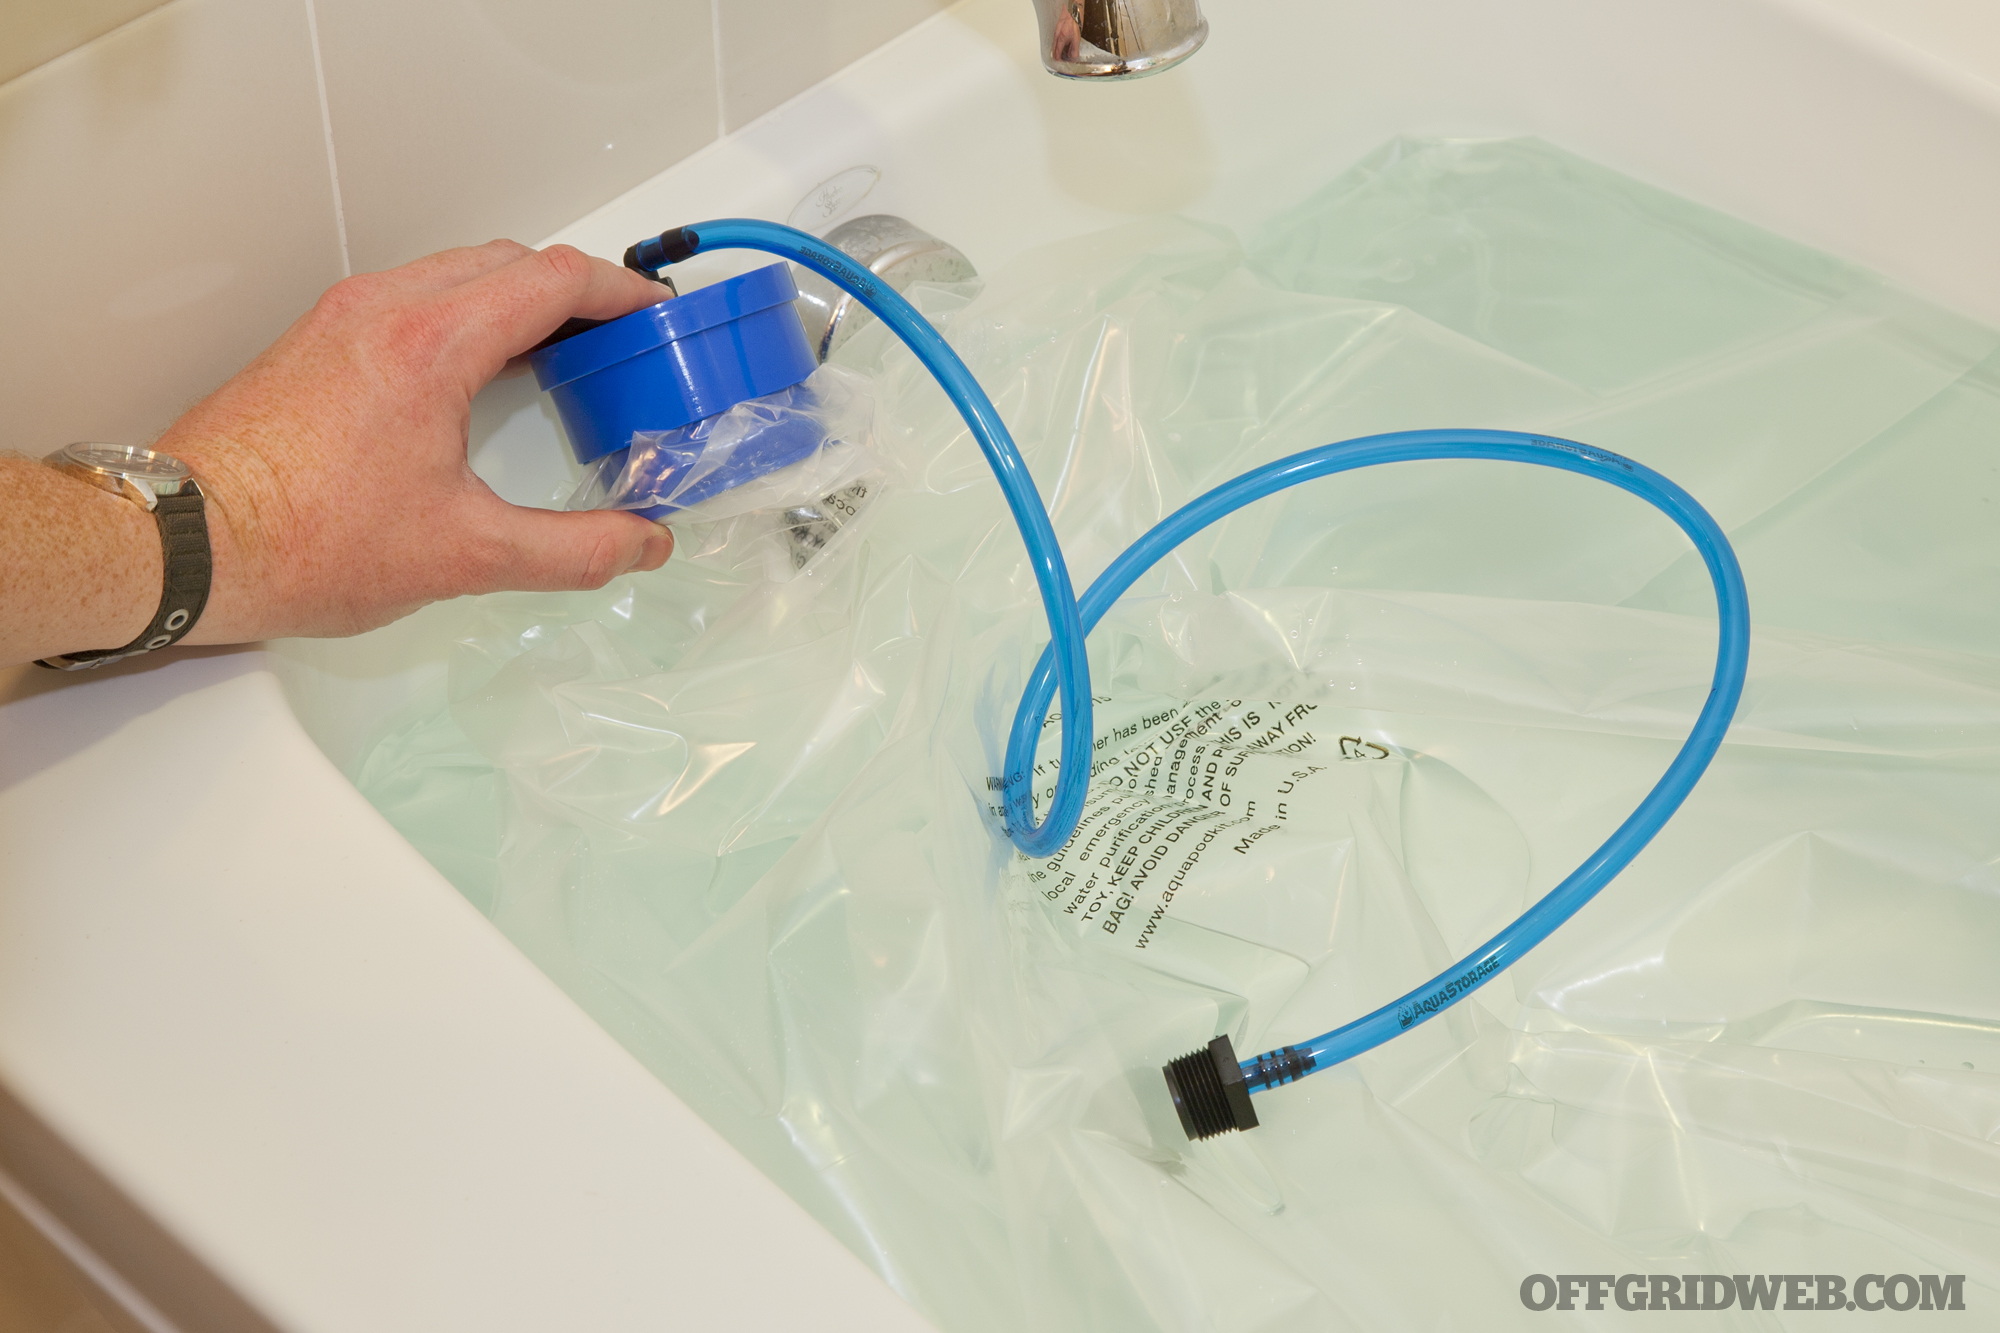
Next, you'll install the sleeve to seal the liner. Before you do this, you may want to compress the liner a little, and let air pockets that formed during filling escape. Then pull the liner's opening up through the inner portion of the blue plastic sleeve.

AquaPodKit emergency water storage 15

Roll the liner's opening down over the inner sleeve. This will provide a tight seal that keeps out bacteria and contaminants.

AquaPodKit emergency water storage 16

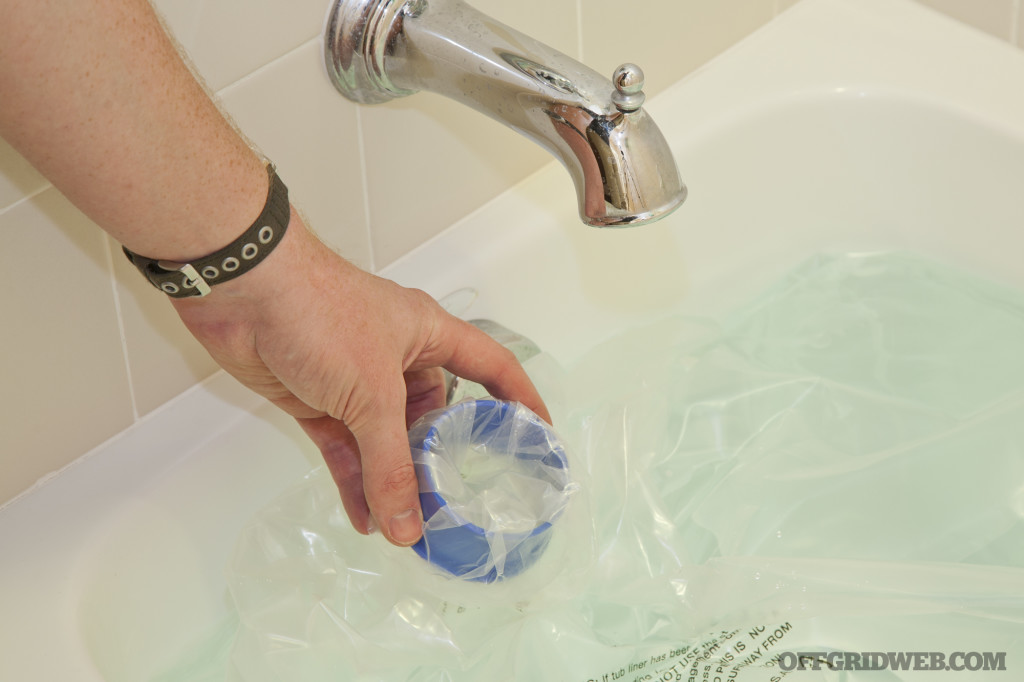
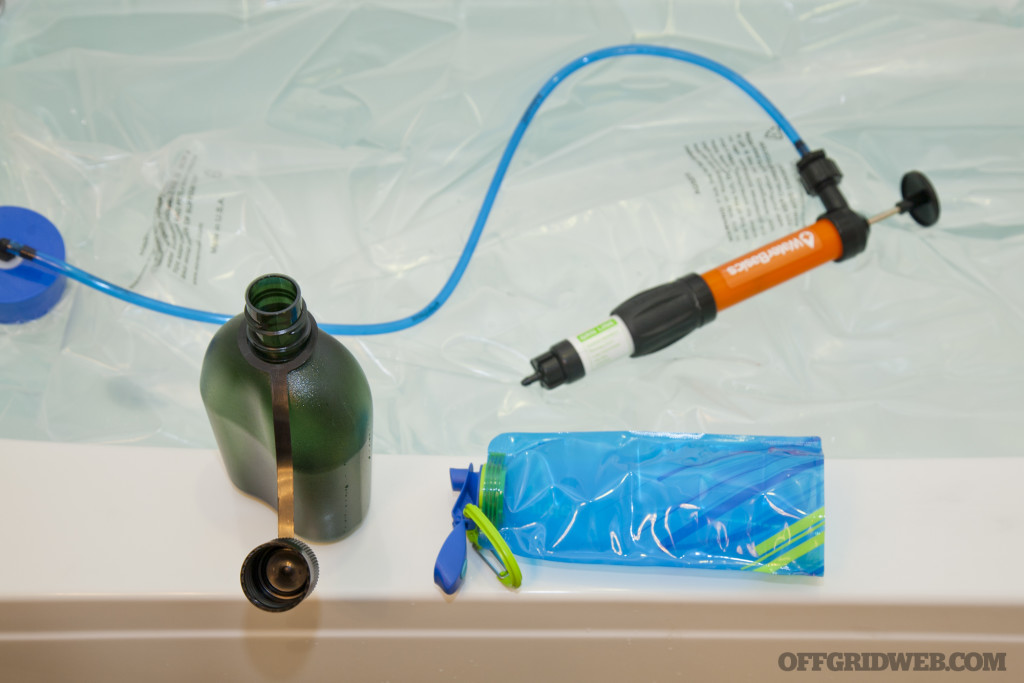
Finally, push the outer sleeve and cap onto the inner sleeve. If you have the basic kit, the pump would be connected directly to the sleeve cap. In the case of the upgraded WaterBasics kit seen here, there's a blue rubber hose that will attach to the pump.

Dispensing Water

AquaPodKit emergency water storage 17
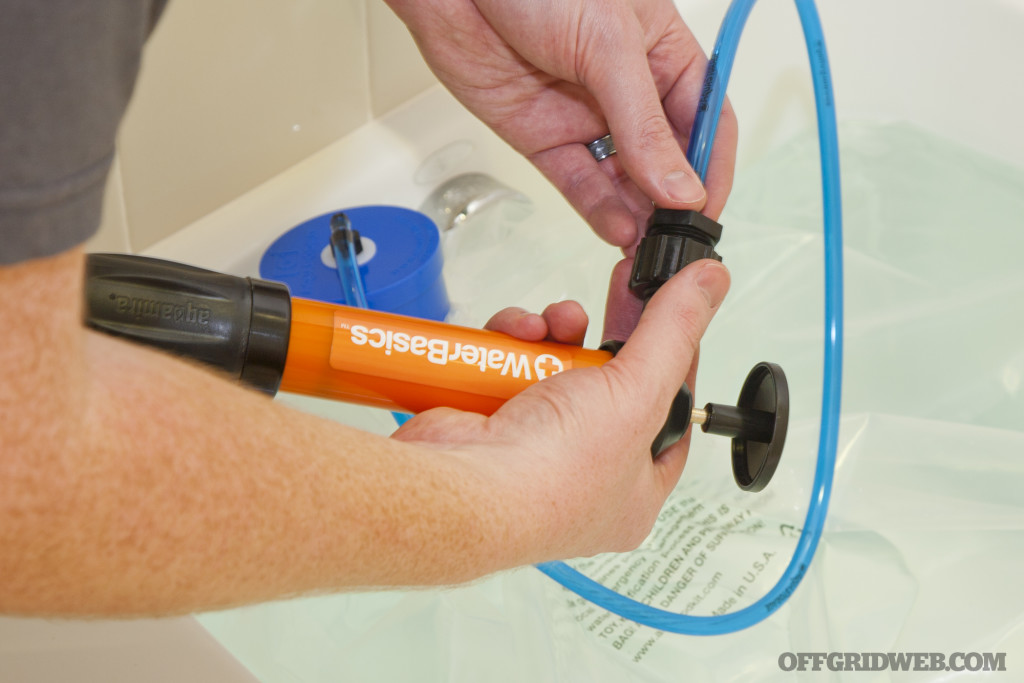
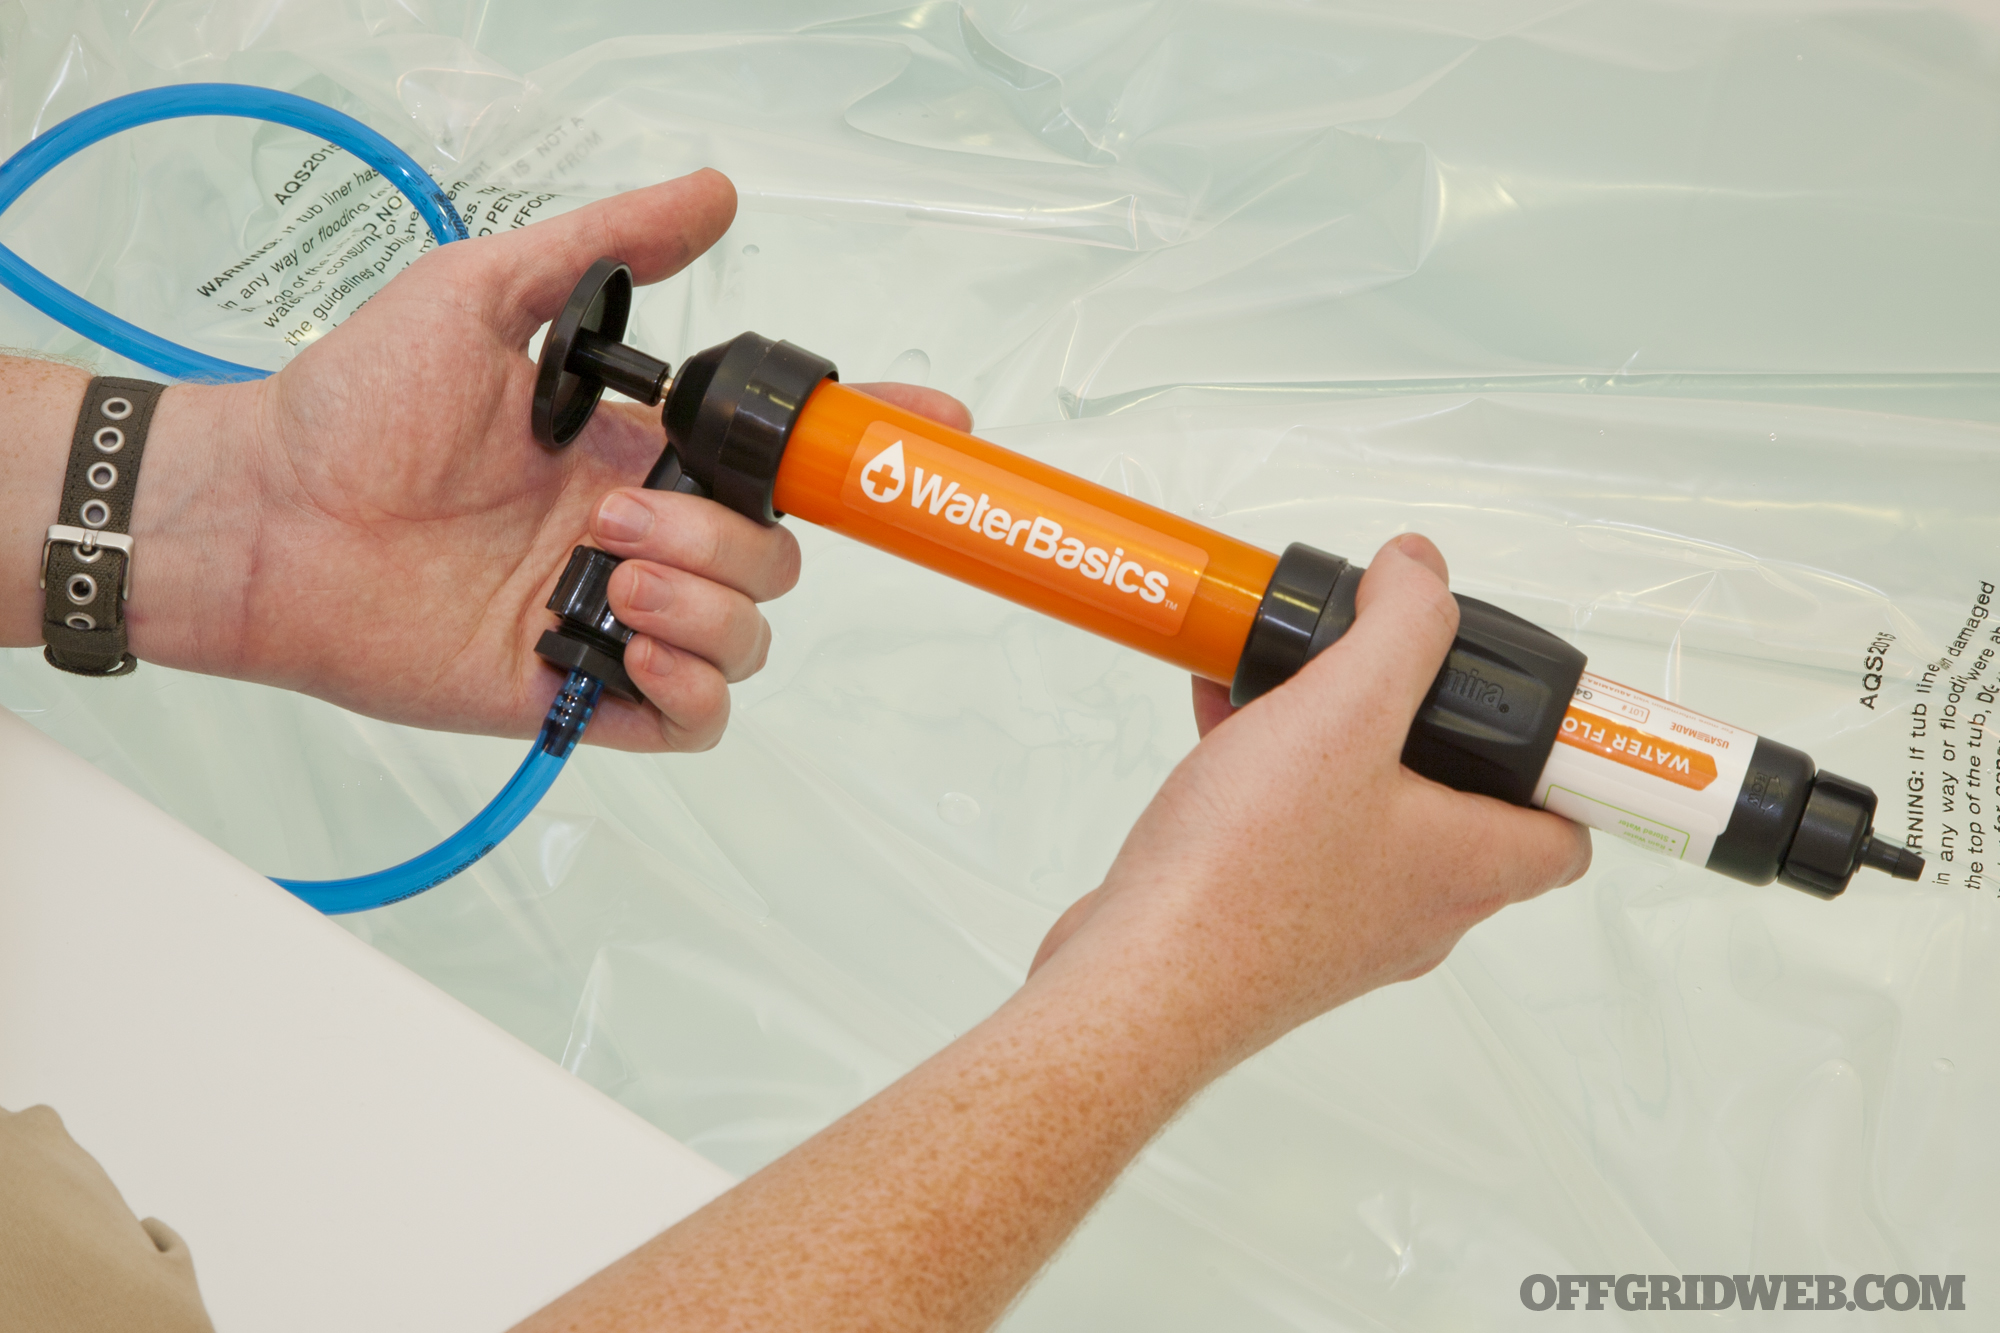
To dispense water, you'll need to connect either the standard bulb pump, or the upgraded WaterBasics orange pump. For the WaterBasics system, the hose is attached to the pump via a threaded fitting.

AquaPodKit emergency water storage 18

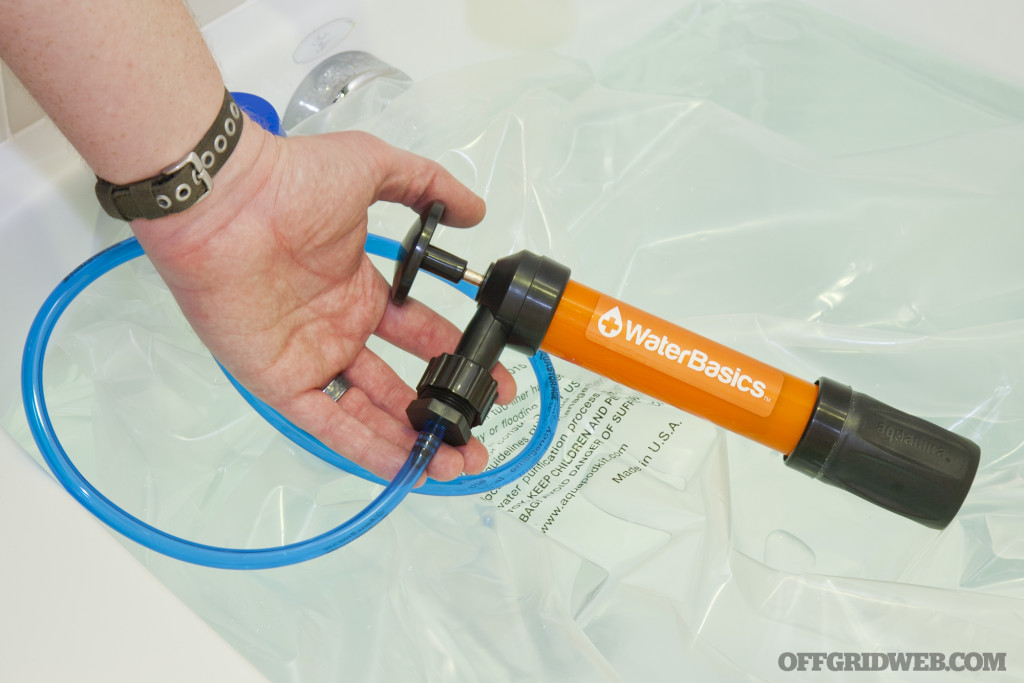
With the fitting tightened, the pump is ready to go. Yes, we'll admit it looks a lot like an off-brand Super Soaker.

AquaPodKit emergency water storage 19

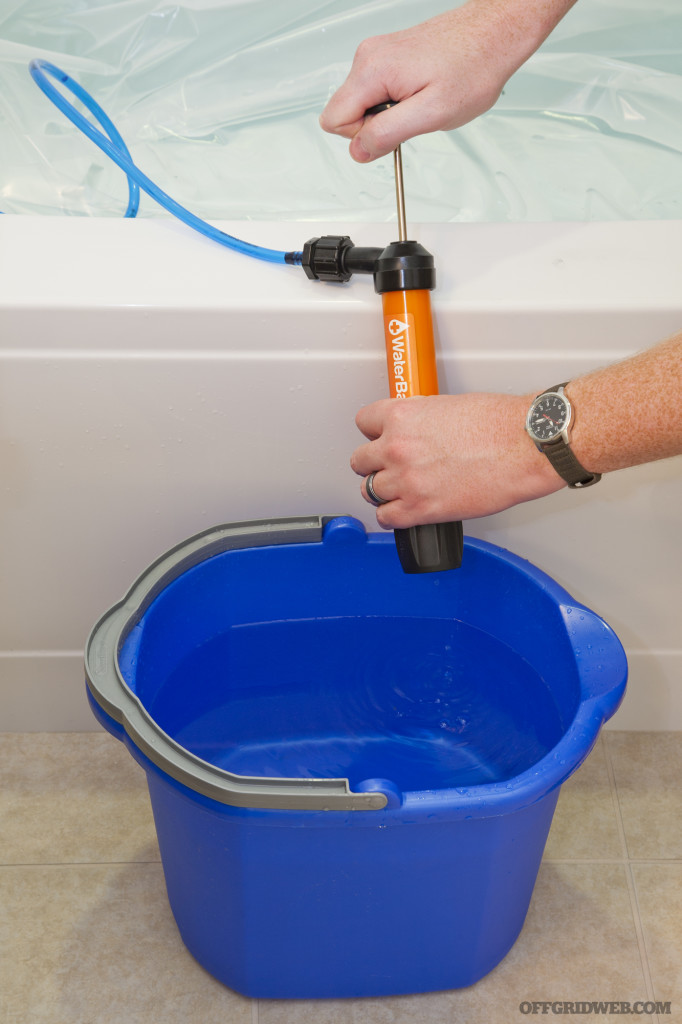
Dispensing water is easy with the pump, albeit slower than we expected. It took several minutes to fill this 3-gallon wash bucket.

Optional WaterBasics Filtration

AquaPodKit emergency water storage 20

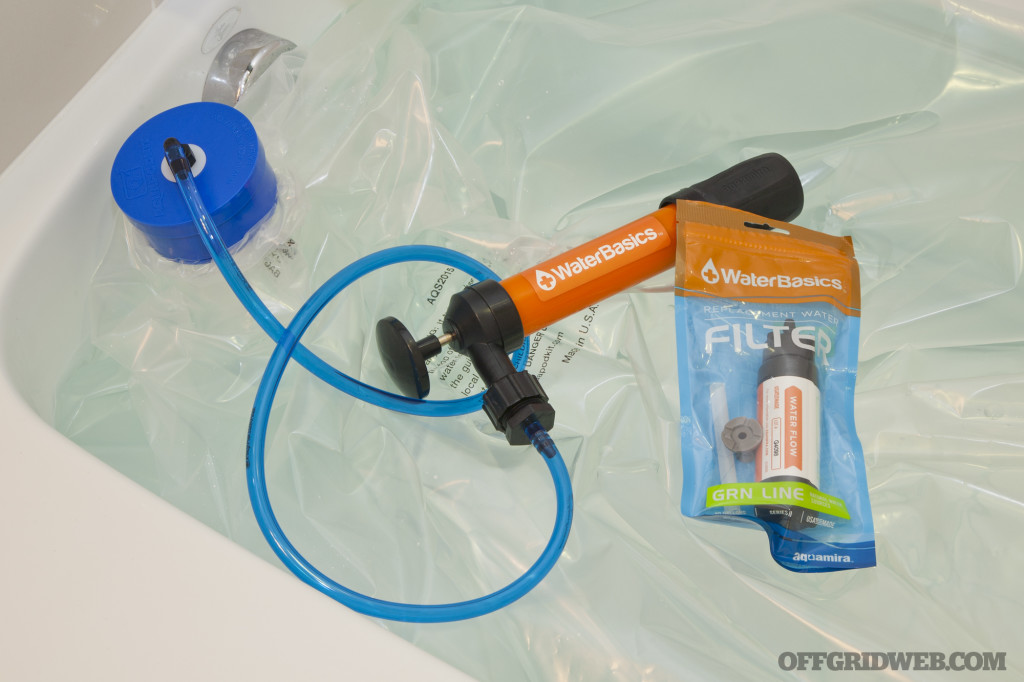
For dispensing drinking water, we recommend installing the included WaterBasics filter. It removes bacteria, unpleasant tastes, and odors from up to 80 gallons of water (more than one bathtub full).

AquaPodKit emergency water storage 22

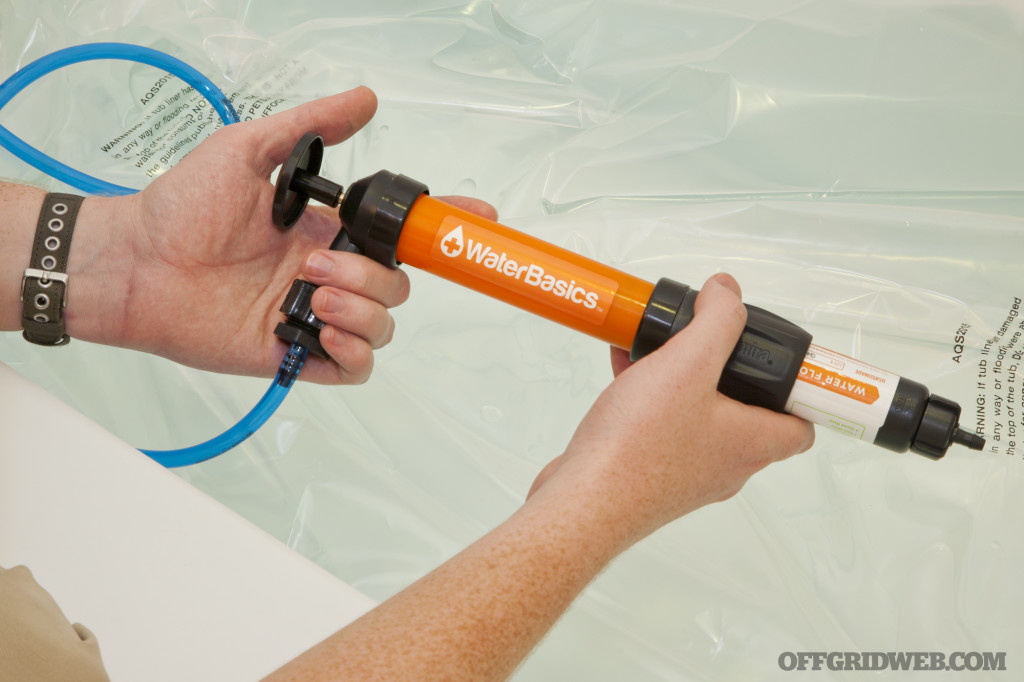
Simply press the filter firmly into the pump, ensuring the “water flow” label is pointing the right direction. Then you're ready to start pumping water again.

AquaPodKit emergency water storage 23

Fill up your canteen, cooking vessel, or even a hydration bladder if you're heading out for supplies. There's more than enough clean water to go around.

Conclusions

AquaPodKit emergency water storage 24

AquaPodKit says the water inside the liner can stay fresh for up to 8 weeks, depending on humidity and temperature conditions. Also, as we said before, the 65 gallon capacity is enough to supply a family of four for about 14 days (or much more if the water is carefully rationed). That means you should have more than enough water to get through a short-term disaster, or at least buy yourself time to find an alternative water source.

The AquaPodKit is a great tool for anyone who plans to hunker down at home if a disaster hits. It's simple enough that even young children could learn how to fill and use it, and it's available at an extremely affordable price point. The WaterBasics filtration option also provides a lot of added value, considering it's only $15 more than the basic kit, so we'd definitely recommend that version if you choose to buy an AquaPodKit product.

AquaPodKit emergency water storage 01

To sum things up, here are some pros and cons:

Pros:

  • Very simple to fill and use.
  • Affordable price point.
  • Optional WaterBasics filter removes bacteria for added safety, and also improves taste.
  • Made in the USA. Assembly of the kits supports local organizations, such as the Austin State School of the Aged and Disabled, in Austin, Texas.

Cons:

  • Pumping water manually is slow and labor-intensive.
  • Added back-pressure from the water filter tends to cause the WaterBasics pump's seals to leak and drip if you pump quickly.

For more information on these emergency water storage systems, visit AquaPodKit.com.


Hot Rock Boiling to Purify Water

Most of us know that boiling is one of the most effective methods to purify drinking water in the wild. In mere minutes, boiling can destroy any nasty viruses, bacteria, protozoa, and other waterborne pathogens that could otherwise wreak havoc in your digestive system or kill you.

However, boiling water off the grid may not be as easy as it sounds. Unless you have a sturdy single-walled metal water bottle, canteen, or pot, you can't simply toss it into the fire and wait for the water to boil.

Most metal water bottles are insulated, and cannot be exposed to direct flame for boiling.

Most metal water bottles are insulated, and cannot be exposed to direct flame for boiling water.

Notice we said single-walled water bottle—the popular double-walled or insulated bottles found at many stores must not be placed on an open flame, and may even explode from the heat. Composite and plastic bottles can't take the heat either, and will begin to melt over the flames. So, how do you boil water if you don't have a metal vessel to boil it in?

Hot rock boiling stones

Rocks are available almost everywhere on earth, and can be used to boil water through heat transfer.

The answer is both simple and ancient: hot rock boiling. You can simply heat several rocks over a campfire, then pick them up with sticks, and drop them into the water vessel of your choice. The residual heat of the stones will heat the water rapidly, and eventually bring it to a boil, purifying it.

Here's a video that shows how it works (you may want to mute the audio if you're not a fan of smooth jazz):

Notice in the video, hand-carved wood vessels are used, and the rocks are rinsed to remove ash and soot before adding to the drinking water. Both of these are smart choices—although small amounts of ash from the campfire may not be harmful to drink, they certainly won't taste good.

Water over rocks

A few more tips:

  • Your rocks should be heated for about 10-15 minutes to reach an adequate temperature.
  • Never place rocks back on the fire immediately after placing them in the water. They may crack or explode.
  • If you don't have a water vessel, you can boil water in the ditches or pools found near a lake or stream bank. This will require building a fire near the river bank, however.
  • To be safe, it's recommended to boil the water for at least one minute, especially at higher altitudes (since water boils at a lower temperature there).

Infographic: How to Survive Hypothermia

Over the last few days, a record-breaking blizzard known as Winter Storm Jonas dumped several feet of snow across the eastern United States, causing at least two dozen deaths. Major storms like this can be life-threatening, especially if you're stuck outdoors and unprepared.

Winter shelter mountains

Don't venture into the outdoors this winter without being mentally and physically prepared.

So, now is the time to learn how to diagnose, treat, and survive hypothermia. That way, if you're caught in a snowstorm, you'll know the warning signs and how to react.

We love infographics for their ability to condense useful facts into a visually appealing and memorable format. This infographic from Eastern Mountain Sports illustrates some useful tips about hypothermia:

How to Survive Hypothermia infographic

Wearing layers, maintaining a high core temperature, and staying dry will give you a good head start towards staving off the cold. However, in case you're stuck outside in the snow for an extended period, you should also know how to build a winter snow shelter.

Small items like Mylar emergency blankets and chemical heat packs can be a life-saver, and they don't weigh much or take up valuable pack space. Consider keeping a few in your go bag and/or your vehicle's glove box. Most of all, plan ahead and prepare to deal with the cold when you leave the house. It might just save you this winter.


Stashing Essential Gear, Just in Case

There are a few things in life that are just necessary evils — things that we all recognize are necessary, but hate doing just the same. Things like going to the dentist, purchasing life insurance, or preparing our last will and testament come to mind. Another necessary evil I find quite objectionable is the concept of caching a firearm. The idea of spending hard-earned money on a firearm whose only purpose is to be secured in a secret location, never to be used or enjoyed except in the most dire of circumstances is one such evil. But the real question becomes, is it necessary?

The practice of caching dates back to when man first walked on two feet. Quite simply, caching is the act of secretly hiding provisions or supplies for use at a later time. Caches can be as small as a candy bar and a bottle of water or they can occupy an entire warehouse. The size of a cache depends entirely on its purpose and your ability to properly secure it. The concept of saving supplies for use at a later date does not work very well if those supplies are either stolen or eaten prior to their retrieval. Let's review three critical aspects of a creating a successful cache: preparation, security, and accessibility.

Preparation is Key

First and foremost, preparation of the items to be cached is of utmost importance. Food items must be selected based upon their ability to be stored for long periods of time. Prepackaged items that are specifically designed for long-term storage such as military-style Meals Ready-to-Eat (MRE) or commercially available freeze-dried emergency food supplies are perfect for any food cache. The convenience of using prepackaged meals for small to midsized caches outweighs the preparation and cost savings of preparing canned food oneself.

food-provisions-for-a-cache

Larger caches that are designed to sustain several people over long periods of time will benefit from a combination of prepackaged emergency food supplies, store-bought canned food, and provisions prepared by the individual. As new canned food supplies are acquired or produced, older supplies can be used to ensure a periodic rotation of supplies. This practice keeps supplies from getting too old and verifies that one's canning processes are being performed properly — so the food is not spoiled after being stored for a long period of time.

Care must be taken to ensure that all food supplies are carefully packed without compromising the integrity of the vacuum-sealed packages or containers. If the seal is damaged, the food will spoil over time and become inedible. One small piece of advice if you do choose to can your own food for a cache: include a couple of small can openers taped to the cans. Little things like this will make life immeasurably easier should the time ever come that you need to access your cache.

If you decide to include a firearm and ammunition in your cache, additional preparations are needed. While ammunition is by definition a self-contained item, it will corrode if exposed to moisture over long periods of time. Any type of corrosion will reduce the reliability of ammunition, causing misfires and, in extreme cases, failure to properly chamber in your firearm. While any type of ammunition can be properly prepared for long-term storage, a quicker alternative is to consider using surplus military ammunition. Most ammunition produced for the military is required to be packaged for long-term storage regardless of its anticipated use.

Military ammunition containers are constructed of metal with a convenient carry handle and a rubber gasket to seal out moisture and dirt. Additionally, small arms containers are designed to be stacked upon one another for more efficient use of available space. Surplus military containers come in different shapes and sizes and, due to their weatherproofing, are easily adapted to fill the roll of a cache container. Many types are available for purchase cheaply online as well as at your local military surplus store.

military-ammunition-containers

Another storage option is the MTM Case-Gard Survival Ammo Can (SAC). The SAC is a three-piece storage container, purpose built for being buried underground. It uses a double O-ring sealed lid and protective cap to secure items inside the bucket-shaped container, sized to hold around 500 rounds of ammunition (but any items that fit into the SAC can be safely stored). A Vapor Corrosion Inhibitor plastic bag and desiccant pack is included with every SAC. Should you choose to use a different container, ensure it has a good vacuum seal and consider the addition of silica gel packs. They will ensure that any moisture trapped inside the container when sealed will be absorbed.

Similarly, when preparing firearms, the elimination of moisture is a critical step. The last thing one wants to see when retrieving a cached firearm is a rust-covered piece of junk that will not function. In addition to a properly sealed container with silica gel packs, you should consider a moderate coating of grease on all exposed metal parts and inside the bore of the barrel as an additional barrier against rust and corrosion.

Secure it Now or Lose it Forever

In real estate, there is a saying — “Location, location, location.” The same advice can be applied to securing a cache. The location is the second critical part of a successful cache. Before we can select a secure spot for it, we need to understand the intended purpose of the cache. Is it designed to fully resupply our provisions, or is it just a pit stop on the way to a larger cache or bug-out location? Is access to the cache needed relatively quickly, or is there time to retrieve a more securely prepared one? Smaller caches meant for quick resupply may require a less secure location in exchange for quicker access. Larger caches that contain the bulk of your supplies may require more effort to secure, increasing the time needed to access them.

Once we have defined the purpose of our cache, our next chore is to choose a suitable location. The desired speed of access to our cache will determine how securely it is hidden. Quick access may require something simple like a camouflage tarp mixed with some foliage or a shallow hole dug into the ground. Sinking a watertight container with a cinderblock and a retrieval cord is another effective method for securing a small cache for quick retrieval, provided you can secure the cord!mtm-case-gard-survival-ammo-can

Larger or more substantial caches may require a larger, deeper hole or a secure underground container. Regardless of the size of our cache, it must be secured not only from humans, but also from any four-legged (or creepy crawly) raiders. With any type of food provisions, care must taken to ensure no scent traces are left on the container or can escape from it. Failure to do so will result in quite a nice meal for Yogi Bear.

Access Denied

The final part of a successful cache is access. Having the best location in the history of caches does one no good if you can't access it when needed. A cache along a riverbank is a great hiding location, until the river floods and sweeps your container away or your access road to the river is flooded. A hidden location at the base of a remote mountain is a great choice until winter snows cause closure of the access roads or torrential rains turn the roads into an impassible muddy mess.

Another consideration is who actually owns the land you select for a cache? If the property does not belong to you, will you still have access to it when needed? Stashing supplies on remote private property may seem like a good idea until the landowner blocks access to the property — or worse yet, in your time of need, you discover the land was sold and a new shopping mall sits on top of your carefully hidden cache.

Enter Mossberg's JIC

Recognizing the wisdom in the concept of preparing a cache, Mossberg introduced the Mossberg Just in Case (JIC) series. The JIC series consists of a Mossberg 500, 12-gauge shotgun outfitted with only a pistol grip and no shoulder stock to reduce the overall size for storage. All JIC shotguns are capable of handling up to 3-inch shotgun shells and have either a six- or eight-round magazine tube, depending upon the model.

As part of the JIC series, several JIC shotguns are packaged in a waterproof storage tube with carrying strap. They are available in the Mariner, Cruiser, Sandstorm, and Patriot. A survival kit-in-a-can is included with the Cruiser, and a multitool and knife are included with the Mariner, which features a tough Marinecote finish. The Sandstorm is finished in a desert camo pattern, and the Patriot's storage tube proudly displays the American flag.shot-gun

Combining a Mossberg JIC series shotgun with a MTM Caseguard SAC stuffed with ammunition, emergency food supplies, and water makes for a small cache that can effectively deal with a variety of emergency situations.

The concept of caching provisions and supplies is nothing more than insurance. It's the ultimate solution to the ultimate “what if” question. What if a situation arises and you are completely cut off from retrieving any supplies from your home? What if a flash forest fire has burned your home down to the foundation, or a tornado has spread your home over the next three counties? What if the only things you possess are literally the clothes on your back and the vehicle under your butt? When facing the possibility of this type of crisis, does the practice of caching firearms, supplies, and provisions become necessary? Absolutely.

Offgrid Tips

Silica Gel Desiccant Packs

silica-gel-packets

Be careful reusing silica gel packs that you've pulled out of other packaging — they may have already become saturated and no longer functional. It's easiest to use fresh packets, but you can also reactivate silica gel by heating them in your oven. Many packs can be recharged at 250 degrees for a couple of hours. Depending on the size of the packs to be recharged, the time and temperature will differ. A quick search online will net you more detailed instructions.

When Packing a Firearm in Your Cache

Here's another little hint — pack some cloth, a bore snake, and a small bottle of lubricant along with the firearm to wipe off the grease and to quickly clean out the bore of the barrel. Once you've done this, a few drops of oil and a function check will ensure your firearm is ready for use.

ofm-jic-m500-cruiser

Stashing Essential Gear, Just in Case

  • Mossberg JIC Cruiser

    Make & Model - Mossberg JIC Cruiser
    Caliber - 12 gauge
    Barrel Length - 18.5 inches
    Overall Length - 31 inches
    Magazine Capacity - 6
    Weight Unloaded - 5 lbs, 8 oz
    MSRP - $494
    URL - www.mossberg.com
    Features - Water-resistant tube with carry strap
    Survival kit in a can
    Resealable plastic storage pouch


    The Mossberg JIC Cruiser is a container for your ammo that is a water-resistant tube with a carry strap for your convenience.

  • MTM Case-Gard Survivor Ammo Can

    Make & Model - MTM Case-Gard Survivor Ammo Can
    Capacity - 423.5 cubic inches (same as a 50-cal. ammo can)
    Outside Dimensions - 10-inch diameter, 13.5-inch height
    Inside Dimensions - 7-inch diameter, 12.4-inch height
    Weight - 3 lbs, 6.5 oz
    MSRP - $30
    URL - www.mtmcase-gard.com
    Features - Double O-ring sealed lid
    Vapor corrosion inhibitor plastic bag
    Desiccant pack


    The MTM Case-Gard Survivor Ammo Can has a double O-ring sealed lid and a vapor corrosion inhibitor bag to keep your ammo safe for when you need it.

  • Tacti-Cool Guns & Gear, Inc. 120mm Ammo Tube

    Source & Item - Tacti-Cool Guns & Gear, Inc. 120mm Ammo Tube
    Outside Dimensions - 8-inch diameter, 44.5-inch height
    Inside Dimensions - 6.25-inch diameter, 38.5-inch height (approx.)
    Weight - 21 lbs
    URL - www.facebook.com/TactiCoolGunsGearInc

    Check out the Tacti-Cool Guns & Gear, Inc. 120mm Ammo Tube that is perfect to keep your ammo ready and unspoiled.


U.N. Emergency Recon Drones

The term drone has become a bit of a buzzword lately, for a number of reasons. On one hand, we have hovering drones that can deliver packages or assist with search and rescue missions. On the other hand, we have the questionable ramifications of unmanned military drones destroying targets from afar. No matter what your opinion of the technology is, aerial drones are definitely here to stay.

Drone-to-Car Communications

A recon drone like this one from DJI will be launched from a moving vehicle.

At the forefront of technological growth, Ford has announced a new partnership with drone manufacturer DJI to launch the Drone-to-Vehicle Developer Challenge. This challenge is designed to encourage software developers to “create a rapidly deployable surveying system for use by the United Nations in emergency zones.” As incentive, the winning developer who accomplishes the challenge will receive a prize of $100,000.

So, what exactly is the Drone-to-Vehicle Developer Challenge? According to DJI, developers must program emergency recon drones that can complete the following tasks:

  • Quickly take off from a moving vehicle
  • Autonomously enter the “disaster area”
  • Survey the area, recognize objects, and create a map of the scene
  • Gather information on the location of “survivors”
  • Transmit the information back to a computer system in the launch vehicle (potentially using Ford SYNC AppLink or OpenXC technology)
  • Return and land on the moving vehicle

Emergency recon drones Ford F150

The Ford F-150 launch vehicle could be driven near a disaster zone by United Nations personnel, then the drone could take off to survey areas hit hard by earthquakes, tsunamis, or floods. The U.N. personnel would be able to control the drone remotely and receive real-time updates, all without leaving the safety of the F-150's cab.

According to Ford, future applications of this semi-autonomous vehicle-launched drone technology “could include agriculture, forestry, construction, bridge inspection and other work.” The contest ends on March 10th, 2016, so we should be seeing more updates on this technology later this year.

For more information, click here to read the full Ford press release.


Morse Code & Why You Should Learn It

It's easy to think of Morse code as an outdated system of communication. After all, when was the last time the postman came to your door and handed you a telegram? Considering this messaging system had already begun its descent into obsolescence by the late 1800s, we'd be willing to bet it has never happened.

However, we'd argue that the underlying ability to communicate via Morse code remains an extremely important skill to this day. Although it may seem archaic, this simple alphabet of dots and dashes can be used to communicate beyond language barriers and convey essential information covertly—taking the time to learn Morse code might even save your life someday.

Jeremiah Denton's Morse Code Message

Morse code can save lives. That's a bold claim, so we'll share some incredible examples of it doing just that.

Back in July 1965, U.S. Naval Aviator Jeremiah Denton was taken prisoner by the North Vietnamese after the A-6A Intruder jet he was piloting was shot down over the city of Thanh Hoa. Denton and his navigator were held as POWs for almost eight years in the now-infamous “Hanoi Hilton” prison camp.

Denton would later recount tales of being beaten with fists and fan belts, and how his captors used ropes to cut off blood circulation to his limbs. He wrote, “I prayed that I could keep my sanity until they released me. I couldn't even give in to their demands, because there were none.”

Denton was also forced by his North Vietnamese captors to participate in a televised propaganda press conference in 1966. While he spoke in front of the camera, claiming that he was being fairly treated, he simultaneously blinked in Morse code to spell out “T-O-R-T-U-R-E”. This ingenious and defiant act secretly sent a message to the U.S. Military about the real conditions he had endured.

Denton's coded message was one of the first clear confirmations of prisoner torture by the North Vietnamese forces, and may have changed the course of the Vietnam War. He was eventually released from captivity, went on to become a U.S. Senator, and lived to the age of 89 back home in Virginia Beach.

“Better Days”and Musical Morse Code

“Ok,” you might be thinking, “but that was 50 years ago.” Here's a more contemporary example of Morse code saving lives in 2010.

In Colombia, a Communist guerrilla movement known as FARC had been active in assassination, kidnapping, ransom, and other terrorist activities since 1964. Their goal was to destabilize the Colombian government and establish a new regime.

Learn morse code FARC guerrillas

A DEA photo of FARC guerrillas marching in formation, circa 2006. Source: Wikipedia

By 2010, a number of soldiers had been kidnapped by FARC and held in a brutal hostage camp deep in the jungle. Knowing this, Colombian army Colonel Jose Espejo set out to communicate with his stranded men and inform them rescue was nearby—but without tipping off the FARC guerrillas of their intentions.

Since guerrillas often had radios playing music in their jungle camps, a plan was formed to broadcast a secret message to the hostage soldiers over the radio. Most of the FARC guerrillas were farmers with no military communications training, so Colonel Espejo figured they wouldn't know Morse code. On the other hand, many of the captured Colombian soldiers did know Morse code.

Learn morse code radio

Although the hostages were cut off from most outside influences, they were within earshot of radios.

Espejo coordinated with a composer, musicians, and various radio stations to produce and broadcast a song called “Better Days” that included a secret Morse code message to the hostages: “19 people rescued, you're next. Don't lose hope.” The code was hidden in the form of a synthesizer interlude that played 3 times throughout the song, and the song's lyrics even hinted at the code's presence.

Click here to play “Better Days” on Soundcloud. The coded message is first audible after the chorus at the 1:30 mark.

The song was broadcast to over 3 million people, and eventually reached the hostages. Amazingly, the plan worked, and many soldiers were able to escape the camp and reach Colombian military forces nearby. Espejo later said, “We know of hostages who heard the message and were able to escape and provide information that led to the release of more hostages.” FARC eventually announced a unilateral ceasefire on July 8th, 2015.

To read more about “Better Days” and the Morse code message sent to hostages, check out this article from The Verge.

How Morse Code Works

A map of international telegraph lines from 1891. Source: Wikipedia

A map of major international telegraph lines from 1891. Source: Wikipedia

Now that you know the practical uses of Morse code, it's helpful to understand how it originated.

The history of Morse code is forever intertwined with that of another invention: the electrical telegraph. This is unsurprising, given the fact that the most widely adopted telegraph system was invented in 1837 by Samuel Morse. In essence, Morse's telegraph used simple on-off electrical pulses sent over a long-distance wire to another telegraph machine on the other end.

The original Samuel Morse telegraph. Source: Wikipedia

A diagram of the original Samuel Morse telegraph. Source: Wikipedia

In order to communicate over the newly-invented telegraph system, Morse and his assistant, Alfred Vail, developed the alphabet now known as Morse code. Short pulses, sometimes called dots, and longer pulses, called dashes, were combined to form letters. Pauses were also added to indicate spaces between words.

Learn morse code alphabet

The basic Morse code alphabet.

This system went on to become the most popular long-range communication technology until the widespread adoption of the telephone in the beginning of the 20th century. However, even after the end of the telegraph, Morse code has continued to see use in various fields today.

How to Learn Morse Code

Clearly, learning Morse code is a valuable skill for any survivalist, but it's not exactly an easy skill to pick up. The traditional way to learn this language is by spending hours studying and memorizing a chart like the one seen above. Needless to say, this is time-consuming, and provides no correction or feedback if you make mistakes. Fortunately, there's an easier way to learn, and you don't even have to leave your couch.

Learn morse code website

Morsecode.io is a web site that offers free interactive Morse code training.

Morsecode.io is a free interactive online tool, and it provides practical (and dare we say, fun) lessons on Morse code. By tapping your mouse or spacebar, you can sound out each letter or word, and the program gives instant audio and visual feedback. Be warned—this tool can eat up a lot of time, but we'd say it's well worth it.

Click here to start learning Morse code on Morsecode.io.

–. — — -.. / .-.. ..- -.-. -.- .-.-.-


Washing Clothes Without Electricity

Staying healthy is essential to staying alive, there's no question about that. We also know that staying clean is one of the easiest ways to stay healthy. Cleanliness prevents the growth of bacteria, fights infection, and keeps you looking fresh and smelling good.

Washing clothes without electricity

Electric washing machines have become ubiquitous in our society, and few people wash clothes by hand anymore.

We apply this same philosophy to our clothes, whether that means washing them in a machine at home or at a local laundromat. Unless part of your survival plan is to disguise yourself as a homeless person if SHTF, you'll probably want to continue keeping your clothes clean, even if you don't have access to washing machines or electricity.

Washing clothes without electricity 2

Two wash basins, a corrugated metal washboard, and a manually-operated wringer. There's not much to it.

So, what's the best method of washing clothes without electricity? Well, there's the time-tested method of a wash basin, washboard, and a wringer that was used for hundreds of years. However, this method requires a lot of elbow grease and access to specialized tools—not many of us own washboards these days.

Washing clothes without electricity

Do you have one of these in your home, and know how to use it? If so, you're in the minority.

Luckily, there's a better way: the DIY bucket and plunger washing machine. Here's what you'll need:

  • Two clean 5-gallon plastic buckets, one bucket lid
  • Clean rubber toilet plunger
  • Hole-punching tool (the video below uses a power drill, but an awl or screwdriver and hammer would work)
  • Water, detergent, and dirty laundry
  • Optional: Cordage and a carabiner for the “spin cycle” dryer

This video illustrates how the DIY washing machine is built and operated:

Even if you're scavenging for supplies in an urban disaster zone, these items shouldn't be too difficult to acquire. If all you've got to wear is the clothes on your back, clean laundry will leave you feeling refreshed and rejuvenated …and a whole lot more hygienic.